Embed Size (px)
Citation preview

eProcure User Manual

Table of ContentsIntroduction........................................................................................................................................3
Accessing eProcure...........................................................................................................................3
Common Problems Accessing eProcure.......................................................................................3
Home/Shop Page.............................................................................................................................. 5
User Profile Settings..........................................................................................................................5
Adding a Default Ship-To Address................................................................................................6
Adding a Purchasing Card (PCard)...............................................................................................7
Email Preferences......................................................................................................................... 9
Shopping........................................................................................................................................... 9
Shopping Roles............................................................................................................................. 9
Types of Shopping.......................................................................................................................10
Hosted Catalog Suppliers............................................................................................................10
Punch-out Suppliers.................................................................................................................... 13
Non-Catalog Suppliers................................................................................................................ 14
Shopping Carts................................................................................................................................16
Managing Carts........................................................................................................................... 17
Managing Items in the Cart......................................................................................................... 17
Favorites.......................................................................................................................................... 18
Checking Out...................................................................................................................................20
Shipping Information....................................................................................................................21
Billing........................................................................................................................................... 22
Choosing a Fiscal Year............................................................................................................... 22
Sales Tax.....................................................................................................................................23
Accounting Codes....................................................................................................................... 23
Splitting Orders............................................................................................................................25
Fair & Reasonable Price..............................................................................................................26
Internal / External Notes and Attachments..................................................................................27
Final Review................................................................................................................................ 27
Approving........................................................................................................................................ 29
Document Search............................................................................................................................32
College of Charleston eProcure User Guide, March 2017 Page 1

Receiving Orders.............................................................................................................................33
Correcting Receipts..................................................................................................................... 35
Your Requisition has been Returned...............................................................................................35
New Supplier Request or Change...................................................................................................36
Placing an Order with the New Supplier......................................................................................37
PCard Only Suppliers...................................................................................................................... 37
Other Services.................................................................................................................................38
Blanket Order Form..................................................................................................................... 38
Change Order Request............................................................................................................... 39
Expenditure Authorization Request.............................................................................................40
Helpful Tips and Tricks.................................................................................................................... 41
Links............................................................................................................................................ 41
Copying Orders........................................................................................................................... 41
Purchase Requisition (PR) Approvals Tab..................................................................................42
eProcure Cheat Sheets................................................................................................................... 43
Commodity Families....................................................................................................................43
Commodity Codes....................................................................................................................... 44
Account Codes............................................................................................................................ 45
Capital Project Codes..................................................................................................................46
College of Charleston eProcure User Guide, March 2017 Page 2

IntroductioneProcure is the College’s electronic purchasing software. This software is used to generate purchase orders. Orders are created in a shopping cart and then submitted for approval and processing. Completed purchase orders are sent to the vendor via email or fax.
eProcure has established work-flow steps based on various criteria. Common steps include Budget Authorization, Fund Approval, IT Buyer Review, Procurement Review, etc.
For eProcure to work efficiently the Index/FOP Access Form must be updated to reflect current staff and their allowed eProcure approval limits (if any). Out-dated or non-existent forms will delay the automated ordering/approving workflow.
All College employees by default have access to eProcure as a shopper. No additional action is required if a user will only have shopper authority.
The Office of Procurement offers monthly hands-on training sessions. Tutorials are also available on our website.
Accessing eProcureThe College’s eProcure system can only be accessed through MyCharleston. First, log into MyCharleston (https://my.cofc.edu). From there, click on the eProcure shopping cart icon in the top navigation bar. Clicking on the eProcure icon will launch a new window.
Common Problems Accessing eProcureUsers may occasionally experience the following problems accessing eProcure.
Internet BrowserMozilla Firefox, Internet Explorer and Google Chrome all support eProcure. Safari is not compatible.
Pop-Up BlockersThe most common problem accessing eProcure is that the internet browser is blocking pop-ups. There is usually an on-screen notification explaining that a window has been blocked. The settings to change this vary from browser to browser and are not hard to change.
Update Contact InformationFirst time users experiencing difficulty accessing eProcure should verify that their College of Charleston office phone number is listed under the Employee Tab in Banner Self-Service.
College of Charleston eProcure User Guide, March 2017 Page 3

If not, add the phone number, by going to MyCharleston, then the Employee tab, and finally to the Banner Self-Service folder (see below). Open the Personal Information folder.
Click on the Update Phones link. The following page will open:
Home/Shop PageeProcure will open to the Home/Shop page.
College of Charleston eProcure User Guide, March 2017 Page 4
Insert a New number.
Select “College of Charleston” from the drop-down menu, insert the number (no dashes) and click on the Submit button.

Use the left navigation bar to navigate within eProcure. Also, at the top right-hand corner of the window are short-cuts to the user’s profile, pending actions, notifications and active shopping cart.
The user can also search for menu items using the Menu Search. The binoculars icon is located in the bottom left-hand corner of the Home/Shop page.
Please refer to the following sections for specific instructions on using and navigating in eProcure.
User Profile SettingsAll user settings can be accessed by clicking the user’s name at the top-middle of the home page. Select View My Profile from the menu.
The following page will open. From this screen, various user settings can be set-up or changed.
College of Charleston eProcure User Guide, March 2017 Page 5

Settings that can be changed are listed under the User Profile and Preference section. Be sure to add your phone number and Department name if not completed. Choose the department from the drop-down menu. See Approvals section for additional information on the Email Approval Code.
Be sure to click the Save button when finished making changes!
Adding a Default Ship-To AddressThe user’s default shipping address will need to be added to their profile. Click on the Default Addresses line within the user’s profile.
To add a Ship-To address, click on the blue Select Addresses for Profile button. This will open a search box.
Search for a College of Charleston address by entering either a partial name in the Nickname / Address Text field.
College of Charleston eProcure User Guide, March 2017 Page 6

As illustrated in the screenshot above, entering “Bell” in the Nickname / Address Text field will retrieve the Bell Building address. Alternately, entering “81” in the Nickname / Address Text Address Text field will also return the Bell Building address.
The Procurement Office recommends searching by the physical address.
Once the desired address is located, select it by clicking on the radio button ( ) next to the building name. Complete any missing required information. The Department, Room number and Phone Number are all required fields. The address can be set as the default address in this step by ticking the “Default” checkbox.
Users can add multiple addresses to their profile. During the check-out process, the ship to address can be changed by selecting one from the profile or by searching for all organizational addresses. This is helpful if ordering regularly for different shipping locations.
Be sure to click the Save button when finished!
Adding a Purchasing Card (PCard)Accountholders can add their PCard to their user profile by selecting Payment Options from the Default User Settings Menu. Storing the card information in the user profile will speed up the check-out process when paying with the PCard.
The following window will open to allow the user to add a new card number and store it securely. Click the blue Add a New Card button and fill in the PCard information under the card details fields.
College of Charleston eProcure User Guide, March 2017 Page 7

Complete the fields under the Card Details heading. Check the Default Card box.
Do not check the “Apply the default card” checkbox or all of the orders will be paid through the PCard by default instead of through Accounts Payable.
When finished, click the Save button!
Email PreferencesEprocure assigns default email and notification preferences based upon a user’s role within eProcure. To view default email settings or to change settings, click on the Notification Preferences. Several email and notifications are set by default. Click on the sub-category to review.
College of Charleston eProcure User Guide, March 2017 Page 8

ShoppingShopping with eProcure is very similar to shopping online at sites such as Amazon. All items to be ordered are first placed into a shopping cart. Once the cart contains all items for the order, the order is submitted by taking the cart through the “check out” process.
Shopping RolesThe requisition process in eProcure is divided between different roles:
Shopper: This is the default role, and any user can be a Shopper. A Shopper has the ability to find and add items to a cart, but does not have the ability to submit a cart for ordering, unless the payment method is the PCard. A Shopper may assign a shopping cart they have created to a Requisitioner or to an Approver.
Approver: An approver can do anything a Shopper can do, but an Approver can also submit carts for order up to their authorized dollar amount.
Types of ShoppingThere are three ways to order items within eProcure:
College of Charleston eProcure User Guide, March 2017 Page 9

Hosted Catalogs: Hosted catalogs are vendors whose catalogs have been downloaded to our site. An advantage to having these catalogs hosted within eProcure is that the user has the ability to check the product details of the catalog items and compare prices and specifications, much like any major electronic shopping website.
Punch-out Suppliers: Punch-outs are vendors whose catalogs are not hosted on our site. When the user clicks on a Punch-out Supplier, they are connected to the supplier’s website. On that website, the user will create the order, and when finished shopping the items in the cart will be transferred back to eProcure and will appear within the user’s active eProcure cart.
Non-Catalog Suppliers: Much of the ordering that is done at the College will be done through Non-Catalog item shopping since the majority of the College’s suppliers are not electronically integrated with eProcure and do not support electronic ordering in this fashion. This type of order is similar to filling out a paper requisition. It requires the name of the supplier, a description of the product or service and the quantity and cost of the product or service.
Hosted Catalog SuppliersHosted suppliers appear on the top of the main shopping page. Use the “Shop” field at the top search bar to search all suppliers and add items to the order.
Similar to an internet search engine, the user can perform a broad search using only a couple of words such as “glass flask,” or a very specific search with additional search terms (i.e. “glass flask 500ml stopper”). Using specific search terms yields fewer and more specific results.
College of Charleston eProcure User Guide, March 2017 Page 10

In the above picture, 4,000+ items were found for the search terms “glass flask.” Narrow the results by adding Keywords or by the Filter Results box to the left of the item list.
An advanced search is accomplished by clicking the advanced search link below the search bar. See screenshot below.
College of Charleston eProcure User Guide, March 2017 Page 11

This will expand the search area to include new fields to choose from such as Part Number (SKU), Supplier, and Manufacturer Name.
Once the desired item(s) are identified, there are several things that can be done:
Add the item(s) to the Cart by clicking on the blue Add to Cart button Compare two or more items by clicking on the compare link underneath the Add to Cart button
and then on the Compare Selected button on the top of the search results Add an item to the favorites list for easy access by clicking on add favorite link next to the
compare link.
Alternately, click on the catalog icon to search only within the suppliers’ catalog in eProcure.
Punch-out Suppliers
College of Charleston eProcure User Guide, March 2017 Page 12

Punch-out Suppliers all have their own dedicated websites.
For example, clicking on the OfficeMax logo will direct the user to the College of Charleston’s Office Max punch-out site.
Each punch-out supplier has their unique website, each with a different layout. Shop within their site and build an order similar to shopping on any other website. Once the order is complete and goes through the checkout process, the items from the punch-out order will be transferred into the user’s eProcure shopping cart. The order can then be submitted for approval.
To cancel the order and return to eProcure, the user should click on the blue Cancel Punch-out button at the top right of the screen.
Non-Catalog SuppliersTo order goods or services from a vendor that is neither a Hosted nor a Punch-out Supplier, requires that item(s) be added to a shopping cart via the Non-Catalog Form. The form is located in the Other category on the Home Page.
College of Charleston eProcure User Guide, March 2017 Page 13
Do not confuse Quantity and Packaging! For example, an order is for 2000 widgets that are packaged in lots of 500. Enter a quantity of “4”, “500” in the packaging field, and select “Lot” for the UOM from the drop-down menu.
The screenshot below is an example of how the form looks in eProcure.
The fields highlighted in yellow are required to place an order.On the form, enter the name of the supplier, a description of the good or service, quantity requested, the price estimate per item, how the item is packaged and finally the commodity code of the item or service. Complete other fields as applicable and as the information is readily available.
College of Charleston eProcure User Guide, March 2017 Page 14

Search for commodity code of the good or service by clicking on the search link next to the commodity code text box. This will open a search window in which the user can search for the commodity code by using a partial number, full number or description.
Commodity codes are standard classification codes for products and services used to detail where money is spent within an organization. It describes the item being purchased. For example, if purchasing software, the commodity code would describe the type of software (e.g. charting software, accounting software)..After identifying the appropriate code, click on the select link to the right of the description and the commodity code will appear within the field on the Non-Catalog Form.
At the end of this manual are “cheat sheets” for the most frequently used codes.
To add multiple line items or services to the order from the same supplier, click on the “Available Actions” drop-down menu, choose “Add to Cart and Return”, and click the Go button.
If finished with the order, choose “Add and go to Cart” from the drop-down menu and click the Go button. This action will open the shopping cart and all the line items entered.
Shopping CartsThe shopping cart is where items reside until the user is ready to submit the cart to become an order. Access active, draft and assigned carts by clicking on the shopping cart icon on the left menu bar or by clicking in the cart area at the top right-hand corner of the homepage (see yellow arrows).
College of Charleston eProcure User Guide, March 2017 Page 15

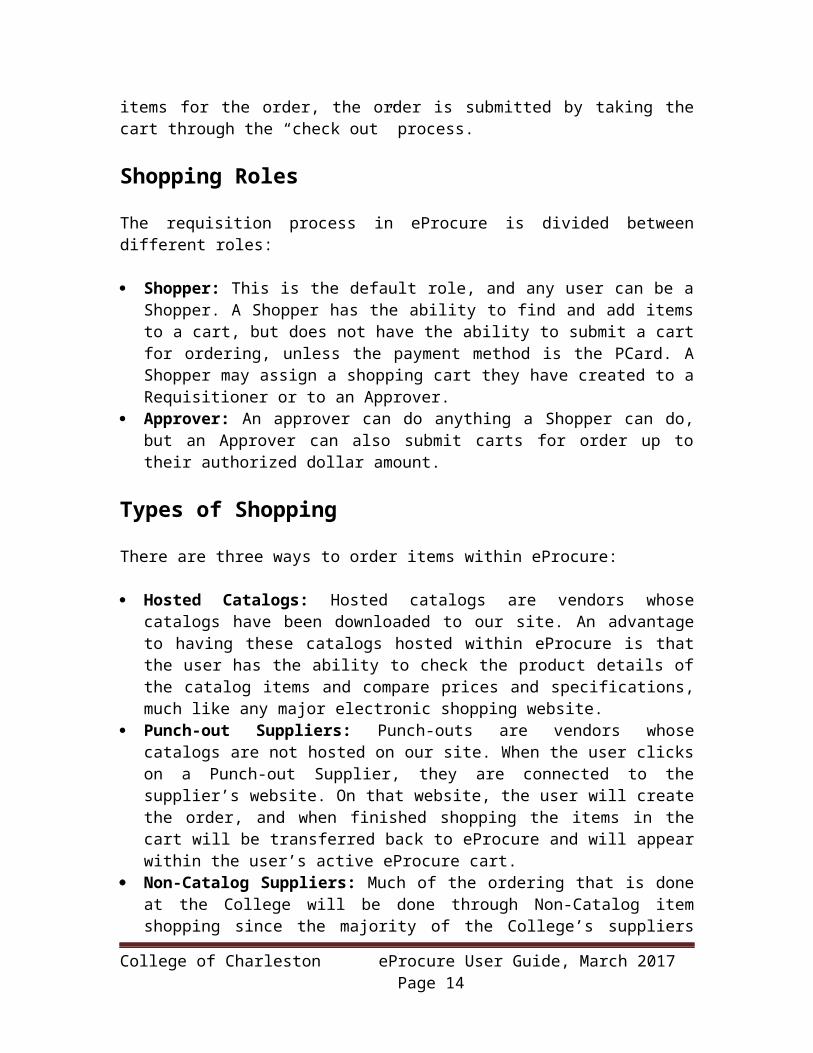
Opening the Carts tab will generate several options. Click on the My Carts and Orders from the menu list. From here, select the active cart, view draft carts or previous orders.
Clicking on Open My Active Shopping Cart will open the active cart. Each cart that is created will be named <today’s date> + < username> + 01 (02, 03…). Any shopping cart can be renamed by typing over the default name in the Cart Name text box (red circle).
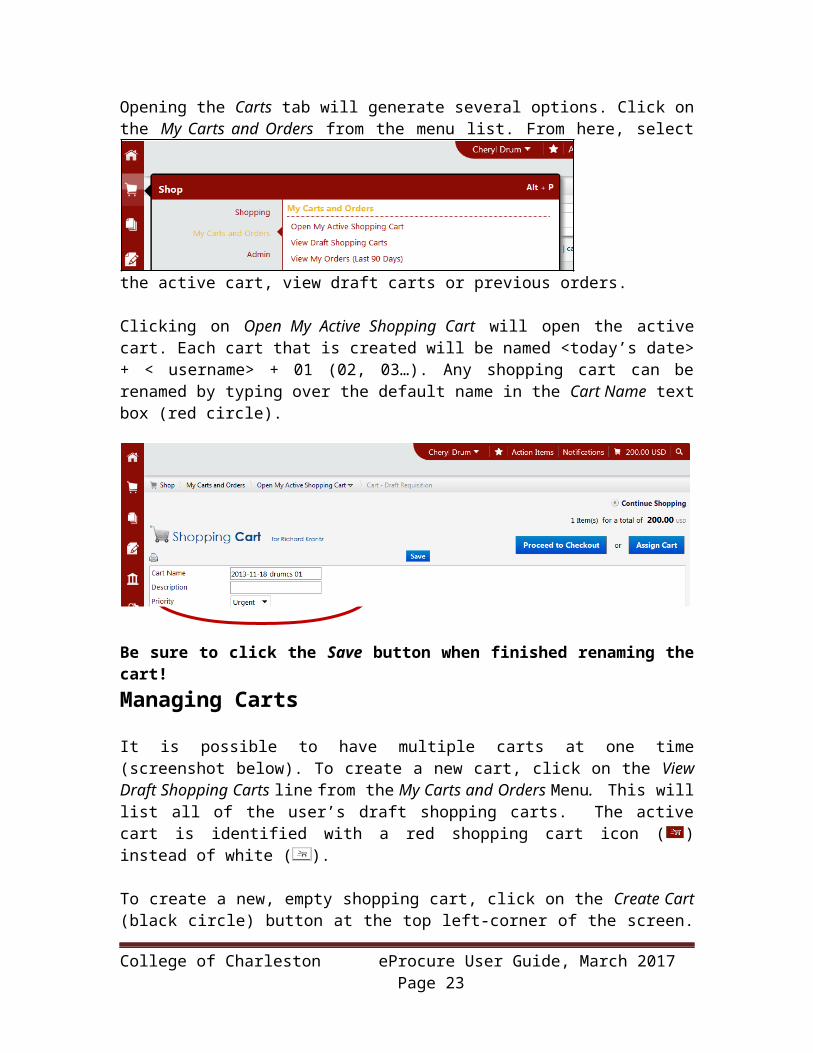
Be sure to click the Save button when finished renaming the cart!Managing CartsIt is possible to have multiple carts at one time (screenshot below). To create a new cart, click on the View Draft Shopping Carts line from the My Carts and Orders Menu. This will list all of the user’s draft shopping carts. The active cart is identified with a red shopping cart icon ( ) instead of white ( ).
To create a new, empty shopping cart, click on the Create Cart (black circle) button at the top left-corner of the screen. This cart will now become the active cart. The user can make any draft cart the active cart by clicking on the shopping cart icon next to the name of the desired shopping cart.
Carts can be deleted if no longer needed. Simply click on the Delete button (red circle) to the far right of the cart.
College of Charleston eProcure User Guide, March 2017 Page 16

Managing Items in the CartOccasionally, a user may need to delete or move items within a shopping cart. To do so, open up the shopping cart by clicking on the Shopping Cart Name hyperlink. (See screenshot next page)
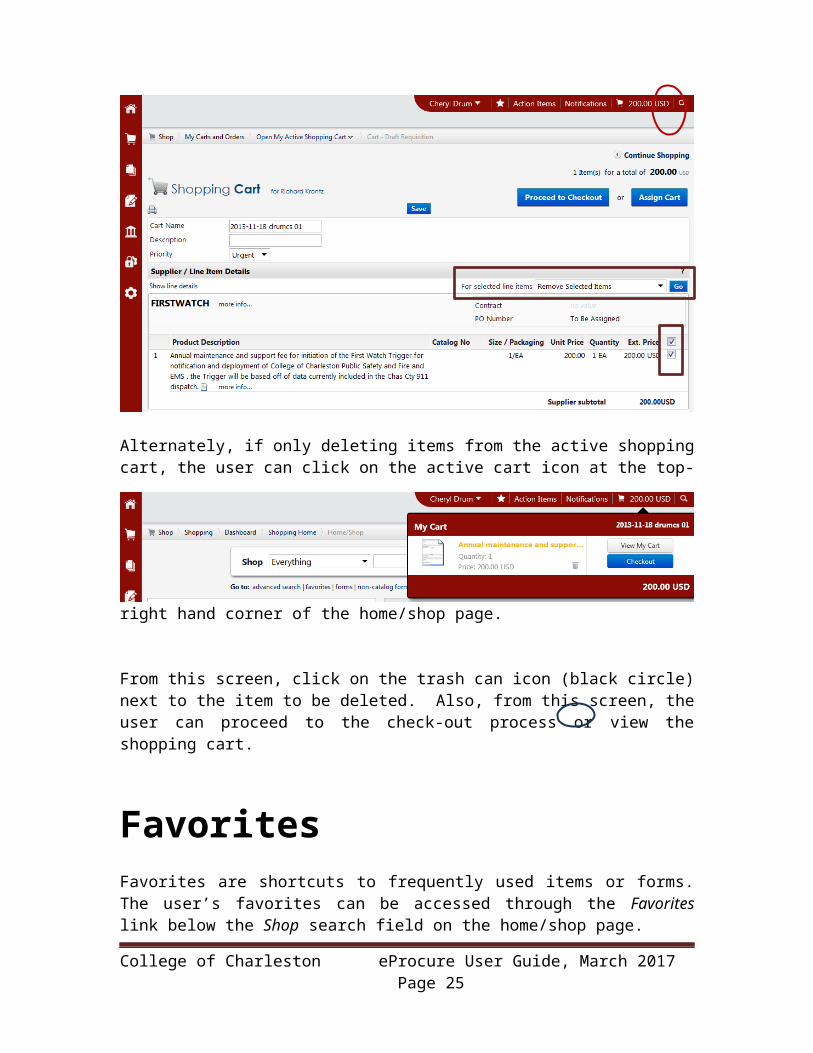
Find the line(s) that need to be changed or deleted and place a check mark in the checkbox on the right-hand side of the line (red oval).
Next, select an option from the “For selected line items” drop-down menu. Once the desired action is selected, click on the Go button next to the drop-down menu for the request to process (see red rectangle).
Alternately, if only deleting items from the active shopping cart, the user can click on the active cart icon at the top-right hand corner of the home/shop page.
College of Charleston eProcure User Guide, March 2017 Page 17

From this screen, click on the trash can icon (black circle) next to the item to be deleted. Also, from this screen, the user can proceed to the check-out process or view the shopping cart.
FavoritesFavorites are shortcuts to frequently used items or forms. The user’s favorites can be accessed through the Favorites link below the Shop search field on the home/shop page.
Or, click on the Shopping Cart icon. Select View Favorites from the Go To sub-menu.
The following types of items or requests can be saved as favorites: Hosted items Punch-out Items (limited, few suppliers support this feature) Non-Catalog items Populated Forms (such as an Expenditure Authorization)
There are multiple ways offered throughout eProcure to add an item to the favorites list. See the following screenshots for examples of these options. From the search results:
College of Charleston eProcure User Guide, March 2017 Page 18

From a form:
Within the shopping cart:
Using any of these options will launch a new window which asks the user to specify a nickname for the item and a destination folder. If a personal folder is not already set-up, click on the New button and follow the prompts.
Checking OutOnce all desired goods and services are added to the cart, it is ready to be submitted to become an order. If a user has only Shopper permissions, the cart must be assigned to a Requisitioner to submit the cart for ordering. Exception: If using your PCard, proceed to checkout and click on the Place Order button once the checkout process is complete.
College of Charleston eProcure User Guide, March 2017 Page 19

To begin, open the active cart and click on the Proceed to Checkout button. This will bring the user to the following screen:
The green progress arrow bar on the top alerts the user to any incomplete information in the order. The symbol means that there is a required field that is missing. Once all fields have been completed, the warning will change to a symbol, indicating that the user is clear to proceed.
Shipping InformationIn the above screenshot, the Shipping information and Accounting Codes need to be added before the order can be submitted. To edit the Shipping information, click on the area of the progress arrow. Click on the blue edit button or and follow the prompts to change this address. Please note that eProcure will default to the user’s ship-to location created in the user’s profile and the attention message regarding the ship-to location will not be generated.
Do not forget to change the ship-to location if not shipping it to the default address!
The delivery requirement is also a mandatory field. This is information that is sent to the supplier. Click on the blue edit button in the Delivery Requirements section of the Shipping box. Use the calendar next to the Required by date field to ensure accurate date formatting.
Billing
College of Charleston eProcure User Guide, March 2017 Page 20

By default, eProcure is setup to pay for purchases through Accounts Payable via a Purchase Order. However, a PCard can be used to pay for the purchase instead. To make this election, click on the Billing section of the progress bar.
Click on the blue edit button next to “Credit Card Info”. eProcure allows the user to either enter a new credit card or to choose from a card already stored in the user’s profile.
Choosing a Fiscal YearClick on the Billing section of the progress bar. To place an order against the next fiscal year, click on the blue edit button next to Billing Options (see above screenshot).
A pop-up box will appear that allows the user to choose an “Accounting Date.”
College of Charleston eProcure User Guide, March 2017 Page 21
If the “No credit card has been assigned” message is underneath the
“Credit Card Info” section, then the order will not be paid via a PCard.
If the credit card information is in that section but the PCard will not be used to pay for this order, click on the blue edit button and then choose the blue
Clear button in the pop-up box.

Anything after June 30th of the current fiscal year will set the order to be paid from the next fiscal year’s budget.
Please note that it is not necessary to fill in this information for orders being paid from the current fiscal year’s budget, only the next fiscal year.
Sales TaxeProcure will add sales tax to shopping carts containing items from hosted and punch-out catalogs. If creating the shopping cart using the Non-Catalog Form, check the “Taxable” checkbox if purchasing goods/equipment.
Accounting CodesAccounting codes must be completed for every order.
There are two fields in the Accounting Codes section, Index and Account.
Index is the fund number the order is charged against Account is the broad expense category describing the good or service
College of Charleston eProcure User Guide, March 2017 Page 22
Click on the blue edit button to enter the index and account numbers. If the number is unknown, the user can search for this information either by numeric or alpha description. Click on the Select from all Values link to start the search.
Type the description of the index in the field and click the blue Search button.
View the results and select the correct index. This will automatically populate the field with the user’s selection.
Be sure to click the Save button when finished!
It is possible for a user to save index-account code combinations in their profile. These combinations can be given a nick-name. During the check-out process, the user can select the appropriate combination from the code favorite’s drop-down menu. This will populate both the index and the account code.
This will not work for all purchases, but will save time for those frequent purchases.
College of Charleston eProcure User Guide, March 2017 Page 23

Splitting an order between indexes requires that the cart be assigned to a buyer in the Procurement Office instead of placing the order; otherwise the order will reject.
Splitting OrdersIt is possible to split an order between different indexes, either per order or per line item.
To add an accounting code split for the whole order, click on the add split link in the Accounting Codes pop-up window:
This will add an additional line that will allow the user to change both the Index and the Account. Orders can be split by percentage of the subtotal of the order, percentage of the quantity of the order or by a specific dollar amount. The drop-down menu to the left of the add split link dictates how the split will be applied.
Please note that when adding a per-order accounting code split, that a per item accounting code split cannot also be added.
To split accounting codes per item, scroll down to the “Supplier/Line Item Details” section and click on the blue edit button next to the item that needs specific accounting codes.
College of Charleston eProcure User Guide, March 2017 Page 24
Change the accounting codes in the subsequent pop-up box. Note that it is possible to split the accounting codes within a single item as well. To do so, click on the add split link and follow the same procedure as above.
Fair & Reasonable PriceSC Procurement Laws state that purchases up to $10,000 must be deemed and certified “fair and reasonable” by the purchaser. This certification must be made on every order in eProcure.
To make this certification in eProcure, answer yes/no using the dropdown box on the Fair and Reasonable screen:
Internal / External Notes and Attachments
College of Charleston eProcure User Guide, March 2017 Page 25

External Notes and Attachments are seen by the supplier only when ordering Non-Catalog items. Hosted and Punch-out Suppliers cannot receive external notes or attachments.
Both of the Notes and Attachment screens allow input of a personalized note or attachment of a file (such as a PDF, an Excel spreadsheet, etc.). Like it sounds, Internal Notes and Attachments can only be viewed internally at the College, however External Notes and Attachments will be sent to the supplier.
Final ReviewOnce every section in the progress bar is complete, the last step is to review the Final Review screen to ensure all of the order information is complete and accurate. It is at this step that a cart may either be assigned to or be submitted for ordering by a Requisitioner.
To submit the cart, click on the blue Place Order button (see screenshot next page).
College of Charleston eProcure User Guide, March 2017 Page 26

If using your PCard, click on the Place Order button. Otherwise, click on the Assign Cart button to assign the cart to a Requisitioner. This action will open a pop-up window, allowing the user to choose another employee who has the role of Requisitioner and assign the cart to them.
From this window, search for the desired assignee or select from a previously added list of Cart Assignees (this list can be created in the user’s profile settings). A note to the assignee can be added at this screen as well. Click on the Assign button to send the cart to the Requisitioner for approval. The Requisitioner will receive an email notification that a cart has been assigned and is awaiting action.
Approving
College of Charleston eProcure User Guide, March 2017 Page 27

Requisitioners and Approvers will need to approve orders from time to time. eProcure is set-up that when an approval is required, an automated email is generated and sent to all available approvers. There are two ways to access pending approvals after logging into eProcure.
The first step is to go to the Action Items box, which is located on the top right-hand section of the main page next to your user name (flag icon). Clicking on the icon will expand the menu, showing everything that is waiting for the user’s attention.
The other way to access approvals is via the Orders & Documents menu from the Main navigation bar. Select Approvals and then My Approvals from the menu.
Clicking on either the navigation bar or the Action Items link will bring you to a page that looks like the following screenshot:
To approve an order that does not need any modification:
1. Expand the shared workflow folder by clicking on the folder name. In the above screenshot, the folder entitled “Index: 210040 (TD Arena Rental Operating): (5,000 – 9,999,999.99) USD” is opened.
College of Charleston eProcure User Guide, March 2017 Page 28

2. In the expanded folder, orders that need your approval or that can be assigned to someone (including yourself – see the My PR Approvals section below) appear. Tick the checkbox next to the requisition(s) to be approved.
3. Choose “Approve/Complete” from the drop-down menu and click on the Go button.
My PR Approvals
Approval folders in eProcure are usually shared among several approvers. It is possible to approve an order directly from the shared folder – as the above directions show how – but it is also possible to assign an order directly to someone. When that occurs, only that person can approve the order, and the order will show in both the shared workflow folder and also in the assignee’s personal folder - “My PR Approvals”.
Clicking on the blue Assign button in a shared workflow folder assigns that order to the user’s own “My PR Approvals” folder. From there, click on the blue Approve button to approve it. This accomplishes the same thing as approving it directly from the shared folder as shown above.
The order can also be assigned to someone else by ticking the checkbox next to the order and using the “Assign” option from the drop-down menu. To un-assign an order from “My PR Approvals”, tick the checkbox next to the order and choose “Return to Shared Folder” from the drop-down menu. Click the blue Go button to complete the action.
Approving Via Email
It is also possible to approve orders via an email order approval notice. This is a secure, fast and easy way to approve orders - even from off-campus. Users with approval authority can enable this feature by first navigating to their user profile. Select Update Security Settings from the menu.
College of Charleston eProcure User Guide, March 2017 Page 29

The approval code must be at least six characters long.
Click on Change Email Approval Code. Enter your Email Approval Code and click on the Save Changes button.
A Take Action button will now appear within the approval email.
Click on this button to open a secure website that will offer the following options:• approve, • reject, or • return the order to the requisitioner
Enter any comments on this order in the comment field. This is especially useful when an order is rejected or returned to the requisitioner. After choosing the appropriate action, the user will enter their unique approval code and click the Submit button.
College of Charleston eProcure User Guide, March 2017 Page 30

eProcure will generate one more confirmation pop-up box. After this box is answered, the approval process is complete!
Document SearchThe Orders & Documents menu will open up a search menu to search for requisitions and purchase orders. Searching this way is fast, flexible and can be customized. Click on the Document icon in the left navigation bar to access this menu.
Click on Search Documents from the menu. This will open the following Search engine:
Located below the search box are links to my requisitions and my purchase orders. Clicking on these links is the fastest way to find a user’s orders from the last 90 days. The default search box is pictured above and it offers a few options in the drop-down menus.
If these options are not specific enough, conduct an advanced search by clicking the link in the Go To tag line. Pick from any option listed or combine multiple search criteria.
College of Charleston eProcure User Guide, March 2017 Page 31

Receiving OrderseProcure will send out an automated reminder email after the order is created stating that a receipt is required once the order arrives (or services have been rendered). A receipt must be created in eProcure when goods/services are received.
First, locate the purchase order by clicking on the Document Search tab, then my purchase orders or by searching for the purchase order(s). Once the appropriate purchase order is identified, select the check box next to the purchase order
total. Then, open the drop-down menu above the search results and select either “Create Quantity Receipt” or “Create Cost Receipt.”
College of Charleston eProcure User Guide, March 2017 Page 32

Create a Quantity Receipt for tangible goods and a Cost Receipt for services. In the above example, the Quantity Receipt is selected. Click the Go button to open the receipt box.
On this screen, complete any relevant information regarding the order under the Receipt Summary section (Header Information section is optional). Refer to the screenshot below. If all items were received as ordered, simply click the blue Complete button.
If only part of the order was received or receiving a Blanket Order, create a partial receipt by entering the actual quantity of items that were delivered or cost for each line item. If an item is not received, check the box to the far right of the line item and click on the Remove line button. Create another receipt(s) for subsequent deliveries until the purchase order is fully received.
This is the final screen in the creating receipts process.
College of Charleston eProcure User Guide, March 2017 Page 33

Do not create a receipt for orders paid with a PCard or received at Central Warehouse.
Correcting ReceiptsOn occasion, it may be necessary to modify a receipt to correct inaccuracies. To make corrections to an existing receipt, create a new receipt with a negative amount to reverse the incorrect amounts received.
Returned RequisitionsOccasionally, the user will receive an email stating that their requisition has been returned. This could happen for a variety of reasons. The most common reason is invalid accounting codes or no authority in Banner Finance to spend for the selected index. The email will describe the problem. Look for the section at the bottom of the email that begins with "The following notes were attached to this requisition during the workflow process."
The reason that the requisition was returned will be in this section, as well as instructions on how to modify and successfully submit the order.
College of Charleston eProcure User Guide, March 2017 Page 34

Avoid Delays! If the completed W-9 and New Supplier Form are not attached to the order, it will stop in Procurement until they are received and processed.
Do not send these forms via email to Procurement, unless requested.
If an order is returned, the cart is returned to the user’s draft shopping carts. The user should open the cart and proceed to the checkout process, correct the error and resubmit the shopping cart.
New Supplier Occasionally the supplier of the requested good/service may not have done prior business with the College of Charleston and is not set up in eProcure. New supplier setups are attached to the requisition. To set up a new supplier, request the company’s W-9 (the IRS W-9 form is required by State and Federal law) and complete the New Supplier Request Form (links – see red box in below).
Attach the W-9 and the completed New Supplier Request or Change Form to the shopping cart during the checkout process (internal attachments). These forms are also available on the
Office of Procurement’s website.
Placing an Order with the New SupplierSelect the vendor named, “UNKNOWN”, on the Non-Catalog Form. This is a temporary placeholder until the new vendor is set-up in both Banner and eProcure.
From here, fill out the Non-catalog Form following normal procedures. Once the Office of Procurement has added the supplier, the order will be modified to show the new supplier and sent on through the approval process to complete the requisition and subsequent purchase order.
College of Charleston eProcure User Guide, March 2017 Page 35

Only select the “UNKNOWN” vendor when requesting a new supplier. Selecting this option any other time will cause the order to fail.
PCard Only SuppliersThis section highlights the vendors that are PCard only suppliers.
Amazon This is a punch-out supplier. Users are required to create a business account upon first-time log on. Additionally, the user must add their PCard to their wallet in their account profile. Each order will require the user to add their PCard to the shopping cart as the payment method. See Billing. Orders will not process if the PCard is not stored in the wallet and applied to the shopping cart.
BCE South/3 Star Ent LLCBusiness cards, envelopes and letterhead should be ordered from BCE South. Templates with College standards are available from their catalog. Request for variances from the template are reviewed by the Marketing and Communications Department for approval.
Additional information is provided for ordering when the icon is clicked. Please note that there is a separate link for new users to create an account with BCE. New user is defined as not placing an order after October 1, 2015.
OfficeMax At this time, OfficeMax will also take a purchase order, but the preferred method of payment is the PCard. Remember, that if you do use your PCard, you are not required to create a receipt upon delivery of the order.
Other ServicesThe Office of Procurement has added frequently used services to this centralized area on the home/shop page.
The Enterprise Rent-A-Car icon contains additional information to place an order. Also included is the link to their website for the College. Please read the instructions carefully.
College of Charleston eProcure User Guide, March 2017 Page 36

New printer purchase requests are initiated from the Laser Printer Authorization Request Form or Xerox MFD Request Form. This will not initiate a purchase order, but will alert Procurement to the need for a printer purchase.
Links to the OptiFreight Outbound Shipping Program and the Xerox Service Portal are housed here as well.
Blanket Order FormBlanket orders are submitted using the Blanket Order Form. This form is located in the “Other” section of the eProcure homepage. A blanket order is similar to establishing a “charge account” with qualified, trusted vendors. They should be used when there is a wide variety of items in a broad class of supplies or services that are generally purchased, but the exact items, quantities, and delivery requirements are not known in advance and may vary considerably. This form will create a single purchase order that allows multiple releases against it at different times throughout a set time period.
Complete the Blanket Order Form and add it to an empty shopping cart. Take the shopping cart through the check-out process like any other purchase.
Example of form. Bolded fields are required. See boxes on form for additional explanations of the required fields.
College of Charleston eProcure User Guide, March 2017 Page 37

Receipt requirements will not be removed for blanket purchase orders. The correct method to receive orders is to create a COST receipt in eProcure for the amount of the invoice. Separate receipts will need to be created for EACH invoice (i.e. if you have 10 invoices for one PO you will have 10 cost receipts). See Receiving Orders.
Purchase Order Change RequestOccasionally, a purchase order needs to be modified after the purchase order number has been assigned and the sent to the vendor. Use the Change Order Request form to:
Increase/decrease the purchase order amount Add or delete line items
College of Charleston eProcure User Guide, March 2017 Page 38
Total amount a caller can spend over a fiscal year.
Name of the person authorized to call vendor and order supplies.
Amount a caller can spend each time they place on order.
A unique range of numbers assigned to a caller (100-199). The caller will give this number to the vendor when placing the order to identify the charge.

Cancel the purchase order in its entirety Change accounting codes (index/account numbers)
Complete the required fields (bold), add the form to an empty cart, and take the shopping cart through the check-out process similar to a normal purchase.
Upon electronic receipt of this request, a Procurement Officer will make the necessary changes to the purchase order. eProcure will generate a new requisition number for this shopping cart, but a new purchase order number will not be created. Requested changes will be made to the purchase order. These changes can be found under the revisions tab in the original purchase order.
Example of the form.
Expenditure Authorization Request This is the electronic version of the form located on the Controller’s website. Complete all required fields and attach all required documents to this form. This may include an IRS Form W-9, New Supplier Request/Change Form, signed registration form, invoice, etc.
When all fields are completed, add this form to an empty shopping cart. Take the shopping cart through the check-out process and place the order. After the necessary approvals have been secured (electronically), the requisition will be sent to the Controller’s Office for final processing.
College of Charleston eProcure User Guide, March 2017 Page 39

Helpful Tips and TricksLinksMany helpful links and announcements are listed on the home/shop page. These are updated several times throughout the year.
Copying OrdersIt is possible to duplicate a previously placed order. This can be a real time saver! First find the requisition. Click on the Orders & Documents menu in the navigation bar and select Search Documents from the list. Enter the requisition number in the search field and click Go. If the requisition number is unavailable, search for the purchase order and open it. The requisition number is hyper-linked on the first tab of the purchase order.
From the Requisition tab within the requisition is an “Available Actions” drop-down menu (right side of the screen).
Choose “Copy to New Cart” from this menu and click on the Go button. Everything in that requisition will be copied to a new shopping cart (including any attachments) and placed into the user’s Draft Carts.
Be sure to make any necessary changes to the new cart before submitting it for order!
Purchase Requisition (PR) Approvals Tab
College of Charleston eProcure User Guide, March 2017 Page 40

Within a requisition there is a PR Approvals tab.
Click on the tab for a visual illustration of where a requisition is in the approval process (see above screenshot). In the above example, the fund expenditure for this requisition was approved and it is currently awaiting the next approval step (Procurement Review).Alternately, view a historical accounting of the life of the requisition by clicking on the History sub-tab.
eProcure Cheat SheetsCommodity Families
Apparel/Luggage/Personal Care Products 53xxxxxxBuilding/Construction Machinery & Accessories 22xxxxxxBuilding/Construction Maintenance Services 72xxxxxxChemicals including Bio-Chemicals & Gas Materials 12xxxxxx
College of Charleston eProcure User Guide, March 2017 Page 41

Cleaning Equipment & Supplies 47xxxxxxCommercial/Military/Private Vehicles & Accessories/Components 25xxxxxxCommunications/Computer Equipment/Peripherals, Components & Supplies 43xxxxxxDefense/Law Enforcement/Security/Safety Equipment & Supplies 46xxxxxxDistribution/Conditioning Systems Equipment & Components 40xxxxxxDomestic Appliances/Consumer Electronic Products & Supplies 52xxxxxxDrugs/Pharmaceutical Products 51xxxxxxEditorial/Design/Graphic & Fine Art Services 82xxxxxxEducation/Training Services 86xxxxxxElectronic Components & Supplies 32xxxxxxEngineering/Research/Technology Based Services 81xxxxxxEnvironmental Services 77xxxxxxFarming/Fishing/Forestry/Wildlife Contracting Services 70xxxxxxFarming/Fishing/Forestry/Wildlife Machinery & Accessories 21xxxxxxFinancial/Insurance Services 84xxxxxxFood/Beverage/Tobacco Products 50xxxxxxFuels/Fuel Additives/Lubricants & Anti-Corrosive Materials 15xxxxxxFurniture & Furnishings 56xxxxxxHealthcare Services 85xxxxxxIndustrial Cleaning Services 76xxxxxxIndustrial Manufacturing & Processing Machinery & Accessories 23xxxxxxIndustrial Production & Manufacturing Services 73xxxxxxLaboratory/Measuring/Observing/Testing Equipment 41xxxxxxLighting/Electrical Accessories & Supplies 39xxxxxxLive Plant & Animal Material & Accessories and Supplies 10xxxxxxManagement/Business Professionals/Administrative Services 80xxxxxxManufacturing Components & Supplies 31xxxxxxMaterial Handling/Conditioning/Storage Machinery Accessories & Supplies 24xxxxxxMedical Equipment, Accessories & Supplies 42xxxxxxMineral/Textile/Inedible Plant/Animal Materials 11xxxxxxMining Machinery & Accessories 20xxxxxxMining/Oil/Gas Drilling Services 71xxxxxxMusical Instruments/Games/Toys/Arts & Crafts/Educ. Equip, Accessories & Supplies 60xxxxxxNational Defense/Public Order/Security & Safety Services 92xxxxxxOffice Equipment, Accessories & Supplies 44xxxxxxOrganizations/Clubs 94xxxxxxPaper Materials & Products 14xxxxxxPersonal/Domestic Services 91xxxxxxPolitics/Civic Affairs Services 93xxxxxxPower Generation/Distribution Machinery & Accessories 26xxxxxxPrinting/Photographic/Audio Visual Equipment & Supplies 45xxxxxxPublic Utilities/Public Sector Related Services 83xxxxxxPublished Products 55xxxxxx
College of Charleston eProcure User Guide, March 2017 Page 42

Resin/Rosin/Rubber/Foam/Film/Elastomeric Materials 13xxxxxxService Industry Machinery Equipment & Supplies 48xxxxxxSports/Recreational Equipment, Accessories & Supplies 49xxxxxxStructures/Building/Construction Components & Supplies 30xxxxxxTimepieces/Jewelry/Gemstone Products 54xxxxxxTools/General Machinery 27xxxxxxTransportation/Storage/Mail Services 78xxxxxxTravel/Food/Lodging/Entertainment Services 90xxxxxx
Commodity Codes**This is not a comprehensive list of all account codes but contains the most commonly used.
Air Conditioning Install/Maintenance/Repair Services 72102305Audio Visual Equipment 52161500Chartered Bus Services 78111803Civil Engineering 81101500Computers 43211500Credenzas 56101701Desks 56101703Electrical Engineering 81101700Handyman Services 72101501Hosted Services 81112106IT Services 81160000Lab Ovens 41104500Laboratory and Scientific Equipment 41100000Mail & Cargo Transport 78000000Mechanical Engineering 81101600Professional Engineering Services 81100000Rats 10101505Software 43230000Software Maintenance & Support 81112200Task Seating 56112102
Account Codes**Contains most commonly used codes. See ePrint Banner Finance on the Finance tab for a complete list.
Services: Supplies:
Advertising 710815 Clothing 720185Auditing & Acct Services 710510 Const. & Renovation Supplies 720121Bank Service Charge 710812 Data Processing-Supplies 720130Building Renovation 710211 Educational Supplies 720187Cellular & Paging Service 710412 Food Supplies 720184
College of Charleston eProcure User Guide, March 2017 Page 43

Data Processing Service 710414 Fuel Supplies 720124Education And Training 710514 Jan Supplies-General 720120Engineering & Architecture 710511 Library Books 720170Freight, Express, Del 710816 Library Journals 720170General Repair 710213 Maintenance Supplies 720122Guest Package Charges 710818 Medical Supplies 720182Honorariums-Non-Us Resident 710517 Motor Vehicle Supplies 720123Honorariums Us Resident 710516 Non-Cap Off/Ed Equip 720181Household, Laundry, Jan, Sec 710210 Non-Capital Comp Equip 720130HVAC Maintenance 710214 Non-Capital Other Equip 720186In Service Training State 710518 Non-Capital Software 720131In Service Training-Non-State 710518 Office Supplies 720140Legal 710512 Other Supplies 720186Medical And Health 710813 Participant Supplies 720150Motorized Vehicle Services 710814 Photographic Supplies 720160New Construct/Renovation 710212 Postage 720183Other Construction Service 710810 Printing-In House 720110Office Equip Service 710811 Procure Cd Supplies 720180Other Telephone Service 710411 Xerox Copies 720111Out Of State Registration 710519Print Binding Library 710111Printing-Binding 710110Printing-Communication Vendor 710110Procure Cd Service 710817Storm Water Utility Fee 710311Telephone And Telegraph 710410Telephone/Internet 710413Temp Service Commission 710513Utilities 710310
Fixed Charges: Equipment over $5000:
Contributions 740311 Computer Equipment 770110Dues And Memberships 740310 Library Books 770116Insurance-State Purchase 740410 Motor Vehicle Purchase 770113Other Fixed Charges 740316 Off/Ed Equipment 770112Pres Choice Awards 740225 Offsite Equipment 770111Ren-Data Proc Equip 740111 Other Equipment 770115Rental Other 740116 Software Pack Purchase 770114Rental-Non St Prop 740112Rental-Office Equip 740110
College of Charleston eProcure User Guide, March 2017 Page 44

Rental-State Prop 740113Royalties 740313Stipend - Federal 740224Stipends 740222
Capital Project Codes (Used Only With Capital Projects, 77xxxx)
Architecture Service 780210 Masonry 780514Builder's Risk Insurance 780213 Millwork 780519Cap Procure Cd Supply 780311 Mobilization 780610Carpet 780524 Non-Cap Equip Other 780313Concrete 780512 Plumbing 780526Concrete Sidewalks 780513 Purchase Of Building 780111Construction 780510 Purchase Of Land 780110Cost Of Building Construction 780510 Renovation 780528Doors 780520 Repair And Replace 780528Electrical Systems 780529 Roofing 780522Elevators/Escalators 780527 Rough Carpentry 780517Finish Carpentry 780518 Site 780410Finishes 780521 Site Work 780410Fire Sprinkler System 780531 Special Construction 780525Fixed Furniture-Cap 780310 Specialties 780523Grading-Demolition 780411 Structural Steel 780515HVAC 780516 Survey & Testing 780211Ins & Surety Bond Cost 790120 Tangible Equipment 780312Interior Decoration 780511Legal Fees 780212Lighting 780530
College of Charleston eProcure User Guide, March 2017 Page 45