Embed Size (px)
Citation preview

SYCON®
© 1999 - 2003 Sycon Beratungs GmbH, Schwalmtal, Germany Page 1 / 44 Version 2.1.5.62 / 15.th November 2005
Introduction IDEA!® Free Edition IDEA!® Personal Edition IDEA!® Professional Edition IDEA!® Power Edition IDEA!® Team Edition General information about the different versions of the IDEA!® software family. The IDEA!® Free Edition is Freeware. The IDEA!® Personal Edition is a licensed version with additional functionality versus the IDEA!® Free Edition. This version is only for private, non-commercial use. The IDEA!® Professional Edition is a licensed version with additional functionality versus the IDEA!® Personal Edition. The IDEA!® Power Edition is a licensed version. It is a team edition without user management and rights management for a single user The IDEA!® Team Edition is a multi user and network version with all functionalities of the single user edition and additional functions. This version addresses groups and organisations. The freeware is quite powerful and contains the key functions of the IDEA! concept. The additional functions of the licensed versions improve the productivity and the comfort while working with IDEA!
We have marked the functions only available in the licensed versions. All functions of the Personal Edition are also part of the Professional Edition. All functions of the Professional Edition are also part of the Team Edition. When you find a P behind a function, it is available in the Personal Edition. If you find a Pro behind a function, the function will be available only within the Professional and Team Edition. An F is placed with all functions of the Freeware. At the end of this document you’ll find a table with an overview of which functions are available in which version.
F = Freeware
P = Personal Edition
Pro = Professional Edition
Note we also market optionally available ArchiveSoftware templates that turn IDEA! into a turn key knowledge management and collaboration tool that allows enterprise drivers and teams and best minds to collaborate smartly and effectively and make better business decisions faster. Just ask us!

SYCON®
© 1999 - 2003 Sycon Beratungs GmbH, Schwalmtal, Germany Page 2 / 44 Version 2.1.5.62 / 15.th November 2005
TABLE OF CONTENTS
PURPOSE OF THE APPLICATION 5
BASIC PART OF THE INTRODUCTION (PART I) 5 General information 5 The application and how to use it 6
THE 4 WINDOWS OF THE MAIN SCREEN 7 1st window, lower right corner: database records 7 2nd window, upper right corner: Attached files to a record: 7
Indicator (Traffic light) 8 Sorting attachments (F) 9
3rd window, upper left corner: Text field for general information to a record 9 4th window, lower left corner: Category or Navigation Tree 9
Sorting Records in Window 1 12
EXPLANATION OF EACH ICON AND ALL MENUS (PART II) 14 Menu Bar Records 14
Locate an entry in the tree (F) 14
Create new records (F) 14
Delete a record (F) 14
Edit a record (F) 14
Confirm entry (F) 14
Cancel editing (F) 14 FILTER: 14
Status bar IDEA! 14
AND Filter (F) 15
OR Filter (F) 15
FILTER: Show unlinked records only (F) 15
FILTER: Marked records only (F) 15
FILTER: Status (P) 15 Status definition (P) 15
FILTER: DUE DATE (P) 15
FILTER: Due Date with flexible date 16
FILTER: Full text search and extended full text search (Pro) 16
INVERT filtered records (P) 19 Multi level filters (P) 19

SYCON®
© 1999 - 2003 Sycon Beratungs GmbH, Schwalmtal, Germany Page 3 / 44 Version 2.1.5.62 / 15.th November 2005
Go to previous or next record (P) 20
PRINTER: GRID REPORT (P) 20 Menu records window (right mouse click): 20
Edit – F2 (F) 20 Clear field (F) 20 Clear record(s) (F) 20 Delete records (F) 20 Copy record(s) (Pro) 20 Paste record(s) (Pro) 21 Marking multiple records (F) 21 Internal links (P) 21
Menu Attachment window (right mouse click) 21 Copy (F) 21 Paste (F) 21 Open Folder (F) 21 Attach (P) 21 Find (P) 22 Delete here (F) 22 Append to mail (Pro) 22 Edit Memo (F) 22 Delete everywhere (F) 22
Menu Category tree (right mouse click) 22 To filter (F) 22 Delete (F) 22 Cut (P) 22 Copy (P) 22 Paste (P) 23
Upper Menu Bar 23
Show previously assigned files to link them as attachments to a record (F) 23
Import IDEA! database (Pro) 23
Export parts of an IDEA! database (P) 23
Open folder (F) 23
Attach files to a record (F) 23
Export Manager (Pro) 24 Export mode 1: “Copy attachments only“ 25
Option 1) Include also attachments from a) alternate path b) mapper 25 Option 2) Keep subfolder structure using a) regular names or b) UNC names 26 Option 5) Write to ZIP file 26
Export mode 2: “Copy Attachments and database” 26 Option 3) Include IDEA!-Database from a) marked node or root node 27 Option 4) Include IDEA! program files 27
Export mode 3: “Stand Alone Archive“ 27 Export mode 4: „XML Export/Docbook“ 27
E-Mail Import (Pro) 28 Mail import: Upper menu bar 29

SYCON®
© 1999 - 2003 Sycon Beratungs GmbH, Schwalmtal, Germany Page 4 / 44 Version 2.1.5.62 / 15.th November 2005
E-Mail Export (Pro) 30 Layout and position of the E-Mail Import- and Export window 31
Alternate path: Menu Configuration – Alternate path (Pro) 31 Mapper for drives and paths (Pro) 31 Password protection (Pro), Menu File - Protect 32 Reports (P) 32
Attachment Report 33 Grid Report 33 Tree Report 33 Free defined reports / report generator (Pro) 33
Create Template for Text Field (P) 33 Create Index 34
Special Attachments 35 1. Lotus Notes Links (F) 35 2. MS Outlook Integration (Pro) 36
2.1 How do I connect elements from MS Outlook in IDEA!? 36 3. Directories and Folders (F) 38
Start program with additional parameter (F) 38 Import data from MS Excel (Pro) 38 Backup safety (F) 39
INFORMATION ABOUT THE IDEA!® TEAM EDITION 40 Introduction 40 Purpose of the application 40
What are the differences compared to the single user version? 40 3 tier architecture (Team Client, Application Server, Database) 41 User Manager 41 Service module and backup routine 42
OVERVIEW OVER ALL FUNCTIONS AND IDEA®! EDITIONS 43

SYCON®
© 1999 - 2003 Sycon Beratungs GmbH, Schwalmtal, Germany Page 5 / 44 Version 2.1.5.62 / 15.th November 2005
Introduction to IDEA!® Free, Personal, Professional and Team Edition Purpose of the application IDEA! helps you to administer the contents of a project more efficiently. It also supports you in structuring and organizing your knowledge in an easy way during your daily work. You will save a lot of time. IDEA! is an easy to use tool with a simple appearance and impression that might make it at first glance misleading, but behind IDEA! is a very strong, practically proven and powerful concept. With IDEA! you can document, structure, communicate, archive and find relevant information and knowledge fast and easy; for yourself, in groups and in organisations. This introduction is divided into 2 parts. In the first part the basic principle and functionalities of IDEA! are explained. In the second part all icons and their meanings are introduced in detail. You’ll need about 20 minutes for the basic part and 40 minutes for the more detailed descriptions of the second part. We recommend that you print this introduction and go through the program step by step, guided by this paper. All users have told us that going through this introduction is the best way to quickly use IDEA! efficiently. IDEA! is not difficult but it’s basic principle differs a bit from most other applications. If you can use a word processor you can work with IDEA!. If you want to use IDEA! in a professional way, we highly recommend to read the second part of this manual as well. Basic part of the introduction (Part I) General information When you start IDEA!, an example database is opened that already contains data. Within the IDEA! Personal Edition the IDEA! database files have the ending .IDB. You can see which database is currently loaded in the left corner below the main menu. There the path and file name is shown. If you have chosen the standard installation directory C:\program files\IDEA you will probably see there C:\program files\IDEA\IDBs\IDEA_2.IDB or just IDEA_2.IDB in case you have not switched to another database yet. You’ll find another database named Sycon_Products.idb in the installation directory. Via the menu “FILE – Open” you can change to another database. To do so, just choose the desired database in the dialog box that opens after you have chosen “Open”. In the same menu you’ll save databases. With “New” you create a new, empty database. If you create a new database, please make sure it has the ending .idb. For this introduction, please change the database and switch to the Sycon_Products.idb database. When you change, you will be asked, if you want to save the changes in the current database. Answer with yes if you don’t want to loose your changes. Answer with no, if you were just playing around or testing something. The product database has a few more records and therefore is better for this tutorial.
When you start IDEA!, the last database you worked on will always be loaded. All window heights and widths as well as the column width within the windows of the whole screen can be adjusted by you (you’ll find a more detailed description how to do so below). All your settings are saved when you leave IDEA! and the next time you start the program, it will appear in the way you left it.

SYCON®
© 1999 - 2003 Sycon Beratungs GmbH, Schwalmtal, Germany Page 6 / 44 Version 2.1.5.62 / 15.th November 2005
The application and how to use it IDEA! has only one screen which is divided into 4 windows. If you see a 5th window in the lower right corner when you started IDEA!, just close it now (click on the small x in the upper right corner of that window to close it). We will come back to it later. Your screen should then look similar to picture 1 below. IDEA! Main screen
Maybe some columns of the database records window (1.st window) are not visible (this depends on the screen resolution and the column width). You can then drag the left window (4th window) smaller (to do so, position the mouse in the grey area between the 1st and the 4th window and change the width while pressing the left mouse button). To change the column width, move the cursor between the two grey column-heads and adjust it while pressing the left mouse button. We will now explain the 4 windows, their functions and their handling. It is important to note that the 1st, 2nd and 3rd window belong together. They are a record and build a content unity consisting of a topic, a description of the topic and related detailed information. The 4th window, the category tree, structures the content unities (records) into a logical hierarchy so that content can be subsequently easily accessed.

SYCON®
© 1999 - 2003 Sycon Beratungs GmbH, Schwalmtal, Germany Page 7 / 44 Version 2.1.5.62 / 15.th November 2005
The 4 windows of the main screen 1st window, lower right corner: database records This is where your work starts with IDEA!. Here you create new database records. Every record gets a title and describes a topic, a task or a content that you are interested in or that you want to work on. E.g.: SPC training, changing a technical part of a plant, software tests, last audit, quality meeting, budgets, a business process etc.; whatever you want. As a title for a record you should choose a distinctive, precise and short description. E.g.: „Budget: monthly reports” or “Interesting new technologies” or “extruder line 1”. In our example database we have used our product names as titles. The icon bar below is related to the records. We will discuss the function and the meaning of each icon in detail in the second part of this introduction.
For now it is sufficient to know that you can add a new record with the button. Just try it and add a new record to the database by clicking on the + button. Enter a title, e.g. “Test IDEA! database” and confirm with ENTER. 2nd window, upper right corner: Attached files to a record: The purpose of this window is to attach files, web sites or in general, detailed information that belongs to a record. The title of the record is used to group more information under it. Because we attach this information to the record, we call them attachments in IDEA! (like in the mail programs where you attach files to the mail body). Attachments could be files, programs, Internet or Intranet pages or Lotus Notes documents or views. Everything that you can start or open via the normal Windows desktop can be attached in IDEA!. When you mark a record with the mouse in the lower right window and move with the arrow keys up and down, you’ll see that the attachments will change from record to record. You will also notice that some of the documents are attached to more than one record. In the attachment window, you always see the attachments that belong to the active record (marked with a colour in the 1st window). You can easily add or remove attachments within this window.
Please go to your new created record and then click in the upper menu on . A window with a file menu pops up. Navigate to any document and confirm your choice with “Open”. The chosen document will be attached. You can now see it in the attachment window and also open it from there. To open it, just mark it and double click on it or press ENTER (both are possible). The document will be opened. Please close it now again. In IDEA! we do not store the file or application itself, we just save the path that points/links to it. You can add attachments by drag and drop to this window. To add an internet address just drag the "e Symbol" to the left beside the http address in the Internet Explorer (keep the left mouse button pressed down) into the attachment window. Make the IE window a bit smaller so that you can see the attachment window from IDEA! in the background. When you release the left mouse button the web address is added. Removing attachments is done via the right mouse button - and the “Delete here” or “Delete everywhere”. You could also simply use the DEL key. You can add a comment to all attachments. This is often very helpful. You can edit the comment field and most other attachment fields by pressing the function key F2. The memo field opens as a rich text editor via a double click or the right mouse menu “Edit Memo”. When you have edited a field you always confirm with ENTER. Drag and drop from Netscape Navigator is also possible. If you use an Opera browser you can add http addresses by copy and paste. For Microsoft products (like Word, Excel, etc) we automatically fill the content of the topic field into the comment field from information entered under document properties in the document (if something has been entered there). A comment for an attachment can always be manually changed (with F2 you enter the edit mode). The document path is stored and shown in the column “Path/folder” of the window. All attachments are only administered once in the database. The same document under the same path will have the same attachment ID.

SYCON®
© 1999 - 2003 Sycon Beratungs GmbH, Schwalmtal, Germany Page 8 / 44 Version 2.1.5.62 / 15.th November 2005
Instead of using drag and drop to attach a file, you can also use the button, travel to the desired file, and attach (only) 1 document or file at a time. (Note though that an attachment can be attached to more than 1 record).
A click on the icon will directly open the folder where the marked attachment is stored and highlight it. Try it now. Please mark the document that you just attached and click on the “open folder “ button. IDEA! navigates directly into the folder where this document is located and highlights it. Normally you will find the “friends” of this document there. Here you can now select more than one document via SHIFT or CTRL and the left mouse button (the usual windows multiple copy commands and procedure). After you marked the files you want, simply drag them into the attachment window and they will all be attached to the current record. This is often very useful and saves a lot of time when you quickly want to add some other files that belong to the same topic. Example: Let’s say you created under 1. the records “Budgets: monthly reports”, “interesting new technologies” and “Test IDEA! database”. Then you could add the monthly budget reports e.g. as Excel, Word or Lotus 123 files in the attachment window. In the same way you add planning’s, forecasts, reviews etc. for turnover, cost etc. This way you’ll have all relevant information for the topic immediately available and you can also access it directly from here. For the record “interesting new technologies” you could add information from manufacturers who developed new machines for your business; their web address(es) and those of their competitors. At “Test IDEA! database” you could attach a file where you write down comments, remarks and questions concerning IDEA!. All relevant information can be stored, easily accessible later via a few keystrokes. Indicator (Traffic light) A coloured indicator has been added to the attachment window. When you first start a new version this field may be at the end of the screen and hence is not immediately visible. You can however move the field to the front by mouse drag and drop. This change is saved when you close IDEA! . The Indicator in the Attachment Window shows whether an attachment is available under:
a) its original path (green) b) the alternate path (yellow) c) neither its original path nor the alternate path (red) d) for a web address, a Lotus Notes link or a mail link, the indicator is grey.
The availability of Notes Links, web addresses and mail links can not be checked fast. For this reason active colour indication has been omitted and these links are grey. Additionally, the Lotus Notes interface by default does not give any return indication on availability. Further, experience has proven that the grey indication makes it quite easy to spot these kinds of attachments, improving usability.
SYCON®
© 1999 - 2003 Sycon Beratungs GmbH, Schwalmtal, Germany Page 9 / 44 Version 2.1.5.62 / 15.th November 2005
Sorting attachments (F) Manually sorting of attachments is possible. This means, that the sequence of attachments is not only controlled by a running number but can also be adjusted by hand. To move an attachment, just press CTRL and the ArrowUp or Arrowdown key and move it to the desired position with these buttons. This position is then retained by saving the database. 3rd window, upper left corner: Text field for general information to a record This window and the attachment window always belong to one record from the lower right window. You access a particular text field by clicking on its related database record in the lower right window or on its position in the tree in the lower left window. Initially, this text field contains default information. The record number, the title, the date and your login ID are automatically put in. A double click in the text field opens a rich text editor so that you can format the default information and enter general information about the related database record – what does it cover; what is it about. It is also very useful as a quick notepad for related information for which you won’t create an own document but that you don’t want to lose. It can even contain substantial amounts of relevant data, store email messages and/or web addresses, and almost any kind of object. Example: we stay with our new records “Test IDEA! database”; Budgets: “monthly reports”, “interesting new technologies”. For the record “Test IDEA! database” you could write down comments, remarks and questions concerning IDEA! while you go through this tutorial. You wouldn’t have to create a new document for this. On the other hand, you can save your entries in this field anytime as an own document. For the budgets you could enter: This record contains all budgets of the current year. For the following reason we have cut the budgets in the following areas: maintenance, software development etc. … Mr. XY is not preparing his reports very well. He should improve it till end of July and integrate the following points. Or for the new technologies: Mr. Mayer from the company XY has presented the latest developments for extruder machines on the 21st of April. We haven’t yet investigated the possible potential for our production lines. Mr Stephen will get a student until 31st of May to have a closer look at the subject etc. 4th window, lower left corner: Category or Navigation Tree This window is the heart of IDEA!. In the database record window (1st window) you’ll get a long list of unstructured records over time and you could lose the overview. Each record bundles relevant information, but the list itself has no content structure because all kinds of different topics are stored one after the other in historical order. In this 4th window you can define a tree with content categories (tree branches) and subcategories to structure and organize your records according their contents. The categories of the tree reflect the organization of your working and project environment. You structure and organize your records by simply dragging a record into one or more categories of the tree. To do so, you mark a record with the mouse, keep the left mouse button pressed and drag it to the category where you want to place it. Then release the left mouse button. The record is now bound to a category within the tree. How you define categories and how many records you assign to which categories, is completely up to you. This method makes IDEA! very flexible. As you build the tree, you may find the structure is not quite right. In this case, just change the structure of the tree. This will lead you automatically to your optimal structure to organize your knowledge and information so you can find everything very fast. Adapting the tree has no influence on the data. It simply organizes the tree in a different way. That is another feature which makes IDEA! unique. You can define any tree structure and assign a record to as many categories as you want. Categories and records can be renamed and moved within the tree at any time. When you search for information, access the desired record via the content categories of the tree. One click on the record in the tree will mark the same record in the record list (1st window). This way you’ll find your bundled information to a topic (with general and detailed information) immediately and you can access them directly.

SYCON®
© 1999 - 2003 Sycon Beratungs GmbH, Schwalmtal, Germany Page 10 / 44 Version 2.1.5.62 / 15.th November 2005
When you search for information, simply go via the content category in the tree and find the desired records. One click on the record in the tree will mark the same record in the record list (1st window). This way you’ll find your bundled information to a topic (with general and detailed information) immediately and you can access them directly. Beside this way there are also other ways to search for information in the database, e.g. a full text search, which we will describe later in this document. If you want to know to which categories a record has been assigned, then click on the symbol . The record will show up red in all categories where it is used. The menu bar below is related to the category tree.
New Category With this icon you create a new category on the same level. Note: When you are at the root of the tree (top level), this is not possible. At the root you can only create subcategories.
New Subcategory With this icon you create a subcategory under the marked category. The root is the highest category (top level).
Expand All A click on this icon shows all records under the marked category and their subcategories. When you use this function at the root, all records and subcategories are shown.
Collapse All A click on this icon hides all subcategories and records under the marked category. Using this function at the root of the tree will only show the root.
Sorting by Alphabet (P) If you click on this icon all subcategories or entries of the marked category will be sorted in alphabetical order. Only those categories that are visible will be sorted. You can, of course sort individual entries and categories of the tree by hand. Just press CTRL and then move the marked category or marked entry within the tree by Arrow Up or Arrow Down key.
Automatic Filter (P) In the menu above the category tree, a checkbox for an additional option (AF) has been added. AF stands for Automatic Filter. When the option is activated and you click in the tree on a category, then the AND filter is automatically activated and you will see only those records in the lower right hand window which are in the selected branch (including the sub categories).
Tree report (P) This icon starts the tree report. Imagine the tree is a book and the single categories are chapters and subchapters etc. Only those records that are visible under the marked category branches are printed. Records currently hidden, that is, those collapsed under the category heading, won’t be printed. The printout is shown in a preview and can also be directed and saved in several different file formats. Example: The records “Budgets: monthly reports“ would probably fit very well in a category named “Budgets“. Therefore we create such a category in the tree and place the record there (assign it to that category). In the same category we could also add other records (if we had created them before). E.g.: “extraordinary expenses”; training cost 2004; quarterly reports, etc. The record with the new extruder technologies could be assigned to a category “new technologies” as

SYCON®
© 1999 - 2003 Sycon Beratungs GmbH, Schwalmtal, Germany Page 11 / 44 Version 2.1.5.62 / 15.th November 2005
well as to a category “extruder” (assigning a record to more than one category is possible!). The record extruder could be a subcategory of technical assets etc. 5th window: Import files (F)
There is a fifth window. You’ll get this when you click on (in the menu bar top left). The window is divided into 2 parts or “baskets”. You can quickly and easily add files from both baskets and attach them to the records.
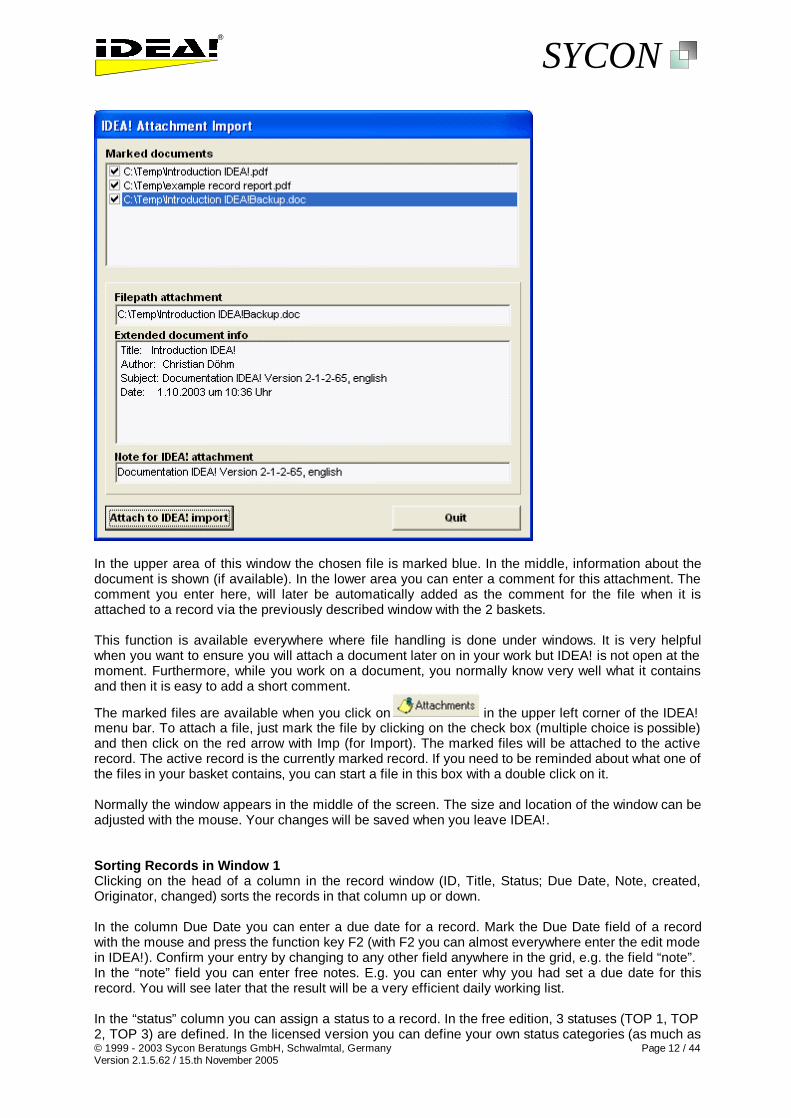
In the lower basket you can see the “last used” files list from widows showing which files you have recently opened. In case the file extension, like .doc or .txt etc. is not shown, you can change this in the windows file explorer. Changes will take effect only for new opened files. In the upper part are those files that you yourself have put in this “basket”. You can put these files there when you mark a file in the file explorer, press the right mouse button and then choose “IDEA2..” from the menu that appears. The window below will be opened.
SYCON®
© 1999 - 2003 Sycon Beratungs GmbH, Schwalmtal, Germany Page 12 / 44 Version 2.1.5.62 / 15.th November 2005
In the upper area of this window the chosen file is marked blue. In the middle, information about the document is shown (if available). In the lower area you can enter a comment for this attachment. The comment you enter here, will later be automatically added as the comment for the file when it is attached to a record via the previously described window with the 2 baskets. This function is available everywhere where file handling is done under windows. It is very helpful when you want to ensure you will attach a document later on in your work but IDEA! is not open at the moment. Furthermore, while you work on a document, you normally know very well what it contains and then it is easy to add a short comment.
The marked files are available when you click on in the upper left corner of the IDEA! menu bar. To attach a file, just mark the file by clicking on the check box (multiple choice is possible) and then click on the red arrow with Imp (for Import). The marked files will be attached to the active record. The active record is the currently marked record. If you need to be reminded about what one of the files in your basket contains, you can start a file in this box with a double click on it. Normally the window appears in the middle of the screen. The size and location of the window can be adjusted with the mouse. Your changes will be saved when you leave IDEA!. Sorting Records in Window 1 Clicking on the head of a column in the record window (ID, Title, Status; Due Date, Note, created, Originator, changed) sorts the records in that column up or down. In the column Due Date you can enter a due date for a record. Mark the Due Date field of a record with the mouse and press the function key F2 (with F2 you can almost everywhere enter the edit mode in IDEA!). Confirm your entry by changing to any other field anywhere in the grid, e.g. the field “note”. In the “note” field you can enter free notes. E.g. you can enter why you had set a due date for this record. You will see later that the result will be a very efficient daily working list. In the “status” column you can assign a status to a record. In the free edition, 3 statuses (TOP 1, TOP 2, TOP 3) are defined. In the licensed version you can define your own status categories (as much as

SYCON®
© 1999 - 2003 Sycon Beratungs GmbH, Schwalmtal, Germany Page 13 / 44 Version 2.1.5.62 / 15.th November 2005
you want) and name them according to your needs. To do so choose “configuration” in the menu and then “status definition” (it will be described further below in more detail with the functions of the main menu bar). In the column “created” IDEA! logs when the record was created and “changed” shows you when it was changed the last time. All buttons have a tool tip which describes their function with a few words. The tool tip shows up when the mouse pointer is positioned about 1 second over the button. Grey buttons are additional functions of the full versions and not available in the IDEA! Free Personal Edition. These functions are also documented further down in this document with a detailed explanation of each icon. At the end of this documentation you’ll find a table which provides an overview over all functions and versions. With the above, the basic functionality of the IDEA! Personal Edition has been described. We now step to more functions by describing each button and icon separately. The second part contains also important information for users of the free Personal Edition and should not be skipped. Reminder: The function key F2 is almost everywhere available to edit records and get into the edit mode. Double click in the text field opens a Rich text editor. Launching the attachments is done with ENTER or double click on them in the attachment window.

SYCON®
© 1999 - 2003 Sycon Beratungs GmbH, Schwalmtal, Germany Page 14 / 44 Version 2.1.5.62 / 15.th November 2005
Explanation of each Icon and all menus (Part II) Menu Bar Records First we will explain the icons in the menu bar above the records. We start from the left.
Locate an entry in the tree (F) When you want to know to which categories you have linked a record, just click on this symbol. The record will be marked red everywhere in the tree where you have assigned it.
Create new records (F)
Delete a record (F) This symbol only appears in the menu bar if a record is not assigned to any category in the tree. There are 3 ways to delete a record: 1. Via this symbol: This is only possible if you have removed the records in the tree before. In this case you are not asked anymore if you really want to delete the record. 2. Via the DEL key. If you are on a record and press the Del (Delete) key, you will be asked if you want to delete the record. You can confirm or cancel. When you delete the record via the Del key, it will also automatically remove it from all categories of the tree where it has been used. 3. Via the right mouse menu „Delete record“. Works in the same way as described under 2..
Edit a record (F) This button switches the table into edit mode. You can then edit with the left mouse key or with F2. Using the shortcut F2 key is normally faster and, as mentioned, F2 is the universal IDEA! Edit key.
Confirm entry (F) Confirms your changes when you have been in edit mode. You can also always confirm by pressing ENTER or by clicking with the mouse in a different part of the table.
Cancel editing (F) This cancels the current editing of a record. You can also always cancel by pressing the ESC button. Note: With the keyboard you are generally faster then with the mouse and the menu bar. FILTER: The icons below are filters. The first two are used in combination with the category tree. To explain their function, we need to explain the status bar first. The status bar is located in the lower part of the IDEA! screen and appears as below. Sometimes the bar is not visible because of the windows task bar; switching the windows task bar on and off fixes this. Status bar IDEA!
Left in the bar you’ll see a statistic about the database. It contains: #Tree: Number of knots in the tree (sum of all categories and records) # Rec: Number of records # Att.: Number of attachments Middle: Filter: In this field we will drag categories from the tree to which we want to apply filter. Status field: The field shows a status message for current operations in IDEA!

SYCON®
© 1999 - 2003 Sycon Beratungs GmbH, Schwalmtal, Germany Page 15 / 44 Version 2.1.5.62 / 15.th November 2005
AND Filter (F) With this filter, you check which records are assigned to more than 1 category at the same time (logical AND = intersection of X categories). If you want to know e.g. which records are in category A (e.g. products in our product database) as well as in category B (e.g. SPC in our product database), then you would do the following: Mark the category “products” in the tree with the mouse and drag it into the filter field while keeping the left mouse button pressed. Do the same with the category SPC. In the filter field you will see then “Filter: products . SPC”. Now click on the AND filter button. Only the records that are in both categories will remain in the list of records. Switch off the AND filter by clicking again on the filter button. Note: If you drag only 1 category into the filter field, only the records of this category will be shown.
OR Filter (F) With this filter you get the union of the records from many categories (Logical OR = union of X categories). If you want to know which records are in both category A (e.g. products in our product database) and in category B (e.g. SPC in our product database), then you would do the following: Mark the category “products” in the tree with the mouse and drag it into the filter field while keeping the left mouse button pressed. Do the same with the category SPC. In the filter field you will see “Filter: products . SPC”. Now click on the OR filter button. All records that are in both categories A and B will remain in the list of records. Switch off the OR filter by clicking again on the filter button.
FILTER: Show unlinked records only (F) This filter shows you all records that haven’t been linked into the tree to at least 1 category. Use this filter to see which records you forgot to categorize or which or not yet categorized for other reasons. The following filters are independent from the category tree. They are related directly to the records.
FILTER: Marked records only (F) At the right border of the records you can mark single records by pressing the CTRL key and clicking with the mouse into the grey area left of the record. The chosen records will be marked blue. Pressing this filter button, after marking some records within the list, will show only these records. The function is very helpful when you need to choose records manually because you want to apply some other functions later to these specific records.
FILTER: Status (P) If you click on the Status Filter button you receive the following menu to filter your records by status. Here you select one or several statuses and click on filter.
Status definition (P) Under the menu Configuration – Status definition: you can define as many status categories as you want. In the freeware 3 statuses (Top 1, Top 2, Top 3) are pre defined.
FILTER: DUE DATE (P) One click on the due date filter shows you all records that have a due date earlier than or equal to

SYCON®
© 1999 - 2003 Sycon Beratungs GmbH, Schwalmtal, Germany Page 16 / 44 Version 2.1.5.62 / 15.th November 2005
today (records over due). As a result you’ll get a complete daily working list with this function and all relevant information for each task/point is immediately available without any further action. You can also print this list immediately via the printer symbol in the same menu bar.
FILTER: Due Date with flexible date The date in the box belongs to the due date filter. If you check the box, all records with a due date, later or equal (>=) to the chosen date, will be shown (look ahead). The filter for full text search is located on the right side because it works on the whole database.
FILTER: Full text search and extended full text search (Pro) If you click on the full text search you will get the menu below. You can search for strings within the whole database, or parts of it. The extended full text search allows you further to integrate the index catalogue of the operating system into your search. We will describe the functionality on the following pages. The whole functionality is available via the full text search configuration screen. An entry box has been added to the menu bar above the records to quickly enter a search string. The search will be executed with the current settings of the full text search configuration screen. The database has an internal index. All data in the IDEA! database is indexed. This guarantees a fast search. The index is automatically updated by IDEA! the moment you change, add or remove data. However, in case the index gets corrupt you can create the index new via the menu “Extras – Create new index”. Before you create a new index, we recommend to close and start IDEA! again, although it is not a must.
In the upper row the search string can be entered. The system does not differentiate between capital or small letters for the search. “sycon” will find “Sycon” as well as “sycon” and “SYCON” and “Sycon”. You can use wildcards like * and ? in your search expressions. Syc* will find all strings that begin with “Syc”. The following logical expressions are supported. AND, OR, NOT and brackets ().

SYCON®
© 1999 - 2003 Sycon Beratungs GmbH, Schwalmtal, Germany Page 17 / 44 Version 2.1.5.62 / 15.th November 2005
a) AND Logical AND: Records that contain the search strings A and B etc. b) OR Logical OR: Records that contain either the string A or the string B c) NOT Records, that do not contain the search string. d) Brackets ( ) (A AND B) OR C: records that contain the strings A and B or the string C. Examples: Sycon AND Software finds all records in which contain the word “Sycon” and the word “Software”. Sycon OR Software finds all records in which either the word “Sycon” or the word “Software” is present. NOT Software finds all records which do not contain the word “Software”. Phrase or string with more then one word: If you want to search for a phrase, e.g. like “old father”, then you put the search string in single or double quotation marks (‘ ’ or “ “). The result will then only contain records with the searched phrase. If you enter my father without quotation marks, then all records will be listed that contain the word “old” AND the word “father” (like the logical AND). Below the entry field for the search string you will find 4 columns: IDEA! records, Attachments, Indexed files, reduced to (Attachments, attached folders and subfolders from folders).
The first 2 columns, “IDEA! Records“, and “Attachments“, refer to the content and fields of the IDEA! database. The search generally searches all fields and then reduces the result based on the selcted fields. This means that the fastest search is the one where you check all fields under IDEA! records and Attachments. The 3.rd column headed “Indexed files“, allows you to integrate the index catalogue of the operating system into your search. The operating systems Windows 2000 and Windows XP allow you to index the files on your hard drive(s) or parts of it. The results are written to an index catalogue. To use the index service, it must be activated. You’ll find the service under Control panel – Administration – Services –Index service. Under Control panel – Administration – Services – Computer Administration – Services and Applications – Index Service you will already find an index catalogue with the name System. Here you can define additional index catalogues or add your own folders to the current system catalogue. In IDEA! you can choose between all defined index catalogues when you check the box “Use index catalogue”.

SYCON®
© 1999 - 2003 Sycon Beratungs GmbH, Schwalmtal, Germany Page 18 / 44 Version 2.1.5.62 / 15.th November 2005
When the field “Use index catalogue” is checked, the search string will also be passed to search the index catalogue. The files that are found via the MS index service will be listed in the lower part of the full text search window. In our example we searched for the string “Productivity” in the index catalogue “SYSTEM“. The found files are listed in the lower part of the window. You can sort them with a click on the respective column header (IDEA! Attm., Name, Type, Path, Size, Modified) up and down. If a found document is already attached to one or more records in IDEA!, then you will see the attachment IDNr. of this document in the first column (otherwise the IDEA! Attm. field will be left empty). A click on the IDNr. or the file will take you immediately to the IDEA! record that has this file as an attachment. A double click on the file will open it. If you find documents here which are relevant for you work but which you haven’t yet attached to an IDEA! record, you can now easily add them via drag and drop to records where they make sense. The found documents/files can also be grouped by file type and path name. The screenshot below shows the grouping by file name with one opened group folder for “Microsoft PowerPoint” presentation files.

SYCON®
© 1999 - 2003 Sycon Beratungs GmbH, Schwalmtal, Germany Page 19 / 44 Version 2.1.5.62 / 15.th November 2005
Beside the grouping functions by file type and path name, you can filter these results as well. To filter the list, just enter a string in the filter field above the list. Only those files will be shown which start with the entered string. “idea” in the filter field would show only those files which start with “idea”. In the 4thcolumn of the search configuration labelled “Reduced to” you have the option to reduce the found files within the index catalogue during the search to already attached documents in IDEA! or to documents which are located in attached folders or subfolders of attached folders. Example: Let’s say you attached the folders d:\idea2\temp\ and C:\My documents\ as folders in IDEA!. If you now checked the option “reduce to (in IDEA!) attached folders” then the results would be reduced to the files which reside in these folders. If you also checked the option “subfolders of attached folders” then the files of these sub folders (that match the search criteria) would also be taken into account. You can execute the search in IDEA! or in the index catalogue independently from each other, or together at the same time with the appropriate options.
INVERT filtered records (P) If you activate the checkbox “inv”, then a previously filtered set of records shown in the lower right window is inverted. After inverting, the difference between all records in the database and the previously filtered records are shown. NOTE: If a record is attached to a number of categories and the filtered records are inverted, then this entry is not shown in the inverted lot; even if this entry is still in other categories. Multi level filters (P) The filters are implemented in a way that you can execute additional filters on a previously filtered set of records. E.g. an AND filter plus “Due Date“ plus and/or a “Status filter“. The first 3 filters (AND, OR

SYCON®
© 1999 - 2003 Sycon Beratungs GmbH, Schwalmtal, Germany Page 20 / 44 Version 2.1.5.62 / 15.th November 2005
and “not linked records”) are basic filters. This means you have to activate them first. If you activated the due date filter first and then the AND filter, you would not get the desired result. Filter & Records It is possible to add new records to the database even when a filter is activated. Further Icons
Go to previous or next record (P) With these arrows you can easily navigate within your recently used entries. Let’s assume you have worked with the entries 12, 19, 27 and 5 in this sequence and are currently at entry 5, if you now use the backward key then the cursor will automatically jump to entry 27, then to 19 and then to 12. Forward, again from 12 to 19, 27 and so on. This function operates the same way as the forward and back button from your web browser.
Tip: Jumping from one entry to the next can easily be observed if you mark one entry (e.g. the title). The marked part is shown in blue. If no area of the record is marked (the cursor for instance is in the attachment window), then only the little cursor on the left side of the entries moves. Obviously the attachments and the text window change as well, but you can see it better with a blue marked field.
PRINTER: GRID REPORT (P) Clicking on this icon prints the current records from the record list in a simple grid report. The print order is the same as the sort order of the records (the printout depends on how you have sorted the records). You find an example of the 4 standard reports in the 2 example databases (idea_2.idb and sycon_products.idb) as attachments under the category “Examples of standard reports”. Each filter is reset by pressing the filter button again. If a filter is still active, it is possible to use a second filter (if possible) on an already filtered set of records. This could make sense for a full text search on a previously reduced set of records through an AND filter. You can use this approach to optimise your search very efficiently. Menu records window (right mouse click): When you click the right mouse button, a small menu with 4 options opens:
Edit – F2 (F) Lets you edit the record. Pressing F2 will also switch into edit mode. Clear field (F) Deletes (clears) the content of the current highlighted field. Clear record(s) (F) Deletes the complete content of a record including attachments and text window. The actual record and record number are retained as an empty entry. Record(s) to mail (Pro) Adds the content of the currently marked record to the mail export. Delete records (F) Delete one or all marked entries from the list and the category tree. Copy record(s) (Pro) Copies one or several marked records into the clipboard to “duplicate” them (via paste).
SYCON®
© 1999 - 2003 Sycon Beratungs GmbH, Schwalmtal, Germany Page 21 / 44 Version 2.1.5.62 / 15.th November 2005
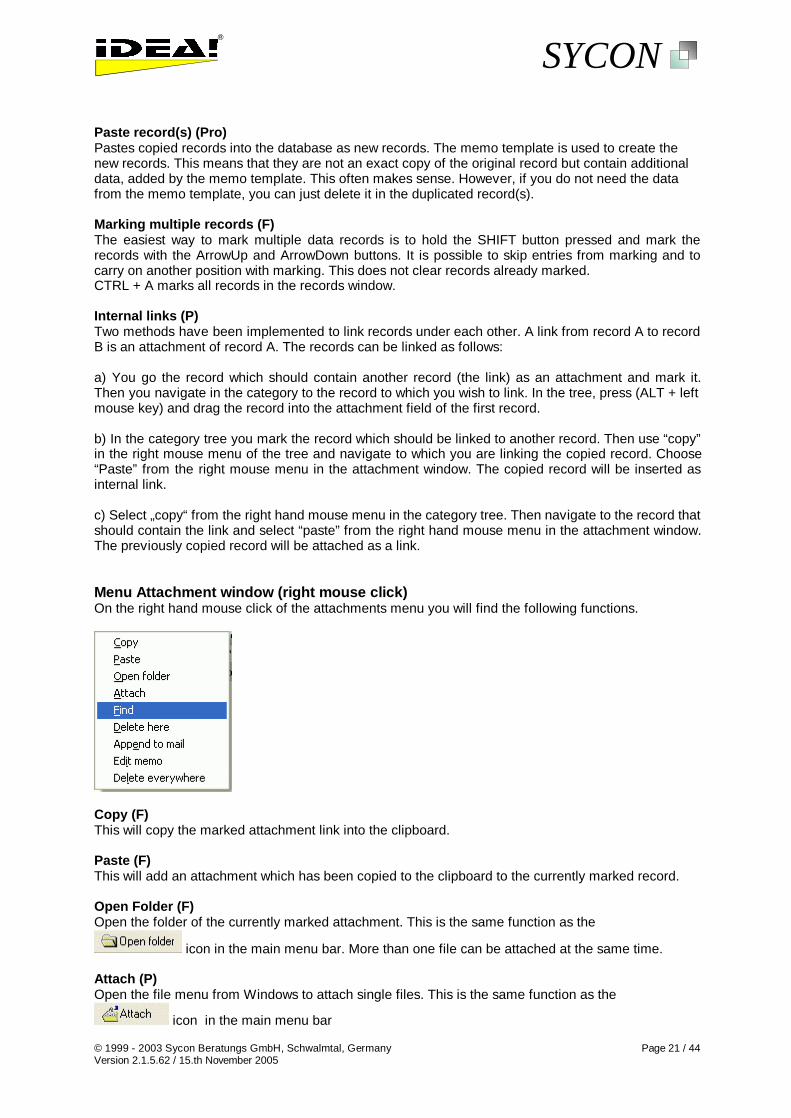
Paste record(s) (Pro) Pastes copied records into the database as new records. The memo template is used to create the new records. This means that they are not an exact copy of the original record but contain additional data, added by the memo template. This often makes sense. However, if you do not need the data from the memo template, you can just delete it in the duplicated record(s). Marking multiple records (F) The easiest way to mark multiple data records is to hold the SHIFT button pressed and mark the records with the ArrowUp and ArrowDown buttons. It is possible to skip entries from marking and to carry on another position with marking. This does not clear records already marked. CTRL + A marks all records in the records window. Internal links (P) Two methods have been implemented to link records under each other. A link from record A to record B is an attachment of record A. The records can be linked as follows: a) You go the record which should contain another record (the link) as an attachment and mark it. Then you navigate in the category to the record to which you wish to link. In the tree, press (ALT + left mouse key) and drag the record into the attachment field of the first record. b) In the category tree you mark the record which should be linked to another record. Then use “copy” in the right mouse menu of the tree and navigate to which you are linking the copied record. Choose “Paste” from the right mouse menu in the attachment window. The copied record will be inserted as internal link. c) Select „copy“ from the right hand mouse menu in the category tree. Then navigate to the record that should contain the link and select “paste” from the right hand mouse menu in the attachment window. The previously copied record will be attached as a link. Menu Attachment window (right mouse click) On the right hand mouse click of the attachments menu you will find the following functions.
Copy (F) This will copy the marked attachment link into the clipboard. Paste (F) This will add an attachment which has been copied to the clipboard to the currently marked record. Open Folder (F) Open the folder of the currently marked attachment. This is the same function as the
icon in the main menu bar. More than one file can be attached at the same time. Attach (P) Open the file menu from Windows to attach single files. This is the same function as the
icon in the main menu bar

SYCON®
© 1999 - 2003 Sycon Beratungs GmbH, Schwalmtal, Germany Page 22 / 44 Version 2.1.5.62 / 15.th November 2005
Find (P) With this function you can see to which records you have assigned the same attachment. The records containing the file will be marked. If the same file attached at more than one record, it is still administered only once.
Press the filter “marked records only” after your search. Then you make sure, that you do not miss records, which are not in the visible part of the grid. Delete here (F) This will delete the attachment from a record. If the attachment is also attached to other records, then it will not be deleted from those records. Append to mail (Pro) With this function you can select single files for e-mail export. The e-mail export has had to be opened at least once to do so. If you have marked an attachment and select “Append to mail”, then this attachment will be added to the attachment list in the e-mail export window. This way you can select single attachments from the whole IDEA! database without getting offered a lot of unnecessary files. Note: If you press the mail export button and you are located on a record with a lot of attachments, then these attachments will naturally also be offered (this is the basic function of the mail export). If you want to avoid this, choose a record with only a few or no attachment when starting the export. Edit Memo (F) This will open the memo field for a single record. This memo field is a rich text editor similar to the one in the upper left window. You can also open the memo field with a double click into the memo field.
If something has been entered in the memo field, then you will see the symbol
Delete everywhere (F) This will delete the attachment from the current record and everywhere else where it is attached. Menu Category tree (right mouse click) On the right hand mouse click of the category tree menu you will find the following functions.
To filter (F) Executes an AND filter with the current marked category (node). This means, only those records are shown in the records window (lower right window) which are in the branch under the marked node. The AND filter will be activated immediately. Delete (F) Deletes a record or a branch from the tree. Note: The deleted records will remain in the record list. Only the link within the tree will be deleted. Cut (P) Cuts a record or a branch out of the tree. In contrast to the delete function the information will remain in the clipboard, so that you can insert the element you have cut out at a new position in the tree. The function is helpful to move records or branches over a longer distance in large trees. Important: When you use the cut function, all sub-nodes with their underlying records will be cut out as well (and therefore can be pasted again later). Copy (P) 1. Copies a record or a branch within the tree. Only those parts of the branch will be copied (in

SYCON®
© 1999 - 2003 Sycon Beratungs GmbH, Schwalmtal, Germany Page 23 / 44 Version 2.1.5.62 / 15.th November 2005
contrast to the cut function) which have been extended. This means that records from sub-categories which were closed will not be copied. Only the visible sub-category nodes/records will be copied. 2. If you copy a single record, you can attach it as an attachment to another record. This way you can easily create an internal link from one record to another. Paste (P) A record or a branch from the clipboard will be inserted into the tree.
Upper Menu Bar
The upper menu bar in IDEA! has 3 areas: 1. Drop Down Menus 2. Icon bar 3. Information bar Explanation of the icon bar
Show previously assigned files to link them as attachments to a record (F)
Import IDEA! database (Pro) With this function you can combine IDEA! databases. When you import another IDEA! database into the currently opened IDEA! database, all records of the imported database will be appended to the current records and the category tree will be expanded by adding the tree of the imported database as a main category. The root of the imported tree becomes a (main-) category of the importing database. All links will be kept. Both databases are “merged” by the import. To execute the import, simply click on the button. Choose the IDEA! database you want to import (*.idb file) in the file menu and confirm your choice with “Open”. The databases will be “merged”.
Export parts of an IDEA! database (P) With this function you can export parts of an IDEA! database and save it in a new IDEA! database. To do so, just mark a category in the tree you want to export. If you execute the export now, the branch with all its subcategories and records will be exported to a new IDEA! database. You can give your new database any name you want. We recommend to use the ending *.idb for an IDEA! data base, although it is not a must. With the import and export functions 2 very powerful tools are available to exchange complex information and knowledge in a very easy and controlled way.
Open folder (F) IDEA! opens the folder in which the currently marked attachment is stored and highlight the selected document in the folder. You can then choose one or more files and attach them via drag and drop to your current record. You can also change to another folder, for example, to go to a document that is elsewhere. This can be anywhere your desktop can reach, locally or across a network.
Attach files to a record (F) A window with a file menu opens in which you can navigate to the desired document or file (it can also be a program file) which you want to attach. Please note: Via this function you can only attach 1 file at a time (with the previously discussed “open folder” function a multi selection is possible).

SYCON®
© 1999 - 2003 Sycon Beratungs GmbH, Schwalmtal, Germany Page 24 / 44 Version 2.1.5.62 / 15.th November 2005
Export Manager (Pro) The Export Manager allows you to copy and hand over IDEA! databases and their attachments fast and easy. Typical tasks and situations where you use the export manager are: 1) Fast retrieval or gathering of information for a business trip or a meeting. 2) Archive complete projects or only a part of a project (for example on a CD ROM) 3) Hand over knowledge to someone in a very structured way 4) Prepare and generate data for (file) replication. The functions of the export manager are applied to all data records or only to a part of it where their number is reduced by filters. You define in the main IDEA! screen which data will be taken into account. All filters with which you reduce the number of records in the records window are also active for the export manager. In the first row of the export manager you see 4 basic export modes. When you call the export manager, the mode “Copy attachments only” is set. Below these 4 modes lies the field “Target folder”. This field is relevant for all 4 modes. You enter here to which folder the attachments and the database will be copied. You must enter a path in this field. The availability of options shown below the path depends on the chosen export mode.
The way you use the manager is basically always the same and contains the following steps: 1. In the main IDEA! screen, you determine which data records you want to archive or to work with. 2. You select these data records in the main screen of IDEA!. 3. You call the export manager, enter the target folder and choose one of the 4 modes. In some
cases you enter additional settings from the available options to fine tune your selection. 4. You start the export. In the first mode “Copy attachments only“, the selection is only related to the visible records in the record window. Within the other 3 export modes, the selection of the data to be exported is done by marking a branch in the category tree. The export refers then as well to the tree structure as to the linked records in this branch and their attachments. The selection via the tree can be more flexibly differentiated by showing or hiding parts of the selected branch. Only the visible categories and their attachments are taken into account for the export. The exception is if you export from the root. In this case, the whole tree and all database records, starting from the root, will be exported (even those ones which are not linked in the whole category tree).

SYCON®
© 1999 - 2003 Sycon Beratungs GmbH, Schwalmtal, Germany Page 25 / 44 Version 2.1.5.62 / 15.th November 2005
Export mode 1: “Copy attachments only“ If his mode is active, all attachments of all the records which are visible in the record window will be copied into the target folder. Example: Let’s assume you have 5 important records, each one with 6 attachments. The 30 attachments (files) are located in various directories on different network drives. Now you want to quickly copy these important files for a business trip onto your laptop. You would then mark these 5 records with CTRL and the left mouse button in the record window of IDEA! and press the filter “marked records only”
The result will look similar to what is shown below (5 records).
Now you open the export manager. All further actions described below refer to the attachments of these 5 selected records. Then you choose a target folder on your computer or laptop.
The target folder need not necessarily already exist. If you want to copy the data into a new folder, just enter the name in the field for the “target folder”. The new path will automatically be created when you start the export. Then press the start button. The 30 files will be copied into the target folder. Now when you are away from home, you can easily access these files via the alternate path (without changing anything in the database). The indicator in the attachment window shows then yellow for these files. Now we look at the available options with their settings:
Option 1) Include also attachments from a) alternate path b) mapper If you check the box “alternate path“, then you will not copy only those attachments which were available under their original path (green indicator) but also those ones which were available via the alternate path (yellow indicator). In the example above, it was assumed that all 30 files were available under their original path (so their indicator was green). Let’s say, this is only the case for 25 files and 5 are not available under their original path but under some alternate path (yellow indicator). In this case, the checked option “alternate path” would copy also those 5 files into the target folder. Other wise these 5 files (with the yellow indicator) would not be copied. The same is valid for attachments that are only available via mapped paths. This means, you can check the box for the alternate path as well as for the mapper. By checking both boxes, both options are active at the same time.
SYCON®
© 1999 - 2003 Sycon Beratungs GmbH, Schwalmtal, Germany Page 26 / 44 Version 2.1.5.62 / 15.th November 2005
Option 2) Keep subfolder structure using a) regular names or b) UNC names This option influences the output and determines whether or not the original folder structure is created in the target folder. Normally all files will be copied “flat” into the target folder. This means that the folder structure of the attachments is not maintained. If you check one of the options (it is an either or option) then the folder structure, where the individual attachments are copied from, will be maintained in the target folder; or to be more precise: they will be created under the target folder. a) With regular names means that the drive letter and its sub folders are created. b) UNC names means that not the drive letter but the server name and the local drive letters on the server will be used and written (e.g. Server01\D\ instead of Z:\). The subfolder structure will be the same in both cases and won’t differ.
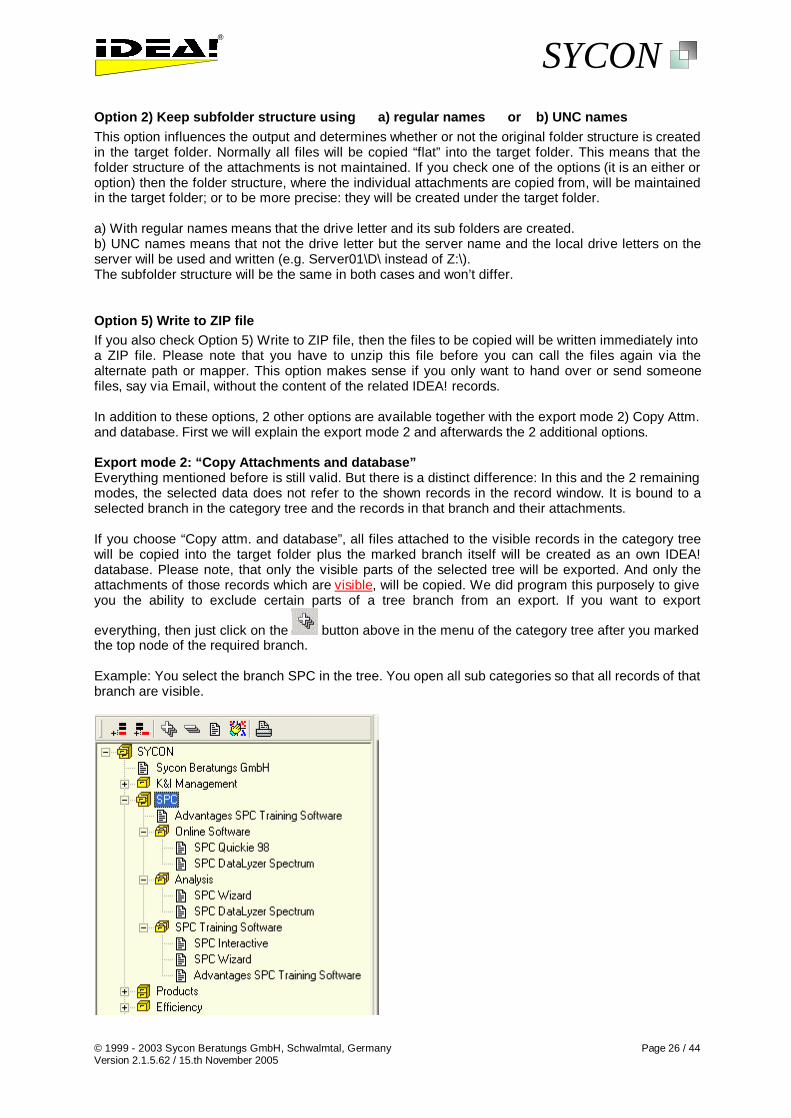
Option 5) Write to ZIP file If you also check Option 5) Write to ZIP file, then the files to be copied will be written immediately into a ZIP file. Please note that you have to unzip this file before you can call the files again via the alternate path or mapper. This option makes sense if you only want to hand over or send someone files, say via Email, without the content of the related IDEA! records. In addition to these options, 2 other options are available together with the export mode 2) Copy Attm. and database. First we will explain the export mode 2 and afterwards the 2 additional options. Export mode 2: “Copy Attachments and database” Everything mentioned before is still valid. But there is a distinct difference: In this and the 2 remaining modes, the selected data does not refer to the shown records in the record window. It is bound to a selected branch in the category tree and the records in that branch and their attachments. If you choose “Copy attm. and database”, all files attached to the visible records in the category tree will be copied into the target folder plus the marked branch itself will be created as an own IDEA! database. Please note, that only the visible parts of the selected tree will be exported. And only the attachments of those records which are visible, will be copied. We did program this purposely to give you the ability to exclude certain parts of a tree branch from an export. If you want to export
everything, then just click on the button above in the menu of the category tree after you marked the top node of the required branch. Example: You select the branch SPC in the tree. You open all sub categories so that all records of that branch are visible.

SYCON®
© 1999 - 2003 Sycon Beratungs GmbH, Schwalmtal, Germany Page 27 / 44 Version 2.1.5.62 / 15.th November 2005
From this branch, in our example SPC, a new IDEA! database will be created which does not contain the rest of the original tree anymore. All records of this branch will be exported and the attachments of these records will be copied into the target folder according the set options 1.) and 2.).
Option 3) Include IDEA!-Database from a) marked node or root node This lets you define, for the just discussed export mode: “Copy attm. and database” whether only a marked branch or the entire database, from its root, is exported into a new. The default is set to “marked node” . If you want to export the whole database you must select “from root node“. Note: If you marked a node in the tree but forgot to expand the branch below that node. The consequence is that no record and no subcategories are visible. Accordingly no records have been selected and consequently no attachments will be copied.
Option 4) Include IDEA! program files This option enables you to include the IDEA! program in the export. All necessary program files will then also be copied into the target folder. You could also define a separate folder to which the program will be copied (here D:\Idea2\IDEA Program). This makes sense, when you want to create a completely independent archive of only a part of the database. If you want to create a stand alone archive of the whole database you better select the export mode 3: “Stand alone archive”.
For ease of use you should give the exported IDEA! database the same name as the current IDEA! database file; but you are free to enter a different name for the target database. (here e.g. SPC.idb) Export mode 3: “Stand Alone Archive“ In this mode the whole database will exported automatically and the IDEA! program will be written into the target folder. In this case, the files to be copied will be written to a TEMP subfolder below the entered target folder. After the files have been copied you just have to burn the files in the target directory 1:1 onto a CD ROM. The program will start from the CD ROM, the database is on the CD and you can open all attachments from the CD. This means IDEA! does not have to be installed on a computer to read and use the archive on the CD. Program, database and data are all located on the CD and can be used from there. This means you have a complete and fully functional stand alone archive. In case you have additionally selected the option “keep subfolder structure“, then 2 additional mapper files will be created. These mapper files enable you to maintain and keep the complete folder and subfolder structure for these standalone archives. Export mode 4: „XML Export/Docbook“ The export mode XML Export/Docbook will create, based on the selected tree branch or the whole database, an XML file. This XML file can be used to convert it with Docbook templates into a different file format, e.g. into a HTML or PDF file. This way the whole content of the database can be made available in a standardized way.

SYCON®
© 1999 - 2003 Sycon Beratungs GmbH, Schwalmtal, Germany Page 28 / 44 Version 2.1.5.62 / 15.th November 2005
Docbook is a worldwide XML based standard for the exchange of structured documents. If you are not familiar with Docbook, please ask your web master for further information or go to www.DocBook.org to get detailed information. Summary: 1) In the mode “Copy attachments only“, you copy all attachments from the marked records into the target folder. You can also decide whether or not to copy only files from the original path or also include those available via the alternate path or mapper. 2) In the mode “Copy attm. and database”, an IDEA! database is created in the target folder beside the copied attachments. The selection of the data is now bound to the category tree and not to the record window. You can export the whole category tree or only a part of it. This enables you to fine tune the export. Only visible parts from the selected branch will be exported. 3) Stand Alone Archive: Here you copy all files with one keystroke into the target folder to create a “stand alone archive” to, for example, a CD ROM. Program, database and files will all be on the CD. You only have to burn the archive on the CD. Automatically created mapper files make it easy to read archives using the folder structure created on the CD. 4) The XML/Docbook export has been integrated to create a XML file from the whole database or a part of it, according to the Docbook standard. These files can be used to exchange and share the content of an IDEA! database with others by generating, for example, an HTML or PDF file according to the docbook standard.
E-Mail Import (Pro) With the E-mail import you can transfer the complete content of a mail, or only a part of it, directly into IDEA!; including any attached files. The function makes it easy for you to extract relevant information and files from your mail in a comfortable way and assign them according to their content in IDEA!.
When you call this function, IDEA! will read all E-Mail from your import folder (currently supported email systems include Lotus Notes and MS Outlook) and offers you your mails for further processing in IDEA!. A similar screen to the one below will appear.

SYCON®
© 1999 - 2003 Sycon Beratungs GmbH, Schwalmtal, Germany Page 29 / 44 Version 2.1.5.62 / 15.th November 2005
The screen is divided in 3 windows and 1 menu bar. In the lower part you see the E-Mails with date, number of attachments, the sender and the title of the E-Mail. Clicking on column headers allows you to sort each column up and down.
In the upper left window you see the text of the mail and in the upper right window the names of the files attached to this mail together with a small checkbox. With the arrow keys you can go through your mails and see the information which belongs to each mail.
We will now explain the upper menu bar with which you can determine which information from an email will be transferred into the IDEA! database.
Mail import: Upper menu bar
If you click on “New”, a new record will be generated out of the current e-mail. Doing this, the - title of the e-mail will be the title of the new record - e-mail text will be the text in the text window - the marked attachments will automatically be attached to this record Click on the red IMP arrow, after you finished your selection.
Because IDEA! can’t know, where you want to store your attachments, you must enter a target folder. This is done via the path/folder picker. Folders which have recently been used are shown in drop down list to let you sort the files quickly into already used folders.
Is is not always necessary to create a new record out of an e-mail (you shouldn’t use IDEA! as a second e-mail system). Often, it is sufficient, to add substantial information from the e-mail or 1 or more attached files to an existing IDEA! record. You have 2 options: 1. When the field „Attm. only“ is checked, no information from the text field of the e-mail will be
imported. Only the marked attachments will be attached to the currently highlighted record. The attachment will be stored in the folder that you have chosen. The e-mail import window is positioned partly over the IDEA! main window. This allows you to choose the relevant record in the tree and then assign the information and/or the files automatically. Optionally you can edit the file names (in the upper right window) by pressing F2 before you detach them (please confirm each change with ENTER after editing the file name).
2. If you only want to import the e-mail text, then just don’t mark any attached files (also no hook at “Attm. only”). Pressing IMP will then transfer the text from the e-mail into the text field of the chosen record. The text will be added at the end of the text field, together with its meta-data. This means: who had sent the e-mail, to whom, when (date & time) and the title.
Often not all information in an e-mail is relevant information. Mail headers and address blocks are no more interesting when you receive them x times. For this reason it is possible to mark only a part of the text from an e-mail. In this case only the marked part of the text will be imported. Combinations of partly marked text and attachments are also possible. This way, you can easily extract relevant information out of your email and transfer it to IDEA!. The transferred data will directly be stored into IDEA! where they are available, independently from your e-mail system.
Please note that the biggest challenge working this way is not the “technical import” but the necessity to split relevant from non relevant information and store only the substantial part. You will notice how quickly your mail folder will get empty (we have made it a habit to delete the e-mails which we have worked on from our e-mail system).
Nevertheless, because you transfer information from your e-mails into IDEA!, the current organisation structure within your e-mail system (mail folders) must not be unnecessary. We recommend that you continue storing e-mails with a short or medium “half-life” (e.g. with political information for a project etc.) in your e-mail folders and create links to these e-mail folders (in Notes ViewLink). These links can be integrated into IDEA! as attachments – positioned at the related topic. It makes sense, for speed - and availability reasons, to place the link on the local replica of the mail database (the server might not always available).

SYCON®
© 1999 - 2003 Sycon Beratungs GmbH, Schwalmtal, Germany Page 30 / 44 Version 2.1.5.62 / 15.th November 2005
The above mentioned functions are available for the incoming mail folder, the draft folder and the send folder of the e-mail system.
E-Mail Export (Pro) The E-Mail export function allows you to send information and files directly from IDEA! very comfortably via you e-mail system. You can gather data very flexibly within your Idea database, edit them and conveniently send them directly from IDEA!. If you click on the Mail-Export button, Idea! reads the local address book from your e-mail system and offers you the information and attached files from the currently marked record for an e-mail. The screen below will appear.
In the upper part you’ll find the usual functions to enter e-mail addresses for recipients. In the middle part, information from the IDEA! record will be entered. You can change and edit this text any time. In the lower part of the window you see the attachments of your record. The attachments where you set a hook in the checkbox will automatically be attached to your e-mail and sent with it. This saves you a lot of time because you do not have to search and find theses files by clicking through your windows file explorer. The e-mail is automatically handed over to you e-mail system. If your mail system is Lotus Notes, you have an additional option to decide whether you want to retain a copy of your e-mail in the mail system or not (check the box “Save” in the upper menu bar for this).
In addition to the file names, we show the note and the path for each attached file. Path and note will not be transferred to the mail when the e-mail is send but a list of all attached files will be added at the end of the e-mail.
This function is not limited to working only with the content of one record. You can select more than 1 record at the same time or one after the other and fill you e-mail. Often you will only need a few more files from other records.
Therefore we have added a function in the right hand mouse menu of the attachment-window where you can append a selected attachment to the current mail. It will then appear in the attachment list of the mail export window. This way you can easily select dedicated files and send them to the mail export window.
SYCON®
© 1999 - 2003 Sycon Beratungs GmbH, Schwalmtal, Germany Page 31 / 44 Version 2.1.5.62 / 15.th November 2005
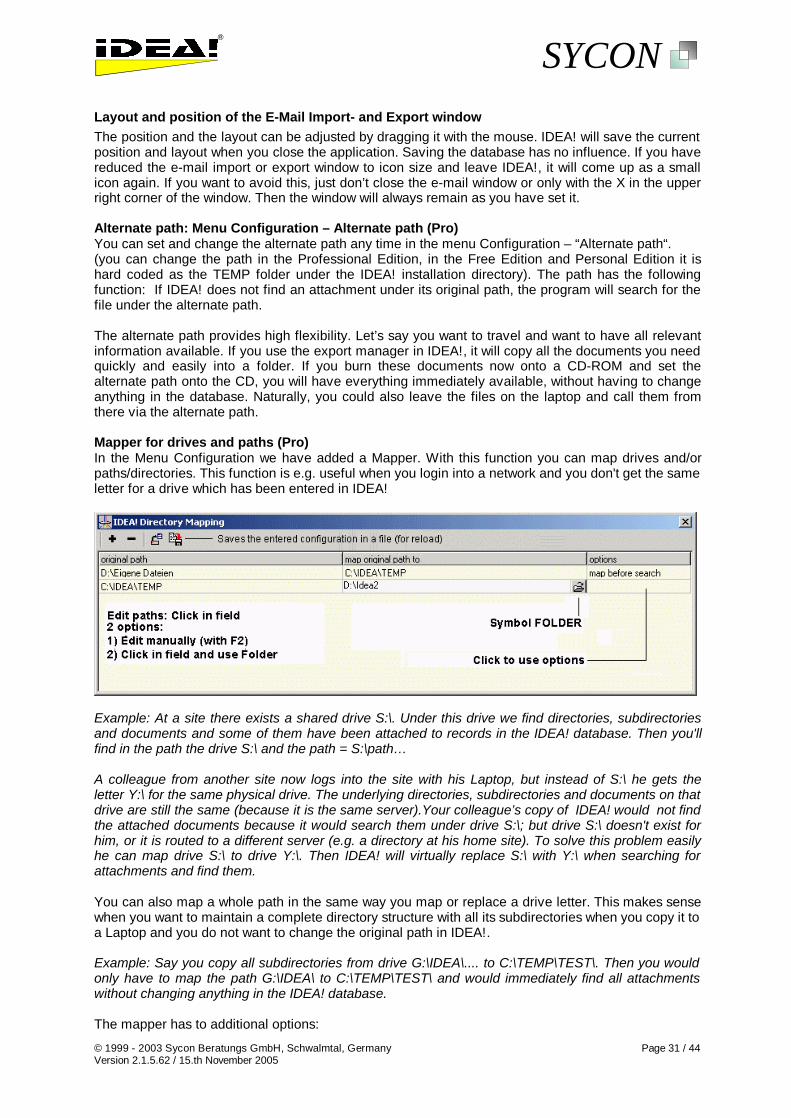
Layout and position of the E-Mail Import- and Export window The position and the layout can be adjusted by dragging it with the mouse. IDEA! will save the current position and layout when you close the application. Saving the database has no influence. If you have reduced the e-mail import or export window to icon size and leave IDEA!, it will come up as a small icon again. If you want to avoid this, just don’t close the e-mail window or only with the X in the upper right corner of the window. Then the window will always remain as you have set it. Alternate path: Menu Configuration – Alternate path (Pro) You can set and change the alternate path any time in the menu Configuration – “Alternate path“. (you can change the path in the Professional Edition, in the Free Edition and Personal Edition it is hard coded as the TEMP folder under the IDEA! installation directory). The path has the following function: If IDEA! does not find an attachment under its original path, the program will search for the file under the alternate path. The alternate path provides high flexibility. Let’s say you want to travel and want to have all relevant information available. If you use the export manager in IDEA!, it will copy all the documents you need quickly and easily into a folder. If you burn these documents now onto a CD-ROM and set the alternate path onto the CD, you will have everything immediately available, without having to change anything in the database. Naturally, you could also leave the files on the laptop and call them from there via the alternate path. Mapper for drives and paths (Pro) In the Menu Configuration we have added a Mapper. With this function you can map drives and/or paths/directories. This function is e.g. useful when you login into a network and you don't get the same letter for a drive which has been entered in IDEA!
Example: At a site there exists a shared drive S:\. Under this drive we find directories, subdirectories and documents and some of them have been attached to records in the IDEA! database. Then you'll find in the path the drive S:\ and the path = S:\path… A colleague from another site now logs into the site with his Laptop, but instead of S:\ he gets the letter Y:\ for the same physical drive. The underlying directories, subdirectories and documents on that drive are still the same (because it is the same server).Your colleague’s copy of IDEA! would not find the attached documents because it would search them under drive S:\; but drive S:\ doesn't exist for him, or it is routed to a different server (e.g. a directory at his home site). To solve this problem easily he can map drive S:\ to drive Y:\. Then IDEA! will virtually replace S:\ with Y:\ when searching for attachments and find them. You can also map a whole path in the same way you map or replace a drive letter. This makes sense when you want to maintain a complete directory structure with all its subdirectories when you copy it to a Laptop and you do not want to change the original path in IDEA!. Example: Say you copy all subdirectories from drive G:\IDEA\.... to C:\TEMP\TEST\. Then you would only have to map the path G:\IDEA\ to C:\TEMP\TEST\ and would immediately find all attachments without changing anything in the IDEA! database. The mapper has to additional options:

SYCON®
© 1999 - 2003 Sycon Beratungs GmbH, Schwalmtal, Germany Page 32 / 44 Version 2.1.5.62 / 15.th November 2005
1. Map before Search: Normally IDEA! searches under the original path before it uses a mapped path. In case you use the option "Map before Search", then the program will not search under the original path first but directly replace it with the mapped one. This avoids searching a far away “home” drive (S:\). 2. Truncate Sub Directory: When this option is checked, all subdirectories are not taken into account for the mapping. Only the single directory with its path is mapped to a different path. Password protection (Pro), Menu File - Protect You have the option to protect your database using a password and additionally via your license key. Normally the database is saved without password and license protection. When calling the menu File – Protect, the following screen appears.
The different protection levels have the following meaning: Not protected: The database opens without asking for a password when you start it. Password protected: The database has a password. When you open the database, you will be asked to enter the password. The one who knows the password, can open the database. Password and ID protected: The database has a password and is additionally protected by the license key. Only when the password is correct and the license key is the same as when the database was saved will the database will open. Reports (P) You can call 4 standard reports. 2 of these reports are the previously described “Tree Report” and the “Grid Report”. 2 other reports are the “Record report” and the “Attachment Report”. A report generator is available as an option, so that you can call and define your own reports. You can find an example of the 4 standard reports in the 2 example databases (idea_2.idb and sycon_products.idb) as attachments under the category “Examples of standard reports”
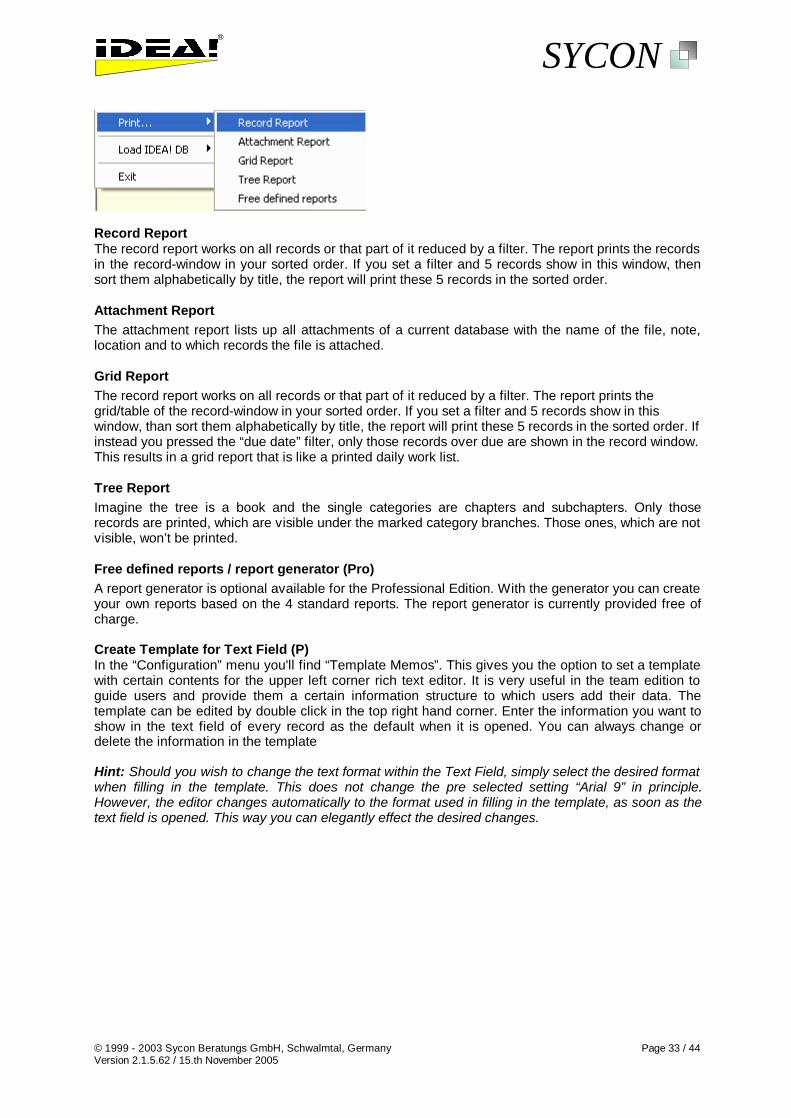
SYCON®
© 1999 - 2003 Sycon Beratungs GmbH, Schwalmtal, Germany Page 33 / 44 Version 2.1.5.62 / 15.th November 2005
Record Report The record report works on all records or that part of it reduced by a filter. The report prints the records in the record-window in your sorted order. If you set a filter and 5 records show in this window, then sort them alphabetically by title, the report will print these 5 records in the sorted order.
Attachment Report The attachment report lists up all attachments of a current database with the name of the file, note, location and to which records the file is attached.
Grid Report The record report works on all records or that part of it reduced by a filter. The report prints the grid/table of the record-window in your sorted order. If you set a filter and 5 records show in this window, than sort them alphabetically by title, the report will print these 5 records in the sorted order. If instead you pressed the “due date” filter, only those records over due are shown in the record window. This results in a grid report that is like a printed daily work list.
Tree Report Imagine the tree is a book and the single categories are chapters and subchapters. Only those records are printed, which are visible under the marked category branches. Those ones, which are not visible, won’t be printed.
Free defined reports / report generator (Pro) A report generator is optional available for the Professional Edition. With the generator you can create your own reports based on the 4 standard reports. The report generator is currently provided free of charge. Create Template for Text Field (P) In the “Configuration” menu you'll find “Template Memos”. This gives you the option to set a template with certain contents for the upper left corner rich text editor. It is very useful in the team edition to guide users and provide them a certain information structure to which users add their data. The template can be edited by double click in the top right hand corner. Enter the information you want to show in the text field of every record as the default when it is opened. You can always change or delete the information in the template Hint: Should you wish to change the text format within the Text Field, simply select the desired format when filling in the template. This does not change the pre selected setting “Arial 9” in principle. However, the editor changes automatically to the format used in filling in the template, as soon as the text field is opened. This way you can elegantly effect the desired changes.

SYCON®
© 1999 - 2003 Sycon Beratungs GmbH, Schwalmtal, Germany Page 34 / 44 Version 2.1.5.62 / 15.th November 2005
Create Index Under the menu „Extras“ you will find the option “Create index”. This will create a new index for the database. Use this function when you think the index got corrupted or gives an error message. In case an error messages appeared, please close and start IDEA! before rebuilding the index.

SYCON®
© 1999 - 2003 Sycon Beratungs GmbH, Schwalmtal, Germany Page 35 / 44 Version 2.1.5.62 / 15.th November 2005
Special Attachments In the IDEA! attachment window, apart from adding “normal attachments” like files and web sites, you can also create special links. These are: 1. Lotus Notes Links (F) You can include documents and views from Lotus Notes as attachments into IDEA! and access them straight from IDEA! just as you would open any file or web site. If you are in Lotus Notes and have opened a document or view, the first step is to click on Edit – Copy as Link – Document Link or View Link. A document link is a link directly to the specific Notes document. A view link will open the current Notes view.
The link is now in the Windows clip board, so go back to IDEA! and position your mouse cursor anywhere in the attachment window. Click your right mouse button and choose “Paste” in the menu.
On completion of pasting you’ll see a data string in the filename window while in the comments field you’ll find information (as far as is available) on the origin of the document (Mail, Title or similar). In the Path/Folder field you’ll see the name of the Notes server which holds the document. ( Note: This can either be a Notes server or a local Notes database) If you set links to views of mail folders or links to mails (so that the actual content has not been imported to IDEA!), consider the following: 1. Links to local databases are always faster (no LAN and no additional load for the server) 2. If you’re using a laptop and you have a link to a server document then you can only access it from IDEA! (and obviously from Notes as well) while you are connected to the server. If you set links to local mail folders or local Notes databases, the information is always available. Please be aware that, according to your Notes configuration, you may have to change your working environment in order to work offline with Notes by changing from “office” to “island”. The attached links looks similar to shown below:
The information shown in the file name window or in the path/folder field must not be changed, if you do, Notes will not be able to find the document. In the comment field however, you can edit the information shown, originally provided from the Notes environment, to your liking. You may find your own descriptions more useful to precisely describe the link. Links are not limited to mail documents but function generally with all Notes databases and views unless restricted by special programming.

SYCON®
© 1999 - 2003 Sycon Beratungs GmbH, Schwalmtal, Germany Page 36 / 44 Version 2.1.5.62 / 15.th November 2005
2. MS Outlook Integration (Pro) IDEA! offers you the option to integrate information and elements from MS Outlook in an easy way into your database. The functions described below are completely available for MS Outlook 2000/XP/2003. Multiple selection is not supported for Drag and Drop with MS Outlook 2002 for some functions. The key functions are also available for Outlook 98 (e.g. linking of emails; email import, but no multiple selection or Drag and Drop into the record window as well as conversion into .msg or .vcf files). A) Information from Outlook that can be integrated into IDEA! There are 3 basic ways how you can intergrate information from MS Outlook in IDEA!. 1) Attach as link: An MS Outlook element will be attached as a link. A double click on the attachment
will open the element in MS Outlook. The source of the information is still MS Outlook.
2) Attach as file: Here the element, e.g. an email or a contact will be attached as a message file (.msg) or a Vcard file (.vcf) in IDEA!. The email or the contact are then stored as separate files on the hard disk and are independent from the Outlook .pst database file).
3) Import information: With this method you import text information and attached files from an email into Idea!. The text information is then part of the IDEA! database. The files are detached from an email, stored as files on the hard disk and are attachments in IDEA!.
You can link the following information and objects from MS Outlook to IDEA! as an attachment. 1) Emails You can drag emails from all folders into IDEA!. If you move an email later in Outlook, IDEA! will still find it. You do not have to change the path in IDEA!. (Limitation: If emails are moved into the archive folder, a link will not work anymore – but we will have an easy and very practical solution for this problem in the next release). 2) Folders or sub folders You can drag any folder or sub folder into the attachment field. Double click or Enter on the link will immediately take you to the folder in Outlook (e.g. inbox, outbox, calendar, contacts, tasks, self defined folders, notes, etc.) 3) Single objects / items It is also possible to link single contacts, tasks, calendar entries, journal items, distribution lists and notes into IDEA!. Contacts can also be attached as VCARD (files ending .vcf) ( keep CTRL key pressed during Drag & Drop).
2.1 How do I connect elements from MS Outlook in IDEA!? For all options described below you can easily integrate the Outlook elements by Drag & Drop into IDEA! and also launch them from there. First it is important to differentiate between simple Drag & Drop and Drag & Drop using the CTRL key I) into the attachment window (upper right window)
II) into the records window (lower right window)
Ia) Drag & Drop into the attachment window creates links to the selected Outlook elements for a) Emails (from any Outlook folder) b) Tasks c) Contacts (from view „telephone list“) d) Folder / subfolder Multi selection from Emails, tasks or contacts is supported for the Outlook versions 2000/XP and 2003. Note: Outlook 2002 might not support the multiple selection via drag and drop. The result looks similar as shown in the picture below. Attachment No 1097 originates from an Outlook
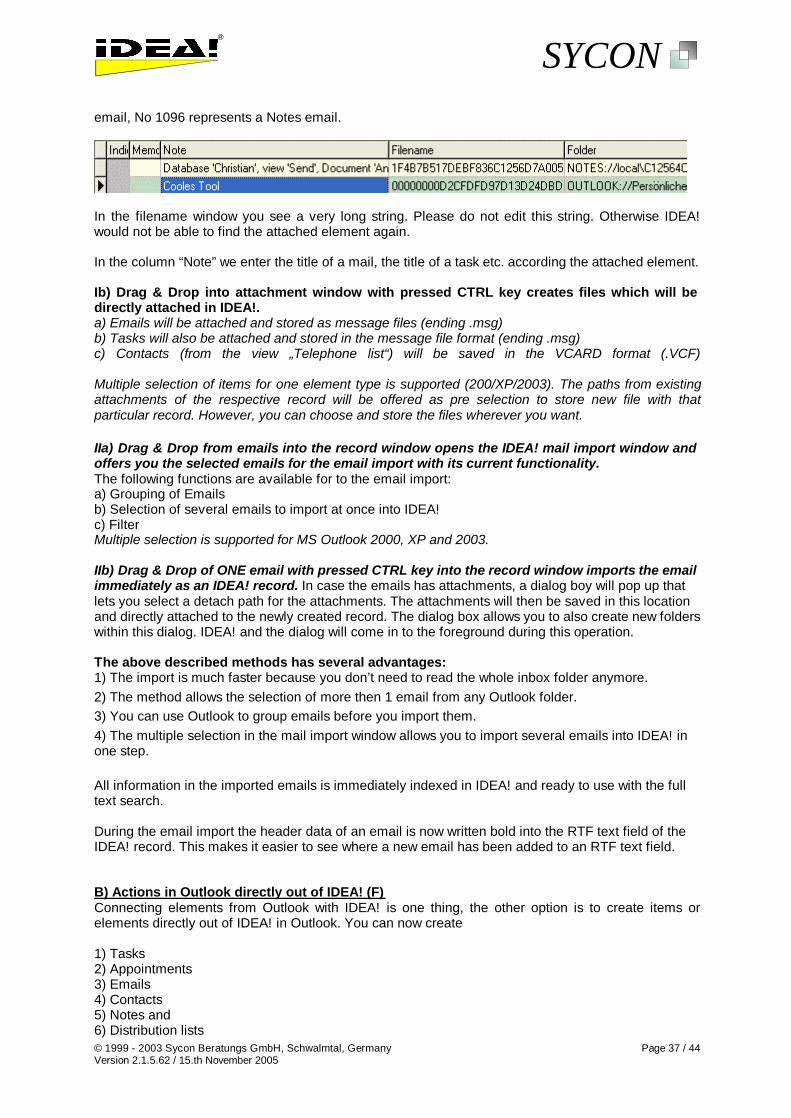
SYCON®
© 1999 - 2003 Sycon Beratungs GmbH, Schwalmtal, Germany Page 37 / 44 Version 2.1.5.62 / 15.th November 2005
email, No 1096 represents a Notes email.
In the filename window you see a very long string. Please do not edit this string. Otherwise IDEA! would not be able to find the attached element again. In the column “Note” we enter the title of a mail, the title of a task etc. according the attached element. Ib) Drag & Drop into attachment window with pressed CTRL key creates files which will be directly attached in IDEA!. a) Emails will be attached and stored as message files (ending .msg) b) Tasks will also be attached and stored in the message file format (ending .msg) c) Contacts (from the view „Telephone list“) will be saved in the VCARD format (.VCF) Multiple selection of items for one element type is supported (200/XP/2003). The paths from existing attachments of the respective record will be offered as pre selection to store new file with that particular record. However, you can choose and store the files wherever you want. IIa) Drag & Drop from emails into the record window opens the IDEA! mail import window and offers you the selected emails for the email import with its current functionality. The following functions are available for to the email import: a) Grouping of Emails b) Selection of several emails to import at once into IDEA! c) Filter Multiple selection is supported for MS Outlook 2000, XP and 2003. IIb) Drag & Drop of ONE email with pressed CTRL key into the record window imports the email immediately as an IDEA! record. In case the emails has attachments, a dialog boy will pop up that lets you select a detach path for the attachments. The attachments will then be saved in this location and directly attached to the newly created record. The dialog box allows you to also create new folders within this dialog. IDEA! and the dialog will come in to the foreground during this operation. The above described methods has several advantages: 1) The import is much faster because you don’t need to read the whole inbox folder anymore. 2) The method allows the selection of more then 1 email from any Outlook folder. 3) You can use Outlook to group emails before you import them. 4) The multiple selection in the mail import window allows you to import several emails into IDEA! in one step. All information in the imported emails is immediately indexed in IDEA! and ready to use with the full text search. During the email import the header data of an email is now written bold into the RTF text field of the IDEA! record. This makes it easier to see where a new email has been added to an RTF text field. B) Actions in Outlook directly out of IDEA! (F) Connecting elements from Outlook with IDEA! is one thing, the other option is to create items or elements directly out of IDEA! in Outlook. You can now create 1) Tasks 2) Appointments 3) Emails 4) Contacts 5) Notes and 6) Distribution lists

SYCON®
© 1999 - 2003 Sycon Beratungs GmbH, Schwalmtal, Germany Page 38 / 44 Version 2.1.5.62 / 15.th November 2005
directly out of IDEA!. To do so, please attach the file “Outlook.exe” in IDEA!. Press F2 to edit the filename and add one of the following parameters behind it /c ipm.task to create a task /c ipm.mail to create an email /c ipm.appointment to create an appointment /c ipm.activity to create a journal entry /c ipm.contact to create a contact /c ipm.distlist to create a distribution list /c ipm.post to create a new public mail The resulting string to create, e.g. to create a task, will be Outlook.exe /c ipm.task If you group the above described actions as attachments under one record, you will have them always available in the database and you can place a copy of them (as attachment) wherever you think it makes sense. Be careful when changing descriptions in this attachment path. In the comments window you can see the title of the mail. Outlook uses the title as an index to your separate mails. This means, if you edit the comment in IDEA! the fast index to find the mail can no longer be used and the system will search using the long number showing in filename. However Outlook has no supporting index for this long number. This leads to extended search time if the comment is changed. How long it actually takes, depends on the speed of your PC and the number of mails in your mail folders. Just give it a try with the original title and then with an edited title. 3. Directories and Folders (F) Besides Outlook and Notes links, you can attach a whole directory to IDEA!. With a double click on the attachment the directory is opened and will show all folders and files within this directory. To attach a directory, just drag and drop it from the Windows Explorer or from the Windows menu into the attachment window. Start program with additional parameter (F) In general, the attachment window allows you to start a program with an optional parameter. Above, we used this option to start Outlook with different parameters. It works with programs which have the Import data from MS Excel (Pro) IDEA! allows you to import data from Excel worksheets and use it to create records in IDEA! Here is how. First name the column headers in your Excel worksheet as shown below: Memo Topic DueDate NoteDueDate Status
Text field Title Due Date Note Status (define first - before import)Text field Title Due Date Note Status (define first - before import)Text field Title Due Date Note Status (define first - before import) During the import, new records will be created out of the data in a table. 1) The fields in the “Memo” column will be imported into the text field (upper left window).
2) The content of the column “Topic” will be the title of a new record.
3) The content of the column “DueDate” will be the due date of a new record.
4) The content of the column “NoteDueDate” will be the note of a new record.

SYCON®
© 1999 - 2003 Sycon Beratungs GmbH, Schwalmtal, Germany Page 39 / 44 Version 2.1.5.62 / 15.th November 2005
5) The content of the column “Status” will be entered as the status of a new record. Note, that you have to define the statuses that you want to import before via the status definition function in IDEA!.
You do not need to import all columns and the columns can have a different order (e.g. Topic, Memo). When you import the data, it will be processed by the current template of the text field (Memo). After you have named the column headers in your worksheet as described above, you mark the area you want to import. It is important that the first row of the marked area contains the described column headers. Then move the cursor to the UPPER LEFT CORNER of the marked block. The mouse pointer will change from a cross to an arrow. Keep the left mouse key pressed and drag the block into the record area of your IDEA! database. The data will be imported and the new records will be created. Note: You must position the mouse pointer EXACTLY at the upper left corner. The area for the mouse pointer where Drag and Drop is enabled in Excel is small. Backup safety (F) We know how important your data is so IDEA! offers several levels of security and safety. The following files are stored in the same folder. In the event your current file fails for some reason, simply go to a desired backup file and rename the extension to .idb. (Note: The backups are not new. We point them out because we have frequently received questions about the meaning of the files below). .idb this is the current working data file
.ba1 this is the last saved .idb file
.ba2 this is the second-last saved .idb file
.ba3 this is the third-last saved .idb file
.bak this is the last manually backed up .idb file and is independent of the rolling backups (under menu File–BackUp)
.tmp this is the exact duplicate of the current .idb file.
We recommend that you regularly backup the above mentioned files on a separate storage media. Should your hard drive fail or break, the rolling local backups won’t help you. In case your database is damaged for some reason, please do the following: 1) Make a backup of the current data files. 2) Simply rename the *.tmp file in *.idb and restart IDEA!. Should this not work, try another backup files. Please do not delete the backup files. ArchiveSoftware and www.teamstart.com Sycon and Info L inc together announce the first knowledge management software with ready to deploy best practices based taxonomies. With get started help this taxonomy builds an indexed corporate memory organized around business people and their activities, decisions, delegated work, work product, links to the web, links to exe files, in fact links to anywhere their desktop can go. EmbarkArchives, StrategicArchives and iPracticeArchives are now available. All powered by the IDEA! Professional Edition!

SYCON®
© 1999 - 2003 Sycon Beratungs GmbH, Schwalmtal, Germany Page 40 / 44 Version 2.1.5.62 / 15.th November 2005
Information about the IDEA!® Team Edition Introduction The IDEA! Team Edition is part of the IDEA! product family. It is the consequent extension of the IDEA! Personal and Professional Edition. You do not have to know the Personal Edition to be able to work with the team edition but because of the great similarity and the logical extension of the concept from the Personal Edition, we strongly recommend that you have a look at the Personal Edition documentation first. It will then become obvious how to use the team edition. This section assumes that you know the content of the introduction of the IDEA! Personal Edition and builds on it. Purpose of the application With the IDEA! Team Edition groups and organisations are able to document, structure, communicate and share their knowledge in an easy but very efficient way. The application provides a flexible and easy to use platform for structured team work. It is important for the user to understand that their work becomes easier using this application and well worth the time learning how to use it properly. The Layout of the start screen looks like the screen from the Personal Edition except the background colour for records is cream instead of green. Functionality is mainly the same but there are some important “global” differences. What are the differences compared to the single user version? 1. In the lower right record window each record represents now an IDEA! database. A double click
on a record (database) opens the database. After the double click the familiar screen from the “IDEA! Personal Edition” with the green background appears.
2. The start screen of the team edition is therefore a catalogue of databases.
3. All elements of the Personal Edition are available in the catalogue as well as in the opened databases. You can use the IDEA! functions to describe and structure the databases of the catalogue in exactly the same way as you do with the topics and contents in a Personal database.

SYCON®
© 1999 - 2003 Sycon Beratungs GmbH, Schwalmtal, Germany Page 41 / 44 Version 2.1.5.62 / 15.th November 2005
Optically, the difference between the versions is indicated by different colours for the background and the records (crème instead of green). The different colours make it immediately clear that you are in the catalogue. But an additional level has been added. This level allows you to describe and organise a lot of databases. The principle is the one that you may know from the Russian nesting dolls where each puppet contains another doll when you open it (recursive principle).
Beside the summary and organisation of many IDEA! databases in a central catalogue, the IDEA! Team edition offers you further functions and possibilities. 1. The IDEA! databases of the team version can be used from several users at the same time.
2. For each database you can assign rights for each individual user with a login and a password. An administrator can assign these different rights (deny, read, read & write, read & write & structure) per database and user.
3. You can mix the information (records) from the different team databases. This allows you to structure the same information according various and different criteria and views.
4. A structured data exchange between the single user editions and the team edition is very easy and supported in both directions. This enables a wide variety of applications. You can easily make a team database out of a single user database (or a part from it) and the visa versa.
These 4 basic additional functionalities are very strong together. The Team Edition is very powerful yet remains as easy to use as the Personal and Professional Edition. Test versions of the team are available on request. The installation is quite simple. Technical preferences and software modules 3 tier architecture (Team Client, Application Server, Database) The IDEA! Team Edition has a 3 tier structure consisting of the:
• IDEA! Team Client
• IDEA! Application Server
• IDEA! Database On the client PC the IDEA! Team Client is running. The second tier consists of the IDEA! application server and the third tier is the SQL database. The team client communicates with the application server and the application server takes care about all transactions with the database and checks the rights. The communication between the team client and the application server is done via DCOM (Distributed COM). This means that no additional database drivers have to be installed on the Client PC. The application server can run on the same server where the database is located or on another computer. For the application server (= one exe file) a computer with a Windows operating system is necessary. Currently, we support the following databases for IDEA!: Interbase SQL Server, Oracle and MS SQL Server. User Manager The Team Edition comes with a user manager which allows you to create roles/groups and assign rights to these roles/groups. Every user can be in several roles/groups and for each database you can assign different groups with defined rights. This way you can administer access to each database precisely with a good overview.

SYCON®
© 1999 - 2003 Sycon Beratungs GmbH, Schwalmtal, Germany Page 42 / 44 Version 2.1.5.62 / 15.th November 2005
A matrix shows you which user has which rights on which database. See below. The white colour indicates that no rights have been assigned for a user for a particular database (whereas red indicates that the access to a particular database has been purposely denied). As long as a field is white, a user does not have any rights on a database (so it is equal to red).
Service module and backup routine Beside the user manager a service module ships with the application which has been developed for maintenance and repair (if necessary) issues of IDEA! databases. Also a backup routine is part of the team edition which backups the whole IDEA! database every day and creates at the same time a personal database from each team database. The backup of the whole database and the personal backups of the team databases are automatically stored in a zip file named with the current date. We wish you a lot of productivity with IDEA! We are thankful for any suggestions and comments to improve IDEA! and the quality of this paper. Your opinion counts. If you have any questions, comments or if you want to purchase the licensed version, please contact us: Sycon Beratungsgesellschaft mbH, Beethovenstr. 18 41366 Schwalmtal Germany Phone. +49-(0)2163-948930 Fax. +49-(0)2163-948931 Email: [email protected] Internet: http://www.sycon.de/

SYCON®
© 1999 - 2003 Sycon Beratungs GmbH, Schwalmtal, Germany Page 43 / 44 Version 2.1.5.62 / 15.th November 2005
Overview over all functions and IDEA®! Editions Function Free
Edition Personal Edition
Professional Edition
Team Edition
Gather files to attach (basket) ● ● ● ●
AND Filter ● ● ● ●
OR FILTER ● ● ● ●
Filter: Show unlinked records only ● ● ● ●
Set Due date ● ● ● ●
Records (sort) ● ● ● ●
Note for record ● ● ● ●
Delete and empty records ● ● ● ●
Sort attachments ● ● ● ●
Indicator for attachments ● ● ● ●
Memo field for attachments ● ● ● ●
Copy, insert, and delete attachments ● ● ● ●
Fixed alternate path ● ● ● ●
Switch between available languages ● ● ● ●
OLE functionality RTF field ● ● ● ●
Attm.: Start programs with parameter ● ● ● ●
Create emails, tasks, contacts, , distribution list in Outlook out of Idea!.
● ● ● ●
Lotus Notes links as attachments (documents and views)
● ● ● ●
Print text and memo fields ● ● ●
Copy, cut and past tree branches ● ● ●
Internal links (record under each other) ● ● ●
Sort tree records in alphabetical order ● ● ●
Status definition and status filter ● ● ●
Filter: Invert ● ● ●
Filter: show only marked records ● ● ●
Multi level filter (cascade) ● ● ●
Print & export defined reports ● ● ●
Create template for text field ● ● ●
Export of IDEA! databases ● ● ●
Search attachments ● ● ●
Automatic filter in tree ● ● ●
Full text search (in IDEA!) ● ●
Extended full text search (Index service OS). Search content of files.
● ●
Import of IDEA! databases ● ●
Password and ID protection ● ●
Flexible alternate path ● ●
Mapper ● ●
Report generator to define own reports ● ●
Export Manager (e.g. stand alone archives)
● ●
Filter: Due date ● ●
Mail Import (Outlook or Lotus Notes) ● ●
Mail Export (Outlook or Lotus Notes) ● ●
Data import from MS Excel ● ●

SYCON®
© 1999 - 2003 Sycon Beratungs GmbH, Schwalmtal, Germany Page 44 / 44 Version 2.1.5.62 / 15.th November 2005
Function Free Edition
Personal Edition
Professional Edition
Team Edition
Outlook Integration: ● ●
Link Outlook folders ● ●
Link Outlook emails ● ●
Link Outlook contacts ● ●
Link Outlook appointments ● ●
Link Outlook tasks ● ●
Link Outlook Notes ● ●
Multi user / network ●
User & rights management ●
Catalogue of databases ●
Multi-databases: Load and work simultaneously in several databases and use the same records cross databases!
●
Import from Personal & Professional ●
Export to Personal & Professional ●
Backend: SQL database ●
Offline Client Work offline and replicate your data back to the central database.
●