Embed Size (px)
Citation preview

www.datacondental.com
Datacon Software Documentation: update title in file>prepare>properties 1
Perio Charting
Introduction Datacon’s Periodontal Charting is a great way to present periodontal treatment plans to your patients, as well as an excellent teaching tool. Offices with workstations in the operatories are able to display the patient’s mouth image. By looking at the screen, patients are able to see the potential for bone loss from not flossing. The tooth chart is graphically accurate down to the millimeter.
Getting Started: • Click on Today’s Patients to get to Today’s Patients • Click the patient you are working with • Click Clinical Exam • Click down arrow for Perio Exam selection Or • Click Patients & Accounts from the Main Menu • Type the patient’s last name, first name, press ENTER • Move the Tab at top to Patient and click on the patient • Click Patient chart>Clinical records • Answer “Y” to “A tooth chart is not on file for this patient. Do you want to add one?” • Click the Add Button and answer “Y” to “Is this a perio exam?” • If a Tooth Chart already exists and you are adding a new perio exam, Click the Add button, the system will default to today’s date. Click the down arrow and select Perio Examination.

www.datacondental.com
Datacon Software Documentation: update title in file>prepare>properties 2
User’s Charting Script – Perio Charting Setup Each user on the system can define the order in which they enter their perio exam information. The charting script allows you to input the tooth data in the same sequence that it is done in the operatory. Without a charting script, all perio tooth fields display “tooth by tooth.” The beauty of entering exactly what you want in this area is that you can simply use your insert key if a tooth recession is present. This saves you from having to enter this information for every tooth if you were charting 1-16 lingual pockets, 1-16 lingual recession. • Click Users from the Main Menu • Click on your name • Click Charting Script
FIGURE 1: USER PERIO CHARTING SCRIPT • Type in your script and click EXIT
www.datacondental.com
Datacon Software Documentation: update title in file>prepare>properties 3
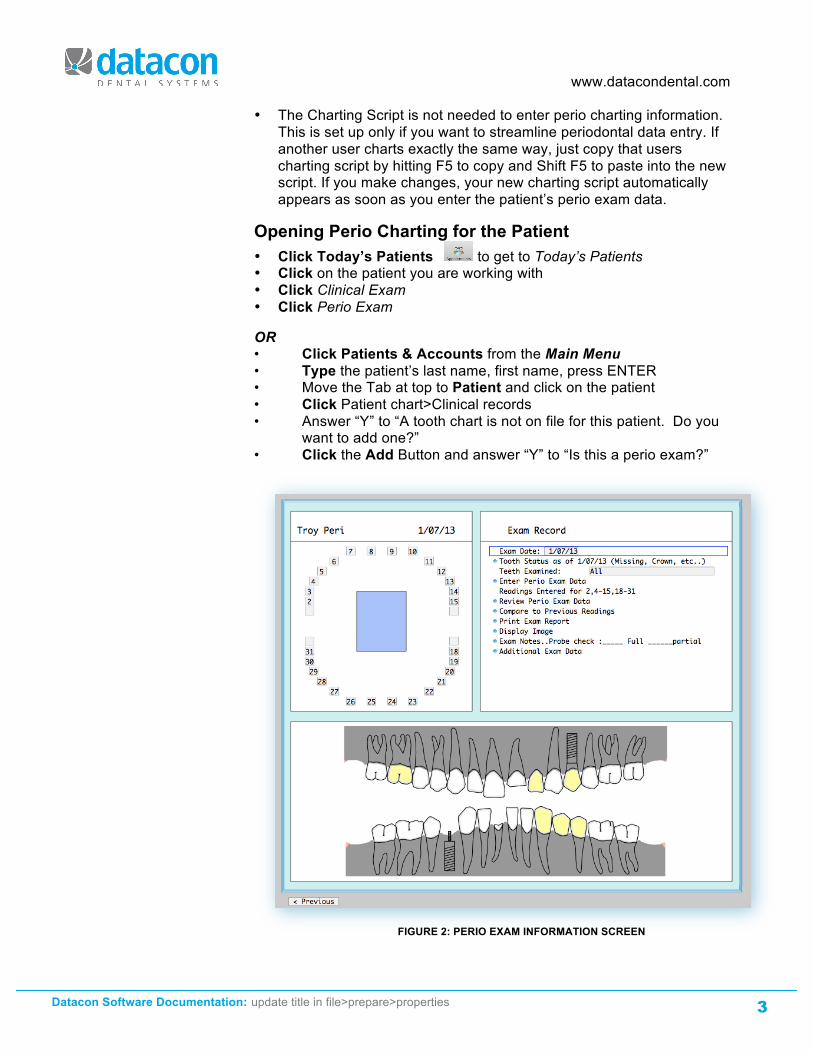
• The Charting Script is not needed to enter perio charting information. This is set up only if you want to streamline periodontal data entry. If another user charts exactly the same way, just copy that users charting script by hitting F5 to copy and Shift F5 to paste into the new script. If you make changes, your new charting script automatically appears as soon as you enter the patient’s perio exam data.
Opening Perio Charting for the Patient • Click Today’s Patients to get to Today’s Patients • Click on the patient you are working with • Click Clinical Exam • Click Perio Exam
OR • Click Patients & Accounts from the Main Menu • Type the patient’s last name, first name, press ENTER • Move the Tab at top to Patient and click on the patient • Click Patient chart>Clinical records • Answer “Y” to “A tooth chart is not on file for this patient. Do you want to add one?” • Click the Add Button and answer “Y” to “Is this a perio exam?”
FIGURE 2: PERIO EXAM INFORMATION SCREEN

www.datacondental.com
Datacon Software Documentation: update title in file>prepare>properties 4
Preparing for Perio Exam You can manually enter this information, or go directly into the charting area and chart existing restorations. If you have done work on the patient, it will automatically be updated. • Click Tooth Status. You will be asked if the patient’s tooth status has
changed since the last exam report date. Answer “Yes” to this question. You have a choice of the following for each tooth: o Normal o Missing o Crown o Pontic o Implant o Implant and Crown o Impacted o Partial Fracture o Full Fracture
When you finish updating the Tooth Status, Escape and Click Enter perio exam data • Teeth Examined default is ALL.
o If only a portion of the mouth is to be examined, you can enter the tooth numbers or mouth quandrant. For example, LR is Lower Right, UL is Upper Left, 1-16 is teeth 1 through 16.
o If you enter this information when you start the perio exam, the system will only allow you to enter perio data for that criteria.
Entering Perio Tooth Data • SELECT Enter perio exam data
o The screen that appears depends if and how you set up your User Charting Script.

www.datacondental.com
Datacon Software Documentation: update title in file>prepare>properties 5
FIGURE 3: EXAMPLE OF NO CHARTING SCRIPT, WHICH ALLOWS YOU TO ENTER ALL CRITERIA FOR THE TEETH • Lingual Pockets: Type the number for each pocket, type a period (.)
or a plus (+) if there is bleeding, and press ENTER o Type 00,01, or 2 through 15 for a total of three readings per
surface. When you press ENTER, the system will go to the next tooth.
o If a tooth starts to bleed after you have moved on, simply click on that tooth, and type . or + to designate bleeding.
• Lingual Recession: Type a number from –6 to 0 to 9, press ENTER • Buccal Pockets: Type the number for each pocket, type a period (.)
or a plus (+) if there is bleeding, and press ENTER • Buccal Recession: Type a number from –6 to 0 to 9, press ENTER • Mobility: Type 1 to 3, type a period (.) after the number to indicate a
plus, and press ENTER • Morphology: Click the down arrow to view options, and press
ENTER o OK is the default. o Minimal gingival attachment. o Inadequate gingical attachment.
• Furcation: Type 1, 2 or 3 and press ENTER, or press ENTER if there is no furcation. o Furcation choices are Class I, II, or III. Furcations can only be
entered on teeth that have multiple roots. Indicate whether the furcation is on the mesial, buccal or distal root.
o Furcations are represented on the tooth chart by triangular symbols that print on the affected root.

www.datacondental.com
Datacon Software Documentation: update title in file>prepare>properties 6
• Comments: These comments are user defined for the practice. Click the down arrow to find the comment you want and press ENTER. o Please see System Settings for Perio Charting section of this
chapter for this setup. • Prognosis: Click the down arrow to find the one you want and press
ENTER o None, Good, Fair,Guarded, Very guarded, Poor, Very poor,
Hopeless • Suppuration: Click the down arrow to choose the option and press
ENTER. o The option is either Present or blank o Supperation is a sign of infection
• Exam notes: This is a free form notes area for typing a narrative regarding this exam. Press ENTER when finished and the exam criteria will be ready for you to fill out on the next tooth.
• EXIT when you are finished with all the teeth and the Exam Screen will display.
Review Perio Exam Data You can review and make changes to the Perio Exam with this option. • Click Review perio exam data • Click on a tooth number to make changes
FIGURE 4: REVIEW PERIO EXAM SCREEN

www.datacondental.com
Datacon Software Documentation: update title in file>prepare>properties 7
Compare to Previous Readings This option compares readings from the current chart to readings from prior visits. A change in the pocket readings (plus or minus) is highlighted. On a patient’s first chart, there will be no previous readings for comparison, and any pocket higher than a two will be highlighted. You can print this screen by clicking the PRINT key. You can also review previous readings by pressing the page up key (or clicking on the “< Previous” tab. The numbers highlighted in red, refer to pockets that have increased from the last time you saw the patient, the numbers in green have decreased
FIGURE 5: COMPARE PREVIOUS EXAM READINGS
Print Exam Report Print the exam report to send to the general dentist or to the periodontist. The report shows the comments, mobility, recession, facial and lingual pockets of each tooth, and a picture of each tooth with its corresponding pocket depths. If the tooth is a crown or implant, impacted or missing, that is indicated as well. • SELECT Print exam report • Answer “Y” to “Would you like to print a periodontal exam?”

www.datacondental.com
Datacon Software Documentation: update title in file>prepare>properties 8
Display Image This is one of the most powerful features of Datacon’s Perio Program. This selection displays a graphic representation of the pocket-charting screen. You can click and draw on the screen with your mouse. When you exit the display, the drawing goes away.
FIGURE 6: DISPLAY IMAGE OF PERIO CHARTING
Exam Notes This is a free-form note area that allows you to type any notes relating to the periodontal exam. You can also customize your system to include these notes when you print the Periodontal Exam. See Miscellaneous Perio Stuff for more details. • Click Exam notes and type away
Additional Exam Data This selection allows you to edit a word processing document assigned specifically to the perio chart. It allows additional exam data specific to your office to be noted, tracked and formatted into a letter or report. For example:
A periodontist can store specific exam findings to create letters to patients and referral sources.
A general dentist can store a checklist to produce educational documents personalized to a patient’s specific dental needs.

www.datacondental.com
Datacon Software Documentation: update title in file>prepare>properties 9
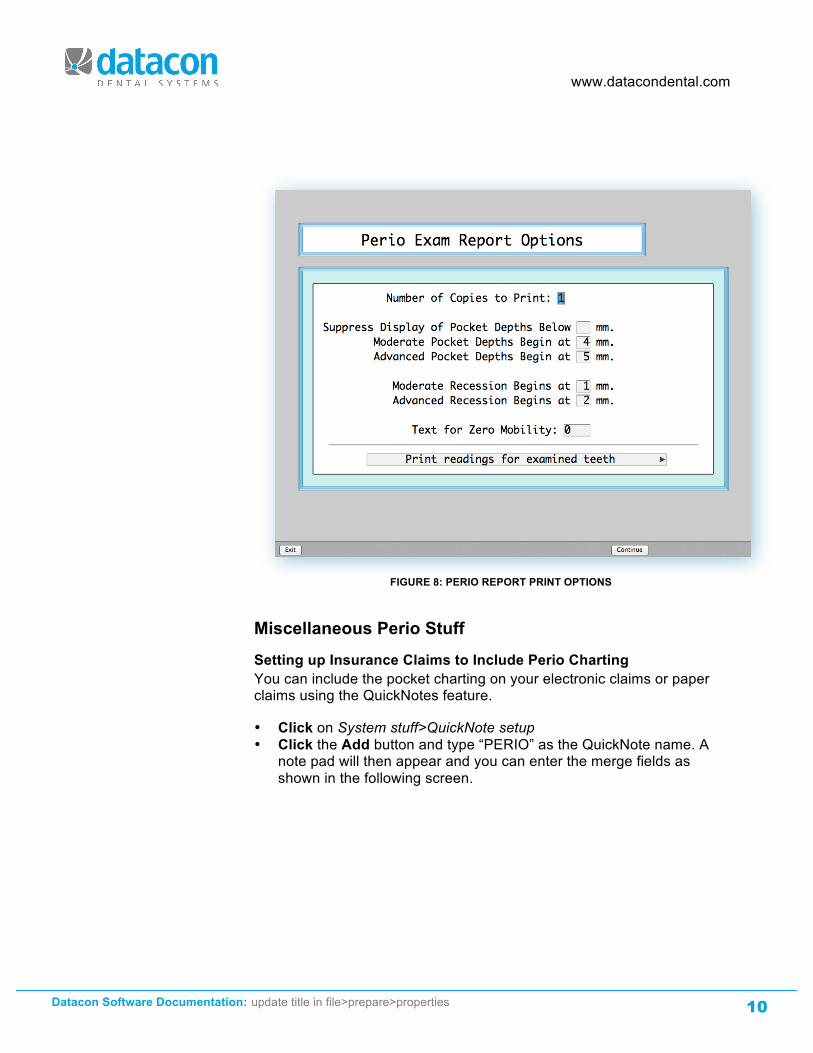
System Settings for Perio Charting There are several setup options for Perio Charting that will make your perio charting life easier. You can define default comments entered for each tooth, your exam data outline, perio pocket depth, and perio report printing options.
Charting Comments Each Perio Exam has a selection named Comments. These comments are user-defined and once they are set up, they are system-wide. There are 15 comments to define. Each tooth can have one comment attached. • From the Main Menu, click System Stuff>Tooth charting options,
Exam data outline>Perio charting comments • Type the code and press RETURN • Type the comment and press RETURN
FIGURE 7: PERIO CHARTING COMMENTS SETUP SCREEN
Hint: Use the Search button to display the name of the item in System Stuff you are looking for.
www.datacondental.com
Datacon Software Documentation: update title in file>prepare>properties 10
FIGURE 8: PERIO REPORT PRINT OPTIONS
Miscellaneous Perio Stuff
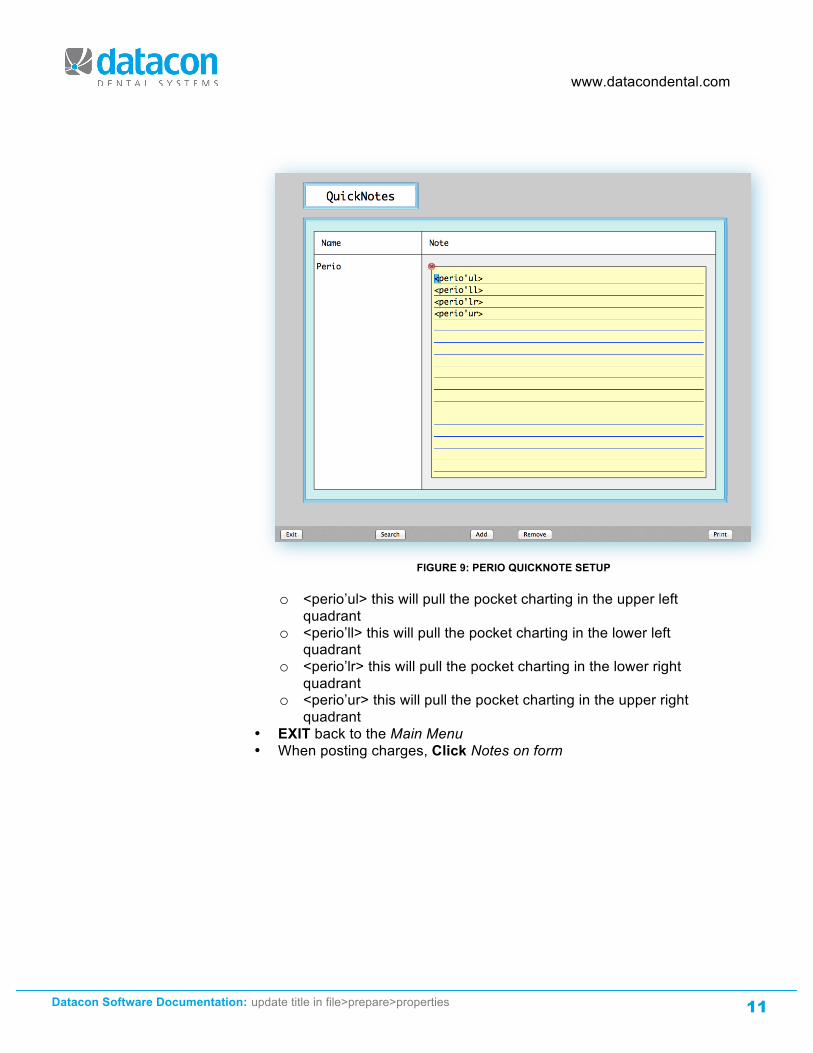
Setting up Insurance Claims to Include Perio Charting You can include the pocket charting on your electronic claims or paper claims using the QuickNotes feature. • Click on System stuff>QuickNote setup • Click the Add button and type “PERIO” as the QuickNote name. A
note pad will then appear and you can enter the merge fields as shown in the following screen.
www.datacondental.com
Datacon Software Documentation: update title in file>prepare>properties 11
FIGURE 9: PERIO QUICKNOTE SETUP
o <perio’ul> this will pull the pocket charting in the upper left quadrant
o <perio’ll> this will pull the pocket charting in the lower left quadrant
o <perio’lr> this will pull the pocket charting in the lower right quadrant
o <perio’ur> this will pull the pocket charting in the upper right quadrant
• EXIT back to the Main Menu • When posting charges, Click Notes on form

www.datacondental.com
Datacon Software Documentation: update title in file>prepare>properties 12
FIGURE 10: PRINTING INSURANCE FORM • SEARCH and type “PERIO” and press ENTER. The note will
populate with your merge fields from above. • Click the Remove button to delete the quadrants you do not want to
include. • ENTER and finish your insurance form.


![1728EX+ : Programming Guide - safe-tech · 02 ... Streamline section Streamline Streamline section Streamline section ... 1728EX+ : Programming Guide Keywords [English] Created Date:](https://img.dokumen.tips/doc/110x75/5b84d6a77f8b9aec488d14a4/1728ex-programming-guide-safe-02-streamline-section-streamline-streamline.jpg)