Embed Size (px)
Citation preview

InterNACHI Student Book “Inspecting Wood Shingle and Shake Roofs” Student Book “Inspecting Wood Shingle and Shake Roofs” Online Video Course www.nachi.org/inspecting-‐wood-‐shingle-‐roof-‐online-‐video-‐course.htm
Page 1 of 22
Welcome to the InterNACHI video course on inspecting wood roofs and tile roofs, I’m your instructor, Kenton Shepard. This course is designed to help you recognize and identify defects and damage, to determine the sources of those problems as often as possible and to make good recommendations. The sections on inspecting for damage from wind and hail were developed with the cooperation of members of the insurance and roofing industries. This course is designed to help qualify you to perform onsite inspection for wind and hail damage for participating members of the insurance industry. We’ll also be taking a look at the standards and best practices related to manufacture and installation. We’ll cover the different types of wood and tile roofing products and their performance characteristics. Along with the roof-covering materials themselves, we’ll cover related components like underlayment, flashing and fasteners. You’ll learn the general, industry-accepted methods for installation, where to look for defects, how to recognize them, how to determine how serious they are, and how to tell when these roofs are at or near the end of their useful lives. Welcome to the video course on inspecting wood roofs. This course is designed to help you recognize and identify defects and damage, to determine the sources of those problems as often as possible and to make appropriate recommendations. The sections on inspecting for damage from wind and hail were developed with the cooperation of members of the insurance and roofing industries. We’ll also be taking a look at the best practices related to manufacture and installation. We’ll cover the different types of wood roofing products and their performance characteristics. Along with wood shakes and shingles, we’ll cover related components like underlayment, flashing and fasteners. We’ll cover the general, industry-accepted methods for installation, where to look for defects, how to recognize them, how to determine how serious they are, and how to tell when these roofs are at or near the end of their useful lives. Although we’ll use common terminology throughout this course, you should keep in mind that different names for the same things are sometimes used in different parts of North America. The exact terms you choose are not as important as making sure that you explain conditions clearly and in a way that they will be understood.
InterNACHI Student Book “Inspecting Wood Shingle and Shake Roofs” Student Book “Inspecting Wood Shingle and Shake Roofs” Online Video Course www.nachi.org/inspecting-‐wood-‐shingle-‐roof-‐online-‐video-‐course.htm
Page 2 of 22
If you are interested in obtaining the InterNACHI Certified Roof Inspector designation, you should have already taken and passed the InterNACHI General Roof Inspection course. That course contains important general information not covered in the courses on the specific roof-covering materials. Let’s get started with wood roofing… Shakes and shingles are available in a various types and grades with categorized levels of resistance to wind, impact and fire. Standards for wood shake and shingle manufacturing and application are provided by a number of standard and code-producing organizations including… ASTM International… which used to be called the American Society for Testing and Materials. The Underwriter’s Laboratories… or “UL” The Cedar Shake and Shingle Bureau… called the “CSSB” The International Residential Code… or IRC” The Uniform Building Code… or UBC The Canadian Standards Association… or “CSA” …and The National Fire Protection Association… “NFPA”
The CSSB is an international trade association whose members are shake and shingle manufacturers. In addition to helping develop manufacturing and application standards, the CSSB is a good source for general information on wood roof-covering products. For application requirements, the CSSB and local Authorities having Jurisdiction… called “AHJs” for short… may have some minor differences. Grading and application standards are similar enough that the material in this course will allow you to recognize conditions considered defects by most jurisdictions.
Grading and application standards are similar enough that the material in this course will allow you to recognize conditions considered defects by most jurisdictions. Before installing shakes or shingles, you should check with the local AHJ and… check the manufacturer’s installation instructions. Although shakes and shingles that undergo and meet the following types of testing and

InterNACHI Student Book “Inspecting Wood Shingle and Shake Roofs” Student Book “Inspecting Wood Shingle and Shake Roofs” Online Video Course www.nachi.org/inspecting-‐wood-‐shingle-‐roof-‐online-‐video-‐course.htm
Page 3 of 22
performance standards are available, you will not be able to confirm visually that the wood roof you are inspecting has qualified for any of these ratings unless documentation is provided. Testing procedures for things like fire and impact are not specific to each roof-covering material. The different types of roof-covering materials all undergo the same tests. In testing for wind resistance, shakes and shingles can be certified by the Underwriter’s Laboratories to resist winds of up to 245MPH for shakes and 173MPH for shingles. Their actual wind resistance will depend on the quality of the material and especially the installation. Chances are good that the roof you’re looking at will not resist winds of these speeds, because of installation quality. Impact For impact resistance, shakes and shingles are available that qualify for class 3 and 4 impact rating, with class 4 being the most resistant to impact damage. Shakes and shingles are available in class A, B or C fire rating, but you can’t just go out and buy class A rated shakes or shingles. Achieving a class A rating requires that a Class B fire retardant-‐treated shakes or shingles be installed above a heavy asphalt cap sheet. Achieving the desired fire rating requires adhering to the recommendations of the company that treated the shakes or shingles. These requirements may vary among treatment companies and failure to adhere to specific recommendations may void the warranty. Also, installation over heavy underlayment will slow drying time and shorten the expected service life of the wood roofing. Pressure-treated shakes and shingles are available to help resist decay in humid climates. The decay resistance of different wood species can vary, so if you’re inspecting a roof made from a wood species that you don’t recognize, you should mention in your report that it may be less resistant to decay than more commonly-used wood species like red cedar. Most wood shakes and shingles commercially available today are made from Western Red Cedar, and to a lesser extent, Southern Pine. You may also see them made from any one of a wide variety of local wood species. Whatever species is used should be durable, meaning resistant to decay and to splitting from moisture cycling… and it should resist splitting when it’s nailed. When a local wood species has been used, it may be difficult or expensive to get matching shakes or shingles for repairs. Some wood species have been used that will not resist decay well and shakes and shingles made from those will fail prematurely compared to those made from more durable wood species.

InterNACHI Student Book “Inspecting Wood Shingle and Shake Roofs” Student Book “Inspecting Wood Shingle and Shake Roofs” Online Video Course www.nachi.org/inspecting-‐wood-‐shingle-‐roof-‐online-‐video-‐course.htm
Page 4 of 22
With species native to the U.S., wood identification can be done by a Forest Products Extension specialist at your State University. Sometimes the State Forestry Service will have a person who can help. If there are legal issues involved, then a private company like the Wood Advisory Services in New York should be contacted.
1Yellow poplar is not good choice, and oak shingles may be a problem. 2White oak has been used successfully, but red oak has lower decay resistance and should not be used as a roof-covering material. If you see a roof covered with oak, consider recommending that the species be identified by a specialist. Generally speaking, shakes are split and shingles are sawn, but it’s not quite that simple! Shakes come in four main types based on how they’re sawn or split. Sawn surfaces are smoother than split surfaces. The surface facing up is called the “face” and the surface facing down is called the “back”. There are two kinds of split shakes… tapersplit and straightsplit… that are split on both sides, the face and back. Tapersplit shakes are tapered from butt to tip, and straightsplit shakes are straight… not tapered. Tapersplit shakes are typically high-quality. Handsplit shakes have a split face and sawn back and are tapered. Tapersawn shakes are sawn on both sides like a shingle but have a heavier butt like a shake. Medium and heavy shakes are available, medium being typically thinner than ¾-inch and heavy being thicker. Shakes are available in 18” and 24” lengths and longer for historical applications. Shingles Shingles are always tapered, always sawn and are thinner than shakes. They’re available in 16”, 18” and 24” lengths. Shakes and shingles come in three grain exposures; edgegrain, flatgrain and slashgrain. The quality is different and you can recognize them by the appearance of the grain. Edgegrain shakes and shingles have tight, straight grain. Flatgrain shakes and shingles have heartwood visible on the face. Slashgrain shakes and shingles have wavy grain. Grain exposure is determined by the part of the log from which the shake or shingle is cut. Grain exposure is important because it has a large influence on the stability of the shake or shingle. By “stability”, I mean how likely it is to check, split, erode or suffer

InterNACHI Student Book “Inspecting Wood Shingle and Shake Roofs” Student Book “Inspecting Wood Shingle and Shake Roofs” Online Video Course www.nachi.org/inspecting-‐wood-‐shingle-‐roof-‐online-‐video-‐course.htm
Page 5 of 22
distortion like curling and cupping. Edgegrain and flatgrain are the most common types of shingles although it’s not unusual to find some flatgrain shingles in a roof which has mostly edgegrain. Edgegrain shakes and shingles are cut perpendicular to the growth rings. In edgegrain shingles, the grain is allowed to slant a maximum of 45° from vertical. Edge grain shingles are the most stable over time and will offer the greatest resistance to wind and impact damage. Of the three different types of shakes and shingles, edgegrain contains the most heartwood. Since it’s the extractives in heartwood that help red cedar resist attack by decay fungi, edgegrain is the most resistant to decay. Extractives are chemical compounds in wood cells that help determine the wood’s permeability to liquids. They also influence the properties of wood like color, density, hardness, compressive strength, and resistance to attack by insects and fungi.
Premium grade shakes and shingles must be 100% edgegrain. Bundles of #1 shakes and shingles may include up to 20% flatgrain shingles.
This is an edgegrain shake. You can see how straight and tight the gain is and how it’s relatively uniform across the face of the shake. Flatgrain shakes and shingles are cut approximately parallel to growth rings, with the grain oriented horizontally when you look at it from the butt end. The face of the shingles shows very wide grain with a fairly obvious centerline, as you can see 2here. Because this type of shingle exposes the most sapwood to weather, it’s the least stable and most likely to check, split, erode or distort. “Checking” is cracking which doesn’t continue clear through the shake or shingle. Flatgrain shakes and shingles are likely to split along this centerline during natural weathering. Flatgrain shakes and shingles are also more likely to suffer from erosion since they expose a greater proportion of sapwood, which is softer than heartwood and has fewer extractives, so flatgrain shakes and shingles are also more likely suffer damage from erosion and wood decay. Looking at the face of this flatgrain shingle, you can see the widely-spaced grain down the middle of the shingle.

InterNACHI Student Book “Inspecting Wood Shingle and Shake Roofs” Student Book “Inspecting Wood Shingle and Shake Roofs” Online Video Course www.nachi.org/inspecting-‐wood-‐shingle-‐roof-‐online-‐video-‐course.htm
Page 6 of 22
Slashgrain shakes and shingles are also cut perpendicular to the growth rings, but at an angle of more than 45° from vertical when viewed from the butt. Grain on the face of the shingle may appear wavy. Because the angle of the cut exposes more sapwood than edgegrain shingles, slashgrain shingles are less stable than edgegrain and more prone to checking, splitting, erosion and distortion. Shakes come in three grades: Premium, #1, and #2, with premium being the best. Premium Grade shakes are 100% Edge Grain, 100% heartwood, and 100% clear and are cut from the best wood. Number 1 shakes are Clear heartwood, with a maximum of 20% Flatgrain. They are cut from lower quality wood than Premium shakes. Number 2 shakes are cut from even lower quality wood or are rejects from number 1 wood. They’ll have a larger percentage of flat grain and will have some defects like sapwood, bark, knots, or decay. Number 2 shakes should really not be used on anything but a barn or outbuilding. The exposure should also be reduced when #2 are used. Shingles #1 shingles are 100% Edge Grain, 100% heartwood, and 100% clear, and are cut from the best wood. #2 are cut from lower quality wood or are from rejects of number 1 wood. The shingles are allowed to have some sapwood and flat grain but the face of the shingle will have be clear with limited knots and defects above the clear area. #3 shingles are cut from even lower quality wood or are from rejects of number 1 and 2 wood. The shingles are allowed to have unlimited sapwood and flat grain but the face of the shingle will have 6” clear on both 16” and 18” shingles and 10” clear on 24” shingles, with limited knots and defects above the clear area. # 3 shingles really shouldn’t be used on anything but a barn or outbuilding. You may also see shingles that have been specially milled. When you order shakes or shingles, be sure to specify the grade, fire rating, length, butt thickness, butt profile, and wood species. For example you might order premium grade, B fire-‐rated, 24”, heavy, taper-‐split, cedar shakes. Manufacturer’s warranties will vary, but may require installation by a certified installer. A common, widely-accepted warranty caveat is the one requiring a Cedar Shake and Shingle Bureau-approved installer.
InterNACHI Student Book “Inspecting Wood Shingle and Shake Roofs” Student Book “Inspecting Wood Shingle and Shake Roofs” Online Video Course www.nachi.org/inspecting-‐wood-‐shingle-‐roof-‐online-‐video-‐course.htm
Page 7 of 22
Both shakes and shingles can be applied over spaced sheathing, with 1x4 being the minimum size. In new construction, Where 1x4 is used on 10-inch centers, an additional 1x4 should be installed between sheathing boards. In older homes you’ll see a variety of board sizes used and you should refrain from reporting this as a defect unless you see failure of some kind. Shakes The distance from centerline to centerline of the sheathing boards should match the weather exposure of the shakes, so 24-inch shakes with a 10-inch exposure should have boards spaced so that they measure 10 inches from center to center. 18-inch shakes should have sheathing spaced a maximum of 7 ½ inches center to center. Roofs covered with shakes are usually sheathed with 1 x 6 boards. In most places, in newer construction the maximum gap allowed between boards is 3 ½ inches. Again, in older homes limit your comments to signs of failure, like sagging rafters or sheathing. The advantage of spaced sheathing is that it allows shingles to dry more quickly. Installations that slow drying times will shorten the service life of the roof. On roofs with spaced sheathing, the portion of the roof deck requiring an ice barrier should be solid decking. Solid sheathing can be used under shakes and shingles and may be required in areas subject to seismic activity or when treated shakes or shingles are used. In humid climate zones, a ventilation system which includes horizontal battens installed across nailing strips may need to be installed on top of the solid sheathing. You may be able to confirm the presence of this type of system by calculating the roof thickness, looking into soffit vents, or viewing the pattern of nails penetrating the underside of the sheathing. Another solution to moisture problems in humid climates is the use of preservative-treated shakes or shingles. In cold climate zones in which ice dams are common, both shake and shingle roofs should have an ice barrier installed as eve protection along the lower roof edge. Even if shakes or shingles are installed on spaced sheathing, the roof deck beneath the ice barrier should be solid sheathing. Shakes and shingles have very different requirements regarding the installation of a water-resistant membrane in the field.
InterNACHI Student Book “Inspecting Wood Shingle and Shake Roofs” Student Book “Inspecting Wood Shingle and Shake Roofs” Online Video Course www.nachi.org/inspecting-‐wood-‐shingle-‐roof-‐online-‐video-‐course.htm
Page 8 of 22
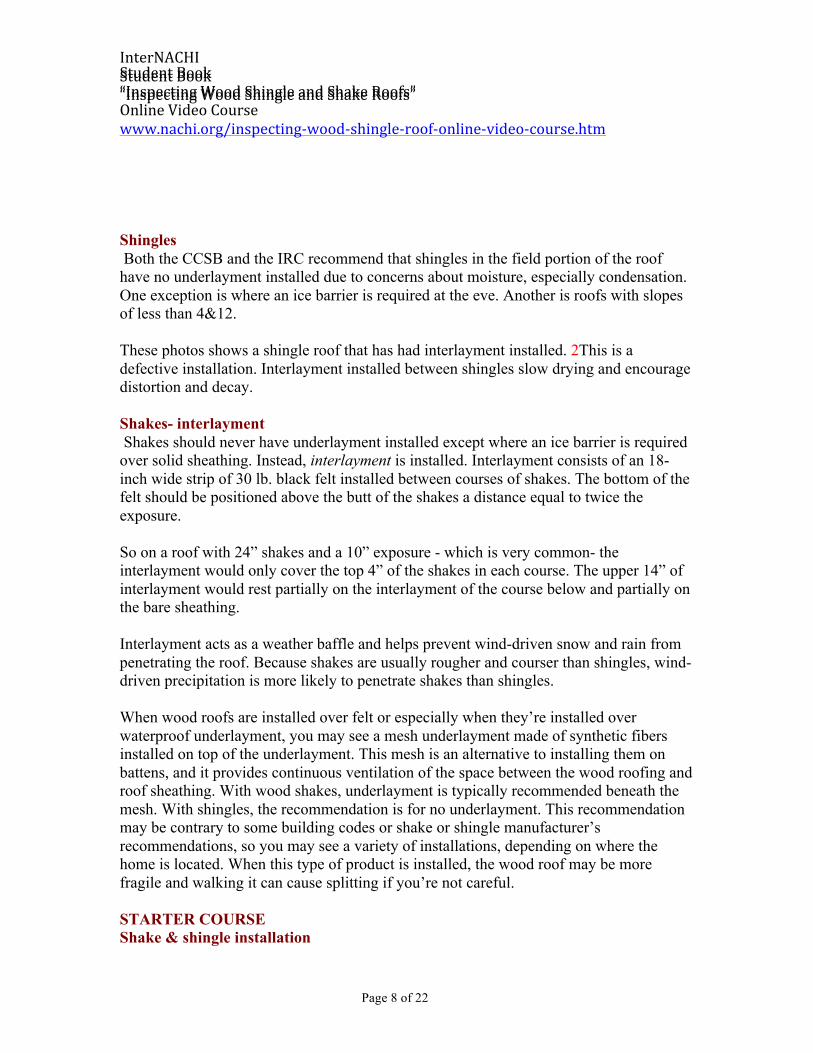
Shingles Both the CCSB and the IRC recommend that shingles in the field portion of the roof have no underlayment installed due to concerns about moisture, especially condensation. One exception is where an ice barrier is required at the eve. Another is roofs with slopes of less than 4&12. These photos shows a shingle roof that has had interlayment installed. 2This is a defective installation. Interlayment installed between shingles slow drying and encourage distortion and decay. Shakes- interlayment Shakes should never have underlayment installed except where an ice barrier is required over solid sheathing. Instead, interlayment is installed. Interlayment consists of an 18-inch wide strip of 30 lb. black felt installed between courses of shakes. The bottom of the felt should be positioned above the butt of the shakes a distance equal to twice the exposure. So on a roof with 24” shakes and a 10” exposure - which is very common- the interlayment would only cover the top 4” of the shakes in each course. The upper 14” of interlayment would rest partially on the interlayment of the course below and partially on the bare sheathing. Interlayment acts as a weather baffle and helps prevent wind-driven snow and rain from penetrating the roof. Because shakes are usually rougher and courser than shingles, wind-driven precipitation is more likely to penetrate shakes than shingles. When wood roofs are installed over felt or especially when they’re installed over waterproof underlayment, you may see a mesh underlayment made of synthetic fibers installed on top of the underlayment. This mesh is an alternative to installing them on battens, and it provides continuous ventilation of the space between the wood roofing and roof sheathing. With wood shakes, underlayment is typically recommended beneath the mesh. With shingles, the recommendation is for no underlayment. This recommendation may be contrary to some building codes or shake or shingle manufacturer’s recommendations, so you may see a variety of installations, depending on where the home is located. When this type of product is installed, the wood roof may be more fragile and walking it can cause splitting if you’re not careful. STARTER COURSE Shake & shingle installation

InterNACHI Student Book “Inspecting Wood Shingle and Shake Roofs” Student Book “Inspecting Wood Shingle and Shake Roofs” Online Video Course www.nachi.org/inspecting-‐wood-‐shingle-‐roof-‐online-‐video-‐course.htm
Page 9 of 22
Projection at the roof edges The starter course The first course of shakes should be doubled with the joints between upper and lower shakes offset by at least 1 ½”. Shakes measuring 15” are made for starter and finish courses- finish courses being the courses at the peak- but are seldom used. Most installers use like-kind shakes and shingles for the starter and finish courses. Projection at the roof edges The amount of overhang at rakes and eves should be the same for shakes and shingles. The first course should project beyond the lower roof edges at the eves by about 1½ inches. At rakes, they should project approximately 1” beyond the roof edge. The first course of shingles can be doubled or tripled. Shingle overhang at roof edges is the same as for shakes… 1 ½” at the bottom… and 1” on the sides. Sidelaps in the starter course should be 1 ½” minimum. ALLOWABLE EXPOSURE The exposure of a shake or shingle is that portion which is exposed to weather. So if you look at a roof with 24” shakes installed and you can see 10” of the length of each shake, the exposure is 10”. Exposure varies with roof pitch and with the length of the shake or shingle. Both shakes and shingles have minimum slope requirements. Shakes cannot be installed on roofs with slopes less than 4:12 Shingles cannot be installed on roofs with slopes less than 3:12 but on roofs with slopes between 3:12 and 4:12, exposures have to be reduced according to shingle length and grade. The proper exposure for both shakes and shingles is also determined by the length and the grade. Although decreasing shake or shingle exposure is acceptable, the maximum exposure should never be exceeded. Excessive exposures will lower the resistance of the roof-covering to wind damage and distortion from weathering. The following tables give the proper exposure for shakes and shingles: FIELD INSTALLATION
• Joint spacing • Shakes

InterNACHI Student Book “Inspecting Wood Shingle and Shake Roofs” Student Book “Inspecting Wood Shingle and Shake Roofs” Online Video Course www.nachi.org/inspecting-‐wood-‐shingle-‐roof-‐online-‐video-‐course.htm
Page 10 of 22
• Shingles • Sidelaps • Vertical joint alignment • Shingle width • Sidewalls
Shakes “Field” shakes and shingles are all those on a roof except those in the starter course along the lower roof edge and in the finish course at the roof peak. Joint spacing- shakes Wood shakes and shingles swell when they get wet and shrink when they dry. Because of the structure and orientation of wood cells, there will be more dramatic movement across the width than in the length. For this reason it’s important to leave adequate space between each shake or shingle. Limitations on joint spacing between shakes and shingles in the same course depend on the AHJ in the area in which the inspection is being performed. It’s usually the CSSB, the IRC. For joint spacing between shakes: The CSSB recommends 3/8” minimum and 5/8” maximum (9mm to 16mm). The IRC recommends 1/8” minimum and 5/8” maximum (3mm to 16mm). Joint spacing- shingles Spacing between shingles should be ¼” to 3/8”. Vertical joint alignment
20 For shakes, neither the CSSB or the IRC offer limitations on the vertical alignment of joints in adjacent courses other than minimum sidelap requirements. For shingles, the CSSB requirement is different from the IRC requirement: The CSSB standards allow a maximum of 10% of all joints in a roof in alternate courses to be indirect alignment. The IRC states that “no two joints in any three adjacent courses shall be in alignment. On shingled roofs, knots and similar defects should be treated as the edge of a shingle and a 1 ½” sidelap maintained. This is because shingles are likely to split first at these defects. When flatgrain grade shingles are used, joints should not align with the centerline of the heartwood, since flatgrain shingles are prone to cracking along the heartwood centerline.
InterNACHI Student Book “Inspecting Wood Shingle and Shake Roofs” Student Book “Inspecting Wood Shingle and Shake Roofs” Online Video Course www.nachi.org/inspecting-‐wood-‐shingle-‐roof-‐online-‐video-‐course.htm
Page 11 of 22
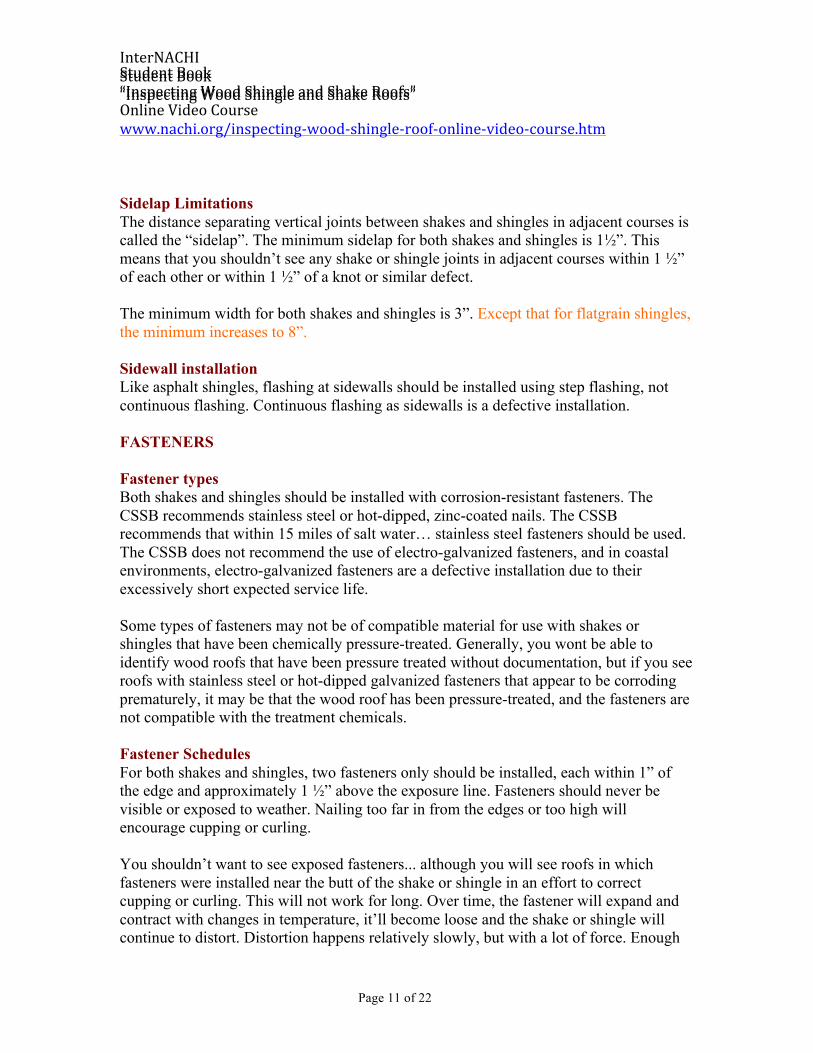
Sidelap Limitations The distance separating vertical joints between shakes and shingles in adjacent courses is called the “sidelap”. The minimum sidelap for both shakes and shingles is 1½”. This means that you shouldn’t see any shake or shingle joints in adjacent courses within 1 ½” of each other or within 1 ½” of a knot or similar defect. The minimum width for both shakes and shingles is 3”. Except that for flatgrain shingles, the minimum increases to 8”. Sidewall installation Like asphalt shingles, flashing at sidewalls should be installed using step flashing, not continuous flashing. Continuous flashing as sidewalls is a defective installation. FASTENERS Fastener types Both shakes and shingles should be installed with corrosion-resistant fasteners. The CSSB recommends stainless steel or hot-dipped, zinc-coated nails. The CSSB recommends that within 15 miles of salt water… stainless steel fasteners should be used. The CSSB does not recommend the use of electro-galvanized fasteners, and in coastal environments, electro-galvanized fasteners are a defective installation due to their excessively short expected service life. Some types of fasteners may not be of compatible material for use with shakes or shingles that have been chemically pressure-treated. Generally, you wont be able to identify wood roofs that have been pressure treated without documentation, but if you see roofs with stainless steel or hot-dipped galvanized fasteners that appear to be corroding prematurely, it may be that the wood roof has been pressure-treated, and the fasteners are not compatible with the treatment chemicals. Fastener Schedules For both shakes and shingles, two fasteners only should be installed, each within 1” of the edge and approximately 1 ½” above the exposure line. Fasteners should never be visible or exposed to weather. Nailing too far in from the edges or too high will encourage cupping or curling. You shouldn’t want to see exposed fasteners... although you will see roofs in which fasteners were installed near the butt of the shake or shingle in an effort to correct cupping or curling. This will not work for long. Over time, the fastener will expand and contract with changes in temperature, it’ll become loose and the shake or shingle will continue to distort. Distortion happens relatively slowly, but with a lot of force. Enough

InterNACHI Student Book “Inspecting Wood Shingle and Shake Roofs” Student Book “Inspecting Wood Shingle and Shake Roofs” Online Video Course www.nachi.org/inspecting-‐wood-‐shingle-‐roof-‐online-‐video-‐course.htm
Page 12 of 22
force to withdraw nails… especially loose nails. Fastener Installation Fasteners should be driven only deep enough that the heads are flush with the surface of the shake or shingle. Over-driving the fastener will sink the head below the surface, reducing the effective thickness of the wood and consequently… the resistance to uplift from wind. Driving the fastener at an angle can have the same effect. Under-driving the fastener will also reduce wind resistance since the head will no longer be in contact with the wood. CAP SHAKES AND SHINGLES Cap shakes and shingles are butted together and fastened with nails or staples. Butt laps should alternate as caps and are installed to help shed runoff properly. Caps fail in several ways: Over time, thermal cycling will loosed the fasteners that hold caps together and the two halves will start to separate, opening an avenue for moisture intrusion. Over time, thermal and moisture cycling will loosen the fasteners that anchor caps to the roof, making them more vulnerable to uplift. Their position on the ridge and hips also give the wind more of a purchase and increases the chances that they’ll be blown off. If installers use the same fasteners to fasten cap shakes that they use for fastening field shakes, cap shakes will be fastened only to underlying shakes, not to the roof deck. This will reduce their wind resistance. WOOD ROOFS PROBLEMS Weathering Weathering is a general term used to describe slow deterioration from exposure to the elements. These include UV radiation from sunlight, moisture cycling, thermal cycling, erosion from precipitation, and buffeting and uplift from wind. The speed at which wood shakes and shingles weather depends on the home’s…
• Climate zone. Roofs located in climate zones that experience severe weather conditions will weather faster than those in zones with mild weather.
• The roof slope orientation will affect the rate of weathering. Roof slopes which face south or which face the direction from which storms approach will weather faster than more protected slopes. Shaded roofs will dry more slowly and deteriorate

InterNACHI Student Book “Inspecting Wood Shingle and Shake Roofs” Student Book “Inspecting Wood Shingle and Shake Roofs” Online Video Course www.nachi.org/inspecting-‐wood-‐shingle-‐roof-‐online-‐video-‐course.htm
Page 13 of 22
more quickly. • The quality of the shakes or shingles will also affect the weathering rate. • The quality of the installation can also make a difference. Poorly installed roofs
may be slow to dry, which can encourage decay and distortion.
UV “Photodegradation“ is the term used to describe damage to wood roofing from ultra violet radiation in sunlight. UV radiation is the most damaging force in weathering of wood shakes and shingles. 2 As newly-installed cedar is exposed to sunlight, it will turn brownish-grey as lignin in the wood surface decomposes. 3Since lignin acts as the glue that holds wood cells together, as it decomposes, wood cells at the surface lose strength and are washed away by rainwater. Erosion Runoff can eventually erode completely through weak, thin portions of shakes and shingles which have been deteriorated by UV exposure. The area of wood just beneath the butts of shakes or shingles in courses above may suffer especially severe erosion, If wood is thin and UV-damaged, erosion may wear completely through the shake or shingle, creating a hole which will typically have tapered or serrated edges. This exposes underlayment which can fail fairly quickly when exposed to UV. Moisture Moisture “cycling” is the fluctuation in moisture content of materials as they expand while absorbing moisture and shrink as they dry. In shakes and shingles, this cycling causes stresses to develop that can create a variety of problems. One problem is distortion. “Distortion” is a general term that includes cupping, which occurs across the width of the shake or shingle, and curling, which occurs along the length. Cupping is caused by uneven moisture absorbtion and drying. As wood absorbs moisture, water fills the spaces between wood cells, causing the wood to swell. As wood dries, water leaves the spaces and the wood shrinks. The undersides of shakes and shingles often dry more slowly than the exposed faces. The exposed faces will shrink as they dry, but the undersides will remain in an expanded condition, since they’re still full of water. 3Unless it creates a gap greater than 1” and is widespread, cupping is seldom a moisture intrusion problem, Curling is caused by natural stresses in the wood, released when the shake or shingle is

InterNACHI Student Book “Inspecting Wood Shingle and Shake Roofs” Student Book “Inspecting Wood Shingle and Shake Roofs” Online Video Course www.nachi.org/inspecting-‐wood-‐shingle-‐roof-‐online-‐video-‐course.htm
Page 14 of 22
cut and made worse by moisture cycling. The 1-inch rue holds true for curling also. Curling that leaves a gap of less than 1-inch is generally not a defective condition. The chances for moisture intrusion will be affected to some degree by the orientation of the roof slope. Roof slopes that face the direction from which storms approach are more likely to suffer moisture intrusion from wind-driven rain. Flatgrain shakes and shingles are more likely to distort than edgegrain or slashgrain. Checks Moisture cycling can cause compression and tension stresses that cause microscopic cracks to develop. With continued moisture cycling and freeze damage, these cracks will grow in size. “Checks” are cracks that don’t extend through the shake or shingle. Cracks that do extend thorough are called “splits”. Light checking is only an aesthetic concern. Deep, widespread checking can retain dirt and moisture that encourages the colonization and spread of decay fungi, and we’ll be talking more about decay very shortly. Splitting All grades and types of cedar shakes and shingles will crack and split naturally as they weather over time. Flat grain shakes and shingles are more likely to split than edgegrain, especially along the center of the heartwood, which is why vertical joints should not align with the centerline of heartwood. 2Splits from weathering will typically be wider at the base of the shingle, which is where they first develop. Splits which have been open and exposed to weather will have rounded edges on the upper surface and will be the same color inside the split as they are outside the split. This first photograph shows a weather split that was broken in two by footfall. You can see that the spit near the but is grey and rounded, but the upper split is very orange, has sharp edges, and runs the length of the shake. The second photograph shows a low-angle hailstrike and the third a more direct hailstrike. The fourth photograph shows an older hailstrike in which the color has started to fade. Splits are more difficult to see when wood is wet, because as it absorbs moisture, it swells, which tends to close splits. For this reason, and because wet wood roofs are slippery and dangerous to walk, they should be inspected when they’re dry. Generally, after ten years exposure to weather, one-third of edgegrain and two-thirds of flatgrain shakes and shingles will have splits.

InterNACHI Student Book “Inspecting Wood Shingle and Shake Roofs” Student Book “Inspecting Wood Shingle and Shake Roofs” Online Video Course www.nachi.org/inspecting-‐wood-‐shingle-‐roof-‐online-‐video-‐course.htm
Page 15 of 22
Causes of splitting Again, splits caused by weathering will have rounded edges and the split will be grey inside, because splits that develop due to weathering… develop slowly. Splits caused by hail will have an indentation along the split. If the shake or shingle was cupped at the time of impact, the impact may be to one side of the split, but this condition is relatively rare. Splits caused by recent hail impact will have sharp edges and be orange inside. Weather-caused splits may not extend from butt to tip. They may only be a few inches long, but… they are lines of weakness. A hailstone striking near a weather-caused split may cause it to extend to the tip, splitting the shake or shingle into two parts. If this is the case, the part of the split near the butt may have rounded edges and be grey inside, while the rest of the spit has sharp edges and is orange inside.
Splits caused by footfall will have no hail indentation and the split will be roughly a uniform width instead of tapered. Fastener splitting Splits may start at fasteners. If more than two fasteners are installed, shakes and shingles may not be able to swell and shrink freely and may split as a result. If fasteners have been loosened by thermal cycling, damp, expanding shakes and shingles will grip the fastener and raise it slightly in its hole. When the wood dries and contracts, the wood will contract and shrink, leaving the fastener protruding above the surface. As time goes by, fasteners will continue to rise out of their holes. Results of splitting If they extend the length of the shake or shingle and cause it to loosen, may be more easily blown off or be displaced by someone walking on the roof.
If they align with vertical joints or other spits in the course below, runoff will have an avenue to enter beneath the roofing.
If they’re wide enough to expose the felt interlayment to sunlight, UV radiation will deteriorate the felt, eventually allowing moisture to penetrate deeper into the roofing system. Decay

InterNACHI Student Book “Inspecting Wood Shingle and Shake Roofs” Student Book “Inspecting Wood Shingle and Shake Roofs” Online Video Course www.nachi.org/inspecting-‐wood-‐shingle-‐roof-‐online-‐video-‐course.htm
Page 16 of 22
Wood decay… which is the same as wood rot… is caused by fungi. Again, heartwood contains extractives that make it more resistant to decay than sapwood. This means that edgegrain shakes and shingles will resist decay better than flatgrain. In addition to decay resistance, extractives make cedar water repellant and slippery. Since the extractives… to a degree… are water soluble, over time they will be leached out of the wood by runoff flowing down the roof. This is called “extractive bleeding”. As extractives are leached away, decay fungi begin to colonize the roof and use it for food. This process accelerates with time. Decay usually happens first at the butts of shakes and shingles, since they’re thickest part and hold moisture the longest. Because they contain large numbers of fungi which can spread to the surrounding roof, shakes and shingles with visible decay should be replaced. Decay is encouraged by any practice or material that slows the drying process. Multiple layers of shingles, improper interlayment or underlayment practices or materials, debris accumulated on the roof or shade from trees or mountainous terrain, can each contribute to the development of decay. Since large cedar logs are no longer readily available, most shakes and shingles are manufactured today from younger trees with lower percentages of extractives, so newer cedar roofing usually has a shorter expected service life than older roofing. Photo These shingles are still in good condition after 65 years
The stains below shingle butts in this photograph were caused by a type of extractive bleeding. Tannins in the wood were dissolved by moisture and then migrated to the surface as the wood dried. Rain will sometimes wash these stains away, but if left exposed to the sun for long enough, polymerization can happen, which will set the stain, which is what you see here. Products containing oxalic acid seem to be the most effective at removing extractive-bleeding stains.
A tannin blocker may need to be applied to keep the stains from reappearing. Extractive bleeding is not a manufacturing or finish-coating defect, but it’s a natural phenomenon that occurs under some conditions. Tannin-blocking products help, but they may not totally prevent recurrence. Thermal cycling Thermal cycling is the cycles experienced by materials as they expand with heat and contract as they cool. Thermal cycling has little affect on shakes and shingles, but does have an effect on metal fasteners. Over time, thermal cycling will cause fasteners to loosen in their holes so that they’ll withdraw more easily, and the roofing they anchor

InterNACHI Student Book “Inspecting Wood Shingle and Shake Roofs” Student Book “Inspecting Wood Shingle and Shake Roofs” Online Video Course www.nachi.org/inspecting-‐wood-‐shingle-‐roof-‐online-‐video-‐course.htm
Page 17 of 22
will suffer reduced wind resistance. This condition is made worse by moisture cycling. As wood shakes or shingles absorb moisture they swell. Wood tightens around loose fasteners, and as it expands, it lifts loosened fasteners upward, which means that it’s withdrawing the fastener. Once it begins to dry, the wood shrinks away from the fastener. The fastener remains partially withdrawn… and as this cycle is repeated the fastener backs out of the hole and the shake or shingles looses wind resistance. A variety of different kinds of damage can be done by those working on the roof. The roof may be walked on for a variety of reasons including performing roof maintenance, work on other components like air-conditioning, electrical, HVAC or communications equipment. Splitting is the type of damage of main concern. Chemical damage can be a problem. Chemicals may be applied to a wood roof for a number of reasons: people may try to extend the life of the roof, to make it more fire-resistant, or to prevent or remove biological growth by applying a wide variety of chemicals, some inappropriate and some damaging to the roof. ENVIRONMENTAL PROBLEMS
• Biological surface growth • Decay • Identification
Causes Various types of biological organisms will grow on wood roofs when conditions are right. These include moss, lichen and algae. Their presence on a roof indicates elevated moisture levels and moss and algae especially will hold moisture against the roof, encouraging decay. Zinc or copper strips may be nailed across the roof near the ridge to help prevent algae growth. Copper is generally more effective and sometimes will kill existing algae. Stay off mossy wood. Moss on wood is slippery! If you try to walk a wet wood roof covered with algae, you’ll find out what it’s like to be a ski jumper… except that you won’t be in control, and you won’t fly through the air or hit the ground… gracefully. The butts of shakes and shingles are thicker and will be the last part of the shake or shingle to dry. For this reason they’re the part most likely to develop decay first. Lifespan The lifespan of a wood roof depends on a number of factors in addition to the problems

InterNACHI Student Book “Inspecting Wood Shingle and Shake Roofs” Student Book “Inspecting Wood Shingle and Shake Roofs” Online Video Course www.nachi.org/inspecting-‐wood-‐shingle-‐roof-‐online-‐video-‐course.htm
Page 18 of 22
we just covered. Here are some other factors that affect shake and shingle lifespan: Climate zone: Obviously roofs in harsher climates will deteriorate more quickly. Since UV radiation from sunlight is the most damaging force, wood roofs in sunny climates will deteriorate more quickly. Areas that experience high annual rainfall or are humid for much of the year… like the gulf states, Alabama, Mississippi, Louisiana, Texas… will be hard on wood roofs. Wood roofs in wet climates may last as little as 20 years. Roofs in dry climates may last over 60 years. Homesite: Conditions at a homesite can hasten deterioration of wood roofs. Wind and features that shade the roof will shorten its lifespan. South-facing slopes suffer most because they experience the greatest amounts of temperature and moisture cycling. Leaf debris accumulating on the roof from overhanging trees will hold moisture against the wood. Roof orientation: The direction the roof faces will determine the amount of wind and sunlight it receives and how it receives approaching storms. Roof pitch: Steeper pitches will shed runoff faster, keeping the roof drier. Installation: Wood shakes and shingles are among the most difficult roof-covering materials to install properly. With good supervision, a beginning roofer can be taught to install Cedar Shakes and Shingles properly in about a year, but it takes years of experience to develop a high level of craftsmanship. You’ll see a lot of roofs that were not installed by craftsmen.
WOOD ROOF MAINTENANCE Wood roofs should be maintained on a regular basis. Damaged or missing shakes or shingles should be replaced and loose ones should be re-fastened. The roof and gutters should be cleaned and tree branches should be trimmed back so that they don’t overhang the roof. Overhanging branches will cause leaves to accumulate on the roof and in gutters. As fasteners loosen over time, cap shingles for ridges and hips will often begin to separate and allow moisture intrusion or lose wind resistance. Look for problems in valleys, at roof penetrations and along the lower roof edges. Squirrels and raccoons may chew or tear wood roofing, especially at areas which are decayed. Shingles with this kind of damage should be replaced. CLEANING WOOD ROOFS Depending on the condition of the roof, there are two methods for cleaning… bleach and

InterNACHI Student Book “Inspecting Wood Shingle and Shake Roofs” Student Book “Inspecting Wood Shingle and Shake Roofs” Online Video Course www.nachi.org/inspecting-‐wood-‐shingle-‐roof-‐online-‐video-‐course.htm
Page 19 of 22
power washing are two methods that typically work well. In many parts of North America, wood roofs suffer discoloration from sunlight, mold fungi and algae. Roofs with this type of damage can be cleaned easily and effectively with bleaching agents like household bleach or swimming pool chlorine mixed with tap water. Diluted correctly, these solutions remove oxidized wood fibers and kill microbes like fungi and algae. The roof color will be lightened to a degree depending on the strength of the solution. The solution is sprayed on with a common garden pump-type sprayer and allowed to remain for 15 to 30 minutes, after which it’s washed off with a garden hose or pressure washer. Scrubbing or brushing is not necessary, but it is necessary to protect landscaping. The pressure washer will be more effective in removing damaged wood fibers, microbial growth and leaf debris. Bleach solutions are not effective at removing dirt, rust stains, extractive stains, or heavy moss or lichen growth. These problems require a pressure washer. If you use household bleach… which is 5% sodium hypochlorite… it should be mixed with equal amounts of water, although stronger solutions can be used. Swimming pool chlorine… which is calcium hypochiorite and 65% chlorine… can be mixed at 2 to 4 ounces per gallon of water. The recommended coverage rate is 1 to 1 ½ gallons per 100 square feet of roof area. Pressure Washing Certain types of moss, algae and lichen will need to be removed using a high-pressure washer similar to those used to clean cars. Pressure washing removes the surface layer of wood fibers and can restore wood roofs to their original color. Excessive pressure can damage roofs, so using them requires some judgment. Pressures around 1000 to 1500 psi with a 15-degree spray fan tip with cold water are usually adequate. Hot water and strong soaps or cleaners are not necessary and may contribute to extractive bleeding. Certain types of moss, algae and lichen will need to be removed using a high-pressure washer similar to those used to clean cars. Pressure washing removes the surface layer of wood fibers and can restore wood roofs to their original color. Wet wood roofs are slippery, so if you recommend that a wood roof be cleaned, be sure to recommend that work be performed by a qualified contractor. Pressure Washing Certain types of moss, algae and lichen will need to be removed using a high-pressure washer similar to those used to clean cars. Pressure washing removes the surface layer of

InterNACHI Student Book “Inspecting Wood Shingle and Shake Roofs” Student Book “Inspecting Wood Shingle and Shake Roofs” Online Video Course www.nachi.org/inspecting-‐wood-‐shingle-‐roof-‐online-‐video-‐course.htm
Page 20 of 22
wood fibers and can restore wood roofs to their original color. Excessive pressure can damage roofs, so using them requires some judgment. Pressures around 1000 to 1500 psi with a 15-degree spray fan tip with cold water are usually adequate. Hot water and strong soaps or cleaners are not necessary and may contribute to extractive bleeding. Certain types of moss, algae and lichen will need to be removed using a high-pressure washer similar to those used to clean cars. Pressure washing removes the surface layer of wood fibers and can restore wood roofs to their original color. Excessive pressure can damage roofs. Pressures around 1000 to 1500 psi with a 15-degree spray fan tip with cold water are usually adequate. Hot water and strong soaps or cleaners are not necessary and may contribute to extractive bleeding. Keep the tip of the wand 8 to 12 inches from the surface. Wet wood roofs are slippery, so stand where it’s dry as you work. Preservative treatments Preservative treatments can be used to slow the growth of mold fungi and moss. As wood roofs become more expensive to replace and wood roof preservative products become less expensive, less toxic and more durable… cleaning and treating roofs with preservatives will be more cost effective. Texas Forest Service evaluations of products for preservative treatments for wood shakes and shingles… which have been underway since 1975… indicate that both water and oil-borne treatments can be very effective for up to 5 years. There are two basic types of preservative applications, water-borne and oil-borne. Both are penetrating types. Water-borne Preservatives Water-borne preservatives are available that are very effective at controlling mold, moss and lichen growth and the development of decay. Some of them may initially turn the roof green although it will weather to a cedar-brown over time. This initial discoloration be avoided by pigmenting the preservative before it’s applied. The downside to water-borne preservatives is that they don’t help prevent the drying effects of the sun and cupping, curling or splitting, since these problems are caused by moisture absorbtion. Oil-borne Preservatives Oil-borne preservatives have naphthenic or paraffin-based compounds that help replenish the oils in wood that have been lost to sun and roof runoff. They’re resistant to oxidation from UV in sunlight and don’t make the roof any more combustible than it already is. Film-forming Preservatives Film-forming preservative coatings like paint and varnish should be avoided, since they

InterNACHI Student Book “Inspecting Wood Shingle and Shake Roofs” Student Book “Inspecting Wood Shingle and Shake Roofs” Online Video Course www.nachi.org/inspecting-‐wood-‐shingle-‐roof-‐online-‐video-‐course.htm
Page 21 of 22
will slow the drying process. Moisture can be absorbed by wood roofs through small cracks in the coating. If shingles have a film-forming finish coating applied while the shakes or shingles are in place, any moisture find its way beneath the coating will be absorbed by the untreated backs and trapped by the coating applied to the faces, so film-forming finish coating will shorten the expected service life of a wood roof. Some of the more effective preservatives are not available to homeowners or applicators in small quantities, so it’s a good idea to contact the Texas Forest Service for the latest information on preservative products for wood roofs. Also, these evaluations are based on conditions in Texas, so contractor in other climate zones should take the time to find out what treatments are appropriate and available in their areas. Application Equipment Although they provide for slow application, garden-type pumps will work adequately for bleach solutions, water-borne preservatives and light solvents. They don’t work for naphthenic-oil treatments. Although more expensive airless sprayers can by used for naphthenic-oil treatment, they’re really overkill. Cheaper and more reliable sprayers can be made with diaphragm pumps like those used in the lawn, turf and pest-control industries. These pumps are good at resisting wear from the pigments and mildewcides in preservatives. A truck-mounted sprayer with 300 feet of hose is adequate to reach most roofs. The pumps are usually driven by gas or diesel engines. Spray guns should be a high-pressure type, able to hand pressures up to about 3,000 PSI. The sprayer should have tips with orifices from 15 to 40 one-thousandths of an inch and fan spreads between 15 and 65 degrees. 18-inch wand extensions can make the work easier on your back, and longer extensions are available for steep, chopped-up roofs, but they’re heavy. WOOD ROOF REPAIR As wood roofs grow older, they become more difficult to repair. Conditions related to age will vary with the climate zone. In the humid, sunny gulf states, repairing shingle roofs over 10 years and shake roofs over 15 years old may be difficult or impossible. Walking these roofs may cause significant damage. In drier areas, walking on and repairing roofs may be much easier. If repair is for hail damage, most of the roof may be in good condition and easy to walk without risking breaking or dislodging wood roofing. When to repair, replace or clean and treat a wood roof with preservatives will vary by area and there are no rules that apply everywhere. We’ll be looking in just a minute at the signs that a roof is at or near the end of its useful life. Repairing damaged areas of wood roofs generally means replacing shakes or shingles. For many roofs, removing and replacing a shake is easy and takes less than 5 minutes. Here’s one way to do it…

InterNACHI Student Book “Inspecting Wood Shingle and Shake Roofs” Student Book “Inspecting Wood Shingle and Shake Roofs” Online Video Course www.nachi.org/inspecting-‐wood-‐shingle-‐roof-‐online-‐video-‐course.htm
Page 22 of 22
END of USEFUL LIFE Once you understand wood roof fundamentals you’ll develop an increasingly better sense of where a roof stands in its lifespan at the time of the inspection. Wood roofs may last anywhere from 20 to 60 years. A large part of the speed at which a wood roof ages has to do with a combination of those things we’ve just covered. Harsher climate zones and homesite conditions which degrade wood roofs will require more diligent maintenance. The quality of the material and installation will be important too. More important than estimating the remaining lifespan is being able to recognize when a roof is near or at the end of its useful life. Here are some of the clues that a roof is nearing the end of its useful life. This applies mainly to field shakes and shingles over a significant portion of the roof:
• There are many loose, split or missing shakes or shingles • Splits leave inadequate sidelaps • Underlayment or roof deck is exposed • Fasteners are exposed • Many areas in which shakes or shingles are thin or eroded through. • Widespread distortion (cupping or curling) across a significant portion of the roof. • A large percentage of decay, typically in butts. • Widespread damage- for example, hail damage.
Wood roofs may affect insurance rates, and there may be local restrictions on their use, so it’s a good idea to let your client know if the home is located in an area where this may be an issue. This concludes the course on inspecting wood roofs, you can now move on to take the final exam. Thanks for taking the course and good luck!