Embed Size (px)
Citation preview
ICeE – User manual – July 2014 Page 1/ 28
INTERFACE FOR CAENORHABDITIS
ELEGANS EXPERIMENTS
User manual
ICeE – User manual – July 2014 Page 2/ 28
User manual
Interface for Caenorhabditis elegans Experiments Version 2
Designed and produced by Frédéric Montañana Sanchis
Version 2.x
Updates by Laurent Tichit ICeE version 1.X designed and produced by: Renaud JULIEN ICeE version beta designed and produced by: Renaud JULIEN
Eric VERCHERAT Frederic GARCIA
Based on work by: Juliette HAYER
Mathilde PELLERIN Thierry MOLINA
Supervised in part by: Lisa MATTHEWS
Laurent TICHIT Consultant: Philippe VAGLIO Conception, Supervision and Project manager: Jonathan EWBANK
Contact: [email protected]
ICeE – User manual – July 2014 Page 3/ 28
Contents INTRODUCTION 4
1 INSTALLATION 5 1.A SERVER AND INTERFACE INSTALLATION 5 1.B DATABASE INSTALLATION 5 1.B.1 UPDATE STRAINS 7 1.B.2 UPDATE RNAI CLONES 9
2 GENERAL DESCRIPTION 10
3 DETAILED DESCRIPTION 11 3.A LOGIN PAGE 11 3.A.1 REGISTRATION 11 3.A.2 LOGIN 11 3.A.3 PASSWORD RETRIEVAL 12 3.A.4 LOGOUT 12 3.B HOME PAGE 12 3.C USER'S SETTINGS 13 3.D INSERT EXPERIMENT 14 3.D.1 EXPERIMENT DETAILS 14 3.D.2 CONDITIONS 15 3.D.3 RESULTS 22 3.D.4 COMMENTS 22 3.E INSERT THE EXPERIMENT 23 3.F EDIT AN EXPERIMENT 23 3.G SEARCH AN EXPERIMENT 24 3.G.1 SEARCH FUNCTION 24 3.G.2 RESULTS DISPLAY 25 3.G.3 VIEW EXPERIMENT DETAILS 25 3.G.4 MAJOR TIME-SAVER: INSERT SIMILAR EXPERIMENT 25 3.H REPORT A BUG 26 3.I BACKUP ICEE 26 3.I.1 DATABASE DUMP 26 3.I.2 RESULT FILES BACKUP 27 3.J RESTORING ICEE 28
ICeE – User manual – July 2014 Page 4/ 28
Introduction
Many different experimental approaches generate results in the form of electronic files, such as digital images, or numerical data in spreadsheets. In a typical laboratory setting, these files are generated on machines shared by multiple users and then transferred to individual’s computers for analysis and storage. An individual researcher can quickly accumulate a substantial number of data files. In the absence of a rational and simple method to organize files, allowing the simultaneous storage of details of the biological sample and experimental protocol, data can easily be misplaced or become un-interpretable. This situation is particularly acute for users of the COPAS™ Biosort. This specialized flow cytometer is conceived for high-throughput analysis, sorting, and dispensing of C. elegans. With its Reflex attachment, it can analyze samples from 96-well plates. With its shortest analysis cycle, more than twenty 96-well plates can be handled per day. Keeping track of this number of results is not a trivial task and incited us to design and implement ICeE, a database coupled with a web-interface, to ensure that relevant information could be entered in a user-friendly way and result files stored in a simple manner. Many of the default settings have been designed for use in the Ewbank lab, and as such reflect the type of experiments that we do, but they are all easily modifiable, so that we hope ICeE will be generally useful to any C. elegans lab. The next section of this manual concerns installation and configuration of the database. Most users can skip directly to Section 2.
ICeE – User manual – July 2014 Page 5/ 28
1 Installation
1.A Server and interface installation This part requires some basic knowledge of server configuration, and access to a server where you have administrator rights. Installation is straightforward, but if the following section is unintelligible for you, ask for help from your IT support team, or nearest friendly computer scientist. First of all, you will need a server architecture. If you don’t have access to this, the easiest is to download a WAMP architecture for a Windows server, build a LAMP architecture for Linux server or download a MAMP architecture for Mac server. Download WAMP: http://www.wampserver.com/download.php Install LAMP: http://lamphowto.com/ Download MAMP: http://www.mamp.info/en/downloads/index.html Then download the correct ICeE archive (zip or tar.gz) from http://sourceforge.net/projects/icee/ and uncompress it into the server’s default web-accessible directory.
The ICeE interface should now be reachable using a web-browser at the IP address of the server, or by “http://localhost” if you have installed it on your own computer.
You can then continue with the database installation.
1.B Database installation If you installed WAMP, MAMP or LAMP, this will have included an installation of MySQL. You will have had the possibility of adding users (and passwords) and defining access rights. In this case, or if you are installing ICeE on a server that already has been configured, with a web browser, go to http://your_server_ip_address/ICeE/xt_dump/ (or http://localhost/ICeE/xt_dump/ if you have installed it on your own computer). Enter the database host (by default this is “localhost”), then the database name. You need to choose a database already installed on MySQL Server; by default MySQL installs one called 'mysql'. Normally you should use this. Then enter your MySQL username and the password to connect the database. Then choose the option 'Restore a database from a backup' and hit “Connect”. If there is a login error, first make you sure that all the information (e.g. password) you entered is correct; xt_dump doesn’t tell you what the problem is!
If you still cannot connect, open the MySQL server and check that the 'mysql' database is already on the server. If not, identify a database that does exist and try again.

ICeE – User manual – July 2014 Page 6/ 28
Then select the only file available (ICeE_install.sql) and click on “Start Restore”.
If for any reason this doesn’t work, you can try with any MySQL administration tool to create a new database (which you should call “ciml_icee”, and import the sql file from ./ICeE/sql/.
Once the database is installed, open the file ./ICeE/php/includes/db_config.php with a text editor. The top lines should look like this: $hostname = ""; $user = ""; $pass = "" ; $base = ""; Enter the different fields; a typical set of default values would be: $hostname = "localhost"; $user = "root"; $pass = ""; $base = "ciml_icee";
ICeE – User manual – July 2014 Page 7/ 28
Don’t forget to save the edited file. Now you can use ICeE with your web browser by typing this address in the address bar: http://your_server_ip_address/ICeE/. At this stage, there is one default user, “administrator”, with the password “elegans”. If you are concerned about users accessing the database management tools (see Section C), you should change this password. ICeE comes pre-loaded with a strain list from the CGC. Before other users access ICeE, you may want to update this to have the latest version, and also incorporate your own lab’s list of worm strains (see next Section - 2.1.4) and RNAi clones (see Section 2.1.5).
1.B.1 Update strains ICeE comes loaded with a recent list of all CGC strains. The database administrator has the possibility of additionally entering into the database a list of strains, for example from the lab’s own strain collection. Before doing this, you should check that you have the most up-to-date CGC strain list. The CGC currently maintains a list at http://biosci.umn.edu/CGC/strains/, under the rubric “Strain list: one big text file”. Login as administrator, click on "Update CGC strains" in the Settings menu under the “Manage database” icon, enter http://www.cbs.umn.edu/sites/default/files/public/files/celelist2.txt and then click on "Update". It is possible that in the future the CGC will change the name or location of this file; check with them if it is no longer obvious where to find it. This process can take quite some time if the list has not been updated regularly. When it has finished, you should see the message, “Update finished with success!”, with a link to a text file listing the names of the added strains.
Once you have the CGC strain list, you are ready to enter your lab strain list. The file must be in a standard simple format: The list of strains must be a simple, tab-delimited text document, in the following format: Strain ID [Tabulation] Genotype
If, for example you use Excel, just save the two columns as tab-delimited text, or if you use FileMaker™ use “Export records”, again as tab-delimited text. The output should look like this: IG1 unc-32(e189) ced-7(n1892)III;ced-5(n1812) dpy-20(e1282) IV IG2 wt;frEx1[pRF4, set-1p::GFP] IG3 wt;frEx2[pRF4, set-1p::GFP] IG4 wt; oxEx166[phsp::transposase, unc-122p::GFP]; oxEx229[Mos1, myo-2p:::GFP] IG6 smf-1(eh5) X IG7 wt;frEx4[pRF4,pStol-1::GFP] IG8 wt;frEx5[pRF4,pStol-1::GFP] Note that some applications might include manual line breaks (symbol ↵). Remove these (e.g. in Microsoft Word, use “replace”; “^11” is the code for ↵) before uploading your file.

ICeE – User manual – July 2014 Page 8/ 28
Once you have your file, click on "Update lab strains" in the settings menu under the “Manage database” icon, then select your file with the browse button and then click on "Update".
If you subsequently need to update your lab strain list, having first updated the CGC list (see above), you can either enter a list of just the new strains, or, submit your entire (updated) strain list. In this case, ICeE adds any new strains and by default checks for modifications to existing strains (i.e. change in genotype) and modifies the relevant entries. Update strain option By default, strains with new ID numbers will be added and any existing strain will be updated. When a strain in the input list has a different genotype from the strain already in the database, the genotype in the database will be updated. This change will be applied to any experiment that has used the strain in question. If you don't want this to happen, click the “No” button beside “Update existing strains”. If you don’t want to upload the entire list of CGC strains, it is relatively simple to convert the CGC’s “Strain list: one big text file” to a suitable format for import. For example, the file can be imported into Excel, as colon (“:”) delimited text:
Then the relevant information can be extracted simply by using the function Data -> Filter -> Autofilter -> Custom, and defining the parameters as below:
ICeE – User manual – July 2014 Page 9/ 28
The resulting table can be saved as a tab-delimited text and using a replace function, it can be turned into the right format: AA1 daf-12(rh257) X. AA6 daf-12(rh84) X. AA10 daf-12(rh286) X. AA18 daf-12(rh61rh412) X. AA34 daf-12(rh61) X. AA82 daf-12(rh284) X. AA83 daf-12(rh62rh157) X. AA85 daf-12(rh285) X. AA89 daf-12(rh274) X. AA107 nhr-48(ok178) X. Once the desired lists are ready, they can be uploaded.
1.B.2 Update RNAi clones ICeE also comes pre-loaded with the list of RNAi clones from the original Ahringer and Vidal libraries. We have included tentative lists of target genes based on information from Wormbase (WS210), but users should be aware that the attribution of targets is not reliable, as for example Wormbase does not take into consideration the fact that Vidal clones are generated from cDNAs, unlike the genomic Ahringer clones. Additionally, with alterations in gene prediction, the supposed target(s) of a given clone can change. For this reason, the information associated with any clone can be altered. To update clones, when logged in as administrator, click on "Update clones" in the settings menu under the “Manage database” icon. You have the choice of updating the Ahringer and Vidal libraries or your own lab collection, using a tab-delimited text file. The updating interface is flexible, with pull-down menus allowing you to choose which fields are to be included and in which order. For example, one can include both the primer sequences used and the predicted target gene(s). An example of a relatively minimal entry for a single clone would be to select in order the fields “Clone name”, “Target gene” and “Comments”, then upload a tab-delimited text file: Lab_F26F12.5 mdc-3 Sequence verified 09/02/04 Note, if uploading multiple clones as a single file, individual fields (e.g. “comments”) can be left blank if there is no information for certain clones.
ICeE – User manual – July 2014 Page 10/ 28
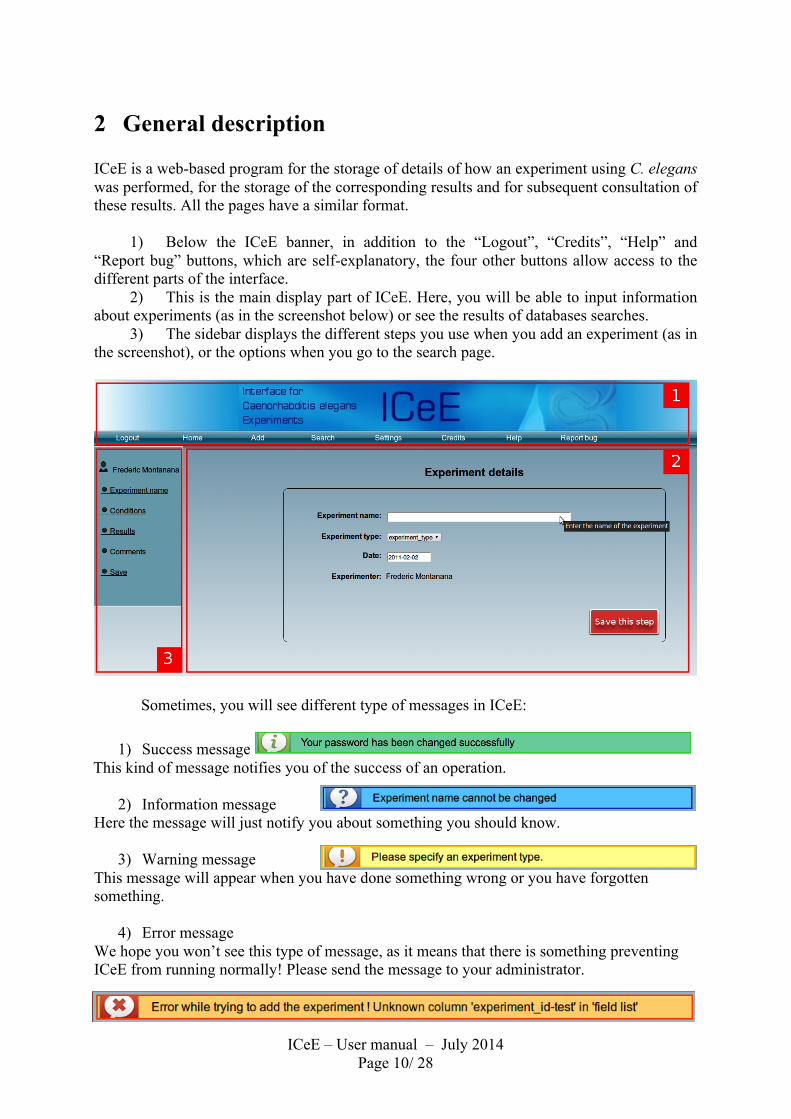
2 General description ICeE is a web-based program for the storage of details of how an experiment using C. elegans was performed, for the storage of the corresponding results and for subsequent consultation of these results. All the pages have a similar format.
1) Below the ICeE banner, in addition to the “Logout”, “Credits”, “Help” and “Report bug” buttons, which are self-explanatory, the four other buttons allow access to the different parts of the interface.
2) This is the main display part of ICeE. Here, you will be able to input information about experiments (as in the screenshot below) or see the results of databases searches.
3) The sidebar displays the different steps you use when you add an experiment (as in the screenshot), or the options when you go to the search page.
Sometimes, you will see different type of messages in ICeE:
1) Success message This kind of message notifies you of the success of an operation.
2) Information message Here the message will just notify you about something you should know.
3) Warning message This message will appear when you have done something wrong or you have forgotten something.
4) Error message We hope you won’t see this type of message, as it means that there is something preventing ICeE from running normally! Please send the message to your administrator.
ICeE – User manual – July 2014 Page 11/ 28
3 Detailed description
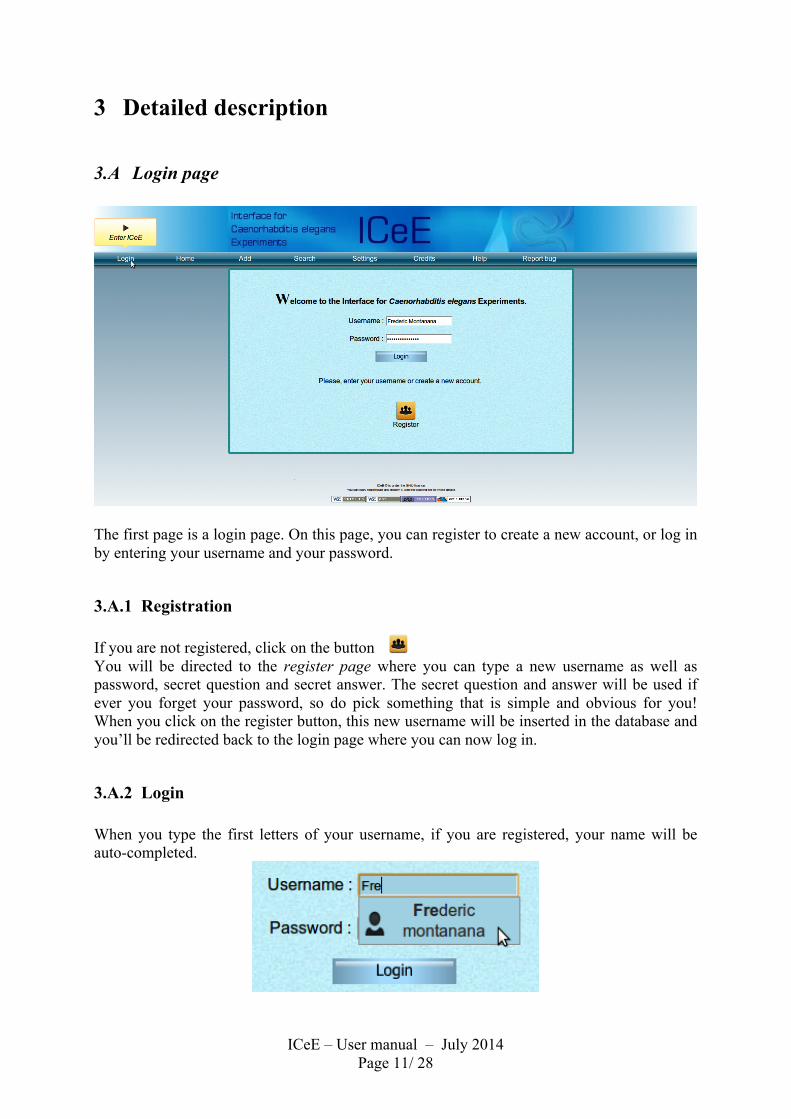
3.A Login page
The first page is a login page. On this page, you can register to create a new account, or log in by entering your username and your password.
3.A.1 Registration If you are not registered, click on the button You will be directed to the register page where you can type a new username as well as password, secret question and secret answer. The secret question and answer will be used if ever you forget your password, so do pick something that is simple and obvious for you! When you click on the register button, this new username will be inserted in the database and you’ll be redirected back to the login page where you can now log in.
3.A.2 Login When you type the first letters of your username, if you are registered, your name will be auto-completed.
ICeE – User manual – July 2014 Page 12/ 28
3.A.3 Password retrieval If you have forgotten your password, or enter an incorrect password, the message below will appear:
If you do hit “here”, you will be asked the secret question that you defined when you registered. If you give exactly the right answer, your old password will be replaced by the password “elegans”. You should change this as soon as you log in again.
If ever you do forget your secret answer, contact the administrator.
3.A.4 Logout Your session will not end until you logout or quit your web-browser. Be aware that when you log out, all data not saved in the database will be lost. But in all cases, you are recommended to logout at the end of each session to avoid any potential problems.
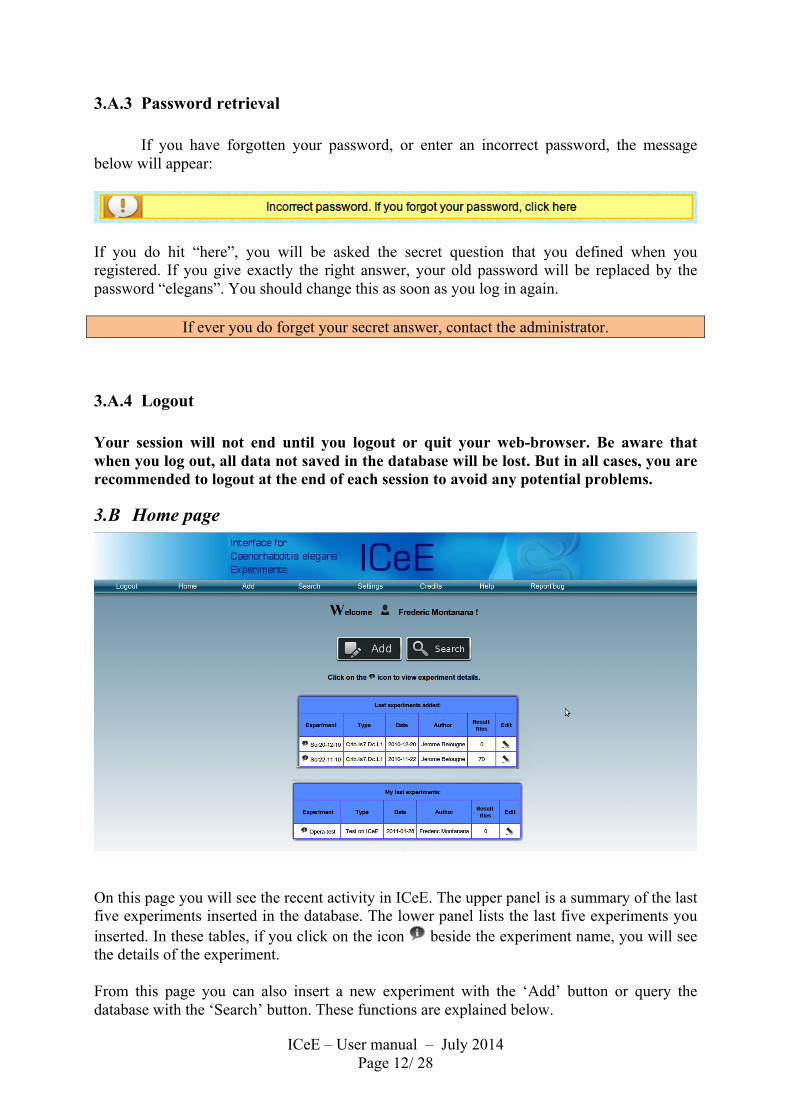
3.B Home page
On this page you will see the recent activity in ICeE. The upper panel is a summary of the last five experiments inserted in the database. The lower panel lists the last five experiments you inserted. In these tables, if you click on the icon beside the experiment name, you will see the details of the experiment. From this page you can also insert a new experiment with the ‘Add’ button or query the database with the ‘Search’ button. These functions are explained below.
ICeE – User manual – July 2014 Page 13/ 28
3.C User's settings
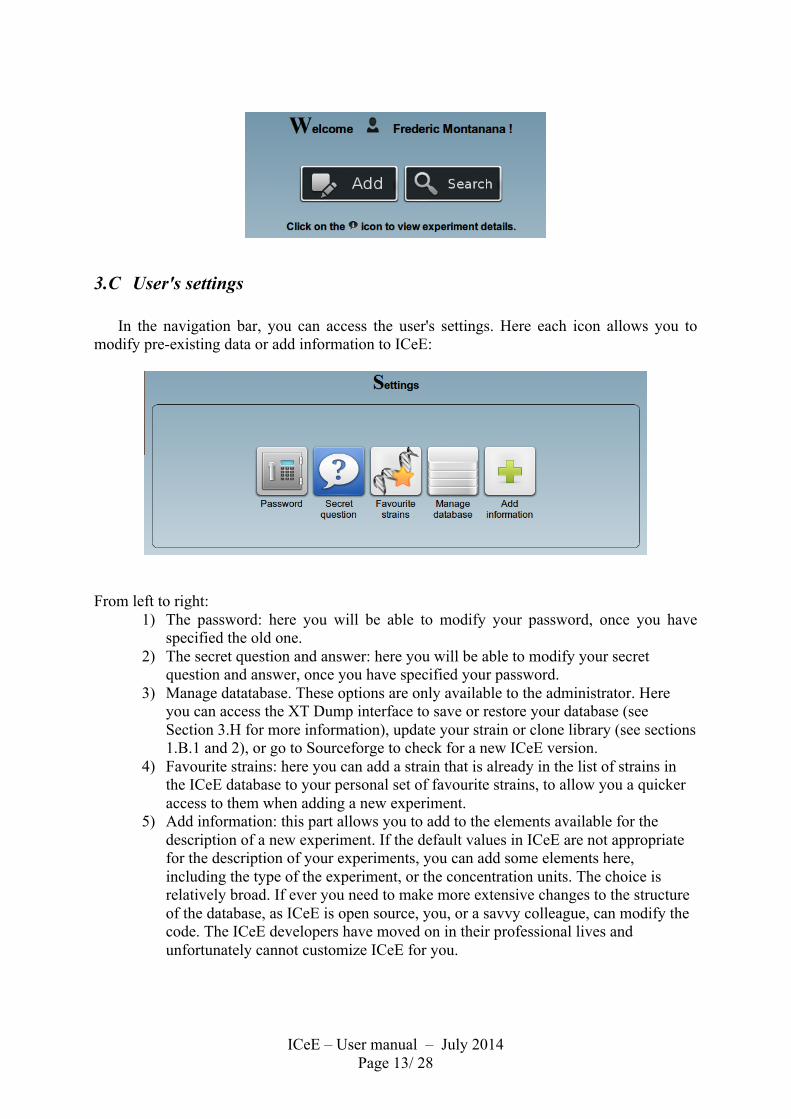
In the navigation bar, you can access the user's settings. Here each icon allows you to modify pre-existing data or add information to ICeE:
From left to right:
1) The password: here you will be able to modify your password, once you have specified the old one.
2) The secret question and answer: here you will be able to modify your secret question and answer, once you have specified your password.
3) Manage datatabase. These options are only available to the administrator. Here you can access the XT Dump interface to save or restore your database (see Section 3.H for more information), update your strain or clone library (see sections 1.B.1 and 2), or go to Sourceforge to check for a new ICeE version.
4) Favourite strains: here you can add a strain that is already in the list of strains in the ICeE database to your personal set of favourite strains, to allow you a quicker access to them when adding a new experiment.
5) Add information: this part allows you to add to the elements available for the description of a new experiment. If the default values in ICeE are not appropriate for the description of your experiments, you can add some elements here, including the type of the experiment, or the concentration units. The choice is relatively broad. If ever you need to make more extensive changes to the structure of the database, as ICeE is open source, you, or a savvy colleague, can modify the code. The ICeE developers have moved on in their professional lives and unfortunately cannot customize ICeE for you.
ICeE – User manual – July 2014 Page 14/ 28
3.D Insert experiment
Important tip! Once you begin to fill in fields in this part of ICeE, the information is not kept if you logout
or close your web browser. It will only be entered into the database when you hit “Save”.
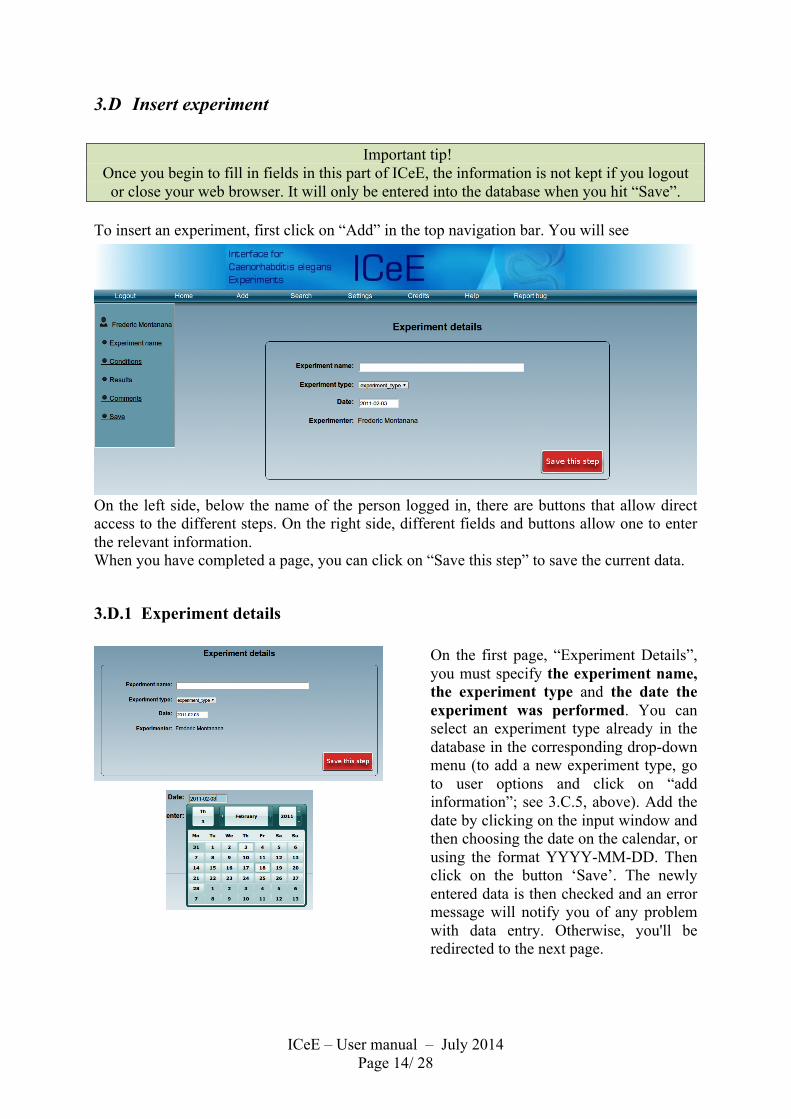
To insert an experiment, first click on “Add” in the top navigation bar. You will see
On the left side, below the name of the person logged in, there are buttons that allow direct access to the different steps. On the right side, different fields and buttons allow one to enter the relevant information. When you have completed a page, you can click on “Save this step” to save the current data.
3.D.1 Experiment details
On the first page, “Experiment Details”, you must specify the experiment name, the experiment type and the date the experiment was performed. You can select an experiment type already in the database in the corresponding drop-down menu (to add a new experiment type, go to user options and click on “add information”; see 3.C.5, above). Add the date by clicking on the input window and then choosing the date on the calendar, or using the format YYYY-MM-DD. Then click on the button ‘Save’. The newly entered data is then checked and an error message will notify you of any problem with data entry. Otherwise, you'll be redirected to the next page.
ICeE – User manual Page 15/ 28
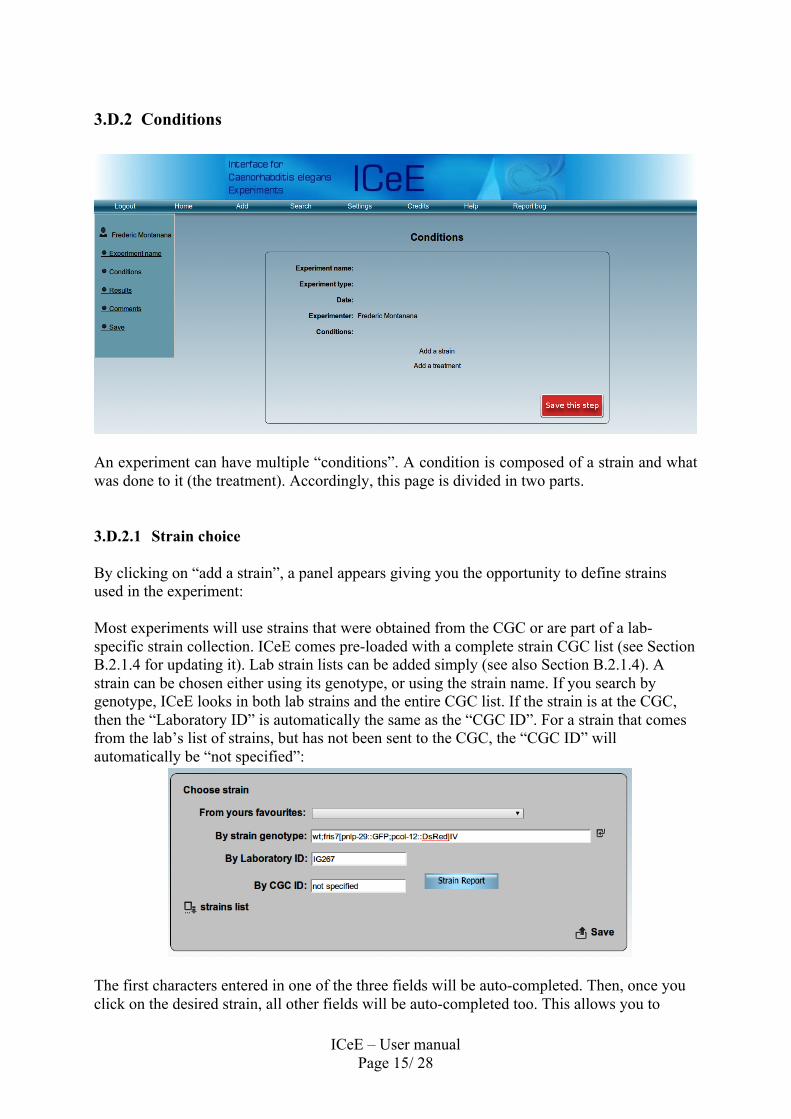
3.D.2 Conditions
An experiment can have multiple “conditions”. A condition is composed of a strain and what was done to it (the treatment). Accordingly, this page is divided in two parts.
3.D.2.1 Strain choice
By clicking on “add a strain”, a panel appears giving you the opportunity to define strains used in the experiment: Most experiments will use strains that were obtained from the CGC or are part of a lab-specific strain collection. ICeE comes pre-loaded with a complete strain CGC list (see Section B.2.1.4 for updating it). Lab strain lists can be added simply (see also Section B.2.1.4). A strain can be chosen either using its genotype, or using the strain name. If you search by genotype, ICeE looks in both lab strains and the entire CGC list. If the strain is at the CGC, then the “Laboratory ID” is automatically the same as the “CGC ID”. For a strain that comes from the lab’s list of strains, but has not been sent to the CGC, the “CGC ID” will automatically be “not specified”:
The first characters entered in one of the three fields will be auto-completed. Then, once you click on the desired strain, all other fields will be auto-completed too. This allows you to

ICeE – User manual Page 16/ 28
check that you’ve entered the right strain. As an alternative, you can use the drop-down menu containing your favourite strains (see Section 3.C.5). By choosing one strain from this list, all the fields will be filled with the information available for this strain. If you choose a strain that is in Wormbase, clicking on “Strain Report” will open a new page/tab with the relevant page at Wormbase. Note, as Wormbase does sometimes change its database structure and so URLs change, this feature might not work in the future. Experiments generally fall into two types, one in which a single strain is subject to multiple experimental treatments and secondly experiments that involves multiple strains. At this step, you therefore have two choices.
3.D.2.1.1 Experiment with a single strain
Once you have chosen the right strain, by clicking “Save” the strain will be added to the experiment immediately. Then, 3 icons appear:
: allows you to copy the strain and any treatment associated with it.
: allows you to edit the strain used and to show the details of any treatment associated
with it.
: allows you to delete the strain and any treatment associated with it.
3.D.2.1.2 Add a strain list
If on the other hand, your experiment involves more than one strain, you can make a list of all the strains you used in the experiment and add all of them at one time. To add a strain to the list, just click the button on the right of the input “By strain genotype”. The “Laboratory ID” or “CGC ID” is copied to the “Strains list” box. You can add as many strains as you want. Once you have finished entering strains, click “Save”, and all the strains in the list will be add to the experiment automatically.
ICeE – User manual Page 17/ 28
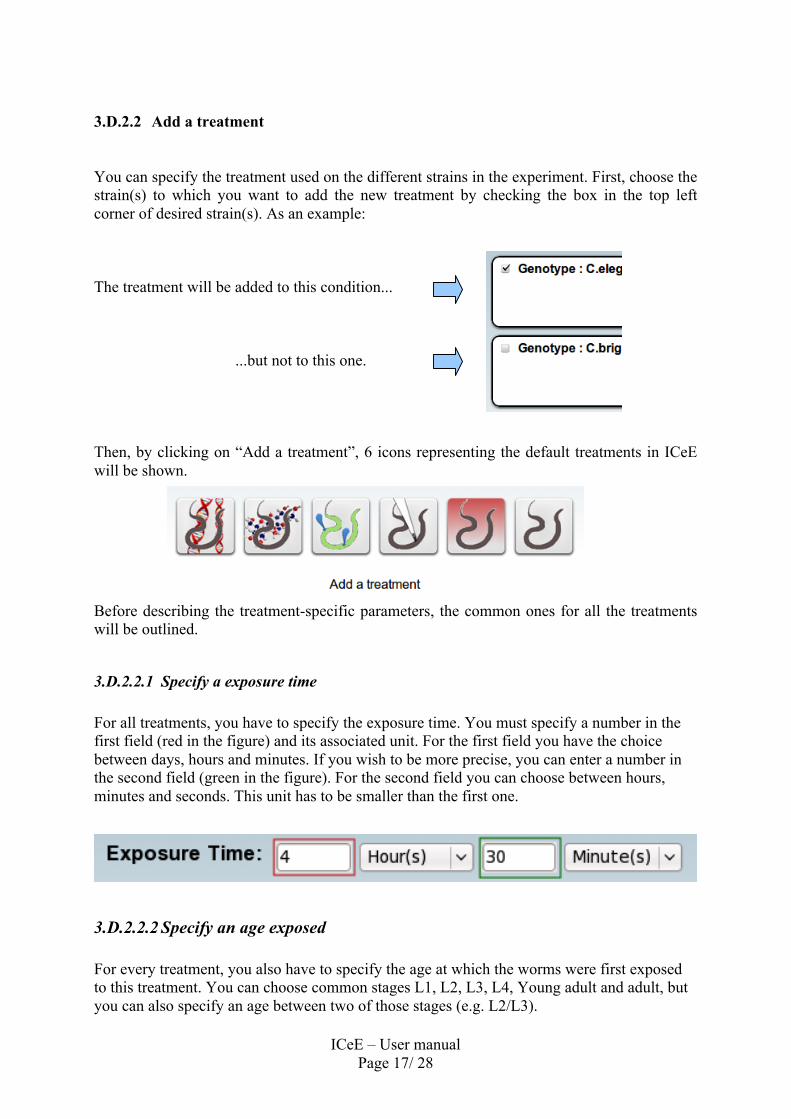
3.D.2.2 Add a treatment
You can specify the treatment used on the different strains in the experiment. First, choose the strain(s) to which you want to add the new treatment by checking the box in the top left corner of desired strain(s). As an example:
The treatment will be added to this condition...
...but not to this one.
Then, by clicking on “Add a treatment”, 6 icons representing the default treatments in ICeE will be shown.
Before describing the treatment-specific parameters, the common ones for all the treatments will be outlined.
3.D.2.2.1 Specify a exposure time
For all treatments, you have to specify the exposure time. You must specify a number in the first field (red in the figure) and its associated unit. For the first field you have the choice between days, hours and minutes. If you wish to be more precise, you can enter a number in the second field (green in the figure). For the second field you can choose between hours, minutes and seconds. This unit has to be smaller than the first one.
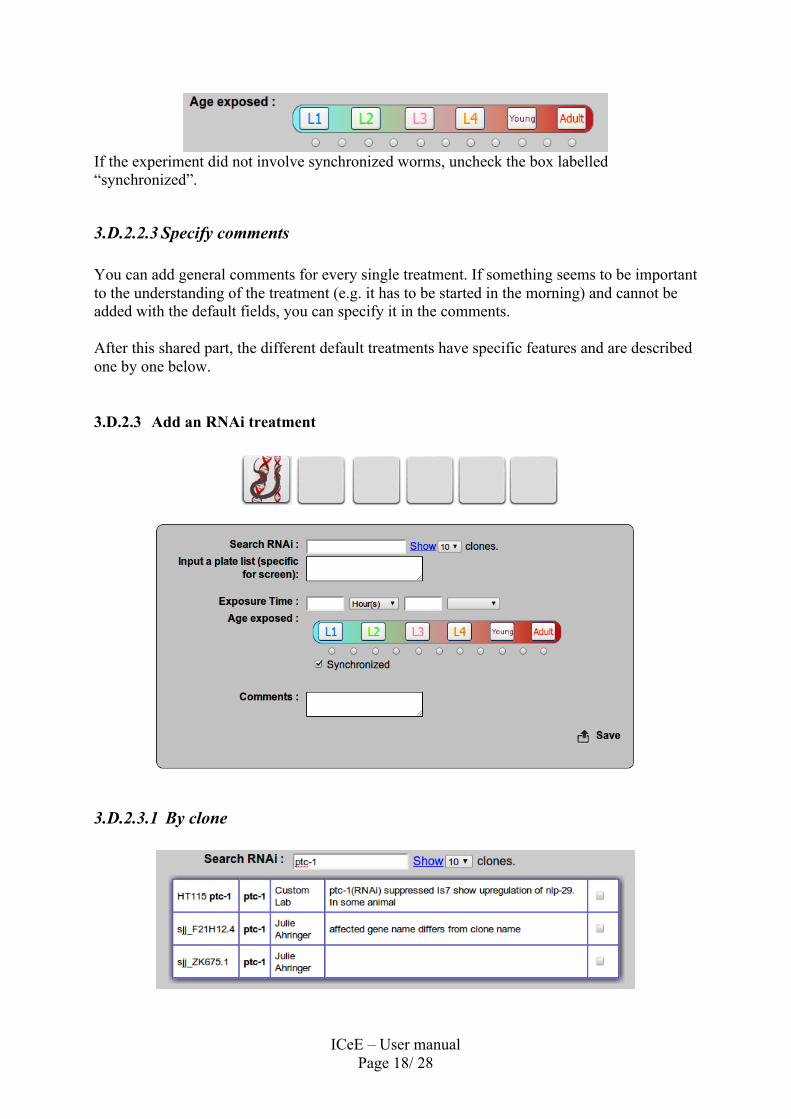
3.D.2.2.2 Specify an age exposed
For every treatment, you also have to specify the age at which the worms were first exposed to this treatment. You can choose common stages L1, L2, L3, L4, Young adult and adult, but you can also specify an age between two of those stages (e.g. L2/L3).
ICeE – User manual Page 18/ 28
If the experiment did not involve synchronized worms, uncheck the box labelled “synchronized”.
3.D.2.2.3 Specify comments
You can add general comments for every single treatment. If something seems to be important to the understanding of the treatment (e.g. it has to be started in the morning) and cannot be added with the default fields, you can specify it in the comments. After this shared part, the different default treatments have specific features and are described one by one below.
3.D.2.3 Add an RNAi treatment
3.D.2.3.1 By clone
ICeE – User manual Page 19/ 28
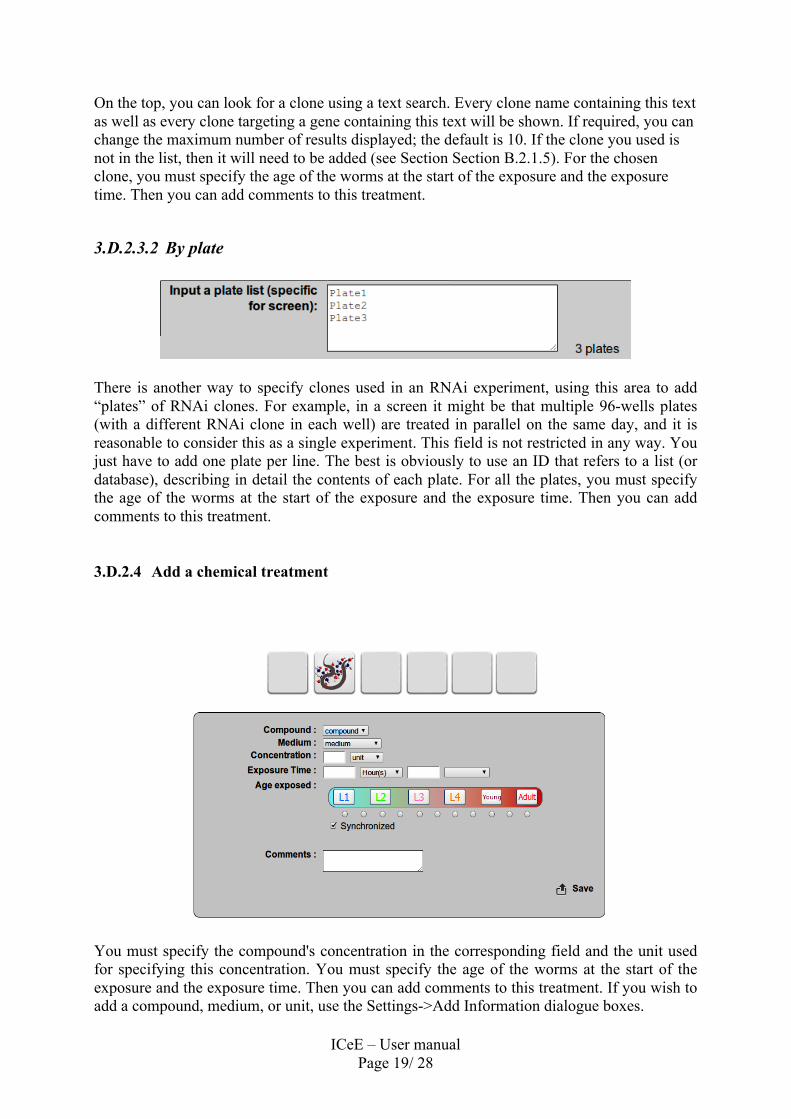
On the top, you can look for a clone using a text search. Every clone name containing this text as well as every clone targeting a gene containing this text will be shown. If required, you can change the maximum number of results displayed; the default is 10. If the clone you used is not in the list, then it will need to be added (see Section Section B.2.1.5). For the chosen clone, you must specify the age of the worms at the start of the exposure and the exposure time. Then you can add comments to this treatment.
3.D.2.3.2 By plate
There is another way to specify clones used in an RNAi experiment, using this area to add “plates” of RNAi clones. For example, in a screen it might be that multiple 96-wells plates (with a different RNAi clone in each well) are treated in parallel on the same day, and it is reasonable to consider this as a single experiment. This field is not restricted in any way. You just have to add one plate per line. The best is obviously to use an ID that refers to a list (or database), describing in detail the contents of each plate. For all the plates, you must specify the age of the worms at the start of the exposure and the exposure time. Then you can add comments to this treatment.
3.D.2.4 Add a chemical treatment
You must specify the compound's concentration in the corresponding field and the unit used for specifying this concentration. You must specify the age of the worms at the start of the exposure and the exposure time. Then you can add comments to this treatment. If you wish to add a compound, medium, or unit, use the Settings->Add Information dialogue boxes.
ICeE – User manual Page 20/ 28
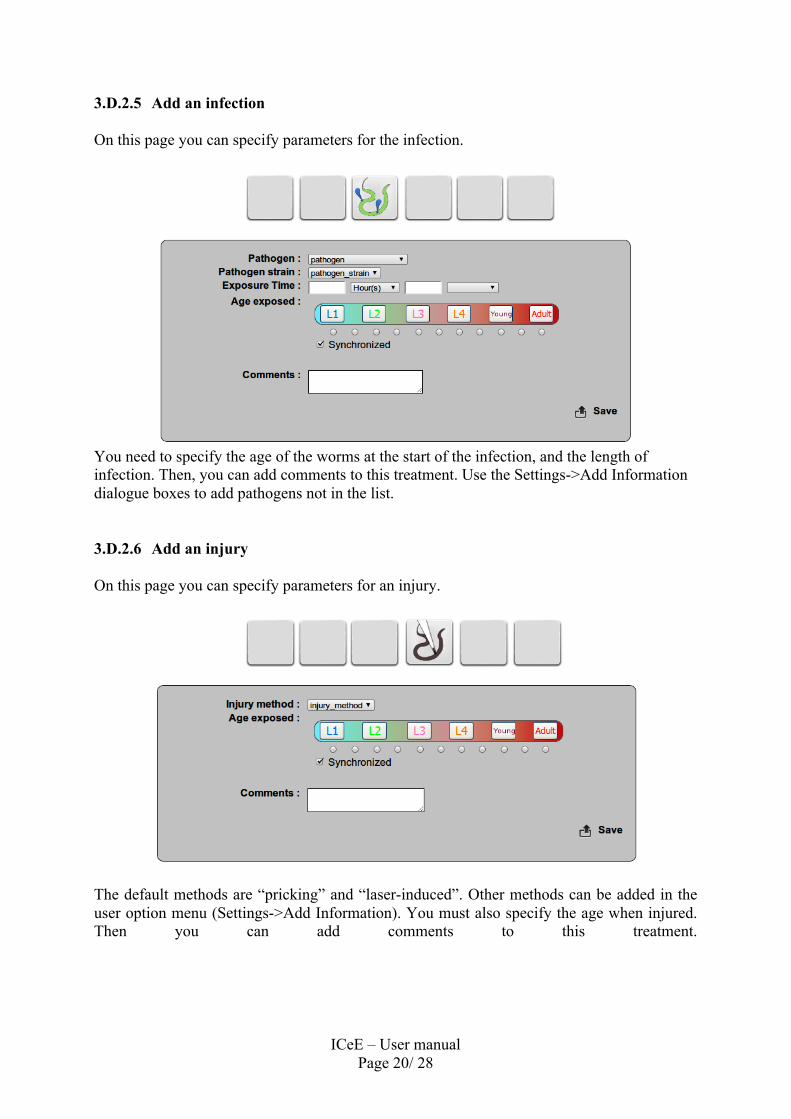
3.D.2.5 Add an infection
On this page you can specify parameters for the infection.
You need to specify the age of the worms at the start of the infection, and the length of infection. Then, you can add comments to this treatment. Use the Settings->Add Information dialogue boxes to add pathogens not in the list.
3.D.2.6 Add an injury
On this page you can specify parameters for an injury.
The default methods are “pricking” and “laser-induced”. Other methods can be added in the user option menu (Settings->Add Information). You must also specify the age when injured. Then you can add comments to this treatment.
ICeE – User manual Page 21/ 28
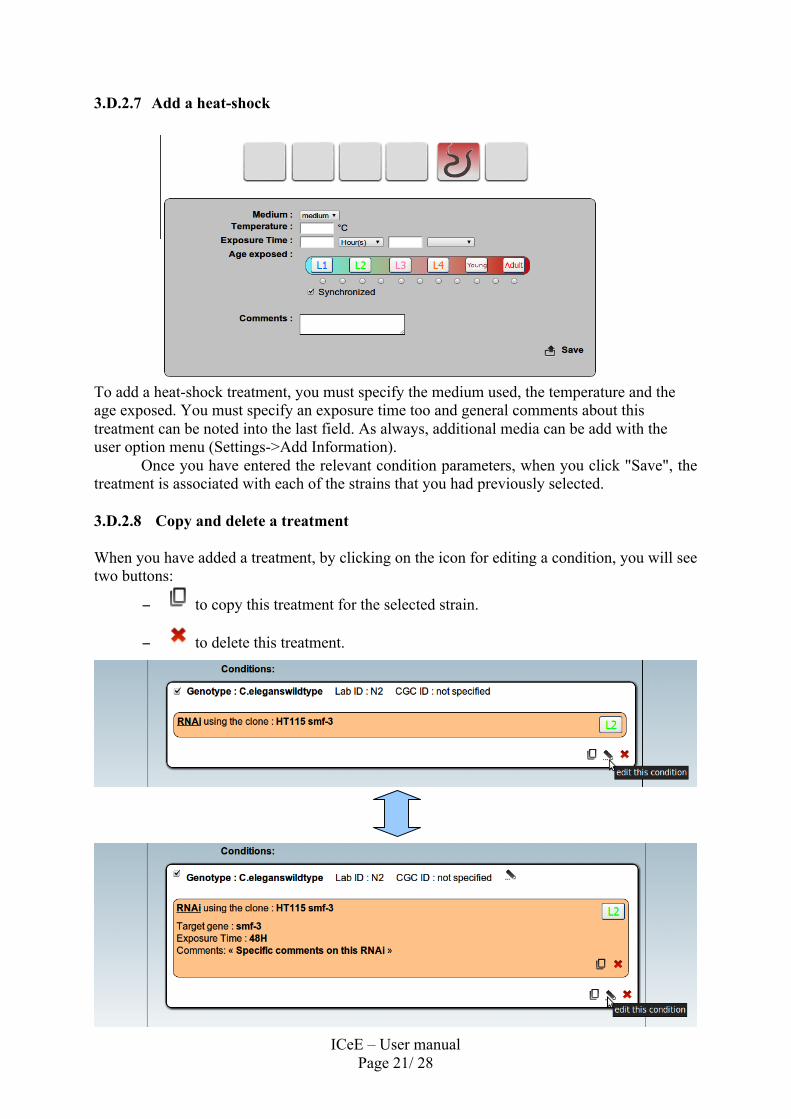
3.D.2.7 Add a heat-shock
To add a heat-shock treatment, you must specify the medium used, the temperature and the age exposed. You must specify an exposure time too and general comments about this treatment can be noted into the last field. As always, additional media can be add with the user option menu (Settings->Add Information).
Once you have entered the relevant condition parameters, when you click "Save", the treatment is associated with each of the strains that you had previously selected.
3.D.2.8 Copy and delete a treatment
When you have added a treatment, by clicking on the icon for editing a condition, you will see two buttons:
− to copy this treatment for the selected strain.
− to delete this treatment.
ICeE – User manual Page 22/ 28
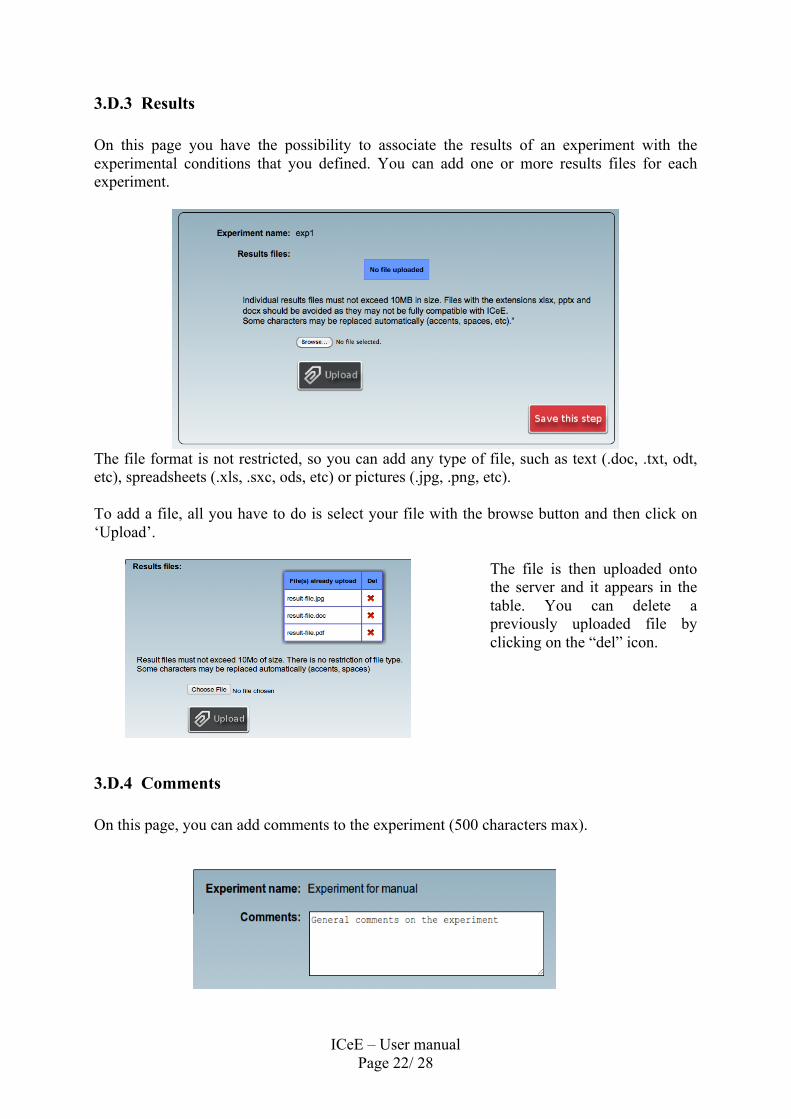
3.D.3 Results On this page you have the possibility to associate the results of an experiment with the experimental conditions that you defined. You can add one or more results files for each experiment.
The file format is not restricted, so you can add any type of file, such as text (.doc, .txt, odt, etc), spreadsheets (.xls, .sxc, ods, etc) or pictures (.jpg, .png, etc). To add a file, all you have to do is select your file with the browse button and then click on ‘Upload’.
The file is then uploaded onto the server and it appears in the table. You can delete a previously uploaded file by clicking on the “del” icon.
3.D.4 Comments On this page, you can add comments to the experiment (500 characters max).
ICeE – User manual Page 23/ 28
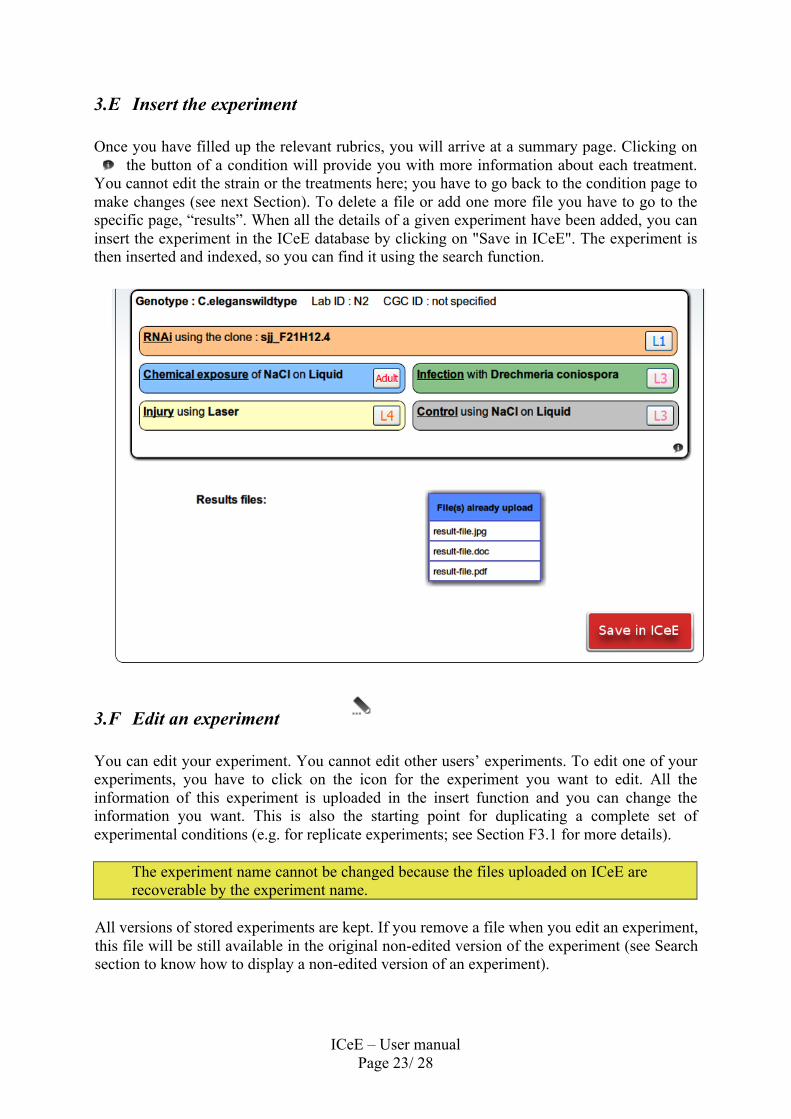
3.E Insert the experiment Once you have filled up the relevant rubrics, you will arrive at a summary page. Clicking on
the button of a condition will provide you with more information about each treatment. You cannot edit the strain or the treatments here; you have to go back to the condition page to make changes (see next Section). To delete a file or add one more file you have to go to the specific page, “results”. When all the details of a given experiment have been added, you can insert the experiment in the ICeE database by clicking on "Save in ICeE". The experiment is then inserted and indexed, so you can find it using the search function.
3.F Edit an experiment
You can edit your experiment. You cannot edit other users’ experiments. To edit one of your experiments, you have to click on the icon for the experiment you want to edit. All the information of this experiment is uploaded in the insert function and you can change the information you want. This is also the starting point for duplicating a complete set of experimental conditions (e.g. for replicate experiments; see Section F3.1 for more details).
The experiment name cannot be changed because the files uploaded on ICeE are recoverable by the experiment name.
All versions of stored experiments are kept. If you remove a file when you edit an experiment, this file will be still available in the original non-edited version of the experiment (see Search section to know how to display a non-edited version of an experiment).
ICeE – User manual Page 24/ 28
Under Linux, all the files of an edited version will be linked with a symbolic link to the old one. Thus no additional space on the disk is required and the deletion of the link will not delete the file.
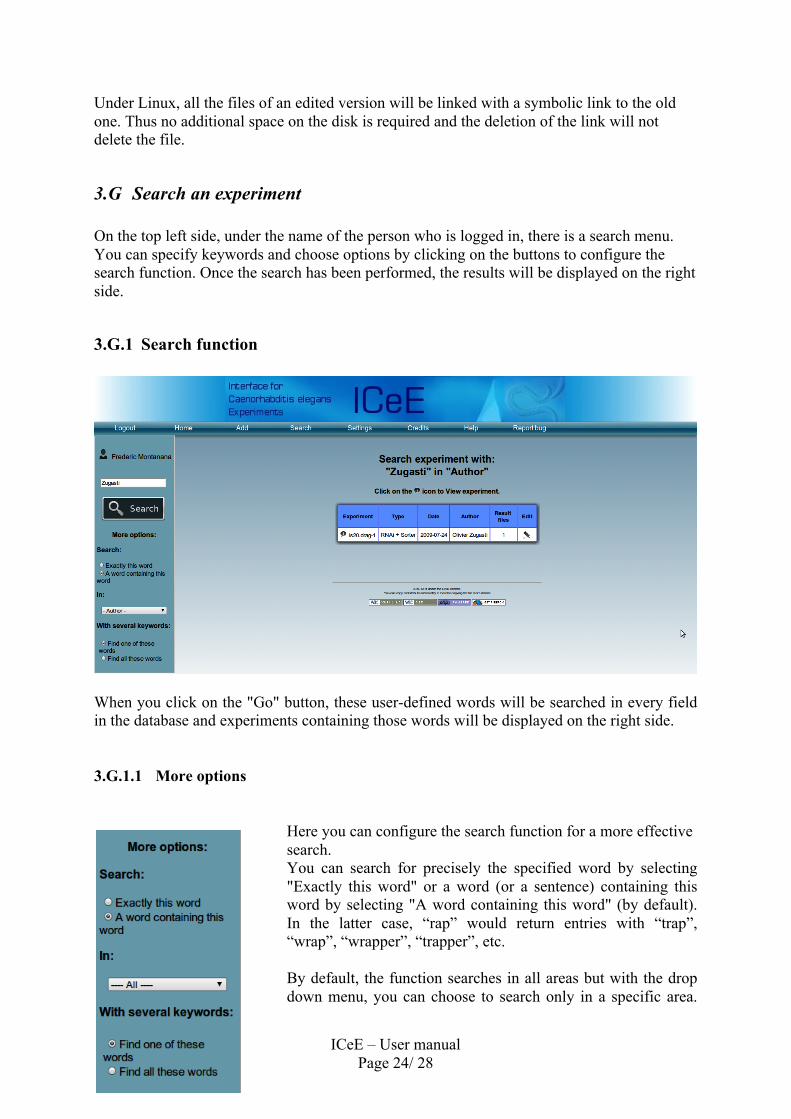
3.G Search an experiment On the top left side, under the name of the person who is logged in, there is a search menu. You can specify keywords and choose options by clicking on the buttons to configure the search function. Once the search has been performed, the results will be displayed on the right side.
3.G.1 Search function
When you click on the "Go" button, these user-defined words will be searched in every field in the database and experiments containing those words will be displayed on the right side.
3.G.1.1 More options
Here you can configure the search function for a more effective search. You can search for precisely the specified word by selecting "Exactly this word" or a word (or a sentence) containing this word by selecting "A word containing this word" (by default). In the latter case, “rap” would return entries with “trap”, “wrap”, “wrapper”, “trapper”, etc. By default, the function searches in all areas but with the drop down menu, you can choose to search only in a specific area.
ICeE – User manual Page 25/ 28
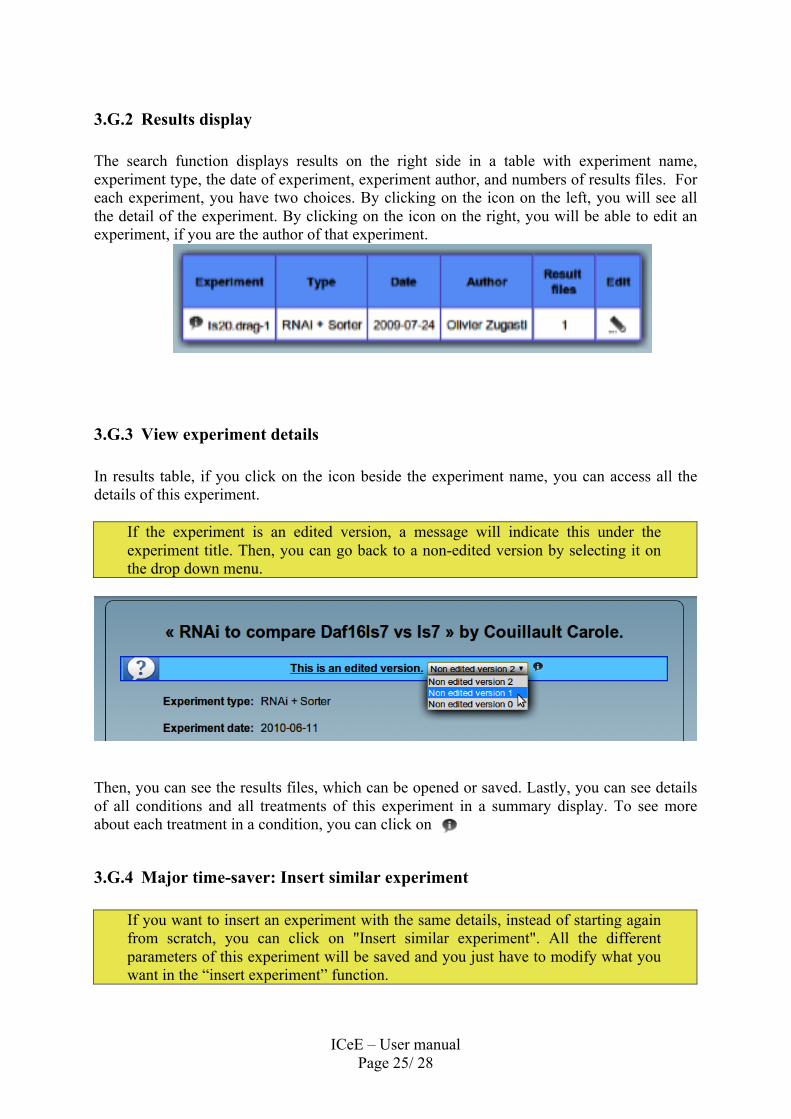
3.G.2 Results display The search function displays results on the right side in a table with experiment name, experiment type, the date of experiment, experiment author, and numbers of results files. For each experiment, you have two choices. By clicking on the icon on the left, you will see all the detail of the experiment. By clicking on the icon on the right, you will be able to edit an experiment, if you are the author of that experiment.
3.G.3 View experiment details In results table, if you click on the icon beside the experiment name, you can access all the details of this experiment.
If the experiment is an edited version, a message will indicate this under the experiment title. Then, you can go back to a non-edited version by selecting it on the drop down menu.
Then, you can see the results files, which can be opened or saved. Lastly, you can see details of all conditions and all treatments of this experiment in a summary display. To see more about each treatment in a condition, you can click on
3.G.4 Major time-saver: Insert similar experiment
If you want to insert an experiment with the same details, instead of starting again from scratch, you can click on "Insert similar experiment". All the different parameters of this experiment will be saved and you just have to modify what you want in the “insert experiment” function.
ICeE – User manual Page 26/ 28
3.H Report a bug In ICeE, you can directly report a bug on sourceforge. This will notify the developers of ICeE. Click on “Report Bug” in the navigation bar. You will be redirected to Sourceforge. Here you can submit your bug (aka Artifact). Please try to be as precise as possible.
3.I Backup ICeE If you want to save all the data entered in ICeE, you have to do two steps.
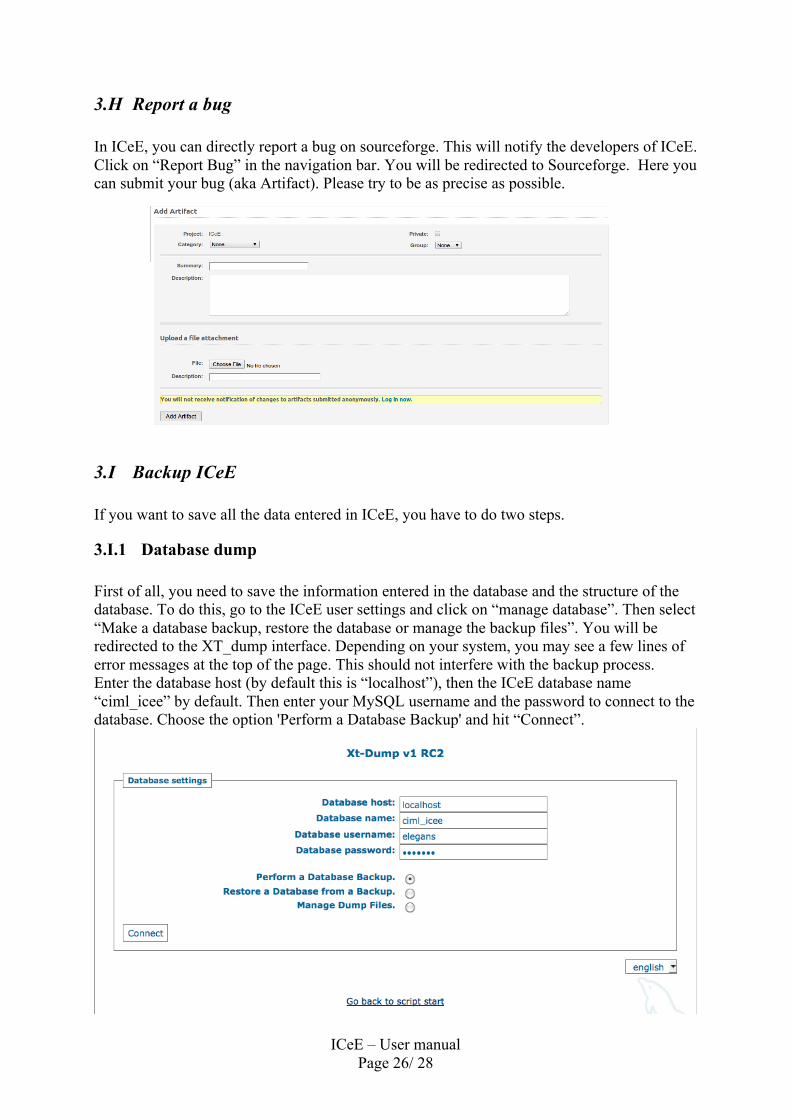
3.I.1 Database dump First of all, you need to save the information entered in the database and the structure of the database. To do this, go to the ICeE user settings and click on “manage database”. Then select “Make a database backup, restore the database or manage the backup files”. You will be redirected to the XT_dump interface. Depending on your system, you may see a few lines of error messages at the top of the page. This should not interfere with the backup process. Enter the database host (by default this is “localhost”), then the ICeE database name “ciml_icee” by default. Then enter your MySQL username and the password to connect to the database. Choose the option 'Perform a Database Backup' and hit “Connect”.
ICeE – User manual Page 27/ 28
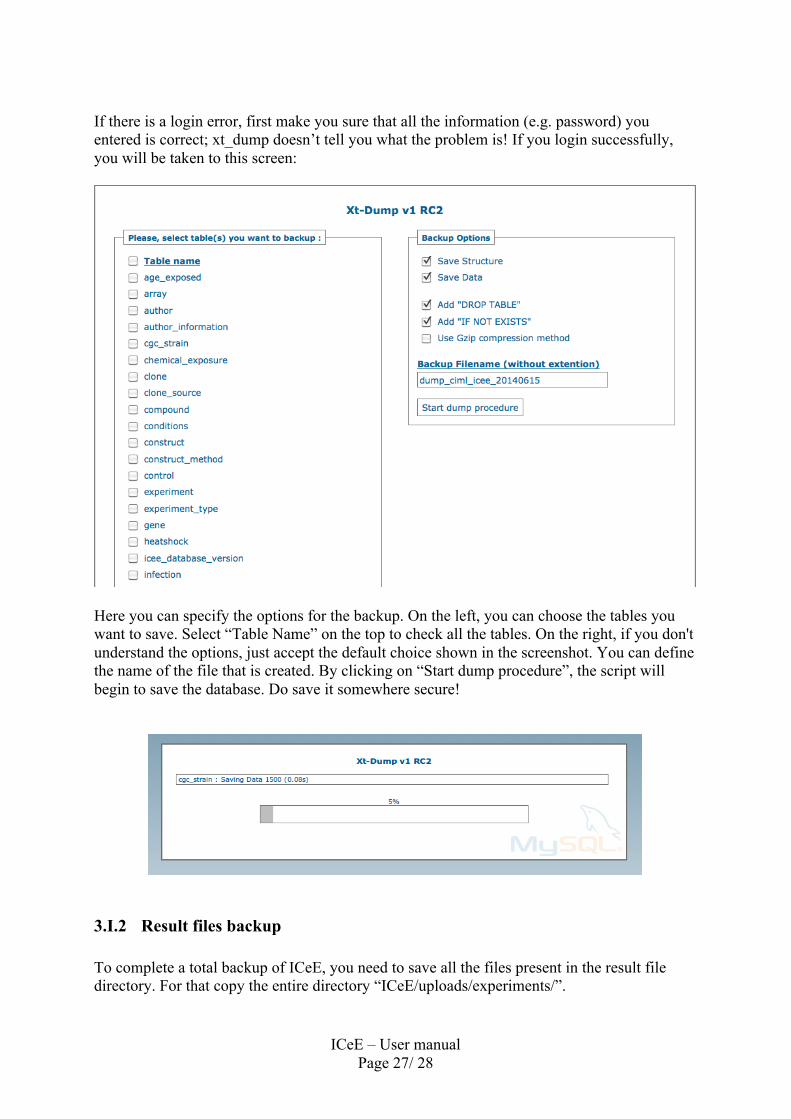
If there is a login error, first make you sure that all the information (e.g. password) you entered is correct; xt_dump doesn’t tell you what the problem is! If you login successfully, you will be taken to this screen:
Here you can specify the options for the backup. On the left, you can choose the tables you want to save. Select “Table Name” on the top to check all the tables. On the right, if you don't understand the options, just accept the default choice shown in the screenshot. You can define the name of the file that is created. By clicking on “Start dump procedure”, the script will begin to save the database. Do save it somewhere secure!
3.I.2 Result files backup To complete a total backup of ICeE, you need to save all the files present in the result file directory. For that copy the entire directory “ICeE/uploads/experiments/”.

ICeE – User manual Page 28/ 28
3.J Restoring ICeE To restore ICeE, we assume that you have made a backup of ICeE as described above. Copy the database backup file, into the directory “ICeE/xt_dump/dumps”. Then, go to the ICeE user settings and click on “manage database”. Then select “Make a database backup, restore the database or manage the backup files”. You will be redirected to the XT_dump interface. Enter the database host (by default this is “localhost”), then the ICeE database name “ciml_icee” by default. Then enter your MySQL username and the password to connect the database. Choose the option 'Restore a Database from a Backup' and hit “Connect”. If you have copied the database backup file correctly, you can choose it from the drop down menu. Hit “Start Restore”. To complete the restoration, just copy and paste the ICeE result files directory in the same place. If all goes as it should, you will have restored a version identical to the one that you had backed-up.