Embed Size (px)
Citation preview

Budget Revision - Operating IBIS User Guide
Page 1
INTEGRATED BUDGET INFORMATION SYSTEM (IBIS) USER GUIDE
BUDGET REVISION – OPERATING FORM

Budget Revision - Operating IBIS User Guide
Page 2
TABLE OF CONTENTS
1. Creating a New Budget Revision 2. Basic Information Tab 3. Positions Tab 4. Budget Detail Tab 5. Uploading Data from Excel 6. Downloading Data to Excel 7. Budget Overview Tab

Budget Revision - Operating IBIS User Guide
Page 3
PREFACE This training guide describes how to use IBIS to complete a budget revision operating form. For policy guidance regarding budget revisions, please consult the State Budget Manual. BUDGET REVISION- OPERATING Once you have successfully logged in, you should see the Work Queue page as shown below. This could be a BRU, Agency or OSBM Work Queue page depending on your log-in credentials.
Find the View indicator in the upper left-hand corner of the page. The field should contain only your BRU, Agency or OSBM. If you have access to multiple departments and/or agencies, these will appear in a drop-down list in this field. In the example below, the user is logged in as the Division of Public Health.

Budget Revision - Operating IBIS User Guide
Page 4
Creating a New Budget Revision To create a new budget revision form, click on the Create New Request dropdown list in the middle of the screen.
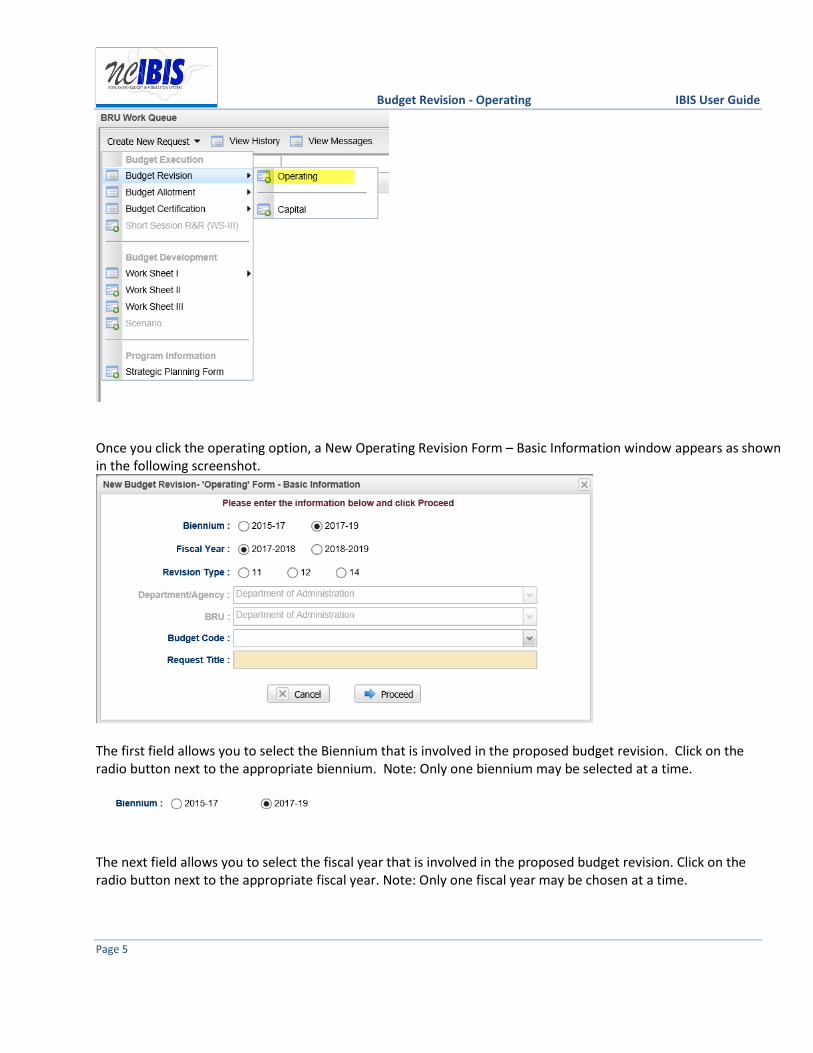
When you click on ‘Create New Request’, the drop-down will display the following options. Click on the “Budget Revision – Operating” option on the menu.
Budget Revision - Operating IBIS User Guide
Page 5
Once you click the operating option, a New Operating Revision Form – Basic Information window appears as shown in the following screenshot.
The first field allows you to select the Biennium that is involved in the proposed budget revision. Click on the radio button next to the appropriate biennium. Note: Only one biennium may be selected at a time.
The next field allows you to select the fiscal year that is involved in the proposed budget revision. Click on the radio button next to the appropriate fiscal year. Note: Only one fiscal year may be chosen at a time.

Budget Revision - Operating IBIS User Guide
Page 6
Note that if you choose the first year of a biennium, you will be able to enter data for both years in the budget revision form. If you choose the second year of the biennium, you will be able to enter data for only the second year in the form.
The next field allows you to select the revision type. Click the radio button next to the appropriate revision type. Note that once the form is created, the form allows a user to change between an 11 and 12 type but will not allow a type 14 to be changed.
Note the next two fields are labeled Department/Agency and BRU. In most cases, access is restricted to a single department/agency so it will default to your Department/Agency and BRU. If a user has access to multiple departments/agencies and BRUs, a dropdown option will appear for selection.
Budget Revision - Operating IBIS User Guide
Page 7
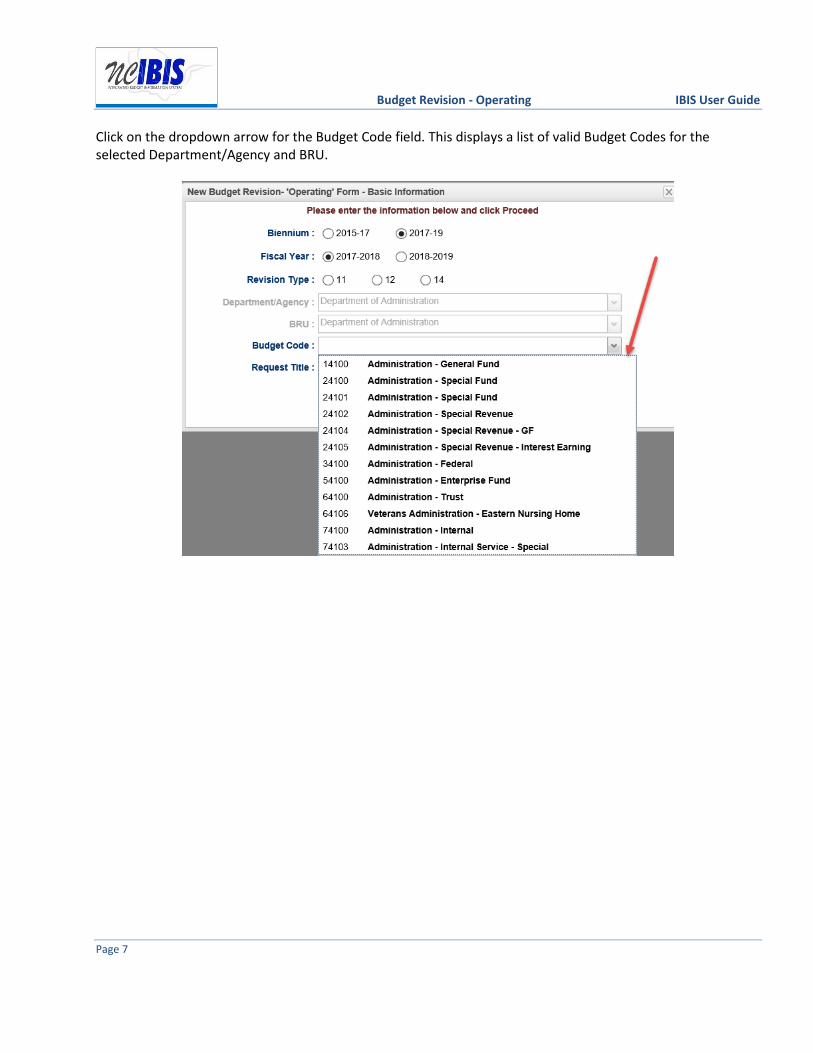
Click on the dropdown arrow for the Budget Code field. This displays a list of valid Budget Codes for the selected Department/Agency and BRU.

Budget Revision - Operating IBIS User Guide
Page 8
Select a Budget Code from the list. Once selected, the budget code will populate the field and the list will disappear as shown below.
Click in the Request Title field. A flashing cursor will appear in the field. Type a title for the budget revision. As you type, the title will appear in the field as shown below.
Clicking on the Cancel button will close the window. Nothing will be saved and the Work Queue will reappear. If there is no need to cancel the form, bypass this step. If all entries are satisfactory, click on the Proceed button as shown below.

Budget Revision - Operating IBIS User Guide
Page 9

Budget Revision - Operating IBIS User Guide
Page 10
A Budget Revision Operating form will open as shown below. The form’s five tabs (Basic Information, Positions, Budget Details, Budget Overview and Attachments) will appear in the upper left corner of the screen.
This section will only address the first four tabs. The Attachments tab’s functionality is addressed in a different user guide that is available on the IBIS website. Basic Information Tab
The Basic Information screen comes to the forefront since it is the default tab when creating a new or opening an existing form. The information from on the basic information tab is largely carried forward from the initialization screen when the form was first created, which includes the following non-editable fields – biennium, fiscal year, reference number, status, department/agency, BRU, and budget code. Biennium: The form shows the Budget Cycle selected in the initiation window. Fiscal Year: The form shows the Fiscal Year selected in the initiation window.
Reference Number: The form shows a reference number that begins with the revision type selected when the form was created (11, 12, or 14) followed by four system generated digits.

Budget Revision - Operating IBIS User Guide
Page 11
Department/Agency: The Department/Agency that is associated with your IBIS ID. BRU: The BRU associated with your IBIS ID and selected in the initiation window. Budget Code: The Budget Code selected in the initiation window.
Review the selection for the revision type field. The form should show the revision type selected when the form was created.
If a type 11 is selected, then the revision codes (lapsed salary, carry forward, new grant, etc. will be inactive (grayed out) since these are not required for type 11 budget revisions. Also, the reference number will change to coincide with the revision type. For example, the Reference Number would change to 11-VQ5Y above if the revision type was changed to 11. View the Effective and Approval Date fields. The Effective Date can be changed by typing a new date into the field or by selecting a date from calendar after the icon is clicked. The Effective Date defaults to the current date.

Budget Revision - Operating IBIS User Guide
Page 12
The Approval Date will be inactive for type 11s and 12s at the BRU and Agency levels as shown below; however, the Approval Date field is active for OSBM because approval authority resides at that level. For type 14 budget revisions, this will be an active field for BRUs and Agencies and an approval date is required to be selected prior to approval.
Click the dropdown arrow for the Recurrence field. You will see a list with the following options: Recurring, Non-recurring, and Time-limited.
Select the option that pertains to your budget revision. You will see your selection populate the field.

Budget Revision - Operating IBIS User Guide
Page 13
Based on the selection made in the Recurrence field, various revision categories will be activated or inactivated based on state budget policy. For example, if Recurring is selected, then the Lapsed Salary and Carry Forward options will be inactivated as shown below. Consult the State Budget Manual for more details. Also, if Time-Limited is selected, an End Date field will appear with a calendar icon. The End Date is required for time-limited budget revisions.
If necessary, the title can be changed by clicking in the title field and altering the text.
Review the budget revision categories. Note that these do not show when a type 11 revision is selected because the General Assembly has defined specific categories for type 11 budget revisions. For type 12 and

Budget Revision - Operating IBIS User Guide
Page 14
type 14 budget revisions, all will show if non-recurring is selected; however, as discussed above, Lapsed Salary, Carry Forward, and One-time salary change will not show when Recurring or Time-Limited is selected. For more policy specifics, consult the State Budget Manual.
Check the category that pertains to your budget revision. (Lapsed Salary was selected in the example below.) Note that if ‘Lapsed Salary’ is selected then an additional options will appear asking for type, which is required. See below for how the options will display for ‘Lapsed Salary’.

Budget Revision - Operating IBIS User Guide
Page 15
Note that if Statutory or Special Provision is selected then an additional field will appear asking for reference information, which is required. See below for how the field will display for the Statutory code. A similar reference box will appear if Special Provision is selected.
Click in the Justification box and enter an explanation for the budget revision. This is a required field on the budget revision form.
The Rich Text Editor can be clicked to format the text or to enter text.
By clicking the Rich Text Editor, a window will come up as shown below where text entered in the justification field can be edited or where a justification can be entered. Additional formatting options are available beyond those displayed on the screen by using shortcuts such as “Control + U”.

Budget Revision - Operating IBIS User Guide
Page 16
Click in the Agency Remarks box and enter text if desired. This is an optional field on the budget revision form. The Agency Remarks are editable only for Agency or BRU users.
The OSBM Remarks field is enabled only for OSBM users and is an optional field. Once text is entered by OSBM, it can be viewed but not edited by Agency and BRU users.

Budget Revision - Operating IBIS User Guide
Page 17
Enter the appropriate information in the justification and remark fields. Positions Tab Click on the Positions tab at the top of the form to continue filling out the form. This will bring the positions tab to the forefront.
If the budget revision form being developed includes changes to positions, information regarding such positions should be filled out on this tab. Note for Annualized Salary: The Annualized Salary Lines are required for any budget revision involving salary reserve. The requirement lines entered on the budget detail tab may be a portion payable amount but the annualized amounts on the Positions tab are always for 12 months. These lines are required only for permanent salary accounts and will be posted to Salary Control. If a revision involves the movement of salary reserve without a position number, bypass the position number and enter N/A for classification and grade. An example is provided further in this section.

Budget Revision - Operating IBIS User Guide
Page 18
In this section, four buttons appear: Edit Row, Remove Row(s), Sort Rows and Cancel Edit as shown below.
Note: The above buttons can only be utilized once rows have been created. Since this guide creates a new budget revision form, adding rows will be discussed first and then describe the functionality associated with these buttons. The data entry row highlighted below is used to add a row the position table.
The following fields are required information on a budget revision form: Fund, Cost Center (defaults to blank), Account Number, Grade, Classification, FTE Y1/FTE Y2 (as applicable) and Annual Salary. Position number is optional so that FTE can be entered with a value greater than 1.0. Fill in the fields in the order they appear in the row. The Fund# provides a dropdown list and a fund code can be selected from the dropdown list or typed in manually.

Budget Revision - Operating IBIS User Guide
Page 19
Entering a Cost Center is an optional. The Cost Center dropdown list will only display values if the Department/Agency uses Cost Centers; otherwise no data will be displayed. If no cost center is associated with a budget revision, this field can be bypassed because the form defaults to a blank cost center as highlighted below.
The Account field will present a list of accounts once the user has entered three digits into the field as shown below. Accounts are numerous so the system allows you to narrow the list down by entering the first few digits, or the full account code can be manually entered (typed) in the field.

Budget Revision - Operating IBIS User Guide
Page 20
Select the appropriate Account Code. The selection will populate the form and the list will disappear. Selection of an Account Code will also cause the adjacent Account Code name field to populate. An account can also be manually entered and does not have to be selected from the dropdown list.
Click in the Position Number field to make the field editable.
When editable, a cursor will appear that allows for a position number to be typed in the field. The position number is an optional field.
Click in the Grade/Band field to make the field editable.

Budget Revision - Operating IBIS User Guide
Page 21
A cursor will appear that allows for a grade/band to be typed in the field. Enter grade information into the field. If entering information for reserve accounts 537xxx, you may enter text such as N/A.
Click in the Classification Title field to make the field editable.
A cursor will appear that allows for a classification to be typed in the field. If entering information for reserve accounts 537xxx, you may enter text such as N/A.
In the next two fields, FTE Y1 and FTE Y2, enter the number of positions that are requested for the budget revision. Numbers may be entered as either positive or negative numbers. Also, if the first fiscal year of a biennium is selected then data can be entered into both columns as shown below.
If the second year of a biennium is selected then data can only be entered in Y2 as shown below.
In the Annual Salary field, enter the annual salary for the position(s) in whole numbers, without a dollar sign, comma or decimal point.
Note: The Annualized Salary Lines are required for any budget revision involving salary reserve. The annualized amounts entered here are always for 12 months. These lines are required only for permanent salary accounts. The requirement lines entered on the budget detail tab may be a portion payable amount if the budget revision has an effective date other than July 1. The amount entered will appear in the field.
Click the Add button and the row will populate the positions grid, clearing the fields for entry of another row. The Add row fields will retain the data entered for Fund Code and Cost Center in order to reduce the number of entries the user must provide in order to create a second row. Although these entries will be pre-filled, other Fund Codes and Cost Centers may be selected by the user.

Budget Revision - Operating IBIS User Guide
Page 22
When the Add button is clicked, the position data will be added to the table as shown below.
Repeat the above process to add all the position rows necessary for the budget revision form being created. To edit a row that has been entered, click on a row to highlight it.
Click on the Edit Row button , and the data in the selected row will populate the Edit/Add row line at the top of the grid as show below. Note: You can also double click the row and it will populate the Edit/Add row line.
When a row has been selected for edit, changes to any of the data previously entered are allowed. To save changes, the Update Button at the end of the row must be clicked.
Once Update has been clicked, the add/update row will clear (except for the Fund Code and Cost Center fields) and the updated data will show in the grid below.

Budget Revision - Operating IBIS User Guide
Page 23
To delete a row that has been entered, click on a row to highlight it.
Click on the Remove Row(s) button and a confirm deletion message box will appear.
When the Remove Row button is clicked, the follow window will appear.
To cancel the deletion, click the Cancel button. To complete the deletion, click the OK button. To Sort the rows that have been entered, click the Sort Rows button (shown below).
The rows will sort in Fund Code, Cost Center, Account Number order, ascending. Click a second time and they will resort in descending order. Note: There is also a built-in sort for Fund Code, Cost Center, Account Number, Account Description, Position Number, and Classification that will sort ascending or descending when the column header is clicked as shown below.

Budget Revision - Operating IBIS User Guide
Page 24
If a row has been selected for edit by highlighting and clicking the Edit Row but then no edit is necessary, click the Cancel Edit to clear the Add/Edit row and return the selected row to the grid without changes.
At the bottom of the Positions tab a Summary table is displayed. The summary information is pulled from the data entered above in the Positions Requested table and none of the data in the Summary is editable. Any changes to the Summary information must be made by editing the data in the Positions Requested table.
Position Tab Examples There may be times when you will need to use the position tab for different purposes. Listed in the steps above was an example of adding a new position. The process would be the same for removing a position; however, in that case, you would enter negative FTE and annual salary amounts. Listed below are other potential situations for the positions tab. For more guidance regarding position transactions, consult your OSBM budget analyst and the State Budget Manual. Realigning Salary Reserve When salary reserve is being realigned and does not affect a specific position, you will need to omit the position number, enter N/A (or something similar) in the Grade/Band and Classification fields, and enter zero (0) in the FTE columns. In the Annual Salary field, enter the salary reserve change.

Budget Revision - Operating IBIS User Guide
Page 25
In the example below, $2,500 is being moved from account 531211 in fund 1119 to account 531211 in fund 1120.
Changing More than One FTE When a position number is entered on the positions tab, IBIS will limit the FTE to no less than one (1.000) and no greater than one (1.000). If there is a need to change more than one FTE, you will need to omit the position number; otherwise, you will receive an error. The example below shows a reserve account with 25 FTE. You can see that the position number was omitted, N/A was entered for Grade/Band and Classification, and $0 was entered for Annual Salary.

Budget Revision - Operating IBIS User Guide
Page 26
Budget Detail Tab Move to the top of the budget revision form and click on the Budget Detail tab to bring that portion of the budget revision form to the forefront.
After clicking the Budget Detail tab, the budget revision form will be displayed as shown below.
Inserting rows in the Requirements and Receipts sections of the budget revision form works in the same fashion as inserting rows on the Positions tab. In the Requirements section, there are four buttons that appear first: Edit Row, Remove Row(s), Sort Rows and Cancel Edit. These functions are only utilized when rows have been entered into the form so the data entry function will be explained first. Then these buttons will be explained. To add a row of data for a requirement on the budget revision form, focus on the data entry row directly below the buttons mentioned above. The fields in this row are editable, and when the end of the row is reached, the Add button will save this data so that another row can be entered.

Budget Revision - Operating IBIS User Guide
Page 27
The Fund field contains a dropdown list that displays fund codes available for the budget code associated with the budget revision being created.
Select the fund from the list for the budget revision form being created. The selected fund will populate the field and the dropdown list will disappear. The fund code can also be typed in manually.
Cost Center is an optional field and the Cost Center dropdown list will only display values if the Department/Agency uses Cost Centers. This field can be bypassed if desired because the form defaults to a blank cost center as highlighted below.

Budget Revision - Operating IBIS User Guide
Page 28
If necessary, select the desired Cost Center from the dropdown list. It will populate the field and the dropdown list will disappear. The Cost Center can also be typed in manually. The Account field will present a list of accounts once the user has entered three digits into the field as shown below. Accounts are numerous so the system allows you to narrow the list down by entering the first few digits, or the full account code can be entered manually (typed) in the field.

Budget Revision - Operating IBIS User Guide
Page 29
Select the desired account from the list or type in the account number manually. It will populate the field and the dropdown list will disappear. By selecting/entering the account number, the associated account description will also populate the adjacent field.
The next set of fields in the Add/Edit Row area are Year 1 and Year 2 amount fields. Note: If the first fiscal year of a biennium is selected then data can be entered into both columns as shown below.
If the second year of a biennium is selected then data can only be entered in Y2 as shown below.
Enter amounts in the fields as appropriate. The values reformat to dollars when you click Add to finish the row entry. Be aware that amounts may be entered as either positive or negative amounts. Amounts are not required to be entered in both year fields. Once amounts are entered, the current authorized budget will be displayed for the fund, cost center, and account combination as shown below.
When all data has been entered for a row, click on the Add button. The row will move down to the grid below, and the majority of the Add/Edit row will clear (Fund Code and Cost Center information will be retained).
Add as many rows of requirements as appropriate to complete the budget revision form. Once the first row is added, the fund code and cost center codes will pre-populate with the choices made when entering that first row to help quicken the entry of subsequent rows. If these values are not appropriate for subsequent row(s), they can be overwritten.

Budget Revision - Operating IBIS User Guide
Page 30
The Add/Edit Row(s) functionality for Receipts is identical to the Requirements functionality and therefore each step will not be replicated here.
Add as many rows of receipts as appropriate to complete the budget revision form. To edit a row that has been entered (in either Requirements or Receipts), click on the row to highlight it.
Click on the Edit Row button and the data in the selected row will populate the Edit/Add row line at the top of the grid.
When a row has been selected for edit, the previously entered data may be changed. The Update button as the end of the row must be clicked to save changes.
Once Update has been clicked, the add/update row will clear (except for the fund code and cost center fields) and the updated data will show in the grid below the data entry row. To delete a row that has been entered, click on a row to highlight it.

Budget Revision - Operating IBIS User Guide
Page 31
Click on the Remove Row(s) button and a confirm deletion message box will appear.
To cancel the deletion, click the Cancel button. To complete the deletion, click the OK button. To Sort the rows that you have entered, click the Sort Rows button.
The rows will sort in Fund Code, Cost Center, Account Number order, ascending. Click a second time and they will resort in descending order. Note: There is also a built-in sort for Fund Code, Cost Center, Account Number, Account Description, Position Number, and Classification that will sort ascending or descending when the column header is clicked. If a row has been selected for edit by highlighting and clicking the Edit Row but then no edit is necessary, click the Cancel Edit to clear the Add/Edit row and to return the selected row to the grid without changes.

Budget Revision - Operating IBIS User Guide
Page 32
When Requirements and/or Receipts entries are entered into the budget revision form, the data populates the Summary table at the bottom of the Budget Detail tab. The Summary table will add all Requirements and Receipts entered in this form and calculate the Appropriation amount.
The transfer to/from section of a budget revision is required for any revision that increases or decreases appropriation. If appropriate for a budget revision, click the dropdown arrow for the budget code field under the Transfer to/from section (below).
Enter at least the first two digits of a budget code and a list of all budget codes that begin with those digits will appear. If the budget code is know, the budget code may be manually entered.

Budget Revision - Operating IBIS User Guide
Page 33
Select the appropriate budget from the list. Alternatively, a budget code can be manually entered in the field.
Click in the Y1 and/or Y2 Amt fields. (Note that the Y1 Amt field will only be enabled if the fiscal year chosen is the first of the biennium. The Y1 Amt is inactive in the example below).
Enter the amount being transferred to/from the budget code selected/entered. The total amount entered in the transfer to/from section should offset the appropriation increase entered on the budget revision so that combined the two will equal zero.
Click on the dropdown arrow next to the Reference# field. You will see a list of current month budget revisions that are the same type as the budget revision form you are completing. The Transfer to/from is restricted to current month revisions and by type. An entry should be made for transfers involving statewide reserve budget codes (19xxx) but no revision number needs to be selected.
Select a revision from the list. When you have completed the new row, click on the Add button. The row will be added to the table below. Add additional rows to the table if appropriation is being transferred from multiple budget codes and through multiple revisions.

Budget Revision - Operating IBIS User Guide
Page 34
The Edit Row, Remove Row(s), and Cancel Edit features work the same as the Positions and Budget Detail tab and will not be explained here. For assistance, refer to those functions described in previous sections of this document. Uploading Data from Excel IBIS has the ability to upload data from Excel, which will make the system more efficient for end users. This feature will allow you to upload line item data from an Excel template into IBIS thereby eliminating the need to enter data into the system manually. The following section provides step-by-step instructions on how to use the upload feature. There is an “Excel Processing” feature located in the upper right corner of the Budget Detail tab as show below. Please note, the Excel Processing tab may not appear right above the Add button as shown below. If you do not see the Excel Processing tab on your screen, please move your scrollbar to the far right of the screen to reveal the Excel Processing tab.
To begin the uploading process, click on the “Excel Processing” button. Once clicked, you will see the following menu.
These four options are described below.
• Download Template: Allows a user to download an Excel template from IBIS.
• Upload & Process: Allows a user to upload data from the Excel template into IBIS.
• Download Bulk Upload Report: Allows a user to download a report that identifies all errors associated with uploading the Excel template to IBIS.
• Export to Template: Allows a user to download requirement or receipt data from IBIS into Excel.

Budget Revision - Operating IBIS User Guide
Page 35
IBIS provides a standardized template for use when uploading data from Excel into the system. You will need to download the template by clicking the “Download Template” option. Clicking this option will produce a “File Download” window that gives you the option to open the template or save it to your computer. You may choose either option.

Budget Revision - Operating IBIS User Guide
Page 36
Open the file to view the template. Certain parts of the template have rules and are locked to prevent changes to its format. For example, users cannot enter more than four digits for a fund code and cannot resize the column widths. Enter all requirements and receipts saving the document as data is entered. Please be aware that requirements and receipts use separate tabs on the Excel spreadsheet.
Once data entry is complete in the Excel file, you are ready to “Upload and Process” the Excel file within IBIS. In order to complete this step, access the form within IBIS and locate the “Excel Processing” feature on the Budget Detail tab. Click on the icon and select “Upload and Process.”
When you select “Upload and Process,” you will see a “Bulk Upload Process” window appear as shown below.

Budget Revision - Operating IBIS User Guide
Page 37
Click the “Browse” button ( ) and select the Excel file you wish to upload into IBIS. The system will upload your file and display the following information about processing the file.
Once the file is finished uploading, IBIS will check for validation errors. If there are no errors, the data will populate the form and display a messaging stating “Line item processing completed without errors.” Please note that you will need to upload requirements and receipts separately; however, the process is the same for both.
If there are errors, you will receive the following message.

Budget Revision - Operating IBIS User Guide
Page 38
This message informs you that errors exist that must be fixed prior to fully uploading the data into IBIS. (Note: If even one error exists the upload will not be completed.) If you receive this error, you will need to click on the “Excel Processing” option on the budget detail tab and select the “Download Bulk Upload Report.” This report is a downloadable Excel file that will list all accounts that have errors associated with your upload attempt.
When you select “Download Bulk Upload Report,” you will see the following window appear. You may choose to open the file immediately or save it to your computer.
You will download the Excel spreadsheet and review each row with an identified error. Errors will be identified in column F of the spreadsheet, which is titled “System Use,” and will be highlighted in red.

Budget Revision - Operating IBIS User Guide
Page 39
The red text will describe the type of error. You will need to correct all errors, re-save the spreadsheet, and upload the file into IBIS following the steps described above. The data will only be accepted and loaded into the budget revision form once all errors are addressed. Downloading Data to Excel IBIS has the ability to download data from IBIS into Excel. This feature may assist users copy data from one budget revision to another. The following section provides step-by-step instructions on how to use the download feature. There is an “Excel Processing” feature located in the upper right corner of the Budget Detail tab as show below. Please note, the Excel Processing tab may not appear right above the Add button as shown below. If you do not see the Excel Processing tab on your screen, please move your scrollbar to the far right of the screen to reveal the Excel Processing tab.
To begin the download process, click the dropdown arrow next on the “Excel Processing” button. Once clicked, you will see the following menu.
Select the “Export to Template” option to download the data entered into IBIS into an Excel spreadsheet. Note you will need to download data from the requirements and receipts tables separately. Once selected, you will see the following window. You may choose to open the file immediately or save it to your computer.

Budget Revision - Operating IBIS User Guide
Page 40
Open the Excel spreadsheet to review your data. The Excel spreadsheet may default to the receipts or requirements tab so you will need to be sure to select the correct tab to view your data. The file will appear as shown below.

Budget Revision - Operating IBIS User Guide
Page 41
Budget Overview Tab
Move to the top of the budget revision form and click on the Budget Overview tab to bring that portion of the form to the forefront.
The Budget Overview tab is a read only tab that reflects the data entered on the Budget Detail screen and it shows summaries by fund. None of the data on this tab is editable. At the bottom of the form there are form action buttons that are available while working on every tab in the form. The buttons are: Export PDF, Save Draft, Save & Close, Ready to Submit and Delete Request. Usage of these buttons is standard within the IBIS application and their functionality is covered in the “Standard Form buttons” training document found on the IBIS website.