Embed Size (px)
Citation preview

INSTRUCTIONS
CYLINDER HEAD TEST AND REPAIR KIT FORD 6.0L
F-SERIES & E-SERIES
NEAL TECHNOLOGIES, INC.
UPDATED 7/16/2015
© 2014 BULLET PROOF DIESEL
2 Cylinder Head Test and Repair Kit| BulletProofDiesel.com
CYLINDER HEAD TEST AND REPAIR KIT FORD 6.0L
F-SERIES & E-SERIES
Problem:
A common pattern failure identified in the Ford 6.0L diesel is fuel in the cooling system. Fuel in
the cooling system is a result of a crack in the cylinder head(s), specifically forming in the injector bore,
in between the cooling and fuel systems. Fuel contamination within the cooling system will result in fuel
attacking the rubber hoses and O-rings of the cooling system, compromising their integrity.
Cure:
Bullet Proof Diesel has developed a method that fixes the problem at the source. Bullet Proof
Diesel developed a tool that fits directly into the injector bore that allows our cylinder head sealant to
be directly injected - at high pressure - into the identified crack.
Benefits:
There are several major benefits to this cylinder head injector bore repair. This repair is done
without removing your cylinder heads. This saves on down time, labor, and parts cost. Another great
benefit is the ability to perform this repair without needing a specialized shop or other specialized tools.
This repair can also be done by the at-home mechanic who is trying to save a little time, money, and
headache. Overall, this repair method allows you to effectively and efficiently repair cylinder head
cracks, without the traditional costs associated with head repairs!
NOTE: Our studies have shown a high rate of success in repairs, when done properly. Please note; there
are several factors that could affect the outcome of this repair, so please follow instructions very
carefully.
We know this repair method has proven to be successful, however repair results
are NOT guaranteed.
3 Cylinder Head Test and Repair Kit| BulletProofDiesel.com
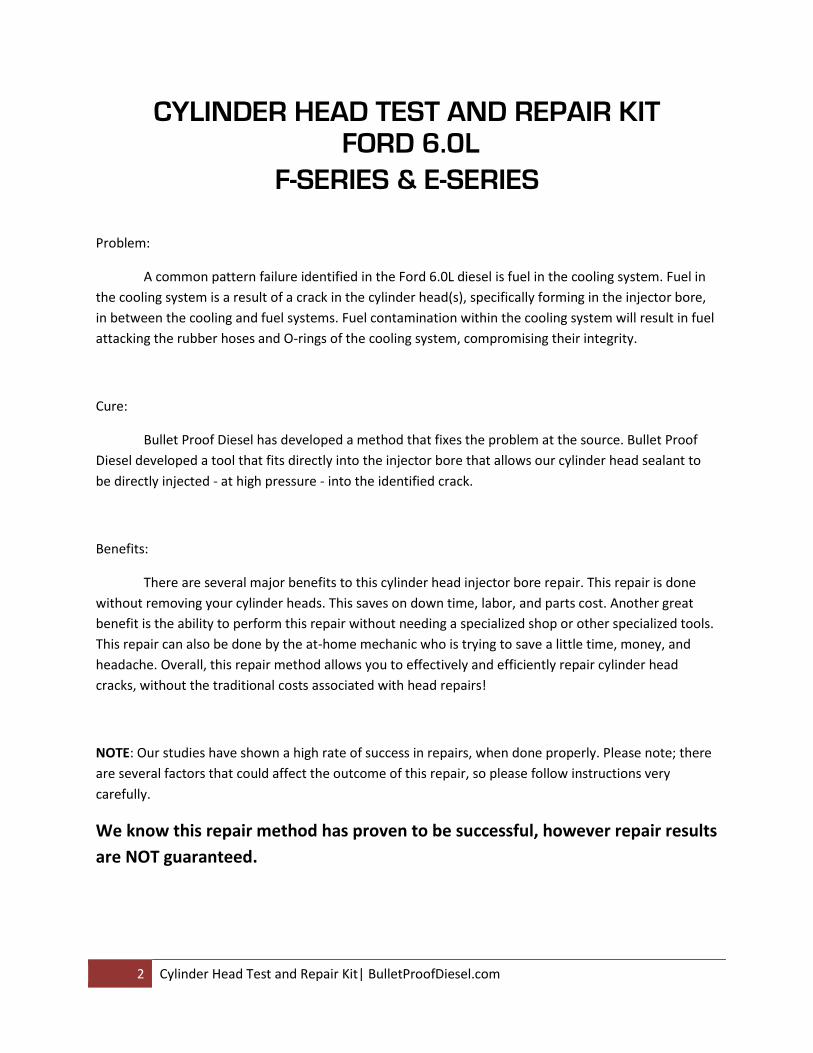
CYLINDER HEAD TEST AND REPAIR KIT
Stage 1: Verifying Fuel in the Cooling System
1. Verify that there is diesel fuel in the cooling system, using the symptoms listed below:
a. Looking inside your degas bottle, is there visible fuel floating in the coolant?
b. Can you smell fuel in degas bottle?
c. Is the degas bottle cap swollen?
d. Are the coolant hoses spongy?
NOTE: Engine oil, or a “chocolate milk” like substance in the degas bottle is likely a different issue. This
will most likely require the replacement of the engine oil cooler. If you have oil in your coolant, please
call us before you proceed.
Degas bottle cap
Degas bottle
Coolant hose
4 Cylinder Head Test and Repair Kit| BulletProofDiesel.com
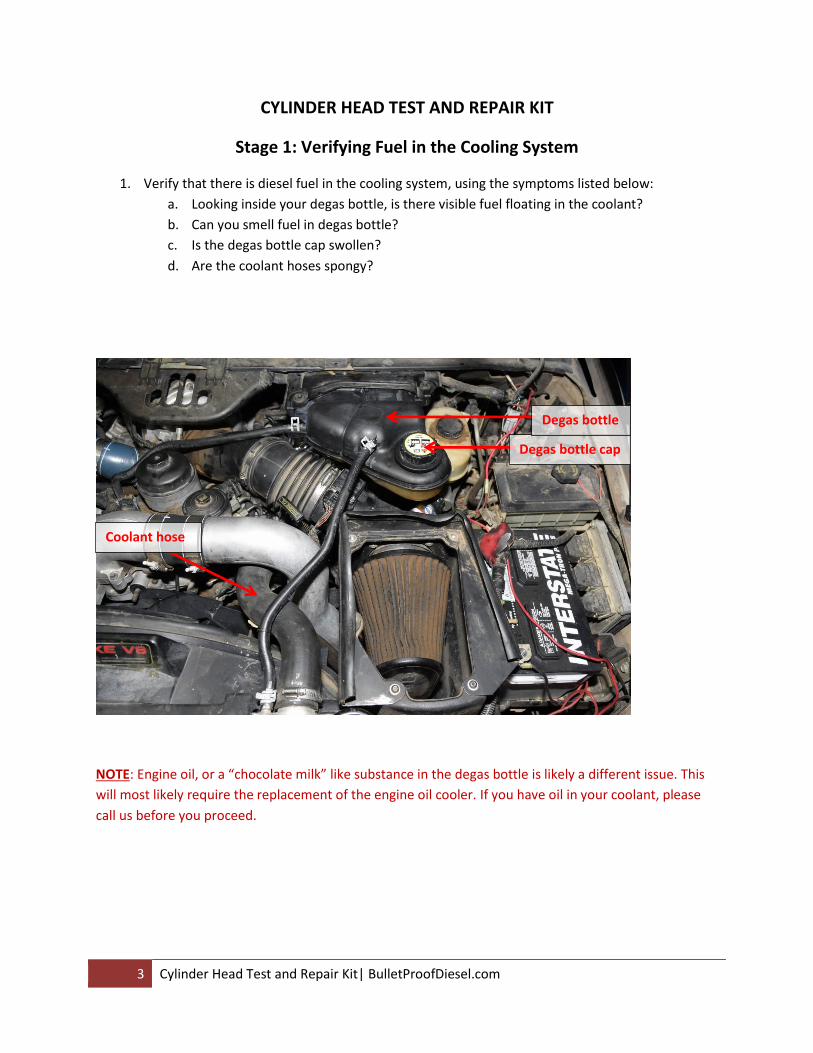
Stage 2: Verifying Cracks in the Heads
2. If you verify the previous symptoms, completely drain the cooling system.
a. Disconnect the negative battery terminals.
b. Remove the radiator petcock drain valve.
c. Remove the two (2), 8mm Allen plugs.
Driver side Passenger side
NOTE: Removal of the starter may be required to reach the block plugs.
Petcock
8mm Plug
8mm Plug
8mm Plug

5 Cylinder Head Test and Repair Kit| BulletProofDiesel.com
3. Following the Ford factory procedure for injector removal, remove all 8 injectors.
4. Clean and dry all injector bores.
NOTE: DO NOT use fluids or solvents to clean. We recommend using a dry shop towel.
6 Cylinder Head Test and Repair Kit| BulletProofDiesel.com
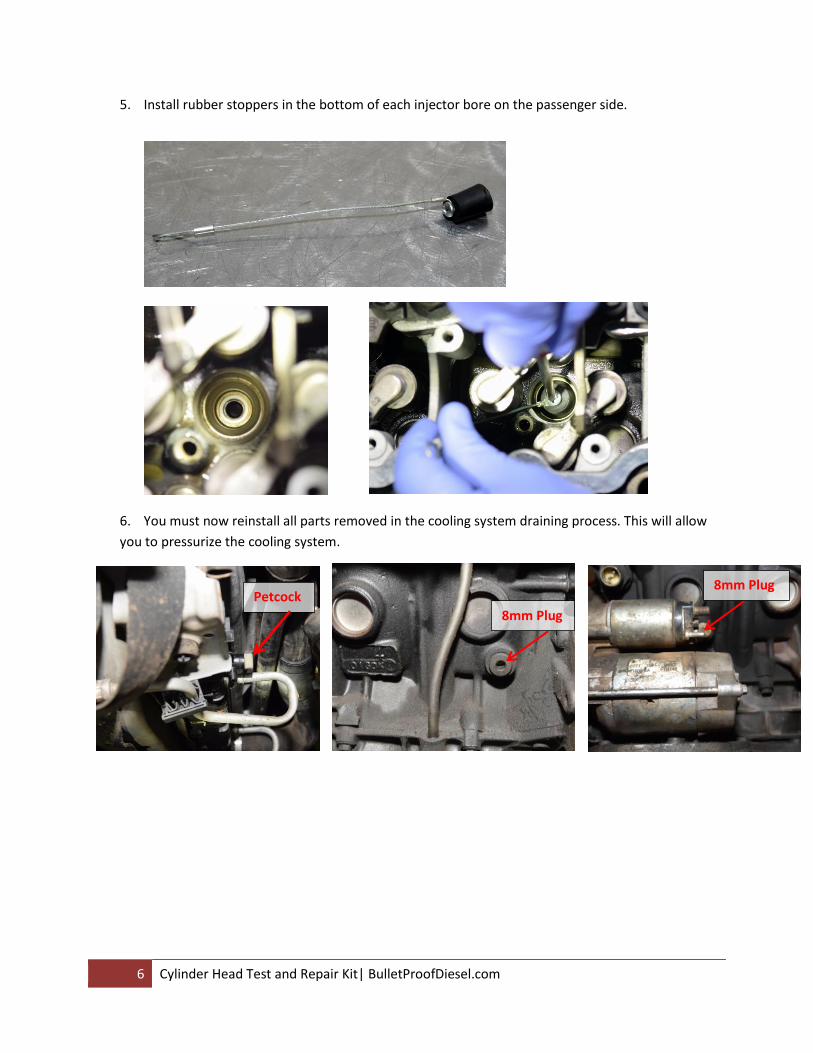
5. Install rubber stoppers in the bottom of each injector bore on the passenger side.
6. You must now reinstall all parts removed in the cooling system draining process. This will allow
you to pressurize the cooling system.
Petcock
8mm Plug
8mm Plug

7 Cylinder Head Test and Repair Kit| BulletProofDiesel.com
7. Using a cooling system pressure tester, pressurize cooling system to 20psi MAX!
NOTE: DO NOT over pressurize! Damage or injury may occur. NOTE: If you do not have a cooling system pressure tester, Bullet Proof Diesel offers them for
sale with the kit. Please note, the tool pictured above is not the tool Bullet Proof Diesel sells.
Please refer to the following page for information on the optional tool you will receive.
8 Cylinder Head Test and Repair Kit| BulletProofDiesel.com
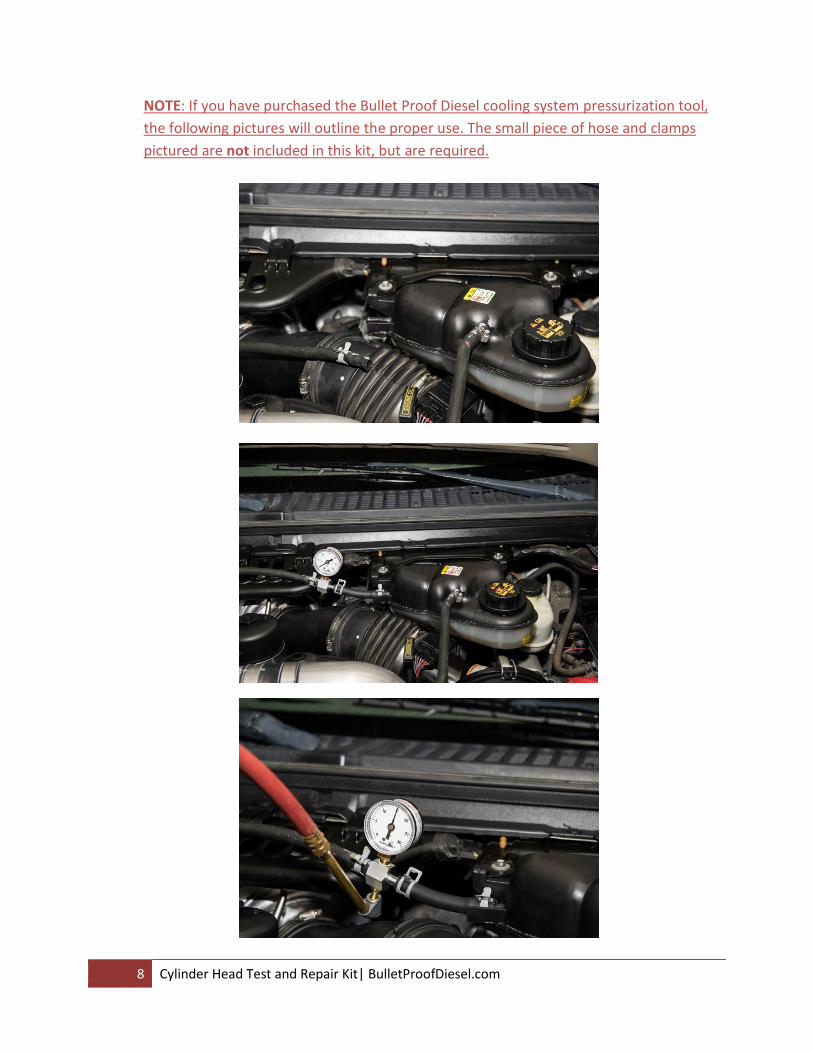
NOTE: If you have purchased the Bullet Proof Diesel cooling system pressurization tool,
the following pictures will outline the proper use. The small piece of hose and clamps
pictured are not included in this kit, but are required.
9 Cylinder Head Test and Repair Kit| BulletProofDiesel.com
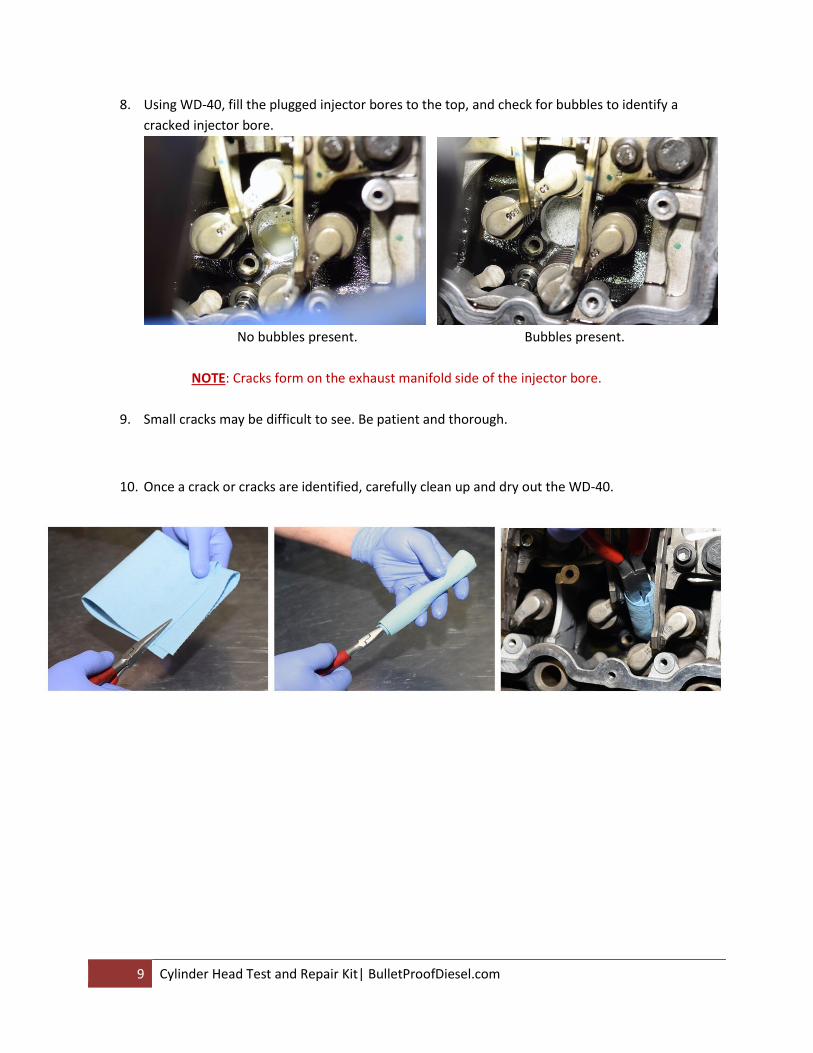
8. Using WD-40, fill the plugged injector bores to the top, and check for bubbles to identify a
cracked injector bore.
No bubbles present. Bubbles present.
NOTE: Cracks form on the exhaust manifold side of the injector bore.
9. Small cracks may be difficult to see. Be patient and thorough.
10. Once a crack or cracks are identified, carefully clean up and dry out the WD-40.

10 Cylinder Head Test and Repair Kit| BulletProofDiesel.com
11. Remove the rubber stoppers.
12. Clean and dry injector bores thoroughly, ensuring ALL foreign objects, debris, and contaminates
are removed.
13. Repeat steps 5-12 on the opposite cylinder head.
NOTE: Surface and bore prep are CRITICAL. Use new gloves to keep surfaces, tools, and work area clean.
11 Cylinder Head Test and Repair Kit| BulletProofDiesel.com
Stage 3: Preparing and Using Cylinder Head Tool for Repair
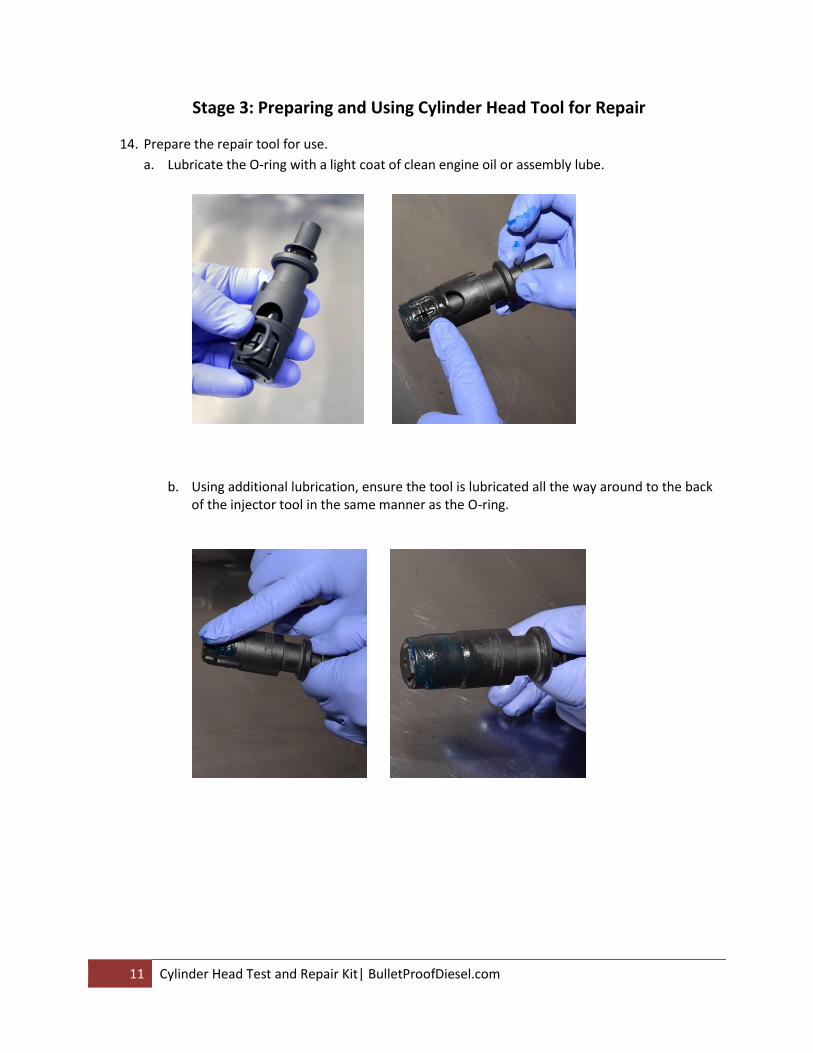
14. Prepare the repair tool for use.
a. Lubricate the O-ring with a light coat of clean engine oil or assembly lube.
b. Using additional lubrication, ensure the tool is lubricated all the way around to the back of the injector tool in the same manner as the O-ring.

12 Cylinder Head Test and Repair Kit| BulletProofDiesel.com
c. While holding the injector tool in one hand, slide the wedged portion open to expose the interior as shown. Lightly lubricate this exposed area on each side of the tool.
d. Once properly lubricated, gently slide the wedged portion open and closed a few times, to work the lubricant into the grooves.

13 Cylinder Head Test and Repair Kit| BulletProofDiesel.com
e. Index the OEM injector hold down clamp to the notch on the injector bore tool.
f. Using a paper towel, tear off enough to form a gumball sized plug, and place it into
the injector bore. This is to prevent the sealant from entering the cylinder. Failure to
do so may cause engine damage.

14 Cylinder Head Test and Repair Kit| BulletProofDiesel.com
g. Push the paper towel plug to the bottom of the injector bore. Make sure the paper
plug is fully seated in the stainless steel injector cup. Be sure to clean the injector
hold down, bolt hole.
h. Install the repair tool into the injector bore, and torque to 24 foot pounds.
NOTE: DO NOT use impact or air tools of any kind when installing the injector bore tool.
While installing the tool into the cylinder head, slowly tighten the injector hold down
bolt while holding the tool as close as possible to center. This will help to ensure the tool
goes into the injector bore straight, and does not bind during installation.
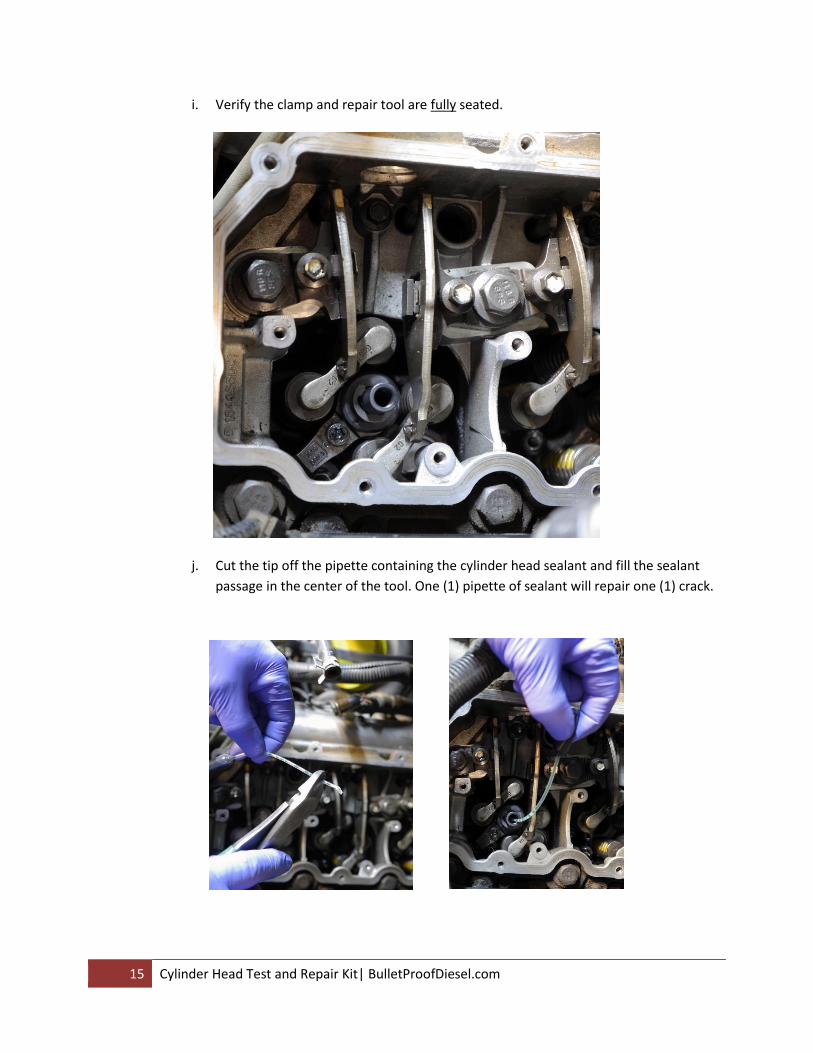
15 Cylinder Head Test and Repair Kit| BulletProofDiesel.com
i. Verify the clamp and repair tool are fully seated.
j. Cut the tip off the pipette containing the cylinder head sealant and fill the sealant
passage in the center of the tool. One (1) pipette of sealant will repair one (1) crack.
16 Cylinder Head Test and Repair Kit| BulletProofDiesel.com
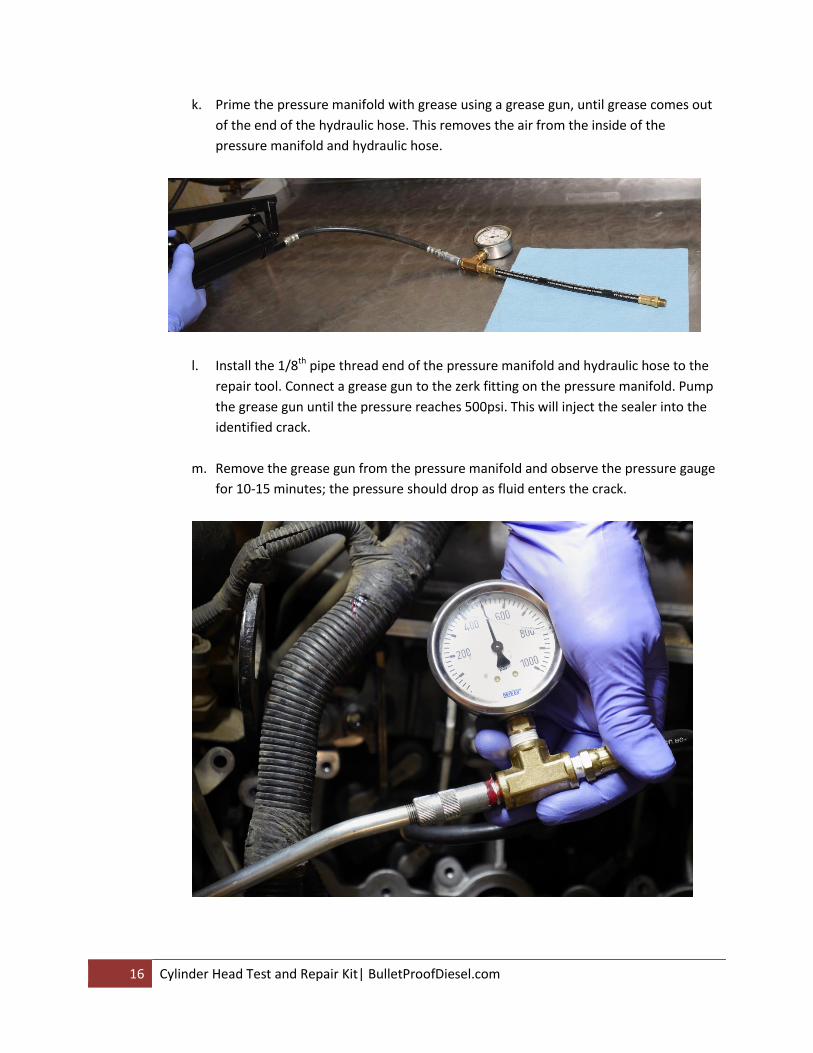
k. Prime the pressure manifold with grease using a grease gun, until grease comes out
of the end of the hydraulic hose. This removes the air from the inside of the
pressure manifold and hydraulic hose.
l. Install the 1/8th pipe thread end of the pressure manifold and hydraulic hose to the
repair tool. Connect a grease gun to the zerk fitting on the pressure manifold. Pump
the grease gun until the pressure reaches 500psi. This will inject the sealer into the
identified crack.
m. Remove the grease gun from the pressure manifold and observe the pressure gauge
for 10-15 minutes; the pressure should drop as fluid enters the crack.

17 Cylinder Head Test and Repair Kit| BulletProofDiesel.com
n. Once the pressure has dropped to near zero, or after 15 minutes, remove and clean the
repair tool using a solvent.
o. Leave the pressure manifold and hydraulic hose charged with the grease gun for the next
repair.
p. After removing the tool, clean and dry the injector bore.
NOTE: DO NOT use impact or air tools of any kind. When removing the tool, carefully loosen the injector
hold down bolt. The bolt will break loose initially, then feel tight again. Once the bolt feels tight again,
slowly loosen the bolt by hand with consistent and even pressure applied. This consistent pressure will
ensure the injector hold down does not become damaged upon removal. If the tool does not come out
by hand, stop and call us.
NOTE: DO NOT use fluids or solvents to clean the injector bore. We recommend using a dry shop towel.
18 Cylinder Head Test and Repair Kit| BulletProofDiesel.com
q. Repeat as necessary on all cracked cylinders, using fresh sealant for each cylinder.
r. Leave injector bores open and allow it to cure for 24 hours. DO NOT attempt to start
or turn the key to the “on” position in your vehicle. Ideal curing temperature is
about 70°F. Colder temperatures (below freezing) could require up to 72 hours to
reach maximum strength.
s. Repeat the test procedures on all repaired cylinder heads after the 24 hours have
passed, verifying the cracks are sealed. Repeat the repair if necessary, with a fresh
pipette of sealant.
t. Follow Ford factory procedure for injector reinstallation.
u. Flush the cooling system completely, following the Ford factory procedure. Be sure
to replace/change any necessary O-rings and hoses.
Stage 4: Other Considerations
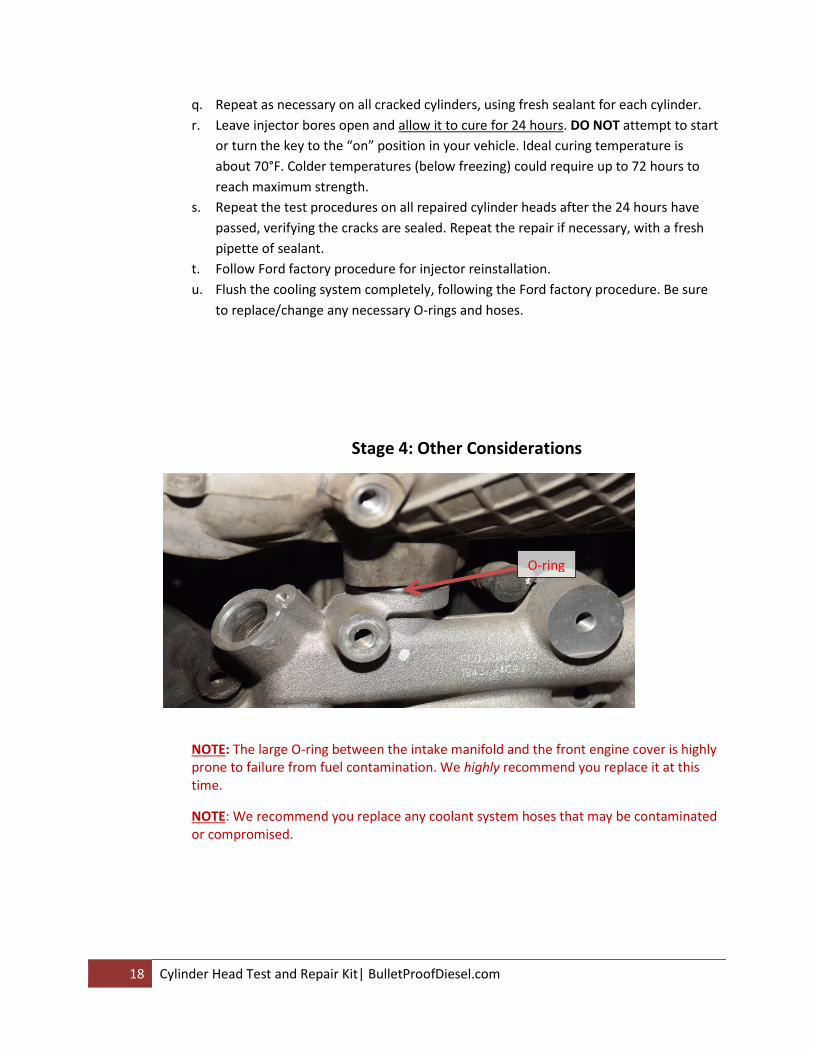
NOTE: The large O-ring between the intake manifold and the front engine cover is highly prone to failure from fuel contamination. We highly recommend you replace it at this time.
NOTE: We recommend you replace any coolant system hoses that may be contaminated or compromised.
8mm Plug
O-ring
19 Cylinder Head Test and Repair Kit| BulletProofDiesel.com
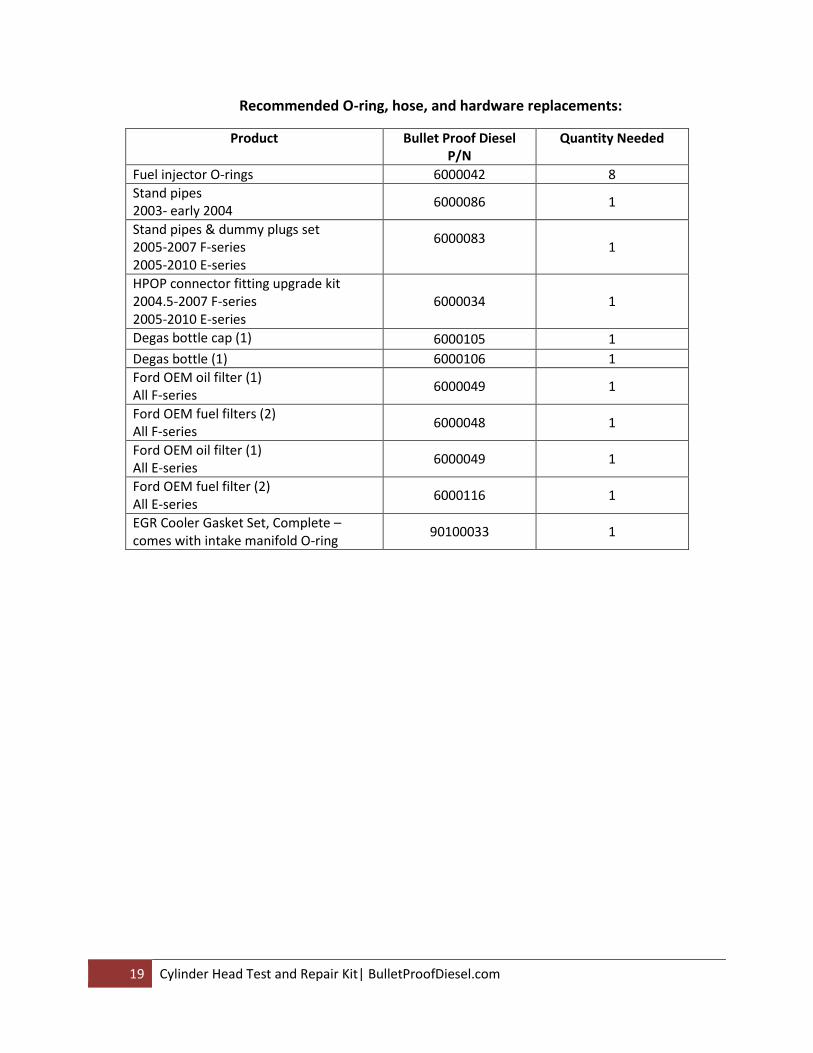
Recommended O-ring, hose, and hardware replacements:
Product Bullet Proof Diesel P/N
Quantity Needed
Fuel injector O-rings 6000042 8
Stand pipes 2003- early 2004
6000086 1
Stand pipes & dummy plugs set 2005-2007 F-series 2005-2010 E-series
6000083
1
HPOP connector fitting upgrade kit 2004.5-2007 F-series 2005-2010 E-series
6000034 1
Degas bottle cap (1) 6000105 1
Degas bottle (1) 6000106 1
Ford OEM oil filter (1) All F-series
6000049 1
Ford OEM fuel filters (2) All F-series
6000048 1
Ford OEM oil filter (1) All E-series
6000049 1
Ford OEM fuel filter (2) All E-series
6000116 1
EGR Cooler Gasket Set, Complete – comes with intake manifold O-ring
90100033 1