Embed Size (px)
Citation preview

Equipment Program
Instructions for Measuring Entrapment Zones
November 2015
Description of Test ToolsEach test requires the use of simple tools, including a cone, a cylinder, and a spring scale. Your tools may look slightly different from the tools in the figures, but they will work the same way.
Cone and Cylinder ToolThe cone and cylinder is a combination tool (see Figure 5). It can be easily taken apart so that the cone and cylinder can be used separately. Tests 1, 2 and 3 use only the cone. Test 4 uses the combined assembled tool.
The diameter of the large end of the cone represents the width of a small adult head (120 mm). The diameter of the cylinder represents the size of a small adult neck (60 mm). The cone and cylinder together weigh 6.8kg. This represents the combined weight of an adult head (5.4kg) and
neck (1.4). The red area of the cylinder defines contact angles in which the neck could become wedged (60 degrees or
narrower)
The cone tool includes the following features: A loop at the end for attaching a spring scale. A safety strap. A marked centre line on the large face of the cone.
The cylinder includes the following features: Red and green zones for identifying pass/fail at side rail ends. A level to aid in tool positioning (yellow end).
To prevent personal injury during the measurement process, attach the strap to a secure point on the bed and shorten the length of the safety strap enough to keep the tool from dropping on your feet if it should fall during a test. Make sure the strap is long enough to not interfere with the test measurement.
Page 1 of 16 | DCSI – Intructions for Measuring Entrapment Zones
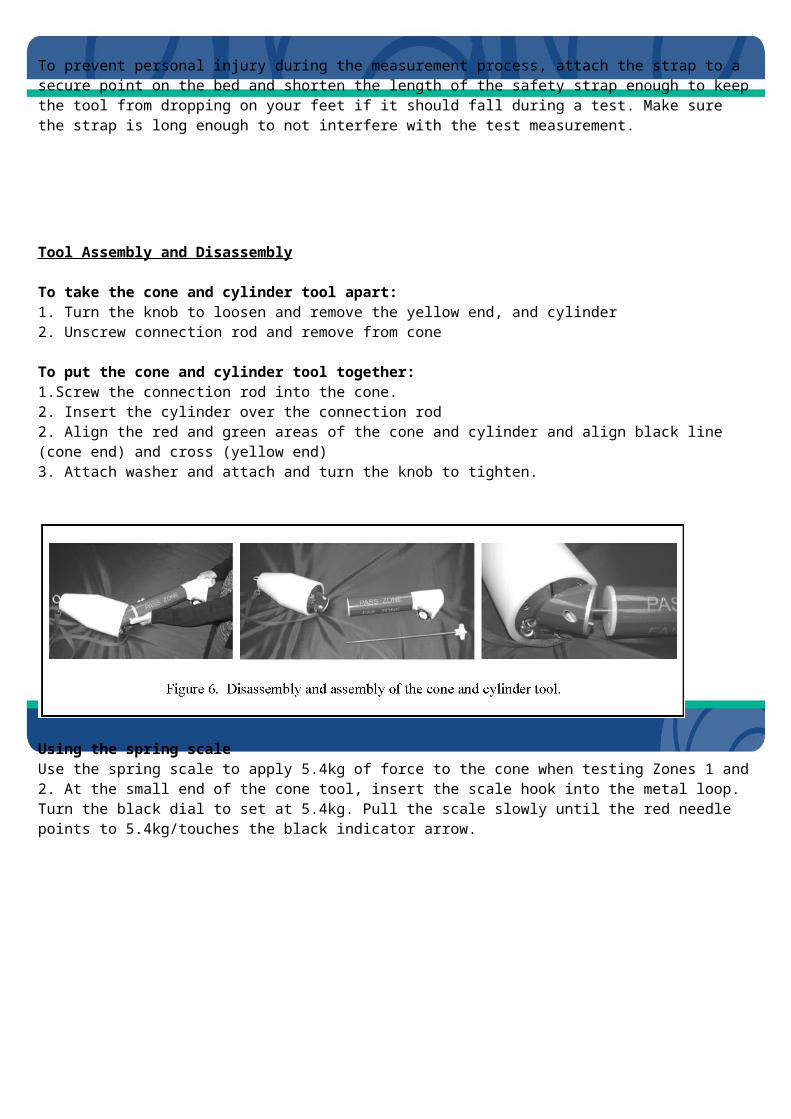
Tool Assembly and Disassembly
To take the cone and cylinder tool apart:1. Turn the knob to loosen and remove the yellow end, and cylinder2. Unscrew connection rod and remove from cone
To put the cone and cylinder tool together:1.Screw the connection rod into the cone.2. Insert the cylinder over the connection rod2. Align the red and green areas of the cone and cylinder and align black line (cone end) and cross (yellow end)3. Attach washer and attach and turn the knob to tighten.
Using the spring scaleUse the spring scale to apply 5.4kg of force to the cone when testing Zones 1 and 2. At the small end of the cone tool, insert the scale hook into the metal loop. Turn the black dial to set at 5.4kg. Pull the scale slowly until the red needle points to 5.4kg/touches the black indicator arrow.
General Testing Considerations
• Bed Occupancy:
Page 2 of 16 | DCSI – Instructions for Measuring Entrapment Zones Equipment Program: Phone:1300 295 786

For ease of mattress movement and measurement, and general safety, the client should not be in the bed during the measurement procedures.• Bed Height: To avoid unnecessary bending or back strain, position the bed at a comfortable working height.• Bed Wheels: To prevent movement of the bed during testing, lock the wheels.• Linens/Sheets: Perform the tests with sheets in place as is typical for client care. Remove any pillows and blankets.• Personal Safety: To avoid injury, use care when pulling the tool through openings in the bed rails.If the tool suddenly pulls through, you could lose your balance and fall. Always use the safety strap to keep the tool from injuring your feet if it falls.• Intermediate Rail Position: Some rails have an intermediate stopping position or a high and low locking position. Follow the individual test instructions, which may require testing the rails at both positions.• Bed Articulation: Most tests should be done with the bed in the flat position. The exception is the test for Zone 2. Follow the individual test instructions carefully.• Testing Sequence : Consider testing Zone 4 either first or last as this is the only Zone that requires full assembly of the tool.• Test Population :These instructions and use of the measuring tool is applicable for testing entrapment zones for adults. There is no tool available for measurement of entrapment zones for children. • Testing Tips : Consult the Frequently Asked Questions and Testing Tips for helpful information.
Zone 1 TestZone 1: Within the railThis test assesses the potential for head entrapment within the perimeter of the rail.The tools needed to do this test are the cone, the safety strap and the spring scale.
Prepare for the Zone 1 Test:1. Lock the wheels.2. Put the bed in the flat, horizontal position.3. Fully raise all bed rails.
Page 3 of 16 | DCSI – Instructions for Measuring Entrapment Zones Equipment Program: Phone:1300 295 786

4. Position the bed at a comfortable working height.
Do the Zone 1 Test:1. With the cone resting on mattress, attach the safety strap of the cone to the rail being tested. Make sure the strap is short enough to keep the tool from injuring your feet if it falls, and long enough so it does not interfere with the test.
2. From inside the rail, insert the cone, small end first, into the largest opening in the rail. Try to pull the tool through the space (figure 8).
3. If the tool does not pull through freely, attach the spring scale to the loop on the small end of the cone. Try to pull the cone through the rail by pulling on the attached spring scale using 5.4kg of force.Use care when pulling. If the tool suddenly pulls through the opening, you may lose your balance and fall, or the tool may fall on you.
4. Repeat steps 2 and 3 to check all other openings within the same rail.
5. Interpret test result.
Interpret the Zone 1 Results:If the large end of the cone does not pass through any of the openings, this space passes the test (figure 9a).If the large end of the cone does pass through any of the openings, this space fails the test(figure 9b).
Repeat the Zone 1 Test:On the other rails: Repeat the test for all other rails on the bed
Zone 2 TestZone 2: Under the rail between the rail supports or next to a single supportThis test assesses the potential for head entrapment under the rail, at a location between the rail supports or next to a single support.The tools needed to do this test are the cone, the safety strap and the spring scale.
Prepare for the Zone 2 Test:1. Lock the wheels.2. Fully raise all bed rails.3. Position the bed at a comfortable working height.
Do the Zone 2 Test:1. Firmly push the mattress away from the rail being measured until it stops.
Page 4 of 16 | DCSI – Instructions for Measuring Entrapment Zones Equipment Program: Phone:1300 295 786

2. Identify the space where the test will be done (see Figure 10a).
3. Test this zone with the bed in both the flat and articulated positions. Raise and lower the head and foot sections of the bed and observe the space between the rail supports that appears to be the largest (this may be at the pivot point when backrest and knee break are raised – see the Appendix for examples). If unsure of where the largest space is created, do multiple tests along the length of the rail between the supports.
4. Attach the safety strap of the cone to the rail being tested. Make sure the strap is short enough to keep the tool from injuring your feet if it falls, and long enough so it does not interfere with the test.
5. From the inside of the rail, insert the cone, small end first, into the gap between the mattress and the lower edge of the rail, between the rail supports. Let the cone compress the mattress.Do not force the cone into the area.
6. Attach the spring scale to the loop on the cone.
7. Pull on the spring scale with 5.4kg of force at any angle that increases the chances of the cone going through the space. Use care when pulling. If the tool suddenly pulls through the opening, you may lose your balance and fall, or the tool may fall on you. Observe whether the large end of the cone enters through the opening.
8. Interpret test result.
Interpret Zone 2 Test Results:If the large end of the cone does not pass through the space under the rail, this space passes the test (figures 11a and 11b).If the large end of the cone does pass through the space under the rail, this space fails the test (figures 11c and 11d).
Page 5 of 16 | DCSI – Instructions for Measuring Entrapment Zones Equipment Program: Phone:1300 295 786

Repeat the Zone 2 Test:On the same rail: If the rail has intermediate locking positions, perform the test for every intermediateposition.On the other rails: Perform the test for all other rails on the bed, including intermediate positions.
Zone 3 TestZone 3: Between the rail and the mattressThis test assesses the potential for head entrapment between the inside of the rail and thesurface of the mattress (compressed by the weight of a person’s head).The tools needed for this test are the cone and the safety strap.
Prepare for the Zone 3 Test:1. Lock the wheels.2. Put the bed in the flat, horizontal position.3. Fully raise all bed rails.
Page 6 of 16 | DCSI – Instructions for Measuring Entrapment Zones Equipment Program: Phone:1300 295 786

4. Position the bed at a comfortable working height.
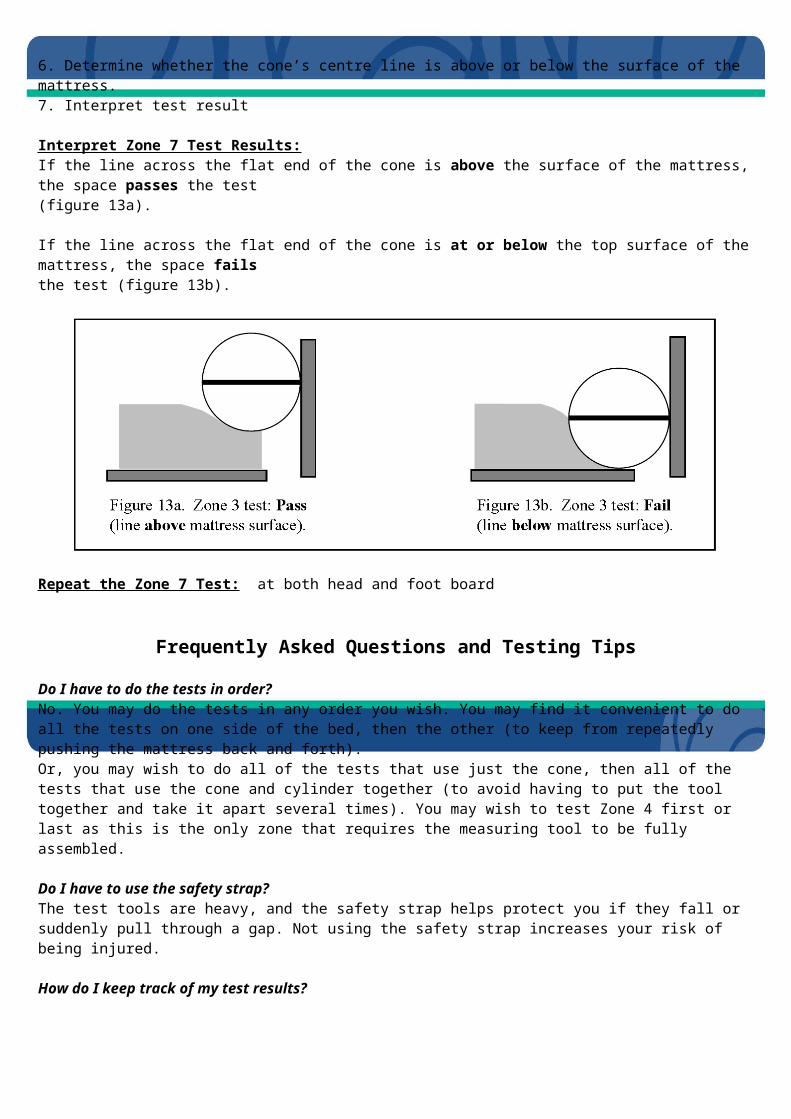
Do the Zone 3 Test:1. Firmly push the mattress away from the rail being measured until it stops.2. Put the cone near the rail being tested and attach the safety strap. Make sure the strap is short enough to prevent the tool from injuring your feet if it falls, and long enough so it does not interfere with the test. 3. Gently place the cone horizontally in the gap (figure 12a). Do not push the tool down into the gap.4. Turn the cone until the line on the face of the large end is horizontal (figure 12b).5. Let the cone sink into the space by its own weight. If the cone is tilted, use one hand to gently level it (figure 12c). Do not push the tool down into the gap.Note: If a mattress stop, rail support, or other structure keeps the cone from sinking in the gap, put the cone tool at a different location along the rail where there is no interference.6. Determine whether the cone’s centre line is above or below the surface of the mattress.7. Interpret test result
Interpret Zone 3 Test Results:If the line across the flat end of the cone is above the surface of the mattress, the space passes the test(figure 13a).
If the line across the flat end of the cone is at or below the top surface of the mattress, the space failsthe test (figure 13b).
Page 7 of 16 | DCSI – Instructions for Measuring Entrapment Zones Equipment Program: Phone:1300 295 786

Repeat the Zone 3 Test:
On the same rail: If the rail has any intermediate positions, perform the test at every intermediateposition.
On the other rails: Perform the test for all other rails on the bed, including the intermediate positions.
Zone 4 TestNOTE: Consider testing this zone first or last as it requires full assembly of the measuring toolZone 4: Under the rail at the end of the railThis test assesses the potential for neck entrapment between the top of the mattress (compressed by the person) and the lower-most portion of the rail, at the end of the rail.The tools needed for this test are the assembled cone and cylinder with safety strap.
Prepare for the Zone 4 Test:1. Lock the wheels.2. Put the bed in the flat, horizontal position.3. Fully raise all bed rails.4. Position the bed at a comfortable working height.
Page 8 of 16 | DCSI – Instructions for Measuring Entrapment Zones Equipment Program: Phone:1300 295 786

Do the Zone 4 Test:1. Firmly push the mattress away from the rail being tested until it stops.
2. Attach the safety strap of the cone tool to the rail being tested. Make sure the strap is short enough to prevent the tool from injuring your feet if it falls, and long enough so it does not interfere with the test.
3. Just beyond the end of the rail, rest the cone portion of the cone and cylinder tool on the mattress. The test area is shown in Figure 14.
Note: If the cylinder tool cannot fit into an area between the head or footboard and the end of a rail, the space passes.
4. Position the tool so that the large face of the cone is flush or even with the edge of the mattress (figure 15a).
5. Let the weight of the cone compress the mattress, but do not force the tool down onto the mattress or under the rail. Slide the tool towards the rail until it touches the rail or support (figure 15b).
6. Hold the cylinder section and use the level on the end of the cylinder to keep the cone level.
7. If the cylinder slides completely under the rail, this space fails. If the cylinder touches the rail, observe the colour on the cylinder where it makes contact: Red fails; Green passes (figure 16).
8. Interpret test result.
Interpret Zone 4 Test Results:If the cylinder touches the rail in the green area, the space passes (figure 16a).If the cylinder touches the rail in the red area, the space fails (figure 16b).If the cylinder passes completely under the rail, the space fails (figure 16c).Reminder: If the cylinder tool cannot fit into an area between the head or footboard and the end of a rail, the space passes.
Page 9 of 16 | DCSI – Instructions for Measuring Entrapment Zones Equipment Program: Phone:1300 295 786

Repeat the Zone 4 Test:On the same rail: If the rail has any intermediate positions, perform the test at every intermediate position.
On the other rails: Perform the Zone 4 test at both ends of all other rails on the bed, including the intermediate positions.
Zone 5Zone 5: Between split railsThere are no instructions for testing of this zone. Split rails are not provided/supplied by the DCSI Equipment Program and it is recommended that these rails are replaced if located on a bed.
Zone 6 TestZone 6: Between the end of the rail and the head or foot boardThis test assesses the potential for neck entrapment between the end of the rail and the head or foot board.The tool needed for this test is the cylinder.
Prepare for the Zone 6 Test:1. Lock the wheels.2. Put the bed in the flat, horizontal position.3. Fully raise all bed rails.4. Position the bed at a comfortable working height.
Do the Zone 6 Test:
A) For full length rails1. Gently place the cylinder horizontally above the gap between the end of the rail and the head or foot board. 2. Allow the cylinder to rest with its full weight on the gap. Do not push the tool down into the gap. Do not use the tool to try to pry apart the rails and the head or foot board.
3. Interpret test result
Page 10 of 16 | DCSI – Instructions for Measuring Entrapment Zones Equipment Program: Phone:1300 295 786

Interpret Zone 6 Test Results (full length rails):If the cylinder enters or slips into the gap, the space fails.If the cylinder remains above the gap and cannot enter, the space passes.
B)For rails that are NOT full length:1. Test the gap between the end of the rail and the head board as for full length rails (see above). 2. Interpret test result as for full length rails (see above).
3. The length of the cylinder is 318mm. Position the length of the cylinder horizontally between the end of the rail and the foot board. Slide the cylinder (horizontally) up and down the vertical distance of the rail.
4. Interpret test result.
Interpret Zone 6 Test Results (rails that are NOT full length):If the length of the cylinder (held horizontally) can pass into the gap for the entire vertical distance of the rail, the space passes.If the cylinder (held horizontally) is obstructed (by the foot board or end of the rail) from entering the space at any point along the vertical distance of the rail, the space fails.
Zone 7 TestZone 7: Between the head or foot board and the end of the mattressThis test assesses the potential for head entrapment between the inside of the head or foot board and thesurface of the mattress (compressed by the weight of a person’s head).The tools needed for this test are the cone and the safety strap.
Prepare for the Zone 3 Test:1. Lock the wheels.2. Put the bed in the flat, horizontal position.3. Fully raise all bed rails.4. Position the bed at a comfortable working height.
Do the Zone 7 Test:1. Firmly push the mattress away from the end being measured until it stops.2. Put the cone near the head/foot board being tested and attach the safety strap (if possible). Make sure the strap is short enough to prevent the tool from injuring your feet if it falls, and long enough so it does not interfere with the test . 3. Gently place the cone horizontally in the gap. Do not push the tool down into the gap.4. Turn the cone until the line on the face of the large end is horizontal. 5. Let the cone sink into the space by its own weight. If the cone is tilted, use one hand to gently level it. Do not push the tool down into the gap.6. Determine whether the cone’s centre line is above or below the surface of the mattress.7. Interpret test result
Interpret Zone 7 Test Results:If the line across the flat end of the cone is above the surface of the mattress, the space passes the test(figure 13a).
Page 11 of 16 | DCSI – Instructions for Measuring Entrapment Zones Equipment Program: Phone:1300 295 786

If the line across the flat end of the cone is at or below the top surface of the mattress, the space failsthe test (figure 13b).
Repeat the Zone 7 Test: at both head and foot board
Frequently Asked Questions and Testing Tips
Do I have to do the tests in order?No. You may do the tests in any order you wish. You may find it convenient to do all the tests on one side of the bed, then the other (to keep from repeatedly pushing the mattress back and forth).Or, you may wish to do all of the tests that use just the cone, then all of the tests that use the cone and cylinder together (to avoid having to put the tool together and take it apart several times). You may wish to test Zone 4 first or last as this is the only zone that requires the measuring tool to be fully assembled.
Do I have to use the safety strap?The test tools are heavy, and the safety strap helps protect you if they fall or suddenly pull through a gap. Not using the safety strap increases your risk of being injured.
How do I keep track of my test results?The Bed Entrapment Zone Measuring Tool has been developed for this purpose. It can be used as a quick reference guide for measuring purposes and has space to record Pass or Fail for each of the zones.
What are the most common mistakes people make when doing the tests?In field tests conducted to evaluate the test tools and instructions, some of the most common errors made by the testers were:• Not pushing the mattress away from the test location• Pulling the mattress toward the test location (instead of pushing it away)• Not articulating the bed enough to create the largest possible gap in Zone 2• Not having the bed flat when testing Zones 1, 3, or 4• Not aligning or levelling the tool properly• Forcibly pushing the tool into gaps
When pushing the mattress, how hard do I need to push?Some test instructions ask you to push the mattress "until it stops." Usually that means pushing until either:• The mattress retention system engages and keeps you from pushing the mattress any further, or• The mattress stops against the opposite bed rail(s).Always make sure you push the mattress straight across; it should not be crooked on the bed.
Page 12 of 16 | DCSI – Instructions for Measuring Entrapment Zones Equipment Program: Phone:1300 295 786

When testing Zone 2, what position should the bed be in?Unlike the other three tests, the Zone 2 test requires the tester to articulate (adjust the head and knee sections) the bed and observe the space. If the space is observed to become larger with articulation, the test should occur at that point with the bed articulated. It may be difficult to detect whether the space gets larger with articulation. It is therefore recommended that this zone is tested with the bed both in the flat position and with the bed articulated. Additionally, multiple tests along the length of the rail between the supports are recommended, particularly with the bed articulated.Some examples of how Zone 2 might change with articulation are shown below.
What if one of the Zones doesn't seem to exist on a particular bed system?If a zone doesn't exist on a particular bed, then there is no risk of a patient becoming trapped in that Zone. For example: if there are no openings in a rail, then a patient could not get his or her head trapped in Zone 1 of that rail. It is appropriate to record a result of “not applicable for Zones that do not exist. (You should provide some indication that the Zone was not accidentally omitted from testing.)
I need to test a bed with an unusual rail design. How do I figure out where to do each test?Occasionally, the most difficult part of a test may be figuring out where on the bed to perform the test. For some beds or rail configurations, it may be difficult to identify the locations of various Zones. The following hints and examples for each Zone may help.
Zone 1: The goal of the Zone 1 test is to see whether a patient could become trapped by putting his or her head through an opening in the rail itself.
Page 13 of 16 | DCSI – Instructions for Measuring Entrapment Zones Equipment Program: Phone:1300 295 786
Example: No openings in the railIf there are no openings in the rail, then there is no risk of entrapment in Zone 1.Examples of cases where there may not be any openings in the rail are:• The rail consists of a solid panel• The rail has a cover on it, and the cover blocks all the openings in the rail (whether you can see through the cover or not).
Zone 2: The goal of the Zone 2 test is to see whether a patient could become trapped by putting his or her head under the rail, head first, between the rail supports (or next to a single support). (Note: Trapping the head by sliding the neck under the rail sideways is addressed by the test for Zone 4.)
Example: Rail supports form part of the rail In some designs, the rail supports also form part of the body of the rail. Crib-style rails, shown here, are common examples. Often, when the rail supports form part of the rail, Zones 1 and 2 overlap. Zone 1 should be tested with the bed in the flat position; if the size of the space changes with articulation, the result for Zone 2 may be different.
Zone 3: The goal of the Zone 3 test is to see whether a patient could become trapped with his or her head in the horizontal space between the rail and the mattress. Usually, the gap in Zone 3 is easily identified, even if the rail design is unusual.
Zone 4: The goal of the Zone 4 test is to see whether a patient could become trapped by sliding or wedging his or her neck under the end of the rail.
Example: The rail end is very close to head/foot board (very little space in between)When testing in Zone 4, do not try to force the cylinder down between the rail and the end board or insert it under the rail from behind. If the cylinder’s diameter will not fit between the end of the rail and the head or foot board, record a result of Pass for Zone 4.
Example: Full-length rail with horizontal supports at the endsAn example of this rail type is shown at the right. The cylinder cannot pass between the end of the rail and the head/foot board and then under the rail -- it would stop on the support. The result for Zone 4 is Pass, because a patient would not be able to get his or her neck under the rail without the head or body going under first. The potential for headfirst entrapment under the rail should be evaluated using the test for Zone 2.
Page 14 of 16 | DCSI – Instructions for Measuring Entrapment Zones Equipment Program: Phone:1300 295 786

Example: The end of the rail is verticalWhen the end of the rail is completely vertical from top to bottom, there may be no space "under" the end of the rail where the cylinder (or a patient's neck) could fit. In the example at right, the left side of the rail is vertical, and there is no space “under” the end of the rail. For the left rail end in the figure, the rating forZone 4 should be either “pass” or “not applicable,” depending on your facility’s policy. The right end should be tested as usual for Zone 4. Note: If you are unsure about a particular rail you are testing, you should go ahead and perform the Zone 4 test to verify your answer. The cone and cylinder would give a result of Pass if they were used to physically test the area shown on the left side of the rail in the figure.
Why did my co-worker and I get different results for the same test?Different testers can get different test results for the same bed system. Or, the same tester may get a different result when he or she repeats a test. Some reasons this can happen are:• Different people may handle the tools slightly differently.• An error or oversight can affect the test result.• When a test is a very close call, some testers may be biased toward passing and others toward failing.• A long time has elapsed between tests (mattresses vary in softness, and can compress over time; rails or rail supports may loosen or bend over time).
What if a result is too close to call?If you are faced with a borderline pass/fail decision, use your best judgment to decide on a result. You can also try these suggestions:• Repeat the test, and double-check that you did every step correctly.• If possible, get a second opinion. Ask a co-worker for help.
What should I do if a bed system fails one of the tests?You must consider mitigation of entrapment risks for bed systems that fail any of the Zone tests. If you are testing the Zones, the client has already been assessed as being at moderate (or higher) risk of entrapment. Mitigation may include recommending that the rails are removed from the bed or that some component(s) of the bed system are changed (or the whole bed system). You may also need to consider recommending an interim solution for immediate risk management. For more information on possible alternative solutions, refer to Bed Rails: Clinical Considerations for Prescribers as well as Bed Assessment: Clinical Considerations for Prescribers, and consider consulting with experienced colleagues.
Reference: Instructions for Zones 1-4, images and FAQ are taken from: “Hospital Bed System Dimensional and Assessment Guidance to Reduce Entrapment” March 2006, US Department of Health and Human Services, Food and Drug Administration
Page 15 of 16 | DCSI – Instructions for Measuring Entrapment Zones Equipment Program: Phone:1300 295 786