Embed Size (px)
Citation preview
INSTRUCTION MANUAL
REFRIGERATOR
LIKO112
Contents_ _ _ _ _ _ _ _ _ _ _ _
_ _ _ _ _ _ _ _ _ _ _ _ _
_ _ _ _ _ _ _
_ _ _ _ _ _ _ _ _ _ _
_ _ _ _ _ _ _ _
Safety and warning information_ __ _ _ _ _ 2
Control panel_ _ _ _ _ _ _ _ _ _ _ _ _ _ _ _
First use and Installation _ _ _ _ _ _ _ _ _ _
Daily use_ _ _ _ _ _ _ _ _ _ _ _ _ _ _ _ _ _
Helpful hints and tips__ _ _ _ _ _ _ _ _ _ _
6
7
9
9
10
4
4
5
6
Cleaning and Care
What to do if…
Description of the appliance
Reversing the door
Disposal of the appliance
Safety and warning information
In the interest of your safety and to ensure the correct use, before installing and first using the appliance, read this user manual carefully, including its hints and warnings. To avoid unnecessary mistakes and accidents, it is important to ensure that all people using the appliance are thoroughly familiar with its operation and safety features. Save these instructions and make sure that they remain with the appliance if it is moved or sold, so that everyone using it through its life will be properly informed on appliance use and safety.For the safety of life and property keep the precautions of these user's instructions as the manufacturer is not responsible for damages caused by omission.
Children and vulnerable people safety
General safety
2
This appliance is not intended for use by persons (including children) with reduced physical, sensory or mental capabilities, or lack of experience and knowledge, unless they have been given supervision or instruction concerning use of the appliance by a person responsible for thei r safety. Chi ldren should be supervised to ensure that they do not play with the appliance.Keep all packaging well away from children. There is risk of suffocation.If you are discarding the appliance pull the plug out of the socket, cut the connection
cable (as close to the appliance as you can)and remove the door to prevent playing children from suffering an electric shock or from closing themselves inside it.If this appliance featuring magnetic door seals is to replace an older appliance having a spring lock (latch) on the door or lid ,be sure to make that spring lack unusable before you discard the old appliance. This will prevent it from becoming a death trap for a child.
Caution! Keep ventilation openings clear of obstruction.
The appliance is intended for keeping foodstuff and/or beverages in a normal household as explained in this instruction booklet.Do not us e a mechanical device or any artificial means to speed up the thawing process.Do not use other electrical appliances (such as icecream makers) inside of refrigerating appliances,unless they are approved for this purpose by the manufacturer .Do not damage the refrigerant circuit.The refrigerant isobutane (R600a) is contained within the refrigerant circuit of the appliance, a natural gas with a high level of environmental compatibility,which is nevertheless flammable.
This appliance is in accordance with the following EU guidelines: 2006/95/EC and 2004/108/EC and 2009/125/EC and EC.643/2009.
During transportation and installation of the appliance, be certain that none of the components of the refrigerant circuit become damaged.-avoid open flames and sources of ignition.-thoroughly ventilate the room in which the appliance is situated.
Caution: risk of fire!
It is dangerous to alter the specifications or modify this product in any way. Any damage to the cord may cause a shortcircuit , fire and/or electric shock.
Warning! Any electrical component (power cord, plug , compressor) must be replaced by certified service agent or qualified service personnel.
1.Power cord must not be lengthened.2.Make sure that the power plug is not squashed or damaged by the back of the appliance. A squashed or damaged power plug may overheat and cause a fire.3.Make sure that you can come to the mains plug of the appliance.4. Do not pull the mains cable.5. If the power plug socket is loose ,do not insert the power plug. There is a risk of electric shock or fire.6. You must not operate the appliance without the lamp cover of interior lighting.
This appliance is heavy. Care should be taken when moving it.Do not remove nor touch items from the freezer compartment if you hands are damp/wet,as this could cause skin abrasions or frost/freezer burns.Avoid prolonged exposure of the appliance to direct sunlight.
Daily use
Do not store flammable gases or liquids in the appliance, There is a risk of an explosion.Do not operate any electrical appliances in the appliance (e.g. electric ice cream makers, mixers etc.).When unplugging always pull the plug from the mains socket, do not pull on the cable.
Do not place hot items near the plastic components of this appliance.Do not place food products directly against the air outlet on the rear wall.1)
Frozen food must not be re-frozen once it has been thawed out.2)
Store pre-packed frozen food in accordance with the frozen food manufacture's instructions. 2)
The appliances manufactures storage recommendations should be strictly adhe red to .Re fe r t o re l re levan t instructions.Do not place carbonated of fizzy drinks in the freeze compartment as it creates pressure on the container, which may cause it to explode, resulting in damage to the appliance. 2)
Ice lollies can cause frost burns if consumed straight from the appliance. 2)
Warning!Care and cleaning
Before maintenance, switch off the appliance and disconnect the mains plug from the mains socket.Do not clean the appliance with metal objects, steam cleaner, ethereal oils, organic solvents or abrasive cleansers.Do not use sharp objects to remove frost from the appliance. Use a plastic scraper.Regularly examine the drain in the refrigerator for defrosted water. If the drain is blocked, water will collect in the bottom of the appliance.
InstallationImportant!
For electrical connection carefully, follow the instructions given in this manual.
Unpack the appliance and check if there are damages on it. Do not connect the appliance if it is damaged. Report possible damages immediately to the place you bought it. In this case retain packing.It is advisable to wait at least four hours before connecting the appliance to allow the oil to flow back in the compressor.Adequate air circulation should be around the appliance, lacking this leads to overheating. To achieve sufficient
3
Control panel
ventilation, follow the instructions relevant to installation.
Wherever possible the back of the product should be against a wall to avoid touching or catching warm parts (compressor, condenser) to prevent the risk of a fire, follow the instructions relevant to installation.The appliance must not be locate close to radiators or cookers.Make sure that the mains plug is accessible after the installation of the appliance.
Any electrical work required to do the servicing of the appliance should be carried out by qualified electrician or competent person.This product must be serviced by an authorized Service Center, and only genuine spare parts must be used.1)If the appliance is Frost Free.2)If the appliance contains freezer compartment.
Service
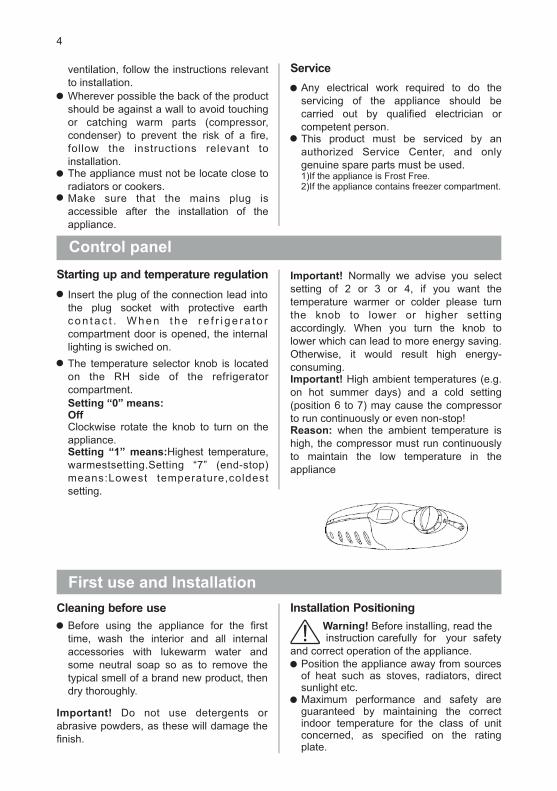
Starting up and temperature regulation
The temperature selector knob is located on the RH side of the refrigerator compartment.
Important! Normally we advise you select setting of 2 or 3 or 4, if you want the temperature warmer or colder please turn the knob to lower or higher setting accordingly. When you turn the knob to lower which can lead to more energy saving. Otherwise, it would result high energy-consuming.Important! High ambient temperatures (e.g. on hot summer days) and a cold setting (position 6 to 7) may cause the compressor to run continuously or even non-stop!Reason: when the ambient temperature is high, the compressor must run continuously to maintain the low temperature in the appliance
First use and Installation
Cleaning before use
Before using the appliance for the first time, wash the interior and all internal accessories with lukewarm water and some neutral soap so as to remove the typical smell of a brand new product, then dry thoroughly.
Important! Do not use detergents or abrasive powders, as these will damage the finish.
Installation Positioning
Warning! Before installing, read the instruction carefully for your safety and correct operation of the appliance.
Position the appliance away from sources of heat such as stoves, radiators, direct sunlight etc.Maximum performance and safety are guaranteed by maintaining the correct indoor temperature for the class of unit concerned, as specified on the rating plate.
Insert the plug of the connection lead into the plug socket with protective earth c o n t a c t . W h e n t h e r e f r i g e r a t o r compartment door is opened, the internal lighting is swiched on.
4
Setting “0” means:Off
appliance.Setting “1” means:Highest temperature, warmestsetting.Setting “7” (end-stop) means:Lowest temperature,coldest setting.
Clockwise rotate the knob to turn on the

This application perform well from . The Appliance may not work properly
if it is left for a longer period at a temperature above or below the indicated range.
N to ST
Climate class Ambient temperature
SN
N
ST
T
+10°C to +32°C
+16°C to +32°C
+16°C to +38°C
+16°C to +43°C
Important! There is a need of good ventilation around the fridge for easy dissipation of heat, high efficiency of refrigeration and low power consumption. For this purpose, sufficient clear space should be available around the fridge. It is advisable for there to be 75mm separating the back of the fridge to the wall, at least 100mm of space at its two sides,height of over 100mm from its top and a clear space upfront to allow the doors to open 160°.
Sufficient air must be allowed to circulate in the lower rear section of appliances, as poor air circulation can affect perfor-mance. Built-in appliances should be positioned away from heat sources such as heaters and direct sunlight.
Leveling
The appliance should be level in order to eliminate vibration. To make the appliance level, it should be upright and both adjusters should be firmly contacted with the floor. You can also adjust the level by screwing out the appropriate level adjusterat the front (use your fingers or a suitable spanner).
Electrical connection
Caution! Any electrical work required to install this appliance should be carried out by a qualified or competent person.Warning! This appliance must be earthed. The manufacture declines any liability should these safety measures not be observe.Appliances must not be exposed to rain.
Daily use
Accessories 1)
Movable shelves/trays
Various glass or plastic storage shelves or wire trays are included with your appliance – different models have different combinations and different models have different quality.The walls of the refrigerator are equipped with a series of runners so that the shelves can be positioned as desired.
Positioning the door shelvesTo permit storage of food packages of various sizes, the door shelves can be placed at different heights.To make these adjustments proceed as follows gradually pull the shelf in the direction of the arrows until it comes free, then repositions as required.
Vegetable Drawer
The drawer is suitable for storing fruit and vegetables.
5

Helpful hints and tips
Noises during Operation
The following noises are characteristic of refrigeration appliances:Clicks Whenever the compressor switches on or off, a click can be heard.Humming As soon as the compressor is in operation, you can hear it humming.Bubbling When refrigerant flows into thin tubes, you can hear bubbling or splashing noises.Splashing Even after the compressor has been switched off, this noise can be heard for a short time.
Energy saving tips
Do not install the appliance near cookers, radiators or other sources of warmth. Do not open the door too often or leave the door open any longer than necessary.Do not set temperature colder than necessary.Make sure the side plates and back plate of the appliance are with some distance from the wall, follow the instructions relevant to installation.I f ske tch map shows the r igh t combination of the drawers, crisper and shelves, do not adjust the com -bination, it would result in more energy-consuming.
Hints for refrigerationMeat(all types): wrap in polythene bags and place on the glass shelf above the vegetable drawer.For safety, store in this way only one or two days at the most.Cooked foods, cold dishes, etc…: these should be covered and may be placed on any shelf.Fruit and vegetables: these should be thoroughly cleaned and placed in the special draw(s) provided.Butter and cheese: these should be placed in aluminum foil or polythene bags to exclude as much air as possible .Milk bottles: these should have a cap and should be stored in the bottle rack on the door
has a strong flavor.Position food so that air can circulate freely around.
6
Hints for fresh food refrigeration
To obtain the best performances:
Do not store warm foods or evaporating liquids in the appliance.Do cover or wrap the food, particularly if it
Cleaning and Care
Cleaning and Care
For hygienic reasons the appliance interior, including interior accessories, should be cleaned regularly.The fr idge should be cleaned and maintained at least every two months.
Warning! Danger of electrical shock!
The appliance should not be connected to the mains during cleaning. Before cleaning switch the appliance off and remove the plug from the mains, or switch off or turn out the circuit breaker or fuse.
Important!
Never clean the appliance with a steam cleaner. Moisture could accumulate in electrical components,Hot vapors can lead to the damage of plastic parts.Ethereal oils and organic solvents can attack plastic parts, e.g. lemon juice or the juice from orange peel, butyric acid, cleanser that contain acetic acid.Do not allow such substances to come into contact with appliance parts.Do not use any abrasive cleansers.
Clean the appliance and the interior accessories with a cloth and lukewarm Remove the food from the appliance
before cleaning. Store them in a cool place, well covered.

water. Commercially available dish washing detergents may also be used.After cleaning wipe with fresh water and clean dish cloth.Accumulation of dust at the condenser increases energy consumption, clean the condenser at the back of the appliance once a year with a soft brush or avacuum cleaner.Check the water drain hole on the rear wall of the refrigerator compartment.Clear a blocked drain hole with the aid of something like soft green peg, be careful not to make any damage to the cabinet by sharp things.After everything is dry place appliance back into service.
Defrosting
Why defrosting
Water contained in food or getting into air inside the fridge be opening doors may form a frost layer inside. It will weaken the refrigeration when the frost is thick. While it is more than 10mm thick, you should defrost.
Defrosting in fresh food storage
compartment
It is automatically controlled by switching the temperature regulator on or off so that there is no need of operation of defrosting. Water from defrosting will be drained into an drip tray through a drain pipe at the back of the fridge automatically.
7
Go out of use for a long time
Remove all refrigerated packages.Switch off the appliance by turning the temperature regulator to position “0”.Remove the mains plug or switch off or disconnect the electricity supply.Clean thoroughly (see section: Cleaning and Care)Leave the door open to avoid the build up of odors.Note:If the appliance contains freezer compartment
What to do if…
Warning! Before trouble shooting, disconnect the power supply. Only a qualified electrician of competent
person must carry out the trouble shooting that is not in the manual.Important! There are some sounds during normal use(compressor, refr igerant circulation)
Important! Repairs to refrigerators/freezers may only be performed by competent service engineers. Improper repairs can give rise to significant hazards for the user. If your appliance needs repairing, please contact your specialist dealer or your local Service Force Center.
Problem Possible cause Solution
Appliance does not work.
Appliance cools too much.
Appliance is not switched on.
Mains plug is not plugged in or is loose.
Fuse has blown or is defective.
Socket is defective.
Temperature is set too cold.
Switch on the appliance.
Insert mains plug.
Check fuse, replace if necessary.
Mains malfunctions are to be corrected by an electrician.
Turn the temperature regulator to a warmer setting temporarily.

8
The food is too warm.
Interior lighting does not work.
Unusual noises.
The compressor does not start immediately after changing the temperature setting.
Water on the floor or storage shelves.
Temperature is not properly adjusted.
Door was open for an extended period.
A large quantity of warm food was placed in the appliance within the last 24 hours.
The appliance is near a heat source.
Light bulb is defective.
Door seal is not air-tight(possibly after reversing the door).
Appliance is not level.
The appliance is touching the wall or other objects.
A component, e.g. a pipe, on the rear of the appliance is touching another part of the appliance or the wall.
This is normal, no error has occurred.
Water drain hole is blocked.
Please look in the “initial Start Up” section.
Open the door only as long as necessary.
Turn the temperature regulation to a colder setting temporarily.
Please look in the “installation location” section.
Please look in the “changing the Light Bulb “section.
Carefully warm the leaking sections of the door seal with a hair dryer(on a cool setting). At the same time shape the warmed door seal by hand such that it sits correctly.
Readjust the feet.
Move the appliance slightly.
If necessary, carefully bend the component out of the way.
The compressor starts after a period of time.
See the “cleaning and care” section.
Heavy build-up of frost, possibly also on the door seal.
Changing the light bulb
Light bulb data: 220-240 V, max. 15 W.
To switch off the appliance, set the temperature regulator to position “0”.Unplug the mains plug.To change the light bulb, undo the screw.Press the light bulb cover as shown and slide it backwards.Change the defective light bulb.Refit the light bulb cover and the screw.Put the refrigerator back into operation.
Warning! If the l ight bulb is damaged, DO NOT CHANG IT BY THE USER!
Changing the light bulb carry out by inexperienced persons may cause injury or serious malfunctioning.It must be replaced by a qualified persons in order to avoid a hazard. Contact your local Service Force.Center for help.
Before changing the light bulb, switch off the appliance and unplug it, or pull the fuse or the circuit breaker.
Bulb(inside)
Lampshade
Thermostat knob
Description of the appliance
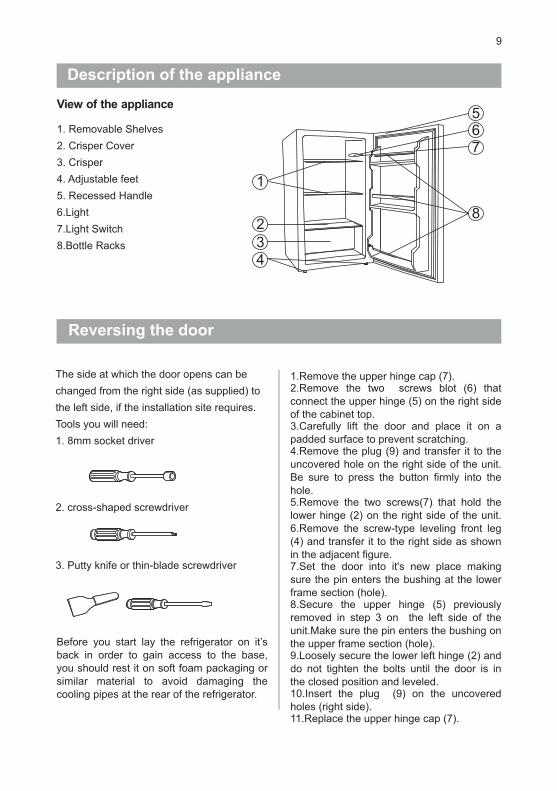
View of the appliance
Reversing the door
1.Remove the upper hinge cap (7).2.Remove the two screws blot (6) that connect the upper hinge (5) on the right side of the cabinet top.3.Carefully lift the door and place it on a padded surface to prevent scratching.4.Remove the plug (9) and transfer it to the uncovered hole on the right side of the unit. Be sure to press the button firmly into the hole.5.Remove the two screws(7) that hold the lower hinge (2) on the right side of the unit.6.Remove the screw-type leveling front leg (4) and transfer it to the right side as shown in the adjacent figure.7.Set the door into it's new place making sure the pin enters the bushing at the lower frame section (hole).8.Secure the upper hinge (5) previously removed in step 3 on the left side of the unit.Make sure the pin enters the bushing on the upper frame section (hole).9.Loosely secure the lower left hinge (2) and do not tighten the bolts until the door is in the closed position and leveled.10.Insert the plug (9) on the uncovered holes (right side).11.Replace the upper hinge cap (7).
9
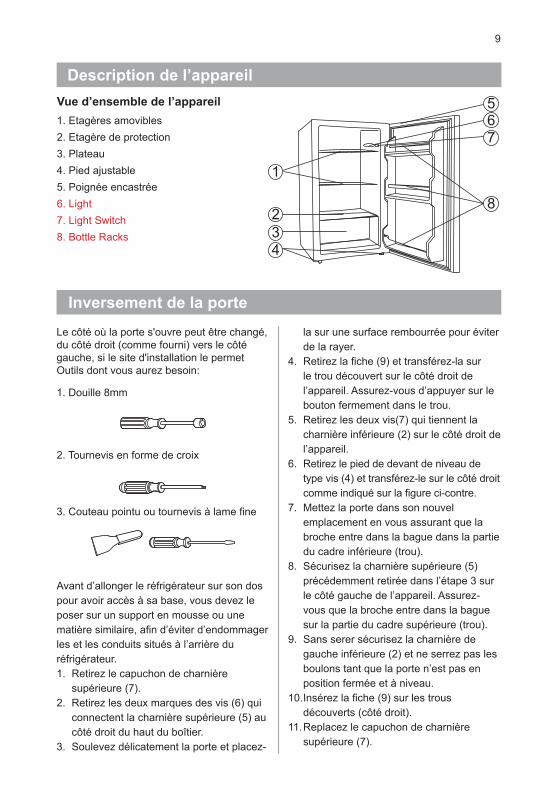
1. Removable Shelves
2. Crisper Cover
3. Crisper
4. Adjustable feet
5. Recessed Handle
6.Light
7.Light Switch
8.Bottle Racks
The side at which the door opens can be
changed from the right side (as supplied) to
the left side, if the installation site requires.
Tools you will need:
1. 8mm socket driver
2. cross-shaped screwdriver
Before you start lay the refrigerator on it’s back in order to gain access to the base, you should rest it on soft foam packaging or similar material to avoid damaging the cooling pipes at the rear of the refrigerator.
3. Putty knife or thin-blade screwdriver
1
234
567
8

10
1.Screw
7.Upper Hinge Cap
2.Low Hinge3.Adjustable Low Foot4.Adjustable High Foot5.Upper Hinge6.Screw Bolt
8.Shaft Sleeve9.Plug
7
8
9
Disposal of the appliance
Correct Disposal of this product
It is prohibited to dispose of this appliance in domestic household waste.Packaging materialsPackaging materials with the recycle symbol are recyclable. Dispose the packaging in a suitable collector container to recycle it.Before disposal of appliance.1. Disconnect the mains plug from the mains socket.2. Cut off the mains cable and discard it.
This symbol on the product or in its packaging indicates that this product may not be treated as household waste. Instead it should be taken to the appropriate collection point for the recycling of electrical and electronic equipment. By ensuring this product is disposed of correctly, you will help prevent potential negative consequences for the environment and human health, which could otherwise be caused by inappropriate waste handling of this product. For more detailed information about recycling of this product, please contact your local council, your household waste disposal service or the shop where you purchased the product.
MANUEL D’UTILISATION
REFRIGERATEUR
LIKO112

3
● Ne placez aucun objet chaud à proximité des composants en plastique de cet appareil.
● Ne placez pas d’aliments directement contre la sortie d’air de la façade arrière. 1) Une fois décongelés, les aliments ne peuvent pas être recongelés.2)
● Stockez les aliments pré-congelés en respectant les consignes du fabricant.2)
● Les recommandations du fabricant doivent être observées. Consultez ces consignes.
● Ne placez pas de boissons gazeuses ou gazéifiées dans le compartiment à congélation, car cela applique une pression sur la bouteille, qui peut exploser, et de fait endommager l’appareil.1)
● Les glaces peuvent brûler si elles sont consommées juste à leur sortie du congélateur.2)
Attention!Nettoyage et entretien
● Avant toute opération d’entretien, coupez l’alimentation de l’appareil et débranchez les cordons des prises murales.
● Pour nettoyer l’appareil, n’utilisez pas d’objets métalliques, de vaporettos, d’huiles qui s’évaporent, de solvants organiques ni de produits nettoyants abrasifs.
● N’utilisez pas d’objets pointus pour retirer le gel à l’intérieur de l’appareil. Utilisez un grattoir en plastique.
● Contrôlez régulièrement l’évacuation de l’eau après le dégivrage de votre appareil. Si l’évacuation est bloquée, l’eau sera récupérée dans la partie inférieure du système.
Installation Important! Pour effectuer les branchements électriques convenablement, suivez les consignes continues dans ce manuel.
● Déballez l’appareil et vérifiez son état général. Ne branchez pas l’appareil s’il est endommagé. En cas de problème, contactez immédiatement votre revendeur.
● Nous vous conseillons d’attendre au moins quatre heures avant de relier l’appareil au réseau électrique domestique afin de permettre à l’huile de rejoindre le compresseur.
● Veillez à laisser l’air circuler autour de l’appareil, car un manqué d’aération peut entraîner une surchauffe. Pour permettre l’aération du système, suivez les consignes d’installation du manuel.
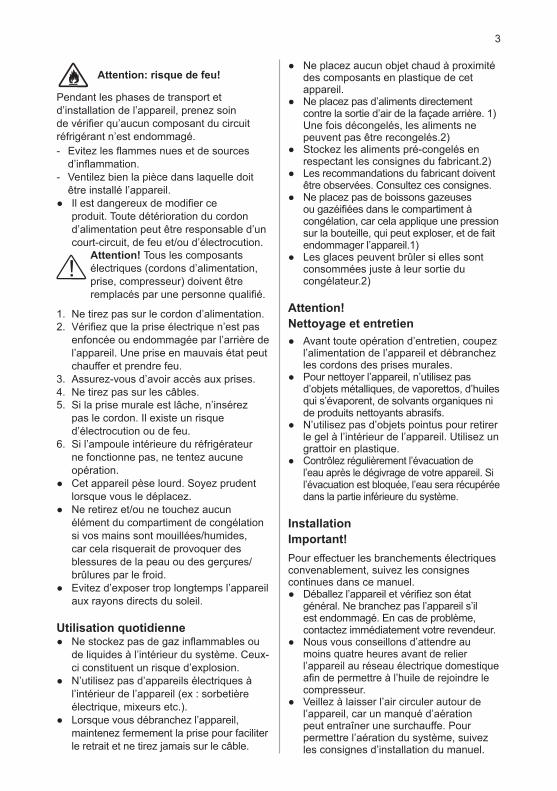
Attention: risque de feu!
Pendant les phases de transport et d’installation de l’appareil, prenez soin de vérifier qu’aucun composant du circuit réfrigérant n’est endommagé.- Evitez les flammes nues et de sources
d’inflammation. - Ventilez bien la pièce dans laquelle doit
être installé l’appareil. ● Il est dangereux de modifier ce
produit. Toute détérioration du cordon d’alimentation peut être responsable d’un court-circuit, de feu et/ou d’électrocution.
Attention! Tous les composants électriques (cordons d’alimentation, prise, compresseur) doivent être remplacés par une personne qualifié.
1. Ne tirez pas sur le cordon d’alimentation. 2. Vérifiez que la prise électrique n’est pas
enfoncée ou endommagée par l’arrière de l’appareil. Une prise en mauvais état peut chauffer et prendre feu.
3. Assurez-vous d’avoir accès aux prises.4. Ne tirez pas sur les câbles.5. Si la prise murale est lâche, n’insérez
pas le cordon. Il existe un risque d’électrocution ou de feu.
6. Si l’ampoule intérieure du réfrigérateur ne fonctionne pas, ne tentez aucune opération.
● Cet appareil pèse lourd. Soyez prudent lorsque vous le déplacez.
● Ne retirez et/ou ne touchez aucun élément du compartiment de congélation si vos mains sont mouillées/humides, car cela risquerait de provoquer des blessures de la peau ou des gerçures/brûlures par le froid.
● Evitez d’exposer trop longtemps l’appareil aux rayons directs du soleil.
Utilisation quotidienne ● Ne stockez pas de gaz inflammables ou
de liquides à l’intérieur du système. Ceux-ci constituent un risque d’explosion.
● N’utilisez pas d’appareils électriques à l’intérieur de l’appareil (ex : sorbetière électrique, mixeurs etc.).
● Lorsque vous débranchez l’appareil, maintenez fermement la prise pour faciliter le retrait et ne tirez jamais sur le câble.

4
Panneau de commandes Démarrage et régulation de la température
● Insérez le cordon dans la prise murale en veillant à l’isoler convenablement. Lorsque la porte du réfrigérateur est ouverte, l’éclairage intérieur s’enclenche.
● La molette de sélection de la température est située sur le côté droit du compartiment du réfrigérateur. Si vous réglez sur la valeur "0", cela signifie que le système est en:ArrêtTournez la molette dans le sens des aiguilles d’une montre pour allumer l’appareil. Si vous réglez sur la valeur "1", cela signifie que:La température la plus élevée (réglage au plus chaud).Si vous réglez sur la valeur "7" (fin-arrêt) cela signifie que:La température la plus basse (réglage au plus froid).
Important! Nous vous conseillons de configurer l’appareil sur 2, 3 ou 4. Si vous souhaitez que la température soit plus élevée ou plus faible, paramétrez le bouton selon vos préférences. Lorsque vous baissez l’intensité, votre système utili plus d’électricité. Dans le cas contraire, vous économisez de l’énergie. Important! Les températures ambiantes élevées (ex: pendant les journées chaudes d’été) associées à un réglage froid (6 ou 7), peuvent entraîner le fonctionnement en continu du compresseur, parfois sans arrêt!Raison: lorsque la température ambiante est élevée, le compresseur fonctionne en continu afin de maintenir l’appareil à une température faiblece
Installation/Positionnement Attention! Avant d’installer l’appareil, lisez attentivement les consignes de
Nettoyage avant utilisation ● Avant d’utiliser l’appareil pour la première
fois, nettoyez l’intérieur ainsi que tous les accessoires intérieurs, au moyen d’eau tiède savonneuse afin de supprimer l’odeur typique des produits neufs, puis séchez entièrement.
● Evitez autant que possible de coller à une paroi murale l’arrière de l’appareil ou des éléments chauds (compresseurs, condensateur), afin d’éviter tout risque d’inflammation. Suivez les consignes d’installation.
● Ne positionnez jamais l’appareil à proximité d’un radiateur ou d’une cuisinière.
● Vérifiez que la prise principale est accessible après l’installation de l’appareil.
Dépannage ● Toute opération électrique doit être
effectuée par une personne compétente ou un électricien qualifié.
● Ce produit ne doit être réparé que par une personne qualifiée et seules les pièces du ou conseillées par le fabricant doivent être employées.
1) Si l’appareil ne renferme pas de gel. 2) Si l’appareil est doté d’un compartiment à
congélation.
● Positionnez l’appareil à distance des sources de chaleur telles que les fours, radiateurs, rayons directs du soleil, etc.
● Cet appareil fonctionnera dans les meilleures conditions si vous respectez la température intérieure conseillée sur la plaque nominative.
Important! N’utilisez aucun détergent ni aucune poudre abrasive car ceux-ci pourraient endommager la finition.
Installation et première utilisation
sécurité et d’utilisation du système.

5
Utilisation quotidienne
Accessoires 1)
Etagères/Plateaux amovibles ● Plusieurs étagères ou plateaux en
plastique sont fournis avec votre appareil. Les différents modèles présentent des propriétés différentes.
● Les parois du réfrigérateur sont dotées de plusieurs rails destinées à recevoir les étagères et les plateaux.
Positionnement des étagères ● Pour faciliter le stockage des emballages
de différentes tailles, les étagères peuvent être placées à différentes hauteurs.
● Pour régler la hauteur des étagères, tirez légèrement l’étagère dans le sens indiqué par la flèche jusqu’à la libérer, puis repositionnez la selon vos préférences.
Compartiments à légumes ● Ce compartiment est idéal pour ranger
des fruits et des légumes.
● Ne jamais exposer l’appareil à la pluie. Un espace suffisant doit être laissé à l’arrière de l’appareil, afin de faciliter la circulation de l’air. Un manque de ventilation peut détériorer le fonctionnement de l’appareil. L’appareil doit être placé à distance des sources de chaleur ou des rayons directs du soleil.
Nivellement ● Pour éliminer les vibrations, cet
appareil doit être de niveau. Pour cela, il doit être installé bien droit et les deux pieds de mise à niveau doivent être fermement en contact avec le sol. Vous pouvez également le mettre de niveau manuellement au moyen d’une cale à l’avant ou à l’arrière (si le sol est incliné).
Branchement électrique Attention! Toutes les interventions électriques nécessaires pour l’installation de cet appareil doivent être effectuées par une personne compétente et qualifiée.Attention! Cet appareil doit être relié au sol. Le fabricant décline toute responsabilité si ces mesures de sécurité ne sont pas observées.
● L’appareil ne fonctionnera plus correctement s’il est laissé pendant une longue période sur une température supérieure ou inférieure à celle mentionnée.
Important! L’air doit pouvoir circuler autour du réfrigérateur afin de permettre la dissipation de la chaleur, l’efficacité de la réfrigération et la baisse de la consommation électrique. A ce titre, vous devez veiller à laisser un espace suffisant autour du réfrigérateur. Nous conseillons de laisser 75 mm entre l’arrière du réfrigérateur et le mur, au moins 100 mm des deux côtés et plus de 100mm en hauteur. La porte doit pouvoir s’ouvrir à 160°.
Type de climat Catégories de températuresSN +10°C à +32°CN +16°C à +32°CST +16°C à +38°CT +16°C à +43°C

6
Astuces et conseils utiles
Nettoyage et entretien
Bruits pendant le fonctionnement Les bruits suivants sont caractéristiques des appareils de réfrigération: « Clics » : dès que le compresseur passe sur Marche ou Arrêt, vous entendrez un « clic ». Bourdonnements: lorsque le compresseur est en fonctionnement, vous pouvez entendre un bourdonnement.“Gargouillis”: lorsque le liquide réfrigérant circule dans les conduits, vous pouvez entendre des gargouillis ou des bruits similaires à des éclaboussures.Eclaboussures: même après extinction du compresseur, ce bruit peut continuer pendant quelques minutes.
Astuces pour économiser votre énergie ● N’installez pas l'appareil à proximité de
cuisinières, de radiateurs ou d’autres sources de chaleur.
● N’ouvrez pas la porte trop fréquemment et ne la laissez pas ouverte plus longtemps que nécessaire.
● Ne réglez pas la température sur une valeur plus froide que nécessaire.
● Assurez-vous que les plaques latérales et la plaque arrière de l'appareil sont à une certaine distance du mur, suivez les instructions pertinentes à l'installation.
● Si le croquis ou la carte du réfrigérateur montre la bonne combinaison des tiroirs, bac à légumes et des étagères, ne réglez pas la combinaison, il en résulterait une consommation accentuée d'énergie.
Conseils pour la réfrigération des aliments frais Pour de meilleurs résultats:
● Ne stockez pas d’aliments chauds ou de liquides qui s’évaporent dans l’appareil.
● Ne filmez n'enfermez pas les aliments, surtout s’ils dégagent une odeur forte.
● Positionnez les aliments de façon à laisser l’air circuler autour.
Astuces pour la réfrigérant ● Viande (tous les types): enroulez les
morceaux de viande dans des sacs polythène et disposez-les sur l’étagère en verre située au-dessus du compartiment à légumes. Pour votre sécurité, stockez un ou deux jours au plus.
● Aliments cuits, plats froids, etc…: conservez-les sur n’importe quelle étagère. Fruits et légumes : nettoyez-les bien et rangez-les dans le compartiment réservé à cet effet.
● Beurre et fromages: enroulez-les dans du papier aluminium ou dans des sacs en polyéthylène afin d’exclure le maximum d’air possible.
● Bouteilles de lait: elles doivent être dotées d’un capuchon et rangées dans le compartiment à bouteilles situé dans la porte du réfrigérateur
Nettoyage et entretien Pour des raisons d’hygiène, les composants intérieurs de l’appareil, y compris les accessoires, doivent être nettoyés régulièrement.Le réfrigérateur doit être nettoyé et entretenu au moins tous les deux mois.
Important! ● Avant de procéder au nettoyage, retirez
les aliments du réfrigérateur. Rangez les aliments dans un endroit frais, à l’abri.
● Ne nettoyez jamais l’appareil au moyen d’un vaporetto. De la moisissure peut s’accumuler dans les composants électriques.
● Les vapeurs chaudes peuvent conduire à une détérioration des éléments en plastique.
● Les huiles qui s’évaporent et les solvants peuvent attaquer les éléments en plastique, par exemple le jus de citron ou le jus des écorces d’orange, l’acide butyrique, ou n’importe quel autre agent nettoyant contenant de l’acide acétique. Ne laissez
Attention! Risque d’électrocution!
● Pendant les phases de nettoyage, l’appareil doit être débranché. Avant de nettoyer l’appareil, coupez l’alimentation électrique, ou arrêtez le disjoncteur.

7
Que faire si…
aucune de ces substances entrer en contact avec les éléments de l’appareil.
● N’utilisez pas d’agents abrasifs. ● Nettoyez l’appareil et ses accessoires
intérieurs avec un tissue souple et de l’eau tiède. Vous pouvez aussi recourir aux produits spécifiques vendus dans le commerce.
● Après avoir nettoyé l’appareil, rincez-le au moyen d’un tissu imbibé d’eau chaude.
● L’accumulation de poussière au niveau du condensateur augmente la consommation d’énergie. Nettoyez le condensateur à l’arrière de l’appareil une fois par an, au moyen d’une brosse à poils souples ou d’un aspirateur. (Uniquement pour le produit à condenseur extérieur)
● Vérifiez le conduit d’évacuation à l’arrière du compartiment de réfrigération.
● Si le conduit est bouché, débouchez-le au moyen par exemple d’un agent spécifique. Faites attention à ne pas endommager le boîtier avec des objets pointus.
● Une fois le conduit débouché, vous pouvez remettre l’appareil en fonctionnement.
Dégivrage Pourquoi dégivrer?
● L’eau qui est contenu dans les aliments
et qui se causent par l’ouverture de la portière, se répand dans l’air à l’intérieur du réfrigérateur. Ceci a pour implication d’affaiblir la réfrigération lorsque le givre devient épais. Si le givre atteint les 10mm d’épaisseur, il faut absolument dégivrer.
Le dégivrage des compartiments de rangement des aliments frais
● L’eau contenue dans les aliments ou dans l’air en suspension dans le réfrigérateur peut se transformer en une couche de gel. Ceci rend la réfrigération plus difficile. Lorsque cette couche fait plus de 10mm d’épaisseur, vous devez dégivrer votre appareil.
En cas d’absence prolongée ● Retirez tous les emballages du réfrigérateur. ● Eteignez l’appareil en plaçant le régulateur
de température sur la position “0”. ● Retirez le cordon d’alimentation ou
coupez l’alimentation électrique. ● Nettoyez bien l’appareil (consultez la
rubrique: Nettoyage et entretien) ● Laissez la porte ouverte afin d’éviter la
formation d’odeurs désagréables. Remarque: si l’appareil est doté d’un compartiment à congélation
Attention! Avant de tenter de réparer l’appareil, coupez l’alimentation électrique. Seul un technicien qualifié
Important!Les réparations apportées au congélateur/réfrigérateur ne doivent être effectuées que par des personnes compétentes ou des techniciens qualifiés. Une mauvaise réparation peut représenter un danger grave pour l’utilisateur. Si votre appareil a besoin d’être réparé, contactez votre revendeur ou un centre technique agréé.
Problème possible Cause possible Solution
L’appareil ne fonctionne pas.
L’appareil n’est pas allumé. Allumez l’appareil.
Le cordon principal n’est pas branché ou est lâche. Insérez la prise principale.
Le fusible a grillé ou est défectueux
Contrôlez le fusible, remplacez-le si nécessaire.
La prise est défectueuse. Les dysfonctionnements doivent être réglés par un électricien.
L’appareil refroidit trop.
La température est configurée sur une valeur trop faible.
Placez le régulateur de température sur une valeur plus chaude.
ou une personne compétente peut se charger de résoudre les problèmes autres ceux mentionnés dans le manuel.Important! Même lors de son fonctionnement normal, l’appareil émet des sons (compresseur, circuit réfrigérant)

8
The appliance is near a heat
(possibly after reversing the
The appliance is touching the
Remplacement de l’ampoule Attention! Si l’ampoule est endommagée, seul un électricien qualifié peut la remplacer!
Faire remplacer l’ampoule par une personne non qualifiée peut provoquer des blessures physiques graves ou un dysfonctionnement important du système. Seules les personnes qualifiées sont autorisées à effectuer ce type d’opération, afin de limiter les risques. Contactez une entreprise spécialisée pour vous faire aider. Avant de changer l’ampoule de la lampe, éteignez l’appareil et débranchez-le, ou enlevez le fusible ou le coupe circuit.
● Propriétés de l’ampoule: 220-240
Les aliments sont trop chauds.
La température est mal réglée. Consultez la rubrique “Premier démarrage”.
La porte a été laissée ouverte pendant une longue période.
Ouvrez la porte uniquement lorsque cela est nécessaire.
Une grande quantité d’aliments chauds a été placée dans l’appareil au cours des dernières 24 heures.
Placez le régulateur de temperature sur une valeur plus froide.
L’appareil se trouve à proximité d’une source de chaleur.
Consultez la rubrique “installation/Emplacement”.
L’éclairage intérieur ne fonctionne pas. L’ampoule est défectueuse. Consultez la rubrique
“remplacement de l’ampoule”.
L'accumulation de givre peut se produire, peut-être aussi sur le joint de porte.
Le joint de la porte laisse passer l’air (probablement après avoir inversé la porte).
Séchez avec précaution les parties lâches du joint de la porte au moyen d’un sèche-cheveux (avec un réglage froid). En même temps, replacez manuellement le joint de la porte.
Bruits inhabituels.
L’appareil n'est pas de niveau. Réajustez le joint.L’appareil touche le mur ou est en contact avec d’autres éléments.
Déplacez doucement l’appareil.
Un composant, par exemple, un conduit, à l’arrière de l’appareil, est en contact avec une autre partie de l’appareil ou du mur.
Si nécessaire, plier soigneusement les composants pour les sortir.
Le compresseur ne démarre pas automatiquement après avoir modifié les paramètres de température.
Ceci est normal, il n’y a pas d’erreur.
Le compresseur démarre après un certain temps.
Présence d’eau sur le sol ou sur les étagères intérieures.
Le conduit d’évacuation est bouché.
Consultez la rubrique “Nettoyage et entretien”
max.15W V, max.15W. ● Pour éteindre l’appareil, régler la position
du régulateur a « 0 ». ● Débrancher le fil d’alimentation électrique
principal. Pour remplacer l’ampoule, desserrez la vis.
● Appuyez sur le culot et faites-le glisser vers vous.
● Remplacez l’ampoule défectueuse. ● Placez la nouvelle ampoule et fixez-la en
serrant la vis. ● Remettez le réfrigérateur en marche.
Ampoule (intérieure)
Culot
Thermostat
9
Description de l’appareil
Inversement de la porte
Vue d’ensemble de l’appareil 1. Etagères amovibles2. Etagère de protection3. Plateau4. Pied ajustable5. Poignée encastrée6. Light7. Light Switch8. Bottle Racks
Le côté où la porte s'ouvre peut être changé, du côté droit (comme fourni) vers le côté gauche, si le site d'installation le permet Outils dont vous aurez besoin:
1. Douille 8mm
Avant d’allonger le réfrigérateur sur son dos pour avoir accès à sa base, vous devez le poser sur un support en mousse ou une matière similaire, afin d’éviter d’endommager les et les conduits situés à l’arrière du réfrigérateur.1. Retirez le capuchon de charnière
supérieure (7).2. Retirez les deux marques des vis (6) qui
connectent la charnière supérieure (5) au côté droit du haut du boîtier.
3. Soulevez délicatement la porte et placez-
2. Tournevis en forme de croix
3. Couteau pointu ou tournevis à lame fine
la sur une surface rembourrée pour éviter de la rayer.
4. Retirez la fiche (9) et transférez-la sur le trou découvert sur le côté droit de l’appareil. Assurez-vous d’appuyer sur le bouton fermement dans le trou.
5. Retirez les deux vis(7) qui tiennent la charnière inférieure (2) sur le côté droit de l’appareil.
6. Retirez le pied de devant de niveau de type vis (4) et transférez-le sur le côté droit comme indiqué sur la figure ci-contre.
7. Mettez la porte dans son nouvel emplacement en vous assurant que la broche entre dans la bague dans la partie du cadre inférieure (trou).
8. Sécurisez la charnière supérieure (5) précédemment retirée dans l’étape 3 sur le côté gauche de l’appareil. Assurez-vous que la broche entre dans la bague sur la partie du cadre supérieure (trou).
9. Sans serer sécurisez la charnière de gauche inférieure (2) et ne serrez pas les boulons tant que la porte n’est pas en position fermée et à niveau.
10. Insérez la fiche (9) sur les trous découverts (côté droit).
11. Replacez le capuchon de charnière supérieure (7).
1
234
567
8
10
Le rejets de l’appareilIl est strictement interdit de jeter cet appareil électroménager dans les déchets domestiques.Le matériel d’emballageL’emballage contient un symbole permettant le recyclage de celui-ci. SVP disposer l’emballage à des fins de recyclage.Avant de rejeter l’appareil1. Déconnecter le câble de sa source principale2. Couper le câble principal et jeter-le
La bonne façon de vous débarrasser de l’appareil
Le symbole inscrit sur le produit indique que ce dernier ne doit pas être disposé comme n’importe quel autre déchet ménager. Au contraire, il devrait être apporté à un centre de collection et de récupération d’équipements électriques et électroniques. En vous assurant que vous vous disposer de cet appareil de façon environnementale, vous prévenez les conséquences sur l’environnement et la santé publique qu’un mauvais rejet de l’appareil pourrait occasionner. Pour plus d’information sur le recyclage de ce produit, SVP contacter votre centre de recyclage local pour venir le chercher. Si non, SVP appeler votre conseil local, votre service de déchet des appareils ménagers ou bien la boutique ou vous l’avez acheté.
7
8
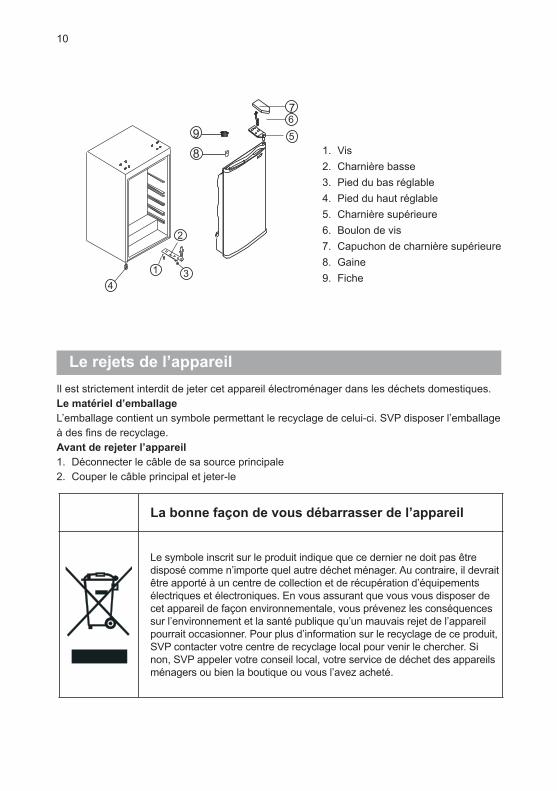
91. Vis2. Charnière basse3. Pied du bas réglable4. Pied du haut réglable5. Charnière supérieure6. Boulon de vis7. Capuchon de charnière supérieure8. Gaine9. Fiche

GEBRUIKSAANWIJZING
KOELKAST
LIKO112

3
van de plastic onderdelen van dit toestel. ● Plaats geen levensmiddelen rechtstreeks
tegen de luchtuitlaat aan de achterwand. 1) Ingevroren voedsel mag niet opnieuw worden ingevroren als het eenmaal ontdooid is. 2)
● Bewaar voorverpakte diepvriesproducten volgens de aanwijzingen van de fabrikant van de diepvriesproducten. 2)
● De opslagaanbevelingen van de fabrikant van het toestel moeten strikt worden nageleefd. Raadpleeg de relevante instructies.
● Plaats geen koolzuurhoudende drank in het vriesvak, daar deze druk op de container veroorzaken, die daardoor kunnen exploderen en kunnen leiden tot schade aan het toestel. 2)
● IJslolly’s kunnen vrieswonden veroorzaken als ze rechtstreeks vanuit het toestel geconsumeerd worden. 2)
Waarschuwing! Zorg en reiniging
● U dient het toestel uit te schakelen en de stekker uit het stopcontact te trekken alvorens een onderhoudsbeurt te geven.
● Maak het toestel niet schoon met metalen voorwerpen, een stoomreiniger, etherische oliën, organische oplosmiddelen of schuurmiddelen.
● Gebruik geen scherpe voorwerpen om ijs uit het toestel te verwijderen. Gebruik een plastic schraper.
● Controleer regelmatig de afvoer voor het dooiwater in de koelkast. Als de afvoer verstopt is, zal er onderin het toestel water worden verzameld.
Installatie Belangrijk! Volg zorgvuldig de instructies in deze handleiding op voor de elektrische aansluiting,.
● Pak het toestel uit en controleer of er geen beschadigingen zijn. Sluit het toestel niet aan als het beschadigd is. Meld mogelijke beschadigingen onmiddellijk aan de winkel waar u het toestel hebt gekocht. Bewaar de verpakking in dit geval.
● Het is aanbevolen om ten minste vier uur te wachten voordat u het toestel aansluit, zodat de olie in de compressor kan terugvloeien.
● Er moet voldoende luchtcirculatie rond het toestel aanwezig zijn, het ontbreken hiervan leidt tot oververhitting. Volg de instructies met betrekking tot de installatie om voldoende ventilatie te bekomen.
Opgelet: brandgevaar!
Zorg er tijdens het transport en de installatie van het toestel voor dat geen onderdelen van het koelcircuit beschadigd raken. - vermijd open vuur en ontstekingsbronnen. - ventileer de ruimte waarin het toestel zich
bevindt grondig. ● Het is gevaarlijk om de specificaties te
wijzigen of dit product aan te passen. Eventuele schade aan het snoer kan tot kortsluiting, brand en/of een elektrische schok leiden.
Waarschuwing! Eventuele elektrische onderdelen (netsnoer, stekker, compressor) moeten worden vervangen door een erkend vertegenwoordiger of bevoegd onderhoudspersoneel.
1. Het netsnoer mag niet verlengd worden. 2. Zorg ervoor dat de stekker niet door de
achterkant van het toestel platgedrukt of beschadigd wordt. Een platgedrukte of beschadigde stekker kan oververhit raken en brand veroorzaken.
3. Zorg ervoor dat u de stekker van het toestel kunt bereiken.
4. Trek niet aan het netsnoer.5. Steek de stekker niet in het stopcontact
als hij los zit. Er bestaat een risico op een elektrische schok of brand.
6. U mag het toestel niet gebruiken zonder de afdekking van de binnenverlichting.
● Dit toestel is zwaar. Voorzichtigheid is geboden bij het verplaatsen ervan.
● U dient geen artikelen uit het vriesvak te halen of aan te raken als uw handen vochtig/nat zijn, daar dit uw huid kan beschadigen of vrieswonden kan veroorzaken.
● Vermijd langdurige blootstelling van het toestel aan rechtstreeks zonlicht.
Dagelijks gebruik ● Bewaar geen brandbare gassen of
vloeistoffen in het toestel. Dit houdt is ontploffingsgevaar in.
● Gebruik geen elektrische apparaten in het toestel (bijv. elektrische ijsmachines, mixers etc.).
● Als u de stekker uit het stopcontact trekt, dient u altijd aan de stekker te trekken en niet aan de kabel.
● Plaats geen warme voorwerpen in de buurt

4
Bedieningspaneel Het eerste gebruik en de temperatuurregeling
● Steek de stekker van het netsnoer in een geaard stopcontact. Wanneer de deur van het koelvak wordt geopend, wordt de binnenverlichting ingeschakeld.
● De knop waarmee u de temperatuur instelt, bevindt zich aan de rechterzijde van het koelvak.Instelling 0 betekent:Uit.Draai de knop met de klok mee om het apparaat in te schakelen. Instelling 1 betekent:Hoogste temperatuur, warmste instelling. Instelling 7 (eindstand) betekent:Laagste temperatuur, koudste instelling.Belangrijk! Het is aanbevolen om het apparaat op positie 2, 3 or 4 in te
stellen. Als u een warmere of koudere temperatuur wilt, draai de knop dienovereenkomstig naar een lagere of hogere positie. Het apparaat op een lagere positie instellen zal tot energiebesparing leiden. Een hogere instelling zal tot een hoger energieverbruik leidenBelangrijk! Hoge omgevingstemperaturen (bijv. op hete zomerdagen) en een koude instelling (stand 6-7) kunnen ervoor zorgen dat de compressor voortdurend of non-stop draait!Oorzaak: wanneer de omgevingstemperatuur hoog is, moet de compressor continu werken om de lage temperatuur in het toestel te handhaven.
Installatieplaats Waarschuwing! Lees de instructies aandachtig vóór de installatie,voor uw
Reinigen vóór gebruik ● Voordat u het toestel voor de eerste
keer gebruikt, dient u het interieur en de interne accessoires te wassen met lauwwarm water en een beetje neutrale zeep om de typische geur van een gloednieuw product te verwijderen, en vervolgens goed te laten drogen.
● Waar mogelijk dient de achterkant van het toestel tegen een muur te worden geplaatst om het aanraken of vastgrijpen van warme onderdelen (compressor, condensor) en brandgevaar te voorkomen. Volg de instructies met betrekking tot de installatie.
● Het toestel mag niet in de buurt van een centrale verwarming of een fornuis worden opgesteld.
● Zorg ervoor dat de stekker na de installatie van het toestel toegankelijk is.
Onderhoudsbeurt ● Alle vereiste elektrische
onderhoudswerkzaamheden aan het toestel moeten door een bevoegd elektricien of competent persoon worden uitgevoerd.
● Onderhoud aan dit toestel mag alleen worden uitgevoerd door een erkende onderhoudsdienst en alleen originele reserveonderdelen mogen worden gebruikt. 1) Als het toestel ontdooid is.2) Als het toestel een vriesvak bevat.
● Plaats het toestel uit de buurt van warmtebronnen zoals kachels, radiatoren, rechtstreeks zonlicht, enz.
● Er wordt een maximale prestatie en veiligheid gegarandeerd door binnenshuis de juiste temperatuur voor de klasse van de betreffende eenheid te handhaven, zoals op het typeplaatje staat vermeld.
Belangrijk! Gebruik geen schoonmaakmiddelen of schuurmiddelen, daar deze de lak beschadigen.
Eerste gebruik en installatie
veiligheid en een goede werking van het toestel.
5
Dagelijks gebruik
Toebehoren 1)
Verplaatsbare schappen/lades ● Er werden diverse glazen of plastic
schappen of draadmanden met uw toestel meegeleverd - verschillende modellen hebben verschillende combinaties en verschillende modellen hebben verschillende kwaliteit.
● De wanden van de koelkast zijn voorzien van een aantal geleiders zodat de schappen naar wens kunnen worden geplaatst.
Het positioneren van de deurplanken ● Om voedingspakketten van verschillende
afmetingen op te kunnen bergen, kunnen de deurplanken op verschillende hoogtes worden geplaatst.
● Om deze aanpassingen uit te voeren, dient u geleidelijk de plank in de richting van de pijlen te trekken totdat deze loskomt en te herpositioneren zoals vereist.
Groentelade ● De lade is geschikt voor het bewaren van
groenten en fruit.
● De toestellen mogen niet aan regen worden blootgesteld. Voldoende lucht moet onderin in het achtergedeelte van de toestellen kunnen circuleren, slechte luchtcirculatie kan namelijk de prestaties beïnvloeden. Ingebouwde toestellen moeten uit de buurt van warmtebronnen zoals kachels en rechtstreeks zonlicht worden geplaatst.
Waterpas stellen ● Het toestel moet waterpas worden gesteld
om trillingen uit te sluiten. Om het toestel waterpas te stellen, moet het rechtop staan en beide stelbouten moeten stevig contact maken met de vloer. U kunt ook het niveau bijstellen door aan de voorzijde de juiste stelbouten uit te draaien (gebruik uw vingers of een geschikte steeksleutel).
Elektrische aansluiting Opgelet! Alle vereiste elektrische onderhoudswerkzaamheden aan het toestel moeten door een bevoegd elektricien of competent persoon worden uitgevoerd. Waarschuwing! Dit toestel moet geaard worden. De fabrikant wijst elke aansprakelijkheid af indien deze veiligheidsmaatregelen niet in acht worden genomen.
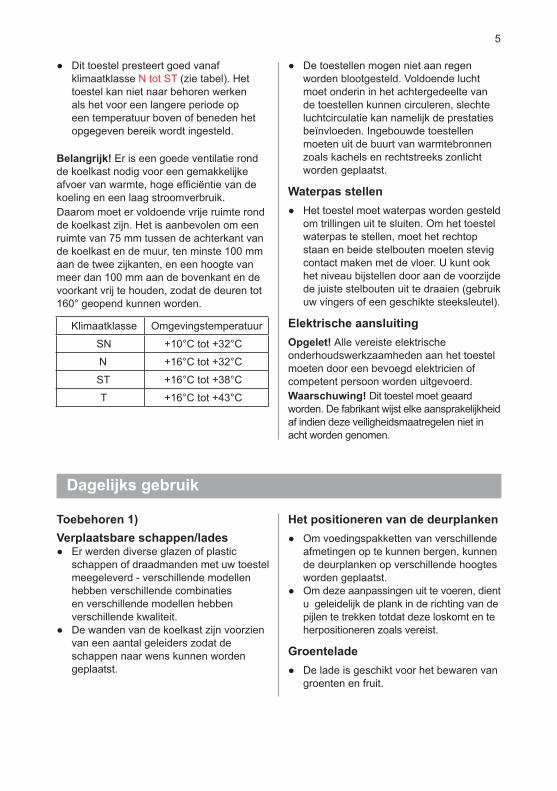
● Dit toestel presteert goed vanaf klimaatklasse N tot ST (zie tabel). Het toestel kan niet naar behoren werken als het voor een langere periode op een temperatuur boven of beneden het opgegeven bereik wordt ingesteld.
Belangrijk! Er is een goede ventilatie rond de koelkast nodig voor een gemakkelijke afvoer van warmte, hoge efficiëntie van de koeling en een laag stroomverbruik.Daarom moet er voldoende vrije ruimte rond de koelkast zijn. Het is aanbevolen om een ruimte van 75 mm tussen de achterkant van de koelkast en de muur, ten minste 100 mm aan de twee zijkanten, en een hoogte van meer dan 100 mm aan de bovenkant en de voorkant vrij te houden, zodat de deuren tot 160° geopend kunnen worden.
Klimaatklasse Omgevingstemperatuur
SN +10°C tot +32°C
N +16°C tot +32°C
ST +16°C tot +38°C
T +16°C tot +43°C

6
Nuttige aanwijzingen en tips
Reiniging en zorg
Geluiden tijdens werking De volgende geluiden zijn kenmerkend voor koelkasten:Klikken - Wanneer de compressor in- of uit wordt geschakeld, kunt u een klik horen.Brommen - Zodra de compressor in werking is, kunt u gebrom horen. Borrelen - Als het koelmiddel de dunne buizen instroomt, kunt u geborrel of spatgeluiden horen. Spatten - Zelfs nadat de compressor is uitgeschakeld, kan dit geluid nog kort te horen zijn.Tips voor energiebesparing
● Plaats het toestel niet in de buurt van kachels, verwarmingselementen of andere warmtebronnen.
● Open de deur niet te vaak of laat de deur niet langer open dan nodig is.
● Stel de temperatuur niet lager in dan nodig. ● Zorg ervoor dat de zijwanden en
achterzijde van het toestel op enige afstand van de muur zijn geplaatst, volg vervolgens de instructies met betrekking tot de installatie op.
● Als de schets de juiste combinatie van de laden, groentelade en schappen toont, pas de combinatie dan niet aan, dit zal tot meer energieverbruik leiden.
Tips voor het koelen van vers voedsel Voor het behalen van de beste prestaties:
● Berg geen warm voedsel of verdampende vloeistoffen in het toestel op.
● Dek het voedsel af of wikkel het in, vooral als het een sterke smaak heeft.
● Plaats het voedsel zodanig dat de lucht vrij kan circuleren.
Tips voor koeling ● Vlees (alle soorten): in plastic zakken
pakken en op de glazen plaat boven de groentelade plaatsen. Op deze manier slechts één of twee dagen bewaren uit veiligheidsoverwegingen.
● Gekookt voedsel, koude schotels, enz.: deze dienen te worden afgedekt en kunnen op elke schap geplaatst worden. Fruit en groenten: deze moeten zorgvuldig worden gereinigd en in de speciale meegeleverde lade(s) worden geplaatst.
● Boter en kaas: deze dienen in aluminiumfolie of plastic zakken te worden ingepakt om zo veel mogelijk lucht buiten te sluiten.
● Melkflessen: deze dienen van een dop te zijn voorzien en moeten in het flessenrek in de deur worden bewaard.
Reiniging en zorg Omwille van hygiënische redenen dient de binnenkant van het apparaat, waaronder de interne onderdelen, regelmatig gereinigd te worden. De koelkast dient iedere twee maanden gereinigd en onderhouden te worden.
Belangrijk! ● Verwijder voedsel uit het apparaat voor
reiniging. Bewaar het op een koele, afgesloten plaats.
● Maak het apparaat nooit schoon met een stoomreiniger. Hierdoor kan er zich vocht ophopen in de elektrische onderdelen.
● Hete dampen kunnen leiden tot beschadiging van plastic onderdelen.
● Etherische oliën en organische oplossingen kunnen plastic onderdelen beschadigen, zoals citroensap of sinaasappelschilsap, boterzuur, en reinigingsmiddel dat azijnzuur bevat. Laat dergelijke substanties niet in contact komen met onderdelen van het apparaat.
Waarschuwing! Gevaar voor elektrische schokken!
● Sluit het apparaat niet op het elektriciteitsnet aan tijdens het schoonmaken. Zet het apparaat uit voor reiniging en trek de stekker uit het stopcontact, of zet de schakelaar of zekering uit.
7
Wat te doen als...
● Gebruik geen schuurmiddelen. ● Reinig het apparaat en de interne
onderdelen met een doekje en lauwwarm water. Afwasmiddelen uit de winkel mogen ook gebruikt worden.
● Veeg het oppervlak na reiniging af met proper water en een proper doekje.
● Ophoping van stof in de condensator verhoogt het energieverbruik, reinig de condensator aan de achterkant van het apparaat daarom één keer per jaar met een zachte borstel of stofzuiger.
● Bekijk de waterafvoer achterin het koelvak van de koelkast.
● Maak een verstopte afvoer vrij met iets als een zachte pin, maar let erop dat de kast niet beschadigd wordt door scherpe dingen.
● Als alles droog is, kunt u het apparaat weer inschakelen.
OntdooienWaarom ontdooien?
● Water in voedsel of water dat in de lucht van het koelvak is gekomen door opening van de deuren kan aan de binnenkant een ijslaag vormen. Als de ijslaag dik is, zal dit de koeling afzwakken. Als het
meer dan 10mm dik is, dient het apparaat ontdooid te worden.
Ontdooiing in vakken voor vers voedsel
● Dit wordt automatisch geregeld door de regulator van de temperatuur in- en uit te schakelen, waardoor het niet nodig is om te ontdooien. Water dat vrijkomt door ontdooiing wordt automatisch afgevoerd naar een opvangbakje door een afvoerpijp aan de achterkant van de koelkast.
Als het apparaat lange tijd niet gebruikt wordt
● Verwijder alles wat zich in het apparaat bevindt.
● Schakel het apparaat uit door de temperatuurregelaar op “0” te zetten.
● Verwijder de stekker uit het stopcontact of schakel de elektriciteit uit.
● Reinig grondig (zie rubriek: Reiniging en zorg) Laat de deur open staan om de opeenhoping van geurtjes te voorkomen. Opmerking: Als het apparaat een vriesvak bevat
Waarschuwing! Schakel het apparaat uit voordat u storingen gaat zoeken. Alleen een bevoegd
Belangrijk! Reparaties aan koelkasten/diepvriezers dienen alleen uitgevoerd te worden door bekwame ingenieurs. Foutieve reparaties kunnen leiden tot aanzienlijke gevaren voor de gebruiker. Als uw apparaat moet hersteld worden, neem dan contact op met uw erkende dealer of uw lokale klantendienst.
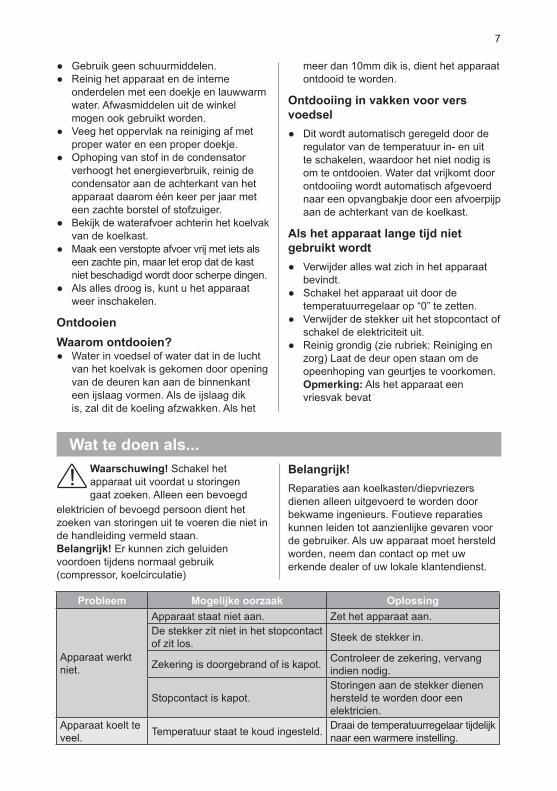
Probleem Mogelijke oorzaak Oplossing
Apparaat werkt niet.
Apparaat staat niet aan. Zet het apparaat aan.De stekker zit niet in het stopcontact of zit los. Steek de stekker in.
Zekering is doorgebrand of is kapot. Controleer de zekering, vervang indien nodig.
Stopcontact is kapot.Storingen aan de stekker dienen hersteld te worden door een elektricien.
Apparaat koelt te veel. Temperatuur staat te koud ingesteld. Draai de temperatuurregelaar tijdelijk
naar een warmere instelling.
elektricien of bevoegd persoon dient het zoeken van storingen uit te voeren die niet in de handleiding vermeld staan.Belangrijk! Er kunnen zich geluiden voordoen tijdens normaal gebruik (compressor, koelcirculatie)
8
The appliance is near a heat
(possibly after reversing the
The appliance is touching the
Vervanging van het lampje Avvertenza! Waarschuwing! Als het LED lampje beschadigd is, dient alleen een bevoegd elektricien of bekwaam persoon deze te vervangen!
Vervanging van het LED lampje door onervaren personen kan verwondingen of ernstige storingen tot gevolg hebben. Hij dient vervangen te worden door een gekwalificeerd persoon om gevaren te voorkomen. Neem contact op met uw lokale reparatiedienst voor hulp.Schakel het apparaat uit om het lampje te vervangen, of trek de stekker of zekering uit.
Het eten heeft te warm.
Temperatuur is niet correct ingesteld.
Raadpleeg de rubriek "bij eerste gebruik".
De deur stond te lang open. Open de deur maar zolang als nodig is.
Er werd een grote hoeveelheid warm eten in de koelkast gestoken binnen de laatste 24 uur.
Draai de temperatuurregelaar tijdelijk naar een koudere instelling.
Het apparaat staat in de buurt van een warmtebron.
Raadpleeg de rubriek "installatieplaats"
Binnenverlichting werkt niet. Het lichtpeertje is stuk. Raadpleeg de rubriek "De lichtpeer
vervangen"
Veel opeenhoping van ijs, mogelijk ook op de deurdichting.
De deurdichting is niet luchtdicht (mogelijk na het omkeren van de deur).
Warm de lekkende delen van de deurdichting voorzichtig op met een haardroger (op een koele stand). Pas tegelijkertijd de opgewarmde deurdichting aan met de hand zodat hij op zijn plaats zit.
Ongebruikelijke geluiden
Apparaat staat niet waterpas. Stel de voetjes bij.Het apparaat komt in aanraking met de muur of andere voorwerpen.
Verplaats het apparaat voorzichtig.
Een onderdeel, bijv. een leiding, aan de achterkant van het apparaat komt in aanraking met een ander onderdeel van het apparaat of de muur.
Indien nodig plooit u het onderdeel voorzichtig uit de weg.
De compressor start niet onmiddellijk na het veranderen van de temperatuurinstelling.
Dit is normaal, er heeft zich geen fout voorgedaan.
De compressor start na een bepaalde tijd.
Water op de vloer of op de schappen.
Waterafvoerleiding zit geblokkeerd.
Raadpleeg de rubriek "reiniging en zorg"
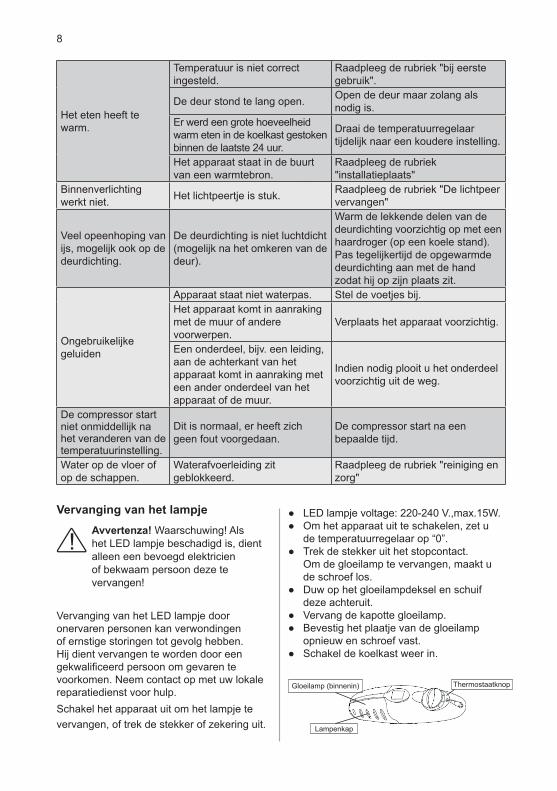
● LED lampje voltage: 220-240 V.,max.15W. ● Om het apparaat uit te schakelen, zet u
de temperatuurregelaar op “0”. ● Trek de stekker uit het stopcontact.
Om de gloeilamp te vervangen, maakt u de schroef los.
● Duw op het gloeilampdeksel en schuif deze achteruit.
● Vervang de kapotte gloeilamp. ● Bevestig het plaatje van de gloeilamp
opnieuw en schroef vast. ● Schakel de koelkast weer in.
Gloeilamp (binnenin)
Lampenkap
Thermostaatknop

9
Beschrijving van het apparaat
De deur omdraaien
Aanzicht van het apparaat 1. Verwijderbare Planken2. Deksel van groentevak3. Groentevak4. Regelbare voeten5. Verzonken Handgreep6. Light7. Light Switch8. Bottle Racks
De kant waar de deur opent, kan veranderd worden van de rechterkant (zoals geleverd) naar de linkerkant, indien dit nodig is voor de plaats van installatie.
Benodigde middelen:
1. 8mm schroevendraaier
Leg voordat u begint de koelkast op zijn rug om toegang te krijgen tot het draagvlak. U dient hem op een piepschuimen ondergrond of soortgelijk materiaal te leggen om beschadiging van koelleidingen aan de achterkant van de koelkast te voorkomen.1. Verwijder de kap van het bovenste
scharnier (7).2. Verwijder de twee schroefbouten (6) die
het bovenste scharnier vastmaken (5) aan de rechterzijde van de bovenkant van de kast.
2. Kruiskopschroevendraaier
3. Plamuurmes of dunne schroevendraaier
3. Til de deur voorzichtig op en plaats deze op een zachte ondergrond, om krassen te voorkomen.
4. Verwijder de plug (9) en verplaats deze naar het onbedekte gat aan de rechterzijde van het apparaat. Zorg ervoor dat u het dopje stevig in het gat duwt.
5. Verwijder de twee schroeven(7) die het onderste scharnier vasthouden (2) aan de rechterzijde van het apparaat.
6. Verwijder de schroef-achtige stelpoot aan de voorkant (4) en verplaats deze naar de rechterkant zoals aangegeven in de figuur hiernaast.
7. Plaats de deur op haar nieuwe positie terwijl u ervoor zorgt dat de pen in het gat valt in onderkant van het raamwerk.
8. Bevestig het bovenste scharnier (5) (dat eerder is verwijderd in stap 3) aan de linkerzijde van het apparaat. Zorg ervoor dat de pen in het gat in de bovenkant van het raamwerk valt.
9. Bevestig het onderste scharnier links losjes (2) en draai de bouten nog niet vast totdat de deur gesloten en waterpas gemaakt is.
10. Steek de plug (9) in de onbedekte gaten (rechterzijde).
11. Plaats de kap van het bovenste scharnier weer terug (7).
1
234
567
8

10
Afdanking van het apparaatHet is verboden dit apparaat weg te gooien met het algemeen huishoudelijk afval.VerpakkingsmateriaalVerpakkingsmateriaal voorzien van een recyclagesymbool kan gerecycleerd worden. Deponeer de verpakking in een geschikte inzamelcontainer om het te recycleren.Alvorens het apparaat af te danken.1. Trek de stekker uit het stopcontact.2. Snijd de netsnoer af en gooi deze weg.
Correcte afdanking van dit product
Dit symbool op het product of in de verpakking ervan geeft aan dat dit product niet behandeld mag worden als algemeen huishoudelijk afval. In plaats daarvan dient het bezorgd te worden aan een geschikt inzamelcentrum voor de recyclage van elektrische en elektronische apparatuur. Door ervoor te zorgen dat dit product correct afgedankt wordt, helpt u de mogelijke negatieve gevolgen voor het milieu en de menselijke gezondheid te voorkomen, die anders zouden kunnen veroorzaakt worden door een foutieve verwerking van dit product. Neem contact op met het inzamelpunt, uw lokale gemeenschap of de winkel waar u het product hebt aangekocht voor gedetailleerde informatie over de recyclage van dit product.
7
8
91. Schroef2. Onderste Scharnier3. Verstelbare Lage Poot4. Verstelbare Hoge Poot5. Bovenste Scharnier6. Schroefbout7. Kap van het Bovenste Scharnier8. Schachthoesje9. Plug