Embed Size (px)
Citation preview

Instruction ManualFor the Digital Monitoring System(Software version SMB SW-V06.20; MPB SW-V04.04)
directory
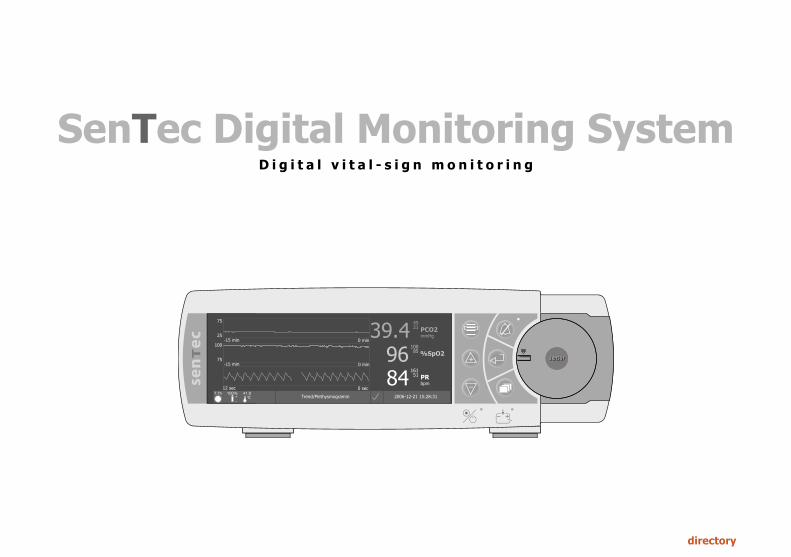
SenTec Digital Monitoring SystemD i g i t a l v i t a l - s i g n m o n i t o r i n g
�
�
������������
12 sec 0 sec
0 min
100
75
75
25-15 min
-15 min
0 min
Trend/Plethysmogramm 2006-12-21 15:28:317.7h 100%
+-
��41.9
39.44521 PCO2mmHg
8416151 PRbpm
9610085%SpO2

�� �� �� ��
�������� ����
directoryback
1 Trend Display Area2 Numerical Display Area3 Select Button4 Alarm Mute Button5 Alarm Mute Indicator (yellow LED)6 Door Lock7 Docking Station Door8 Enter Button9 Display Button10 AC Power/Battery Indicator (green/yellow LED)11 UP/DOWN Buttons12 ON/OFF Indicator (green LED)13 Status Bar14 Speaker (on the side)
15 Sensor Connection Port16 Multipurpose l/O-Port (Nurse Call & Analog Output)17 Serial Data Port (RS-232)18 Network Port (LAN)*19 Gas Bottle Slot20 Fan21 Equipotential Terminal Connector (ground)22 Fuse Holder23 AC Power Connector24 ON/OFF Switch
*feature not currently available
�
�
sensorsensor
������ �����
�����
���
��
��
���������
�������
�����
�������������������� ����������������������� ����
�
��C
����
�������� ����
����
������� ��
���
������������
��
��
� � ��
�
�������
��
�

directory
����������
��� ��R
WarrantyThe manufacturer warrants to the initial purchaser that each new component of the SenTec Digital Monitoring System (see list of components) will be free from defects in workmanship and materials. The manufacturer‘s sole obligation under this warranty is to replace any component - for which the manufacturer acknowledges the warranty cover - with a replacement component.
Warranty Exclusions and System PerformanceSenTec AG can neither guarantee or verify instrument performance characteristics nor accept warranty claims or product liability claims if the recommended procedures are not carried out, if the product has been subject to misuse, neglect or accident, if the product has been damaged by extraneous causes, if accessories other than those recommended by SenTec AG are used, or if instrument repairs are not carried out by SenTec authorized service personnel.
CAUTION: Federal law (U.S.) restricts this device to sale by or on the order of a physician.
Patents/Trademarks/CopyrightInternational Industrial Design No. DM/054179, Japanese Design No. 1137696, U.S. Patent No. D483488, U.S. Patent No. 6760610, European Patent No. 1335666 / SenTec™, V-Sign™ and V-STATS™ are trademarks of SenTec AG / © 2007 SenTec AG. All rights reserved. The contents of this document may not be reproduced in any form or communicated to any third party without the prior written consent of SenTec AG. While every effort is made to ensure the correctness of the information provided in this document, SenTec AG assumes no responsibility for errors or omissions. This document is subject to change without notice.
Patient MonitorWITH RESPECT TO ELECTRICAL SHOCK, FIRE AND MECHANICAL HAZARDS ONLY IN ACCORDANCE WITH UL 60601-1/CAN/CSA C22.2 No. 601.1, IEC 60601-1-4, IEC 60601-2-2320LW
SenTec AG, Ringstrasse 39, CH-4106 Therwil, Switzerland, www.sentec.ch

Page 3 ∙ Contents
Contents
Intended use and limitations page 4 Intended use page 4 Limitations of cutaneous blood gas measurements page 5 Limitations of pulse oximetry page 5Setting up the SenTec Digital Monitoring System (SDMS) page 6-11 List of components page 6 Installation of the Service Gas bottle page 7 Connect the Extension Cable page 7 Connect to AC power page 7 Battery operation page 8 Connect a sensor page 8 Turning on the SenTec Digital Monitor (SDM) page 8 Check the sensor page 8 Sensor calibration and storage page 9 Sensor membrane change page 10Use of the SDMS - patient application page 12-20 Patient population/Measurement Site page 12 Attachment with the Ear Clip page 13 Detachment of the sensor from the ear page 14 Use of Multi-Site Attachment Rings page 15 Application of the sensor page 15 Detachment of the Attachment Ring page 17 Controls of the SenTec Digital Monitor (SDM) page 19 Measurements page 20 Alarms page 20 Visual indicators page 20Maintenance of the SDM page 21 Cleaning and disinfection page 21 Routine checks page 21 Service page 21

directorySDM overview
∙ The SenTec Digital Monitoring System - consisting of the SenTec Digital Monitor, the V-Sign™ Sensor and accessories - is indicated for continuous, noninvasive patient monitoring.
∙ The V-Sign™ Sensor is indicated for use with the SenTec Digital Monitor when continuous noninvasive monitoring of carbon dioxide tension (PCO2), oxygen saturation (SpO2), and pulse rate (PR) are required for adult and pediatric patients. In neonatal patients the use of the V-Sign™ Sensor is indicated for carbon dioxide tension monitoring only.
∙ SenTec’s Ear Clip is intended for use with the V-Sign™ Sensor when continuous, noninvasive carbon dioxide tension, oxygen saturation and pulse rate monitoring are required. The Ear Clip is for single-patient use and is indicated to attach the V-Sign™ Sensor to the earlobe of the patient. The use of the Ear Clip is contraindicated for patients whose earlobes are too small to ensure adequate sensor application.
∙ SenTec’s Multi-Site Attachment Ring, model MAR-A/P/N, is intended for use with the V-Sign™ Sensor when continuous, noninvasive carbon dioxide tension monitoring is required for adult, pediatric, and neonatal patients. The Multi-Site Attachment Ring, model MAR-A/P/N, is for single use and is indicated to attach the V-Sign™ Sensor to conventional measurement sites for carbon dioxide tension monitoring.
Intended use and limitations
Page 4 ∙ Intended use and limitations
∙ SenTec’s Multi-Site Attachment Ring, model MAR-A/P, is intended for use with the V-Sign™ Sensor when continuous, noninvasive carbon dioxide tension monitoring is required for adult and pediatric patients. The Multi-Site Attachment Ring, model MAR-A/P, is for single use and is indicated to attach the V-Sign™ Sensor to conventional measurement sites for carbon dioxide tension monitoring.
∙ The SenTec Digital Monitoring System is indicated for use in hospitals, hospital-type facilities, intra-hospital transport environments, and - if under clinical supervision - home environments.
∙ The SenTec Digital Monitoring System is for prescription use only. Note: Hospital use typically covers areas such as general care floors, operating rooms, special procedure areas, intensive and critical care areas. Hospital-type facilities typically cover facilities such as surgical centers, special nursing facilities, and sleep labs outside of the hospital. Intra-hospital transport includes transport of a patient within the hospital or hospital-type facilities.
Intended use of the SenTec Digital Monitoring System (SDMS)

SDM overview directory
Limitations of cutaneous blood gas measurements
The SDMS monitors cutaneous PCO2. The following clinical situations or factors may affect the correlation between cutaneous and arterial PCO2 values:· arterio-venous shunts∙ hypoperfused measurement site, e.g. because of low cardiac index,
shock, hypothermia, or vasoactive drugs· condition of patient’s skin and subcutaneous tissue· interference with anesthetic gases
Note: The SDMS is not a blood gas device. Keep the above mentioned limitations in mind when interpreting cutaneous PCO2 values.
Note: When comparing PCO2 values displayed by the SDM against PCO2 values obtained from arterial blood gas (ABG) analysis, pay attention to the following points:∙ Carefully draw and handle blood samples.∙ Blood sampling should be performed in steady state conditions.∙ The PCO2 value obtained from ABG analysis has to be compared to
the SDM’s PCO2 at the time of blood sampling.∙ The PCO2 values displayed by the SDM are automatically corrected to
37°C (regardless of the patient’s core temperature). When perform-ing the ABG analysis make sure to properly enter the patient’s core temperature into the blood gas analyzer. Use the blood gas analyzer’s “37°C-PCO2” value to compare with the SDM’s PCO2 values.
∙ Verify proper operation of the blood gas analyzer. Periodically com-pare the blood gas analyzer’s barometric pressure against a known calibrated reference barometer.
Page 5 ∙ Intended use and limitations
Limitations of pulse oximetry
The SDMS monitors functional oxygen saturation (SpO2). The follow-ing clinical situations or factors may limit the correlation between SpO2 and arterial oxygen saturation (SaO2) values:· dysfunctional hemoglobins (COHb, MetHb)· intravascular dyes· low perfusion at the measuring site· skin pigmentation· venous pulsations (e.g. due to use of the earlobe as a measurement
site on a patient in steep Trendelenburg position)· anemia
Note: Oxygen saturation measurement techniques – including pulse oximetry – are not able to detect hyperoxemia.
Note: Due to the S-shape of the oxyhemoglobin dissociation curve (ODC) pulse oximetry cannot reliably detect respiratory problems in patients inspiring supplemental oxygen.

f
h
e
g
b
i
a
������� ��� ����
k
c
d ���������������������������������������������������
�����
������ � � �
��� � � �
� � � � � � � � � � � � � �� � � � � � � � � � � � � � � � � � � � � � � � � � � � � � � � � � � � � � � � �� � � �
� � � �� � �� �� � �� �� �
� �� �� �� �� �� �� �� ���� ���� �� �� ���������������������������������
����������������
���������������
������������������������������������������������������������������������������������������������������������������������������������������������������������������
l
directorySDM overview
�
�
������������
12 sec 0 sec
0 min
100
75
75
25-15 min
-15 min
0 min
Trend/Plethysmogramm 2006-12-21 15:28:317.7h 100%
+-
��41.9
39.44521 PCO2mmHg
8416151 PRbpm
9610085%SpO2
Setting up the SenTec Digital Monitoring System (SDMS)
Page 6 ∙ Setting up
List of components
The SenTec Digital Monitoring System (SDMS) comprises the following components: a SenTec Digital Monitor (SDM)b Power cord (applicable to country of sale)c SDMS instruction manual (applicable to country of sale)d SDMS Manual CD (providing detailed information, SDM Technical Manual in English only)e V-Sign™ Sensorf Digital Monitor Extension Cableg V-Sign™ Disposable Set (sensor remembraning tool)h Ear Clip/Multi-Site Attachment Ring (for sensor application)i Sensor Gel (contact liquid)k Service Gas (for sensor calibration)l V-STATS™ Installation CD (current version)
Additional instructions for the V-Sign™ Sensor, the V-Sign™ Disposable Set, the Ear Clip and the Multi-Site Attachment Rings are provided in the respective directions for use. To ensure proper operation of the SDMS, precisely follow the in-structions provided in this instruction manual step by step.

directorySDM overview Page 7 ∙ Setting up
Installation of the Service Gas bottle
WARNING: Pressurized container. Protect from sunlight and do not expose to temperatures exceeding 50°C (122°F). Do not pierce or burn, even after use. Do not spray on a naked flame or any incandescent material.
WARNING: Do not use gas bottles from manufacturers other than SenTec. The use of non-SenTec gas bottles may damage the Docking Station. Wrong calibration gas mixtures will result in wrong sensor calibrations, and subsequently re-sult in wrong PCO2 data.
The gas bottle slot is located on the rear of the SDM 19 .
Remove the gas bottle by turning it in counter-clockwise direction.
Insert the gas bottle by turning it in clockwise direction and tighten it without applying undue force (see picture).
Note: The status icon “Gas” (
8.0h 6.4h 3.2h4.8h 1.6h 0.0h
100% 75% 50% 25%
��42.0
��41.0
��42.0
10%
730
100% 50% 10% 0%
100% 50% 10% 0%
+-
+-
+-
+-
+-
) is displayed only if the sen-sor is in the Docking Station and if the parameter “PCO2” is en-abled. Replace the gas bottle if the message “Gas bottle empty” (
8.0h 6.4h 3.2h4.8h 1.6h 0.0h
100% 75% 50% 25%
��42.0
��41.0
��42.0
10%
730
100% 50% 10% 0%
100% 50% 10% 0%
+-
+-
+-
+-
+-
) is displayed in the status bar.
Note: Dispose of empty gas bottles according to local waste regulations for aluminum comtainers.
Connect the Extension Cable
Connect the Digital Monitor Extension Cable to the SDM. The connection is properly established when both clamps of the plug snap in 15 . To disconnect the cable from the SDM release the clamps by pressing the two buttons on the black plug (see picture) and pull to remove the cable.
Connect to AC power
Plug the female connector of the pow-er cord into the AC power connector on the rear of the monitor 23 .
Plug the male connector of the power cord into a properly grounded AC power outlet.
The SDM will automatically adapt to the applicable local volt-age: 100 - 240V~ (50/60Hz).Verify that the AC power/battery indicator 10 is lit. If the AC power/battery indicator is not lit, check the power cord, acces-sible fuses, and the AC power outlet.

��
��
��
��
��
��
�� ����� �� �����
�� ������ ����
��
��
�� ������ � ����
�����
directorySDM overview page 8 ∙ Setting up
ON/OFF switch
Battery operation
The SDM is equipped with a rechargeable internal LiIon bat-tery that can be used to power the monitor during transport or when AC power is not available. A new, fully charged battery will provide 6 hours of monitoring time. The battery icon (
8.0h 6.4h 3.2h4.8h 1.6h 0.0h
100% 75% 50% 25%
��42.0
��41.0
��42.0
10%
730
100% 50% 10% 0%
100% 50% 10% 0%
+-
+-
+-
+-
+-
) informs about the remaining battery charge (%).
The AC power/battery indicator informs about the charging status of the battery:AC power/battery indicator green: battery fully chargedAC power/battery indicator yellow: battery charging
It takes approximately 7 hours to fully charge an empty bat-tery.
Connect a sensor
Connect the V-Sign™ Sensor to the Digital Monitor Extension Cable.
Turning on the SenTec Digital Monitor (SDM)
Turn on the SDM by pushing the ON/OFF switch at the rear of the SDM 24 . The SDM performs a power-on self-test. Check the date/time settings of the SDM and adjust if necessary.
Check the sensor
Make sure the sensor is not affected by loose fit of the membrane, trapped air under the membrane, or dried-up electrolyte (white appearance of the membrane). If needed change the membrane. In case of any staining on the sensor membrane clean it with 70% isopropanol. In case of any vis-ible damage of the sensor housing or cable contact SenTec authorized serv-ice personnel or your local SenTec representative.

������������
������������
������������
�����
��
���
������������
������������ ������
��
���
���
������
���
��
���
������������
directorySDM overview Page 9 ∙ Setting up
Sensor calibration and storage
If a calibration of the sensor is needed, the SDM will automati-cally prompt the message “Calibrate sensor” in the status bar.
1. Open the Docking Station door 7 on the front side of the monitor by pressing the door lock 6 .
2. Check the gasket in the Docking Station. If necessary clean Docking Station and gasket by using a cotton swab (Q-Tip) with 70% isopropanol.
WARNING: Always clean the sen-sor before putting it into the Docking Station.
3. Hang the sensor into the holder at the inside of the door (red light visible).
CAUTION: Wrong orientation of the sensor in the Docking Station might cause damage to the sensor, the Docking Station, or parts of them.
4. The sensor has to be placed prop-erly into the holder to ensure that the Docking Station door can be closed without force.
WARNING: For a correct calib-ration it is necessary that the sensor is always positioned correctly in the
Docking Station door and that the Docking Station door is properly closed.
5. Close the Docking Station door. The SDM now checks the sensor and auto-matically starts to calibrate the sensor. After a successful calibration the mes-sage “Ready for use” is displayed. If a sensor membrane change is required follow the instructions provided on the following pages and confirm the membrane change as requested by the monitor.
Note: For best PCO2 results it is recommended to store the sensor in the Docking Station the first four hours after switch-ing-on the monitor or after membrane change. If you want to measure immediately, we recommend additional calibrations.
WARNING: To maintain monitor readiness always keep the monitor switched on and always store the sensor in the Docking Station.

��
��
��
��
��
��
�� ����� �� �����
�� ������ ����
��
��
�� ������ � ����
�����
��
��
��
��
��
��
�� ����� �� �����
�� ������ ����
��
��
�� ������ � ����
�����
��
��
��
��
��
��
�� ����� �� �����
�� ������ ����
��
��
�� ������ � ����
����� ��
��
��
��
��
��
�� ����� �� �����
�� ������ ����
��
��
�� ������ � ����
����� ��
��
��
��
��
��
�� ����� �� �����
�� ������ ����
��
��
�� ������ � ����
����� ��
��
��
��
��
��
�� ����� �� �����
�� ������ ����
��
��
�� ������ � ����
�����
��
��
��
��
��
��
�� ����� �� �����
�� ������ ����
��
��
�� ������ � ����
����� ��
��
��
��
��
��
�� ����� �� �����
�� ������ ����
��
��
�� ������ � ����
����� ��
��
��
��
��
��
�� ����� �� �����
�� ������ ����
��
��
�� ������ � ����
�����
directorySDM overview page 10 ∙ Setting up
Sensor membrane change
Under normal use, the membrane of the V-Sign™ Sensor has to be changed every 28 days. The monitor requests a mem-brane change if required. Additionally the membrane of the sensor must be changed if air bubbles are visible underneath the membrane or if the membrane is damaged.
Note: The membrane timer only resets to 28 days if you con-firm the membrane change on the monitor.
Inserting sensor into tool
a. Place the membrane changer (V-Sign™ Disposable Set, short: tool) on a solid flat surface (e.g. table top).
b. Insert the sensor head (mem-brane up) into the tool.
Change sensor membrane in 4 steps
The membrane change procedure consists of the following 4 steps: step 1 removes old sensor membrane, step 2 cleans sensor surface, step 3 applies new electrolyte on sensor sur-face and step 4 sets new membrane on sensor.
Repeat the following Press and Turn procedure 4 times:
a. Press down slowly but firmly with palm of hand and hold for 3 seconds.
b. Keep tool horizontally. Grab base of tool with one hand, turn top clockwise with other hand to next stop.
Important: Pay attention to repeat the Press and Turn procedure 4 times!

��
��
��
��
��
��
�� ����� �� �����
�� ������ ����
��
��
�� ������ � ����
�����
��
��
��
��
��
��
�� ����� �� �����
�� ������ ����
��
��
�� ������ � ����
�����
directorySDM overview Page 11 ∙ Setting up
Removing sensor from tool
a. Lift the sensor and remove it from the tool.
Inspecting sensor membrane
a. Verify that the membrane ring is securely seated on the sensor.
b. Verify that there are no air bubbles between membrane and sensor surface.
In case of loose fit or trapped air, you must repeat the membrane change procedure as described above.
To perform an unrequested membrane change (e.g. if the membrane is damaged), activate the menu item “Membrane Change” (see page 19).

directorySDM overview
Use of the SDMS - patient application
Patient population/Measurement Site
The choice of the type of sensor application depends on the skin condition, the patient´s age, and the parameters to be measured:
Adults/pediatrics (i.e. more than one month of age)
Type of sensor application
Skin condition
Measurement site
Parameters
Ear Clip All skin conditions, but intact
Earlobe SpO2, PR and PCO2
SpO2, PRPCO2
MAR-A/P Normal intact
Cheek, forehead (close to the eye brow), thorax under clavicle, upper arm, skin area behind earlobe
PCO2
MAR-A/P/N Sensitive, fragile, but intact
Warning: The measurement of SpO2 and PR are not defined on sites other than the earlobe. In order to avoid er-roneous readings and false alarms of SpO2 and PR, ensure that the appropriate patient mode (Adult or Neonatal) is selected.
For sensor application on sites other than the earlobe in adult/pediatric patients furthermore disable the parameters SpO2/PR in the menu of the SDM.
Neonates (i.e. up to one month of age)
Type of sensor application
Skin condition
Measurement site
Parameters
MAR-A/P/N All skin conditions, but intact
Thorax, back, thigh
PCO2
Warning: The sensor SET temperature of 42°C shall not be used on neonates/infants (up to one year of age). In order to avoid potential burns as well as erroneous readings and false alarms of SpO2 and PR, activate the neonatal mode in the menu of the SDM. SpO2 and PR are disabled in the neo-natal mode and the sensor SET temperature is automatically adjusted to 41°C.
Note: If the SDM is operated in the neonatal mode, a yellow “NEO” indicator is displayed on the measurement, calibration and “Ready for use” screen.
page 12 ∙ Use of the SDMS - patient application

�����
��
���
������������
������������ ������
��
���
���
������
���
��
���
������������
�����
��
���
������������
������������ ������
��
���
���
������
���
��
���
������������
�����
��
���
������������
������������ ������
��
���
���
������
���
��
���
������������
�����
��
���
������������
������������ ������
��
���
���
������
���
��
���
������������
�����
��
���
������������
������������ ������
��
���
���
������
���
��
���
������������
directorySDM overview page 13 ∙ Use of the SDMS - patient application
Attachment with the Ear Clip
To attach the Ear Clip, the earlobe needs to be big enough to cover the whole dark surface of the senor. If the earlobe is too small, you may use a Multi-Site Attachment Rings (model MAR-A/P or MAR-A/P/N) to attach the sensor on an alternate site for PCO2 only monitoring (see page 15).
1. Verify that the appropriate patient mode (Adult or Neonatal) is selected and that the SDM is “Ready for use”. Check the available monitoring time.
2. Clean the earlobe with a swab wetted with 70% isopropanol and let it dry.
Note: If the SDM is in the sleep mode, the display is inactive (black). Press any of the control-buttons of the SDM to activate the display.
3. Open the Docking Station door and take out the sensor. Check the sensor Temperature (
8.0h 6.4h 3.2h4.8h 1.6h 0.0h
100% 75% 50% 25%
��42.0
��41.0
��42.0
10%
730
100% 50% 10% 0%
100% 50% 10% 0%
+-
+-
+-
+-
+-
).
4. Close the Docking Station door.
5. Press the sensor into the Ear Clip un-til it snaps in. Use a new Ear Clip for every new patient!
6. Pull off the liner protecting the adhe-sive tape of the Ear Clip.
WARNING: Do not swallow sensor gel. Keep away from children. Avoid con-tact with eyes and injured skin. Use only approved SenTec Sensor Gel.

�����
��
���
������������
������������ ������
��
���
���
������
���
��
���
������������
directorySDM overview page 14 ∙ Use of the SDMS - patient application
7. Place one small drop of Sensor Gel in the middle of the membrane surface. Make sure to keep the Ear Clip open and to handle the sensor such as the gel does not run off the membrane. Avoid wetting the adhesive pad of the Ear Clip!
Note: Instead of using Sensor Gel, youmay also use clean tap water to wet the inside of the earlobe.
8. Attach the sensor with the Ear Clip at the back of the earlobe. If possible, pull the earlobe in a horizontal position to at-tach the sensor. Close the clip from above, then guide the earlobe back in vertical position. The sensor is applied correctly if the whole dark surface is covered by the earlobe. Make sure that the sensor has good contact to the skin (no air gaps between membrane and earlobe).
9. Wrap the sensor cable around the ear twice, tape the cable to the cheek as shown in the picture, and secure the cable with Clothing Clip on shirt or bed linen. Due to the slightly increased sensor temperature the maximal site time is auto-matically controlled by the SDM. Remove the sensor when the site time has elapsed (status message “site time elapsed” 8.0h 6.4h 3.2h4.8h 1.6h 0.0h
100% 75% 50% 25%
��42.0
��41.0
��42.0
10%
730
100% 50% 10% 0%
100% 50% 10% 0%
+-
+-
+-
+-
+-
).
Detachment of the sensor from the ear
1. Remove the adhesive tape and the Ear Clip carefully from the patient. Detach the sensor carefully from the Ear Clip.
2. After use, remove gel residues from the sensor and the patient´s earlobe with a swab wetted with 70% isopro-panol.
3. Open the Docking Station door.
�����
��
���
������������
������������ ������
��
���
���
������
���
��
���
������������
�����
��
���
������������
������������ ������
��
���
���
������
���
��
���
������������
������������
�����
��
���
������������
������������ ������
��
���
���
������
���
��
���
������������
�����
��
���
������������
������������ ������
��
���
���
������
���
��
���
������������

Fore-head
Cheek
directorySDM overview
4. Hang the sensor (red light visible) into the holder at the inside of the Docking Station door. Close the Docking Station door. Sensor calibration starts automati-cally. Note the messages displayed by the SDM.
Note: After successful calibration the display of the SDM changes to the “Ready for use” screen.
Use of Multi-Site Attachment Rings
Preparation
1. Verify that the appropriate patient mode (Adult or Neonatal) is selected and that for adult/pediatric patients the parameters SpO2/PR are disabled in the menu of the SDM.
Note: Verify that the SDM is “Ready for use” and check the available Monitoring time.
Note: If the SDM is in the sleep mode, the display is inactive (black). Press any of the control buttons of the SDM to activate the display.
2. Select an appropriate measurement site (see page 12 and illustrations below).
�����
��
���
������������
������������ ������
��
���
���
������
���
��
���
������������
Note: For forehead/cheek placement please wrap the sensor cable twice around the ear, tape it to the skin and secure it with a clothing clip on shirt or bed linen.
3. Select the appropriate attachment ring depending on the patient’s age and skin condition at the measurement site (MAR-A/P/N or MAR-A/P, see page 12).
4. Remove hair if necessary.
5. Clean the skin at the measuring site with a swab wetted with 70% isopropa-nol and let it dry.
Application of the sensor
There are two alternative methods applying the sensor to the skin:
Method A: First the Multi-Site Attachment Ring is attached to the skin then the sensor is inserted.
page 15 ∙ Use of the SDMS - patient application

directorySDM overview
1. Pull off the liner protecting the adhesive tape of the attach-ment ring.
2. Hold the snap ring and attach the ring to the measurement site, press gently on snap ring. Move your finger around the ring circumference to ensu-re a good seal, i.e. good adhesion of the entire adhesive to the skin.
Warning: Do not swallow sensor gel. Keep away from children. Avoid contact with eyes and injured skin. Use only approved SenTec Sensor Gel.
3. Apply one small drop of Sensor Gel to the skin area in the center of the attachment ring.
Note: Instead of Sensor Gel you may use one small drop of clean tap water.
4. Open the docking station door and take out the sensor. Check the sensor temperature (
8.0h 6.4h 3.2h4.8h 1.6h 0.0h
100% 75% 50% 25%
��42.0
��41.0
��42.0
10%
730
100% 50% 10% 0%
100% 50% 10% 0%
+-
+-
+-
+-
+-
adults/pediatrics;
8.0h 6.4h 3.2h4.8h 1.6h 0.0h
100% 75% 50% 25%
��42.0
��41.0
��42.0
10%
730
100% 50% 10% 0%
100% 50% 10% 0%
+-
+-
+-
+-
+-
infants/neonates).
�����
��
���
������������
������������ ������
��
���
���
������
���
��
���
������������
�����
��
���
������������
������������ ������
��
���
���
������
���
��
���
������������
page 16 ∙ Use of the SDMS - patient application
5. Close the Docking Station door.
6. Gently press the sensor into the at-tachment ring until it snaps in. Slightly twist the sensor in the ring and press the sensor gently against the skin to spread the Sensor Gel.
Note: Care must be taken to ensure air gaps and bubbles are eliminated when placing the sensor onto the skin.
7. Twist the sensor into the best position. Tape the cable at a distance of 5 to 10 cm from the sensor head to skin and secure it with a clothing clip on shirt or bed linen. For forehead/cheek placement first wrap the sensor cable twice around the ear.
Note: Alternatively you may first takeout the sensor from the docking station, apply one small drop of gel to the center of the sensor membrane surface, and finally snap in the sensor into the attachment ring (make sure to hand-

directorySDM overview
Method B: First the sensor is clicked into the Multi-Site At-tachment Ring then the assembly is attached to the skin.
1. Open the Docking Station door and take out the sensor. Check the sensor temperature (
8.0h 6.4h 3.2h4.8h 1.6h 0.0h
100% 75% 50% 25%
��42.0
��41.0
��42.0
10%
730
100% 50% 10% 0%
100% 50% 10% 0%
+-
+-
+-
+-
+-
adults/pediatrics;
8.0h 6.4h 3.2h4.8h 1.6h 0.0h
100% 75% 50% 25%
��42.0
��41.0
��42.0
10%
730
100% 50% 10% 0%
100% 50% 10% 0%
+-
+-
+-
+-
+-
infants/neonates).
2. Close the Docking Station door.
3. Press the sensor into the attachment ring until it snaps in.
4. Pull off the liner protecting the adhe-sive tape of the attachment ring.
�����
��
���
������������
������������ ������
��
���
���
������
���
��
���
������������
page 17 ∙ Use of the SDMS - patient application
�����
��
���
������������
������������ ������
��
���
���
������
���
��
���
������������
Warning: Do not swallow sensor gel. Keep away from children. Avoid contact with eyes and injured skin. Use only approved SenTec Sensor Gel.
5. Apply one small drop of Sensor Gel to the center of the sensor membrane surface (avoid gel running off the mem-brane, thereby potentially wetting the adhesive tape).
6. Attach the sensor-ring assembly to the measurement site, press gently on sensor. Move your finger around the ring circumference to ensure a good seal, i.e. good adhesion of the entire adhesive to the skin.
Note: Care must be taken to ensure air gaps and bubbles are eliminated when placing the sensor onto the skin.
7. Twist the sensor into the best posi-tion. Tape the cable at a distance of 5 to 10 cm from the sensor head to skin and secure it with a clothing clip on shirt or bed linen. For forehead/cheek placement first wrap the sensor cable twice around the ear.

directorySDM overview page 18 ∙ Use of the SDMS - patient application
4. Open the docking station door.
5. Hang the sensor (red light visible) into the holder at the inside of the Docking Station door. Close the Dock-ing Station door. Sensor calibration starts automatically. Note the messages displayed by the SDM.
Note: After successful calibration the display of the SDM changes to the “Ready for use” screen.
Note: Two or more Multi-Site Attachment Rings may be attached to the skin simultaneously to alternate the sensor application site.
Detachment of the Attachment Ring
Note: For inspection of the measuring site or calibration of the sensor do not remove the Attachment Ring from the skin.
1. Hold the outer part of the attach-ment ring with two fingers while care-fully detaching the sensor from the snap ring.
2. Remove the attachment ring from the skin by carefully pulling at the lit-tle tab.
Note: Careful removal of the adhesive tape on premature or micro-preemies is important.
3. After use, remove gel residues from the sensor and the patient´s skin with a swab wetted with 70% isopropanol.
�����
��
���
������������
������������ ������
��
���
���
������
���
��
���
������������
�����
��
���
������������
������������ ������
��
���
���
������
���
��
���
������������
������������

directorySDM overview page 19 ∙ Use of the SDMS - patient application
Controls of the SenTec Digital Monitor (SDM)
The SDM can be controlled with 6 buttons:
�
�
- to access the menu - to scroll through the menu
Note: A grey, underlying bar highlights the selected sub-menu, menu parameter, or function.
�
�
- to activate a selected submenu or function
�
�
and
�
� - to change the value of the selected menu parameter
- to adjust brightness of the display (if in Measurement Mode)
�
�
- to switch between the available measurement displays
- to return to the measurement display from any menu level
�
�
- to mute alarms for 1 or 2 minutes (depending on menu setting)
- to mute alarms permanently (if pressing > 3 seconds)
Note: The ON/OFF switch is located on the rear of the SDM 24 .
Example: “Membrane Change”
Operate the menu of the SDM as follows:
Note: The menu “Membrane Change” can only be accessed if the sensor is neither in the Docking Station nor on the patient.
1. Select the menu “Membrane Change”, by pressing
�
�
three times.
2. Activate the selection by pressing
�
�
.
3. Select the menu item “Membrane Change Done” by pres-sing
�
�
once.
4. Press
�
�
to confirm that you have changed the sensor membrane.
Note: The membrane timer only resets to 28 days, if you con-firm the membrane change.
Select Button
Enter Button
UP & DOWNButton
DisplayButton
Alarm Mute Button

directorySDM overview page 20 ∙ Use of the SDMS - patient application
Measurements
The SDM displays the plethysmographic waveform, current values and trend graphs for SpO2, PCO2 und PR (see page 6). Furthermore it displays high and low alarm limits, alarms, alarm/status messages and status icons. Additionally the pulse can be monitored by a mutable audio-signal. Its automatic pitch modulation reflects changing SpO2 levels.
Alarms
The SDM uses audible and visual alarm signals, to alert the user when a measurement value violates its alarm limits or to indicate conditions of the equipment that require user aware-ness. The following alarms can be distinguished:
High priority alarm:2 sequences of 5 pulses of high pitch, repeated every 10 seconds. An immediate action of the personnel is necessary: SpO2, PCO2 or PR values violate the alarm limits.
Low priority alarm: 1 single pulse of low pitch, repeated every 10 seconds. Verify the monitor and/or the application of the sensor at the earlobe.
Note: During the PCO2 stabilization phase, both visual and audible PCO2 alarm signals are inhibited and the numeric PCO2 value is displayed in gray (status message: “PCO2 stabilizing”).
By pressing the alarm mute button, audible alarm signals can be muted for 1 or 2 minutes (depending on menu setting) or permanently (if pressing > 3 seconds).
WARNING: The function “Nurse Call” is inactive when alarms are muted.
Visual Indicators
Alarm Mute Indicator
yellow: audible alarms muted for 1 or 2 minutesflashes yellow: audible alarms permanently mutedLED off: audible alarms active
ON/OFF Indicator
green: SDM turned onLED off: SDM turned off
AC Power/Battery Indicator
green: connected to AC power, battery fully chargedyellow: connected to AC power, battery chargingLED off: not connected to AC power
Status icons in the status bar 13 provide information on (from left to right): remaining site time, battery charge, sensor tem-perature, barometric pressure, gas bottle level.

directorySDM overview page 21 ∙ Maintenance of the SDM
Maintenance of the SDMTo guarantee continuous perfomance and reliability, basic main-tenance procedures and checks have to be performed regularly.
WARNING: Before cleaning the monitor, always switch it off and disconnect it from AC power.
CAUTION: Plugs and connectors have to be kept clean and dry at all times. Do not expose the SDM to heavy mois-ture and do not allow any fluids to enter the SDM.
CAUTION: Do not use other cleaning agents than those recom-mended here. Otherwise the SDM could be damaged permanently.
CAUTION: Do not sterilize any parts of the SDM by irradiation, steam or ethylene oxide.
Cleaning and disinfection
The directions for cleaning and disinfection vary from hospital to hospital. In case of doubt consult your hygiene department.SenTec recommends the following agents:∙ surface cleaning: water, mild non-abrasive cleaning agent
or if needed KLENYZME (Steris)∙ disinfection: 70% isopropanol e.g. WEBCOL Pads (Kendall)
or CIDEX OPA (Johnson and Johnson)Refer to the instructions for use of the respective manufacturer for preparation, application and disposal of the cleaning agents.
Routine checks
The following checks should be performed regularly:· Monthly check the SDM for mechanical and functional damages.· Monthly check the power cord and the Digital Monitor Exten-
sion Cable for mechanical or functional damages. Defective cables must be replaced by original replacement parts.
· Monthly check the barometer (
8.0h 6.4h 3.2h4.8h 1.6h 0.0h
100% 75% 50% 25%
��42.0
��41.0
��42.0
10%
730
100% 50% 10% 0%
100% 50% 10% 0%
+-
+-
+-
+-
+-
) of the SDM against a known calibrated barometer.
∙ Weekly clean the Docking Station gasket using a cotton swab (Q-Tip) with 70% isopropanol.
∙ Monthly inspect the Docking Station door and gasket for mechanical damages.
Refer to the technical manual of the monitor and the directions for use of the sensor for additional/complete check lists and maintenance procedures.
Note: Please check the dispoables monthly. Replace expired products!
Service
The SDM must be controlled annually by SenTec authorized service personnel. If service is necessary contact SenTec author-ized service personnel or your local SenTec representative.
WARNING: The cover should be removed only by SenTec authorized service personnel. There are no user-serviceable parts inside the SDM.

HB-005771-b ∙ Art. 100978