Embed Size (px)
Citation preview

INSTRUCTION, INSTALLATION, MAINTENANCE AND REPAIR MANUAL3500 SERIES / MODEL 3550 ASME/ANSI B73.1M
FRAMES S, M, L AND XL – INDUSTRIAL PROCESS PUMPS 2
SECTION 2 ITEM 3550DATED SEPTEMBER 2010
NOTICE:
Aurora model 3550 pumps MUST be installed only in systems that have been designed by qualified engineering personnel. The system MUST conform to all applicable local and national regulations and safety standards.
This manual is intended to assist in the installation, operation and maintenance of Aurora model 3550 pumps and MUST be kept with the pump.
Pump service shall be performed by qualified technicians ONLY. Service shall confirm to all applicable local and national regulations and safety standards.
Thoroughly review this manual, all instructions and hazard warnings BEFORE performing any work on the pump.
Maintain ALL system and pump operation and hazard warning decals, signs, placards, etc.
This is a SAFETY ALERT SYMBOL.
Read and understand all warnings before installation or servicing pump. Failure to follow the warnings in this manual caould cause personal injury, death, or major property damage.
Will cause personal injury or death and major property damage.
Can cause serious injury and major property damage.
Can cause personal injury or property damage.
NOTICE:Follow special instructions as they are very important and must be followed.
Danger:
Warning:
CAUTION
3500 SERIES / MODEL 3550
2
PUMP DESCRIPTION:
Fill this in for your record purposes: It will be critical to have this information for the accurate identification of spare parts which may be required later.
Pump Size:
Serial Number:
Impeller Diameter:
Flow:
Application:
Mechanical Seal Type:
Model:
Date Received:
RPM:
Head:
Material of Construction*:
*Nameplate includes material information for shaft (left) and wet end (right) in that order.
INDEX:
Warnings .............................................................................................................................................................. 3
Introduction ......................................................................................................................................................... 4
Installation ....................................................................................................................................................... 4–8
Operation ......................................................................................................................................................... 8–9
Maintenance ...................................................................................................................................................... 10
Disassembly & Assembly ............................................................................................................................ 10–17
Installation Troubleshooting Guide ................................................................................................................ 18
Cross Sectional Illustrations ...................................................................................................................... 19–20
Parts & Material Composition ........................................................................................................................ 21
Spare Parts ........................................................................................................................................................ 21
Appendix I ......................................................................................................................................................... 22
Appendix II .................................................................................................................................................. 22–23
Appendix III ...................................................................................................................................................... 23
Appendix IV ...................................................................................................................................................... 24
Appendix V ........................................................................................................................................................ 24
Appendix VI ...................................................................................................................................................... 25
Appendix VII ..................................................................................................................................................... 26
Warranty ........................................................................................................................................................... 27

3500 SERIES / MODEL 3550
3
MAINTENANCE SAFETY DATA:
Warning: Toxic Fluid HandlingHazardous or toxic fluids must be flushed and properly disposed of before performing service to the pump. Check local and national regulations on disposal regulations for your area. Clean all contaminated parts according to local and national regulations. Isolate pump by closing the suction and discharge valves before servicing the pump. Wear personal protective equipment when there is a potential of handling hazardous or toxic materials.
Warning: Relieve PressureRelieve system pressure prior to servicing the pump. Failure to do so can cause personal injury or property damage. Use quality fasteners (OEM supplied) of proper size and material. Do not use force to draw piping flanges to pump as this may cause dangerous strains within the pump case and misalignment between the pump and driver. Do not disassmble or adjust any pressure containing component or shaft seal prior to relieving the pressure from the primary and auxiliary fluid systems. This will ensure no hazardous or high pressure fluid is ejected causing personal injury or equipment damage.
Warning: Cut PowerLock out power to the driver prior to performing work on the pump. Accidental start could occur if power is not locked out, causing personal injury. Always wear proper safety equipment including glasses, gloves, shoes and respirators. Do not touch pump while in operation. Lockout or uncouple driver prior to personal contact with unit. Be careful of any odd shaped or sharp edges. Avoid contact with the rotating components in the seal chamber area. All adjustments to the pump shoul be made with the pump shut and locked out.
Danger: Do Not Heat to LoosenDo not apply heat for removal or disassembly as any trapped fluid could ignite causing an explosion.
CAUTIONLifting/Handling of Unit
Lift the unit with a device that is capable of lifting the weight of the combined pump components.
NOTICE: This pump is intended for fluid transfer. Do not use for any other purpose than the intended applications.
OPERATIONAL SAFETY DATA:
CAUTIONDo not exceed rated pressures. Do not operate under minimum rated flow. Do not operate with discharge or suction valves closed. Do not adjust or disassemble any pressure containing component or shaft seal prior to depressurizing the system.
Warning: Do not operate unless the suction is primed with fluid. Never run pump dry. Do not operate without liquid supplied to the mechanical seal. Running the mechanical seal dry (even for limited runs) can cause failure and fluid release. Personal injury can occur.
CAUTIONDo not touch the pump while it is connected to hot or cold fluids. Doing so could cause personal injury.

3500 SERIES / MODEL 3550
4
INTRODUCTION:
RECEIVING SHIPMENT: Upon receiving shipment, check items against packing list. Be sure to inspect entire box for any additional parts and read all special instruction tags attached to the pump.
STORAGE: If the unit will not be installed immediately, the unit should be kept dry and in the shipping container until ready for installation.
HANDLING:
Heavy pumps and components. Serious injury or damage to the equipment could result from improper lifting and support.
You may hoist the isolated pump using the eyebolt in the bearing frame. If the pump is mounted on a baseplate, place a sling under the motor end and a sling under the pump end to hoist. If the pump and baseplate also contain a motor you may hoist by placing a sling under the motor end and a sling under the pump end.
Do not hoist the pump, motor and base assembly using the eyebolts in the pump or motor.
INSTALLATION:
MOTOR REQUIREMENTS AND SPECIFICATIONS: The motor power rating cannot exceed the maximum power limitations of the pump. Consult the chart below to ensure proper power limitations.
Power Limits Frame S M L XL
HP (kW) per 100
RPM
1.1(.82)
3.4(2.6)
5.6(4.2)
14(10.5)
NOTE: When calculating HP (kW) the pumped fluid specific gravity must be considered.
FOUNDATION: The foundation must maintain alignment under normal and abnormal conditions as this is one of the most controlling aspects for the overall reliability of the pump. The foundation must be as heavy as possible and nonresonant so it can minimize vibration. The length and width of the foundation should project beyond the anchor bolts at least 6" (152mm) while considering a generous factor of safety when determining the thickness of the base.
Certified pump elevation drawings can be supplied. These drawings will include general information on determining the size and thickness of the base and dimensions for locating the anchor bolts.
Anchor bolts must be accurately situated and provided with sleeves. The sleeve bore diameter should be nearly double the diameter of the bolt, providing no less than .5" (13mm) clearance around the bolt.
Use an acceptable foundation for pump installation.
PROPER FOOTPRINT:
ACCEPTABLE MASS: Mass of the foundation must be at least triple the mass of the pump and motor.
CAUTION
RIGHT! WRONG!
30º angle from pump;c must exit base (not side) for good
bearing area L
cL
Base too narrow; not enough bearing area
causes pump to rock
cL
RIGHT! WRONG!
Concrete weight 150 lb./ft3
(2408 kg/m3)

3500 SERIES / MODEL 3550
5
LEVELING: Acceptable parallel machined bearing plates or chock blocks need to be placed under the base along the sides and ends to distribute the load evenly. These must be leveled, lengthwise and widthwise, before installation of the base can begin.
GROUTING: The anchor bolts are for hold-down only. The grouting withstands end thrust and side thrust while compensating for the nonuniformity between the base and the foundation, preventing the pump from shifting.
Use nonexpanding, nonshrinking and high strength grouting mixture.
Allow proper setting of grouting before tightening anchor bolts. Check coupling alignment after tightening to ensure it has not changed. Realign as required in the Coupling Alignment instructions.
COUPLING ALIGNMENT:
NOTICE: Check rotation direction of the driver before coupling it to the pump. The front surface of the pump casing has indications of rotation direction. Damage to the pump will occur if the direction of rotation is not correct.
Good alignment through the flexible coupling will result in good service life of the driver and pump.
COUPLING INFORMATION:
•Useflexibletypecouplingformotorandpump.
•When aligning the shafts, the coupling should bedisconnected and the halves should be brought into alignment.
ALIGNMENT CHECKS:
•Check cold alignment before and after grout has beenapplied to the baseplate.
•Prior to cold alignment piping should be connected to thepump.
•Operatethepumpanddriverforanadequateamountoftimeto achieve maximum operating temperature before the final or hot alignment is performed.
•Repeated checks of alignment should be performed toensure proper, smooth and continuous operation.
•If any changes occur in process conditions it isrecommended to perform an alignment check.
NOTICE: Inspect the alignment between the pump and driver to ensure no misalignment was caused in the transportation and handling of the unit.
Do not align if base and mounting flanges have not been tightened. Perform alignment when the pump and driver are at normal operating temperatures.
ALIGNMENT METHOD: There are many ways to ensure proper alignment, and specific alignment choices are the customer’s choice. If you require information on the double dial indicator method, contact the Aurora factory for details. Check Hydraulic Institute Standards for additional information.
ALIGNMENT CRITERIA: Complete alignment occurs when the unit’s parallel and angular Total Indicator Run-out (TIR) measures less than .005" (.13mm). Measure the parallel alignment on the rim of the coupling, and the angular alignment on the face of the coupling. Corrections need to be made if any values exceed those stated.
Check Hydraulic Institute Standards for proper piping details.
PIPING FORCES AND MOMENTS: The discharge and suction piping flanges must be aligned concentric and parallel to the pump flanges. All piping must be independently supported near the pump to eliminate any forces that could be transmitted to the pump after the nuts and bolts have been securely fastened. Always tighten bolts 180° across from each other in an alternating fashion to ensure even gasket compression.
The piping system must be designed to allow for thermal expansion while not creating excessive forces on the pump due to the expansion/contraction, or the weight of the pipe and fluid.
NOTICE: Do not draw the piping to the pump by force. Excess forces and moments on the pump will reduce seal and bearing life.
Typical Foundation
Warning:Always lock out electrical power to the driver before performing alignment. Failure to lock out power could result in serious injury.
Warning:Install coupling guard once alignment is completed. Ensure coupling guard is properly installed before operating the pump.
Warning:Never use force to draw piping to pump flanges. This can cause excess strain on the pump case and misalignments can occur between the pump and driver resulting in serious injury and damage to the equipment.

3500 SERIES / MODEL 3550
6
Excess forces and moments on the pump may occur due to:
•Thermalexpansionandcontractionofthepipingindicatingimproper piping design and/or lack of expansion joints or loops.
•Improperpipesupportduetouseofrodhangers(insteadofspring hangers), anchors or restraints used when installing the piping.
•Misalignmentofthepumpsuctionanddischargeflangestothe piping flanges.
SUCTION PIPING:
•Suctionpipingshouldnotbelessthanthesizeofthepumpsuction nozzle. Suction piping should be no more than one size larger than the pump suction nozzle.
•Suction line velocities should not exceed 10 ft./sec. Thiswill prevent cavitation of the pump.
•Fluidvelocityguidelinesare4to6ft./sec.forsuctionand6to 10 ft./sec. for discharge.
•Pressuredropacrosspermanentsuctionstrainersneedstobeconsidered when calculating pump inlet suction pressure.
•Tee branches and valve stems must be installedperpendicular to the pipe centerline. Installing them parallel is incorrect.
NPSH: The pump must have enough positive suction head to prevent cavitation. The NPSH available (NPSHa) must be greater than the NPSH required (NPSHr). To locate NPSHr information, refer to the pump’s performance curve.
For submerged suction, the inlet must be located deep enough to prevent vortexing. If needed to prevent the formation of a vortex, provide vortex breakers in the suction vessel.
The suction piping must be free of all air pockets. An eccentric reducer may be used to reduce the chances of air pockets forming if joining different sizes of suction piping.
NOTICE: Never control the pump flow by throttling a valve in the suction line. The only function of the suction valve is to isolate the pump from the system for maintenance.
A straight length of suction piping (at least five times the diameter of the pipe) is recommended directly in front of the suction flange. Never insert an elbow directly in front of the suction flange.
All elbows in suction piping should be long radius.
When operating from the same supply source, separate suction lines are recommended.
Suction strainers need to have a total free area of at least three times the suction piping area.
A straight length of suction piping at least five times the diameter of the pipe is recommended directly in front of the suction flange.
Piping for elevated source should be in one plane. A straight length of suction piping at least five times the diameter of the pipe is recommended directly in front of the suction flange.
Problems may occur if the elbow bolts directly to the pump’s suction. The liquid tends to follow the longer radius, creating a void or reverse flow along the shorter radius, which starves part of the impeller.
Avoid situations where there are many elbows in many planes.
REDUCERS:
•Suctionpiping isusuallynomore thanonediameter largerthan pump suction nozzle.
5 DIAMETERS
SOURCESOURCE
5 DIAMETERS
NOT RECOMMENDED
NOT RECOMMENDED
3500 SERIES / MODEL 3550
7
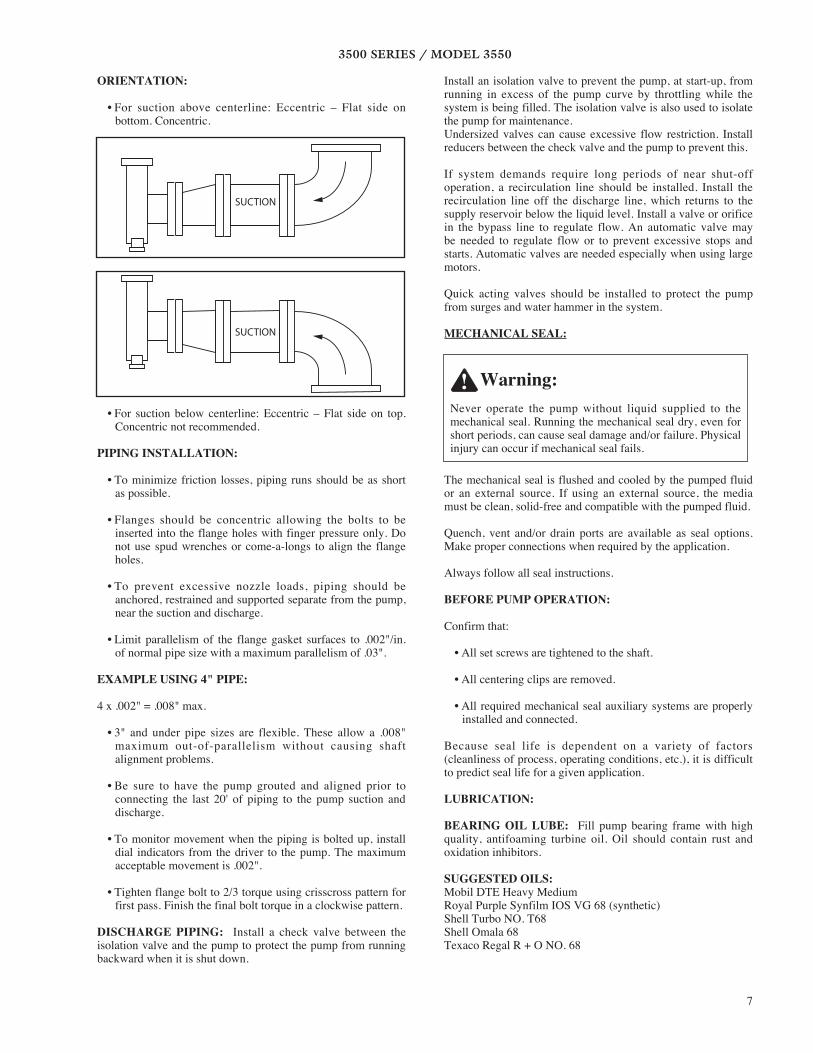
ORIENTATION:
•For suction above centerline: Eccentric – Flat side onbottom. Concentric.
•For suctionbelowcenterline:Eccentric –Flat side on top.Concentric not recommended.
PIPING INSTALLATION:
•Tominimizefriction losses,pipingrunsshouldbeasshortas possible.
•Flanges should be concentric allowing the bolts to beinserted into the flange holes with finger pressure only. Do not use spud wrenches or come-a-longs to align the flange holes.
•To prevent excessive nozzle loads, piping should beanchored, restrained and supported separate from the pump, near the suction and discharge.
•Limit parallelismof the flangegasket surfaces to .002"/in.of normal pipe size with a maximum parallelism of .03".
EXAMPLE USING 4" PIPE:
4 x .002" = .008" max.
•3" and under pipe sizes are flexible. These allow a .008"maximum out-of-parallelism without causing shaft alignment problems.
•Be sure to have the pump grouted and aligned prior toconnecting the last 20' of piping to the pump suction and discharge.
•Tomonitormovementwhenthepipingisboltedup, installdial indicators from the driver to the pump. The maximum acceptable movement is .002".
•Tightenflangeboltto2/3torqueusingcrisscrosspatternforfirst pass. Finish the final bolt torque in a clockwise pattern.
DISCHARGE PIPING: Install a check valve between the isolation valve and the pump to protect the pump from running backward when it is shut down.
Install an isolation valve to prevent the pump, at start-up, from running in excess of the pump curve by throttling while the system is being filled. The isolation valve is also used to isolate the pump for maintenance.Undersized valves can cause excessive flow restriction. Install reducers between the check valve and the pump to prevent this.
If system demands require long periods of near shut-off operation, a recirculation line should be installed. Install the recirculation line off the discharge line, which returns to the supply reservoir below the liquid level. Install a valve or orifice in the bypass line to regulate flow. An automatic valve may be needed to regulate flow or to prevent excessive stops and starts. Automatic valves are needed especially when using large motors.
Quick acting valves should be installed to protect the pump from surges and water hammer in the system.
MECHANICAL SEAL:
The mechanical seal is flushed and cooled by the pumped fluid or an external source. If using an external source, the media must be clean, solid-free and compatible with the pumped fluid.
Quench, vent and/or drain ports are available as seal options. Make proper connections when required by the application.
Always follow all seal instructions.
BEFORE PUMP OPERATION:
Confirm that:
•Allsetscrewsaretightenedtotheshaft.
•Allcenteringclipsareremoved.
•Allrequiredmechanicalsealauxiliarysystemsareproperlyinstalled and connected.
Because seal life is dependent on a variety of factors (cleanliness of process, operating conditions, etc.), it is difficult to predict seal life for a given application.
LUBRICATION:
BEARING OIL LUBE: Fill pump bearing frame with high quality, antifoaming turbine oil. Oil should contain rust and oxidation inhibitors.
SUGGESTED OILS:Mobil DTE Heavy MediumRoyal Purple Synfilm IOS VG 68 (synthetic)Shell Turbo NO. T68Shell Omala 68Texaco Regal R + O NO. 68
SUCTION
SUCTION
Warning:Never operate the pump without liquid supplied to the mechanical seal. Running the mechanical seal dry, even for short periods, can cause seal damage and/or failure. Physical injury can occur if mechanical seal fails.

3500 SERIES / MODEL 3550
8
Change oil every 12 months. Oil should be changed more frequently under severe environmental conditions (dust, moisture, corrosive atmospheres, etc.).
PROPERTIES OF LUBRICATING OIL:ISO GRADE VG...................................................................... 68Approximate SSU at 100°F (40°C) ....................................... 300300 Kinematic Viscosity at 100°F (40°C)(cSt) ....................... 68
OIL LEVEL: The oil level in the bearing frame should be one-half (1/2) of the way up the oil sight glass when the unit is not operating.
BEARING FRAME OIL VOLUMES:
Bearing Frame Oil Capacity
Frame Pints (ml)
S 1.0 (473)
M 2.6 (1,230)
L 3.0 (1,420)
XL 7.4 (3,502)
BEARING GREASE LUBE: Choose premium quality lithium grease. The grease should have an NLGI 2 or 3 consistency and a base oil viscosity of 68 centistokes minimum at 40°C. Pregrease the bearings after assembly onto the shaft when reassembling the pump. Pack the bearings full with grease; pack the bearing housing adjacent to the bearings one-third (1/3) to one-half (1/2) full.
NOTICE: Never mix greases of different consistencies. SUGGESTED GREASES: Chesterton #615 SKF LGMT2/LGMT3
REGREASING INTERVALS: For back-to-back angular contact, single and double row bearings, add several shots of grease from a grease gun at the following intervals:
RPM Hourly Interval
1180 RPM 5000 hours
1750 RPM 4000 hours
3550 RPM 1250 hours
Bearings need regreasing more frequently at bearing temperatures above 150°F (66°C). Halve greasing intervals for every 27°F (15°C) increase. Grease temperature should not exceed 185°F (85°C). Replace the grease completely at every third regreasing interval or at least once a year minimum.
NOTICE: Overgreasing is the most common cause of bearing overheating and contributes to premature bearing failure.
COUPLING LUBRICATION: Consult the coupling manufacturer’s instructions for lubrication information.
TEMPERATURE CONTROL:
NOTICE: Normal operating oil temperature should be below 160°F (71°C) and should NEVER surpass 180°F (82°C).
BEARING FRAME: Use the optional cooling coil for water cooling of the bearing frame. The cooling coil is required only when the pumped media temperature surpasses 400°F (204°C) at 1800 RPM or 300°F (149°C) at 3600 RPM. Under these conditions, ambient temperaturewater at 1–3 gallons/minute(.23 to .68 m3/hr.) is required for appropriate cooling of the oil. To keep the oil temperature below the maximum recommended, higher flows may be necessary.
Turn on the cooling water before allowing the hot process fluid to enter the pump.
SEAL CHAMBER: Water jacketed seal chambers are available. Requirements for the jacket are based on the type of mechanical seal and selection of elastomers.
Ambient temperaturewater at 2–3 gallons/minute (.45 to .68m3/hour) is required for appropriate cooling of the seal chamber when a jacket is installed.
A jacket is recommended for any application over 350°F (177°C). Consult the factory for specific recommendations.
SEAL FLUSH: The seals may be cooled and/or heated 1) from an external source or 2) by passing pump discharge fluid through a heat exchanger and then into the seal flush connection. A double seal may use cooled/heated barrier fluid from an external source or convection system.
Always follow all required seal operating instructions as listed in the seal instruction booklet.
OPERATION:
START-UP INSPECTION:
1. Check Installation. Examine the entire pump package for proper alignment. Confirm that all auxiliary systems are connected and ready for use.
2. Check Rotation Direction.
NOTICE: Improper rotation direction will damage the pump.
The coupling must be totally disconnected from the pump and driver when checking for proper rotation direction. Operate the driver independently to check for proper rotation. The pump rotation should be clockwise when viewed from the coupling end. The rotation direction is distinguished by an arrow on the front of the casing.
3. Check Impeller Clearance.
NOTICE: Setting impeller clearance is crucial for maintaining maximum pump efficiency. Be sure to compensate for additional thermal growth in high temperature applications. Consult Appendix I (page 22) of the manual to set impeller clearance.
Set impeller clearance.
Warning:Lock out driver to prevent accidental start-up and physical injury.

3500 SERIES / MODEL 3550
9
a. When making adjustments, unseat the mechanical seal from the shaft.
b. Check total clearance. Confirm that it follows the given instructions.
c. Set the proper operating clearance on the suction side of the impeller.
Increase the clearance on the suction side of the impeller if the pumpage temperature exceeds 100°F (38°C). Consult Appendix I Table I of the manual for proper instructions.
4. Check Rotating Element. To confirm a free-rotating element, turn the shaft by hand several times (there will be a degree of resistance due to the bearings and the mechanical seal). Do not attempt to operate the pump if any rubbing noise occurs during this process. Instead, readjust the impeller clearance as outlined in Appendix I, then reset the mechanical seal according to its instructions.
5. Check Lubrication. Inspect the pump, motor and coupling for proper lubrication.
AUXILIARIES START-UP: The unit’s auxiliary components must be turned on where applicable before priming and starting the pump. Do not start the pump / motor until all the auxiliary systems are fully operating.
BEARING FRAME COOLING: Turn on the water to the cooling coil in the bottom of the oil sump if applicable. For proper flow requirements, consult page 8 of the manual.
MECHANICAL SEAL: Turn on the flush, quench or barrier fluid to the mechanical seal if applicable. Regulate pressure and flow according to the seal manufacturer's installation instructions. Turn on the heating/cooling fluid if the seal flush includes a heat exchanger.
SEAL CHAMBER JACKET: Turn on the water to the cooling jacket attached to the seal chamber. For proper flow requirements, consult page 8 of the manual.
PRIMING:
The pump is now ready to be primed.
1. Close the pump discharge valve.
2. Open the pump suction valve.
3. Confirm that all vent and/or ejector connections are closed after priming.
START-UP:
NOTICE: Before start-up, confirm that the shaft turns freely by hand (clockwise when facing the coupling end).
Open the suction valve completely. Start the pump with the discharge valve open approximately 20% before gradually opening the valve until reaching design flow point. The discharge valve should be adjusted to achieve proper process flow, operating as close to the BEP as possible. The suction line should not be throttled or restricted at all during the operation.
PUMP PERFORMANCE: Once started, confirm that the pump is running at or close to the operating point on the pump performance curve. Throttle the discharge valve if the pump is overloading the motor or delivering too much flow. A restriction orifice at the pump discharge may be necessary to control pump capacity.
Monitor all the flows and pressures to the auxiliary components and adjust accordingly.
Check the mechanical seal and all other connections for potential leakage. Tighten where necessary.
Shut down the pump when it has run for one hour and is at maximum operating temperature. Then, turn the shaft by hand (in the direction of the rotation arrow) to establish that the rotating element is not binding and the impeller is not rubbing. Also check the shaft alignment. Consult page 5 for coupling alignment.
SHUTDOWN:
To shut down the pump:
1. Turn off the pump and de-energize the motor. Be sure motor is locked out before attempting to work on the pump.
2. Close the discharge valve and the suction valve.
3. Drain the pump casing.
4. Turn off all auxiliary components in the reverse order from start-up.
5. To prevent damage from freezing in cold weather, the entire pump (including all auxiliary components) should be completely drained.
Warning:Never operate the pump dry. It is important that the pump never be subjected to thermal shock. The liquid must be allowed to enter the pump casing slowly. A centrifugal pump should never be started until all parts have been gradually brought to the ultimate intended pump temperature.
Danger:Never operate the pump below minimum rated flow and/or with the discharge valve closed. These operating conditions could cause extreme temperature rise in the pump and an explosive hazard. Also, premature failure can result due to high radial loads and excess vibration.
Warning:Lock out driver to prevent accidental start-up and physical injury.

3500 SERIES / MODEL 3550
10
Tag valves as standard practice.
MAINTENANCE:
DISASSEMBLY:
Always use a lifting device capable of supporting the full weight of the pump components or assemblies.
Do not adjust or disassemble any pressure containing component or shaft seal prior to depressurizing the primary and auxiliary fluid systems. This will ensure that no hazardous or high pressure fluid is ejected that may cause personal injury or equipment damage.
DISASSEMBLY & ASSEMBLY:
Required Tools .................................................................page 10Disassembly ............................................................pages10–12Inspections ...............................................................pages12–13Assembly..................................................................pages13–17
REQUIRED TOOLS:
•AllenWrenches •BearingPuller •BrassDriftPunch •CleaningAgents •DialIndicator •FeelerGauges •HydraulicPress •InductionBearingHeater •LevelingBlocks •LiftingSling •Micrometer •RubberMallet
•Screwdriver •Snap-RingPliers •TorqueWrenchwithSockets •Wrenches
DISASSEMBLY:
NOTE: Ensure all replacement parts are available before disassembling the pump for overhaul.
1. Stop flow to and from pump. Be sure all valves are closed.
2. Drain liquid from piping. If necessary, flush pump.
3. Remove piping and tubing.
4. Remove coupling guard. Consult the Coupling Guard Installation and Disassembly section in Appendix II (page 22–23).
5. Disconnect coupling.
6. Remove pump endplate for coupling guard.
7. Drain oil from bearing frame (if oil lubricated). To drain:
• Removebearingframedrainplug(408AorH). • Afteroilisdrained,replaceplug. • Ifequipped,removeoilreservoir.
CAUTION
Warning:Personal protective equipment must be worn if there is a potential for handling hazardous or toxic materials. Fluid must be handled and disposed of in accordance with local and national regulations. Pump must be isolated by closing suction and discharge valves before working on the pump.
Warning:Lock out power to the driver before working on the pump. Failure to properly lock out driver could result in accidental start, causing personal injury.
CAUTION
Warning:Pump components can be heavy. Proper methods of lifting must be employed to avoid physical injury and/or equipment damage. Steel toed shoes must be worn at all times.
Warning:The pump may handle hazardous and/or toxic fluids. Proper personal protective equipment should be worn. Precautions must be taken to prevent physical injury. Pumpage must be handled and disposed of in conformance with applicable environmental regulations.
Warning:Lock out power supply to driver / motor to prevent accidental start-up and physical injury.
Warning:Operator must be aware of pumpage and safety precautions to prevent physical injury.
Warning:Allow all system and pump components to cool before handling them to prevent physical injury.
Warning:When handling hazardous and/or toxic fluids, use personal protection equipment to avoid personal injury. Pumpage must be handled and disposed of in accordance with applicable environmental regulation.

3500 SERIES / MODEL 3550
11
8. Use frame adapter (108) or frame (228) for placing hoisting strap.
9. Remove bearing frame foot hold-down bolts and casing bolts (370).
10. Tighten jack screws (418) evenly then remove back pull-out
assembly from casing (100).
NOTE: If adapter to casing joint is excessively corroded, penetrating oil can be used.
NOTE: Remove and then mark shims from under frame foot. Save for reassembly.
11. Remove casing gasket (351). This gasket should be replaced with a new one when reassembled.
12. Remove jack screws (418).
NOTE: Due to binders and adhesives in the gasket material, casing gasket (351) may partially adhere to casing. Clean all gasket surfaces.
13. Be sure to place back pull-out assembly on a clean work surface to avoid contamination.
14. Secure frame adapter (108 / 228) to work surface.
15. Carefully remove the coupling hub.
IMPELLER REMOVAL:
S, M, L models:
1. Slide shaft wrench over shaft (122) and key.
2. Rotate impeller clockwise (as viewed from impeller end of shaft), raising wrench off the work surface.
3. Quickly turn impeller counterclockwise (as viewed from impeller end of shaft), impacting wrench handle on the workbench or solid block until impeller loosens.
4. Remove impeller O-ring (412) and discard. (Replace with new O-ring during reassembly.)
XL model:
1.Performsteps1–3aslistedabove.
2. If impeller cannot be loosened after several attempts:
• Placeasocketwrenchovercastnutonimpellerhub. • Turnimpellercounterclockwise(asviewedfromimpeller
end of shaft). • Useworksurfaceorablock to rest the impellerwrench
on. • Securepowerendtoworksurface.
3. Remove impeller O-ring (412) and discard. (Replace with new O-ring during reassembly.)
NOTE: Clamp frame foot (241) to workbench when using this method to remove impeller.
NOTE FOR ALL MODELS: If previous methods do not successfully remove impeller, complete the following steps:
•Cutshaftbetweenglandandframe. •Remove impeller, stuffingbox cover, gland, sleeve and
shaft end as one unit. •Donotuseheat.
SEAL CHAMBER COVER (MECHANICAL SEAL) REMOVAL:
1. Remove the following components in the order listed below:
• Glandstudnuts(355) • Sealchamberstudnuts(370H) • Sealchamber(184) • Shaftsleeve(126)(Ifused)
NOTE: Mechanical seal is attached to sleeve (126). Rotary portion of seal must be removed from sleeve by loosening set screws and sliding it off the sleeve. Consult mechanical seal instructions.
2. Remove gland (250) with stationary seat and O-ring (360Q).
NOTE: Do not damage stationary portion of mechanical seal. Stationary portion is seated in the gland bore.
STUFFING BOX COVER (PACKED BOX) REMOVAL:
Remove the following components in the order listed below:
•Glandstudnuts(355)andgland(107) •Stuffingboxcoverstudnuts(370H)andstuffingboxcover
(184) •Shaftsleeve(126) •Packing (106) and lantern ring (105) from stuffing
box cover (184) (No lantern ring is provided with self-lubricating graphite packing)
Warning:Never apply heat to remove parts. Use of heat may cause an explosion due to trapped fluid, resulting in severe physical injury and property damage.
Warning:Never remove the back pull-out assembly unassisted. Physical injury can occur.
Warning:Never apply heat to remove an impeller. The use of heat may cause an explosion due to trapped fluid, resulting in severe physical injury and property damage.
Warning:Wear heavy work gloves when handling impellers (101) as sharp edges may cause physical injury.
3500 SERIES / MODEL 3550
12
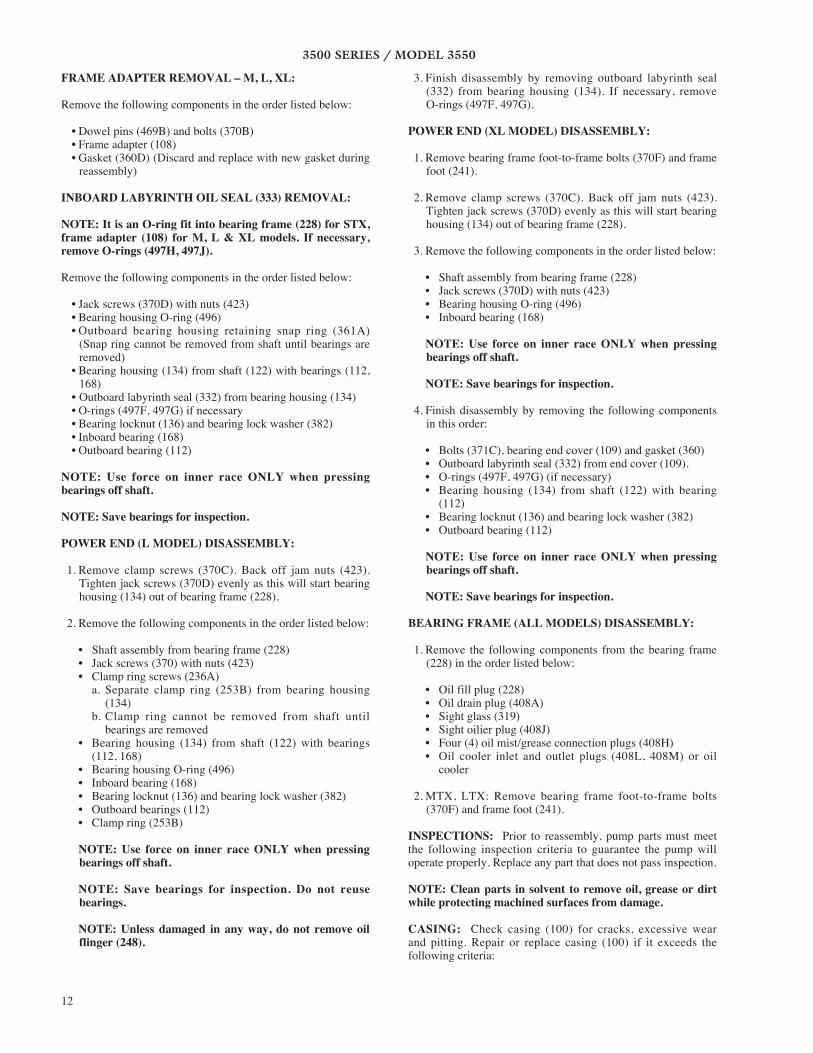
FRAME ADAPTER REMOVAL – M, L, XL:
Remove the following components in the order listed below:
•Dowelpins(469B)andbolts(370B) •Frameadapter(108) •Gasket(360D)(Discardandreplacewithnewgasketduring
reassembly)
INBOARD LABYRINTH OIL SEAL (333) REMOVAL:
NOTE: It is an O-ring fit into bearing frame (228) for STX, frame adapter (108) for M, L & XL models. If necessary, remove O-rings (497H, 497J).
Remove the following components in the order listed below:
•Jackscrews(370D)withnuts(423) •BearinghousingO-ring(496) •Outboard bearing housing retaining snap ring (361A)
(Snap ring cannot be removed from shaft until bearings are removed)
•Bearinghousing(134)fromshaft(122)withbearings(112,168)
•Outboardlabyrinthseal(332)frombearinghousing(134) •O-rings(497F,497G)ifnecessary •Bearinglocknut(136)andbearinglockwasher(382) •Inboardbearing(168) •Outboardbearing(112)
NOTE: Use force on inner race ONLY when pressing bearings off shaft.
NOTE: Save bearings for inspection.
POWER END (L MODEL) DISASSEMBLY:
1. Remove clamp screws (370C). Back off jam nuts (423). Tighten jack screws (370D) evenly as this will start bearing housing (134) out of bearing frame (228).
2. Remove the following components in the order listed below:
• Shaftassemblyfrombearingframe(228) • Jackscrews(370)withnuts(423) • Clampringscrews(236A) a. Separate clamp ring (253B) from bearing housing
(134) b. Clamp ring cannot be removed from shaft until
bearings are removed • Bearing housing (134) from shaft (122)with bearings
(112, 168) • BearinghousingO-ring(496) • Inboardbearing(168) • Bearinglocknut(136)andbearinglockwasher(382) • Outboardbearings(112) • Clampring(253B)
NOTE: Use force on inner race ONLY when pressing bearings off shaft.
NOTE: Save bearings for inspection. Do not reuse bearings.
NOTE: Unless damaged in any way, do not remove oil flinger (248).
3. Finish disassembly by removing outboard labyrinth seal (332) from bearing housing (134). If necessary, remove O-rings (497F, 497G).
POWER END (XL MODEL) DISASSEMBLY:
1. Remove bearing frame foot-to-frame bolts (370F) and frame foot (241).
2. Remove clamp screws (370C). Back off jam nuts (423). Tighten jack screws (370D) evenly as this will start bearing housing (134) out of bearing frame (228).
3. Remove the following components in the order listed below:
• Shaftassemblyfrombearingframe(228) • Jackscrews(370D)withnuts(423) • BearinghousingO-ring(496) • Inboardbearing(168)
NOTE: Use force on inner race ONLY when pressing bearings off shaft.
NOTE: Save bearings for inspection.
4. Finish disassembly by removing the following components in this order:
• Bolts(371C),bearingendcover(109)andgasket(360) • Outboardlabyrinthseal(332)fromendcover(109). • O-rings(497F,497G)(ifnecessary) • Bearing housing (134) from shaft (122)with bearing
(112) • Bearinglocknut(136)andbearinglockwasher(382) • Outboardbearing(112)
NOTE: Use force on inner race ONLY when pressing bearings off shaft.
NOTE: Save bearings for inspection.
BEARING FRAME (ALL MODELS) DISASSEMBLY:
1. Remove the following components from the bearing frame (228) in the order listed below:
• Oilfillplug(228) • Oildrainplug(408A) • Sightglass(319) • Sightoilierplug(408J) • Four(4)oilmist/greaseconnectionplugs(408H) • Oil cooler inlet and outlet plugs (408L, 408M) or oil
cooler
2. MTX, LTX: Remove bearing frame foot-to-frame bolts (370F) and frame foot (241).
INSPECTIONS: Prior to reassembly, pump parts must meet the following inspection criteria to guarantee the pump will operate properly. Replace any part that does not pass inspection.
NOTE: Clean parts in solvent to remove oil, grease or dirt while protecting machined surfaces from damage.
CASING: Check casing (100) for cracks, excessive wear and pitting. Repair or replace casing (100) if it exceeds the following criteria:

3500 SERIES / MODEL 3550
13
•Localizedwearorgroovinggreaterthan1/8"(3.2mm)deep •Pittinggreaterthan1/8"(3.2mm)deep •Check case gasket seat surface for deformities or
irregularities
IMPELLER: Repair or replace the following impeller (101) components if they exceed the following criteria:
•Impeller vanes grooved deeper than 1/16" (1.6mm) or ifworn evenly more than 1/32" (0.8mm)
•Pump-outvanesifwornmorethan1/32"(0.8mm) •Check leading and trailing edges of vanes for cracking,
pitting, erosion and/or corrosion.
FRAME ADAPTER: Replace frame adapter (108) if any cracking or excessive corrosion damage is present.
Confirm that the gasket surface is clean.
SHAFT AND SLEEVE: Replace shaft (122) if any bearing fits are outside the tolerance listed in Appendix III (page 23).
Replace shaft (122) and sleeve (126) if the surface shows any sign of grooves or pitting.
BEARING FRAME: Check bearing frame (228) and frame foot (241) for cracks. Inspect frame inside surfaces for rust, scale or other debris. Remove all loose and foreign material.
Confirm that all lubrication passages are clear.
Inspect frame for corrosion or pitting if it has been exposed to pumpage.
Consult Appendix III (page 23) when inspecting inboard bearing bore.
BEARINGS: Check ball bearings (112, 168) for contamination and/or damage. Bearing conditions will provide information on operating conditions in bearing frame.
Take note of lubricant condition and residue. Oil analysis is helpful. Investigate bearing damage to determine cause of damage. Immediately correct cause of damage if it is not a result of normal wear.
NEVER REUSE BEARINGS.
BEARING HOUSING: Consult Appendix III (page 23) when inspecting bearing housing (134) bore. Replace if dimensions surpass those listed in Appendix III.
Check for cracking and pitting.
•S,MModels:Checkforcracksinsnapringgroove.Itmustnot be cracked.
•LModel:Checkthatgroovesandholesareclear. •XLModel:Besuregasketsurfaceisclean.
LABYRINTH SEALS: Replace labyrinth seal (332, 333) O-rings if any cuts or cracks are present.
REASSEMBLY:
Rotating Element and Bearing Frame AssemblyS, M Models
NOTE: Apply thread sealant to clean pipe threads and fittings.
1. Install the following components into the bearing frame (228) in the order listed below:
• Oilfillplug(228) • Oildrainplug(408A) • Sightwindow(319) • Sightoilierplug(408J) • Fouroilmist connectionplugs (408H)orgrease fittings
(193) and relief plugs (228) • Oil cooler inlet and outlet plugs or oil cooler (408L,
408M)
2. Hand-tighten bearing frame foot (241) with bolts (370F).
NOTE: Outboard regreaseable bearing has a single shield and is installed with shield toward impeller.
NOTE: The recommended bearing installation method is to use an induction heater that heats as well as demagnetizes the bearings.
3. Install outboard bearing (112) on shaft (122).
4. Place lock washer (382) with tang in keyway of shaft (122).
5. Thread locknut (136) onto shaft (122) and tighten locknut until snug. Bend any tang of lock washer into a slot of locknut.
NOTE: If necessary, tighten locknut to align the closest tab of lock washer with slot on locknut.
6. Place bearing retaining ring (361A) over shaft (122), flat side facing bearing.
7. Install inboard bearing (168) on shaft (122).
NOTE: Inboard regreaseable bearing has a single shield and is installed with shield away from impeller.
NOTE: The recommended bearing installation method is to use an induction heater that heats as well as demagnetizes the bearings.
NOTE: Lubricate internal surfaces of bearings.
Warning:Wear insulated gloves when using a bearing heater. Bearings will get hot and can cause physical injury.
Warning:Wear insulated gloves when using a bearing heater. Bearings will get hot and can cause physical injury.

3500 SERIES / MODEL 3550
14
8. Install new O-ring (496).
9. Use oil to coat the outside of outboard bearing (112) and bearing housing (134) bore.
10. Place bearing housing (134) onto shaft/bearing assembly.
NOTE: DO NOT force assembly together.
11. Place retaining ring (361A) into groove in bearing housing bore (134). Be sure shaft is free turning.
NOTE: For unobstructed oil flow, the space between the ends of retaining ring should be located in the oil return groove.
12. Install outboard labyrinth oil seal (332) into bearing housing (134) (it is an O-ring fit). Position the labyrinth seal drain slots at the bottom (6 o’clock) position.
NOTE: Consult Appendix V (page 24) for more detailed labyrinth seal installation instructions.
NOTE: Keyway edges must be free of burrs.
NOTE: To protect O-rings, cover keyway lengthwise with a piece of electrical tape before installing labyrinth seal.
13. Use oil to coat outside of bearing housing (134) and all internal surfaces of bearing frame (228).
14. Allowing approximately .125" (3.175mm) clearance between the face of bearing housing and bearing frame, install shaft assembly into frame (228). Check shaft for free turning.
15. Hand-tighten clamping bolts (370C) into bearing housing (134).
16. Hand-tighten jacking bolts (370D) with locking nuts (423) into housing (134).
L MODEL:
NOTE: Apply thread sealant to clean pipe threads and fittings.
1. Install the following components into the bearing frame (228) in the order listed below:
• Oilfillplug(228) • Oildrainplug(408A) • Sightwindow(319) • Sightoilierplug(408J) • Fouroilmist connectionplugs (408H)orgrease fittings
(193) and relief plugs (228) • Oil cooler inlet and outlet plugs or oil cooler (408L,
408M)
2. Hand-tighten bearing frame foot (241) with bolts (370F).
3. Install oil flinger (248) on shaft (122) (if removed).
NOTE: Oil flinger is a press-fit onto shaft. Use a proper-sized driver to prevent damage to oil flinger.
4. Note orientation when placing bearing clamp ring (253B) over shaft (122).
5. Install the outboard bearings (112) on shaft (122).
The L model uses duplex bearings mounted back-to-back. Make sure orientation of the bearings is correct.
NOTE: The recommended bearing installation method is to use an induction heater that heats as well as demagnetizes the bearings.
6. Place lock washer (382) with tang of lock washer in keyway, on shaft (122).
7. Thread locknut (136) onto shaft (122) and tighten locknut until snug. Bend any tang of lock washer (382) into a slot of locknut.
NOTE: If necessary, tighten locknut to align the closest tab of lock washer with slot on locknut.
8. Install the inboard bearing (168) on shaft (122).
NOTE: Inboard regreaseable bearing has a single shield and is installed with shield away from impeller.
NOTE: The recommended bearing installation method is to use an induction heater that heats as well as demagnetizes the bearings.
NOTE: Lubricate internal surfaces of bearings.
9. Use oil to coat outside of outboard bearing (112) and bearing housing (134) bore.
10. Place bearing housing (134) onto shaft/bearing assembly.
NOTE: DO NOT force assembly together.
11. Install clamp ring bolts (236A). Check shaft for free turning. Consult Appendix VI (page 25) for bolt torque values.
Tighten clamp ring bolts (236A) in a crisscross pattern.
12. Install new O-ring (496).
13. Install outboard labyrinth oil seal (332) into bearing housing (134) (it is an O-ring fit). Position the labyrinth seal drain slots at the bottom (6 o’clock) position.
Warning:Wear insulated gloves when using a bearing heater. Bearings will get hot and can cause physical injury.
CAUTION
Warning:Wear insulated gloves when using a bearing heater. Bearings will get hot and can cause physical injury.
CAUTION

3500 SERIES / MODEL 3550
15
NOTE: Consult Appendix V (page 24) for detailed labyrinth seal installation instructions.
NOTE: Keyway edges must be free of burrs.
NOTE: To protect O-rings, cover keyway lengthwise with a piece of electrical tape before installing labyrinth seal.
14. Use oil to coat outside of bearing housing (134) and all internal surfaces of bearing frame (228).
15. Allowing approximately .125" (3.175mm) clearance between the face of bearing housing and bearing frame, install shaft assembly into frame (228). Check shaft for free turning.
16. Hand-tighten clamping bolts (370C) into bearing housing (134).
17. Hand-tighten jacking bolts (370D) with locking nuts (423) into housing (134).
XL MODEL:
NOTE: Apply thread sealant to clean pipe threads and fittings.
1. Install the following components into the bearing frame (228) in the order listed below:
• Oilfillplug(113) • Oildrainplug(408A) • Sightglass(319) • Sightoilierplug(408J) • Fouroilmist connectionplugs (408H)orgrease fittings
(193) and relief plugs (228) • Oil cooler inlet and outlet plugs or oil cooler (408L,
408M)
2. Place the outboard bearing (112) on shaft (122).
NOTE: Outboard regreaseable bearing has a single shield and is installed with shield toward impeller.
NOTE: The recommended bearing installation method is to use an induction heater that heats as well as demagnetizes the bearings.
3. Place lock washer (382) with tang of lock washer in keyway, on shaft (122).
4. Thread locknut (136) onto shaft (122) and tighten locknut until snug. Bend any tang of lock washer (382) into a slot of locknut.
NOTE: If necessary, tighten locknut to align the closest tab of lock washer with slot on locknut.
5. Using oil, coat outside of outboard bearing (112) and bore of bearing housing (134).
6. Install the bearing housing (134) onto shaft/bearing assembly.
NOTE: DO NOT force assembly together.
7. Install gasket (360), end cover (109) and bolts (371C). For bolt torque values, consult Appendix IV (page 24). Check shaft for free turning.
8. Place the inboard bearing (168) on shaft (122).
NOTE: Inboard regreaseable bearing has a single shield and is installed with shield away from impeller.
NOTE: The recommended bearing installation method is to use an induction heater that heats as well as demagnetizes the bearings.
NOTE: Lubricate internal surfaces of bearings.
9. Install new O-ring (496).
10. Install outboard labyrinth oil seal (332) into end cover (109) (it is an O-ring fit). Position the labyrinth seal drain slots at the bottom (6 o’clock) position.
NOTE: Consult Appendix V (page 24) for detailed labyrinth seal installation instructions.
NOTE: Keyway edges must be free of burrs.
NOTE: To protect O-rings, cover keyway lengthwise with a piece of electrical tape before installing labyrinth seal.
11. Use oil to coat outside of bearing housing (134) and all internal surfaces of bearing frame (228).
12. Allowing approximately .125" (3.175mm) clearance between the face of bearing housing and bearing frame, install shaft assembly into frame (228). Check shaft for free turning.
13. Install and hand-tighten the following components in the order listed below:
• Clampingbolts(370C)intobearinghousing(134) • Jackingbolts(370D)withlockingnuts(423)intohousing
(134) • Bearingframefoot(241)withbolts(370F)
ALL MODELS:
1. Support frame assembly horizontally.
Warning:Wear insulated gloves when using a bearing heater. Bearings will get hot and can cause physical injury.
Warning:Shaft (122) may be heavy. Use care when handling.
Warning:Wear insulated gloves when using a bearing heater. Bearings will get hot and can cause physical injury.
3500 SERIES / MODEL 3550
16
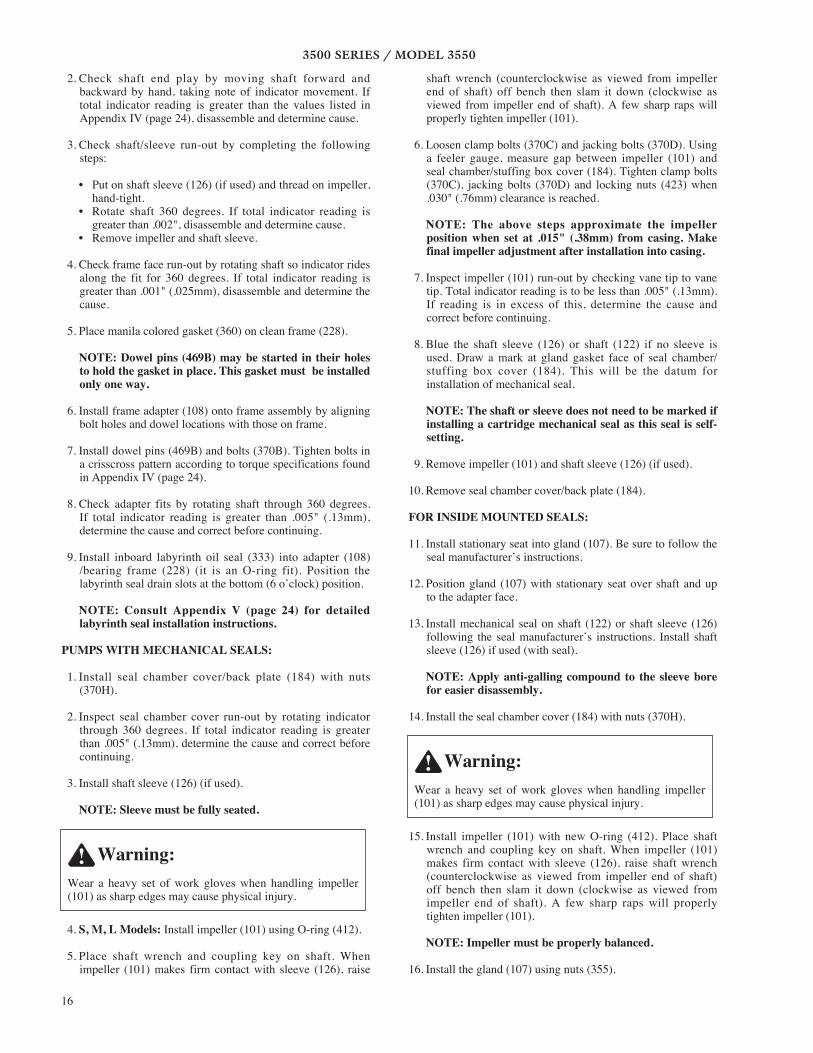
2. Check shaft end play by moving shaft forward and backward by hand, taking note of indicator movement. If total indicator reading is greater than the values listed in Appendix IV (page 24), disassemble and determine cause.
3. Check shaft/sleeve run-out by completing the following steps:
• Putonshaftsleeve(126)(ifused)andthreadonimpeller,hand-tight.
• Rotate shaft 360 degrees. If total indicator reading isgreater than .002", disassemble and determine cause.
• Removeimpellerandshaftsleeve.
4. Check frame face run-out by rotating shaft so indicator rides along the fit for 360 degrees. If total indicator reading is greater than .001" (.025mm), disassemble and determine the cause.
5. Place manila colored gasket (360) on clean frame (228).
NOTE: Dowel pins (469B) may be started in their holes to hold the gasket in place. This gasket must be installed only one way.
6. Install frame adapter (108) onto frame assembly by aligning bolt holes and dowel locations with those on frame.
7. Install dowel pins (469B) and bolts (370B). Tighten bolts in a crisscross pattern according to torque specifications found in Appendix IV (page 24).
8. Check adapter fits by rotating shaft through 360 degrees. If total indicator reading is greater than .005" (.13mm), determine the cause and correct before continuing.
9. Install inboard labyrinth oil seal (333) into adapter (108) /bearing frame (228) (it is an O-ring fit). Position the labyrinth seal drain slots at the bottom (6 o’clock) position.
NOTE: Consult Appendix V (page 24) for detailed labyrinth seal installation instructions.
PUMPS WITH MECHANICAL SEALS:
1. Install seal chamber cover/back plate (184) with nuts (370H).
2. Inspect seal chamber cover run-out by rotating indicator through 360 degrees. If total indicator reading is greater than .005" (.13mm), determine the cause and correct before continuing.
3. Install shaft sleeve (126) (if used).
NOTE: Sleeve must be fully seated.
4. S, M, L Models: Install impeller (101) using O-ring (412).
5. Place shaft wrench and coupling key on shaft. When impeller (101) makes firm contact with sleeve (126), raise
shaft wrench (counterclockwise as viewed from impeller end of shaft) off bench then slam it down (clockwise as viewed from impeller end of shaft). A few sharp raps will properly tighten impeller (101).
6. Loosen clamp bolts (370C) and jacking bolts (370D). Using a feeler gauge, measure gap between impeller (101) and seal chamber/stuffing box cover (184). Tighten clamp bolts (370C), jacking bolts (370D) and locking nuts (423) when .030" (.76mm) clearance is reached.
NOTE: The above steps approximate the impeller position when set at .015" (.38mm) from casing. Make final impeller adjustment after installation into casing.
7. Inspect impeller (101) run-out by checking vane tip to vane tip. Total indicator reading is to be less than .005" (.13mm). If reading is in excess of this, determine the cause and correct before continuing.
8. Blue the shaft sleeve (126) or shaft (122) if no sleeve is used. Draw a mark at gland gasket face of seal chamber/stuffing box cover (184). This will be the datum for installation of mechanical seal.
NOTE: The shaft or sleeve does not need to be marked if installing a cartridge mechanical seal as this seal is self-setting.
9. Remove impeller (101) and shaft sleeve (126) (if used).
10. Remove seal chamber cover/back plate (184).
FOR INSIDE MOUNTED SEALS:
11. Install stationary seat into gland (107). Be sure to follow the seal manufacturer’s instructions.
12. Position gland (107) with stationary seat over shaft and up to the adapter face.
13. Install mechanical seal on shaft (122) or shaft sleeve (126) following the seal manufacturer’s instructions. Install shaft sleeve (126) if used (with seal).
NOTE: Apply anti-galling compound to the sleeve bore for easier disassembly.
14. Install the seal chamber cover (184) with nuts (370H).
15. Install impeller (101) with new O-ring (412). Place shaft wrench and coupling key on shaft. When impeller (101) makes firm contact with sleeve (126), raise shaft wrench (counterclockwise as viewed from impeller end of shaft) off bench then slam it down (clockwise as viewed from impeller end of shaft). A few sharp raps will properly tighten impeller (101).
NOTE: Impeller must be properly balanced.
16. Install the gland (107) using nuts (355).
Warning:Wear a heavy set of work gloves when handling impeller (101) as sharp edges may cause physical injury.
Warning:Wear a heavy set of work gloves when handling impeller (101) as sharp edges may cause physical injury.
3500 SERIES / MODEL 3550
17
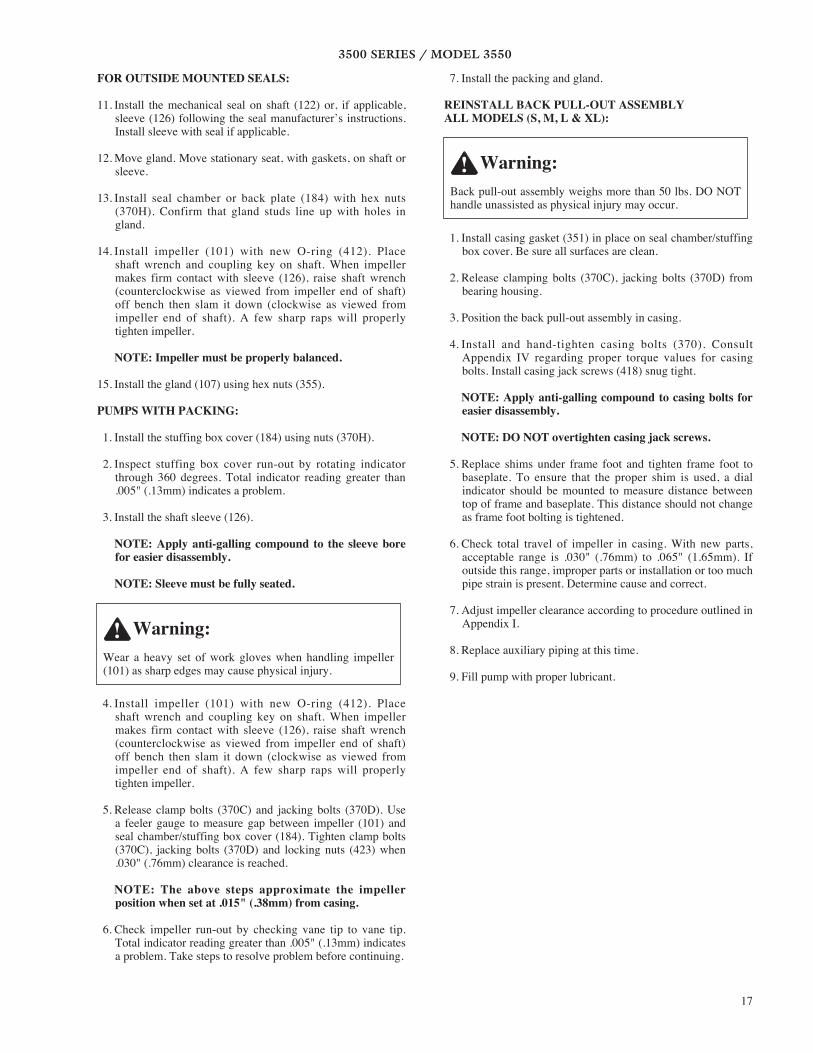
FOR OUTSIDE MOUNTED SEALS:
11. Install the mechanical seal on shaft (122) or, if applicable, sleeve (126) following the seal manufacturer’s instructions. Install sleeve with seal if applicable.
12. Move gland. Move stationary seat, with gaskets, on shaft or sleeve.
13. Install seal chamber or back plate (184) with hex nuts (370H). Confirm that gland studs line up with holes in gland.
14. Install impeller (101) with new O-ring (412). Place shaft wrench and coupling key on shaft. When impeller makes firm contact with sleeve (126), raise shaft wrench (counterclockwise as viewed from impeller end of shaft) off bench then slam it down (clockwise as viewed from impeller end of shaft). A few sharp raps will properly tighten impeller.
NOTE: Impeller must be properly balanced.
15. Install the gland (107) using hex nuts (355).
PUMPS WITH PACKING:
1. Install the stuffing box cover (184) using nuts (370H).
2. Inspect stuffing box cover run-out by rotating indicator through 360 degrees. Total indicator reading greater than .005" (.13mm) indicates a problem.
3. Install the shaft sleeve (126).
NOTE: Apply anti-galling compound to the sleeve bore for easier disassembly.
NOTE: Sleeve must be fully seated.
4. Install impeller (101) with new O-ring (412). Place shaft wrench and coupling key on shaft. When impeller makes firm contact with sleeve (126), raise shaft wrench (counterclockwise as viewed from impeller end of shaft) off bench then slam it down (clockwise as viewed from impeller end of shaft). A few sharp raps will properly tighten impeller.
5. Release clamp bolts (370C) and jacking bolts (370D). Use a feeler gauge to measure gap between impeller (101) and seal chamber/stuffing box cover (184). Tighten clamp bolts (370C), jacking bolts (370D) and locking nuts (423) when .030" (.76mm) clearance is reached.
NOTE: The above steps approximate the impeller position when set at .015" (.38mm) from casing.
6. Check impeller run-out by checking vane tip to vane tip. Total indicator reading greater than .005" (.13mm) indicates a problem. Take steps to resolve problem before continuing.
7. Install the packing and gland.
REINSTALL BACK PULL-OUT ASSEMBLYALL MODELS (S, M, L & XL):
1. Install casing gasket (351) in place on seal chamber/stuffing box cover. Be sure all surfaces are clean.
2. Release clamping bolts (370C), jacking bolts (370D) from bearing housing.
3. Position the back pull-out assembly in casing.
4. Install and hand-tighten casing bolts (370). Consult Appendix IV regarding proper torque values for casing bolts. Install casing jack screws (418) snug tight.
NOTE: Apply anti-galling compound to casing bolts for easier disassembly.
NOTE: DO NOT overtighten casing jack screws.
5. Replace shims under frame foot and tighten frame foot to baseplate. To ensure that the proper shim is used, a dial indicator should be mounted to measure distance between top of frame and baseplate. This distance should not change as frame foot bolting is tightened.
6. Check total travel of impeller in casing. With new parts, acceptable range is .030" (.76mm) to .065" (1.65mm). If outside this range, improper parts or installation or too much pipe strain is present. Determine cause and correct.
7. Adjust impeller clearance according to procedure outlined in Appendix I.
8. Replace auxiliary piping at this time.
9. Fill pump with proper lubricant.
Warning:Wear a heavy set of work gloves when handling impeller (101) as sharp edges may cause physical injury.
Warning:Back pull-out assembly weighs more than 50 lbs. DO NOT handle unassisted as physical injury may occur.

3500 SERIES / MODEL 3550
18
Fault Possible Cause Remedy
Excessive shaft end play. Bearing internal clearance too great.
•Reducespeedlevel.
Snap ring loose in bearing housing groove.
•Reseat.
Excessive shaft/sleeve run-out. Sleeve worn. •Replace.
Shaft bent. •Replace.
Excessive bearing frame flange run-out.
Shaft bent. •Replace.
Bearing frame flange distorted. •Replace.
Excessive frame adapter run-out.
Corrosion. •Replace.
Frame gasket adapter not seated correctly.
•Reseat.
Excessive seal chamber/stuffing box cover run-out.
Seal chamber/stuffing box cover improperly seated in frame adapter.
•Reseat.
Corrosion/wear. •Replace.
Excessive impeller vane tip run-out.
Bent vane/vanes. •Replaceimpeller.
INSTALLATION TROUBLESHOOTING GUIDE

3500 SERIES / MODEL 3550
19
S – PUMP CROSS SECTIONAL
100
184
101
412
250 370H 357K 360Q
351105
106
107353
355
503370126333408H168228113408H112134370C 382
136
332
400
122
497F
497G
370D
423496 361A 408H 408M 408L 408A 408J 319 408H 497J 497H 418
100
184
101
412
351105106
107
353
355
126
370108333370B 360D408H228113361A408H370C
134
382
136
332
400
122
497F
497G 370D 423 496 112 408H
408J370F
241
408M 408L 360Q357K
370H250
418
497H497J
168
469B408H319408A
M – PUMP CROSS SECTIONAL

3500 SERIES / MODEL 3550
20
L – PUMP CROSS SECTIONAL
100184
101
412
351105
106
107
353355
126
250 370H 357K 360Q
370108333360D370B408H228113408H 253B 236A370C
134
382
136
332
400
122
497F
497G
370D
423
496 112
408H 248 408J
370F
241
408M 408L 408A 319 408H 469B
168 497J 497H
418
100
184
101
412
351105106107353355
136
370B
333408H168
113
228134408H370C382
250 370
357K360Q418 497H497J469B
136
109
332
400
122
497F
497G
371C
360 370D 423 496 112 370F 241 408J 408A319408L408M
XL – PUMP CROSS SECTIONAL

3500 SERIES / MODEL 3550
21
PARTS & MATERIAL COMPOSITIONItem
NumberReq’d Per
Pump Part NameAll
SteelAll
316SSAll
Alloy 20All
CD4MCuAll
TitaniumHastelloy
B&C100 1 Casing Steel 316SS Alloy 20 CD4MCu Titanium Hastelloy B&C101 1 Impeller Steel 316SS Alloy 20 CD4MCu Titanium Hastelloy B&C105 1 Lantern Ring Glass Filled Teflon*106 1 Packing Teflon* Impregnated Fibers107 1 Packing Gland 316SS Alloy 20 Titanium Hastelloy B&C108 1 Frame Adapter Ductile Iron112 1 Outboard (Thrust) Bearing Double Row Angular Contact**122 1 Shaft – Less Sleeve (Optional) 316SS122 1 Shaft – With Sleeve SAE4140 316SS126 1 Shaft Sleeve 316SS 316SS Alloy 20 316SS Titanium Hastelloy B&C134 1 Bearing Housing Cast Iron136 1 Lock Nut / Lock Washer Steel168 1 Inboard (Radial) Bearing Single Row Deep Groove184 1 Stuffing Box Steel 316SS Alloy 20 CD4MCu Titanium Hastelloy B&C228 1 Frame Cast Iron (Ductile for Small Frame)241 1 Frame Foot Cast Iron250 1 Gland 316SS Alloy 20319 1 Sight Oil Gauge 316SS332A 1 Labyrinth Oil Seal (Outboard) Bronze (Optional Carbon Filled Teflon)333A 1 Labyrinth Oil Seal (Inboard) Bronze (Optional Carbon Filled Teflon)351 1 Casing Gasket Aramid Fiber with EPDM Rubber353 4 Gland Stud 316SS355 4 Gland Nut 304SS357K 2 Hex Nut 304SS358A 1 Casing Drain Plug (Optional) Steel 316SS Alloy 20 316SS Titanium Hastelloy B&C360 1 Gasket, Frame-to-Adapter Vellumoid360A 1 Gasket, Bearing End Cover Vellumoid (XL Only)370 3 Bearing Housing Hex Bolt Steel418 3 Casing Jack Screw Steel469B 2 Dowel Pin Steel496 1 Bearing Housing O-Ring Buna Rubber496A 1 Impeller O-Ring Glass Filled TFE
* E.I. DuPont Registered Trademark ** NOTE: L Power End features Duplex Angular Contact.
Recommended Spares – All PumpsImpeller (101) Bearing Lockwasher (382)Shaft (122A) Bearing Locknut (136)
Shaft Sleeve (126) if used Impeller O-ring (412A)Outboard, Thrust Bearing (112A) Bearing Housing O-ring (496)Inboard, Radial Bearing (168A) Outboard Lab Seal Rotary O-ring (497)
Casing Gasket (351) Outboard Lab Seal Stationary O-ring (497G)Frame-to-Adapter Gasket (360D) Inboard Lab Seal Rotary O-ring (497H)
Bearing Housing Retaining Ring (361A) Inboard Lab Seal Stationary O-ring (497J)
SPARE PARTSKeep the following components on hand as spare parts (at minimum):

3500 SERIES / MODEL 3550
22
APPENDIX I: IMPELLER CLEARANCE ADJUSTMENT:
FEELER GAUGE METHOD:
1. Lock out power supply to motor.
2. Remove coupling guard and spacer.
3. Loosen jack bolts (370D) and jam nuts (423).
4. Tighten bearing housing bolts (370C) evenly while slowly rotating the shaft. Continue rotating until the impeller begins to rub the casing.
5. Use a feeler gauge to set the gap between the three housing bolts (370C) and bearing housing. Consult the table below for gap settings.
6. Tighten jacking bolts (370D) evenly until bearing housing backs out and makes contact with bearing housing bolts (370C).
7. Tighten jam nuts (423) evenly. Rotate shaft to check for free turning.
8. Reinstall coupling spacer and guard.
DIAL INDICATOR METHOD:
1. Lock out power supply to motor.
2. Remove coupling guard and spacer.
3. Place a dial indicator with a magnetic mounting base on the surface of the pump baseplate. Indicator should be placed against face of pump shaft.
4. Loosen jacking bolts (370D) and jam nuts (423).
5. Tighten bearing housing bolts (370C) evenly while slowly rotating the shaft. Continue rotating until the impeller begins to rub the casing. Set the dial indicator to zero.
6. Tighten jacking bolts (370D) evenly until they contact the bearing frame. Continue tightening the jacking bolts (about one flat at a time), drawing the bearing housing away from the frame until the dial indicator shows appropriate clearance.
7. Tighten bearing housing bolts (370C) evenly before tightening jacking bolts (370D). Check that the dial indicator reading does not move from the appropriate setting. Rotate shaft to check for free turning.
8. Reinstall coupling spacer and guard.
TABLE 1:
Impeller Clearance at Ambient for Various Service Temps.in inches (cm)
PumpageTemperature
Pump Frame SizeS M L XL
–20º to 200ºF(–7º to 93ºC)
0.005"(0.0127)
0.008"(0.0232)
0.18"(0.4572)
0.015"(0.0381)
Up to 250ºF(121ºC)
0.006"(0.0152)
0.009"(0.0229)
0.19"(0.4826)
0.016"(0.4064)
Up to 300ºF(149ºC)
0.007"(0.0178)
0.010"(0.0254)
0.20"(0.5080)
0.017"(0.0432)
Up to 350ºF(177ºC)
0.009"(0.0229)
0.012"(0.0305)
0.22"(0.5588)
0.019"(0.0483)
Up to 400ºF(204ºC)
0.010"(0.0254)
0.013"(0.0330)
0.23"(0.5842)
0.020"(0.0508)
Up to 450ºF(232ºC)
0.011"(0.0279)
0.014"(0.0356)
0.24"(0.6096)
0.021"(0.0533)
Up to 500ºF(260ºC)
0.012"(0.0305)
0.015"(0.0381)
0.25"(0.6350)
0.22"(0.5588)
APPENDIX II: COUPLING GUARDS INSTALLATION INSTRUCTIONS:
Simple design allows complete assembly of the coupling guard in about 15 minutes, including assembly of the end plate (pump end). Assembly can be accomplished in about five minutes if the end plate is already in place.
ASSEMBLY:
NOTE: If end plate (pump end) is already installed, make any necessary coupling adjustments and proceed to Step 2.
1. S, M, L Models: Align end plate (pump end) to bearing frame (no impeller adjustment required).
XL Model: Align end plate (pump end) to pump bearing housing so that 1) large slots on end plate clear bearing housing tap bolts and 2) small slots are aligned to impeller adjusting bolts. Attach end plate to bearing housing using jam nuts on impeller adjusting bolts.
Check and reset impeller clearance after end plate is attached to bearing housing.
NOTE: Complete coupling adjustments before proceeding with coupling guard assembly.
2. Spread bottom of coupling guard half (pump end) slightly and place over pump end plate (the annular groove in the guard half is located around the end plate).
Warning:Before assembly or disassembly of the coupling guard is performed the motor must be de-energized, the motor controller/starter put in a locked-out position and a caution tag placed at the starter indicating the disconnect. Replace coupling guard before resuming normal operation of the pump. Pump manufacturer assumes no liability if this requirement is not followed.

3500 SERIES / MODEL 3550
23
3. Once coupling guard half (pump end) is located around end plate, tighten it securely with a bolt, nut and two washers through the round hole at front end of guard half.
4. Spread bottom of coupling guard half (driver end) slightly, then place over coupling guard half (pump end). Check that annular groove in coupling guard half (driver end) faces motor.
5. Place end plate (driver end) over motor shaft. Locate end plate in annular groove at rear of coupling guard half (driver end), then hand-tighten with a bolt, nut and two washers through the round hole at rear of guard half.
6. To completely cover shafts and coupling, adjust length of coupling guard by sliding coupling guard half (driver end) toward motor. Secure with bolt, nut and two washers through slotted holes at center of guard and tighten. Inspect all nuts on guard assembly for proper tightness.
DISASSEMBLY: Remove the coupling guard for certain maintenance and adjustments to the pump. Specific instances include adjustment of the coupling, impeller clearance adjustment, etc. The coupling guard must be replaced after completing maintenance procedures.
DO NOT resume pump operation with the coupling guard removed.
NOTE: For reverse order assembly, refer to diagrams.
1. Remove nut, bolt and washers from center slotted hole in coupling guard. Slide motor end coupling guard half toward pump.
2. Remove nut, bolt and washers from coupling guard half (driver end) and remove end plate.
3. Spread bottom of coupling guard half slightly and lift off.
4. Remove remaining nut, bolt and washers from coupling guard half (pump end). Spread bottom of coupling guard half slightly and lift off.
Disassembly of the coupling guard is now complete.
NOTE: Bearing housing tap bolts are accessible without removing end plate if maintenance of internal pump parts is necessary. Therefore, it is unnecessary to remove end plate (pump end) from pump bearing housing.
Warning:Before assembly or disassembly of the coupling guard is performed, the motor must be de-energized, the motor controller/starter put in a locked-out position and a caution tag placed at the starter indicating the disconnect. Replace coupling guard before resuming normal operation of the pump.
APPENDIX III
Bearing Fits and Tolerances - In accordance with ABEC I Standard
Bearing Fits in inches (cm)S Frame M Frame L Frame XL Frame
RadialBearing
(Inboard)
Shaft OD 1.3785 (3.5014)1.3781 (3.5003)
1.7722 (4.5014)1.7718 (4.5004)
2.1660 (5.5016)2.1655 (5.5004)
2.5597 (6.5016)2.5592 (6.5004)
Bearing ID 1.3780 (3.5001)1.3775 (3.4989)
1.7717 (4.5001)1.7712 (4.4989)
2.1654 (5.5001)2.1648 (5.4986)
2.5591 (6.5001)2.5585 (6.4986)
Frame/Adapter ID 2.8346 (7.1999)2.8353 (7.2017)
3.9370 (10.0000)3.9379 (10.0023)
4.7244 (12.0000)4.7253 (12.0023)
5.5118 (14.0000)5.5128 (14.0025)
Bearing OD 2.8346 (7.1999)2.8353 (7.2017)
3.9370 (10.0000)3.9364 (9.9985)
4.7244 (12.0000)4.7238 (11.9985)
5.5118 (14.0000)5.5111 (13.9982)
ThrustBearing
(Outboard)
Shaft OD 1.1815 (3.0010)1.1812 (3.0002)
1.7722 (4.5014)1.7718 (4.5004)
1.9690 (5.0013)1.9686 (5.0002)
2.5597 (6.5016)2.5592 (6.5004)
Bearing ID 1.1811 (3.0000)1.1807 (2.9990)
1.7717 (4.5001)1.7712 (4.4988)
1.9685 (4.9999)1.9680 (4.9987)
2.5591 (6.5001)2.5585 (6.4986)
Bearing Housing ID 2.8346 (7.1999)2.8353 (7.2017)
3.9370 (10.0000)3.9379 (10.0023)
4.3307 (11.0000)4.3316 (11.0023)
5.5118 (14.0000)5.5128 (14.0025)
Bearing OD 2.8346 (7.1999)2.8341 (7.1986)
3.9370 (10.0000)3.9364 (9.9985)
4.3307 (11.0000)4.3301 (10.9985)
5.5118 (14.0000)5.5111 (13.9982)

3500 SERIES / MODEL 3550
24
APPENDIX IV
Bolt Torque, ft.-lbs. (Nm)
Location Frame All Materials, All ModelsLube Dry
Casing Bolts (370) orCasing Nuts (425)
6" S5/8" 115 (156) 173 (235)
8" S1/2" 58 (79) 87 (118)
M, L5/8" 115 (156) 173 (235)
XL5/8" 115 (156) 173 (235)
Frame-to-Adapter All 20 (27) 30 (40)
Bearing Clamp Ring Bolts (236A)Duplex Bearing Only
S, M 10* (1.1) 17* (1.9)L 55* (6.2) 83* (9.4)
Bearing End Cover Bolts (371C) XL 9 (12) 12 (16)
Dynamic Seal Capscrews (265)S, M, L 55* (6.2) 83* (9.4)
XL 9 (12) 12 (16)
Shaft End PlayS in. (mm) M in. (mm) L in. (mm) XL in. (mm)
Double Row .0011 (.028).0019 (0.47)
.0013 (.033)
.0021 (.054) not applicable .0014 (.036).0023 (.058)
Duplex .0007 (.018).0010 (.026)
.0009 (.022)
.0012 (.030).0010 (.026).0015 (.038)
.0010 (.026)
.0015 (.038)
APPENDIX V:
Never mix greases of different consistencies or types.
BEARING ISOLATORS:
The Aurora model 3550 pump comes with Impro® bearing isolators. These labyrinth seals are highly effective at keeping oil in the bearing frame while keeping contaminants out. The drain hole must be at the bottom (6 o’clock position) for proper operation. This seal has a theoretically infinite life as it is a non-contacting seal; however, it can be damaged through an outright bearing failure in close clearance situations. The rotor is driven by a replaceable O-ring which fits onto the pump shaft. The stator OD is sealed with a replaceable O-ring. A third O-ring is internal to the seal and cannot be replaced. Due to this, treat the seal as an assembly and replace it as such if necessary.
8
7
4
6
3
1
9
52
1. ROTOR
2. STATOR
3. VBX® RING
4. ROTOR DRIVE RING
5. STATOR GASKET
6. EXPULSION PORT
7. LAB GROOVE
8. LUBE RETURN
9. LOCATION RAMP
VBX® O-RING ACTION
* Values are in inch-lbs. (Nm)

3500 SERIES / MODEL 3550
25
APPENDIX VI: PRESSURE – TEMPERATURE RATINGS:
–400 –300 –200 –100 0 100 200 300 400 500 600
–240 –200 –160 –120 –80 –40 0 40 60 80 120 160 200 240 280
–400 –300 –200 –100 0 100 200 300 400 500 600
300
250
200
150
100
50
0
22
20
18
16
14
12
10
8
6
4
2
0
400
350
200
100
0
temperature – degrees Fahrenheit
temperature – degrees Celcius
temperature – degrees Fahrenheit
max. case w
orkin
g p
ressu
re –
PS
IG
max. c
ase w
orkin
g p
ressu
re –
BA
R
max. case w
orkin
g p
ressu
re –
PS
IG
Maximum Working Pressure LimitsModels S, M, L; Class 150 Flanges
Maximum Working Pressure LimitsModels S, M, L; Class 300 Flanges
HASTELLOY® B&C
316
W-20
MONEL®
NICKEL
TYPE 316, W-20, MONEL®, NICKEL, HASTELLOY® B&C
NICKEL
–240 –200 –160 –120 –80 –40 0 40 60 80 120 160 200 240 280
temperature – degrees Celcius
28
24
14
7
0
max. c
ase w
orkin
g p
ressu
re –
BA
R
–400 –300 –200 –100 0 100 200 300 400 500 600
–240 –200 –160 –120 –80 –40 0 40 60 80 120 160 200 240 280
–400 –300 –200 –100 0 100 200 300 400 500 600
300
250
200
150
100
50
0
22
20
18
16
14
12
10
8
6
4
2
0
400
350
200
100
0
temperature – degrees Fahrenheit
temperature – degrees Celcius
temperature – degrees Fahrenheit
max. case w
orkin
g p
ressu
re –
PS
IG
max. c
ase w
orkin
g p
ressu
re –
BA
R
max. case w
orkin
g p
ressu
re –
PS
IG
Maximum Working Pressure LimitsModels S, M, L; Class 150 Flanges
Maximum Working Pressure LimitsModels S, M, L; Class 300 Flanges
HASTELLOY® B&C
316
W-20
MONEL®
NICKEL
TYPE 316, W-20, MONEL®, NICKEL, HASTELLOY® B&C
NICKEL
–240 –200 –160 –120 –80 –40 0 40 60 80 120 160 200 240 280
temperature – degrees Celcius
28
24
14
7
0
max. c
ase w
orkin
g p
ressu
re –
BA
R
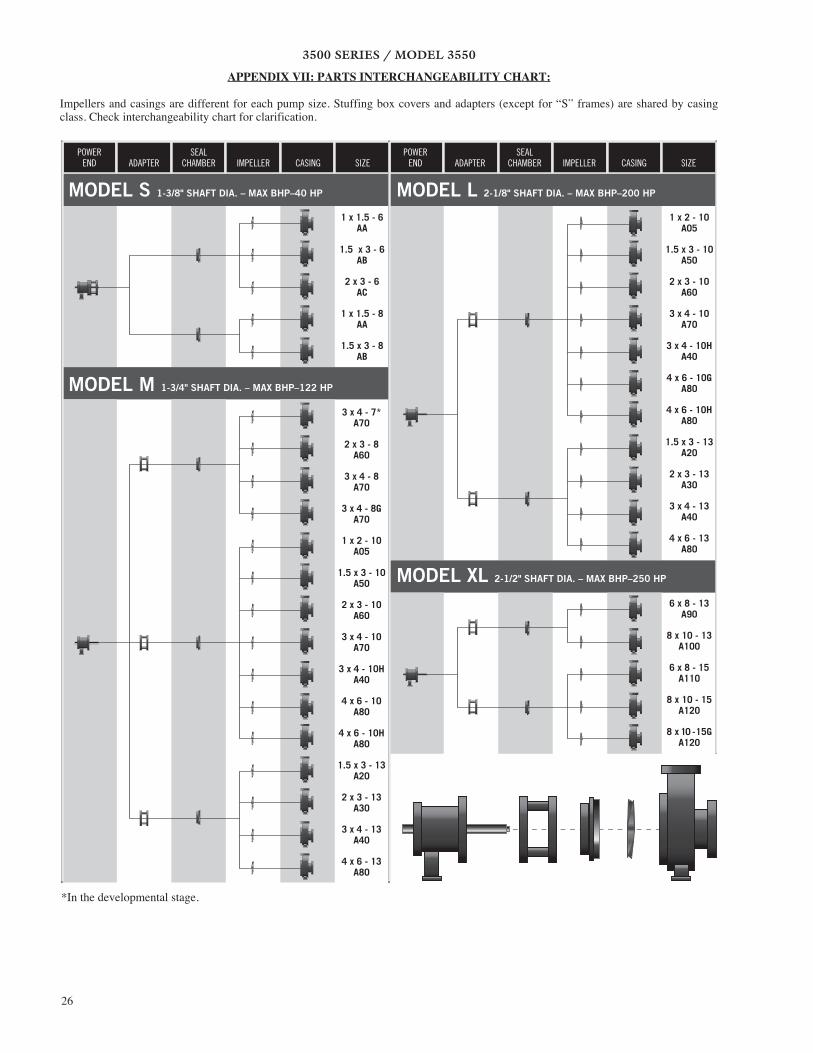
3500 SERIES / MODEL 3550
26
APPENDIX VII: PARTS INTERCHANGEABILITY CHART:
Impellers and casings are different for each pump size. Stuffing box covers and adapters (except for “S” frames) are shared by casing class. Check interchangeability chart for clarification.
3 x 4 - 7*A70
2 x 3 - 8A60
3 x 4 - 8A70
3 x 4 - 8GA70
1 x 2 - 10A05
1.5 x 3 - 10A50
2 x 3 - 10A60
3 x 4 - 10A70
3 x 4 - 10HA40
4 x 6 - 10A80
4 x 6 - 10HA80
1.5 x 3 - 13A20
2 x 3 - 13A30
3 x 4 - 13A40
4 x 6 - 13A80
1 x 1.5 - 6AA
1.5 x 3 - 6AB
2 x 3 - 6AC
1 x 1.5 - 8AA
1.5 x 3 - 8AB
6 x 8 - 13A90
8 x 10 - 13A100
6 x 8 - 15A110
8 x 10 - 15A120
8 x 10 - 15GA120
1 x 2 - 10A05
1.5 x 3 - 10A50
2 x 3 - 10A60
3 x 4 - 10A70
3 x 4 - 10HA40
4 x 6 - 10GA80
4 x 6 - 10HA80
1.5 x 3 - 13A20
2 x 3 - 13A30
3 x 4 - 13A40
4 x 6 - 13A80
MODEL S 1-3/8" SHAFT DIA. – MAX BHP–40 HP MODEL L 2-1/8" SHAFT DIA. – MAX BHP–200 HP
MODEL XL 2-1/2" SHAFT DIA. – MAX BHP–250 HP
MODEL M 1-3/4" SHAFT DIA. – MAX BHP–122 HP
POWEREND ADAPTER
SEALCHAMBER IMPELLER CASING SIZE
POWEREND ADAPTER
SEALCHAMBER IMPELLER CASING SIZE
*In the developmental stage.

3500 SERIES / MODEL 3550
27
WARRANTY:
Seller warrants equipment (and its component parts) of its own manufacture against defects in materials and workmanship under normal use and service for one (1) year from the date of installation or start-up, or for eighteen (18) months after the date of shipment, whichever occurs first. Seller does not warrant accessories or components that are not manufactured by Seller; however, to the extent possible, Seller agrees to assign to Buyer its rights under the original manufacturer's warranty, without recourse to Seller. Buyer must give Seller notice in writing of any alleged defect covered by this warranty (together with all identifying details, including the serial number, the type of equipment, and the date of purchase) within thirty (30) days of the discovery of such defect during the warranty period. No claim made more than 30 days after the expiration of the warranty period shall be valid. Guarantees of performance and warranties are based on the use of original equipment manufactured (OEM) replacement parts. Seller assumes no responsibility or liability if alterations, non-authorized design modifications and/or non-OEM replacement parts are incorporated If requested by Seller, any equipment (or its component parts) must be promptly returned to Seller prior to any attempted repair, or sent to an authorized service station designated by Seller, and Buyer shall prepay all shipping expenses. Seller shall not be liable for any loss or damage to goods in transit, nor will any warranty claim be valid unless the returned goods are received intact and undamaged as a result of shipment. Repaired or replaced material returned to customer will be shipped F.O.B., Seller's factory. Seller will not give Buyer credit for parts or equipment returned to Seller, and will not accept delivery of any such parts or equipment, unless Buyer has obtained Seller's approval in writing. The warranty extends to repaired or replaced parts of Seller's manufacture for ninety (90) days or for the remainder of the original warranty period applicable to the equipment or parts being repaired or replaced, whichever is greater. This warranty applies to the repaired or replaced part and is not extended to the product or any other component of the product being repaired. Repair parts of its own manufacture sold after the original warranty period are warranted for a period of one (1) year from shipment against defects in materials and workmanship under normal use and service. This warranty applies to the replacement part only and is not extended to the product or any other component of the product being repaired. Seller may substitute new equipment or improve part(s) of any equipment judged defective without further liability. All repairs or services performed by Seller, which are not covered by this warranty, will be charged in accordance with Seller's standard prices then in effect.
THIS WARRANTY IS THE SOLE WARRANTY OF SELLER AND SELLER HEREBY EXPRESSLY DISCLAIMS AND BUYER WAIVES ALL OTHER WARRANTIES EXPRESSED, IMPLIED IN LAW OR IMPLIED IN FACT, INCLUDING ANY WARRANTIES OF MERCHANTABILITY OR FITNESS FOR A PARTICULAR PURPOSE. Seller's sole obligation under this warranty shall be, at its option, to repair or replace any equipment (or its component parts) which has a defect covered by this warranty, or to refund the purchase price of such equipment or part. Under the terms of this warranty, Seller shall not be liable for (a) consequential, collateral, special or liquidated losses or damages; (b) equipment conditions caused by normal wear and tear, abnormal conditions of use, accident, neglect, or misuse of said equipment; (c) the expense of, and loss or damage caused by, repairs or alterations made by anyone other than the Seller; (d) damage caused by abrasive materials, chemicals, scale deposits, corrosion, lightning, improper voltage, mishandling, or other similar conditions; (e) any loss, damage, or expense relating to or resulting from installation, removal or reinstallation of equipment; (f) any labor costs or charges incurred in repairing or replacing defective equipment or parts, including the cost of reinstalling parts that are repaired or replaced by Seller; (g) any expense of shipment of equipment or repaired or replacement parts; or (h) any other loss, damage or expense of any nature.
The above warranty shall not apply to any equipment which may be separately covered by any alternate or special warranties.
PERFORMANCE: In the absence of Certified Pump Performance Tests, equipment performance is not warranted or guaranteed. Performance curves and other information submitted to Buyer are approximate and no warranty or guarantee shall be deemed to arise as a result of such submittal. All testing shall be done in accordance with Seller's standard policy under Hydraulic Institute procedures.
LIABILITY LIMITATIONS: Under no circumstances shall the Seller have any liability under the Order or otherwise for liquidated damages or for collateral, consequential or special damages or for loss of profits, or for actual losses or for loss of production or progress of construction, regardless of the cause of such damages or losses. In any event, Seller's aggregate total liability under the Order or otherwise shall not exceed the contract price.
ACTS OF GOD: Seller shall in no event be liable for delays in delivery of the equipment or other failures to perform caused by fires, acts of God, strikes, labor difficulties, acts of governmental or military authorities, delays in transportation or procuring materials, or causes of any kind beyond Seller's control.
COMPLIANCE WITH LAW: Seller agrees to comply with all United States laws and regulations applicable to the manufacturing of the subject equipment. Such compliance shall include: The Fair Labor Standards Acts of 1938, as amended; Equal Employment Opportunity clauses of Executive Order 11246, as amended; Occupational Safety and Health Act of 1970 and the standards promulgated thereunder, if applicable. Since compliance with the various Federal, State, and Local laws and regulations concerning occupational health and safety, pollution or local codes are affected by the use, installation and operation of the equipment and other matters over which Seller has no control, Seller assumes no responsibility for compliance with those laws and regulations, whether by way of indemnity, warranty, or otherwise. It is incumbent upon the Buyer to specify equipment which complies with local codes and ordinances.
3500 SERIES / MODEL 3550
28
Aurora Pump800 Airport RoadNorth Aurora, IL 60542phone: 630-859-7000fax: 630-859-7060
NOTE:Aurora Pump reserves the right to make revisions to its products and their specifications, this bulletin and related information without notice.
A-03-339 09.10