Embed Size (px)
Citation preview
Installing MultiTrans 7 on Separate Application andWeb ServersRevised: 2019-12-20
Installing MultiTrans 7 on Separate Application and Web Servers 2
ContentsCONTENTS 2Requirements 3Flow 3Installing the Jakarta Connector to Publish Flow (Tomcat) through IIS 7 3
DOWNLOADING THE APACHE JAKARTA CONNECTOR DLL 3CREATING CONFIGURATION FILES FOR JAKARTA CONNECTOR 4CONFIGURING IIS 7WEBSITE WITH THE JAKARTA CONNECTOR 5
Blocking Flow Modules through IIS 8MultiTrans 9
ABOUT SDL 13
Installing MultiTrans 7 on Separate Application and Web Servers 3
RequirementsThe following ports must be open for 2-way TCP/IP communication between theapplication and Web servers: 5555, 5556, 5557, 5558, 5885, 8009, 27000 and 27001.
If an anti-virus program is installed on the servers, the following folders must bewhitelisted:
• C:\Program Files\Donnelley• C:\Program Files (x86)\Donnelley• C:\ProgramData\MultiTrans• C:\Users\Public\Public Documents\MultiTrans
Both the application server and the Web server must meet the minimum systemrequirements as defined in the MultiTrans Server Installation Guide.
An IIS service restart on the Web server may be required.
FlowTo install Flow on an application server, but have the web portal(s) available through theWeb server, the following steps must be done:
1. Install the Jakarta Connector to publish Flow (Tomcat) through IIS 7.2. Block any desired Flow modules directly in IIS.
Installing the Jakarta Connector to Publish Flow (Tomcat) through IIS 7To install the Jakarta connector:1. Download the Apache Jakarta connector dll.2. Create configuration files for the Jakarta connector.3. Configure the IIS 7 web site with the Jakarta connector
Downloading the Apache Jakarta connector dll
To download the Apache Jakarta connector dll:1. Navigate to this link (http://www.apache.org/dist/tomcat/tomcat-connectors/jk/binaries/)and choose the proper version of the Jakarta Connector DLL. The choice of the properversion is based on the operating system (Windows) and the architecture (32 or 64 bits).
2. In the root of the Flow installation folder, create a new folder named “jk”, and save thedll (isapi_redirect-[version].dll) in that folder.
3. Once downloaded, rename the dll file to “isapi_redirect.dll”.

Installing MultiTrans 7 on Separate Application and Web Servers 4
Creating configuration files for Jakarta connector
To create configuration files:1. Create a file named “isapi_redirect.properties” in the same folder as the dll, and thencreate a folder named “conf” and a folder named “log” under the JK Connectorinstallation folder. The JK Connector installation folder should now look as follow:
2. Edit the “isapi_redirect.properties” file with the following content. Note that except forthe “extension_uri” and “log_level” properties, all other properties must be adjusted tomatch you current setup.
# Configuration file for the Jakarta ISAPI Redirector# The path to the ISAPI Redirector Extension, relative to the website# This must be in a virtual directory with execute privilegesextension_uri=/jakarta/isapi_redirect.dll# Full path to the log file for the ISAPI Redirectorlog_file=C:\FLOW\jk\log\isapi_redirect.log# Log level (debug, info, warn, error or trace)log_level=info# Full path to the workers.properties fileworker_file=C:\FLOW\jk\conf\workers.properties.minimal# Full path to the uriworkermap.properties fileworker_mount_file=C:\FLOW\jk\conf\uriworkermap.properties
3. In the “conf” folder, create two files named “uriworkermap.properties” and“workers.properties.minimal” and then add the following content. Note that unless thedefault AJP13 port has been modified after Tomcat (Flow) installation, the content ofthese files should not be modified.
4. If Flow is located on a different server than the web server (IIS) please specify the IP ofthe Flow server in the “workers.properties.minimal” file in the following line:worker.ajp13w.host=IP_FLOW_SERVER
# uriworkermap.properties - IIS## This file provides sample mappings for example wlb

Installing MultiTrans 7 on Separate Application and Web Servers 5
# worker defined in workermap.properties.minimal# The general syntax for this file is:# [URL]=[Worker name]/*=wlb# Optionally filter out all .jpeg files inside that context# For no mapping the url has to start with exclamation (!)## Mount jkstatus to /jkmanager# For production servers you will need to# secure the access to the /jkmanager url#/jkmanager=jkstatus
# workers.properties.minimal -## This file provides minimal jk configuration properties needed to# connect to Tomcat.## The workers that jk should create and work with#worker.list=wlb,jkstatus## Defining a worker named ajp13w and of type ajp13# Note that the name and the type do not have to match.#worker.ajp13w.type=ajp13worker.ajp13w.host=localhostworker.ajp13w.port=8009## Defining a load balancer#worker.wlb.type=lbworker.wlb.balance_workers=ajp13w## Define status worker#worker.jkstatus.type=status
Configuring IIS 7 Website with the Jakarta connector
To configure the IIS 7 Website with the Jakarta connector:1. Create a new web site in IIS, or use the default web site. Note that this web site mustbe dedicated to the Flow application and cannot be a context path (i.e.:www.mysite.com/Flow is not supported).
Installing MultiTrans 7 on Separate Application and Web Servers 6
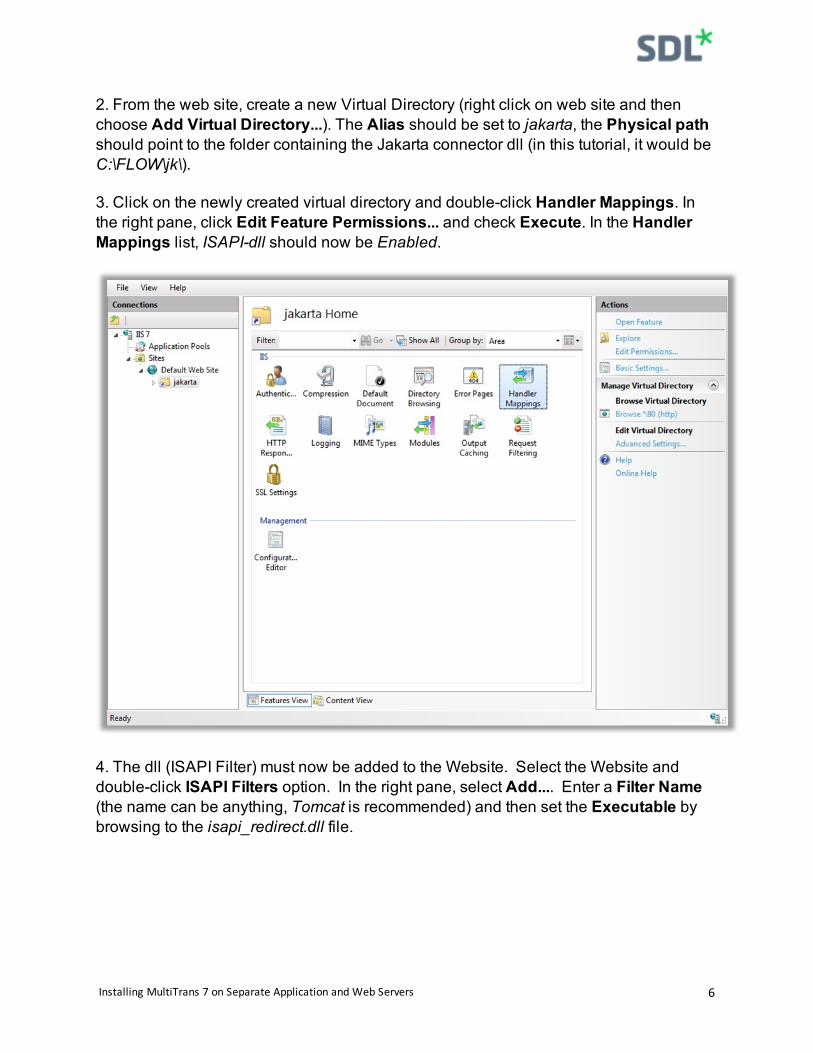
2. From the web site, create a new Virtual Directory (right click on web site and thenchoose Add Virtual Directory...). The Alias should be set to jakarta, the Physical pathshould point to the folder containing the Jakarta connector dll (in this tutorial, it would beC:\FLOW\jk\).
3. Click on the newly created virtual directory and double-click Handler Mappings. Inthe right pane, click Edit Feature Permissions... and check Execute. In the HandlerMappings list, ISAPI-dll should now be Enabled.
4. The dll (ISAPI Filter) must now be added to the Website. Select the Website anddouble-click ISAPI Filters option. In the right pane, select Add.... Enter a Filter Name(the name can be anything, Tomcat is recommended) and then set the Executable bybrowsing to the isapi_redirect.dll file.

Installing MultiTrans 7 on Separate Application and Web Servers 7
5. Grant execution rights to this ISAPI filter:a) Select the top node of the configuration tree (in this example, the node in namedIIS 7) and then double-click ISAPI and CGI Restrictions.b) In the right pane, select Add.... c) Set the ISAPI or CGI path by browsing to the isapi_redirect.dll file.d) Enter Tomcat as the Description and check Allow extension path to execute.
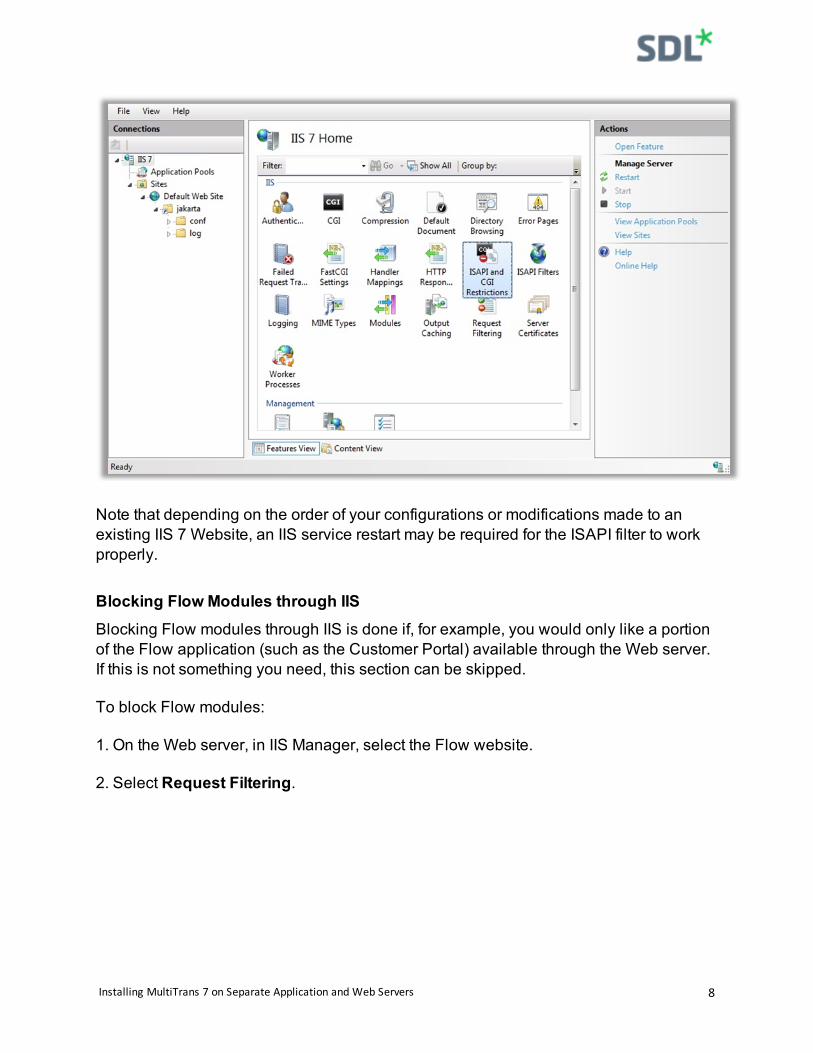
Installing MultiTrans 7 on Separate Application and Web Servers 8
Note that depending on the order of your configurations or modifications made to anexisting IIS 7 Website, an IIS service restart may be required for the ISAPI filter to workproperly.
Blocking Flow Modules through IISBlocking Flow modules through IIS is done if, for example, you would only like a portionof the Flow application (such as the Customer Portal) available through the Web server.If this is not something you need, this section can be skipped.
To block Flow modules:
1. On the Web server, in IIS Manager, select the Flow website.
2. Select Request Filtering.

Installing MultiTrans 7 on Separate Application and Web Servers 9
3. Go to the URL tab. Right-click on each module and you can Allow or Deny access.
MultiTransTo install the MultiTrans Server on the application server, and expose the MultiTransWeb applications on a Web server:
1. Following the instructions in the MultiTrans Server Installation Guide, install theMultiTrans server on the application server. It is recommended to not install theMultiTrans Web on the application server, unless you have licenses for 2 MultiTransWeb Servers.
2. On the Web server, install the MultiTrans Server Web Services, the MultiTrans Weband the Web Editor Server if applicable. Use the MultiTrans server installation program,selecting these components and again following the instructions in the MultiTransServer Installation Guide.
3. Point the licensing utility on the Web server towards the application server:a. From the Web server, click Start > All Programs >MultiTrans 6.0 > LicenseServer Administration.b. In the Server tab, enter 27000@ApplicationServerName whereApplicationServerName is the real name or IP address of your application server.c. Click Save License Server Name and then Close.

Installing MultiTrans 7 on Separate Application and Web Servers 10
4. From the application server, open the Administration Console and connect tolocalhost. Alternatively, from a location off the server, open the Administration Consoleand connect to the application server.
5. If necessary, add the application server by selecting the Servermenu, then Registernew server. It is recommended to register as localhost using TCP/IP directly on theapplication server.
6. On the Web server, open the registry and add a string value registry key calledDirectoryServerUrl, with the value = the Web server name or IP address, in the followingtwo locations:
HKEY_LOCAL_MACHINE\Software\Donnelley\MultiTrans ServerHKEY_LOCAL_MACHINE\Software\Wow6432Node\Donnelley\MultiTrans Server
7. To make the Web Editor and the MultiTrans Web available, edit theWeb.config file forthe MultiCorporaServices Web application on the Web server, using a text editor. Thisfile is found at C:\Program Files (x86)\Donnelley\MultiTrans 6.0\MultiTrans Server\WebServices\Web.config.
a. Search for the comment <!-- WCF Clients --> in the file, and replace eachinstance of localhost in the list below by the address of the application server. Forexample:
Replace <endpoint address="net.tcp://localhost:5558/XliffWeb/Service.svc"…with <endpoint address="net.tcp://backend-server-address:5558/XliffWeb/Service.svc" …
b. Search for the following entry and replace the FRONT-END_ADDRESS by theaddress of your Web server. Remove the comments (<!-- and -->) from around thesection.
<!-- Special from-end server overrides (uncomment and edit when needed)<add key="OverrideTermBaseServerUrl" value=" FRONT-END_ADDRESS|https|MultiCorporaServices"/><add key="OverrideTextBaseServerUrl" value="qa8. FRONT-END_ADDRESS|https|MultiCorporaServices"/>-->
c. In the same Web.config file, all instances of localhost within the <client/> element must be replaced by the IP address of the application server, including:
<add key="DSAddress" value="localhost" /><add key="TermBaseServerAddress" value="localhost" />
d. Find the following section:<!-- Frontend/backend configuration for Repository Service
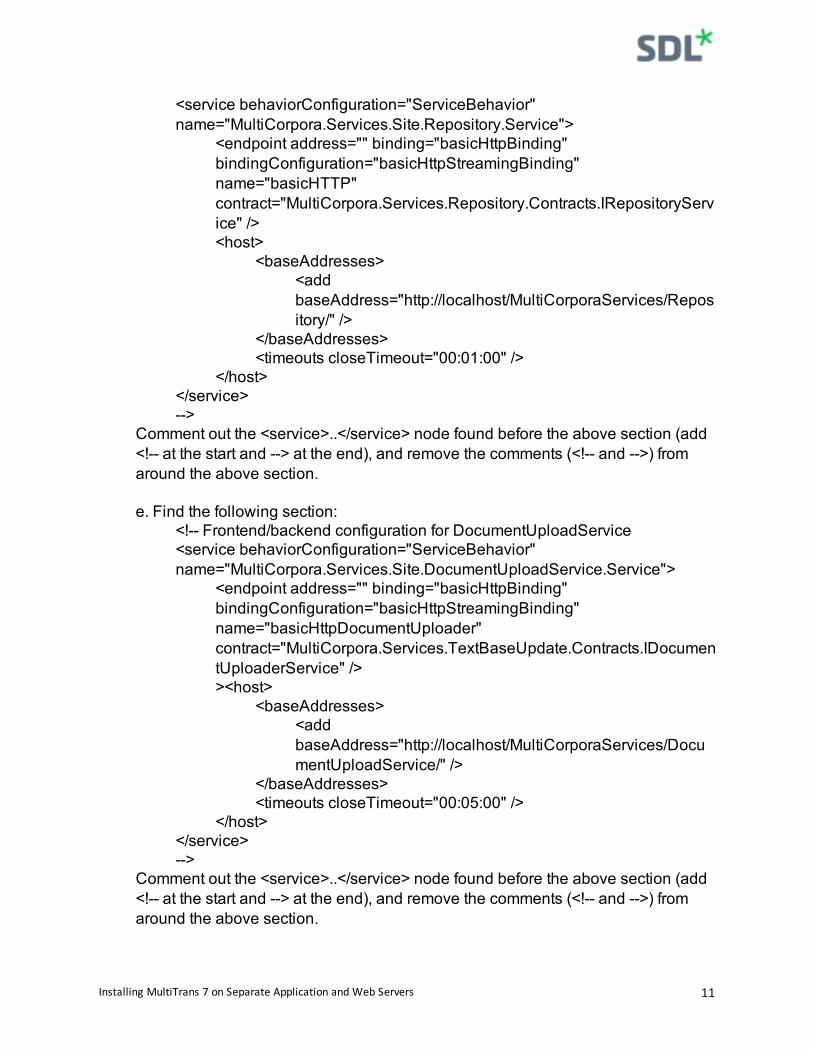
Installing MultiTrans 7 on Separate Application and Web Servers 11
<service behaviorConfiguration="ServiceBehavior"name="MultiCorpora.Services.Site.Repository.Service">
<endpoint address="" binding="basicHttpBinding"bindingConfiguration="basicHttpStreamingBinding"name="basicHTTP"contract="MultiCorpora.Services.Repository.Contracts.IRepositoryService" /><host>
<baseAddresses><addbaseAddress="http://localhost/MultiCorporaServices/Repository/" />
</baseAddresses><timeouts closeTimeout="00:01:00" />
</host></service>-->
Comment out the <service>..</service> node found before the above section (add<!-- at the start and --> at the end), and remove the comments (<!-- and -->) fromaround the above section.
e. Find the following section:<!-- Frontend/backend configuration for DocumentUploadService<service behaviorConfiguration="ServiceBehavior"name="MultiCorpora.Services.Site.DocumentUploadService.Service">
<endpoint address="" binding="basicHttpBinding"bindingConfiguration="basicHttpStreamingBinding"name="basicHttpDocumentUploader"contract="MultiCorpora.Services.TextBaseUpdate.Contracts.IDocumentUploaderService" />><host>
<baseAddresses><addbaseAddress="http://localhost/MultiCorporaServices/DocumentUploadService/" />
</baseAddresses><timeouts closeTimeout="00:05:00" />
</host></service>-->
Comment out the <service>..</service> node found before the above section (add<!-- at the start and --> at the end), and remove the comments (<!-- and -->) fromaround the above section.

Installing MultiTrans 7 on Separate Application and Web Servers 12
f. Save and close the file.
8. Open the file C:\Program Files (x86)\Donnelley\MultiTrans 6.0\MultiTrans Server\WebServices\Repository\Service.svc in a text editor. Replace the entire content of the filewith this line:
<%@ ServiceHost Debug="true"Service="MultiCorpora.Services.Site.Repository.Service" %>
Save and close the file.
9. Open the file C:\Program Files (x86)\Donnelley\MultiTrans 6.0\MultiTrans Server\WebServices\DocumentUploadService\Service.svc in a text editor. Replace the entirecontent of the file with this line:
<%@ ServiceHost Debug="true"Service="MultiCorpora.Services.Site.DocumentUploadService.Service"%>
Save and close the file.
10. If the Web Editor is being used, open the file C:\Program Files\Donnelley\MultiTrans6.0\MultiTrans Server\Websites\Editor Web\Web.config in a text editor. Search for thefollowing and replace localhost by the address of the Application server:
<endpoint address="net.tcp://localhost:5558/XliffWebLogin/Service.svc"
Installing MultiTrans 7 on Separate Application and Web Servers 13
About SDLSDL (LSE:SDL) is the global innovator in language translation technology, services and contentmanagement. With more than 25 years of experience, SDL delivers transformative business results byenabling powerfully nuanced digital experiences with customers around the world. Find out more atsdl.com
Copyright © 2019 SDLplc. All Rights Reserved. The SDLname and logo, and SDLproduct and service names are trademarks of SDLplc and/or its
subsidiaries, some of which may be registered. Other company, product or service names are the property of their respective holders