Embed Size (px)
Citation preview

24 March 2015 CHEVYClassics
Story and photography by Colin Date
Tools: putty knife, utility knife
Cost: price varies depending on seals or number of seals
Performance gains: a quiet, weatherproof interior and trunk
Tip: If you happen to break or lose a plastic retainer during installa-tion, try using 3M weatherstrip adhesive in its place. The glue issuper tacky and forms a lasting, watertight seal.
Whenever setting out on any restoration, we all know that newweatherstripping is a must. It can make the biggest difference in the lookand feel of your interior. It also serves as a barrier to keep out the harshoutdoor elements. If you have ever driven a car home from the paintshop with absolutely no weatherstripping in it, you know what I mean.Unfortunately, the stuff is just plain old rubber and has no defensemechanisms against the sun, rain, or chemicals (not to mention time).Lucky for us, replacing most weatherstripping is a walk in the park.
The main items? Door seals, roofrail seals, window felts, quarter glassseals, vent window seals and trunk seals. Most of these are readilyavailable for just about any classic GM vehicle. Eckler’s offers theseseals and more in conveniently packaged and discounted kits. Whatmore can you ask for? You can literally replace every rubber seal andbumper on your car, all for few hundred dollars (in most cases).
Time: approximately 30 minutes (for one part: eg. door, trunk, etc.)
INSTALLING NEW WEATHERSTRIPPING
Door seals are some of the most commonly abused and replacedpieces of weatherstripping. On hardtop cars, they wrap around the body ofthe door in a large “U” shape form. Inside the seal are small, plasticpush-in retainers that line up to pre-drilled holes in the door frame. Onboth ends of the seal is a molded rubber “head” with removable retainers.Starting at the front edge of the door towards the dash, insert the retainersthrough the seal and into the frame. As you move down the door, lockeach retainer into its corresponding hole. You may need to stretch the sealin some places for all of the retainers to properly line up. The seal willloop around the bottom of the door and back up to the other side of thewindow opening. Again, attach the head of the seal to the door frame, andyou’re done! On post cars, the door and the window have a full frame. Theseal works in a similar fashion, but is a one piece “O” shape.
Tinware: new weatherstripping, weatherstripping adhesive,weatherstrip remover (aerosol can).
The plastic retainers in the seal are simply insertedinto the factory-drilled holes in the door shell.
The quarter glass weatherstrip slides right up intothe track of the window.
CHEVYClassics March 2015 25
When installing trunk weatherstripping, make sure the lipis facing outside the car.
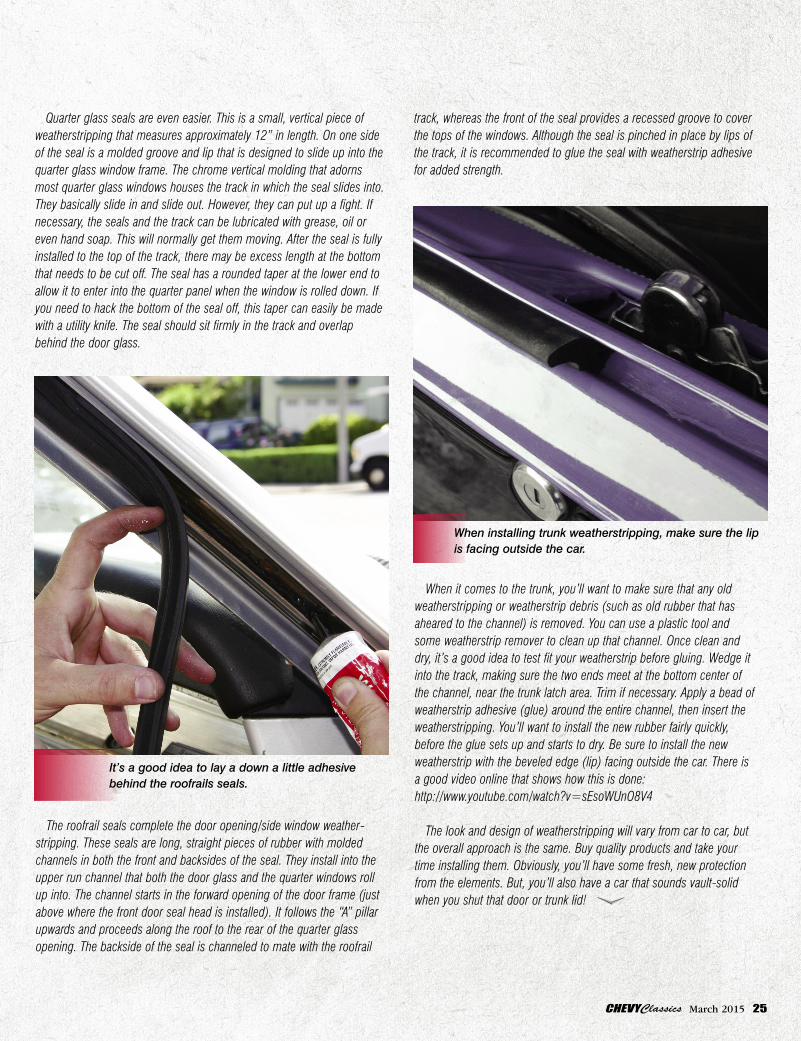
It’s a good idea to lay a down a little adhesivebehind the roofrails seals.
Quarter glass seals are even easier. This is a small, vertical piece ofweatherstripping that measures approximately 12” in length. On one sideof the seal is a molded groove and lip that is designed to slide up into thequarter glass window frame. The chrome vertical molding that adornsmost quarter glass windows houses the track in which the seal slides into.They basically slide in and slide out. However, they can put up a fight. Ifnecessary, the seals and the track can be lubricated with grease, oil oreven hand soap. This will normally get them moving. After the seal is fullyinstalled to the top of the track, there may be excess length at the bottomthat needs to be cut off. The seal has a rounded taper at the lower end toallow it to enter into the quarter panel when the window is rolled down. Ifyou need to hack the bottom of the seal off, this taper can easily be madewith a utility knife. The seal should sit firmly in the track and overlapbehind the door glass.
The roofrail seals complete the door opening/side window weather-stripping. These seals are long, straight pieces of rubber with moldedchannels in both the front and backsides of the seal. They install into theupper run channel that both the door glass and the quarter windows rollup into. The channel starts in the forward opening of the door frame (justabove where the front door seal head is installed). It follows the “A” pillarupwards and proceeds along the roof to the rear of the quarter glassopening. The backside of the seal is channeled to mate with the roofrail
track, whereas the front of the seal provides a recessed groove to coverthe tops of the windows. Although the seal is pinched in place by lips ofthe track, it is recommended to glue the seal with weatherstrip adhesivefor added strength.
When it comes to the trunk, you’ll want to make sure that any oldweatherstripping or weatherstrip debris (such as old rubber that hasaheared to the channel) is removed. You can use a plastic tool andsome weatherstrip remover to clean up that channel. Once clean anddry, it’s a good idea to test fit your weatherstrip before gluing. Wedge itinto the track, making sure the two ends meet at the bottom center ofthe channel, near the trunk latch area. Trim if necessary. Apply a bead ofweatherstrip adhesive (glue) around the entire channel, then insert theweatherstripping. You’ll want to install the new rubber fairly quickly,before the glue sets up and starts to dry. Be sure to install the newweatherstrip with the beveled edge (lip) facing outside the car. There isa good video online that shows how this is done:http://www.youtube.com/watch?v=sEsoWUnO8V4
The look and design of weatherstripping will vary from car to car, butthe overall approach is the same. Buy quality products and take yourtime installing them. Obviously, you’ll have some fresh, new protectionfrom the elements. But, you’ll also have a car that sounds vault-solidwhen you shut that door or trunk lid!


![Tacky the Penguin: 'What's the Problem?' [1st grade]](https://img.dokumen.tips/doc/110x75/62527f28758d9174d60db97a/tacky-the-penguin-whats-the-problem-1st-grade.jpg)