Embed Size (px)
Citation preview

Installing Citrix for Mac OS X (10.4, 10.5, 10.6, and 10.7) and configuring NET Infoview
Updated May 17, 2012
Step 1 - Download Citrix (Skip steps 1 and 2, if Citrix is already installed)
https://www.alaska.edu/oit/software/authenticate/files/macintosh-applications/ica/ You will be asked for you UA username and password. The downloaded file is named “MacICA_OSX.dmg”. When finished downloading it should appear on your desktop or your downloads folder in your web browser.
The older 7.0.411 version is preferred for Mac OSX Tiger (10.4), Leopard (10.5) and Snow Leopard (10.6). The newer 10.0.6 version is preferred for OS X Lion (10.7).
The downloaded file is named “MacICA_OSX.dmg”. When finished downloading it should appear on your desktop or your downloads folder in your web browser.
University of Alaska Foundation
This document is located at http://www.alaska.edu/foundation/foundation_i-net/

Step 2 - Install Citrix
Double-click the file MacICA_OSX.dmg to begin the install process.
The file will launch a window that looks like this
Double-click the “ICA Client.pkg” icon. This will launch the installer. The following window will appear. Click “Continue”.
University of Alaska Foundation
This document is located at http://www.alaska.edu/foundation/foundation_i-net/
The next step in the install process is to continue with the “Read Me” and “License” stages. Click “Continue” at each stage.
Next, select the destination, by click on the “Hard Drive” Icon. Then click “Continue”
University of Alaska Foundation
This document is located at http://www.alaska.edu/foundation/foundation_i-net/
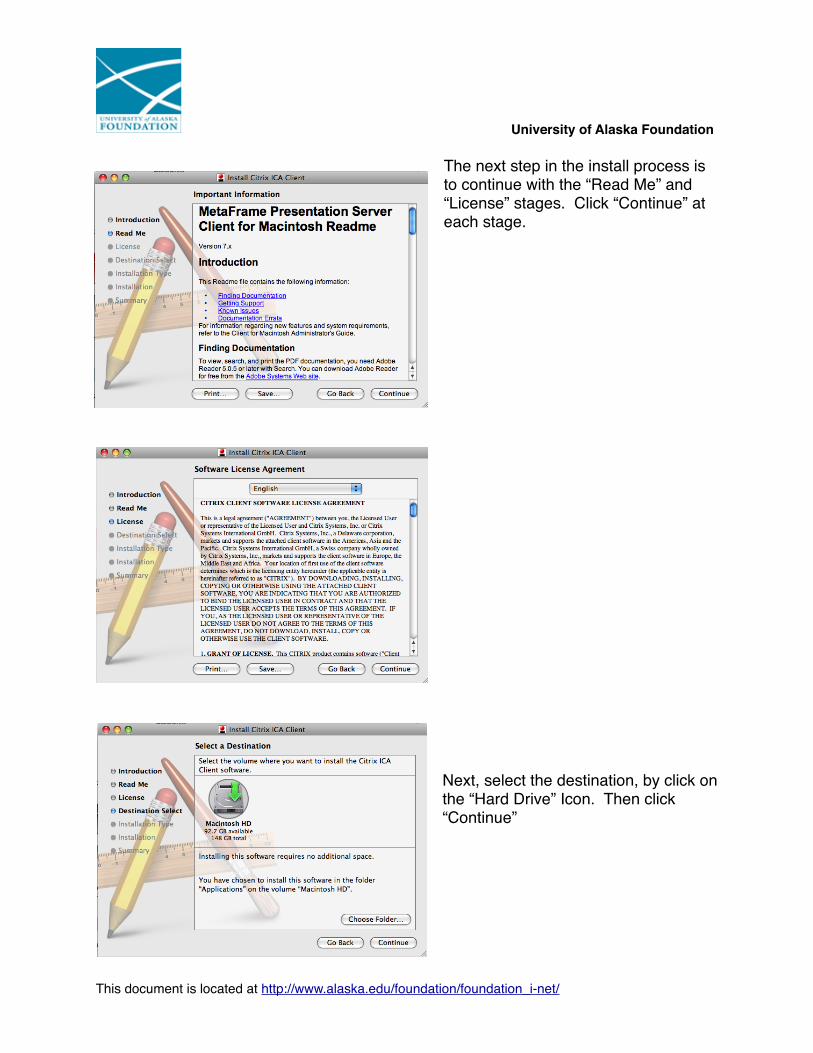
The next step will ask what location to install Citrix. DO NOT click “Change Install Location”, the installer will default to your “Applications” folder. Click “Install”.
The installer will finish and you may exit it by clicking the red button in the upper left corner.
Note - that when finished there will still be an icon on your desktop that
looks like this
Drag the icon to the Trash. You may also drag the file “MacICA_OSX.dmg” to the Trash as well.
Step 3 - Configuring NET Infoview using Citrix
Using your Hard Drive icon, navigate to the “Applications” folder. Find the Folder labeled “Citrix ICA client”. Open the folder. Double-click the icon “Citrix ICA Client Editor”. The following window will open.
Go to the menu bar at the top of the screen and click on the menu “Options”, select “Default Settings”. The following window will appear. Make sure the tabs “Making a Connection” and “Server Location” are highlighted in blue.
University of Alaska Foundation
This document is located at http://www.alaska.edu/foundation/foundation_i-net/
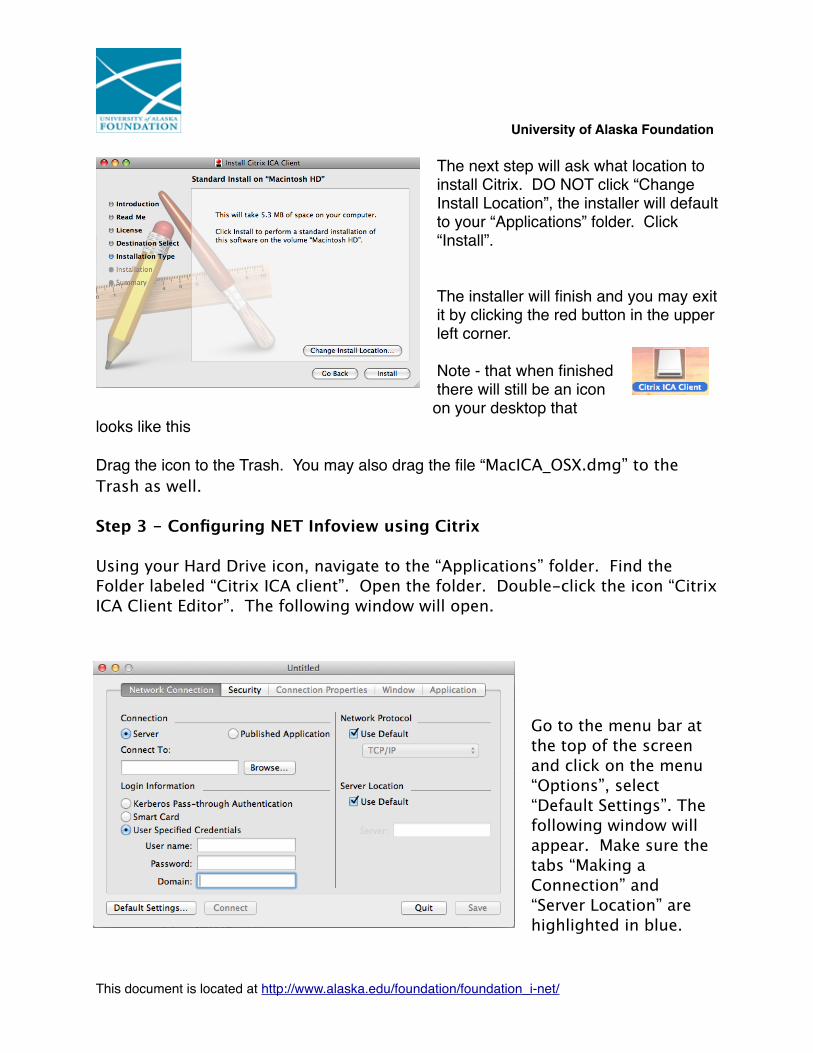
Using the pull-down, select Network Protocol as TCP/IP
Using the pull-down, select Encryption Level at 128 Bit
Click the “Add” button. (this make take a while for anything to happen)
E Enter into the field“fbk-
fe01.apps.ad.alaska.edu”. Click OK.Click the tab on the top row that says “Connection Properties”. On the second row, click the tab “Windows and Sounds”. The following window will appear.
Click “Enable Windows Alert Sounds”
Set the Window Size (800x600 recommended for most laptops, 1024x786 for desktops).
Set Windows Colors to Thousands.
Leave all other settings as they are.
Click “Save”.
University of Alaska Foundation
This document is located at http://www.alaska.edu/foundation/foundation_i-net/

The following window will appear again. Click “Publish Application”.
Click the “Browse” button. Note that you must be on a university secure network to finish this stage (hardwire, secure wireless or VPN).
A menu of options will appear. Scroll down to the bottom of it. Click “NET Infoview”. Click “Select”.
Enter your “User Specified Credentials” in the lower left corner. Enter your UA username and password and either “SW” or “UA” domain as instructed by OIT.You can find your UA username at elmo.alaska.edu.
Go to the “File” menu at the top of the screen and select “Save As”. Save to theApplications folder, Citrix ICA Client folder, as “NET Infoview”.
University of Alaska Foundation
This document is located at http://www.alaska.edu/foundation/foundation_i-net/

WARNING: when clicking in the new icon (or the desktop alias), it may be treated as a TXT file and the Text Editor program will launch. To correct this, go to the icon or alias and Control+Click and select “Get Info”. A new window will launch. Select the section that says “Open With” and choose “Citrix ICA Client App”. Also, select the “Change All” button.
You can make a desktop shortcurt/alias by holding down the control key and clicking on the NET Infoview icon. The following menu will appear.
Click “Make Alias”
A “duplicate” file will appear (with a small arrow in the bottom left corner on the icon). This is the alias. Drag it to your desktop or the right-most portion of your dock.
Close the Citrix Client Editor by going to the File menu and click “Quit”
Step 4 - Launch NET Infoview.
Either click on the alias you just made or go to your Applications folder, Citrix ICA Client folder and click “NET Infoview”.
The program may tell you this is the first time the program is being launched and asks you if want to continue. Click “OK”.
It may take several seconds for anything happen. Future launchings will be much quicker. The following
window will appear. Click OK. If your User Credentials in step 2 were entered correctly, NET Infoview will launch.
University of Alaska Foundation
This document is located at http://www.alaska.edu/foundation/foundation_i-net/

The screen will change to the following. Click “Log On”. You do not need to change any of the fields.
The following screen will appear. Canned reports can be found under the “Public Folder”.
To Exit from NET Infoview, While inside the Citrix window, click the middle icon on the right side of the upper tool bar. This takes you back to the Log On screen above. Now, click the “X” in the upper right corner
The first time you launch NET Infoview through Citrix in the Mac OS, the Citrix window may remain open during the closing process. Go to the menu bar at the top of the page, select the menu “Citrix ICA Client” and then “Quit”. In future sessions, the Citrix window will close when NET Infoview is exited.
University of Alaska Foundation
This document is located at http://www.alaska.edu/foundation/foundation_i-net/


![BusinessObjects Enterprise™ XI Release 2 InfoView …1].pdfWelcome to BusinessObjects Enterprise 1 About this guide 10 BusinessObjects Enterprise XI Release 2 InfoView User’s Guide](https://img.dokumen.tips/doc/110x75/5aac7cb97f8b9a2e088d0cc1/businessobjects-enterprise-xi-release-2-infoview-1pdfwelcome-to-businessobjects.jpg)