Embed Size (px)
Citation preview

last updated for the April 2017 release
Technical Guide
Installing and Configuring One Analytics

Revision History
Doc Ref Installing and Configuring One Analytics Technical Guide/April 2017/2017-03-31
© Capita Business Services Ltd 2017. All rights reserved. No part of this publication may be reproduced, photocopied, stored on a retrieval system, translated or transmitted without the express written consent of the publisher. Microsoft® and Windows® are either registered trademarks or trademarks of Microsoft Corporation in the United States and/or other countries.
www.capita-one.co.uk
Contacting the Service Desk You can log a call with the Service Desk via the Customer Service tool available on My Account.
Providing Feedback on Documentation We always welcome comments and feedback on the quality of our documentation including online help files and handbooks. If you have any comments, feedback or suggestions regarding the module help file, this handbook (PDF file) or any other aspect of our documentation, please email:
Please ensure that you include the document name, version and aspect of documentation on which you are commenting.
Version Published on
Spring 2017 (3.62) - 1.0 31/03/2017

Contents
01 | Introduction .................................................................................................1 Purpose ...................................................................................................................................1 Overview and Scope ...............................................................................................................1 Prerequisites ...........................................................................................................................1 Naming Conventions ...............................................................................................................1
02 | Installing the Data Warehouse ...................................................................2 Introduction .............................................................................................................................2 Installing the Data Warehouse ................................................................................................2 Configuring ETL Parameters ..................................................................................................4
config.Parameters Table ....................................................................................................4 config.LAServices Table ....................................................................................................7
03 | Installing the One Analytics Server ...........................................................8 Introduction .............................................................................................................................8 Installing the One Analytics Server .........................................................................................8 Adding One Analytics server components to your PATH variable ...................................... 13
04 | Configuring the One Analytics Server ..................................................... 14 One Analytics Server Configuration ..................................................................................... 14
General ........................................................................................................................... 14 SMTP Setup .................................................................................................................... 15 Alerts and Subscriptions ................................................................................................. 16 SSL ................................................................................................................................. 17 Set additional Server configuration values ..................................................................... 17
Configure the Data Warehouse backup strategy (optional) ................................................. 18 Populating One User accounts ............................................................................................ 18
Configuring the Settings.ini file ....................................................................................... 19 Configuring the Scheduled Task ..................................................................................... 20
Publishing Data Sources ...................................................................................................... 24 Embedding Passwords ........................................................................................................ 25
05 | Installing and Configuring the One Analytics Console .......................... 26 Installing the One Analytics Console ................................................................................... 26 Configuration ........................................................................................................................ 28 Encrypting config values ...................................................................................................... 29 Linking v4 Online to the One Analytics console ................................................................... 30
06 | Installing One Analytics Import Tool ....................................................... 32 Installing One Analytics Import Tool .................................................................................... 32
07 | Installing One Analytics Desktop and connecting to published data sources (Power Report Writers Only) ............................................................ 33
Install One Analytics Desktop .............................................................................................. 33 Connecting To Tableau Server ............................................................................................ 34

Connect to the One Analytics data source .......................................................................... 35
08 | Restoring a hosted eStart Database ........................................................ 37 Introduction .......................................................................................................................... 37 Pre-requisites ....................................................................................................................... 37 Installation ............................................................................................................................ 38 Running the script ................................................................................................................ 38
Index ................................................................................................................. 39
Introduction
Installing and Configuring One Analytics Technical Guide 1
01 | Introduction Purpose This document describes the installation and configuration of the One Analytics software.
Overview and Scope One Analytics is a reporting tool that is installed alongside an existing Capita One environment. It requires a Microsoft SQL database as an interface between the One Oracle database and the Tableau reporting software that is used to analyse the data in the One Oracle database.
Prerequisites An existing One environment, with hardware that meets the minimum OTRA specification.
SQL Server 2012 R2 Standard Edition or higher.
Mixed-mode authentication enabled.
Oracle Client 12.1.0.2, both 32-bit and 64-bit, configured to connect to any relevant One Oracle databases.
If you require a secure connection to the Tableau server, Tableau server must have exclusive access to port 443.
Naming Conventions The One Analytics server software is a customised version of the Tableau server software. Generally, the terms One Analytics server and Tableau server are interchangeable, although this guide uses “One Analytics server” whenever possible. “Tableau server” is used only if the software could not be customised, such as the Tableau Server Configuration utility.

Installing the Data Warehouse
Installing and Configuring One Analytics Technical Guide 2
02 | Installing the Data Warehouse Introduction After installing and configuring the SQL Server, you can install and populate the One Analytics Data Warehouse. The data warehouse installer, ONEAnalyticsDeployment.Input.ps1, is included in the Data Warehouse folder of the release media. You must also configure the ETL parameters.
Installing the Data Warehouse The data warehouse is installed and upgraded using the OneAnalyticsDeployment.Input.ps1 script. You can run it from any machine with access to the One Analytics SQL server, however it is recommended that you run it directly on the One Analytics server. The script prompts you to enter all the information it requires. After you have entered all the required information, the script starts the installation/upgrade process automatically. You can monitor the installation progress via the SQL Server Agent jobs list in SQL Server. For more information on monitoring progress, see the View Job Activity page on Microsoft’s TechNet website. When the One Analytics database is installed or updated, a completion message is also displayed in the PowerShell console window.
IMPORTANT NOTE: Running the DW Deployment job redeploys the ETL jobs. This removes the job schedules associated with the ETL jobs. You should check the existing schedules prior to running the DW Deployment job as you will need to replace them after it has completed.
1. Open a new PowerShell terminal.
2. Within PowerShell, navigate to the folder where the deployment script is located. The deployment script is located in the DW Deployment folder of the installation media.
3. Run the following command to start the script: .\ OneAnalyticsDeployment.Input.ps1
4. Enter the details requested by the script. You should enter details for each requested parameter, unless noted in the table below. The parameters are outlined in the following table.

Installing the Data Warehouse
Installing and Configuring One Analytics Technical Guide 3
Input Parameter Details Example
Input your SQL Server name
This is the server name of the target SQL environment you are deploying to.
Sqlserver1942\mssql
Input the SQL user name
This is the SQL login for the target SQL environment you are deploying to. This user must have permissions to create databases, and manage security roles within the server, along with creating SQL agent jobs and scheduled tasks.
Sqladmin
Input the SQL user password
This is the password of the SQL login you are connecting to the target SQL environment with.
########
Input the SQL user name to use the ETL if different from above
This is the SQL login used by the Extract, Transform, and Load (ETL) processes (SQL Jobs).
Must have permission to create tables, write to tables, run SQL jobs and be able to add jobs into MSDB.
datauser
Input the SQL user password to use the ETL
This is the password for the SQL login used by the ETL processes (SQL Jobs).
########
Input your Oracle server name
The server name of the One Oracle database that this warehouse will be populated from. Your Oracle client must be configured to allow this.
EMSMAIN
Input the Oracle user name
The username for access to the One Oracle database.
onemx64
Input the Oracle user password
The password for access to the One Oracle database
########
Input your eStart server name
eStart only - The server name\instance name of the eStart SQL server that this warehouse will be populated from. If you do not have an eStart installation in your environment or do not want to analyse eStart data, enter “none”.
SQLServer12\eStart
Input your eStart database
eStart only - The name of the database to retrieve eStart data from. If you do not have an eStart installation in your environment or do not want to analyse eStart data, enter “none”.
eSuite
Input the eStart user name
eStart only - The username for the eStart database. If you do not have an eStart installation in your environment or do not want to analyse eStart data, enter “none”.
eStartAdmin
Input the eStart user password
eStart only - The password for the eStart database. If you do not have an eStart installation in your environment or do not want to analyse eStart data, enter “none”.
########
Input your Youth server name:
Not currently used. Enter nothing and press the Enter key.
Input the Youth user name:
Not currently used. Enter nothing and press the Enter key.
Input the Youth User password:
Not currently used. Enter nothing and press the Enter key.

Installing the Data Warehouse
Installing and Configuring One Analytics Technical Guide 4
Input Parameter Details Example
Input the location of the ETL packages folder (reference in the SQL Server)
The local path to the ETL packages folder on the SQL Server.
D:\ONE Analytics\ETL
Input the destination ETL packages if different from above, (if copying over using a remote mapped drive)
The folder into which the SQL jobs and packages will be copied. This is only different from the previous parameter if you are installing from a remote location.
V:\ETL
Input the SQL Server to deploy the SQL job, if different from above
The server name\instance name of the SSIS server. If you are deploying the SQL job to the same SQL server defined earlier, enter nothing for this step and the script will automatically skip ahead to the Input the first job schedule (dd/MM/yyyy hh:mm) step.
SQLServer12\SSIS
Input the SQL user to use the ETL
The username to connect to the SQL SSIS instance specified above. This user must have permission to create SSIS jobs and schedules.
Ssisuser
Input the SQL user password to use the ETL
The password for the user specified above. ########
Input the first job schedule (dd/MM/yyyy hh:mm)
The date and time the first ETL population will occur. The jobs will be scheduled to run once per day from this date onwards.
29/03/2016 15:00
Input if you would trigger SQL jobs - Yes or No
Yes if you want to run the ETL jobs immediately after creation.
Yes or No
Verbose (see what I am doing) - Yes or No
Yes if you want to enable extra logging details within the installation process.
Yes or No
Configuring ETL Parameters Within SQL Server, configure the parameters in the config.Parameters and config.LAservices tables (Databases | OneAnalyticsDWStaging | Tables). These parameters must be set before the ETL process is executed. If the parameters are not configured, the default values will be used.
config.Parameters Table
Young Carer There are two ways of identifying students who are young carers. The Young Carer parameters determine which one is used for the ETL process. After configuration, these parameters populate the Is Young Carer and Was Young Carer fields for students within the data sources.

Installing the Data Warehouse
Installing and Configuring One Analytics Technical Guide 5
Parameter Use
IsYoungCarerFlag
Set to either ‘Student Record’ or ‘Young Carer History’.
If ‘Student Record’ is set, the ‘Carer’ flag is used on the student record.
If ‘Young Carer History’ is set, then the ‘YoungCarerInvolvementForm’ and ‘YoungCarerService’ parameters must be set.
Default value is ‘Student Record’
YoungCarerInvolvementForm
If the ‘IsYoungCarerFlag’ parameter is set to ‘Young Carer History’, either this parameter or the ‘YoungCarerService’ parameter must be populated.
This parameter indicates the ID of the involvement form that is valid for young carers.
Default value is null.
YoungCarerService If the ‘IsYoungCarerFlag’ parameter is set to ‘Young Carer History’, either this parameter or the ‘YoungCarerInvolvementForm’ parameter must be populated.
This parameter indicates the ID of the service that supports young carers.
Default value is null.
Student History Null Registration Type To deal with issues created by student history records with no registration type (REGTYPE) values, this parameter enables you to decide whether to ignore such records, import them with a null registration type value or to replace the null with a default value in the data warehouse.
Parameter Use
NullRegTypeBehaviour To select a new default value, set this parameter to the required code from lookups table 722.
To ignore records with null REGTYPE values, enter the value ‘IGN’.
To import records in spite of a null REGTYPE value, leave this field blank.
Default value is ‘OTH’ (other).
Null Inactive Reason Code When student records are flagged as inactive but no reason code is provided to explain why, this parameter enables you to decide whether to permit such records as they are, or to replace the null with a default value.
Parameter Use
NullInactiveReasonCode To select a new default value, set this parameter to the required code from lookups table 48.
To permit null values in the reason code fields, set this parameter to ‘LEV’.
Default value is ‘DEC’ (deceased).
Minimum and Maximum School Age To identify if students should be attending compulsory education, and to populate the Missing Education field, define the age range for your LA using these two parameters.

Installing the Data Warehouse
Installing and Configuring One Analytics Technical Guide 6
Parameter Use
MinimumSchoolAge
Minimum statutory age at which children are required to be in education.
Default value is ‘5’.
NOTE: Default value is based on legislation for England.
MaximumSchoolAge Age at which children are no longer required to be in education.
Default value is ‘18’.
NOTE: Default value is based on legislation for England.
Early Years Provider Type Current descriptions for Early Years provider types are provided by the default values for the following parameters. You can change the description for the provider types by updating these parameters.
Parameter Use
EarlyYearsProviderTypeB Provider Type: B
Default value is ‘School’.
EarlyYearsProviderTypeD Provider Type: D
Default value is ‘Child Minder’.
EarlyYearsProviderTypeO Provider Type: O
Default value is ‘Independent’.
EarlyYearsProviderTypeNull Provider Type: Null
Default value is ‘Not Provider’.
eStart If the default setting (where the eStart member ID is matched to the One person ID) is not used to populate the EMS_Id field in the member table, one of the two eStart ETL parameters must be configured. The value entered must match the original name exactly, otherwise a null value will be returned. If a null value is returned for both parameters, the default setting is assumed, and the native EMS_Id column value is used.
Parameter Use
eStartEMSMemberCustomLabel If a custom label field is used to populate the EMS_Id field in the member table, the name must be entered exactly as it is into this parameter.
eStartEMSExternalSystemIdCompany If an external system identifier is used to populate the EMS_Id field in the member table, the name must be entered exactly as it is into this parameter.

Installing the Data Warehouse
Installing and Configuring One Analytics Technical Guide 7
Vulnerable Risk Groups This parameter displays the risk category codes that are available to be tracked within One analytics.
Parameter Use
PermittedRiskCategories To select risk categories to be tracked, enter the required risk category codes from lookups table 520. Separate codes with a comma, e.g. DD, DC, PP.
Where a risk category code is not stated, the associated risk category is not displayed against students in One Analytics.
config.LAServices Table
Services Involved With Student-service relationships (defined as activities, involvements or provisions related to the indicated service) can be checked by logic implemented into the ETL. To enable this, the services must be entered into the [OneAnalyticsDWStaging].[config].[LAservices] table. The following information is needed:
Column Name Entry
Service_Id
The ID of the service you want to include from the SSS_Services table.
This can be any relevant value from Select Service_ID from SSS_Services.
One_Service_Name The name of the service as known within the One system.
Select the description from SSS_Services, e.g. ‘Childcare’, ‘Young Children’s Services’.
DW_Service_Column_Name The name to be used to create a column for the service within the data warehouse. The new column uses a tri-state (true/false/null) field to indicate whether a person currently has (true), has had in the past (false), or has never had (null) a relationship with this service.
The names must follow column naming conventions, e.g. ‘Young_Career_Service’.

Installing the One Analytics Server
Installing and Configuring One Analytics Technical Guide 8
03 | Installing the One Analytics Server Introduction After installing and configuring the SQL Server and the data warehouse, you can install the One Analytics (OA) server. The OA server installer, TableauServer-n-n-n-CapitaServer-64bit.exe, is included in the release media in the Tableau Software folder.
Installing the One Analytics Server 1. On your OA server, double click the TableauServer-n-n-n-CapitaServer-64bit.exe to display the
Tableau Server Setup wizard.
NOTE: If you are presented with a security warning when you try to run the installer, click the Run button
2. Click Next to display the Select Destination Location page.

Installing the One Analytics Server
Installing and Configuring One Analytics Technical Guide 9
3. If want to change the installation location for the Tableau Server, click the Browse button and choose the required location.
4. Click the Next button to display the System Verification page.
The installer will now extract all of the files required for the installation process to the local drive, then perform checks to ensure your server meets the minimum requirements for installation. The minimum requirements can be found on the Tableau website (http://www.tableau.com/products/server/specs). If your server fails the minimum requirement checks, you cannot continue the installation process.
5. After the verification completes, click the Next button to display the Select Start Menu Folder page.

Installing the One Analytics Server
Installing and Configuring One Analytics Technical Guide 10
6. Confirm your start menu folder name or, if required, click the Browse button to select a different location.
7. Click the Next button to display a summary page.
8. Click the Install button to start the installation process
After the installation completes, you must activate and configure the One Analytics server.

Installing the One Analytics Server
Installing and Configuring One Analytics Technical Guide 11
9. Click the Next button to display start the Activate Tableau Server wizard.
IMPORTANT NOTE: License activation requires a connection to the Tableau licensing services, hosted externally. If the server being used for installation does not have external internet access, please contact the One Service Desk for information regarding offline activation.
10. Click the Activate the product option to display the Activation page.

Installing the One Analytics Server
Installing and Configuring One Analytics Technical Guide 12
A licence key can be obtained from your One administrator as required.
11. Enter the licence key and click the Activate button to activate the product.
After the Tableau activation, the installer will open the final configuration dialog.
12. Enter the required information into the Tableau Server Configuration tool. For more information on configuring the Tableau server, see Configuring the One Analytics Server on page 14.
13. After completing the server configuration, click the OK button to close the Tableau Server Configuration tool.
The installer will now proceed to complete the installation.
The installation starts. The intallation can take some time and there is no progress bar. When the installation is complete, the Tableau Server web page is displayed.

Installing the One Analytics Server
Installing and Configuring One Analytics Technical Guide 13
14. Create an administrator account by entering a Username, Display name and Password.
15. Click the New Administrator Account button to create the new administrator. The server administrator role is used to log in to the server and to create other users.
Adding One Analytics server components to your PATH variable You should add the One Analytics bin folder to your Windows PATH variable. This ensures that all the One Analytics executables are easily accessible throughout the system. Although the folder location is dependent on where you chose to install the One Analytics server components, the default location is C:\Program Files\Tableau\Tableau Server\<version number>\bin.
For more information on adding a folder to the PATH variable, refer to the How to: Add Tool Locations to the PATH Environment Variable page, available from Microsoft.com.

Configuring the One Analytics Server
Installing and Configuring One Analytics Technical Guide 14
04 | Configuring the One Analytics Server One Analytics Server Configuration You must configure several areas of the One Analytics server using Tableau Server Configuration tool, which is automatically opened as part of the One Analytics server installation process. The tool can be accessed later via Start | Tableau <version number> | Configure Tableau Server. When you have entered you configuration details in the each section, click the OK button to save your changes.
IMPORTANT NOTE: Only the Tableau settings relevant to configuring One Analytics are covered in this document (General, SMTP Setup, Alerts and Subscriptions and SSL). For information on other areas of configuration within the One Analytics/Tableau Server, refer to Tableau Server documentation.
General
Setting Name Details Example
User The user identity/service account that the OneAnalytics/Tableau Server will run as. Use the built-in NetworkService account or a domain account. If you use the NetworkService account, no password is required.
DOMAIN\Username

Configuring the One Analytics Server
Installing and Configuring One Analytics Technical Guide 15
Setting Name Details Example
Password The password of the user identity/service account specified above. The password is required to save any changes to the configuration. If you used the NetworkService account in the previous step, no password is required.
########
Port Number The port number that One Analytics/Tableau Server will run on. Default is 8000.
8000
Open Port in Windows Firewall
If selected, the configuration utility will attempt to open the entered port within the Windows firewall on the current server. If other firewall software is in use, this may need to be done manually.
SMTP Setup If email delivery is required as part of the operation (either system alerts or subscriptions), the settings must be configured here.
Setting Name Details Example
SMTP Server Name or IP address of the SMTP server. xxx.xxx.xxx.xxx
Username The username to use to authenticate to the SMTP server.
DOMAIN\Username
Password The password to use to authenticate to the SMTP server.
########

Configuring the One Analytics Server
Installing and Configuring One Analytics Technical Guide 16
Setting Name Details Example
Port The port to use for connection to the SMTP server. Default SMTP port is 25.
25
Send Email From The email address that system generated alerts and subscriptions are sent from.
Send Email To The email addresses/distribution list that system alerts (in the event of any system failure) are sent to.
Tableau Server URL The URL used to link to visualisations and dashboards within One Analytics Server on alerts and subscription emails.
http://oneanalyticsserver:8000
Alerts and Subscriptions After the SMTP Server is configured, the alerts/emails that are sent to users need to be configured via the Alerts and Subscriptions tab.
Setting Name Details Example
Enable users to receive emails for subscriptions
Allow users to receive emails when subscribing to views within the server.
Send email alerts for server component…
Allow the server to send alert emails to the configured groups on server up/down/fail events.

Configuring the One Analytics Server
Installing and Configuring One Analytics Technical Guide 17
Setting Name Details Example
Disk Space Monitoring
This section allows system alerts to be sent when certain conditions are met regarding server disk space. For more information on these settings, please refer to the Tableau Server documentation.
SSL To secure connections between One Analytics client, server and console applications, you must configure certificate information via the SSL tab. The relevant certificate and key files for installation must be provided to complete this step.
Click the OK button to save the configuration details. If the Tableau Server Configuration tool was opened automatically by the One Analytics server installer, you will be returned to the installer when you click the OK button.
Set additional Server configuration values A number of configuration settings are required in order to allow the One Analytics Server to integrate with the One Analytics Console site. These settings are managed via the TabAdmin command line utility, available directly on the One Analytics server.
To configure these settings:
1. Locate the ConfigureONEAnalyticsServer.bat file in the Configuration folder on the release media.
2. Open the file in a text editor, and locate the text “xxx.xxx.xxx.xxx”.
3. Replace this with the hostname or IP address of the server hosting the One Analytics website. If more than one address is needed, add multiple IP addresses, separated with a comma.

Configuring the One Analytics Server
Installing and Configuring One Analytics Technical Guide 18
4. Save the file, and execute the batch file directly from the One Analytics Server
Configure the Data Warehouse backup strategy (optional)
1. Using Microsoft SQL Server Management tool, ensure both OneAnalyticsDW and OneAnalyticsDWStaging are set to simple recovery mode:
a. In the Databases folder, right click on the OneAnalyticsDW database and select Properties from the menu to display the Database Properties dialog.
b. From the Select a page panel, select Options to display the current settings.
c. Ensure the selected Recovery Mode is Simple.
d. Repeat steps a – c for the OneAnalyticsDWStaging database.
2. Create an appropriate maintenance plan for both the ONEAnalyticsDW and ONEAnalyticsDWStaging databases, according to local backup strategy.
Populating One User accounts The One Analytics server can be configured to use the Single Sign On (SSO) functionality, which enables users to log into the One Analytics server using their One user accounts.
To enable this functionality, a Windows scheduled task must be set up to synchronise One user accounts with the One Analytics server.
The synchronisation process operates by connecting to the One Analytics database to retrieve the user list, before adding/removing users from the One Analytics Server. In order that this process operates correctly, the following two conditions are necessary:
The user that the Windows scheduled task runs as must have read permissions to the One Analytics Staging Database

Configuring the One Analytics Server
Installing and Configuring One Analytics Technical Guide 19
The SysAdmin ETL process must run before the AddUsers scheduled task will bring new user information across to the One Analytics Server. For more information, refer to the Scheduling ETL Processes chapter in the One Analytics Handbook.
NOTE: Any One user that requires access to One Analytics must be a member of a One user group with read, read-write or read-write-delete access to the One Analytics main business process.
Configuring the Settings.ini file To configure and schedule the user management script to run:
1. From the One Analytics installation media, copy the AddUsers.ps1 and Settings.ini files from the Configuration folder into a new folder on your One Analytics server.
2. Open the Settings.ini file in a text editor and add the following values:
Setting Name Details Example
Path The URL to your One Analytics Server installation. http://xxx.xxx.xxx.xxx
Username The username to use to connect to the One Analytics Server.
OAUserAdmin
Password The password to login to the One Analytics Server. ########
GroupName The name of the group in One to use as the One Analytics permissions group. Default should be “ONE Analytics”.
ONE Analytics
SQLDBServer The name/URL to the SQL Server hosting the One Analytics Staging and Warehouse databases.
xxx.xxx.xxx.xxx
SQLDatabase The SQL database to use to retrieve user information from. Unless specifically stated, this should ALWAYS be ONEAnalyticsDWStaging.
ONEAnalyticsDWStaging
SQLUserName User that can access the One Analytics SQL database entered above.
sa
SQLPassword Password for the database user entered above. #########
3. Save and close the Settings.ini file.
Configuring the One Analytics Server
Installing and Configuring One Analytics Technical Guide 20
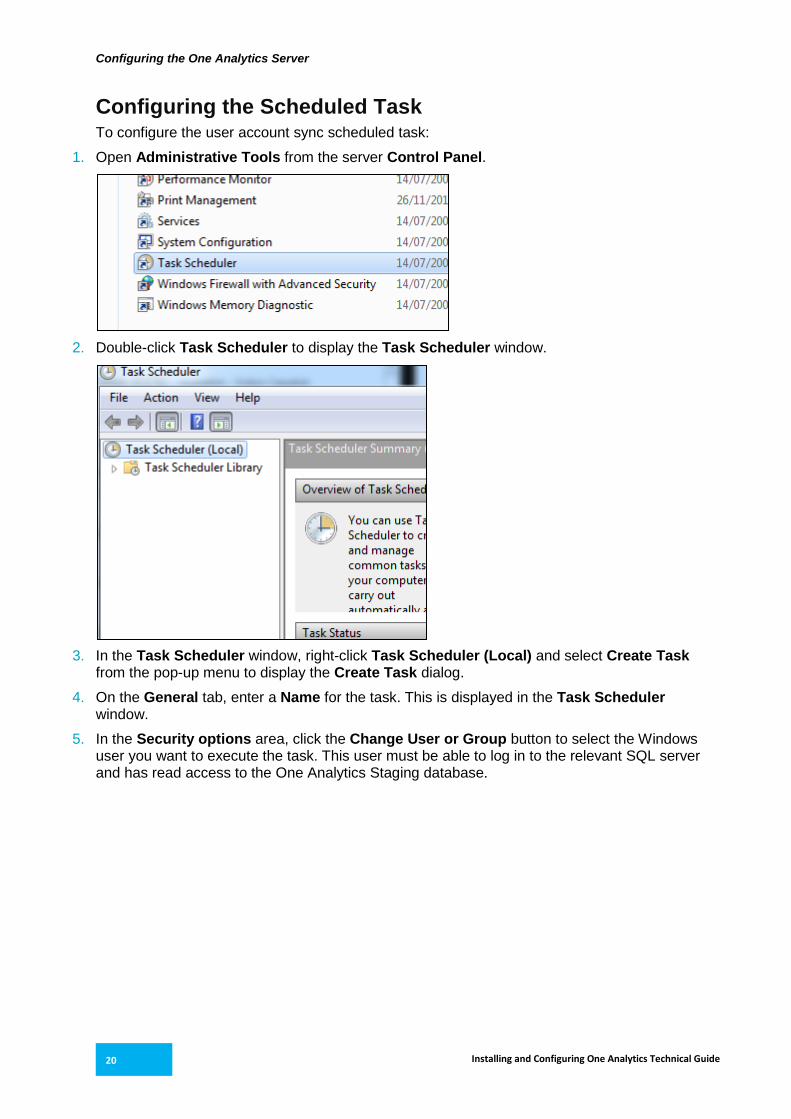
Configuring the Scheduled Task To configure the user account sync scheduled task:
1. Open Administrative Tools from the server Control Panel.
2. Double-click Task Scheduler to display the Task Scheduler window.
3. In the Task Scheduler window, right-click Task Scheduler (Local) and select Create Task from the pop-up menu to display the Create Task dialog.
4. On the General tab, enter a Name for the task. This is displayed in the Task Scheduler window.
5. In the Security options area, click the Change User or Group button to select the Windows user you want to execute the task. This user must be able to log in to the relevant SQL server and has read access to the One Analytics Staging database.

Configuring the One Analytics Server
Installing and Configuring One Analytics Technical Guide 21
6. Select the Run whether user is logged on or not radio button. When saving the task, you will be asked to enter the password for the selected user.
7. Select the Triggers tab.
8. Click the New button to display the New Trigger dialog.

Configuring the One Analytics Server
Installing and Configuring One Analytics Technical Guide 22
9. Ensure Begin the Task is set to On a Schedule, and then select a schedule appropriate for your environment. New One Analytics users will only be added to the server when this task runs.
10. Click the OK button to save the task.
11. Select the Actions tab.
12. Click the New button to display the New Action dialog.

Configuring the One Analytics Server
Installing and Configuring One Analytics Technical Guide 23
13. Ensure the Action is set to Start a Program, then click the Browse button to select the PowerShell application. By default, this is located in C:\Windows\System32\WindowsPowerShell\v1.0.
14. In the Add arguments (optional) field, enter .\AddUsers.ps1.
15. In the Start in (optional) field, enter the full path to the folder on your local machine that contains the AddUsers.ps1 script. For example, C:\One Analytics\Scripts\.
16. Click the OK button to save the action and close the dialog.
17. In the Create Task window, click the OK button to save the scheduled task.
The new scheduled task is now available within the Task Scheduler Library.

Configuring the One Analytics Server
Installing and Configuring One Analytics Technical Guide 24
Publishing Data Sources In order to publish the data sources used by One Analytics, you must run the PublishDatasource.ps1 script available on the One Analytics release media in the Configuration folder. This process should be repeated with each release of One Analytics.
IMPORTANT NOTE: If you are given a security warning when attempting to run the script, please enter “R” to allow the script to run.
When running, you will be prompted to enter the following details:
Setting Name Details Example
Tableau Server URL The URL to your One Analytics Server installation. http://xxx.xxx.xxx.xxx
Current Datasource Path
The folder path containing the data source files (part of the One Analytics installation media).
C:\ONE Analytics\Data Sources
Tableau Server Username
The username to login to the One Analytics Server. OAAdmin
Tableau Server Password
The password for the username in the previous value.
########
Project Name The project within the One Analytics server that the data sources should be published to. This will overwrite/upgrade any existing version within the project.
Default
Database Username The SQL Server username to use when the data source connects to the One Analytics data warehouse. This can be any username that has the necessary permissions to access the SQL data warehouse.
SQLUser
Database Password The password for the database user. ########
After all details are entered, the utility will publish the latest versions of the One Analytics data sources to your One Analytics server.
Configuring the One Analytics Server
Installing and Configuring One Analytics Technical Guide 25
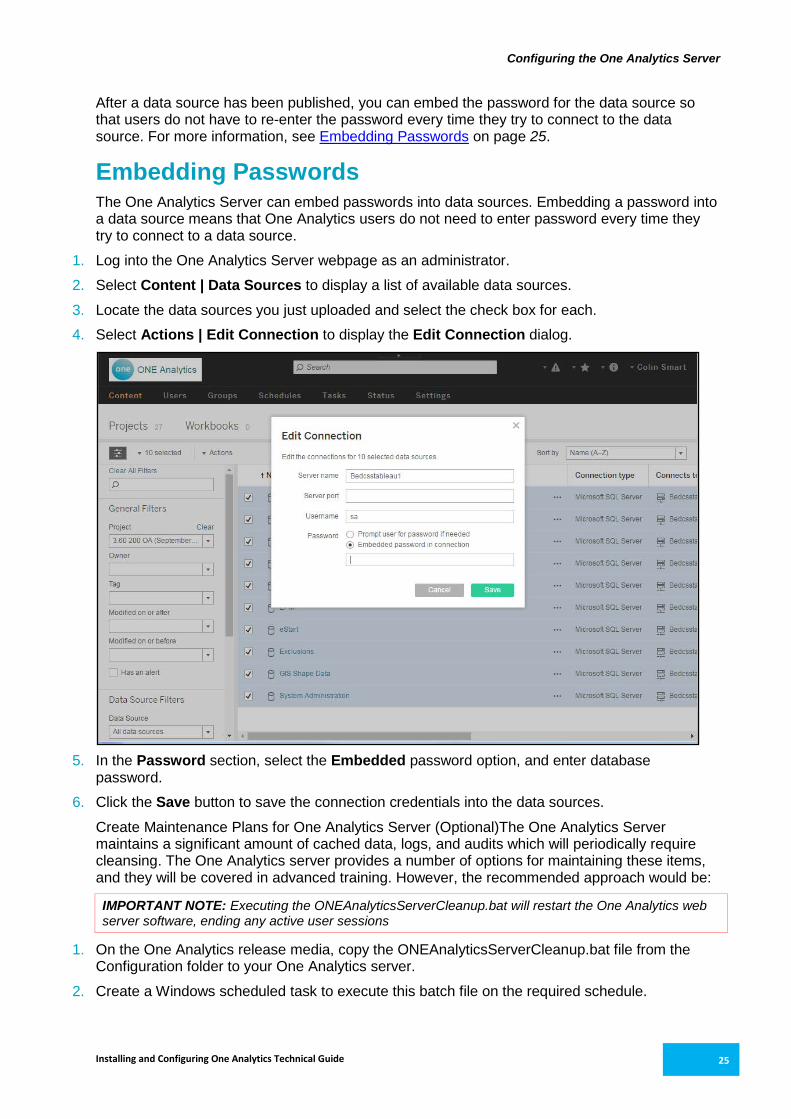
After a data source has been published, you can embed the password for the data source so that users do not have to re-enter the password every time they try to connect to the data source. For more information, see Embedding Passwords on page 25.
Embedding Passwords The One Analytics Server can embed passwords into data sources. Embedding a password into a data source means that One Analytics users do not need to enter password every time they try to connect to a data source.
1. Log into the One Analytics Server webpage as an administrator.
2. Select Content | Data Sources to display a list of available data sources.
3. Locate the data sources you just uploaded and select the check box for each.
4. Select Actions | Edit Connection to display the Edit Connection dialog.
5. In the Password section, select the Embedded password option, and enter database password.
6. Click the Save button to save the connection credentials into the data sources.
Create Maintenance Plans for One Analytics Server (Optional)The One Analytics Server maintains a significant amount of cached data, logs, and audits which will periodically require cleansing. The One Analytics server provides a number of options for maintaining these items, and they will be covered in advanced training. However, the recommended approach would be:
IMPORTANT NOTE: Executing the ONEAnalyticsServerCleanup.bat will restart the One Analytics web server software, ending any active user sessions
1. On the One Analytics release media, copy the ONEAnalyticsServerCleanup.bat file from the Configuration folder to your One Analytics server.
2. Create a Windows scheduled task to execute this batch file on the required schedule.
Installing and Configuring the One Analytics Console
Installing and Configuring One Analytics Technical Guide 26
05 | Installing and Configuring the One Analytics Console
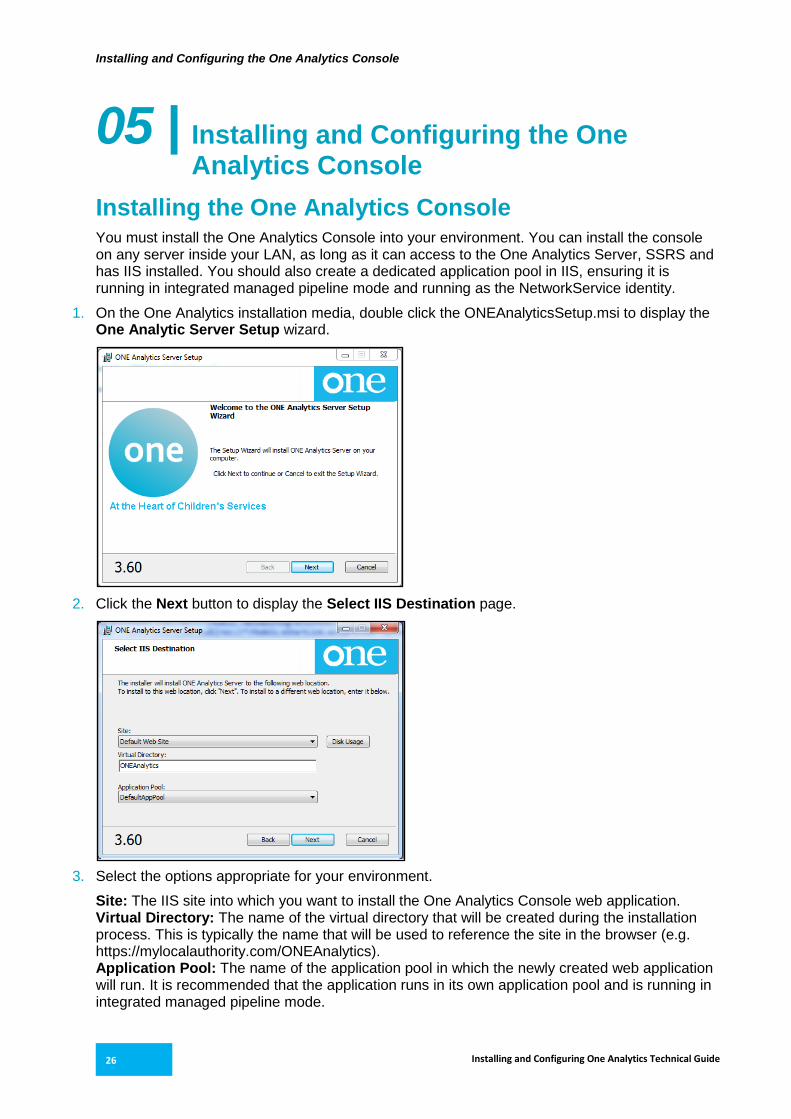
Installing the One Analytics Console You must install the One Analytics Console into your environment. You can install the console on any server inside your LAN, as long as it can access to the One Analytics Server, SSRS and has IIS installed. You should also create a dedicated application pool in IIS, ensuring it is running in integrated managed pipeline mode and running as the NetworkService identity.
1. On the One Analytics installation media, double click the ONEAnalyticsSetup.msi to display the One Analytic Server Setup wizard.
2. Click the Next button to display the Select IIS Destination page.
3. Select the options appropriate for your environment.
Site: The IIS site into which you want to install the One Analytics Console web application. Virtual Directory: The name of the virtual directory that will be created during the installation process. This is typically the name that will be used to reference the site in the browser (e.g. https://mylocalauthority.com/ONEAnalytics). Application Pool: The name of the application pool in which the newly created web application will run. It is recommended that the application runs in its own application pool and is running in integrated managed pipeline mode.

Installing and Configuring the One Analytics Console
Installing and Configuring One Analytics Technical Guide 27
4. Click the Next button to display the Ready to Install ONE Analytics Server page.
5. Click the Install button to begin the installation.
The installation will now take place, copying the application files to your IIS instance, and performing all required configuration within IIS.
6. Once the installation is complete, click the Finish button to close the installation dialog.

Installing and Configuring the One Analytics Console
Installing and Configuring One Analytics Technical Guide 28
Configuration After the installation of the One Analytics console is complete, you must edit the configuration file within the site to connect the site to the One Analytics Server and the One suite.
Locate the web.config file in the root of the website, typically C:\inetpub\wwwroot\ONEAnalytics, and open it in a text editor such as Notepad.
Within this file, search for each of the settings below by name, and enter the value appropriate for your environment.
Config Area Setting Name Details Example
connectionStrings TableauIntegrationEntities Connection details to access the Tableau Integration database
Data source=sqlserver\instance; initial catalog=TableauIntegration; user id=sqlUser;password=sqlUserPassword;MultipleActiveResultSets=True;App=EntityFramework
eStartLinkEntities Connection details to access the OA Staging database
data source=sqlserver\instance;initial catalog=OneAnalyticsDWStaging; user id=sqlUser;password=sqlUserPassword;MultipleActiveResultSets=True;App=EntityFramework
appSettings ApplicationServerUrl The URL to the application server
https://localauthority.com/ CCSApplicationServer
system.webServer customHeaders. Access-Control-Allow-Origin
The URL to the Tableau server
http://myTableauServer:8000
system.serviceModel endpoint ReportService2010.asmx of the SSRSServer
https://localauthority.com/ ReportServer/ReportService2010.asmx
applicationSettings TableauServerURL
The URL to the One Analytics (Tableau) server installation
http://myTableauServer:8000
TableauUsername The username of the service account to use for connection to the One Analytics (Tableau) server
TableauConsole
TableauSiteName The site name of the One Analytics (Tableau) Server that will host the OA Console content in the case where multiple sites are used. If only a single site is needed, leave this blank
TestSite
TableauProjectName The name of the project within the One Analytics (Tableau) server that will host the content for the OA Console.
OAConsoleReports
FeedbackApplicationURL Setting not currently used; leave blank.

Installing and Configuring the One Analytics Console
Installing and Configuring One Analytics Technical Guide 29
Config Area Setting Name Details Example
TableauPassword The password for the user specified in the TableauUsername setting. The settings should be encrypted – see below.
********
SSRSServerURL The URL to your report server hosting the SSRS content to share via the OA Console
https://localauthority.com/ReportServer/ pages/ReportViewer.aspx
SSRSUsername The username for authentication to the SSRS report server. If the One environment uses PRIME, this should be a One user account. If the One environment does not use PRIME, this should be a Windows user account. The settings should be encrypted, for information, Encrypting config values on page 29.
SSRSServiceUser
SSRSPassword The password for the username specified in the SSRSUsername setting. The settings should be encrypted, for information, Encrypting config values on page 29.
********
SSRSAppDomain The domain name for the username specified in the SSRSUsername setting. If you are using a One user account for the SSRSUsername (because your environment uses PRIME), then this value should be blank. The settings should be encrypted, for information, Encrypting config values on page 29.
Localauthority.com or blank if using One PRIME.
SSRSFolderName The name of the folder on the report server containing the content to make available via the OA Console.
OAReports
Encrypting config values To enhance security, you must encrypt the following values within the One Console configuration file:
TableauPassword

Installing and Configuring the One Analytics Console
Installing and Configuring One Analytics Technical Guide 30
SSRSUsername
SSRSPassword
SSRSAppDomain
Each value should be encrypted individually and placed back into the web.config file, replacing the unencrypted values.
The encryption tool, CCSEncryptionTool.exe, is available in the Configuration folder of the One Analytics release media.
1. Open command prompt and change the directory to the One Analytics install configuration folder.
2. Enter the following command in the command prompt, replacing the valuetoencrypt and MACHINENAME as appropriate.
IMPORTANT NOTE: The MACHINENAME must be in all CAPS and is the name of the machine that is hosting SSRS.
D:\...\bin\Debug>CCSEncryptionTool.exe valuetoencrypt MACHINENAME
Linking v4 Online to the One Analytics console In order to link the One Analytics lozenge in v4 Online to the One Analytics console, the One Analytics console address must be entered into the Tableau Integration Online URL field in the CCS Server Configuration Utility.
To update the One environment to link to the One Analytics console, complete the following:
1. On the Application server, run the CCSServerConfig.exe from the C:\inetpub\wwwroot\CCSEnterpriseApplicationService_LIVE\Config folder.
2. Select the Application Server tab, and select the required application server from the drop-down.
3. Navigate to the URL Settings section.
4. Enter your One Analytics Console site URL into the Tableau Integration Online URL field.

Installing and Configuring the One Analytics Console
Installing and Configuring One Analytics Technical Guide 31
5. Click the Save button.

Installing One Analytics Import Tool
Installing and Configuring One Analytics Technical Guide 32
06 | Installing One Analytics Import Tool Installing One Analytics Import Tool There is no installer for the One Analytics Import Tool, simply copy the OA Import Tool folder from the release media to wherever you want to run it from. The Import Tool must be installed on a Windows machine. After copying the files, you should use a text editor to edit the following parameters within the One Analytics – Import Tool.exe.config file.
Config Area Setting Name Details Example
connectionStrings ONEAConnectionString Connection details to access the data warehouse database
Data Source=sqlserver\OneAnalyticsDW;Initial Catalog= OneAnalyticsDW;Integrated Security= true;Min Pool Size=20; Max Pool Size=500;
appSettings ApplicationServerUrl The URL to the Application Server
https://localauthority.com/ CCSApplicationServer
IMPORTANT NOTE: The user running the One Analytics - Import Tool.exe must be authorised to access the SQL Server database and have a PULSE license.

Installing One Analytics Desktop and connecting to published data sources (Power Report Writers Only)
Installing and Configuring One Analytics Technical Guide 33
07 | Installing One Analytics Desktop and connecting to published data sources (Power Report Writers Only)
Install One Analytics Desktop 1. From the One Analytics installation media, run the One Analytics Desktop installer appropriate
for your local environment (either 32-bit or 64-bit) located in the Tableau Software folder.
2. If you want to install with the default options, click the Install button. Click the Customize button to display the Custom Setup page and change the installation location or change the shortcut options:
After installation, the One Analytics shortcuts should be on your start menu or desktop, depending on the options selected during installation.

Installing One Analytics Desktop and connecting to published data sources (Power Report Writers Only)
Installing and Configuring One Analytics Technical Guide 34
3. Double-click a shortcut to start the software.
Connecting To Tableau Server 1. Open the One Analytics client.
2. Select Server | Sign In to display the Tableau Server Sign In dialog.
3. Enter your Server address. This should be obtained from your server administrator.
4. Enter your Username and Password. These should have already been supplied. If not, contact your One administrator.

Installing One Analytics Desktop and connecting to published data sources (Power Report Writers Only)
Installing and Configuring One Analytics Technical Guide 35
Connect to the One Analytics data source
1. On the One Analytics home page in the Connect pane, select Tableau Server under the To a Server menu item
2. Click the name of the data source you wish to connect to. Ensure you connect to the data source in the correct project for the activities you wish to perform.
You are automatically connected to the selected data source, and a new workbook is created.
3. Select Sheet 1 to get started.

Installing One Analytics Desktop and connecting to published data sources (Power Report Writers Only)
Installing and Configuring One Analytics Technical Guide 36
The Tableau icon next to the data source indicates that you are connected to an online data source. You should remain connected to the Server version of the data source unless you wish to edit/add fields to that data source.
4. To download the data source to enable local editing, right-click on the data source, and select Create Local Copy from the pop-up menu.
Restoring a hosted eStart Database
Installing and Configuring One Analytics Technical Guide 37
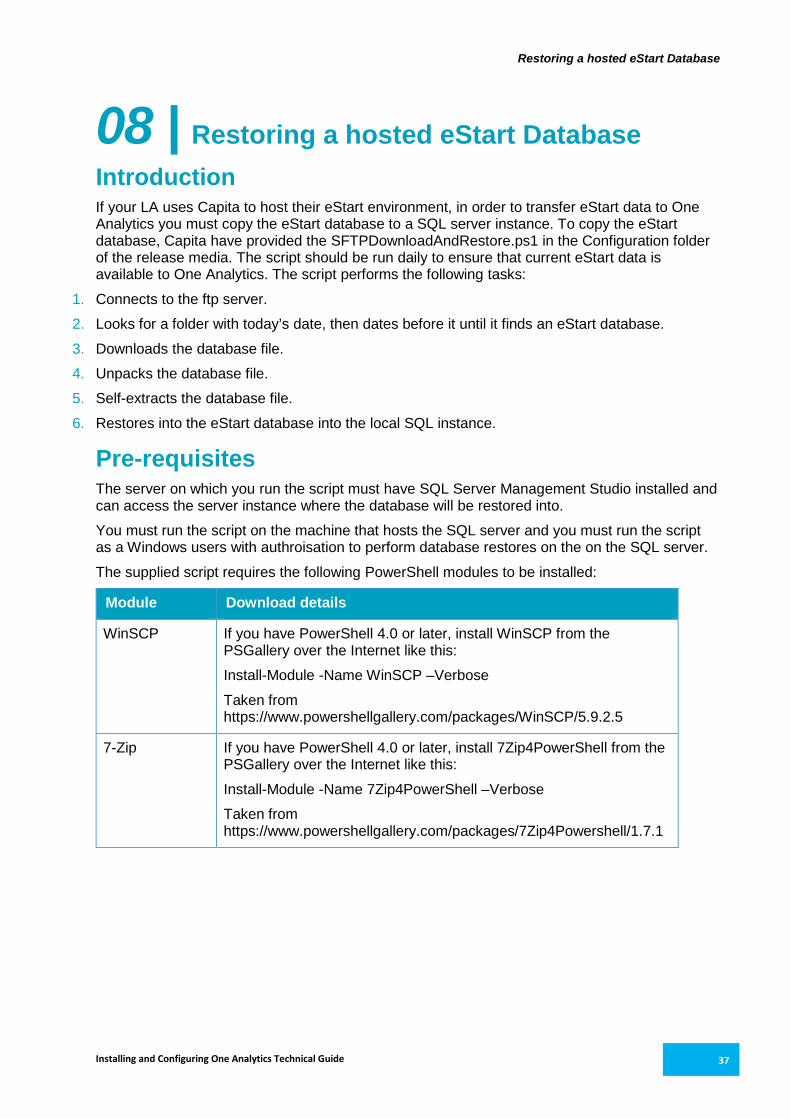
08 | Restoring a hosted eStart Database Introduction If your LA uses Capita to host their eStart environment, in order to transfer eStart data to One Analytics you must copy the eStart database to a SQL server instance. To copy the eStart database, Capita have provided the SFTPDownloadAndRestore.ps1 in the Configuration folder of the release media. The script should be run daily to ensure that current eStart data is available to One Analytics. The script performs the following tasks:
1. Connects to the ftp server.
2. Looks for a folder with today’s date, then dates before it until it finds an eStart database.
3. Downloads the database file.
4. Unpacks the database file.
5. Self-extracts the database file.
6. Restores into the eStart database into the local SQL instance.
Pre-requisites The server on which you run the script must have SQL Server Management Studio installed and can access the server instance where the database will be restored into.
You must run the script on the machine that hosts the SQL server and you must run the script as a Windows users with authroisation to perform database restores on the on the SQL server.
The supplied script requires the following PowerShell modules to be installed:
Module Download details
WinSCP If you have PowerShell 4.0 or later, install WinSCP from the PSGallery over the Internet like this:
Install-Module -Name WinSCP –Verbose
Taken from https://www.powershellgallery.com/packages/WinSCP/5.9.2.5
7-Zip If you have PowerShell 4.0 or later, install 7Zip4PowerShell from the PSGallery over the Internet like this:
Install-Module -Name 7Zip4PowerShell –Verbose
Taken from https://www.powershellgallery.com/packages/7Zip4Powershell/1.7.1

Restoring a hosted eStart Database
Installing and Configuring One Analytics Technical Guide 38
Parameters The SFTPDownloadAndRestore.ps1 script requires information on the following parameters:
Parameter Description Example
FTPServer Supplied by Capita – the host of the FTP site.
10.129.4.37
FTPUsername Supplied by Capita – the user name to log on to the FTP server.
user-1234
FTPPassword Supplied by Capita – the password to log on to the FTP server.
Pa55word
SshHostKeyFingerprint Supplied by Capita – the ssh key to log on to the ftp server.
ssh-rsa 1024 34:1f:33:51:3f:96:72:32:ec:7b:df:f8:e8:04:c3:74
FileDownloadLocalPath Full path of the folder to which you want to downloaded files.
D:\eStartFTPFiles\downloads
ZipFilePassword Password required to unzip the datbase download.
egexampleblahblah
SQLDBServer The name of the SQL server instance that will host the restored database.
myServer\MSSQL2012
SQLDatabase The name to give the restored database.
hostedeStart
Installation Copy the STFPDownloadAndRestore.ps1 and FTPDownloadSetting.ini files to a directory on the server, e.g. D:\eStartFTPFiles
Edit the FTPDownloadSetting.ini file, replacing the default values as described in the Pre-requisites on page 37.
Running the script You should create a Windows scheduled task to run the STFPDownloadAndRestore.ps1 script every night. The scheduled task should execute the following commands: D:\eStartFTPFiles\SFTPDownloadAndRestore.ps1 -settingsFile D:\eStartFTPFiles\FTPDownloadSetting.ini

Index
Installing and Configuring One Analytics Technical Guide 39
Index Adding One Analytics server components to
your PATH variable .................................. 13 Alerts and Subscriptions .................................. 16 config.LAServices Table .................................... 7 config.Parameters Table .................................... 4 Configuration .................................................... 28 Configure the Data Warehouse backup strategy
(optional)................................................... 18 Configuring ETL Parameters.............................. 4 Configuring the Scheduled Task ...................... 20 Configuring the Settings.ini file ........................ 19 Connect to the One Analytics data source ....... 35 Connecting To Tableau Server ........................ 34 Embedding Passwords .................................... 25 Encrypting config values .................................. 29 General ............................................................. 14 Install One Analytics Desktop .......................... 33 Installation ........................................................ 38 Installing One Analytics Import Tool ................ 32 Installing the Data Warehouse ........................... 2 Installing the One Analytics Console ............... 26 Installing the One Analytics Server .................... 8 Introduction............................................... 2, 8, 37 Linking v4 Online to the One Analytics console
.................................................................. 30 Naming Conventions .......................................... 1 One Analytics Server Configuration ................. 14 Overview and Scope .......................................... 1 Populating One User accounts ........................ 18 Prerequisites ...................................................... 1 Pre-requisites ................................................... 37 Publishing Data Sources .................................. 24 Purpose .............................................................. 1 Running the script ............................................ 38 Set additional Server configuration values ....... 17 SMTP Setup ..................................................... 15 SSL 17