Embed Size (px)
Citation preview

12,000 and 18,000 BTU Ceiling Cassette Heat Pump &
Air Handler
Installation & Owner’s ManualDocument Version: 04/2017
Blueridge Owners Manual
Document Version: 4/2017Copyright 2017 Alpine Home Air Products
2
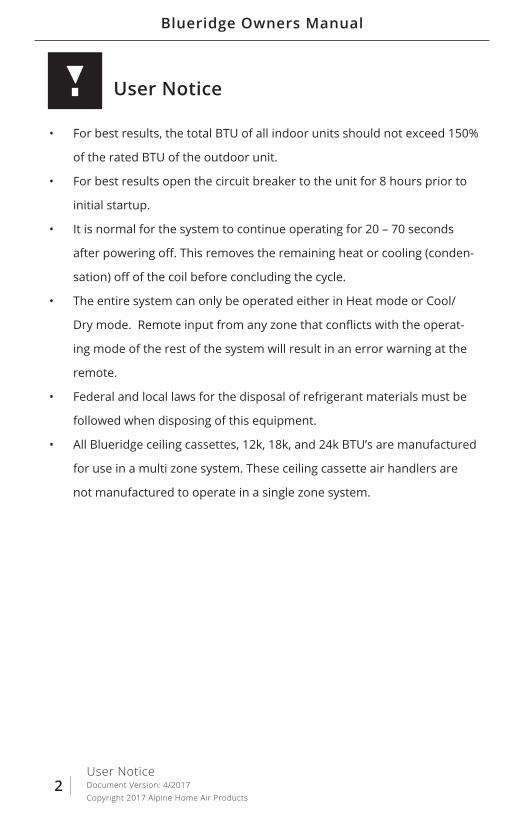
• For best results, the total BTU of all indoor units should not exceed 150%
of the rated BTU of the outdoor unit.
• For best results open the circuit breaker to the unit for 8 hours prior to
initial startup.
• It is normal for the system to continue operating for 20 – 70 seconds
after powering off. This removes the remaining heat or cooling (conden-
sation) off of the coil before concluding the cycle.
• The entire system can only be operated either in Heat mode or Cool/
Dry mode. Remote input from any zone that conflicts with the operat-
ing mode of the rest of the system will result in an error warning at the
remote.
• Federal and local laws for the disposal of refrigerant materials must be
followed when disposing of this equipment.
• All Blueridge ceiling cassettes, 12k, 18k, and 24k BTU’s are manufactured
for use in a multi zone system. These ceiling cassette air handlers are
not manufactured to operate in a single zone system.
User Notice
User Notice
Blueridge Owners Manual
Document Version: 04/2017Copyright 2017 Alpine Home Air Products
3
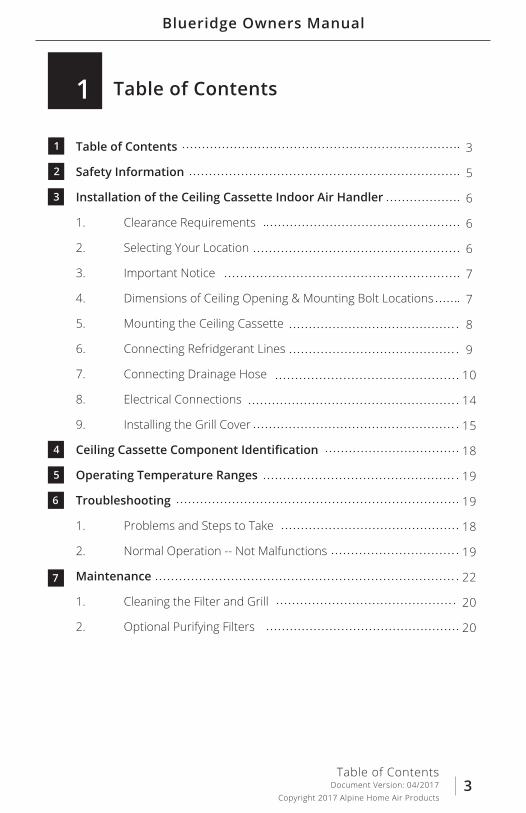
Table of Contents
Safety Information
Installation of the Ceiling Cassette Indoor Air Handler
1. Clearance Requirements
2. Selecting Your Location
3. Important Notice
4. Dimensions of Ceiling Opening & Mounting Bolt Locations
5. Mounting the Ceiling Cassette
6. Connecting Refridgerant Lines
7. Connecting Drainage Hose
8. Electrical Connections
9. Installing the Grill Cover
Ceiling Cassette Component Identification
Operating Temperature Ranges
Troubleshooting
1. Problems and Steps to Take
2. Normal Operation -- Not Malfunctions
Maintenance
1. Cleaning the Filter and Grill
2. Optional Purifying Filters
1
1
2
3
4
5
6
7
Table of Contents
3
5
6
6
6
7
7
8
9
10
14
15
18
19
19
18
19
22
20
20
Table of Contents
Blueridge Owners Manual
Document Version: 4/2017Copyright 2017 Alpine Home Air Products
4
Blueridge Owners Manual
Document Version: 04/2017Copyright 2017 Alpine Home Air Products
5
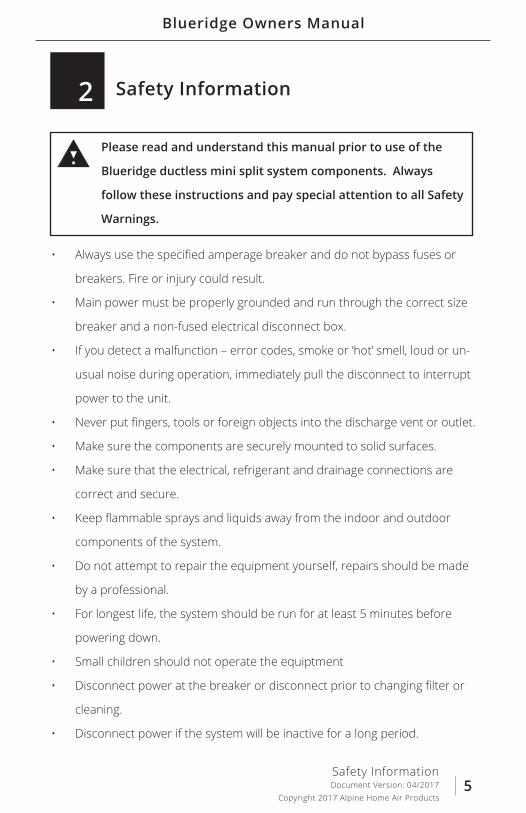
2 Safety Information
Please read and understand this manual prior to use of the
Blueridge ductless mini split system components. Always
follow these instructions and pay special attention to all Safety
Warnings.
• Always use the specified amperage breaker and do not bypass fuses or
breakers. Fire or injury could result.
• Main power must be properly grounded and run through the correct size
breaker and a non-fused electrical disconnect box.
• If you detect a malfunction – error codes, smoke or ‘hot’ smell, loud or un-
usual noise during operation, immediately pull the disconnect to interrupt
power to the unit.
• Never put fingers, tools or foreign objects into the discharge vent or outlet.
• Make sure the components are securely mounted to solid surfaces.
• Make sure that the electrical, refrigerant and drainage connections are
correct and secure.
• Keep flammable sprays and liquids away from the indoor and outdoor
components of the system.
• Do not attempt to repair the equipment yourself, repairs should be made
by a professional.
• For longest life, the system should be run for at least 5 minutes before
powering down.
• Small children should not operate the equiptment
• Disconnect power at the breaker or disconnect prior to changing filter or
cleaning.
• Disconnect power if the system will be inactive for a long period.
Safety Information
Blueridge Owners Manual
Document Version: 4/2017Copyright 2017 Alpine Home Air Products
6
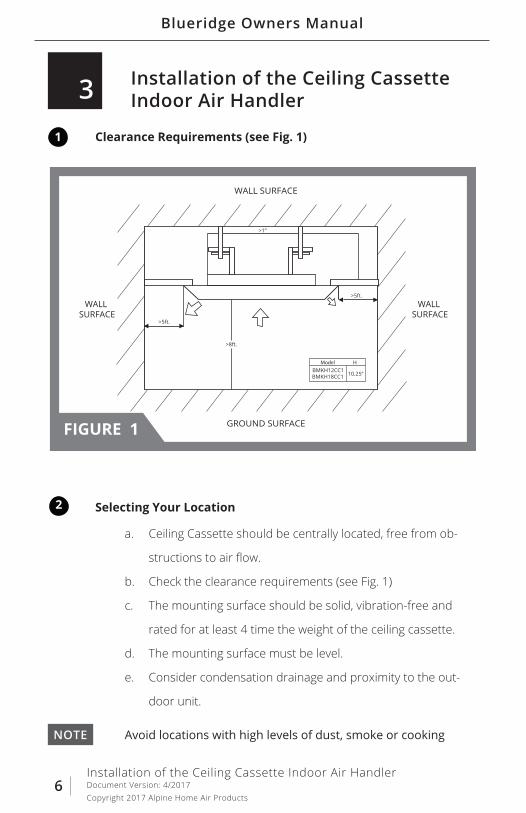
3 Installation of the Ceiling CassetteIndoor Air Handler
Installation of the Ceiling Cassette Indoor Air Handler
Clearance Requirements (see Fig. 1)
Selecting Your Location
a. Ceiling Cassette should be centrally located, free from ob-
structions to air flow.
b. Check the clearance requirements (see Fig. 1)
c. The mounting surface should be solid, vibration-free and
rated for at least 4 time the weight of the ceiling cassette.
d. The mounting surface must be level.
e. Consider condensation drainage and proximity to the out-
door unit.
NOTE Avoid locations with high levels of dust, smoke or cooking
1
2
FIGURE 1
BMKH18CC1
Model HBMKH12CC1
WALL SURFACE
WALL SURFACE
WALL SURFACE
GROUND SURFACE
>5ft.
>5ft.
>1”
>8ft.
BMKH18CC1 10.25”
Blueridge Owners Manual
Document Version: 04/2017Copyright 2017 Alpine Home Air Products
7Installation of the Ceiling Cassette Indoor Air Handler
Important Notice
Dimensions of Ceiling Opening and Mounting Bolt Locations
a. Have the unit professionally installed to validate the warranty
b. Refer any repairs to your authorized Blueridge dealer
Installation dimensions (see Fig. 2 below):
3
4
FIGURE 2
25”
22.5”
22.5”
15.75”
23.75”
25”
Figure 2 - Install Dimension of ModeBMKH12CC
BMKH18CC1
Blueridge Owners Manual
Document Version: 4/2017Copyright 2017 Alpine Home Air Products
8
Mounting the Ceiling Cassette 5
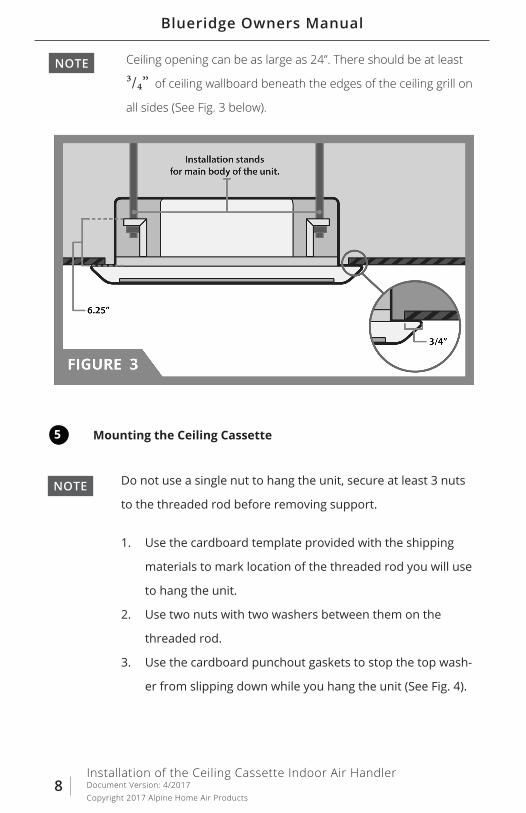
NOTE Do not use a single nut to hang the unit, secure at least 3 nuts
to the threaded rod before removing support.
Installation of the Ceiling Cassette Indoor Air Handler
Ceiling opening can be as large as 24”. There should be at least
3/4” of ceiling wallboard beneath the edges of the ceiling grill on
all sides (See Fig. 3 below).
NOTE
1. Use the cardboard template provided with the shipping
materials to mark location of the threaded rod you will use
to hang the unit.
2. Use two nuts with two washers between them on the
threaded rod.
3. Use the cardboard punchout gaskets to stop the top wash-
er from slipping down while you hang the unit (See Fig. 4).

Blueridge Owners Manual
Document Version: 04/2017Copyright 2017 Alpine Home Air Products
9
4. Orient the unit so that the drain is in the desired location.
5. Hang the unit, placing each threaded rod with lower nut and
washer into each of the four brackets on the side of the unit.
6. Tighten the lower nuts to adjust to the desired height.
7. Use a level to ensure the unit is level in all dimensions.
8. Remove the cardboard punchout gaskets and tighten the
top nuts to secure the unit.
Installation of the Ceiling Cassette Indoor Air Handler
6
1. Connect the flare fitting of the refrigerant line set to the
refrigerant port of the ceiling cassette and tighten the com-
pression nut by hand.
2. Tighten the compression nut by using a torque wrench set
to the specification in the table on the next page.
Connecting Refridgerant Lines
Blueridge Owners Manual
Document Version: 4/2017Copyright 2017 Alpine Home Air Products
10
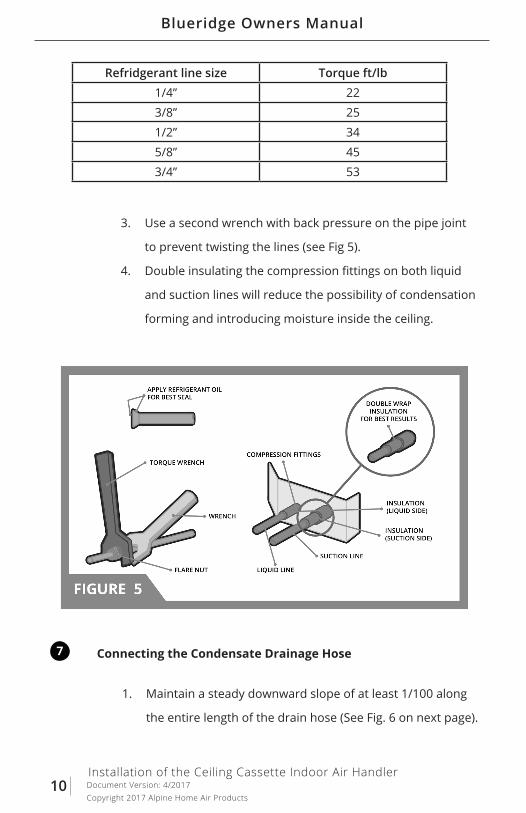
Refridgerant line size Torque ft/lb1/4” 22
3/8” 25
1/2” 34
5/8” 45
3/4” 53
Installation of the Ceiling Cassette Indoor Air Handler
7 Connecting the Condensate Drainage Hose
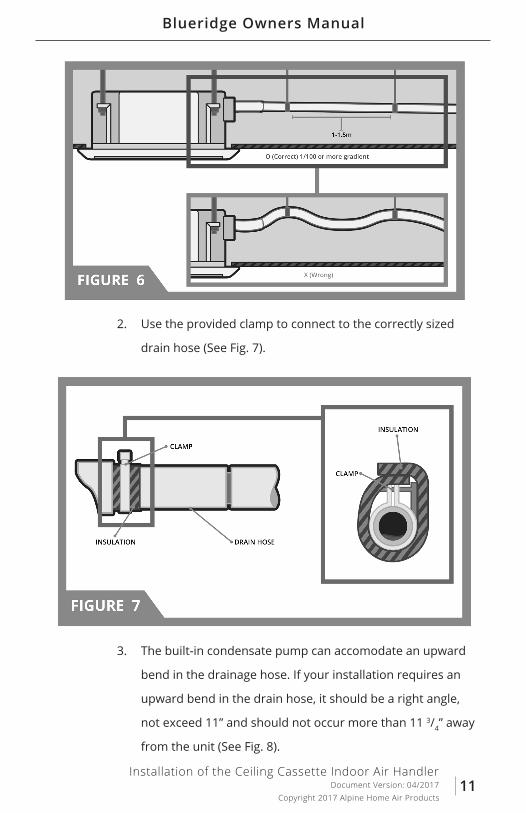
1. Maintain a steady downward slope of at least 1/100 along
the entire length of the drain hose (See Fig. 6 on next page).
3. Use a second wrench with back pressure on the pipe joint
to prevent twisting the lines (see Fig 5).
4. Double insulating the compression fittings on both liquid
and suction lines will reduce the possibility of condensation
forming and introducing moisture inside the ceiling.
Blueridge Owners Manual
Document Version: 04/2017Copyright 2017 Alpine Home Air Products
11
2. Use the provided clamp to connect to the correctly sized
drain hose (See Fig. 7).
Installation of the Ceiling Cassette Indoor Air Handler
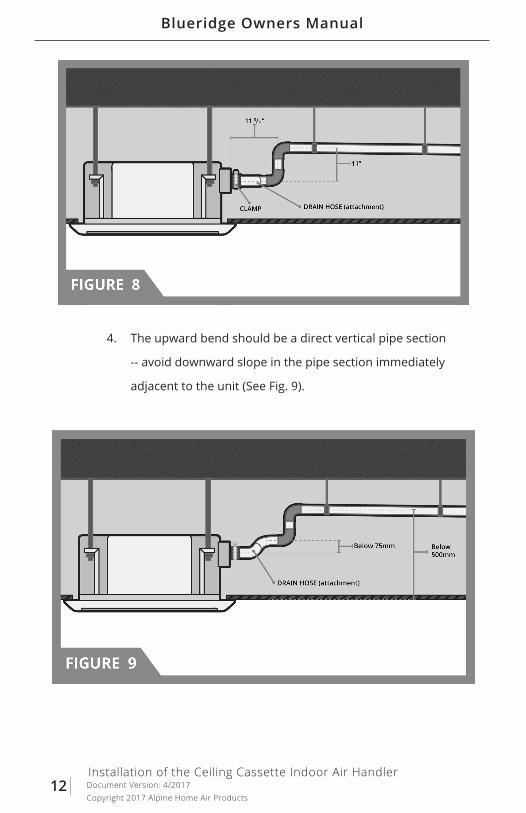
3. The built-in condensate pump can accomodate an upward
bend in the drainage hose. If your installation requires an
upward bend in the drain hose, it should be a right angle,
not exceed 11” and should not occur more than 11 3/4” away
from the unit (See Fig. 8).
Blueridge Owners Manual
Document Version: 4/2017Copyright 2017 Alpine Home Air Products
12
4. The upward bend should be a direct vertical pipe section
-- avoid downward slope in the pipe section immediately
adjacent to the unit (See Fig. 9).
Installation of the Ceiling Cassette Indoor Air Handler
Blueridge Owners Manual
Document Version: 04/2017Copyright 2017 Alpine Home Air Products
13
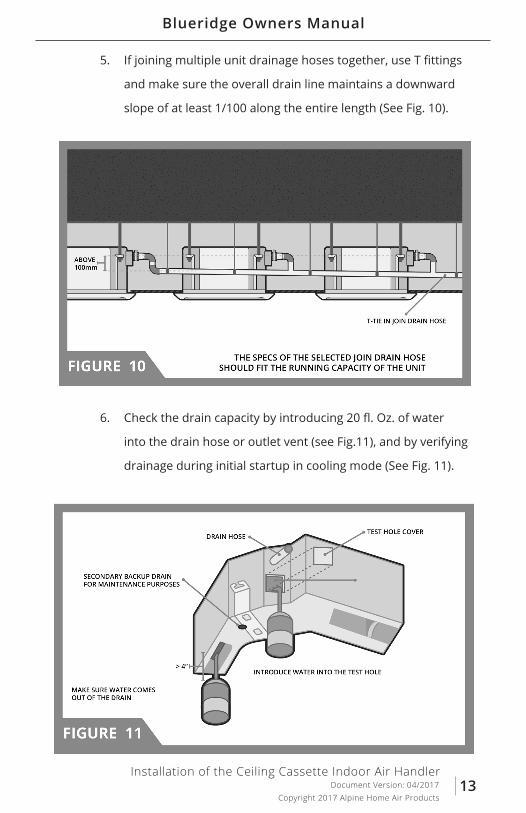
5. If joining multiple unit drainage hoses together, use T fittings
and make sure the overall drain line maintains a downward
slope of at least 1/100 along the entire length (See Fig. 10).
6. Check the drain capacity by introducing 20 fl. Oz. of water
into the drain hose or outlet vent (see Fig.11), and by verifying
drainage during initial startup in cooling mode (See Fig. 11).
Installation of the Ceiling Cassette Indoor Air Handler
Blueridge Owners Manual
Document Version: 4/2017Copyright 2017 Alpine Home Air Products
14
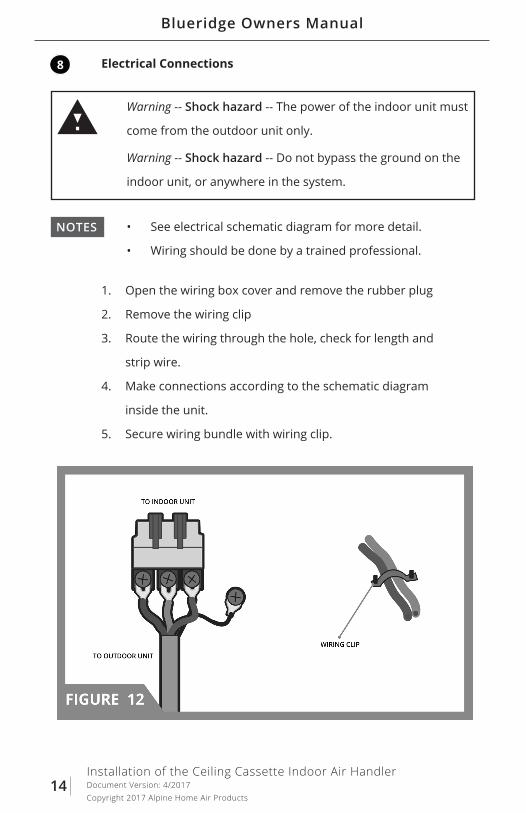
• See electrical schematic diagram for more detail.
• Wiring should be done by a trained professional.
NOTES
1. Open the wiring box cover and remove the rubber plug
2. Remove the wiring clip
3. Route the wiring through the hole, check for length and
strip wire.
4. Make connections according to the schematic diagram
inside the unit.
5. Secure wiring bundle with wiring clip.
Installation of the Ceiling Cassette Indoor Air Handler
Warning -- Shock hazard -- Do not bypass the ground on the
indoor unit, or anywhere in the system.
8 Electrical Connections
Warning -- Shock hazard -- The power of the indoor unit must
come from the outdoor unit only.
Blueridge Owners Manual
Document Version: 04/2017Copyright 2017 Alpine Home Air Products
15
9 Install the Grill Cover
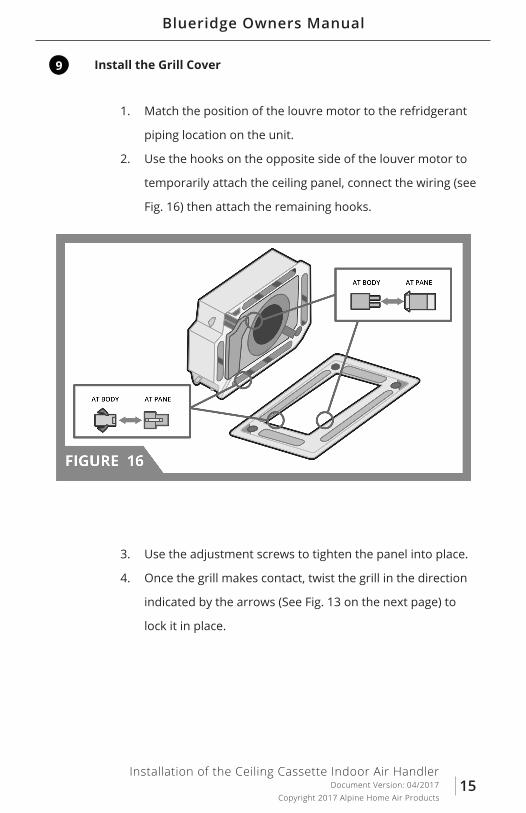
1. Match the position of the louvre motor to the refridgerant
piping location on the unit.
2. Use the hooks on the opposite side of the louver motor to
temporarily attach the ceiling panel, connect the wiring (see
Fig. 16) then attach the remaining hooks.
Installation of the Ceiling Cassette Indoor Air Handler
3. Use the adjustment screws to tighten the panel into place.
4. Once the grill makes contact, twist the grill in the direction
indicated by the arrows (See Fig. 13 on the next page) to
lock it in place.

Blueridge Owners Manual
Document Version: 4/2017Copyright 2017 Alpine Home Air Products
16Installation of the Ceiling Cassette Indoor Air Handler
5. Use the adjustment screws to make good contact with
the ceiling. Avoid tightening the screws to protect from
deforming or breaking the grill.
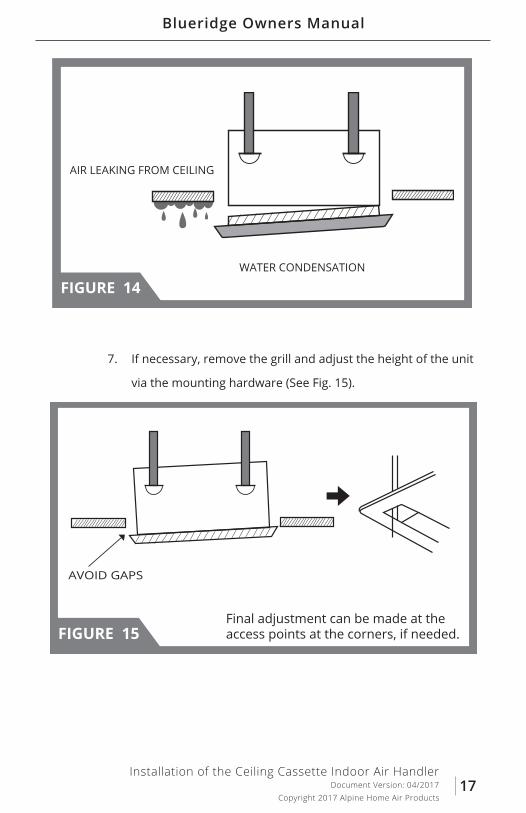
6. Take the necessary steps to ensure good contact is made
between the grill and the ceiling on all four sides. Air
leakage around the grill can effect performance and lead
to moisture forming around the grill (See Fig. 14 on next
page).
Blueridge Owners Manual
Document Version: 04/2017Copyright 2017 Alpine Home Air Products
17
7. If necessary, remove the grill and adjust the height of the unit
via the mounting hardware (See Fig. 15).
Installation of the Ceiling Cassette Indoor Air Handler
FIGURE 14
AIR LEAKING FROM CEILING
WATER CONDENSATION
FIGURE 15
AVOID GAPS
Final adjustment can be made at the access points at the corners, if needed.
Blueridge Owners Manual
Document Version: 4/2017Copyright 2017 Alpine Home Air Products
18
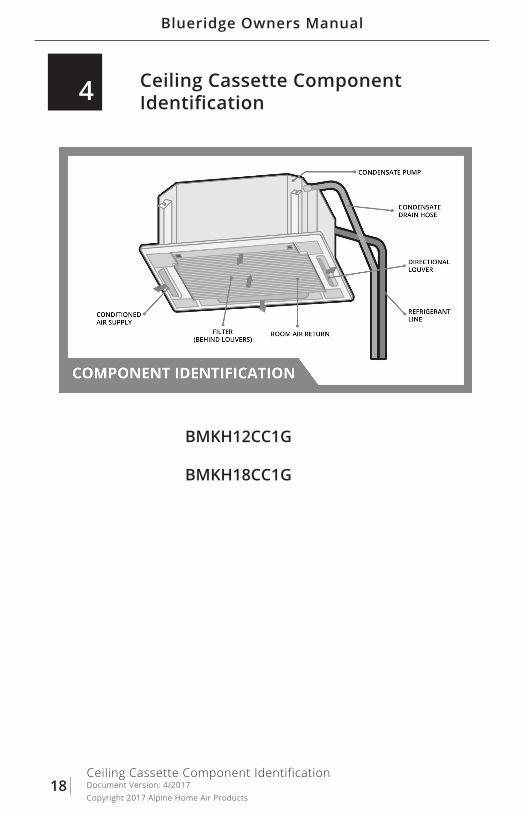
4 Ceiling Cassette Component Identification
Ceiling Cassette Component Identification
BMKH12CC1G
BMKH18CC1G
Blueridge Owners Manual
Document Version: 04/2017Copyright 2017 Alpine Home Air Products
19
5
6
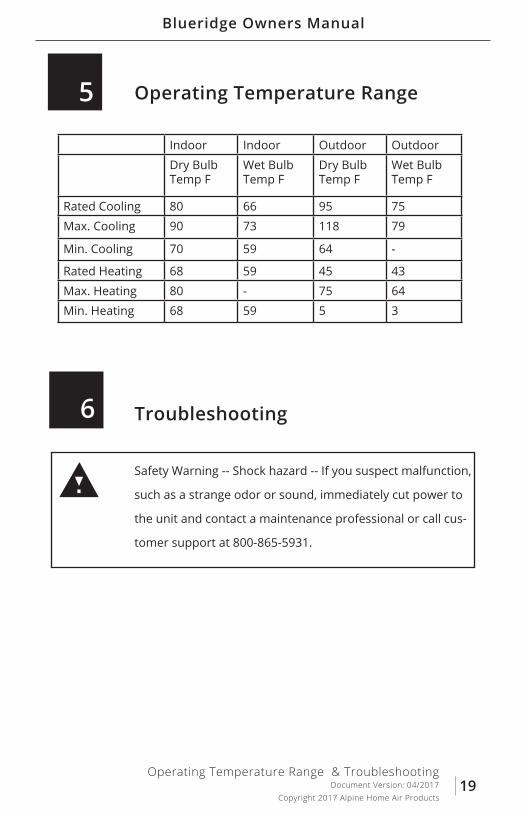
Operating Temperature Range
Troubleshooting
Indoor Indoor Outdoor Outdoor
Dry Bulb Temp F
Wet Bulb Temp F
Dry BulbTemp F
Wet Bulb Temp F
Rated Cooling 80 66 95 75
Max. Cooling 90 73 118 79
Min. Cooling 70 59 64 -
Rated Heating 68 59 45 43
Max. Heating 80 - 75 64
Min. Heating 68 59 5 3
Safety Warning -- Shock hazard -- If you suspect malfunction,
such as a strange odor or sound, immediately cut power to
the unit and contact a maintenance professional or call cus-
tomer support at 800-865-5931.
Operating Temperature Range & Troubleshooting
Blueridge Owners Manual
Document Version: 4/2017Copyright 2017 Alpine Home Air Products
20
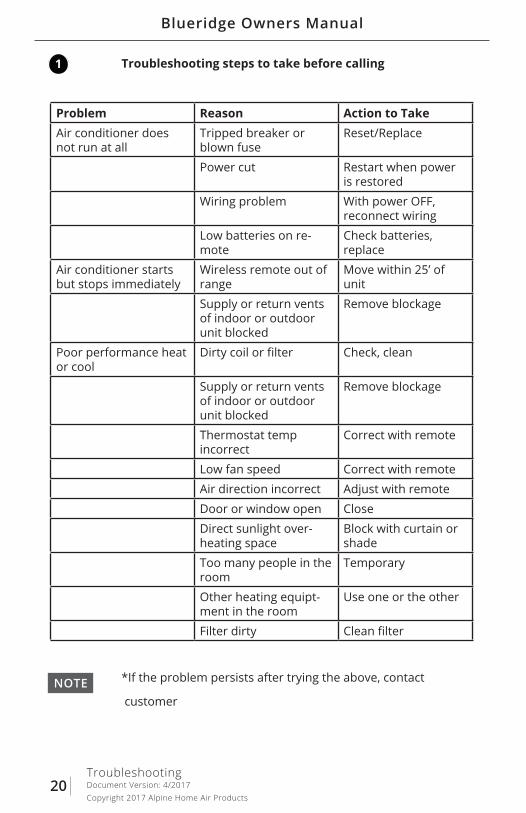
Problem Reason Action to TakeAir conditioner does not run at all
Tripped breaker or blown fuse
Reset/Replace
Power cut Restart when power is restored
Wiring problem With power OFF, reconnect wiring
Low batteries on re-mote
Check batteries, replace
Air conditioner starts but stops immediately
Wireless remote out of range
Move within 25’ of unit
Supply or return vents of indoor or outdoor unit blocked
Remove blockage
Poor performance heat or cool
Dirty coil or filter Check, clean
Supply or return vents of indoor or outdoor unit blocked
Remove blockage
Thermostat temp incorrect
Correct with remote
Low fan speed Correct with remote
Air direction incorrect Adjust with remote
Door or window open Close
Direct sunlight over-heating space
Block with curtain or shade
Too many people in the room
Temporary
Other heating equipt-ment in the room
Use one or the other
Filter dirty Clean filter
1 Troubleshooting steps to take before calling
*If the problem persists after trying the above, contact
customer NOTE
Troubleshooting
Blueridge Owners Manual
Document Version: 04/2017Copyright 2017 Alpine Home Air Products
21
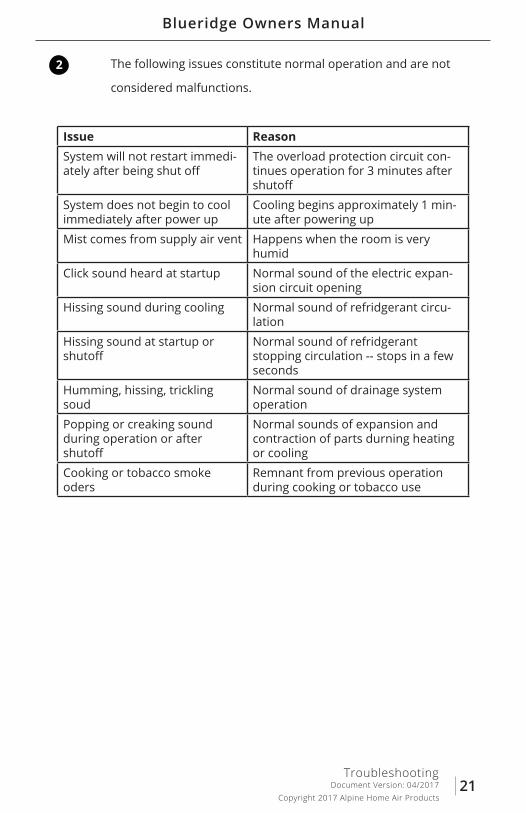
2 The following issues constitute normal operation and are not
considered malfunctions.
Issue Reason System will not restart immedi-ately after being shut off
The overload protection circuit con-tinues operation for 3 minutes after shutoff
System does not begin to cool immediately after power up
Cooling begins approximately 1 min-ute after powering up
Mist comes from supply air vent Happens when the room is very humid
Click sound heard at startup Normal sound of the electric expan-sion circuit opening
Hissing sound during cooling Normal sound of refridgerant circu-lation
Hissing sound at startup or shutoff
Normal sound of refridgerant stopping circulation -- stops in a few seconds
Humming, hissing, trickling soud
Normal sound of drainage system operation
Popping or creaking sound during operation or after shutoff
Normal sounds of expansion and contraction of parts durning heating or cooling
Cooking or tobacco smoke oders
Remnant from previous operation during cooking or tobacco use
Troubleshooting
Blueridge Owners Manual
Document Version: 4/2017Copyright 2017 Alpine Home Air Products
22
7 Maintenance
Warning -- Shock hazard -- Be sure to turn off the power at
the breaker prior to cleaning or maintence.
For best results, perform maintenance at the beginning or
end of each (heating and cooling) season.
When the unit will not be used for an extended period,
turn off power at the circuit breaker.
NOTE
NOTE
1
2
Cleaning the air filter and grill
Optional odor filters are available and can be installed in
place of the original filter
a. Use proper safety equiptment such as gloves and eye
protection
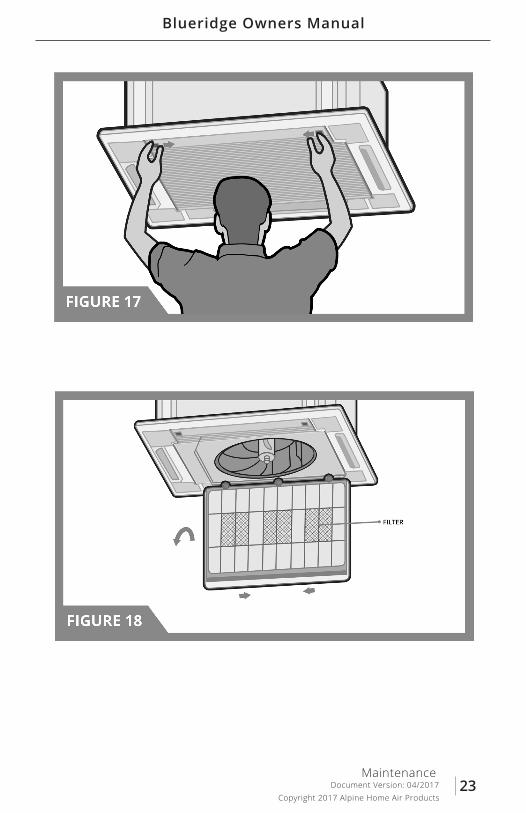
b. Open air inlet grill by loosening two screws, and push-
ing the latches toward each other (See Fig. 17).
c. Swing the grill door open and remove filter (See Fig.
18).
d. Clean the filter with warm, soapy water if heavily
soiled. If the filter is only dusty, use compressed air or
a soft brush.
e. Clean the grill with a soft cloth or brush while the door
is open and the filter is out.
f. Clean the supply air outlets with a soft cloth or brush,
Maintenance
Blueridge Owners Manual
Document Version: 04/2017Copyright 2017 Alpine Home Air Products
23Maintenance