Embed Size (px)
Citation preview

www.kufatec.de
Kufatec GmbH & Co. KG • Dahlienstr. 15 • 23795 Bad Segeberg • e-mail: [email protected]
Version 1.03
Installation manual
FISCUBE®
Audi
Article-ID 38358
38358-1
38359
For factory equipment
MMI High (2G)
MMI High Navigation Plus (3G)
MMI Navigation Plus with MMI touch (3G Plus)

1
Content
General advice ........................................................................................................................................... 1
Safety Instructions ...................................................................................................................................... 2
References of legal regulations for operation ............................................................................................. 2
FISCUBE .................................................................................................................................................... 3
Scope of delivery ........................................................................................................................................ 4
Wiring diagram ........................................................................................................................................... 4
Installation instruction MMI 2G ................................................................................................................... 5
Interface connection MMI 2G ..................................................................................................................... 6
Connection Video loom MMI 2G ................................................................................................................. 8
Connection video loom MMI 2G – RVC available ...................................................................................... 9
Installation instruction MMI 3G / MMI 3G Plus ......................................................................................... 10
Interface connection MMI 3G/ MMI 3G Plus ............................................................................................. 11
Connection video loom MMI 3G/ MMI 3G Plus ........................................................................................ 13
Coding ...................................................................................................................................................... 15
USB-connection ........................................................................................................................................ 16
Control elements ...................................................................................................................................... 17
Start Up .................................................................................................................................................... 19
Operation instruction MMI 2G ................................................................................................................... 22
Operating instruction MMI 3G ................................................................................................................... 30
Operating instruction MMI 3G Plus ........................................................................................................... 38
Additional video input 2G/ 3G/ 3GPlus ..................................................................................................... 44
Video output ............................................................................................................................................. 45
General advice
While developing this product, your personal safety combined with the best operating service, modern design and an up-to-date production technique was especially taken into account. Unfortunately, despite the utmost care injuries and/or damages might occur due to improper installation and/or use. Please read the attached instruction manual completely with great care and keep it! All articles of our production line pass through a 100 % check - for your safety and security. We reserve the right to carry out technical changes which serve the improvement at any time. According to each article and purpose, it is sometimes necessary to check each country’s legal regulations before installing and starting the unit. In case of guarantee claims, the device has to be sent back to the seller in the original packaging with the attached bill of purchase and detailed defect‘s description. Please pay attention to the manufacturer‘s return requirements (RMA). The legal warranty directions are valid. The guarantee claim as well as the operating permission becomes invalid due to:
a) unauthorized changes to the device or accessories which have not been approved or carried out by the manufacturer or its partners b) opening the device‘s frame c) device‘s repairs carried out by one‘s own d) improper use / operation e) brute force to the device (drop, willful damage, accident etc.)

2
Safety Instructions
Installation requires special knowledge.
Do not install the unit yourself. For safe and reliable installation, consult a dealer having special knowledge.
• Never use bolts or nuts from the car’s safety devices for installation. If bolts or nuts from the steering wheel ,brakes or other safety devices are used for installation of the unit, it may cause an accident.
• Use the unit with a DC 12V negative ground car. This unit cannot be used in large trucks which use a DC 24V battery. If it is used with a DC 24V battery, it may cause a fire or accident.
• Avoid installing the unit in following places: - Where it would hinder your safe driving. - Where it could damage the car’s fittings.
• This unit is only for use in the following vehicles. Only connections described within this instruction guide are allowed or required to use for installation.
• For damage impact caused by faulty installation, unsuitable connections inappropriate vehicles Kufatec GmbH & Co. KGassumes no liability.
• We advise you that these units process datas out of the MOST - protocol from the vehicle. As the supplier of this device we don‘t know the overall system you are working with. If our device causes damage due to other changes made by to the vehicle Kufatec GmbH assumes no liability.
• Kufatec GmbH & Co. KG supplier do not guaranty the use of the product for changing’s within a new vehicle series.
• If the car manufacturer’s don‘t agree with the installation of our device by reason of warranty the Kufatec GmbH & Co. KG assumes no liability. Please check conditions and warranty before you begin the installation.
• Kufatec GmbH & Co. KG supplier reserves the right to change the device specifications without notice.
NOTE: The road traffic has to have your full attention.
Operations should only be done by suitable traffic and weather situations. The volume need to be set that you are still able to realise acoustic warn signals (Police, fire brigade).
• Errors and changes excepted.
References of legal regulations for operation
Only use this unit in the intended domain.
If you use it in a foreign domain, if the unit is not installed properly, or if the unit will be reconstructed, the guarantee will expire.

3
FISCUBE
Features
DVB-T – Integrated DVB-T receiver with TV recording function E13 approval - 10R-03-12423 Video/Audio coding: MPEG II (No MPEG4 /HDTV) TV recording stored on USB source – Recording capacity 3h with an 5GB USB-memory TV recording format: *.mpg Dimensions (LxBxH): 11,4cm x 9,2cm x 3,1cm
USB - USB connection for memory stick or HDD (FAT 32) – limited capacity 40GB NOTE: Only for hard drives with current consumption not more than 500mA - it's necessary to have a external power supply with capacity over 500mA. Supported audio format: mp3, wav Supported video format: mpg; *.dat; *.vob; *.avi with MPEG4 ASP. USB extension must not be longer than 2 meter!
NOTE USB Root directory
Up to 95 entries can be stored within the root directory. Each entry can include another 95 entries.
NOTE: Entries consists of single files as well as directories.
NOTE: Before installing the multimedia system you need to check whether the car is retrofitted with an interface not developed by Kufatec GmbH & Co. KG. In case a non-Kufatec interface is fitted we are not able to guaranty the absolute operation of the FISCUBE system. You may need to remove the non-Kufatec interface.
NOTE: Fiber optical looms MUST NOT BE CRACKED! The recommended radius for fitting is 40 mm.
In case of incorrect fitting we are not able to guaranty the absolute operation of the multimedia system.
NOTE: After the very first installation the system is completing an automatic generated search for available TV channels. For refreshing the channel list please see section „Start –up”.

4
Scope of delivery
FISCUBE Interface Wiring Aerials 2x
Wiring diagram
Fig.1
* If factory fitted
Note MMI 2G: In case the vehicle is not factory fitted with rear view camera (RVC) the displayinterface needs to be replaced. A displayinterface with FBAS input is needed. After replacing the displayinterface the component protection needs to be removed. Please contact your local Audi dealer.
Detailed information please see page 46

5
Installation instruction MMI 2G
For vehicles WITHOUT factory fitted rear view camera
Fig. 2
1 – Radiobox A4 8K, A5 8T, A6 4F, A8 4E 2 – Radiobox Q7 4L
3 – Displayinterface A4 8K, A5 8T 4 – Displayinterface A6 4F, A8 4E, Q7 4L
5 – FISCUBE Interface
For vehicles WITH factory fitted rear view camera
Fig. 3
1 – Radiobox A4 8K, A5 8T, A6 4F 2 – Radiobox Q7 4L
3 – RVC – control unit Q7 4L 4 – RVC – control unit A4, A5, A6 4F, A8 4E
5 – FISCUBE Interface
Location Radiobox
The fitting location of the radiobox can be verify within the vehicle.
A4 8K, A5 8T, A6 4F, A8 4E Q7 4L
Fig.4 Fig.5 Fig.6

6
Interface connection MMI 2G
Fiber optic cable
The connection will be completed plug & play on the back of the radiobox.
Fig.7
Remove the original fiber optical cable of the radiobox (Fig. 8). Join the original fiber optical connector to the female connector of the delivered loom (Fig. 9).
Fig.8 Fig.9
Put the optical connector of the delivered loom to the radiobox (Fig. 10). ). Figure 11 is showing the final connection of the Interface.
Fig.10 Fig.11

7
Join the 18-pole connector as well as the fiber optical to the interface (Fig. 12).
Fig.12 Fig.13
Aerials
To ensure correct operation, aerials should be installed far from: - shielded glasses/ Bodywork/ Other parts – which may prevent a good signal reception.
Mount the supplied areal horizontally or vertically. It is recommended to try different positions to assess the ideal location for the positioning of the aerials within the vehicle.
NOTE: Sequence of Installation – Aerials needs to be connected to the interface FIRST. AFTER connecting the aerials the power supply can be completed. In case this sequence will be not considered the TV reception can be weak. The number of available channels could decrease.
Power
The connection will be completed plug & play on the back of the radiobox. Remove the original power connector of the radiobox (Fig. 14). Join the original connector to the female connector of the delivered loom (Fig. 15).
Fig.14 Fig.15
Put the connector of the delivered loom to the radiobox (Fig. 16). Figure 17 is showing the final connection of the multimedia interface.
Fig.16 Fig.17
8
Connection Video loom MMI 2G
For vehicles WITHOUT factory fitted rear view camera
Wire the loom into the front of the vehicle (Fig. 18 - 20).
Fig.18 Fig.19 Fig.20
A4 8K, A5 8T
Remove the climate control with suitable tools (Fig. 21). Remove the CD-changer (Fig. 22). Loosen the necessary screws of the displayinterface and remove it (Fig. 23).
Fig.21 Fig.22 Fig.23
A6 4F, A8 4E, Q7 4L
Loosen the necessary screws of the glove box (Fig. 24, 25). Remove the displayinterface (Fig. 26).
Fig.24 Fig.25 Fig.26

9
Connect the video loom to the displayinterface (Fig. 27).
In case the vehicle is not factory fitted with rear view camera (RVC) the displayinterface needs to be replaced – Kufatec Article-ID. 35600
Notes please see page 46
Fig.27
Connection video loom MMI 2G – RVC available
For vehicles WITH factory fitted rear view camera
Location RVC-control unit
Depending of the vehicle the RVC-control unit is fitted on different fitting locations.
A4 8K, A5 8T, A6 4F, A8 4E Q7 4L
Fig.28 Fig.29
Connect the video loom to the RVC-control unit - FAKRA BROWN (Fig. 30).
Fig.30

10
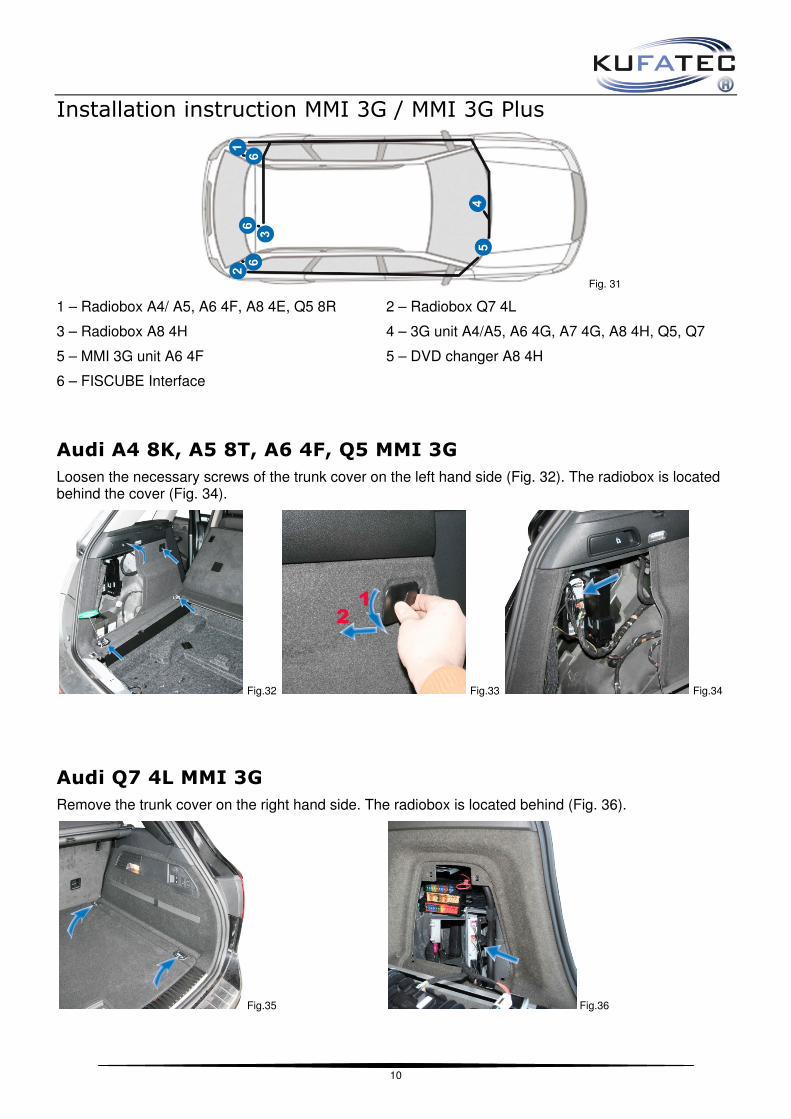
Installation instruction MMI 3G / MMI 3G Plus
Fig. 31
1 – Radiobox A4/ A5, A6 4F, A8 4E, Q5 8R 2 – Radiobox Q7 4L
3 – Radiobox A8 4H 4 – 3G unit A4/A5, A6 4G, A7 4G, A8 4H, Q5, Q7
5 – MMI 3G unit A6 4F 5 – DVD changer A8 4H
6 – FISCUBE Interface
Audi A4 8K, A5 8T, A6 4F, Q5 MMI 3G
Loosen the necessary screws of the trunk cover on the left hand side (Fig. 32). The radiobox is located behind the cover (Fig. 34).
Fig.32 Fig.33 Fig.34
Audi Q7 4L MMI 3G
Remove the trunk cover on the right hand side. The radiobox is located behind (Fig. 36).
Fig.35 Fig.36

11
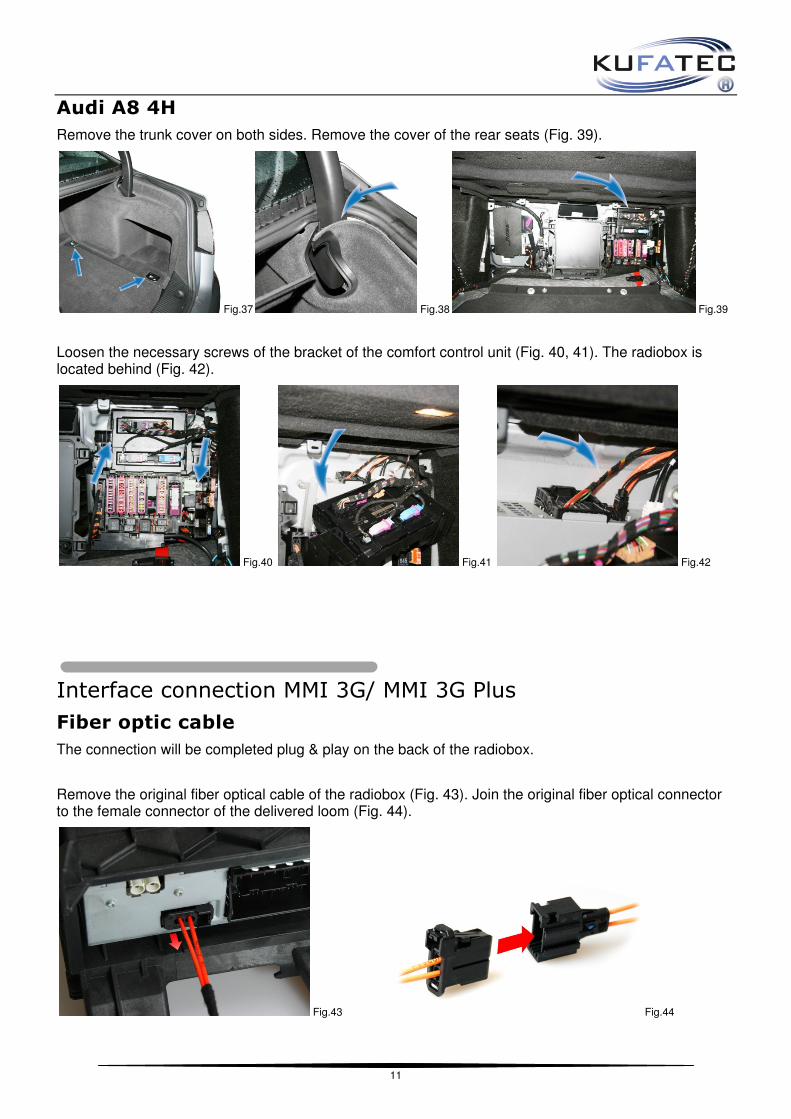
Audi A8 4H
Remove the trunk cover on both sides. Remove the cover of the rear seats (Fig. 39).
Fig.37 Fig.38 Fig.39
Loosen the necessary screws of the bracket of the comfort control unit (Fig. 40, 41). The radiobox is located behind (Fig. 42).
Fig.40 Fig.41 Fig.42
Interface connection MMI 3G/ MMI 3G Plus
Fiber optic cable
The connection will be completed plug & play on the back of the radiobox.
Remove the original fiber optical cable of the radiobox (Fig. 43). Join the original fiber optical connector to the female connector of the delivered loom (Fig. 44).
Fig.43 Fig.44

12
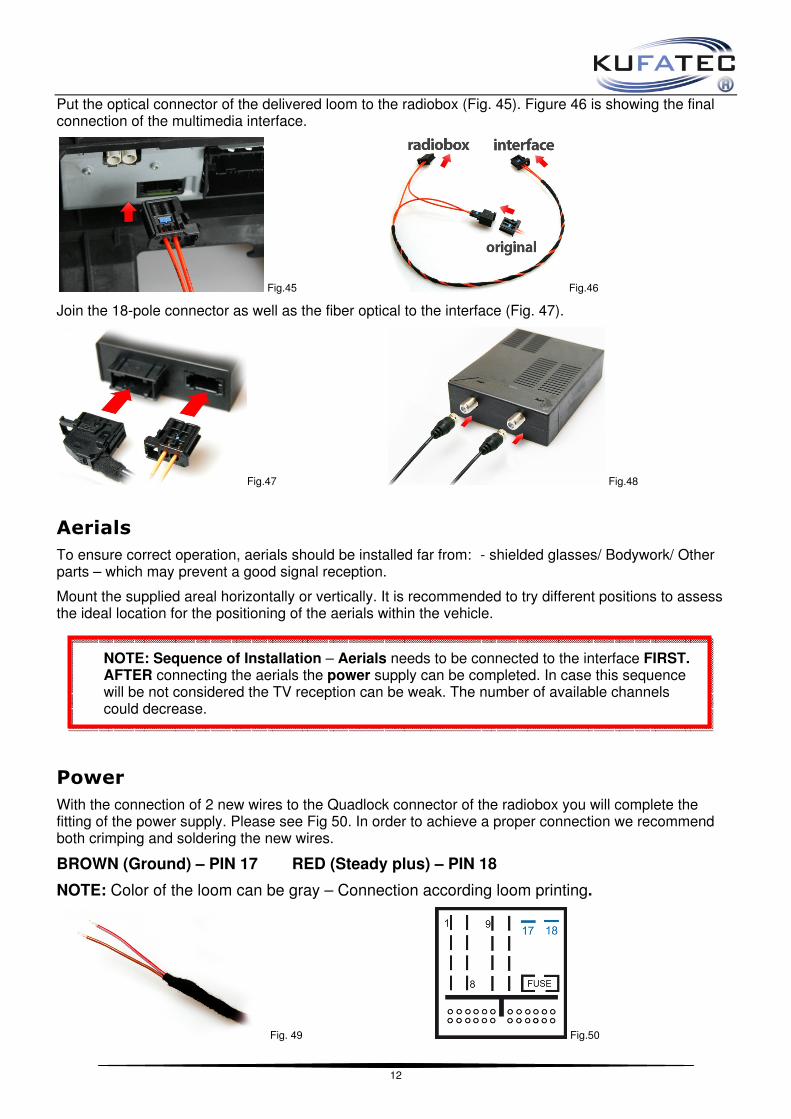
Put the optical connector of the delivered loom to the radiobox (Fig. 45). Figure 46 is showing the final connection of the multimedia interface.
Fig.45 Fig.46
Join the 18-pole connector as well as the fiber optical to the interface (Fig. 47).
Fig.47 Fig.48
Aerials
To ensure correct operation, aerials should be installed far from: - shielded glasses/ Bodywork/ Other parts – which may prevent a good signal reception.
Mount the supplied areal horizontally or vertically. It is recommended to try different positions to assess the ideal location for the positioning of the aerials within the vehicle.
NOTE: Sequence of Installation – Aerials needs to be connected to the interface FIRST. AFTER connecting the aerials the power supply can be completed. In case this sequence will be not considered the TV reception can be weak. The number of available channels could decrease.
Power
With the connection of 2 new wires to the Quadlock connector of the radiobox you will complete the fitting of the power supply. Please see Fig 50. In order to achieve a proper connection we recommend both crimping and soldering the new wires.
BROWN (Ground) – PIN 17 RED (Steady plus) – PIN 18
NOTE: Color of the loom can be gray – Connection according loom printing.
Fig. 49 Fig.50

13
Connection video loom MMI 3G/ MMI 3G Plus
Wire the video loom in the front oft he vehicle (Fig. 51 - 53).
Fig.51 Fig.52 Fig.53
A4 8K, A5 8T, Q5 8R, Q7 4L
Remove the MMI 3G unit using suitable tools (Fig. 54, 55).
Fig.54 Fig.55
A6 4F, A8 4E
Loosen the necessary screws of the glove box (Fig. 56, 57).
Fig.56 Fig.57
14
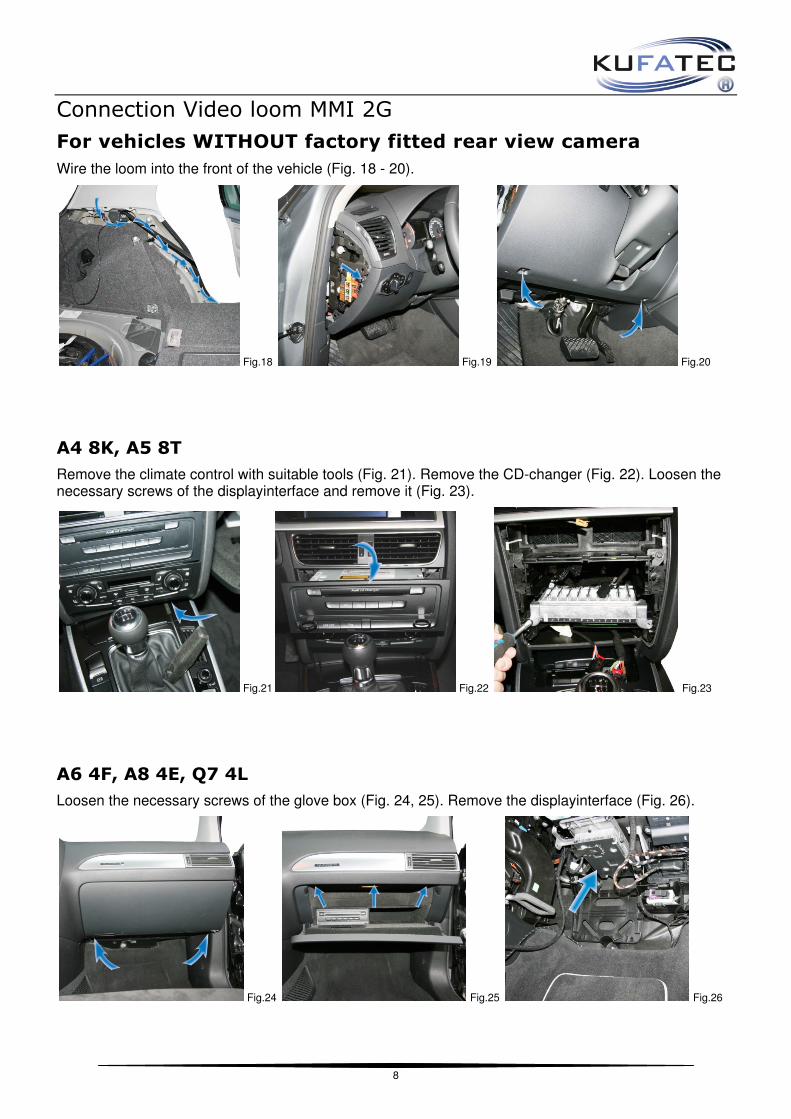
A8 4H
Loosen the screw of the center consol cover (Fig. 58) as well as the screws of the MMI 3G unit cover (Fig. 59). Remove the MMI 3G unit.
Fig.58 Fig.59 Fig.60
Connect the video loom to the MMI 3G unit – FAKRA GREEN (Fig. 61).
Fig.61
NOTE: In case the vehicle is factory fitted with DVD-changer (e.g. A8 4H, A7 4G) the video loom has to be connected to the DVD-changer.
Fig.62 Fig.63

15
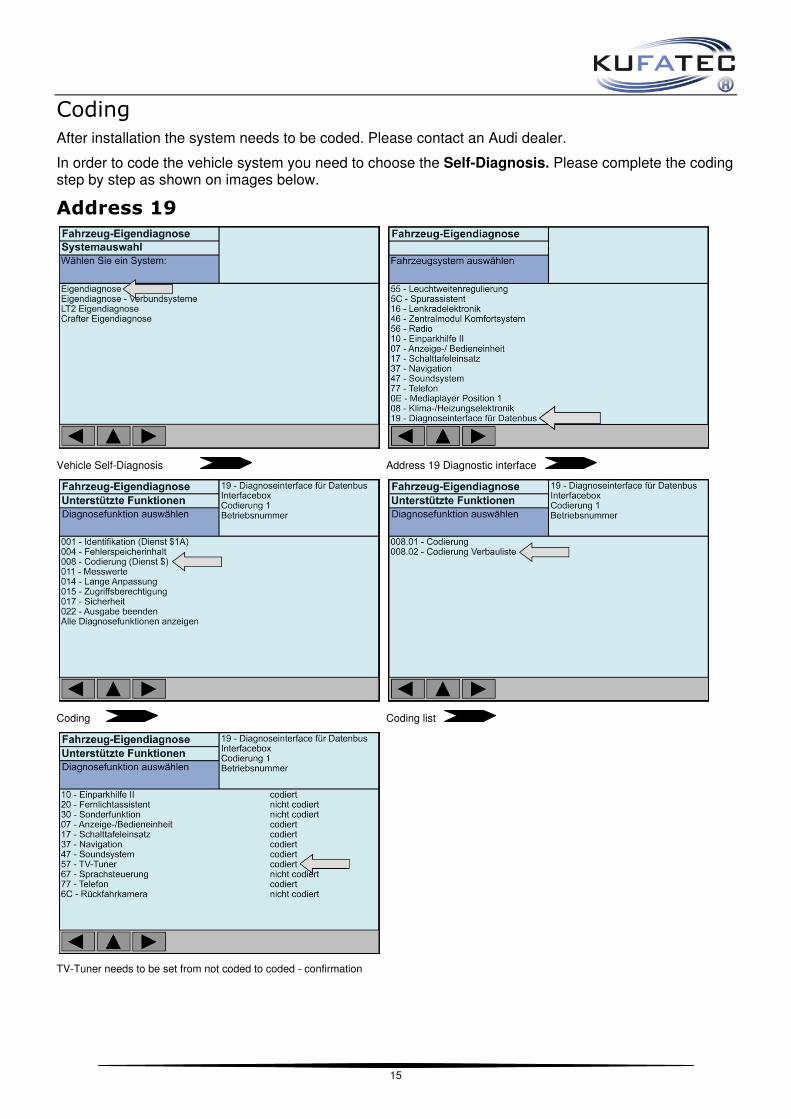
Coding
After installation the system needs to be coded. Please contact an Audi dealer.
In order to code the vehicle system you need to choose the Self-Diagnosis. Please complete the coding step by step as shown on images below.
Address 19
Vehicle Self-Diagnosis Address 19 Diagnostic interface
Coding Coding list
TV-Tuner needs to be set from not coded to coded - confirmation

16
USB-connection
Connecting of USB-memory sticks or hard disc drives (HDD)
MP3 music / video via USB
The whole memory capacity (Audio + Video) is up to 40GB - Format FAT32
NOTE: Only for hard drives with current consumption not more than 500mA - it's necessary to have an external power supply with capacity over 500mA.
Root directory for the complete USB source (audio + video):
Up to 95 entries can be stored within the root directory. Each entry can include another 95 entries.
NOTE: Entries consists of single files as well as directories.
Supported audio format: *.mp3, *.wav
Supported video format: *.mpg; *.dat; *.vob; *.avi (MPEG4 ASP, XviD, DivX4.0/5.0/6.0)
Files will be filtered autom. – In USB audio mode only audio files will be displayed. In USB video mode only video files will be displayed.
Last-Position-Memory:
- For music files - the last listen track will start again from the beginning - For video files - will start again directly where the video has been stopped playing
TV Recording
NOTE: In order to record TV an USB source has to be connected. The source need to have enough capacity for recording.
Recording capacity 3h with an 5GB USB-memory
TV recording format: *.mpg

17
Control elements
Multifunctional steering wheel
By pushing the MODE/ARROW button you will reach the TV menu (Fig. 64, 65).
By using the SCROLL you will select the single channels. Push the SCROLL for selecting the channel. Volume adjustment will be done with the SCROLL on the right hand side.
Example A5 8T
Fig. 64
Example A8 4H
Fig. 65
Driver information system
The FISCUBE channels will be displayed within the driver information system.
Example A5 8T Example A8 4H
Fig.66 Fig.67

18
MMI operation panel
OEM-menu driven operation by using the MMI panel.
After pressing the button MEDIA or CD/TV (Fig. 68, 69) the TV source can be selected. After that the
FISCUBE can controlled by using the rotate controller as well as the control key (Fig. 71).
Example MMI 2G/ MMI 3G
Fig.68 Fig.69
Example A8 4H
Fig.70 Fig.71

19
Start Up
Start up will be displayed in the following on MMI 3G. It is the same procedure for MMI 2G as well as MMI 3G Plus.
1. Push the MEDIA button – TV-Tuner needs to be selected (Fig. 73).
Fig.72 Fig.73
2. Scroll down to…99 SETUP > selecting
Fig.74
Push knob AGAIN >…
3. Select REGION & LANGUAGE >
Fig.75
Push knob AGAIN >…
Media
99 ---
99 Record
99 Setup99 USB-Audio
99 USB-Video
Programme
12:00
Media
1 Exit Setup
2 Region&Langu3 Autoscan
4 Vol +
5 Vol -
Programme
12:00

20
4. Select REGION (e.g. GERMANY)
Fig.76
Push knob AGAIN >…
5. Select LANGUAGE (e.g. GERMAN)
Fig.77
Push knob AGAIN >…
6. Select 99 SETUP >
Fig.78
Push knob AGAIN >…
Media
Finland
France
Germany…
Programme
12:00
Media
Finnisch
French
GermanIndonesian
Programme
12:00
Media
99 ---
99 Record
99 Setup99 USB-Audio
99 USB-Video
Programme
12:00

21
7. Select AUTOSCAN > Search will start automatically
Fig.79
When auto search has finished the system will switch the first channel.
Push knob AGAIN >…
8. Select 99 SETUP >
Fig.80
Push knob AGAIN >…
9. Select VOL + > Set the volume to the same level of the radio or other sources of the vehicle.
Fig.81
Leave the settings through the menu EXIT SETUP.
Media
1 Exit Setup
2 Region&Langu
3 Autoscan4 Vol +
5 Vol -
Programme
12:00
Media
99 ---
99 Record
99 Setup99 USB-Audio
99 USB-Video
Programme
12:00
Media
1 Exit Setup
2 Region&Langu
3 Autoscan
4 Vol +5 Vol -
Programme
12:00
22
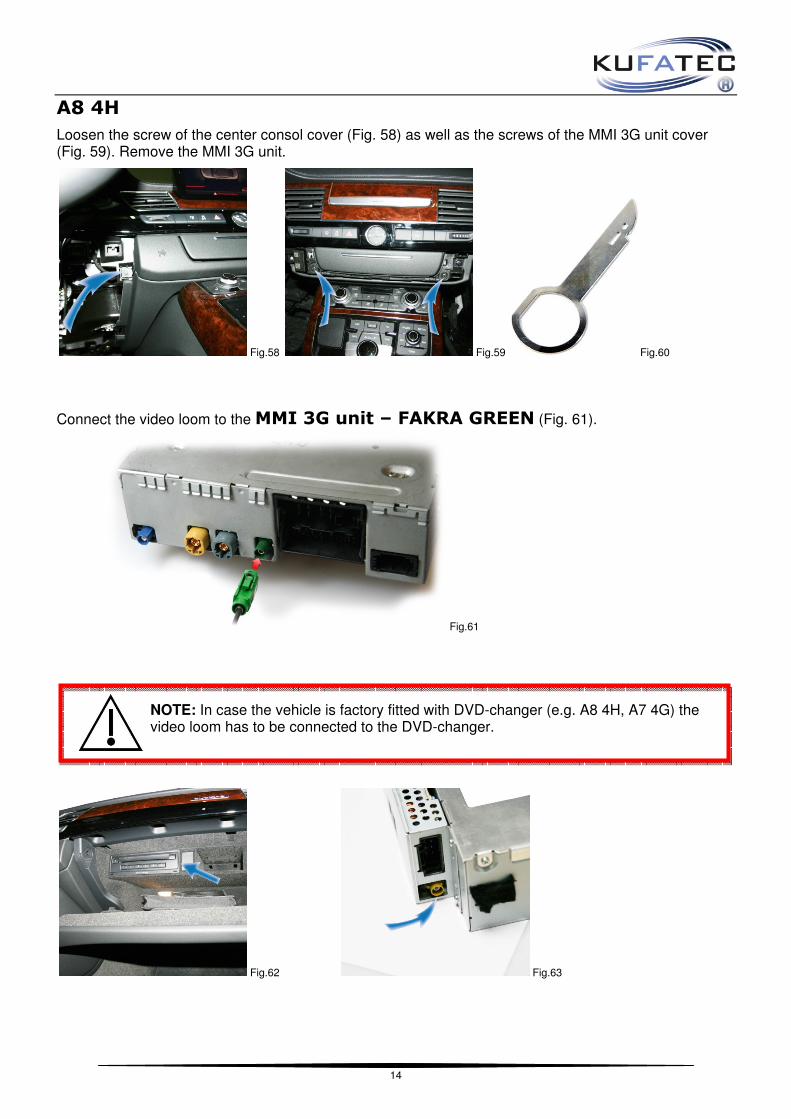
Operation instruction MMI 2G
Push the MEDIA or CD/TV button – TV-Tuner needs to be selected (Fig. 83).
Fig.82 Fig.83
Channel list
Single channels can be selected of the channel list by using the knob (Fig. 84).
Fig.84
Manual channel selection
Press the buttons TV CONTROL > SEEK DOWN or SEEK UP. While using the knob you can switch between the single channels (Fig. 85).
Fig.85
TV
CD
Audi music interface
TVExterne AV Quelle 1
Externe AV Quelle 2
12:00
Quelle
TV
WDR Köln
Kabel eins
N24
ProSieben
SAT.1
12:00
TV
12:00Manuell
ProSieben
Sendervor

23
TV Recording
USB-memory/ HDD (FAT 32) needs to be connected to the USB connection.
Select TV source > scroll down to > 99 RECORD.
> Select 99 RECORD in order to START recording. During recording a REC symbol will be displayed (Fig. 87).
Fig.86 Fig.87
Select 99 RECORD again in order to STOP recording. The record will be stored within directory RECORDED_TV.
Playing TV records
Select TV source > scroll down to > 99 USB-VIDEO > selecting
Push knob AGAIN >…> Select directory RECORDED_TV … >
Push knob AGAIN >…> Select the recorded file you want to play (Fig. 90).
Fig.88 Fig.89
Fig.90
TV
12:00
99 ---
99 Record
99 Setup
99 USB-Audio
99 USB-Video
RECREC
TV
12:00
99 ---
99 Record
99 Setup
99 USB-Audio
99 USB-Video
TV
12:00
TV
..
Video 1
Video 2
Recorded_TV
TV
12:00
TV
..
Aufnahme 1
Aufnahme 2
Aufnahme 3
24
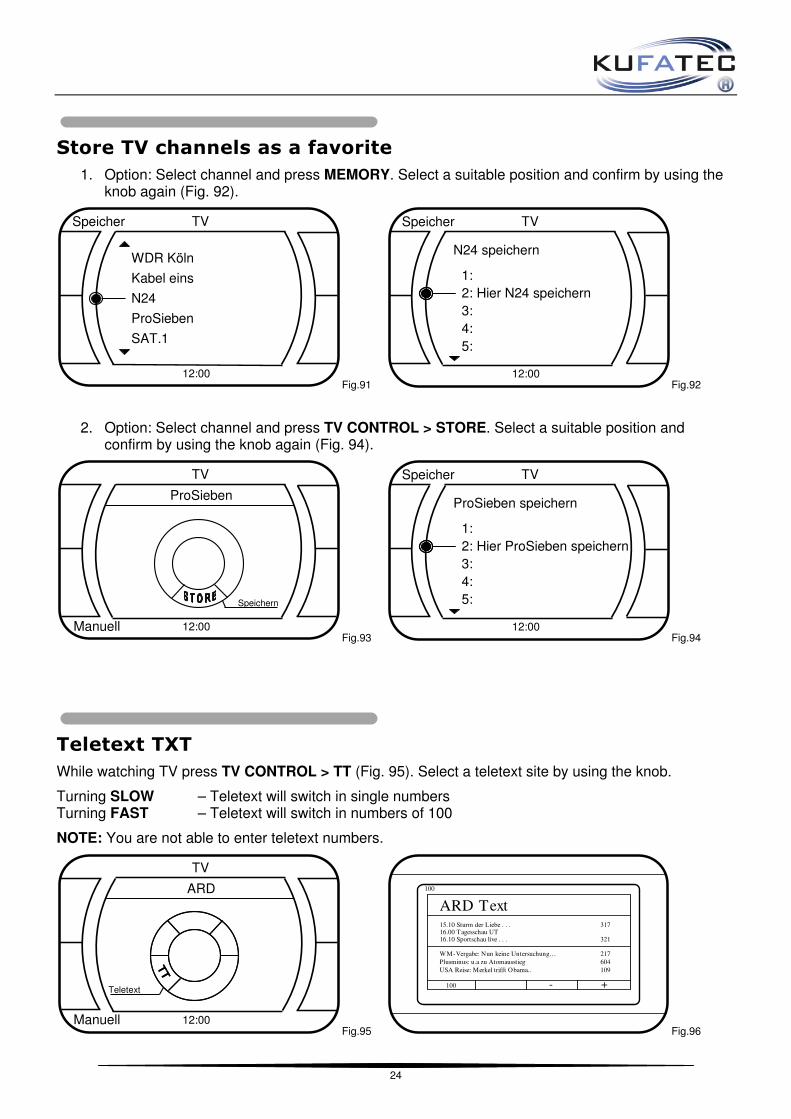
Store TV channels as a favorite
1. Option: Select channel and press MEMORY. Select a suitable position and confirm by using the knob again (Fig. 92).
Fig.91 Fig.92
2. Option: Select channel and press TV CONTROL > STORE. Select a suitable position and confirm by using the knob again (Fig. 94).
Fig.93 Fig.94
Teletext TXT
While watching TV press TV CONTROL > TT (Fig. 95). Select a teletext site by using the knob.
Turning SLOW – Teletext will switch in single numbers Turning FAST – Teletext will switch in numbers of 100
NOTE: You are not able to enter teletext numbers.
Fig.95 Fig.96
TV
12:00
Speicher
WDR Köln
Kabel eins
N24
ProSieben
SAT.1
TV
12:00
Speicher
1:
2: Hier N24 speichern
3:
4:
5:
N24 speichern
TV
12:00Manuell
ProSieben
Speichern
TV
12:00
Speicher
1:
2: Hier ProSieben speichern
3:
4:
5:
ProSieben speichern
TV
12:00Manuell
ARD
TT
TT
Teletext
ARD Text15.10 Sturm der Liebe . . . 31716.00 Tagesschau UT16.10 Sportschau live . . . 321
WM-Vergabe: Nun keine Untersuchung… 217
Plusminus: u.a zu Atomausstieg 604
USA Reise: Merkel trifft Obama.. 109
+-100
100

25
EPG Electronic Program Guide
While watching TV press TV CONTROL > EGP (Fig. 97).
NOTE: The display of EPG information could take a while. The channels will be refreshed step by step. EPG information can only be displayed if available.
Fig.97 Fig.98
MP3 Music
USB-memory/ HDD (FAT 32) needs to be connected to the USB connection.
Select TV source > scroll down to > 99 USB-AUDIO
>Select 99 USB-AUDIO … >
Fig.99
Push knob AGAIN >…
>Select DIRECTORY or MUSIC FILE for playing (Fig. 100).
Fig.100
TV
12:00Manuell
ZDF
EPG
Programm-information
0019 Das Erste
0020 Tele 5
0021 QVC
0022 DAS VIERT
0023 Channel21/E
0024 RTL HH SH
0025RTL2
0026 SRTL
Program List 2011/6/17 08:20:32
TV
12:00
99 ---
99 Record
99 Setup
99 USB-Audio
99 USB-Video
TV
12:00
TV
..
21 – Herbert Grönemeyer –
22 – Jennifer Lopez –
23 – Bon Jovi –
24 – Lady Gaga –

26
NOTE: With menu .. you will step back to the previous directory.
Display of track information as well as interpret (Fig. 101)
Fig.101
Manual selecting of music files
While listening to the music press the buttons TV CONTROL > SEEK DOWN or SEEK UP. While using the knob the next or previous file can be selected (Fig. 102).
Fig.102
Music fast forward/ fast backward
While listening to the music press the buttons TV CONTROL > MANUAL DOWN or MANUAL UP. While using the knob the needed speed can be selected (Fig. 103).
2x – 4x – 8x – 20x
Fig.103
Music
00:10/04:03
Er gehört zu mir
Marianne Rosenberg
Music
00:10/04:03
Er gehört zu mir
Marianne Rosenberg
TV
12:00Manuell
ProSieben
Sendervor
TV
12:00Manuell
ProSieben
Manuellvor

27
Video
USB-memory/ HDD (FAT 32) needs to be connected to the USB connection.
Select TV source > scroll down to > 99 USB-VIDEO > selecting … >
Push knob AGAIN >…
> Select DIRECTORY or VIDEO FILE for playing (Fig. 105).
Fig.104 Fig.105
NOTE: With menu .. you will step back to the previous directory.
Manual selecting of video files
While watching video press the buttons TV CONTROL > SEEK DOWN or SEEK UP. While using the knob the next or previous video file can be selected. (Fig. 106).
Fig.106
NOTE: Only video files within the same directory can be selected.
TV
12:00
99 ---
99 Record
99 Setup
99 USB-Audio
99 USB-Video
TV
12:00
TV
..
Forrest Gump
Der Pate II
Titanic
Fight Club
TV
12:00Manuell
ProSieben
Sendervor

28
Video fast forward/ fast backward
While watching video press the buttons TV CONTROL > MANUAL DOWN or MANUAL UP. While using the knob the needed speed can be selected (Fig. 107).
2x – 4x – 8x – 20x
Fig.107
Setup
Select TV source > scroll down to > 99 SETUP > selecting
The following settings can be done (Fig. 109)
Region & Language – Selecting region + language
Autoscan –search for available channels
Vol+ – volume up
Vol- – volume down
Reset – restart of the FISCUBE device
Fig.108 Fig.109
TV
12:00Manuell
ProSieben
Manuellvor
TV
12:00
99 ---
99 Record
99 Setup
99 USB-Audio
99 USB-Video
Exit Setup
Region&Langu
Autoscan
Vol +
Vol -
TV
12:00

29
Settings
Within the TV mode press the SETUP button.
The following settings can be done (Fig. 111)
Brightness Contrast Color
Fig.110 Fig.111
Example Brightness
Fig.112
TV
12:00
Helligkeit
Kontrast
Farbe
Tint
Mehrkanal
TV-Norm
min maxmin max
Setup TV
12:00
Helligkeit

30
Operating instruction MMI 3G
Push the MEDIA button – TV-Tuner needs to be selected (Fig. 114).
Fig.113 Fig.114
Channel list
Single channels can be selected of the channel list by using the knob (Fig. 115).
Fig.115
Manual channel selection
1. Option: Press the buttons TV CONTROL > CH. While using the knob you can switch between the single channels (Fig. 116)
2. Option: Press the buttons TV CONTROL > Symbol or . While using the knob you can switch between the single channels (Fig. 117).
Fig.116 Fig.117
Media
WDR Köln
kabel eins
N24
ProSieben
SAT.1
Programme
12:00
Media
ProSieben
12:00
CH
Manuell
Media
ProSieben
12:00Manuell

31
TV Recording
USB-memory/ HDD (FAT 32) needs to be connected to the USB connection.
Select TV source > scroll down to > 99 RECORD.
> Select 99 RECORD in order to START recording. During recording a REC symbol will be displayed (Fig. 118).
Fig.118 Fig.119
Select 99 RECORD again in order to STOP recording. The record will be stored within directory RECORDED_TV.
Playing TV records
Select TV source > scroll down to > 99 USB-VIDEO > selecting
Push knob AGAIN >…> Select directory RECORDED_TV … >
Push knob AGAIN >…> Select the recorded file you want to play (Fig. 122).
Fig.120 Fig.121
Fig.122
Media
99 ---
99 Record99 Setup
99 USB-Audio
99 USB-Video
Programme
12:00RECREC
Media
99 ---
99 Record
99 Setup
99 USB-Audio
99 USB-Video
Programme
12:00
Media
TV
…
Video 1
Video 2
Recorded_TV
Programme
12:00
Media
TV
…
Aufnahme 1
Aufnahme 2
Aufnahme 3
Programme
12:00
32
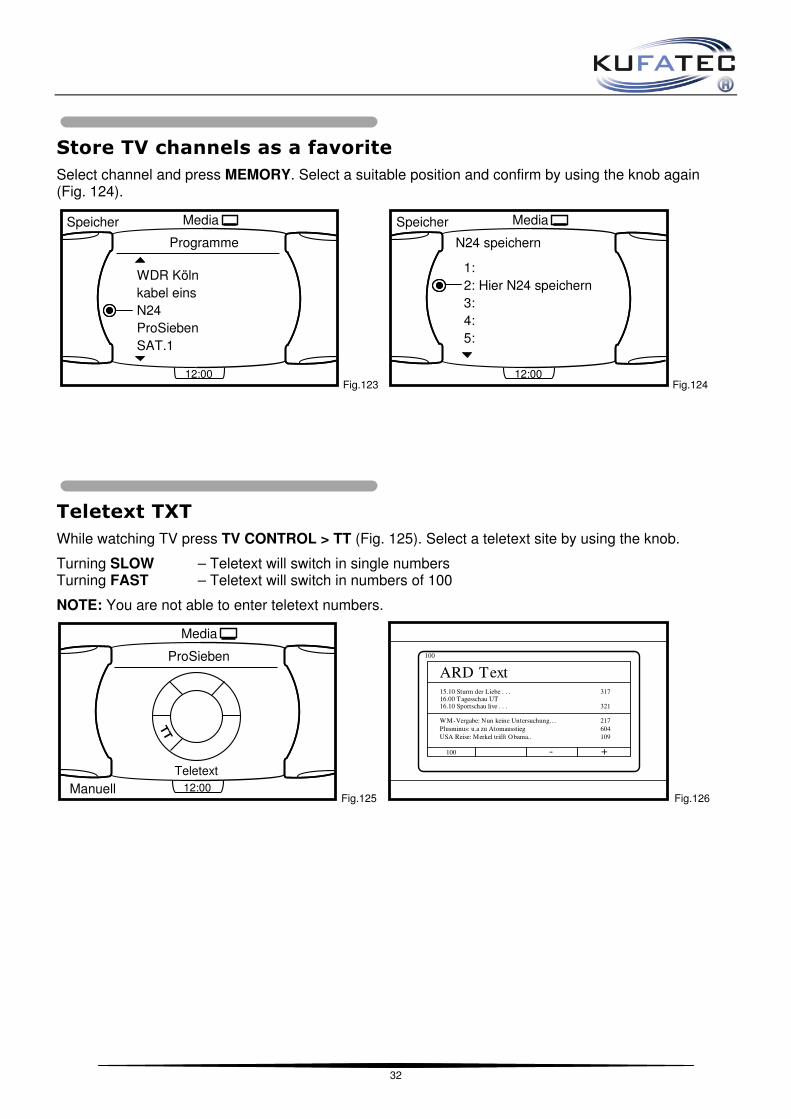
Store TV channels as a favorite
Select channel and press MEMORY. Select a suitable position and confirm by using the knob again (Fig. 124).
Fig.123 Fig.124
Teletext TXT
While watching TV press TV CONTROL > TT (Fig. 125). Select a teletext site by using the knob.
Turning SLOW – Teletext will switch in single numbers Turning FAST – Teletext will switch in numbers of 100
NOTE: You are not able to enter teletext numbers.
Fig.125 Fig.126
Media
WDR Köln
kabel eins
N24
ProSieben
SAT.1
Programme
12:00
Speicher Media
1:
2: Hier N24 speichern
3:
4:
5:
N24 speichern
12:00
Speicher
Media
ProSieben
12:00Manuell
Teletext
TT
ARD Text15.10 Sturm der Liebe . . . 31716.00 Tagesschau UT16.10 Sportschau live . . . 321
WM-Vergabe: Nun keine Untersuchung… 217
Plusminus: u.a zu Atomausstieg 604
USA Reise: Merkel trifft Obama.. 109
+-100
100

33
EPG Electronic Program Guide
While watching TV press TV CONTROL > EGP (Fig. 127).
NOTE: The display of EPG information could take a while. The channels will be refreshed step by step. EPG information can only be displayed if available.
Fig.127 Fig.128
MP3 Music
USB-memory/ HDD (FAT 32) needs to be connected to the USB connection.
Select TV source > scroll down to > 99 USB-AUDIO
>Select 99 USB-AUDIO … >
Fig.129
Push knob AGAIN >…
>Select DIRECTORY or MUSIC FILE for playing (Fig. 130).
Fig.130
Media
ProSieben
12:00Manuell
Programminfos
EPG
TV EPG
12:00Manuell
ZDF
12:00 Serie…
15:30
3sat
16:45 Spielfilm…
17:30
Media
99 ---
99 Record
99 Setup
99 USB-Audio99 USB-Video
Programme
12:00
TV
..
21 – Herbert Grönemeyer –
22 – Jennifer Lopez –
23 – Bon Jovi –
24 – Lady Gaga –
Media
Programme
12:00

34
NOTE: With menu .. you will step back to the previous directory.
Display of track information as well as interpret (Fig. 131)
Fig.131
Manual selecting of music files
While listening to the music press TV CONTROL > Symbol or . While using the knob the next or previous file can be selected (Fig. 132).
Fig.132
Music fast forward/ fast backward
While listening to the music press TV CONTROL > CH. While using the knob the needed speed can be selected (Fig. 133).
2x – 4x – 8x – 20x
Fig.133
Media
Programme
12:00
Music
00:10/04:03
Er gehört zu mir
Marianne Rosenberg
Music
00:10/04:03
Er gehört zu mir
Marianne Rosenberg
Media
ProSieben
12:00Manuell
Media
ProSieben
12:00
CH
Manuell
35
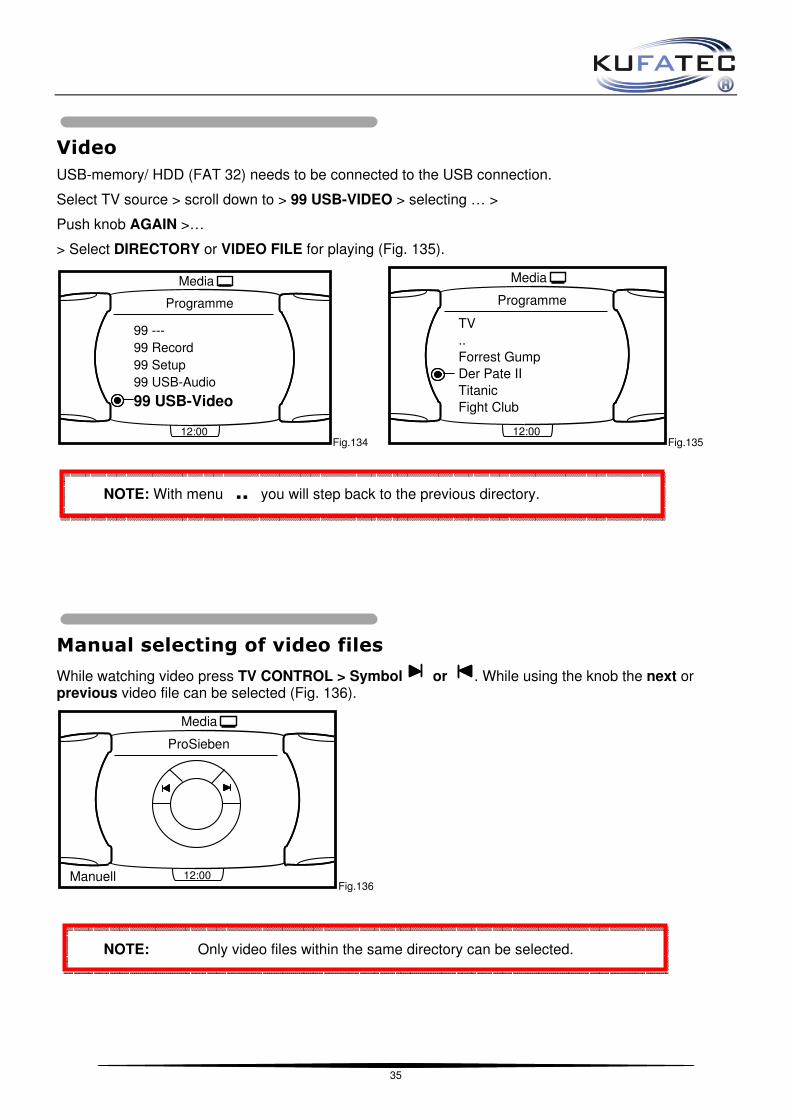
Video
USB-memory/ HDD (FAT 32) needs to be connected to the USB connection.
Select TV source > scroll down to > 99 USB-VIDEO > selecting … >
Push knob AGAIN >…
> Select DIRECTORY or VIDEO FILE for playing (Fig. 135).
Fig.134 Fig.135
NOTE: With menu .. you will step back to the previous directory.
Manual selecting of video files
While watching video press TV CONTROL > Symbol or . While using the knob the next or previous video file can be selected (Fig. 136).
Fig.136
NOTE: Only video files within the same directory can be selected.
Media
99 ---
99 Record
99 Setup
99 USB-Audio
99 USB-Video
Programme
12:00
Media
Programme
12:00
TV
..
Forrest Gump
Der Pate II
Titanic
Fight Club
Media
ProSieben
12:00Manuell
36
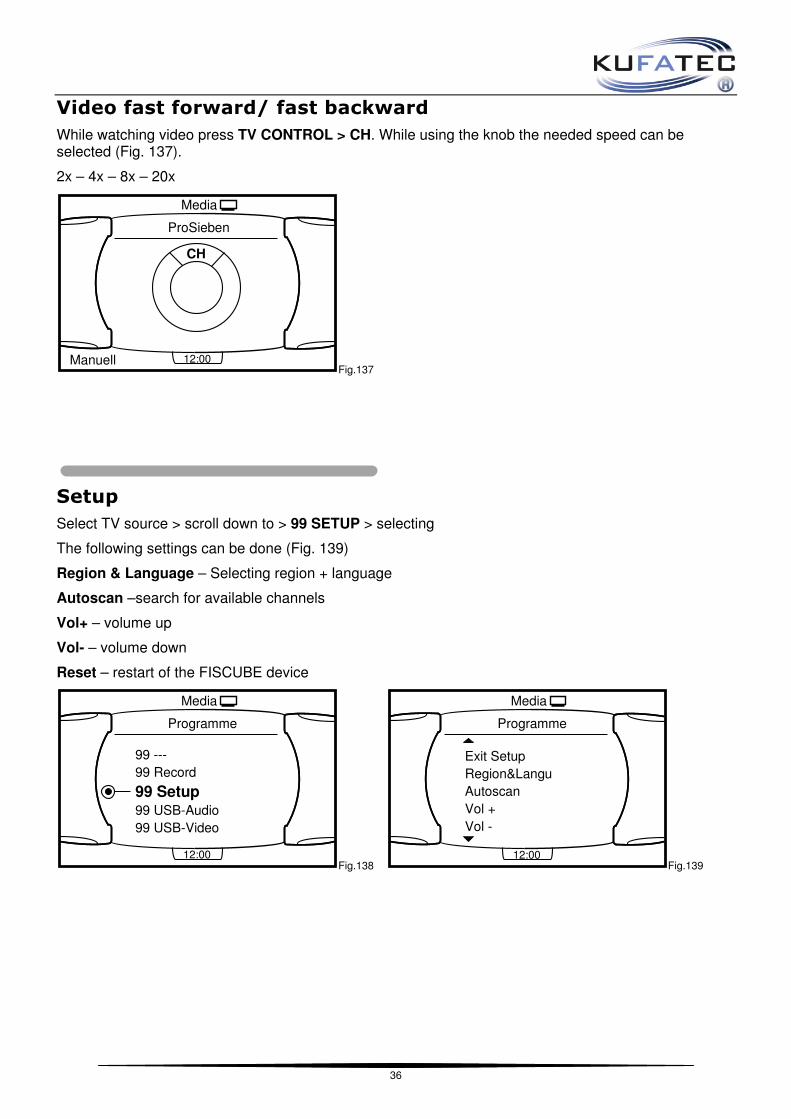
Video fast forward/ fast backward
While watching video press TV CONTROL > CH. While using the knob the needed speed can be selected (Fig. 137).
2x – 4x – 8x – 20x
Fig.137
Setup
Select TV source > scroll down to > 99 SETUP > selecting
The following settings can be done (Fig. 139)
Region & Language – Selecting region + language
Autoscan –search for available channels
Vol+ – volume up
Vol- – volume down
Reset – restart of the FISCUBE device
Fig.138 Fig.139
Media
ProSieben
12:00
CH
Manuell
Media
99 ---
99 Record
99 Setup99 USB-Audio
99 USB-Video
Programme
12:00
Media
Exit Setup
Region&Langu
Autoscan
Vol +
Vol -
Programme
12:00

37
Settings
Within the TV mode press the SETUP button.
The following settings can be done (Fig. 141)
Brightness Contrast Color
Fig.140 Fig.141
Example Brightness
Fig.142
Setup TV
Helligkeit
Kontrast
Farbe
Tint
Mehrkanal
TV-Norm
12:00
Setup TV
Helligkeit
12:00Manuell
min max

38
Operating instruction MMI 3G Plus
Push the MEDIA button – TV-Tuner needs to be selected (Fig. 144).
Fig.143 Fig.144
Channel list
Single channels can be selected of the channel list by using the knob (Fig. 145).
Fig.145
Manual channel selection
Select menu FUNCTIONS.
While using the options SEEK DOWN or SEEK UP you can switch between the single channels (Fig. 146).
Symbol
Fig.146 Fig.147
Media Quelle
Jukebox
Leer
Leer
Nicht verbunden
TV Tuner
Media Quelle
ZDF
3sat
Neo/KiKa
ZDFinfokanal
Bayerisches FS
MDR Fernsehen
Speicher
Funktionen Einstellungen
Media
Funktionen
Phoenix
VOR ORT
0:00 – 0:00
EPG
Suchlauf zurück
Media
Funktionen
Phoenix
VOR ORT
0:00 – 0:00
EPG
Suchlauf vor

39
TV Recording
USB-memory/ HDD (FAT 32) needs to be connected to the USB connection.
Select TV source > scroll down to > 99 RECORD.
> Select 99 RECORD in order to START recording. During recording a REC symbol will be displayed (Fig. 149).
Fig.148 Fig.149
Select 99 RECORD again in order to STOP recording. The record will be stored within directory RECORDED_TV.
Playing TV records
Select TV source > scroll down to > 99 USB-VIDEO > selecting
Push knob AGAIN >…> Select directory RECORDED_TV … >
Push knob AGAIN >…> Select the recorded file you want to play (Fig. 152).
Fig.150 Fig.151
Fig.152
Media Quelle
ZDF
3sat
Neo/KiKa
99 ---
99 Record
99 Setup
Speicher
Funktionen Einstellungen RECREC
Media Quelle
99 ---
99 Record
99 Setup
99 USB-Audio
99 USB-Video
Speicher
Funktionen Einstellungen
Media Quelle
TV
..
Video 1
Video 2
Recorded_TV
Speicher
Funktionen Einstellungen
Media Quelle
TV
..
Aufnahme 1
Aufnahme 2
Aufnahme 3
Speicher
Funktionen Einstellungen

40
Store TV channels as a favorite
Select the menu FUNCTIONS. Select STORE CHANNEL. Select a suitable position and confirm by using the knob again (Fig. 154).
Fig.153 Fig.154
Teletext TXT
While watching TV press FUNCTIONS > TELETEXT (Fig. 155). Select a teletext site by using the knob.
Turning SLOW – Teletext will switch in single numbers Turning FAST – Teletext will switch in numbers of 100
NOTE: You are not able to enter teletext numbers.
Fig.155 Fig.156
Media
Funktionen
Phoenix
VOR ORT
0:00 – 0:00
EPGSender speichern
MediaSpeicher
1
2
3 Phoenix hier speichern
4
5
Media
Funktionen
ARD
Sturm der
0:00 – 0:00
EPG
Teletext
Media
Funktionen
ARD
Sturm der
0:00 – 0:00
EPG
Teletext
ARD Text
15.10 Sturm der Liebe . . . 31716.00 Tagesschau UT16.10 Sportschau live . . . 321
WM-Vergabe: Nun keine Untersuchung… 217
Plusminus: u.a zu Atomausstieg 604
USA Reise: Merkel trifft Obama.. 109
+-100
100

41
EPG Electronic Program Guide
While watching TV press FUNCTIONS > EGP (Fig. 157).
NOTE: The display of EPG information could take a while. The channels will be refreshed step by step. EPG information can only be displayed if available.
Fig.157 Fig.158
MP3 Music
USB-memory/ HDD (FAT 32) needs to be connected to the USB connection.
Select TV source > scroll down to > 99 USB-AUDIO
>Select 99 USB-AUDIO … > (Fig. 160).
Fig.159 Fig.160
NOTE: With menu .. you will step back to the previous directory.
Display of track information as well as interpret (Fig. 161)
Fig.161
EPG
Media
Funktionen
Phoenix
VOR ORT
0:00 – 0:00
EPG
EPG
ZDF
12:00 Serie…
15:30
3sat
16:45 Spielfilm…
17:30
Funktionen
QuelleSpeicher
Einstellungen
Media Quelle
WDR Köln
99 ---
99 Record
99 Setup
99 USB-Audio
99 USB-Video
Speicher
Funktionen Einstellungen
Media Quelle
TV
..
21 – Herbert Grönemeyer –
22 – Jennifer Lopez –
23 – Bon Jovi –
24 Lady Gaga –
Speicher
Funktionen Einstellungen
Music
00:10/04:03
Er gehört zu mir Hitmix
Marianne Rosenberg
Music
00:10/04:03
Er gehört zu mir Hitmix
Marianne Rosenberg

42
Manual selecting of music files
While listening to the music press FUNCTIONS > SEEK DOWN or SEEK UP in order to select the next or previous music file (Fig. 162).
Symbol
Fig.162
Video
USB-memory/ HDD (FAT 32) needs to be connected to the USB connection.
Select TV source > scroll down to > 99 USB-VIDEO > selecting … >
Push knob AGAIN >…
> Select DIRECTORY or VIDEO FILE for playing (Fig.164).
Fig.163 Fig.164
NOTE: With menu .. you will step back to the previous directory.
Media
Funktionen
Phoenix
VOR ORT
0:00 – 0:00
EPG
Suchlauf zurück
Media Quelle
99 ---
99 Record
99 Setup
99 USB-Audio
99 USB-Video
Speicher
Funktionen Einstellungen
Media Quelle
TV
..
Forrest Gump
Der Pate II
Titanic
Fight Club
Speicher
Funktionen Einstellungen

43
Manual selecting of video files
While watching video press FUNCTIONS > SEEK DOWN or SEEK UP in order to select the next or previous video file (Fig. 165).
Symbol
Fig.165
NOTE: Only video files within the same directory can be selected.
Setup
Select TV source > scroll down to > 99 SETUP > selecting
The following settings can be done (Fig. 167)
Region & Language – Selecting region + language
Autoscan –search for available channels
Vol+ – volume up
Vol- – volume down
Reset – restart of the FISCUBE device
Fig.166 Fig.167
Media
Funktionen
Phoenix
VOR ORT
0:00 – 0:00
EPG
Suchlauf zurück
Media Quelle
ARD
WDR Köln
99 ---
99 Record
99 Setup
99 USB-Audio
Speicher
Funktionen Einstellungen
Media Quelle
Exit Setup
Region & Language
Autoscan
Vol +
Vol –
Reset
Speicher
Funktionen Einstellungen

44
Settings
Within the TV mode press the SETUP button.
The following settings can be done (Fig. 169)
Brightness Contrast Color Example Brigtness
Fig.168 Fig.169
Additional video input 2G/ 3G/ 3GPlus
Note: No processing of audio signals – only video signals
Remove the housing of the 18-pole connector of the FISCUBE loom. Integrate the single PIN’s of the RCA -connector (Kufatec article-ID 35570) (Fig. 170).
PIN 2 – Video ground (Black)
PIN 1 – Video (Yellow)
The video source needs to be selected manually through the AV source on the MMI panel.
NOTE: No auto switch available by choosing the rear gear.
Fig.170 Fig.171
Media
Einstellungen
Helligkeit
Kontrast
Farbe
Tint
Mehrkanalton
TV-Norm
Media
Einstellungen
Helligkeit
min max
Einstellungen
Media Quelle
Jukebox
Leer
Leer
Nicht verbunden
TV Tuner
Externer AV EingangAV

45
Video output
For connecting to additional screens within the vehicle:
e.g. Head rest screens, Overhead screens
NOTE: No processing of audio signals – ONLY VIDEO signals
Join the adapter article-ID. 38392 with the FAKRA video loom of the FISCUBE wiring.
The RCA connector can connected to an additional screen.
NOTE: Depending on the number of additional screens a video booster may be required.
Fig.172
Connection in case of factory fitted analog TV MMI 2G
For vehicles with factory fitted analog TV tuner
NOTE: Not needed for MMI 3G/ 3G Plus
Location analog TV Tuner
The TV tuner is located with the infotainment rack of the vehicle (Fig. 173).
Item number 38323-2 (Fig. 174).
Fig.173 Fig.174

46
Factory fitted analog tuner needs to be removed.
Join wiring 38323-2 with the connections of the factory fitted TV-Tuner.
TV Tuner connector Red FAKRA GREEN
Fig.175 Fig.176 Fig.177
Join the 18-pole connector of the loom 38323-2 as well as the original fiber optical connector (TV tuner) to the interface (Fig. 177).

47
Replacement Displayinterface
NOTE: before replacing the displayinterface all MMI components needs to be updated to the latest software index. Please get in contact with your local Audi dealer.
Neede update CD
Model CD-part number
A6 4F, A8 4E, Q7 4L 4L0 998 961
A4 8K, A5 8T 8K0 998 961
Procedure
Disconnect battery replace interface connect battery again
Turn ignition on remove component protection (Get in contact with your local Audi
dealer – online connection is required)
Address 07 remove component protection (In some cases the coding machine is
asking a blocking time – These time needs to be elapsed completely)
Additional coding Address 07
Country code, Vehicle – Note down the values of the old interface Copy the values into
the new interface
Additional adaption channels
Channel 01 – MMI device list (ACC, AAS, PDC, MFSW, TPMS, RVC)
Channel 02 – Options within CAR menu (Left hand drive, battery status)
Channel 11 – Additional MMI features (logbook, clima comfort, aux heating)
Channel 12 – Phone version (1 for PR-Nr. 9ZW --- 2 for PR-Nr. 9ZF)
Channel 13 – Protocol setting: 0 = A6, A8, Q7 / 8191 = A4 8K, A5 8T
Channel 111 – MMI start for activating the configurated values
NOTE: Kufatec GmbH & Co. KG has got no influence in deleting the component protection. In case it is not possible to delete the protection please get in contact with [email protected].

www.kufatec.de
Kufatec GmbH & Co. KG • Dahlienstr. 15 • 23795 Bad Segeberg • e-mail: [email protected]
Version 1.03
Installation manual
FISCUBE®
Audi
Article-ID 38358
38358-1
38359
For factory equipment
MMI High (2G)
MMI High Navigation Plus (3G)
MMI Navigation Plus with MMI touch (3G Plus)

1
Content
General advice ........................................................................................................................................... 1
Safety Instructions ...................................................................................................................................... 2
References of legal regulations for operation ............................................................................................. 2
FISCUBE .................................................................................................................................................... 3
Scope of delivery ........................................................................................................................................ 4
Wiring diagram ........................................................................................................................................... 4
Installation instruction MMI 2G ................................................................................................................... 5
Interface connection MMI 2G ..................................................................................................................... 6
Connection Video loom MMI 2G ................................................................................................................. 8
Connection video loom MMI 2G – RVC available ...................................................................................... 9
Installation instruction MMI 3G / MMI 3G Plus ......................................................................................... 10
Interface connection MMI 3G/ MMI 3G Plus ............................................................................................. 11
Connection video loom MMI 3G/ MMI 3G Plus ........................................................................................ 13
Coding ...................................................................................................................................................... 15
USB-connection ........................................................................................................................................ 16
Control elements ...................................................................................................................................... 17
Start Up .................................................................................................................................................... 19
Operation instruction MMI 2G ................................................................................................................... 22
Operating instruction MMI 3G ................................................................................................................... 30
Operating instruction MMI 3G Plus ........................................................................................................... 38
Additional video input 2G/ 3G/ 3GPlus ..................................................................................................... 44
Video output ............................................................................................................................................. 45
General advice
While developing this product, your personal safety combined with the best operating service, modern design and an up-to-date production technique was especially taken into account. Unfortunately, despite the utmost care injuries and/or damages might occur due to improper installation and/or use. Please read the attached instruction manual completely with great care and keep it! All articles of our production line pass through a 100 % check - for your safety and security. We reserve the right to carry out technical changes which serve the improvement at any time. According to each article and purpose, it is sometimes necessary to check each country’s legal regulations before installing and starting the unit. In case of guarantee claims, the device has to be sent back to the seller in the original packaging with the attached bill of purchase and detailed defect‘s description. Please pay attention to the manufacturer‘s return requirements (RMA). The legal warranty directions are valid. The guarantee claim as well as the operating permission becomes invalid due to:
a) unauthorized changes to the device or accessories which have not been approved or carried out by the manufacturer or its partners b) opening the device‘s frame c) device‘s repairs carried out by one‘s own d) improper use / operation e) brute force to the device (drop, willful damage, accident etc.)

2
Safety Instructions
Installation requires special knowledge.
Do not install the unit yourself. For safe and reliable installation, consult a dealer having special knowledge.
• Never use bolts or nuts from the car’s safety devices for installation. If bolts or nuts from the steering wheel ,brakes or other safety devices are used for installation of the unit, it may cause an accident.
• Use the unit with a DC 12V negative ground car. This unit cannot be used in large trucks which use a DC 24V battery. If it is used with a DC 24V battery, it may cause a fire or accident.
• Avoid installing the unit in following places: - Where it would hinder your safe driving. - Where it could damage the car’s fittings.
• This unit is only for use in the following vehicles. Only connections described within this instruction guide are allowed or required to use for installation.
• For damage impact caused by faulty installation, unsuitable connections inappropriate vehicles Kufatec GmbH & Co. KGassumes no liability.
• We advise you that these units process datas out of the MOST - protocol from the vehicle. As the supplier of this device we don‘t know the overall system you are working with. If our device causes damage due to other changes made by to the vehicle Kufatec GmbH assumes no liability.
• Kufatec GmbH & Co. KG supplier do not guaranty the use of the product for changing’s within a new vehicle series.
• If the car manufacturer’s don‘t agree with the installation of our device by reason of warranty the Kufatec GmbH & Co. KG assumes no liability. Please check conditions and warranty before you begin the installation.
• Kufatec GmbH & Co. KG supplier reserves the right to change the device specifications without notice.
NOTE: The road traffic has to have your full attention.
Operations should only be done by suitable traffic and weather situations. The volume need to be set that you are still able to realise acoustic warn signals (Police, fire brigade).
• Errors and changes excepted.
References of legal regulations for operation
Only use this unit in the intended domain.
If you use it in a foreign domain, if the unit is not installed properly, or if the unit will be reconstructed, the guarantee will expire.

3
FISCUBE
Features
DVB-T – Integrated DVB-T receiver with TV recording function E13 approval - 10R-03-12423 Video/Audio coding: MPEG II (No MPEG4 /HDTV) TV recording stored on USB source – Recording capacity 3h with an 5GB USB-memory TV recording format: *.mpg Dimensions (LxBxH): 11,4cm x 9,2cm x 3,1cm
USB - USB connection for memory stick or HDD (FAT 32) – limited capacity 40GB NOTE: Only for hard drives with current consumption not more than 500mA - it's necessary to have a external power supply with capacity over 500mA. Supported audio format: mp3, wav Supported video format: mpg; *.dat; *.vob; *.avi with MPEG4 ASP. USB extension must not be longer than 2 meter!
NOTE USB Root directory
Up to 95 entries can be stored within the root directory. Each entry can include another 95 entries.
NOTE: Entries consists of single files as well as directories.
NOTE: Before installing the multimedia system you need to check whether the car is retrofitted with an interface not developed by Kufatec GmbH & Co. KG. In case a non-Kufatec interface is fitted we are not able to guaranty the absolute operation of the FISCUBE system. You may need to remove the non-Kufatec interface.
NOTE: Fiber optical looms MUST NOT BE CRACKED! The recommended radius for fitting is 40 mm.
In case of incorrect fitting we are not able to guaranty the absolute operation of the multimedia system.
NOTE: After the very first installation the system is completing an automatic generated search for available TV channels. For refreshing the channel list please see section „Start –up”.

4
Scope of delivery
FISCUBE Interface Wiring Aerials 2x
Wiring diagram
Fig.1
* If factory fitted
Note MMI 2G: In case the vehicle is not factory fitted with rear view camera (RVC) the displayinterface needs to be replaced. A displayinterface with FBAS input is needed. After replacing the displayinterface the component protection needs to be removed. Please contact your local Audi dealer.
Detailed information please see page 46

5
Installation instruction MMI 2G
For vehicles WITHOUT factory fitted rear view camera
Fig. 2
1 – Radiobox A4 8K, A5 8T, A6 4F, A8 4E 2 – Radiobox Q7 4L
3 – Displayinterface A4 8K, A5 8T 4 – Displayinterface A6 4F, A8 4E, Q7 4L
5 – FISCUBE Interface
For vehicles WITH factory fitted rear view camera
Fig. 3
1 – Radiobox A4 8K, A5 8T, A6 4F 2 – Radiobox Q7 4L
3 – RVC – control unit Q7 4L 4 – RVC – control unit A4, A5, A6 4F, A8 4E
5 – FISCUBE Interface
Location Radiobox
The fitting location of the radiobox can be verify within the vehicle.
A4 8K, A5 8T, A6 4F, A8 4E Q7 4L
Fig.4 Fig.5 Fig.6

6
Interface connection MMI 2G
Fiber optic cable
The connection will be completed plug & play on the back of the radiobox.
Fig.7
Remove the original fiber optical cable of the radiobox (Fig. 8). Join the original fiber optical connector to the female connector of the delivered loom (Fig. 9).
Fig.8 Fig.9
Put the optical connector of the delivered loom to the radiobox (Fig. 10). ). Figure 11 is showing the final connection of the Interface.
Fig.10 Fig.11

7
Join the 18-pole connector as well as the fiber optical to the interface (Fig. 12).
Fig.12 Fig.13
Aerials
To ensure correct operation, aerials should be installed far from: - shielded glasses/ Bodywork/ Other parts – which may prevent a good signal reception.
Mount the supplied areal horizontally or vertically. It is recommended to try different positions to assess the ideal location for the positioning of the aerials within the vehicle.
NOTE: Sequence of Installation – Aerials needs to be connected to the interface FIRST. AFTER connecting the aerials the power supply can be completed. In case this sequence will be not considered the TV reception can be weak. The number of available channels could decrease.
Power
The connection will be completed plug & play on the back of the radiobox. Remove the original power connector of the radiobox (Fig. 14). Join the original connector to the female connector of the delivered loom (Fig. 15).
Fig.14 Fig.15
Put the connector of the delivered loom to the radiobox (Fig. 16). Figure 17 is showing the final connection of the multimedia interface.
Fig.16 Fig.17

8
Connection Video loom MMI 2G
For vehicles WITHOUT factory fitted rear view camera
Wire the loom into the front of the vehicle (Fig. 18 - 20).
Fig.18 Fig.19 Fig.20
A4 8K, A5 8T
Remove the climate control with suitable tools (Fig. 21). Remove the CD-changer (Fig. 22). Loosen the necessary screws of the displayinterface and remove it (Fig. 23).
Fig.21 Fig.22 Fig.23
A6 4F, A8 4E, Q7 4L
Loosen the necessary screws of the glove box (Fig. 24, 25). Remove the displayinterface (Fig. 26).
Fig.24 Fig.25 Fig.26

9
Connect the video loom to the displayinterface (Fig. 27).
In case the vehicle is not factory fitted with rear view camera (RVC) the displayinterface needs to be replaced – Kufatec Article-ID. 35600
Notes please see page 46
Fig.27
Connection video loom MMI 2G – RVC available
For vehicles WITH factory fitted rear view camera
Location RVC-control unit
Depending of the vehicle the RVC-control unit is fitted on different fitting locations.
A4 8K, A5 8T, A6 4F, A8 4E Q7 4L
Fig.28 Fig.29
Connect the video loom to the RVC-control unit - FAKRA BROWN (Fig. 30).
Fig.30
10
Installation instruction MMI 3G / MMI 3G Plus
Fig. 31
1 – Radiobox A4/ A5, A6 4F, A8 4E, Q5 8R 2 – Radiobox Q7 4L
3 – Radiobox A8 4H 4 – 3G unit A4/A5, A6 4G, A7 4G, A8 4H, Q5, Q7
5 – MMI 3G unit A6 4F 5 – DVD changer A8 4H
6 – FISCUBE Interface
Audi A4 8K, A5 8T, A6 4F, Q5 MMI 3G
Loosen the necessary screws of the trunk cover on the left hand side (Fig. 32). The radiobox is located behind the cover (Fig. 34).
Fig.32 Fig.33 Fig.34
Audi Q7 4L MMI 3G
Remove the trunk cover on the right hand side. The radiobox is located behind (Fig. 36).
Fig.35 Fig.36
11
Audi A8 4H
Remove the trunk cover on both sides. Remove the cover of the rear seats (Fig. 39).
Fig.37 Fig.38 Fig.39
Loosen the necessary screws of the bracket of the comfort control unit (Fig. 40, 41). The radiobox is located behind (Fig. 42).
Fig.40 Fig.41 Fig.42
Interface connection MMI 3G/ MMI 3G Plus
Fiber optic cable
The connection will be completed plug & play on the back of the radiobox.
Remove the original fiber optical cable of the radiobox (Fig. 43). Join the original fiber optical connector to the female connector of the delivered loom (Fig. 44).
Fig.43 Fig.44
12
Put the optical connector of the delivered loom to the radiobox (Fig. 45). Figure 46 is showing the final connection of the multimedia interface.
Fig.45 Fig.46
Join the 18-pole connector as well as the fiber optical to the interface (Fig. 47).
Fig.47 Fig.48
Aerials
To ensure correct operation, aerials should be installed far from: - shielded glasses/ Bodywork/ Other parts – which may prevent a good signal reception.
Mount the supplied areal horizontally or vertically. It is recommended to try different positions to assess the ideal location for the positioning of the aerials within the vehicle.
NOTE: Sequence of Installation – Aerials needs to be connected to the interface FIRST. AFTER connecting the aerials the power supply can be completed. In case this sequence will be not considered the TV reception can be weak. The number of available channels could decrease.
Power
With the connection of 2 new wires to the Quadlock connector of the radiobox you will complete the fitting of the power supply. Please see Fig 50. In order to achieve a proper connection we recommend both crimping and soldering the new wires.
BROWN (Ground) – PIN 17 RED (Steady plus) – PIN 18
NOTE: Color of the loom can be gray – Connection according loom printing.
Fig. 49 Fig.50

13
Connection video loom MMI 3G/ MMI 3G Plus
Wire the video loom in the front oft he vehicle (Fig. 51 - 53).
Fig.51 Fig.52 Fig.53
A4 8K, A5 8T, Q5 8R, Q7 4L
Remove the MMI 3G unit using suitable tools (Fig. 54, 55).
Fig.54 Fig.55
A6 4F, A8 4E
Loosen the necessary screws of the glove box (Fig. 56, 57).
Fig.56 Fig.57

14
A8 4H
Loosen the screw of the center consol cover (Fig. 58) as well as the screws of the MMI 3G unit cover (Fig. 59). Remove the MMI 3G unit.
Fig.58 Fig.59 Fig.60
Connect the video loom to the MMI 3G unit – FAKRA GREEN (Fig. 61).
Fig.61
NOTE: In case the vehicle is factory fitted with DVD-changer (e.g. A8 4H, A7 4G) the video loom has to be connected to the DVD-changer.
Fig.62 Fig.63
15
Coding
After installation the system needs to be coded. Please contact an Audi dealer.
In order to code the vehicle system you need to choose the Self-Diagnosis. Please complete the coding step by step as shown on images below.
Address 19
Vehicle Self-Diagnosis Address 19 Diagnostic interface
Coding Coding list
TV-Tuner needs to be set from not coded to coded - confirmation

16
USB-connection
Connecting of USB-memory sticks or hard disc drives (HDD)
MP3 music / video via USB
The whole memory capacity (Audio + Video) is up to 40GB - Format FAT32
NOTE: Only for hard drives with current consumption not more than 500mA - it's necessary to have an external power supply with capacity over 500mA.
Root directory for the complete USB source (audio + video):
Up to 95 entries can be stored within the root directory. Each entry can include another 95 entries.
NOTE: Entries consists of single files as well as directories.
Supported audio format: *.mp3, *.wav
Supported video format: *.mpg; *.dat; *.vob; *.avi (MPEG4 ASP, XviD, DivX4.0/5.0/6.0)
Files will be filtered autom. – In USB audio mode only audio files will be displayed. In USB video mode only video files will be displayed.
Last-Position-Memory:
- For music files - the last listen track will start again from the beginning - For video files - will start again directly where the video has been stopped playing
TV Recording
NOTE: In order to record TV an USB source has to be connected. The source need to have enough capacity for recording.
Recording capacity 3h with an 5GB USB-memory
TV recording format: *.mpg

17
Control elements
Multifunctional steering wheel
By pushing the MODE/ARROW button you will reach the TV menu (Fig. 64, 65).
By using the SCROLL you will select the single channels. Push the SCROLL for selecting the channel. Volume adjustment will be done with the SCROLL on the right hand side.
Example A5 8T
Fig. 64
Example A8 4H
Fig. 65
Driver information system
The FISCUBE channels will be displayed within the driver information system.
Example A5 8T Example A8 4H
Fig.66 Fig.67

18
MMI operation panel
OEM-menu driven operation by using the MMI panel.
After pressing the button MEDIA or CD/TV (Fig. 68, 69) the TV source can be selected. After that the
FISCUBE can controlled by using the rotate controller as well as the control key (Fig. 71).
Example MMI 2G/ MMI 3G
Fig.68 Fig.69
Example A8 4H
Fig.70 Fig.71

19
Start Up
Start up will be displayed in the following on MMI 3G. It is the same procedure for MMI 2G as well as MMI 3G Plus.
1. Push the MEDIA button – TV-Tuner needs to be selected (Fig. 73).
Fig.72 Fig.73
2. Scroll down to…99 SETUP > selecting
Fig.74
Push knob AGAIN >…
3. Select REGION & LANGUAGE >
Fig.75
Push knob AGAIN >…
Media
99 ---
99 Record
99 Setup99 USB-Audio
99 USB-Video
Programme
12:00
Media
1 Exit Setup
2 Region&Langu3 Autoscan
4 Vol +
5 Vol -
Programme
12:00

20
4. Select REGION (e.g. GERMANY)
Fig.76
Push knob AGAIN >…
5. Select LANGUAGE (e.g. GERMAN)
Fig.77
Push knob AGAIN >…
6. Select 99 SETUP >
Fig.78
Push knob AGAIN >…
Media
Finland
France
Germany…
Programme
12:00
Media
Finnisch
French
GermanIndonesian
Programme
12:00
Media
99 ---
99 Record
99 Setup99 USB-Audio
99 USB-Video
Programme
12:00

21
7. Select AUTOSCAN > Search will start automatically
Fig.79
When auto search has finished the system will switch the first channel.
Push knob AGAIN >…
8. Select 99 SETUP >
Fig.80
Push knob AGAIN >…
9. Select VOL + > Set the volume to the same level of the radio or other sources of the vehicle.
Fig.81
Leave the settings through the menu EXIT SETUP.
Media
1 Exit Setup
2 Region&Langu
3 Autoscan4 Vol +
5 Vol -
Programme
12:00
Media
99 ---
99 Record
99 Setup99 USB-Audio
99 USB-Video
Programme
12:00
Media
1 Exit Setup
2 Region&Langu
3 Autoscan
4 Vol +5 Vol -
Programme
12:00

22
Operation instruction MMI 2G
Push the MEDIA or CD/TV button – TV-Tuner needs to be selected (Fig. 83).
Fig.82 Fig.83
Channel list
Single channels can be selected of the channel list by using the knob (Fig. 84).
Fig.84
Manual channel selection
Press the buttons TV CONTROL > SEEK DOWN or SEEK UP. While using the knob you can switch between the single channels (Fig. 85).
Fig.85
TV
CD
Audi music interface
TVExterne AV Quelle 1
Externe AV Quelle 2
12:00
Quelle
TV
WDR Köln
Kabel eins
N24
ProSieben
SAT.1
12:00
TV
12:00Manuell
ProSieben
Sendervor

23
TV Recording
USB-memory/ HDD (FAT 32) needs to be connected to the USB connection.
Select TV source > scroll down to > 99 RECORD.
> Select 99 RECORD in order to START recording. During recording a REC symbol will be displayed (Fig. 87).
Fig.86 Fig.87
Select 99 RECORD again in order to STOP recording. The record will be stored within directory RECORDED_TV.
Playing TV records
Select TV source > scroll down to > 99 USB-VIDEO > selecting
Push knob AGAIN >…> Select directory RECORDED_TV … >
Push knob AGAIN >…> Select the recorded file you want to play (Fig. 90).
Fig.88 Fig.89
Fig.90
TV
12:00
99 ---
99 Record
99 Setup
99 USB-Audio
99 USB-Video
RECREC
TV
12:00
99 ---
99 Record
99 Setup
99 USB-Audio
99 USB-Video
TV
12:00
TV
..
Video 1
Video 2
Recorded_TV
TV
12:00
TV
..
Aufnahme 1
Aufnahme 2
Aufnahme 3

24
Store TV channels as a favorite
1. Option: Select channel and press MEMORY. Select a suitable position and confirm by using the knob again (Fig. 92).
Fig.91 Fig.92
2. Option: Select channel and press TV CONTROL > STORE. Select a suitable position and confirm by using the knob again (Fig. 94).
Fig.93 Fig.94
Teletext TXT
While watching TV press TV CONTROL > TT (Fig. 95). Select a teletext site by using the knob.
Turning SLOW – Teletext will switch in single numbers Turning FAST – Teletext will switch in numbers of 100
NOTE: You are not able to enter teletext numbers.
Fig.95 Fig.96
TV
12:00
Speicher
WDR Köln
Kabel eins
N24
ProSieben
SAT.1
TV
12:00
Speicher
1:
2: Hier N24 speichern
3:
4:
5:
N24 speichern
TV
12:00Manuell
ProSieben
Speichern
TV
12:00
Speicher
1:
2: Hier ProSieben speichern
3:
4:
5:
ProSieben speichern
TV
12:00Manuell
ARD
TT
TT
Teletext
ARD Text15.10 Sturm der Liebe . . . 31716.00 Tagesschau UT16.10 Sportschau live . . . 321
WM-Vergabe: Nun keine Untersuchung… 217
Plusminus: u.a zu Atomausstieg 604
USA Reise: Merkel trifft Obama.. 109
+-100
100

25
EPG Electronic Program Guide
While watching TV press TV CONTROL > EGP (Fig. 97).
NOTE: The display of EPG information could take a while. The channels will be refreshed step by step. EPG information can only be displayed if available.
Fig.97 Fig.98
MP3 Music
USB-memory/ HDD (FAT 32) needs to be connected to the USB connection.
Select TV source > scroll down to > 99 USB-AUDIO
>Select 99 USB-AUDIO … >
Fig.99
Push knob AGAIN >…
>Select DIRECTORY or MUSIC FILE for playing (Fig. 100).
Fig.100
TV
12:00Manuell
ZDF
EPG
Programm-information
0019 Das Erste
0020 Tele 5
0021 QVC
0022 DAS VIERT
0023 Channel21/E
0024 RTL HH SH
0025RTL2
0026 SRTL
Program List 2011/6/17 08:20:32
TV
12:00
99 ---
99 Record
99 Setup
99 USB-Audio
99 USB-Video
TV
12:00
TV
..
21 – Herbert Grönemeyer –
22 – Jennifer Lopez –
23 – Bon Jovi –
24 – Lady Gaga –

26
NOTE: With menu .. you will step back to the previous directory.
Display of track information as well as interpret (Fig. 101)
Fig.101
Manual selecting of music files
While listening to the music press the buttons TV CONTROL > SEEK DOWN or SEEK UP. While using the knob the next or previous file can be selected (Fig. 102).
Fig.102
Music fast forward/ fast backward
While listening to the music press the buttons TV CONTROL > MANUAL DOWN or MANUAL UP. While using the knob the needed speed can be selected (Fig. 103).
2x – 4x – 8x – 20x
Fig.103
Music
00:10/04:03
Er gehört zu mir
Marianne Rosenberg
Music
00:10/04:03
Er gehört zu mir
Marianne Rosenberg
TV
12:00Manuell
ProSieben
Sendervor
TV
12:00Manuell
ProSieben
Manuellvor

27
Video
USB-memory/ HDD (FAT 32) needs to be connected to the USB connection.
Select TV source > scroll down to > 99 USB-VIDEO > selecting … >
Push knob AGAIN >…
> Select DIRECTORY or VIDEO FILE for playing (Fig. 105).
Fig.104 Fig.105
NOTE: With menu .. you will step back to the previous directory.
Manual selecting of video files
While watching video press the buttons TV CONTROL > SEEK DOWN or SEEK UP. While using the knob the next or previous video file can be selected. (Fig. 106).
Fig.106
NOTE: Only video files within the same directory can be selected.
TV
12:00
99 ---
99 Record
99 Setup
99 USB-Audio
99 USB-Video
TV
12:00
TV
..
Forrest Gump
Der Pate II
Titanic
Fight Club
TV
12:00Manuell
ProSieben
Sendervor

28
Video fast forward/ fast backward
While watching video press the buttons TV CONTROL > MANUAL DOWN or MANUAL UP. While using the knob the needed speed can be selected (Fig. 107).
2x – 4x – 8x – 20x
Fig.107
Setup
Select TV source > scroll down to > 99 SETUP > selecting
The following settings can be done (Fig. 109)
Region & Language – Selecting region + language
Autoscan –search for available channels
Vol+ – volume up
Vol- – volume down
Reset – restart of the FISCUBE device
Fig.108 Fig.109
TV
12:00Manuell
ProSieben
Manuellvor
TV
12:00
99 ---
99 Record
99 Setup
99 USB-Audio
99 USB-Video
Exit Setup
Region&Langu
Autoscan
Vol +
Vol -
TV
12:00

29
Settings
Within the TV mode press the SETUP button.
The following settings can be done (Fig. 111)
Brightness Contrast Color
Fig.110 Fig.111
Example Brightness
Fig.112
TV
12:00
Helligkeit
Kontrast
Farbe
Tint
Mehrkanal
TV-Norm
min maxmin max
Setup TV
12:00
Helligkeit

30
Operating instruction MMI 3G
Push the MEDIA button – TV-Tuner needs to be selected (Fig. 114).
Fig.113 Fig.114
Channel list
Single channels can be selected of the channel list by using the knob (Fig. 115).
Fig.115
Manual channel selection
1. Option: Press the buttons TV CONTROL > CH. While using the knob you can switch between the single channels (Fig. 116)
2. Option: Press the buttons TV CONTROL > Symbol or . While using the knob you can switch between the single channels (Fig. 117).
Fig.116 Fig.117
Media
WDR Köln
kabel eins
N24
ProSieben
SAT.1
Programme
12:00
Media
ProSieben
12:00
CH
Manuell
Media
ProSieben
12:00Manuell

31
TV Recording
USB-memory/ HDD (FAT 32) needs to be connected to the USB connection.
Select TV source > scroll down to > 99 RECORD.
> Select 99 RECORD in order to START recording. During recording a REC symbol will be displayed (Fig. 118).
Fig.118 Fig.119
Select 99 RECORD again in order to STOP recording. The record will be stored within directory RECORDED_TV.
Playing TV records
Select TV source > scroll down to > 99 USB-VIDEO > selecting
Push knob AGAIN >…> Select directory RECORDED_TV … >
Push knob AGAIN >…> Select the recorded file you want to play (Fig. 122).
Fig.120 Fig.121
Fig.122
Media
99 ---
99 Record99 Setup
99 USB-Audio
99 USB-Video
Programme
12:00RECREC
Media
99 ---
99 Record
99 Setup
99 USB-Audio
99 USB-Video
Programme
12:00
Media
TV
…
Video 1
Video 2
Recorded_TV
Programme
12:00
Media
TV
…
Aufnahme 1
Aufnahme 2
Aufnahme 3
Programme
12:00

32
Store TV channels as a favorite
Select channel and press MEMORY. Select a suitable position and confirm by using the knob again (Fig. 124).
Fig.123 Fig.124
Teletext TXT
While watching TV press TV CONTROL > TT (Fig. 125). Select a teletext site by using the knob.
Turning SLOW – Teletext will switch in single numbers Turning FAST – Teletext will switch in numbers of 100
NOTE: You are not able to enter teletext numbers.
Fig.125 Fig.126
Media
WDR Köln
kabel eins
N24
ProSieben
SAT.1
Programme
12:00
Speicher Media
1:
2: Hier N24 speichern
3:
4:
5:
N24 speichern
12:00
Speicher
Media
ProSieben
12:00Manuell
Teletext
TT
ARD Text15.10 Sturm der Liebe . . . 31716.00 Tagesschau UT16.10 Sportschau live . . . 321
WM-Vergabe: Nun keine Untersuchung… 217
Plusminus: u.a zu Atomausstieg 604
USA Reise: Merkel trifft Obama.. 109
+-100
100

33
EPG Electronic Program Guide
While watching TV press TV CONTROL > EGP (Fig. 127).
NOTE: The display of EPG information could take a while. The channels will be refreshed step by step. EPG information can only be displayed if available.
Fig.127 Fig.128
MP3 Music
USB-memory/ HDD (FAT 32) needs to be connected to the USB connection.
Select TV source > scroll down to > 99 USB-AUDIO
>Select 99 USB-AUDIO … >
Fig.129
Push knob AGAIN >…
>Select DIRECTORY or MUSIC FILE for playing (Fig. 130).
Fig.130
Media
ProSieben
12:00Manuell
Programminfos
EPG
TV EPG
12:00Manuell
ZDF
12:00 Serie…
15:30
3sat
16:45 Spielfilm…
17:30
Media
99 ---
99 Record
99 Setup
99 USB-Audio99 USB-Video
Programme
12:00
TV
..
21 – Herbert Grönemeyer –
22 – Jennifer Lopez –
23 – Bon Jovi –
24 – Lady Gaga –
Media
Programme
12:00

34
NOTE: With menu .. you will step back to the previous directory.
Display of track information as well as interpret (Fig. 131)
Fig.131
Manual selecting of music files
While listening to the music press TV CONTROL > Symbol or . While using the knob the next or previous file can be selected (Fig. 132).
Fig.132
Music fast forward/ fast backward
While listening to the music press TV CONTROL > CH. While using the knob the needed speed can be selected (Fig. 133).
2x – 4x – 8x – 20x
Fig.133
Media
Programme
12:00
Music
00:10/04:03
Er gehört zu mir
Marianne Rosenberg
Music
00:10/04:03
Er gehört zu mir
Marianne Rosenberg
Media
ProSieben
12:00Manuell
Media
ProSieben
12:00
CH
Manuell

35
Video
USB-memory/ HDD (FAT 32) needs to be connected to the USB connection.
Select TV source > scroll down to > 99 USB-VIDEO > selecting … >
Push knob AGAIN >…
> Select DIRECTORY or VIDEO FILE for playing (Fig. 135).
Fig.134 Fig.135
NOTE: With menu .. you will step back to the previous directory.
Manual selecting of video files
While watching video press TV CONTROL > Symbol or . While using the knob the next or previous video file can be selected (Fig. 136).
Fig.136
NOTE: Only video files within the same directory can be selected.
Media
99 ---
99 Record
99 Setup
99 USB-Audio
99 USB-Video
Programme
12:00
Media
Programme
12:00
TV
..
Forrest Gump
Der Pate II
Titanic
Fight Club
Media
ProSieben
12:00Manuell

36
Video fast forward/ fast backward
While watching video press TV CONTROL > CH. While using the knob the needed speed can be selected (Fig. 137).
2x – 4x – 8x – 20x
Fig.137
Setup
Select TV source > scroll down to > 99 SETUP > selecting
The following settings can be done (Fig. 139)
Region & Language – Selecting region + language
Autoscan –search for available channels
Vol+ – volume up
Vol- – volume down
Reset – restart of the FISCUBE device
Fig.138 Fig.139
Media
ProSieben
12:00
CH
Manuell
Media
99 ---
99 Record
99 Setup99 USB-Audio
99 USB-Video
Programme
12:00
Media
Exit Setup
Region&Langu
Autoscan
Vol +
Vol -
Programme
12:00

37
Settings
Within the TV mode press the SETUP button.
The following settings can be done (Fig. 141)
Brightness Contrast Color
Fig.140 Fig.141
Example Brightness
Fig.142
Setup TV
Helligkeit
Kontrast
Farbe
Tint
Mehrkanal
TV-Norm
12:00
Setup TV
Helligkeit
12:00Manuell
min max

38
Operating instruction MMI 3G Plus
Push the MEDIA button – TV-Tuner needs to be selected (Fig. 144).
Fig.143 Fig.144
Channel list
Single channels can be selected of the channel list by using the knob (Fig. 145).
Fig.145
Manual channel selection
Select menu FUNCTIONS.
While using the options SEEK DOWN or SEEK UP you can switch between the single channels (Fig. 146).
Symbol
Fig.146 Fig.147
Media Quelle
Jukebox
Leer
Leer
Nicht verbunden
TV Tuner
Media Quelle
ZDF
3sat
Neo/KiKa
ZDFinfokanal
Bayerisches FS
MDR Fernsehen
Speicher
Funktionen Einstellungen
Media
Funktionen
Phoenix
VOR ORT
0:00 – 0:00
EPG
Suchlauf zurück
Media
Funktionen
Phoenix
VOR ORT
0:00 – 0:00
EPG
Suchlauf vor

39
TV Recording
USB-memory/ HDD (FAT 32) needs to be connected to the USB connection.
Select TV source > scroll down to > 99 RECORD.
> Select 99 RECORD in order to START recording. During recording a REC symbol will be displayed (Fig. 149).
Fig.148 Fig.149
Select 99 RECORD again in order to STOP recording. The record will be stored within directory RECORDED_TV.
Playing TV records
Select TV source > scroll down to > 99 USB-VIDEO > selecting
Push knob AGAIN >…> Select directory RECORDED_TV … >
Push knob AGAIN >…> Select the recorded file you want to play (Fig. 152).
Fig.150 Fig.151
Fig.152
Media Quelle
ZDF
3sat
Neo/KiKa
99 ---
99 Record
99 Setup
Speicher
Funktionen Einstellungen RECREC
Media Quelle
99 ---
99 Record
99 Setup
99 USB-Audio
99 USB-Video
Speicher
Funktionen Einstellungen
Media Quelle
TV
..
Video 1
Video 2
Recorded_TV
Speicher
Funktionen Einstellungen
Media Quelle
TV
..
Aufnahme 1
Aufnahme 2
Aufnahme 3
Speicher
Funktionen Einstellungen

40
Store TV channels as a favorite
Select the menu FUNCTIONS. Select STORE CHANNEL. Select a suitable position and confirm by using the knob again (Fig. 154).
Fig.153 Fig.154
Teletext TXT
While watching TV press FUNCTIONS > TELETEXT (Fig. 155). Select a teletext site by using the knob.
Turning SLOW – Teletext will switch in single numbers Turning FAST – Teletext will switch in numbers of 100
NOTE: You are not able to enter teletext numbers.
Fig.155 Fig.156
Media
Funktionen
Phoenix
VOR ORT
0:00 – 0:00
EPGSender speichern
MediaSpeicher
1
2
3 Phoenix hier speichern
4
5
Media
Funktionen
ARD
Sturm der
0:00 – 0:00
EPG
Teletext
Media
Funktionen
ARD
Sturm der
0:00 – 0:00
EPG
Teletext
ARD Text
15.10 Sturm der Liebe . . . 31716.00 Tagesschau UT16.10 Sportschau live . . . 321
WM-Vergabe: Nun keine Untersuchung… 217
Plusminus: u.a zu Atomausstieg 604
USA Reise: Merkel trifft Obama.. 109
+-100
100

41
EPG Electronic Program Guide
While watching TV press FUNCTIONS > EGP (Fig. 157).
NOTE: The display of EPG information could take a while. The channels will be refreshed step by step. EPG information can only be displayed if available.
Fig.157 Fig.158
MP3 Music
USB-memory/ HDD (FAT 32) needs to be connected to the USB connection.
Select TV source > scroll down to > 99 USB-AUDIO
>Select 99 USB-AUDIO … > (Fig. 160).
Fig.159 Fig.160
NOTE: With menu .. you will step back to the previous directory.
Display of track information as well as interpret (Fig. 161)
Fig.161
EPG
Media
Funktionen
Phoenix
VOR ORT
0:00 – 0:00
EPG
EPG
ZDF
12:00 Serie…
15:30
3sat
16:45 Spielfilm…
17:30
Funktionen
QuelleSpeicher
Einstellungen
Media Quelle
WDR Köln
99 ---
99 Record
99 Setup
99 USB-Audio
99 USB-Video
Speicher
Funktionen Einstellungen
Media Quelle
TV
..
21 – Herbert Grönemeyer –
22 – Jennifer Lopez –
23 – Bon Jovi –
24 Lady Gaga –
Speicher
Funktionen Einstellungen
Music
00:10/04:03
Er gehört zu mir Hitmix
Marianne Rosenberg
Music
00:10/04:03
Er gehört zu mir Hitmix
Marianne Rosenberg
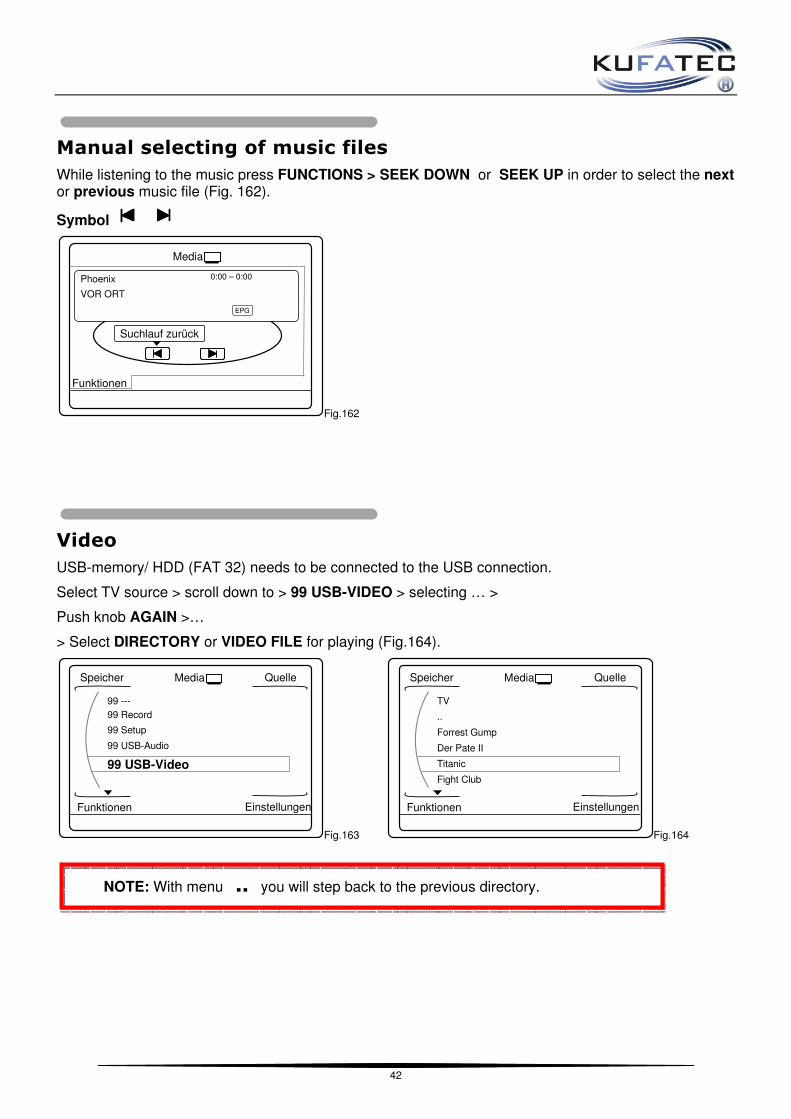
42
Manual selecting of music files
While listening to the music press FUNCTIONS > SEEK DOWN or SEEK UP in order to select the next or previous music file (Fig. 162).
Symbol
Fig.162
Video
USB-memory/ HDD (FAT 32) needs to be connected to the USB connection.
Select TV source > scroll down to > 99 USB-VIDEO > selecting … >
Push knob AGAIN >…
> Select DIRECTORY or VIDEO FILE for playing (Fig.164).
Fig.163 Fig.164
NOTE: With menu .. you will step back to the previous directory.
Media
Funktionen
Phoenix
VOR ORT
0:00 – 0:00
EPG
Suchlauf zurück
Media Quelle
99 ---
99 Record
99 Setup
99 USB-Audio
99 USB-Video
Speicher
Funktionen Einstellungen
Media Quelle
TV
..
Forrest Gump
Der Pate II
Titanic
Fight Club
Speicher
Funktionen Einstellungen

43
Manual selecting of video files
While watching video press FUNCTIONS > SEEK DOWN or SEEK UP in order to select the next or previous video file (Fig. 165).
Symbol
Fig.165
NOTE: Only video files within the same directory can be selected.
Setup
Select TV source > scroll down to > 99 SETUP > selecting
The following settings can be done (Fig. 167)
Region & Language – Selecting region + language
Autoscan –search for available channels
Vol+ – volume up
Vol- – volume down
Reset – restart of the FISCUBE device
Fig.166 Fig.167
Media
Funktionen
Phoenix
VOR ORT
0:00 – 0:00
EPG
Suchlauf zurück
Media Quelle
ARD
WDR Köln
99 ---
99 Record
99 Setup
99 USB-Audio
Speicher
Funktionen Einstellungen
Media Quelle
Exit Setup
Region & Language
Autoscan
Vol +
Vol –
Reset
Speicher
Funktionen Einstellungen

44
Settings
Within the TV mode press the SETUP button.
The following settings can be done (Fig. 169)
Brightness Contrast Color Example Brigtness
Fig.168 Fig.169
Additional video input 2G/ 3G/ 3GPlus
Note: No processing of audio signals – only video signals
Remove the housing of the 18-pole connector of the FISCUBE loom. Integrate the single PIN’s of the RCA -connector (Kufatec article-ID 35570) (Fig. 170).
PIN 2 – Video ground (Black)
PIN 1 – Video (Yellow)
The video source needs to be selected manually through the AV source on the MMI panel.
NOTE: No auto switch available by choosing the rear gear.
Fig.170 Fig.171
Media
Einstellungen
Helligkeit
Kontrast
Farbe
Tint
Mehrkanalton
TV-Norm
Media
Einstellungen
Helligkeit
min max
Einstellungen
Media Quelle
Jukebox
Leer
Leer
Nicht verbunden
TV Tuner
Externer AV EingangAV
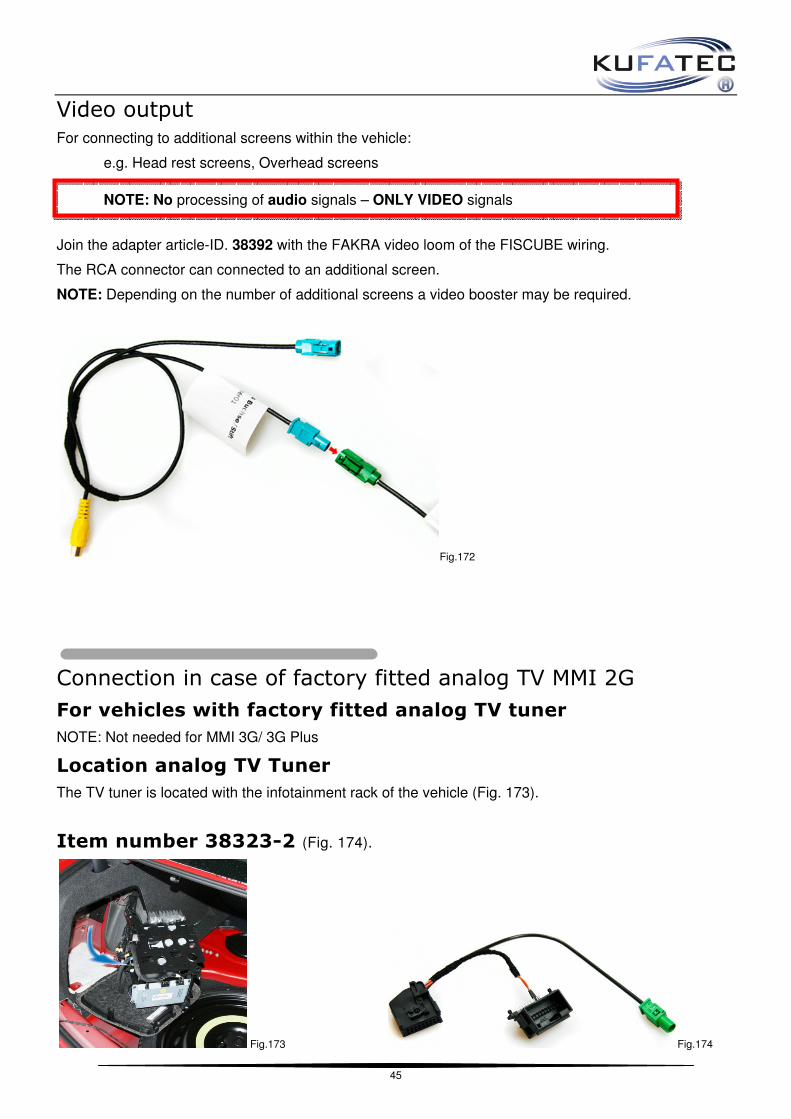
45
Video output
For connecting to additional screens within the vehicle:
e.g. Head rest screens, Overhead screens
NOTE: No processing of audio signals – ONLY VIDEO signals
Join the adapter article-ID. 38392 with the FAKRA video loom of the FISCUBE wiring.
The RCA connector can connected to an additional screen.
NOTE: Depending on the number of additional screens a video booster may be required.
Fig.172
Connection in case of factory fitted analog TV MMI 2G
For vehicles with factory fitted analog TV tuner
NOTE: Not needed for MMI 3G/ 3G Plus
Location analog TV Tuner
The TV tuner is located with the infotainment rack of the vehicle (Fig. 173).
Item number 38323-2 (Fig. 174).
Fig.173 Fig.174

46
Factory fitted analog tuner needs to be removed.
Join wiring 38323-2 with the connections of the factory fitted TV-Tuner.
TV Tuner connector Red FAKRA GREEN
Fig.175 Fig.176 Fig.177
Join the 18-pole connector of the loom 38323-2 as well as the original fiber optical connector (TV tuner) to the interface (Fig. 177).

47
Replacement Displayinterface
NOTE: before replacing the displayinterface all MMI components needs to be updated to the latest software index. Please get in contact with your local Audi dealer.
Neede update CD
Model CD-part number
A6 4F, A8 4E, Q7 4L 4L0 998 961
A4 8K, A5 8T 8K0 998 961
Procedure
Disconnect battery replace interface connect battery again
Turn ignition on remove component protection (Get in contact with your local Audi
dealer – online connection is required)
Address 07 remove component protection (In some cases the coding machine is
asking a blocking time – These time needs to be elapsed completely)
Additional coding Address 07
Country code, Vehicle – Note down the values of the old interface Copy the values into
the new interface
Additional adaption channels
Channel 01 – MMI device list (ACC, AAS, PDC, MFSW, TPMS, RVC)
Channel 02 – Options within CAR menu (Left hand drive, battery status)
Channel 11 – Additional MMI features (logbook, clima comfort, aux heating)
Channel 12 – Phone version (1 for PR-Nr. 9ZW --- 2 for PR-Nr. 9ZF)
Channel 13 – Protocol setting: 0 = A6, A8, Q7 / 8191 = A4 8K, A5 8T
Channel 111 – MMI start for activating the configurated values
NOTE: Kufatec GmbH & Co. KG has got no influence in deleting the component protection. In case it is not possible to delete the protection please get in contact with [email protected].