Embed Size (px)
Citation preview

Installation Instructions for PIP and IPO Deck Panels(page 1)
52”-108”
93.5”
3 7/8”gap
5/8” Res3/4” Com
1“ Res1.5” Com
5“11“
32”
36”
40”
12”
1. Post installation: Posts for the 93.5” panel should be spaced 8 feet on-center, which will leave space for inserting the brackets. ASTM recommends post holes be at least 2 feet deep and roughly four times the diameter of the post. Options on posts can include the standard 2” x 2” iron square posts with base plate, or the standard 4” x 4” wood post and railings. The deck framing and desired aesthetics will determine the type, height, and installation of posts.2. Bracket Installation: Installation for deck brackets will vary depending on the type of products being used. For a typical deck application, insert brackets into the top and bottom rail on one side of the fence panel. Carefully measure and bolt the additional two brackets on the post, opposite the side of the deck panel that has brackets already inserted. For added bracket support & stability, use a strong exterior epoxy adhesive (we recommend Ramset-A5O1K), spot welds, or fasten using a tap screw. The use of two or more fastening methods is highly recommended. At this point, two brackets are inserted into the deck panel on one side. The other two brackets are mounted to the post on the opposite side. Make sure that the brackets attached to the post are measured and leveled. 3. Deck Panel Installation: The deck panel can then be lifted onto the brackets that have previously been installed on the post, then lift and level the other side of the panel and attach it to the opposite post. A block on the ground may help to support the weight. Once the brackets have been attached to the post on the opposite side, the deck panel should be level and in place. Another common installation would be to insert the brackets into the panel at all points, and then lift, level, and mount to the posts as one piece. 4. Accessories Installation: Accent Panels can be installed in 3 different ways: epoxy, spot welding, or tap screws. It is common to use longer posts with your deck panel (ex. Use a 5’ post with a 3’ panel) to have additional room at the top of the post to attach your accent panel. When the U-channel is properly placed over the top rail, the accent top panel pickets should align with the pickets in the deck panel. Ornamental Inserts are to be used with the IPO design. These inserts are installed using set screws on the top and bottom of the outer ring in the panel. Simply place the insert into the ring in the panel and tighten using a 9mm allen wrench. An option we suggest is to use an epoxy in addition to the set screws. *Always check your local codes and BOCA requirements for compliance before ordering and installing any Fortress Iron Fence or Deck product.
C
M
Y
CM
MY
CY
CMY
K
Deck Installation Front.pdf 7/25/2006 9:18:34 AMDeck Installation Front.pdf 7/25/2006 9:18:34 AM
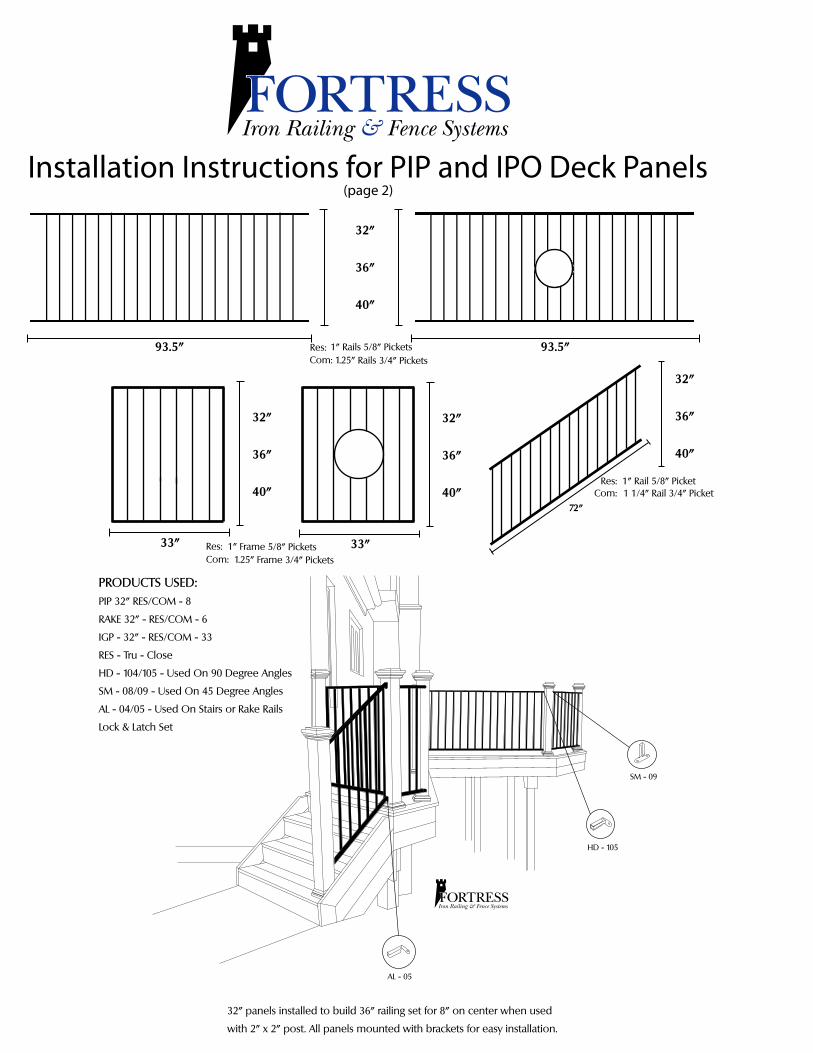
Installation Instructions for PIP and IPO Deck Panels(page 2)
32"
36"
40"
93.5"93.5"
32"
36"
40"
33"
32"
36"
40"
33"
32"
36"
40"
72"
PRODUCTS USED:PIP 32" RES/COM - 8
RAKE 32" - RES/COM - 6
IGP - 32" - RES/COM - 33
RES - Tru - Close
HD - 104/105 - Used On 90 Degree Angles
SM - 08/09 - Used On 45 Degree Angles
AL - 04/05 - Used On Stairs or Rake Rails
Lock & Latch Set
32" panels installed to build 36" railing set for 8" on center when used
with 2" x 2" post. All panels mounted with brackets for easy installation.
HD - 105
AL - 05
SM - 09
Res: 1" Rail 5/8" Picket1 1/4" Rail 3/4" PicketCom:
1" Rails 5/8" Pickets Res: Com: 1.25” Rails 3/4” Pickets
Res: 1” Frame 5/8” PicketsCom: 1.25” Frame 3/4” Pickets


![design[ human ]design Creative Prompt Card Deck by Pip ...designhumandesign.media.mit.edu/designhumandesign... · Design These variables are examples of the many artifacts that we](https://img.dokumen.tips/doc/110x75/5abdde737f8b9ab02d8c2bf3/design-human-design-creative-prompt-card-deck-by-pip-these-variables-are-examples.jpg)