Embed Size (px)
Citation preview

INSTALLATION INSTRUCTIONSfor Exterior Trim Boards Made with AuraLast-The Worry-Free Wood®
(JII035)
Note to Installer: Provide a copy of these instructions to the building owner. By installing this product, you acknowledge the terms and conditions of the limited product warranty as part of the terms of the sale.
Thank you for selecting JELD-WEN products. Attached are JELD-WEN’s recommended installation instructions for Trim Boards. These instructions include the following approved trim board applications: Fascia, Corner, Column, Window & Door Trim, and Band Board. While the use of these installation instructions is recommended, consult your local building code official for applicable building codes and regulations. Local building code requirements supersede recommended installation instructions.
PRODUCT INSTALLATION RECOmmENDATIONS
•Useproperbuildingpracticeswhenintegratingtrimboardswithareasofthebuildingdesignedtoshedwatertotheexterior.Whereapplicable,installflashinginashiplapmannertointerceptanddirecttheflowofwaterawayfromthebuildingtodesigneddrainagepaths.Installhorizontalflashingextendingfromthetopofallwindowsanddoorsandwherethereisanychangeinmaterialordirection.Theflashingshouldtiltdownwardtoallowwatertodrainawayfromthewall.
•TrimBoardsareanonstructuraldecorativetrimproductandshouldnotbeusedwherestructurallumberisrequiredorfordecking,fencesorplanters.Thetrimboardsaredesignedtobeappliedtostructuralframing,sheathingandothermaterials.
• InstallTrimBoardssotheywillnotcontacttheground,backfill,sod,mulch,etc.oranyplacethatcollectswater.
•DonotinstallwherewatersprinklerscanregularlywetTrimBoards.
• InstallinamannerthatallowswatertoeasilyrunoffandnotbecometrappedbehindTrimBoards.
•Allhorizontalunflashedprofiles(e.g.,windowsills,watertabletrim,beadandmouldings)mustbeslopedtoensureproperdrainage.
Failure to install trim boards according to the recommendations in these instructions could result in denial of warranty claims for operational or performance problems.
NEEDED mATERIALS
Note! Follow all material manufacturers’ instructions for proper use and compatibility.•Galvanizednails.Naillengthwillvarydependingonthethicknessoftheboard.Nailsmustpenetrateatleast11/4"intosolidwood.
•Sealant(exteriorgrade,highqualitypolyurethaneifpaintedor100%siliconeifleftexposed)
•Finishingsupplies(sandpaper,woodputty,paintorstain)
•Cleaningsupplies
NEEDED TOOLS
ImporTANTINFormATIoN&GloSSAry
GLOSSARy
Band BoardAdecorativeelementthatusuallydelineatesbetweentwodifferentwallmaterials.Butt JointThejointoftwosquareedgesunitedwithoutoverlapping.Corner BoardsAdecorativeelementcoveringtheseamsofallcornerswheretheexteriorwallscometogether.Decorative ColumnDecorativeboardsinstalledonsupportbeamstoaddanicefinishedandattractiveappearancetoahouse.FasciaDecorativetrimboardsalongtherooflinethatconcealtheendsofrafterboards.miter JointThesearecomponentsthatarejoinedatanangletoeachother.Eachoneiscutanangleequaltohalftheangleofthejunctionareusuallyatrightangles.Pilot HoleAdrilledholethatisnolargerthanthebodyofthescrew(minusthethreads).ShiplapThelayeringmethodinwhicheachlayeroverlapsthelayerbelowitsothatwaterrunsdowntheoutside.Window & Door TrimAdecorativecasingsurroundingthewindows&doorsthatgivesaddedprotectionagainstmoistureinfiltration.
•Hammerorpneumaticnailer
•Tapemeasure
•Caulkinggun
•Compoundmitersaw
•Drillwithbits
•paintbrushorroller
•Sandingblock
INSTALLATION INSTRUCTIONSfor Exterior Trim Boards Made with AuraLast-The Worry-Free Wood® (JII035)
2
SAFETy&HANDlING
SAFETy
•readandfullyunderstandAllmanufacturers’instructionsbeforebeginning.
•Donotworkalone.Twoormorepeoplearerequired.Usesafeliftingtechniques.
•Wearprotectivegear(e.g.safetyglasses,gloves,earprotection,etc.).
•operatehand/powertoolssafelyandfollowmanufacturer’soperatinginstructions.
•Usecautionwhenworkingatelevatedheights.
IF INJURy OCCURS, ImmEDIATELy SEEK mEDICAL ATTENTION!
mATERIALS & HANDLING
•Heedmaterialmanufacturers’handlingandapplicationinstructions.
•Storetrimboardsindry,well-ventilatedareaflatandoffthegroundtoallowaircirculation;preferablyinanenclosedbuilding.
•protectfromexposuretodirectsunlightduringstorage.
• Installonlywhenconditionsandmaterialsaredry.
removeshippingmaterialsandinspecttrimboardsfor:•Cosmeticdamage
•Correctproduct(length,thickness,prefinishetc.)
Ifanyoftheseconditionsrepresentaconcern,beforeinstalling,contactyourdealerordistributorforrecommendations.
INSTAllTrImBoArDS1
JOINTS
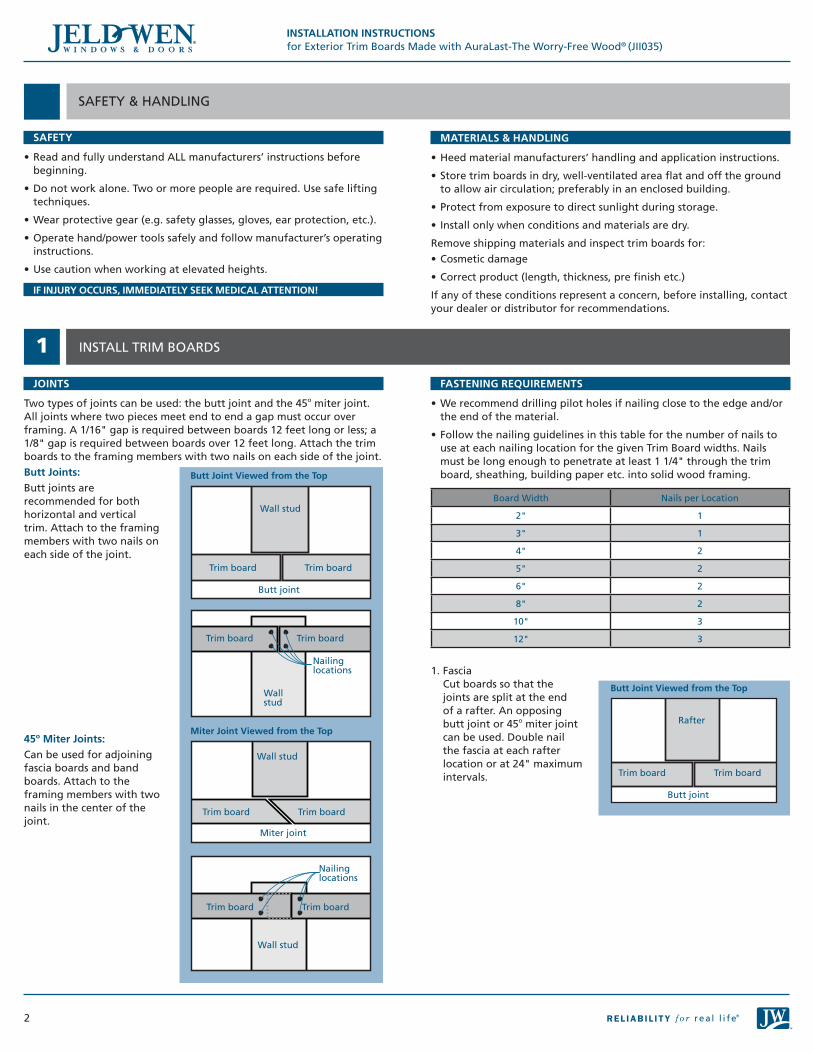
Twotypesofjointscanbeused:thebuttjointandthe45omiterjoint.Alljointswheretwopiecesmeetendtoendagapmustoccuroverframing.A1/16"gapisrequiredbetweenboards12feetlongorless;a1/8"gapisrequiredbetweenboardsover12feetlong.Attachthetrimboardstotheframingmemberswithtwonailsoneachsideofthejoint.Butt Joints:Buttjointsarerecommendedforbothhorizontalandverticaltrim.Attachtotheframingmemberswithtwonailsoneachsideofthejoint.
45º miter Joints:Canbeusedforadjoiningfasciaboardsandbandboards.Attachtotheframingmemberswithtwonailsinthecenterofthejoint.
FASTENING REqUIREmENTS
•Werecommenddrillingpilotholesifnailingclosetotheedgeand/ortheendofthematerial.
•FollowthenailingguidelinesinthistableforthenumberofnailstouseateachnailinglocationforthegivenTrimBoardwidths.Nailsmustbelongenoughtopenetrateatleast11/4"throughthetrimboard,sheathing,buildingpaperetc.intosolidwoodframing.
Board Width Nailsperlocation
2" 1
3" 1
4" 2
5" 2
6" 2
8" 2
10" 3
12" 3
1.Fascia Cutboardssothatthejointsaresplitattheendofarafter.Anopposingbuttjointor45omiterjointcanbeused.Doublenailthefasciaateachrafterlocationorat24"maximumintervals.
Wallstud
Wallstud
Wallstud
Wallstud
Trimboard
Trimboard
Trimboard
Trimboard
Nailinglocations
Nailinglocations
Trimboard
Trimboard
Trimboard
Trimboard
Buttjoint
miterjoint
Butt Joint Viewed from the Top
miter Joint Viewed from the TopRafter
Trimboard Trimboard
Buttjoint
Butt Joint Viewed from the Top

INSTALLATION INSTRUCTIONSfor Exterior Trim Boards Made with AuraLast-The Worry-Free Wood® (JII035)
3
pleasevisitjeld-wen.com/resourcesfor warrantyinformation.
Thankyouforchoosing
©2011 JELD-WEN, inc.; This publication and its contents are owned by JELD-WEN, inc. and are protected under the U.S. Copyright Act and other intellectualproperty laws. All trademarks, service marks, logos and the like (whether registered or unregistered) are owned or controlled by JELD-WEN, inc. or others.Unauthorized use or duplication of JELD-WEN intellectual property is prohibited.JELD-WEN reserves the right to change product specifications without notice. Please check our website, jeld-wen.com, for current information. (09/11)
INSTAllTrImBoArDS-CoNTINUED1
2.CornerBoards Werecommendbuttjointsforeasyinstallation.Doublenailintoframingevery24".Tocreateatightjointbetweenthetwocornerboards,driveanadditionalnailalongtheoutersideoftheoverlappingcornerboardevery16".Applyabeadofsealanttothejointsbetweensidingorothermaterialandcornerboards.
3.DecorativeColumn Werecommendbuttjointsforeasyinstallationinthesamemannerasthecornerboardinstallation.Createanaircavityusingshimsoranequivalentbetweenthecolumnandthetrimboard.makesurethatdrainageisallowedforatbottomofcolumn.Applyasealantjointonthecornerswheretheboardsmeet.
ThisisaguidelineforpaintingandfinishingTrimBoards.Consultapaintprofessionalforspecific“how-to”instructionsandadditionalmaterials.Duringmanufacturingofprimedproducts,awaterborneprimerisappliedforgoodpaintfilmadhesionandsomewoodprotectionduringshipping,handlingandinstallation.
Werecommendfinishingtrimboardsassoonaspossibleafterinstallationorwithin90daysduringfavorableweatherconditions.Trimboardsmustbecleananddrybeforefinishing.Ifnecessary,cleanwithamildsoapandwaterandletdry.Useagoodqualityexteriorgradeacryliclatexpaint.Applyfinishaccordingtothemanufacturersinstructions.
BasicFinishingrecommendations:
•Donotattemptpainting/finishinginwetweatheroranyextremeenvironmentalconditions.
•Thenormaltemperaturerangerecommendedbypaintmanufacturersis50°-85°.Afterfinishapplication,thetemperatureshouldnotdropbelowtheminimumforatleastfourhours.Someproductshaveawidertemperaturerange.
•Therelativehumidityshouldbebelow85%.
•paint/finishinadustfreelocationthatiswelllit,butnotindirectsunlightandallowsplentyofventilation.
•Fillallnailholeswithwoodputty,allowtodryandsandsmooth.
•multiplelightcoatsaregenerallybetterthanoneheavycoat.
4.Window&DoorTrim Installtrimboardsleavinga1/4"-3/8"expansiongapbetweenthetrimboardsandthewindowordoor,andsiding.Fastentrimboards24"apartusingastaggerednailpatternanddoublenailatthejointsasshown.Applysealanttoalljointsbetweentrimboards,betweentrimandsidingandbetweentrimandthewindowframe.
5.BandBoard Iftherunrequiresmorethanonepiece,cutamiterjointandleavea1/8"gapbetweenthepiecestoallowforexpansionandcontraction.Fastentrimboards24"apartanddoublenailalljoints.
CArE&mAINTENANCE3
Woodcareincludesproperfinishingandrefinishingofthewood'sfinishasneeded.Biannualinspectionsaresufficientformostareas;however,coastalareasrequiremonthlyinspectionsbecauseofmoistureandsaltintheair.Cleanexposedwoodsurfaceswithmildsoapandwater.Forstubbornstainsonpaintedsurfaces,considerlightlysandingandrefinishing,orcontactapaintprofessionalforrecommendations.Immediatelyrepairscratches,voidsorcracksinpaintedsurfacesorsealantjoints.
FINISHING2
Siding
Sealantjoints
Sealantjoints
Trim
24"16"
16"
Trim boards