Embed Size (px)
Citation preview

INSTALLATION GUIDE
RD93 CHRYSLER 81/4”, 29 SPLINE
Part No. 210281Revision Date 15/09/03
Copyright © 2001 by ARB Corporation Limited
No liability is assumed for damages resulting in the use of the information contained herein. ARB AIR LOCKER Locking Differentials and AIR LOCKER are trademarks of ARB Corporation Limited. Other product names used herein are for identification purposes only and may be trademarks of their respective owners.
ARB 4x4 ACCESSORIES Corporate Head Office
42-44 Garden St Tel: +61 (3) 9761 6622 Kilsyth, Victoria Fax: +61 (3) 9761 6807 AUSTRALIA 3137
Australian enquiries [email protected] North & South American enquiries [email protected] Other international enquiries [email protected]
www.arb.com.au

Table of Contents:
1
1 Introduction 3 1.1 Pre-Installation Preparation 3 1.2 Tool-Kit Recommendations 4
2 Removing the Existing Differential 5 2.1 Vehicle Support 5 2.2 Differential Fluid Drain 5 2.3 Removing the Axles 5 2.4 Marking the Bearing Caps 6 2.5 Checking the Current Backlash Amount 7 2.6 Removing the Differential Carrier 8
3 Installing the Air Locker 10 3.1 Mounting the Ring Gear 10 3.2 Installing the Carrier Bearings 11 3.3 Drilling and Tapping the Bulkhead Port 12 3.4 Setting Up the Inner Bulkhead Fitting 13 3.5 Setting the Backlash 15 3.6 Profiling the Seal Housing Tube 16 3.7 Installing the Junction Fitting 17 3.8 Re-Installing the Axles 19
4 Installing the Air System 21 4.1 Mounting the Solenoid 21 4.2 Running & Securing the Air Line 23 4.3 Connection to the Bulkhead Fitting 24
5 Mounting & Connecting the Electrical System 25 5.1 Mounting the Actuator Switch(es) 25 5.2 Wiring the Actuator System 26
6 Testing & Final Assembly 29 6.1 Leak Testing 29 6.2 Testing the Air Locker Actuation 29 6.3 Re-Sealing & Filling the Differential 30 6.4 Post-Installation Check List 31
7 Parts List 33 7.1 Exploded Assembly Diagram 33 7.2 Itemized Parts List 34
2
2 Removing the Existing Differential
3
IMPORTANT : BEFORE ATTEMPTING TO DISMANTLE YOUR VEHICLE FOR THIS INSTALLATION, PLEASE READ THIS INSTALLATION GUIDE IN ITS
ENTIRETY, AS WELL AS ALL APPLICABLE SECTIONS OF YOUR VEHICLE MANUFACTURER’S SERVICE MANUAL.
1.1 Pre-Installation Preparation This booklet is to be used in conjunction with your vehicle manufacturer’s service manual. ARB endeavors to account for every possible variation in vehicle model when publishing its installation guides, and guides are updated regularly as new model information becomes available, however, the rapid and globally varied release of some vehicles makes it difficult to insure that your vehicle model has been accurately accounted for. In the case of any technical discrepancies between this guide and your service manual, we strongly advise that you adhere to the specifications and techniques as documented in your service manual. Although your ARB Air Locker comes complete with all the step by step instructions you will need to supplement your vehicle manufacturer’s service manual and install your new differential, ARB recommends that you have your Air Locker installed by a trained professional. Many ARB distributors around the world have been fully instructed in Air Locker installations by ARB, and have gained a wealth of experience and skill from years of performing similar installations. Once you begin this installation your vehicle will be immobile until all steps of the installation are complete. Make sure your Air Locker kit is the correct model for your vehicle and that it contains all of the parts listed on back cover of this booklet. Also be sure you have appropriately equipped yourself with all the necessary tools, parts, and materials to complete this installation (see Section 1.2 Tool-Kit Recommendations), and that you have allowed for an appropriate amount of vehicle down time. HINT : Place a mark inside each of the c symbols as
you complete each step. It is very important NOT to miss any of the steps!
2 Removing the Existing Differential
4
1.2 Tool-Kit Recommendations Below is a list of tools and supplies you may need to complete this installation. Requirements for your vehicle may vary. Please consult your vehicle service manual for additional recommendations. 1.2.1 Tools
c Standard automotive sizes (metric and/or imperial) of sockets, wrenches, Allan keys, and drills.
c A dial indicator or other suitable measuring tool for checking ring & pinion backlash.
c A razor knife for nylon tubing. c A suitable adjuster nut wrench to set backlash and preload for your
model of axle assembly. c A torque wrench (See vehicle service manual for required torque
range) c A lubricant drain reservoir. c A 11.2mm [7/16”] drill and ¼”NPT tap for bulkhead fitting installation. c Needle-nosed pliers. c An automotive bearing puller (2 jawed) or a differential carrier bearing
puller. c A bearing press or arbor press.
1.2.2 Supplies
c Thread lubricant/sealant compound (e.g., LOCTITE #567) c Thread locking compound (e.g., LOCTITE #272) c A gasket sealant or replacement gasket for your differential cover. c A sufficient volume of differential oil to completely refill your housing.
(see the ARB Air Locker Operating and Service Manual for recommended lubricants)
c A soap and water mixture to test for air leaks. c Teflon paste.
2 Removing the Existing Differential
5
2.1 Vehicle Support
c Safely secure the vehicle on a hoist. We recommend supporting the vehicle on a chassis hoist to keep the differential area at a convenient working height and to leave the wheels and axles free to be rotated and removed.
c Once supported in the air, release the parking brake and leave the vehicle in neutral. Chock the wheels if necessary.
2.2 Differential Fluid Drain
c Clean around the differential cover seal to prevent dirt from entering the differential.
c Position a fluid drain reservoir under the differential. c If a drain plug exists, remove it and completely drain all differential oil
from the housing. c If no drain plug exists then the oil can be drained by loosening the
cover bolts and gently prying the cover away at the bottom until oil runs out.
HINT : If no drain plug exists then it would be a good idea to drill and tap for a tapered oil drain plug to assist with future oil changes.
c Once drained, remove the differential cover plate.
HINT : This is a good time to check for metal particles in your oil and in the bottom of the housing which may indicate a worn bearing or differential component.
2.3 Removing the Axles
IMPORTANT :
Collision damage or heavy off-road use of your vehicle in the past may have resulted in some degree of bending in the axle. Any
misalignment of the axle tubes may result in excessive wear and/or failure of your differential and axle shafts. ARB strongly
recommends that you have your axle assembly inspected for concentricity and straightness before installing your Air Locker.
2 Removing the Existing Differential
6
c Remove the wheels and brake assembly according to your vehicle’s service manual.
c Rotate the differential center until the cross shaft can be removed. c Remove the cross shaft retaining pin and the cross shaft. c Rotate the differential until the ‘C’ clip access window is accessible. c Gently tap the axle ends inward to release the ‘C’ clips. c Remove ‘C’ clips with needle nose pliers. c Gently tap axles outward and remove them from the differential center.
NOTE : Rubber oil seals can be easily damaged. Support the weight of the axle when extracting it across the edges of the seals.
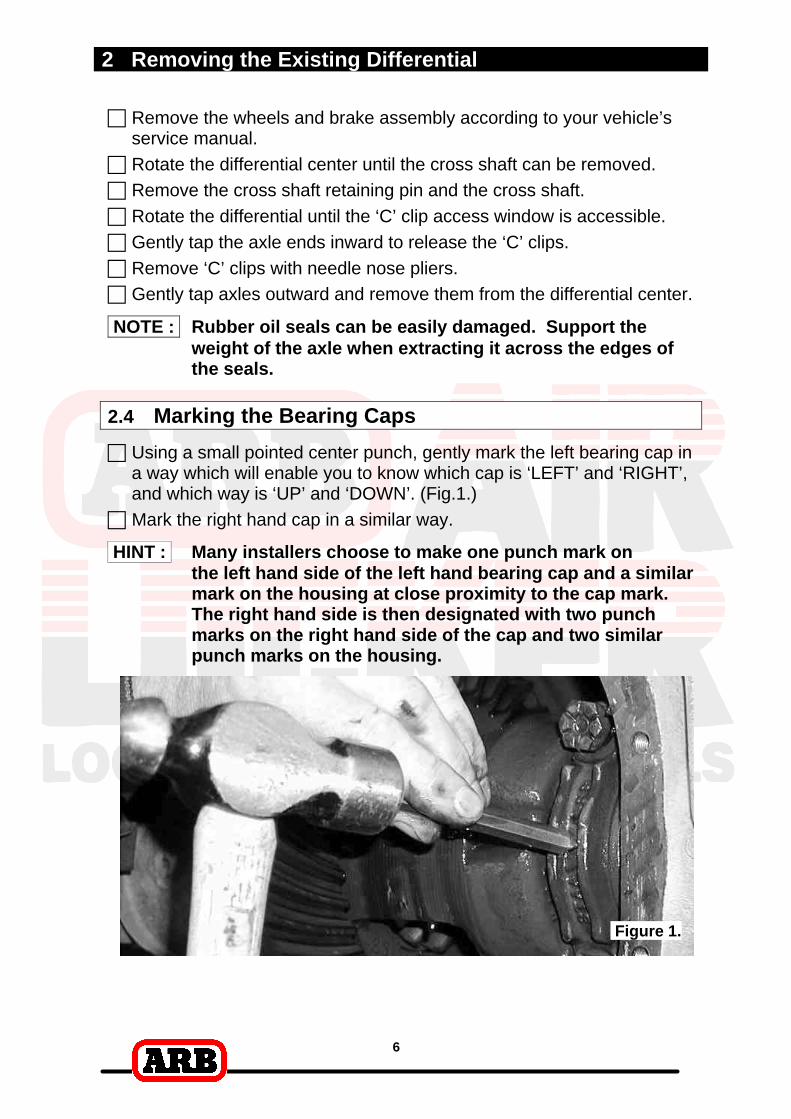
2.4 Marking the Bearing Caps
c Using a small pointed center punch, gently mark the left bearing cap in a way which will enable you to know which cap is ‘LEFT’ and ‘RIGHT’, and which way is ‘UP’ and ‘DOWN’. (Fig.1.)
c Mark the right hand cap in a similar way.
HINT : Many installers choose to make one punch mark on the left hand side of the left hand bearing cap and a similar mark on the housing at close proximity to the cap mark. The right hand side is then designated with two punch marks on the right hand side of the cap and two similar punch marks on the housing.
Figure 1.
2 Removing the Existing Differential
7
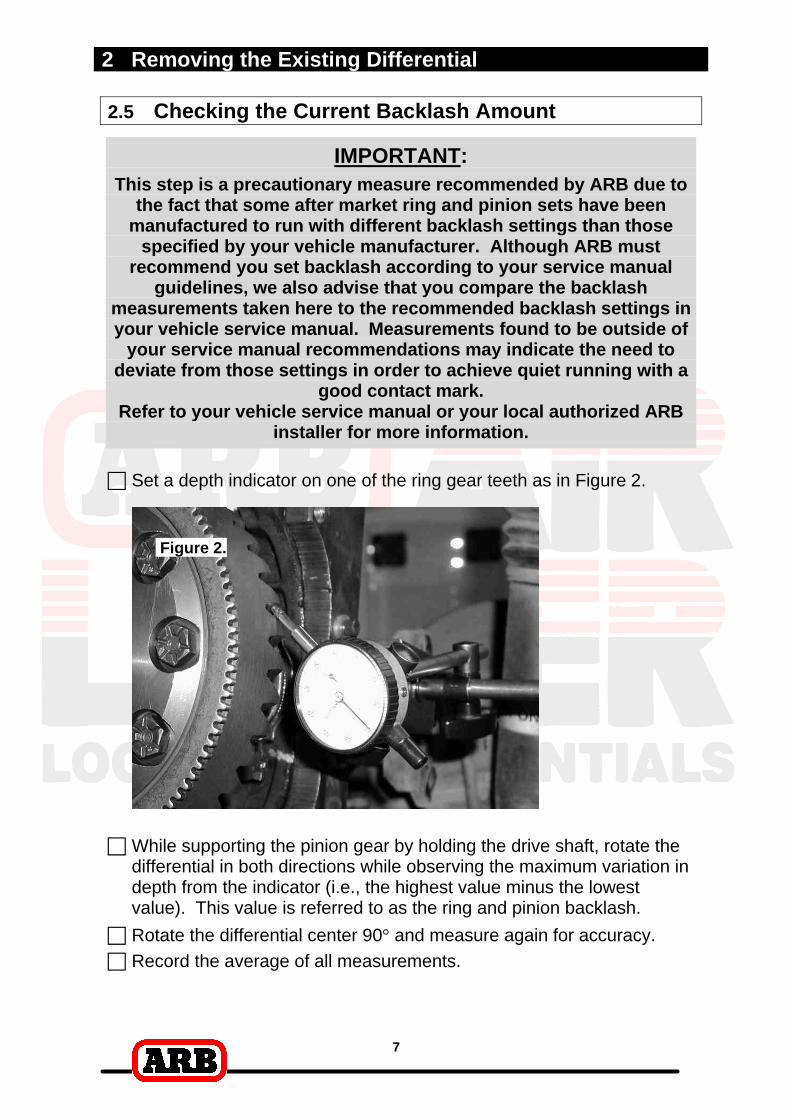
2.5 Checking the Current Backlash Amount
IMPORTANT:
This step is a precautionary measure recommended by ARB due to the fact that some after market ring and pinion sets have been
manufactured to run with different backlash settings than those specified by your vehicle manufacturer. Although ARB must
recommend you set backlash according to your service manual guidelines, we also advise that you compare the backlash
measurements taken here to the recommended backlash settings in your vehicle service manual. Measurements found to be outside of
your service manual recommendations may indicate the need to deviate from those settings in order to achieve quiet running with a
good contact mark. Refer to your vehicle service manual or your local authorized ARB
installer for more information.
c Set a depth indicator on one of the ring gear teeth as in Figure 2.
Figure 2. c While supporting the pinion gear by holding the drive shaft, rotate the
differential in both directions while observing the maximum variation in depth from the indicator (i.e., the highest value minus the lowest value). This value is referred to as the ring and pinion backlash.
c Rotate the differential center 90° and measure again for accuracy. c Record the average of all measurements.

2 Removing the Existing Differential
8
2.6 Removing the Differential Carrier
c Remove the adjuster nut locking tabs. c Remove the bearing caps from the third member. c Remove the adjuster nuts. c Carefully remove the differential carrier from the third member.
NOTE : The differential center is heavy and quite difficult to handle when covered in oil. Do not drop it!
c Remove the tapered roller bearings from the differential carrier with a bearing puller. (Fig.3.)
HINT : Check the condition of the bearing for wear and discard
if damaged.
Figure 3.
2 Removing the Existing Differential
9
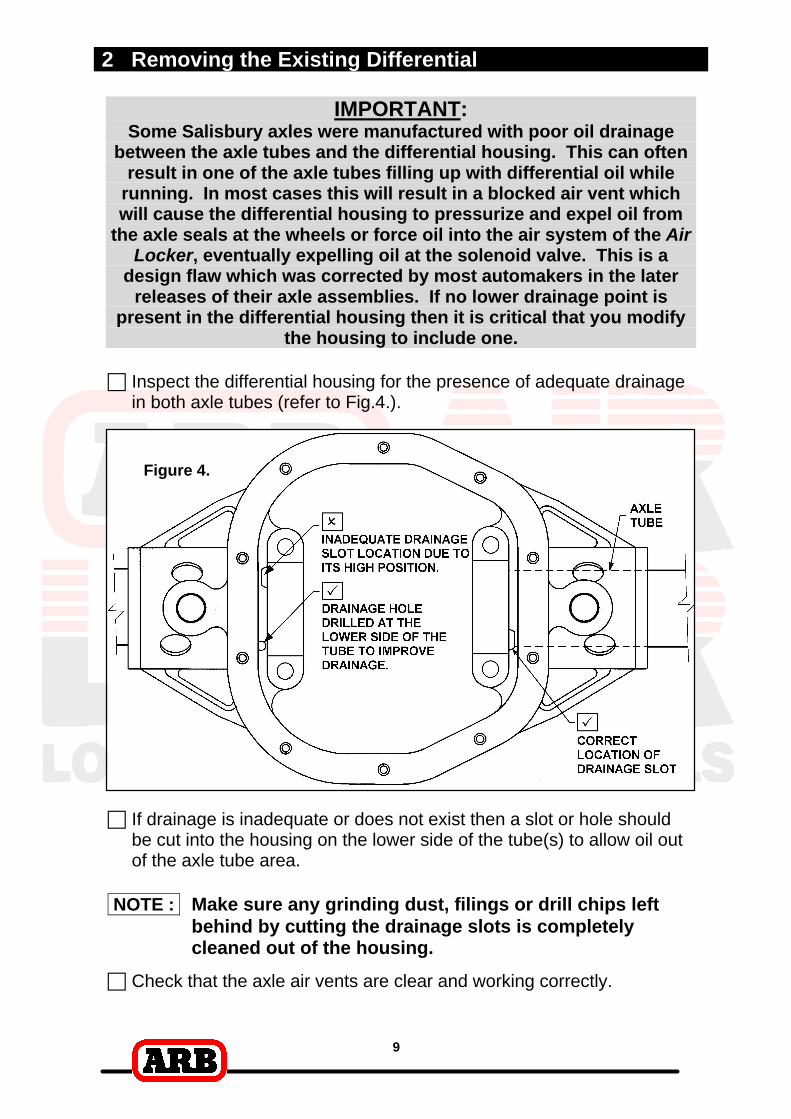
IMPORTANT: Some Salisbury axles were manufactured with poor oil drainage
between the axle tubes and the differential housing. This can often result in one of the axle tubes filling up with differential oil while
running. In most cases this will result in a blocked air vent which will cause the differential housing to pressurize and expel oil from
the axle seals at the wheels or force oil into the air system of the Air Locker, eventually expelling oil at the solenoid valve. This is a
design flaw which was corrected by most automakers in the later releases of their axle assemblies. If no lower drainage point is
present in the differential housing then it is critical that you modify the housing to include one.
c Inspect the differential housing for the presence of adequate drainage in both axle tubes (refer to Fig.4.).
Figure 4.
c If drainage is inadequate or does not exist then a slot or hole should be cut into the housing on the lower side of the tube(s) to allow oil out of the axle tube area.
NOTE : Make sure any grinding dust, filings or drill chips left behind by cutting the drainage slots is completely cleaned out of the housing.
c Check that the axle air vents are clear and working correctly.

3 Installing the Air Locker
10
3.1 Mounting the Ring Gear
IMPORTANT:
Higher ratio gearing uses deeper (thicker) ring gears with teeth that extend much further. Make sure the teeth of the ring gear will
not obstruct the removal of the cross shaft when fitted. If so, ARB recommends that you grind just enough off of one of the
ring gear teeth to successfully remove the cross shaft. DO NOT MODIFY THE CROSS SHAFT!
NOTE : If your existing differential was fitted with a toner ring it will need to be removed and installed onto the Air Locker before the ring gear can be mounted. See your vehicle service manual.
c Apply a thin film of high pressure grease to the ring gear shoulder of the Air Locker to prevent seizing.
c Thoroughly clean any thread locking compound or other foreign matter from the holes of the ring gear, the threads of the ring gear bolts, and the mating surfaces between the ring gear and the Air Locker flange.
HINT : Stoning the ring gear mounting face before installation will remove any high spots around the threads.
c Heat the ring gear to between 80 and 100°C [175 - 212°F] in hot water or in an oven to slightly expand the gear and facilitate assembly.
NOTE : NEVER HEAT GEARS WITH A FLAME! This could damage the hardened surface of the gear and result in premature wear or failure.
c Dry the gear and bolt holes with compressed air (if wet). c Install the ring gear onto the Air Locker by aligning the bolt holes
and then gently tapping it around in a circle with a soft mallet. Avoid using the bolts to pull down the ring gear as this puts excess strain on the bolts and the differential flange.
c Apply a thread locking compound to the thread of each ring gear bolt before inserting it. Do not apply threading compound directly into the threaded hole as this could prevent the bolt from reaching its full depth.
c Tighten the ring gear bolts in a star pattern with a torque wrench according to your vehicle manufacturer’s specified torque.
3 Installing the Air Locker
11
3.2 Installing the Carrier Bearings
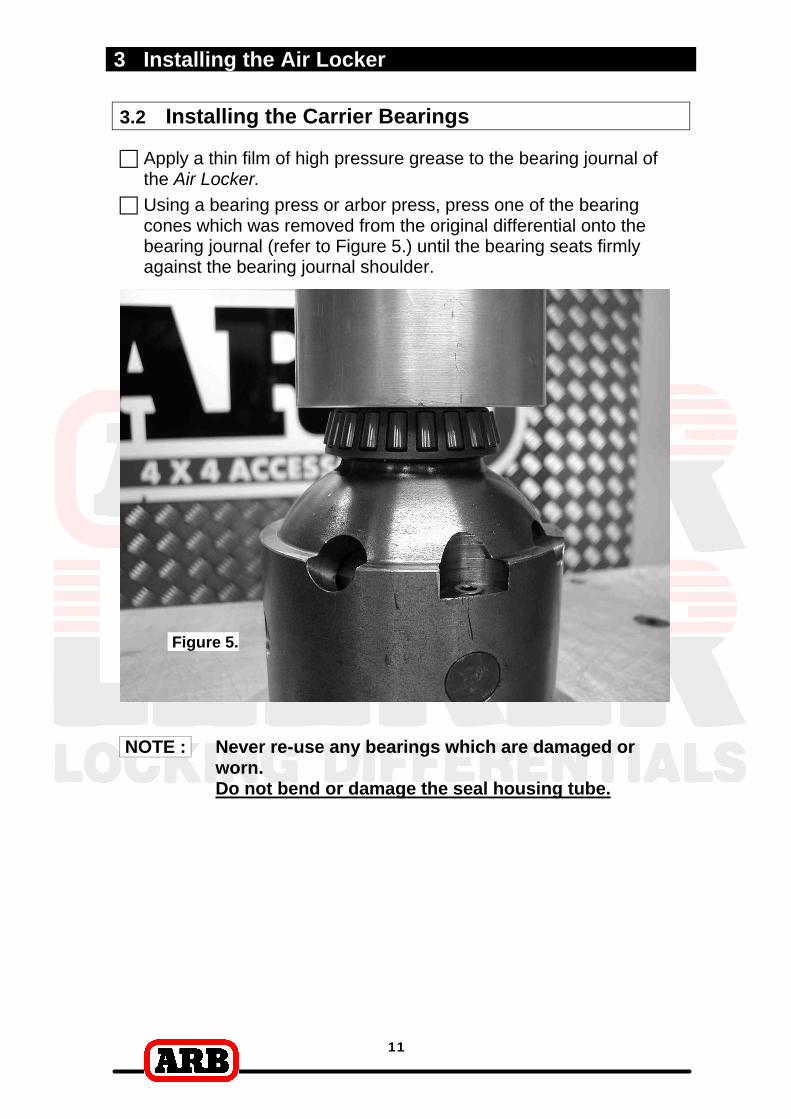
c Apply a thin film of high pressure grease to the bearing journal of the Air Locker.
c Using a bearing press or arbor press, press one of the bearing cones which was removed from the original differential onto the bearing journal (refer to Figure 5.) until the bearing seats firmly against the bearing journal shoulder.
Figure 5.
NOTE : Never re-use any bearings which are damaged or worn. Do not bend or damage the seal housing tube.

3 Installing the Air Locker
12
3.3 Drilling and Tapping the Bulkhead Port
An airline port must be drilled and tapped through the differential housing to mount the bulkhead fitting into.
c Mark a spot on the top of the outside shell of the differential housing that will be clear of the ring gear position once the seal housing tube has been installed. Figure 6. shows how the tube will port through the differential housing.
NOTE : Higher ratio gearing uses deeper (thicker) ring gears with teeth that extend much further. Make sure the intended hole location is far enough away from the ring gear teeth that the air line will not be at risk of contact with the current or future ring gears.
Figure 6.
c Cover the drive pinion and axle tube areas with a rag to protect them from metal filings.
c Drill through the housing square to the outside surface using a 11.2mm [7/16”] drill. (Figure 7.)
Figure 7.
3 Installing the Air Locker
13
c Tap the hole from the outside using a ¼” NPT pipe tap. c Remove any sharp edges from the hole that may chip-off and fall
into the housing. c Carefully remove rags and inspect with a service light inside the
housing to insure no metal filings are left behind.
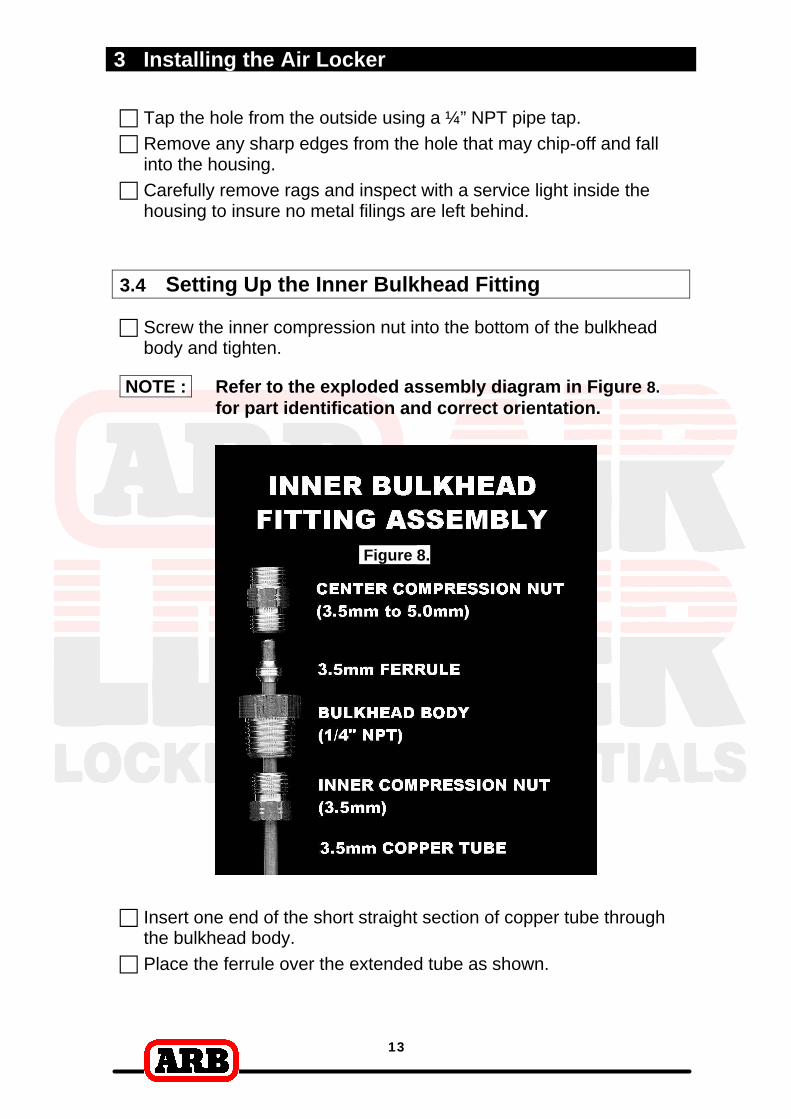
3.4 Setting Up the Inner Bulkhead Fitting c Screw the inner compression nut into the bottom of the bulkhead
body and tighten.
NOTE : Refer to the exploded assembly diagram in Figure 8. for part identification and correct orientation.
Figure 8. c Insert one end of the short straight section of copper tube through
the bulkhead body. c Place the ferrule over the extended tube as shown.
3 Installing the Air Locker
14
NOTE : Be sure to use the correct size ferrule. (inside diameter of approx. 3.5mm [0.118”]) This size can be visually identified by the two bands around the midsection. (Fig.8.)
c Place the small drilled end of the center compression nut over the extended tube as shown in the exploded assembly diagram, and screw it into the bulkhead body hand tight.
NOTE : Be sure to insert the correct end of the center compression nut into the bulkhead body. The thread has been partially relieved on the bulkhead side of the center compression nut to visually identify its orientation. (Fig.8.)
c While supporting the inner compression nut with a wrench and holding the tube at its full depth into the center compression nut, tighten the center compression nut. This will permanently clamp the ferrule onto the tube.
c Apply thread sealant to the threads of the bulkhead body. c Insert the tube into the bulkhead port from the outside until you can
screw the bulkhead body into the tapped hole, and tighten. c Wipe the area clean of any excess thread sealant (inside and
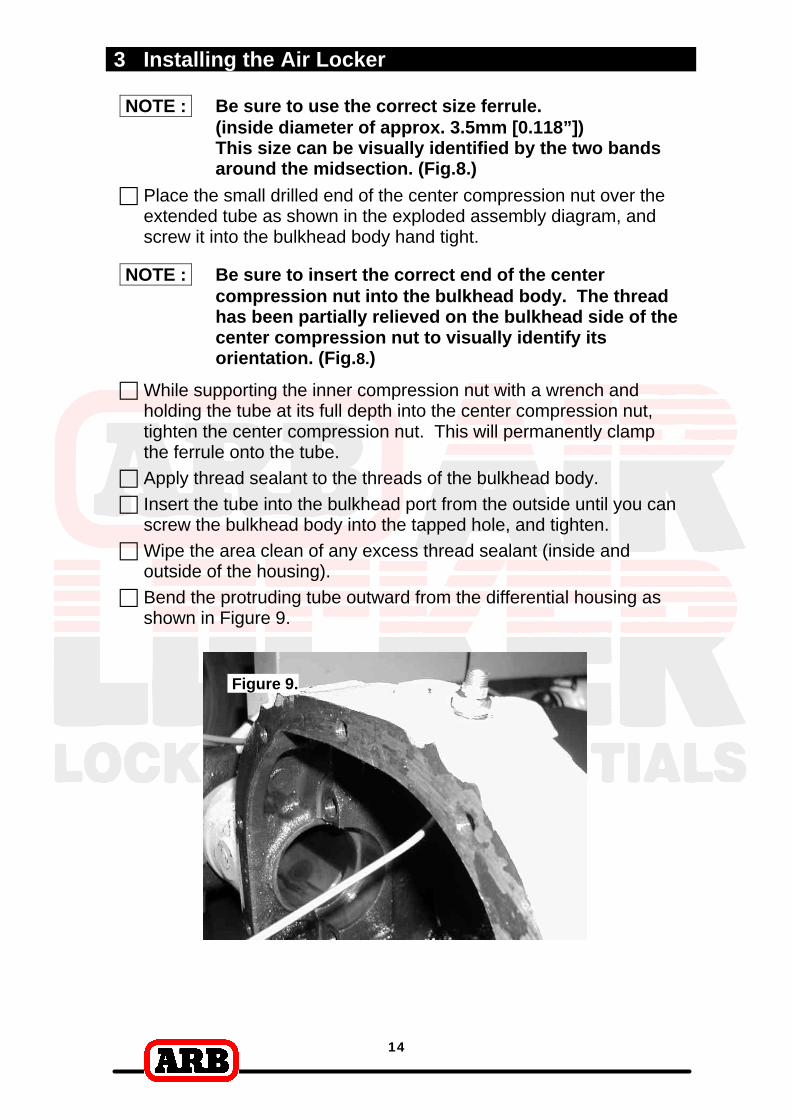
outside of the housing). c Bend the protruding tube outward from the differential housing as
shown in Figure 9.
Figure 9.
3 Installing the Air Locker
15
3.5 Setting the Backlash
c Hold the bearing cups onto the Air Locker, insert it into the housing and rotate it until it is fully in mesh with the pinion gear.
c Sit the adjuster nuts into the threads against the bearing cups. c Install the bearing caps (use the markings from Section 2.4 to
determine which side is which) and hand tighten all bearing cap bolts lightly.
c Hand tighten both adjuster nuts against the Air Locker until only a small amount of backlash can be felt.
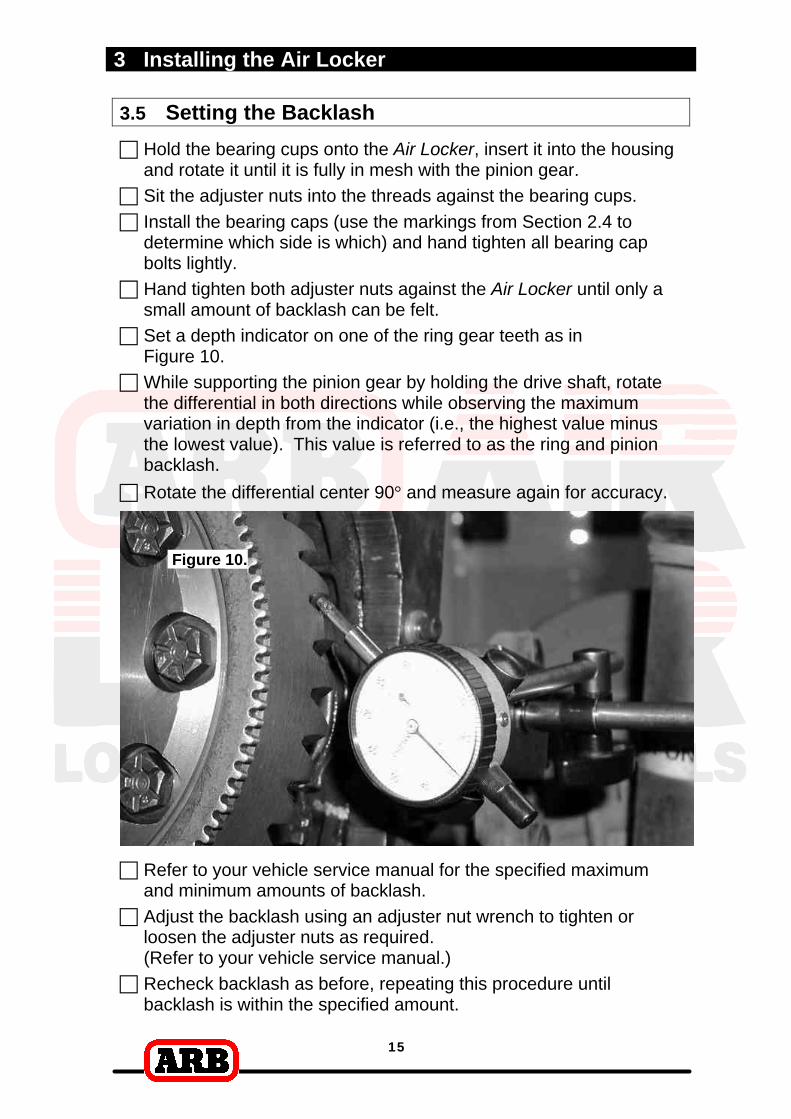
c Set a depth indicator on one of the ring gear teeth as in Figure 10.
c While supporting the pinion gear by holding the drive shaft, rotate the differential in both directions while observing the maximum variation in depth from the indicator (i.e., the highest value minus the lowest value). This value is referred to as the ring and pinion backlash.
c Rotate the differential center 90° and measure again for accuracy.
Figure 10.
c Refer to your vehicle service manual for the specified maximum
and minimum amounts of backlash. c Adjust the backlash using an adjuster nut wrench to tighten or
loosen the adjuster nuts as required. (Refer to your vehicle service manual.)
c Recheck backlash as before, repeating this procedure until backlash is within the specified amount.
3 Installing the Air Locker
16
IMPORTANT: It is critical to set up bearing pre-load when a differential is
installed. Improper pre-load will result in undue bearing wear, increased stresses in the differential center, increased running
noise, and ultimately, ring and pinion gear damage. c Set pre-load by tightening the adjuster nuts against each other by
an amount specified in your vehicle service manual. c Tighten the bearing cap bolts with a torque wrench to the torque
specified in your vehicle manufacturer’s service manual. c Install locking tabs onto the bearing caps.
3.6 Profiling the Seal Housing Tube
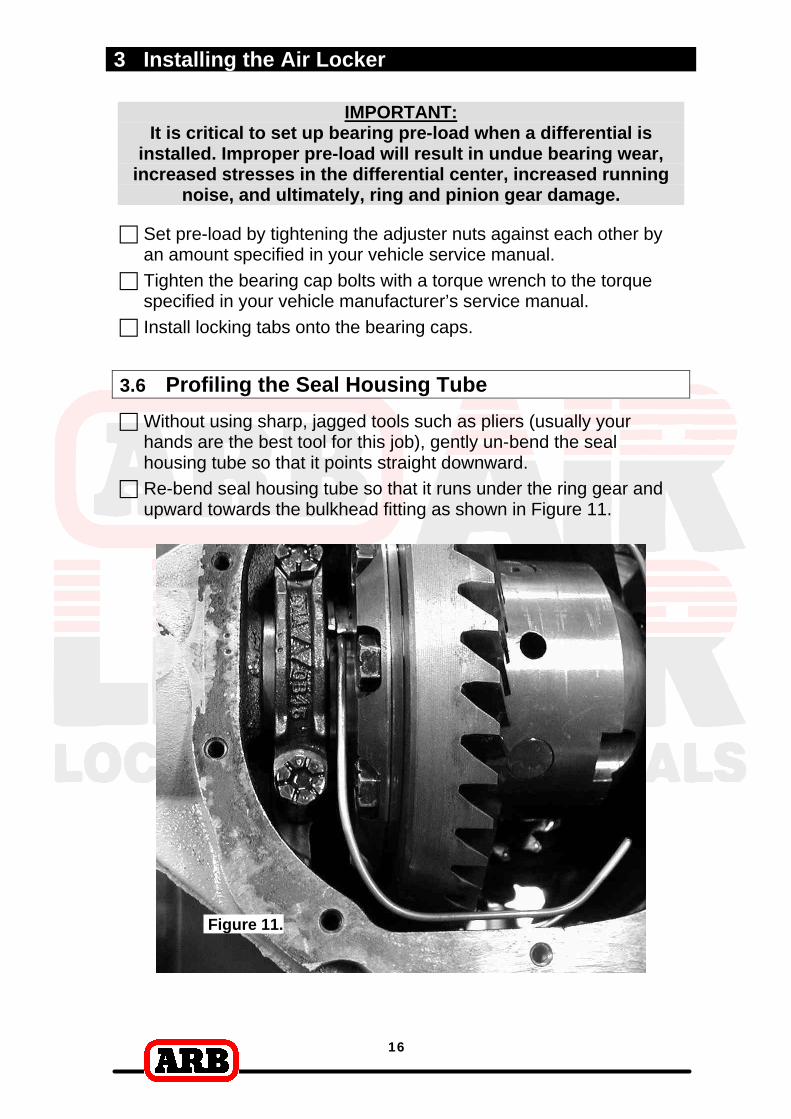
c Without using sharp, jagged tools such as pliers (usually your hands are the best tool for this job), gently un-bend the seal housing tube so that it points straight downward.
c Re-bend seal housing tube so that it runs under the ring gear and upward towards the bulkhead fitting as shown in Figure 11.
Figure 11.
3 Installing the Air Locker
17
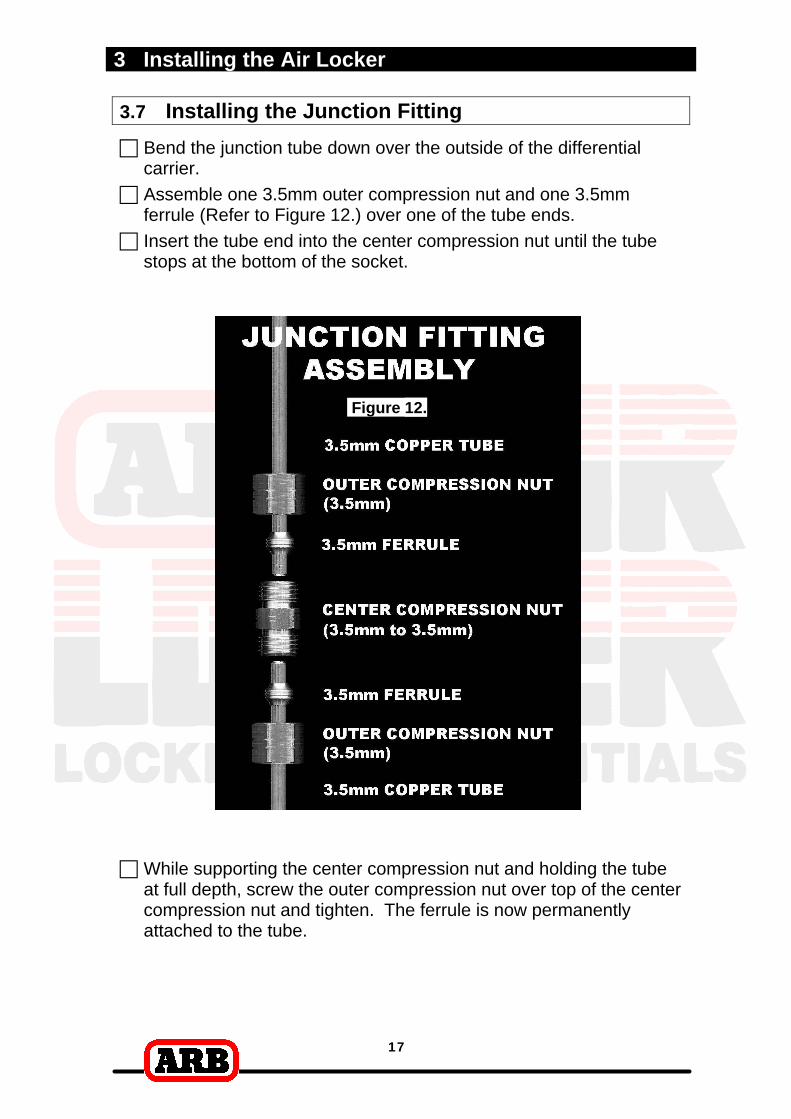
3.7 Installing the Junction Fitting
c Bend the junction tube down over the outside of the differential carrier.
c Assemble one 3.5mm outer compression nut and one 3.5mm ferrule (Refer to Figure 12.) over one of the tube ends.
c Insert the tube end into the center compression nut until the tube stops at the bottom of the socket.
Figure 12.
c While supporting the center compression nut and holding the tube
at full depth, screw the outer compression nut over top of the center compression nut and tighten. The ferrule is now permanently attached to the tube.
3 Installing the Air Locker
18
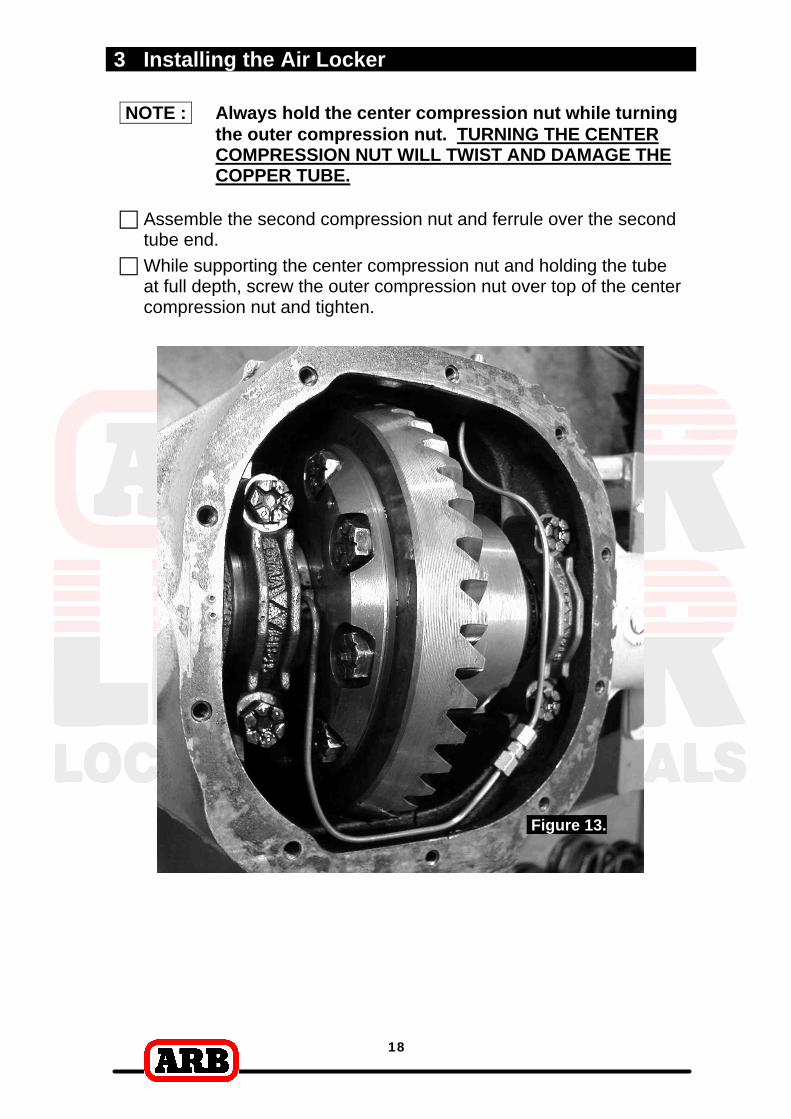
NOTE : Always hold the center compression nut while turning the outer compression nut. TURNING THE CENTER COMPRESSION NUT WILL TWIST AND DAMAGE THE COPPER TUBE.
c Assemble the second compression nut and ferrule over the second tube end.
c While supporting the center compression nut and holding the tube at full depth, screw the outer compression nut over top of the center compression nut and tighten.
Figure 13.
3 Installing the Air Locker
19
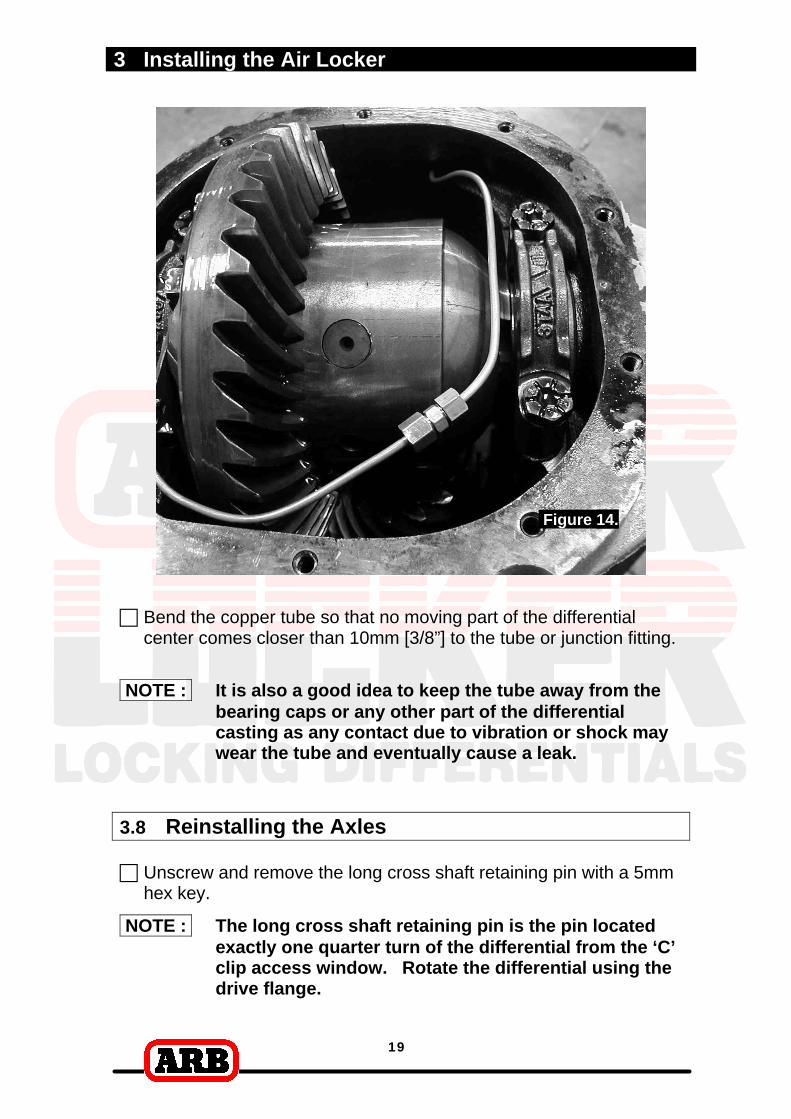
Figure 14. c Bend the copper tube so that no moving part of the differential
center comes closer than 10mm [3/8”] to the tube or junction fitting. NOTE : It is also a good idea to keep the tube away from the
bearing caps or any other part of the differential casting as any contact due to vibration or shock may wear the tube and eventually cause a leak.
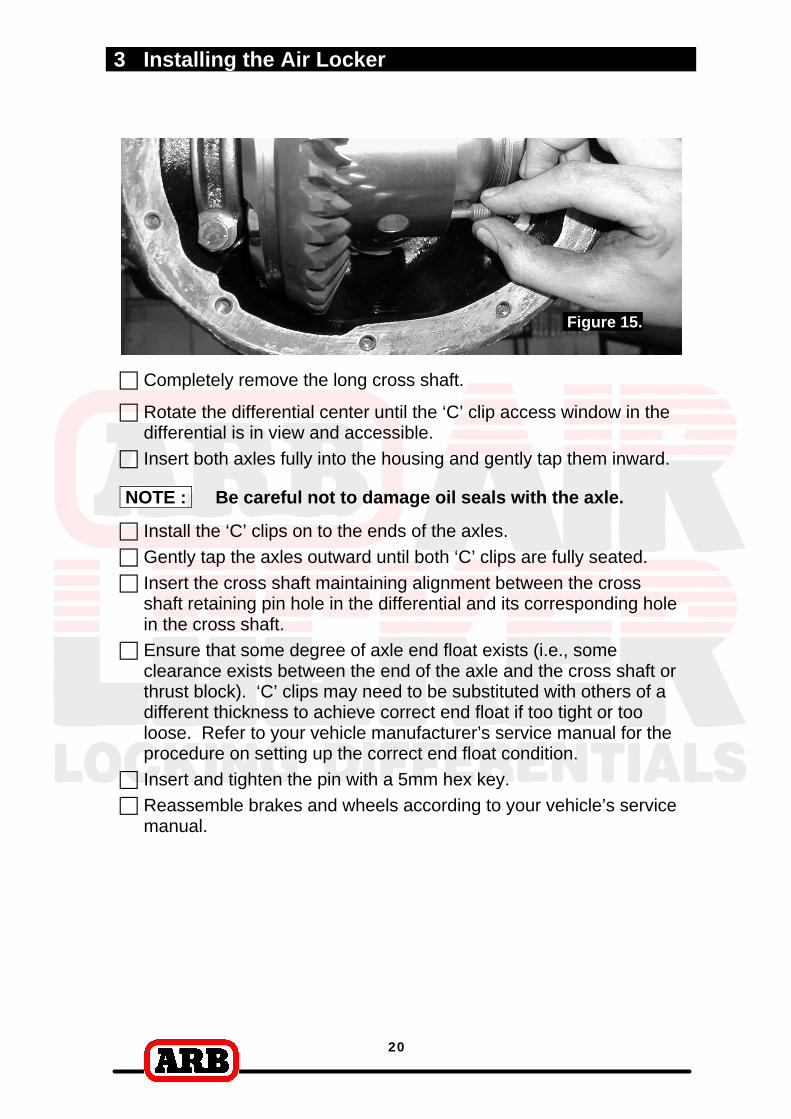
3.8 Reinstalling the Axles c Unscrew and remove the long cross shaft retaining pin with a 5mm
hex key.
NOTE : The long cross shaft retaining pin is the pin located exactly one quarter turn of the differential from the ‘C’ clip access window. Rotate the differential using the drive flange.
3 Installing the Air Locker
20
Figure 15.
c Completely remove the long cross shaft.
c Rotate the differential center until the ‘C’ clip access window in the differential is in view and accessible.
c Insert both axles fully into the housing and gently tap them inward.
NOTE : Be careful not to damage oil seals with the axle.
c Install the ‘C’ clips on to the ends of the axles. c Gently tap the axles outward until both ‘C’ clips are fully seated. c Insert the cross shaft maintaining alignment between the cross
shaft retaining pin hole in the differential and its corresponding hole in the cross shaft.
c Ensure that some degree of axle end float exists (i.e., some clearance exists between the end of the axle and the cross shaft or thrust block). ‘C’ clips may need to be substituted with others of a different thickness to achieve correct end float if too tight or too loose. Refer to your vehicle manufacturer’s service manual for the procedure on setting up the correct end float condition.
c Insert and tighten the pin with a 5mm hex key. c Reassemble brakes and wheels according to your vehicle’s service
manual.
4 Installing the Air System
21
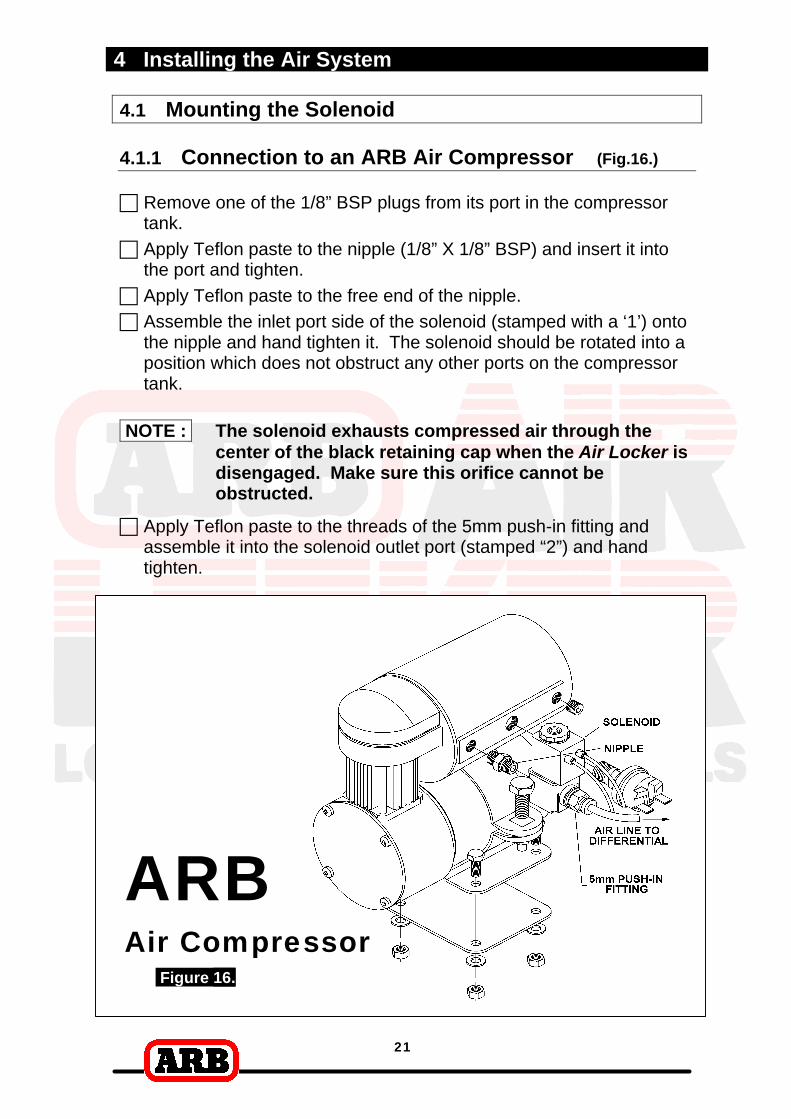
4.1 Mounting the Solenoid 4.1.1 Connection to an ARB Air Compressor (Fig.16.) c Remove one of the 1/8” BSP plugs from its port in the compressor
tank. c Apply Teflon paste to the nipple (1/8” X 1/8” BSP) and insert it into
the port and tighten. c Apply Teflon paste to the free end of the nipple. c Assemble the inlet port side of the solenoid (stamped with a ‘1’) onto
the nipple and hand tighten it. The solenoid should be rotated into a position which does not obstruct any other ports on the compressor tank.
NOTE : The solenoid exhausts compressed air through the
center of the black retaining cap when the Air Locker is disengaged. Make sure this orifice cannot be obstructed.
c Apply Teflon paste to the threads of the 5mm push-in fitting and assemble it into the solenoid outlet port (stamped “2”) and hand tighten.
Figure 16.
ARB Air Compressor
4 Installing the Air System
22
4.1.2 Connection to an Alternate Air Source For ease of installation, quality of air supply, and a high level of dependability from your Air Locker(s), ARB strongly recommends use of a genuine ARB Air Compressor, however, the Air Locker air system can be operated on any alternate air source that meets each of the following guidelines:
c Must supply a minimum of 85PSI [586kPa]. c The supply must never exceed 105PSI [724kPa]. c The air source should have a tank capacity which enables it to
actuate the Air Locker(s) in one charge so that no hesitation is experienced when locking one or two differentials.
HINT : A good way to insure that you have the necessary capacity is to make sure you can engage, disengage, and then reengage your Air Locker(s) without the air source having to regenerate (e.g., without the compressor turning on to refill the tank).
c Must supply clean air, free of rust, dirt, water, or other foreign
matter. c Must match the 1/8” BSP porting of the Air Locker solenoid.
c Mount solenoid within close proximity of the air supply and secure it
from the effects of vibration and shock. c Connect the air supply to the 1/8” BSP inlet port of the solenoid
(stamped “1” on the solenoid body) using thread sealant.
IMPORTANT :
ARB cannot warranty your Air Locker(s) against damage caused as a result of using an alternate air supply. If you have any doubts as to the suitability of your air system to use in an Air Locker system, consult your ARB distributor.
4 Installing the Air System
23
4.2 Running and Securing the Air Line
The path taken by the air line from your air source (i.e., compressor) to your Air Locker is unique to your vehicle and the position of your air source. Plan ahead carefully when running the air line and always follow these guidelines:
c Account for axle travel when running the line from the axle to a fixed point on the vehicle. Leave enough slack in the air line to allow for maximum suspension travel in both directions.
c Avoid leaving large lengths of air line hanging underneath the vehicle where they may get tangled on rocks, sticks, etc.
HINT : Cable tying the air line to one of your flexible brake lines will account for axle travel and should help keep your line from getting snagged.
c Run the air line all the way from the compressor to the differential before trimming either end of the line to length. This will save complications which may arise if the air line has to be removed.
c Make sure the line does not contact sharp edges or abrasive surfaces that may damage the air line over time.
c Do not run the air line around tight bends which may kink the air line and restrict or block the air flow.
c Keep the air line well away from your vehicle’s exhaust components. Air lines will melt if subjected to extreme heat.
c Do not run more air line than necessary. Excess line volume created when coiling the left over hose, using unusually large diameter hose, etc., will increase drain on the compressor tank resulting in the compressor running more often than needed.
c Support the air line by tying it back with cable ties wherever possible. c At the solenoid end of the air line, trim the line to length with a sharp
knife. c To attach the air line to the push-in fitting of the solenoid; insert the
line firmly into the fitting, pull outward on the flange of the fitting while holding the line as far into the fitting as possible, and then gently pull outward on the air line to clamp the line in place.
NOTE : To remove the air line from the push-in fitting; pull outward on the flange of the fitting, push the air line as far into the fitting as possible and hold, push inward on the flange, and then pull the air line free of the fitting.
4 Installing the Air System
24
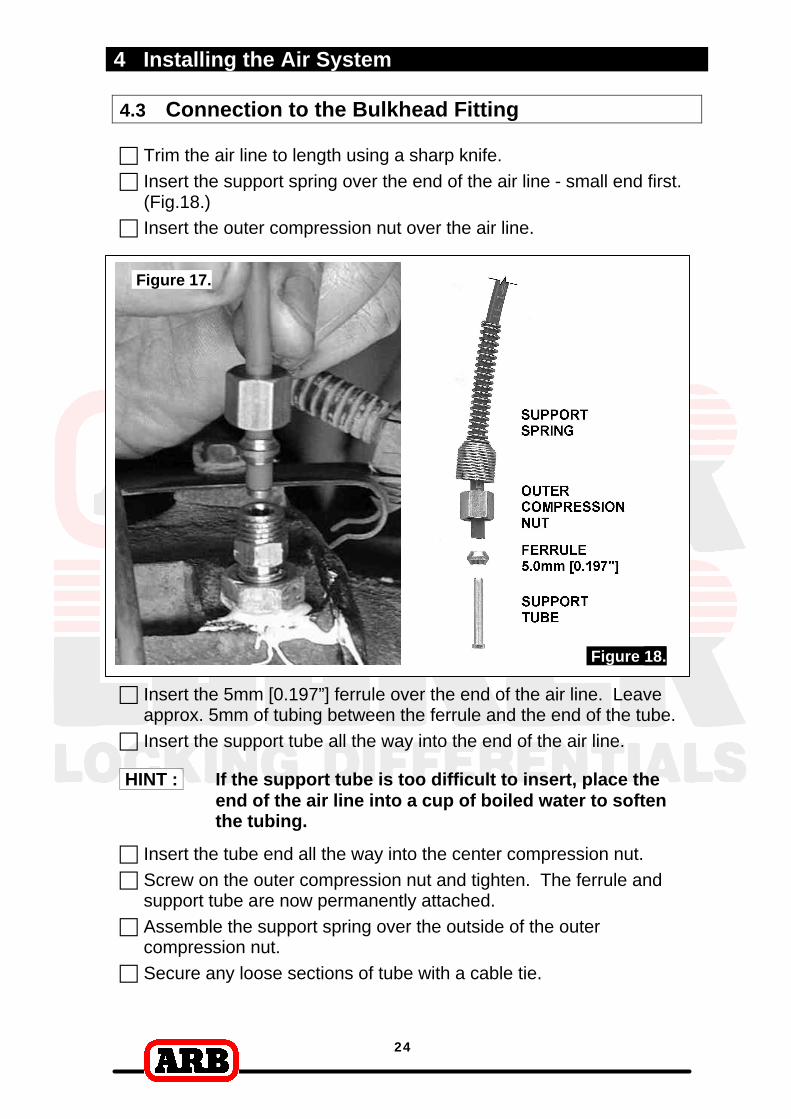
4.3 Connection to the Bulkhead Fitting c Trim the air line to length using a sharp knife. c Insert the support spring over the end of the air line - small end first.
(Fig.18.) c Insert the outer compression nut over the air line.
Figure 17.
Figure 18.
c Insert the 5mm [0.197”] ferrule over the end of the air line. Leave approx. 5mm of tubing between the ferrule and the end of the tube.
c Insert the support tube all the way into the end of the air line.
HINT : If the support tube is too difficult to insert, place the end of the air line into a cup of boiled water to soften the tubing.
c Insert the tube end all the way into the center compression nut. c Screw on the outer compression nut and tighten. The ferrule and
support tube are now permanently attached. c Assemble the support spring over the outside of the outer
compression nut. c Secure any loose sections of tube with a cable tie.
5 Mounting & Connecting the Electrical System
25
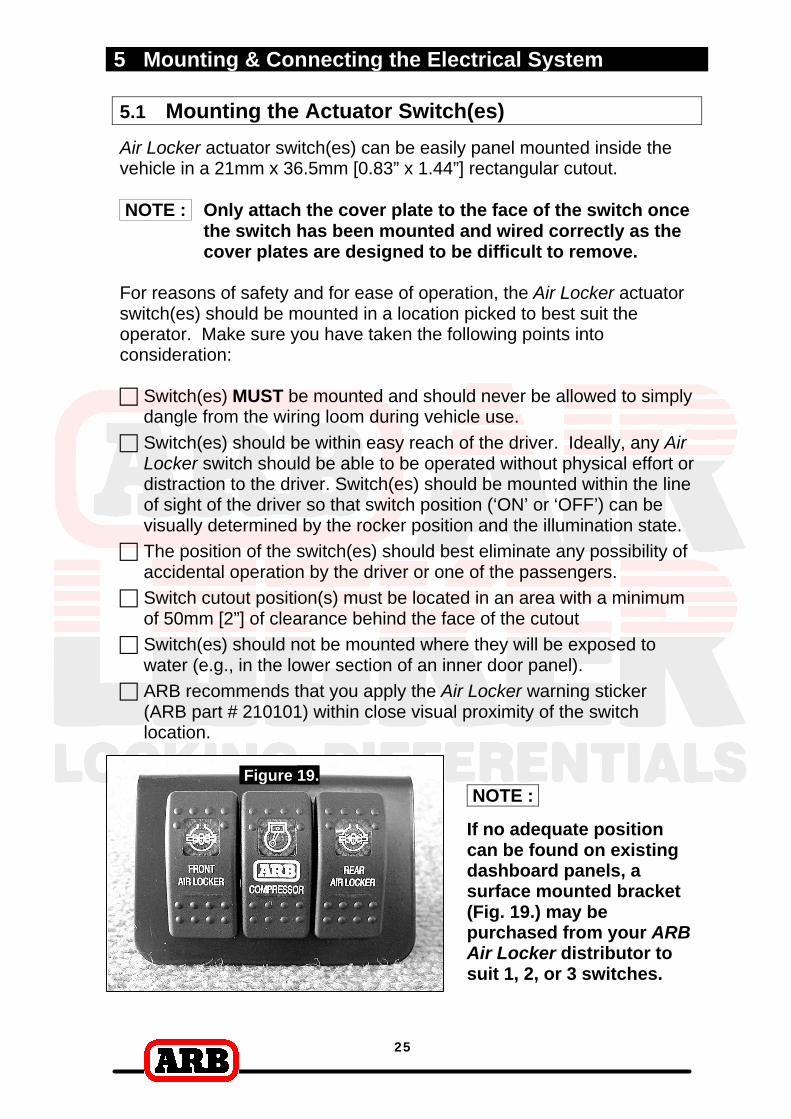
5.1 Mounting the Actuator Switch(es)
Air Locker actuator switch(es) can be easily panel mounted inside the vehicle in a 21mm x 36.5mm [0.83” x 1.44”] rectangular cutout. NOTE : Only attach the cover plate to the face of the switch once
the switch has been mounted and wired correctly as the cover plates are designed to be difficult to remove.
For reasons of safety and for ease of operation, the Air Locker actuator switch(es) should be mounted in a location picked to best suit the operator. Make sure you have taken the following points into consideration: c Switch(es) MUST be mounted and should never be allowed to simply
dangle from the wiring loom during vehicle use. c Switch(es) should be within easy reach of the driver. Ideally, any Air
Locker switch should be able to be operated without physical effort or distraction to the driver. Switch(es) should be mounted within the line of sight of the driver so that switch position (‘ON’ or ‘OFF’) can be visually determined by the rocker position and the illumination state.
c The position of the switch(es) should best eliminate any possibility of accidental operation by the driver or one of the passengers.
c Switch cutout position(s) must be located in an area with a minimum of 50mm [2”] of clearance behind the face of the cutout
c Switch(es) should not be mounted where they will be exposed to water (e.g., in the lower section of an inner door panel).
c ARB recommends that you apply the Air Locker warning sticker (ARB part # 210101) within close visual proximity of the switch location.
Figure 19.
NOTE :
If no adequate position can be found on existing dashboard panels, a surface mounted bracket (Fig. 19.) may be purchased from your ARB Air Locker distributor to suit 1, 2, or 3 switches.
5 Mounting & Connecting the Electrical System
26
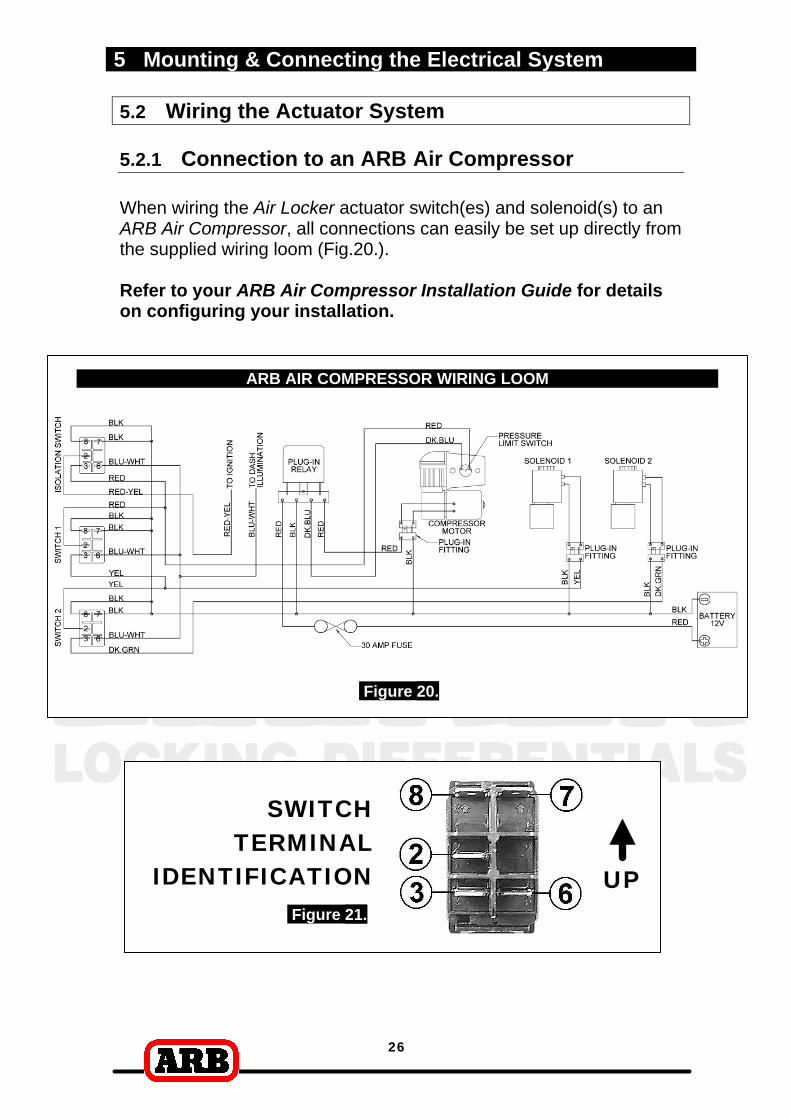
5.2 Wiring the Actuator System 5.2.1 Connection to an ARB Air Compressor When wiring the Air Locker actuator switch(es) and solenoid(s) to an ARB Air Compressor, all connections can easily be set up directly from the supplied wiring loom (Fig.20.). Refer to your ARB Air Compressor Installation Guide for details on configuring your installation.
Figure 20.
Figure 21.
SWITCHTERMINAL
IDENTIFICATION UP
ARB AIR COMPRESSOR WIRING LOOM

5 Mounting & Connecting the Electrical System
27
5.2.2 Connection to an Alternate Air Source When connecting the actuation switch to an alternate air source, the switch(es) should be wired according to Figures 22. and 23., depending on whether one or two Air Lockers will be installed in the vehicle. 5.2.2.1 Single Air Locker System c If only one Air Locker is to be installed in the system, the switch and
solenoid should be wired according to Figure 22. regardless of whether the Air Locker has been installed in the front or rear axle of the vehicle.
c Attach the appropriate switch cover (i.e., ‘FRONT’ or ‘REAR’) to the switch.
NOTE : Refer to Figure 21. for the correct switch terminal
identification and switch orientation.
Figure 22.
SINGLE AIR LOCKER SYSTEM

5 Mounting & Connecting the Electrical System
28
5.2.2.2 Dual Air Locker System c If two Air Lockers are to be installed in the system, ARB
recommends that the switches and solenoids be wired according to Figure 23. For safety reasons, this configuration allows SOLENOID 2 to be actuated only if SOLENOID 1 is already on.
c Attach the “REAR AIR LOCKER” switch cover to SWITCH 1, and the “FRONT AIR LOCKER” switch cover to SWITCH 2.
NOTE : Refer to Figure 21. for the correct switch terminal
identification and switch orientation. c Configure SOLENOID 1 as the air line leading to the rear axle Air
Locker, and SOLENOID 2 as the air line leading to the front axle Air Locker.
Figure 23.
DUAL AIR LOCKER SYSTEM
6 Testing & Final Assembly
29
6.1 Leak Testing c With the vehicle parked and the engine off, turn the compressor on
and wait until the air system is fully charged. NOTE : With the Air Locker(s) disengaged, the air source (i.e.,
compressor) should not have to recharge over time. Intermittent recharging without Air Locker use usually indicates a leak at the solenoid fittings or at the compressor tank O-ring seal.
c Actuate the Air Locker(s). c The compressor should not come on again for a period of at least
15min. Air system recharging within that time period would indicate that a leak is present in the system.
NOTE : If an alternate air source (e.g., an air cylinder or a belt
driven air pump) is used instead of a compressor, the air system will have to be leak tested with a pressure gauge and a shut-off valve in series before the solenoid input.
c If a leak is found to be present, spray a soap and water mixture
onto all air fittings in the system while the compressor is fully charged. Bubbles should appear at any leak points.
c Check that leaky fittings have been adequately tightened. c Disassemble, clean threads, and reapply thread sealant if leaking
persists. 6.2 Testing the Air Locker Actuation To test that your air system, electrical system, and your Air Locker differential is functioning correctly: c Support the vehicle such that the wheels are free to rotate (e.g., on
axle stands, a chassis hoist, etc.) c Leave the parking brake off, the transmission in neutral, and the Air
Locker switch ‘OFF’.
6 Testing & Final Assembly
30
c Turn the ignition to the ‘ON’ position (leaving the motor off). The large illuminating symbol on the Air Locker switch cover should be ‘OFF’.
c Turn the compressor (or alternate air source) on to charge the air supply up to its maximum pressure.
c Rotate one wheel by hand. c The wheel should rotate freely and the opposite wheel should be
turning in the opposite direction without any resistance or mechanical noise from within the differential.
c Turn the Air Locker switch to the ‘ON’ position. The illuminated symbol on the switch cover should light up.
c Rotate the same wheel again. c Both wheels should rotate together. c Turn the switch off again. c Rotate the same wheel. c The wheels should again rotate in opposite directions.
6.3 Re-Sealing & Filling the Differential NOTE : Consult the ARB Air Locker Operating & Service
Manual for recommendations on differential lubricant specifications.
c Replace the differential cover using gasket sealant or a standard
differential cover gasket for your make of vehicle. c Refill the differential until level with the filler hole. c Rotate the differential center 2 full turns. c Check the oil level and refill if necessary. c Replace filler plug (apply thread sealant to filler plug before
inserting if it is a threaded type plug). c Wipe differential housing clean of any oil or grease which may
collect dirt or other abrasive particles.
6 Testing & Final Assembly
31
6.4 Post-Installation Check List Now that the Air Locker installation has been completed, ARB recommends that you take the time to complete the following check list just to insure that you haven’t missed any of the vital steps. c The air system has been leak tested.
c Thread locking compound was used on the ring gear bolts.
c All torque settings comply with the vehicle manufacturer’s specs and were set with an accurate torque wrench.
c Differential fluid complies with ARB recommendations and has been filled to the correct level.
c All air lines and wiring have been securely cable tied to resist snagging.
c Switch(es) have been securely mounted within operator reach, yet well away from danger of accidental engagement.
c Switch(es) function correctly and illuminate to indicate that Air Locker(s) have been engaged.
c The Air Locker Warning Sticker has been located within close proximity of the actuator switch(es).
c All operators who are to use the Air Locker have read, and fully understand the ARB Air Locker Operating & Service Manual.
INSTALLATION PERFORMED BY:
DATE OF INSTALLATION:
ODOMETER READING:
AIR LOCKER SERIAL No.:
___________________________
___________________________
___________________________
___________________________
6 Testing & Final Assembly
32

7 Parts List
33
7.1 Exploded Assembly Diagram (see itemized parts list overleaf)
Figure 24.
7 Parts List
34
7.2 Itemized Parts List
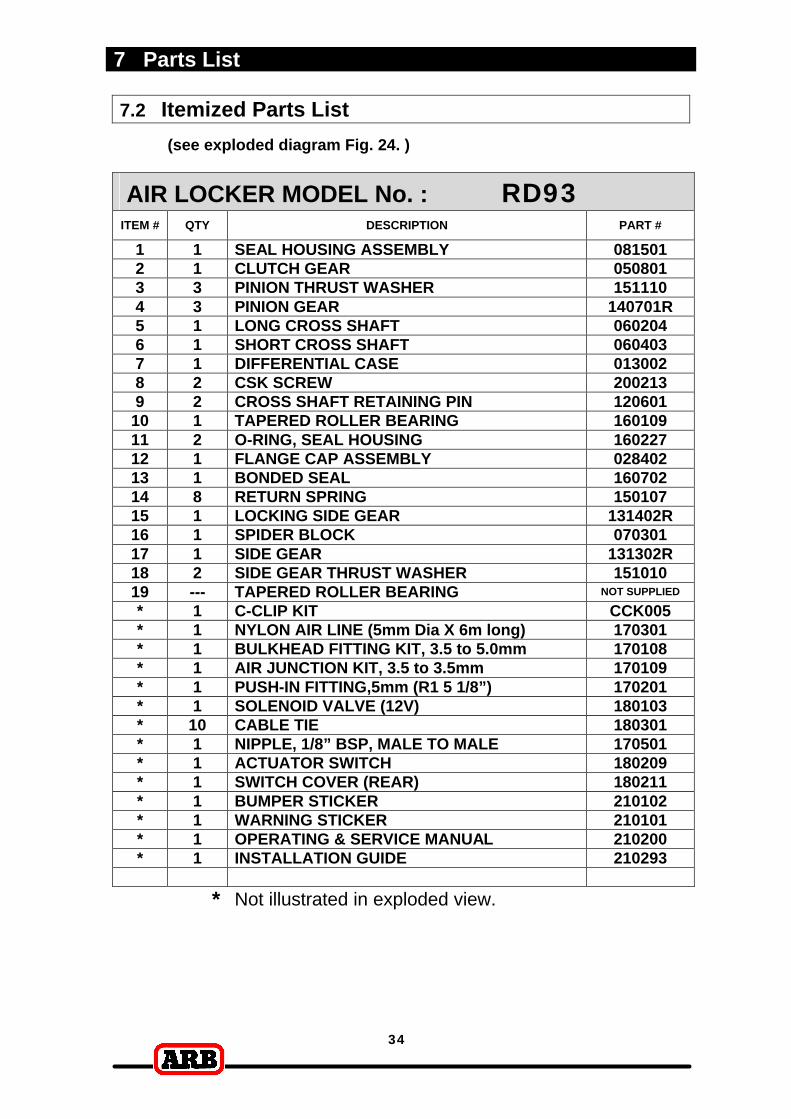
(see exploded diagram Fig. 24. )
AIR LOCKER MODEL No. : RD93 ITEM # QTY DESCRIPTION PART #
1 1 SEAL HOUSING ASSEMBLY 081501 2 1 CLUTCH GEAR 050801 3 3 PINION THRUST WASHER 151110 4 3 PINION GEAR 140701R 5 1 LONG CROSS SHAFT 060204 6 1 SHORT CROSS SHAFT 060403 7 1 DIFFERENTIAL CASE 013002 8 2 CSK SCREW 200213 9 2 CROSS SHAFT RETAINING PIN 120601
10 1 TAPERED ROLLER BEARING 160109 11 2 O-RING, SEAL HOUSING 160227 12 1 FLANGE CAP ASSEMBLY 028402 13 1 BONDED SEAL 160702 14 8 RETURN SPRING 150107 15 1 LOCKING SIDE GEAR 131402R 16 1 SPIDER BLOCK 070301 17 1 SIDE GEAR 131302R 18 2 SIDE GEAR THRUST WASHER 151010 19 --- TAPERED ROLLER BEARING NOT SUPPLIED
* 1 C-CLIP KIT CCK005 * 1 NYLON AIR LINE (5mm Dia X 6m long) 170301 * 1 BULKHEAD FITTING KIT, 3.5 to 5.0mm 170108 * 1 AIR JUNCTION KIT, 3.5 to 3.5mm 170109 * 1 PUSH-IN FITTING,5mm (R1 5 1/8”) 170201 * 1 SOLENOID VALVE (12V) 180103 * 10 CABLE TIE 180301 * 1 NIPPLE, 1/8” BSP, MALE TO MALE 170501 * 1 ACTUATOR SWITCH 180209 * 1 SWITCH COVER (REAR) 180211 * 1 BUMPER STICKER 210102 * 1 WARNING STICKER 210101 * 1 OPERATING & SERVICE MANUAL 210200 * 1 INSTALLATION GUIDE 210293
* Not illustrated in exploded view.