Embed Size (px)
Citation preview

Spring 2017
INSTALLATION GUIDE
Page 1 Copyright © 2017 Instant Technologies. All rights reserved.
Rev 15 – RQ
May. 9, 2017
Copyright and Disclaimer
This document, as well as the software described in it, is furnished under license of the Instant
Technologies Software Evaluation Agreement and may be used or copied only in accordance with the
terms of such license. The content of this document is furnished for informational use only, is subject
to change without notice, and should not be construed as a commitment by Instant Technologies.
Instant Technologies assumes no responsibility or liability for any errors or inaccuracies that may
appear in this document. All information in this document is confidential and proprietary.
Except as permitted by the Software Evaluation Agreement, no part of this document may be
reproduced, stored in a retrieval system, or transmitted in any form or by any means, electronic,
mechanical, recording, or otherwise, without the prior written permission of Instant Technologies.
Copyright © 2005 - 2017 Instant Technologies, All rights reserved.
Trademarks
All other trademarks are the property of their respective owners.
Contact Information
See our Web site for Customer Support information.
http://www.instant-tech.com/
Page 2 Copyright © 2017 Instant Technologies. All rights reserved.
Rev 15 – RQ
May. 9, 2017
CONTENTS
System Requirements ................................................................................................................................... 4
Hardware Recommendations........................................................................................................................ 4
Required Accounts .................................................................................................................................... 5
Chime Setup Wizard ..................................................................................................................................... 7
Installation Type ........................................................................................................................................ 8
Choose Installation Folder (Custom Installation Only) .............................................................................. 9
High Availability (Custom Installation Only) ............................................................................................... 9
Active Directory Authentication Scheme ................................................................................................. 10
Active Directory ....................................................................................................................................... 10
On Premise .............................................................................................................................10
Office 365 ..............................................................................................................................11
Chime Database ...................................................................................................................................... 12
Create/Update the Database ...................................................................................................12
Configure Database Service Account ....................................................................................14
Service Account ....................................................................................................................................... 15
Web Client Configuration ......................................................................................................................... 16
On-Premise ............................................................................................................................16
Office 365 ..............................................................................................................................16
Installation Options .................................................................................................................................. 17
Ready to Install ........................................................................................................................................ 18
Chime Configuration Wizard ....................................................................................................................... 19
Configure Active Directory ....................................................................................................................... 20
On Premise .............................................................................................................................20
Office 365 ..............................................................................................................................20
Configure SQL ......................................................................................................................................... 21
Setup Web Client (Optional) .................................................................................................................... 22
On Premise .............................................................................................................................22
Office 365 ..............................................................................................................................23
Pick Admin User ...................................................................................................................................... 24
Setup SSL (Optional) ............................................................................................................................... 25
Start the Chime Application ..................................................................................................................... 26
Starting from Configuration Wizard ......................................................................................26
Starting from Services............................................................................................................26

Page 3 Copyright © 2017 Instant Technologies. All rights reserved.
Rev 15 – RQ
May. 9, 2017
Issues Starting Chime ............................................................................................................26
Access the Chime Application .................................................................................................................... 28
Page 4 Copyright © 2017 Instant Technologies. All rights reserved.
Rev 15 – RQ
May. 9, 2017
CHIME INSTALLATION GUIDE
SYSTEM REQUIREMENTS
64-bit Windows Server®: 2008 R2, 2012, 2012 R2 o Server 2008 R2 requires Desktop Experience feature to be installed o Server 2012/2012 R2 requires Media Foundation feature to be installed
Application cannot be installed on the same server hosting Lync®. Application will conflict with Lync® settings.
Connection to Microsoft SQL Server®. The application supports full SQL Server® or SQL Express Edition®
o Account with create access to SQL server (for building and updating the Chime database)
o Account with read\write access to Chime database The application supports both SQL and Windows server authentication options. Note: For optimal performance, Chime and SQL Server should be in the same
physical site.
Read Access to Windows Active Directory
Chime 2.x (Self hosted) with Lync On-Premise support
.Net Framework 4.5.1+
UMCA 4.0
SQL Server 2008 R2+ (SQL Express, Standard, Enterprise…)
1 Lync account for Web Client
1 Lync account per queue for dispatcher
Chime 2.x (Self hosted) with Office 365 support
.Net Framework 4.5.1+
UMCA 4.0
SQL Server 2008 R2+ (SQL Express, Standard, Enterprise…)
1 Office 365 Lync account for Web Client*
1 Office 365 Lync account per queue for dispatcher*
*Lync Online Plan 2 and Microsoft Office 365 with Lync Plans are supported
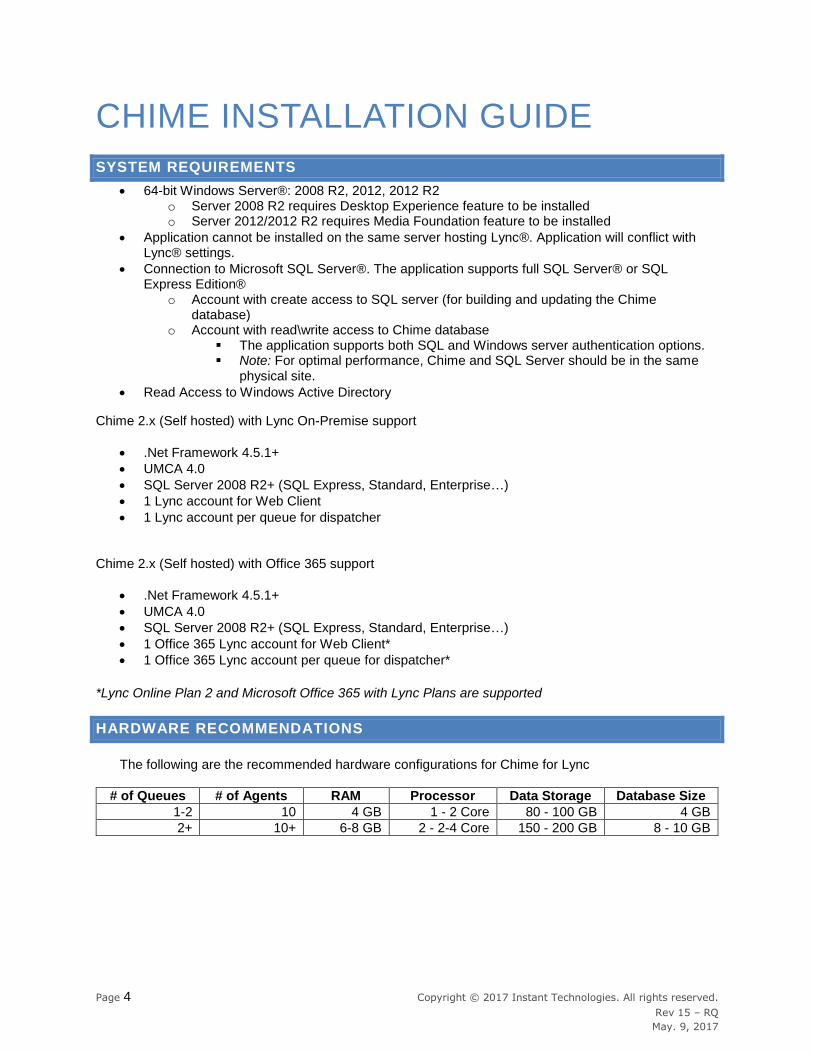
HARDWARE RECOMMENDATIONS
The following are the recommended hardware configurations for Chime for Lync
# of Queues # of Agents RAM Processor Data Storage Database Size
1-2 10 4 GB 1 - 2 Core 80 - 100 GB 4 GB
2+ 10+ 6-8 GB 2 - 2-4 Core 150 - 200 GB 8 - 10 GB
Page 5 Copyright © 2017 Instant Technologies. All rights reserved.
Rev 15 – RQ
May. 9, 2017
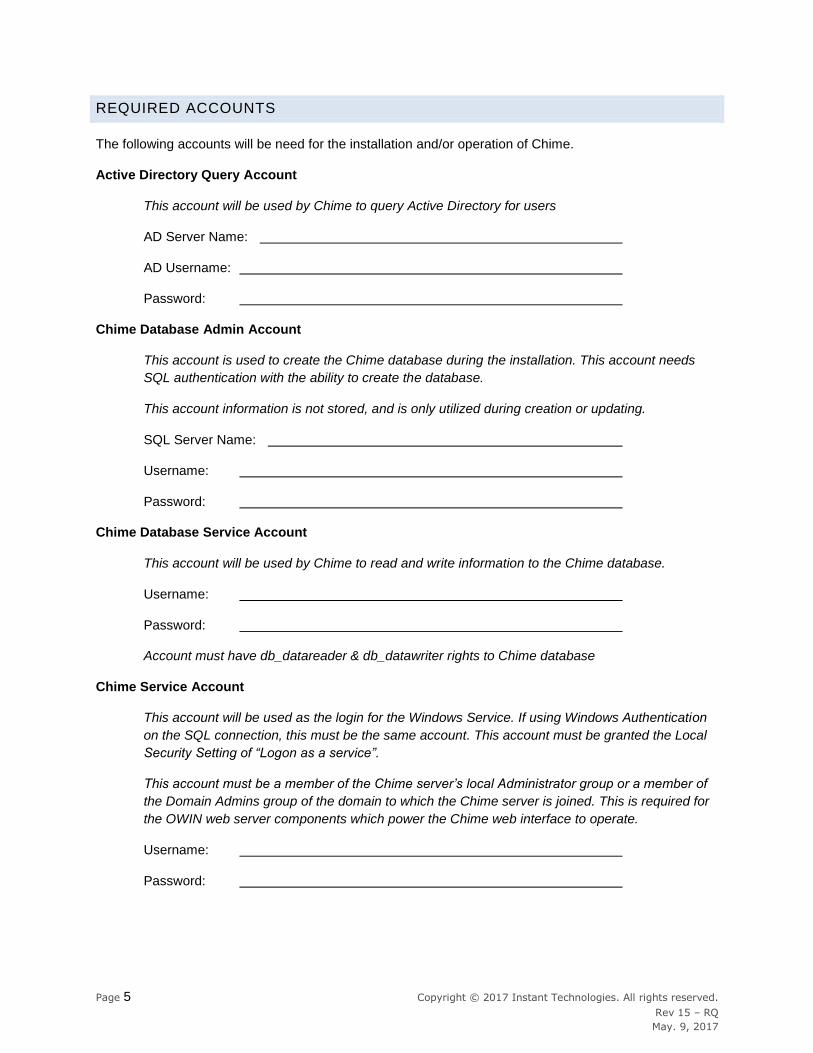
REQUIRED ACCOUNTS
The following accounts will be need for the installation and/or operation of Chime.
Active Directory Query Account
This account will be used by Chime to query Active Directory for users
AD Server Name:
AD Username:
Password:
Chime Database Admin Account
This account is used to create the Chime database during the installation. This account needs
SQL authentication with the ability to create the database.
This account information is not stored, and is only utilized during creation or updating.
SQL Server Name:
Username:
Password:
Chime Database Service Account
This account will be used by Chime to read and write information to the Chime database.
Username:
Password:
Account must have db_datareader & db_datawriter rights to Chime database
Chime Service Account
This account will be used as the login for the Windows Service. If using Windows Authentication
on the SQL connection, this must be the same account. This account must be granted the Local
Security Setting of “Logon as a service”.
This account must be a member of the Chime server’s local Administrator group or a member of
the Domain Admins group of the domain to which the Chime server is joined. This is required for
the OWIN web server components which power the Chime web interface to operate.
Username:
Password:

Page 6 Copyright © 2017 Instant Technologies. All rights reserved.
Rev 15 – RQ
May. 9, 2017
Web Seeker account - This account will be used by Chime to connect request from the web chat to Lync
experts. This account needs to be Lync enabled and not used anywhere else.
AD Username:
Password:
Dispatcher accounts - This account will be used by Chime to connect request from a seeker to Lync
experts. This account needs to be Lync enabled. Each queue will need a separate dispatcher.
Page 7 Copyright © 2017 Instant Technologies. All rights reserved.
Rev 15 – RQ
May. 9, 2017
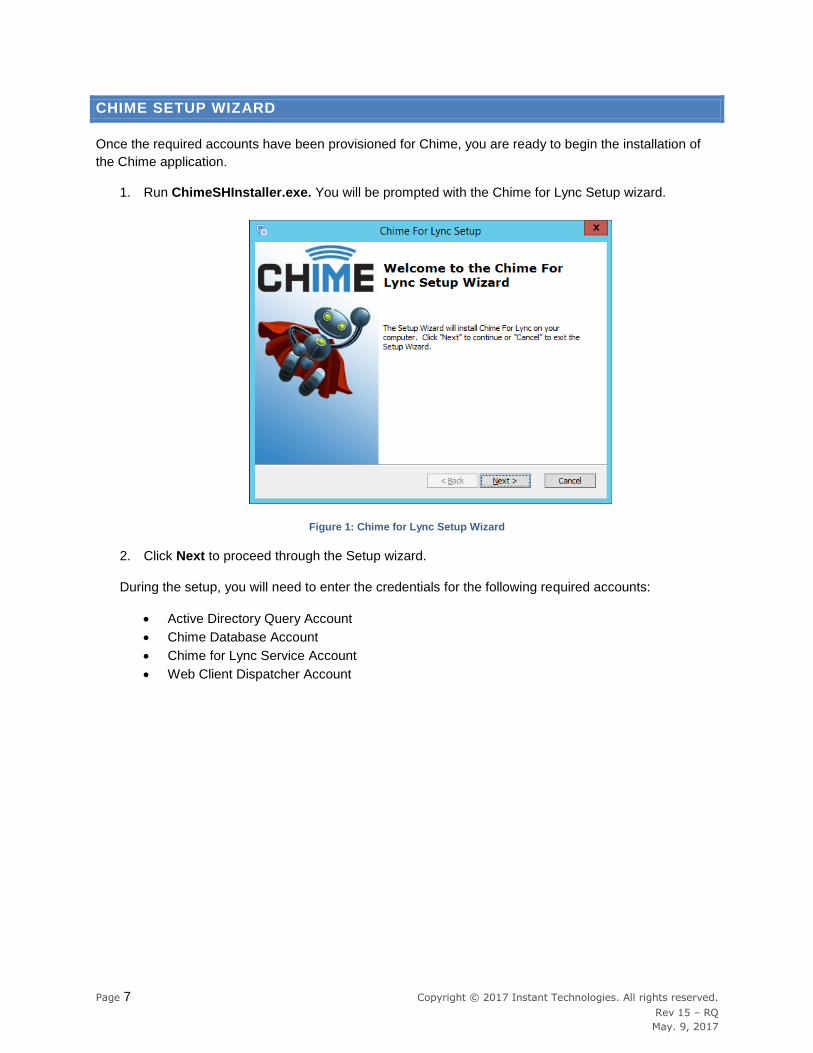
CHIME SETUP WIZARD
Once the required accounts have been provisioned for Chime, you are ready to begin the installation of
the Chime application.
1. Run ChimeSHInstaller.exe. You will be prompted with the Chime for Lync Setup wizard.
Figure 1: Chime for Lync Setup Wizard
2. Click Next to proceed through the Setup wizard.
During the setup, you will need to enter the credentials for the following required accounts:
Active Directory Query Account
Chime Database Account
Chime for Lync Service Account
Web Client Dispatcher Account
Page 8 Copyright © 2017 Instant Technologies. All rights reserved.
Rev 15 – RQ
May. 9, 2017
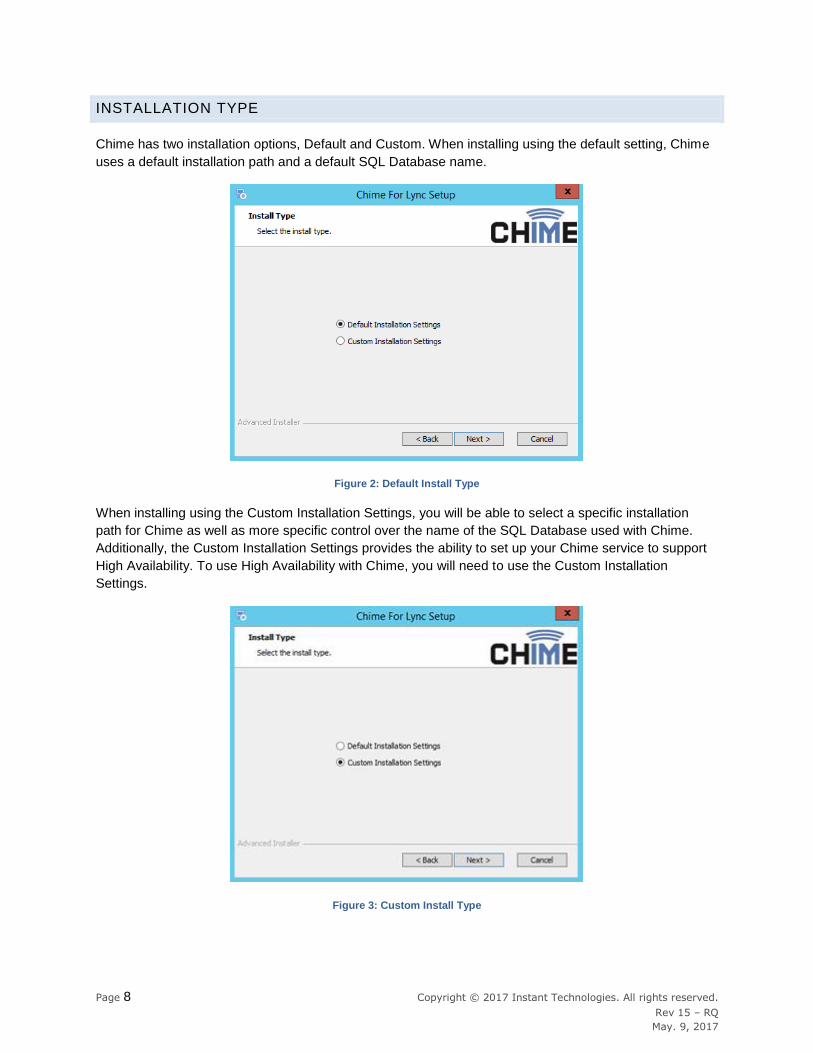
INSTALLATION TYPE
Chime has two installation options, Default and Custom. When installing using the default setting, Chime
uses a default installation path and a default SQL Database name.
Figure 2: Default Install Type
When installing using the Custom Installation Settings, you will be able to select a specific installation
path for Chime as well as more specific control over the name of the SQL Database used with Chime.
Additionally, the Custom Installation Settings provides the ability to set up your Chime service to support
High Availability. To use High Availability with Chime, you will need to use the Custom Installation
Settings.
Figure 3: Custom Install Type
Page 9 Copyright © 2017 Instant Technologies. All rights reserved.
Rev 15 – RQ
May. 9, 2017
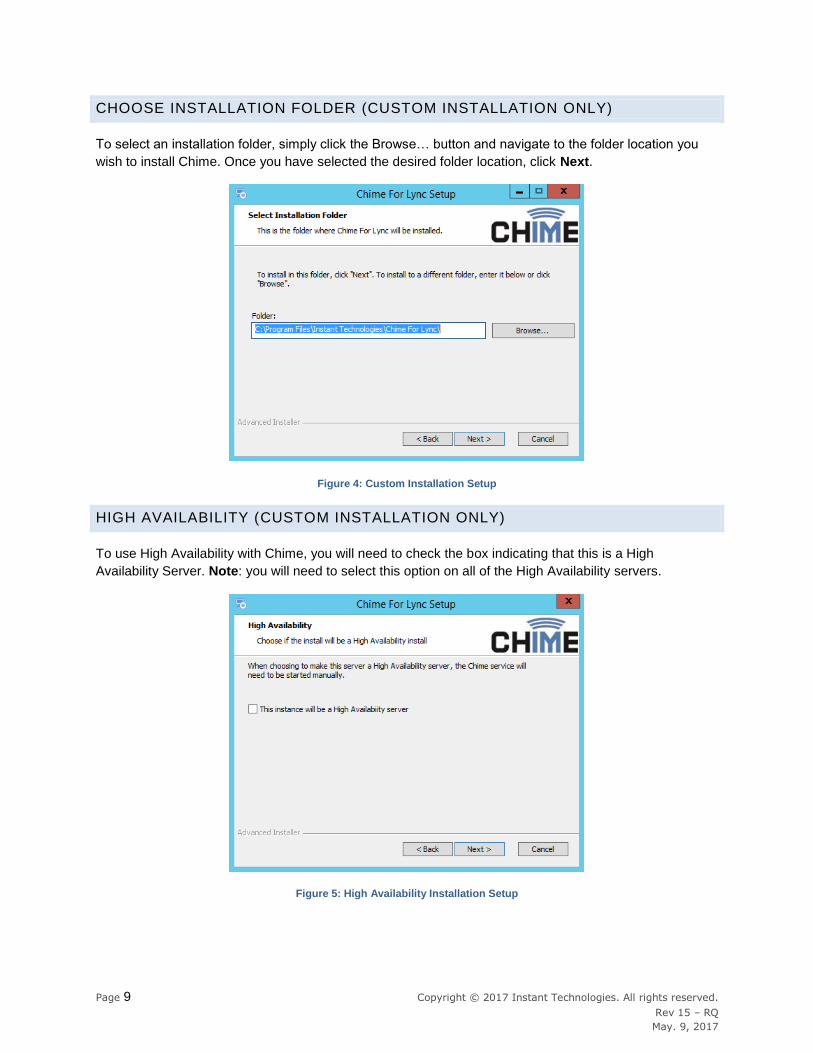
CHOOSE INSTALLATION FOLDER (CUSTOM INSTALLATION ONLY)
To select an installation folder, simply click the Browse… button and navigate to the folder location you
wish to install Chime. Once you have selected the desired folder location, click Next.
Figure 4: Custom Installation Setup
HIGH AVAILABILITY (CUSTOM INSTALLATION ONLY)
To use High Availability with Chime, you will need to check the box indicating that this is a High
Availability Server. Note: you will need to select this option on all of the High Availability servers.
Figure 5: High Availability Installation Setup
Page 10 Copyright © 2017 Instant Technologies. All rights reserved.
Rev 15 – RQ
May. 9, 2017
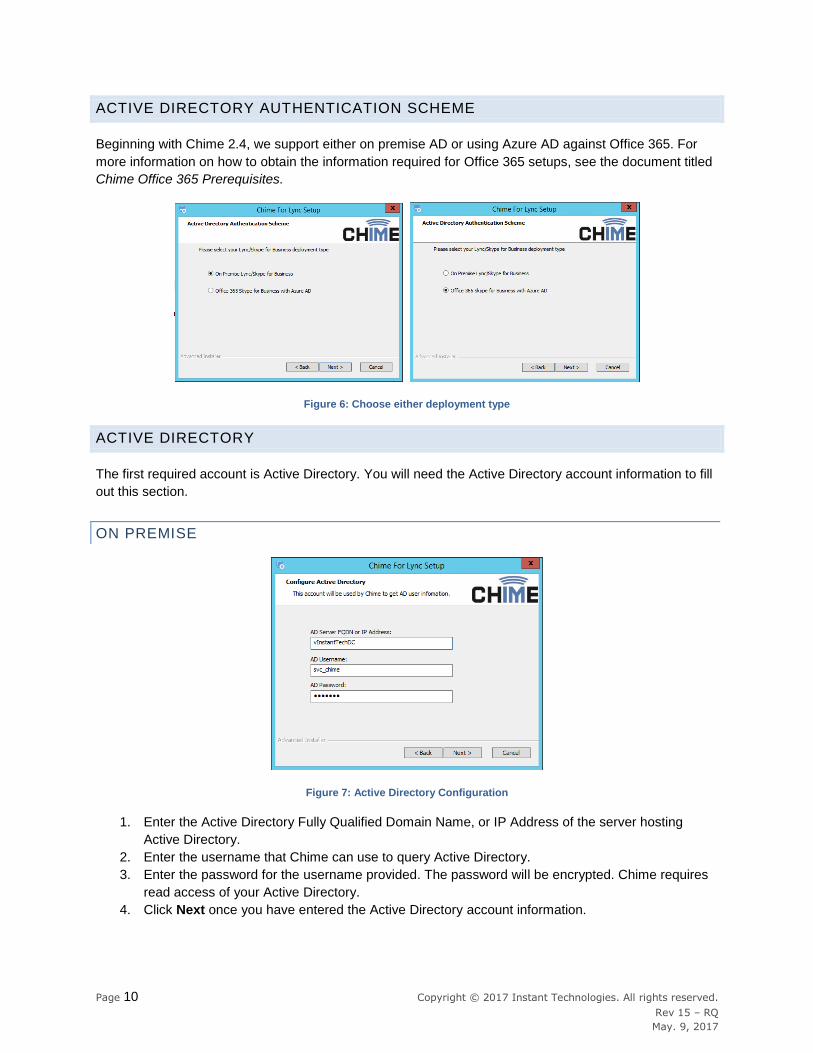
ACTIVE DIRECTORY AUTHENTICATION SCHEME
Beginning with Chime 2.4, we support either on premise AD or using Azure AD against Office 365. For
more information on how to obtain the information required for Office 365 setups, see the document titled
Chime Office 365 Prerequisites.
Figure 6: Choose either deployment type
ACTIVE DIRECTORY
The first required account is Active Directory. You will need the Active Directory account information to fill
out this section.
ON PREMISE
Figure 7: Active Directory Configuration
1. Enter the Active Directory Fully Qualified Domain Name, or IP Address of the server hosting
Active Directory.
2. Enter the username that Chime can use to query Active Directory.
3. Enter the password for the username provided. The password will be encrypted. Chime requires
read access of your Active Directory.
4. Click Next once you have entered the Active Directory account information.
Page 11 Copyright © 2017 Instant Technologies. All rights reserved.
Rev 15 – RQ
May. 9, 2017
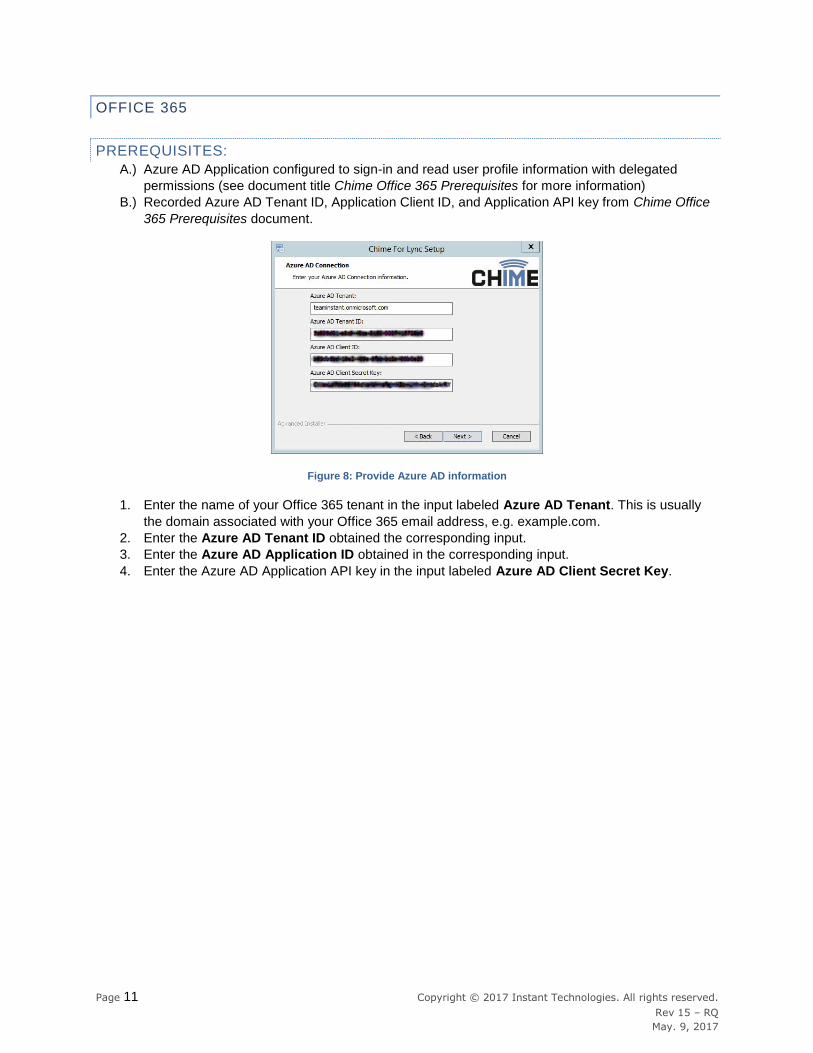
OFFICE 365
PREREQUISITES:
A.) Azure AD Application configured to sign-in and read user profile information with delegated
permissions (see document title Chime Office 365 Prerequisites for more information)
B.) Recorded Azure AD Tenant ID, Application Client ID, and Application API key from Chime Office
365 Prerequisites document.
Figure 8: Provide Azure AD information
1. Enter the name of your Office 365 tenant in the input labeled Azure AD Tenant. This is usually
the domain associated with your Office 365 email address, e.g. example.com.
2. Enter the Azure AD Tenant ID obtained the corresponding input.
3. Enter the Azure AD Application ID obtained in the corresponding input.
4. Enter the Azure AD Application API key in the input labeled Azure AD Client Secret Key.
Page 12 Copyright © 2017 Instant Technologies. All rights reserved.
Rev 15 – RQ
May. 9, 2017
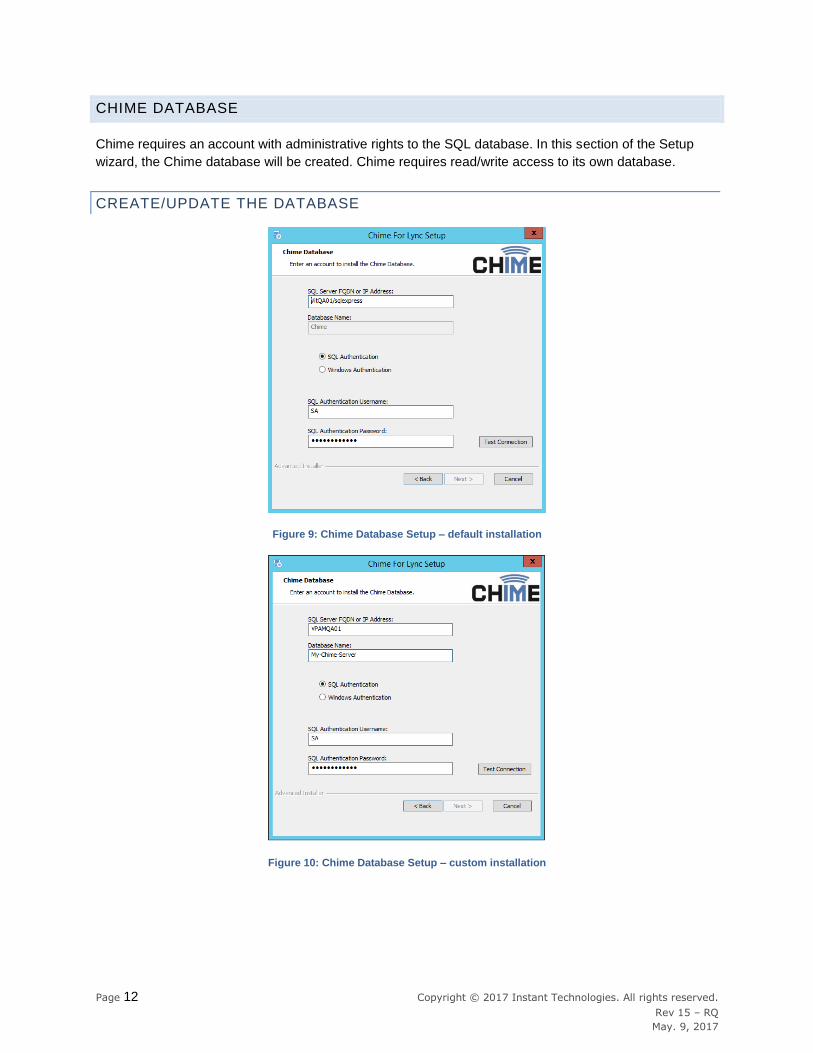
CHIME DATABASE
Chime requires an account with administrative rights to the SQL database. In this section of the Setup
wizard, the Chime database will be created. Chime requires read/write access to its own database.
CREATE/UPDATE THE DATABASE
Figure 9: Chime Database Setup – default installation
Figure 10: Chime Database Setup – custom installation
Page 13 Copyright © 2017 Instant Technologies. All rights reserved.
Rev 15 – RQ
May. 9, 2017
1. Enter the Fully Qualified Domain Name or IP address of the SQL Server where the Chime
database will be installed.
2. Provide the username of the account that will be used to create the Chime database. This
account needs sys_admin rights for the SQL Server.
3. Enter the password for the SQL account.
If you chose the Custom Install option, you are able to change the name of the Database.
4. Click on Test Connection once the require account information has been entered.
5. Click Next to proceed.
Page 14 Copyright © 2017 Instant Technologies. All rights reserved.
Rev 15 – RQ
May. 9, 2017
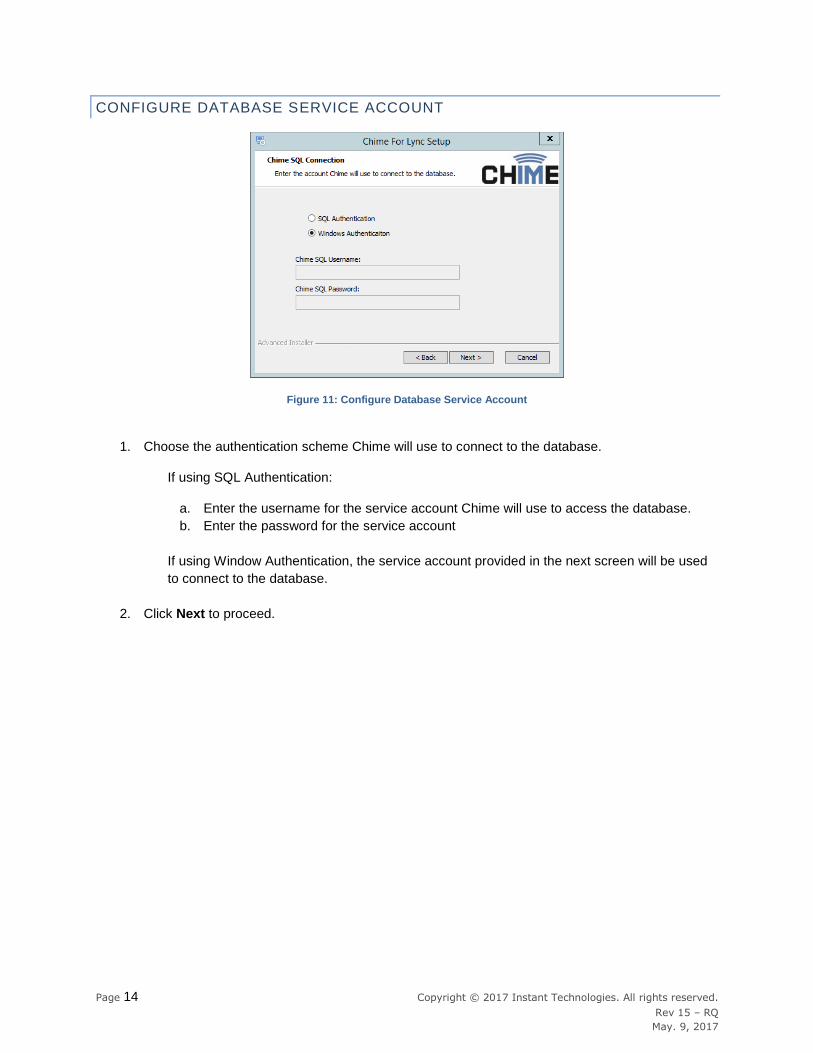
CONFIGURE DATABASE SERVICE ACCOUNT
Figure 11: Configure Database Service Account
1. Choose the authentication scheme Chime will use to connect to the database.
If using SQL Authentication:
a. Enter the username for the service account Chime will use to access the database.
b. Enter the password for the service account
If using Window Authentication, the service account provided in the next screen will be used
to connect to the database.
2. Click Next to proceed.
Page 15 Copyright © 2017 Instant Technologies. All rights reserved.
Rev 15 – RQ
May. 9, 2017
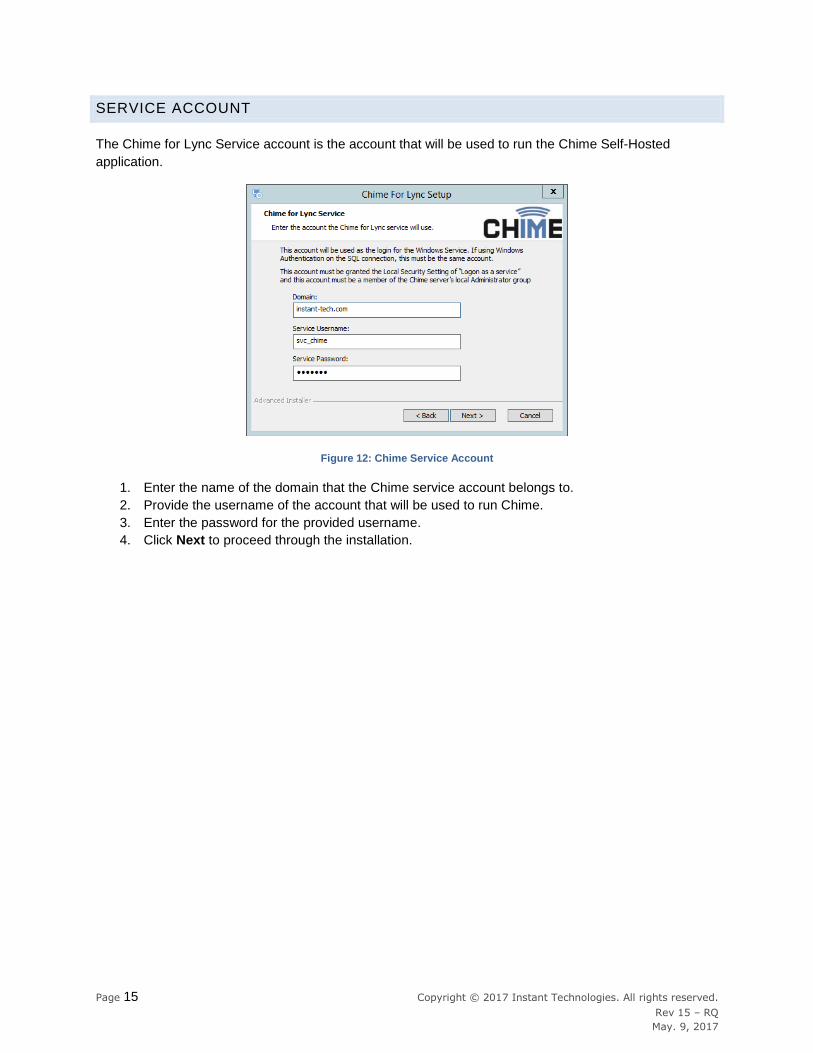
SERVICE ACCOUNT
The Chime for Lync Service account is the account that will be used to run the Chime Self-Hosted
application.
Figure 12: Chime Service Account
1. Enter the name of the domain that the Chime service account belongs to.
2. Provide the username of the account that will be used to run Chime.
3. Enter the password for the provided username.
4. Click Next to proceed through the installation.

Page 16 Copyright © 2017 Instant Technologies. All rights reserved.
Rev 15 – RQ
May. 9, 2017
WEB CLIENT CONFIGURATION
ON-PREMISE
Figure 13: Web Client configuration screen
1. Enter the information requested in the appropriate fields.
2. Click Next to continue.
OFFICE 365
Figure 14: Web Client configuration screen
1. Enter the information requested in the appropriate fields.
2. Click Next to continue.
Page 17 Copyright © 2017 Instant Technologies. All rights reserved.
Rev 15 – RQ
May. 9, 2017
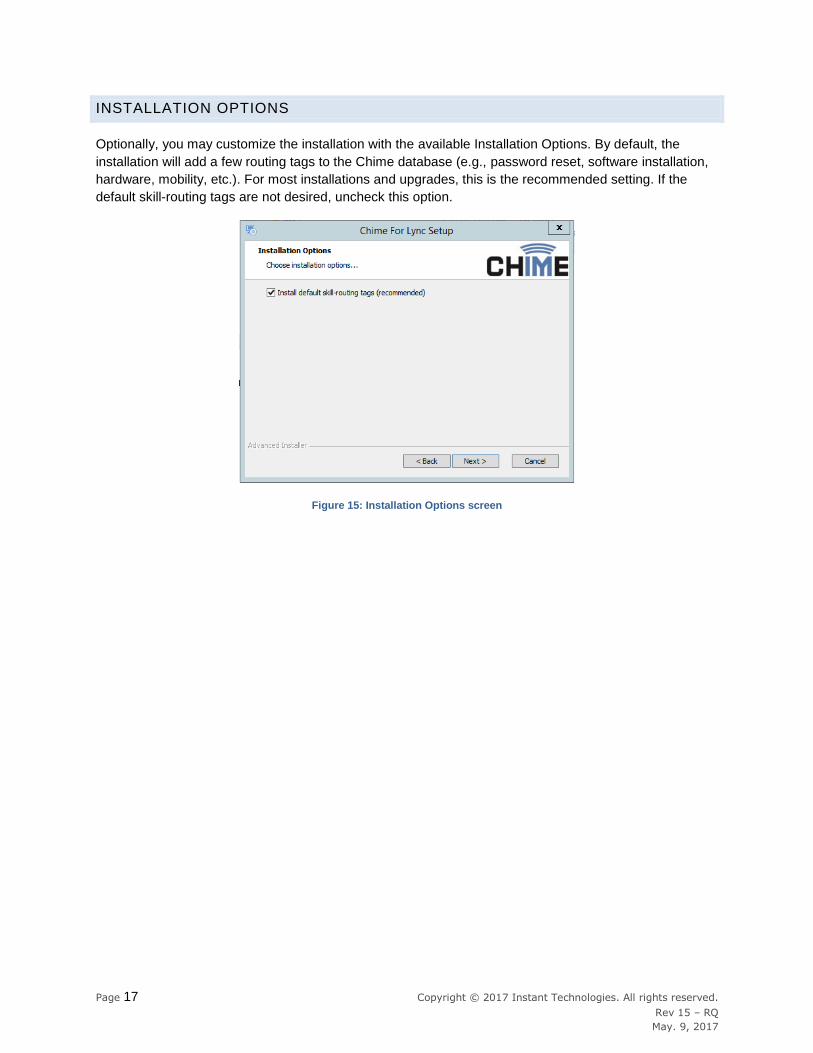
INSTALLATION OPTIONS
Optionally, you may customize the installation with the available Installation Options. By default, the
installation will add a few routing tags to the Chime database (e.g., password reset, software installation,
hardware, mobility, etc.). For most installations and upgrades, this is the recommended setting. If the
default skill-routing tags are not desired, uncheck this option.
Figure 15: Installation Options screen

Page 18 Copyright © 2017 Instant Technologies. All rights reserved.
Rev 15 – RQ
May. 9, 2017
READY TO INSTALL
Press the Install button to begin installing Chime.
Figure 16: Install Chime
Figure 17: Install Complete
Click Finish to close the setup wizard and launch the configuration wizard.

Page 19 Copyright © 2017 Instant Technologies. All rights reserved.
Rev 15 – RQ
May. 9, 2017
CHIME CONFIGURATION WIZARD
Once all the required account information has been filled out in the Chime Setup wizard, you will be
prompted with the next part of the installation, the Configuration Wizard. In this section you will do the
following:
Verify Active Directory account information
Verify and test connection to the SQL Database
Setup the Chime Web Client
Pick the first administrative user for the Chime application
Configure SSL Certificates (optional)
Figure 18: Configuration Wizard
Page 20 Copyright © 2017 Instant Technologies. All rights reserved.
Rev 15 – RQ
May. 9, 2017
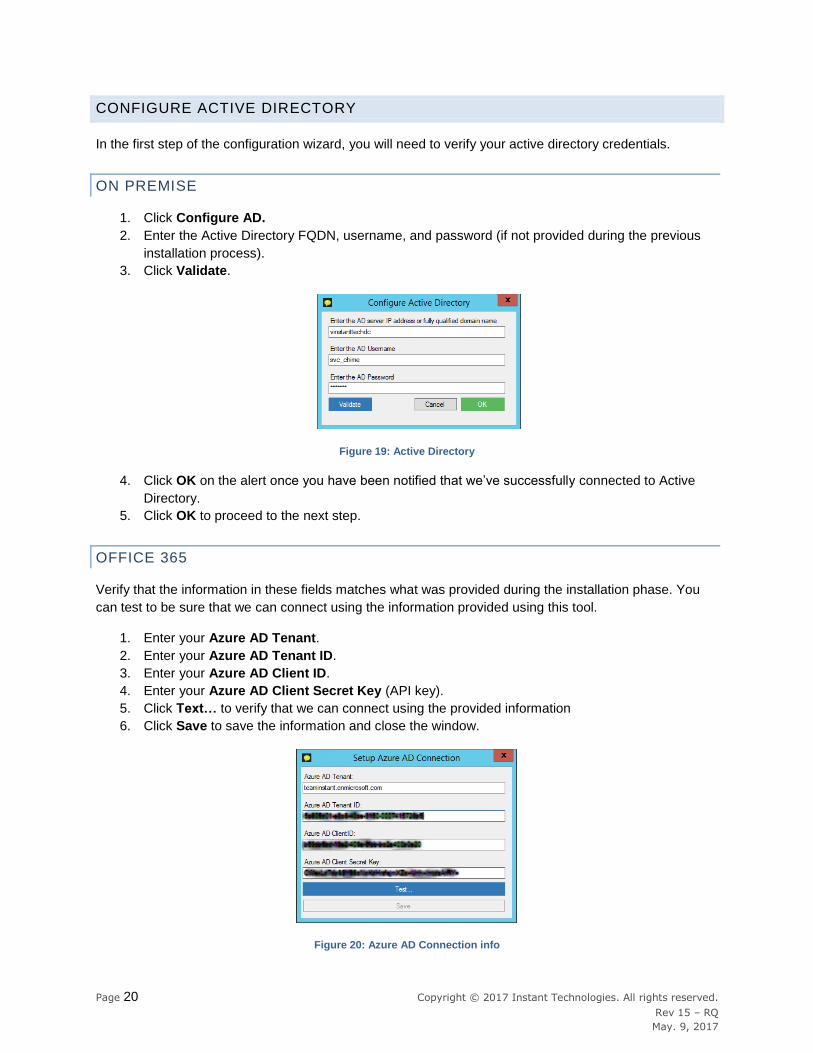
CONFIGURE ACTIVE DIRECTORY
In the first step of the configuration wizard, you will need to verify your active directory credentials.
ON PREMISE
1. Click Configure AD.
2. Enter the Active Directory FQDN, username, and password (if not provided during the previous
installation process).
3. Click Validate.
Figure 19: Active Directory
4. Click OK on the alert once you have been notified that we’ve successfully connected to Active
Directory.
5. Click OK to proceed to the next step.
OFFICE 365
Verify that the information in these fields matches what was provided during the installation phase. You
can test to be sure that we can connect using the information provided using this tool.
1. Enter your Azure AD Tenant.
2. Enter your Azure AD Tenant ID.
3. Enter your Azure AD Client ID.
4. Enter your Azure AD Client Secret Key (API key).
5. Click Text… to verify that we can connect using the provided information
6. Click Save to save the information and close the window.
Figure 20: Azure AD Connection info
Page 21 Copyright © 2017 Instant Technologies. All rights reserved.
Rev 15 – RQ
May. 9, 2017
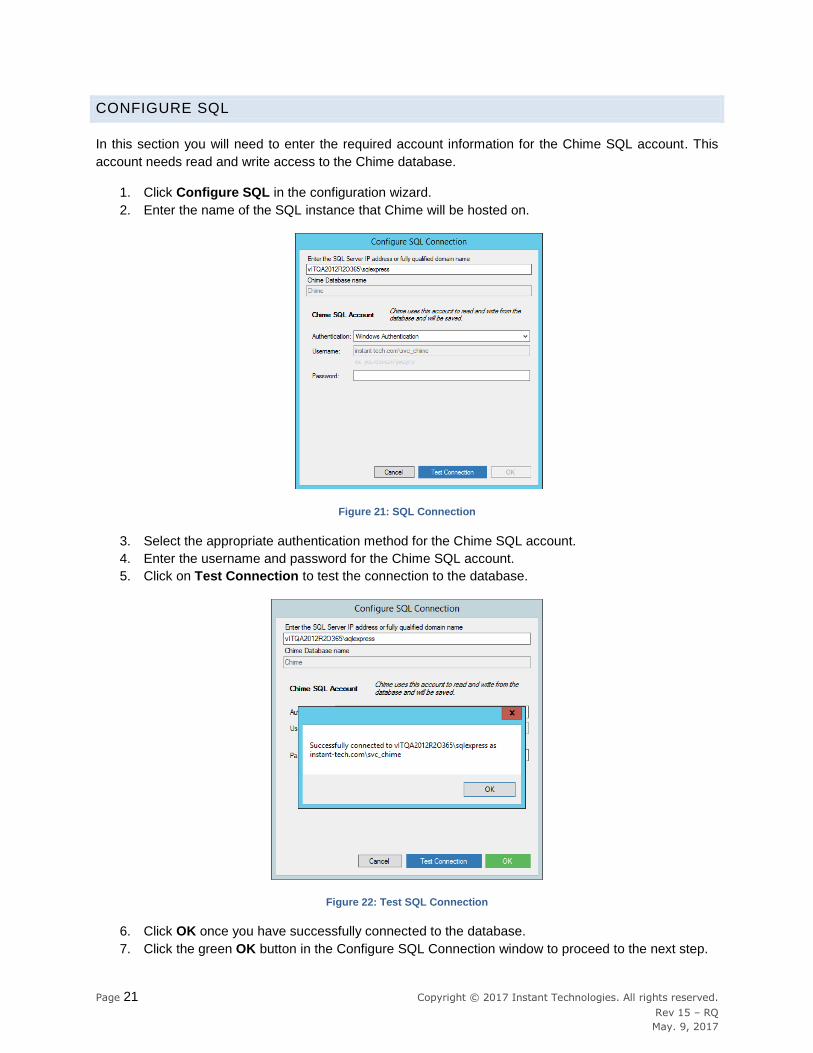
CONFIGURE SQL
In this section you will need to enter the required account information for the Chime SQL account. This
account needs read and write access to the Chime database.
1. Click Configure SQL in the configuration wizard.
2. Enter the name of the SQL instance that Chime will be hosted on.
Figure 21: SQL Connection
3. Select the appropriate authentication method for the Chime SQL account.
4. Enter the username and password for the Chime SQL account.
5. Click on Test Connection to test the connection to the database.
Figure 22: Test SQL Connection
6. Click OK once you have successfully connected to the database.
7. Click the green OK button in the Configure SQL Connection window to proceed to the next step.
Page 22 Copyright © 2017 Instant Technologies. All rights reserved.
Rev 15 – RQ
May. 9, 2017
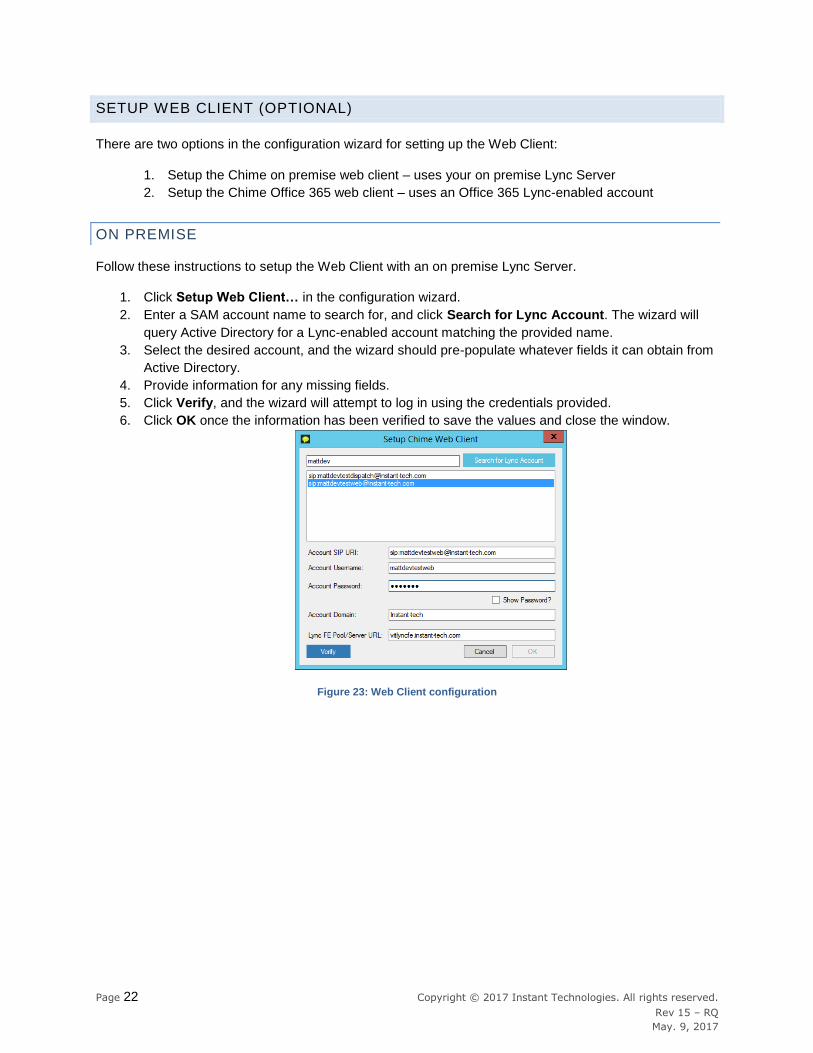
SETUP WEB CLIENT (OPTIONAL)
There are two options in the configuration wizard for setting up the Web Client:
1. Setup the Chime on premise web client – uses your on premise Lync Server
2. Setup the Chime Office 365 web client – uses an Office 365 Lync-enabled account
ON PREMISE
Follow these instructions to setup the Web Client with an on premise Lync Server.
1. Click Setup Web Client… in the configuration wizard.
2. Enter a SAM account name to search for, and click Search for Lync Account. The wizard will
query Active Directory for a Lync-enabled account matching the provided name.
3. Select the desired account, and the wizard should pre-populate whatever fields it can obtain from
Active Directory.
4. Provide information for any missing fields.
5. Click Verify, and the wizard will attempt to log in using the credentials provided.
6. Click OK once the information has been verified to save the values and close the window.
Figure 23: Web Client configuration
Page 23 Copyright © 2017 Instant Technologies. All rights reserved.
Rev 15 – RQ
May. 9, 2017
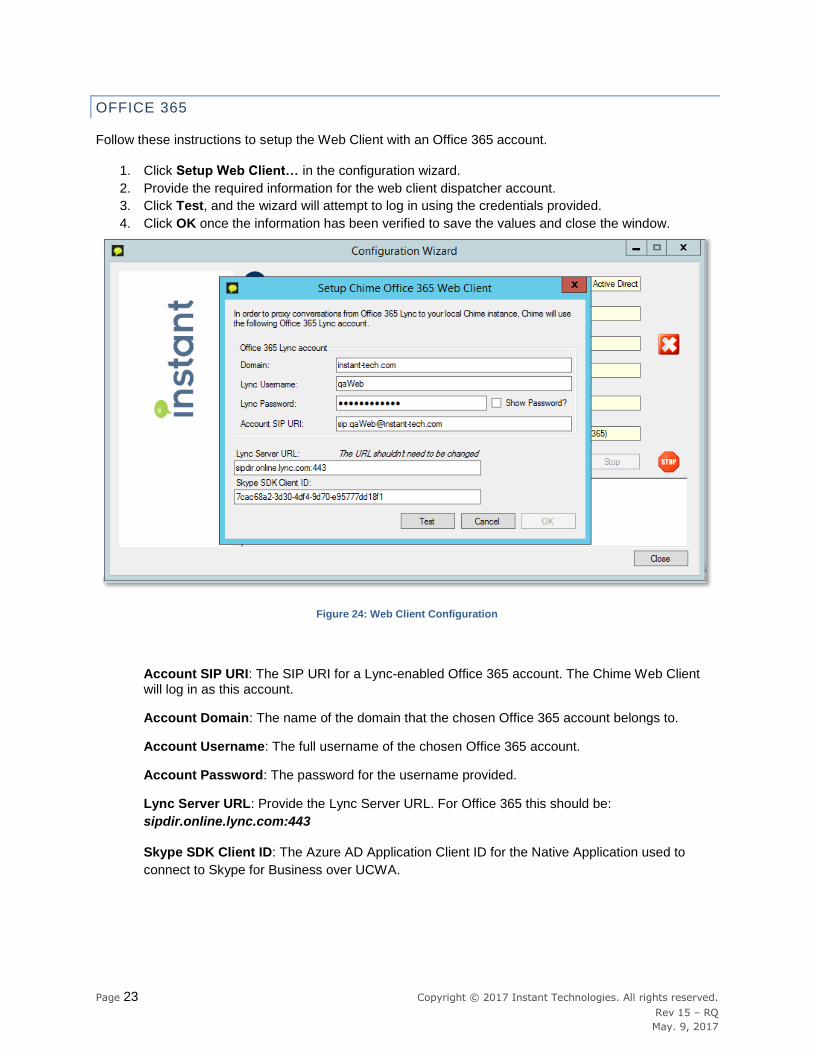
OFFICE 365
Follow these instructions to setup the Web Client with an Office 365 account.
1. Click Setup Web Client… in the configuration wizard.
2. Provide the required information for the web client dispatcher account.
3. Click Test, and the wizard will attempt to log in using the credentials provided.
4. Click OK once the information has been verified to save the values and close the window.
Figure 24: Web Client Configuration
Account SIP URI: The SIP URI for a Lync-enabled Office 365 account. The Chime Web Client will log in as this account.
Account Domain: The name of the domain that the chosen Office 365 account belongs to.
Account Username: The full username of the chosen Office 365 account.
Account Password: The password for the username provided.
Lync Server URL: Provide the Lync Server URL. For Office 365 this should be:
sipdir.online.lync.com:443
Skype SDK Client ID: The Azure AD Application Client ID for the Native Application used to
connect to Skype for Business over UCWA.

Page 24 Copyright © 2017 Instant Technologies. All rights reserved.
Rev 15 – RQ
May. 9, 2017
PICK ADMIN USER
Chime will need a Lync-enabled account to be configured as the first Admin user of Chime. That person
will be able to add other people once they log in.
1. Click on Pick Admin from the Configuration Wizard.
2. Enter the partial or full username of the person who will be the first admin. Click Search to find the
user.
Figure 25: Pick Admin User
3. Select the correct user from the list, and click Check User.
Figure 26: Check User
4. Once you’ve verified that the user picked is valid, click OK. Then, click OK in the Choose Admin
user window to proceed to the next step of the Configuration Wizard.
Page 25 Copyright © 2017 Instant Technologies. All rights reserved.
Rev 15 – RQ
May. 9, 2017
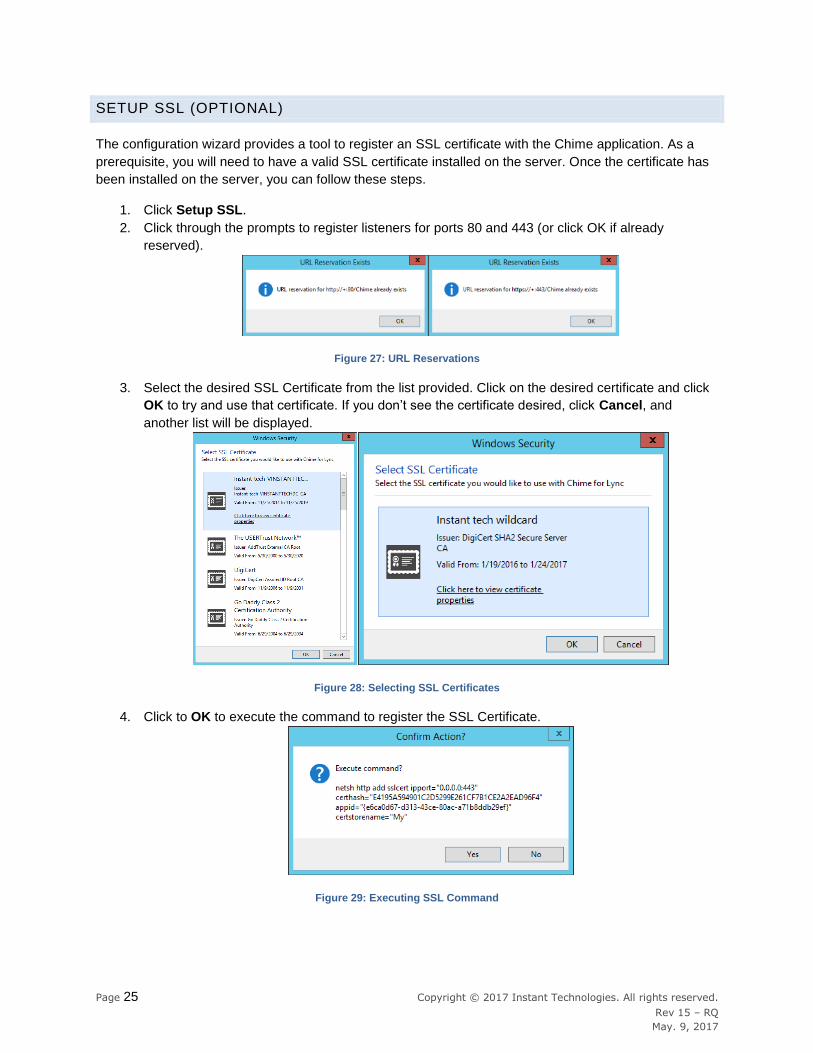
SETUP SSL (OPTIONAL)
The configuration wizard provides a tool to register an SSL certificate with the Chime application. As a
prerequisite, you will need to have a valid SSL certificate installed on the server. Once the certificate has
been installed on the server, you can follow these steps.
1. Click Setup SSL.
2. Click through the prompts to register listeners for ports 80 and 443 (or click OK if already
reserved).
Figure 27: URL Reservations
3. Select the desired SSL Certificate from the list provided. Click on the desired certificate and click
OK to try and use that certificate. If you don’t see the certificate desired, click Cancel, and
another list will be displayed.
Figure 28: Selecting SSL Certificates
4. Click to OK to execute the command to register the SSL Certificate.
Figure 29: Executing SSL Command

Page 26 Copyright © 2017 Instant Technologies. All rights reserved.
Rev 15 – RQ
May. 9, 2017
START THE CHIME APPLICATION
STARTING FROM CONFIGURATION WIZARD
Click the Start button on the configuration wizard to start the Chime service.
STARTING FROM SERVICES
1. Log on to the server that Chime is hosted on.
2. Go to the Control Panel, and navigate to Administrative Tools.
3. Open ‘Services’.
4. Find ‘Chime for Lync’ in the list of services.
5. Right-click on Chime for Lync and click ‘Start’.
ISSUES STARTING CHIME
UNABLE TO START THE CHIME SERVICE – INCORRECT LOGON
If you are unable to start the Chime service due to a logon failure, it’s possible that you entered the
incorrect credentials for the Chime Service account during the install. To verify these credentials, follow
these steps:
1. Log on to the server that Chime is hosted on.
2. Go to the Control Panel, and navigate to Administrative Tools.
3. Open ‘Services’.
4. Find ‘Chime for Lync’ in the list of services.
5. Right-click on Chime for Lync and click on ‘Properties’.
6. Navigate to the ‘Log On’ tab.
7. Click OK once the account credentials have been changed or verified.
8. Follow the steps to start the Chime service.
UNABLE TO START THE SERVICE – LOG ON AS A SERVICE
If you are unable to start the Chime service, and receive an error message that the account doesn’t have
the proper rights, you will need to give administrative rights to the Chime Service account.
1. Log on to the server that Chime is hosted on.
2. Go to the Control Panel, and navigate to Administrative Tools.
3. Open ‘Local Security Policy’
4. Under ‘Local Policies’, click on ‘User Rights Assignment’.
5. Click on ‘Log On as a Service’, and then click on Add User or Group.
6. Enter the service account name, and click ‘Check Names’
7. Click OK once you’ve selected the service account to add.
8. Follow the steps to start the Chime service.

Page 27 Copyright © 2017 Instant Technologies. All rights reserved.
Rev 15 – RQ
May. 9, 2017
UNABLE TO START THE SERVICE – SERVICE ACCOUNT NOT AN ADMINSTRATOR
If you are unable to start the Chime service, and receive an error message saying to check that account
can log on as a service, you will need to add the Chime service account to the administrator group on
your system.
1. Log on to the server that Chime is hosted on.
2. Go to the Control Panel and navigate to Administrative Tools.
3. Open ‘Computer Management’.
4. Under ‘Local Users and Groups, click on ‘Groups’.
5. Right-click on ‘Administrators’ and select ‘Properties’.
6. Click ‘Add’, enter the service account name and click ‘Check Names’.
7. Select the correct Chime service account and click ‘OK’ back to Administrator Properties.
8. Click ‘Apply’ and then ‘OK’
9. Follow the steps to start the Chime service.

Page 28 Copyright © 2017 Instant Technologies. All rights reserved.
Rev 15 – RQ
May. 9, 2017
ACCESS THE CHIME APPLICATION
Once you’ve successfully installed Chime, you are ready to access the application.
1. Type in the URL of the Chime instance. It will look something like this:
Error! Hyperlink reference not valid.
- or -
Error! Hyperlink reference not valid.
2. Log in to the application.
3. You are ready to add more administrators, agents, and start routing chats.
Figure 30: Chime Agent Dashboard