Embed Size (px)
Citation preview

PHONE:888-871-5723
WWW.STOREITCOLD.COM [email protected]
SHIPPING• YourCoolBotCoolerSystemwillbedeliveredinthree(3)differentshipments.
1. Enclosure(Walk-inbox)shipment2. A/Cunitshipment3. CoolBotTemperatureControllershipment
• Shipmentscanbedeliveredbyseparatecarriersatdifferenttimes.Youwillbeprovided
withshipmentinformationandestimateddeliverytimes.• OurWalk-inenclosureManufacturerandourA/Csupplierstakeeveryprecautionforsafe
arrival,buttheirresponsibilityceaseswhenshipmentisturnedovertothecarrier.• PleasereadcarefullythenextpageregardingWalk-inBoxandA/Cshipmentsfor
instructionsonreceiving,inspectingandfilingclaimsifnecessary.• THEWALK-INCOOLERBOX(ENCLOSURE)WILLBETRANSPORTEDANDDELIVEREDEITHER
ONAFLATBEDORASEMITRUCK.THERECEIVERWILLBERESPONSIBLEFORPROVIDINGAPPROPRIATEACCESSTOTHEDELIVERYVEHICLEANDALLNECESSARYEQUIPMENTTOSAFELYUNLOADTHEPALLETSFROMTHECARRIER.
• IFACOMMERCIALADDRESSISPROVIDEDFORDELIVERY,THEA/CUNITWILLBE
TRANSPORTEDANDDELIVEREDINACOMMERCIALFREIGHTTRUCK.THERECEIVERWILLBERESPONSIBLEFORPROVIDINGAPPROPRIATEACCESSTOTHEDELIVERYVEHICLEANDALLNECESSARYEQUIPMENTTOSAFELYUNLOADTHEA/CUNIT.
• IFARESIDENTIALADDRESSISPROVIDEDFORDELIVERY,THEA/CUNITWILLBEDELIVEREDINACOMMERCIALBOXTRUCKTHATMAYORMAYNOTHAVEALIFTGATE.THERECEIVERWILLBERESPONSIBLEFORPROVIDINGTHENECESSARYEQUIPMENT(ORMANPOWER)TOSAFELYUNLOADTHEA/CUNIT.

PHONE:888-871-5723
WWW.STOREITCOLD.COM [email protected]
IMPORTANT
WALK-INBOXANDA/CSHIPMENTSINSPECTSHIPMENTIMMEDIATELYUPONARRIVALFORLOSSORDAMAGE
PLEASENOTEANYDAMAGESAND/ORDISCREPANCIESONBILLOFLADINGATTHETIMEOFDELIVERYANDTAKEPHOTOSTOSUPPORTCLAIM
YourWalk-inCoolerEnclosurehasbeencarefullypalletizedandcratedatthefactorytominimizethechancesoftransportationdamage.Thoroughlyinspectyourshipmentforvisibledamagesuchusbrokencrating,tearsintheshrinkplasticcovering,etc.,beforeyousignthereleaseofthebillofladingtothedriver.
IncaseofadamagedshippingpleaseforwardcopyofthebillofladingwiththedamagesandphotosasproofoflosstoyourSalesRepresentativeatStoreItCold.Otherwise,noclaimcanbeestablishedfortheresolutionwiththecarrierbyStoreItCold.
Ifconcealedlossordamageisdiscoveredlater,notifythecarrieratonceandrequestaninspection.Thisisabsolutelynecessary.Concealeddamageclaimsmustbemadewithin15daysofdeliveryandfiledbyyou.
FREIGHTDAMAGEANDLOSSCLAIMSCANBEFILEDDIRECTLYWITHTHECARRIER.PLEASENOTIFYYOURSALESREPRESENTATIVEIFYOUNEEDFURTHERASSISTANCEINTHEMATTER.
WARRANTY
ENCLOUSURE10YEARLIMITEDWARRANTYTheenclosure(Walk-inbox)manufacturerwarrantstotheoriginalpurchaserthatthispre-engineeredwall,ceiling,andfloor(ifapplicable)panelspurchasedfromSIC,arefreefromdefectsinmaterialandworkmanshipforaperiodoften(10)yearsfromthedateoforiginalshipmentunderconditionsofnormaluseandserviceattheoriginalinstallationsite.
Componentparts,hardwareandaccessoriesarewarrantedforaperiodofone(1)yearfromdateofshipment.

PHONE:888-871-5723
WWW.STOREITCOLD.COM [email protected]
TheobligationoftheManufacturerunderthiswarrantyshallbelimitedtorepairingorreplacing,atthecompany’sdiscretion,thepanelsthatprovetobedefectivewithinten(10)yearsofpurchase,FOBfactory.Allhardwareandaccessoriescarryastandardoneyearwarranty.Thestandardwarrantydoesnotincludeanylaborchargesforrepairorreplacementofdefectiveparts.Innoevent,shallSICbeliableforlossofuse,revenueorprofit,orforanyotherindirect,incidental,special,orconsequentialdamageincluding,butnotlimitedto,foodspoilageorproductloss.
SICexpresslydisclaimsandmakesnowarranties,expressorimplied,astothecondition,design,utility,quality,adequacy,orcapacitywithrespecttoanystandardornon-standardproduct,including,withoutlimitations,anywarrantyofmerchantabilityorfitnessofsuchproductforaparticularpurposeorintendeduse.
Thiswarrantyisinlieuofallotherwarrantiesexpressedorimpliedanddoesnotapplytoequipmentwhichhasbeensubjecttoanyaccident,alteration,abuse,misuse,alterationsbyunauthorizedservice,improperinstallationorinstallationbyanunlicensedcontractor.
ExclusionsfromWarrantyCoverage:
• Labor,mileageorothercostsincurredforrepairing,removing,installing,shipping,servicing,orhandlingofdefectiveorreplacementpanelsorparts.
• Normalmaintenanceorrepairs• Damageordelaysoccurringintransit• Damageorlossofproduct,property,incomeorprofit• Floorpanelssubjectedtowetmopping,flood,waterleak,palletjacksorweight
exceeding700lbs/sqft• Damagebyfire,flood,earthquakeornaturaldisasters
A/CUNIT1YEARLIMITEDWARRANTYYourA/Cunitcarriesa1yearlimitedwarranty.PleasecontactSICtofacilitateawarrantyclaimofyourA/Cunitduringthisperiod.
IMPORTANT!PleaserefertotheOWNERS’SMANUALoftheA/Cunittofollowrecommendationsaboutproperinstallation,operation,andmaintenanceofyourA/Cunit.
ThiswarrantywillNOTcoverclaimsduetoimproperinstallationorimproperelectricalsupplytotheA/Cunit.

PHONE:888-871-5723
WWW.STOREITCOLD.COM [email protected]
COOLBOTDIGITALCONTROLLER1YEARLIMITEDWARRANTYDISCLAIMER:ByusingtheCoolBottemperaturecontroller,you(the“User”)acknowledgethereareinherenthazardsingettinganair-conditioner(“A/C”)todosomethingitwasnotoriginallydesignedtodo,andthattheseinherenthazardscannotbeameliorated,mitigatedorobviatedwhilestillmaintainingtheessentialfunctionalityoftheCoolBot.UseracceptsallresponsibilityintheuseofandmonitoringoftheCoolBotandA/C.UserassumesallriskoflossofpropertyorproductduetoimproperfunctioningoftheCoolBot(orA/C).Userassumesallriskofinjuryandwarrants that he/she will defend, indemnify and hold the seller harmless for any direct orconsequentialharmordamagethatmayresultfromtheuseofthisproduct.
LIMITEDWARRANTY:CoolBotsarewarrantedagainstdefectsfor1year,notincludingdamageduetomisuseoraccidents.TodoublethewarrantyonyourCoolBotseepage19oftheCoolBotInstallationManual.
IMPORTANTALLCOOLBOTWALK-INCOOLERSALESAREFINALINCLUDINGALLITSCOMPONENTS-ENCLOSURE,A/CUNITANDCOOLBOTDIGITALCONTROLLER.
PHONE:888-871-5723
WWW.STOREITCOLD.COM [email protected]
ENCLOSUREINSTALLATIONINTRUCTIONSEnclosedwiththeInstallationmanualthereisaSet-updrawing,showingtheidentification
andproperplacementofyourwalk-incoolerpanels.
WWallPanelsforusewithfloorpanels.
NWallPanelsforusewithoutfloorpanels.
CCeilingsPanels.
FFloorPanels.
DDoorandDoorFrame.
HavingaSUCCESSFULINSTALLATIONbeginswithhavingalevelfloor.Ifthefloorisnotlevel,itwillbenecessarytoinstallshims,undereachfloorpanelcam—lock.IfWalk—lndoesnothaveFloorPanels,thenundertheWalk—in's(Wallpanels)Vinylscreed.
Aminimumof2"clearancebetweenexistingbuildingwallsandWalk-inisnecessaryforproperaircirculation.

PHONE:888-871-5723
WWW.STOREITCOLD.COM [email protected]
CAM-LOCKMECHANISMBeforestartingtoputyourenclosuretogether,familiarizeyourselfwiththeoperationoftheCam-lockmechanism.
Lockswillbeontherightsideofthepanelandtheyoperateinaclockwiserotationtolock.Theyareaccessiblethroughthesmallholesontherightsideofthepanel.
InserttheHexWrenchprovidedwithyourInstallationpackage,andafterthepanelshavebeencarefullyaligned,turnapproximately¾ofafullturnuntilpanelsaresecurelylockedtogether.
DONOTOVERTGHTEN!ItwillstriptheHexholeanddamagethemechanism.
DONOTdrivetheHexWrenchwithahammerasthiscandamagethelock.
Thislockingmechanismisreversible.Simplyrotateintheoppositedirectiontoreleasethelockandmakeadjustments.Don’tforgettolockyourpanelagainafteradjustmentshavebeenmade.
PHONE:888-871-5723
WWW.STOREITCOLD.COM [email protected]
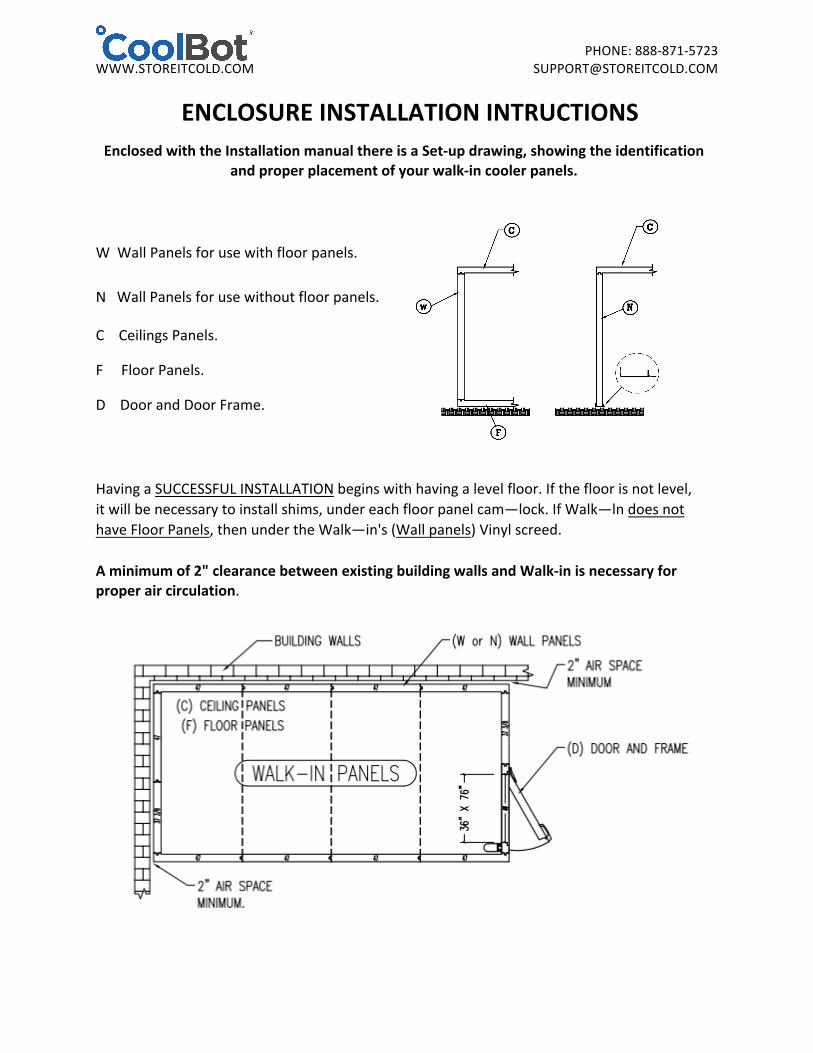
WALK-ININSTALLATIONWITHAFLOOROPTION1. SetthefloorpanelsaccordingtotheSet-updrawingincludedinyourdocumentation.
Allpanelshavelabels,andareidentifiedintheSet-updrawing.
2. Makesurethatallfloorpanelsarelevel.Ifnot,usingshimsundercam-locksofthefloorpanelsaroundtheoutsideedgeissuggestedtolevelthefloor.

PHONE:888-871-5723
WWW.STOREITCOLD.COM [email protected]
3. Afterallfloorpanelsarelevel,firmlyandsecurelylockallfloorpanelstogetherwiththeHexWrenchprovidedinyourinstallationpackage.Turnitapproximately¾ofafullturnandrepeatuntilallfloorpanelsaresecurelylockedtogether.
4. Beginwithtwocornerpanels.Usuallytheleftbackcornerisagoodplacetostart.Makesurethatthetopofeachwalladjacentpanelisflushwitheachother.Usethewrenchtosecurethewallpanelstothefloorandthenlockthewallpanelstogethertostartthewall.Checkforalignmenttomakesurethepanelsareflushwiththefloor,cornersandeachotherasyouproceed.

PHONE:888-871-5723
WWW.STOREITCOLD.COM [email protected]
5. Selectthenextadjacentwallpanel,goinginaclockwisedirectionaroundtheperimeterandfollowthesamestepsasabove:Align,locktothefloor,locktotheadjacentwallpanelanddoublecheckforalignmentmakingsurepanelisflushonallsidesandontopwiththeadjacentpanelsandfloor.
6. Repeatthisprocedurewitheachwallpanelworkingyourwayaroundtheperimeterofthecoolerinaclockwisefashion.
7. WheninstallingtheDoorpanel,DONOTREMOVEDOORFROMDOORFRAME.Followthesamerecommendationsaswheninstallingthewallpanels.Doorframepanelmustbelevelwithadjacentpanelsandflushatthetopwithalladjacentpanels.DONOTscrew-inthedoorthresholdyet.
PHONE:888-871-5723
WWW.STOREITCOLD.COM [email protected]
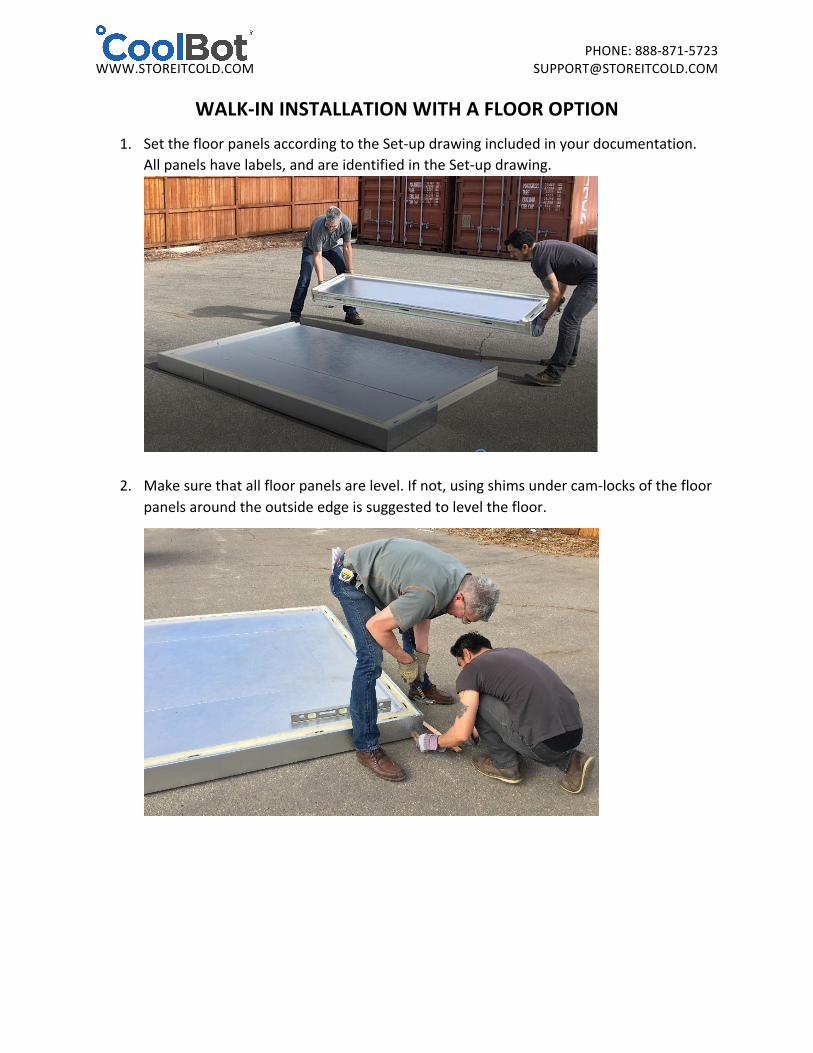
8. Proceedtoinstalltherestofthewallpanelsinthesamewaytheotherwallpanelswhereinstalled,leavingtheFrontleftcornerforlast.
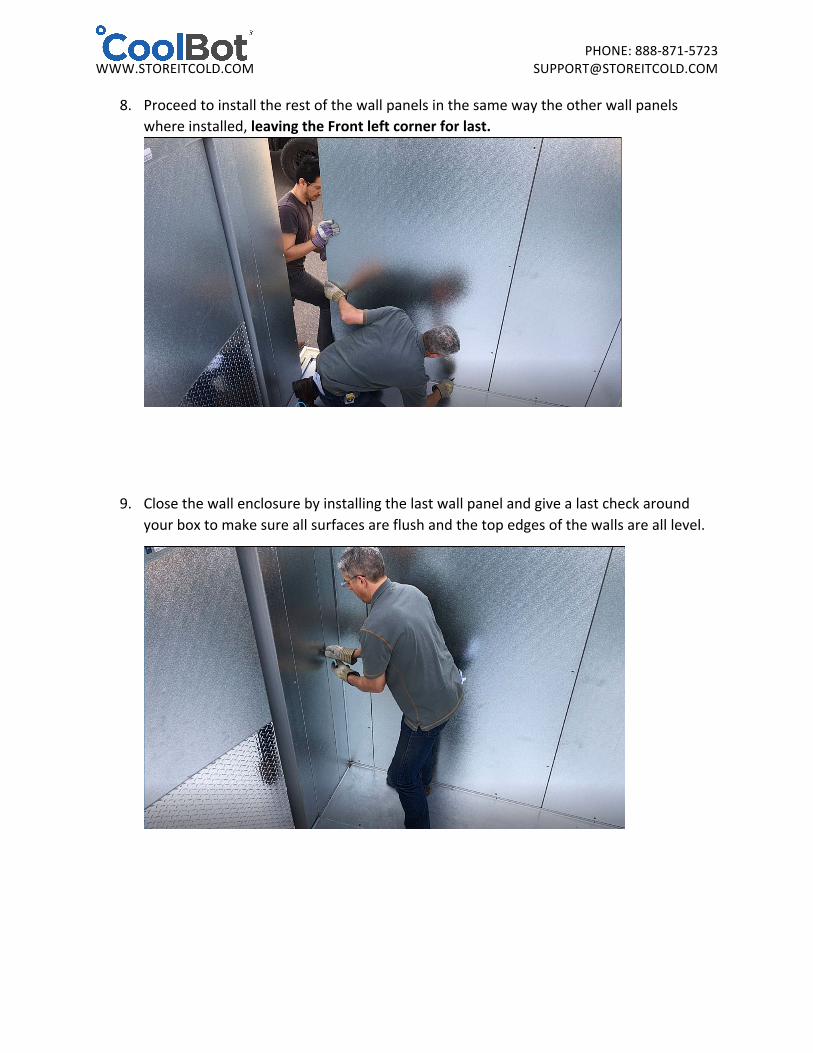
9. Closethewallenclosurebyinstallingthelastwallpanelandgivealastcheckaroundyourboxtomakesureallsurfacesareflushandthetopedgesofthewallsarealllevel.
PHONE:888-871-5723
WWW.STOREITCOLD.COM [email protected]
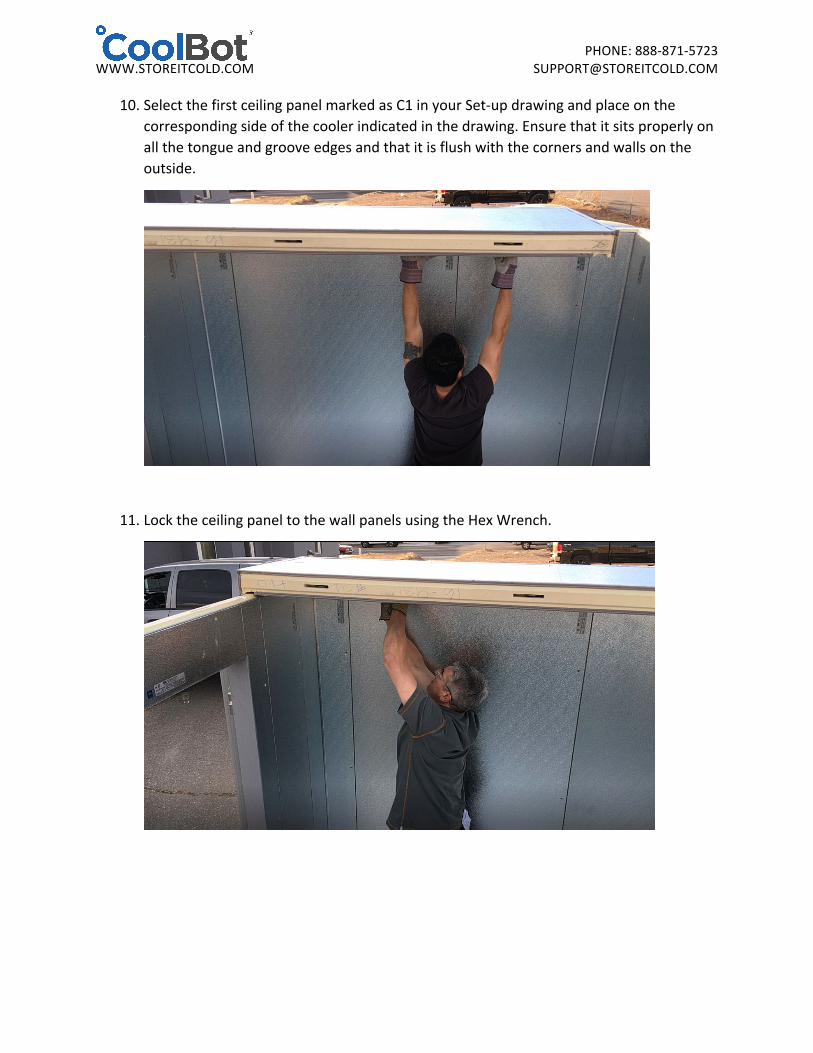
10. SelectthefirstceilingpanelmarkedasC1inyourSet-updrawingandplaceonthecorrespondingsideofthecoolerindicatedinthedrawing.Ensurethatitsitsproperlyonallthetongueandgrooveedgesandthatitisflushwiththecornersandwallsontheoutside.
11. LocktheceilingpaneltothewallpanelsusingtheHexWrench.
PHONE:888-871-5723
WWW.STOREITCOLD.COM [email protected]
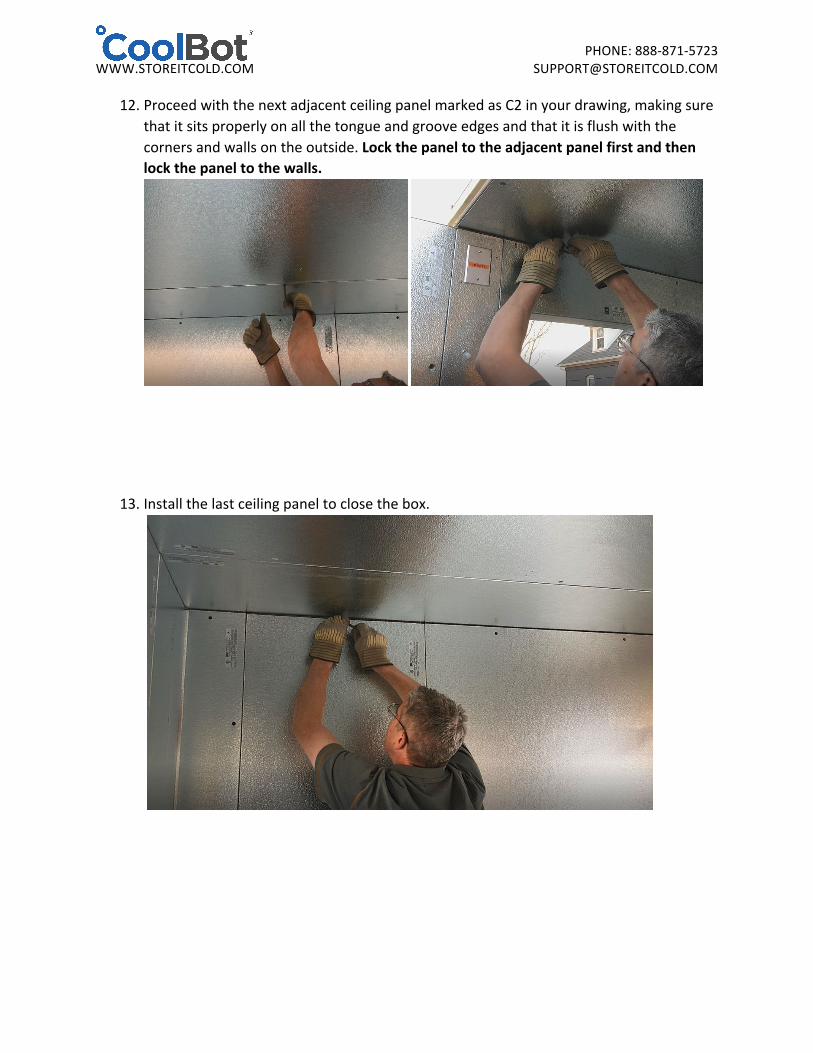
12. ProceedwiththenextadjacentceilingpanelmarkedasC2inyourdrawing,makingsurethatitsitsproperlyonallthetongueandgrooveedgesandthatitisflushwiththecornersandwallsontheoutside.Lockthepaneltotheadjacentpanelfirstandthenlockthepaneltothewalls.
13. Installthelastceilingpaneltoclosethebox.

PHONE:888-871-5723
WWW.STOREITCOLD.COM [email protected]
14. Checkyourboxaroundonelasttime.Seamsinbetweenpanelsshouldbetightandflush.Checkyourdoorforcorrectoperation.Openyourdoorlessthan90°andletitclosebyitself.Makesureitclosesfreelyandmakesagoodsealwiththeframe.Ensurethedoordoesnothitorrubagainstanypartsoftheframe.Adoorthatisnotclosingproperlyisusuallytheresultofunlevelset-upand/orimproperinstallation.Pleaseunlockthenecessarypanelsandcorrectpositioningandlevelinguntilthedooroperatesproperly.
15. Coverwrenchholeswiththeplasticbuttonsprovidedintheinstallationkit.Useaplasticorregularhammertogentlytaptheminplace.
PHONE:888-871-5723
WWW.STOREITCOLD.COM [email protected]
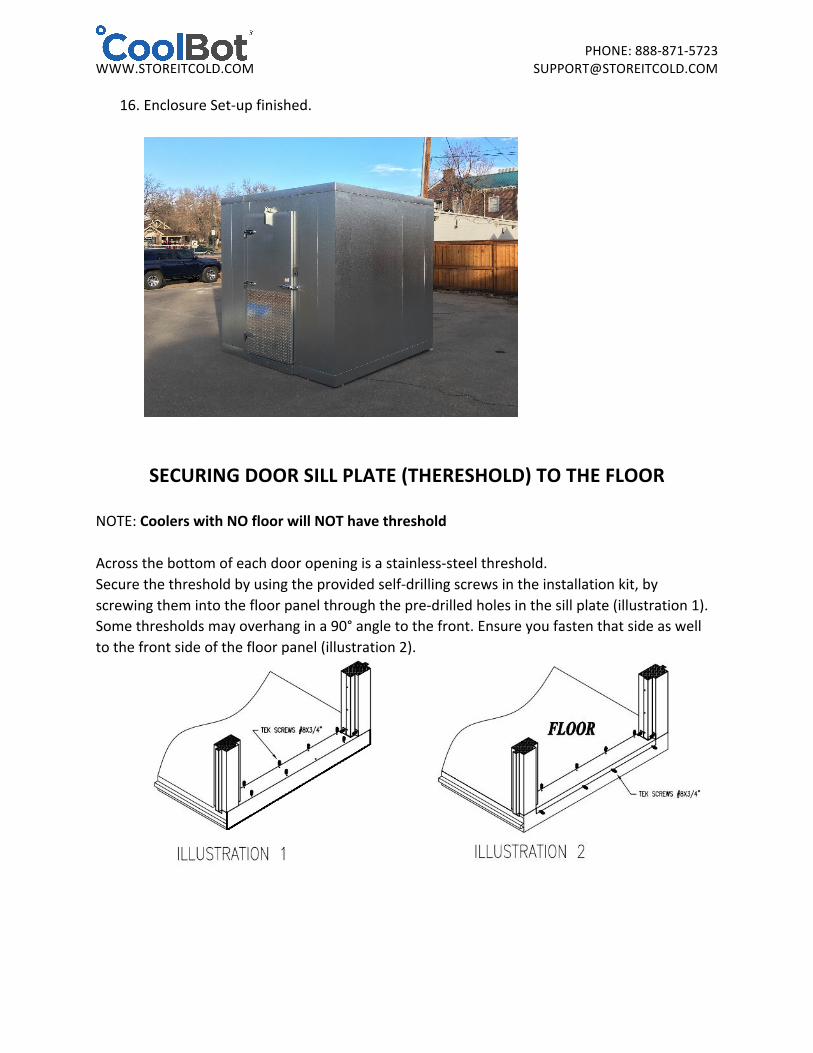
16. EnclosureSet-upfinished.
SECURINGDOORSILLPLATE(THERESHOLD)TOTHEFLOOR
NOTE:CoolerswithNOfloorwillNOThavethresholdAcrossthebottomofeachdooropeningisastainless-steelthreshold.Securethethresholdbyusingtheprovidedself-drillingscrewsintheinstallationkit,byscrewingthemintothefloorpanelthroughthepre-drilledholesinthesillplate(illustration1).Somethresholdsmayoverhangina90°angletothefront.Ensureyoufastenthatsideaswelltothefrontsideofthefloorpanel(illustration2).
PHONE:888-871-5723
WWW.STOREITCOLD.COM [email protected]
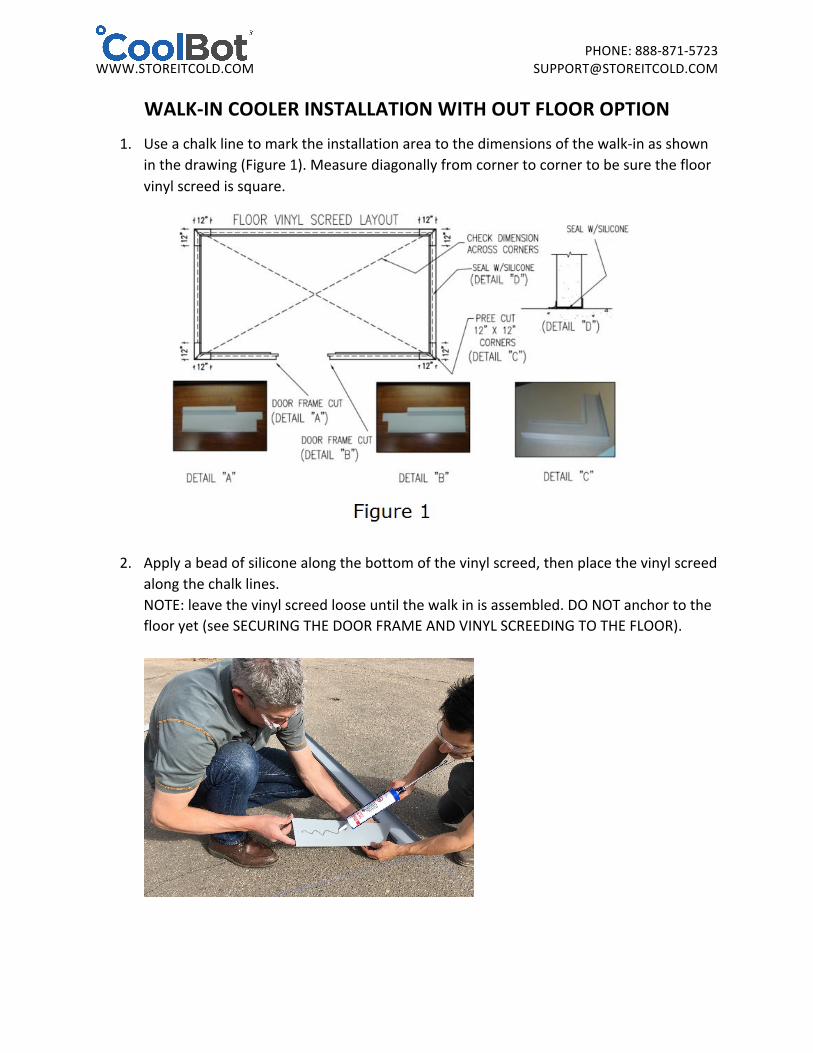
WALK-INCOOLERINSTALLATIONWITHOUTFLOOROPTION1. Useachalklinetomarktheinstallationareatothedimensionsofthewalk-inasshown
inthedrawing(Figure1).Measurediagonallyfromcornertocornertobesurethefloorvinylscreedissquare.
2. Applyabeadofsiliconealongthebottomofthevinylscreed,thenplacethevinylscreedalongthechalklines.NOTE:leavethevinylscreedlooseuntilthewalkinisassembled.DONOTanchortotheflooryet(seeSECURINGTHEDOORFRAMEANDVINYLSCREEDINGTOTHEFLOOR).

PHONE:888-871-5723
WWW.STOREITCOLD.COM [email protected]
3. Beginwithtwocornerpanels.Usuallytheleftbackcornerisagoodplacetostart.Standthewallpanelsinsidethescreedmakingsuretheysitcorrectly(fullycradledinthescreeding).Makesurethatthetopofeachwalladjacentpanelisflushwitheachother.Usethewrenchtosecurethewallpanelstogethertostartthewall.Checkforalignmenttomakesurethepanelsareflushwitheachotherasyouproceed.
4. Selectthenextadjacentwallpanel,goinginaclockwisedirectionaroundtheperimeterandfollowthesamestepsasabove:Align,locktotheadjacentwallpanelanddoublecheckforalignmentmakingsurepanelisflushonallsidesandontopwiththeadjacentpanels.

PHONE:888-871-5723
WWW.STOREITCOLD.COM [email protected]
5. Installshimsundervinylscreedcornersandacrossasneeded,toensuresupportpaneljointsandlevelnessofpanelsandwallsacrossthetop.
6. FollowtherestofthestepsasmentionedinINSTALLATIONOFAWALK-INWITHFLOOROPTIONfromstep6(inclusive)through16.
SECURINGTHEDOORFRAMEANDVINYLSCREEDINGTOTHEFLOOR
Oncetheentirewalk-incoolerisassembled,securethevinylscreedtothefloorbyusinga¼”pin-griporconcreteanchor(notprovided)underallwallsanddoorframelegs(Figure2).Sealwithsiliconeboththeinsideandoutsideedgeswherethescreedmeetsthewallpanel(Figure2).

PHONE:888-871-5723
WWW.STOREITCOLD.COM [email protected]
INSTALLATIONOFOUTDOORPACKAGE(OUTDOORUNITSONLY)
Outdoorunitsthatwillbeexposedtorainandsnowhavebeenshipwithadoorhood,anA/Chood,aroofmembraneandahardwarekitaspartofyouroutdoorpackage.Installthehoodsbeforeyourroofmembrane.
RAINHOODS(OUTDOORUNITSONLY)Alignthetopedgeofthehoodsnomorethan1”abovethehorizontaljointinbetweentheceilingpanelandthewallpanel.Makesureit’scenterinpositionwithrespecttothedoorortheA/Copening.Screwinplacewiththeself-drillingmetalscrewsprovidedintheinstallationkit.

PHONE:888-871-5723
WWW.STOREITCOLD.COM [email protected](OUTDOORUNITSONLY)IMPORTANTSICrecommendstheroofmembranetobeinstalledbyacontractortoensureitisinstalledcorrectly.Improperinstallationmayresultinwateraccumulationorwaterinfiltrationthroughthemembrane.
1. Extendyourmembraneontheroofofyourwalk-inwiththesoft(smoothsemi-glossytextured)sideup.Ensurethatithangsapproximatelythesameamountonallsides.Don’tworryifitistoolong,itcanbetrimmedafterit’sinstalledinplace.
2. ProceedtoinstallyourfirstanchoratthefrontleftcorneroftheCoolerceiling(ontop)tokeepthemembraneinplace.
PHONE:888-871-5723
WWW.STOREITCOLD.COM [email protected]
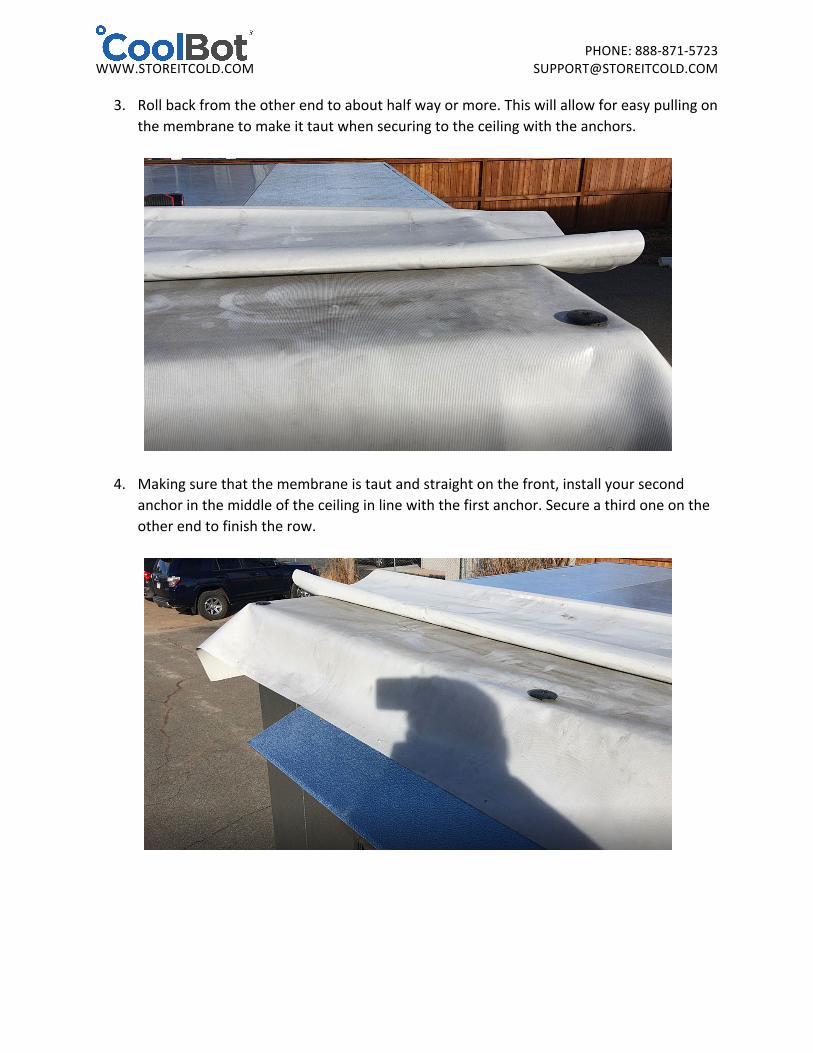
3. Rollbackfromtheotherendtoabouthalfwayormore.Thiswillallowforeasypullingonthemembranetomakeittautwhensecuringtotheceilingwiththeanchors.
4. Makingsurethatthemembraneistautandstraightonthefront,installyoursecondanchorinthemiddleoftheceilinginlinewiththefirstanchor.Secureathirdoneontheotherendtofinishtherow.

PHONE:888-871-5723
WWW.STOREITCOLD.COM [email protected]
5. Continuethesamewayinstallinghorizontalrowsof3anchorsasyouunrollandpulltightonthemembraneeachtimeyouarescrewingananchor.
• For8x8Coolersminimum12anchorsarerecommendedequallyspacedatfront
middleandbackoftheceilingpanel.(figure1)• For8x12Coolersminimumof15anchorsarerecommendedequallyspacedat
frontmiddleandbackoftheceilingpanel.(figure1)
PHONE:888-871-5723
WWW.STOREITCOLD.COM [email protected]
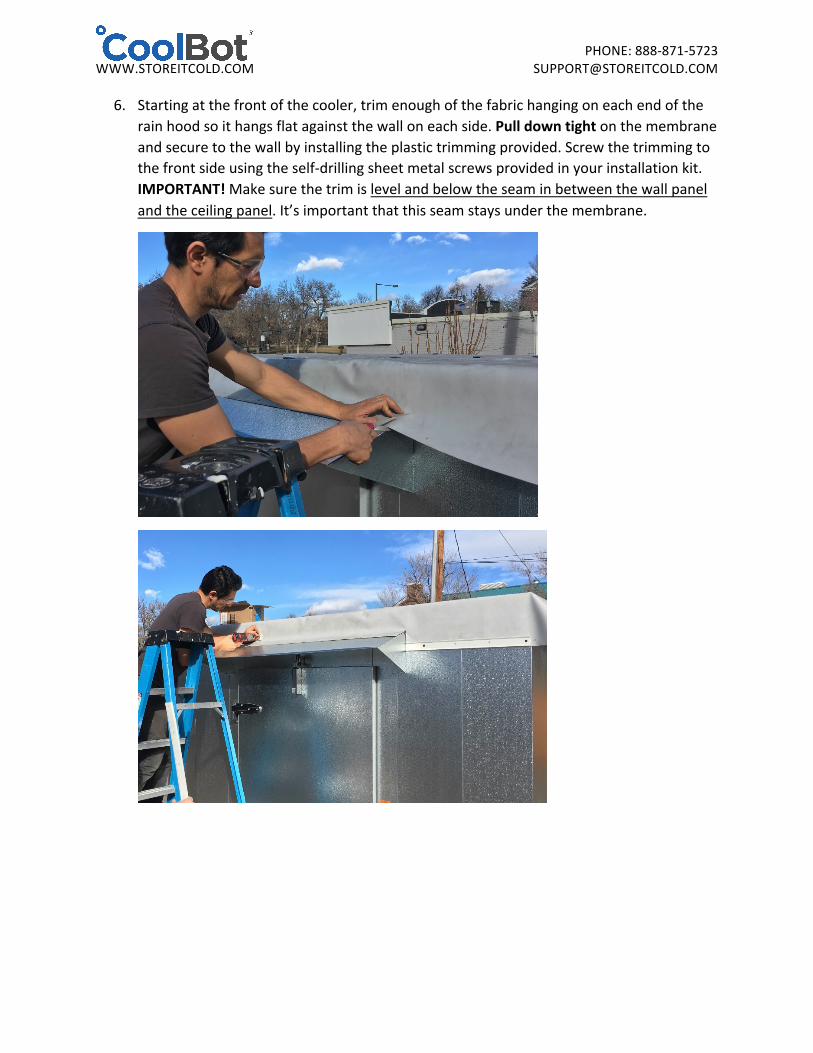
6. Startingatthefrontofthecooler,trimenoughofthefabrichangingoneachendoftherainhoodsoithangsflatagainstthewalloneachside.Pulldowntightonthemembraneandsecuretothewallbyinstallingtheplastictrimmingprovided.Screwthetrimmingtothefrontsideusingtheself-drillingsheetmetalscrewsprovidedinyourinstallationkit.IMPORTANT!Makesurethetrimislevelandbelowtheseaminbetweenthewallpanelandtheceilingpanel.It’simportantthatthisseamstaysunderthemembrane.

PHONE:888-871-5723
WWW.STOREITCOLD.COM [email protected]
7. Afterthefrontpartofthemembranehasbeensecured,proceedtooneofthesidesofthecooler.Tucktheexcessfabricatthefrontcornerunderneaththemembranetocreateanicefold.Pulldowntightandstartsecuringthemembranetothewallpanelsfollowingthesamerecommendationsasbefore.Installthetrimmingatthesamelevelasyoudidonthefronttoremainconstantaroundtheperimeterofthecooler.Workyourwayfromfronttobackasyoupulldowntightandsecure.
8. Repeatthesameprocessfortheothersideofthecoolerleavingthebackforlast.9. Finishsecuringthemembranebyinstallingthebacktrimmingfollowingthesame
directionsasabove.10. Afterthemembranehasbeencorrectlyinstalledandsecuredtothetopandsidesofyour
cooler,youcantrimwithautilityknifetheexcessfabricbelowthetrimifdesired.Thiswillgiveacleanerandmoreprofessionallookbutitisnotnecessary.
11. InstalltheTrimcoveringtofinishtheinstallationofthemembrane.Eitherslidefromthesidesorsnapitinplacebytuckingthecoverunderneaththetrimatthebottomandgentlytappingwithyourhandthetopparttosnapinplace.Theshortcoverpiecessuppliedinyourkitareabitbiggeranddesignedtocovertheseamsinbetweenthecoverpieces.
PHONE:888-871-5723
WWW.STOREITCOLD.COM [email protected]
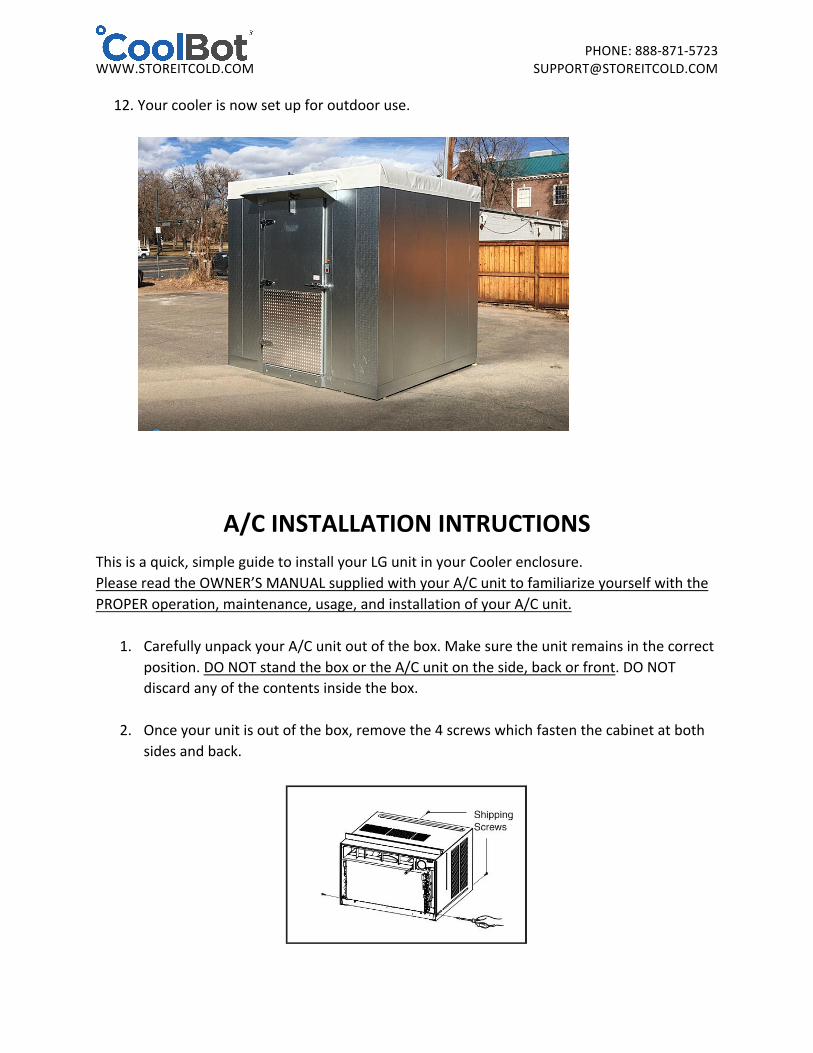
12. Yourcoolerisnowsetupforoutdooruse.
A/CINSTALLATIONINTRUCTIONSThisisaquick,simpleguidetoinstallyourLGunitinyourCoolerenclosure.PleasereadtheOWNER’SMANUALsuppliedwithyourA/CunittofamiliarizeyourselfwiththePROPERoperation,maintenance,usage,andinstallationofyourA/Cunit.
1. CarefullyunpackyourA/Cunitoutofthebox.Makesuretheunitremainsinthecorrectposition.DONOTstandtheboxortheA/Cunitontheside,backorfront.DONOTdiscardanyofthecontentsinsidethebox.
2. Onceyourunitisoutofthebox,removethe4screwswhichfastenthecabinetatbothsidesandback.

PHONE:888-871-5723
WWW.STOREITCOLD.COM [email protected]
3. Slidetheunitfromthecabinetbygrippingthebasepanhandleandpullingforwardwhilebracingthecabinet.
4. CarefullyinserttheA/Ccabinetonthepre-cutholefromtheinsideofthecoolerandslidetowardstheoutsideuntilthetopbracketofthecabinettouchesthewallpanel.
5. Ensurethatthecabinethasaslighttiltdownwardtowardstheoutside.Positionthecabinetsothatthebackisabout½”to1”lowerthanthefront.UsetheholesatthebottomofyourA/Ccabinettoscrewinplacetothewoodedgeoftheprecutholeonthewallpanel.

PHONE:888-871-5723
WWW.STOREITCOLD.COM [email protected]
6. Slidetheunitinsidethecabinet.
7. DonotinstallthefrontcoveroftheA/Catthispoint.
COOLBOTCONTROLLERINSTALLATIONThefollowingisaquicksetupguidetoinstallyourCoolBotcontrollertotheLGA/CunitaspartofyourCoolersystem.PleaserefertotheCOOLBOTINSTALLATIONMANUALANDTROUBLESHOOTINGGUIDEincludedwith your CoolBot package to familiarize yourself with the parts, functioning, proper use,settings,andtroubleshootingoftheCoolBotdigitalcontroller.
1. Plug the wires into the corresponding labelled ports at the bottom of the CoolBottemperaturecontroller.

PHONE:888-871-5723
WWW.STOREITCOLD.COM [email protected]
2. MounttheCoolBotonthewallnexttotheA/C’scontrolpanelside.
3. FindandfreetheA/C’sTemperatureSensor.It’stheonlythingattachedtothefrontgrilloftheA/C.Removeboththemountingclipandthesensor.Takethesensoroutofthemountingclip.

PHONE:888-871-5723
WWW.STOREITCOLD.COM [email protected]
4. UsingONLYa2”squarepieceofAluminumfoil(includedwiththeCoolBotpackage),placetheCoolBotHeaterCable (RedTip)next to theA/C’sTemperatureSensor.Hold themtogetherandwrapthemtightlywiththefoil.YoucanuseaTwist-tie1inchbelowthefoiltokeepthemtogether.
5. RoutetheA/CsensorandheateralongthemainA/Cpowercablesotheyhangdown.Youcanuseatwisttietokeeptheminplacearoundthepowercord.Placethetierightbeforetheredshrinkstarts.

PHONE:888-871-5723
WWW.STOREITCOLD.COM [email protected]
6. UseapenorapenciltoopenasmallgapinthefrontofthefinsoftheA/Cabout1”fromthebottomandnearthecenter,betweenthefirstandsecondCoolingpipes.TaketheFINSSensorcablefromtheCoolBotandinsertONLY¼”ofthetipintothesmallgap.DONOTforcetheSensorin;youwilldamageit!DONOTTOUCHanyCoolingPipeswiththeSensor.PinchthefinslightlyaroundtheSensortokeepitinplace.
7. PLEASEPROCEEDCAREFULLYINTHISSTEP.NOTE:YoudonothavetoreplacethefrontcoveroftheA/Cifyoudon’twantto.Thisisforaestheticpurposesonlyanditwon’taffectthefunctioningorthewarrantyofyoursystem.AnA/Cunitwiththefrontcoverremoved,willgiveyoumucheasieraccesstothe coil and Fin sensor for troubleshooting purposes and regularmaintenance (coilcleaning).ReplacethefrontcoveroftheA/CstartingwiththetopandthencarefullyroutingthesensorandheatercablesthroughthesmallopeningthattheA/Ccoverhasontherightsidenearthebottom.TheA/CpowercableandtheHeater-A/Csensorconnectionwillberoutedthroughthesmallopeningatthebottomofthefrontcover.TheFinSensorandtheHeaterCablewillgothroughthenotchontherightsideofthecoverastheymaketheirwaytoconnectwiththeCoolBotdigitalcontroller.AfterthecoverisinplacesecureitonthefrontwiththescrewsthatcamewithyourA/Cinstallationpackage.IMPORTANT!EnsurethatyoudonotpinchanycableswhiletryingtoattachthefrontoftheA/C.IMPORTANT!Afterthefrontcoverisinplace,visuallyinspectthroughthelouvresofthecovertoensurethattheFinSensorend(tip)didnotcomelooseoutofthefins.

PHONE:888-871-5723
WWW.STOREITCOLD.COM [email protected]
8. Youcanuseziptiesorcabletiestoroute,bundleandmanagethecablesinsidethecoolerforanicerlook.IMPORTANT.Ifyoudecidetoorganizeyourcablesandtiethem,pleasemakesurethat:
• TheHeater-A/Csensorconnectionisnottouchinganythingmetalanditisoutofthedirectairdraft
• TheFinsSensordidnotcomeoutofitspositiononthefinsoftheA/C• TheRoomSensorisnottouchinganythingmetalandhangslooseintheair.
NOTE:Cablemanagementisonlyforaestheticpurposesanditwon’taffectthefunctioningorthewarrantyofyourCoolerifyoudecidenottodoit.Justmakesuretofollowtherecommendationsforthesensorsandcablesmentionedabove.

PHONE:888-871-5723
WWW.STOREITCOLD.COM [email protected]
ELECTRICALINSTALLATIONIMPORTANT
Electricalinstallationforyourcoolershouldbeperformedbyaqualifiedelectriciantoensurecorrectpowersupply,wiringandcompliancewithLocalcodes.
• A115V60Hzsinglephasepowerconnectionisrequiredtosupplypowertothelightandthedigitalthermometer.
• A115V60Hzsinglephasepowerconnectionisrequiredtosupplypowertothe15KBTU’S(orsmaller)A/CunitshippedwithyourCooler.
A230V60Hzsinglephaseconnectionisrequiredtosupplypowertothe24KBTU’Sor18KBTU’SA/CunitshippedwithyourCooler.
• A115V50-60Hzor230V50-60Hz(plugadaptorrequired)singlephaseconnectionisrequiredtosupplypowertotheCoolBotDigitalcontroller.
OPERATIONANDMAINTENACEINSTRUCTIONS1. OPERATION
• Productinsideyourwalk-incoolershouldnotbeoverloadedortightlystackedastoinhibitproperairflowandairdistributionthroughoutthebox.
• DONOTSTACKPRODUCTINFRONTOFTHEA/C.Thetopoftheboxisnotdesignedforstorage.Itemsstoredontopmaycausecondensation,damagepanelsandvoidthewarranty.
2. ROUTINECLEANING• Wipepanelswithadampclothusingmildsoap.DONOTuseharshchemicalsor
abrasivepadsorcleaners.Stainlessshouldbecleanedwithstainlesssteelcleaner;wipeinthedirectionofthegrain.Dryallfinishesthoroughly.
• Cleandoorgasketsusingmildsoap;wipedryaftercleaning• Donotwashdownorspraytheinsideofthewalk-inwithwater• CleanthefinsofyourA/Cfollowingtheinstructionsonpage15(DIRTYFINS)of
yourCOOLBOTINSTRUCTIONSMANUALANDTROUBLESHOOTINGGUIDE.
PHONE:888-871-5723
WWW.STOREITCOLD.COM [email protected]
3. PERIODICINSPECTIONS• InspectthedoorgasketforwearandmakesureitsealstightagainsttheStainless-
Steeltrimoftheframe.Replacegasketsifwornortorn.• Inspectthehydraulicdoorclosertoensurethatitengageswhenthedooriswithin
aninchortwoandpullsthedoortight.• Inspectthedoorhingesandlubricatehingepinswithpetroleumjellyasneeded.• Inspectthedoorsweepgasketatthebottomofthedoorforproperseal.Replaceif
sweepiswornortorn.• ChecktheThermometerreadingwithanotherthermometerinthesamelocationor
byplacingthethermometerprobeintoacupofwaterwithice;itshouldread32°F(0°C).
• Checkformissingplugsandbuttonsandreplaceasnecessary.