Embed Size (px)
Citation preview

Freshwater Distiller
Installation, Commissioning and Maintenance Manual
REV.1.04082017

2 2 SONDEX® Freshwater Distiller - Installation, Commissioning and Maintenance Manual
Project:
Customer:
Freshwater distiller type:
Serial number:
Year:
PED category: Art. 4, par.3 Cat. 1 Cat. 2 Cat. 3 Cat. 4
Approved by: NB number:
Remarks:
The contents of this publication are based on the latest information available and the materials that are used at the time of printing. However, because of rapid developments in this field we cannot be held liable for changes in specifications affecting the contents of this publication.
COPYRIGHTCopyright © Sondex by Danfoss. All rights reserved. No part of this publication may be reproduced or distributed without prior written permission of Sondex by Danfoss.
33SONDEX® Freshwater Distiller - Installation, Commissioning and Maintenance Manual
1 GENERAL DESCRIPTION . . . . . . . . . . . . . . . . . . . . . . . . . . . . . . . . . . . . . . . . . . . . . . . . . . . . . . . . . 4 1.1 Foreword . . . . . . . . . . . . . . . . . . . . . . . . . . . . . . . . . . . . . . . . . . . . . . . . . . . . . . . . . . . . . . . . . . . 4 1.2 Introduction . . . . . . . . . . . . . . . . . . . . . . . . . . . . . . . . . . . . . . . . . . . . . . . . . . . . . . . . . . . . . . . . 4 1.3 Safety Alert Notices . . . . . . . . . . . . . . . . . . . . . . . . . . . . . . . . . . . . . . . . . . . . . . . . . . . . . . . . . 4 1.4 Sondex Freshwater Distiller . . . . . . . . . . . . . . . . . . . . . . . . . . . . . . . . . . . . . . . . . . . . . . . . . 5
2 WORKING DESCRIPTION . . . . . . . . . . . . . . . . . . . . . . . . . . . . . . . . . . . . . . . . . . . . . . . . . . . . . . . . 6 2.1 Heating sources . . . . . . . . . . . . . . . . . . . . . . . . . . . . . . . . . . . . . . . . . . . . . . . . . . . . . . . . . . . . 6 2.2 Evaporating/condensing process. . . . . . . . . . . . . . . . . . . . . . . . . . . . . . . . . . . . . . . . . . . . 6 2.3 Unit construction . . . . . . . . . . . . . . . . . . . . . . . . . . . . . . . . . . . . . . . . . . . . . . . . . . . . . . . . . . . 6 2.4 Freshwater system / Quality control . . . . . . . . . . . . . . . . . . . . . . . . . . . . . . . . . . . . . . . . . 7 2.5 Operation panel . . . . . . . . . . . . . . . . . . . . . . . . . . . . . . . . . . . . . . . . . . . . . . . . . . . . . . . . . . . . 7 2.6 Anti scaling system . . . . . . . . . . . . . . . . . . . . . . . . . . . . . . . . . . . . . . . . . . . . . . . . . . . . . . . . . 7 2.7 Sea water pump . . . . . . . . . . . . . . . . . . . . . . . . . . . . . . . . . . . . . . . . . . . . . . . . . . . . . . . . . . . . 7
3 INSTALLATION DESCRIPTION . . . . . . . . . . . . . . . . . . . . . . . . . . . . . . . . . . . . . . . . . . . . . . . . . . . 8 3.1 Installation description. . . . . . . . . . . . . . . . . . . . . . . . . . . . . . . . . . . . . . . . . . . . . . . . . . . . . . 8 4 START-UP AND SHUT-DOWN PROCEDURE . . . . . . . . . . . . . . . . . . . . . . . . . . . . . . . . . . . . . . 9 4.1 Start-up procedure . . . . . . . . . . . . . . . . . . . . . . . . . . . . . . . . . . . . . . . . . . . . . . . . . . . . . . . . . 9 4.2 Shut-down procedure . . . . . . . . . . . . . . . . . . . . . . . . . . . . . . . . . . . . . . . . . . . . . . . . . . . . . . 10
5 SERVICE AND MAINTENANCE. . . . . . . . . . . . . . . . . . . . . . . . . . . . . . . . . . . . . . . . . . . . . . . . . . . 12 5.1 Maintenance . . . . . . . . . . . . . . . . . . . . . . . . . . . . . . . . . . . . . . . . . . . . . . . . . . . . . . . . . . . . . . . 13 5.2 Cleaning of the plant . . . . . . . . . . . . . . . . . . . . . . . . . . . . . . . . . . . . . . . . . . . . . . . . . . . . . . . 14 5.3 Replacement of the gasket . . . . . . . . . . . . . . . . . . . . . . . . . . . . . . . . . . . . . . . . . . . . . . . . . . 17 5.4 Chemical dosing of scale control chemicals. . . . . . . . . . . . . . . . . . . . . . . . . . . . . . . . . . 18 5.5 Zinc anode . . . . . . . . . . . . . . . . . . . . . . . . . . . . . . . . . . . . . . . . . . . . . . . . . . . . . . . . . . . . . . . . . 20
6 TROUBLE SHOOTING . . . . . . . . . . . . . . . . . . . . . . . . . . . . . . . . . . . . . . . . . . . . . . . . . . . . . . . . . . . 21 6.1 Trouble shooting . . . . . . . . . . . . . . . . . . . . . . . . . . . . . . . . . . . . . . . . . . . . . . . . . . . . . . . . . . . 21
7 SALINOMETER. . . . . . . . . . . . . . . . . . . . . . . . . . . . . . . . . . . . . . . . . . . . . . . . . . . . . . . . . . . . . . . . . . 25 7.1 Overview . . . . . . . . . . . . . . . . . . . . . . . . . . . . . . . . . . . . . . . . . . . . . . . . . . . . . . . . . . . . . . . . . . . 25 7.2 Specification. . . . . . . . . . . . . . . . . . . . . . . . . . . . . . . . . . . . . . . . . . . . . . . . . . . . . . . . . . . . . . . . 26 7.3 Installation . . . . . . . . . . . . . . . . . . . . . . . . . . . . . . . . . . . . . . . . . . . . . . . . . . . . . . . . . . . . . . . . . 26 7.4 Instruction - Salinity controller . . . . . . . . . . . . . . . . . . . . . . . . . . . . . . . . . . . . . . . . . . . . . . 29 7.5 Test of the Salinity controller . . . . . . . . . . . . . . . . . . . . . . . . . . . . . . . . . . . . . . . . . . . . . . . . 34 7.6 Maintenance . . . . . . . . . . . . . . . . . . . . . . . . . . . . . . . . . . . . . . . . . . . . . . . . . . . . . . . . . . . . . . . 34
8 SERVICE . . . . . . . . . . . . . . . . . . . . . . . . . . . . . . . . . . . . . . . . . . . . . . . . . . . . . . . . . . . . . . . . . . . . . . . . 35 8.1 After sales service. . . . . . . . . . . . . . . . . . . . . . . . . . . . . . . . . . . . . . . . . . . . . . . . . . . . . . . . . . . 35 8.2 Network reference list. . . . . . . . . . . . . . . . . . . . . . . . . . . . . . . . . . . . . . . . . . . . . . . . . . . . . . . 36
CONTENTS

4 4 SONDEX® Freshwater Distiller - Installation, Commissioning and Maintenance Manual
1.1 ForwordThis manual is a guide for installation, commissioning and maintenance of Fresh Water Distiller supplied by Sondex by Danfoss. It is meant for those who are responsible for the installation, the use and maintenance of the Fresh Water Distiller. We recommend that you read this manual carefully before commencing any work.
1.2 IntroductionThis manual is applicable for all Fresh Water Distillers produced and supplied by SONDEX by DANFOSS. Particular chapters has been made as supplement to cover the special features that can be supplied.
Sondex by Danfoss cannot be held responsible or liable for damage as a result of incorrect installation, use and / or maintenance of Sondex by DanfossFresh Water Distiller as well as not complying with the instructions in this manual.
Please note that our Fresh Water Distillers are specially designed and built for the operating conditions (pressures, temperatures and capacities) provided by the customer. Sudden pressure peaks beyond the normal operating pressure (or pressure surges) which can occur during starting up or stopping of the system can severely damage the heat exchanger inside the Fresh Water Distiller and should be prevented. Sondex by Danfoss cannot be held responsible for any damage as a result of any operation deviating from the original design conditions.
If you wish to alter the design conditions, please contact us, see chapter 14. You may only commission the Fresh Water Distiller under the modified conditions after inspection and written approval by Sondex by Danfoss.
1.3 Safety Alert NoticeFollowing must be respected by installing/running/servicing Fresh Water Distillers: Keeping current local safety regulations.
Before any work begins ensure that the exchangers are pressure less and cooled till below 40°C. Use gloves for preventing any injury from sharp edges when handling plates. In all cases ensure that all laws and regulations are strictly kept concerning human/ environment protection.
ATTENTION TRIANGLERefer to applicable SAFETY ALERT notices within the manual!
1 GENERAL DESCRIPTION

55SONDEX® Freshwater Distiller - Installation, Commissioning and Maintenance Manual
1.4 Sondex Freshwater DistillerThe SONDEX Freshwater Distiller is based on the plate heat exchanger technology in single- or multistage which makes the SONDEX Freshwater Distiller very efficient and compact. By evaporating sea water in a vacuum chamber, high quality fresh water is produced.Under normal conditions, the Fresh Water Distiller has no need for supervision. For Installation on ships, rigs and remote onshore locations.
CapacitySondex Fresh Water Distiller can be ordered in a range from 5 to 100m3/24h. Depending on: • Hot water temperature/flow.• Seawater temperature/flow. • Amount of plates in evaporator and condenser plate stack.• Chosen SFD type.Determines the fresh water capacity of the plant.

6 6 SONDEX® Freshwater Distiller - Installation, Commissioning and Maintenance Manual
General system - and working description
WARNINGDo ONLY produce fresh water in suitable areas. Further precautions has to be made if fresh water is used for human consumption.
2.1 Heating sourcesThe Sondex Freshwater Distiller utilizes the hot water flow from diesel engine jacket cooling water, or steam as heating sources to produce pure drinkable water by evaporating seawater under vacuum enabling the feed water to evaporate at temperatures below 100°C.
2.2 Evaporating / condensing processThe Sondex Fresh water Distiller is based on Sondex titanium plate heat exchangers, working as evaporator and condenser respectively and installed in a vacuum tight chamber/container.
The feed water is heated up to evaporation temperature by passing from bottom to top of the evaporator plate packs.
Vapour and feed water are entering the evaporation chamber from top of the evaporator plate pack due to the vacuum condition. Water spray and droplets are partly separated from the vapour by the deflector plate mounted over the evaporator and partly by a build-in demister. The brine and separated brine droplets are flowing to bottom of the evaporation chamber, from where the brine is extracted from the chamber by the sea water driven ejector.
The ejector is double acting and even used for removing non condensable gasses (air) from the process.
The feed water flow is approx. 2.5 -3 times the evaporated fresh water quantity in order to prevent salt and mineral scaling on the evaporator plates.
The desalted vapour passing through the demister will be sucked into the condenser plate pack through openings in the top. The vapour is condensed by cooling from seawater.
2.3 Unit constructionThe Fresh Water Distiller is delivered as a finished production unit including operation panel, fresh water pump system and anti scaling system.
The unit is including internal piping and electrical installations.
2 WORKING DESCRIPTION

77SONDEX® Freshwater Distiller - Installation, Commissioning and Maintenance Manual
2.4 Fresh water system / quality controlThe pure distilled water is taken out by an integral freshwater pump through a water meter and a spring loaded, adjustable non return valve.
The produced fresh water is controlled by a Salinometer to ensure, that the specified fresh water quality is maintained.
If the salinity value exceeds the set point of the Salinometer, a solenoid valve on the fresh water discharge line is activated from the Salinometer, and faulty distillate is returned to the feed water line or dumped.
The Salinometer can be connected to a remote alarm so that salinity values higher than set point are registered immediately at the bridge of the ship or in the control room.
If the produced fresh water is used for human consumption, control of the drinking water quality has to be carried out in accordance to international and national legislation.
Be aware of chemical dosing rate in feed water is not exceeding the specified rate given by the chemical supplier.
2.5 Operation panelAs standard, an operation panel is installed on the Fresh Water Distiller. The standard operation panel is including main switch, relays and switches for pump operating, salinometer and fresh water dumping system. The operation panel can be custom made, therefore the enclosed electrical diagram should be check.
2.6 Anti scaling systemFor preventing scaling of evaporator plates a system for dosing anti scaling chemical into the feed water line is included as standard.
2.7 Sea water pumpTo ensure correct sea water flow and pressure for condenser cooling and driving flow for the ejector, normally the seawater pump is included in Fresh Water Distiller orders.
Important notesEvaporator and condenser plate packs are designed for an operation pressure at 4 Bar.
Vacuum chamber is designed for 100% vacuum.
The sea water pressure at inlet condenser must be at minimum 4 Bar.
Sea water pressure after ejector (counter pressure in the overboard line) must be at maximum 0.6 Bar.
Inlet pressure for sea water pump must at minimum 0.1 Bar.

8 8 SONDEX® Freshwater Distiller - Installation, Commissioning and Maintenance Manual
3.1 Installation descriptionPlace the freshwater distiller so that it will be possible to open the cover for inspection and cleaning. Be aware that seawater, jacket water and fresh water piping are at correct dimensions, that pipe lengths and number of bends and valves are kept at a minimum to avoid unnecessary pressure drop, which could affect the specified pump efficiency and the produced freshwater capacity.
Please check the installation drawing and technical specifications.
Be aware that it must be possible to read thermometers and manometers.
The support of the pipes must not be too far from the distiller, and should be installed in such a way that they do not load sockets on the Freshwater Distiller.
The pipe work needs to be thoroughly cleaned and flushed before connecting up to the heat exchanger
Connect the evaporator to the jacket water system from the engine or any other heating source. This can be done either in series with a bypass valve or in parallel with the cooler of the engine.
Sea water suction line for sea water pump has to be placed clear of all outlet - and drain lines.
Connect the seawater pump with its suction socket to the seawater inlet at a place where the inlet pressure always is positive.
Connect the sea water pump outlet/ pressure pipe at the inlet flange on the condenser.
The outlet of sea water from the ejector outlet flange is taken directly overboard with its own overboard valve. This should be placed above water line at deepest draft.
Check the specified quantity of jacket water to the evaporator, or steam flow to the he heating unit according to the technical specifications.
Check the specified quantity of seawater flows through the condenser according to the technical specifications.
The fresh water pipe should be connected to the fresh water tank of the ship with additional equipment for fresh water treatment fitted in between. The counter pressure in the freshwater pipe should not exceed 1,2 – 1,6 bar according to technical specification.
Note:The sea water pump is designed to be placed at the same level and in close vicinity to the Fresh Water Distiller. The sea water pump is designed for an outlet pressure of 5 bar. Minimum seawater pressure at inlet to condenser is 4 bar. Maximum counter-pressure after ejector is 0,6 bar.
3 INSTALLATION DESCRIPTION

99SONDEX® Freshwater Distiller - Installation, Commissioning and Maintenance Manual
4.1 Start-up procedureBy starting fresh water production, the following procedure has to be carried out:Item number according to drawing no. 400005211010 and Item List
REMEMBER! Sea water - and fresh water pump must be water filled before starting up.
Before first start up or after maintenance please check that pumps are operating and running in correctly direction.
1. Close feed water valve item 17. Close fresh water outlet valve item 18.
2. Ensure sea water pump outlet valve is closed.
3. Ensure overboard valve is open.
4. Start sea water pump item 4 on the operation panel. Open sea water pump outlet valve slowly. Check the pressure rise to 4-5 bars after the sea water pump.
5. Now vacuum is appearing. Observe the vacuum gauge item 26 and check, that min. 92% vacuum is obtained.
6. Open the feed water valve item 17, and adjust the valve until water level is visible at top part of the sight glass.
7. Adjust the ppm set-point on the Salinometer item 6 (For instance 10 ppm). Check the salinometer manual for guidance.
8. Open the hot water inlet - and outlet valve and make sure, that inlet – and outlet temperature is according to specification.
9. Now fresh water production is starting.
10. When fresh water is visible in the level glass/pipe on side of the bleeding unit item 12, start the fresh water pump item 5 on the operation panel item 9 and make sure, that pressure is indicated in the pressure gauge item 25 on pressure side of the pump.
11. Now open the fresh water outlet valve item 18 and ensure, that pressure is still indicated on the pressure gauge item 25.
12. The actual ppm-value of the fresh water is shown in the display of the Salinometer. As long as ppm-value is over ppm set-point, the fresh water is dumped by the solenoid valve item 16.
13. When ppm set-point is obtained, the solenoid valve item 16 will close, and fresh water will run to the fresh water storage tank.
14. Adjust the fresh water outlet valve item 18, so that a constant level is visible in the level glass/pipe on side of the bleeding unit item 12.The produced fresh water amount is indicated in the water meter item 8.
4 START-UP AND SHUT-DOWN PRODEDURE

10 10 SONDEX® Freshwater Distiller - Installation, Commissioning and Maintenance Manual
15. Look at the brine level in the sight glass. Re-adjust the feed water inlet valve item 17, so that the brine level is constant visible at top part of the sight glass. * Open feed water valve item 17 totally, if the brine level now is not according to stated level above. the feed water orifice item 24 should be changed into correct size accordingly.
16. Add anti scaling chemical from container item 20 to feed water by adjusting the flow meter unit into specified dosage.* Regarding dosage, see flow meter description in manual. The chemical dosing is very important to avoid evaporator scaling.
17. When the distilling process is balanced, and hot water is supplied constantly, the fresh water production will run constantly and without need of supervision.
If operation situation changes: • Adjust the feed water valve item 17 until water level is visible at top part of the sight glass.• Adjust the fresh water outlet valve item 18, so that a constant level is visible in the level
glass/pipe on side of the bleeding unit item 12.• Adjust anti scaling chemical from container item 20 on flow meter unit.
If no success are achieved with above adjustments, the “Start-Up Procedure” must be repeated. If no improvements is obtained, consult the chapter “Trouble Shooting”.
4.2 Shut-down procedure1. Close the hot water inlet and outlet valve.
2. After 5 minutes. Close the feed water valve item 17.
3. Stop sea water pump item 4 and fresh water pumps item 5.
4. Close sea water pump outlet valve.
5. Close the fresh water outlet valve item 18.
6. Close overboard valve if legislation requires it.
7. Switch off electrical power on the main switch in the operation panel.
*Chemical dosing will stop by itself when the vacuum in the system drops.
By unintended process stop the “Start-Up Procedure” must be repeated.

1111SONDEX® Freshwater Distiller - Installation, Commissioning and Maintenance Manual

12 12 SONDEX® Freshwater Distiller - Installation, Commissioning and Maintenance Manual
Correct operationThis user manual provides information and instructions for correct and safe operation of the unit. Many accidents are caused by incorrect use!
It is essential that you study the instructions carefully, and above all, ensure the availability to those who install, maintain and operate the Fresh Water Distiller on a daily basis. This manual is of no value if it is not available at the time when your staff needs it.
If a problem occurs with your Sondex by Danfoss Fresh Water Distiller which is beyond the scope of this manual, do not hesitate to contact us. The installation should not be put into operation before all indistinctness’s have been solved!
To avoid injuries and damages, follow the instructions and local applicable safety regulations.
Also take the necessary protective measures, depending on the nature of your process or circumstances related to it, at your plant.
Correct operationAll potential personal injury hazards are identified by safety alert symbol.Bodily harm can be caused by:• Burning as a result of touching the Fresh Water Distiller or other parts of the installation.• The uncontrolled release of pressurized media with which the danger of burning and
other injuries is present;• Contact with chemicals;• Touching sharp edges of the installation.
Damage to equipment can be caused by:• External forces;• Corrosion;• Chemical action;• Erosion;• Material exhaustion;• Water hammer;• Thermal and / or mechanical shock• Freezing;• Wrong transport / lifting.
Even after stopping the installation some parts of it can still be hot!
The heat exchanger may only be used with the fluids specified on the datasheet.
The hot medium may not flow through the exchanger without the cold medium flowing through. This is to prevent damage to the Fresh Water distiller.
In case the cold medium is present but does not flow while the hot medium is flowing through, the cold medium will start boiling and the exchanger will be damaged.
Sudden pressure and temperature changes should be prevented.
5 SERVICE AND MAINTENANCE

1313SONDEX® Freshwater Distiller - Installation, Commissioning and Maintenance Manual
If a danger of frost occurs, the heat exchanger should be drained completely. When a heat exchanger (filled with water or a water mixture) which is not in operation is exposed to temperatures below zero, the plates can become deformed.
Demountable Fresh Water Distiller plate stack can always leak. We advise you to take this into account while installing.
If welding activities have to be carried out near the Fresh Water Distiller, never use the Fresh Water Distiller for earthing the construction work. Electrical currents can cause severe damage to both plate and gasket. If you have to weld, dismantle the connecting flanges and isolate the heat exchanger from the system.
Correct operationUnder normal conditions, there is no need for supervision of the plant.If the salinity is too high, the Salinometer will give an alarm and dump the fresh water by opening the solenoid valve and it will re-circulate back to feed water inlet.In order to check that the Fresh Water Distiller is working normally and that no fouling is occurring, the temperature, pressure and production should be compared with the data from the technical specification and adjustment of sea water and hot water should bed made as described in the chapter “Start-Up and Stop off Procedure”.
Correct operationAlways be careful about the sea water quality. Producing fresh water in polluted sea or river may result in water, which is unsuitable for human consumption.Be aware of chemical dosing rate in feed water is not exceeding the specified rate given by the chemical supplier.
5.1 MaintenanceRegular maintenance of the Fresh Water Distiller is made to improve the performance and accessibility of the plant.
The operation/ working conditions of the Fresh Water Distiller has a great influence on the life time and the frequency of maintenance, overhaul and cleaning of the plant.
The following sheet are not obligatory but should be seen as a recommendation.
After the plant has been in operation for a period of time and experience about the actual performance, operation and the surrounding influence on the plant, it will be possible to adapt this knowledge into the maintenance schedule to extend the maintenance intervals, if possible.
All other equipment than in below sheet is designed to have a long life time and run to it breaks down. As the Fresh Water Distiller is designed without any moving parts besides on the FW - and SW pump, it has been assessed this is the best solution to reduce unnecessary maintenance and time spent on maintenance and prevent against unnecessary consumption of materials. At the same time consequential damage will be minimal to failure.
WARNING! The fresh water system is very sensitive for pollution.
14 14 SONDEX® Freshwater Distiller - Installation, Commissioning and Maintenance Manual
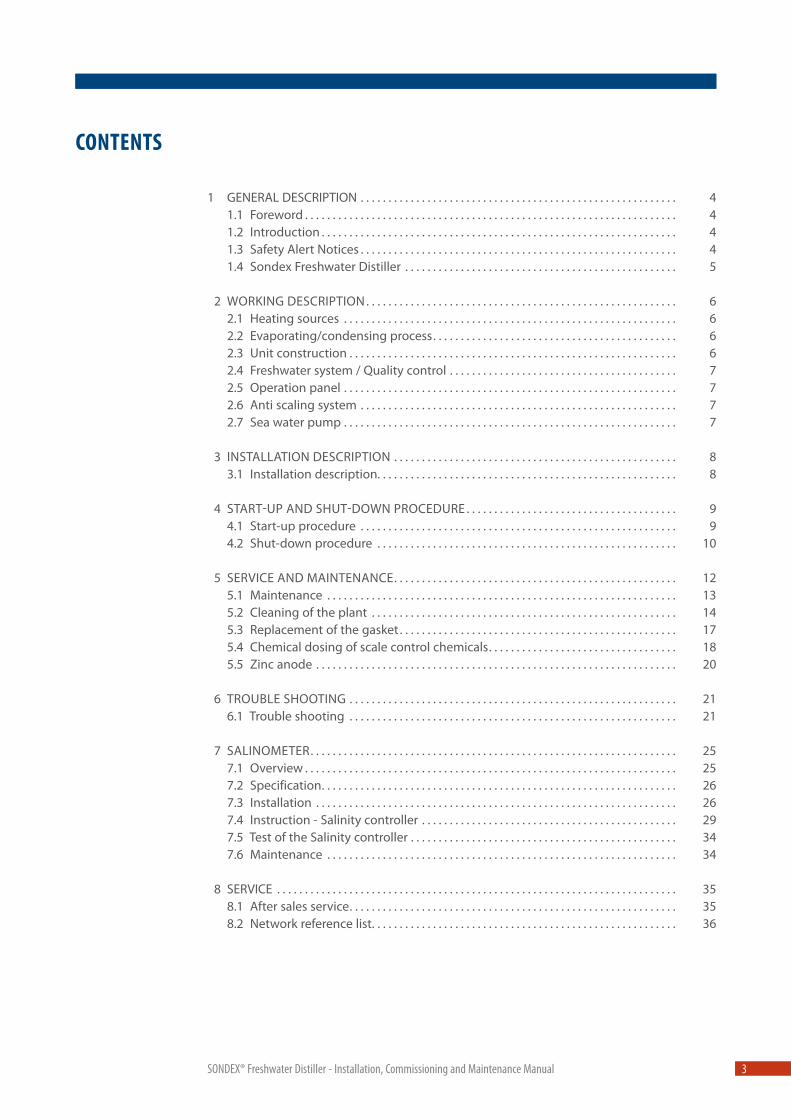
5.2 Cleaning of the plant
CAUTION! Ensure unit is depressurized and drained of hot water before unit is opened to prevent personal injury.
CAUTION! Sharp edges. When handling plates, gloves should be worn.
Although the working temperature of the Fresh Water Distiller is kept at 40-48 oC and chemicals are added, scaling on the plates of the evaporator will gradually occur, causing a reduction of the capacity of the Freshwater Distiller and cleaning of the plates will be necessary.
The frequency of the cleaning depends on the working conditions. Under normal circumstances total cleaning and inspection of the plate stack / container, 2-3 times a year will be sufficient.
Component Operationg hour/ time between Act
Evaporator/ Condenser plate stack
As required. Recommended intervals 2-3 a year. But depends a lot on working conditions.
• Chemical cleaning of plate stack.
Container/shell As required. It can be done at same time as cleaning the plate stack.
• Scrub container/shell with a brush and pure fresh water.
Salinity sensor Every month. • The sensor should be removed from the brass tee and cleaned with a clean and soft rag.
Zinc anode As required. Recommended intervals 2 times a year. But depends on the working conditions.
• Replace zinc anode.
Sea Water Pump As required. Recommended intervals every 8000 hours.
• Consult pump suppliers manual.
Fresh Water Pump As required. • The internal pump parts are maintenance-free. Motor must be kept clean in order to ensure adequate cooling of motor. If the pump is installed in dusty environments, clean and check the pump regularly. Take the enclosure class of the motor into account when cleaning.
• The bearings has maintenance-free, greased-for-life bearings.
Ejector Recommended intervals every 12000 hours.
• Measure Nozzles and diffuser and compare to measurement in technical specification.
Valves 8000 hours • Check for right function. • Repair if necessary. • Remember the fresh water system is very
sensitive for pollution.
Pressure/ Temp. Gauges
8000 hours • Check for right function. • Replace if necessary.

1515SONDEX® Freshwater Distiller - Installation, Commissioning and Maintenance Manual
Cleaning by opening of Fresh Water Distiller When the plant has been stopped as described under the chapter “Start-Up and Stop Off Procedure” open the Freshwater Distiller and inspect condenser, evaporator, demister and the interior of the Freshwater Distiller and carry out the required cleaning.
Normally it is necessary only to separate the evaporator and clean the plates by means of the chemicals described under the chapter “Chemical Dosing of Scale Control Chemicals”. The interior of the Freshwater Distiller should be cleaned at the same time using the same chemicals.
Cleaning the Evaporator Procedure1. Remove bolts and clamps on between frame and container and open fresh water chamber.
2. Loosen the nuts on the tie bars gradually so that no nut is carrying the entire load alone.
3. Remove the follower and take out the plates one by one and note their position in order not to get a “disorganized” plate pack when you have to assemble again.
4.Submerge plates completely in a hot, inhibited acid bath at maximum 50 oC. For further information about chemicals used please consult the chapter “Chemical Dosing of Scale Control Chemicals”.
WARNING!Always follow carefully the supplier instructions when using inhibited acids.Remember to neutralize according to supplier instructions. Do always flush the system before producing fresh water again.
5. Scrub plates with a soft scrubbing brush to clean.Never use a metal brush, steel wool or sand/glass paper. This will damage the passivation film of the plates.
6. Examine plates and gaskets for possible damage and remove damaged plates and/ or replace damaged gaskets.
7.1 If a defective plate is found, remove the plate together with the other plates in this group (a plate group consist of four plates, numbered 1-4). The start plate and the end plate in the plate pack cannot be removed without being replaced by a new plate.
7.2 When assembling a separated evaporator, it should be checked that the gaskets have not been damaged – change defective gaskets, if any. Cut gaskets as shown on the plate arrangement diagram drawing no. 400045010001.
8. Assemble the plates in due succession according to plate arrangement drawing and be aware that they are positioned correctly (1-2-3-4). Please see drawing no. 400045010001. Remember the start plate and the end plate in the plate pack are special.
Tighten the plate pack to the correct dimension according to the number of plates.

16 16 SONDEX® Freshwater Distiller - Installation, Commissioning and Maintenance Manual
Each plate have a compression dimension of:
Type Dimension
SFD6 3,2 mm
SFD13 3,9 mm
SFD22 3,5 mm
SFD35 3,9 mm
SFD45 3,9 mm
SFD222 3,9 mm
An example:A SFD 13 has an evaporator that contains 68 plates.
Total compression dimension of evaporator plate pack = 68 plates * 3,9 mm = 265,2 mm
So the measurement of the plate pack. AND ONLY the plate pack is:The amount of plates * the compression of one plate = clamping measurement.
9. Leak test evaporator plate pack before closing front cover: This is done by opening the hot water valves and fill the evaporator with circulating hot water. If leaks are observed: Close hot water valves and repeat above-mentioned process.
10. When the evaporator plates are found to be tight, close front cover and tighten the bolts.
11. Re-tighten, when vacuum has been reestablished.
Cleaning the Condenser ProcedureUse stage 1 – 8 from “Cleaning the Evaporator Procedure”.Assembling the separated condenser: Please see drawing no. 400045010002
Leak test condenser plate pack: Open sea water pump inlet valve and open sea water overboard valve. Start sea water pump on the operation panel and open slowly the sea water outlet valve. If leaks are observed, repeat above-mentioned procedure.
Use stage 10 – 11 from “Cleaning the Evaporator Procedure”.

1717SONDEX® Freshwater Distiller - Installation, Commissioning and Maintenance Manual
5.3 Replacement of the gasketDismantle of plate packWhen the plates are removed from the plate pack, please note the numbers of plates in each plate pack. Also please note that a plate pack is built up of total 4 different plates + a start - and end plate.
A plate pack is build up in the following way. The first plate against the frame of the Fresh Water Distiller is always a type 1 plate with a start gasket. This start gasket is made out of two ordinary gaskets, which are cut in half, and then glued together. The next plate is a type 2 plate, then type 3, type 4, type 1, type 2, type 3.... until the amount of plates in the plate pack is used up. The amount of plates in the plate pack can always be divided by 4. The last plate in the plate pack has always to be a type 4 with 0 holes. Please see the enclosed drawing no. 400045010001 for condenser and 400045010002 for evaporator.
Each plate is normal marked with a number which is stamped into the plates. Fx. the SFD13 plates are marked with the number 013-43214-1. The last digit means that this is a type 1 plate. Please check that the plates are marked, before removing them from the plate stack, because it is important, that it is remounted in the correct way, which will say type 1, type 2, type 3, type 4, type 1 ...etc.
New gasketThe gaskets for every second plate are cut out of an ordinary gasket. Therefore, please note the way the old gasket is cut out and placed on the plate before removing them.
Removal of old gasketRemove old gasket from the groove. If the gasket cannot come off, heat the back of the plate with a hot air blower to loosen the gasket from the groove. Pay attention not to overheat the plate.
Cleaning of plates/grooveIf charred or loose glue and rubber remains a stainless steel brush can be used. All glue or rubber must be removed. For cleaning and degreasing new gaskets and gasket grooves, use “Acetone”. Clean the groove with a clean rag dipped in Acetone. It is very important that every detergent is evaporated before putting glue on.
WARNING!
Solvents are dangerous to inhale.
Glue TypePliobond 25/Scotchgrip 847/Scotch Weld 820 are nitrile rubber glues on soluble basis (25% solid materials). The glues are partly thermoplastic so that old gaskets can be unsticked by boiling-water heating.

18 18 SONDEX® Freshwater Distiller - Installation, Commissioning and Maintenance Manual
Gluing/ Replace of gasketAfter wiping gaskets and gasket grooves with a cloth moistened with degreasing substance the gluing itself can begin. The gluing areas must be quite clean – free from fingerprints etc. The Glue is applied to the gaskets by a brush with a thin coat of glue on the gluing area. Afterward placed on a clean and dry place in order to dry.The gluing process is carried out easiest on a solid table. After the gaskets have been put into the plate gasket grooves, the plates can be stacked.
When the gluing is finished the plates are hung into the Fresh Water Distiller again and evaporator/condenser is clamped together. The Fresh Water Distiller can be warmed up by hot water if the glue is to dry quickly – but without pressure on the water!
Drying timeApprox. 2 hours at 80 - 100 oC Approx. 24 hours at 40 - 50 oC Approx. 48 hours at Room temperature
If it is not possible to heat the Fresh Water Distiller, plates must be placed as warm as possible.
AssemblyWhen the glue is dry, the plates can be remounted into the Fresh Water Distiller. Remember to start with the type 1 plate with the start gasket, then type 2... etc. as mentioned above. Clamp the plate stack together, to the correct dimension according to the amount of plates, when all the plates are back into the correct position.
5.4 Chemical dosing of scalecontrol chemicalsPrevention of scalingDuring the sea water evaporation there is always a risk of scaling on the heating surfaces especially in the evaporator section. This results in reduced K-values of the heating surface and decreased fresh water production as well an overall reduction of the plant efficiency.
Without correct operation of the Fresh Water Distiller as well as adding chemical treatment to the feed water before it enters the Fresh Water Distiller solid salt from the sea water will form scales on evaporator plates.
In order to prevent scaling the operators must be aware of the factors influencing the scale formation.
Feed water ratioThe feed water ratio is the most important factor. It is defined by the relationship between the feed water amount feed into the plant and the produced fresh water amount.
The Fresh Water Distiller is designed with a feed water ratio between 2.5 - 3 times the produced fresh water quantity. The feed water, which not ends up as fresh water, is taken out with the ejector as salty brine. Feed water pressure before condenser shall be 3 - 4 bar.
If the feed water ratio is reduced, the salt concentration will rise in the plant subsequently, resulting in scale formations.

1919SONDEX® Freshwater Distiller - Installation, Commissioning and Maintenance Manual
Two things may change the feed water ratio:1. All direct adjustment of the feed water system.2. Exceeding the max. fresh water production laid out for the plant.
Evaporator TemperatureThe temperature in the evaporator has great influents on scale formation. Temperatures higher than design temperatures (indicated on the technical specification) will increase the scaling risk.
Chemical dosageIn order to control scale formation on the heating surfaces and continuously ensure long operation periods without cleaning of the Fresh Water Distiller, it is necessary to dose scale control additives to the feed water. The operators must follow the instructions for chemical dosing given by the chemical supplier carefully.
WARNING!If the distiller is operated at boiling temperatures above 45°C without chemicals, frequent cleaning of the evaporator is necessary.
Sondex recommend that the Fresh Water Distiller is always operated with chemical dosage.
Scale inhibitor dosage equipment for feed waterWhen adding chemicals mix thoroughly to ensure a homogenous blend of chemicals and water according to suppliers instructions.Use a fully soluble scale inhibitor, e.g. on polymer basis. The following products can be recommended:
• Drew Marine - Ameroyal EVAPORATOR TREATMENT• NALFLEET - Vaptreat
Procedure for chemical dosing1. Mix the required quantity for operation in the chemical container according to maker’s instructions.
2. Adjust flow meter to cover the maximum fresh water output from the distiller.
3. Flush the dosage system regularly.
Chemical for cleaning of plate stackWhen cleaning of evaporator plates is necessary following chemical can be recommended:
Stone and limestone can be removed with nitric acid (HN03) – max concentration 1,5% - max. temp. 65 deg. C.Mixture for 1,5% concentration = 2.4 ltr. HN03 62% per 100 ltr. water.Nitric acid also has an affective build up effect on the passivation film of stainless steel!
Sondex by Danfoss strongly recommend removing the gasket from the plate before cleaning.

20 20 SONDEX® Freshwater Distiller - Installation, Commissioning and Maintenance Manual
CAUTION!Nitric acid and Sodium Hydroxide may cause injury to exposed skin, eyes and mucous membranes. Use of protective eyewear and gloves is strongly recommended.
Always pour chemical in water, not water in chemical.
Chemicals should be mixed thoroughly to ensure a homogenous blend of chemicals and water according to suppliers instructions. Remember to use appropriate Personal Protection Equipment according to suppliers instructions.
If another anti scale chemical is used, the user will be fully responsible concerning its efficiency in scale control and its compatibility with the plant and equipment. Should this chemical or process cause any damage to any part of the Fresh Water Distiller or result in insufficient control of the formation of scale, then such cases will not be covered by the warranty obligations.
Safety precautions when usage of chemicals 1. Use eye protection and gloves. Avoid direct skin contact, eye contact of contact with clothes.
2. Clean empty containers before disposal.
3. If chemicals are spilled on clothes, change clothes and afterwards rinse the clothes with water and soap according to the material safety data sheet.
4. If chemicals are spilled on the floor, rinse with water and suck remaining chemicals off with sand. Clean spot immediately afterwards.
5. Print out and submit the material safety data sheet at locations where the chemicals are used and stored.
6. Scale inhibitor is hazardous, if consumed in a concentrated solution. If consumed by mistake. IMMEDIATELY SEEK MEDICAL ATTENTION.
7. If eyes get in contact with the chemicals, rinse for at least 20 minutes with water. IMMIDIATELY SEEK MEDICAL ATTENTION.
Check the material safety data sheet or product data sheet if any uncertainties.
5.5 Zinc anodeAlways check the condition of the zinc anode when the front cover is off, and be sure to change it if it´s worn. Sondex recommend change of zinc anode approx. two times a year.

2121SONDEX® Freshwater Distiller - Installation, Commissioning and Maintenance Manual
If production of fresh water drops, check pressure and temperatures according to the technical specifications
REMEMBER! Do only adjust one item at the time. If multiples settings/ objects are changed at the same time, you do not know what action is solving the problem, and new problem can arise regarding to the new settings/objects.
Problems that are caused by insufficient vacuum can be detected by watching the vacuum meter while stopping the plant. If necessary with the following valve closed (If the non-return valves in the system are leaking).• The feed water valve item 17.• The overboard valve • The sea water pump outlet valve.• The fresh water outlet valve item 18.• The valve on top of the flow meter unit for chemical dosing.Check the shaft sealing on the freshwater pump for leakage, by stopped plant.
If specific troubles with sea water pump or fresh water pump not related to the Fresh Water Distiller, please consult the pump supplier manual.
If the problems with the Fresh Water Distiller cannot be solved by the data from this chapter, fill in the enclosed Start-Up Report and forward it to Sondex A/S.
6 TROUBLE SHOOTING

22 22 SONDEX® Freshwater Distiller - Installation, Commissioning and Maintenance Manual
Problem Cause Act
Decrease in production
Strainer before Sea Water Pump is clogged up • Clean strainer.
Low ejector/sea water pump pressure. • Check for leakages in system. Or see instruction “Low sea water flow/ pressure at inlet of ejector”, below.
Leakages in system. • Pressure test according to the manual and repair as necessary.
Scale formation/ sludge deposits on hot water side of evaporator.
• Dismantle evaporator section and clean evaporator.
Foreign bodies in the ejector Nozzle. • Inspect nozzles and clean. Replace as necessary.
Ejector nozzles may be worn or damaged. • Inspect nozzles and clean. Replace as necessary.
Too high pressure on ejector outlet side (max. 0,6bar).
• Check pipe system, valves and other equipment after ejector for blocking/ right function.
Non-return valve in bleeding unit defect. • Replace non-return valve.
Hot water temperature too high. • Adjust to specified temperature according to technical specification or change feed water orifice to a greater size (this will affect the operation afterwards).
Hot water temperature too low. • Adjust to specified temperature according to technical specification or change feed water orifice to a smaller size (this will affect the operation afterwards).
Defective water clock. • Check water clock and inspect level in Fresh Water Tank. If level increases and water meter shows the same, replace water meter.
Defective Solenoid valve • Check that the solenoid valve for dumping fresh water back to the evaporator is closed at normal salinity.
Problem Cause Act
Low sea water flow/ pressure at inlet of ejector (min. 3,5bar)
Strainer before sea water pump is clogged up. • Clean strainer.
Too low sea water pump pressure. • Clean or replace pressure gauge as necessary. If problem still occur, examine pump according to pump manual.
Valve on sea water pipe line is blocked/ defect. • Inspect and repair as necessary.
Impeller/ seal ring/ mechanical seal defect. • Examine and repair pump according to pump manual.
Blocked up sea water side of condenser plate. • Dismantle condenser and clean.
Pump rotate in wrong direction. • Examine electrical connection according to pump manual. Change phases.

2323SONDEX® Freshwater Distiller - Installation, Commissioning and Maintenance Manual
Problem Cause Act
Sight glass brine overflow
Insufficient vacuum. • Check for leakages in system. Or see instruction “Low sea water flow/ pressure at inlet of ejector”, above.
Valves on fresh water line closed or defect. • Check all valves on fresh water line.
Impeller/ seal ring/ Mechanical seal in fresh water pump defect.
• Replace according to pump manual.
Orifice too large or defective. • Inspect Orifice and change to a smaller diameter if necessary.
Foreign bodies in the ejector Nozzle. • Inspect nozzles and clean. Replace as necessary.
Ejector nozzles may be worn or damaged. • Inspect nozzles and clean. Replace as necessary.
Non-return valve in bleeding unit defect. • Check non-return valve and replace as necessary.
Pump rotate in wrong direction. • Examine electrical connection according to pump manual. Change phases.
Too high pressure on ejector outlet side (max. 0,6bar).
• Check pipe system, valves and other equipment after ejector for blocking/ right function.
Problem Cause Act
Too high salinity
Salinometer sensor dirty or defect. • Check if sensor is mounted correctly. Clean sensor as necessary. Check sensor for any abnormalities. Change as necessary.
Gasket for vapor turn plate defect or not fitted correctly or damaged.
• Check correct location of gasket for steam turn plate (should be placed obliquely downwards against frame). Change if defect/damaged.
Demister not fitted correctly. • Check if the demister is fitted against the chamber plate and the shell of the container.
Gasket sealing to main frame is not “cut” to fit or has a leakage.
• Change gasket sealing to main frame.
Insufficient brine outlet. • See instruction “Sight glass brine overflow”, above.
Salinometer main print defect. • Test the salinity controller according to Salinometer manual.
Leakage in the condenser. • Open the container, open overboard valve, close feed valve and start up the sea water pump. If any leaks these will now appear. Open plate stack, relocate plate stack and inspect the plates that was leaking. Change damaged/defect plates/gaskets if any. Refit the plate stack, assembly and test again.
Condenser plate pack gathered in wrong sequence.
• Open condenser plate stack and check correct sequence of plates according to manual.

24 24 SONDEX® Freshwater Distiller - Installation, Commissioning and Maintenance Manual
Problem Cause Act
Overcooling of Engine Cooling Water to Evaporator
Insufficient flow or/and temperature. • Reason must be found outside the freshwater distiller, in the engine water cooling system. (check desired temperature in the technical specification).
Problem Cause Act
Insufficient cooling of condenser/ overheating of sea water
The condenser plates is scaled and needs cleaning.
• Clean condenser according to manual.
Overheating of sea water can indicate insufficient flow (check according technical specification).
• Check the sea water flow to fresh water generator. The flow can be determined by comparing the ejector pump pressure with the pump curve.
Problem Cause Act
Frequently loss of fresh water in jacket water system
Evaporator plate pack gathered in wrong sequence.
• Open evaporator plate stack and check correct sequence of plates according to manual.
Leakage in evaporator. • Open the container and start jacket water circulation through evaporator. If any leaks these will now appear. Open plate stack, relocate plate stack and inspect the plates that was leaking. Change damaged/defect plates/gaskets. Refit the plate stack, assembly and test again.
Problem Cause Act
Abnormalities in sea water pump electrical consumption
Defect ejector nozzles. • Inspect and replace as necessary.
Defect bearing in motor. • Inspect and replace as necessary.
Defect contractor/ manual motor starters. • Inspect and replace as necessary. NB: Do only replace electrical components in co-operation with a qualified professional or Sondex.
Other electrical problem. • See pump manual.

2525SONDEX® Freshwater Distiller - Installation, Commissioning and Maintenance Manual
7.1 Overview of content
SPECIFICATION . . . . . . . . . . . . . . . . . . . . . . . . . . . . . . . . . . . . . . . . . . . . . . . . . . . . . . . . . . . . . . . . . . . . . . . 26INSTALLATION . . . . . . . . . . . . . . . . . . . . . . . . . . . . . . . . . . . . . . . . . . . . . . . . . . . . . . . . . . . . . . . . . . . . . . . . 26 Sensor . . . . . . . . . . . . . . . . . . . . . . . . . . . . . . . . . . . . . . . . . . . . . . . . . . . . . . . . . . . . . . . . . . . . . . . . . . . . . 26 Cable connections . . . . . . . . . . . . . . . . . . . . . . . . . . . . . . . . . . . . . . . . . . . . . . . . . . . . . . . . . . . . . . . . . 27INSTRUCTION - SALANITY CONTROLLER . . . . . . . . . . . . . . . . . . . . . . . . . . . . . . . . . . . . . . . . . . . . . . 29 Buttons on display . . . . . . . . . . . . . . . . . . . . . . . . . . . . . . . . . . . . . . . . . . . . . . . . . . . . . . . . . . . . . . . . . 29 Display notices. . . . . . . . . . . . . . . . . . . . . . . . . . . . . . . . . . . . . . . . . . . . . . . . . . . . . . . . . . . . . . . . . . . . . 30 Set-up menu. . . . . . . . . . . . . . . . . . . . . . . . . . . . . . . . . . . . . . . . . . . . . . . . . . . . . . . . . . . . . . . . . . . . . . . 31 Changing the default limits . . . . . . . . . . . . . . . . . . . . . . . . . . . . . . . . . . . . . . . . . . . . . . . . . . . . . . . . 32TEST OF THE SALINITY CONTROLLER . . . . . . . . . . . . . . . . . . . . . . . . . . . . . . . . . . . . . . . . . . . . . . . . . . 34MAINTENANCE . . . . . . . . . . . . . . . . . . . . . . . . . . . . . . . . . . . . . . . . . . . . . . . . . . . . . . . . . . . . . . . . . . . . . . . 34
Functions:• Calculates the amount of salt in ppm.• Measuring chemical level in container. (high / low)• Time meter. Registration of operating hours.
Display options:• Displays salinity in ppm. (0-200 ppm)• Displays limit for activation of alarm and solenoid. (0-200 ppm)• Display whether the alarm is on/off.• Display if there is a low chemical level.• Displays operating hours.
Output via 4-20mA:• The ability to remotely read the current value of salt concentration via a 4-20mA signal.
Option:• Limit for activation of the solenoid and alarm can be configured. (0-200 ppm)• The solenoid can directly turn on or delayed on. The delay can be adjusted from 1 to 10min.• Default setting - The solenoid is off for 10 minutes at system startup.
Miscellaneous:• Limits for activation of alarm status on-line transfer and chemical alarm are saved at
disconnection of the system.• It is possible to test if the salt-sensor measures correctly.• 10 bits resolution.• The update rate of the display is ½ sec.
7 SALINOMETER

26 26 SONDEX® Freshwater Distiller - Installation, Commissioning and Maintenance Manual
7.2 Specification
Salinity controller Specification
SupplyInput voltage 230V/AC w/ground 50/60Hz
InputsMeasuring range salinityAccuracy
Level sensor inputPull high for the above input
0-200 ppm±1 ppm @ 0-20ppm±5 ppm @ 21-200ppmHigh: >8V; Low: <1VApprox. 12V 5mA
OutputsTransmission of salinity levelAlarm outputSolenoid
4-20mA ±3% FS230V/AC and 10W.230V/AC and 10W.
EnvironmentEnvironmentTemperature rangeSealing
Indoor industrial environment 0-50 °CIP65 when mounted correctly in a switchboardOtherwise IP0
Sondex Spare Part No. Complete box 230V + sensor - 795000000050Complete box 110V + sensor - 795000000055Main print - 600083000001
Sensor Specification
EnvironmentTemperature rangeSealingThread
The sensor is screwed into the pipe with fresh water.0-50 °CIP67G3 / 4 "pipe thread
Sondex Spare Part No. 795034000001
7.3 InstallationSensorIn order to obtain correct measurement with the Salinity controller the sensor legs must be isolated from contact with conductive materials other than water. The pins must be completely covered by water.
The salt sensor is divided into 5 parts:• ¾” brass tee• Adaptor.• Salt Sensor.• Protective cover.• Cable-grand.
2727SONDEX® Freshwater Distiller - Installation, Commissioning and Maintenance Manual
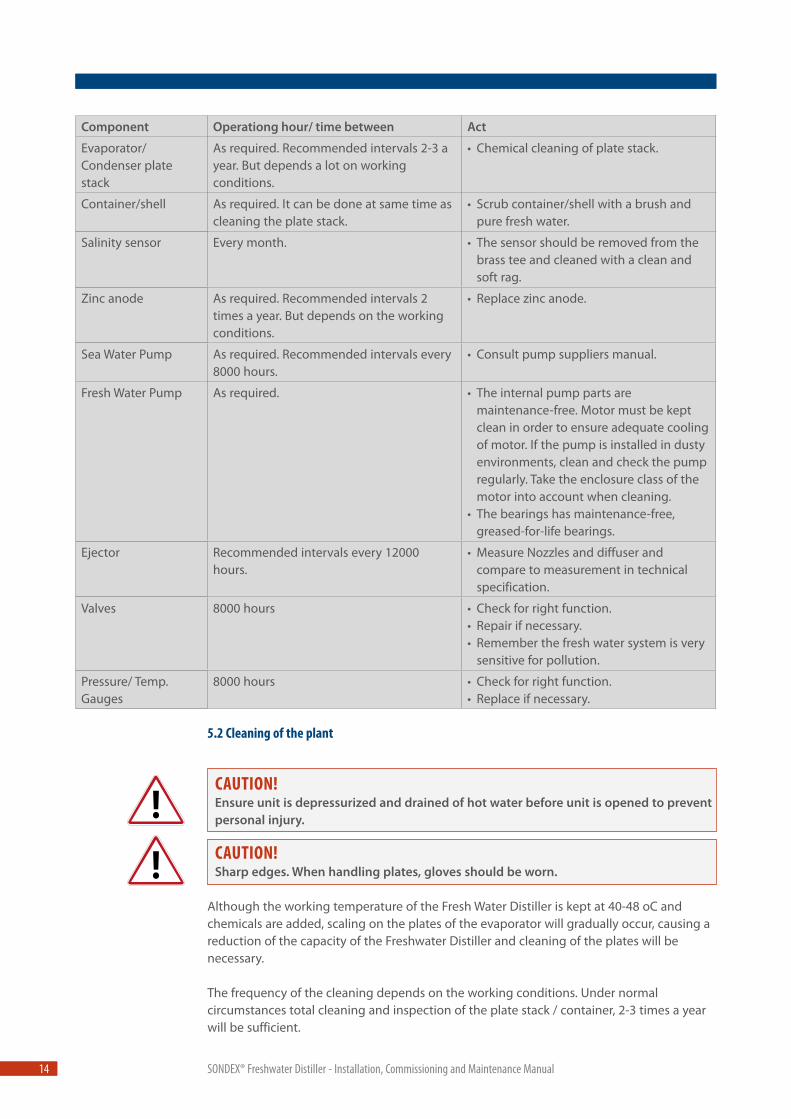
The sensor is calibrated to the brass block (tee). It is important that the salt sensor is mounted in the tee block and in the flow direction as shown in the sketch below. Otherwise, it will affect the accuracy of the measurements.
Installation of Sensor1. Mount the adapter into the brass tee.2. Mount the salt sensor adapter so that the pins are aligned in the flow direction.3. Pull the cable through the protective cap and screw it into the adapter.4. Pull the cable through the cable gland, and mount the protective cap.5. The cable from the salt sensor can now be connected into the Salinity controller.
Cable ConnectionsL, Ground, N 230V/AC, Main supplyTerminal 1-3 Salt sensorTerminal 4-5 Level sensor for chemical containerTerminal 6-7 Remote display, 4-20mA outputTerminal 8-9 SolenoidTerminal 10-12 Alarm

28 28 SONDEX® Freshwater Distiller - Installation, Commissioning and Maintenance Manual
Main print

2929SONDEX® Freshwater Distiller - Installation, Commissioning and Maintenance Manual
7.4 Instruction - Salinity controllerThe Salinity controller calculates the salt concentration in the fresh water and updates the level at the display every ½ sec.
The Salinity Controller monitors if the salt concentration is within the configured limit, and/or the chemical level in the container is low. If the limits are out of the configured limits, the alarm is activated and an error message is shown at the display panel.
The default values on the Salinity Controller is set to:• Alarm threshold 10 ppm.• Solenoid deactivated for 10 min. at startup.• Online transfer is active.• Chemical alarm is active.
Buttons on display
Toggle between the different menu items.
Single tab increment/decrement. If the buttons are held down it will start to increment/decrement continually.
Change / confirm the setting.
The light is activated on the display by the touch of a button.

30 30 SONDEX® Freshwater Distiller - Installation, Commissioning and Maintenance Manual
Display noticesDisplaying salinity level
Salinity within level:• Solenoid is on.• Salinity was below the threshold at least 7 seconds.• Chemicals level is highSALINITY: XXXppm
Salinity displayed. XXXppm is a value from 0 to 200 ppm.
Salinity exceed measuring limits:• The salt content has been above 200 ppm at least 7 seconds.
SALINITY:>200ppm
Salinity level is higher than 200ppm.
Salinity exceed limits, but solenoid is delayed:• The solenoid is off.
SALINITY: XXXppmSOL. OFF XXMIN
Salinity level - XXXppm is a value from 0 to 200 ppmDelay on alarm - XXMIN is a value from 1 to 10 min.
Salinity AlarmWhen salinity has been above the limit for at least 7 seconds, and the solenoid is on, the alarm and solenoid relay will be activated, and error message is shown on the display.
ALARM!!!SALINITY: XXXppm
Salinity is above limit
When salinity has been below the threshold for at least 7 seconds, the alarm will be disabled.

3131SONDEX® Freshwater Distiller - Installation, Commissioning and Maintenance Manual
Chemical AlarmIf the conditions for chemical alarm is present and the chemical level has been low for more than 15 minutes. The alarm relay will be activated and the error message below is shown on the display.
ALARM!!! LOW CHEMICAL LEVEL
Low chemical level
"<┘" button can be pressed or the chemical container can be filled up again to turn off the chemical alarm.
Setup MenuWhen pressing the "Setup" button the following menus can be scroll through on the display:
The limit for the solenoid and the alarm.• Press the "Setup" button.• The system displays the “LIMIT” of the solenoid and alarm on the display.
Press the "<┘" to change.
LIMIT: XXXppmCHANGE? PRESS <┘
Change the value for solenoid and alarm. XXX is a value from 0 to 200
Status of the solenoid.• Press the "Setup" button.• The system displays the status of the alarm “SOLENOID IS ON/OFF” the display.
Press the "<┘" to change.
SOLENOID IS XXXCHANGE? PRESS <┘
Change the status of solenoid alarm. XXX is either ON or OFF
Status of online transfer.• Press the "Setup" button.• The system displays the status of online transfers on the display.
Press the "<┘" to change.
ONLINE IS XXX CHANGE? PRESS <┘
Change the status of online application. XXX is either ON or OFF

32 32 SONDEX® Freshwater Distiller - Installation, Commissioning and Maintenance Manual
Status of the chemical alarm.• Press the "Setup" button.• The system displays the status of chemical alarm on the display.
Press the "<┘" to change.
CHEMICAL IS XXX CHANGE? PRESS <┘
Change the status of chemical alarm. XXX is either ON or OFF
Running hours.• Press the "Setup" button.• The system displays the number of hours the system has been running.
RUNHOUR: XXXXXh
Operating hours for the system.
Press "Setup" again and the menu returns to first step. If no buttons are pressed for 3 sec. the controller will exit the setup menu and nothing will be saved.
Changing the default limitsChange the configuration of the solenoid alarmIn this menu the limit at which the solenoid and alarm relay will be activated can be changed. This menu can be accessed by pressing "<┘" after pressing the "Setup" button.
• The system displays configuration of the limit.
NEW LIMIT XXXppmSAVE? PRESS <┘
Display text XXX can be set to a value between 0 and 200• The limit can be changed with "-" and "+".• The limit is stored in memory by pressing "<┘"• After pressing the "<┘" the Salinity controller will automatically exit the menu system
If no buttons are pressed for 3 sec. the controller will exit the setup menu and nothing will be saved.

3333SONDEX® Freshwater Distiller - Installation, Commissioning and Maintenance Manual
Change the configuration of the solenoid alarmIn this menu the solenoid alarm can be set on or off for 1-10 min. This menu can be accessed by pressing "<┘" after 2 tabs on the "Setup" button. • The system displays the configuration of alarm solenoid status.
SOL. XXXXXXXXXXSAVE? PRESS <┘
X's are the status of the solenoid alarm. Status can be either "ON" or "OFF XX minutes". XX is between 1 and 10.• That can be changed between "ON" and the number of minutes. with "-" and "+"• The Configuration is saved with "<┘" • The system displays the selected configuration of the alarm status.
SOLENOID IS NOW:XXXXXXXXXXXXX
X’s are the new status of the solenoid alarm and can be "ON" or "OFF xx min".• After pressing the "<┘" the Salinity controller will automatically exit the menu system
If no buttons are pressed for 3 sec. the controller will exit the setup menu and nothing will be saved.
Change the status of online transmissionThis menu item allows online transmission (4-20mA output) of salinity level to be configure on or of.This menu can be accessed by pressing "<┘" after 3 tab on the "Setup" button. • The system displays the configuration of the online transmission.
ONLINE XXX SAVE? PRESS <┘
X's marked and has the status of online transfer. Status can be either "ON" or "OFF".• It can be changed between "ON" and "OFF" with "-" and "+"• The configuration is saved with "<┘"• The system displays the selected configuration of the alarm status.
ONLINE IS NOW: XXX
X’s are the new status for online transfer and can be "ON" or "OFF• After pressing the "<┘" the Salinity controller will automatically exit the menu system
If no buttons are pressed for 3 sec. the controller will exit the setup menu and nothing will be saved.

34 34 SONDEX® Freshwater Distiller - Installation, Commissioning and Maintenance Manual
Change the status of chemical alarmThis menu item allows chemical alarm be configured on or off.This menu can be accessed by pressing "<┘" after 4 tab on the "Setup" button.
• The system displays the configuration of the alarm status.
CHEMICAL XXX SAVE? PRESS <┘
X's marked and status by chemical alarm. Status can be either "ON" or "OFF• It can be changed between "ON" and "OFF" with "-" and "+" • Configuration is saved with "<┘" The system displays the selected configuration of the alarm status.
CHEMICAL IS NOW: XXX
X’s are the new status of chemical alarm and can be "ON" or "OFF• After pressing the "<┘" the Salinity controller will automatically exit the menu system
If no buttons are pressed for 3 sec. the controller will exit the setup menu and nothing will be saved.
7.5 Test of the Salinity ControllerEvery unit is tested doing production to be within specifications (see Specifications, page 4).
Test of the Salinity Controller• Jumper 4 and 5 are moved to test position on the print• The displayed salinity level must be 12 ppm (±1 ppm)
Note: The software in the Salinity Controller can be put into test mode / calibration by holding SETUP and MINUS button while turning on the product. To carry out the test / calibration requires connection of additional equipment, which is not supplied. This means that you must turn off the power to the Salinity Controller if the program enters the software calibration/test mode. Otherwise the correct measurement cannot be guaranteed afterwards.
7.6 MaintenanceAlways keep the Salinometer dry and clean. The accuracy of the Salinometer is very dependent on the electrodes are kept clean. The Fresh Water Generator cannot be operated while preforming maintenance.
The sensor should be removed from the brass tee and cleaned at least once a month. Use only clean and soft rags. Avoid touching the electrode with the fingers and drop/bump it against the surroundings. When cleaning the electrodes it is IMPORTANT that the electrodes are not polluted by oil or other chemical.

3535SONDEX® Freshwater Distiller - Installation, Commissioning and Maintenance Manual
8.1 After sales serviceOrdering Spare PartsWhen requesting spare parts, please forward the following information:• Serial number of the Fresh water Distiller.• Item/ position number, name and description of part according to chapter “Drawing and
Spare Part List”.• If ordering Spare Parts for Pump, please provide information from nameplate.• If ordering Spare Parts for Control Box, please provide information from data sticker inside
the Control Box. • If any doubt about the Spare Part, please provide Sondex with photos of the component
with measurement of the component.
Normally delivery of spare parts can take place within a few days from the Head Office in Denmark.
8 SERVICE

36 36 SONDEX® Freshwater Distiller - Installation, Commissioning and Maintenance Manual
8.2 Network reference list
EuropeDENMARKSondex A/S (Head Office)Marsvej 5DK- 6000 KoldingDenmark
Tel.: +45 76 306 100Fax: + 45 75 538 [email protected] www.sondex.net
ITALYSondex Italia s.r.l.Strada Provinciale 23, n°1026010 Salvirola (CR)Italy
Tel.: (+39) 0373 729485Fax: (+39) 0373 [email protected]
POLANDSondex Polska Sp. z.o.oul. J. Chłopickiego 5004-275 Warszawa, Poland
Tel./fax +48 22 473 14 32Fax: +48 22 812 70 [email protected]
GERMANYSondex Deutschland GmbHRobert-Koch-Straße 3D-21423 Winsen / LuheGermany
Tel.: +49 (0)4171 7883 30Fax: +49 (0) 4171 7883 [email protected] www.sondex.de
HUNGARYSondex Hőcserélők Magyarország Kft.Temesvár u. 20, I ép., III em, 315. szoba1116 BudapestHungary
Tel.: +36-30-585-0583Fax: [email protected]
TURKEYSondex-Tanpera EndüstriEnerji San. ve Tic. Ltd. Şti.Ostim 1203,. Sokak No. 1406374-Yenimahalle, Ankara, Turkey
Tel.: +90 312 395 52 10Fax: +90 312 394 58 [email protected]
THE NETHERLANDSSondex BVDe Volger 14/161483 GA De Rijp,The Netherlands
Tel.: (+31) (0) 299 674934Fax: (+31) (0) 299 [email protected] www.sondex.nl
UNITED KINGDOMSondex UK LtdUnit 3, Swallowfield Centre,Swallowfield Way, Hayes, Middlesex, UB3 1AW, United Kingdom
Tel.: (+44) (0) 20 8573 6276Fax: (+44) (0) 20 8573 [email protected] www.sondexphe.co.uk
CZECH REPUBLIC & SLOVAKIA Sondex CZ S.R.OZelený pruh 1560/99140 02 Praha 4Česká republika
Tel.: (+420) 734 693 [email protected] www.sondex.cz
FRANCESondex France SARL12 Chemin de Chapoly69230 St Genis LavalFrance
Tel.: +33 4 78 86 92 03Fax: +33 4 78 51 98 [email protected]
FINLANDSondex Tapiro Oy AbSinikellontie 10 A01300 VANTAAFinland
Tel.: +358 (0) 9 755 981Fax: +358 (0) 9 755 [email protected]
ROMANIAS.C. Sondex Romania SRLStr. Fabricii Nr.14407107, Rascruci, Jud. ClujRomania
Tel.: +40 364 402 270Fax.: +40 364 402 [email protected]
North America South AmericaUSA Sondex Inc.7040 International DriveKY 40258 LouisvilleUSA
Tel.: (+01) 502-933-9991Fax: (+01) [email protected]
USAPolaris Plate Heat Exchangers, LLC106 Apple Street, Suite 106NJ 07724 Tinton FallsUSA
Tel.: (+01) 732 345 7188Fax: (+01) 732 345 [email protected]
BRAZILSondex Brasil Ltda.Rua Antonio Biscuola, 200 galpão 1Louveira – São PauloBrasil - CEP – 13290-000
Tel.: +55 11 4599-2294 [email protected]

3737SONDEX® Freshwater Distiller - Installation, Commissioning and Maintenance Manual
AsiaDUBAIGulf Sondex FZCOPlot S31121Jebel Ali Free Zone DubaiUnited Arab Emirates
Tel.: (+971) 4 8809979Fax: (+971) 4 [email protected]
SINGAPORESondex South East Asia Pte Ltd21 Joo Koon Crescent629026 SingaporeSingapore
Tel.: (+65) 6227 1203Fax: (+65) 6227 [email protected]
MALAYSIASondex MalaysiaNo.8, Jalan TPM 1, Taman Meranti Jaya Industrial Park, Puchong, 47120 SelangorMalaysia
Tel.: (+60) 3 8062 3247Tel 2.: (+60) 3 8052 2427Fax: (+60) 3 2178 4908
VIETNAMSondex VietnamFloor 2, 45 Thang Long St, Ward 4, Tan Binh District, Ho Chi Minh CityVietnam
Tel.: (+84) 8 6272 6280Fax: (+84) 8 3948 [email protected]
SOUTH KOREASondex Korea LLCTa4-2 Nammoon Industrial District Nammoondong Jinhae-Gu645-370 Changwon-City, Gyeongsangnam-Do, South Korea
Phone: +82 51 972 8013Fax: +82 51 972 [email protected]
CHINASondex Heat Exchangers (Ningbo) Co., Ltd.Room 5002, No. 1558 Jiangnan Road, Ningbo, ZhejiangP. R. China
Tel.: (+86) 574 27908915Tel 2.: (+86) 188 68955845Fax: (+86) 574 [email protected]
INDIASondex Heat Exchangers India Pvt. Ltd.E/1 GIDC Savli, PO Manjusar, Vadodora, Gujarat India
Tel.: +91 2667 267000 Fax: +91 2667 264133 [email protected] www.sondex.in
OceaniaAUSTRALIASondex Australia PTY LTD11/899 Wellington RoadVic., 3178 RowvilleAustralia
Tel.: (+61) 3 9755 6789Fax: (+61) 3 9755 [email protected]
NEW ZEALANDSondex New Zealand Ltd94 White Street3110 Fenton Park RotoruaNew Zealand
Tel.: +(64) 7 348 [email protected]

38 38 SONDEX® Freshwater Distiller - Installation, Commissioning and Maintenance Manual
Sondex by Danfoss can accept no responsibility for possible errors in catalogues, brochures and other printed material. Sondex by Danfoss reserves the right to alter its products without notice. This also applies to products already on order provided that such alterations can be made without sub sequential changes being necessary in specifications already agreed. All trademarks in this material are property of the respective companies. Sondex by Danfoss and the Sondex by Danfoss logotypes are trademarks of Sondex A/S. All rights reserved.
Sondex A/S · Marsvej 5 · DK-6000 Kolding · DenmarkTel.: + 45 76 306 100 · Email: [email protected] · www.sondex.net