Embed Size (px)
Citation preview

InnoMedia ESBC
Enterprise Session Border Controller
Administration Guide
September 2018
Copyright ©2010-2018 InnoMedia Inc. All rights reserved.

2
InnoMedia ESBC Administrative Guide
Table of Contents
1 SAFETY CHECK ................................................................................................................................ 10
1.1 IMPORTANT SAFETY INSTRUCTIONS ....................................................................................................... 10
1.2 SAFETY GUIDELINES ........................................................................................................................... 12
1.2.1 General Precautions .............................................................................................................. 12
1.2.2 Protecting Against Electrostatic Discharge ........................................................................... 13
1.2.3 Optional Battery Pack Use .................................................................................................... 13
1.3 ESBC MODEL DIFFERENTIATIONS AND KEY FEATURES .............................................................................. 14
1.3.1 TDM PRI with PRI ESBC (ESBC 9x80 series) ........................................................................... 14
1.3.2 SIP Trunking Using ESBCs with B2BUA (ESBC 8xxx and 9xxx series) ..................................... 14
1.3.3 Hosted Service Using ESBCs with SIP ALG (ESBC 8xxx and 9xxx series) ................................. 15
1.3.4 High Capacity B2BUA and Transcoding Integrated Model: ESBC 10K –MDX series ............. 15
1.4 CAPACITY AND LICENSE ....................................................................................................................... 17
1.5 INSTALLING THE ESBC9XXX AND 8XXX SERIES TO AN ENTERPRISE NETWORK .................................................. 18
1.6 INSTALLING THE ESBC10K SERIES TO AN ENTERPRISE NETWORK ................................................................. 20
1.7 WEB BASED MANAGEMENT (HTTP, HTTPS) ......................................................................................... 22
1.7.1 The Console Home Page: System Overview .......................................................................... 22
1.7.2 Real Time Activity Monitor ................................................................................................... 23
1.7.2.1 Network Status ................................................................................................................................. 23
1.7.2.2 Port Mapping Table .......................................................................................................................... 25
1.7.2.3 Routing Table ................................................................................................................................... 25
1.7.3 Telephony Activities .............................................................................................................. 26
1.7.3.1 SIP Server Redundancy ..................................................................................................................... 26
1.7.3.2 Line Status ........................................................................................................................................ 26
1.7.3.3 Active Calls ....................................................................................................................................... 27
1.8 CLI BASED MANAGEMENT .................................................................................................................. 28
1.8.1 Root mode ............................................................................................................................ 28
1.8.2 net mode ............................................................................................................................... 28
1.8.2.1 LAN ................................................................................................................................................... 29
1.8.2.2 WAN ................................................................................................................................................. 29

3
InnoMedia ESBC Administrative Guide
1.8.3 system mode ......................................................................................................................... 29
1.8.3.1 Provisioning ...................................................................................................................................... 30
1.8.3.2 EMS .................................................................................................................................................. 30
1.8.3.3 PRI (applicable to ESBC-9xxx series) ................................................................................................. 30
1.8.3.4 Function ID (applicable to ESBC-9xxx series) .................................................................................... 31
1.9 SNMP BASED MANAGEMENT .............................................................................................................. 32
1.9.1 Trap host configurations ....................................................................................................... 32
1.9.2 SNMP v3 setup ...................................................................................................................... 34
1.9.2.1 Security Levels in SNMPv3 ............................................................................................................... 34
1.10 EMAIL (SMTP) BASED MANAGEMENT .................................................................................................. 36
1.11 XML CONFIG-FILE BASED MANAGEMENT ................................................................................................ 37
1.12 AUTO-PROVISIONING BASED MANAGEMENT ........................................................................................... 38
1.12.1 Basic Provisioning Mechanism Configurations ..................................................................... 38
1.12.1.1 DHCP Provisioning Method .......................................................................................................... 38
1.12.1.2 HTTP / HTTPS / TFTP/ SecHTTP Provisioning Methods ................................................................ 39
1.12.2 Server Initiated Provisioning: SIP NOTIFY ............................................................................. 40
1.12.3 Log ........................................................................................................................................ 40
1.12.4 EMS based management ...................................................................................................... 42
2 THE ESBC NETWORK REQUIREMENTS AND CONFIGURATIONS ....................................................... 44
2.1 DETERMINING THE NETWORK REQUIREMENTS FOR VOICE SERVICES .............................................................. 44
2.1.1 Understand the network factors which affect quality of service .......................................... 44
2.1.1.1 Bandwidth Requirement .................................................................................................................. 44
2.1.1.2 Latency ............................................................................................................................................. 45
2.1.1.3 Jitter ................................................................................................................................................. 45
2.1.1.4 Packet Loss ....................................................................................................................................... 45
2.2 DUAL WAN REDUNDANCY .................................................................................................................. 46
2.2.1 The Configuration of Redundant WAN ................................................................................. 46
2.2.1.1 Enable the Backup WAN port ........................................................................................................... 46
2.2.1.2 Configuring the Backup WAN Interface ........................................................................................... 47
2.2.1.3 WAN Redundancy Settings ............................................................................................................... 49
2.2.1.4 Monitor WAN availability ................................................................................................................. 49

4
InnoMedia ESBC Administrative Guide
2.2.1.5 Configuring the Redundancy and Failover Settings .......................................................................... 51
2.2.2 Changes to ESBC services when WAN redundancy mode is enabled .................................... 54
2.3 SINGLE AND MULTIPLE LOGICAL IP NETWORK SERVICE MODELS ................................................................... 56
2.3.1.1 Single IP Network Interface .............................................................................................................. 56
2.3.1.2 VLAN settings for Multi-Service Capabilities to the WAN Logical Interface ..................................... 58
2.3.1.3 The Physical Ethernet Port Configurations ....................................................................................... 59
2.3.1.4 Multiple logical IP networks (available on the ESBC 93xx models) .................................................. 60
2.3.2 Cable modem embedded ESBC models ................................................................................. 63
2.3.2.1 Logical Network Interface ................................................................................................................ 63
2.3.2.2 Physical Ethernet Port ...................................................................................................................... 64
2.4 LAN INTERFACE CONFIGURATIONS ........................................................................................................ 65
2.4.1 The LAN interface configurations for voice services ............................................................. 65
2.4.1.1 LAN side Topology: RTP Default Gateway for SIP Trunk (B2BUA) voice services ............................. 67
2.4.1.2 LAN side Topology Design: Static Routing Configurations................................................................ 68
2.4.2 DHCP Server .......................................................................................................................... 69
2.4.2.1 Client List .......................................................................................................................................... 70
2.4.2.2 MAC Binding ..................................................................................................................................... 70
2.4.3 Advanced Configurations for Voice and Data Featured Services .......................................... 71
2.4.3.1 Enabling the Management Port ....................................................................................................... 72
2.4.3.2 Enabling the Bridge Port .................................................................................................................. 73
2.4.3.3 Enabling the Router Port for data services ....................................................................................... 73
2.4.4 Ethernet Advanced Configurations for LAN Interfaces ......................................................... 76
2.4.5 Remote access to the ESBC LAN Interfaces and LAN hosts ................................................... 77
2.4.5.1 Through VPN .................................................................................................................................... 77
2.4.5.2 Through Port Forwarding ................................................................................................................. 79
2.4.6 Enabling Data Service Access for the ESBC LAN hosts .......................................................... 79
2.4.6.1 DNS Proxy ......................................................................................................................................... 79
2.4.6.2 Access Control .................................................................................................................................. 80
2.4.6.3 UPnP ................................................................................................................................................. 82
2.4.6.4 DMZ (De-militarized Zone) ............................................................................................................... 82
2.4.6.5 Miscellaneous .................................................................................................................................. 83
2.5 USING AN NTP SERVER TO OFFER TIME INFORMATION TO ESBC LAN DEVICES .............................................. 84

5
InnoMedia ESBC Administrative Guide
2.6 QOS CONTROL .................................................................................................................................. 85
2.6.1 QoS Settings for Voice and Data Traffic ................................................................................ 85
2.6.2 Cable Modem Embedded Models: ESBC 95xx and 85xx ....................................................... 86
2.6.2.1 DQoS service flow settings ............................................................................................................... 86
3 SIP TRUNK VOICE SERVICE CONFIGURATIONS ................................................................................ 88
3.1 ROUTING CALLS BETWEEN THE ESBC AND SIP TRUNK (SERVICE PROVIDER) .................................................. 88
3.1.1 Trunk Settings: SIP Server ..................................................................................................... 88
3.1.2 Trunk Setting: Sip server redundancy ................................................................................... 90
3.1.2.1 Dynamic Query for Redundant SIP Servers ...................................................................................... 91
3.1.2.2 Static Input for Redundant SIP Servers ............................................................................................ 91
3.1.3 Trunk Setting: Codec Filter .................................................................................................... 92
3.2 ADDING AND CONFIGURING USER ACCOUNTS ON THE ESBC ..................................................................... 93
3.2.1 SIP UA Setting ....................................................................................................................... 93
3.2.1.1 Public identity: Batch Add ................................................................................................................ 94
3.2.1.2 Public identity: Batch Modify/Delete ............................................................................................... 97
3.2.1.3 Public identity: Individual Settings and Authentication ................................................................... 98
3.2.2 Implicit registration: Registration Agent .............................................................................. 99
3.2.2.1 Bulk Assigning................................................................................................................................. 100
3.2.3 SIP Trunk Parameter Configurations ................................................................................... 101
3.2.3.1 SIP Profile Configuration: SIP Parameters ...................................................................................... 102
3.2.3.2 SIP Profile Configuration: Interoperability ..................................................................................... 103
3.2.3.3 SIP Profile Configuration: Security ................................................................................................. 108
3.2.3.4 SIP Profile Configuration: Features ................................................................................................ 109
3.2.4 Analog interface FXS Configuration: FAX and Modem Calls ............................................... 112
3.2.4.1 Media Parameter Configuration for Analog Ports .......................................................................... 113
3.2.4.2 Call Feature Configuration for Analog Ports ................................................................................... 115
3.3 VERIFYING CALLS BETWEEN THE ESBC AND SIP TRUNK: TEST AGENT ........................................................ 117
3.3.1 The Test Agent Setting ........................................................................................................ 117
3.3.2 The Usage of Test Agent ..................................................................................................... 119
3.4 ROUTING CALLS: ESBC WITH A SIP-PBX ............................................................................................. 121
3.4.1 SIP PBX Profile ..................................................................................................................... 121

6
InnoMedia ESBC Administrative Guide
3.4.1.1 Basic SIP Parameters ...................................................................................................................... 121
3.4.1.2 Interoperability .............................................................................................................................. 122
3.4.1.3 ESBC - PBX Security Configuration.................................................................................................. 127
3.4.1.4 ESBC - PBX Call Feature Configuration ........................................................................................... 128
3.4.2 SIP-PBX and SIP-Client Authentication ................................................................................ 129
3.5 ESBC SYSTEM GLOBAL SIP SETTINGS .................................................................................................. 130
3.5.1 SIP Parameters .................................................................................................................... 130
3.5.1.1 SIP Parameters ............................................................................................................................... 130
3.5.1.2 System Music on Hold (MOH) ........................................................................................................ 132
3.5.1.3 Filter SIP Method ............................................................................................................................ 132
3.5.2 Customized SIP response code settings .............................................................................. 133
3.6 NUMBERING PLAN ........................................................................................................................... 134
3.6.1 Configuring numbers and formulating digit translation rules ............................................ 134
3.7 EMERGENCY CALL CONFIGURATION ..................................................................................................... 135
3.7.1.1 Adding or deleting emergency call numbers .................................................................................. 135
3.7.1.2 Connection settings for emergency call numbers .......................................................................... 135
3.8 MEDIA TRANSCODING ...................................................................................................................... 137
3.8.1 Introduction ........................................................................................................................ 137
3.8.1.1 Enabling Transcoding Profiles ........................................................................................................ 137
3.8.1.2 Editing or Adding a Transcoding Profile ......................................................................................... 137
3.8.2 DTMF Transcoding .............................................................................................................. 140
3.8.3 FAX Transcoding ................................................................................................................. 140
3.8.4 Voice Codec Transcoding .................................................................................................... 142
3.8.4.1 Typical example of voice codec transcoding in deployment .......................................................... 142
3.9 ROUTING CALLS: ESBC WITH A PRI-PBX ............................................................................................. 143
3.9.1 PRI Spans and Channels ...................................................................................................... 143
3.9.2 PRI Span Statistics ............................................................................................................... 145
3.9.3 PRI Span Connection Settings ............................................................................................. 146
3.9.3.1 Basic Settings.................................................................................................................................. 146
3.9.3.2 ISDN Interoperability Configuration ............................................................................................... 147
3.9.3.3 B-Channel Maintenance ................................................................................................................. 152

7
InnoMedia ESBC Administrative Guide
3.9.4 User Account Assignment to PRI Span Groups ................................................................... 152
3.9.4.1 Assigning UAs to a PRI Span Group ................................................................................................ 153
3.9.4.2 Selecting an appropriate B-Channel hunting scheme .................................................................... 153
3.9.5 PRI Media Profile Settings ................................................................................................... 155
3.9.6 PRI diagnostics .................................................................................................................... 158
3.9.6.1 Bit error rate testing (BERT) ........................................................................................................... 158
3.9.6.2 PRI Span LoopBack Diagnostics ...................................................................................................... 160
3.9.7 SIP response code – PRI cause code mapping ..................................................................... 161
3.9.7.1 Mapping of a received SIP 4xx-6xx response to an outbound INVITE request ............................... 161
3.9.7.2 Mapping of a Received PRI Cause Code to SIP Response ............................................................... 162
3.10 SIP TRUNK VOICE SERVICE DURING REDUNDANT WAN SWITCHOVER ....................................................... 164
4 ESBC HOSTED VOICE SERVICE ....................................................................................................... 165
4.1 ESBC SIP-ALG FUNCTIONALITY FEATURES AND BENEFITS ....................................................................... 165
4.2 CONFIGURING SIP PHONES FOR HOSTED SERVICES VIA THE ESBC ............................................................. 166
4.2.1 Configuring the SIP phones on the ESBC LAN ..................................................................... 166
4.2.2 Configuring the ESBC SIP ALG Module ................................................................................ 166
4.2.3 Hosted Voice Service Survivability ...................................................................................... 167
4.3 FQDN TO IP STATIC MAPPING .......................................................................................................... 169
4.4 LIST OF ACTIVE DEVICES FOR HOSTED SERVICE ...................................................................................... 170
4.4.1 Enable Provisioning Service to IP Phones for Hosted Voice Services ................................... 170
5 OAMP, SECURITY AND FRAUD PROTECTION ................................................................................. 171
5.1 USER ACCOUNT CONFIGURATIONS ...................................................................................................... 171
5.1.1 Local Account Settings ........................................................................................................ 171
5.1.2 TACACS+ Account Settings .................................................................................................. 172
5.2 SYSTEM TIME .................................................................................................................................. 174
5.3 MANAGEMENT CONTROL .................................................................................................................. 176
5.4 MAINTENANCE ................................................................................................................................ 178
5.4.1 Reboot |Scheduled Reboot | Restore Factory Default | Restore WAN MAC Address ........ 178
5.4.1.1 ESBC 9K series -- Restore to Factory Default .................................................................................. 179
5.4.1.2 ESBC 10K series – Restore to Factory Default ................................................................................ 179
5.4.2 Firmware Update | Rollback Software ............................................................................... 179

8
InnoMedia ESBC Administrative Guide
5.4.3 Import XML or Binary Config | Export XML or Binary Config .............................................. 180
5.5 AUTO BACKUP SYSTEM CONFIGURATION PERIODICALLY ............................................................................ 181
5.6 BATTERY STATUS ............................................................................................................................. 183
5.7 CALL HISTORY AND LOGS .................................................................................................................. 184
5.7.1 Call History Settings ............................................................................................................ 184
5.7.2 Call History Record .............................................................................................................. 184
5.7.3 VQM (Voice Quality Measurement) .................................................................................... 186
5.8 VOICE QUALITY MEASUREMENT AND SLA ASSURANCE ........................................................................... 188
5.8.1 Voice Quality Parameter Basic Configuration..................................................................... 188
5.8.2 Voice quality statistics line chart ........................................................................................ 189
5.8.3 SLA (Service Level Agreement) Parameters ........................................................................ 190
5.8.4 Advanced Settings .............................................................................................................. 190
5.9 ALERT NOTIFICATION: ...................................................................................................................... 192
5.9.1 SNMP Trap Alarms .............................................................................................................. 192
5.9.2 Email Alarms ....................................................................................................................... 194
5.10 SECURITY ....................................................................................................................................... 195
5.10.1 System access control: Basic ............................................................................................... 195
5.10.2 IP Layer Protection: Access Control List .............................................................................. 196
5.10.3 SIP Layer Protection ............................................................................................................ 197
5.10.3.1 SIP Firewall Rules ....................................................................................................................... 197
5.10.4 SIP Firewall logs .................................................................................................................. 198
5.10.5 SIP Message | domain | IP examination to prevent attack or fraud .................................. 198
5.10.5.1 Fraud from the LAN interface .................................................................................................... 198
5.10.5.2 Fraud or attack from the WAN interface ................................................................................... 199
5.10.6 Audit logs ............................................................................................................................ 199
5.11 SYSTEM MONITOR ........................................................................................................................... 200
5.11.1 CPU Utilization History ........................................................................................................ 200
5.12 SYSTEM INFORMATION ..................................................................................................................... 202
6 DIAGNOSIS ................................................................................................................................... 203
6.1 TEST CALLS ..................................................................................................................................... 203

9
InnoMedia ESBC Administrative Guide
6.2 SYSLOG .......................................................................................................................................... 204
6.2.1 Debugging syslog ................................................................................................................ 204
6.2.2 Operational syslog .............................................................................................................. 204
6.3 CALL TRACE .................................................................................................................................... 207
6.3.1 Tracing - Ladder diagram.................................................................................................... 207
6.3.2 Packet capture .................................................................................................................... 208
6.4 NETWORK DIAGNOSTIC UTILITIES ........................................................................................................ 211
6.4.1 Ping Test ............................................................................................................................. 211
6.4.2 Traceroute .......................................................................................................................... 212
6.4.3 Nslookup ............................................................................................................................. 212
7 INSTALLERS AND OPERATORS ...................................................................................................... 213
7.1 INSTALLATION VIA TECHNICAN WEB CONSOLE ...................................................................................... 213
7.1.1 The ESBC9x78, 9x28, ESBC10K series models ..................................................................... 213
7.1.1.1 Technician-Trunk Interface ............................................................................................................ 213
7.1.1.2 Telephony and Network Diagnostics .............................................................................................. 214
7.1.1.3 Connect/Register SIP PBX to the ESBC ........................................................................................... 214
7.1.1.4 LAN Setting ..................................................................................................................................... 215
7.1.1.5 Monitor .......................................................................................................................................... 215
7.1.2 ESBC-9x80 series models (switch between T1/E1 and transcoding) ................................... 216
7.2 OPERATOR MANAGEMENT VIA THE OPERATOR WEB CONSOLE ................................................................ 218
8 SIP FIREWALL AND HEADER MANIPULATION RULES (SHMR) ........................................................ 219
8.1 SIP HEADER MANIPULATION AND FIREWALL SCRIPTS ............................................................................. 220
8.2 SIP FIREWALL ................................................................................................................................. 222
9 APPENDIX ..................................................................................................................................... 224
9.1 SIP REASON HEADER ....................................................................................................................... 224
9.2 SIP REMOTE-PARTY-ID HEADER PARAMETER MAPPING WITH THE PRI SETUP MESSAGE ............................... 228
9.3 ESBC-TDM PBX RINGBACK TONE BEHAVIOR SUMMARY ......................................................................... 228
9.4 ESBC SIP AUTHENTICATION FLOW ..................................................................................................... 232
9.4.1 Authenticate SIP Request Messages from SIP Server ......................................................... 232
9.4.2 Authenticate SIP Request Messages from SIP-PBX ............................................................. 232

10
InnoMedia ESBC Administrative Guide
1 Safety Check
1.1 Important Safety Instructions
This section contains important safety information you should know before working with the ESBC. Use
the following guidelines to ensure your own personal safety and to help protect your ESBC from potential
damage.
This warning symbol means danger. You are in a situation that could cause bodily injury.
Before you work on any equipment, be aware of the hazards involved with electrical circuitry and be
familiar with standard practices for preventing accidents
Only trained and qualified personnel should be allowed to install, replace, or service this equipment.
To avoid electric shock, do not connect safety extra-low voltage (SELV) circuits to telephone-network
voltage (TNV) circuits. LAN ports contain SELV circuits, and WAN ports contain TNV circuits. Some LAN and
WAN ports both use RJ-45 connectors. Use caution when connecting cables. Statement 1021
Before working on a system that has an on/off switch, turn OFF the power and unplug the power
cord.
This unit is intended for installation in restricted access areas. A restricted access area is where
access can only be gained by service personnel through the use of a special tool, lock and key, or other
means of security, and is controlled by the authority responsible for the location.
This product relies on the building’s installation for short-circuit (overcurrent) protection. Ensure
that a fuse or circuit breaker no larger than 120 VAC, 15A U.S. (240 VAC, 10A international) is used on the
phase conductors (all current-carrying conductors).
This equipment must be grounded. Never operate the equipment in the absence of a suitably
installed ground conductor. Contact the appropriate electrical inspection authority or an electrician if you
are uncertain that suitable grounding is available.
Do not work on the system or connect or disconnect cables during periods of lightning activity.
Before working on equipment that is connected to power lines, remove jewelry (including rings,
necklaces, and watches). Metal objects will heat up when connected to power and ground and can cause
serious burns or weld the metal object to the terminals.

11
InnoMedia ESBC Administrative Guide
The safety cover is an integral part of the product. Do not operate the unit without the safety cover
installed. Operating the unit without the cover in place will invalidate the safety approvals and pose a risk
of fire and electrical hazards.
Enclosure covers serve three important functions: they prevent exposure to hazardous voltages
and currents inside the chassis; they contain electromagnetic interference (EMI) that might disrupt other
equipment; and they direct the flow of cooling air through the chassis. Do not operate the system unless
all covers are in place.
Ultimate disposal of this product should be handled according to all national laws and regulations.
To prevent bodily injury when mounting or servicing this unit in a rack, you must take special
precautions to ensure that the system remains stable. The following guidelines are provided to ensure
your safety:
This unit should be mounted at the bottom of the rack if it is the only unit in the rack.
When mounting this unit in a partially filled rack, load the rack from the bottom to the top with the
heaviest component at the bottom of the rack.
If the rack is provided with stabilizing devices, install the stabilizers before mounting or servicing the
unit in the rack.

12
InnoMedia ESBC Administrative Guide
1.2 Safety Guidelines
To reduce the risk of bodily injury, electrical shock, fires, and damage to the equipment, observe the
following precautions.
1.2.1 General Precautions
Observe the following general precautions for using and working with your system:
Opening or removing covers might expose you to electrical shock. Components inside these
compartments should be serviced only by an authorized service technician.
If any of the following conditions occur, unplug the product from the electrical outlet and replace the
part or contact your authorized service provider:
o The power cable, extension cord or plug is damaged.
o An object has fallen into the product.
o The product does not operate correctly when you follow the operating instructions.
o The product has been exposed to water.
o The product has been dropped or damaged.
o The product does not operate correctly when you follow the operating instructions.
Keep your system components away from radiators and heat sources. Also, do not block cooling
vents.
Do not spill food or liquids on your system components, and never operate the product in a wet
environment.
Do not push any objects into the openings of your system components. Doing so can cause fire or
electric shock by shorting out interior components.
Allow the product to cool before removing covers or touching internal components.
Use the correct external power source. Operate the product only from the type of power source
indicated on the electrical ratings label. If you are not sure of the type of power source required,
consult your service representative or local power company.
Use only approved power cables. If you have not been provided with a power cable for your ESBC or
for any AC-powered option intended for your system, purchase a power cable that is approved for
use in your country. The power cable must be rated for the product and for the voltage and current
marked on the product’s electrical ratings label. The voltage and current rating of the cable should be
greater than the ratings marked on the product.
To help prevent electric shock, plug the system components and peripheral power cables into
properly grounded electrical outlets. These cables are equipped with three-prong plugs to help

13
InnoMedia ESBC Administrative Guide
ensure proper grounding. Do not use adapter plugs or remove the grounding prong from a cable. If
you must use an extension cord, use a three-wire cord with properly grounded plugs.
Observe extension cord and power strip ratings. Make sure that the total ampere rating of all
products plugged into the extension cord or power strip does not exceed 80 percent of the extension
cord or power strip ampere ratings limit.
To help protect your system components from sudden, transient increases and decreases in electrical
power, use a surge suppressor, line conditioner or uninterruptible power supply (UPS).
Position cables and power cords carefully; route cables and the power cord and plug so that they
cannot be stepped on or tripped over. Be sure that nothing rests on your system components’ cables
or power cord.
Do not modify power cables or plugs. Consult a licensed electrician or your power company for site
modifications. Always follow your local or national wiring rules.
1.2.2 Protecting Against Electrostatic Discharge
Static electricity can harm delicate components inside the equipment. To prevent static damage,
discharge static electricity from your body before you touch any of your system’s electronic components.
You can do so by touching an unpainted metal surface on the chassis.
You can also take the following steps to prevent damage from electrostatic discharge (ESD):
When unpacking a static-sensitive component from its shipping carton, do not remove the
component from the antistatic packing material until you are ready to install the component in your
system. Just before unwrapping the antistatic packaging, be sure to discharge static electricity from
your body.
When transporting a sensitive component, first place it in an antistatic container or packaging.
Handle all sensitive components in a static-safe area. If possible, use antistatic floor pads and
workbench pads.
1.2.3 Optional Battery Pack Use
Due to the California Energy Commission on the CEC safety required of battery pack use. The optional peripheral of the ESBC battery:
(1) That is embedded in a separate end-use product that is designed to continuously operate using mains
power (including end-use products that use external power supplies); and
(2) Whose sole purpose is to recharge a battery used to maintain continuity of power in order to provide
normal or partial operation of a product in case of input power failure.

14
InnoMedia ESBC Administrative Guide
Getting Started with the ESBC
1.3 ESBC Model Differentiations and Key Features
The Innomedia ESBC product family seamlessly migrates your enterprise telephony system to state-of-
the-art IP-based SIP trunking or hosted voice services.
1.3.1 TDM PRI with PRI ESBC (ESBC 9x80 series)
The InnoMedia Enterprise Session Border Controllers are capable of both B2BUA and SIP ALG operation as
well as having TDM PRI interfaces. These features allow broadband service providers to offer services to
TDM-PBX customers today, with an easy migration path to SIP trunking or hosted services later when the
customers transition from TDM to IP by adopting IP-PBX or IP Centrex services.
Figure 1. TDM-PRI with the PRI ESBC
1.3.2 SIP Trunking Using ESBCs with B2BUA (ESBC 8xxx and 9xxx series)
As part of InnoMedia’s comprehensive business voice service solutions, InnoMedia’s highly
manageable Enterprise Session Border Controller (ESBC) product family provides complete B2BUA
functionality for comprehensive signaling normalization/header manipulation, transcoding for
codec/fax/DTMF media translation, NAT traversal, topology hiding, SHMR for in-field header manipulation,
QoS management, and many other features to support the ability for a service provider to deliver a
scalable and reliable SIP Trunking offering. These IMS-ready and SIPConnect-compliant ESBCs are ideal for
service providers looking for seamless network migration.
Figure 2. SIP Trunking Using ESBCs with B2BUA
15
InnoMedia ESBC Administrative Guide
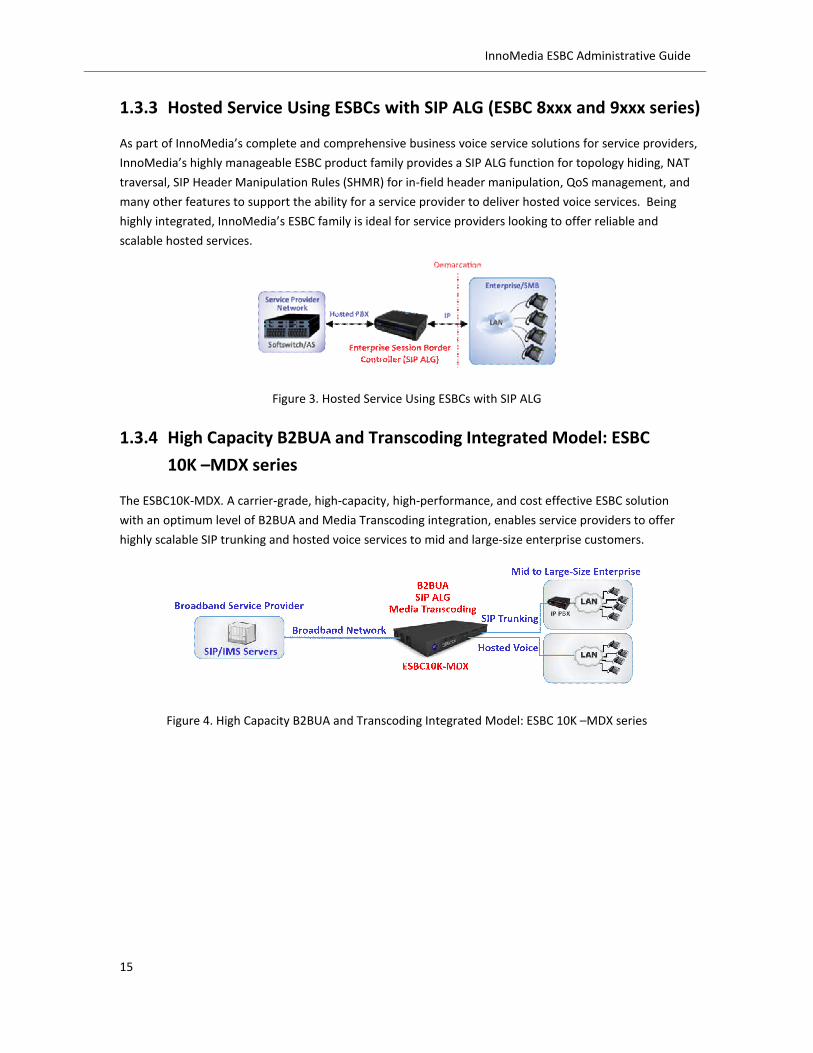
1.3.3 Hosted Service Using ESBCs with SIP ALG (ESBC 8xxx and 9xxx series)
As part of InnoMedia’s complete and comprehensive business voice service solutions for service providers,
InnoMedia’s highly manageable ESBC product family provides a SIP ALG function for topology hiding, NAT
traversal, SIP Header Manipulation Rules (SHMR) for in-field header manipulation, QoS management, and
many other features to support the ability for a service provider to deliver hosted voice services. Being
highly integrated, InnoMedia’s ESBC family is ideal for service providers looking to offer reliable and
scalable hosted services.
Figure 3. Hosted Service Using ESBCs with SIP ALG
1.3.4 High Capacity B2BUA and Transcoding Integrated Model: ESBC
10K –MDX series
The ESBC10K-MDX. A carrier-grade, high-capacity, high-performance, and cost effective ESBC solution
with an optimum level of B2BUA and Media Transcoding integration, enables service providers to offer
highly scalable SIP trunking and hosted voice services to mid and large-size enterprise customers.
Figure 4. High Capacity B2BUA and Transcoding Integrated Model: ESBC 10K –MDX series

16
InnoMedia ESBC Administrative Guide
Model Name WAN
B2BUA
(SIP Trunk)
SIP ALG
(Hosted Service) Transcoding T1/E1 QoS
ESBC8528-4B DOCSIS 2.0 Yes Yes - - Smart-DQoS™
ESBC9528-4B DOCSIS 3.0 Yes Yes - - Smart-DQoS™
ESBC9578-4B DOCSIS 3.0 Yes Yes Yes - Smart-DQoS™
ESBC9580-4B DOCSIS 3.0 Yes Yes - Yes Smart-DQoS™
ESBC8328-4B 10/100BT Yes Yes - - ToS/DSCP
ESBC9328-4B Gigabit Yes Yes - - ToS/DSCP
ESBC9378-4B Gigabit Yes Yes Yes - ToS/DSCP
ESBC9380-4B Gigabit Yes Yes - Yes ToS/DSCP
ESBC-10K-MDX Dual Gigabit Yes Yes Yes ToS/DSCP
ESBC-10K-MD Dual Gigabit Yes Yes No ToS/DSCP
Table 1. The ESBC Product Summary

17
InnoMedia ESBC Administrative Guide
1.4 Capacity and License
The ESBC series platforms support software licenses so that the platform can be upgraded or downgraded
in the field.
The ESBC license number essentially is equivalent to the number of concurrent calls allowed on a system.
Hence, adding licenses increases the maximum number of concurrent calls handled by the device. There is
no need to purchase other license type for registered SIP UAs. Check your ESBC system capacities from
the following page.
Login to the ESBC Administrative web console, and navigate to System > License. (See section 1.7 for
descriptions of login to the console)
Figure 5. Managing the ESBC licenses
License Control Description
Licensed Date The date when license string (or file) was input to the system.
B2BUA Calls The number of concurrent calls for SIP trunk voice service.
SIP ALG Calls The number of concurrent calls for hosted voice service.
Note: The ESBC system maximum capacities are model dependent. See section 5.11 for the maximum
capacities of your ESBC system.

18
InnoMedia ESBC Administrative Guide
1.5 Installing the ESBC9xxx and 8xxx series to an enterprise network
Getting Started. Please refer to the document: InnoMedia ESBC deployment checklist for Voice Service
Deployment.
Figure 6. Hardware interface. The ESBC9580 back panel
Note 1. The ESBC93xx series WAN interface is Gigabit Ethernet; the ESBC95xx WAN interface is a
DOCSIS 3.0 Cable Modem.
Note 2. ESBC WAN and LAN interfaces have to be configured with different networks.
Step 1–Connecting the panel ports.
1. Connect the active RF coaxial cable to the “CABLE” connector (for ESBC 8528/9528/9580) or the RJ-45
cable to the “WAN” connector (for ESBC 8328/9328/9380/9580/9378).
2. Connect the administrator PC to LAN port 1.
3. Connect LAN ports 2, 3, or 4 to the corporate LAN which resides in the same network as the IP PBX or
IP phones. Skip this step for a TDM PBX with E1/T1 connections.
4. Optionally, connect T1/E1 port(s) to a corporate TDM PBX. Please ensure the cable between the
interface port and the PBX is connected correctly. Do not connect to T1/E1 Port 2 unless T1/E1 Port 1
is also connected to the same TDM PBX.
5. Optionally, connect any standard analog phone or fax machine to the “PHONE” connectors, labeled 1-
4.
6. Open the battery compartment and insert the optional battery.
7. Connect included AC power cable to the electrical outlet and its cable to the ESBC’s 12V DC connector.
19
InnoMedia ESBC Administrative Guide
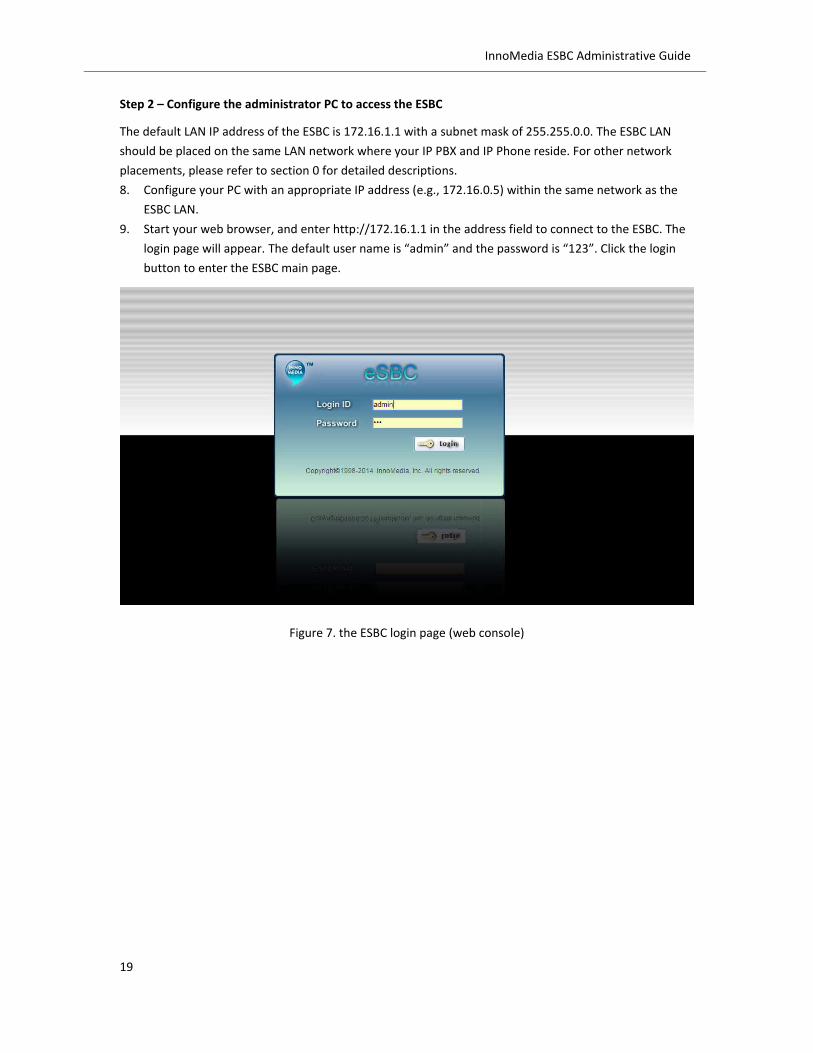
Step 2 – Configure the administrator PC to access the ESBC
The default LAN IP address of the ESBC is 172.16.1.1 with a subnet mask of 255.255.0.0. The ESBC LAN
should be placed on the same LAN network where your IP PBX and IP Phone reside. For other network
placements, please refer to section 0 for detailed descriptions.
8. Configure your PC with an appropriate IP address (e.g., 172.16.0.5) within the same network as the
ESBC LAN.
9. Start your web browser, and enter http://172.16.1.1 in the address field to connect to the ESBC. The
login page will appear. The default user name is “admin” and the password is “123”. Click the login
button to enter the ESBC main page.
Figure 7. the ESBC login page (web console)

20
InnoMedia ESBC Administrative Guide
1.6 Installing the ESBC10K series to an enterprise network
Figure 8. The ESBC 10K back panel
Note 1. The ESBC 10K series support dual WAN interfaces, which support layer 2 redundancy features.
Note 2. LAN1 by default is configured as a management port whose default IP address is
10.10.200.1/255.255.255.0. This logical port is designed for an administrator PC.
Note 3. LAN 2 is the Voice-NAT port whose default IP address is 172.16.1.1/255.255.0.0. This logical port
is designed for telephony services.
Note 4. When the management port is enabled, the administrator PC can access the ESBC10K console
only via LAN1. When the management port is disabled from the web console, LAN1 is disabled.
The administrator PC and telephony devices and equipment connect to LAN2 for management
and telephony services.
Note 5. ESBC WAN and LAN interfaces have to be configured with different networks.
Step 1–Connecting the panel ports.
1. Connect the RJ-45 cable to either the WAN 1 or WAN 2 interfaces. Or connect two cables to WAN1
and WAN 2 respectively. Note that when both WAN ports are used, connect them to 2 different
Ethernet switches.
2. Connect the administrator PC to LAN1.
3. Connect LAN 2 to the corporate LAN which resides in the same network as the IP PBX and/or IP
Phones.
4. Connect included AC power cable to the electrical outlet.
Step 2 – Configure the administrator PC to access the ESBC.
5. Configure your PC with appropriate IP address (i.e., 10.10.200.5) within the same network as the
ESBC management port.
6. Start your web browser, and enter http://10.10.200.1 in the address field to connect to the ESBC. The
login page will appear. The default user name is “admin” and the password is “123”. Click the login
button to enter the ESBC main page.

21
InnoMedia ESBC Administrative Guide
If the management port is disabled, connect your PC NIC to ESBC LAN2, and the login procedure is the
same as that of the ESBC 9xxx series. See section 1.5 for further details.
Start your web browser and enter http://10.10.200.1 (or http://172.16.1.1) in the address field to connect
to the ESBC. The login page will appear. The default user name is “admin” and the password is “123”. Click
the login button to enter the ESBC main page. See Figure 47.

22
InnoMedia ESBC Administrative Guide
1.7 WEB based management (HTTP, HTTPs)
This administrative guide is based on the operation of WEB based management. There are other
supporting management interfaces: CLI, XML, SNMP, Provisioning and EMS, which will be described
briefly in the following sections.
Access the ESBC WEB management console through one the following URLs from a web browser. See
section 2.2 for detailed descriptions of configuring the ESBC Ethernet interfaces.
LAN access:
‒ For ESBC 8xxx/9xxx series, enter http://NAT_VOICE_IP (or http://ESBC_LAN_IP). The default IP
address is 172.16.1.1/16
‒ For the EBSC 10K series, enter http://management_port_IP. The default IP address is
10.10.200.1/24.
WAN access: http://WAN_IP:8080; or https://WAN_IP. (The default configuration of the ESBC WAN
interface is DHCP client.) When the WAN Interface mode is configured as “Multiple Interfaces”, enter
the ESBC IP address assigned to OAMP network.
The default credentials to logon to the WEB management console are: User ID: admin; Password: 123.
When the ESBC management port is configured and enabled, web console access from the NAT_Voice
interface will be disabled. See section 2.4.3.1 for details.
Note: Multiple users are allowed to access the ESBC WEB console simultaneously.
When an admin user who has read/write privileges has logged into the system, other admin users
with different usernames can login to the system simultaneously but with only read-only privilege, or
the second admin user can force the current user to logout by selecting the “override” option.
When an admin user is currently logged in, users with “oper” or “tech” privileges may login to the
system but will have “read–only” privilege.
1.7.1 The Console Home Page: System Overview
Once logged on to the ESBC WEB management console successfully, the dashboard page displays system
configurations and status.

23
InnoMedia ESBC Administrative Guide
Figure 9. The ESBC Home Page
1.7.2 Real Time Activity Monitor
The ESBC provides a real time system activity monitor screen, including Network and Telephony activities.
1.7.2.1 Network Status
This Monitor page displays overall IP connection status. Navigate to Network > Settings > Monitor.

24
InnoMedia ESBC Administrative Guide
Figure 10. Network Connection Status Monitor Page (ESBC 93xx example)
Internet Connection Description
Current Connection Type The mechanism of IP addressing, either DHCP client, or Static IP.
Log Displays the DHCP client connection event history.
Status The layer 3 IP connection status of the WAN interface.
Link Status The layer 2 (data link) connection status of the WAN interface.
MAC address The MAC address of the ESBC Internet Ethernet interface (WAN).
LAN Connection Description
Port 1 ~ 4 Up or Down. Link speed (10, 100, or 1000Mbps), duplex mode (full
or half).
Displays data link connection status for all four LAN ports,
respectively. Each ESBC LAN port can be assigned a different
subscribed service, i.e., NAT-Voice, Bridge, Router, and

25
InnoMedia ESBC Administrative Guide
Management. See section 2.4.2 for details.
NAT and Voice Description
Current Connection Type Static IP or DHCP Client
Status Up or Down
MAC Address The MAC Address of the LAN NIC interface card
IP Address The IPv4 address assigned to the NAT and Voice interface
Netmask The netmask for the enterprise NAT and Voice network
Router Description
IP Address The IPv4 address assigned to the Router interface, if Router port is
enabled on the ESBC.
Netmask The netmask for the enterprise data network.
1.7.2.2 Port Mapping Table
The port mapping table assigned for remote access to hosts residing on the ESBC NAT-Voice network via
the WAN interface (see section 5.10.1).
Note: Port Mapping Table is not available when the WAN interface is configured with multiple logical IP
networks.
Figure 11. The Port Mapping Table
1.7.2.3 Routing Table
Click the <Routing Table > button to view the ESBC network routing information for both Internet and LAN
connections.
Note: Routing Table is not available when the WAN interface is configured with multiple logical IP
networks.

26
InnoMedia ESBC Administrative Guide
Figure 12. Network Routing Table
See section 2.4 for suggestions on LAN side network topology design.
1.7.3 Telephony Activities
Navigate to Telephony > TOOLS > Monitor. Click the associated tab to display the real-time states of SIP
Servers, Lines, and Active calls.
The ESBC admin web GUI page refreshes at configurable interval (default 3 seconds), see section 5.10.1. If
necessary, click the <Refresh> button to get the latest status of the server status information.
1.7.3.1 SIP Server Redundancy
This page displays the enquiry results and status of redundant sip servers, see section 3.1.2.
Figure 13. SIP Redundant Server List
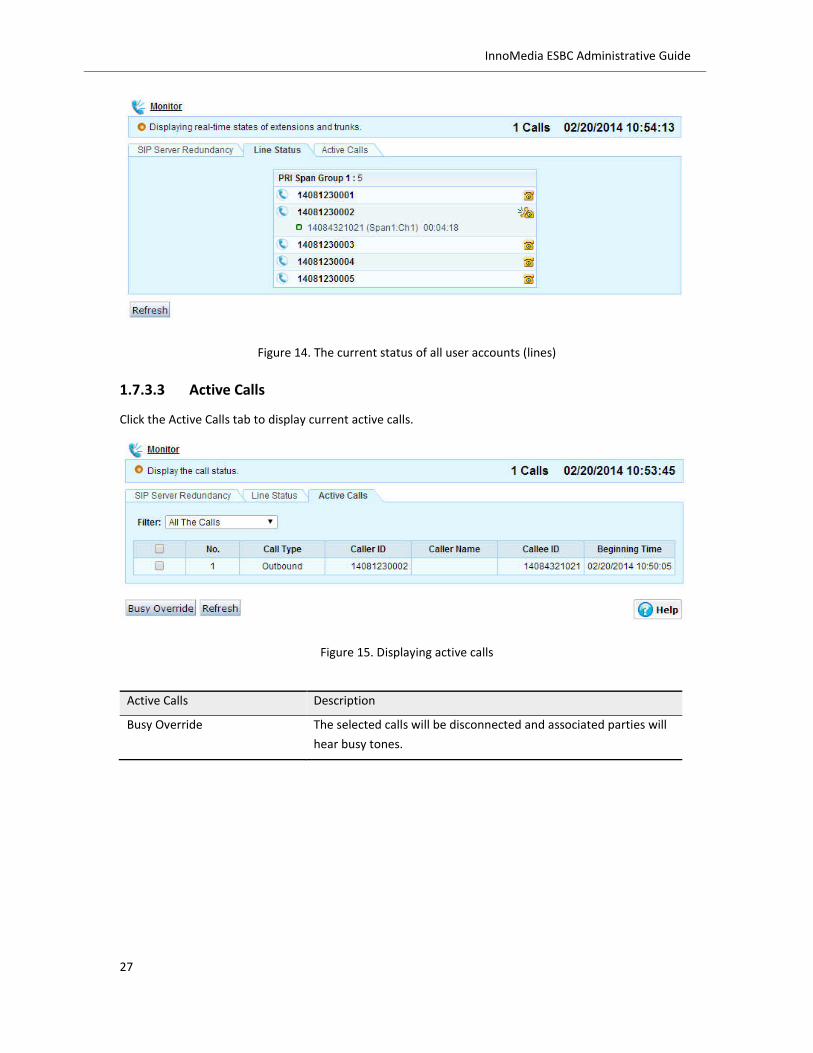
1.7.3.2 Line Status
This page displays the current state of all user accounts configured on the ESBC, as busy or idle states. If in
a busy state, call duration, call type, and peer telephone number are displayed as well.
The upper right corner shows the number of active calls at any particular moment.
27
InnoMedia ESBC Administrative Guide
Figure 14. The current status of all user accounts (lines)
1.7.3.3 Active Calls
Click the Active Calls tab to display current active calls.
Figure 15. Displaying active calls
Active Calls Description
Busy Override The selected calls will be disconnected and associated parties will
hear busy tones.

28
InnoMedia ESBC Administrative Guide
1.8 CLI Based Management
The ESBC supports a CLI (command line interface) based console interface to configure system
parameters.
ESBC 9x, 8x: connecting via SSH and EMS-telnet clients.
ESBC 10K: connecting via SSH and EMS-telnet clients, and also serial console.
The login ID and password are identical to those for WEB console. Once you login to the ESBC CLI console,
the ESBC’s current running version and the LAN IP address are displayed.
Note: If accessing the ESBC CLI console via WAN interface, when the WAN Interface mode is configured as
“Multiple Interfaces, enter the ESBC IP address assigned to OAMP network.
Serial port connection settings (applicable to ESBC-10K only). Connect the serial port (port #1) on the
ESBC-10K back panel to your PC, with speed (baud rate) “115200”, data bits “8”, stop bits “1”, Parity
“None” and Flow control “XON/XOFF”.
Type “?” to get help.
1.8.1 Root mode
Command Description
passwd Change administrator login password (changing password for both
CLI and WEB consoles)
enter [net | system | root] Enter configuration mode
pwd Display the current mode
show version Show running information
help | ? Display command list
reboot Reboot the system
quit Exit from current configuration mode
bye Exit from the CLI console
The following commands can be set under any mode: reboot, quit, bye, help|?, pwd, enter root.
Under any mode, type “?” at the end of each unfinished command followed by <cr> to display
command hint.
1.8.2 net mode
esbc> enter net <cr>
net>
29
InnoMedia ESBC Administrative Guide
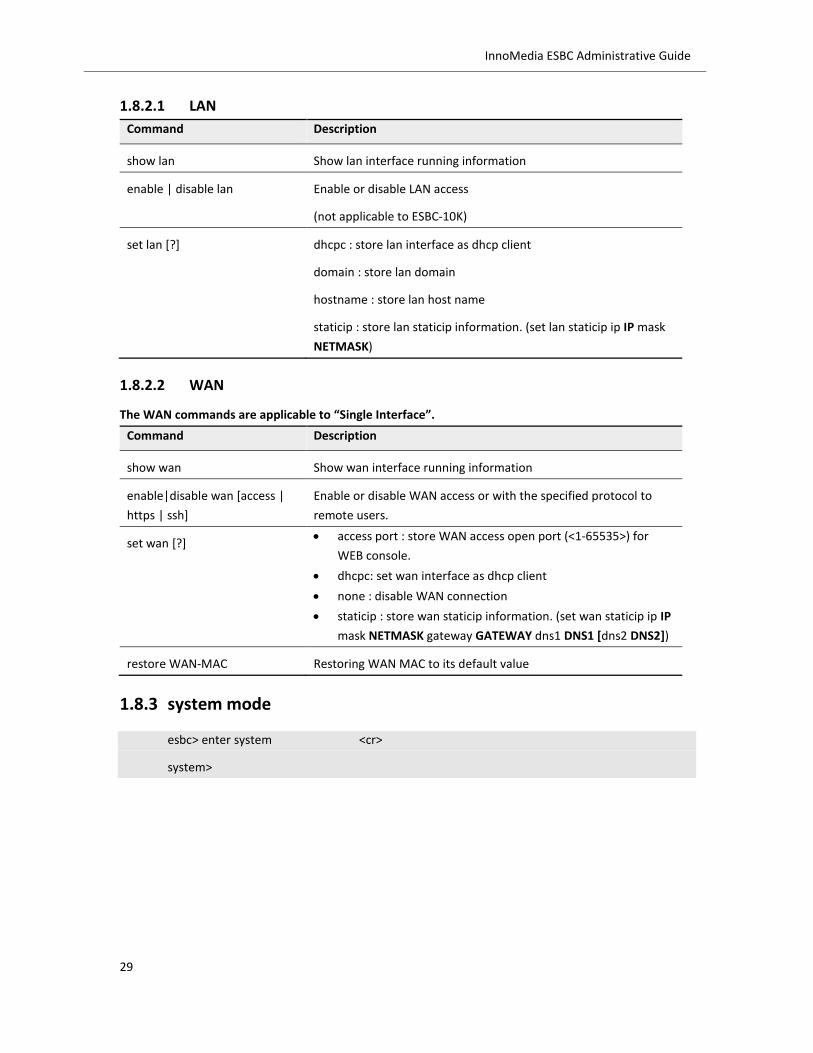
1.8.2.1 LAN
Command Description
show lan Show lan interface running information
enable | disable lan Enable or disable LAN access
(not applicable to ESBC-10K)
set lan [?] dhcpc : store lan interface as dhcp client
domain : store lan domain
hostname : store lan host name
staticip : store lan staticip information. (set lan staticip ip IP mask
NETMASK)
1.8.2.2 WAN
The WAN commands are applicable to “Single Interface”.
Command Description
show wan Show wan interface running information
enable|disable wan [access |
https | ssh]
Enable or disable WAN access or with the specified protocol to
remote users.
set wan [?] access port : store WAN access open port (<1-65535>) for
WEB console.
dhcpc: set wan interface as dhcp client
none : disable WAN connection
staticip : store wan staticip information. (set wan staticip ip IP
mask NETMASK gateway GATEWAY dns1 DNS1 [dns2 DNS2])
restore WAN-MAC Restoring WAN MAC to its default value
1.8.3 system mode
esbc> enter system <cr>
system>

30
InnoMedia ESBC Administrative Guide
1.8.3.1 Provisioning
Command Description
show provisioning Display provisioning configuration
enable|disable provisioning Enable or disable auto-provisioning.
set provisioning [?] server ADDRESS port PORT: set provisioning server IP|FQDN
(up to 40 characters) and port (<1-65535>)
account USERNAME PASSWORD : authentication user name
(up to 40 characters) and password
start provisioning Trigger provisioning process. (provisioning should be enabled)
1.8.3.2 EMS
Command Description
show ems Display EMS configuration
enable|disable ems Enable or disable EMS function
set ems [?] device type VALUE <0-254> : store EMS device type (0-254)
heartbeat type [V2|V3] : store EMS heartbeat type.
key derivation function VALUE (1 | 2) : 1-InnoMedia ; 2-
PBKDF2-sha1.
local port <1-65535> : default 5200
region id ID: store EMS region ID.
server[2] : server ADDRESS port PORT: set EMS server
IP|FQDN (up to 40 characters) and port (<1-65535>)
Note: when “1-InnoMedia” is selected for key derivation function,
please refer to the document for “the use of RC4_102.”
restart ems Restart EMS service
1.8.3.3 PRI (applicable to ESBC-9xxx series)
Command Description
show pri parameters Show adaptive jitter buffer configurations and echo cancellation
status.
enable|disable pri echo cancellation: enable or disable echo cancellation on PRI
trunks.

31
InnoMedia ESBC Administrative Guide
1.8.3.4 Function ID (applicable to ESBC-9xxx series)
The function ID is to set the PCIC card for the ESBC to operate at PRI or SIP B2BUA (transcoding) mode.
Command Description
show function id Display function id of PCIC card.
set function id <3-15> Configure function id for PCIC card. Note, do not change function
id unless you are guided with instructions. Changing to
inappropriate ID number may result in unexpected system
behavior.

32
InnoMedia ESBC Administrative Guide
1.9 SNMP based management
The ESBC’s embedded SNMP agent works with a standard SNMP Manager to operate, maintain and
provision (OAMP) the system. It supports standard and proprietary MIBs (Management Information Base)
which allow the operator to collect information and hence enable a deeper probe into the device.
The ESBC can also send unsolicited events (traps) towards the SNMP manager. All supported MIB files are
supplied for each new ESBC firmware release.
Please refer to section 5.9.1 for all traps for alert notifications.
1.9.1 Trap host configurations
The SNMP Basic Setting page allows you to configure the SNMP trap host based on IP address. The ESBC
SNMP agent accepts GET and SET requests from the configured IP address with correct community strings.
SNMPv1 and SNMPv2 use the notion of communities to establish trust between managers and agents. An
agent is configured with three community strings: read-only, read-write, and trap. The “SNMP Community
string” is like a user id or password that allows access to the ESBC parameters. . If the community string is
correct, the EBSC responds with the requested information. If the community string is incorrect, the ESBC
simply discards the request and does not respond.
1. The SNMP community strings are used on SNMPv1 and SNMPv2 protocol. The SNMPv3 uses
username/password authentication along with an encryption key.
2. The ESBC sends traps to two SNMP trap hosts simultaneously if both IP addresses of Trap Host 1
and Trap Host 2 are configured
Navigate to System > SNMP.

33
InnoMedia ESBC Administrative Guide
Figure 16. Configuring the SNMP Trap Host Information
SNMP Host Description
System Name
System Location
System Contact
Enter the designated values for this deployed ESBC unit. The name
of the ESBC system; the location of deployed premises, the
contact info.
Read Only Community Set the SNMP read only community string. Enabling a remote
device to retrieve “read-only” information from the ESBC. The
default string is set to "public". It is suggested that the network
administrator change all the community strings so that outsiders
cannot see information about the internal network.
Read Write Community SNMP Read-Write community string. Enabling a remote device to
read information from the ESBC and to modify settings. The
default string is set to “private.” It is suggested that the network
administrator change all the community strings so that outsiders
cannot see information about the internal network.
Trap Host1 and Trap Host 2 The SNMP trap host destinations, an IPv4 address. See section
5.9.1 for Trap alarm descriptions.
Trap Host: Community SNMP Trap community string which is used when sending SNMP
Traps to SNMP Trap Host. This community string is different from
the polling (read and read-write) community strings.
Trap Version The notion of communities is applicable to SNMPv1 or SNMPv2.

34
InnoMedia ESBC Administrative Guide
1.9.2 SNMP v3 setup
SNMPv3 provides secure access to devices by a combination of authenticating and encrypting packets
over the network. It includes three important services: authentication, privacy and access control.
You can create users, determine the protocol used for message authentication as well as determine if
data transmitted between two SNMP entities is encrypted. In addition, you can restrict user privileges by
defining which portions of the Management Information Bases (MIB) that a user can view. In this way, you
restrict which MIBs a user can display and modify. In addition, you can restrict the types of messages, or
traps, the user can send.
1.9.2.1 Security Levels in SNMPv3
The ESBC SNMPv3 Agent supports the following set of security levels as defined in the USM MIB (user
security module), RFC 2574.
NoAuth/NoPriv – Communication without authentication and privacy.
Auth/NoPriv – Communication with authentication and without privacy. The protocols used for
Authentication are MD5 and SHA (Secure Hash Algorithm).
AuthPriv – Communication with authentication and privacy.
Configure authentication and privacy for SNMPv3 users as follows.
Figure 17. SNMPv3 Setup page
SNMPv3 Setup Description
User Name The user id.
User Access MIB views. Read-only, or read-write.
Security Level The SNMPv3 security level. Options available: No
Authorization/No privacy, Authorization/No Privacy or
Authorization/Privacy.
Auth. Protocol The SNMPv3 (user-based security module) authorization type to
use. Options available: MD5 or SHA.
Auth. Password The SNMPv3 USM passphrase. Min string length: 8 characters.

35
InnoMedia ESBC Administrative Guide
Priv. Protocol Privacy protocols supported currently are DES or AES.
Priv. Password The SNMPv3 passphrase for encrypting data between two entities.
The string must be at least 8 characters long.
If you choose to not assign a privacy value, then SNMPv3
messages are sent in plain text format.
Action Add, Edit, and Delete.

36
InnoMedia ESBC Administrative Guide
1.10 Email (SMTP) Based Management
The ESBC supports sending Alert Notifications via Emails with SMTP (simple mail transfer protocol). See
section 5.9.2 for Email alarm descriptions.
Navigate to System > SMTP for the Email server settings.
Figure 18. Email based management configuration
SNMPv3 Setup Description
Your Name Enter the name which you would like it to appear on the emails
sent out.
E-Mail Address An email notification will be sent to this email account.
SMTP server Enter the SMTP server IP, or FQDN for outgoing emails.
SMTP server port
Enter the SMTP Server Port. If no SSL connection is required, the
default communication port is 25. Check with your email
administrator for SSL configuration requirements for outgoing
emails.
Logon Information Enter the user name and password which are associated with the
E-Mail address specified above.
Test Account Settings Click this button and the ESBC will send out a test mail to the E-
mail account specified above.

37
InnoMedia ESBC Administrative Guide
1.11 XML config-file based management
Please refer to the ESBC provisioning tag document for detailed descriptions of all tags and sample
configuration files.
The XML configuration file is a text-based file (which can be edited with, for example, notepad) that
contains any number of provisioning tags (parameters). The XML configuration file can be imported to the
ESBC via the following methods:
Auto-provisioning. (See section 1.12 for a detailed description)
XML config import from the WEB administrative console. (See section 5.4.3 for a detailed
description.)
See section 5.4 for the ESBC configuration backup.

38
InnoMedia ESBC Administrative Guide
1.12 Auto-Provisioning based management
1.12.1 Basic Provisioning Mechanism Configurations
The ESBC supports auto-provisioning based management features which allow the provisioning of user
accounts, service features, system capacity, and upgrading system firmware through auto-provisioning
servers.
Provisioning Method: DHCP | TFTP | HTTP | HTTPS | SecHTTP
Supported configuration file formats: XML | INI
Please refer to the ESBC provisioning tag document for detailed descriptions of all tags and sample
configuration files.
Navigate to System > Provisioning.
Figure 19. Auto Provisioning Management
The use of the supported provisioning methods is described in the following sections.
1.12.1.1 DHCP Provisioning Method
The ESBC supports auto provisioning mechanism by utilizing DHCP Options 66 and Option 67
39
InnoMedia ESBC Administrative Guide
When DHCP Provisioning Method is selected, the ESBC Internet Connection has to be configured as
DHCP client.
DHCP Option 66 only: Specify provisioning server IP address (or host name) together with the
complete provisioning URL, e.g., “protocol://host:port/path/prov_file_name.” The protocol used can
be TFTP, HTTP, or HTTPS.
URL1 http://provision.example.org:8080/Config_Path/$MAC_Config.xml
URL2 tftp://provision.example.org/Config_Path/$MAC_Config.ini
DHCP Option 66 with Option 67. Use Option 66 to specify the TFTP IP address or host name, and
Option 67 for the config file path and name. The protocol used is TFTP.
DHCP Option 66 – provision.example.org
DHCP Option 67 – config/$MAC_config.xml
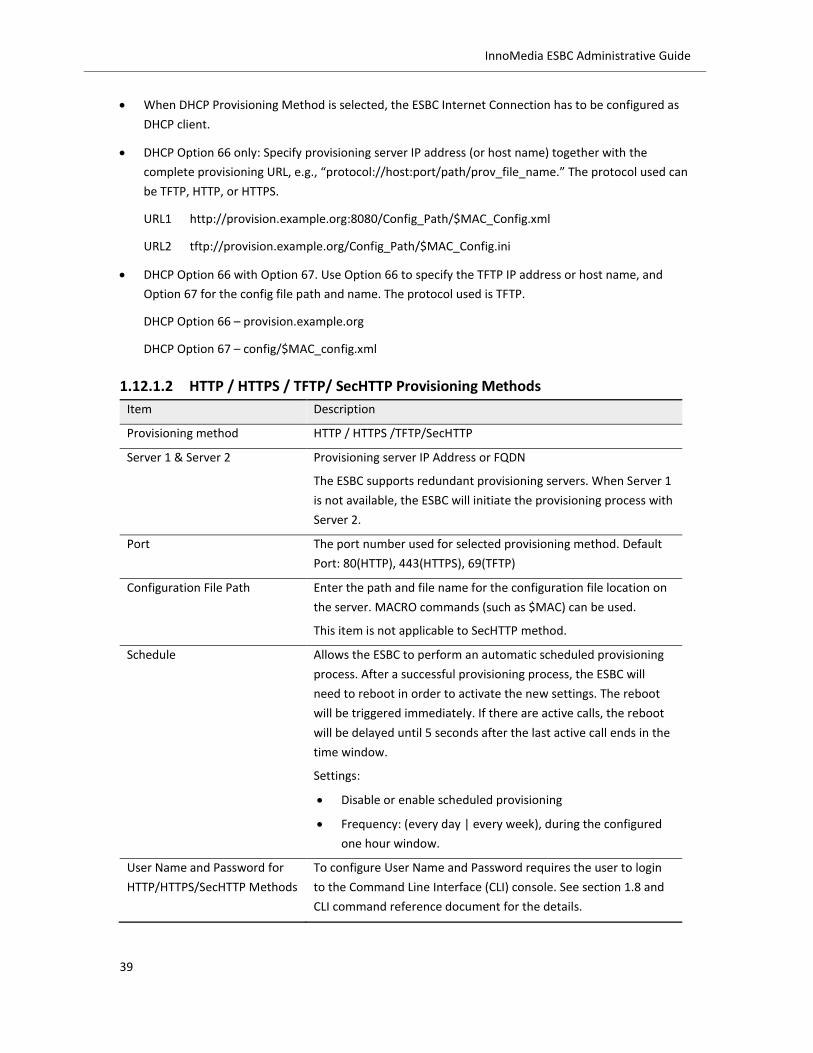
1.12.1.2 HTTP / HTTPS / TFTP/ SecHTTP Provisioning Methods
Item Description
Provisioning method HTTP / HTTPS /TFTP/SecHTTP
Server 1 & Server 2 Provisioning server IP Address or FQDN
The ESBC supports redundant provisioning servers. When Server 1
is not available, the ESBC will initiate the provisioning process with
Server 2.
Port The port number used for selected provisioning method. Default
Port: 80(HTTP), 443(HTTPS), 69(TFTP)
Configuration File Path Enter the path and file name for the configuration file location on
the server. MACRO commands (such as $MAC) can be used.
This item is not applicable to SecHTTP method.
Schedule Allows the ESBC to perform an automatic scheduled provisioning
process. After a successful provisioning process, the ESBC will
need to reboot in order to activate the new settings. The reboot
will be triggered immediately. If there are active calls, the reboot
will be delayed until 5 seconds after the last active call ends in the
time window.
Settings:
Disable or enable scheduled provisioning
Frequency: (every day | every week), during the configured
one hour window.
User Name and Password for
HTTP/HTTPS/SecHTTP Methods
To configure User Name and Password requires the user to login
to the Command Line Interface (CLI) console. See section 1.8 and
CLI command reference document for the details.

40
InnoMedia ESBC Administrative Guide
Note. SecHTTP is a proprietary provisioning protocol which is used
for communicating with the InnoMedia EMS server. If this
provisioning method is selected, it is necessary to use the rc4-102
encryption utility (InnoMedia proprietary) to encrypt the config
file. Please refer to the document “the use of rc4-102 utility.”
1.12.2 Server Initiated Provisioning: SIP NOTIFY
The ESBC supports an unsolicited SIP NOTIFY to perform requested operations from the SIP server.
Event: reboot | resync | report
reboot: the ESBC reboots itself and re-fetches the config file from the provisioning server.
resync: the ESBC re-fetches the config file from the provisioning server without rebooting.
report: the ESBC sends its profile to the specified FTP server as configured in Figure 20.
Figure 20. The SIP Notify Configuration—server initiated provisioning
1.12.3 Log
“Log” tab to view the image/configuration file changes of this ESBC unit.

41
InnoMedia ESBC Administrative Guide
Figure 21. Provisioning Log
Click <XML Log> button to view tag-parameter updates for the latest provisioning event.
Click <Export> to export the current page view to text file.
Click <Refresh> to refresh the page view, and click <Clear> button to clear all records.

42
InnoMedia ESBC Administrative Guide
1.12.4 EMS based management
InnoMedia EMS (element management system) is a scalable and fully redundant solution covering
OAM&P features such as device auto-provisioning and device management functions (via SNMP).
Auto-Provisioning protocols supported on the EMS: HTTP | SecHTTP | TFTP
EMS generates device-dependent configuration files on the fly, providing maximum flexibility for the
provisioned device with per device parameters.
Device Management: the EMS allows a service provider’s customer service and maintenance personnel to
provide effective device management, trouble-shooting and statistics collection, all from an easy-to-use
and secure browser interface. It is possible to access the web console of a particular ESBC unit through
the EMS administrative console. The EMS system is able to manage and communicate with devices even
if they are behind a NAT router.
Note that the EMS voice loopback test cannot be performed when the ESBC WAN interface is configured
with multiple IP networks for both voice and OAMP services and EMS is in the OAMP service network,
Navigate to System > EMS.
Figure 22. InnoMedia EMS server configuration
EMS Server settings Description
Enabled Check this box to enable management via an EMS server.
Device Type The device type ID defined in the EMS server to categorize
connected devices by models. Check with the EMS administrator
to input the desired value for your deployed CPE units.
When the value of Device Type is not available at the initial setup

43
InnoMedia ESBC Administrative Guide
stage, set the value to 255 which is the factory default value. The
ESBC will communicate with the EMS server by sending its model
related system information to the EMS server through a heartbeat
message, and obtain its configured device type automatically after
registering to the EMS successfully.
This requires the EMS to also have this feature enabled.
EMS Server 1
EMS Server 2
The ESBC supports geographically redundant EMS servers. Server 1
is the active server, and server 2 is the backup. Enter EMS IP (or
FQDN), and port information. The communication port for EMS is
5200 by default. If the active EMS server is down, the ESBC
automatically switches to the backup server.
Local EMS port The communication port for EMS is 5200 by default. Check with
your service provider for any different configurations.
Region ID The deployed region ID defined in the EMS server to categorize
connected devices by regions. Check with the EMS administrator
to input the desired value for your deployed CPE units.
When the value of Region ID is not available at the initial setup
stage, set the value to 100000 which is the factory default value.
The ESBC will communicate with the EMS server by sending its
model related system information to the EMS server through a
heartbeat message, and obtain its configured Region ID
automatically after registering to the EMS successfully.
This requires the EMS to also have this feature enabled.
Heartbeat Type The InnoMedia proprietary keep-alive protocol communicating
between CPEs and the EMS.

44
InnoMedia ESBC Administrative Guide
2 The ESBC Network requirements and configurations
Login to the ESBC web console via the LAN VoIP-NAT port interface (see section 1.7 ) to configure the
ESBC WAN interface. This is required to access the operator’s network (and vice versa). Note that
updating the WAN IP address can only be performed via LAN interface.
The WAN interface is used to route traffics generated by the ESBC itself and from the LAN networks with
the service provider networks. Traffic types include: voice signal and media, OAMP data, and LAN network
data in general.
2.1 Determining the network requirements for voice services
2.1.1 Understand the network factors which affect quality of service
Identifying the network connectivity requirements is the key to the success of voice service deployment. It
is necessary for the IP WAN and LAN to provide networks that meet the requirements for toll-quality
service. It is important to identify the following factors which affect the quality of services and service
level agreements.
Bandwidth
Latency
Jitter
Packet Loss
2.1.1.1 Bandwidth Requirement
The amount of bandwidth for voice calls depends on these factors:
Number of concurrent calls |The codec used for voice communications |Signaling overheads
These protocol header assumptions are used for calculations:
Headers: 40 Bytes overall consisting of IPv4 (20 Bytes)/ UDP (8 Bytes) / RTP (12 Bytes)
38 Bytes for fixed Ethernet headers
Voice codecs G.711 G.729
Sampling rate 8 kHz 8 kHz
Effective sample size 8 bits 1 bit
Data rate 64 kbps 8 kbps
Bandwidth consumption for one way voice
Codec Bit rate Packetization Payload size Ethernet

45
InnoMedia ESBC Administrative Guide
period (ptime) bandwidth
G.711 64 kbps 20 ms 1280 bits 95.2 Kbps
G.729 8K bps 20 ms 160 bits 39.2 Kbps
PPS (packet per sec) = (Sampling rate) / (sample period)
Voice payload size = Data rate / PPS
Total packet size = (IP/UDP/RTP header) + (voice payload size) + (fixed Ethernet overhead)
Bandwidth consumption for one way voice= (Total packet size) * PPS
2.1.1.2 Latency
Latency is one way delay from “mouth to ear”. It comprises the following processes:
Time required to sampledigitize (or encode) and packetize the sender’s voice
Time required to send the packet over the IP network
De-packetization, decoding and relaying the speech to the receiving party
2.1.1.3 Jitter
Jitter is the variation of latency across the network and the variation in the timing of packet processing
inside the devices. To compensate for jitter, modern devices usually utilize an adaptive jitter buffer.
However, high levels of jitter can cause packets to be discarded by the jitter buffer at the receiver, and
also increase latency as the jitter buffer adapts.
2.1.1.4 Packet Loss
The human ear is very good at handling the short gaps that are typical of packet loss. So it may take a
significant amount of packet loss for the user to be significantly affected by packet loss to report it. On the
other hand, fax and modem calls are particularly sensitive to packet loss, almost demanding 0% packet
loss to avoid problems with fax/modem transmission.
There are two types of packet loss in a VoIP system: received packet loss, and received packet discard.
Received packet loss is where a packet is never delivered to the receiving system; while receiving packet
discard is where a packet is received after a time when it is not useable for generating audio playback.
Packets could be dropped somewhere in the network causing received packet loss, or packets could be
delayed somewhere in the network causing received packet discard. Network issues could include:
A poor link causing packet errors which may vary by time of day or load.
Network congestion causing the router or switch buffer to overflow or produce high jitter.

46
InnoMedia ESBC Administrative Guide
A transient network problem. Packets will get dropped if a valid alternate path is not immediately
available.
2.2 Dual WAN Redundancy
The InnoMedia ESBC offers a redundant WAN interface to allow a backup network to take over the Voice
and Data Internet connection in the event of a failure on the primary interface. Two interfaces can be
configured to act as a redundant pair, i.e., the primary and secondary interfaces.
The ESBC WAN redundancy feature utilizes two separate interfaces which connect to two different
physical routes (networks) respectively. The ESBC WAN physical interface, either through the WAN
Ethernet port (ESBC93xx) or the embedded cable modem (ESBC95xx) connects to the primary network.
The backup WAN interface, if enabled, is selected from one of the LAN Ethernet ports, and connects to
the standby network. The ESBC constantly monitors the availability of the primary network, and
automatically switches to the secondary interface if the primary is determined unreachable. Once the
primary network comes back online, the ESBC can be configured to automatically revert the service back
to the primary (under Revertive mode), or can be switched back under a Manual Switchover action being
triggered by the administrator.
Applicable models: ESBC9380, ESBC9378, ESBC9328, ESBC9580, ESBC9528, and ESBC9578.
Note: The WAN redundancy feature is not available when the WAN interface is configured in “Multiple
Interfaces” mode. See section 2.3 for more details.
Figure 23. The ESBC WAN Redundancy Topology
2.2.1 The Configuration of Redundant WAN
2.2.1.1 Enable the Backup WAN port
To enable the WAN Redundancy feature, navigate to the LAN Interface page and select one Ethernet LAN
port as the WAN Backup port.
Network > Advanced > LAN Interfaces.
After selecting the WAN Backup port, click the <Apply> button. A warning message pops up as a reminder
that the ESBC needs to reboot in order for this configuration to take effect.
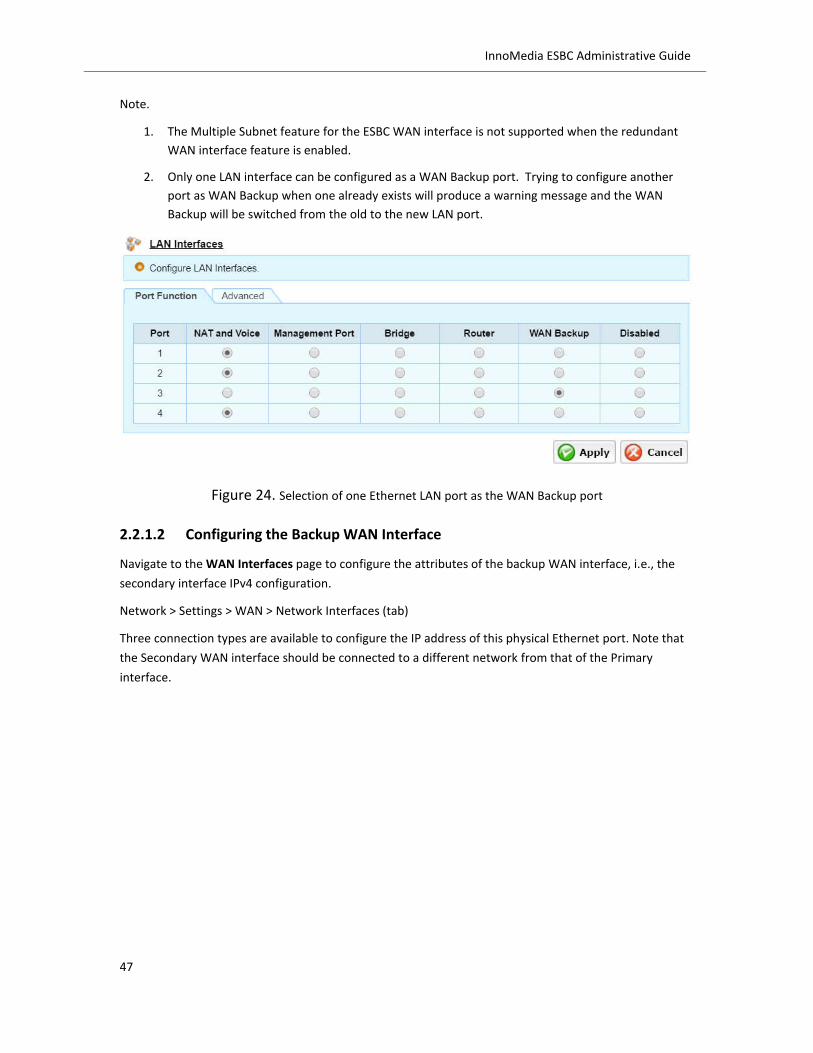
47
InnoMedia ESBC Administrative Guide
Note.
1. The Multiple Subnet feature for the ESBC WAN interface is not supported when the redundant
WAN interface feature is enabled.
2. Only one LAN interface can be configured as a WAN Backup port. Trying to configure another
port as WAN Backup when one already exists will produce a warning message and the WAN
Backup will be switched from the old to the new LAN port.
Figure 24. Selection of one Ethernet LAN port as the WAN Backup port
2.2.1.2 Configuring the Backup WAN Interface
Navigate to the WAN Interfaces page to configure the attributes of the backup WAN interface, i.e., the
secondary interface IPv4 configuration.
Network > Settings > WAN > Network Interfaces (tab)
Three connection types are available to configure the IP address of this physical Ethernet port. Note that
the Secondary WAN interface should be connected to a different network from that of the Primary
interface.
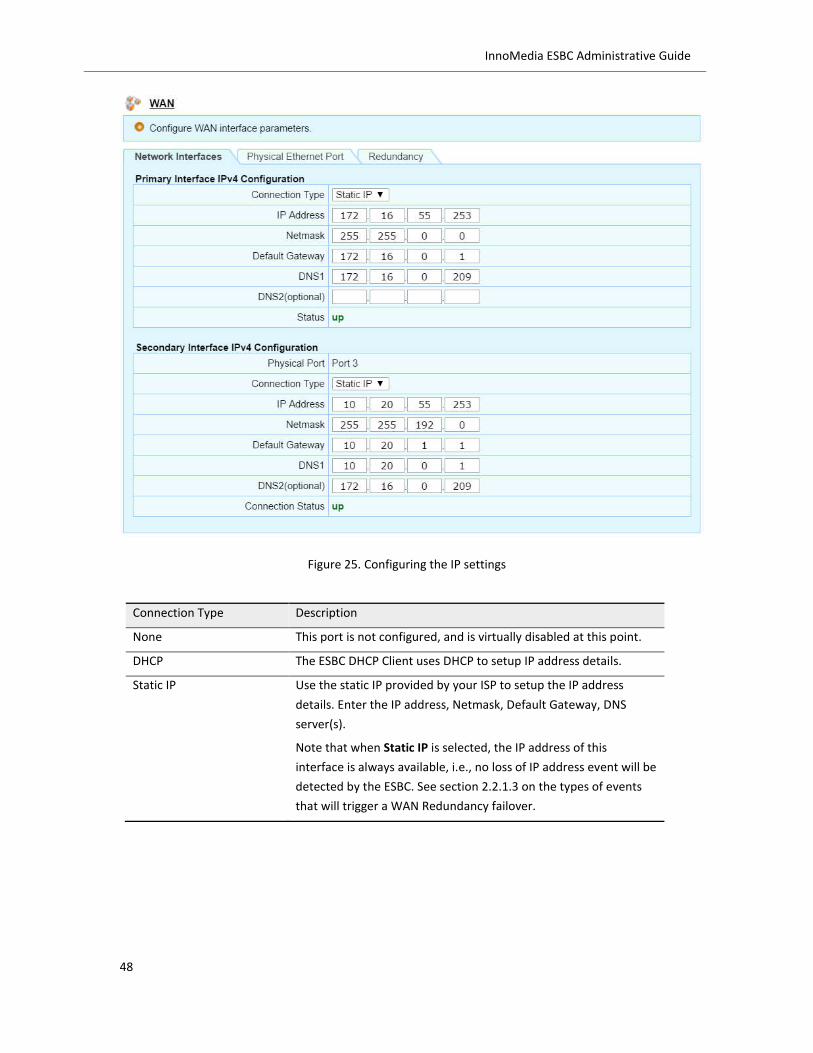
48
InnoMedia ESBC Administrative Guide
Figure 25. Configuring the IP settings
Connection Type Description
None This port is not configured, and is virtually disabled at this point.
DHCP The ESBC DHCP Client uses DHCP to setup IP address details.
Static IP Use the static IP provided by your ISP to setup the IP address
details. Enter the IP address, Netmask, Default Gateway, DNS
server(s).
Note that when Static IP is selected, the IP address of this
interface is always available, i.e., no loss of IP address event will be
detected by the ESBC. See section 2.2.1.3 on the types of events
that will trigger a WAN Redundancy failover.

49
InnoMedia ESBC Administrative Guide
2.2.1.3 WAN Redundancy Settings
The ESBC WAN Redundancy feature utilizes two separate interfaces which connect to two different
networks (routes). If a communication failure is detected on the primary network, the ESBC automatically
switches to the secondary network to ensure reliable voice services.
The ESBC detects network availability according to three factors:
The physical Ethernet link status (for ESBC93xx), or the connection status between the
embedded CM and CMTS (for ESBC95xx).
The availability of the WAN IP address
The network or route accessibility through a ping detection capability
If the ESBC is connected to the secondary network, there are two options for the ESBC to failback to the
primary network once it detects the primary network comes back online:
Automatic failback by enabling Revertive Mode, and
Manual Switchover.
These two options are described in sections 2.2.1.4 and 2.2.1.5.
2.2.1.4 Monitor WAN availability
Navigate to the Monitor screen once the Primary and Secondary interfaces are configured and connected
to their respective networks.
Navigate to Network > Settings > Monitor.
Figure 26. The dual WAN interface real time status monitor

50
InnoMedia ESBC Administrative Guide
WAN Physical Port Description
MAC Address The MAC address of the physical WAN interface.
Link Status Only applicable to the ESBC93xx models where the WAN interface is an
Ethernet link.
The physical connection status between the ESBC WAN port and its
directly connected switch port.
Link up/down status
Speed
Duplex mode
Dual WAN Interfaces
Description
Primary and Secondary Networks
Physical Port Primary: WAN
Secondary: the selected port number from one of the four LAN
Interfaces.
Connection Type DHCP Client | Static IP | None
Status up | down
Connection Type – DHCP Client: Status shows “up” as long as the
physical link connection is good to the directly connected switch
port AND the ESBC is able to obtain an IP address from the DHCP
server. Shows “down” otherwise.
Connection Type – Static IP: Status shows “up” as long as the
physical link connection is good to the directly connected switch
port. Shows “down” otherwise.
Connection Type – None: Status always shows “down”.
IP Address | Default
Gateway | DNS1 | DNS2
The IP address and network information for this particular
interface.
Current Active Interface Primary | Secondary.
The current active interface providing voice & data services.
Primary: When the primary network is up and running.
Secondary: When the Primary network is not reachable, the ESBC
uses the Secondary interface.
Manual Switch Over Trigger the action of manually switching the current active
interface to another.
Refer to section 2.2.1.5 for the ‘Revertive Mode’ setting which
allows automatic failback.

51
InnoMedia ESBC Administrative Guide
Figure 27. Status ‘down’ vs. physical link ‘up’
In the particular example shown in Figure 27, LAN Port 3 is selected as the WAN Backup port. This backup
WAN interface is configured as a DHCP client. When the secondary network has issues and the ESBC
cannot obtain an IP address from the network DHCP server, the Status of the Secondary Interface shows
‘down,’ even though the physical LAN port 3 is still up, i.e., the physical wire connection is still good.
2.2.1.5 Configuring the Redundancy and Failover Settings
Navigate to the Redundancy page to configure the physical link detection and layer 3 ping detection to
determine the availability of the network connection for the primary and secondary interfaces.
Navigate to Network > Settings > WAN > Redundancy (tab)

52
InnoMedia ESBC Administrative Guide
Figure 28. Configuring redundancy and failover settings
Redundancy Description
Enable Revertive Mode Enable Revertive Mode. If the ESBC is using the secondary interface,
this setting allows the ESBC to revert back to the primary interface
automatically, as soon as the ESBC detects the primary interface
connection is back online, i.e., network reachability for the primary
interface changes from unavailable to available.
Note: If the operator manually switches the active interface to the
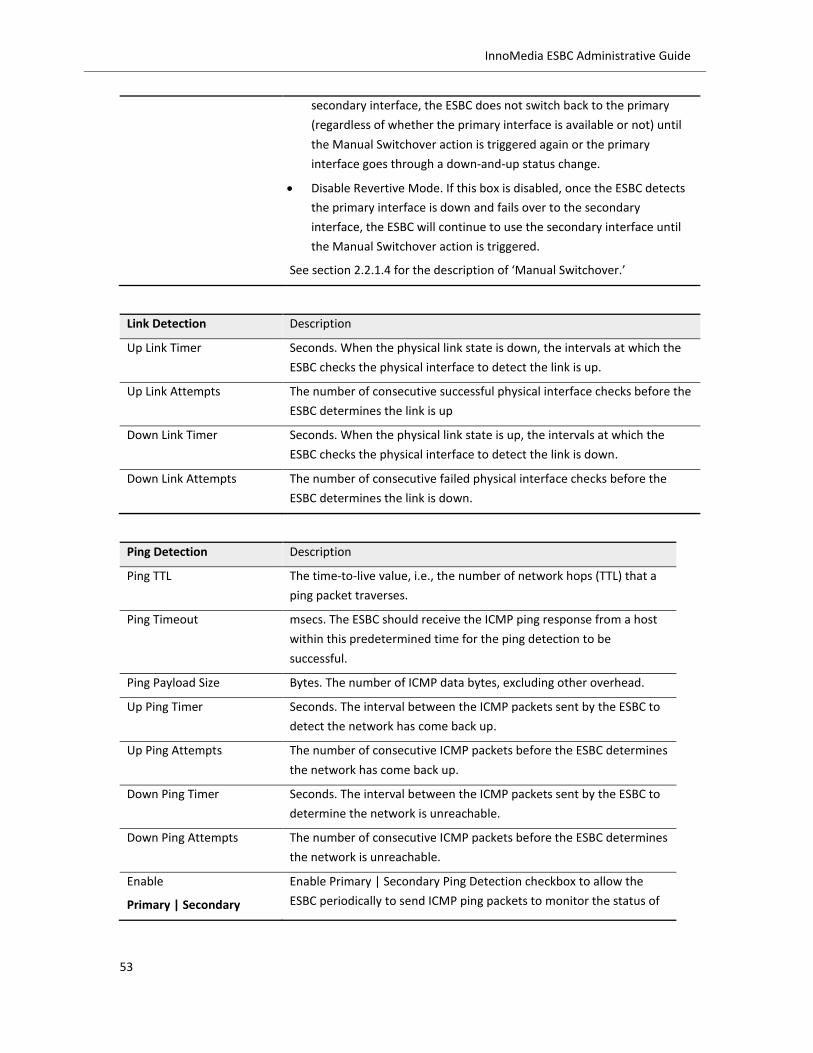
53
InnoMedia ESBC Administrative Guide
secondary interface, the ESBC does not switch back to the primary
(regardless of whether the primary interface is available or not) until
the Manual Switchover action is triggered again or the primary
interface goes through a down-and-up status change.
Disable Revertive Mode. If this box is disabled, once the ESBC detects
the primary interface is down and fails over to the secondary
interface, the ESBC will continue to use the secondary interface until
the Manual Switchover action is triggered.
See section 2.2.1.4 for the description of ‘Manual Switchover.’
Link Detection Description
Up Link Timer Seconds. When the physical link state is down, the intervals at which the
ESBC checks the physical interface to detect the link is up.
Up Link Attempts The number of consecutive successful physical interface checks before the
ESBC determines the link is up
Down Link Timer Seconds. When the physical link state is up, the intervals at which the
ESBC checks the physical interface to detect the link is down.
Down Link Attempts The number of consecutive failed physical interface checks before the
ESBC determines the link is down.
Ping Detection Description
Ping TTL The time-to-live value, i.e., the number of network hops (TTL) that a
ping packet traverses.
Ping Timeout msecs. The ESBC should receive the ICMP ping response from a host
within this predetermined time for the ping detection to be
successful.
Ping Payload Size Bytes. The number of ICMP data bytes, excluding other overhead.
Up Ping Timer Seconds. The interval between the ICMP packets sent by the ESBC to
detect the network has come back up.
Up Ping Attempts The number of consecutive ICMP packets before the ESBC determines
the network has come back up.
Down Ping Timer Seconds. The interval between the ICMP packets sent by the ESBC to
determine the network is unreachable.
Down Ping Attempts The number of consecutive ICMP packets before the ESBC determines
the network is unreachable.
Enable
Primary | Secondary
Enable Primary | Secondary Ping Detection checkbox to allow the
ESBC periodically to send ICMP ping packets to monitor the status of

54
InnoMedia ESBC Administrative Guide
Ping Detection the associated interface.
At most three hosts (IP addresses or FQDNs) can be configured for
each interface. It is recommended that hosts are selected which
reside in remote networks, i.e., not in the network directly connected
to the WAN interfaces. As long as the ESBC receives ping responses
from one host, the ESBC will determine that the associated interface
is in an up state.
Overall, the ESBC will make a determination on whether an interface is “down” and switch to the
other interface if:
1. Physical link is detected to be down OR
2. No WAN IP address OR
3. The ping detection status is “down”
2.2.2 Changes to ESBC services when WAN redundancy mode is enabled
Once the redundant WAN port is enabled, this will result in some changes to the availability of certain
features:
WAN port VLAN feature is not supported
Multiple logical IP network service model is not supported
Voice-NAT & Management ports are supported
Bridge & Router ports are supported and they are mapped to the primary interface only.
The following services are available on both the primary and secondary interfaces
simultaneously:
- ACL
- WAN WEB console access
- WAN SSH console access
- Allow Ping to the ESBC WAN Interface
- SNMP (walk|get|set)
The following services are available on the current active interface:
- Network diagnostics
- PPTP server
- Syslog
- SNMP Trap

55
InnoMedia ESBC Administrative Guide
- Provisioning
- SNTP
- Auto Back
- EMS
The following services are only applicable on the primary interface.
- Bridge port
- Router port
- Access Control for LAB host data services
- DNS proxy
- Port forwarding
- DMZ

56
InnoMedia ESBC Administrative Guide
2.3 Single and Multiple logical IP network service models
The ESBC supports the following two deployment architectural models.
Single IP network interface. With this mode, configuring a single IP address to the ESBC WAN port for
routing all types of traffics which are generated by the ESBC and from the LAN networks, to/from the
service provider networks. (see section 2.3.1.1)
Multiple logical IP network interfaces. With this mode, configuring multiple IP networks to the ESBC
WAN port and route separately OAMP and Voice (signaling and media) traffics to different network
segments for security, administration, and QoS quests. This can be achieved by adopting both VLAN
(layer 2) and IP subnet (layer 3) logics. (see 2.3.1.4) This feature is available on the ESBC93xx models.
OAMP traffics include operational data from administrative consoles (WEB/CLI), EMS, provisioning, syslog,
SNMP, and etc. Voice Signaling + Media traffics includes SIP, and RTP/RTCP packets.
2.3.1.1 Single IP Network Interface
A single IP address is configured for the ESBC WAN port for routing all types of traffic between the service
provider network and the ESBC itself and its LAN ports.
When a single interface is selected, “Connection Type” and “VLAN” tagging features are available for
separate traffic types.
The ESBC assigns VLAN tags to WAN traffic, which provides application-level control over VLAN
connections.
Navigate to Network > Settings > WAN. Choose Single Interface mode.
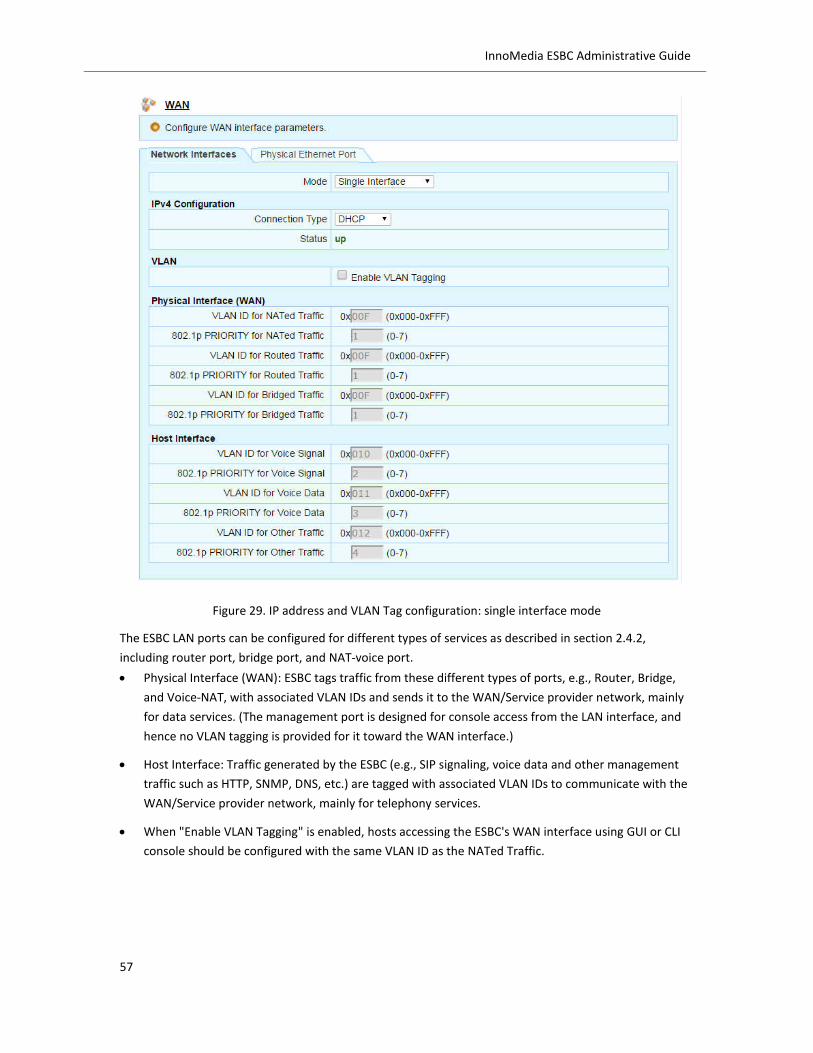
57
InnoMedia ESBC Administrative Guide
Figure 29. IP address and VLAN Tag configuration: single interface mode
The ESBC LAN ports can be configured for different types of services as described in section 2.4.2,
including router port, bridge port, and NAT-voice port.
Physical Interface (WAN): ESBC tags traffic from these different types of ports, e.g., Router, Bridge,
and Voice-NAT, with associated VLAN IDs and sends it to the WAN/Service provider network, mainly
for data services. (The management port is designed for console access from the LAN interface, and
hence no VLAN tagging is provided for it toward the WAN interface.)
Host Interface: Traffic generated by the ESBC (e.g., SIP signaling, voice data and other management
traffic such as HTTP, SNMP, DNS, etc.) are tagged with associated VLAN IDs to communicate with the
WAN/Service provider network, mainly for telephony services.
When "Enable VLAN Tagging" is enabled, hosts accessing the ESBC's WAN interface using GUI or CLI
console should be configured with the same VLAN ID as the NATed Traffic.
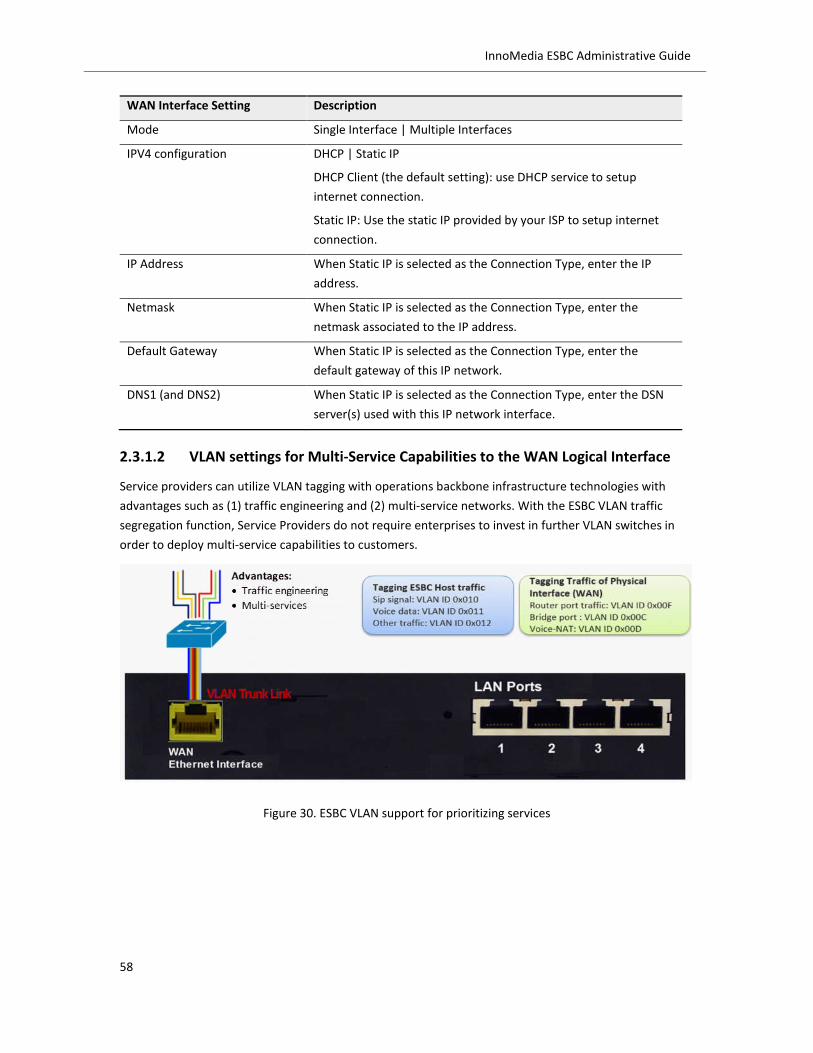
58
InnoMedia ESBC Administrative Guide
WAN Interface Setting Description
Mode Single Interface | Multiple Interfaces
IPV4 configuration DHCP | Static IP
DHCP Client (the default setting): use DHCP service to setup
internet connection.
Static IP: Use the static IP provided by your ISP to setup internet
connection.
IP Address When Static IP is selected as the Connection Type, enter the IP
address.
Netmask When Static IP is selected as the Connection Type, enter the
netmask associated to the IP address.
Default Gateway When Static IP is selected as the Connection Type, enter the
default gateway of this IP network.
DNS1 (and DNS2) When Static IP is selected as the Connection Type, enter the DSN
server(s) used with this IP network interface.
2.3.1.2 VLAN settings for Multi-Service Capabilities to the WAN Logical Interface
Service providers can utilize VLAN tagging with operations backbone infrastructure technologies with
advantages such as (1) traffic engineering and (2) multi-service networks. With the ESBC VLAN traffic
segregation function, Service Providers do not require enterprises to invest in further VLAN switches in
order to deploy multi-service capabilities to customers.
Figure 30. ESBC VLAN support for prioritizing services
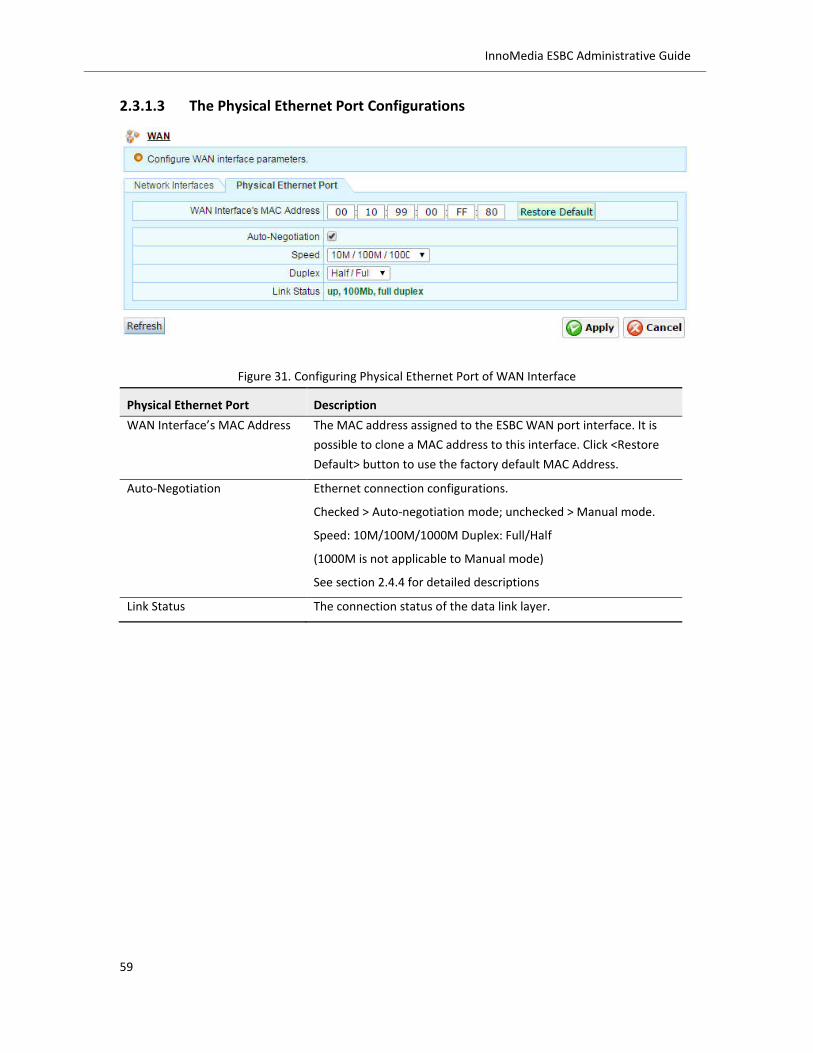
59
InnoMedia ESBC Administrative Guide
2.3.1.3 The Physical Ethernet Port Configurations
Figure 31. Configuring Physical Ethernet Port of WAN Interface
Physical Ethernet Port Description
WAN Interface’s MAC Address The MAC address assigned to the ESBC WAN port interface. It is
possible to clone a MAC address to this interface. Click <Restore
Default> button to use the factory default MAC Address.
Auto-Negotiation Ethernet connection configurations.
Checked > Auto-negotiation mode; unchecked > Manual mode.
Speed: 10M/100M/1000M Duplex: Full/Half
(1000M is not applicable to Manual mode)
See section 2.4.4 for detailed descriptions
Link Status The connection status of the data link layer.

60
InnoMedia ESBC Administrative Guide
2.3.1.4 Multiple logical IP networks (available on the ESBC 93xx models)
The InnoMedia ESBC 93xx model series supports one physical WAN interface to accommodate either
SINGLE or MULTIPLE logical network configurations.
Multiple logical IP network interfaces. With this mode, multiple IP addresses can be configured for
different subnets on the ESBC WAN port, separating OAMP and Voice (signaling and media) traffic onto
different network segments. This can be achieved by employing layer-2 VLANs together with layer-3
broadcast network domains. The separation of traffic types at both layer-2 and layer-3 facilitates policy
control with regard to service security requirements and QoS management.
1. Security requirements. Voice and OAMP traffic on the WAN interface can be segregated using both
Layer 2 VLANs and Layer 3 broadcast network domains. Therefore, voice traffic is routed directly
to/from the service provider’s voice network to the “ESBC WAN-Voice interface” on a particular
network interface which is managed to ensure no external access. On the other hand, OAMP traffic
may be from the open Internet or from a separate managed network. OAMP traffic (which may
include web GUI access, provisioning, SNMP, etc.) is routed via a different WAN-OAMP interface.
Therefore, in this case, it may be easier to avoid SIP attacks on the ESBC voice-WAN interface. This
may then allow security configurations (such as SIP firewall rules and access control lists) to be greatly
simplified in attempting to mitigate the effects of sip attacks.
2. QoS management. QoS parameters and routing policy are often very different for Voice and OAMP
traffic. A more flexible network topology and traffic management methodology can, therefore, often
be achieved through the use of multiple network interfaces.
Figure 32. Multiple subnet architecture example for SIP Trunk voice service
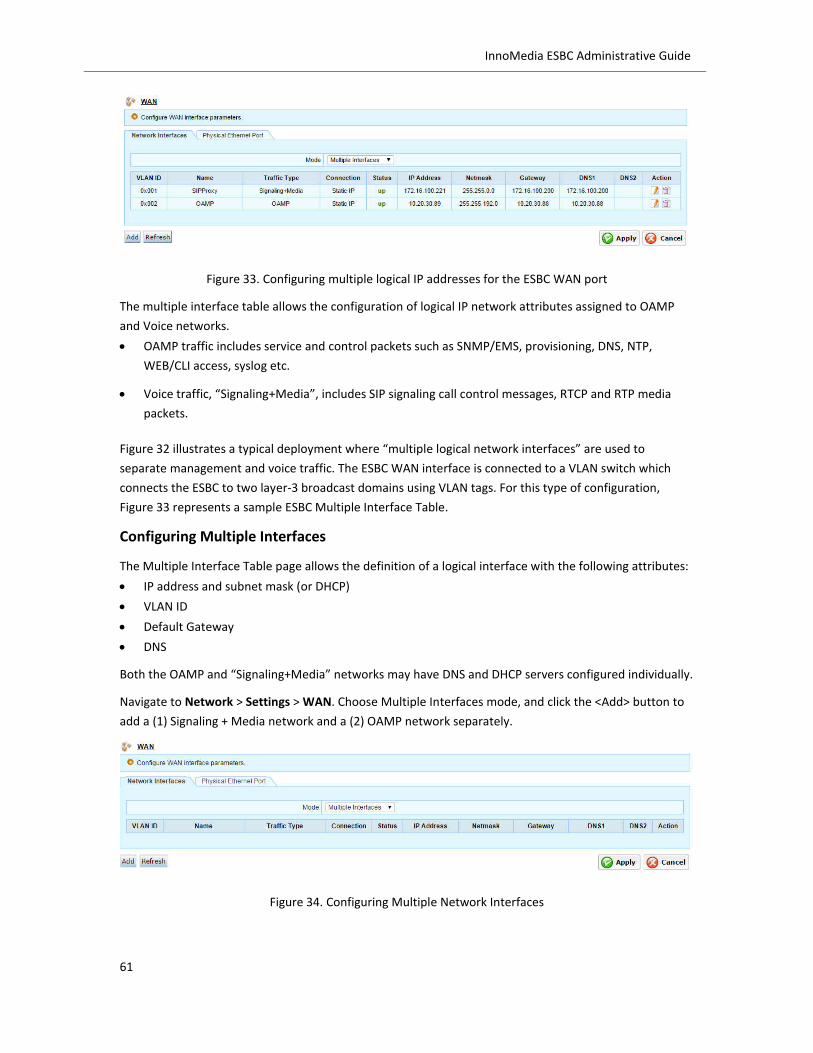
61
InnoMedia ESBC Administrative Guide
Figure 33. Configuring multiple logical IP addresses for the ESBC WAN port
The multiple interface table allows the configuration of logical IP network attributes assigned to OAMP
and Voice networks.
OAMP traffic includes service and control packets such as SNMP/EMS, provisioning, DNS, NTP,
WEB/CLI access, syslog etc.
Voice traffic, “Signaling+Media”, includes SIP signaling call control messages, RTCP and RTP media
packets.
Figure 32 illustrates a typical deployment where “multiple logical network interfaces” are used to
separate management and voice traffic. The ESBC WAN interface is connected to a VLAN switch which
connects the ESBC to two layer-3 broadcast domains using VLAN tags. For this type of configuration,
Figure 33 represents a sample ESBC Multiple Interface Table.
Configuring Multiple Interfaces
The Multiple Interface Table page allows the definition of a logical interface with the following attributes:
IP address and subnet mask (or DHCP)
VLAN ID
Default Gateway
DNS
Both the OAMP and “Signaling+Media” networks may have DNS and DHCP servers configured individually.
Navigate to Network > Settings > WAN. Choose Multiple Interfaces mode, and click the <Add> button to
add a (1) Signaling + Media network and a (2) OAMP network separately.
Figure 34. Configuring Multiple Network Interfaces

62
InnoMedia ESBC Administrative Guide
Figure 35. Configuring the “Signaling + Media” logical network interface
Figure 36. Configuring the “OAMP” logical network interface
Logical Interface Setting Description
VLAN ID Enter the VLAN ID assigned to this IP network.
Name Enter the name of this logical network interface. This is a text
string that can be assigned by the user to this interface for ease of
reference.
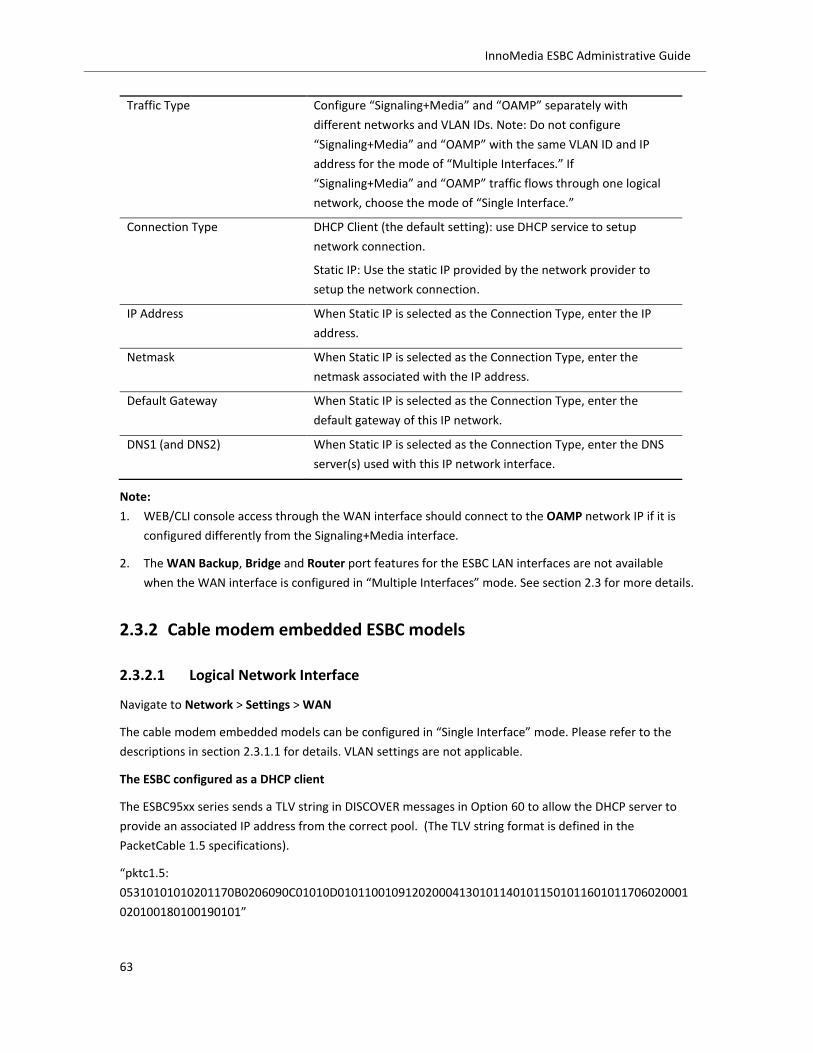
63
InnoMedia ESBC Administrative Guide
Traffic Type Configure “Signaling+Media” and “OAMP” separately with
different networks and VLAN IDs. Note: Do not configure
“Signaling+Media” and “OAMP” with the same VLAN ID and IP
address for the mode of “Multiple Interfaces.” If
“Signaling+Media” and “OAMP” traffic flows through one logical
network, choose the mode of “Single Interface.”
Connection Type DHCP Client (the default setting): use DHCP service to setup
network connection.
Static IP: Use the static IP provided by the network provider to
setup the network connection.
IP Address When Static IP is selected as the Connection Type, enter the IP
address.
Netmask When Static IP is selected as the Connection Type, enter the
netmask associated with the IP address.
Default Gateway When Static IP is selected as the Connection Type, enter the
default gateway of this IP network.
DNS1 (and DNS2) When Static IP is selected as the Connection Type, enter the DNS
server(s) used with this IP network interface.
Note:
1. WEB/CLI console access through the WAN interface should connect to the OAMP network IP if it is
configured differently from the Signaling+Media interface.
2. The WAN Backup, Bridge and Router port features for the ESBC LAN interfaces are not available
when the WAN interface is configured in “Multiple Interfaces” mode. See section 2.3 for more details.
2.3.2 Cable modem embedded ESBC models
2.3.2.1 Logical Network Interface
Navigate to Network > Settings > WAN
The cable modem embedded models can be configured in “Single Interface” mode. Please refer to the
descriptions in section 2.3.1.1 for details. VLAN settings are not applicable.
The ESBC configured as a DHCP client
The ESBC95xx series sends a TLV string in DISCOVER messages in Option 60 to allow the DHCP server to
provide an associated IP address from the correct pool. (The TLV string format is defined in the
PacketCable 1.5 specifications).
“pktc1.5:
05310101010201170B0206090C01010D0101100109120200041301011401011501011601011706020001
020100180100190101”

64
InnoMedia ESBC Administrative Guide
Figure 37. The ESBC is configured as DHCP Client
The ESBC configured with Static IP Address
Figure 38. Configuring WAN IP address for cable modem embedded ESBC models
2.3.2.2 Physical Ethernet Port
Figure 39 Configuring MAC address of the ESBC WAN interface
Please refer to section 2.3.1.3 for descriptions of configuring MAC address for the ESBC WAN interface.

65
InnoMedia ESBC Administrative Guide
2.4 LAN interface configurations
2.4.1 The LAN interface configurations for voice services
The default configurations of the LAN interfaces provide NAT-and-Voice services (applicable to ESBC-
9xxx/8xxx series models). The four switch ports connect to the enterprise telephony network for SIP PBX,
IP phones, and PCs to access the ESBC administrative consoles via the LAN interfaces, including WEB GUI
and SSH CLI.
Figure 40. Default configuration: LAN ports serve enterprise telephony services
Navigate to Network > Settings > LAN to configure the IP address. By default, all the LAN ports serve NAT-
and-Voice services which are switch ports and share one IP address.
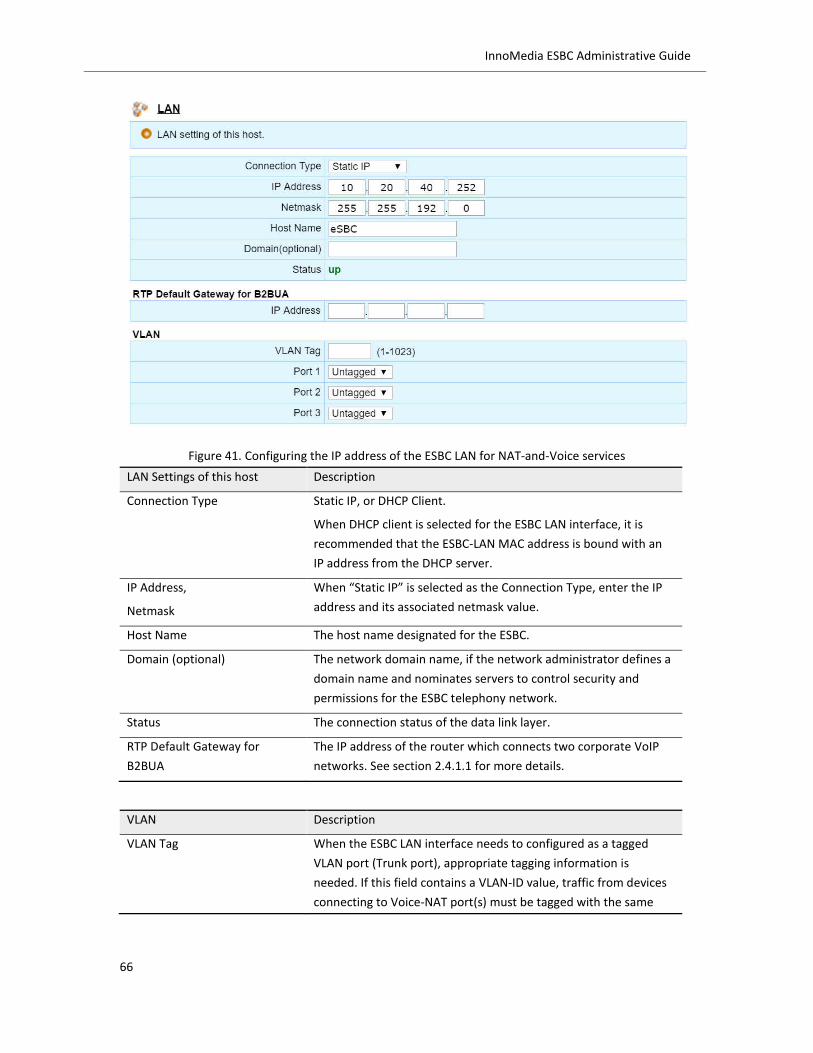
66
InnoMedia ESBC Administrative Guide
Figure 41. Configuring the IP address of the ESBC LAN for NAT-and-Voice services
LAN Settings of this host Description
Connection Type Static IP, or DHCP Client.
When DHCP client is selected for the ESBC LAN interface, it is
recommended that the ESBC-LAN MAC address is bound with an
IP address from the DHCP server.
IP Address,
Netmask
When “Static IP” is selected as the Connection Type, enter the IP
address and its associated netmask value.
Host Name The host name designated for the ESBC.
Domain (optional) The network domain name, if the network administrator defines a
domain name and nominates servers to control security and
permissions for the ESBC telephony network.
Status The connection status of the data link layer.
RTP Default Gateway for
B2BUA
The IP address of the router which connects two corporate VoIP
networks. See section 2.4.1.1 for more details.
VLAN Description
VLAN Tag When the ESBC LAN interface needs to configured as a tagged
VLAN port (Trunk port), appropriate tagging information is
needed. If this field contains a VLAN-ID value, traffic from devices
connecting to Voice-NAT port(s) must be tagged with the same
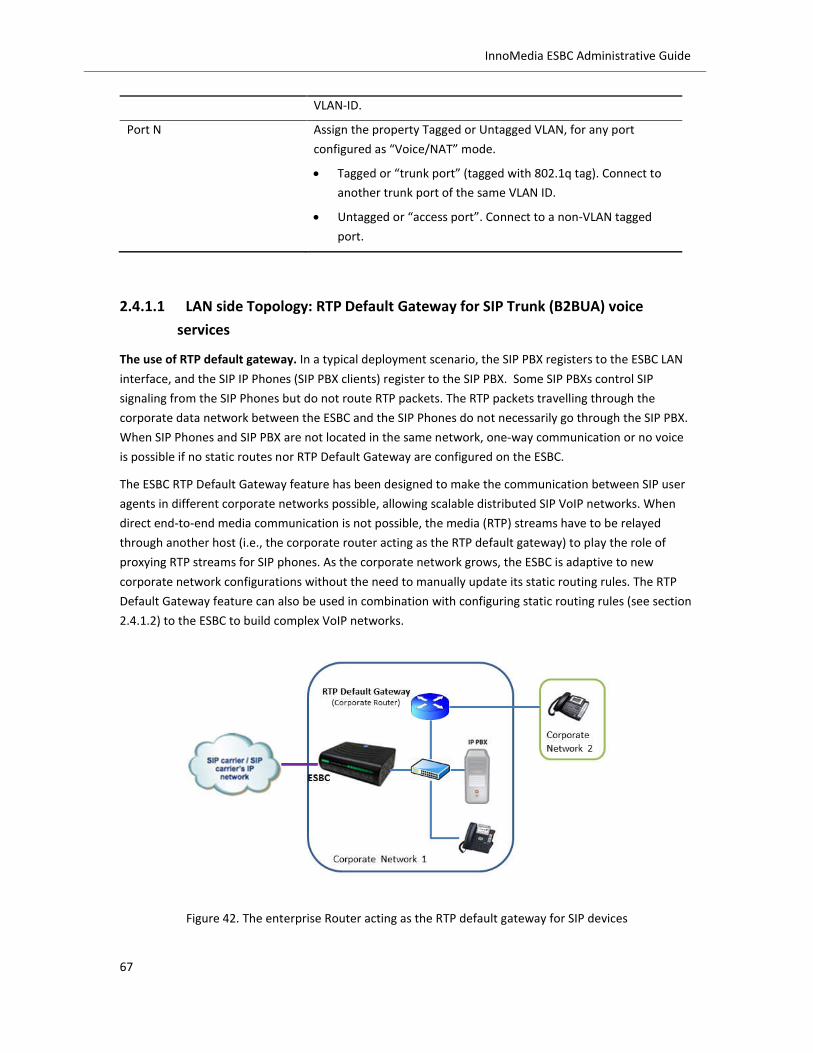
67
InnoMedia ESBC Administrative Guide
VLAN-ID.
Port N Assign the property Tagged or Untagged VLAN, for any port
configured as “Voice/NAT” mode.
Tagged or “trunk port” (tagged with 802.1q tag). Connect to
another trunk port of the same VLAN ID.
Untagged or “access port”. Connect to a non-VLAN tagged
port.
2.4.1.1 LAN side Topology: RTP Default Gateway for SIP Trunk (B2BUA) voice
services
The use of RTP default gateway. In a typical deployment scenario, the SIP PBX registers to the ESBC LAN
interface, and the SIP IP Phones (SIP PBX clients) register to the SIP PBX. Some SIP PBXs control SIP
signaling from the SIP Phones but do not route RTP packets. The RTP packets travelling through the
corporate data network between the ESBC and the SIP Phones do not necessarily go through the SIP PBX.
When SIP Phones and SIP PBX are not located in the same network, one-way communication or no voice
is possible if no static routes nor RTP Default Gateway are configured on the ESBC.
The ESBC RTP Default Gateway feature has been designed to make the communication between SIP user
agents in different corporate networks possible, allowing scalable distributed SIP VoIP networks. When
direct end-to-end media communication is not possible, the media (RTP) streams have to be relayed
through another host (i.e., the corporate router acting as the RTP default gateway) to play the role of
proxying RTP streams for SIP phones. As the corporate network grows, the ESBC is adaptive to new
corporate network configurations without the need to manually update its static routing rules. The RTP
Default Gateway feature can also be used in combination with configuring static routing rules (see section
2.4.1.2) to the ESBC to build complex VoIP networks.
Figure 42. The enterprise Router acting as the RTP default gateway for SIP devices

68
InnoMedia ESBC Administrative Guide
With the example illustrated in Figure 42, the SIP Phones in Corporate Network 2 register to the IP PBX in
Network 1. With the RTP default gateway (the corporate router’s IP address) configured on the ESBC, the
RTP (media) streams can be handled by the ESBC and communicate with the service provider network.
Note that when RTP default gateway is configured, the static routing rules may not be necessary.
The IP PBX has to be located in the same network as that of the ESBC LAN interface if there is no static
route rule configured (see section 2.4.1.2).
2.4.1.2 LAN side Topology Design: Static Routing Configurations
For enterprises with multiple voice networks, static routing rules are needed if one of the following
conditions is true.
SIP Trunk voice service (B2BUA mode): IP PBX (or any SIP User Agents) which register to the ESBC are
located in a network other than that of the ESBC NAT-Voice interface.
Hosted voice service (SIP-ALG mode): the IP phones are not located in the ESBC NAT-Voice network.
Note that when static routing rules are configured, the RTP default gateway may or may not be necessary.
To configure Static Routing rules, navigate to Network > Advanced > Static Routing.
Figure 43. Configuring network static routing rules for the ESBC LAN interface
Static Routing Description
Number Record number.
Interface The interface to which static routing rules apply (LAN only).
Destination IP The destination network address which this route reaches.
Netmask The destination network netmask
Gateway IP address of the router to which the ESBC can reach to route
packets for this particular network.
Metrics Metrics count. If not configured, the default value is 1.
(Note: Metric is the network administrative distance. The default
value for connected interface is 0, and static route is 1. Lower
numbers take priority over higher numbers.)

69
InnoMedia ESBC Administrative Guide
Click <Routing Table> button to display the ESBC network routing information. (<Routing Table> display is
available only when the WAN Interface mode is configured as Single Interface.)
2.4.2 DHCP Server
The ESBC DHCP server allows clients which connect to the Voice-and-NAT ports to obtain dynamic IP
addresses. The administrator can also view a DHCP client list and MAC bindings.
Navigate to Network > Settings > DHCP Server.
Figure 44. The DHCP Server for devices in the Voice-and-NAT network
Static Routing Description
Enabled Check this box to enable DHCP server service on the ESBC. The
default configuration is disabled.
Starting IP Address
Ending IP Address
The range of IP addresses assigned to the LAN clients. Note that
this range should not include the broadcast address, e.g., network
172.16.0.0/16 has a broadcast address of 172.16.255.255.
Lease Time The time period for which the IP address assigned to DHCP clients
is valid.
Primary DNS (optional)
Secondary DNS (optional)
The DNS server(s) specified provides name service for DHCP
clients.
WINS (optional) Windows Internet Naming Service, for NetBIOS names.

70
InnoMedia ESBC Administrative Guide
Default Routing (optional)
Option 66 (optional) Obtain the host name or IP address of the provisioning server for
DHCP clients, i.e., allows the connected SIP devices to obtain a
provisioning server address. A text string.
Option 67 (optional) Boot file name. A text string.
Option 150 (optional) List of TFTP Server IP address(es) for IP phone image download.
Option 156 (optional) FTP server details. A text string
Option 159 (optional) Specifies a text string in the form of a FQDN. It can be used to
point the IP phones to the domain name of a TFTP server using
HTTP.
Option 160 (optional) Specifies a text string in the form of a FQDN. It can be used to
point the IP phones to the domain name of a TFTP server using
HTTPS.
2.4.2.1 Client List
This client list table include IP address, MAC address, obtained time and expired time of all DHCP clients.
Figure 45. The ESBC DHCP server – client list.
2.4.2.2 MAC Binding
The DHCP MAC Binding feature allows the system administrator to bind an IP address to a client's MAC
address, so the ESBC will always assign a fixed IP address to this client. Click the <MAC Binding> button.

71
InnoMedia ESBC Administrative Guide
Figure 46. The ESBC DHCP server – MAC binding.
2.4.3 Advanced Configurations for Voice and Data Featured Services
The ESBC 9xxx and 8xxx series are equipped with four Ethernet switch ports which can be configured
individually to fulfill various featured services for field deployments. These featured services can be all or
partially activated on one ESBC unit. They are
NAT-and-Voice port
Management port
Router port (applicable only when the WAN Interface mode is configured as Single Interface)
Bridge port (applicable only when the WAN Interface mode is configured as Single Interface)
Figure 47. The ESBC 9xxx interface for network access (conceptual view)
To configure the ESBC featured service, navigate to Network > Advanced > LAN Interfaces > Port
Function.
Note that Bridge port and Router port are available when the WAN Interface mode is configured as Single
Interface.
Figure 48. The ESBC 9xxx LAN interfaces. Default Settings (configuration view)

72
InnoMedia ESBC Administrative Guide
2.4.3.1 Enabling the Management Port
Figure 49. Enabling the ESBC management port
The management port is used by the PC to access the ESBC administrative console (WEB or CLI) through
the LAN interface. When the management port feature is enabled, the LAN NAT-and-Voice ports only
serve voice traffic, and do not allow PCs to access the administrative console. Access via the ESBC WAN
interface remains unchanged.
Navigate to Network > Advanced > Management Port.
The ESBC Management port can serve a subnet. If the associated DHCP function is enabled, its netmask
and IP address range have to be properly managed.
Figure 50. Configuring the ESBC Management Port
Note: If the management port is enabled, it is possible to access the administrative console through
management port only, or the WAN port.
The ESBC 10K series models are equipped with two LAN ports. Port #1 is assigned as a management port,
and port #2 is a NAT-and-Voice port.
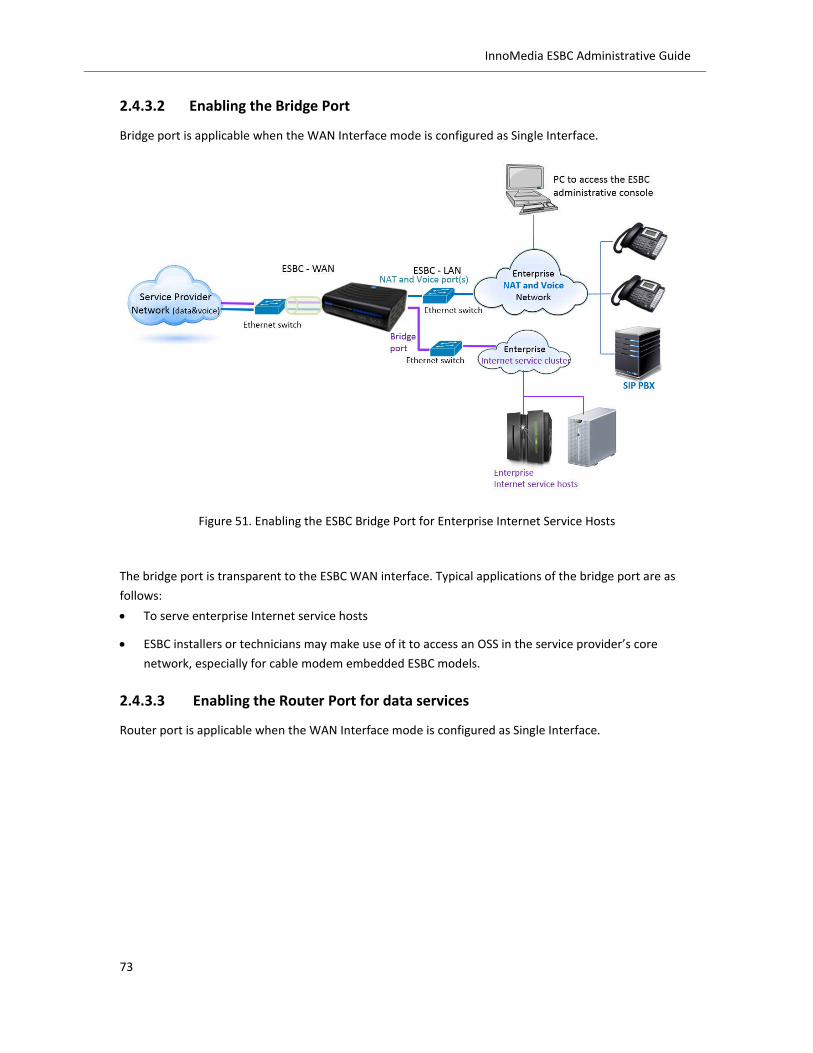
73
InnoMedia ESBC Administrative Guide
2.4.3.2 Enabling the Bridge Port
Bridge port is applicable when the WAN Interface mode is configured as Single Interface.
Figure 51. Enabling the ESBC Bridge Port for Enterprise Internet Service Hosts
The bridge port is transparent to the ESBC WAN interface. Typical applications of the bridge port are as
follows:
To serve enterprise Internet service hosts
ESBC installers or technicians may make use of it to access an OSS in the service provider’s core
network, especially for cable modem embedded ESBC models.
2.4.3.3 Enabling the Router Port for data services
Router port is applicable when the WAN Interface mode is configured as Single Interface.

74
InnoMedia ESBC Administrative Guide
Figure 52. Enabling the ESBC Router Port for Data Service
When the router port is enabled, the ESBC router port performs data network router functionality, which
allows service providers to offer data services to enterprise customers. As Figure 52 illustrates, hosts
behind the ESBC router port may use public IP addresses which are routed by the ESBC to the service
provider network. The ESBC dynamically updates its routing table with the Network Router in the service
provider’s core network.
Navigate to Network > Advanced > Router Mode to configure router and protocol security parameters.
Figure 53. Configuring the Router Mode Port

75
InnoMedia ESBC Administrative Guide
Router Mode Description
Router Port Select the appropriate port number as the router port.
Router-
IP address
Netmask
Enter the public IP address and netmask that the service provider
designated for this enterprise Router which serves as the default
gateway for hosts on the enterprise data network.
RIP Setting
Version V2: standard routing protocol with associated authentication
features.
V1: standard routing protocol.
Authentication MD5 | Text | None
MD5 is the default mode if RIPV2 is selected. Plain text
authentication should not be used when security is an issue. Select
appropriate method which interoperates with the core router in
the service provider’s network.
Key ID Applicable to MD5. Give the RIPV2 key chain name. This need not
to be identical with that of the remote router.
Key String Applicable to MD5. The actual password. It needs to be identical
to the key string on the remote router.
Broadcast Interval Update. The interval after which the EBSC sends an unsolicited
response message of the complete routing table to all neighboring
RIP routers.
Timeout. (Upon this timeout threshold being reached, the
particular route is no longer valid.
Garbage. Upon this timer expiring, this particular route is removed
from the routing table.
Note: RIP route authentication is configured on a per-interface basis. All RIP neighbors on interfaces
configured for RIP message authentication must be configured with the same authentication mode and
key for adjacencies to be established.

76
InnoMedia ESBC Administrative Guide
2.4.4 Ethernet Advanced Configurations for LAN Interfaces
See Application note: ESBC Application Notes-Ethernet Control.doc
Ethernet interfaces. Navigate to Network > Advanced > LAN Interfaces > Advanced.
The ESBC’s Ethernet connection can be configured for one of the following modes:
Manual
Speed 10M, 100M
Duplex Full, Half
Auto Negotiation
Speed/Duplex Automatically choose common transmission parameters.
Speed: 10M/100M/1000M
Duplex: Full/Half
Figure 54. Ethernet Interface Controls for the LAN Interfaces of ESBC 8xxx and 9xxx series models
Figure 55. Ethernet Interface Controls for the LAN Interfaces of ESBC 10K series models
Note: If the management port is enabled, it is possible to access the administrative console through the
management port only or the WAN port. The ESBC 9xxx and 8xxx series models support four LAN ports
which are configurable. The ESBC 10K series models are equipped with two LAN ports. Port #1 is assigned
as a management port, and port #2 is a NAT-and-Voice port.

77
InnoMedia ESBC Administrative Guide
If the connected devices support auto-negotiation, it is highly recommended that auto-negotiation is
used. The remote side port must also operate in auto-negotiation mode.
When configuring the device port running in manual mode, the same mode (i.e., duplex and speed)
must be configured on the remote port manually.
WARNING: An Ethernet port that does not match the settings of the connected device can lose
connectivity.
Link status of Auto-Negotiation. The correct behavior of link status with auto-negotiation in accordance
with IEEE Std 802.3z-1998 should be as follows:
If A is enabled and B is enabled, then the link status should be reported on both devices as link up.
If A is disabled and B is enabled, then A should report link up and B should report link down.
If A is enabled and B is disabled, then A should report link down and B should report link up.
Flow Control. ESBC Ethernet flow control is used to regulate the amount of traffic sent out of the
interface. There is a PAUSE functionality built into the ESBC Ethernet LAN interfaces to avoid dropping of
packets. Flow control must be negotiated, and hence both devices must be configured for full duplex
operation to send PAUSE frames.
Threshold of transmit on (48 buffers by default, ranges from 16-256).
Threshold of transmit off (64 buffers by default, ranges from 16-256, must be greater than threshold
of transmit on).
Storm Control. The ESBC storm control is used to for network broadcast and multicast packets. It prevents
network outage on the LAN interfaces, and rate limit broadcast and multicast traffic at a specified level
and to drop packets when the specified traffic level is exceeded.
When the broadcast and multicast storm control is enabled, all broadcast and multicast packets beyond
the thresholds are discarded. The threshold values are as follows:
Threshold of Storm Rate: unit in frames, Rn, n ranges from 1 to 11 (1M fps by default).
2.4.5 Remote access to the ESBC LAN Interfaces and LAN hosts
2.4.5.1 Through VPN
The ESBC allows remote computers (Windows or any hosts supporting PPTP) to access the ESBC LAN
interfaces for administrative tasks or other LAN hosts via a PPTP VPN secured tunnel. Note that when it is
used to reach other LAN hosts, an additional LAN router needs to be configured to route traffic from the
LAN hosts to the ESBC VPN clients.
Navigate to Network > VPN > PPTP Server.

78
InnoMedia ESBC Administrative Guide
Figure 56. Configuring the VPN client IP range
PPTP-Server (General) Description
Enabled Enable the PPTP VPN server. The default for the VPN feature is
disabled.
Server IP Address Create and enter the VPN server IP address within this VPN
network range. This virtual network should not conflict with the
networks configured on both the ESBC WAN and LAN interfaces.
Client IP Address – range The VPN server acts as a DHCP server and grants an IP address to
clients when they pass the security checks.
Connections The number of VPN concurrent connections.
Enter the ESBC WAN IP address when configuring the “Internet Address” on the VPN client running on the
host operating system, such as Windows. When the ESBC WAN Interface mode is configured as “Multiple
Interfaces”, enter the IP assigned to the OAMP network.
Figure 57. Configuring the VPN client ID and password for connection
Use the configured IDs and passwords for the remote VPN clients to access to the VPN server, the ESBC
LAN and the LAN hosts.

79
InnoMedia ESBC Administrative Guide
2.4.5.2 Through Port Forwarding
Port forwarding is applicable when the WAN Interface mode is configured as Single Interface.
Software ports are numbered connections that a computer uses to sort different types of network
traffic. The ESBC supports port forwarding features which allow remote computers to access services
offered by other LAN hosts. A few standard services are listed on the Comments section of the ESBC port
forwarding page. By default, the ESBC closes all software ports to the Internet unless they are configured
in the port forwarding list, and SIP/RTP ports which are dynamically opened for communication purposes.
Navigate to Network > Advanced > Port Forwarding.
Figure 58. The port forwarding feature for remote access to LAN services
Port Forwarding Description
Description Enter the purpose of forwarding the specified port number range
to access software services provided by LAN hosts.
Protocol Enter the transportation protocol(s) used by the software service.
Starting port – Ending port Enter the port range used by the software service.
IP Address Enter the IP address of the LAN host which offers the software
service.
Schedule All the time/Working Time.
Click the <Schedule Setting> button to configure the working time
slots.
2.4.6 Enabling Data Service Access for the ESBC LAN hosts
2.4.6.1 DNS Proxy
The DNS Proxy feature is applicable to the ESBC-93xx and 83xx serial models.

80
InnoMedia ESBC Administrative Guide
Because DNS is used by virtually every device connected to the Internet, it is a common target for hacker
attacks. For security and performance considerations, the ESBC DNS proxy feature includes rule sets to
control outgoing DNS requests from its trusted hosts. A typical DNS proxy processes DNS queries by
issuing a new DNS resolution query to each name server in the list until the hostname is resolved. A DNS
proxy improves domain lookup performance by caching previous lookups. When a DNS query is resolved
by a DNS proxy, the result is stored in the device's DNS cache. This stored cache helps the devices to
resolve subsequent queries from the same domain and avoid network latency.
Navigate to Network > Advanced > DNS Proxy.
Figure 59. Configuring the DNS Proxy service for trusted LAN hosts
DNS Proxy Description
Domain Name (root) Domain Name suffixes, e.g. the domain name root of ftp.abc.com
is abc.com.
DNS Server IP Enter the IP address of the DNS server used to query this
particular domain name.
2.4.6.2 Access Control
The Access Control feature is applicable when the WAN Interface mode is configured as a Single Interface.
The Access Control feature provides the basic traffic filtering capabilities which enables ESBC LAN hosts,
i.e., clients connecting to the ESBC Voice-and-NAT ports, to access Internet data services other than voice
services (SIP Trunk or Hosted voice services).
Navigate to Network > Advanced > Access Control.
Access Control – LAN
The Access Control feature provides basic traffic filtering capabilities which enable ESBC LAN hosts, i.e.,
clients connecting to the ESBC Voice-and-NAT ports, to access non-voice traffic.
Enable legitimate ESBC LAN hosts to access Internet data services (such as provisioning), by specifying:
hosts within particular IP address ranges
hosts within particular subnets
hosts with specified MAC addresses
ports employed by applications

81
InnoMedia ESBC Administrative Guide
In cases where the SIP devices connected to the ESBC Voice-and-NAT port(s) need to access the
provisioning server to update configuration files or an image, it is necessary to enable LAN devices to
access the Internet using access control.
Figure 60. To enable internet data access to the ESBC LAN hosts or applications
Note that when the ESBC LAN interface connection type is configured as DHCP client (see section 2.4 for
details), the ESBC does not check the validness of access control configurations.
Click <Schedule Setting> to define the time periods during which the legitimate hosts/ports are allowed to
access Internet data services.
Figure 61. Schedule setting for LAN hosts and application to access Internet services
Access Control – WAN
The ESBC may impose restrictions on Internet resources to which the LAN clients can access, by specifying
particular IP address ranges
particular Subnets,

82
InnoMedia ESBC Administrative Guide
ports employed by applications
domains
Figure 62 Legitimate Internet resources
Click <Schedule Setting> to define the time periods during which the legitimate Internet resources are
accessible by the ESBC LAN hosts.
2.4.6.3 UPnP
The UPnP feature is applicable to the ESBC-93xx and 83xx serial models, and is applicable when the WAN
Interface mode is configured as Single Interface.
The ESBC supports UPnP, and hence it can auto discover and control Internet connections at any place in
a small office environment, provided its north bound switch/router supports UPnP.
Navigate to Network > Advanced > UPnP.
Figure 63. Enabling the UPnP network feature
Enable the UPnP feature by checking the box if the office network switch/router is equipped with this
capability.
2.4.6.4 DMZ (De-militarized Zone)
The DMZ feature is applicable to the ESBC-93xx and 83xx serial models, and is applicable when the WAN
Interface mode is configured as Single Interface.
In the ESBC setup, most devices on the LAN run with ESBC firewall protection to communicate with the
Internet/service provider network. The DMZ is a device inserted in the “neutral zone” between the ESBC
private network and the outside public network. It prevents outside users from getting direct access to an
ESBC LAN host. A DMZ is optional, and acts as a proxy server as well.

83
InnoMedia ESBC Administrative Guide
Navigate to Network > Advanced > DMZ.
Figure 64. Enabling the DMZ host on the ESBC LAN network
Enter the IP address which is assigned to the DMZ host.
2.4.6.5 Miscellaneous
Navigate to Network > Advanced > Miscellaneous.
Figure 65. Miscellaneous configurations of network attributes
Miscellaneous Description
Enable Ping to WAN Interface For security purpose, disable “Ping” to WAN interface, i.e., not to
respond to ICMP messages, by unchecking this box. When the
WAN Interface mode is configured as Multiple Interfaces, “ping”
command is applicable to the IP assigned for the OAMP network.
MTU (maximum transmission
unit)
The default value 1500 (byte per packet), the largest packet size
allowed by Ethernet. A larger MCU brings greater efficiency.
Reduce MTU value if any network device cannot support the
specified MTU size.
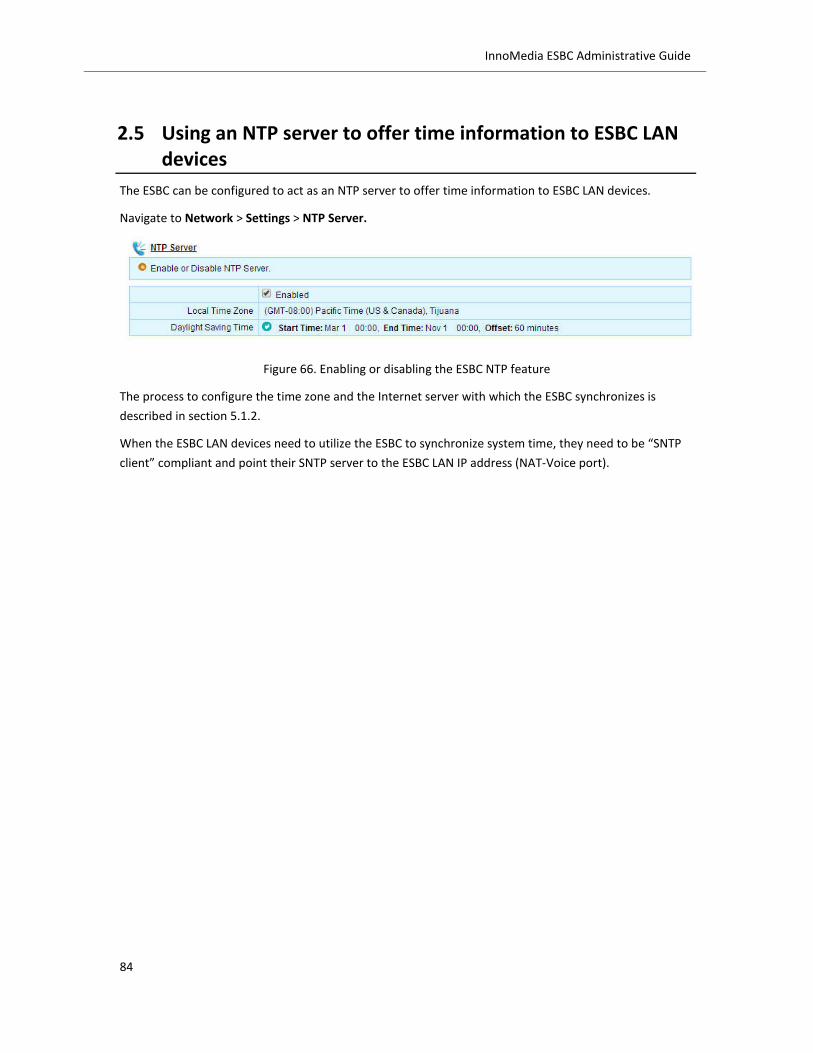
84
InnoMedia ESBC Administrative Guide
2.5 Using an NTP server to offer time information to ESBC LAN devices
The ESBC can be configured to act as an NTP server to offer time information to ESBC LAN devices.
Navigate to Network > Settings > NTP Server.
Figure 66. Enabling or disabling the ESBC NTP feature
The process to configure the time zone and the Internet server with which the ESBC synchronizes is
described in section 5.1.2.
When the ESBC LAN devices need to utilize the ESBC to synchronize system time, they need to be “SNTP
client” compliant and point their SNTP server to the ESBC LAN IP address (NAT-Voice port).
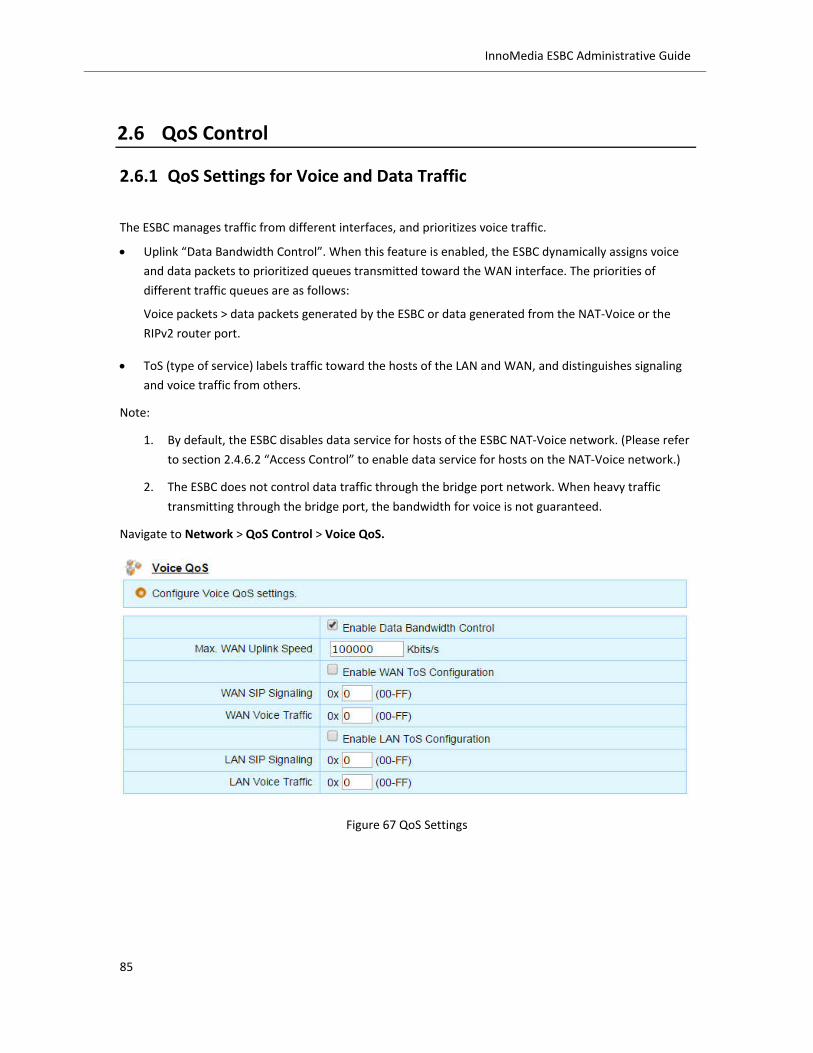
85
InnoMedia ESBC Administrative Guide
2.6 QoS Control
2.6.1 QoS Settings for Voice and Data Traffic
The ESBC manages traffic from different interfaces, and prioritizes voice traffic.
Uplink “Data Bandwidth Control”. When this feature is enabled, the ESBC dynamically assigns voice
and data packets to prioritized queues transmitted toward the WAN interface. The priorities of
different traffic queues are as follows:
Voice packets > data packets generated by the ESBC or data generated from the NAT-Voice or the
RIPv2 router port.
ToS (type of service) labels traffic toward the hosts of the LAN and WAN, and distinguishes signaling
and voice traffic from others.
Note:
1. By default, the ESBC disables data service for hosts of the ESBC NAT-Voice network. (Please refer
to section 2.4.6.2 “Access Control” to enable data service for hosts on the NAT-Voice network.)
2. The ESBC does not control data traffic through the bridge port network. When heavy traffic
transmitting through the bridge port, the bandwidth for voice is not guaranteed.
Navigate to Network > QoS Control > Voice QoS.
Figure 67 QoS Settings

86
InnoMedia ESBC Administrative Guide
Voice QoS Settings Description
Enable Data bandwidth control Check to enable data bandwidth control.
Max WAN Uplink speed Enter the bandwidth (bit rates) that are allocated to the ESBC
WAN interface for uplink traffic direction.
WAN ToS Configuration
LAN ToS configuration
Labeling ToS (Type of Service) to packets toward the designated
interface directions. The IP header contains an 8-bit field for QoS
control (RFC2474). Values range from 00 to FF (in hex).
2.6.2 Cable Modem Embedded Models: ESBC 95xx and 85xx
The ESBC embedded cable modem models, ESBC95xx and ESBC85xx, support industry leading patent
pending “Smart DQoS” technology. It relies on an intelligent edge device (the ESBC) with an embedded
DOCSIS cable modem initiating DOCSIS UGS service flow requests based on user or signaling events. With
Smart DQoS, the addition of policy servers and complex interactions among various network server
components can be avoided.
2.6.2.1 DQoS service flow settings
Navigate to Telephony > SIP TRUNKS > DQoS Settings.
Figure 68 DQoS Call Control – QoS Settings on DOCSIS networks
DQoS Setting Description
Enable the Call Control DQoS Enabling this option allows a guaranteed service flow mechanism
between the CMTS and ECMM/ESBC for voice connections.
Disabling this feature results in all voice calls being processed with
best effort.
Number to limit the Active
Dynamic Service Flows (DSF)
Enter the number of service flows reserved for the ESBC. The
maximum guaranteed value on DOCSIS 3.0 network is 24.
Allow the SIP Trunking Calls
beyond the limit of Active
Dynamic Service Flows
When the number of calls exceeds the DSF mentioned above,
allowing additional calls to be connected with best effort. This
configuration is applicable to SIP Trunking voice calls (B2BUA
mode), not for hosted voice services (SIP ALG mode).
Use Time of Day received from The ESBC may use “Time of Day” information from the Cable
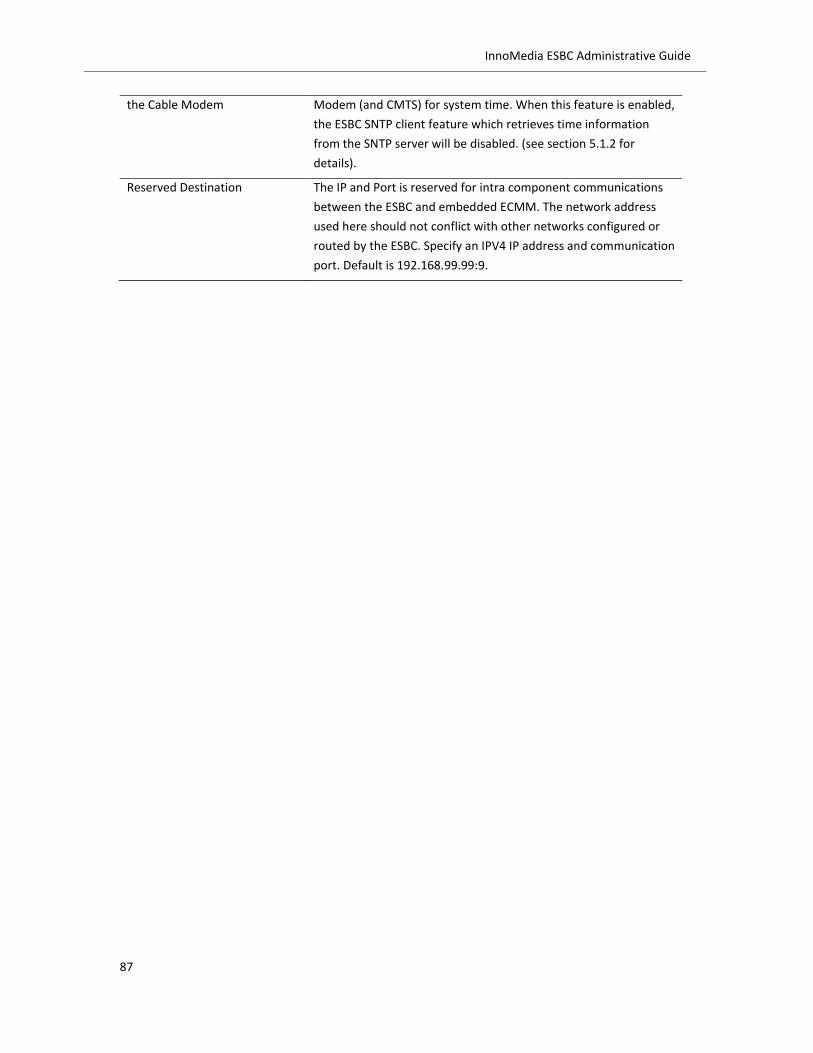
87
InnoMedia ESBC Administrative Guide
the Cable Modem Modem (and CMTS) for system time. When this feature is enabled,
the ESBC SNTP client feature which retrieves time information
from the SNTP server will be disabled. (see section 5.1.2 for
details).
Reserved Destination The IP and Port is reserved for intra component communications
between the ESBC and embedded ECMM. The network address
used here should not conflict with other networks configured or
routed by the ESBC. Specify an IPV4 IP address and communication
port. Default is 192.168.99.99:9.

88
InnoMedia ESBC Administrative Guide
3 SIP Trunk Voice Service Configurations
3.1 Routing Calls between the ESBC and SIP Trunk (service provider)
In order for the ESBC to route calls between corporate PBX users and the SIP trunk service for PSTN calls,
the items below need to configured properly:
Trunk Settings: configure the SIP Trunk Server profile(s)
User Account Configurations: configure SIP UAs on the ESBC
SIP Trunk Signaling Tuning for Interworking: Fine tune the Trunk SIP Profile
3.1.1 Trunk Settings: SIP Server
A Trunk denotes a subscribed SIP trunk service. Trunk Setting is used to configure the required
parameters for the SIP server. The ESBC supports multiple trunk SIP proxy profiles. This flexibility allows
the system administrator to configure up to 8 profiles for different subscribed services. To configure a
trunk profile, navigate to Telephony > SIP TRUNKS > Trunks Setting,
Figure 69. ESBC Trunk Settings

89
InnoMedia ESBC Administrative Guide
SIP Server Description
Default Profile Check the option box if you want to set this profile as the default
profile. Any SIP UAs will be associated to this profile automatically.
Profile ID Enter a unique profile ID for this profile. Enter any name which can
be recognized easily.
SIP Domain The SIP Domain name provided by your service provider for
service query purposes.
SIP Proxy The IP address or FQDN of the target SIP server (or SBC) which
processes SIP requests/messages sent from the ESBC.
Port The default SIP communication port is 5060. Change to the port
number which the SIP trunk service provider specifies.
SIP Outbound Proxy The IP address or FQDN of the target SBC (or SIP server) to which
the ESBC sends SIP messages/requests. The ESBC supports DHCP
Option 15 to obtain a connection-specific DNS domain suffix.
(DHCP Option is applicable only when the ESBC’s internet
connection is configured as a DHCP client.)
INVITE Request-URI Domain Enter the SIP domain name for the Request-URI for INVITE
messages. (If it is different from the SIP Domain name of SIP
REGISTER messages.)
Min/Max Retry Interval Registration fail retry timers. When the first REGISTER attempt
fails, the ESBC attempts the next REGISTER with a back-off
mechanism which defines the “Min” and “Max” timers.
Transport Specify the transport protocol for SIP signals interconnecting the
ESBC and the SIP server.
Auto: the default configuration. The ESBC uses the protocol
after negotiating with the SIP server.
TCP: use TCP to transport SIP signals only.
UDP: use UDP to transport SIP signals only.
TLS: use secured TLS tunnel to transport SIP signals. Be sure
to set the SIP Port number to 5061.
Security- CA Root Certification When TLS secured connection is used, it is possible to load the 'CA
root certificate' issued by your service provider, and the ESBC then
authenticates the Server to ensure secured and trusted
connections.
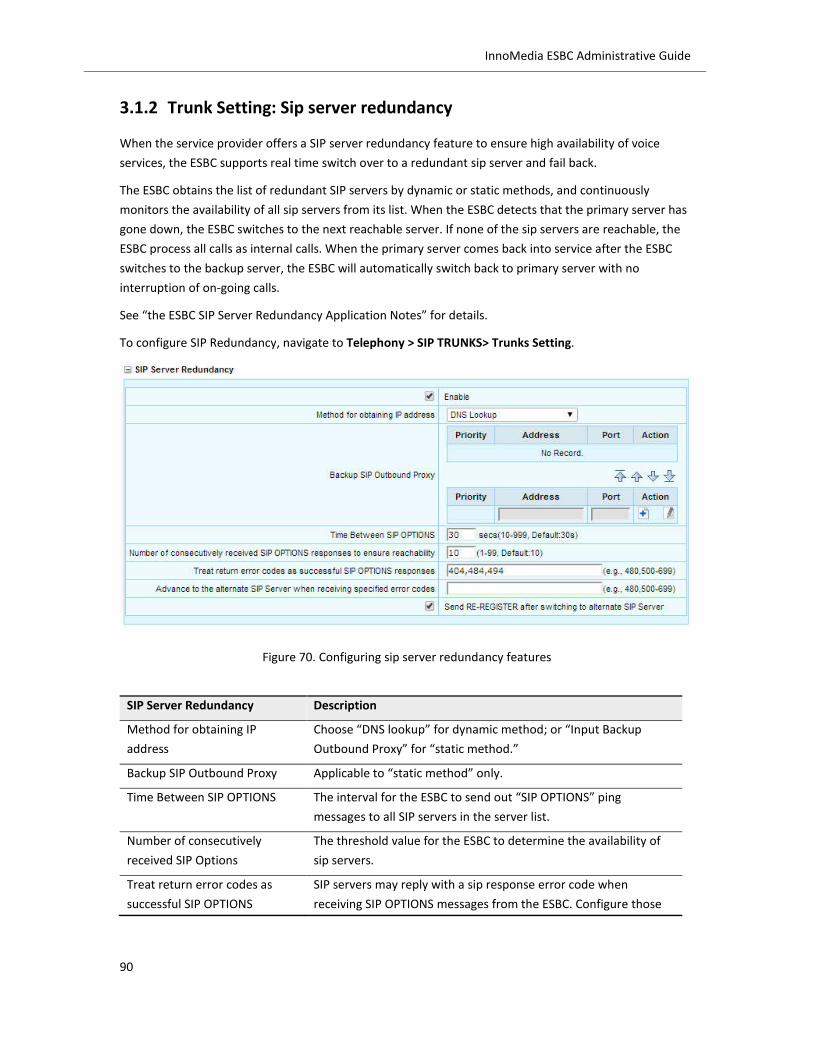
90
InnoMedia ESBC Administrative Guide
3.1.2 Trunk Setting: Sip server redundancy
When the service provider offers a SIP server redundancy feature to ensure high availability of voice
services, the ESBC supports real time switch over to a redundant sip server and fail back.
The ESBC obtains the list of redundant SIP servers by dynamic or static methods, and continuously
monitors the availability of all sip servers from its list. When the ESBC detects that the primary server has
gone down, the ESBC switches to the next reachable server. If none of the sip servers are reachable, the
ESBC process all calls as internal calls. When the primary server comes back into service after the ESBC
switches to the backup server, the ESBC will automatically switch back to primary server with no
interruption of on-going calls.
See “the ESBC SIP Server Redundancy Application Notes” for details.
To configure SIP Redundancy, navigate to Telephony > SIP TRUNKS> Trunks Setting.
Figure 70. Configuring sip server redundancy features
SIP Server Redundancy Description
Method for obtaining IP
address
Choose “DNS lookup” for dynamic method; or “Input Backup
Outbound Proxy” for “static method.”
Backup SIP Outbound Proxy Applicable to “static method” only.
Time Between SIP OPTIONS The interval for the ESBC to send out “SIP OPTIONS” ping
messages to all SIP servers in the server list.
Number of consecutively
received SIP Options
The threshold value for the ESBC to determine the availability of
sip servers.
Treat return error codes as
successful SIP OPTIONS
SIP servers may reply with a sip response error code when
receiving SIP OPTIONS messages from the ESBC. Configure those

91
InnoMedia ESBC Administrative Guide
responses codes which are treated as successful SIP OPTIONS responses.
Advance to alternate SIP Server
when receiving specified error
codes
When the ESBC receives the configured sip response error code(s)
from the server, the ESBC should treat this currently connected
server as not available for service and move to the next reachable
sip server.
Send RE-REGISTER after
switching to the alternate
server
Enable this option if the databases of redundant sip servers are
not synchronized. If sip servers implement HA (high availability)
features, it is possible to disable this feature to save processing
bandwidth and improve switching efficiency.
3.1.2.1 Dynamic Query for Redundant SIP Servers
When “DNS Lookup” is chosen from the menu “Method for obtaining IP address” (see Figure 70), the
ESBC obtains the list of redundant sip servers by doing a DNS SRV/NAPTR/A Record lookup with the
configured “SIP Outbound Proxy” (see Figure 69). If both “SIP Outbound Proxy” and “SIP Proxy” are not
configured, the SIP domain setting is used. Optionally, the domain may be learnt from a DHCP Option 15
response.
To view the queried server, navigate to Telephony > TOOLS > Monitor > SIP Server Redundancy
Figure 71. Redundant sip servers: queried results
3.1.2.2 Static Input for Redundant SIP Servers
When “Input Backup Outbound Proxy” is chosen from the menu “Method for obtaining IP address” (see
Figure 70), the ESBC obtains redundant sip servers using user input records. <Arrow> keys are used to
adjust their priorities.

92
InnoMedia ESBC Administrative Guide
3.1.3 Trunk Setting: Codec Filter
Figure 72. Codec Filter Table
Codec Description
Filter Codec Enable this to filter and only use selected CODECs in SIP/SDP
messages. When the ESBC composes SIP messages to the SIP
Proxy or to the SIP PBX, it will only use CODECs from the list.
To change the priority level of CODECs, select the desired CODEC
name and click the up or down arrow. To remove a CODEC, click
the <Delete> button. To restore to the default, click the <Restore
Default> button.
Supported Packetization Time Specify the supported ptime values in SDP media attribute
descriptions.
Note that the selection of codec filters takes higher priority than the extended codecs in the transcoding
profile (see section 3.8).

93
InnoMedia ESBC Administrative Guide
3.2 Adding and Configuring User Accounts on the ESBC
3.2.1 SIP UA Setting
To configure User Accounts (UAs), navigate to Telephony > SIP UA Setting > SIP User Accounts. Click the
<Batch Config> button to configure SIP User Accounts in bulk mode, or click the <Setting> icon to
configure User Accounts individually.
To Search user accounts, select the target searching criteria from the “Search” drop-down menu, and
then click the <Search> button. The public identities are user accounts which the ESBC uses to register to
the SIP server. Public identities of a subscribed sip trunk service include
One main public identity
One or more alternate public identities
Nominating a main public identity is not mandatory for an ESBC configuration. However, if implicit
registration is required by the service provider, it is necessary to nominate the main public identity and
configure it as the registration agent.
Figure 73. SIP UA Registration Status
SIP User Accounts Description
Main Public Identity Also known as pilot number, or main trunk number. This user
account is selected/configured as a registration agent for implicit
registration. The Main Public Identity registers to the SIP server on
behalf all other alternate ESBC user accounts (of the same
subscribed sip trunk service).
Default Route Default route. When multiple user accounts (DIDs) have the
same destination (e.g., the same connected TDM-PBX or SIP-PBX),

94
InnoMedia ESBC Administrative Guide
the default route account can route calls on behalf of all other
user accounts associated with the same destination. The ESBC
directs all inbound calls whose called number is not configured on
the ESBC database to the destination of the Default Route.
Status Connected. Successful REGISTER.
Not Connected.
Authentication Failure. Credential information is not correct.
Registration Error.
Account disabled on the ESBC
Static Registration (Static Operation Mode)
No. The nth SIP Trunk user account. This number is used for identifying
the user account for provisioning tags.
User ID SIP account user name, usually the DID telephony number.
Registration Agent The assigned Registration Agent for this trunk (used with IMS
implicit registration settings).
Trunk Proxy Profile Associate SIP UAs to a SIP Trunk Proxy Profile described in Section
3.1.1.
Type The target type of this selected UA. There are three types of
targets: PRI, FXS and SIP.
Enabled Status of this SIP UA
Action: Setting Configure parameters of this SIP account.
Action: Delete Delete this SIP account.
Batch Config Add/Configure SIP account(s) in bulk mode.
Refresh Pages refresh automatically based on a time interval. This time
interval can be set on the "Auto Refresh" page under "System".
Click "Refresh" and the page will be refreshed immediately.
Register
De-Register
Click this button to Register or De-Register SIP UAs with the
service provider sip server.
Register All
De-Register All
Click this button to perform Registration/De-Registration for all SIP
UAs configured in the ESBC database.
3.2.1.1 Public identity: Batch Add
Click the <Batch Config> button to add/configure user accounts in bulk mode.

95
InnoMedia ESBC Administrative Guide
Figure 74. SIP UA Batch Configuration: Add
Enter the User ID (usually the DID number). In the Repeat Count field, enter the number of UAs you
would like to add to the system. The User IDs will be generated as consecutive numbers.
Add User Accounts Description
Type Select appropriate attribute for the user agents to be configured.
The available options are as follows:
SIP: applicable to sip devices or sip-pbx connecting to the
ESBC “NAT and Voice” LAN interface.
PRI (Group n): applicable to a TDM-PBX
FXS 1~4: applicable to one of the ESBC’s four FXS ports
User ID A SIP user account to REGISTER with the SIP server. It can be a DID
(TN) number or a user name.
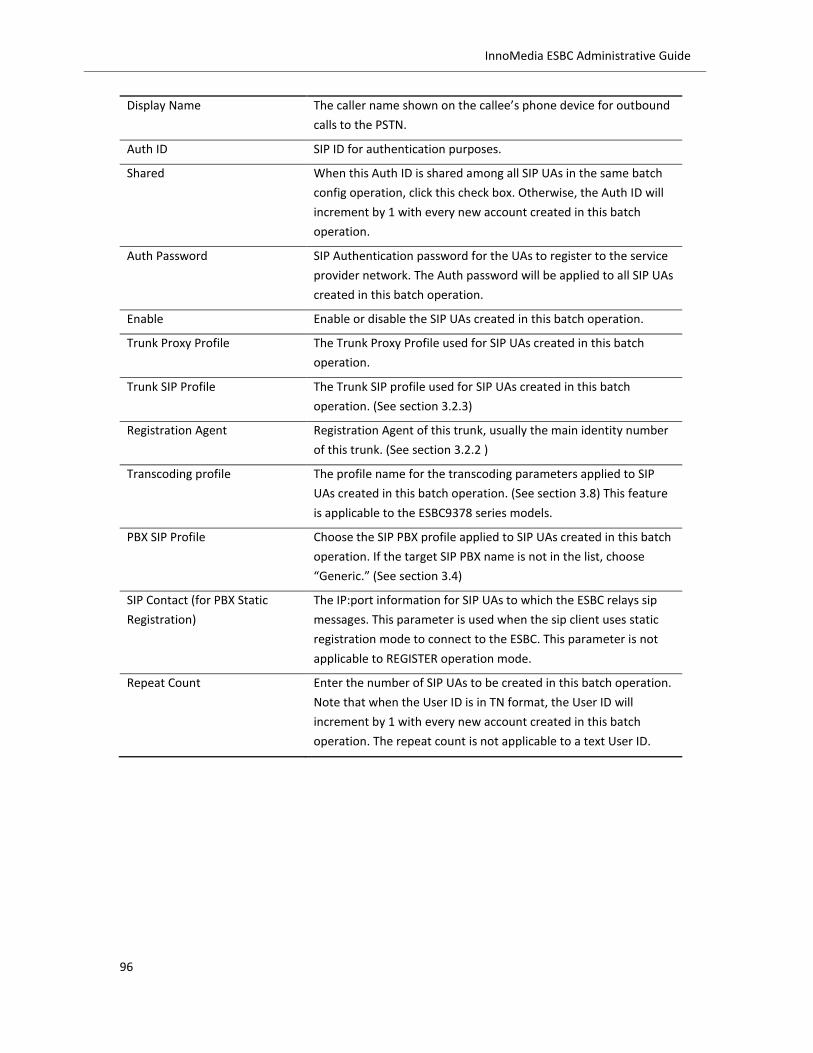
96
InnoMedia ESBC Administrative Guide
Display Name The caller name shown on the callee’s phone device for outbound
calls to the PSTN.
Auth ID SIP ID for authentication purposes.
Shared When this Auth ID is shared among all SIP UAs in the same batch
config operation, click this check box. Otherwise, the Auth ID will
increment by 1 with every new account created in this batch
operation.
Auth Password SIP Authentication password for the UAs to register to the service
provider network. The Auth password will be applied to all SIP UAs
created in this batch operation.
Enable Enable or disable the SIP UAs created in this batch operation.
Trunk Proxy Profile The Trunk Proxy Profile used for SIP UAs created in this batch
operation.
Trunk SIP Profile The Trunk SIP profile used for SIP UAs created in this batch
operation. (See section 3.2.3)
Registration Agent Registration Agent of this trunk, usually the main identity number
of this trunk. (See section 3.2.2 )
Transcoding profile The profile name for the transcoding parameters applied to SIP
UAs created in this batch operation. (See section 3.8) This feature
is applicable to the ESBC9378 series models.
PBX SIP Profile Choose the SIP PBX profile applied to SIP UAs created in this batch
operation. If the target SIP PBX name is not in the list, choose
“Generic.” (See section 3.4)
SIP Contact (for PBX Static
Registration)
The IP:port information for SIP UAs to which the ESBC relays sip
messages. This parameter is used when the sip client uses static
registration mode to connect to the ESBC. This parameter is not
applicable to REGISTER operation mode.
Repeat Count Enter the number of SIP UAs to be created in this batch operation.
Note that when the User ID is in TN format, the User ID will
increment by 1 with every new account created in this batch
operation. The repeat count is not applicable to a text User ID.
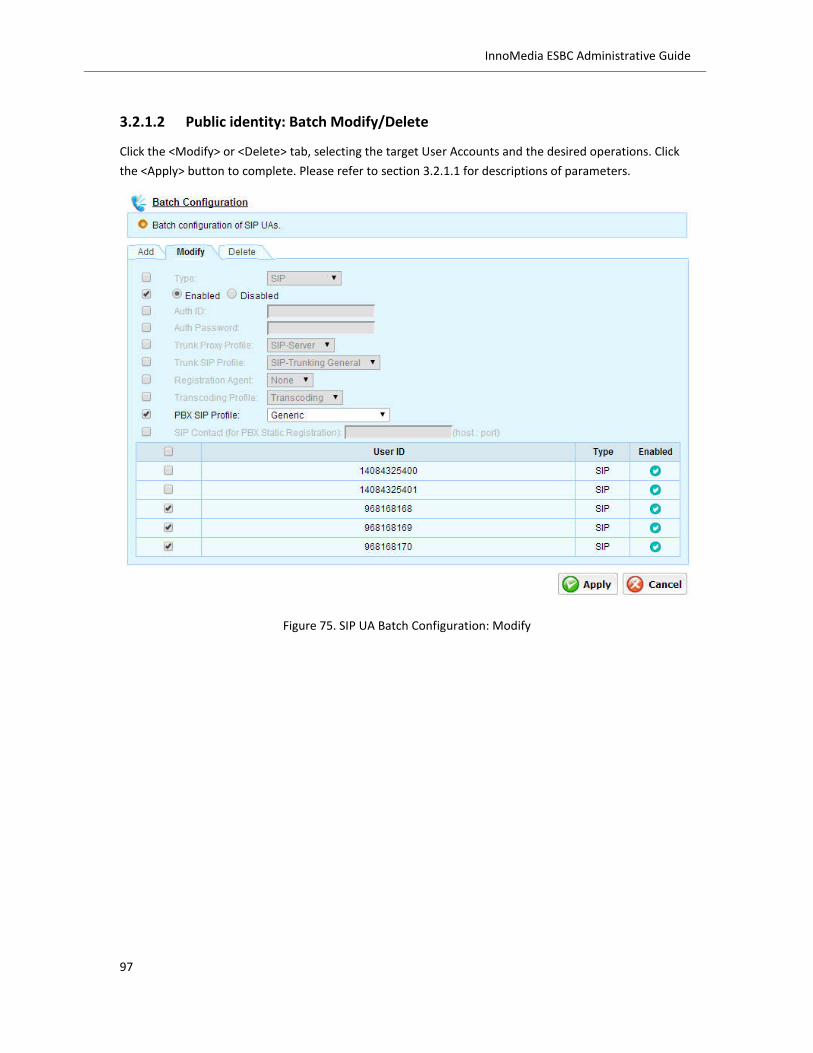
97
InnoMedia ESBC Administrative Guide
3.2.1.2 Public identity: Batch Modify/Delete
Click the <Modify> or <Delete> tab, selecting the target User Accounts and the desired operations. Click
the <Apply> button to complete. Please refer to section 3.2.1.1 for descriptions of parameters.
Figure 75. SIP UA Batch Configuration: Modify

98
InnoMedia ESBC Administrative Guide
3.2.1.3 Public identity: Individual Settings and Authentication
To configure a selected public identity (SIP UA) individually, click the <Action> button in Figure 73.
Figure 76. Individual SIP UA Settings
Most of the parameters should already be entered in a Batch-Add operation (see section 3.2.1.1). This
page allows you to configure/update parameters for an individual account.
Three options are available for the PBX Authentication Mode, they are “None”, “Local” and “RADIUS”. The
configurations apply to SIP PBX, SIP clients and analog FXS ports. Please see section 3.4.2 for details.
If “Local” mode is chosen, the Auth password configuration is described as follows.
Local Authentication Description
Same as Auth Password The ESBC applies the same “Auth Password” of the SIP Trunk to
authenticate the sip request attempts from the SIP PBX (or SIP
clients). The Auth Password has to be configured on the SIP PBX
accordingly.
If a different Auth Password is needed, choose the other option and
enter the password accordingly.

99
InnoMedia ESBC Administrative Guide
3.2.2 Implicit registration: Registration Agent
Implicit registration is completed by the Registration Agent (RA) which is usually the pilot number. The RA
registers to the SIP server on behalf all user accounts (alternate public identities or DIDs) of the subscribed
service. To configure an RA, navigate to Telephony > SIP ACCOUNTS > SIP UA Setting > Registration
Agent. Click the <Add> button to add an RA.
Figure 77. Add Registration Agent
Add Registration Agent Description
Agent Name Name of the registration Agent
None Select none if not using implicit registration.
New SIP UA If the RA account is not configured on the ESBC, choose this option
to add a new user account. Please refer to 3.2.1.1 for parameter
descriptions.
Select from current SIP UA For the use of implicit registration, select an existing SIP UA from
the drop down menu.

100
InnoMedia ESBC Administrative Guide
3.2.2.1 Bulk Assigning
The ESBC’s web console provides the ability to assign Bulk SIP UAs to the FXS ports, SIP PBX, or TDM PBX.
The Bulk Assigning feature is convenient when assigning numbers to different types of clients is needed.
Navigate to Telephony > SIP ACCOUNTS > Bulk Assigning.
Figure 78. Bulk Assigning VoIP numbers to the ESBC clients
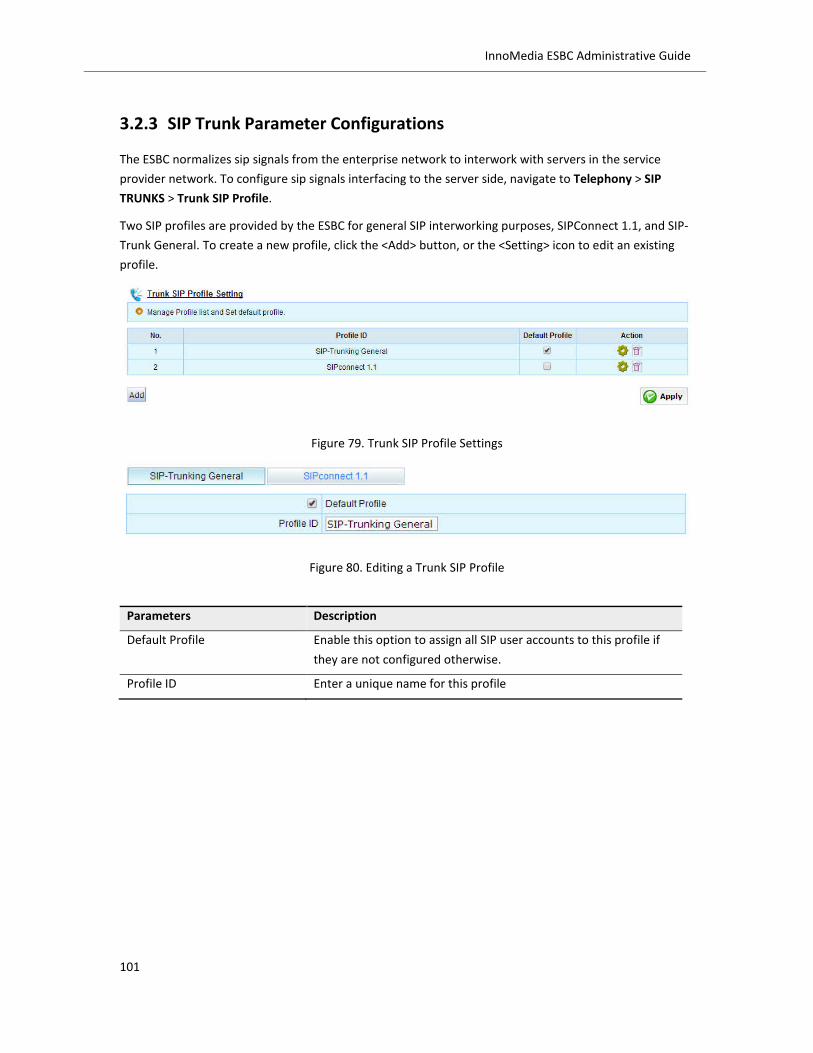
101
InnoMedia ESBC Administrative Guide
3.2.3 SIP Trunk Parameter Configurations
The ESBC normalizes sip signals from the enterprise network to interwork with servers in the service
provider network. To configure sip signals interfacing to the server side, navigate to Telephony > SIP
TRUNKS > Trunk SIP Profile.
Two SIP profiles are provided by the ESBC for general SIP interworking purposes, SIPConnect 1.1, and SIP-
Trunk General. To create a new profile, click the <Add> button, or the <Setting> icon to edit an existing
profile.
Figure 79. Trunk SIP Profile Settings
Figure 80. Editing a Trunk SIP Profile
Parameters Description
Default Profile Enable this option to assign all SIP user accounts to this profile if
they are not configured otherwise.
Profile ID Enter a unique name for this profile

102
InnoMedia ESBC Administrative Guide
3.2.3.1 SIP Profile Configuration: SIP Parameters
Click the ‘Setting’ icon on an existing profile.
Figure 81 Configuring a Trunk SIP Profile—SIP Parameters
SIP Parameters Description
Static Registration If selected, the service provider network treats the ESBC as a peer
network, but not a registering device.
GIN Registration Globally Identifiable Number (GIN) Registration (RFC 6140) is used
widely for implicit registrations. The ESBC supports GIN to
construct and distribute a URI that can be used universally. This
mechanism requires the RA to perform implicit registration to the
service provider’s network (see section 3.2.2).
Enable Session Timer The SIP session timer specifies a keep-alive mechanism for SIP
sessions, which limits the time period over which a stateful proxy
must maintain state information without a refresh re-INVITE. (The
Session Timer parameter in the SIP Parameter Page (See section
3.5) needs to be enabled in order for this setting to take effect.
Timer C, Timer 1xx
Retransmission, Timer Register
Expires, Min Registration-Retry
Time, Max-Registration Retry
Time
Standard SIP timers defined in RFC 3261
Keep-alive Interval Specifies the interval for sending keep-alive messages for active
SIP sessions
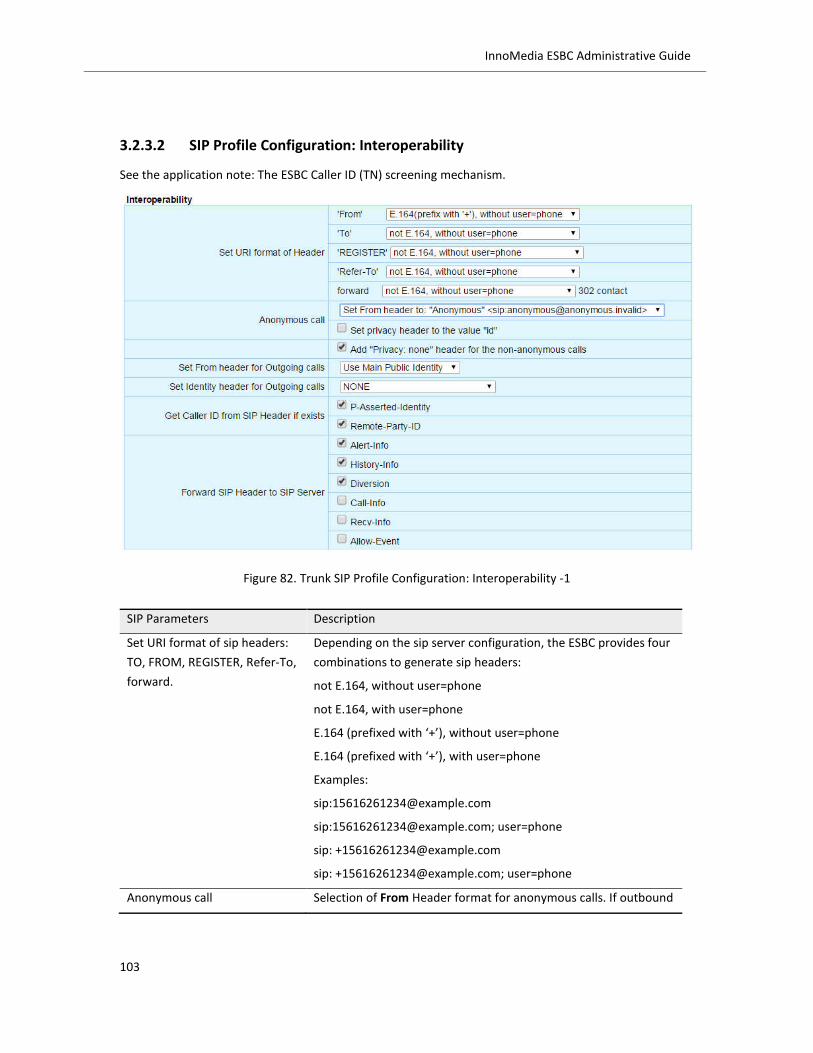
103
InnoMedia ESBC Administrative Guide
3.2.3.2 SIP Profile Configuration: Interoperability
See the application note: The ESBC Caller ID (TN) screening mechanism.
Figure 82. Trunk SIP Profile Configuration: Interoperability -1
SIP Parameters Description
Set URI format of sip headers:
TO, FROM, REGISTER, Refer-To,
forward.
Depending on the sip server configuration, the ESBC provides four
combinations to generate sip headers:
not E.164, without user=phone
not E.164, with user=phone
E.164 (prefixed with ‘+’), without user=phone
E.164 (prefixed with ‘+’), with user=phone
Examples:
sip:[email protected]; user=phone
sip: [email protected]
sip: [email protected]; user=phone
Anonymous call Selection of From Header format for anonymous calls. If outbound

104
InnoMedia ESBC Administrative Guide
calls from the PBX specify the blocking of CID, the ESBC offers
various From Header formats that may be sent to the SIP Server.
Privacy Header. The presence of certain values of the privacy type
in a Privacy header field indicates that the user would like to keep
their identity private with respect to SIP entities outside the Trust
Domain with which the user is authenticated.
Set privacy header to the value ‘id’: Privacy: id. Identification
must be hidden (defined in RFC3325)
Set privacy header to the value ‘none’: Privacy: none for non-
anonymous calls. Identity is not hidden.
Note: Outbound calls from the PBX that specify the blocking of CID
are specified as follows:
(1) SIP PBX: the From header specifies the blocking of CID.
(2) PRI PBX: Presentation flag set to “restricted” in SETUP
messages.
Set From header for outgoing
calls
The From header can be used to transport caller information, such
as caller ID and name displayed at the called party side. Four
options are available:
Use Alternate Identity: Use the individual AOR configured in
the ESBC database.
Use Main Public Identity: Use the pilot number (registration
agent account) configured in the ESBC database.
Use the original caller: Use the information obtained from
the PBX user.
Use a configured phone number: Enter a preferred caller ID
string to override the setting.
Set Identity header for
outgoing calls
Depending on the sip server privacy configuration, the ESBC may
add one of the following three headers as the caller identity
header (or none).
P-Asserted-Identity: defined in RFC 3325. This sip header is
used among trusted sip entities to carry the identification of
the user sending a sip message as it was verified by
authentication.
P-Preferred-Identity: defined in RFC 3325. This sip header is
used from a user agent to a trusted proxy to carry the
identification the user sending the sip message wishes to be
used for the P-Asserted-Header field value that the trusted
entity will insert.

105
InnoMedia ESBC Administrative Guide
Remote-Party-ID: This sip header provides information about
the remote party. See Appendix 9.2 for SIP Remote-Party-ID
header parameter mapping with the PRI SETUP message.
Get Caller ID from SIP Header if
exists
Choose from one among the following three options to transport
information on Caller ID to the SIP PBX
P-Asserted-Identity,
Remote-Party-ID
Forward SIP Header to SIP
Server
The ESBC allows the forwarding of the following SIP headers sent
from the LAN SIP UAs to the Service Provider’s SIP server.
Alert-Info | History-Info | Diversion | Call-Info | Recv-Info | Allow-
Event
Figure 83. Trunk SIP Profile Configuration: Interoperability -2
SIP Parameters Description
Add "Allow-event: vq-rtcpxr"
into REGISTER
To support VQM (voice quality measurement) requirements of
RFC6035.
Forward DTMF in SIP INFO to
SIP server
When this feature is enabled, the ESBC forwards SIP INFO
messages if the registered SIP UAs send DTMF tones with SIP INFO
method.
Strip ICE Attribute ICE attributes are used for NAT traversal purposes. Enable this
feature to allow the ESBC to strip all ICE related parameters in SDP
messages for messages sent to the SIP server. ICE related
attributes in SDP include
a=candidate(.*)
a=ice(.*)
Use RFC2543 Hold RFC2543 is obsoleted by RFC3261. For backward compatibility, the
ESBC can allow the use of “c” destination addresses set to all

106
InnoMedia ESBC Administrative Guide
zeroes (0.0.0.0) for call hold operations.
Remove Contact and Record-
Route Headers in 180
responses
For SIP Server interoperability purposes, check this item when
necessary.
Enable rinstance The parameter “rinstance” (for the Contact header in REGISTER) is
used when sip devices support multiple lines. It is not defined in
an RFC but is an opaque URI parameter used to differentiate
different lines. Checking this item will allow the ESBC to add the
“rinstance” parameter to support remote SIP device with multiple
line features that support this parameter.
Reuse TLS connection Enable this feature to allow the ESBC to use the actual source port
of a TLS connection in addition to the default port 5061.
Use “Ir=true” for loose routing Depending on the sip server configuration, the ESBC adds
“Ir=true” parameter for loose routing.
In loose routing, as specified in RFC3261, the Request-URI always
contains the URI of the destination user agent. As opposed to
“strict routing,” where the request-URI always contains the URI of
the next hop.
Reject all received REFER When enabled, the ESBC rejects all REFER messages for Call
transfer operations.
Force send REFER even if the
peer not add REFER in the
Allow header
The ESBC adds “REFER” to the “Allow” header.
Remove other media types
when sending T.38 offer
When this parameter is selected, "m=" lines other than t38 are all
removed from SDP messages.
Allow T.38 on WAN side If this item is disabled, the ESBC rejects all T.38 transmission
attempts from remote devices.
Figure 84. Trunk SIP Profile Configuration: Interoperability -3

107
InnoMedia ESBC Administrative Guide
SIP Parameters Description
Order of sending Re-INVITEs Some particular SIP UAs do not proceed with new sessions with
reINVITEs for the current dialog unless the current session is
concluded with a response code, such as 200 OK. Leave the
default setting unless necessary.
Scenario: A – ESBC – B. After call setup, the ESBC receives reINVITE
from A.
Send re-INVITEs all the way directly. The ESBC sends reINVITE
to B, and after receives 200 OK from B, then the ESBC sends
200 OK to A.
Send response before forwarding re-INVITEs. The ESBC replies
200 OK to A with old SDP, and then sends reINVITE to B. After
the ESBC receiving 200 OK from B, it will not send 200 OK to
A.
Method of processing INVITE
without SDP
Scenario: A – ESBC – B. A calls B, the INVITE message has no
SDP.
Send INVITEs without SDP. The ESBC sends INVITE to B
without SDP.
Send INVITEs with a fake SDP. The ESBC sends INVITE to B
with a fake SDP (g.711). After call setup, the ESBC re-
negotiates SDP by sending a reINVITE.
Method of processing re-INVITE
without SDP
Scenario: A – ESBC – B. A calls B, the INVITE message has no SDP.
Send reINVITEs without SDP. The ESBC sends INVITE to B
without SDP.
Sends reINVITEs with the old SDP. The ESBC sends reINVITE
to B with old SDP. After call setup, the ESBC re-negotiates
SDP by sending a reINVITE.
Accept RTP/AVP with
sdescriptions offer
Sdescription is short for security descriptions for media streams.
Some clients choose to code them as "RTP/AVP" to make clients
accept the SDP as an offer. Select here if the ESBC should accept
incoming offers where sdescriptions are presented as "RTP/AVP"
offers.
SDP with Secure Description The RTP/SAVP profile is defined for security services for RTP media
and is signaled by use of RTP transport, i.e., SDP media line with
the value: m=RTP/SAVP, together with the “crypto” SDP attribute.
Select the appropriate item according to the SIP server’s capability
to process secured RTP streams. Leave the default selection
unchanged unless necessary.
Transmit sdescription transparent
Transmit all sdescription in SAVP
Transmit all sdescription in AVP
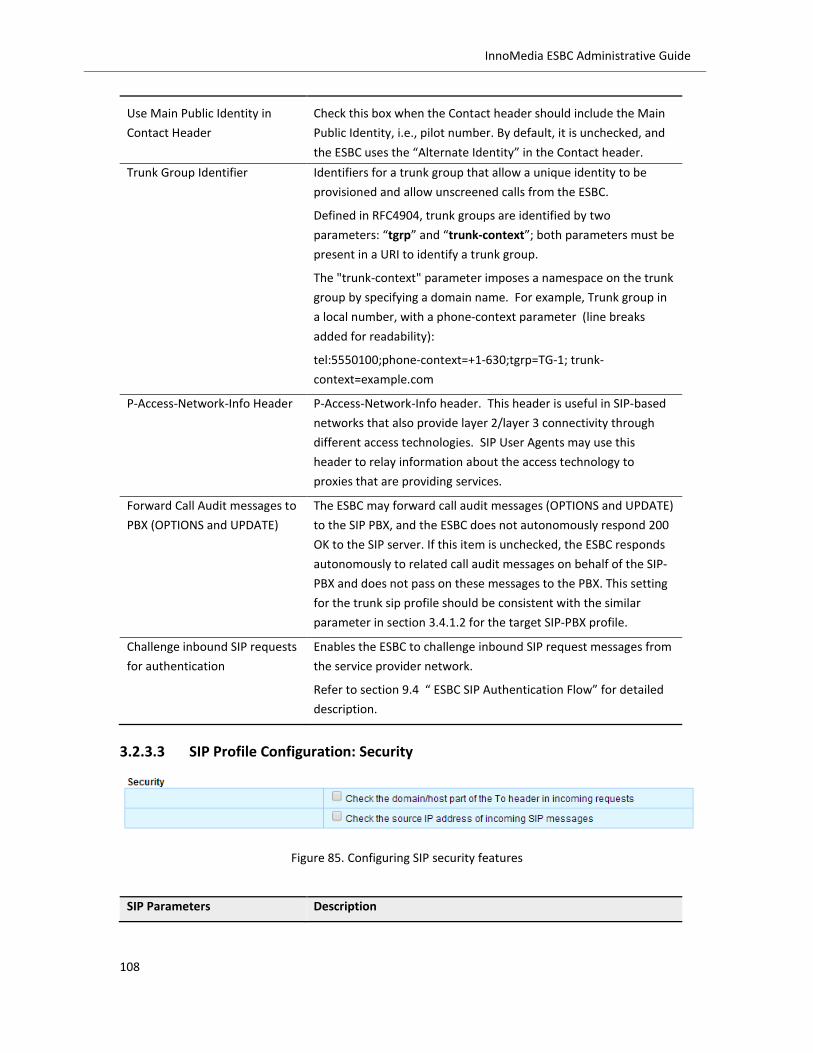
108
InnoMedia ESBC Administrative Guide
Use Main Public Identity in
Contact Header
Check this box when the Contact header should include the Main
Public Identity, i.e., pilot number. By default, it is unchecked, and
the ESBC uses the “Alternate Identity” in the Contact header.
Trunk Group Identifier Identifiers for a trunk group that allow a unique identity to be
provisioned and allow unscreened calls from the ESBC.
Defined in RFC4904, trunk groups are identified by two
parameters: “tgrp” and “trunk-context”; both parameters must be
present in a URI to identify a trunk group.
The "trunk-context" parameter imposes a namespace on the trunk
group by specifying a domain name. For example, Trunk group in
a local number, with a phone-context parameter (line breaks
added for readability):
tel:5550100;phone-context=+1-630;tgrp=TG-1; trunk-
context=example.com
P-Access-Network-Info Header P-Access-Network-Info header. This header is useful in SIP-based
networks that also provide layer 2/layer 3 connectivity through
different access technologies. SIP User Agents may use this
header to relay information about the access technology to
proxies that are providing services.
Forward Call Audit messages to
PBX (OPTIONS and UPDATE)
The ESBC may forward call audit messages (OPTIONS and UPDATE)
to the SIP PBX, and the ESBC does not autonomously respond 200
OK to the SIP server. If this item is unchecked, the ESBC responds
autonomously to related call audit messages on behalf of the SIP-
PBX and does not pass on these messages to the PBX. This setting
for the trunk sip profile should be consistent with the similar
parameter in section 3.4.1.2 for the target SIP-PBX profile.
Challenge inbound SIP requests
for authentication
Enables the ESBC to challenge inbound SIP request messages from
the service provider network.
Refer to section 9.4 “ ESBC SIP Authentication Flow” for detailed
description.
3.2.3.3 SIP Profile Configuration: Security
Figure 85. Configuring SIP security features
SIP Parameters Description

109
InnoMedia ESBC Administrative Guide
Check the domain/host part of
the To header in incoming
requests
If the domain/host part of the To header in incoming requests is
different to the ESBC configuration for the SIP domain field, the
ESBC rejects these incoming SIP messages.
Check the source IP address of
incoming SIP messages
If the source IP address of incoming SIP messages is different to
that used when registering SIP UA accounts, the ESBC rejects these
incoming SIP messages.
3.2.3.4 SIP Profile Configuration: Features
Figure 86. Trunk SIP Profile – Features
SIP Parameters Description
Require Register event (3GPP) Defined in RFC 3680. The ESBC subscribes to the registration event
for an AOR, resulting in notifications of registration state changes.
For example, when the administrator shortens the registration
(e.g., when fraud is suspected), the registration server sends a
notification to the ESBC which can re-register and re-authenticate.
Not Retry Registration on 403
Responses
The ESBC, upon receiving a response code 403 from the
registration server, will not perform any more REGISTER attempts.
Send SUBSCRIBE For Message
Waiting Interval
The ESBC sends SUBSCRIBE messages for subscribing to voice mail
services (i.e., VMWI) from the server.
Process Call Transfer and Call
Forwarding Locally
When this feature is enabled, the ESBC performs requests such as
the following:
Process “call transfer” with re-INVITE method instead of
sending REFER to the sip server.
Process “call transfer” with re-INVITE method instead of
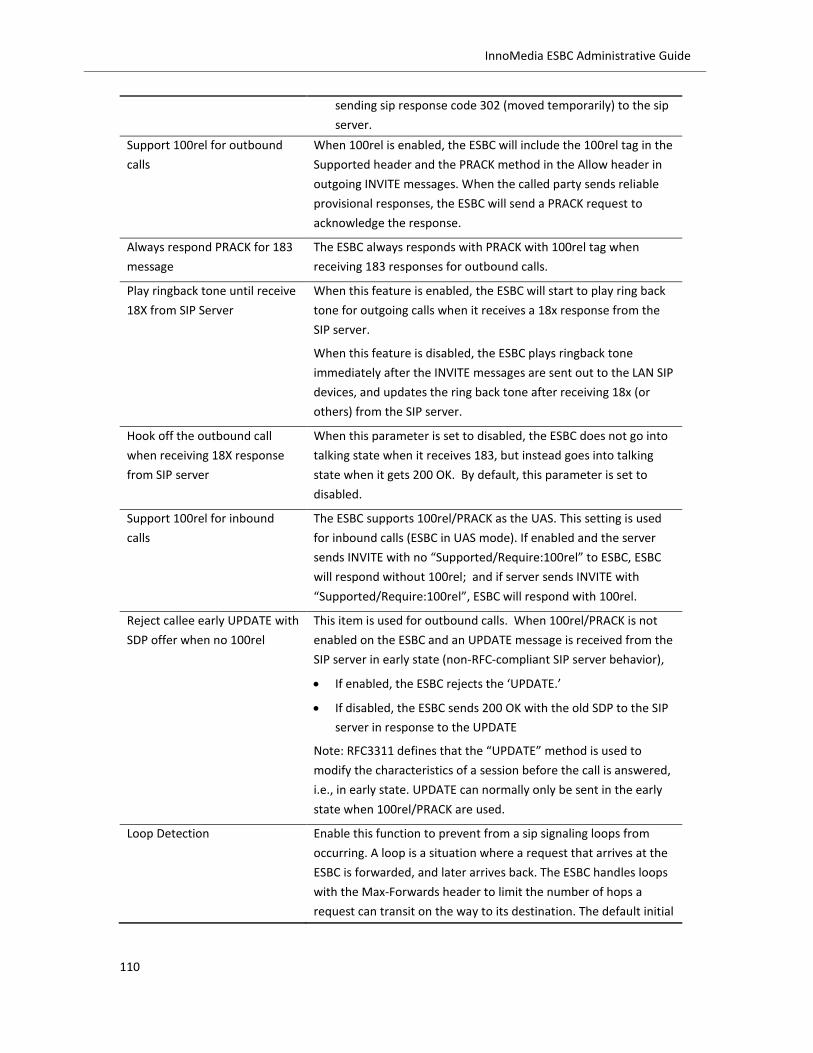
110
InnoMedia ESBC Administrative Guide
sending sip response code 302 (moved temporarily) to the sip
server.
Support 100rel for outbound
calls
When 100rel is enabled, the ESBC will include the 100rel tag in the
Supported header and the PRACK method in the Allow header in
outgoing INVITE messages. When the called party sends reliable
provisional responses, the ESBC will send a PRACK request to
acknowledge the response.
Always respond PRACK for 183
message
The ESBC always responds with PRACK with 100rel tag when
receiving 183 responses for outbound calls.
Play ringback tone until receive
18X from SIP Server
When this feature is enabled, the ESBC will start to play ring back
tone for outgoing calls when it receives a 18x response from the
SIP server.
When this feature is disabled, the ESBC plays ringback tone
immediately after the INVITE messages are sent out to the LAN SIP
devices, and updates the ring back tone after receiving 18x (or
others) from the SIP server.
Hook off the outbound call
when receiving 18X response
from SIP server
When this parameter is set to disabled, the ESBC does not go into
talking state when it receives 183, but instead goes into talking
state when it gets 200 OK. By default, this parameter is set to
disabled.
Support 100rel for inbound
calls
The ESBC supports 100rel/PRACK as the UAS. This setting is used
for inbound calls (ESBC in UAS mode). If enabled and the server
sends INVITE with no “Supported/Require:100rel” to ESBC, ESBC
will respond without 100rel; and if server sends INVITE with
“Supported/Require:100rel”, ESBC will respond with 100rel.
Reject callee early UPDATE with
SDP offer when no 100rel
This item is used for outbound calls. When 100rel/PRACK is not
enabled on the ESBC and an UPDATE message is received from the
SIP server in early state (non-RFC-compliant SIP server behavior),
If enabled, the ESBC rejects the ‘UPDATE.’
If disabled, the ESBC sends 200 OK with the old SDP to the SIP
server in response to the UPDATE
Note: RFC3311 defines that the “UPDATE” method is used to
modify the characteristics of a session before the call is answered,
i.e., in early state. UPDATE can normally only be sent in the early
state when 100rel/PRACK are used.
Loop Detection Enable this function to prevent from a sip signaling loops from
occurring. A loop is a situation where a request that arrives at the
ESBC is forwarded, and later arrives back. The ESBC handles loops
with the Max-Forwards header to limit the number of hops a
request can transit on the way to its destination. The default initial

111
InnoMedia ESBC Administrative Guide
value for Max-Forward is 70. If the Max-Forwards value reaches 0
before the request reaches its destination, it will be rejected with
a 483 (too many hops) error response.

112
InnoMedia ESBC Administrative Guide
3.2.4 Analog interface FXS Configuration: FAX and Modem Calls
Once the user accounts have been configured on the ESBC database (see section 3.2.1 ), you may select
accounts (numbers) and assign them to the ESBC FXS ports to which analog devices are connected, such
as FAX machines, point of sale station modems, or POTS phones.
Navigate to Telephony > FXS > FXS Port Setting.
Figure 87. FXS port settings
Click the drop down menu of the Number column, choose a number for this particular FXS port, and enter
the User name and Auth Password if needed (see section 3.2.1.3).
Screen Display Description
Status Displays the connected status of analog ports
Normal
H/W Fault
Authentication Failed
Disabled
Port The connected port ID, as on the label on the back panel for each
port interface.
Number Selected SIP Trunk User Account.
User The user name assigned to this port.
Auth Password Enter the password if needed (see section 3.2.1.3).
Line Profile The media parameters defined through the <Profile Config>
operation (see section 3.2.4.1)
Action Configure call features for this particular analog port (see section
3.2.4.2)

113
InnoMedia ESBC Administrative Guide
3.2.4.1 Media Parameter Configuration for Analog Ports
Click <Profile Config> button to configure media parameters for analog ports.
Figure 88. Configuring media parameters for analog ports
FXS port media parameters Description
Profile ID Name of this profile
Signaling “Loop Start” and “Ground Start” are supported. Choose the
correct signaling type according to the analog equipment to which

114
InnoMedia ESBC Administrative Guide
the FXS port is connected.
DTMF mode “RFC2833” out-of-band and “In-band” methods are both
supported. If RFC 2833 is chosen, the ESBC supports auto
negotiation with the SIP servers (or SIP devices) at the SIP Trunk
side. Choose the correct mode according to the specification of
the service provider, or leave the default settings (2833)
unchanged.
Gain Controls telephone speaker and earpiece volume
CODEC Control SIP media negotiation. To change the priority level of a
CODEC, highlight it and click the arrow keys to adjust its position.
To remove a CODEC, click the <Delete> button under the Action
column.
Fax
The ESBC supports both “T.38 Relay” and Pass_Through modes for
fax transmission over an IP network.
Parameters for Pass_Through
FAX calls transmitted in Pass_Through mode are treated as voice
calls and transmitted using the G.711 codec only. Depending on
the region where the ESBC is deployed, choose either G.711 u-
Law, or G.711 A-Law for transmitting FAX calls.
Parameters for T.38 Relay
(Note: If the peer gateway does not support T.38 relay, FAX calls
will fall back to Pass_Through mode)
Jitter Buffer. Default value is 120 ms. Do not change the
default value unless necessary.
T2. Timeout timer for receiving packets. Default value is 400
ms. Do not change the default value unless necessary.
Low Speed Redundancy. Number of redundant T.38 fax
packets to be sent for the low speed V.21-based T.30 fax
machine protocol. Default value is 3. Do not change the
default value unless necessary.
High Speed Redundancy. Number of redundant T.38 fax
packets to be sent for high-speed V.17, V.27, and V.29 fax
machine image data. Default value is 1. Do not change the
default value unless necessary.
NOTE: Increasing the High Speed Redundancy parameter may
cause a significant impact in the network bandwidth consumed by
fax calls.
Bit Rate. Choose a fax transmission speed to be attempted:
2400, 4800, 9600, or 14400. By choosing 14400, the ESBC can
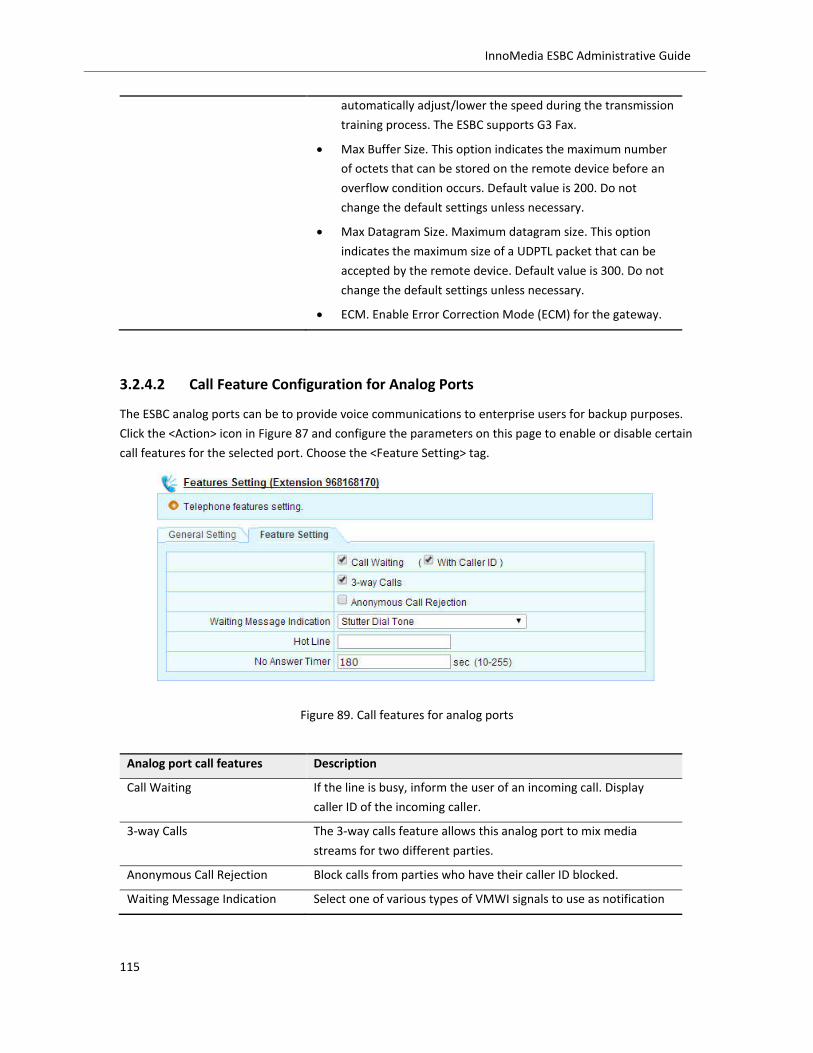
115
InnoMedia ESBC Administrative Guide
automatically adjust/lower the speed during the transmission
training process. The ESBC supports G3 Fax.
Max Buffer Size. This option indicates the maximum number
of octets that can be stored on the remote device before an
overflow condition occurs. Default value is 200. Do not
change the default settings unless necessary.
Max Datagram Size. Maximum datagram size. This option
indicates the maximum size of a UDPTL packet that can be
accepted by the remote device. Default value is 300. Do not
change the default settings unless necessary.
ECM. Enable Error Correction Mode (ECM) for the gateway.
3.2.4.2 Call Feature Configuration for Analog Ports
The ESBC analog ports can be to provide voice communications to enterprise users for backup purposes.
Click the <Action> icon in Figure 87 and configure the parameters on this page to enable or disable certain
call features for the selected port. Choose the <Feature Setting> tag.
Figure 89. Call features for analog ports
Analog port call features Description
Call Waiting If the line is busy, inform the user of an incoming call. Display
caller ID of the incoming caller.
3-way Calls The 3-way calls feature allows this analog port to mix media
streams for two different parties.
Anonymous Call Rejection Block calls from parties who have their caller ID blocked.
Waiting Message Indication Select one of various types of VMWI signals to use as notification

116
InnoMedia ESBC Administrative Guide
of new voicemails.
Hot Line With the hotline number entered, the telephone automatically
connects to this destination number as soon as the user lifts the
handset.
No Answer Timer No answer timeout for incoming call.
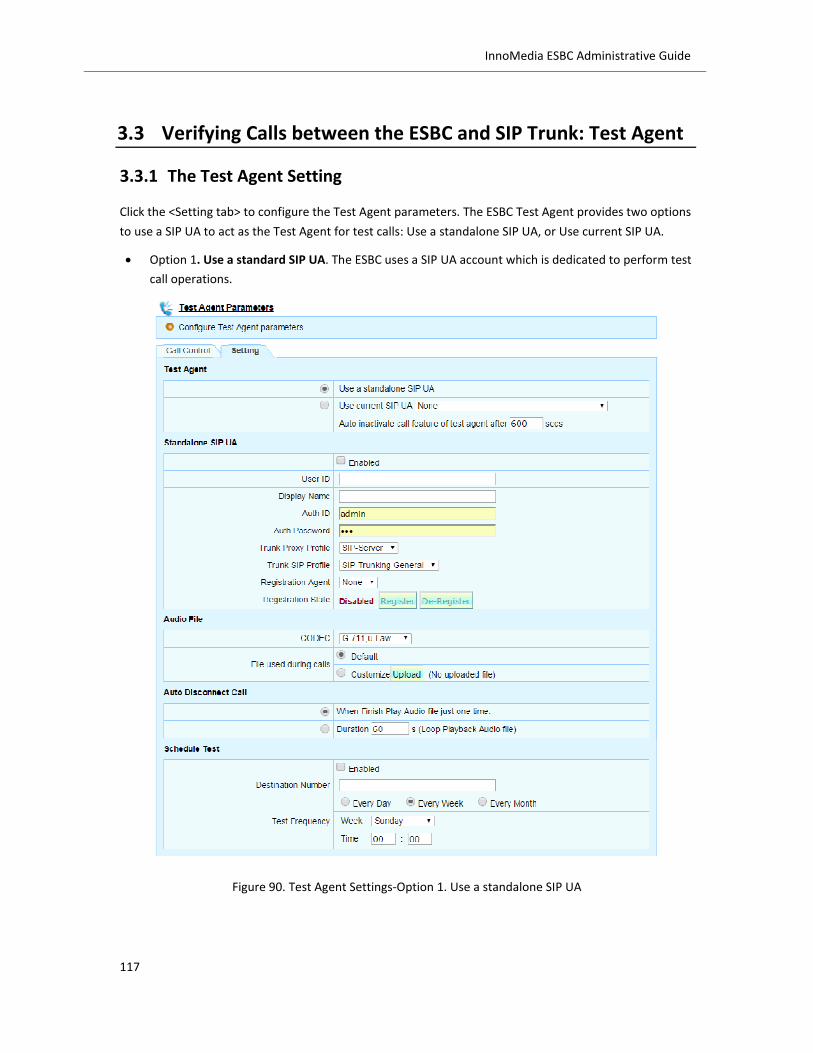
117
InnoMedia ESBC Administrative Guide
3.3 Verifying Calls between the ESBC and SIP Trunk: Test Agent
3.3.1 The Test Agent Setting
Click the <Setting tab> to configure the Test Agent parameters. The ESBC Test Agent provides two options
to use a SIP UA to act as the Test Agent for test calls: Use a standalone SIP UA, or Use current SIP UA.
Option 1. Use a standard SIP UA. The ESBC uses a SIP UA account which is dedicated to perform test
call operations.
Figure 90. Test Agent Settings-Option 1. Use a standalone SIP UA
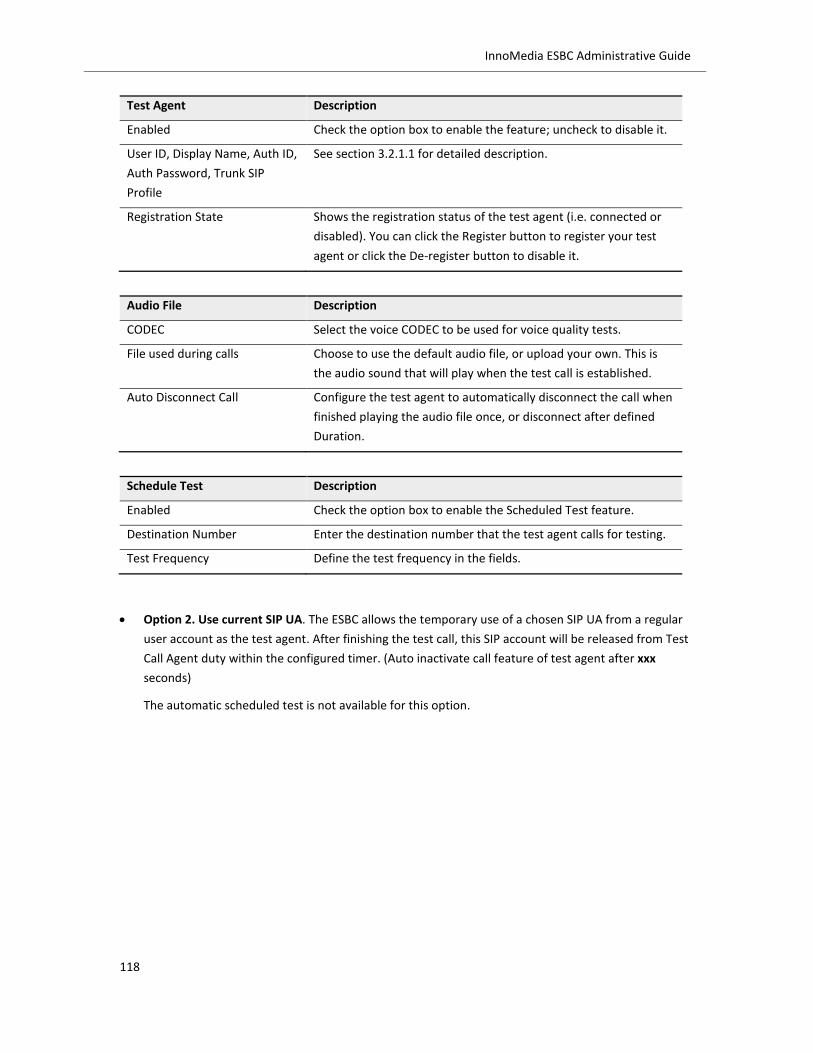
118
InnoMedia ESBC Administrative Guide
Test Agent Description
Enabled Check the option box to enable the feature; uncheck to disable it.
User ID, Display Name, Auth ID,
Auth Password, Trunk SIP
Profile
See section 3.2.1.1 for detailed description.
Registration State Shows the registration status of the test agent (i.e. connected or
disabled). You can click the Register button to register your test
agent or click the De-register button to disable it.
Audio File Description
CODEC Select the voice CODEC to be used for voice quality tests.
File used during calls Choose to use the default audio file, or upload your own. This is
the audio sound that will play when the test call is established.
Auto Disconnect Call Configure the test agent to automatically disconnect the call when
finished playing the audio file once, or disconnect after defined
Duration.
Schedule Test Description
Enabled Check the option box to enable the Scheduled Test feature.
Destination Number Enter the destination number that the test agent calls for testing.
Test Frequency Define the test frequency in the fields.
Option 2. Use current SIP UA. The ESBC allows the temporary use of a chosen SIP UA from a regular
user account as the test agent. After finishing the test call, this SIP account will be released from Test
Call Agent duty within the configured timer. (Auto inactivate call feature of test agent after xxx
seconds)
The automatic scheduled test is not available for this option.
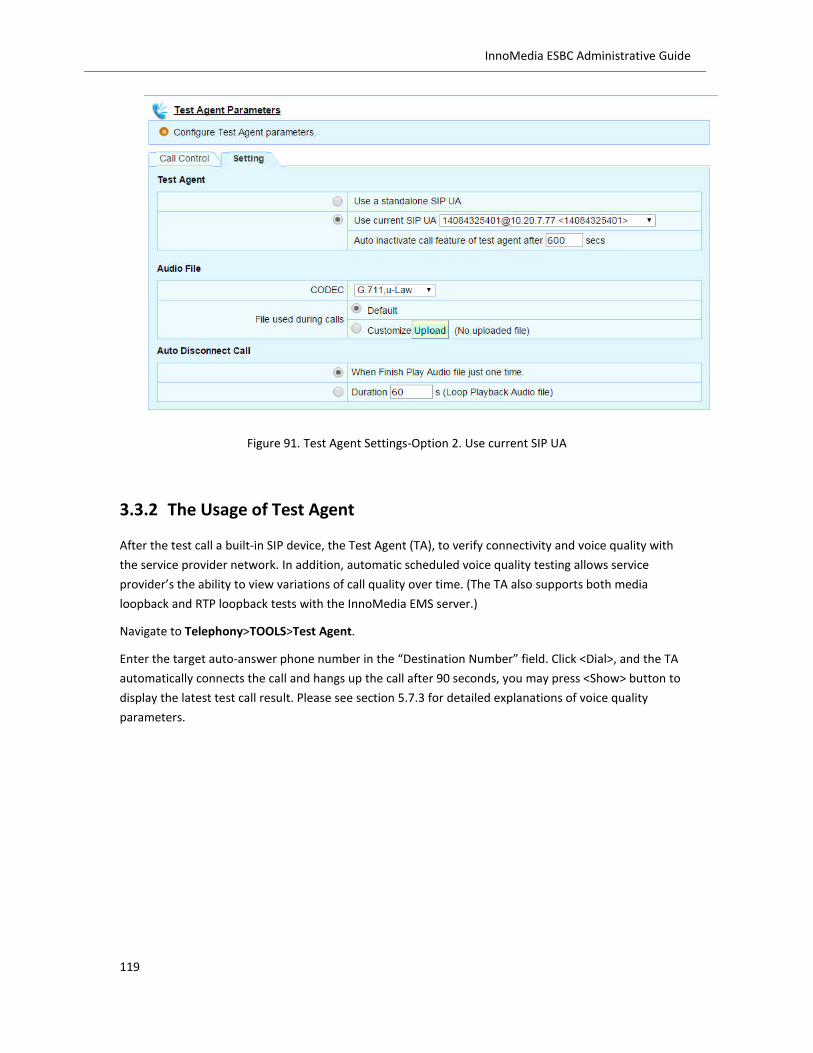
119
InnoMedia ESBC Administrative Guide
Figure 91. Test Agent Settings-Option 2. Use current SIP UA
3.3.2 The Usage of Test Agent
After the test call a built-in SIP device, the Test Agent (TA), to verify connectivity and voice quality with
the service provider network. In addition, automatic scheduled voice quality testing allows service
provider’s the ability to view variations of call quality over time. (The TA also supports both media
loopback and RTP loopback tests with the InnoMedia EMS server.)
Navigate to Telephony>TOOLS>Test Agent.
Enter the target auto-answer phone number in the “Destination Number” field. Click <Dial>, and the TA
automatically connects the call and hangs up the call after 90 seconds, you may press <Show> button to
display the latest test call result. Please see section 5.7.3 for detailed explanations of voice quality
parameters.

120
InnoMedia ESBC Administrative Guide
Figure 92. Test Agent Call Control
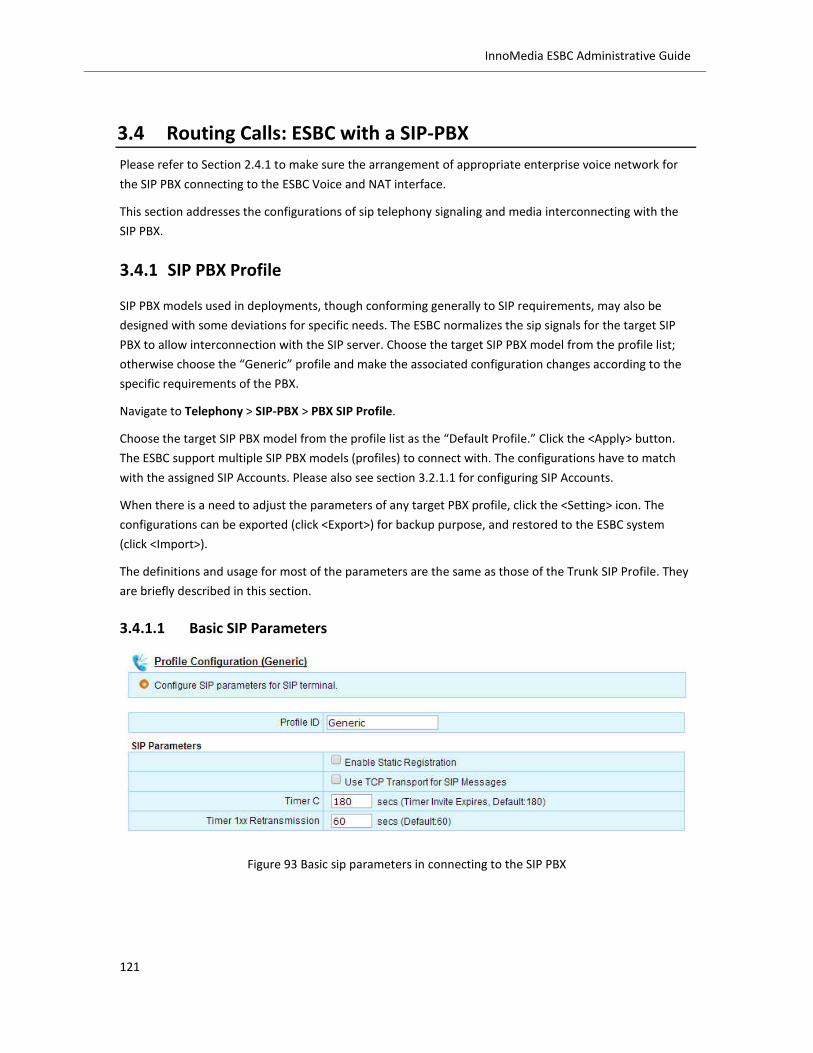
121
InnoMedia ESBC Administrative Guide
3.4 Routing Calls: ESBC with a SIP-PBX
Please refer to Section 2.4.1 to make sure the arrangement of appropriate enterprise voice network for
the SIP PBX connecting to the ESBC Voice and NAT interface.
This section addresses the configurations of sip telephony signaling and media interconnecting with the
SIP PBX.
3.4.1 SIP PBX Profile
SIP PBX models used in deployments, though conforming generally to SIP requirements, may also be
designed with some deviations for specific needs. The ESBC normalizes the sip signals for the target SIP
PBX to allow interconnection with the SIP server. Choose the target SIP PBX model from the profile list;
otherwise choose the “Generic” profile and make the associated configuration changes according to the
specific requirements of the PBX.
Navigate to Telephony > SIP-PBX > PBX SIP Profile.
Choose the target SIP PBX model from the profile list as the “Default Profile.” Click the <Apply> button.
The ESBC support multiple SIP PBX models (profiles) to connect with. The configurations have to match
with the assigned SIP Accounts. Please also see section 3.2.1.1 for configuring SIP Accounts.
When there is a need to adjust the parameters of any target PBX profile, click the <Setting> icon. The
configurations can be exported (click <Export>) for backup purpose, and restored to the ESBC system
(click <Import>).
The definitions and usage for most of the parameters are the same as those of the Trunk SIP Profile. They
are briefly described in this section.
3.4.1.1 Basic SIP Parameters
Figure 93 Basic sip parameters in connecting to the SIP PBX

122
InnoMedia ESBC Administrative Guide
SIP PBX Profile Description
Profile ID Enter a unique name for this profile. Usually enter the SIP PBX
model name.
Enable Static Registration Check this option when the target SIP PBX uses static registration
mode to connect to its north bound sip server, i.e., the ESBC.
Please refer to the SIP-PBX requirements for configuring this
option.
Use TCP Transport for SIP
Messages
Check this option when the target SIP PBX uses only the TCP
transport protocol for SIP messages (but not UDP). Please refer to
the SIP-PBX requirements for configuring this option.
Timer C, Timer 1xx
Retransmission
Standard SIP timers defined in RFC 3261
3.4.1.2 Interoperability
See the application note: The ESBC Caller ID screening mechanism.
Figure 94 SIP-PBX Interoperability I
SIP PBX Interoperability Description
Country Code The DIDs or user accounts configured on the ESBC and SIP server
usually do not include country code information. When the PBX
configured numbers are composed of “country code” + “DID”,

123
InnoMedia ESBC Administrative Guide
input the “country code” value in this field, and hence the ESBC
will translate the calling/called numbers with or without country
code, and connect calls.
Set URI format of Header:
From, To.
Depending on the SIP PBX configuration, the ESBC generates the
URI format and sends to the SIP PBX accordingly.
1. not E.164, without user=phone
2. not E.164, with user=phone
3. E.164 (prefixed with ‘+’), without user=phone
4. E.164 (prefixed with ‘+’), with user=phone
Set Identity header for calls to
SIP terminal
Depending on the SIP PBX privacy configuration, the ESBC may add
one of the following headers as the caller identity header for
privacy purposes and forward to the SIP PBX.
P-Asserted-Identity: defined in RFC 3325. This sip header is
used among trusted sip entities to carry the identification of
the user sending a sip message as it was verified by
authentication.
Remote-party-id: is defined in a sip draft. This sip header
provides information about the remote party.
Anonymous Call Depending on the SIP PBX configuration, the ESBC generates the
sip From header in four different formats. Select one of these from
the drop down menu.
Anonymous call-
Set privacy header to the value
“id”
The ESBC is able to assert an identity and forward to a trusted SIP
PBX by inserting “P-Asserted-Identity” and a “Privacy: id” header
(RFC3325)
Set Caller ID if it does not exist When the inbound call to the SIP PBX does not include a Caller ID,
the ESBC may insert a specified caller ID.
Get Caller ID from SIP Header if
exists
Choose desired caller ID source(s) among the following three
options to transport the SIP PBX
P-Asserted-Identity | Remote-Party-ID | P-Preferred-Identity
Forward SIP Header to PBX Check these items to allow the ESBC to forward the following SIP
headers from the service provider network to the SIP PBX. The
ESBC itself does not generate the following headers, it simply
forwards.
Alert-Info | History-Info | Diversion | Call-Info | Recv-Info | Allow-
Event

124
InnoMedia ESBC Administrative Guide
Figure 95. SIP-PBX Interoperability II
Please refer to the application notes: ESBC Application Notes- Configurations for SIP PBX Call Transfer-
REFER.
Please refer to the application notes: The ESBC Caller ID screening mechanism.
SIP Interoperability Description
Forward DTMF in SIP INFO to
SIP Server
When this feature is enabled, the ESBC forwards SIP INFO if the
registered SIP UAs send DTMF tones using SIP INFO method.
Strip ICE Attribute ICE attributes are used for NAT traversal purposes. Enable this
feature to allow the ESBC to strip all ICE related parameters in SDP
messages for messages sent to the SIP PBX. ICE related attributes
in SDP include
a=candidate(.*)
a=ice(.*)
Remove Contact and Record-
Route Headers in 180
responses
Enable this feature so that the ESBC removes network routing
information (Contact headers and Record-Route headers) from SIP
messages before forwarding to the SIP PBX.
Add expires header in the 200
response of registration
Expires header: value in seconds e.g., Expires=3600
Inside a REGISTER request, an Expires header designates the
lifespan of the registration.
Use the SIP Terminal’s IP
address as the domain
Enable this feature so that the ESBC composes the host-part of the
SIP URI for request messages using the SIP-PBX IP and forwards to
the SIP-PBX.
Use “Ir=true” for loose routing Depending on the SIP PBX configuration, the ESBC adds “Ir=true”
to enable the loose routing feature.
In loose routing, as specified in RFC3261, the Request-URI always
contains the URI of the destination user agent. As opposed to
“strict routing,” where the request-URI always contains the URI of

125
InnoMedia ESBC Administrative Guide
the next hop.
Use entire SIP address as the
authentication name
Use AOR, e.g., “user@domain” as the authentication ID.
Use RFC2543 Hold RFC2543 is obsoleted by RFC3261. For backward compatibility, the
ESBC can allow the use of “c” destination addresses set to all
zeroes (0.0.0.0) for call hold operations.
Prefer Route by Identities If this item is checked, the ESBC validates Caller ID in the order of
precedence “P-Preferred-Identity” > “P-Asserted-Identity” >
“Remote-Party-Identity” > “From” of the INVITE messages from
the SIP PBX. Otherwise the ESBC validates “From” header only.
(Please refer to the application notes: ESBC Application Notes-ANI
TN Screen.
Remove other media types
when sending T.38 offer
When SIP/SDP messages include multiple m= lines for SIP offers,
the ESBC removes those m= lines which are not related to T.38
media types.
Ignore domain in Refer-To
Header
This option is designed for processing call transfer features using
the SIP REFER method with the SIP-PBX.
Please refer to the application notes: ESBC Application Notes-
Configurations for SIP PBX Call Transfer-REFER
Figure 96. SIP-PBX Interoperability III
SIP Interoperability Description
Order of sending Re-INVITEs Some particular SIP UAs do not proceed with new sessions with
reINVITEs for the current dialog unless the current session is
concluded with a response code, such as 200 OK. Leave the
default setting unless necessary.
Scenario: A – ESBC – B. After call setup, the ESBC receives reINVITE
from A.
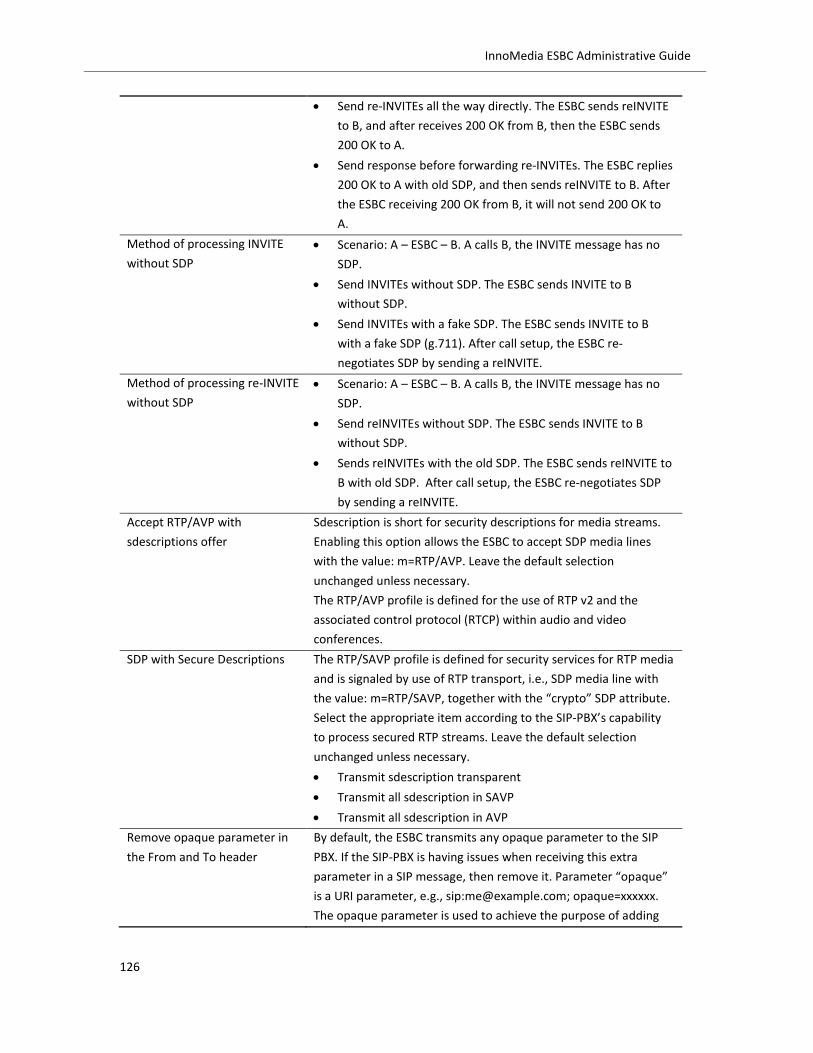
126
InnoMedia ESBC Administrative Guide
Send re-INVITEs all the way directly. The ESBC sends reINVITE
to B, and after receives 200 OK from B, then the ESBC sends
200 OK to A.
Send response before forwarding re-INVITEs. The ESBC replies
200 OK to A with old SDP, and then sends reINVITE to B. After
the ESBC receiving 200 OK from B, it will not send 200 OK to
A.
Method of processing INVITE
without SDP
Scenario: A – ESBC – B. A calls B, the INVITE message has no
SDP.
Send INVITEs without SDP. The ESBC sends INVITE to B
without SDP.
Send INVITEs with a fake SDP. The ESBC sends INVITE to B
with a fake SDP (g.711). After call setup, the ESBC re-
negotiates SDP by sending a reINVITE.
Method of processing re-INVITE
without SDP
Scenario: A – ESBC – B. A calls B, the INVITE message has no
SDP.
Send reINVITEs without SDP. The ESBC sends INVITE to B
without SDP.
Sends reINVITEs with the old SDP. The ESBC sends reINVITE to
B with old SDP. After call setup, the ESBC re-negotiates SDP
by sending a reINVITE.
Accept RTP/AVP with
sdescriptions offer
Sdescription is short for security descriptions for media streams.
Enabling this option allows the ESBC to accept SDP media lines
with the value: m=RTP/AVP. Leave the default selection
unchanged unless necessary.
The RTP/AVP profile is defined for the use of RTP v2 and the
associated control protocol (RTCP) within audio and video
conferences.
SDP with Secure Descriptions The RTP/SAVP profile is defined for security services for RTP media
and is signaled by use of RTP transport, i.e., SDP media line with
the value: m=RTP/SAVP, together with the “crypto” SDP attribute.
Select the appropriate item according to the SIP-PBX’s capability
to process secured RTP streams. Leave the default selection
unchanged unless necessary.
Transmit sdescription transparent
Transmit all sdescription in SAVP
Transmit all sdescription in AVP
Remove opaque parameter in
the From and To header
By default, the ESBC transmits any opaque parameter to the SIP
PBX. If the SIP-PBX is having issues when receiving this extra
parameter in a SIP message, then remove it. Parameter “opaque”
is a URI parameter, e.g., sip:[email protected]; opaque=xxxxxx.
The opaque parameter is used to achieve the purpose of adding
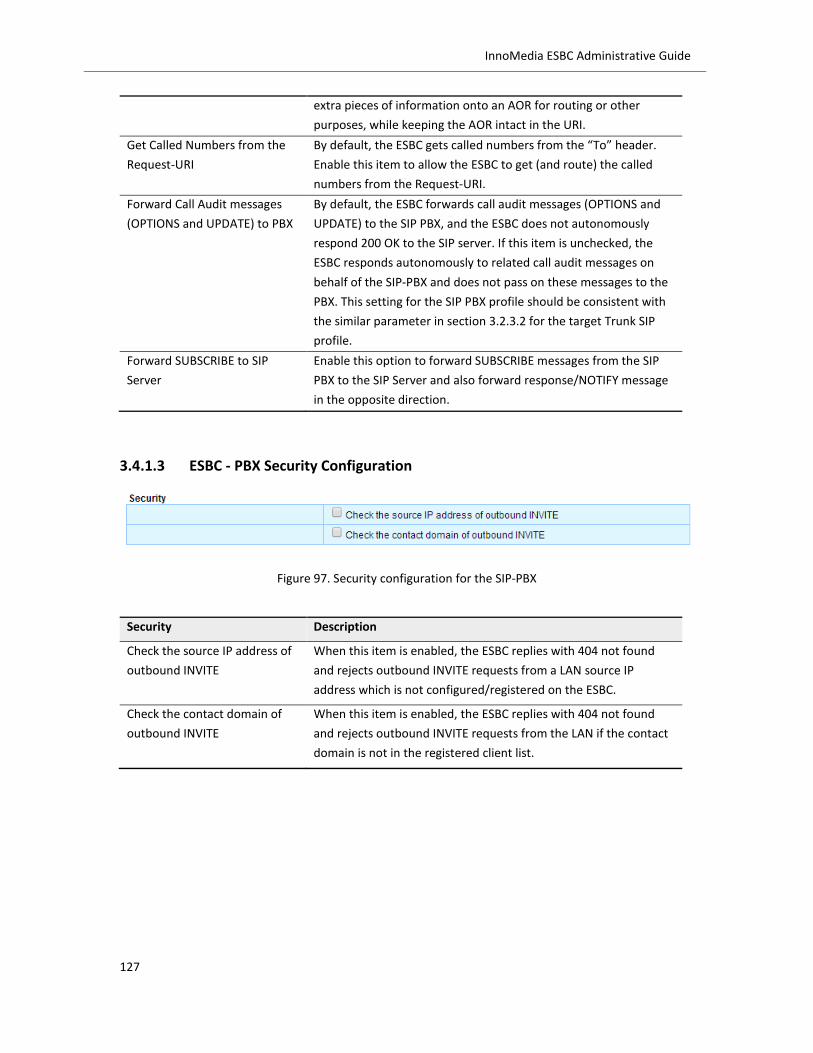
127
InnoMedia ESBC Administrative Guide
extra pieces of information onto an AOR for routing or other
purposes, while keeping the AOR intact in the URI.
Get Called Numbers from the
Request-URI
By default, the ESBC gets called numbers from the “To” header.
Enable this item to allow the ESBC to get (and route) the called
numbers from the Request-URI.
Forward Call Audit messages
(OPTIONS and UPDATE) to PBX
By default, the ESBC forwards call audit messages (OPTIONS and
UPDATE) to the SIP PBX, and the ESBC does not autonomously
respond 200 OK to the SIP server. If this item is unchecked, the
ESBC responds autonomously to related call audit messages on
behalf of the SIP-PBX and does not pass on these messages to the
PBX. This setting for the SIP PBX profile should be consistent with
the similar parameter in section 3.2.3.2 for the target Trunk SIP
profile.
Forward SUBSCRIBE to SIP
Server
Enable this option to forward SUBSCRIBE messages from the SIP
PBX to the SIP Server and also forward response/NOTIFY message
in the opposite direction.
3.4.1.3 ESBC - PBX Security Configuration
Figure 97. Security configuration for the SIP-PBX
Security Description
Check the source IP address of
outbound INVITE
When this item is enabled, the ESBC replies with 404 not found
and rejects outbound INVITE requests from a LAN source IP
address which is not configured/registered on the ESBC.
Check the contact domain of
outbound INVITE
When this item is enabled, the ESBC replies with 404 not found
and rejects outbound INVITE requests from the LAN if the contact
domain is not in the registered client list.
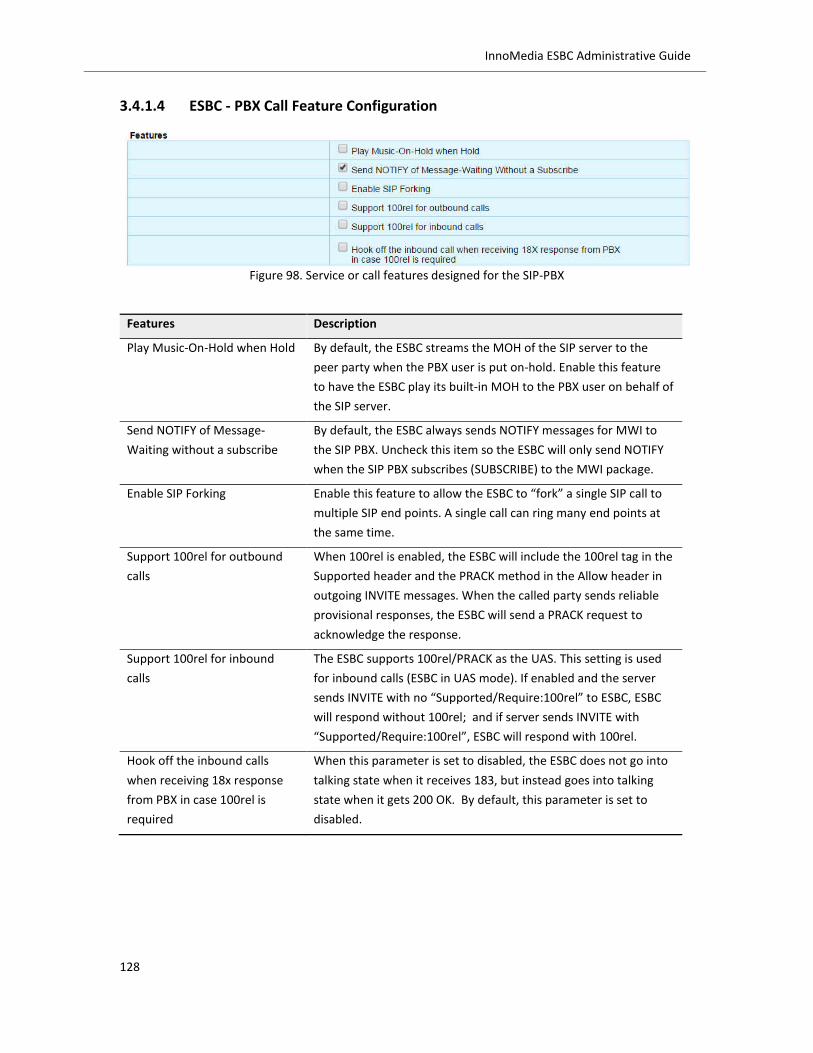
128
InnoMedia ESBC Administrative Guide
3.4.1.4 ESBC - PBX Call Feature Configuration
Figure 98. Service or call features designed for the SIP-PBX
Features Description
Play Music-On-Hold when Hold By default, the ESBC streams the MOH of the SIP server to the
peer party when the PBX user is put on-hold. Enable this feature
to have the ESBC play its built-in MOH to the PBX user on behalf of
the SIP server.
Send NOTIFY of Message-
Waiting without a subscribe
By default, the ESBC always sends NOTIFY messages for MWI to
the SIP PBX. Uncheck this item so the ESBC will only send NOTIFY
when the SIP PBX subscribes (SUBSCRIBE) to the MWI package.
Enable SIP Forking Enable this feature to allow the ESBC to “fork” a single SIP call to
multiple SIP end points. A single call can ring many end points at
the same time.
Support 100rel for outbound
calls
When 100rel is enabled, the ESBC will include the 100rel tag in the
Supported header and the PRACK method in the Allow header in
outgoing INVITE messages. When the called party sends reliable
provisional responses, the ESBC will send a PRACK request to
acknowledge the response.
Support 100rel for inbound
calls
The ESBC supports 100rel/PRACK as the UAS. This setting is used
for inbound calls (ESBC in UAS mode). If enabled and the server
sends INVITE with no “Supported/Require:100rel” to ESBC, ESBC
will respond without 100rel; and if server sends INVITE with
“Supported/Require:100rel”, ESBC will respond with 100rel.
Hook off the inbound calls
when receiving 18x response
from PBX in case 100rel is
required
When this parameter is set to disabled, the ESBC does not go into
talking state when it receives 183, but instead goes into talking
state when it gets 200 OK. By default, this parameter is set to
disabled.
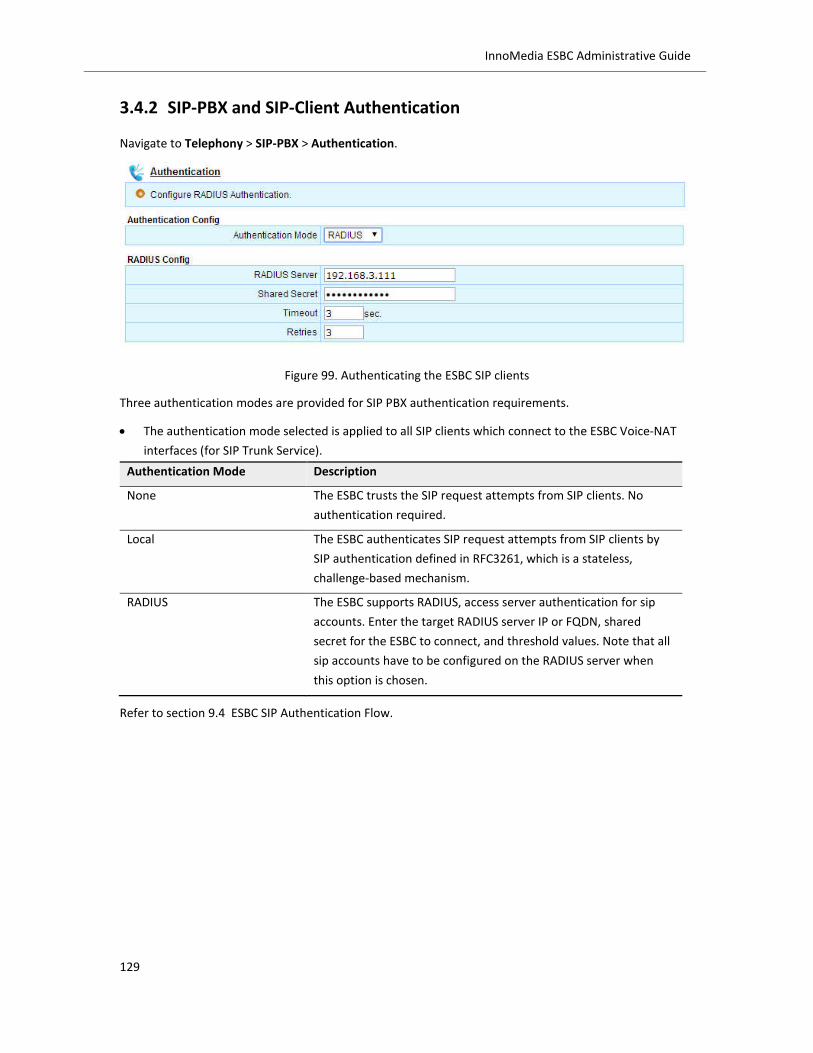
129
InnoMedia ESBC Administrative Guide
3.4.2 SIP-PBX and SIP-Client Authentication
Navigate to Telephony > SIP-PBX > Authentication.
Figure 99. Authenticating the ESBC SIP clients
Three authentication modes are provided for SIP PBX authentication requirements.
The authentication mode selected is applied to all SIP clients which connect to the ESBC Voice-NAT
interfaces (for SIP Trunk Service).
Authentication Mode Description
None The ESBC trusts the SIP request attempts from SIP clients. No
authentication required.
Local The ESBC authenticates SIP request attempts from SIP clients by
SIP authentication defined in RFC3261, which is a stateless,
challenge-based mechanism.
RADIUS The ESBC supports RADIUS, access server authentication for sip
accounts. Enter the target RADIUS server IP or FQDN, shared
secret for the ESBC to connect, and threshold values. Note that all
sip accounts have to be configured on the RADIUS server when
this option is chosen.
Refer to section 9.4 ESBC SIP Authentication Flow.

130
InnoMedia ESBC Administrative Guide
3.5 ESBC System Global SIP Settings
3.5.1 SIP Parameters
To configure the ESBC’s global SIP settings (in addition to those on the “Trunk SIP Profile” and “PBX SIP
Profile”), navigate to Telephony > SIP-PBX > SIP Parameters.
3.5.1.1 SIP Parameters
Figure 100 SIP parameter global settings
SIP Parameters Description
SIP Session Timer The SIP session timer specifies a keep-alive mechanism for SIP
sessions, which limits the time period over which a stateful proxy
must maintain state information without a refresh re-INVITE.
Routing incoming calls by
Request-URI
The ESBC, by default, routes incoming calls according to the
context specified in the “TO” header. If this box is checked, the
ESBC routes incoming calls according to “Request-URI” header.

131
InnoMedia ESBC Administrative Guide
T1, T2, T4, Timer B, Timer F,
Timer H, Timer D
Standard SIP timers, defined in RFC 3261
T100 Waiting time for sending 100 Trying for an INVITE message.
Max Forwards Defined in RFC3261, the Max-Forwards header is used to limit the
number of proxies or gateways that can forward the request to
avoid looping errors. Default number is 70.
SIP Port Port used for SIP signaling communicating with north bound SIP
servers. Default 5060 for B2BUA (SIP trunk service) and 5080 for
SIP-ALG (hosted voice service).
Place call among SIP UAs as
internal calls
When this feature is enabled, the ESBC routes calls locally when
the called numbers are configured on the ESBC database and does
not route to the service provider network. By default, this feature
is disabled.
Send De-Register if reboot When the ESBC reboots, it sends a De-Register message to the
service provider network, and initiates the Register and service
subscription processes.
Reject B2BUA incoming TCP
connection via WAN
By default, the ESBC rejects TCP connection attempts to reduce
the possibility of large TCP packets being dropped by routers along
the communication path which may result in call attempt failures.
Automatic switching to TCP
whenever SIP request message
size exceeds xxxx bytes.
Allow automatic switching from UDP to TCP transport when the
size of a SIP request message is larger than a threshold value.
Default is set to enabled, and the configurable threshold default
value is 1300 bytes (not including UDP and IP headers). This
configuration applies to both LAN and WAN interfaces, but only to
SIP request messages, not responses.
Store nonce for authentication Depending on the SIP (or IMS) server configuration, the ESBC may
store nonce for authentication.
Media Inactivity Timer Single-direction or Bi-direction time-out timer in second.
If checked, the ESBC disconnects calls when no media traffic is
detected according to the selection “single-direction” or “both-
direction” after the xxx seconds entered.
Send Dummy packets to open
WAN side NAT connections
Keep alive message to keep rtp port open if there is NAT
equipment deployed in the service provider network to which the
ESBC transmits media packets.
SIP response for PRI D-Channel
Down
Defines the SIP response code sent to the SIP Server when the PRI
D-Channel goes down.

132
InnoMedia ESBC Administrative Guide
3.5.1.2 System Music on Hold (MOH)
Figure 101. Configuring the ESBC system MOH
MOH Description
Audio File The ESBC plays Music On Hold for calls on the FXS ports and SIP
UAs during special conditions to prevent the remote side
experiencing dead-silence if they are on hold. The ESBC supports a
customized MOH audio file of G.711-uLaw of 60 second in length.
3.5.1.3 Filter SIP Method
The ESBC filters SIP messages specified in the list during the call setup process. The configurations affect
both inbound and outbound directions to the SIP PBX and the SIP server in the Service Provider network.
Figure 102 Filter SIP Method
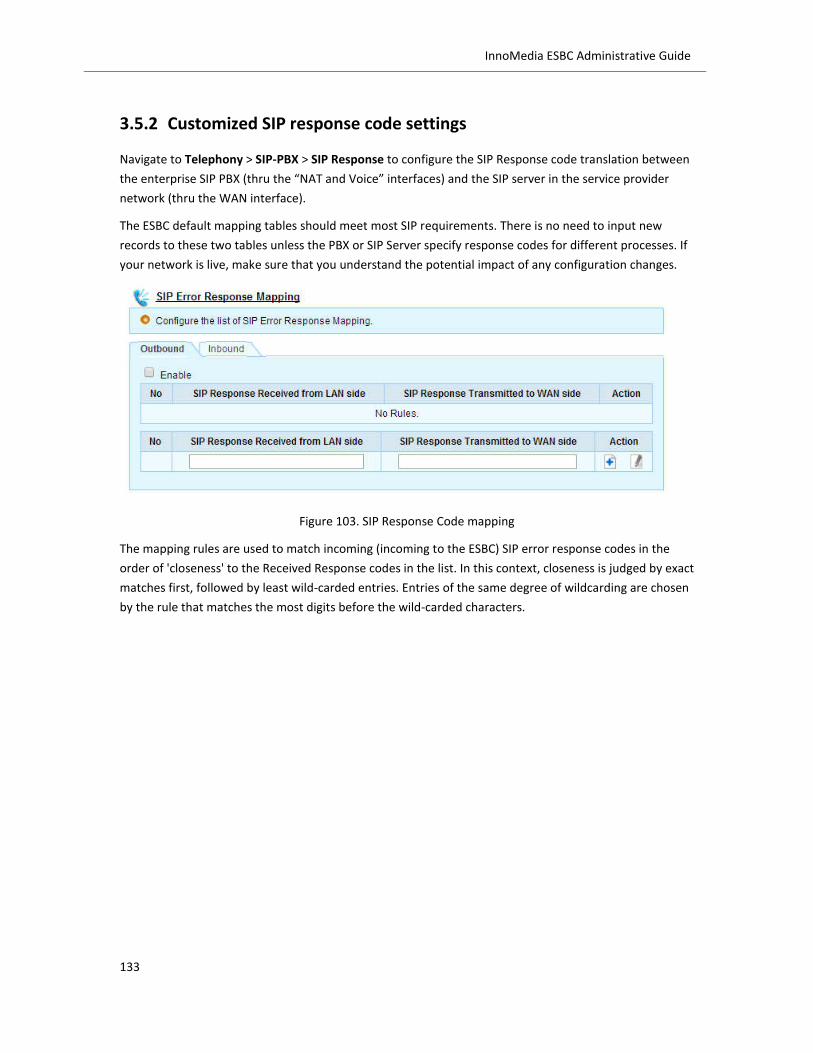
133
InnoMedia ESBC Administrative Guide
3.5.2 Customized SIP response code settings
Navigate to Telephony > SIP-PBX > SIP Response to configure the SIP Response code translation between
the enterprise SIP PBX (thru the “NAT and Voice” interfaces) and the SIP server in the service provider
network (thru the WAN interface).
The ESBC default mapping tables should meet most SIP requirements. There is no need to input new
records to these two tables unless the PBX or SIP Server specify response codes for different processes. If
your network is live, make sure that you understand the potential impact of any configuration changes.
Figure 103. SIP Response Code mapping
The mapping rules are used to match incoming (incoming to the ESBC) SIP error response codes in the
order of 'closeness' to the Received Response codes in the list. In this context, closeness is judged by exact
matches first, followed by least wild-carded entries. Entries of the same degree of wildcarding are chosen
by the rule that matches the most digits before the wild-carded characters.

134
InnoMedia ESBC Administrative Guide
3.6 Numbering Plan
When the ESBC SIP User accounts (usually DID numbers) and the PBX numbers do not have the same
patterns, the “Digit Translation” plan and configuration can be used.
See the ESBC Application Notes--Configurations for digit translations.
3.6.1 Configuring numbers and formulating digit translation rules
The Digit Translation Feature enables the ESBC to prepend or strip certain digits from calling and called
numbers in both the outbound and inbound directions by formulating match-pattern and digit map rules.
Navigate to Telephony > ADVANCED > Digit Translation.
Figure 104. Digit Translation for Called or Calling Parties
Digit Translation Description
Direction Direction of the call: Inbound or Outbound
Call Party - Match Call party to be used to match the digit string rule: Calling Party or
Called Party. Note: For Inbound calls, only the called party can be
modified.
Type Types of calls: All, SIP, or PRI
Match Pattern The Digit Map string that must match before the number can be
translated.
Call Party - Translate Choose whether to translate the number of the calling or called
Party.
Strip Digits The number of digits to strip, starting from the left side.
Add prefix The digit string to prepend to the number
Description Add a description of this translation rule.
The following example describes the rule displayed in Figure 104.
1. Strip the first four digits from any telephone numbers which match the pattern (1408xxxxxxx).
2. Add Prefix “3510” is to prepend digit 3510 to the string after step 1 is processed.
The result of this translation will be 3510xxxxxxx (the called numbers sent from the ESBC to the SIP server).

135
InnoMedia ESBC Administrative Guide
NOTE: To translate CallerID from the PBX for outbound calls, it may be necessary to configure “Set From
header for outgoing calls” on the “Trunk SIP Profile.” Select the item “Use the original caller” (PBX) and
the SIP Server must accept the calling number after translation (see section 3.2.3.2).
3.7 Emergency Call configuration
The ESBC emergency call features permit the service to provide:
Proper priority for emergency calls
Line Preemption to always allow emergency calls regardless of session limits--All 911 Emergency Calls
always are allowed to be established regardless of any limit in the number of sessions, i.e., the system
capacity.
Overriding of the caller ID and caller name information--Emergency CID and Display Name overrides
all other caller id and display name settings when dialing out on an Outbound Route flagged as
Emergency.
3.7.1.1 Adding or deleting emergency call numbers
To configure emergency call numbers: navigate to Telephony > ADVANCED > Emergency Call.
Figure 105. Adding emergency call numbers
Enter an emergency call number in the Number field and its description in the Description Field. Carefully
check your local emergency call list. Click the <Add and Apply> button to add this new entry to the ESBC
database.
3.7.1.2 Connection settings for emergency call numbers
Click the <Setting> tab.

136
InnoMedia ESBC Administrative Guide
Figure 106. Connection settings for emergency call numbers
Connection Settings Description
Override Caller Information If enabled, Emergency CID and Display Name will override all other
caller id and display name settings when dialing out.
Caller ID Emergency caller ID.
Display Name Emergency caller Display Name.
Set SIP Priority Header to
"emergency"
If enabled, the Outbound Route is flagged as Emergency by setting
priority: emergency in sip messages.
Set SIP Priority Header to
"emergency"
If enabled, the Outbound Route is flagged as Emergency.
Override Trunk Group Identifier If enabled, the emergency tgrp will override the regular Trunk
Group Identifier.
tgrp Enter an unique Trunk Group Identifier for Emergency Calls
Trunk-context Enter the Trunk-context for emergency calls
DSCP for RTP Packets Upstream Internet Protocol (IP) packets are marked with a
configurable DSCP to indicate that the IP packet content contains
Emergency Media
Value DSCP value for emergency call media packets.
Send SNMP Trap Check this box to send an SNMP trap to the EMS or SNMP server
when there is an emergency call.

137
InnoMedia ESBC Administrative Guide
3.8 Media Transcoding
3.8.1 Introduction
The media transcoding feature offered in InnoMedia ESBC 9378 and ESBC-10K series provides a solution
to the problem where the Service Provider supports different media capabilities to those of the end
device located at the enterprise. The ESBC provides the ability to transcode between the following media
capabilities: Fax (T.38 and G.711), Voice CODECs (G.711, G.729, G.726), and DTMF (RFC2833 and In-band).
By configuring the ESBC, it is possible to allow different forms of SIP signaling negotiation between the
Service Provider side and the Enterprise side before media transcoding takes place.
Please refer to the ESBC Application Notes- Media Transcoding Features for call flows and signal
descriptions.
3.8.1.1 Enabling Transcoding Profiles
The Transcoding Profile screen allows the profile list and the default profile to be managed. It also
provides access to the Profile configuration screen, which allows the system administrator to configure
Fax, CODEC or DTMF transcoding settings between the WAN and LAN side of the ESBC.
To enable the Transcoding Profile, navigate to the Telephony > ADVANCED > Transcoding Profile page.
Simply check the “Enable” and hit the <Apply> button.
Figure 107 Enabling the transcoding profile
3.8.1.2 Editing or Adding a Transcoding Profile
To add a Transcoding Profile, click the <Add> button and then click the <Setting> button to edit
transcoding parameters. Individual profiles can be created with different configurations for a specific SIP
UA or a group of SIP UAs to use.
In the Profile Configuration screen, modify the Profile ID and select one Transcoding Mode option from
the drop-down list that a SIP UA group can use:

138
InnoMedia ESBC Administrative Guide
Figure 108. Transcoding mode selections
Transcoding mode Description
No Transcoding Transcoding is disabled on UAs assigned to this transcoding profile
CODEC Transcoding This setting only allows CODEC transcoding. CODEC transcoding
only happens if there are no common CODECs between the caller
and called UAs. Fax and DTMF transcoding will not be performed.
CODEC, FAX, and DTMF
Transcoding
Fax, DTMF and CODEC transcoding for all calls.
CODEC, and FAX Transcoding Fax, CODEC transcoding for all calls, but no DTMF transcoding.
Transcoding options Description
Allow calls when no supported
CODEC in SDP offer
The ESBC will allow the SDP offer to pass through even if the codec
is not in the Extended CODEC list (see section 3.8.4). In this case,
no transcoding will take place, but this feature allows unsupported
transcoding codecs (e.g., G.723.1) to be negotiated end-to-end
between Enterprise and Service Provider SIP UA’s.
Allow calls even when
transcoding resources are
exhausted
When selected, the ESBC will allow calls to be processed even if
there may not be enough channels to process transcoding. The
calls will go through but the media may not be transcoded.

139
InnoMedia ESBC Administrative Guide
Figure 109. The ESBC Transcoding Profile Configuration
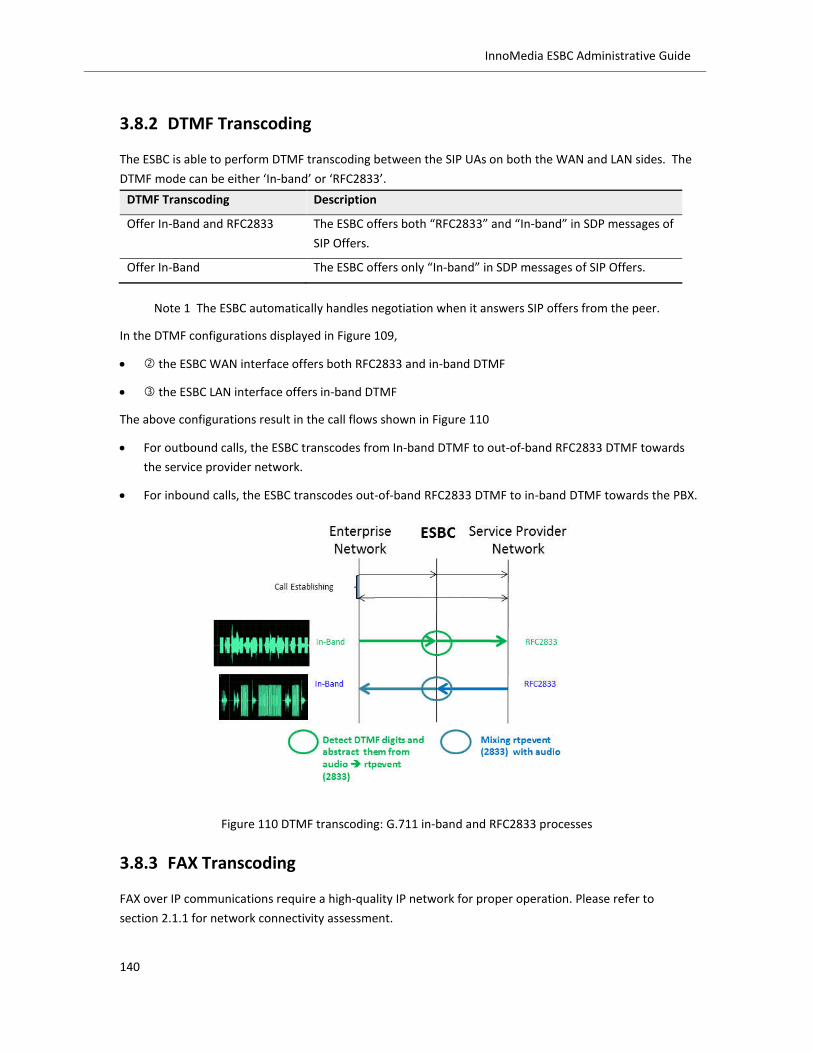
140
InnoMedia ESBC Administrative Guide
3.8.2 DTMF Transcoding
The ESBC is able to perform DTMF transcoding between the SIP UAs on both the WAN and LAN sides. The
DTMF mode can be either ‘In-band’ or ‘RFC2833’.
DTMF Transcoding Description
Offer In-Band and RFC2833 The ESBC offers both “RFC2833” and “In-band” in SDP messages of
SIP Offers.
Offer In-Band The ESBC offers only “In-band” in SDP messages of SIP Offers.
Note 1 The ESBC automatically handles negotiation when it answers SIP offers from the peer.
In the DTMF configurations displayed in Figure 109,
the ESBC WAN interface offers both RFC2833 and in-band DTMF
the ESBC LAN interface offers in-band DTMF
The above configurations result in the call flows shown in Figure 110
For outbound calls, the ESBC transcodes from In-band DTMF to out-of-band RFC2833 DTMF towards
the service provider network.
For inbound calls, the ESBC transcodes out-of-band RFC2833 DTMF to in-band DTMF towards the PBX.
Figure 110 DTMF transcoding: G.711 in-band and RFC2833 processes
3.8.3 FAX Transcoding
FAX over IP communications require a high-quality IP network for proper operation. Please refer to
section 2.1.1 for network connectivity assessment.

141
InnoMedia ESBC Administrative Guide
The ESBC performs FAX transcoding based on an SDP Offer-Answer negotiation. As shown in Figure 109,
and denote the configuration of the Egress FAX Setting. The ESBC can change its egress SDP signaling
using the following three options:
Egress FAX Setting Description
Passthrough ESBC allows both LAN UA and WAN UA endpoints to negotiate SDP
themselves
Offer G.711 Only ESBC removes the T.38 codec from the egress SDP offer.
Offer G.711 and T.38 ESBC sends two “m=” lines in its egress SDP including both T.38
and G.711
Packetization Time Ptime. This parameter is applicable to T.38 packets. Three options
are available: 10, 20, and 30 ms.
Note 2. When offered two “m=” lines in SDP, some FAX adaptors will choose the first “m=” line,
regardless of the content of the two lines.
To allow FAX Transcoding, the Egress FAX Setting must be selected for both WAN and LAN sides as shown
in Figure 109. This will allow the following steps to take place:
1. The ESBC starts processing FAX transcoding flows only when FAX transmission is detected.
2. When FAX transmission is detected by the FAX adaptor on ONE SIDE of the fax transmission (usually
the receiving side), this side initiates T.38 FAX requests by sending a reINVITE with T.38 information
to the ESBC. The ESBC will attempt to honor the T.38 FAX offer from this FAX adaptor.
3. When the condition of item 2 occurs, the ESBC forwards the FAX transmission request to the fax
adaptor on the OTHER SIDE, according to the ESBC Egress FAX Setting Rules given below:
If Offer G.711 and T.38 is selected, then the ESBC offers two transmission modes (T.38 and G.711)
and allows the FAX adaptor to choose which FAX mode to use.
If Offer G.711 Only is selected, then the ESBC offers only G.711 transmission mode to the FAX
adaptor.
If Passthrough is selected on either side, then the ESBC will let the FAX Adaptors determine the
final fax transmission mode by allowing both endpoints to negotiate SDP between them.
Note 3. T.38 does not indicate which party (calling party or called party) is responsible for detecting that a
FAX transmission is being attempted and initiating the switch from audio mode to T.38 mode by sending
reINVITE requests carrying T.38 information. That is, either calling party or called party may initiate T.38
FAX requests.
142
InnoMedia ESBC Administrative Guide
3.8.4 Voice Codec Transcoding
The ESBC can be configured to add certain codec capabilities (extended codec list, items and of
Figure 109) to transcoding profiles, and perform transcoding in cases where the selected codec in the
answer SDP is not available in the original offer.
3.8.4.1 Typical example of voice codec transcoding in deployment
When the Service Provider network only supports G.711 u-law, then only that CODEC is configured
for the ESBC WAN extended codec list.
When the PBX on the ESBC LAN network only supports G.729, then only that CODEC is configured for
the ESBC LAN extended codec list.
Referring to Figure 109, items and are used to configure the following codec transcoding example.
When an outgoing call from the PBX advertises only G.729 in the SDP offer, then the ESBC will add G.711
u-law in the SDP offer when sending out SIP messages to the Service Provider. When an Incoming call
from the Service Provider advertises only G.711 u-law in the SDP offer, then the ESBC will add G.729 in the
SDP offer when sending out SIP messages to the PBX in the LAN direction.
Once the call is established, the ESBC will transcode the media in both directions with the supported
CODECs.

143
InnoMedia ESBC Administrative Guide
3.9 Routing Calls: ESBC with a PRI-PBX
3.9.1 PRI Spans and Channels
The ESBC T1/E1 module supports ISDN PRI digital lines, and provides up to two T1/E1 ports for connection
to the enterprise’s TDM PBXs. The T1/E1 TDM voice traffic is converted to VoIP and processed by the ESBC
to connect to service provider’s SIP trunks and vice versa.
To configure digital lines (PRI T1/E1), navigate to Telephony > T1/E1> Digital Line.
The T1/E1 Status page displays the system configuration and status of all PRI span(s), including D and B
channels.
Figure 111. Status display of ESBC digital lines: 2 Span T1 model
Figure 112. Status display of ESBC digital line: 1 Span E1 model

144
InnoMedia ESBC Administrative Guide
PRI Span Status
Refer to section 3.9.3
Description
Span Status Disabled: Span is disabled
Clear, OK: Span is ready to use
D-channel Down: PRI span signaling error or wire unplugged
Alarm: Alarm signals are received locally or by the remote PBX
No. PRI span 1, and span 2
Protocol T1, J1 or E1
Line Coding T1 / J1: AMI or B8ZS
E1: HDB3 or HDB3 with CRC4
Line Framing T1 / J1: D4 or ESF
E1: CCS
Profile The media transmission profile defined in the “Profile Config”
section for PRI spans. It defines codecs and media related
parameters used for PRI spans communicating with the SIP Trunk
servers. See detailed description in section 3.9.5.
Span Group If there are more than one PRI spans (ports), each span can be
assigned to a different PRI Span Group to which certain UAs
belong. Each span group defines its own PRI span settings and
hence a span group may indicate a connection to a different TDM
PBX.
See detailed description in section 3.9.4.
Enabled Span enabled or disabled
Channel Status Idle: channel is ready to use
Active: an active call is ongoing on the specified channel
Unavailable: channel is disabled
ISDN signaling channel (D-Channel)
B-Channel Restarting
Remote out of service
145
InnoMedia ESBC Administrative Guide
3.9.2 PRI Span Statistics
The status view of span statistics for digital lines shows Framing Errors, CRC Errors, Code Violations,
Errored Blocks, and Slips.
Statistics of Span Health Description
No. PRI span (port) number
Framing Errors Framing errors are counted during synchronous state only. The
number increments when incorrect FT and FS-bits in F4, F12 and
F72 format or incorrect FAS-bits in ESF format are received.
CRC Errors No function if CRC6 procedure or ESF format are disabled. In ESF
mode, this counter is incremented when a multi-frame has been
received with a CRC error. CRC errors are not counted during
asynchronous state.
Code Violations No function if NRZ or CMI code has been enabled. If the B8ZS code
is selected, this counter is incremented by detecting violations
which are not due to zero substitution. If simple AMI coding is
enabled, all bipolar violations are counted.
Errored Block In ESF format this counter is incremented if a multi-frame has
been received with a CRC error or an errored frame alignment has
been detected. CRC and framing errors are not counted during
asynchronous state. In F4/12/72 format an errored block contain
4/12 or 72 frames. Incrementing is done once per multi-frame if
framing errors have been detected.
Slips The number of frame slips due to clock synchronization between
the ESBC and the TDM- PBX
Framing and Coding Status
The Line Framing and Line Coding configuration and the status of
the D-channel.
Reset Counter Resets the counters of all Span Statistics fields

146
InnoMedia ESBC Administrative Guide
3.9.3 PRI Span Connection Settings
3.9.3.1 Basic Settings
Always ensure that PRI Span parameters are consistent or matched with those settings on the peer TDM-
PBX. Always start from T1/E1 port 1. Ensure the cable between the interface port and the PBX is
connected correctly. ESBC PRI port 1 synchronizes with the clock source, and port 2 follows the timing of
port 1. PRI cable(s) must be connected to the port 1 before the port 2 can be used.
Figure 113. PRI Span Basic Settings
PRI Span: Basic Description
PRI Span Group Configure Span 1 (and/or 2) to the target PRI span group which
assigns the ESBC user accounts to PRI spans. (PRI Span Groups are
described in section 3.9.4)
PRI Profile The media transmission profile defined in the “Profile Config” for
PRI spans. It defines codecs and media related parameters used
for PRI spans communicating with the SIP Trunk servers.
Enabled Check this box to enable the particular span. Span 1 should always
be enabled.
Clock Source Internal. The ESBC default clock source is “Internal”, where voice
transmission timings follow the ESBC internal clocking scheme.
The connected TDM-PBX clock should be configured to follow the
ESBC clock.
Line. The ESBC follows the TDM-PBX clocking scheme.
If there are two spans, span2 always follows the clock of span1.
Span2 does not have its own clocking scheme.
If there is only one PRI line, always connect to SPAN1. Do not

147
InnoMedia ESBC Administrative Guide
change the ESBC clock mode default settings unless necessary.
Line Framing/Coding T1 / J1: ESF/B8ZS or D4/AMI
E1: CCS/HDB3 or CCS/HDB3 with CRC4
The configuration of the ESBC should be consistent with that of
the TDM-PBX.
Line Build Out Default mode: 0 db (CSU) / 0-133 feet (DSX-1).
The configuration of the ESBC should be based on T1 line length
and match that of the TDM-PBX.
Channel Total Channel Numbers: T1-24 channels; E1-31 channels
B-Channel: configure the enabled B-channel numbers.
D-Channel: T1 fixed at CH 24; E1 fixed at CH 16
Switch Type T1: National ISDN 2 (default), Nortel DMS100, AT&T 4ESS, Lucent
5ESS, Old National ISDN 1, Q.SIG
E1: EuroISDN (common in Europe)
The configuration of the ESBC should match that of the TDM-PBX.
Signaling Method PRI NET/PRI CPE.
Always configure the ESBC with PRI NET mode to perform switch
side functionality (the TDM-PBX should be in PRI-CPE mode). Do
not change this default setting unless necessary.
3.9.3.2 ISDN Interoperability Configuration
The parameters listed here are available for PRI interoperability purposes. They are settings for
provisioning Network specific facilities, and ISDN Timers for Q,921/Q.931. Normally, the default settings
meet most usage requirements. You will only need to adjust these parameters if the default settings need
to be changed to deal with special conditions.

148
InnoMedia ESBC Administrative Guide
Figure 114. PRI Span Interoperability Settings
PRI Span: Basic Description
Network Specific Facility The ISDN protocol allows telephone service providers to add their
own custom protocol extensions. These custom protocol
extensions provide various localized services that are not defined
in the general ISDN specifications.
The ESBC supports the following types of Network Specific Facility
and acts as a PRI NET role (Central Office switch side). Configure
‘none’ if the type is unknown or not configured on the TDM-PBX.
Available options are: none| sdn | megacom | tollfreemegacom |
accunet.
PRI Exclusive Default mode: checked. Unconditionally picking B channels
exclusively. This parameter should be enabled when the ESBC is
configured as “PRI NET.” Do not change this default setting unless
necessary.
Discard Remote Hold Retrieval To ignore remote side (PRI side) indications and use MOH that is
supplied over the B channel. Default mode: checked.
Do not change this default setting unless necessary.

149
InnoMedia ESBC Administrative Guide
ISDN Timers Do not change these default settings unless necessary.
Q921 Timers:
K: the maximum value of outstanding I frames
N200: Maximum number of retransmission attempts
T200: Transmission Timer
T203: Maximum time allowed without Frame Exchange
Q931 Timers:
T305: Timer sets how long to wait to get a response such as
RELEASE to a DISCONNECT message.
T308: sets how long to wait to get a response such as RELEASE
COMPLETE to a RELEASE message.
T313: sets how long to wait to get a response such as
CONNECT ACK to a CONNECT message.
Transmission of Facility Based
ISDN Supplementary Services
Default mode: checked.
Do not change this default setting unless necessary.
Enable Transfer Default mode: unchecked. Enable this feature when the client
subscribes to this supplementary service.
Supports business ISDN supplementary services: TBCT/RLT/ECT
(National ISDN II/Nortel DMS/Euro ISDN).
When enabled, the ESBC uses the SIP REFER method to the SIP
Server side and releases B channels when call transfer/forwarding
operations are successful.
Send Display Name Default mode: checked.
Send the display name of the caller to the TDM PBX called party
for an inbound call. Some TDM-PBX’s do not support “Display
Name” Facility message settings coming with the SETUP message.
Uncheck this setting when necessary.
Processing PRI Outbound Calls
Play Ring Back Tone (RBT). The ESBC provides the flexibility to support various forms of RBT generation,
either in-band RBT media or out-of-band RBT signals. The default configuration should meet most
deployment requirements.
Please take care in fine tuning ring back tone parameters only when necessary. If your network is live,
make sure that you understand the potential impact of any configuration changes. In the interworking of
ISDN and SIP/SDP signaling between the TDM-PBX and the VoIP network, a common problem scenario is:
A PBX user places a call through the ESBC to an external number and does not hear a RBT before the call is
answered, even though the receiving phone rings and the call is answered.

150
InnoMedia ESBC Administrative Guide
The ESBC processes in-band RBT media, or out-of-band RBT signals are controlled by the following
settings:
1. "Play Ringback Tone for outbound call". Three options are available: ALWAYS, NEVER, AS-NEEDED.
ALWAYS: The ESBC always sends inband RBT media to the PBX, either relaying media from the
network or the ESBC generating locally. No out-of-band RBT for “ALWAYS” mode.
NEVER: The ESBC never generates inband RBT locally. RBT sent to the PBX is either inband RBT media
from the SIP Trunk side or out-of-band RBT signals (default setting).
AS-NEEDED. The ESBC decides the RBT action to the PBX according to the messages it receives (SIP
response codes 180/183 from the network; and Q.931 Progress Indicator from the PBX).
2. Check Box: "Ignore 183/early media for outbound calls". When unchecked, the ESBC honors 183
messages received from the network side; otherwise the ESBC will not process inband RBT media
relayed from the network. (default setting: unchecked)
Please refer to Section 9.3.
PRI Span: Processing PRI
Outbound Calls
Description
Play Ring Back Tone (RBT) See description above.
Ignore 183/early media When it is unchecked, the ESBC honors 183 messages received
from the network side; otherwise the ESBC will not process inband
RBT media relayed from the network. (Default setting:
unchecked). See description above.
Buffered Calling-Name
Completion, timeout xxx ms.
(xxx = 500 by default)
When making outbound calls from the PRI-PBX, the PBX may send
a SETUP message without the Calling Party IE, and later the PBX
sends a FACILITY message with the Calling Party IE.
1. Disabled: The ESBC will send out the SIP INVITE message
without Calling-Name after receiving the SETUP message, and
ignores the FACILITY message afterwards.
2. Enabled: the ESBC will not send out the INVITE message
immediately. Instead, it will wait xxx ms for the FACILITY
message to arrive with the calling party information before
sending out the INVITE to the SIP server. The threshold timer
is as configured. (Option “Transmission of Facility-based ISDN
Supplementary Services” must be enabled for this setting).
Calling Number Substitution for
Unavailable Display Name
Enabled: When the Display Name is not available in the SETUP
message from the PBX, the ESBC uses the configured calling
number to substitute the User part of the From header of the SIP
message sent to the SIP Server. Note that the parameter “Set

151
InnoMedia ESBC Administrative Guide
From header for Outgoing calls” needs to be set to “Use the
Original Caller”. See Section 3.2.3.2 SIP Profile Configuration:
Interoperability.
Processing PRI Inbound Calls
PRI Span: Processing PRI
Inbound Calls
Description
Enable Early Media. Inband ring back tone (RBT) media may be provided by the PBX
when "Enable early media" is checked, which enables the ESBC to
send out a 183 message and forward inband media to the service
provider’s network when the ESBC receives inband signals from
the PBX. The default setting is enabled.
Configure settings from this section only when a WAN-side user
places a call to a PBX user through the ESBC and does not hear a
RBT before the call is answered, even though the receiving phone
rings and the call is answered.
Please refer to “ESBC Application Notes for PRI RBT Processing” for
a detailed feature description and the ESBC usage of the PRI
Progress Indicator.
Number of digits sent to PBX This setting allows the ESBC to strip off digits and send the number
of digits configured to the PBX. Examples as follows:
If the setting is set to “x”, then the ESBC keeps the x least
significant digits (from the right to the left). When x=4 with an
incoming call to the number 17775554567, the ESBC sends
“4567” to the PBX.
If the setting is set to “No Change”, then the ESBC does not
strip off any digits.
This specific setting only applies to a TDM PBX connected to the
ESBC with PRI span(s). There is another digit translation feature
(see section 3.6 Numbering Plan) whose configuration applies to
both SIP devices and a TDM PBX.
Calling Number can be passed
along as User-Provided or
Network-Provided
This parameter is used to set the screening indicator of an
inbound call. The options are:
User-Provided
Network-Provided
The ESBC default value setting is ’User-Provided’.

152
InnoMedia ESBC Administrative Guide
3.9.3.3 B-Channel Maintenance
B-channel “RESTART” and “Status Enquiry” mechanisms are used to synchronize the B-channels of the
ESBC and PBX so as to ensure that telephony services are operational.
Figure 115. Span Setting Screen— B-Channel maintenance
B-Channel RESTART
The RESTART message requests a restart (set to idle) for a specified B-channel to the peer device.
Response to a successful request is the RESTART ACKNOWLEDGE message.
By default, the ESBC triggers B-channel restarts every 60 minutes. The restart requests are performed on
idle B channels only. In addition, when an incoming call is placed and the ISDN cause code returned from
the PBX is "channel unavailable (44)" or "circuit congestion (34)", the ESBC immediately directs the
incoming call to the next available channel, and triggers a Restart Message to the PBX in order to re-
initialize this B-channel to an idle state.
If there are no acknowledgement messages (RESTART ACKNOWLEDGE) received from the PBX, then the
ESBC marks these channels with “not available for service”.
STATUS Enquiry
The ESBC attempts to continuously monitor the status of active calls by sending STATUS ENQUIRY
messages to the PBX periodically, and indicates whether calls are still active from the “STATUS” messages
returned from the PBX. The returned STATUS message contains the call state Information element (IE). On
the occurrence of certain procedural errors, both sides of the connection will attempt to re-align call
states.
3.9.4 User Account Assignment to PRI Span Groups
Click the <PRI Span Group> tab to assign user accounts to each Span Group. If there are more than one
PRI spans (ports), each span can be assigned to a different PRI Span Group to which certain UAs belong.
Each span group defines its own PRI span settings and hence a span group can allow a connection to a
different TDM PBX.
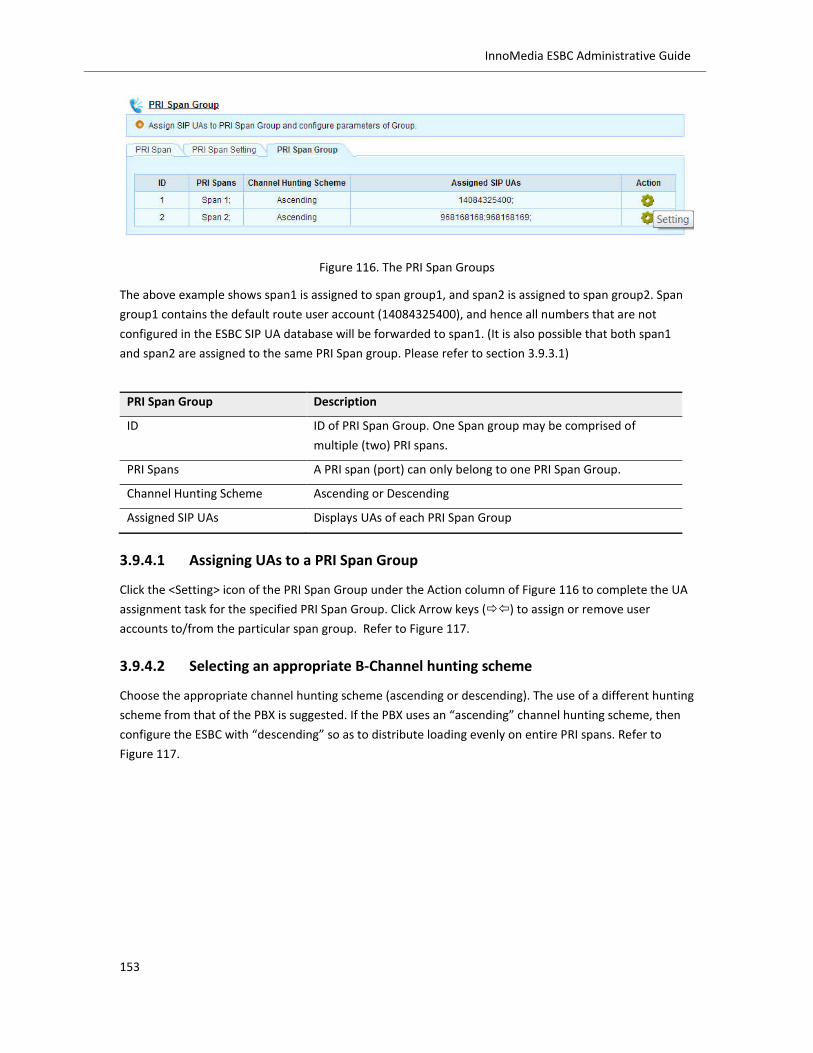
153
InnoMedia ESBC Administrative Guide
Figure 116. The PRI Span Groups
The above example shows span1 is assigned to span group1, and span2 is assigned to span group2. Span
group1 contains the default route user account (14084325400), and hence all numbers that are not
configured in the ESBC SIP UA database will be forwarded to span1. (It is also possible that both span1
and span2 are assigned to the same PRI Span group. Please refer to section 3.9.3.1)
PRI Span Group Description
ID ID of PRI Span Group. One Span group may be comprised of
multiple (two) PRI spans.
PRI Spans A PRI span (port) can only belong to one PRI Span Group.
Channel Hunting Scheme Ascending or Descending
Assigned SIP UAs Displays UAs of each PRI Span Group
3.9.4.1 Assigning UAs to a PRI Span Group
Click the <Setting> icon of the PRI Span Group under the Action column of Figure 116 to complete the UA
assignment task for the specified PRI Span Group. Click Arrow keys () to assign or remove user
accounts to/from the particular span group. Refer to Figure 117.
3.9.4.2 Selecting an appropriate B-Channel hunting scheme
Choose the appropriate channel hunting scheme (ascending or descending). The use of a different hunting
scheme from that of the PBX is suggested. If the PBX uses an “ascending” channel hunting scheme, then
configure the ESBC with “descending” so as to distribute loading evenly on entire PRI spans. Refer to
Figure 117.

154
InnoMedia ESBC Administrative Guide
Figure 117. PRI Span Group Settings

155
InnoMedia ESBC Administrative Guide
3.9.5 PRI Media Profile Settings
To configure media transmission settings for digital lines, click <Profile Config> button on the PRI Span
main page, Figure 112.
FAX over IP communications require a high-quality IP network for proper operation. Please refer to
section 2.1.1 for network connectivity assessment.
Figure 118 Media profile configuration for digital lines

156
InnoMedia ESBC Administrative Guide
PRI Media Profile Setting Description
Profile ID Name of this profile
DTMF mode “RFC2833” and “In-band” are supported. Choose the correct mode
according to what the sip trunk (service provider) indicates.
G.726 packing order There are two types of byte order for G.726, namely RFC3551 and
AAL2. With this setting you can choose the byte order in order to
use the same order as the remote entity.
Gain Control telephone speaker and listen volume.
Tx: transmission gain to digital lines (toward the PBX)
Rx: receiving gain from the digital lines and sending toward the SIP
Trunk side.
CODEC To change the priority level of the CODECs, select the CODEC and
click the up and down arrows at the bottom-right hand corner. To
remove a CODEC, click the Delete icon in the Action column.
Fax
The ESBC supports both “T.38 Relay” and Pass_Through modes for
fax transmission over an IP network.
Parameters for Pass_Through:
Fax signals are transmitted in the same way as voice media. Codec
used: G.711 (U-Law or A-Law).
Parameters for T.38 Relay:
Jitter Buffer. Default value is 120 ms. Do not change the
default value unless necessary.
T2. Timeout timer for receiving packets. Default value is 400
ms. Do not change the default value unless necessary.
Low Speed Redundancy. Number of redundant T.38 fax
packets to be sent for the low speed V.21-based T.30 fax
machine protocol. Default value is 4. Do not change the
default value unless necessary.
High Speed Redundancy. Number of redundant T.38 fax
packets to be sent for high-speed fax machine image data.
Default value is 2. Do not change the default value unless
necessary.
Bit Rate. Choose a fax transmission speed to be attempted:
2400, 4800, 9600, or 14400. By choosing 14400, the ESBC can
automatically adjust/lower the speed during the transmission
training process. The ESBC supports G3 Fax.
Max Buffer Size. This option indicates the maximum number
of octets that can be stored on the remote device before an

157
InnoMedia ESBC Administrative Guide
overflow condition occurs. Default value is 200. Do not
change the default settings unless necessary.
Max Datagram Size. Maximum datagram size. This option
indicates the maximum size of a UDPTL packet that can be
accepted by the remote device. Default value is 300. Do not
change the default settings unless necessary.
ECM. Enable Error Correction Mode (ECM) for the gateway.
Packetization Time (p-time): For fax, the period (in ms) after
which a UDPTL packet is sent. The default value is 20ms.

158
InnoMedia ESBC Administrative Guide
3.9.6 PRI diagnostics
To diagnose the status of the ESBC PRI spans, navigate to Telephony > T1/E1 > Digital Line, and click the
<Diagnostics> button. The ESBC supports both “Bit Error Rate Test” (BERT) and “Loop Back Test” for PRI
trunk lines. Note that the PRI trunk lines will be put out of service when entering diagnostic mode.
3.9.6.1 Bit error rate testing (BERT)
The BERT module tests PRI cables and diagnoses signal problems in the field. BERT generates a specific
pattern on the egress data stream of a T1/E1 controller and analyzes the ingress data stream for the same
pattern. The bits that do not match the expected pattern are counted as bit errors. Error statistics are
displayed in real-time during the testing process.
Environmental factors may affect BERT Results. In a communication system, the bit error rate of the
receiver side may be affected by transmission channel noise, interference, distortion, bit
synchronization problems, attenuation due to cable length, etc. The BERT checks communications
between the local and the remote ports.
Figure 119. BERT diagnostics page

159
InnoMedia ESBC Administrative Guide
Choose which span to test, target pattern of bit stream, loop back mode, and test duration, then simply
press the <Start> button to perform the BERT diagnostics.
Pattern Type
Depending on the particular sequence of bits (i.e., the data pattern) transmitted through a system,
different numbers of bit errors may occur. Patterns that contain long strings of consecutive identical digits
(CIDs). When the BER is tested using dissimilar data patterns, it is possible to get different results. A
detailed analysis of pattern-dependent effects is beyond the scope of this article, but it is sufficient to
note the importance of associating a specific data pattern with BER specifications and test results.
Pattern Type Description
2^15
2^20
Pseudo-random repeating test pattern that consists of 32,767
(2^15) or 1,048,575 (2^20) bits.
Unframed 2^15
Unframed 2^20
Pseudo-random repeating pattern that is 32,767 (2^15) or
1,048,575 (2^20) bits long. The DS-3/E3 framing bits in the DS-
3/E3 frame are overwritten when the pattern is inserted into the
frame.
Two modes are supported for BERT: Auto and Manual.
BERT Loop Back Mode Description
Auto The ESBC sends the loopup code to the remote port before
starting the BERT and sends the loopdown code after the BERT
finishes.
Manual The ESBC does not send loopup or loopdown mode codes to the
far end port. When this mode is selected, you must manually
enable loopback at the remote port before you start the BERT.
The ESBC displays the total number of error bits and statistics in real-time during the testing process. The
number of “Bit Errors” and “Sync Count” may be incremented over time until the duration timer is
reached.
BERT Test Results Description
Status Synchronized
Not Synchronized: when no signal is received.
Sync Count 0: not sync-up at all.
1 or more: the number of sync-up times.
Bit Errors This is the Count of total number of bit errors detected after
Status is "Synchronized."
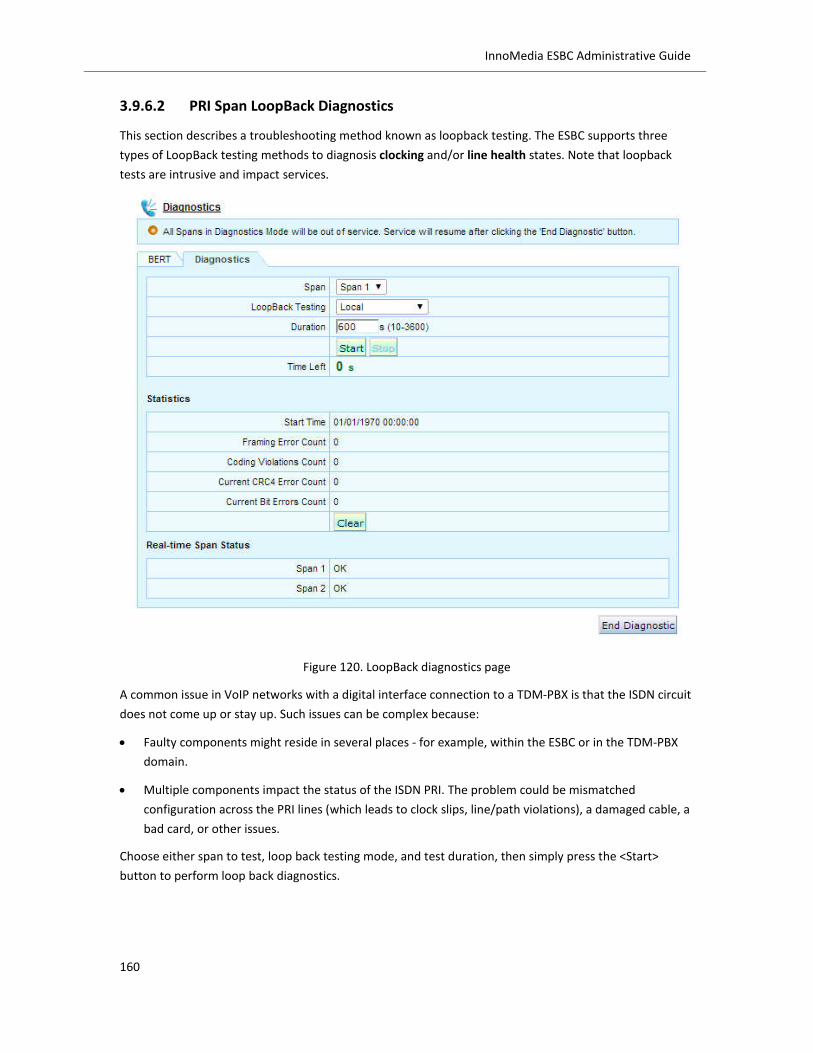
160
InnoMedia ESBC Administrative Guide
3.9.6.2 PRI Span LoopBack Diagnostics
This section describes a troubleshooting method known as loopback testing. The ESBC supports three
types of LoopBack testing methods to diagnosis clocking and/or line health states. Note that loopback
tests are intrusive and impact services.
Figure 120. LoopBack diagnostics page
A common issue in VoIP networks with a digital interface connection to a TDM-PBX is that the ISDN circuit
does not come up or stay up. Such issues can be complex because:
Faulty components might reside in several places - for example, within the ESBC or in the TDM-PBX
domain.
Multiple components impact the status of the ISDN PRI. The problem could be mismatched
configuration across the PRI lines (which leads to clock slips, line/path violations), a damaged cable, a
bad card, or other issues.
Choose either span to test, loop back testing mode, and test duration, then simply press the <Start>
button to perform loop back diagnostics.

161
InnoMedia ESBC Administrative Guide
LoopBack Testing Mode Description
Local Tests the inward loopback such that the interface on the ESBC can
synchronize on the signal it is sending.
Network Line Loops the data back towards the network before the framer chip
entering the ESBC.
Network payload Loops the data back towards the network from the T1/E1 framer
chip in the ESBC.
Note that the wire used for LoopBack testing has to be made with special cross-over pin wiring. It is
illustrated in the following picture.
Figure 121. T1/E1 loopback wiring map
Please refer to the “ESBC Application Notes-T1E1 PRI Troubleshooting Guide” for further detailed
information.
3.9.7 SIP response code – PRI cause code mapping
Navigate to Telephony > T1/E1 > SIP Response Mapping to configure the mapping of SIP Response codes
to PRI cause codes, and vice versa. Cause codes identify possible reasons for call failures.
The ESBC default mapping tables should already meet most deployment requirements. There is no need
to input new records to these two tables unless the PBX or SIP Server specifies proprietary codes. If your
network is live, make sure that you understand the potential impact of any configuration changes.
3.9.7.1 Mapping of a received SIP 4xx-6xx response to an outbound INVITE request
The ESBC follows the guidelines below to disconnect calls.
On receipt of a SIP failure response (4xx-6xx) to an outbound SIP NVITE request, unless the ESBC is
able to retry the INVITE request to avoid the problem (e.g., by supplying authentication in the case of
a 401 or 407 response), the ESBC transmits a Q.931 DISCONNECT message with the Cause Code value
in accordance with the SIP 4xx-6xx response.

162
InnoMedia ESBC Administrative Guide
On receipt of a SIP BYE request from the IP domain, the ESBC sends a Q.931 DISCONNECT message
with cause value 16 (normal call clearing).
On receipt of a SIP CANCEL request to clear a call for which ESBC has not sent a SIP final response to
the received SIP INVITE request, the ESBC sends a Q.931 DISCONNECT message with cause value 16
(normal call clearing).
Note that when a call is disconnected from the ISDN (PRI PBX) side, the sip Reason header is set to the
received Q.850 cause in the appropriate messages (e.g., BYE|CANCEL|FINAL… failure responses) and sent
to the SIP server. If the call is disconnected because of a SIP reason, the Reason header is set to the
appropriate sip response code.
Refer to “ESBC Application Notes-- Interworking of SIP Response Codes and ISDN Q.931 Cause Codes”.
Figure 122. Configuring special SIP response to PRI cause code mapping records
SIP Response to PRI Cause
Code
Description
No Record number
Received SIP Response Code Must specify digits within the range 400-699 which denote SIP
trunk side errors.
Transmitted PRI Cause Code Must specify digits within the range 1-127 which denote PRI Q.931
errors.
3.9.7.2 Mapping of a Received PRI Cause Code to SIP Response
The ESBC follows the guidelines below to disconnect calls.
If ESBC has received a SIP INVITE request but not sent a SIP final response, ESBC sends a SIP response
according to the cause code value in the received Q.931 DISCONNECT message from the PBX. Refer to
“ESBC Application Notes: Interworking of SIP Response Codes and ISDN Q.931 Cause Codes.”
If a Q.931 cause value is neither listed in the default mapping nor in the configurable mapping, the
default response '500 Server internal error' is used.

163
InnoMedia ESBC Administrative Guide
Figure 123. The PRI cause code mapping to SIP Response codes
PRI Cause Code to SIP
Response
Description
No Record number
Received PRI Cause Code Must specify digits within the range 1-127 which denote PRI Q.931
errors.
Transmitted SIP Response Code Must specify digits within the range 400-699 which denote SIP
trunk side errors.

164
InnoMedia ESBC Administrative Guide
3.10 SIP Trunk Voice Service During Redundant WAN Switchover
For SIP Trunking Voice Services, the ESBC processes all SIP messages on behalf of both SIP servers and its
LAN SIP UAs. When the WAN interface switches, the ESBC will
Terminate on-going calls.
Perform a registration process on behalf of all SIP UAs to the SIP Server immediately.
New outgoing calls will be processed through the new active interface.
If the ESBC receives new inbound calls (SIP INVITEs) from the original active interface, the ESBC will process the calls and send 200 OK replies from the new active interface.
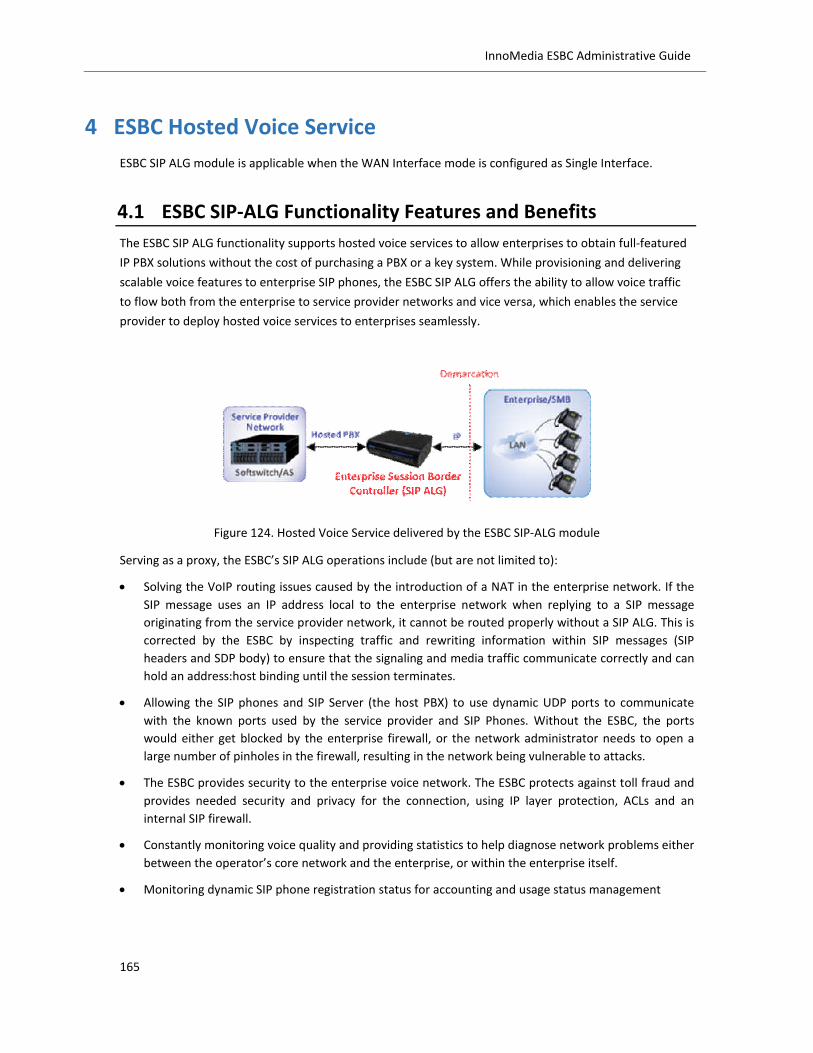
165
InnoMedia ESBC Administrative Guide
4 ESBC Hosted Voice Service
ESBC SIP ALG module is applicable when the WAN Interface mode is configured as Single Interface.
4.1 ESBC SIP-ALG Functionality Features and Benefits
The ESBC SIP ALG functionality supports hosted voice services to allow enterprises to obtain full-featured
IP PBX solutions without the cost of purchasing a PBX or a key system. While provisioning and delivering
scalable voice features to enterprise SIP phones, the ESBC SIP ALG offers the ability to allow voice traffic
to flow both from the enterprise to service provider networks and vice versa, which enables the service
provider to deploy hosted voice services to enterprises seamlessly.
Figure 124. Hosted Voice Service delivered by the ESBC SIP-ALG module
Serving as a proxy, the ESBC’s SIP ALG operations include (but are not limited to):
Solving the VoIP routing issues caused by the introduction of a NAT in the enterprise network. If the
SIP message uses an IP address local to the enterprise network when replying to a SIP message
originating from the service provider network, it cannot be routed properly without a SIP ALG. This is
corrected by the ESBC by inspecting traffic and rewriting information within SIP messages (SIP
headers and SDP body) to ensure that the signaling and media traffic communicate correctly and can
hold an address:host binding until the session terminates.
Allowing the SIP phones and SIP Server (the host PBX) to use dynamic UDP ports to communicate
with the known ports used by the service provider and SIP Phones. Without the ESBC, the ports
would either get blocked by the enterprise firewall, or the network administrator needs to open a
large number of pinholes in the firewall, resulting in the network being vulnerable to attacks.
The ESBC provides security to the enterprise voice network. The ESBC protects against toll fraud and
provides needed security and privacy for the connection, using IP layer protection, ACLs and an
internal SIP firewall.
Constantly monitoring voice quality and providing statistics to help diagnose network problems either
between the operator’s core network and the enterprise, or within the enterprise itself.
Monitoring dynamic SIP phone registration status for accounting and usage status management

166
InnoMedia ESBC Administrative Guide
4.2 Configuring SIP Phones for Hosted Services via the ESBC
Follow the steps below to allow SIP devices (phones or gateway) on the enterprise network to register
and obtain voice service from the service provider via the ESBC.
4.2.1 Configuring the SIP phones on the ESBC LAN
Arrange the SIP devices to be located in the same network as the ESBC NAT and Voice (VoIP) ports. If the
SIP devices are configured as DHCP clients and the ESBC LAN port is configured to offer DHCP server
functionality, the SIP devices may obtain an IP address from the ESBC. If the SIP devices are configured
with fixed IP, it is necessary to have the default gateway of the SIP devices point to the ESBC LAN IP
address.
Apart from the IP addresses configured on the sip devices being on the same network as the ESBC LAN,
the registering sip server and other service configurations of the sip devices should be pointed to the
service provider network.
4.2.2 Configuring the ESBC SIP ALG Module
To enable ESBC SIP ALG service is straightforward. Navigate to the Telephony > SIP ALG > Setting page.
Figure 125. Configuring the ESBC SIP-ALG module
Field Name Description
Enable Check this item to enable SIP ALG service.
RTP Timeout This item refers to a media inactivity timer. When there are no
RTP packets associated with a particular connection for a longer
period than this timer, the ESBC drops this connection.
SIP Expired Time If the registration status of a particular SIP UA becomes stale and
exceeds this configured timer, the ESBC removes it from the
registration list.
Modify the User part of the
Contact header in outgoing
The User part of contact headers usually refers to the SIP
accounts. Do not change this default setting unless necessary.

167
InnoMedia ESBC Administrative Guide
messages This setting is used for handling inbound calls with SIP Forking
features from the SIP server to the IP Phones. When multiple
phones are configured with one SIP account, the ESBC composes
the contact header for each phone by appending a device-
dependent string to ring these phones configured with the same
SIP account.
Modify the host and port part
of the Contact header to the
ESBC’s IP and port in outgoing
messages
If this option is enabled, the ESBC SIP ALG module replaces the
IP:port information of SIP headers and the SDP body with that of
the ESBC WAN interface in outgoing messages to the SIP server for
NAT traversal purposes.
4.2.3 Hosted Voice Service Survivability
When the ESBC switches its WAN connection from the primary to the secondary interface (or vice versa),
during the transitional period ongoing calls may still continue. However, new inbound calls can only be
successfully connected once the IP phones complete a SIP registration process with the host SIP server.
That is, the IP phones need to send REGISTER messages in order to receive calls. In order to minimize the
time duration between the network switchover and REGISTER messages being sent by the IP phones, the
ESBC uses two SIP parameters to smooth the voice service transition.
Even when both the primary and secondary WAN interfaces (networks) are out of service, the ESBC can
still assure continuity of local voice services. The connected IP phones can still make calls locally.
Navigate to Telephony > SIP ALG > Setting
Figure 126. SIP ALG settings for accelerating voice service transition-1

168
InnoMedia ESBC Administrative Guide
Figure 127. SIP ALG settings for accelerating voice service transition-2
Parameters Description
Override Phone
Registration Expires
The REGISTER expiration value A (in SIP 200 OK response to the IP phone)
The ESBC uses this configured value, A, to replace the Expires value in the
200 OK message sent by the SIP server in reply to the REGISTER request
from the IP Phone.
The value X is the registration expiration time in the REGISTER request
from the IP Phone. The value Y is the Expires value in the 200 OK message
from the SIP server.
A ≤ X (A has to be smaller or equal to X)
A ≤ Y (A has to be smaller or equal to Y)
It is recommended that this parameter is enabled. The intention is to have
the IP Phones trigger REGISTER requests as frequently as needed to
reduce the time from the switchover of network interfaces to when the IP
phones are registered on the new network. Hence a small value is
recommended, such as 60 seconds.
Override SIP-Server
Registration Expires
The registration expiration value B (in the REGISTER request)
The ESBC uses this configured value B, to replace the Expires value in the
REGISTER request sent to the SIP server. If it is disabled, the ESBC simply
forwards the value X (as described above) in the REGISTER requests to the
SIP server.
B ≤ Y
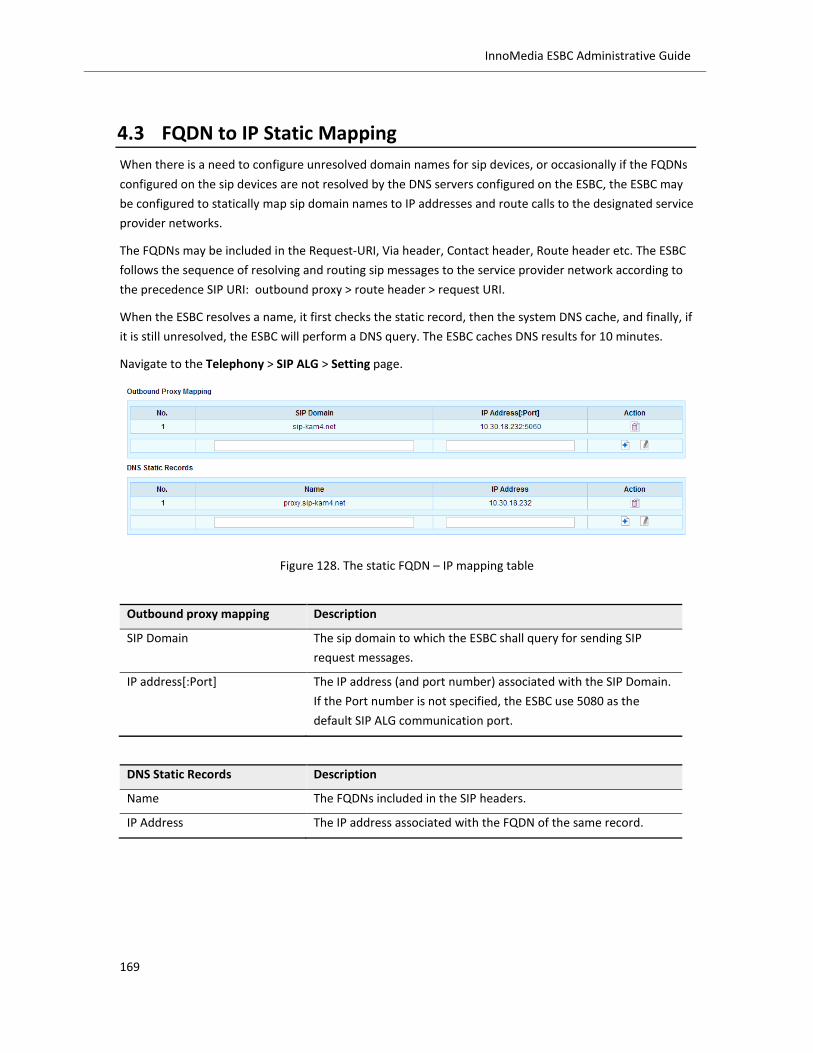
169
InnoMedia ESBC Administrative Guide
4.3 FQDN to IP Static Mapping
When there is a need to configure unresolved domain names for sip devices, or occasionally if the FQDNs
configured on the sip devices are not resolved by the DNS servers configured on the ESBC, the ESBC may
be configured to statically map sip domain names to IP addresses and route calls to the designated service
provider networks.
The FQDNs may be included in the Request-URI, Via header, Contact header, Route header etc. The ESBC
follows the sequence of resolving and routing sip messages to the service provider network according to
the precedence SIP URI: outbound proxy > route header > request URI.
When the ESBC resolves a name, it first checks the static record, then the system DNS cache, and finally, if
it is still unresolved, the ESBC will perform a DNS query. The ESBC caches DNS results for 10 minutes.
Navigate to the Telephony > SIP ALG > Setting page.
Figure 128. The static FQDN – IP mapping table
Outbound proxy mapping Description
SIP Domain The sip domain to which the ESBC shall query for sending SIP
request messages.
IP address[:Port] The IP address (and port number) associated with the SIP Domain.
If the Port number is not specified, the ESBC use 5080 as the
default SIP ALG communication port.
DNS Static Records Description
Name The FQDNs included in the SIP headers.
IP Address The IP address associated with the FQDN of the same record.
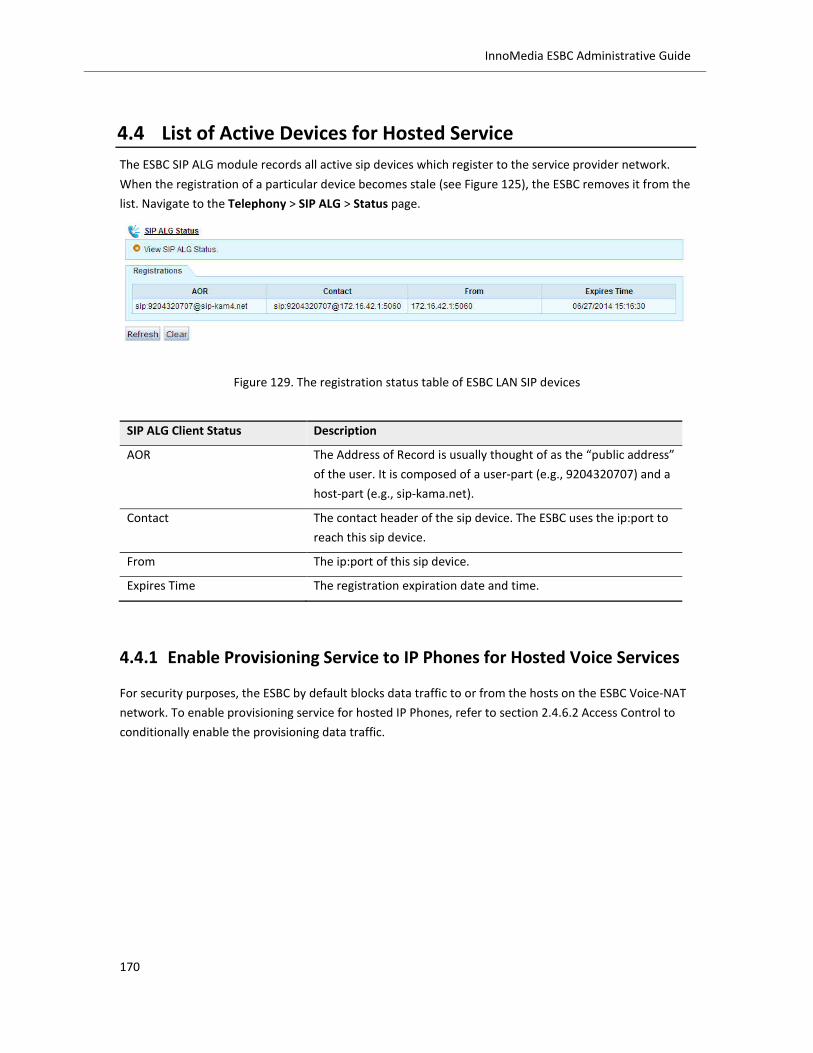
170
InnoMedia ESBC Administrative Guide
4.4 List of Active Devices for Hosted Service
The ESBC SIP ALG module records all active sip devices which register to the service provider network.
When the registration of a particular device becomes stale (see Figure 125), the ESBC removes it from the
list. Navigate to the Telephony > SIP ALG > Status page.
Figure 129. The registration status table of ESBC LAN SIP devices
SIP ALG Client Status Description
AOR The Address of Record is usually thought of as the “public address”
of the user. It is composed of a user-part (e.g., 9204320707) and a
host-part (e.g., sip-kama.net).
Contact The contact header of the sip device. The ESBC uses the ip:port to
reach this sip device.
From The ip:port of this sip device.
Expires Time The registration expiration date and time.
4.4.1 Enable Provisioning Service to IP Phones for Hosted Voice Services
For security purposes, the ESBC by default blocks data traffic to or from the hosts on the ESBC Voice-NAT
network. To enable provisioning service for hosted IP Phones, refer to section 2.4.6.2 Access Control to
conditionally enable the provisioning data traffic.

171
InnoMedia ESBC Administrative Guide
5 OAMP, Security and Fraud Protection
5.1 User Account Configurations
5.1.1 Local Account Settings
To add or modify user privileges to access the ESBC console.
Navigate to System > Administrator.
To modify attributes of existing users, click <Setting> icon under column Action. To add a user, click <Add>
button. Note that the User ID “admin” is the default administrator ID, and cannot be deleted from the
system.
Figure 130. User account administrative page
Figure 131. Adding or modifying a user account attributes
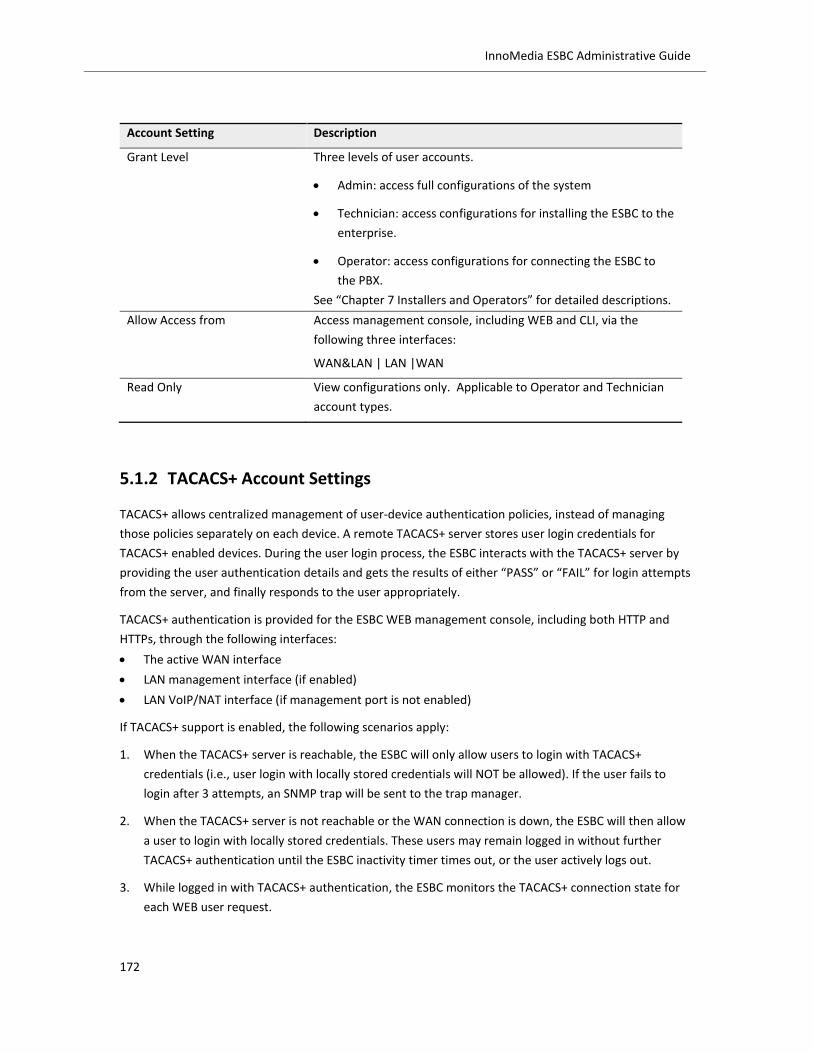
172
InnoMedia ESBC Administrative Guide
Account Setting Description
Grant Level Three levels of user accounts.
Admin: access full configurations of the system
Technician: access configurations for installing the ESBC to the
enterprise.
Operator: access configurations for connecting the ESBC to
the PBX.
See “Chapter 7 Installers and Operators” for detailed descriptions.
Allow Access from Access management console, including WEB and CLI, via the
following three interfaces:
WAN&LAN | LAN |WAN
Read Only View configurations only. Applicable to Operator and Technician
account types.
5.1.2 TACACS+ Account Settings
TACACS+ allows centralized management of user-device authentication policies, instead of managing
those policies separately on each device. A remote TACACS+ server stores user login credentials for
TACACS+ enabled devices. During the user login process, the ESBC interacts with the TACACS+ server by
providing the user authentication details and gets the results of either “PASS” or “FAIL” for login attempts
from the server, and finally responds to the user appropriately.
TACACS+ authentication is provided for the ESBC WEB management console, including both HTTP and
HTTPs, through the following interfaces:
The active WAN interface
LAN management interface (if enabled)
LAN VoIP/NAT interface (if management port is not enabled)
If TACACS+ support is enabled, the following scenarios apply:
1. When the TACACS+ server is reachable, the ESBC will only allow users to login with TACACS+
credentials (i.e., user login with locally stored credentials will NOT be allowed). If the user fails to
login after 3 attempts, an SNMP trap will be sent to the trap manager.
2. When the TACACS+ server is not reachable or the WAN connection is down, the ESBC will then allow
a user to login with locally stored credentials. These users may remain logged in without further
TACACS+ authentication until the ESBC inactivity timer times out, or the user actively logs out.
3. While logged in with TACACS+ authentication, the ESBC monitors the TACACS+ connection state for
each WEB user request.

173
InnoMedia ESBC Administrative Guide
4. If the TACACS+ server reachability state changes from up to down during a user’s login period, the
user will be logged out when they next attempt a WEB user request, and will need to re-login with
local credentials.
Figure 132. Configure TACACS+ Server
TACACS+ Setting Description
Enabled Enable or disable the TACACS+ authentication mode. Default is
disabled.
TACACS+ Server The IP address or FQDN of the TACACS+ server
Server Secret The shared secret between the TACACS+ server and the ESBC for
data obfuscation.
Timeout The length of time in seconds that the ESBC waits for a TACACS+
response before failing the authentication.
Authentication Mode Select a TACACS+ authentication mode from the drop-down list:
ASCII
PAP (Password Authentication Protocol)
CHAP (Challenge Handshake Authentication Protocol)
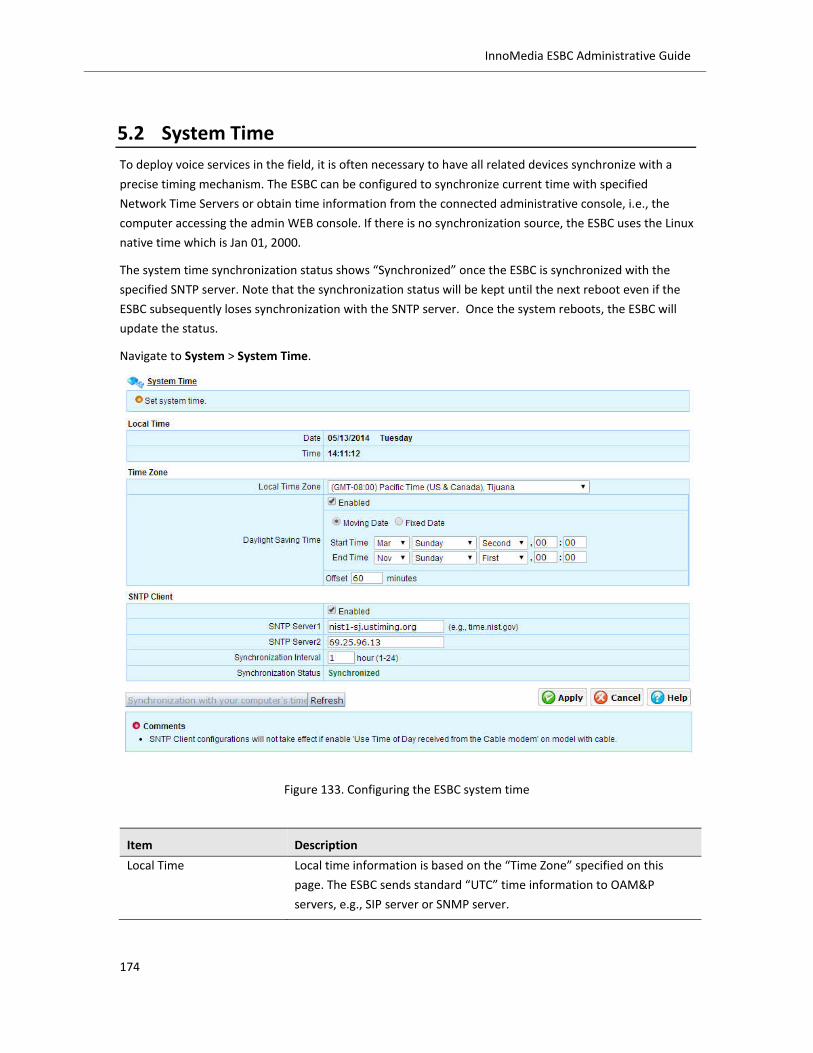
174
InnoMedia ESBC Administrative Guide
5.2 System Time
To deploy voice services in the field, it is often necessary to have all related devices synchronize with a
precise timing mechanism. The ESBC can be configured to synchronize current time with specified
Network Time Servers or obtain time information from the connected administrative console, i.e., the
computer accessing the admin WEB console. If there is no synchronization source, the ESBC uses the Linux
native time which is Jan 01, 2000.
The system time synchronization status shows “Synchronized” once the ESBC is synchronized with the
specified SNTP server. Note that the synchronization status will be kept until the next reboot even if the
ESBC subsequently loses synchronization with the SNTP server. Once the system reboots, the ESBC will
update the status.
Navigate to System > System Time.
Figure 133. Configuring the ESBC system time
Item Description
Local Time Local time information is based on the “Time Zone” specified on this
page. The ESBC sends standard “UTC” time information to OAM&P
servers, e.g., SIP server or SNMP server.

175
InnoMedia ESBC Administrative Guide
Time Zone Select the Time Zone where the ESBC is physically deployed.
Enable or disable the “Daylight Saving Time” (DST) option.
If DST is enabled, choosing “Moving Date” or “Fixed Date” for the
starting and ending date of DST. In North America, the start day
usually is the second Sunday in March, and end day is the first
Sunday in November, and hence “Moving Date” should be selected.
Offset: The offset refers to the offset between DST and “normal time.”
SNTP Client Configure the ESBC to synchronize time with network time servers
(SNTP server).
Enable the SNTP Client to synchronize time with the SNTP server.
Input the FQDN or IP addresses of the target SNTP servers (primary
and secondary).
Synchronization Interval. (default is 2 hours)
The ESBC displays the synchronization status.
Synchronization with your
computer’s time
When “SNTP Client” is unchecked (disabled), the ESBC may synchronize
time information with the management computer (the device running
the web console). Click this button to trigger time sync immediately.

176
InnoMedia ESBC Administrative Guide
5.3 Management Control
The management control function allows the service provider to shut down voice services temporarily for
maintenance purposes, and then restart these services automatically by configuring a prescheduled time
or under certain conditions.
Navigate to System > Management Control page.
Figure 134. Administrative and Operational State Management
Host Description
Current Time Display The current system time is displayed at the upper right corner.
Operational State of Host Displays the current state: Operational, or Not Operational. If the ESBC is
in “Not Operational” state, some condition exists which prevents the
ESBC from providing Business Voice service. For example, it could be
administratively out-of-service, or missing some critical configuration
data, or other physical issues which block its ability to provide service.
Schedule Transition to out-of-service state at a predefined time. There are
options available only to shut down the service under configured
conditions.
Transition to In-service at a predefined time.
Actions Out-of-Service immediately: Have the ESBC enter maintenance state
NOW with no conditions.
Out-of-Service when idle: Have the ESBC enter maintenance state
automatically when there are no active calls.
In-service immediately: Have the ESBC enter service mode NOW.

177
InnoMedia ESBC Administrative Guide
Enterprise SIP Entity Description
Enable When this feature is enabled, if the Enterprise SIP entity (i.e., SIP PBX) is
removed from service, the ESBC will release all active calls towards the
service provider network, then de-register the Enterprise SIP Entity from
the service provider network.
Operational State of
Enterprise SIP Entity
Displays the current state of the connected SIP PBX “Operational”, or
“Not Operational”. If the IP PBX is in “Not Operational” state, some
condition exists which is preventing the IP PBX from providing Business
Voice service. For example, it could be administratively out-of-service, or
the IP PBX may be missing some critical configuration data, or other
physical issues may be present which are blocking its ability to provide
service.
Determine its operational
state
Select the desired method for the ESBC to determine whether the SIP
Entity is operating properly.
Based on registration state. This is applicable to the SIP Entity which
uses SIP REGISTER to connect to the ESBC (as opposed to the Static
operational mode).
By using SIP OPTIONS ping. This SIP method is used to send keep-
alive messages. This is applicable to the SIP Entity which supports SIP
OPTIONS pings.

178
InnoMedia ESBC Administrative Guide
5.4 Maintenance
The ESBC maintenance features are used to change the system status.
Navigate to System > Maintenance page.
Figure 135. System Maintenance
5.4.1 Reboot |Scheduled Reboot | Restore Factory Default | Restore
WAN MAC Address
The comments for each function displayed on this page are self-explanatory.
Item Description
Reboot Performs a soft-reboot process.
Scheduled Reboot Enables the ESBC to perform an automatic administrative reboot at a
scheduled frequency and time. Scheduled reboot will be triggered under
the following conditions:
Uptime is more than 20 hours, and
When the system time is synchronized with a SNTP server.
Configuration Control
Disable or enable scheduled reboot settings.
Frequency: every day | every week, during the configured one hour
window.
If there is an active call, the reboot will be delayed until 5 seconds after
the active call ends in the time window.
Restore Factory Default Clears all updates and restores the unit to default values. It is
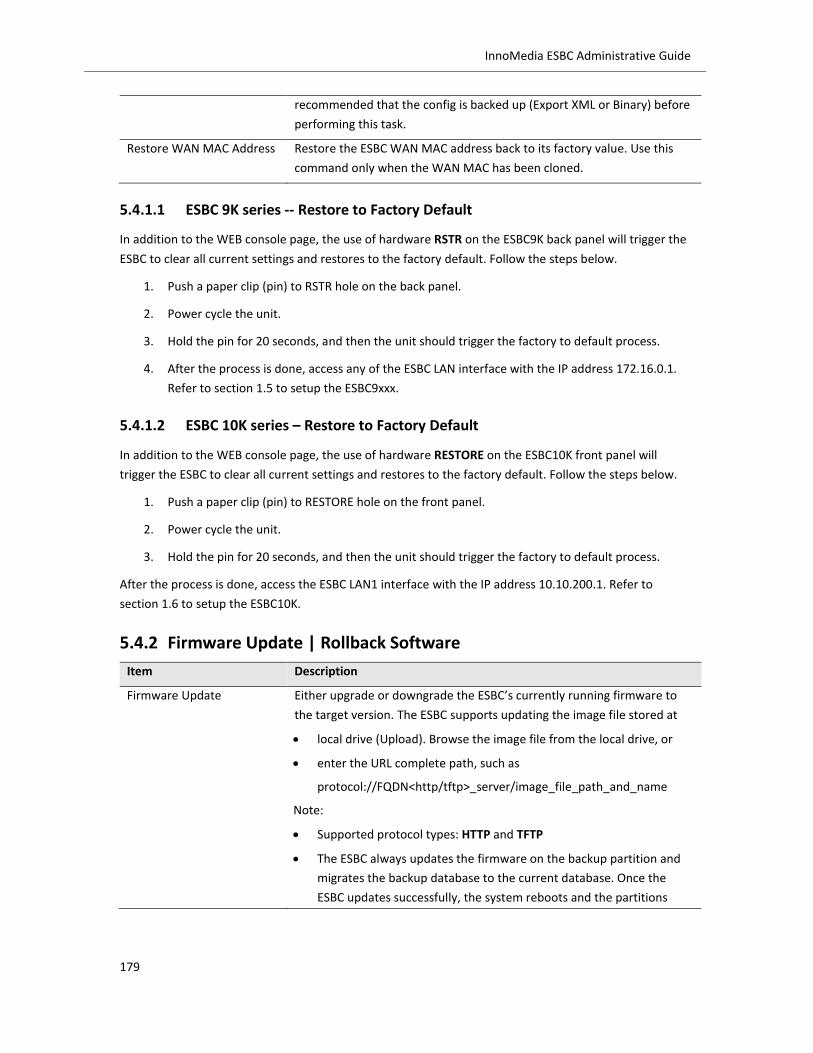
179
InnoMedia ESBC Administrative Guide
recommended that the config is backed up (Export XML or Binary) before
performing this task.
Restore WAN MAC Address Restore the ESBC WAN MAC address back to its factory value. Use this
command only when the WAN MAC has been cloned.
5.4.1.1 ESBC 9K series -- Restore to Factory Default
In addition to the WEB console page, the use of hardware RSTR on the ESBC9K back panel will trigger the
ESBC to clear all current settings and restores to the factory default. Follow the steps below.
1. Push a paper clip (pin) to RSTR hole on the back panel.
2. Power cycle the unit.
3. Hold the pin for 20 seconds, and then the unit should trigger the factory to default process.
4. After the process is done, access any of the ESBC LAN interface with the IP address 172.16.0.1.
Refer to section 1.5 to setup the ESBC9xxx.
5.4.1.2 ESBC 10K series – Restore to Factory Default
In addition to the WEB console page, the use of hardware RESTORE on the ESBC10K front panel will
trigger the ESBC to clear all current settings and restores to the factory default. Follow the steps below.
1. Push a paper clip (pin) to RESTORE hole on the front panel.
2. Power cycle the unit.
3. Hold the pin for 20 seconds, and then the unit should trigger the factory to default process.
After the process is done, access the ESBC LAN1 interface with the IP address 10.10.200.1. Refer to
section 1.6 to setup the ESBC10K.
5.4.2 Firmware Update | Rollback Software
Item Description
Firmware Update Either upgrade or downgrade the ESBC’s currently running firmware to
the target version. The ESBC supports updating the image file stored at
local drive (Upload). Browse the image file from the local drive, or
enter the URL complete path, such as
protocol://FQDN<http/tftp>_server/image_file_path_and_name
Note:
Supported protocol types: HTTP and TFTP
The ESBC always updates the firmware on the backup partition and
migrates the backup database to the current database. Once the
ESBC updates successfully, the system reboots and the partitions

180
InnoMedia ESBC Administrative Guide
swap.
When auto-provisioning is enabled, the firmware update button is
greyed out on the WEB GUI.
Rollback software The rollback function allows the backup partition image and database to
become active. With the rollback function, the database will not be
migrated. The ESBC will simply swap partitions.
5.4.3 Import XML or Binary Config | Export XML or Binary Config
Item Description
Export XML Config
Export Binary Config
Manually backs up the ESBC database to an external file.
XML format. Files can be edited after export. Use the ESBC
provisioning tags to assign appropriate values. XML files are firmware
version independent. If the currently running firmware version does
not recognize any provisioning tags, the ESBC just ignores them.
Binary format. Files include the complete database of the ESBC for
the current partition. Binary files are firmware dependent. They can
be imported to a system running the same firmware version as was
used during the export. The file is read only and ensures data
integrity with the system.
Note that manual backup can be used together with the “auto backup”
function, see section 5.5 for a detailed description.
Import XML Config
Import Binary Config
Manually restore an ESBC configuration file to the current system.
Note:
When auto-provisioning is enabled, the “Import” buttons are grey
out.
Importing a Binary Config needs a “matching” firmware version.
During import of an XML Config, since it is version dependent, some
parameters could be ignored if the target firmware version does not
support these parameters.
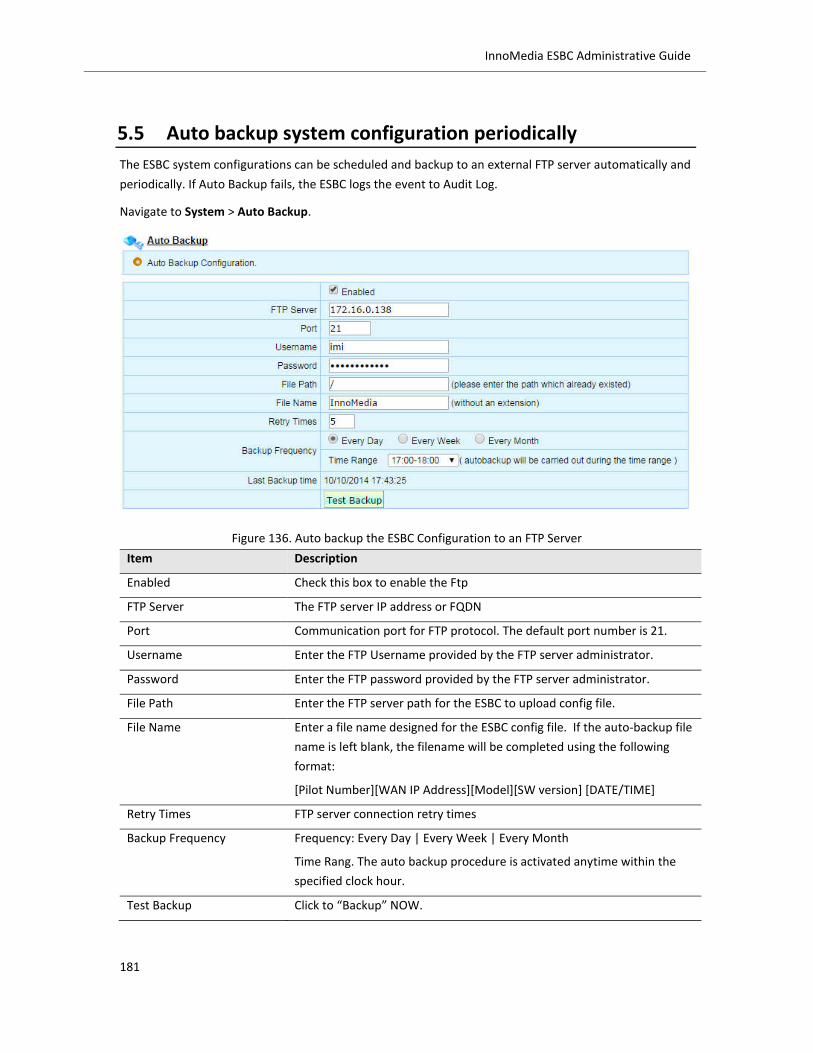
181
InnoMedia ESBC Administrative Guide
5.5 Auto backup system configuration periodically
The ESBC system configurations can be scheduled and backup to an external FTP server automatically and
periodically. If Auto Backup fails, the ESBC logs the event to Audit Log.
Navigate to System > Auto Backup.
Figure 136. Auto backup the ESBC Configuration to an FTP Server
Item Description
Enabled Check this box to enable the Ftp
FTP Server The FTP server IP address or FQDN
Port Communication port for FTP protocol. The default port number is 21.
Username Enter the FTP Username provided by the FTP server administrator.
Password Enter the FTP password provided by the FTP server administrator.
File Path Enter the FTP server path for the ESBC to upload config file.
File Name Enter a file name designed for the ESBC config file. If the auto-backup file
name is left blank, the filename will be completed using the following
format:
[Pilot Number][WAN IP Address][Model][SW version] [DATE/TIME]
Retry Times FTP server connection retry times
Backup Frequency Frequency: Every Day | Every Week | Every Month
Time Rang. The auto backup procedure is activated anytime within the
specified clock hour.
Test Backup Click to “Backup” NOW.

182
InnoMedia ESBC Administrative Guide
Note that the ESBC does not perform auto backup procedure if one of the following conditions happens.
“Every Day” is selected. The current hour is behind the scheduled hour.
“Every Month” is selected. The current date is behind the scheduled date.
The previous backup event happens less than one hour (3,600 seconds) of the current time.
The ESBC boot-up time is within the scheduled auto backup hour.

183
InnoMedia ESBC Administrative Guide
5.6 Battery Status
The ESBC unit comes with a built-in smart battery for continuing voice service in case of power outage
event happening.
Navigate to System > UPS.
Figure 137. The UPS-Battery status page

184
InnoMedia ESBC Administrative Guide
5.7 Call History and Logs
5.7.1 Call History Settings
In order for the ESBC to record each call detail record, navigate to Telephony > TOOLS > Call History >
Setting. Check all desired call types to enable call history for these calls.
Figure 138. Call History Setting Options
Call History Setting Description
Log Call History B2BUA: check this item to enable Call History Records for
SIP Trunk Service Calls
SIPALG: check this item to enable Call History Records for
Hosted Service Calls
VQM VQM: check this item to enable voice quality measurement (R-
Factor, MOS calculation) for selected call types (B2BUA and/or SIP
ALG)
Note: To enable “Log Call History” is needed for the Voice Quality calculation and display. See section 5.8
for details.
5.7.2 Call History Record
The ESBC records all calls through the system, if configured to do so. The Call History page displays calls
with various filtering criteria: Call Type, Caller ID, Callee ID, and Dates. The CDRs can be exported to an
external csv file for accounting use. Navigate to Telephony > TOOLS > Call History.
Note: It is necessary to enable “Log Call History” in order for the ESBC to calculate and display Voice
Quality Measurement information (see section 5.7.1)

185
InnoMedia ESBC Administrative Guide
Figure 139. Call history records (list view)
As the mouse points to any MOS score area, the associated voice metrics statistics are displayed.
Call History Description
Caller MOS
Callee MOS
Based on IP network factors, the ESBC calculates R-factor and MOS
scores for each call. Hence, only IP connections can generate VQM
results and MOS scores are displayed for both parties for IP
connections. No MOS scores are available for PRI connections.
Search Filter and display records according to the various inquiry criteria
Export Export call history records to a text based CSV file
Figure 140. Call History (Chart View)

186
InnoMedia ESBC Administrative Guide
5.7.3 VQM (Voice Quality Measurement)
Call statistics are gathered at the end of each call based on packets received and sent by the ESBC during
the call.
Figure 141. Call History (Voice Quality details)
VQM Factors Description
Time The time and date of end of call reporting.
PRI, SETA, SIP-ALG, B2BUA;
trace-id
Category of call and Internal trace number (SETA: SIP End Point
Test Agent)
Start-time; end-time Internal time stamps of a session: start – end.
Call-side The calling party, either from the WAN or LAN side.
Direction OUTBOUND or INBOUND call
qos-type BE: best effort; UGS: cable modem guaranteed service flow
codec-type Audio codec types
NLR Network Packet Loss Rate
RTD Round trip delay
IAJ Inter-arrival jitter
amos Average mos
mmos Minimum MOS
Afactor Average R-factor
mfactor Minimum R-factor

187
InnoMedia ESBC Administrative Guide
CALLID Call ID in SIP message
LocalID The ESBC User Account in SIP URI format
RemoteID The remote User Account in SIP URI format
OrigID The caller User Account in SIP URI format
LocalAddr:PORT The ESBC WAN interface IP address: RTP Port
RemoteAddr:PORT The remote SIP entity IP address: RTP port
SSRC Synchronization source identifier uniquely identifies the source of
a stream. The synchronization sources within the same RTP
session will be unique.
Remote Group/Local Group The User Accounts of remote party and of the ESBC

188
InnoMedia ESBC Administrative Guide
5.8 Voice Quality Measurement and SLA Assurance
Rating Factor (R-Factor) and Mean Opinion Score (MOS) are two commonly used measurements of
overall VoIP call quality. The ESBC employs R-factor to evaluate and rate the quality of telephony voice
traffic and translate it to MOS values. The voice quality performance of each call over time is calculated
from the RTP traffic to/from the service provider side on the ESBC WAN interface, and on the ESBC LAN
interface with connected SIP devices for both SIP Trunk (B2BUA) and Hosted (SIP-ALG) services.
R-Factor: The R-Factor provides a powerful and repeatable way to assess whether a data network is
capable of carrying VoIP calls with high quality. A value is derived from network factors such as latency,
jitter, and packet loss per ITU-T Recommendations. Typical scores range from 50 (poor) to over 90 (best
quality).
MOS: Subjective MOS scores are gathered through exhaustive tests with large groups of human listeners
who listen to audio and give their opinion of the call quality. The ITU-T Recommendations P.800 series
describes how these tests are conducted and the types of scores that are produced.
There are strong correlations between R-Factor and MOS and the mapping between R-factor and MOS-
CQE scores is described in ITU-T G.107 standard. The ESBC calculates the voice quality metric R-factor and
uses this mapping to translate it to a MOS value.
To configure the Voice Quality parameters and view statistics, navigate to Telephony > TOOLS > Voice
Quality
5.8.1 Voice Quality Parameter Basic Configuration
Figure 142. Voice Quality Parameter Basic Configuration
Note: In order to display Voice Quality Chart and SLA information, it is necessary to enable the Call
History feature which is described in section 5.7.1.

189
InnoMedia ESBC Administrative Guide
R-Factor and MOS Description
Enable R-Factor and MOS
scoring
Check the option box if you would like to enable R-factor and MOS
scoring calculations for calls. Calls for SIP Trunk services and SIP
Hosted (ALG) modes are both supported.
Send Voice Quality Information
to Syslog Server
Enter the Syslog Server IP addresses or FQDNs to which the ESBC
sends VQM (voice quality measurement) statistics for each call.
The ESBC supports the ability to send VQM messages to up to 3
(three) syslog servers simultaneously.
Send to EMS Server If the InnoMedia EMS is deployed alongside the ESBC, enter the IP
address or FQDN of the EMS server.
SIP PUBLISH Enable this feature and enter the Telemetry Collector URI to allow
statistics to be carried in SIP PUBLISH messages.
Measuring and calculating
interval
R-factor calculation interval in seconds. The range is from 5 to 120
seconds.
Traps threshold Enable the ESBC to send SNMP traps to an SNMP server if the
voice quality is considered poor. Please note that the “Send SNMP
trap alarm” and “Alarm” features must be enabled (see section
1.9, and section 5.9.11.9)
5.8.2 Voice quality statistics line chart
Figure 143. Voice Quality Statistics Line Chart

190
InnoMedia ESBC Administrative Guide
Point the mouse to any spot on the chart to display the related VQM parameters. Figure 143 shows that
the WAN side “Packet Loss Ratio: 45.5%” is most likely the factor which results in a low MOS value for this
call leg.
R-Factor and MOS Description
WAN to ESBC The RTP (media) packets coming from the WAN side to the ESBC.
LAN to ESBC The RTP (media) packets coming from the LAN side to the ESBC.
5.8.3 SLA (Service Level Agreement) Parameters
The SLA page provides a high level view of overall performance for quality of experience.
Figure 144. Overall quality of experience display
5.8.4 Advanced Settings
The values in this table are used as some of the input parameters to the R-factor calculation. Do not
change these values unless instructed to do so.
Figure 145. R-Factor Parameter Setting

191
InnoMedia ESBC Administrative Guide
R-Factor and MOS Description
G.711 with PLC If this option is checked, ESBC will calculate the R-factor as if the
remote endpoint supports PLC with G.711.
Jitter Buffer Nominal Delay/
Jitter Buffer Maximum Delay
A jitter buffer holds datagrams at the receiving side. If x ms
nominal delay setting is used, the first voice sample received is
held for x ms before it is played out.
The maximum delay is used as an input parameter to the R-factor
calculation.
RTT Round Trip Time
If RTT cannot be collected by the ESBC, this configuration value
can be used as a default RTT to calculate R-factor
End-To-End Delay If endpoint to endpoint delay is greater than the configured value,
it will consider the delay as excessive and send out a SNMP Trap
alarm.
Alarm Threshold Specify how many occurrences of poor MOS values will trigger the
ESBC to send out an SNMP Trap alarm.
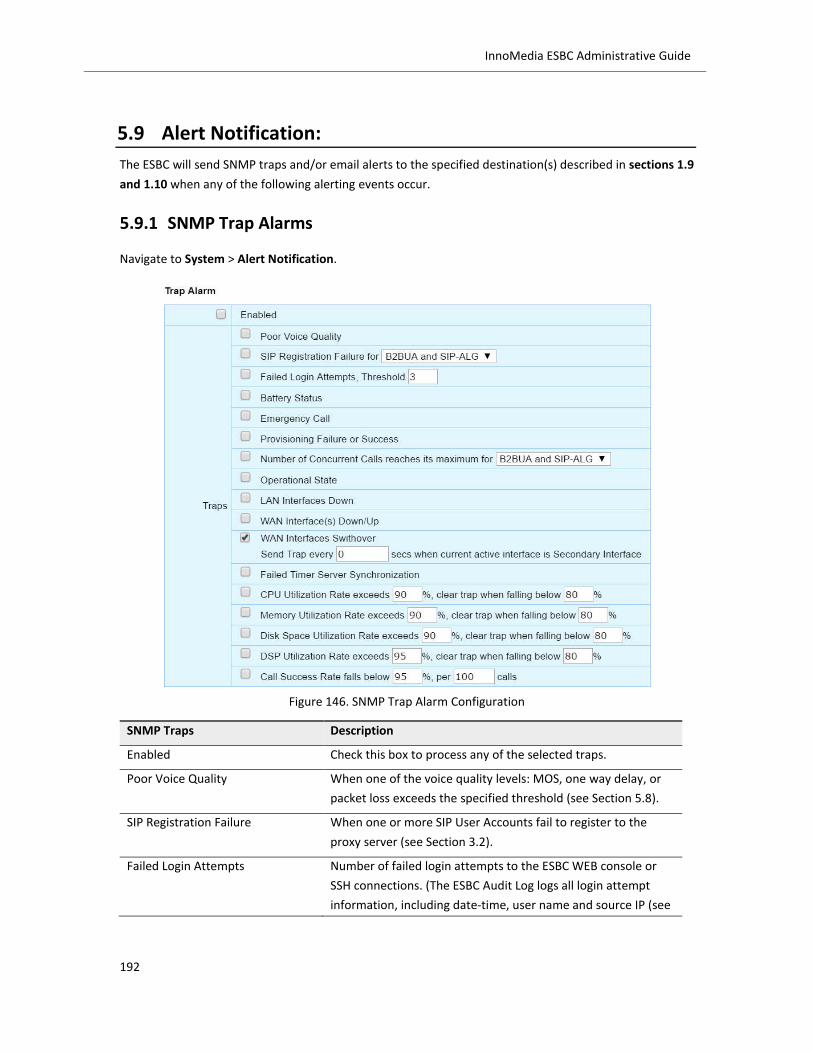
192
InnoMedia ESBC Administrative Guide
5.9 Alert Notification:
The ESBC will send SNMP traps and/or email alerts to the specified destination(s) described in sections 1.9
and 1.10 when any of the following alerting events occur.
5.9.1 SNMP Trap Alarms
Navigate to System > Alert Notification.
Figure 146. SNMP Trap Alarm Configuration
SNMP Traps Description
Enabled Check this box to process any of the selected traps.
Poor Voice Quality When one of the voice quality levels: MOS, one way delay, or
packet loss exceeds the specified threshold (see Section 5.8).
SIP Registration Failure When one or more SIP User Accounts fail to register to the
proxy server (see Section 3.2).
Failed Login Attempts Number of failed login attempts to the ESBC WEB console or
SSH connections. (The ESBC Audit Log logs all login attempt
information, including date-time, user name and source IP (see

193
InnoMedia ESBC Administrative Guide
Section 5.10.6).
Battery Status When the battery is low, missing, or status changes.
PRI Alarm When a PRI alarm happens (e.g., D channel down, or any
red/yellow alarms). Please refer to “ESBC 9x80 PRI SNMP and
MIBs” document for managing Alarm events through SNMP
traps.
Emergency Call When there is an emergency call from a PBX subscriber (see
Section 3.7).
Provisioning Failure or Success When there are provisioning events (see Section 1.12).
Number of concurrent calls reach its maximum
When the number of calls reaches the integrated licensed
number, the ESBC sends out a trap (See Section 1.4).
Operational State When the operational state of the ESBC changes (See Section
5.3).
LAN Interface Down When the LAN interface is not accessible for management
access, e.g., data link layer down, lost connection to the
connected switch or cable unplugged (See Section 1.7.2.1).
WAN Interface Down/Up Send out alert trap for WAN interface link-down and link-up
events. These traps are only sent out when the WAN interface
recovers.
WAN Interfaces Switchover
Send out a trap when the WAN connection is transitioning to
the secondary interface.
A periodic trap with a configurable timer can also be sent when
the secondary interface is in use.
Failed Timer Server Synchronization
When the ESBC loses connection with the SNTP server and fails
to synchronize system time (See Section 5.1).
System Utilization Rate exceeds x and clear trap when falling below y
CPU | Memory | Disk Space: send out alert trap when the
number exceeds x %; and clear trap when falls below y%. By
default, x=90, and y=80.
Call Success Rate: send out alert trap when the number falls
below x% per y calls. By default: x= 95, and y=100
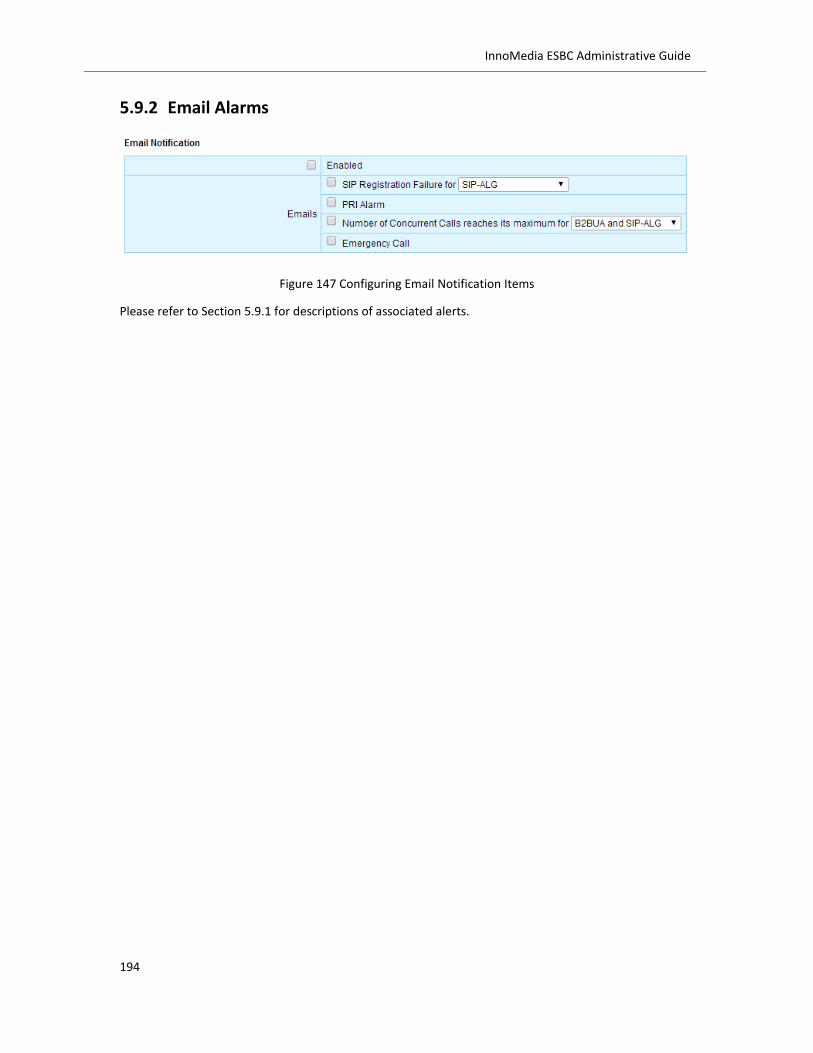
194
InnoMedia ESBC Administrative Guide
5.9.2 Email Alarms
Figure 147 Configuring Email Notification Items
Please refer to Section 5.9.1 for descriptions of associated alerts.
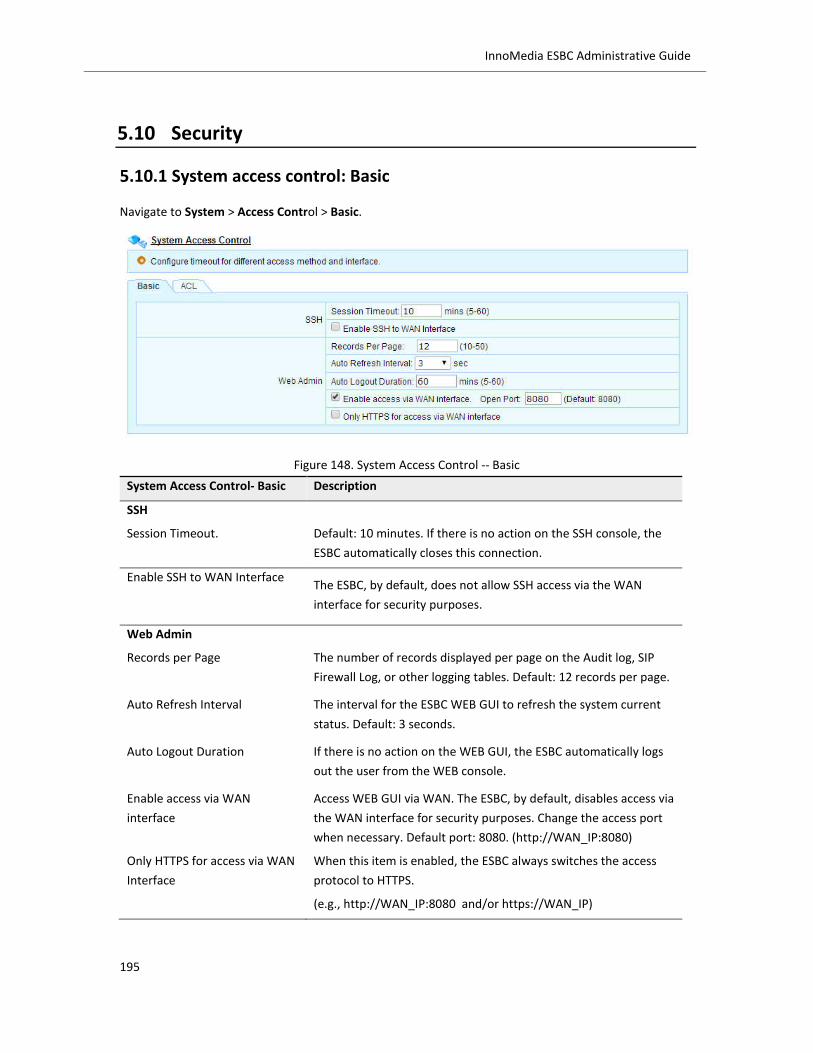
195
InnoMedia ESBC Administrative Guide
5.10 Security
5.10.1 System access control: Basic
Navigate to System > Access Control > Basic.
Figure 148. System Access Control -- Basic
System Access Control- Basic Description
SSH
Session Timeout. Default: 10 minutes. If there is no action on the SSH console, the
ESBC automatically closes this connection.
Enable SSH to WAN Interface The ESBC, by default, does not allow SSH access via the WAN
interface for security purposes.
Web Admin
Records per Page
The number of records displayed per page on the Audit log, SIP
Firewall Log, or other logging tables. Default: 12 records per page.
Auto Refresh Interval
The interval for the ESBC WEB GUI to refresh the system current
status. Default: 3 seconds.
Auto Logout Duration
If there is no action on the WEB GUI, the ESBC automatically logs
out the user from the WEB console.
Enable access via WAN
interface
Access WEB GUI via WAN. The ESBC, by default, disables access via
the WAN interface for security purposes. Change the access port
when necessary. Default port: 8080. (http://WAN_IP:8080)
Only HTTPS for access via WAN
Interface
When this item is enabled, the ESBC always switches the access
protocol to HTTPS.
(e.g., http://WAN_IP:8080 and/or https://WAN_IP)

196
InnoMedia ESBC Administrative Guide
5.10.2 IP Layer Protection: Access Control List
The use of an ACL (Access Control List) is recommended to protect the ESBC on the specified interfaces
from undesired access attempts, scanning etc. The ACL rules for the WAN and LAN interfaces are
processed independently. That is, if the rule is configured for the WAN, it applies to traffic on the WAN
interface only. Traffic that comes into the ESBC is compared to the ACL rules based on the order in the list.
The ESBC continues to match the packet against the rules until it finds a match. If no matches are found,
the traffic is dropped. In other words, if the ACL feature is enabled, there is an implicit ‘drop’ rule that will
block packets that do not match any rules for that interface.
For detailed configuration guideline, please refer to the ESBC Application Notes – ACL Configurations.
Navigate to System > Access Control > ACL.
Figure 149. The ESBC Access Control List (IP Layer Protection)
ACL Description
Enable Special Note: When the ACL feature is enabled, there is an implicit
drop rule that will block packets that do not match any rules for
that interface.
No. Sequential number of rule
Interface Apply ACLs to WAN or LAN
Protocol TCP, UDP, and TCP+UDP
Source/Mask Source IP or Network /Mask: (e.g., 0.0.0.0/0.0.0.0,
192.168.1.1/255.255.255.255, 172.16.1.1/255.255.0.0, or
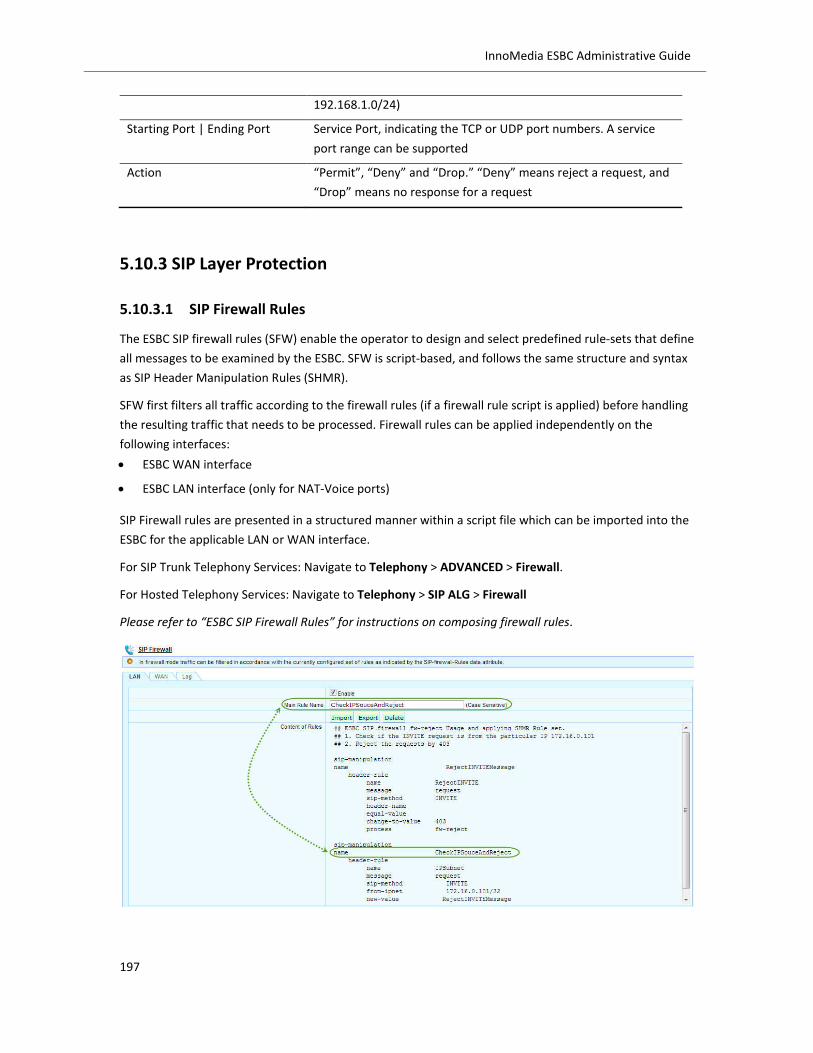
197
InnoMedia ESBC Administrative Guide
192.168.1.0/24)
Starting Port | Ending Port Service Port, indicating the TCP or UDP port numbers. A service
port range can be supported
Action “Permit”, “Deny” and “Drop.” “Deny” means reject a request, and
“Drop” means no response for a request
5.10.3 SIP Layer Protection
5.10.3.1 SIP Firewall Rules
The ESBC SIP firewall rules (SFW) enable the operator to design and select predefined rule-sets that define
all messages to be examined by the ESBC. SFW is script-based, and follows the same structure and syntax
as SIP Header Manipulation Rules (SHMR).
SFW first filters all traffic according to the firewall rules (if a firewall rule script is applied) before handling
the resulting traffic that needs to be processed. Firewall rules can be applied independently on the
following interfaces:
ESBC WAN interface
ESBC LAN interface (only for NAT-Voice ports)
SIP Firewall rules are presented in a structured manner within a script file which can be imported into the
ESBC for the applicable LAN or WAN interface.
For SIP Trunk Telephony Services: Navigate to Telephony > ADVANCED > Firewall.
For Hosted Telephony Services: Navigate to Telephony > SIP ALG > Firewall
Please refer to “ESBC SIP Firewall Rules” for instructions on composing firewall rules.

198
InnoMedia ESBC Administrative Guide
Figure 150. ESBC SIP firewall rules: importing scripts
SIP Firewall Rules allow administrators to define the following categories.
IP, IP-Subnet, port
From and To directions
SIP method
Black or white lists
For any access attempts which match the SIP firewall rules, the ESBC processes those access attempts
according to the defined actions (e.g., disposition event)
fw-accept: allow the messages to pass through the ESBC
fw-drop: discard the messages
fw-reject: reject incoming sip messages and reply with sip error response code.
sip-manip: firewall rule set manipulation.
All the actions taken by the ESBC SIP firewall rules are recorded in the Firewall log (see section 5.10.4).
5.10.4 SIP Firewall logs
All access attempts which match the ESBC SIP firewall rules are logged.
For SIP Trunk Telephony Services: Navigate to Telephony > ADVANCED > Firewall > Log.
For Hosted Telephony Services: Navigate to Telephony > SIP ALG > Firewall > Log.
The administrator can search for sources of attack according to the following recorded items for each
access attempt.
Date & Time | Protocol | SIP Identity | Source IP | Destination IP | Source Port | Destination Port |
Message Type | Disposition Event | Reason
5.10.5 SIP Message | domain | IP examination to prevent attack or fraud
The ESBC can be configured to block incoming SIP messages from both LAN/WAN interfaces (or either one)
by examining their originating IP or domains.
5.10.5.1 Fraud from the LAN interface
An INVITE from an unregistered LAN side rogue CPE can be examined and/or blocked from initiating an
outbound call.
Navigate to Telephony > SIP-PBX > PBX SIP Profile. Choose the relevant target PBX profile for the LAN SIP
PBX or SIP User Agents.
See section 3.4.1.3 for a detailed description.

199
InnoMedia ESBC Administrative Guide
5.10.5.2 Fraud or attack from the WAN interface
The IP or domain of incoming SIP messages will be examined and/or be blocked to prevent spoofed
source IP, SIP attacks or fraud from the WAN. The ESBC blocks all REGISTER attempts from the WAN
interface.
Navigate to Telephony > SIP TRUNKS > Trunk SIP Profile. Choose the relevant target trunk sip profile for
the SIP server in the service provider network.
See section 3.2.3.3 for detailed descriptions.
5.10.6 Audit logs
The ESBC logs major operations which are issued by the system administrator or events triggered by the
system.
Operations such as:
Login/Logout | Importing/Exporting Configurations | WAN/LAN interface settings | Provisioning settings |
Firmware updates | DMS/EMS settings | Maintenance commands | T1/E1 D-Channel up/down | etc.
Navigate to System > Audit Log to view or export audit log records.
Figure 151. The ESBC Audit Log page
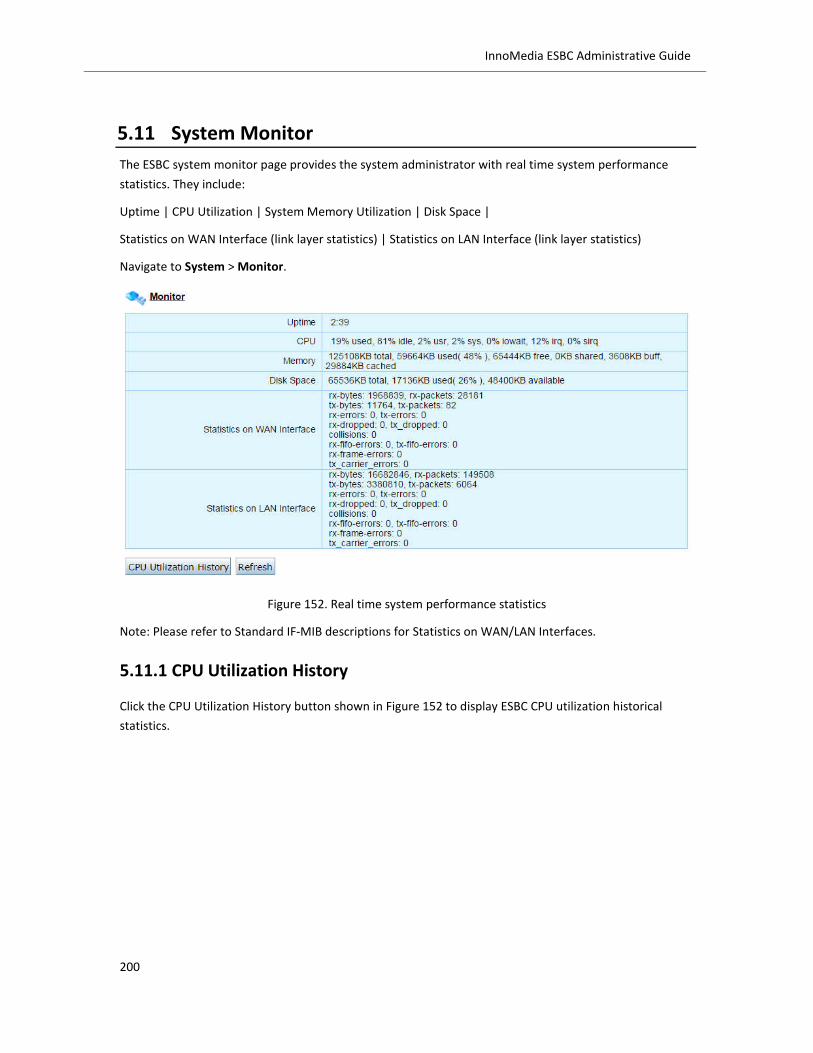
200
InnoMedia ESBC Administrative Guide
5.11 System Monitor
The ESBC system monitor page provides the system administrator with real time system performance
statistics. They include:
Uptime | CPU Utilization | System Memory Utilization | Disk Space |
Statistics on WAN Interface (link layer statistics) | Statistics on LAN Interface (link layer statistics)
Navigate to System > Monitor.
Figure 152. Real time system performance statistics
Note: Please refer to Standard IF-MIB descriptions for Statistics on WAN/LAN Interfaces.
5.11.1 CPU Utilization History
Click the CPU Utilization History button shown in Figure 152 to display ESBC CPU utilization historical
statistics.

201
InnoMedia ESBC Administrative Guide
Figure 153. CPU utilization rate historical chart

202
InnoMedia ESBC Administrative Guide
5.12 System information
Navigate to the System > Information page to view system information for the current ESBC unit.
Figure 154. System information page

203
InnoMedia ESBC Administrative Guide
6 Diagnosis
6.1 Test Calls
Navigate to Telephony > TOOLS > Test Agent.
Test calls are used to verify successful registration from the SIP Trunk Interface to the service provider
network. Enter the telephony number to be called (for example, the technician’s cell phone number) to
complete the test. The called number will be sent a .WAV file and a series of tones for approximately 60
seconds. See Test Agent (section 3.3) for detailed configuration.
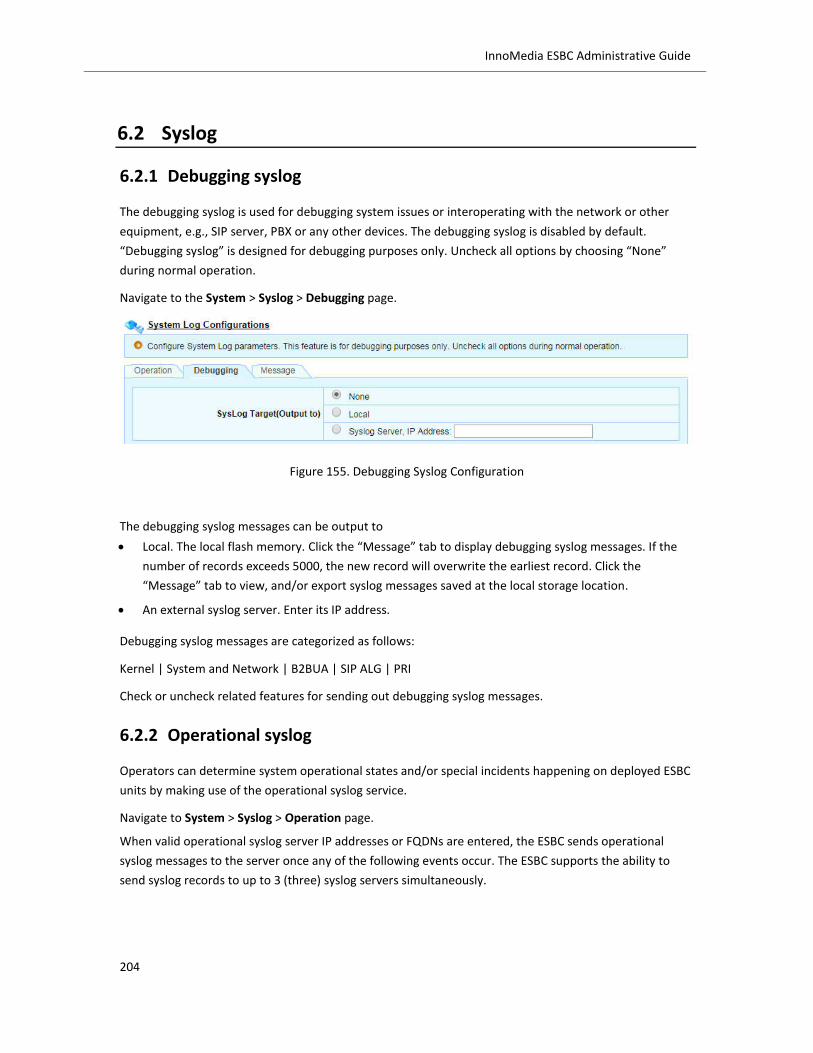
204
InnoMedia ESBC Administrative Guide
6.2 Syslog
6.2.1 Debugging syslog
The debugging syslog is used for debugging system issues or interoperating with the network or other
equipment, e.g., SIP server, PBX or any other devices. The debugging syslog is disabled by default.
“Debugging syslog” is designed for debugging purposes only. Uncheck all options by choosing “None”
during normal operation.
Navigate to the System > Syslog > Debugging page.
Figure 155. Debugging Syslog Configuration
The debugging syslog messages can be output to
Local. The local flash memory. Click the “Message” tab to display debugging syslog messages. If the
number of records exceeds 5000, the new record will overwrite the earliest record. Click the
“Message” tab to view, and/or export syslog messages saved at the local storage location.
An external syslog server. Enter its IP address.
Debugging syslog messages are categorized as follows:
Kernel | System and Network | B2BUA | SIP ALG | PRI
Check or uncheck related features for sending out debugging syslog messages.
6.2.2 Operational syslog
Operators can determine system operational states and/or special incidents happening on deployed ESBC
units by making use of the operational syslog service.
Navigate to System > Syslog > Operation page.
When valid operational syslog server IP addresses or FQDNs are entered, the ESBC sends operational
syslog messages to the server once any of the following events occur. The ESBC supports the ability to
send syslog records to up to 3 (three) syslog servers simultaneously.
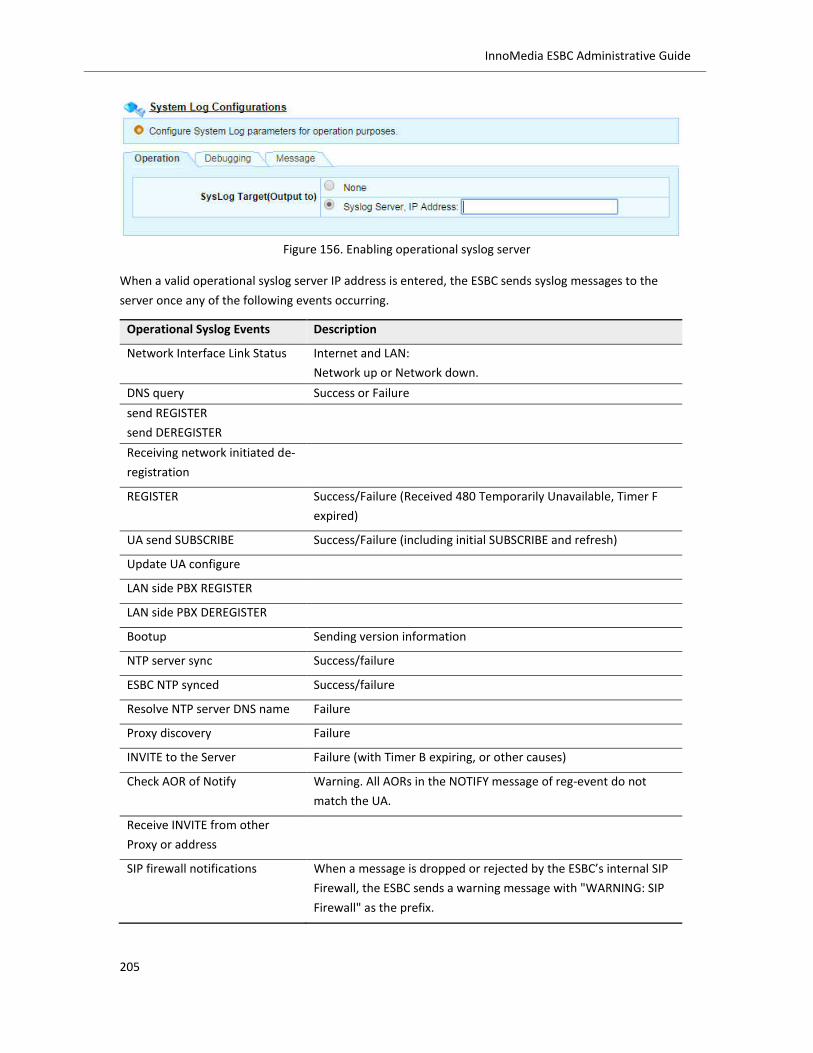
205
InnoMedia ESBC Administrative Guide
Figure 156. Enabling operational syslog server
When a valid operational syslog server IP address is entered, the ESBC sends syslog messages to the
server once any of the following events occurring.
Operational Syslog Events Description
Network Interface Link Status Internet and LAN:
Network up or Network down.
DNS query Success or Failure
send REGISTER
send DEREGISTER
Receiving network initiated de-
registration
REGISTER Success/Failure (Received 480 Temporarily Unavailable, Timer F
expired)
UA send SUBSCRIBE Success/Failure (including initial SUBSCRIBE and refresh)
Update UA configure
LAN side PBX REGISTER
LAN side PBX DEREGISTER
Bootup Sending version information
NTP server sync Success/failure
ESBC NTP synced Success/failure
Resolve NTP server DNS name Failure
Proxy discovery Failure
INVITE to the Server Failure (with Timer B expiring, or other causes)
Check AOR of Notify Warning. All AORs in the NOTIFY message of reg-event do not
match the UA.
Receive INVITE from other
Proxy or address
SIP firewall notifications When a message is dropped or rejected by the ESBC’s internal SIP
Firewall, the ESBC sends a warning message with "WARNING: SIP
Firewall" as the prefix.

206
InnoMedia ESBC Administrative Guide
DQoS failures Send alert messages when B2BUA reserve DQoS fails.
B2BUA: if reserve DQoS fails, send an error log; if the DQoS is
BE, send a warning log.
SIP ALG: if reserve DQoS fails, send a warning log.

207
InnoMedia ESBC Administrative Guide
6.3 Call Trace
The built-in ESBC call trace capability can be used to capture and store SIP+PRI signaling traces. The
<Tracing> utility displays call signal traces in a ladder diagram format, and the <Capture> utility captures
packets of all calls during the recording period, including SIP, RTP, ISDN Q921 and ISDN Q931 packets.
6.3.1 Tracing - Ladder diagram
Navigate to Telephony > TOOLS > Call Trace.
Figure 157. SIP Account List
Select target User IDs and track SIP and PRI (Q.931) signals for all connections.
Log Register Msg: display SIP flows for SIP UA REGISTER exchanges with the SIP Server.
Log NonRegister Msg: display SIP and PRI flows for all call attempts.
Click the <Show Call Trace> button to display information for the selected User ID account.
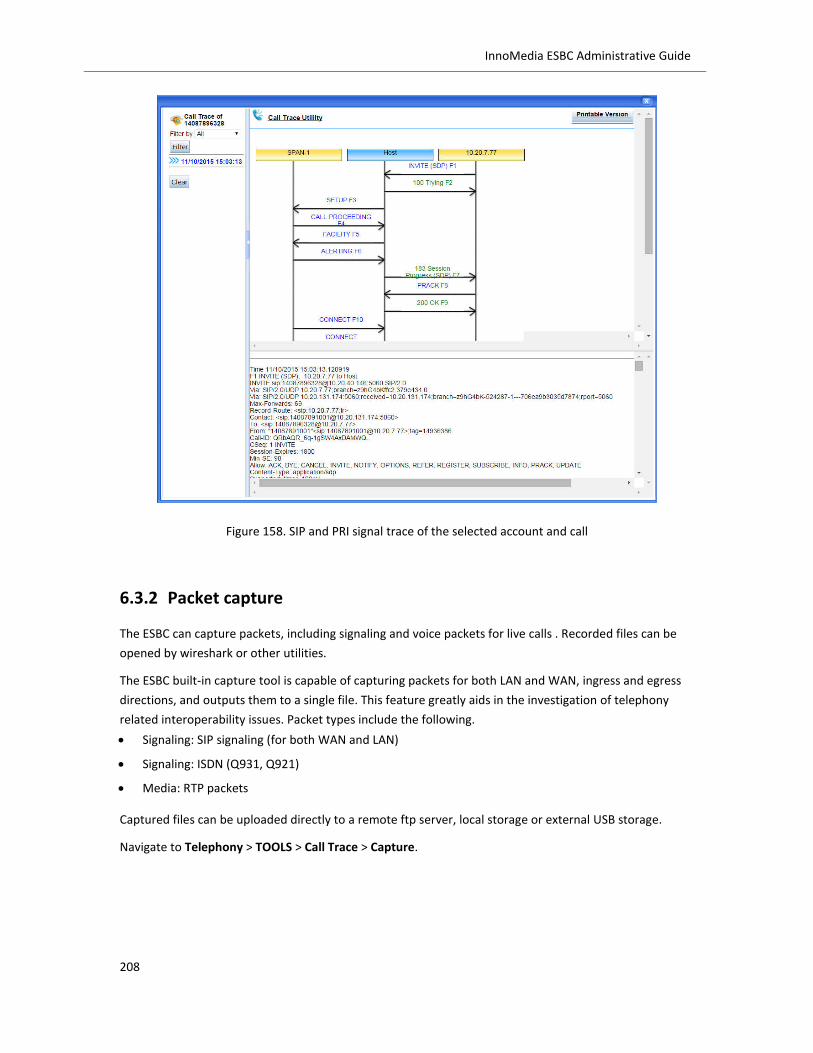
208
InnoMedia ESBC Administrative Guide
Figure 158. SIP and PRI signal trace of the selected account and call
6.3.2 Packet capture
The ESBC can capture packets, including signaling and voice packets for live calls . Recorded files can be
opened by wireshark or other utilities.
The ESBC built-in capture tool is capable of capturing packets for both LAN and WAN, ingress and egress
directions, and outputs them to a single file. This feature greatly aids in the investigation of telephony
related interoperability issues. Packet types include the following.
Signaling: SIP signaling (for both WAN and LAN)
Signaling: ISDN (Q931, Q921)
Media: RTP packets
Captured files can be uploaded directly to a remote ftp server, local storage or external USB storage.
Navigate to Telephony > TOOLS > Call Trace > Capture.

209
InnoMedia ESBC Administrative Guide
Figure 159 Packet Capture
Capture Trace Description
Filter Voice, both SIP and RTP packets
Signaling, SIP packets
Media, RTP
Capture PRI Enable this item when it is necessary to capture ISDN Q931 and
Q921 signals in call flows (note that you must use q931 or q921 in
the filtering box within wireshark).
FTP Server
Username/Password
File Path
Interval
Size
Enter the IP address or FQDN of the target FTP server
The Username and password to access the FTP server
The path for the ESBC to upload captured files
In seconds. 0=No Limit, A new pcap file will be created after this
specified duration. Must be more than 30 seconds.
Kbytes. 1024-10240. A new pcap file will be created after the
current file size is greater than this specified size.
Time Limit The capturing duration in seconds (0=No Limit).

210
InnoMedia ESBC Administrative Guide
Storage Description
Internal Storing captured files to the ESBC internal flash memory.
External If an USB flash disk is inserted, it is possible to specify an external
storage space for the captured files.

211
InnoMedia ESBC Administrative Guide
6.4 Network diagnostic utilities
The network administrator can use the test tools on the ESBC WEB console to verify the connectivity of
the ESBC system and trace the path of data through the network.
Navigate to Network > Advanced > Diagnostics.
Figure 160. The network diagnosis utilities
6.4.1 Ping Test
Ping is the most common test used to verify basic connectivity to a networking device. Successful ping test
results indicate that both physical and virtual path connections exist between the system and the test IP
address. Successful ping tests do not guarantee that all data messages are allowed between the system
and the test IP address.

212
InnoMedia ESBC Administrative Guide
6.4.2 Traceroute
Traceroute is used to track the progress of a packet through the network. This test can be used to verify
that data destined for a WAN device reaches the remote IP address via the desired path. Similarly,
network paths internal to a company can be traced over the LAN to verify the local network topology.
Selecting LAN or WAN determines the path (direction) of the trace route test.
6.4.3 Nslookup
Nslookup is a network administrator tool for querying the Domain Name System (DNS) to obtain the
corresponding IP address of a domain (example, "abc.com"). It will also do a reverse name lookup and
find the host name for an IP address you specify.
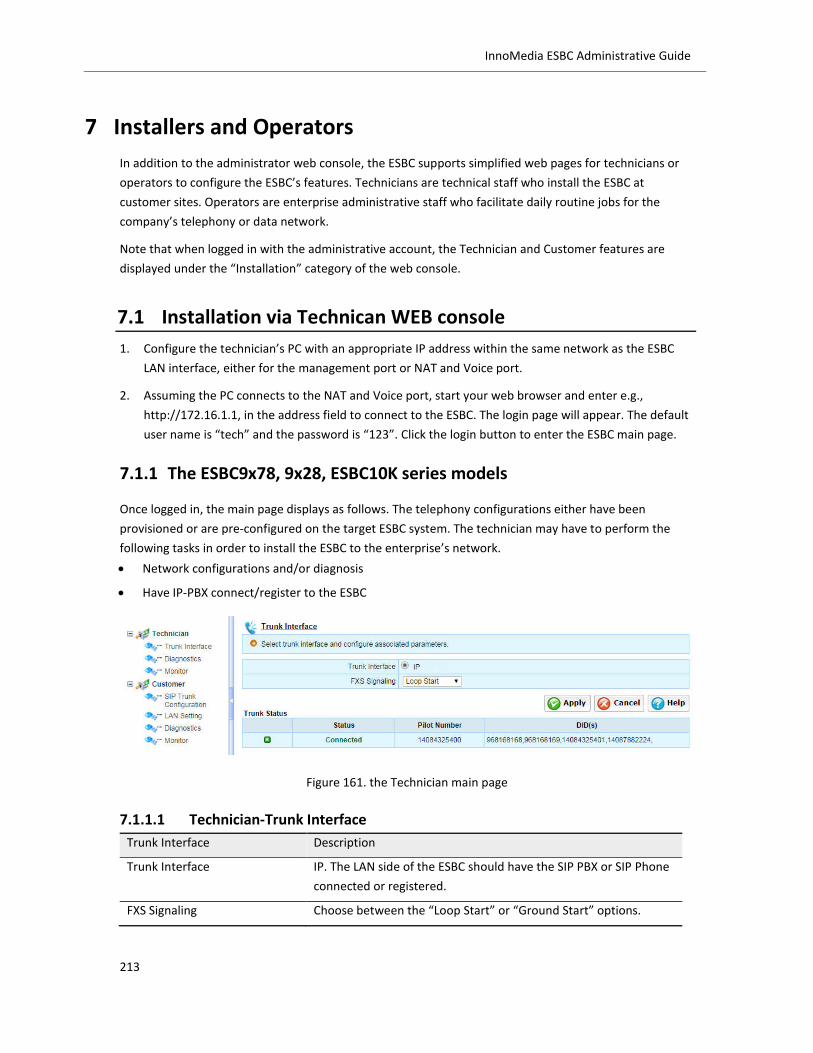
213
InnoMedia ESBC Administrative Guide
7 Installers and Operators
In addition to the administrator web console, the ESBC supports simplified web pages for technicians or
operators to configure the ESBC’s features. Technicians are technical staff who install the ESBC at
customer sites. Operators are enterprise administrative staff who facilitate daily routine jobs for the
company’s telephony or data network.
Note that when logged in with the administrative account, the Technician and Customer features are
displayed under the “Installation” category of the web console.
7.1 Installation via Technican WEB console
1. Configure the technician’s PC with an appropriate IP address within the same network as the ESBC
LAN interface, either for the management port or NAT and Voice port.
2. Assuming the PC connects to the NAT and Voice port, start your web browser and enter e.g.,
http://172.16.1.1, in the address field to connect to the ESBC. The login page will appear. The default
user name is “tech” and the password is “123”. Click the login button to enter the ESBC main page.
7.1.1 The ESBC9x78, 9x28, ESBC10K series models
Once logged in, the main page displays as follows. The telephony configurations either have been
provisioned or are pre-configured on the target ESBC system. The technician may have to perform the
following tasks in order to install the ESBC to the enterprise’s network.
Network configurations and/or diagnosis
Have IP-PBX connect/register to the ESBC
Figure 161. the Technician main page
7.1.1.1 Technician-Trunk Interface
Trunk Interface Description
Trunk Interface IP. The LAN side of the ESBC should have the SIP PBX or SIP Phone
connected or registered.
FXS Signaling Choose between the “Loop Start” or “Ground Start” options.
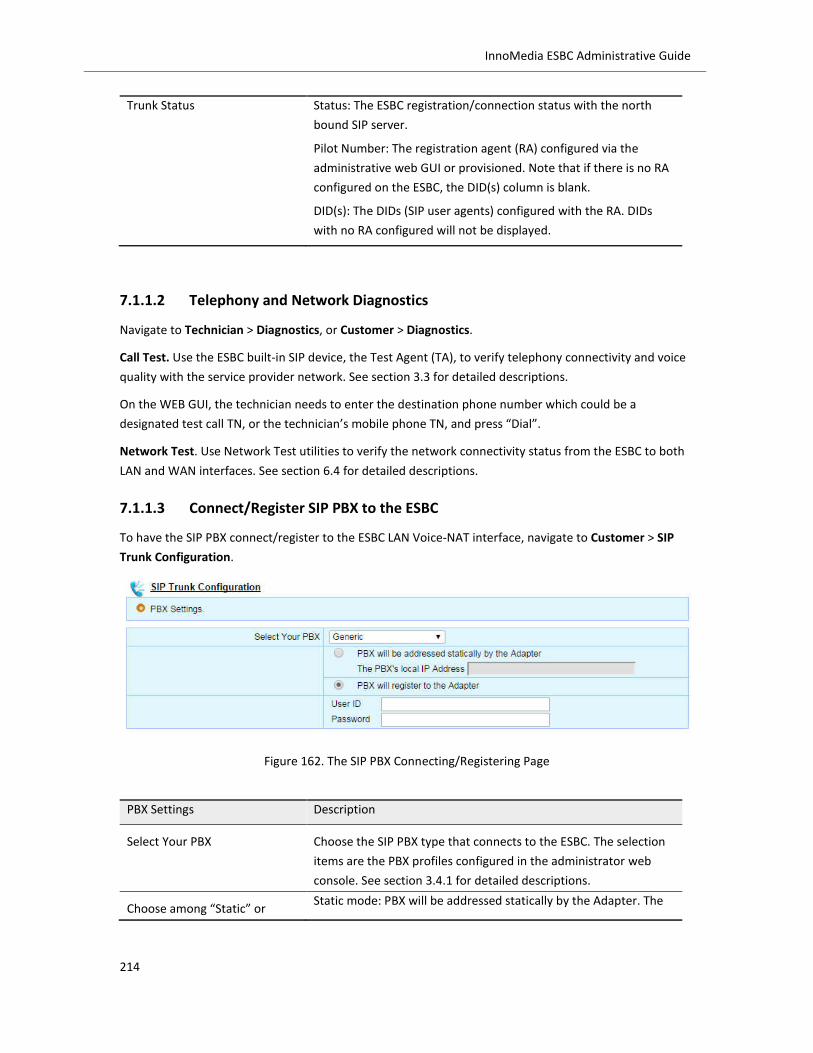
214
InnoMedia ESBC Administrative Guide
Trunk Status Status: The ESBC registration/connection status with the north
bound SIP server.
Pilot Number: The registration agent (RA) configured via the
administrative web GUI or provisioned. Note that if there is no RA
configured on the ESBC, the DID(s) column is blank.
DID(s): The DIDs (SIP user agents) configured with the RA. DIDs
with no RA configured will not be displayed.
7.1.1.2 Telephony and Network Diagnostics
Navigate to Technician > Diagnostics, or Customer > Diagnostics.
Call Test. Use the ESBC built-in SIP device, the Test Agent (TA), to verify telephony connectivity and voice
quality with the service provider network. See section 3.3 for detailed descriptions.
On the WEB GUI, the technician needs to enter the destination phone number which could be a
designated test call TN, or the technician’s mobile phone TN, and press “Dial”.
Network Test. Use Network Test utilities to verify the network connectivity status from the ESBC to both
LAN and WAN interfaces. See section 6.4 for detailed descriptions.
7.1.1.3 Connect/Register SIP PBX to the ESBC
To have the SIP PBX connect/register to the ESBC LAN Voice-NAT interface, navigate to Customer > SIP
Trunk Configuration.
Figure 162. The SIP PBX Connecting/Registering Page
PBX Settings Description
Select Your PBX Choose the SIP PBX type that connects to the ESBC. The selection
items are the PBX profiles configured in the administrator web
console. See section 3.4.1 for detailed descriptions.
Choose among “Static” or Static mode: PBX will be addressed statically by the Adapter. The

215
InnoMedia ESBC Administrative Guide
REGISTER operation mode IP address of the target SIP PBX (the interface toward the ESBC) is
needed for this mode.
REGISTER mode: PBX will register to the Adapter. The User ID and
Password (of the main pilot number) for the SIP PBX is needed to
register to the ESBC for this mode.
7.1.1.4 LAN Setting
Configure the ESBC LAN Voice-NAT interface to interoperate with the enterprise telephony network.
Enable the DHCP Server option when the ESBC is to offer IP addresses to SIP UAs or hosts in this network.
Note that when the SIP PBX connects to the ESBC by the static operation mode, it is recommended that
this SIP PBX is configured with a static IP which should be out of the range of the DHCP server IP address
range.
Navigate to Customer > LAN Setting.
Figure 163. The Installer page: ESBC LAN settings
7.1.1.5 Monitor
The monitor page displays the SIP UAs registration/connection status for both the North bound and South
bound interfaces of the ESBC.
Navigate to Technician > Monitor, or Customer > Monitor.
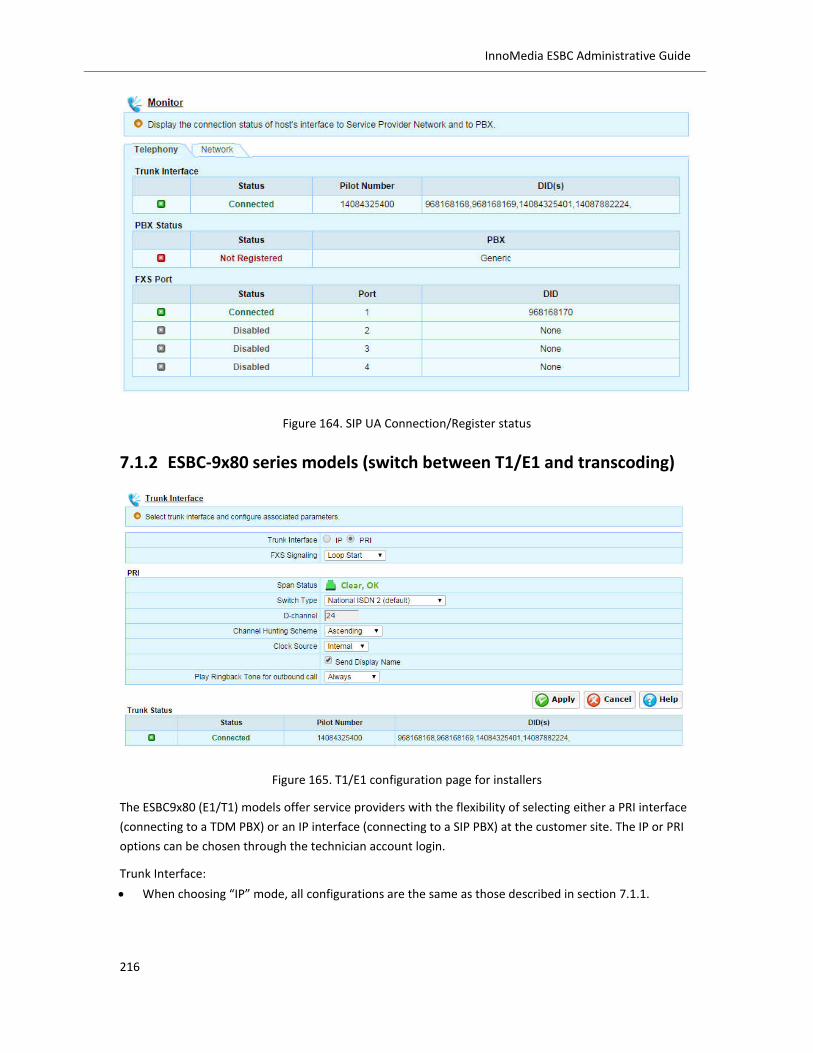
216
InnoMedia ESBC Administrative Guide
Figure 164. SIP UA Connection/Register status
7.1.2 ESBC-9x80 series models (switch between T1/E1 and transcoding)
Figure 165. T1/E1 configuration page for installers
The ESBC9x80 (E1/T1) models offer service providers with the flexibility of selecting either a PRI interface
(connecting to a TDM PBX) or an IP interface (connecting to a SIP PBX) at the customer site. The IP or PRI
options can be chosen through the technician account login.
Trunk Interface:
When choosing “IP” mode, all configurations are the same as those described in section 7.1.1.

217
InnoMedia ESBC Administrative Guide
When choosing “PRI” mode, the technician will need to configure the PRI interface to connect to the
TDM-PBX. See section 3.9 for a detailed description of PRI configurations.
For all PRI configurations, please refer to section 7.1.1 for a detailed description.
PRI Description
Span Status To display the D Channel connection status, which reflects the
q921 signaling for Up or Down.
Switch Type To choose the switch type, which needs to be exactly the same as
that of the TDM-PBX to which the ESBC connects.
D-Channel Display the fixed channel number for the D-Channel. CH 24 for T1;
CH 16 for E1.
Channel Hunting Scheme Choose the appropriate channel hunting scheme (ascending or
descending). It is suggested that a different hunting scheme is
used from that of the PBX. E.g., if the PBX uses an “ascending”
channel hunting scheme, then configure the ESBC with a
“descending” scheme so as to distribute loading evenly on entire
PRI spans.
Clock Source The ESBC default clock mode is “Internal”, using which voice
transmissions follow the ESBC’s internal clocking scheme. The
connected TDM-PBX clock should be configured to follow the ESBC
clock.
If there are two spans, span2 always follows the clock of span1.
span2 does not have its own clocking scheme.
Do not change the ESBC clock mode default settings unless
necessary.
Send Display Name Default mode: checked.
Send display names to called parties for inbound calls. Some TDM-
PBX’s do not support “Display Name” IE settings. Uncheck this
setting when necessary.
Play Ringback Tone for
outbound call
"Play Ringback Tone for outbound call". Three options are
available: ALWAYS, NEVER, AS-NEEDED.
ALWAYS: The ESBC always sends inband RBT media to the PBX,
either relaying media from the network or the ESBC generating
locally. No out-of-band RBT for “ALWAYS” mode.
NEVER: The ESBC never generates inband RBT locally. RBT sent to
the PBX is either inband RBT media from the SIP Trunk side or out-
of-band RBT signals (default setting).
AS-NEEDED: The ESBC decides the RBT action to the PBX according
to the messages it receives (SIP response codes 180/183 from the
network; and Q.931 Progress Indicator from the PBX).

218
InnoMedia ESBC Administrative Guide
7.2 Operator Management via the Operator WEB Console
1. Configure the operator’s PC with an appropriate IP address within the same network as the ESBC
LAN interface, either for the management port or NAT_and_Voice port.
2. Assuming the PC connects to the NAT_and_Voice port, start your web browser and enter e.g.,
http://172.16.1.1, in the address field to connect to the ESBC. The login page will appear. The
default user name is “oper” and the password is “123”. Click the login button to enter the ESBC main
page.
The operator console is designed for the end customer to configure the PBX (TDM or SIP) information on
the ESBC when there are network setting updates.
Please refer to section 7.1 for descriptions of related features.
Figure 166. The operator (end customer) login page

219
InnoMedia ESBC Administrative Guide
8 SIP Firewall and Header Manipulation Rules (SHMR) To provide finer control of SIP messages traversing through the SIP PBX and the SIP server, the ESBC allows the service providers to create SIP Header Manipulation Rules (SHMR) to achieve this purpose.
The SHMR function consists of a sophisticated scripting language that can be used to create scripts that
modify SIP message contents both at the LAN/WAN ingress and egress in the following directions:
ESBC WAN interface, inbound
ESBC WAN interface, outbound
ESBC LAN interface (NAT-Voice port), inbound
ESBC LAN interface (NAT-Voice port), outbound
SHMR can be used to modify SIP headers, parameters as well as SDP contents. Regular expressions also
allow complex matching rules to be constructed. Another feature of the SHMR function is multi-level
programmability which enables rules to reference each other and pass parameters between them.
To import, verify, and activate Firewall rules and SHMR rules,
SIP trunk voice services—SIP B2BUA mode (including SIP PBX, TDM PBX), navigate to Telephony >
ADVANCED > Firewall, and Telephony > ADVANCED > SHMR.
SIP hosted voice services – SIP ALG mode, navigate to Telephony > SIP ALG > Firewall, and Telephony
> SIP ALG > SHMR.
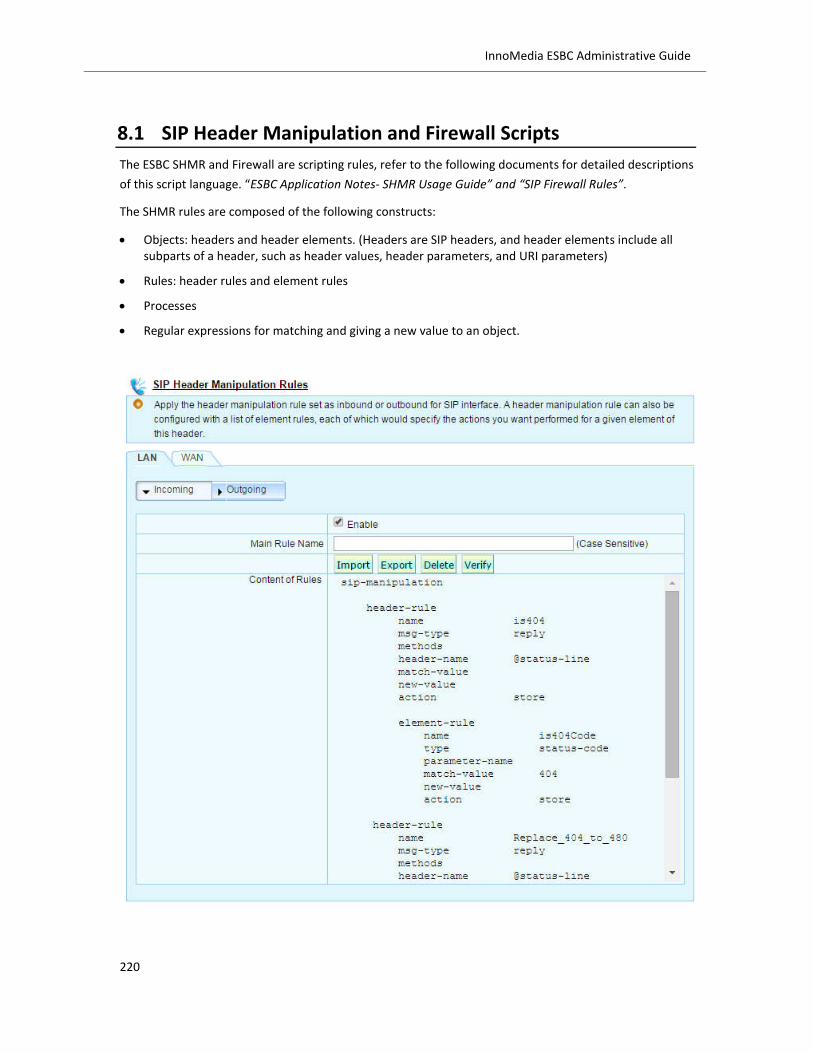
220
InnoMedia ESBC Administrative Guide
8.1 SIP Header Manipulation and Firewall Scripts
The ESBC SHMR and Firewall are scripting rules, refer to the following documents for detailed descriptions
of this script language. “ESBC Application Notes- SHMR Usage Guide” and “SIP Firewall Rules”.
The SHMR rules are composed of the following constructs:
Objects: headers and header elements. (Headers are SIP headers, and header elements include all subparts of a header, such as header values, header parameters, and URI parameters)
Rules: header rules and element rules
Processes
Regular expressions for matching and giving a new value to an object.

221
InnoMedia ESBC Administrative Guide
Figure 167. The ESBC SHMR script configuration screen
ESBC SHMR Description
Enable Check this box to activate a SHM rule (or rule set) of the target
interface-direction.
Import Importing SHMR script from a file in text file format.
Export Exporting the SHMR script from the ESBC system to a text file.
Delete Deleting the current SHMR rule file from the ESBC system.
Verify Verify the SHMR with a sample SIP message.
Figure 168. The SHMR SIP message verification screen (changing 404 to 480)

222
InnoMedia ESBC Administrative Guide
8.2 SIP Firewall
Figure 169. The ESBC SIP firewall configuration screen
ESBC SIP Firewall Description
Enable Check this box to activate SIP firewall rules of the target interface.
Import Importing firewall rules from a file in text file format.
Export Exporting the firewall script from the ESBC system to a text file.
Delete Deleting the current firewall rule file set from the ESBC system.
Log Viewing the SIP firewall log

223
InnoMedia ESBC Administrative Guide
Figure 170. The ESBC SIP firewall log

224
InnoMedia ESBC Administrative Guide
9 Appendix
9.1 SIP Reason Header
The SIP Reason header (see IETF RFC3326) can be added to either “BYE and CANCEL” request messages or
SIP responses to provide information on the possible causes of call failures. Some of the reasons covered
including the following (although this list is not exhaustive):
1. Abnormal conditions cause the ESBC to drop calls. (see Table 2. Abnormal conditions)
2. Calls are disconnected from the T1/E1 LAN interface, and their related Q.850 cause codes will be
carried in the Reason header with the appropriate SIP messages and sent to the SIP Server. In this
case, the PRI Q.850 cause codes include both normal call clearance and abnormal failures.
Table 2. Abnormal conditions
Item Description Reason Header Sample scenarios
1 Reload ESBC
configuration during
active calls
Reason: SIP;text="Reload
configurations"
Change configuration on SIP
Parameters page during the call
2 Trunk lost registration Reason: SIP;text="Trunk lost registration"
The ESBC de-registers this UA from the server during the ongoing call
3 SDP negotiation failure Reason: SIP;text="SDP
negotiation failed"
A call where caller and callee do
not have common CODEC
4 PRI-D channel down Reason: SIP;text="PRI D-Channel
down"
Unplug T1 cable during the call
to enter OOS condition
5 PRI channel is restarted
(by the PBX)
Reason: SIP;text="PRI channel is
restarted"
Receive RESTART from PBX on
the channel of the current
active call
6 PRI STATUS enquiry
failed
Reason: SIP;text="PRI STATUS
enquiry failed"
PRI STATUS timeout
7 PRI Call state error Reason: SIP;text="PRI Call state
error"
PRI call state machine error
8 DQoS Reservation
failed
Reason: SIP;text="Reserve DQoS
failed"
When the number of B2BUA
concurrent calls reaches the
‘Active Dynamic Service Flows’
limit, and the option “allowing
calls of best effort” is disabled.
Upon making a new call, this
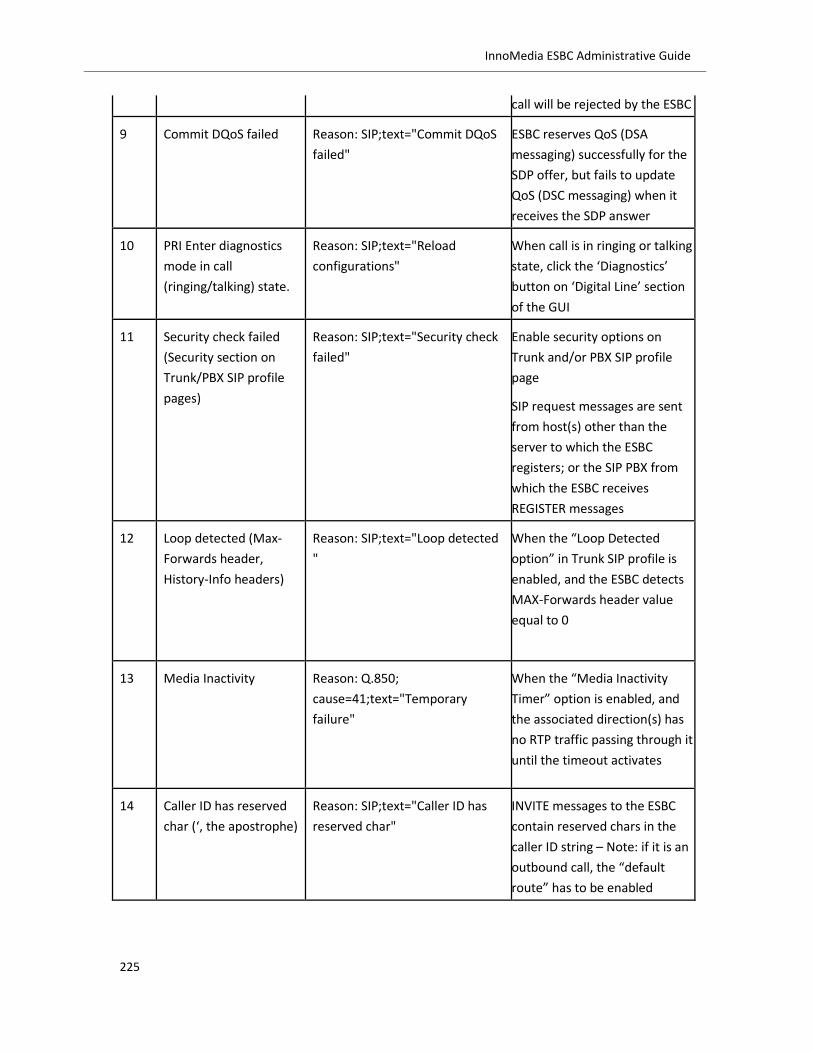
225
InnoMedia ESBC Administrative Guide
call will be rejected by the ESBC
9 Commit DQoS failed Reason: SIP;text="Commit DQoS
failed"
ESBC reserves QoS (DSA
messaging) successfully for the
SDP offer, but fails to update
QoS (DSC messaging) when it
receives the SDP answer
10 PRI Enter diagnostics
mode in call
(ringing/talking) state.
Reason: SIP;text="Reload
configurations"
When call is in ringing or talking
state, click the ‘Diagnostics’
button on ‘Digital Line’ section
of the GUI
11 Security check failed
(Security section on
Trunk/PBX SIP profile
pages)
Reason: SIP;text="Security check
failed"
Enable security options on
Trunk and/or PBX SIP profile
page
SIP request messages are sent
from host(s) other than the
server to which the ESBC
registers; or the SIP PBX from
which the ESBC receives
REGISTER messages
12 Loop detected (Max-
Forwards header,
History-Info headers)
Reason: SIP;text="Loop detected
"
When the “Loop Detected
option” in Trunk SIP profile is
enabled, and the ESBC detects
MAX-Forwards header value
equal to 0
13 Media Inactivity Reason: Q.850;
cause=41;text="Temporary
failure"
When the “Media Inactivity
Timer” option is enabled, and
the associated direction(s) has
no RTP traffic passing through it
until the timeout activates
14 Caller ID has reserved
char (‘, the apostrophe)
Reason: SIP;text="Caller ID has
reserved char"
INVITE messages to the ESBC
contain reserved chars in the
caller ID string – Note: if it is an
outbound call, the “default
route” has to be enabled

226
InnoMedia ESBC Administrative Guide
15 Called number has
reserved char (‘, the
apostrophe)
Reason: SIP;text="Called number
has reserved char"
INVITE messages to the ESBC
contain reserved chars in called
party ID string. Note: if it is an
inbound call, the “default
route” has to be enabled
16 No supported codec for
transcoding
(Transcoding profile
setting, "Allow calls
when no supported
CODEC in SDP offer" is
disabled.)
Reason: SIP;text="No supported
codec for transcoding"
Disable option "Allow calls
when no supported CODEC in
SDP offer" on transcoding
setting page
Configure caller to use SDP
which is not supported in
transcoding
Make outbound call
17 Ongoing calls
terminated by new
emergency calls
Reason: SIP;text="Killed by
emergency call"
When the number of
“Concurrent calls” reaches the
B2BUA user license number,
new emergency calls preempt
system resources and
terminate existing calls
18 (Certain customers
only) When the ESBC
receives an INVITE from
the PBX while the PBX
registration is either
expired or lost, the
ESBC rejects this call
attempt
Reason: SIP;text="PBX is not
registered"
Deregister PBX from the ESBC,
then make call from PBX to ESBC.

227
InnoMedia ESBC Administrative Guide
Figure 171. A partial SIP to PRI call flow
Table 3. Example of a SIP Reason Header with Q.850 cause code sent to the SIP Server
ISDN Q.931
Message
F15 DISCONNECT, SPAN-1 to Host
Protocol Discriminator: Q.931 (8) len=9
TEI=0 Call Ref: len= 2 (reference 44/0x2C) (Sent to originator)
Message Type: DISCONNECT (69) [08 02 81 90]
Cause (len= 4) [ Ext: 1 Coding: CCITT (ITU) standard (0) Spare: 0 Location: Private network serving the local user (1)
Ext: 1 Cause: Normal Clearing (16), class = Normal Event (1) ]
SIP Reason Header
with Q.850 cause
F18 BYE, Host to 10.20.7.77
BYE sip:[email protected]:5063 SIP/2.0
Via: SIP/2.0/UDP 10.20.40.146:5060;branch=z9hG4bK-524287-1---2674dc287af43c73;rport
Max-Forwards: 70
Route: <sip:10.20.7.77;lr>
Contact: <sip:[email protected]:5060>
To: "My Name"<sip:[email protected]>;tag=1450022260
From: <sip:[email protected];user=phone>;tag=66098017
Call-ID: [email protected]
CSeq: 2 BYE
User-Agent: ESBC9380-4B-2.0.14.0-ER63
Reason: Q.850;cause=16;text="Normal Clearing"
Content-Length: 0
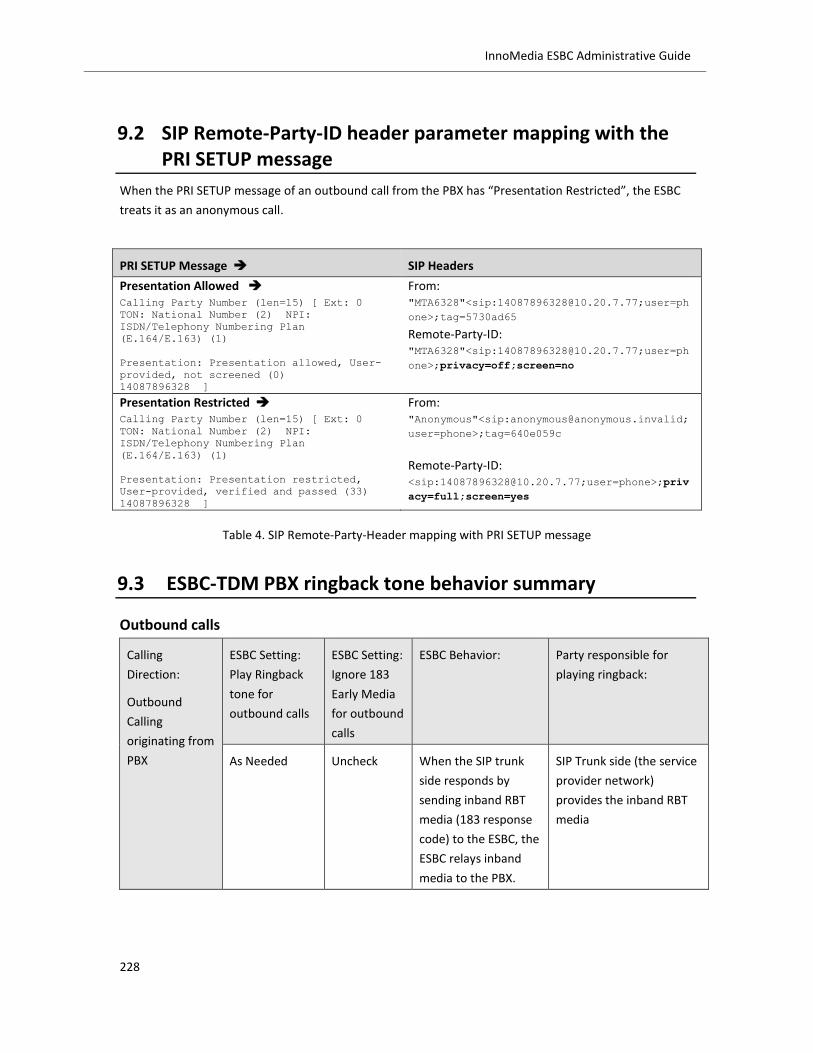
228
InnoMedia ESBC Administrative Guide
9.2 SIP Remote-Party-ID header parameter mapping with the PRI SETUP message
When the PRI SETUP message of an outbound call from the PBX has “Presentation Restricted”, the ESBC
treats it as an anonymous call.
PRI SETUP Message SIP Headers
Presentation Allowed Calling Party Number (len=15) [ Ext: 0 TON: National Number (2) NPI: ISDN/Telephony Numbering Plan (E.164/E.163) (1) Presentation: Presentation allowed, User-provided, not screened (0) 14087896328 ]
From: "MTA6328"<sip:[email protected];user=ph
one>;tag=5730ad65
Remote-Party-ID: "MTA6328"<sip:[email protected];user=ph
one>;privacy=off;screen=no
Presentation Restricted Calling Party Number (len=15) [ Ext: 0 TON: National Number (2) NPI: ISDN/Telephony Numbering Plan (E.164/E.163) (1) Presentation: Presentation restricted, User-provided, verified and passed (33) 14087896328 ]
From: "Anonymous"<sip:[email protected];
user=phone>;tag=640e059c
Remote-Party-ID: <sip:[email protected];user=phone>;priv
acy=full;screen=yes
Table 4. SIP Remote-Party-Header mapping with PRI SETUP message
9.3 ESBC-TDM PBX ringback tone behavior summary
Outbound calls
Calling
Direction:
Outbound
Calling
originating from
PBX
ESBC Setting:
Play Ringback
tone for
outbound calls
ESBC Setting:
Ignore 183
Early Media
for outbound
calls
ESBC Behavior: Party responsible for
playing ringback:
As Needed Uncheck When the SIP trunk
side responds by
sending inband RBT
media (183 response
code) to the ESBC, the
ESBC relays inband
media to the PBX.
SIP Trunk side (the service
provider network)
provides the inband RBT
media

229
InnoMedia ESBC Administrative Guide
When the SIP Trunk
side responds with
out-of-band RBT
signals (180 response
code) to the ESBC but
the SETUP message of
caller expects inband
RBT media, the ESBC
generates inband RBT
media locally and
sends to PBX.
ESBC provides the inband
RBT media
When the SIP Trunk
side responds with
out-of-band RBT
signals (180 response
code) to the ESBC,
and the SETUP
message from the
caller indicates out-of-
band RBT, the ESBC
will let the PBX play
RBT.
PBX provides the out-of-
band RBT
Checked When the SETUP
message from the
caller expects inband
RBT media, the ESBC
generates inband RBT
media locally and
sends to the PBX
ESBC provides the inband
RBT media
When the SETUP
message from the
caller indicates out-of-
band RBT, the ESBC
will let the PBX play
RBT.
PBX provides the out-of-
band RBT
Always
Uncheck When the SIP trunk
side responds with
sending inband RBT
media (183 response
code) to the ESBC, the
SIP Trunk side (the service
provider network)
provides the inband RBT
media

230
InnoMedia ESBC Administrative Guide
ESBC relays inband
media to the PBX.
When the SIP Trunk
side responds with
out-of-band RBT
signals (180 response
code) to the ESBC but
the SETUP message of
caller expects inband
RBT media, the ESBC
generates inband RBT
media locally and
sends to PBX.
ESBC provides the inband
RBT media
Check Regardless of what
the SIP trunk side
responds with
regarding RBT, the
ESBC always
generates inband RBT
media locally and
sends to PBX.
ESBC provides the inband
RBT media
Never
Uncheck When the SIP trunk
side responds with
sending inband RBT
media (183 response
code) to the ESBC, the
ESBC relays inband
media to the PBX.
SIP Trunk side (the service
provider network)
provides inband RBT
media
When the SIP Trunk
side responds with
out-of-band RBT
signals (180 response
code) to the ESBC, the
ESBC will let the PBX
play RBT.
PBX or device behind PBX
provides out-of-band RBT
media
Check Regardless of what PBX or device behind PBX

231
InnoMedia ESBC Administrative Guide
the SIP trunk side
responds with
regarding RBT, the
ESBC will let the PBX
play RBT.
provides out-of-band RBT
media
Table 5. The ESBC – PRI : Outbound call ringback tone behavior summary

232
InnoMedia ESBC Administrative Guide
9.4 ESBC SIP Authentication Flow
9.4.1 Authenticate SIP Request Messages from SIP Server
When the ESBC receives incoming SIP requests from the SIP server, the ESBC checks the setting
“Challenge inbound SIP requests for authentication”.
Navigate to Telephony > SIP Trunks > Trunk SIP Profile.
If enabled, the ESBC sends 401 to a request without the correct credentials, and challenges the
SIP request.
If disabled, the ESBC processes the SIP request.
Figure 172. Authentication Flow: SIP Request Messages from the SIP Proxy Server
9.4.2 Authenticate SIP Request Messages from SIP-PBX
When the ESBC receives incoming SIP requests from SIP-PBX, the ESBC processes them according to the
following logic:
1. Check “Authenticate” settings from the “Filter SIP Method” table. Navigate to Telephony > SIP-PBX >
SIP Parameters.
If it is enabled for this SIP method, go to step 2.
If it is not enabled for this SIP method, go to step 4.
2. Check “Authenticate Mode” setting. Navigate to Telephony > SIP-PBX > Authentication
If it is “None”, go to step 4.
If it is “Local” or “Radius”, go to step 3
3. The ESBC challenges the SIP message with 401 if it is sent without the correct credentials.
4. The ESBC does not challenge the SIP message.
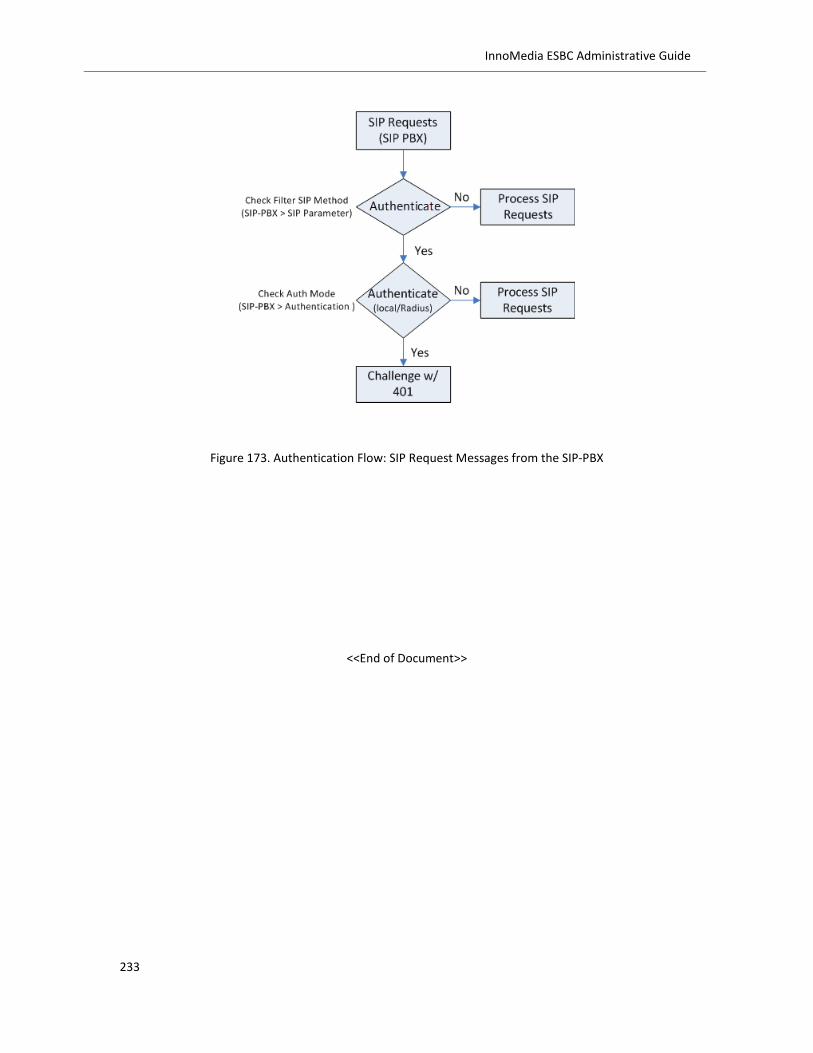
233
InnoMedia ESBC Administrative Guide
Figure 173. Authentication Flow: SIP Request Messages from the SIP-PBX
<<End of Document>>