Embed Size (px)
Citation preview

Inmagic Genie for SQL 3.6 Installation and Upgrade Instructions Page 1
Inmagic® Genie for SQL v3.6 Installation and Upgrade Instructions
Thank you for purchasing Inmagic® Genie. Inmagic Genie is an integrated library system application that
consists of a set of predefined textbases, forms, and business logic to support library functions such as cataloging, acquisitions, circulation of materials, serials tracking, interlibrary lending, and end-user searching.
Purpose: This document pertains to the SQL version of Genie v3.6. Please see the Readme.htm on the
Inmagic Extranet Download page for details on this release.
If you are not using the SQL platform, please obtain the non-SQL version of the Installation and Upgrade Instructions from the Inmagic Extranet Download page.
Contents Before You Begin ........................................................................................................................................ 2
Genie Component Requirements ............................................................................................................ 2
System Requirements ............................................................................................................................. 2
Terminology ............................................................................................................................................. 2
Default Locations ..................................................................................................................................... 2
Pre-installation Tasks .............................................................................................................................. 3
Installing Genie for SQL v3.6 (New Installations Only) ............................................................................... 4
Step 1 - Install Inmagic Genie for SQL v3.6 ............................................................................................ 4
Step 2 - Install New Genie Textbases on SQL Server ............................................................................. 8
Step 3 - Set Windows Permissions on Textbase Folders ........................................................................ 9
Step 4 - Assign Rights to SQL Server and Genie Textbases ................................................................ 11
Step 5 - Test and Wrap-up .................................................................................................................... 13
Upgrading to Genie for SQL v3.6 .............................................................................................................. 15
Step 1 – Manually back up files ............................................................................................................. 15
Step 2 – Perform the upgrade ............................................................................................................... 15
Installing MARC Services (optional) .......................................................................................................... 21
About Genie Documentation ..................................................................................................................... 21

Page 2 Inmagic Genie for SQL 3.6 Installation and Upgrade Instructions
Before You Begin
This information applies to new installations as well as upgrades.
Genie Component Requirements
Genie consists of three components. Upgrades can be performed in any order, but new installations must be installed in the order specified below.
1. Install DB/TextWorks for SQL. This step may be done before or after installing WebPublisher PRO for SQL.
2. Install WebPublisher PRO for SQL This may be on either on the same server as DB/TextWorks for SQL, or on a different server.
3. Install Genie for SQL. This must be on the same server as WebPublisher PRO for SQL.
Each component has its own Setup program and Installation and Upgrade Notes.
System Requirements
Requirements for all three components are specified in the Inmagic Genie Support Matrix, which is available on the Inmagic Customer Extranet. Important! Please be sure that you have met the
requirements before proceeding.
Terminology
Older versions of DB/TextWorks for SQL were called Content Server. The terms may be used interchangeably.
When this document refers to Genie, DB/TextWorks, or WebPublisher PRO, the SQL platform is implied. All three components must run on the SQL platform. See the Inmagic Genie Support Matrix for supported versions.
Default Locations
The default locations for files and folders mentioned in this document are as follows:
Default Location For
C:\Program Files\Inmagic\ICSWeb WebPublisher PRO for SQL installation
C:\Program Files\Inmagic\ICSWeb\icsweb.INI WebPublisher PRO for SQL configuration file
C:\Program Files (x86)\Inmagic\ICSWeb\Exec\InmCSAdmin.exe
Administration program (32-bit OS’s do not include “(x86)” in the path)
C:\Program Files\Inmagic\Genie Genie installation
C:\Program Files\Inmagic\Genie\Textbases Genie installed textbases

Inmagic Genie for SQL 3.6 Installation and Upgrade Instructions Page 3
Pre-installation Tasks
Before you install or upgrade Genie, complete the following tasks.
Verify that WebPublisher PRO can search a textbase and edit a record. You must be able to
search and edit records with WebPublisher PRO before installing Genie. If the CARS textbase was installed with WebPublisher PRO, you can perform the following test:
a. Point your browser to http://WPPserver/ics-wpd/sample/carsqs.htm, where WPPserver is the Web server where WebPublisher PRO is installed.
b. Type an asterisk (*) in the Model Type: Assembled or Kit? box and click Submit Query. A successful search will display the search results.
c. From the drop-down list, select Prices (edit links).
d. Select the Edit Record link for any record, then modify any field.
e. Click Submit Record. A successful record save message should appear.
Exit all Windows applications. Also ensure that the Importer service isn't running.
Log in with Administrator access. Log in as Local Administrator or a domain user with local
administrator privileges before you start the installation.
Know your organization’s validation override preference for Browse lists. You will be asked for this during installation. We recommend that Genie be configured to accept overrides and update the corresponding validation list. The other option is to disallow overrides (reject records that do not comply with content validation.) Consult with your library administrator.
Know whether you will install the Sample textbases. We recommend that new installations install
the sample textbases, because the library staff may want to use them to learn the application. Upgrades probably already have these textbases installed. Consult with your library administrator.
Serial number. Have your Genie serial number available. You will be asked for it during installation.
Upgrades should know whether WebPublisher PRO is using Windows Authentication or SQL Authentication as the SQL Server authentication method. Open INMCSRV.INI, located in the
WebPublisher PRO installation folder, and see whether WindowsAuthentication=1 (Windows Authentication) or WindowsAuthentication=0 (SQL Authentication). Depending on this information, you may have to specify/modify certain settings before you can use Genie. This document details which settings are required for each situation.
Page 4 Inmagic Genie for SQL 3.6 Installation and Upgrade Instructions
Installing Genie for SQL v3.6 (New Installations Only)
These instructions pertain only to new installations, not to upgrades. For upgrades, see page 15.
Installing Genie involves the following main steps:
Step 1 - Install Inmagic Genie for SQL v
Step 2 - Install New Genie Textbases on SQL Server
Step 3 - Set Windows Permissions on Textbase Folders
Step 4 - Assign Rights to SQL Server and Genie Textbases
Step 5 - Test and Wrap-up
Step 1 - Install Inmagic Genie for SQL v3.6
In this step, the following actions will be performed:
A directory structure will be created for the Genie program files (folder and subfolders).
The virtual directory required by the Genie application will be created and configured.
You will be prompted to select the IIS authentication method for the Genie application.
SOAP files necessary for Genie will be copied to the Soap subfolder of the installation folder for WebPublisher PRO.
1. On the Web server where WebPublisher PRO is installed, log in with Administrator privileges (for example, Local Administrator or a domain user with local administrator privileges). If you are not logged with Administrator privileges, the installation cannot continue.
Note: If you are installing Genie on Windows 2008 R2 or SP2, you must log in with the Local
Administrator account.
2. Download the Genie ZIP file and unzip it to a temporary folder on the server where WebPublisher PRO is installed. Then, from within that folder, double-click Setup.EXE.
The Setup program will not proceed if Microsoft .NET Framework Version 3.5 Service Pack 1 is not already installed. This requirement was stated in the Genie Support Matrix.
3. If you are installing Genie on Windows 2008 and you encounter a User Account Control dialog, it indicates that you are not logged in as the Local Administrator. Please cancel the installation, log off Windows, log back in as the Local Administrator, and re-start the Genie installation.
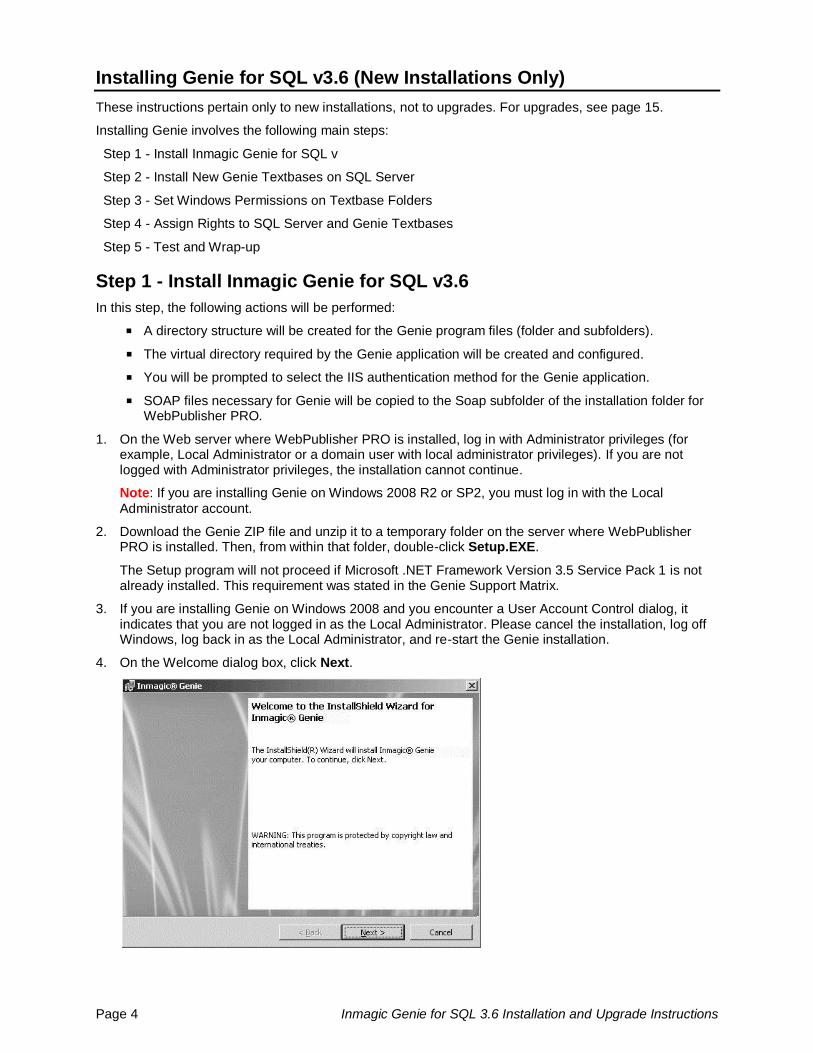
4. On the Welcome dialog box, click Next.
Inmagic Genie for SQL 3.6 Installation and Upgrade Instructions Page 5
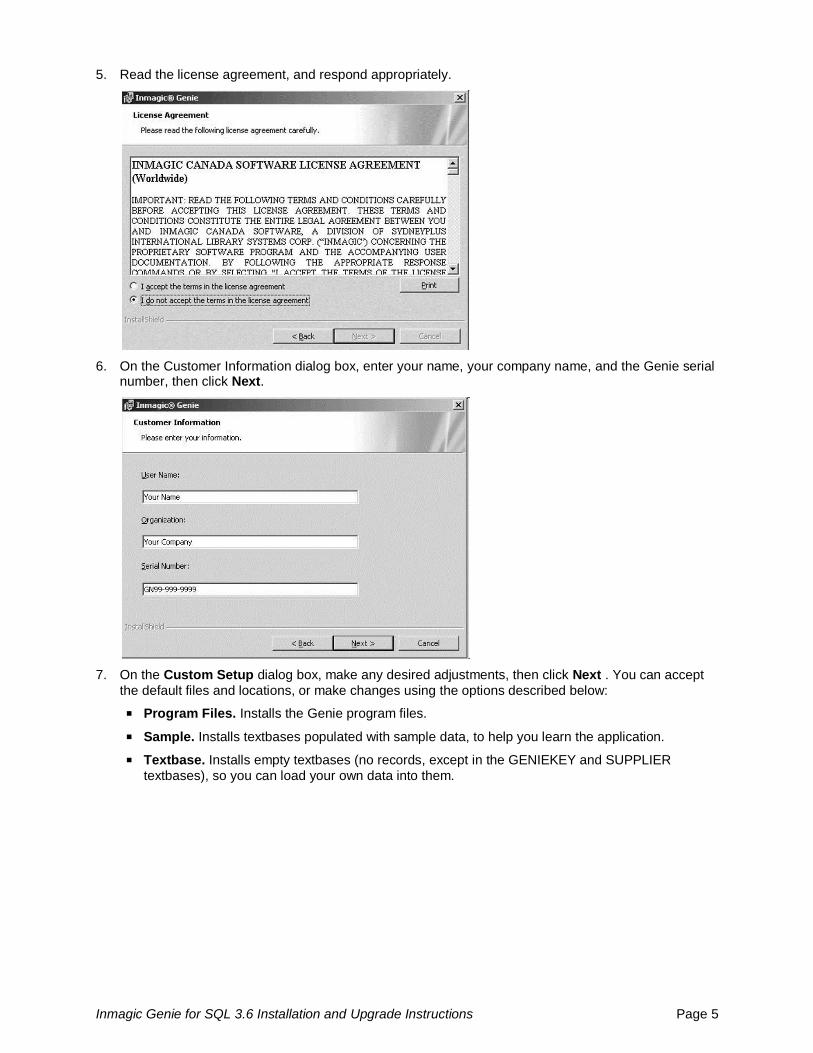
5. Read the license agreement, and respond appropriately.
6. On the Customer Information dialog box, enter your name, your company name, and the Genie serial number, then click Next.
7. On the Custom Setup dialog box, make any desired adjustments, then click Next . You can accept
the default files and locations, or make changes using the options described below:
Program Files. Installs the Genie program files.
Sample. Installs textbases populated with sample data, to help you learn the application.
Textbase. Installs empty textbases (no records, except in the GENIEKEY and SUPPLIER
textbases), so you can load your own data into them.

Page 6 Inmagic Genie for SQL 3.6 Installation and Upgrade Instructions
8. On the Textbases Folder dialog box, accept the default location for the Genie textbase files or click the Change button to change it. Note that Setup will edit ICSWEB.INI to point WebPublisher PRO to
this location for the Genie textbases.
9. On the DB/Text WebPublisher PRO Folder dialog box, indicate where WebPublisher PRO is installed.
10. On the Validation Overrides dialog box, specify one of the following options, then click Next.
Yes, accept overrides and update lists. Genie will be configured to accept validation overrides
and update the corresponding validation list. This is the recommended choice.
No, reject records that do not comply with content validation. Genie will not permit overrides.
Note: If you later decide that you want to switch validation methods, see Inmagic Knowledgebase Article 2728.

Inmagic Genie for SQL 3.6 Installation and Upgrade Instructions Page 7
11. On the Web Site Information dialog box, specify the settings to use with your InmagicGenie and InmagicBrowse virtual directories, then click Next.
Web Site Name. Specify the Web site on which to create the InmagicGenie virtual directory. This must be the same Web site as the WebPublisher PRO virtual directory (ics-wpd).
Web Site Security. Select an authentication method to use with the Genie application. For example, you can select Anonymous Access with or without SSL or you can use Integrated Windows Authentication (Single Sign-on) to bypass the user login screen.
Important! Do not select Integrated Windows Authentication unless the following are true:
The virtual directory for WebPublisher PRO has Anonymous Authentication selected.
The INMCSRV.INI file in the WebPublisher PRO installation folder has WindowsAuthentication=1.
12. When you see the Ready to Install the Program dialog box, click Install to begin.
13. Wait while Genie is installed. A status bar will indicate the progress.
14. On the Wizard Completed dialog box, check View Readme to read or print the file. If you select Check for Service Packs, your Web browser will open to the Inmagic Customer Extranet Service Pack page. We recommend that you check both options. Then click Finish.

Page 8 Inmagic Genie for SQL 3.6 Installation and Upgrade Instructions
Step 2 - Install New Genie Textbases on SQL Server
When you ran Setup, Genie textbase files were copied into subfolders of the Genie installation folder. Before you can use the textbases, you must install them to SQL Server, as explained below.
1. On the Web server where WebPublisher PRO for SQL is installed, log in with Administrator privileges.
Important! If your SQL Server instance is on a machine separate from DB/TextWorks for SQL, you must adjust the login parameters for the SQL Server service: Right-click the My Computer icon on your desktop and select Manage. Expand the Services and Applications tree and double-click Services. Right-click the instance of SQL Server being used for Genie and select Properties. Click the Log On tab and specify a domain user account on the domain server. This account should be part of the local Admin group on the SQL Server machine. (It does not need to be a member of any domain Admin group.)
2. Launch the Administration program:
Windows 2008 64-bit operating systems: Windows 2008 R2 or Windows 2008 SP2 (x64) users must navigate to C:\Program Files (x86)\Inmagic\ICSWeb\Exec\InmCSAdmin.exe, right-click the EXE file, and select “run as administrator…”. If you launch the program from the Start menu, the textbase restore process will appear to have succeeded, but the textbase files will not actually be restored.
All other supported operating systems: Go to the Start menu and choose Inmagic Applications>DBText for SQL>Administration (WP-SQL).
3. The User File Path dialog box appears the first time you run the software on that machine. Specify where you want to create user files and temporary files, then click OK. You need full rights to the
specified folder.
4. Choose Back Up & Restore>Restore Textbases to open the Restore Textbase Options dialog box.
5. In the Backup set box, use the Browse button to select a set of installed textbases (.CBA), then Restore them to the equivalent Target path. We recommend that you select all of the .CBA files.
Two sets of backup files were installed. You need to decide which set of files you want to use. We recommend the Sample Backup File Set:
Sample_Backup_File_Set. These textbases are populated with sample data, so you can begin using them immediately to familiarize yourself with the application. Default locations:
Backup sets: C:\Program Files\Inmagic\Genie\Textbases\Sample\Sample_Backup_File_Set Restore path: C:\Program Files\Inmagic\Genie\Textbases\Sample
Textbase_Backup_File_Set. These are empty textbases that do not contain records (except in the GENIEKEY and SUPPLIER textbases), so you can load your own data. Default locations:
Backup sets: C:\Program Files\Inmagic\Genie\Textbases\Textbase_Backup_File_Set Restore path: C:\Program Files\Inmagic\Genie\Textbases

Inmagic Genie for SQL 3.6 Installation and Upgrade Instructions Page 9
Note: If your SQL Server instance is on a machine other than the one on which DB/TextWorks for SQL is installed, either use the Browse button to select the backup sets or enter a UNC path in the format \\Server\Share\...
6. Click OK to close the dialog box.
7. If you installed the Sample_Backup_File_Set, you must edit the ICSWeb.INI file (in the WebPublisher PRO installation folder) to point to the path where sample textbases are installed. The default is C:\Program Files\Inmagic\Genie\Textbases\Sample. The ICSWeb.INI file cannot point to both the real and sample textbases; only one set of Genie textbases can be specified in the INI file.
Step 3 - Set Windows Permissions on Textbase Folders
If you selected Anonymous Access for the InmagicGenie virtual directory, you can skip this section
because the Genie installation assigned the necessary Windows rights to the folders.
If you selected Integrated Windows Authentication or Basic Authentication, follow the instructions
below to set Windows permissions on the folder where you installed the Genie textbases, to allow users to search and/or modify them.
The instructions below are for a Windows 2003 machine. Other operating systems may vary slightly.
1. Right-click the folder where you installed the Genie textbases and choose Properties from the
shortcut menu:
If you installed the empty textbases, the default is C:\Program Files\Inmagic\Genie\Textbases.
If you installed the sample textbases, the default is C:\Program Files\Inmagic\Genie\Textbases\Sample.
2. Select the Security tab in the Textbases Properties dialog box.
3. In the Group or user names list, select the domain user or group account that will be using the Genie application, and provide Modify and Write permissions.
Note: If the account you want is not in the list, perform the step below. Otherwise, you are now done applying permissions to the selected folder and you can click OK to close the dialog box.
4. Perform this step only if the desired Group or user name was not in the list:

Page 10 Inmagic Genie for SQL 3.6 Installation and Upgrade Instructions
a. Click Add, then open the Locations dialog box and select the Windows domain.
b. When your Windows domain is showing in the From this location box, click Advanced .
c. Click Find Now to display a list of your user and group accounts in the Search results box.
d. Select the user or group account from the list and click OK.
e. Click OK again to return to the Textbases Properties dialog box.
f. Now you can select the domain user or group account that will be using the Genie application, and provide Modify and Write permissions.
g. Click OK to close the dialog box. You are now done applying permissions to the selected folder.
5. If you installed both of the supplied textbase sets, select the other folder and repeat this entire procedure to provide Modify and Write permissions for it, as well. The default folder locations are shown below:
C:\Program Files\Inmagic\Genie\Textbases
C:\Program Files\Inmagic\Genie\Textbases\Sample
You have now finished applying permissions.

Inmagic Genie for SQL 3.6 Installation and Upgrade Instructions Page 11
Step 4 - Assign Rights to SQL Server and Genie Textbases
With Windows Authentication (SQL Server) combined with Basic authentication or Integrated Windows authentication (IIS), you need to 1) ensure that there is a SQL login for all NT groups or users that will be accessing Genie and 2) assign appropriate permissions for each group/user for each textbase.
With Windows Authentication (SQL Server) combined with Anonymous access (IIS), you need to ensure that there is a SQL login for the Anonymous access account and you need to assign read-write permissions for the anonymous access account to each textbase.
Assign user rights to SQL Server
1. From the Start menu, choose Inmagic Applications>DBText for SQL>Administration (WP-SQL)
to launch the DB/Text for SQL Administration program (InmCSAdmin.EXE).
2. Choose Configure SQL Server>Manage Security>Assign User Rights to SQL Server.
3. Click the Add User button.
4. Use the Add Database User dialog box to select a Windows user or group. Note: The Windows
user/group must have a login on the SQL Server.
If you are using Anonymous access or Integrated Windows authentication for IIS, select the Anonymous access account for the ICS-WPD virtual directory from the drop-down list and click OK. Important! If your SQL Server is on a different machine than the Genie application, you
must use a domain account for anonymous access, rather than the local IUSR account.
If you are using Basic authentication in IIS, select the group containing Genie users and click OK.
5. For the Windows user or group selected in the Current Database Users list, select the appropriate Content Server role membership and click Apply.
6. If you are assigning individual users, repeat these steps to add users and assign role memberships.
7. When you are done, click Close.

Page 12 Inmagic Genie for SQL 3.6 Installation and Upgrade Instructions
Assign user rights to the Genie textbases
This section explains how to provide users/groups (specifically, their domain accounts with logins on SQL Server) membership to roles granting varying degrees of access to the Genie textbases on SQL Server.
If you are using SQL Authentication (SQL Server), you do not have to assign textbase permissions, so you can skip this section.
If you are using Windows Authentication (SQL Server) combined with Basic authentication or Integrated Windows authentication (IIS), you need to assign appropriate permissions for each group/user for each textbase.
If you are using Windows Authentication (SQL Server) combined with Anonymous access (IIS), you need to assign read-write permissions for the anonymous access account to each textbase.
You must specify security settings for all of the Genie textbases in the Textbases subfolder as well as the Sample subfolder (if you plan to use the sample textbases).
1. From the Start menu, choose Inmagic Applications>DBText for SQL>Administration (WP-SQL) to launch the DB/Text for SQL Administration program (InmCSAdmin.EXE).
2. Choose Configure SQL Server>Manage Security>Assign User Rights to Textbase to open the Select Content Server Textbase dialog box.
3. Select a Genie textbase from the folder in which they were installed, and click Open. The default location is C:\Program Files\Inmagic\Genie\Textbases.
4. On the Assign User Rights to Textbase dialog box, click the Add User button.
5. Use the Add Database User dialog box to select a Windows user or group, for example IUSR (for IIS 7) or IUSR_MACHINENAME (for IIS6). Note: The Windows user/group must have a login on the SQL Server.
For Anonymous Access or Integrated Windows Authentication, select the Anonymous Access account for the ICS-WPD virtual directory from the drop-down list and click OK. Important! If
your SQL Server is on a different machine than the Genie application, you must use a domain account for Anonymous Access, rather than the IUSR account.
For Basic Authentication, select the group containing Genie users and click OK.

Inmagic Genie for SQL 3.6 Installation and Upgrade Instructions Page 13
6. For the Windows user or group selected in the Current Database Users list, select the appropriate Content Server role membership and click Apply.
7. Repeat this process (steps 4–6) for each Windows user or group that should have access to the currently selected Genie textbase. When done, click the Close button.
8. Select another Genie textbase and repeat this process (steps 3–7), until you have processed all of the textbases in this folder (C:\Program Files\Inmagic\Genie\Textbases).
9. If you are planning on using the Sample textbases, repeat this process (steps 3–7) for each textbase in the Sample subfolder. The default location is C:\Program Files\Inmagic\Genie\Textbases\Sample.
10. When you are done, close any open dialog boxes and close the DB/Text for SQL Administration program.
You have now completed assigning user rights, and you can move on to the test and wrap-up phase.
Step 5 - Test and Wrap-up
After installing Genie, perform the following test to make sure the application is accessible. If any of these steps fails, there may be a problem with the installation. If an error message appears during this test, check the Inmagic Knowledgebase, available through the Inmagic Customer Extranet. Make a note of the exact text of the message or print the page in case you need to contact Inmagic Technical Support.
To test access to the Genie application
1. Point your browser to http://ServerName/InmagicGenie, where ServerName is the Web server where
the Genie application is installed. The InmagicGenie virtual directory was created when you installed the application.
2. Log in by typing a username and password combination of admin/admin. The password is case-sensitive. This is the highest-level default username/password combination. We strongly recommend that you change the password at your earliest convenience. To learn about the other default username/password combinations, how to change passwords, and other security features, see the Inmagic Genie Security Notes.
Login Error 405: If you are unable to log in due to a 405 error, you may need to correct a Handler
Mapping in IIS. This may occur if you installed Genie on Windows 2008 or you are installing Genie on Windows 2003 for the first time. For instructions on how to resolve the problem, go to the Inmagic Customer Extranet and search the Inmagic Support Knowledgebase for “405”.
3. Choose Suppliers>Search Suppliers.
4. On the Supplier Search page, click the Browse button next to the Company Name box, select a Supplier from the list, and click the Add button. Do this multiple times if you like. When you are finished selecting Suppliers, click the Close button.
5. Click the Submit Query button.
6. On the Search Results page, click the Edit link for any Supplier record. Supplier information should appear for the record (for example, there is a company name, address, and Web site URL). Note that not all boxes for the record may be filled in, but some information should appear for the record.
7. On the Edit Supplier Record page, make a mental note of the current value in the State/Province box, then click the [Browse] link for the box, select an item from the list, and click Replace All.
8. Click Save. Verify that “Record updated successfully” appears in the messages area of the page.
9. Change the contents of the State/Province back to the original value, and click Save again.

Page 14 Inmagic Genie for SQL 3.6 Installation and Upgrade Instructions
To change the default content page
By default, after you log in, Genie opens the Catalog Search page (catalog_search.ASPX). You can specify a different default page, if you want.
1. Go to IIS, right-click the InmagicGenie virtual directory, and select Properties to open the InmagicGenie Properties dialog box.
2. Select the Documents tab.
3. Remove the catalog_search.ASPX entry.
4. Add the .ASPX file you want as your default page.
For example, if you check out loans frequently, you may want to default to the Check Items Out page, so you would add the loans_checkout.ASPX file. For the names of the .ASPX pages, see the root of your Genie installation folder. The pages are easily identifiable by their file names, which generally follow the format of textbase name_function.ASPX.
To wrap up the installation process
It is important to provide your library administrator with the following information.
Where you installed the Genie application and its textbases.
README file. This file, located in the Documentation subfolder of the Genie installation folder, provides information that the library administrator will need to know, including how to set up the application with the library data for your organization and how to access the application. The Readme file is also available from the Inmagic Customer Extranet.
ICSWEB.INI points WebPublisher PRO to the appropriate set of Genie textbases. Library
administrators may decide to use the set of Genie textbases other than what was chosen during the installation. For example, the library administrator may later decide to point to the Sample textbases for training purposes. To do this, it is necessary to edit ICSWEB.INI (the default location is C:\Program Files\Inmagic\WebPubPRO\ICSWEB.INI).
ICSWEB.INI specifies the default location(s) for textbases, and can include entries for textbases that are not in the default location. For example:
[[Web Defaults]
Default-Textbase-Paths=c:\Program Files\inmagic\webpubpro\textbase\
[Web Textbase Paths]
cars=c:\Program Files\inmagic\webpubpro\sample\
catalog=c:\data\library\
Note that ICSWEB.INI must not point include references to both the real and sample textbases. For example, you cannot point to Cars in the Textbases folder and Cars in the Samples folder.

Inmagic Genie for SQL 3.6 Installation and Upgrade Instructions Page 15
The username/password combination of “admin/admin” that gives the highest-level access to the application. To log in to Genie, the library administrator needs to know this username/password combination. We strongly recommend that you change the password at your earliest convenience. To learn about the other default username/password combinations, how to change passwords, and other security features, see the Inmagic Genie Security Notes. For example, to take advantage of Windows Authentication enabling the login bypass feature, you need to add user login names to Genie.
For non-U.S. installations, specify date and currency options. This involves setting the culture in WEB.CONFIG and the correct date format in INMCSRV.INI and MyGenie.Config. See the Inmagic
Genie Technical Notes for instructions.
Upgrading to Genie for SQL v3.6
This section explains how to upgrade from Genie for SQL v3.2 or later.
Note: If you are upgrading from v3.2, be sure to consult the v3.3 and v3.4 installation notes from the Inmagic Customer Extranet for information about enabling or using new features introduced in those releases.
The upgrade process performs the following operations:
The Genie install kit creates a secondary backup of your existing Genie textbase and config files.
The existing Genie program files and subfolders are uninstalled.
Genie 3.6 program files and subfolders are installed in the same location as the prior Genie version.
Genie textbases and config files from the previous install are restored.
The previous IIS authentication method is preserved.
SOAP files necessary for Genie are copied to the Soap subfolder of the installation folder for WebPublisher PRO.
Step 1 – Manually back up files
IMPORTANT! You must MANUALLY back up ALL GENIE FILES BEFORE UPGRADING. Be sure to
COPY ALL GENIE FOLDERS AND FILES TO ANOTHER LOCATION ON YOUR SERVER OR NETWORK. (The copied files and folders can be safely deleted after you have successfully upgraded your Genie application.)
Step 2 – Perform the upgrade
1. On the Web server where WebPublisher PRO is installed, log in with Administrator privileges (for example, Local Administrator or a domain user with local administrator privileges).
2. Download the Genie ZIP file, and unzip it to a temporary folder on the Web server machine where WebPublisher PRO is installed. Then, from within that folder, double-click Setup.EXE.
The Setup program will not proceed if Microsoft .NET Framework Version 3.5 Service Pack 1 is not already installed. This requirement was stated in the Genie Support Matrix.
3. Setup detects a previous version. Click Yes to upgrade. (If you click No the program will exit.)

Page 16 Inmagic Genie for SQL 3.6 Installation and Upgrade Instructions
4. Use the Back up Genie Data dialog box to specify the location of your current Genie Textbases folder so that all data can be backed up to a temporary folder. If necessary, click Change and browse
to the proper folder.
5. Use the Back up DB/Text WebPublisher PRO Folder dialog box to specify the location of your WebPubPRO folder so data can be backed up to a temporary folder. If necessary, click Change and browse to the proper folder.

Inmagic Genie for SQL 3.6 Installation and Upgrade Instructions Page 17
6. The Ready to Upgrade dialog box reminds you to back up your current Genie folder, if you have not already done so. Then click Next.
7. Please wait while Genie and WebPublisher PRO are backed up. Note: After the data is backed up,
the old Genie application (3.2, 3.3, or 3.4) will be uninstalled in preparation for the upgrade.
8. When the Welcome screen reappears, click Next.

Page 18 Inmagic Genie for SQL 3.6 Installation and Upgrade Instructions
9. Read the license agreement and respond appropriately.
10. The Customer Information dialog box is pre-populated with your user name, company name, and Genie serial number. Click Next.

Inmagic Genie for SQL 3.6 Installation and Upgrade Instructions Page 19
11. On the Custom Setup dialog box, click Next to accept the defaults, or make any desired changes and then click Next. By default, all files will be copied to the same location as your currently installed
version of Genie. Your previous Genie textbases will be restored later in the upgrade process.
Program Files. Installs the Genie program files. (required)
Sample. Installs the sample textbase file sets supplied with the application. Since you are upgrading Genie, you probably already have working textbases, so installing the sample textbases is not likely to provide added benefit. If you do install them, any previous modifications you made will be retained.
12. On the DB/Text WebPublisher PRO Folder dialog box, change the location of the DB/Text WebPublisher PRO software, if necessary.
13. On the Validation Overrides dialog box, specify one of the following options, then click Next.
Yes, accept overrides and update lists. Genie will be configured to accept validation overrides
and update the corresponding validation list. This is the recommended choice.
No, reject records that do not comply with content validation. Genie will not permit overrides.
Note: If you later decide that you want to switch validation methods, see Inmagic Knowledgebase Article 2728.

Page 20 Inmagic Genie for SQL 3.6 Installation and Upgrade Instructions
14. A message states that your original Genie Web site selections (e.g., Default Web Site, Non-Default Web Site) and authentication selections (e.g., Anonymous Authentication, Windows Authentication) have been preserved by the upgrade. Click OK.
15. Click Install to install the program.
16. A message lists the Genie textbases that already exist in the WebPublisher PRO INI file (ICSWEB.INI), to inform you that Setup did not change these entries during the upgrade. Click OK.
Note: If desired, you can edit ICSWEB.INI at a later time to change the default location(s) for
textbases, and to include entries for textbases that are not in the default location.
17. On the Wizard Completed dialog box, check View Readme to read or print the file. If you select Check for Service Packs, your Web browser will open to the Inmagic Customer Extranet Service Pack page. We recommend that you check both options. Then click Finish.

Inmagic Genie for SQL 3.6 Installation and Upgrade Instructions Page 21
Installing MARC Services (optional)
If are upgrading Genie version 3.4.x or newer, you can skip this section. Genie MARC Services have not changed in 3.6. Genie 3.4 included with an optional module you can use to upload MARC Communication format files and have them converted and imported into the Catalog textbase. Read about these services in the InmagicGenieMarcNotes.pdf document.
You can install this optional module after successfully installing or upgrading Genie.
To install this module, navigate to the MarcServices folder in the Genie installer folder and double-click Setup.exe. Specify the folder in which to install the services when asked. The default location is C:\Program Files\Inmagic\Genie. If your copy of Genie is installed in a different folder, you may want to install the services there instead.
About Genie Documentation
For important information, please see the Genie README file and other documentation, which is installed in the default location of C:\Program Files\Inmagic\Genie\Documentation. For the latest documentation or updates, please check the Inmagic Extranet Download page.

Page 22 Inmagic Genie for SQL 3.6 Installation and Upgrade Instructions
Copyright 2009 - 2013 by Inmagic. All rights reserved.
Inmagic®, the Inmagic logo, DB/Text
®, DB/TextWorks
®, and IntelliMagic
® are registered trademarks, and
Inmagic.net™
, and PowerPack™
are trademarks of Inmagic.
Other brand and product names are trademarks or registered trademarks of their respective holders. Use of any other product name does not imply endorsement of that product by Inmagic.
The information in this document is subject to change without notice and should not be construed as a commitment by Inmagic, Inc., which assumes no responsibility for any errors that may appear in this document.
WARRANTY
INMAGIC MAKES NO WARRANTY, EXPRESS OR IMPLIED, INCLUDING BUT NOT LIMITED TO THE WARRANTIES OF MERCHANTABILITY AND FITNESS. INMAGIC SHALL NOT BE LIABLE FOR ANY LOST PROFITS OR ANY OTHER INCIDENTAL OR CONSEQUENTIAL DAMAGES. IN PARTICULAR,
INMAGIC SHALL HAVE NO LIABILITY FOR ANY DATA OR PROGRAMS STORED OR USED WITH THIS PRODUCT, INCLUDING THE COSTS OF RECOVERING SUCH PROGRAMS OR DATA.
U.S. GOVERNMENT: If Licensee is acquiring the software on behalf of any unit or agency of the U.S. Government, the following shall apply:
(a) For units of the Department of Defense: RESTRICTED RIGHTS LEGEND: Use, duplication or disclosure by the Government is subject to restrictions as set forth in subparagraph (c)(1)(ii) of the Rights in Technical Data Clause at DFARS 252.227-7013. (b) For any other unit or agency: NOTICE - Notwithstanding any other lease or license agreement that may pertain to, or accompanying the delivery of, the computer software and accompanying documentation, the rights of the Government regarding its use, reproduction and disclosure are as set forth in Clause 52.227-19(c)(2) of the FAR.
Contractor/Manufacturer is Inmagic, 600 Unicorn Park Drive, Fourth Floor, Woburn, MA 01801, U.S.A.
Questions regarding any Inmagic product should be addressed to Inmagic.
Inmagic 600 Unicorn Park Drive Fourth Floor Woburn, MA 01801 U.S.A. Telephone: 781-938-4444 or 800-229-8398 Fax: 781-938-4446 http://www.inmagic.com
[email protected] - technical support questions [email protected] - general company, product, and services questions [email protected] - sales, product pricing, and custom solution questions [email protected] - feature requests
10-02-13