Embed Size (px)
Citation preview

INFORMATION SYSTEMS SERVICE
NETWORKS AND COMMUNICATIONS SECTOR
VPN Remote Access
Installation and Configuration Guide
Operating System: Windows (XP, Vista, 7 and 8)
ΥΠΣ ΕΔ/50
November 2012

2
INFORMATION SYSTEMS SERVICES
A. INSTALLATION OF THE CLIENT SOFTWARE
B. CONFIGURATION OF THE CLIENT SOFTWARE
C. WINDOWS 8 ISSUES

3
INFORMATION SYSTEMS SERVICES
A. Installation of the Client Software
Step A1:
Open your browser and type in the following url https://ucyvpn.ucy.ac.cy. You will then be
asked to provide logon information – username and password. These are the same
credentials as those you use to access your University of Cyprus webmail. Enter your
credentials and click on Logon:
Step A2:
A list containing four different clients in .zip format will appear.
Click on the one that reads “Download Cisco IPSec client for Windows” if you have the 32-bit
operating system edition. Otherwise, you will have to click on “Download Cisco IPSec client
for Windows 64 Bit”. To determine which of the two system type editions your computer is
running, follow these steps:

4
INFORMATION SYSTEMS SERVICES
i. Click Start
ii. Click All Programs
iii. Right click on Computer
iv. From the menu click Properties.
v. On the following screen that will appear, you can see the System type (32-bit or 64-bit).
Step A3:
Once you have identified your computer’s system type, select the appropriate client and
click to Save it on your computer:

5
INFORMATION SYSTEMS SERVICES
Step A4:
Select where you wish to Save the client software and then click Open:
Step A5:
Right-click on the .zip file you have just downloaded and select the Extract Here to extract
the contents of the compressed folder:

6
INFORMATION SYSTEMS SERVICES
Step A6:
Once you have extracted the contents of the .zip folder you downloaded, open the folder
and double click the file vpnclient_setup as shown below:
Step A7:
On the following screen that will appear, click Next.
Step A8:
Select the radio button that reads I accept the license agreement and then click Next.

7
INFORMATION SYSTEMS SERVICES
Step A9:
It is recommended to keep the default destination folder as is. If you wish to change the
installation location, click on Browse and select a different folder. Click Next.

8
INFORMATION SYSTEMS SERVICES
Step A10:
Click Next to proceed with the installation:
Step A11:
The following screen informs you on the successful installation of the VPN Client. Click
Finish.

9
INFORMATION SYSTEMS SERVICES
Step A12:
You may be asked to restart your system for the configuration changes to take effect. Click
Yes to restart your system.

10
INFORMATION SYSTEMS SERVICES
B. Configuration of the Client Software
Step B1:
Launch the VPN Client by clicking on Start > All Programmes > Cisco Systems VPN Client >
VPN Client:
Step B2:
At this point you will have to import the University of Cyprus.pcf file, even if the connection
«University of Cyprus» appears under Connection Entry. Click on the Import button:
11
INFORMATION SYSTEMS SERVICES
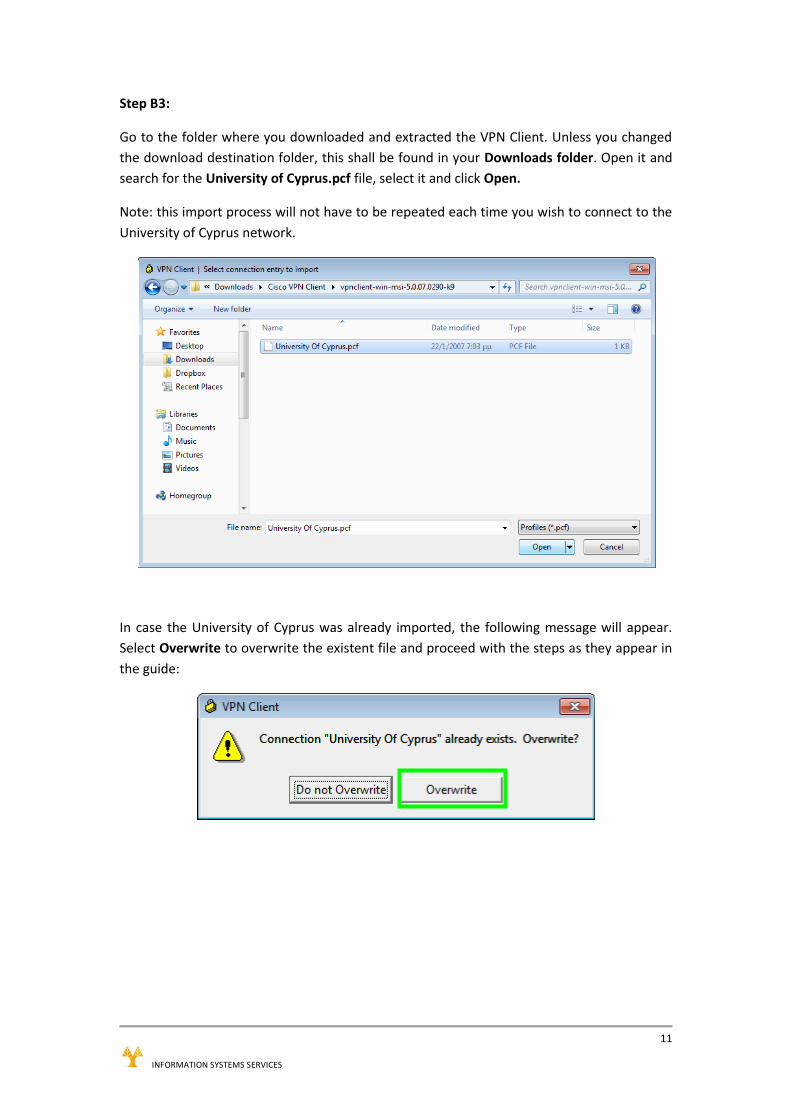
Step B3:
Go to the folder where you downloaded and extracted the VPN Client. Unless you changed
the download destination folder, this shall be found in your Downloads folder. Open it and
search for the University of Cyprus.pcf file, select it and click Open.
Note: this import process will not have to be repeated each time you wish to connect to the
University of Cyprus network.
In case the University of Cyprus was already imported, the following message will appear.
Select Overwrite to overwrite the existent file and proceed with the steps as they appear in
the guide:

12
INFORMATION SYSTEMS SERVICES
Step B4:
The University of Cyprus connection shall now appear. Select it and then click on the
Connect button:
Step B5:
You will be prompted to enter your credentials at the following screen. Use the username
and password that you use to access your University of Cyprus e-mail account. Enter your
credentials and click OK:

13
INFORMATION SYSTEMS SERVICES
Step B6:
You are now securely connected to the University of Cyprus’ network. This is indicated by a
yellow lock that appears next to the Connection Entry and on your computer’s taskbar as
well. If you wish to Disconnect, click on the Disconnect icon.

14
INFORMATION SYSTEMS SERVICES
C. Windows 8 Issues
C.1 Problem «Failed to enable virtual adapter»
Symptom: The «Connect» command returns the error message «Failed to enable virtual adapter».
Workaround:
Step C.1.1
Open the Registry Editor by typing regedit in the Run prompt and click OK:
Note:
To locate the Run prompt move your mouse to the upper right corner until the Charms Bar pops out.
Select Apps from the list and type “run” in the search box. Click on Run from the search results.
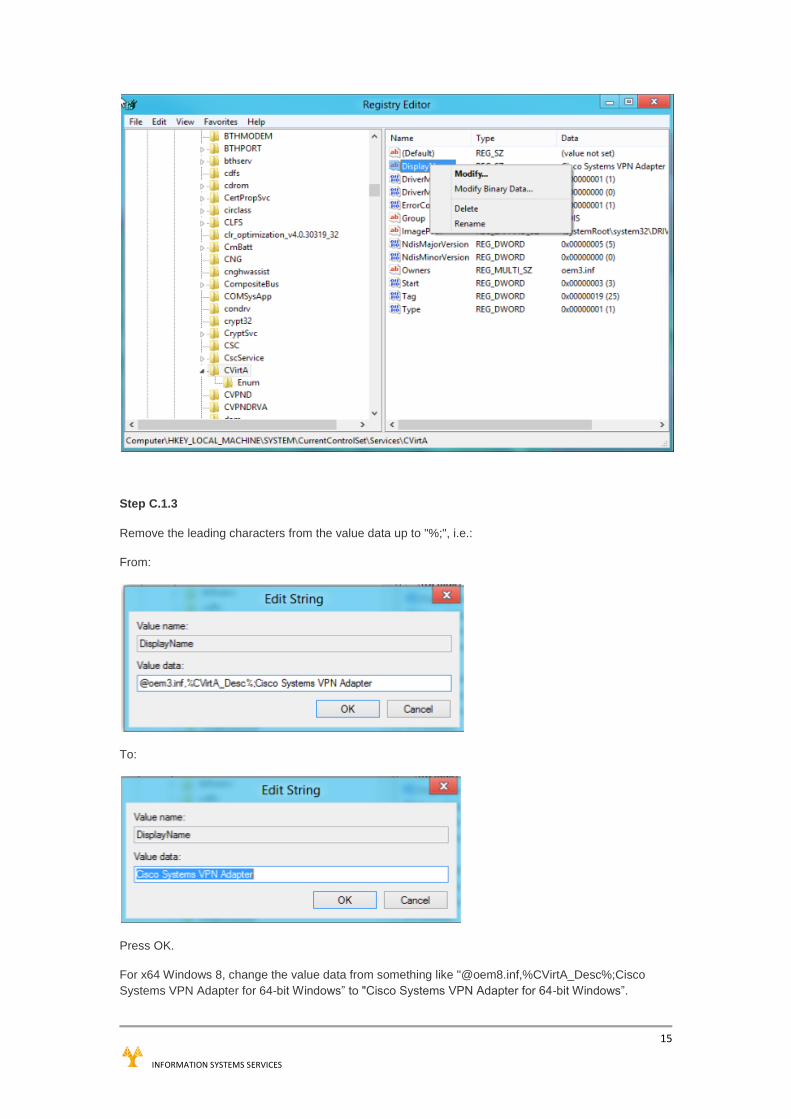
Step C.1.2
Locate the HKEY_LOCAL_MACHINE\SYSTEM\CurrentControlSet\Services\CVirtA Registry Key, select
the DisplayName property (right-click) to modify:
15
INFORMATION SYSTEMS SERVICES
Step C.1.3
Remove the leading characters from the value data up to "%;", i.e.:
From:
To:
Press OK.
For x64 Windows 8, change the value data from something like "@oem8.inf,%CVirtA_Desc%;Cisco
Systems VPN Adapter for 64-bit Windows” to "Cisco Systems VPN Adapter for 64-bit Windows”.

16
INFORMATION SYSTEMS SERVICES
Step C.1.4
Try connecting again to confirm that the workaround has fixed the problem.

![[ WIRELESS COMMUNICATIONS ] - Welcome / Bienvenue | · PDF fileCANADA’S WIRELESS COMMUNICATIONS SECTOR ... including mesh networks, ... Wireless Technologies, Software, Mobile Media](https://img.dokumen.tips/doc/110x75/5aa3fdbb7f8b9afa758b4766/-wireless-communications-welcome-bienvenue-canadas-wireless-communications.jpg)