Embed Size (px)
Citation preview
Copyright © 2015 MarkLogic Corporation. All rights reserved.
MarkLogic Server
Information Studio Developer’s Guide1
MarkLogic 8February, 2015
Last Revised: 8.0-1, February, 2015
MarkLogic Server Table of Contents
Table of Contents
Information Studio Developer’s Guide
1.0 Introduction to Information Studio ................................................................51.1 Information Studio Components .............................................................................51.2 Application Services App Server and Databases ....................................................61.3 Information Studio APIs .........................................................................................71.4 Configuring Large-Scale Loading Processes ..........................................................71.5 Starting Application Services .................................................................................8
2.0 Controlling Access to Information Studio .....................................................92.1 Predefined Roles for Information Studio ................................................................9
2.1.1 infostudio-user Role ....................................................................................92.1.2 infostudio-admin-internal Role ...................................................................9
2.2 infostudio-admin User ............................................................................................9
3.0 Creating and Configuring Databases and REST Servers .............................103.1 Accessing the Database Section of the Application Services Page ......................103.2 Creating a New Database ......................................................................................113.3 Configuring a Database ........................................................................................12
3.3.1 Navigating to the Database Settings Page ................................................123.3.2 Configuring Text Indexes .........................................................................143.3.3 Configuring Database Range Indexes .......................................................15
3.3.3.1 Creating an Attribute Range Index ............................................163.3.3.2 Creating an Element Range Index .............................................183.3.3.3 Creating a Field Range Index ....................................................20
3.3.4 Configuring Database Fields ....................................................................243.4 Deleting a Database ..............................................................................................253.5 Creating a REST API Instance .............................................................................26
4.0 Creating and Configuring Flows ..................................................................284.1 Accessing Information Studio ..............................................................................284.2 Creating a New Flow ............................................................................................294.3 Selecting a Collector .............................................................................................31
4.3.1 Changing the Default Collector ................................................................314.3.2 Using the Filesystem Directory Collector ................................................324.3.3 Using the Browser Drop-Box Collector ...................................................344.3.4 Using the External Binary Filesystem Collector ......................................374.3.5 Using the Oscars Example Data Loader Collector ...................................384.3.6 Configuring Ingestion Options .................................................................39
MarkLogic 8—February, 2015 Information Studio Developer’s Guide—Page 2
MarkLogic Server Table of Contents
4.4 Transforming Content During Ingestion ...............................................................424.4.1 Adding a Transform To A Flow ...............................................................424.4.2 Deleting Elements or Attributes ...............................................................454.4.3 Normalizing Dates ....................................................................................464.4.4 Validating Documents Against a Schema ................................................484.4.5 Applying a Custom XSLT Stylesheet .......................................................494.4.6 Extracting Metadata from Binary Content With the Filter Documents Trans-
form 504.4.7 Renaming Elements or Attributes .............................................................514.4.8 Adding a Custom XQuery Transform ......................................................52
4.5 Selecting Database Load Settings .........................................................................534.5.1 Selecting the Destination Database ...........................................................544.5.2 Document Settings ....................................................................................54
4.5.2.1 Configuring the URI Structure ..................................................564.5.2.2 Configuring Document Access Permissions .............................594.5.2.3 Configuring Collections ............................................................604.5.2.4 Configuring Quality Boost ........................................................61
4.6 Launching Ingestion and Tracking Status ............................................................624.7 Deleting a Flow .....................................................................................................63
5.0 Scripting Information Studio Tasks .............................................................645.1 The info API .........................................................................................................645.2 Creating a Database ..............................................................................................645.3 Configuring the Database Text Indexes ................................................................655.4 Loading Data into Databases ................................................................................665.5 Establishing Ingestion Policies .............................................................................675.6 Applying Ingestion Policies ..................................................................................725.7 Ingestion Policies and Multiple Load Operations .................................................73
6.0 Creating Custom Collectors and Transforms ...............................................766.1 The infodev and plugin APIs ................................................................................766.2 Information Studio Plugin Framework .................................................................76
6.2.1 Plugin Directory ........................................................................................776.2.2 Upgrading 4.2 Custom Plugins to MarkLogic 8 .......................................776.2.3 Collector or Transform Plugin Module ....................................................786.2.4 Example: Basic Capabilities Manifest ......................................................79
6.3 Creating Custom Collectors ..................................................................................806.3.1 Types of Collectors ...................................................................................806.3.2 Collector Capabilities and Function Signatures ........................................806.3.3 Collector Interaction with Information Studio ..........................................84
6.3.3.1 One-Shot Collectors ..................................................................846.3.3.2 Long-Running Collectors ..........................................................85
6.3.4 Collector Type and MarkLogic Server Restart .........................................866.3.5 An Example Collector ..............................................................................876.3.6 Initializing the Example Collector ............................................................92
MarkLogic 8—February, 2015 Information Studio Developer’s Guide—Page 3
MarkLogic Server Table of Contents
6.4 Creating Custom Transforms ................................................................................936.4.1 Transform Capabilities and Function Signatures ......................................936.4.2 Transform Interaction with Information Studio ........................................956.4.3 An Example Transform ............................................................................95
7.0 Technical Support ......................................................................................102
8.0 Copyright ...................................................................................................1038.0 NOTICE ..............................................................................................................103
MarkLogic 8—February, 2015 Information Studio Developer’s Guide—Page 4
MarkLogic Server Introduction to Information Studio
1.0 Introduction to Information Studio 8
Note: Information Studio is deprecated and will be removed in a future release of MarkLogic Server.
The MarkLogic Server Application Services suite includes Information Studio, which is a browser-based Interface and XQuery API that enables you to quickly create MarkLogic Server databases and load them with content. Information Studio simplifies how you load and transform content by enabling you to collect content from different sources, process it with XSLT and built-in transformation logic, and load it into a MarkLogic database. You can customize Information Studio to connect to any data source and create your own solutions for transforming content as it is collected and loaded into the database.
This chapter includes the following sections:
• Information Studio Components
• Application Services App Server and Databases
• Information Studio APIs
• Configuring Large-Scale Loading Processes
• Starting Application Services
1.1 Information Studio ComponentsThe Information Studio components are the following:
• A flow is a content load configuration that defines the documents to be loaded into a database and how to load them into the database. A flow consists of the following:
• A collector
• A transform
• An ingestion policy
• A collector is an Information Studio plugin that gathers the content to load into a database. Specific collector implementations gather content in different ways. You can also create custom collectors, as described in “Creating Custom Collectors” on page 80. The collectors bundled with Information Studio are the following:
• A one-shot collector scans and loads files from a filesystem directory and then stops.
• A long-running collector listens for documents from a source and loads them into the database until it is explicitly stopped.
MarkLogic 8—February, 2015 Information Studio Developer’s Guide—Page 5
MarkLogic Server Introduction to Information Studio
• A transform is an Information Studio plugin that modifies content as it is loaded into the database. Specific transform implementations modify the content in different ways. For more details, see the following sections:
• Transforms bundled with Information Studio are described in “Transforming Content During Ingestion” on page 42.
• Creating custom transforms is described in “Creating Custom Transforms” on page 93.
• An ingestion policy is a unit of XML configuration, in the form of a stored <options> node, that specifies how to load content into a database. An Information Studio database can have multiple named policies, as well as a default policy. For more details, see the following sections:
• “Configuring Ingestion Options” on page 39
• “Establishing Ingestion Policies” on page 67
• A ticket is a mechanism for tracking a database load process and recording errors that occur. A ticket has a unique ID that can be used to get status reports. Tickets persist in a database until they reach their expiration date or are explicitly deleted.
1.2 Application Services App Server and DatabasesInformation Studio uses an HTTP App Server at port 8002, named App-Services, which stores data in the App-Services database described below. In addition, Information Studio internally uses a database named Fab.
Database Purpose
App-Services The App-Services database stores the Information Studio configuration data for the flows and the tickets and log messages generated by the load operations.
The App-Services database also serves as the triggers database for both the App-Services and Fab databases.
Fab The Fab database retains the state information related to the document transformation and distribution processes. Documents that generate errors during a load operation are retained in the Fab database.
If there are transformation steps configured for the flow, the collector loads the documents to the Fab database, where they are processed by a Content Processing Framework (CPF) pipeline. The CPF pipeline transforms the content and distributes the resulting documents to the destination database.
MarkLogic 8—February, 2015 Information Studio Developer’s Guide—Page 6
MarkLogic Server Introduction to Information Studio
When you create a flow, two scheduled tasks are created to garbage-collect the content in the Information Studio databases as follows:
• Deleting expired documents from the Fab database: By default, this task is scheduled to run in 30 days at 11:59 pm. The start time can be configured programmatically by means of the fab-retention-duration element, as described in “Establishing Ingestion Policies” on page 67. The task logs a message at the "Debug" level when no documents remain to be removed.
• Deleting expired tickets from the App-Services database: By default, this task is scheduled to run in 30 days at 11:59 pm. The start time can be configured programmatically by means of the ticket-retention-duration element, as described in “Establishing Ingestion Policies” on page 67. The task logs a message at the "Debug" level for each ticket it deletes and a final message when complete. A default message is logged if the task runs and no tickets are deleted.
1.3 Information Studio APIs The info and infodev APIs enable you to programmatically configure and use Information Studio and to create custom collector and transform plugins. For reference documentation on each function, see the MarkLogic XQuery and XSLT Function Reference.
The info and infodev APIs provide the following functionality:
• The info module API enables you to script the Information Studio processes. The use of the info API is described in “Scripting Information Studio Tasks” on page 64. Information Studio processes include the following:
• Creating, configuring, and deleting databases
• Loading content
• Setting policy
• Getting status information using info:ticket
• Getting error information using info:ticket-errors
• Running a flow configured in Information Studio
• The infodev module API enables you to create custom collector and transform plugins. The functions in this API provide the hooks into the plugin framework. The use of the infodev API is described in “Creating Custom Collectors and Transforms” on page 76.
1.4 Configuring Large-Scale Loading ProcessesInformation Studio uses the App-Services and Fab databases to temporarily store collected documents and to retain configuration and state information for the Information Studio flows.
MarkLogic 8—February, 2015 Information Studio Developer’s Guide—Page 7
MarkLogic Server Introduction to Information Studio
If you plan to load a large amount of content with an Information Studio flow, consider mounting the App-Services and Fab databases on a different volume from the volume where you mount the destination database.
If you initially configure all of your MarkLogic Server databases on one volume, you can delete the forests for the App-Services and Fab databases, create new forests on a different volume, and attach the new forests to the App-Services and Fab databases.
If you want to retain the existing data in the App-Services and Fab databases, you can move the forests. The following procedure assumes there is no activity on the forests being moved. If there are updates to the forests being moved, they might end up in different states. This procedure should not be done on active systems, as there is a short outage period between detaching the old forest and attaching the new forest.
To move an existing forest to another volume, use the following steps:
1. Backup the App-Services and Fab forests to a directory using the forest backup/restore page of the Admin Interface as described in Making Backups of a Forest in the Administrator’s Guide.
2. On the new destination volume, create new App-Services and Fab forests, as described in Creating a Forest in the Administrator’s Guide.
3. For the new App-Services and Fab forests, restore the forests from the backups made in step 1, as described in Restoring a Forest in the Administrator’s Guide.
4. Detach your original App-Services and Fab forests from their respective databases and attach the newly restored public forest to the database, as described in Attaching and/or Detaching Forests to/from a Database in the Administrator’s Guide.
5. Delete the original private forests.
1.5 Starting Application ServicesInformation Studio is bundled as part of the Application Services suite of applications. To start Application Services, open the following URL in a browser window:
http://localhost:8000/appservices
If your instance of MarkLogic Server runs on a different host, or if Information Studio is configured on a different port, substitute the appropriate values for host and port.
To use Information Studio, you need the infostudio-user role assigned to your login account. To use Application Builder, you need the app-builder role. Users with the admin role have access to both applications.
MarkLogic 8—February, 2015 Information Studio Developer’s Guide—Page 8
MarkLogic Server Controlling Access to Information Studio
MarkLogic 8—February, 2015 Information Studio Developer’s Guide—Page 9
2.0 Controlling Access to Information Studio9
Information Studio enables you to create and configure databases and to load documents into databases. This chapter describes the security roles needed to run Information Studio. For details about the MarkLogic Server security model and about configuring users and roles, see Understanding and Using Security Guide and Security Administration in the Administrator’s Guide.
This chapter includes the following sections:
• Predefined Roles for Information Studio
• infostudio-admin User
2.1 Predefined Roles for Information StudioInformation Studio uses the following predefined roles:
• infostudio-user Role
• infostudio-admin-internal Role
2.1.1 infostudio-user RoleThe infostudio-user role is a minimally-privileged role that is needed to use Information Studio. You must grant this role to all users who are allowed to access Information Studio.
The infostudio-user role has the following execute privileges:
• http://marklogic.com/xdmp/privileges/infostudio
• http://marklogic.com/xdmp/privileges/unprotected-collections
2.1.2 infostudio-admin-internal RoleInformation Studio uses the infostudio-admin-internal role to amp certain functions that Information Studio performs. You should not explicitly grant the infostudio-admin-internal role to any user. This role is only for internal use by Information Studio.
2.2 infostudio-admin UserThe infostudio-admin user is a preconfigured user that handles Content Processing Framework (CPF) restart and resumes unfinished Information Studio tasks in the event of an unexpected shutdown and restart of MarkLogic Server. When MarkLogic Server is restarted, long-running collectors resume loading documents to the database, as described in “Collector Type and MarkLogic Server Restart” on page 86. In this situation, the original user that started the collector is unknown, so the purpose of the infostudio-admin user is to resume control of the collector.
MarkLogic Server Creating and Configuring Databases and REST Servers
3.0 Creating and Configuring Databases and REST Servers27
This chapter describes how to create and configure a database in Information Studio, and how to create a REST API instance. You must have the infostudio-user role to do these tasks in Information Studio.
• Accessing the Database Section of the Application Services Page
• Creating a New Database
• Configuring a Database
• Deleting a Database
• Creating a REST API Instance
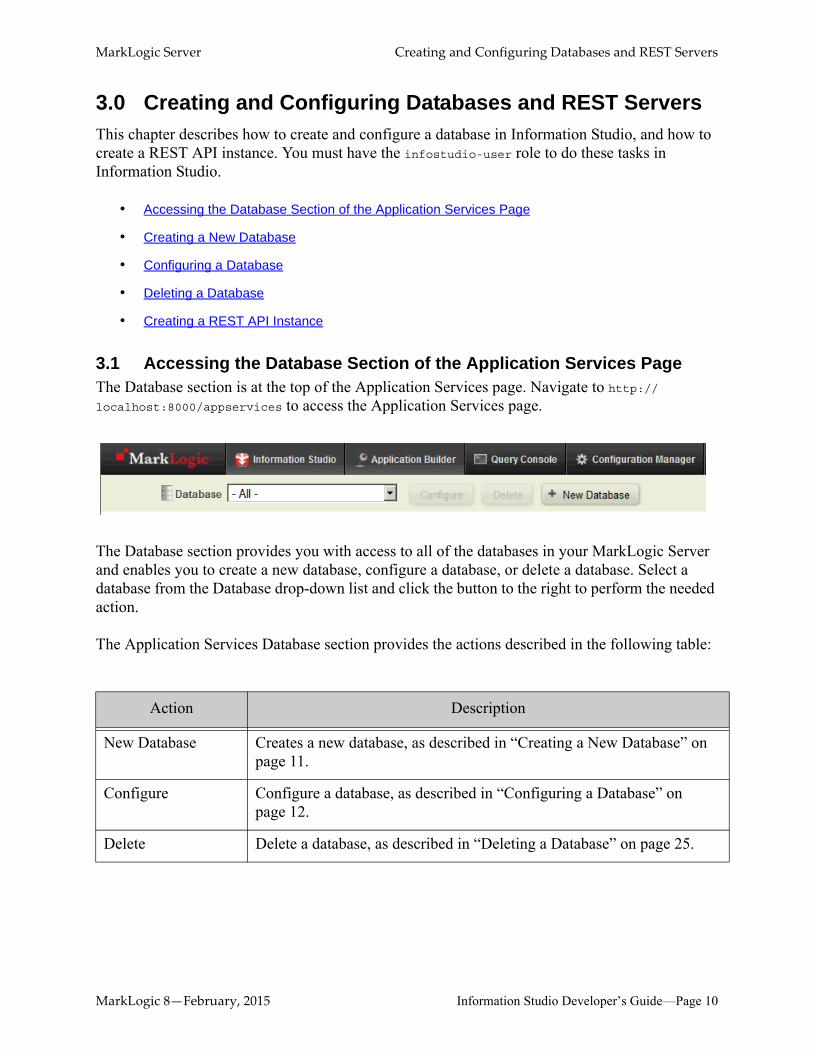
3.1 Accessing the Database Section of the Application Services PageThe Database section is at the top of the Application Services page. Navigate to http://localhost:8000/appservices to access the Application Services page.
The Database section provides you with access to all of the databases in your MarkLogic Server and enables you to create a new database, configure a database, or delete a database. Select a database from the Database drop-down list and click the button to the right to perform the needed action.
The Application Services Database section provides the actions described in the following table:
Action Description
New Database Creates a new database, as described in “Creating a New Database” on page 11.
Configure Configure a database, as described in “Configuring a Database” on page 12.
Delete Delete a database, as described in “Deleting a Database” on page 25.
MarkLogic 8—February, 2015 Information Studio Developer’s Guide—Page 10
MarkLogic Server Creating and Configuring Databases and REST Servers
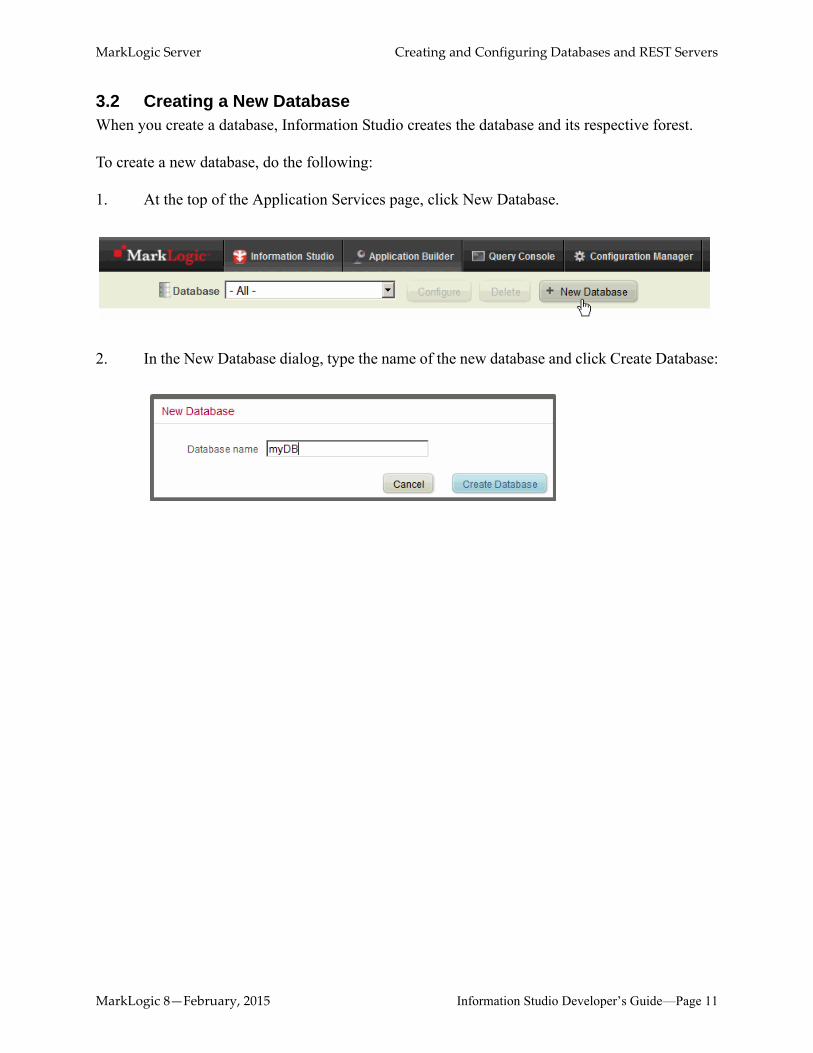
3.2 Creating a New DatabaseWhen you create a database, Information Studio creates the database and its respective forest.
To create a new database, do the following:
1. At the top of the Application Services page, click New Database.
2. In the New Database dialog, type the name of the new database and click Create Database:
MarkLogic 8—February, 2015 Information Studio Developer’s Guide—Page 11
MarkLogic Server Creating and Configuring Databases and REST Servers
3.3 Configuring a DatabaseThis section describes how to configure a database and includes the following topics:
• Navigating to the Database Settings Page
• Configuring Text Indexes
• Configuring Database Range Indexes
• Configuring Database Fields
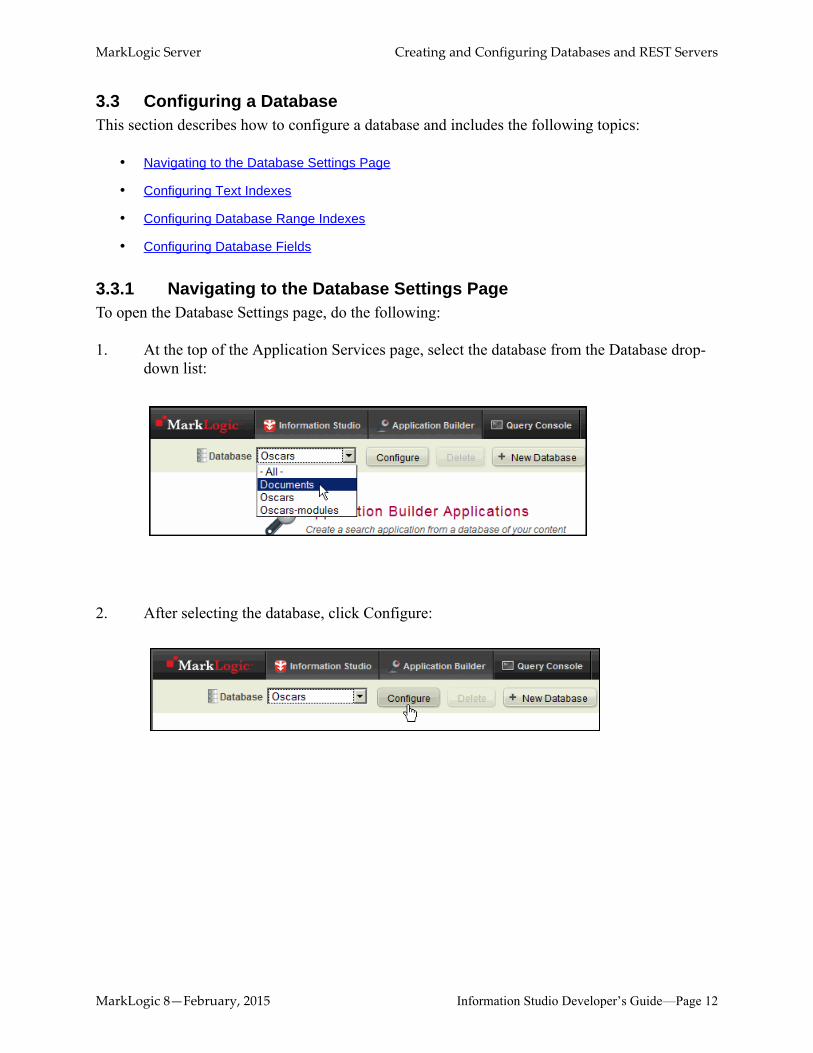
3.3.1 Navigating to the Database Settings PageTo open the Database Settings page, do the following:
1. At the top of the Application Services page, select the database from the Database drop- down list:
2. After selecting the database, click Configure:
MarkLogic 8—February, 2015 Information Studio Developer’s Guide—Page 12
MarkLogic Server Creating and Configuring Databases and REST Servers
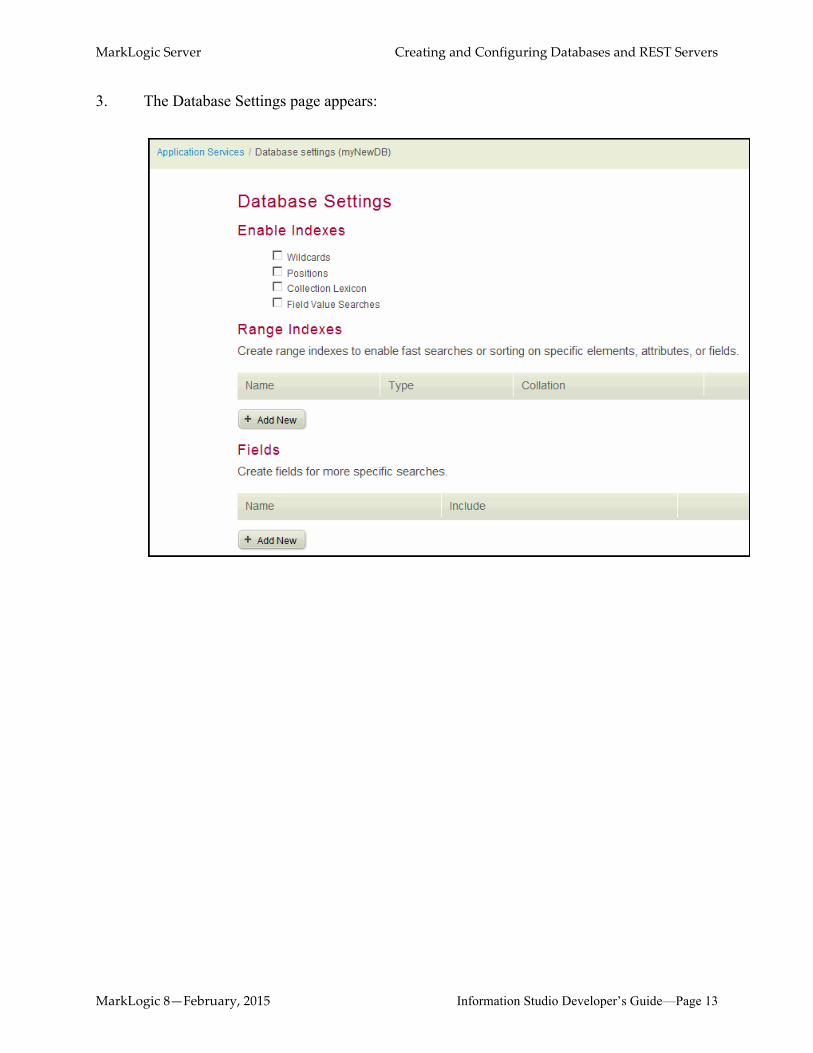
3. The Database Settings page appears:
MarkLogic 8—February, 2015 Information Studio Developer’s Guide—Page 13
MarkLogic Server Creating and Configuring Databases and REST Servers
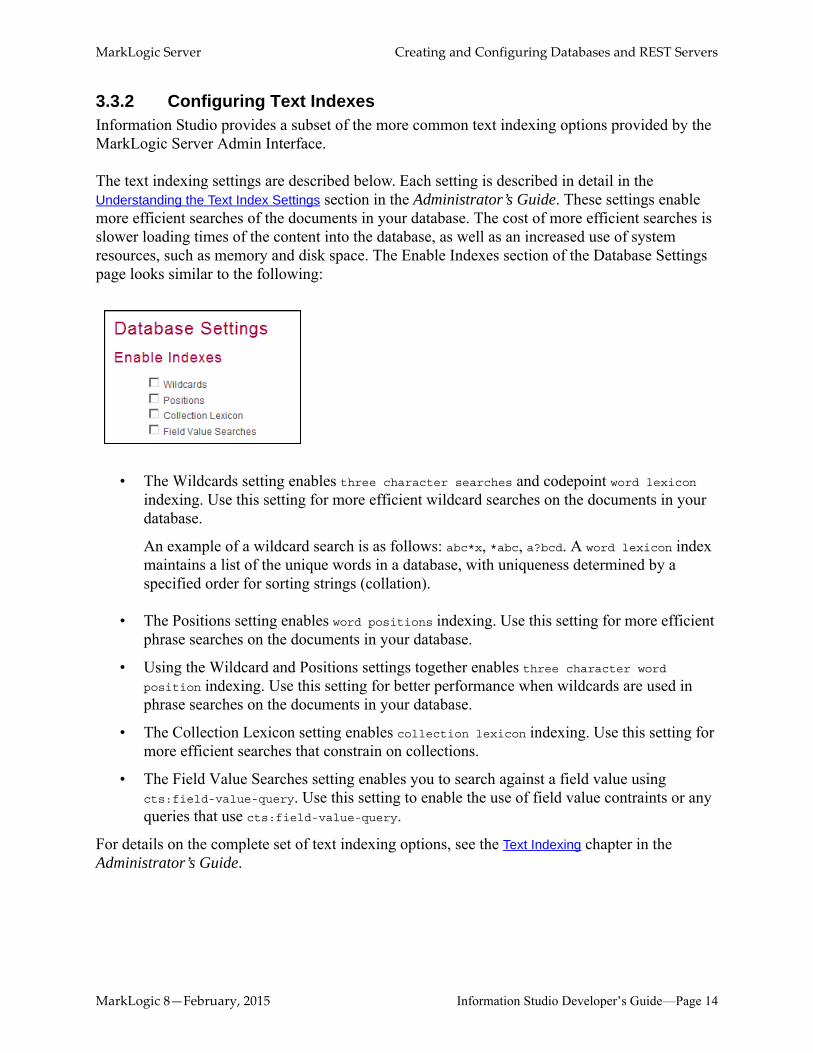
3.3.2 Configuring Text IndexesInformation Studio provides a subset of the more common text indexing options provided by the MarkLogic Server Admin Interface.
The text indexing settings are described below. Each setting is described in detail in the Understanding the Text Index Settings section in the Administrator’s Guide. These settings enable more efficient searches of the documents in your database. The cost of more efficient searches is slower loading times of the content into the database, as well as an increased use of system resources, such as memory and disk space. The Enable Indexes section of the Database Settings page looks similar to the following:
• The Wildcards setting enables three character searches and codepoint word lexicon indexing. Use this setting for more efficient wildcard searches on the documents in your database.
An example of a wildcard search is as follows: abc*x, *abc, a?bcd. A word lexicon index maintains a list of the unique words in a database, with uniqueness determined by a specified order for sorting strings (collation).
• The Positions setting enables word positions indexing. Use this setting for more efficient phrase searches on the documents in your database.
• Using the Wildcard and Positions settings together enables three character word position indexing. Use this setting for better performance when wildcards are used in phrase searches on the documents in your database.
• The Collection Lexicon setting enables collection lexicon indexing. Use this setting for more efficient searches that constrain on collections.
• The Field Value Searches setting enables you to search against a field value using cts:field-value-query. Use this setting to enable the use of field value contraints or any queries that use cts:field-value-query.
For details on the complete set of text indexing options, see the Text Indexing chapter in the Administrator’s Guide.
MarkLogic 8—February, 2015 Information Studio Developer’s Guide—Page 14
MarkLogic Server Creating and Configuring Databases and REST Servers
3.3.3 Configuring Database Range IndexesMarkLogic Server maintains a set of indexes for every database to enable search applications to rapidly search the text, structure, and combinations of the text and structure in XML documents. Defining a range index on an element or attribute enables more efficient range query search operations, such as those described in the Search Page section in the Application Builder Developer’s Guide. For documents that contain numeric or date information, queries may include search conditions based on inequalities (for example, price < 100.00 or date ≥ thisQtr).
Range indexes are described in detail in the Range Indexes and Lexicons chapter in the Administrator’s Guide. The following sections describe how to create range indexes using Information Studio:
• Creating an Attribute Range Index
• Creating an Element Range Index
• Creating a Field Range Index
MarkLogic 8—February, 2015 Information Studio Developer’s Guide—Page 15

MarkLogic Server Creating and Configuring Databases and REST Servers
3.3.3.1 Creating an Attribute Range IndexTo create an attribute range index, perform the following steps:
1. Navigate to the Database Settings page for the database you want to index. See “Navigating to the Database Settings Page” on page 12.
2. In the Range Indexes section of the Database Settings page, click Add New.
A selection dialog appears.
MarkLogic 8—February, 2015 Information Studio Developer’s Guide—Page 16
MarkLogic Server Creating and Configuring Databases and REST Servers
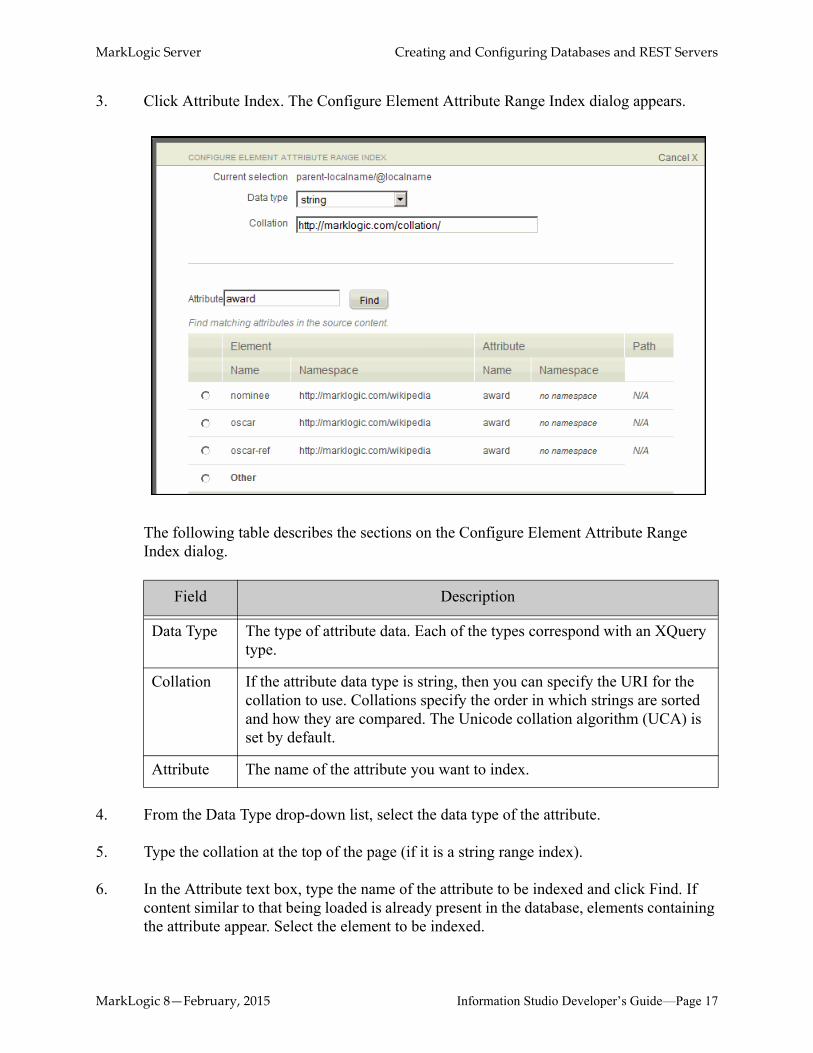
3. Click Attribute Index. The Configure Element Attribute Range Index dialog appears.
The following table describes the sections on the Configure Element Attribute Range Index dialog.
4. From the Data Type drop-down list, select the data type of the attribute.
5. Type the collation at the top of the page (if it is a string range index).
6. In the Attribute text box, type the name of the attribute to be indexed and click Find. If content similar to that being loaded is already present in the database, elements containing the attribute appear. Select the element to be indexed.
Field Description
Data Type The type of attribute data. Each of the types correspond with an XQuery type.
Collation If the attribute data type is string, then you can specify the URI for the collation to use. Collations specify the order in which strings are sorted and how they are compared. The Unicode collation algorithm (UCA) is set by default.
Attribute The name of the attribute you want to index.
MarkLogic 8—February, 2015 Information Studio Developer’s Guide—Page 17
MarkLogic Server Creating and Configuring Databases and REST Servers
7. Click Done to save the index settings.
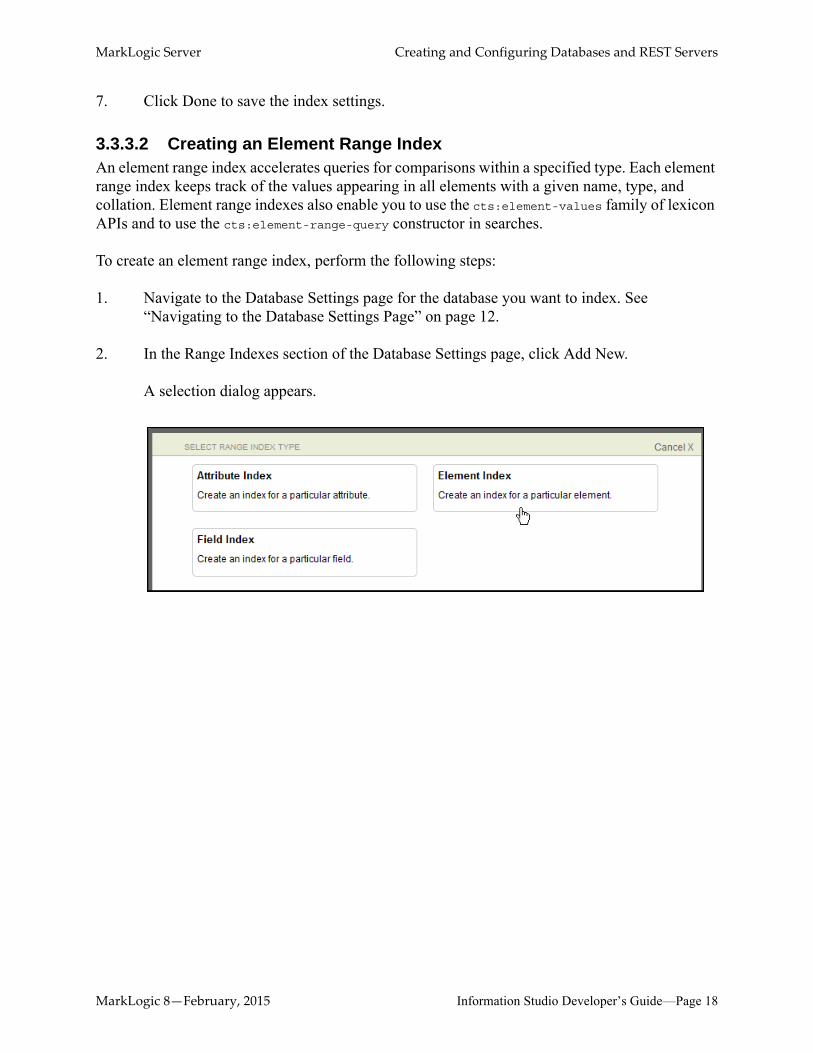
3.3.3.2 Creating an Element Range IndexAn element range index accelerates queries for comparisons within a specified type. Each element range index keeps track of the values appearing in all elements with a given name, type, and collation. Element range indexes also enable you to use the cts:element-values family of lexicon APIs and to use the cts:element-range-query constructor in searches.
To create an element range index, perform the following steps:
1. Navigate to the Database Settings page for the database you want to index. See “Navigating to the Database Settings Page” on page 12.
2. In the Range Indexes section of the Database Settings page, click Add New.
A selection dialog appears.
MarkLogic 8—February, 2015 Information Studio Developer’s Guide—Page 18
MarkLogic Server Creating and Configuring Databases and REST Servers
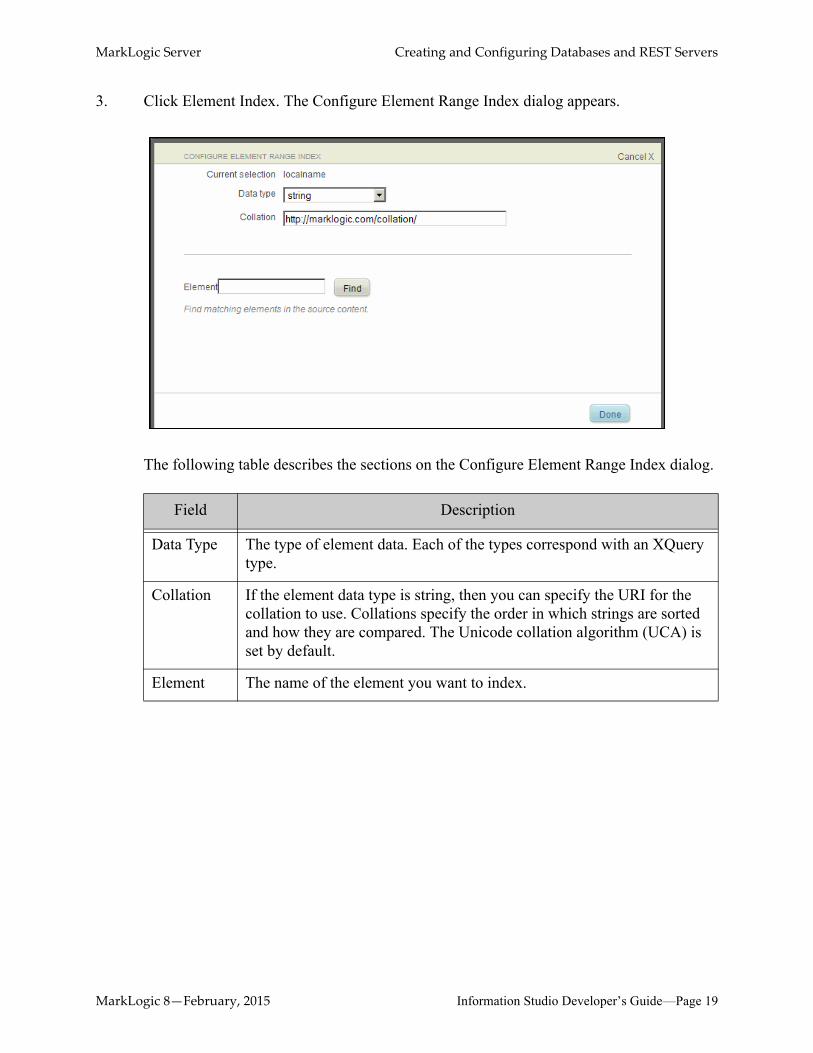
3. Click Element Index. The Configure Element Range Index dialog appears.
The following table describes the sections on the Configure Element Range Index dialog.
Field Description
Data Type The type of element data. Each of the types correspond with an XQuery type.
Collation If the element data type is string, then you can specify the URI for the collation to use. Collations specify the order in which strings are sorted and how they are compared. The Unicode collation algorithm (UCA) is set by default.
Element The name of the element you want to index.
MarkLogic 8—February, 2015 Information Studio Developer’s Guide—Page 19
MarkLogic Server Creating and Configuring Databases and REST Servers
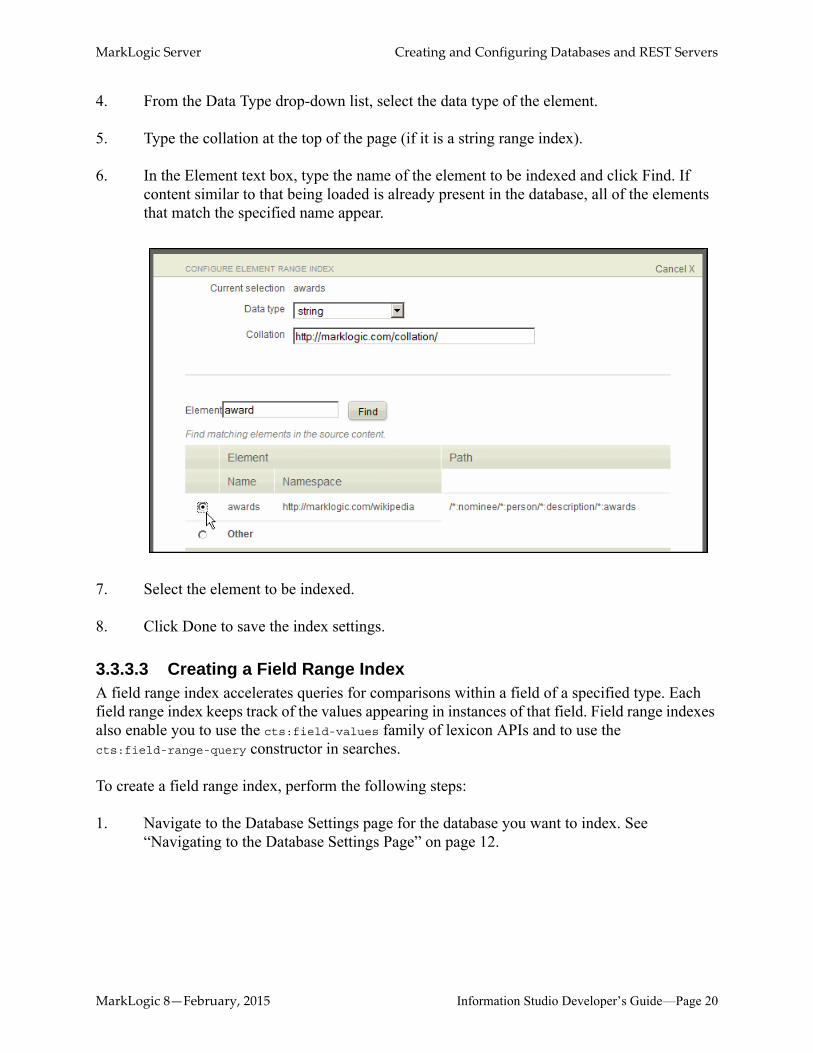
4. From the Data Type drop-down list, select the data type of the element.
5. Type the collation at the top of the page (if it is a string range index).
6. In the Element text box, type the name of the element to be indexed and click Find. If content similar to that being loaded is already present in the database, all of the elements that match the specified name appear.
7. Select the element to be indexed.
8. Click Done to save the index settings.
3.3.3.3 Creating a Field Range IndexA field range index accelerates queries for comparisons within a field of a specified type. Each field range index keeps track of the values appearing in instances of that field. Field range indexes also enable you to use the cts:field-values family of lexicon APIs and to use the cts:field-range-query constructor in searches.
To create a field range index, perform the following steps:
1. Navigate to the Database Settings page for the database you want to index. See “Navigating to the Database Settings Page” on page 12.
MarkLogic 8—February, 2015 Information Studio Developer’s Guide—Page 20
MarkLogic Server Creating and Configuring Databases and REST Servers
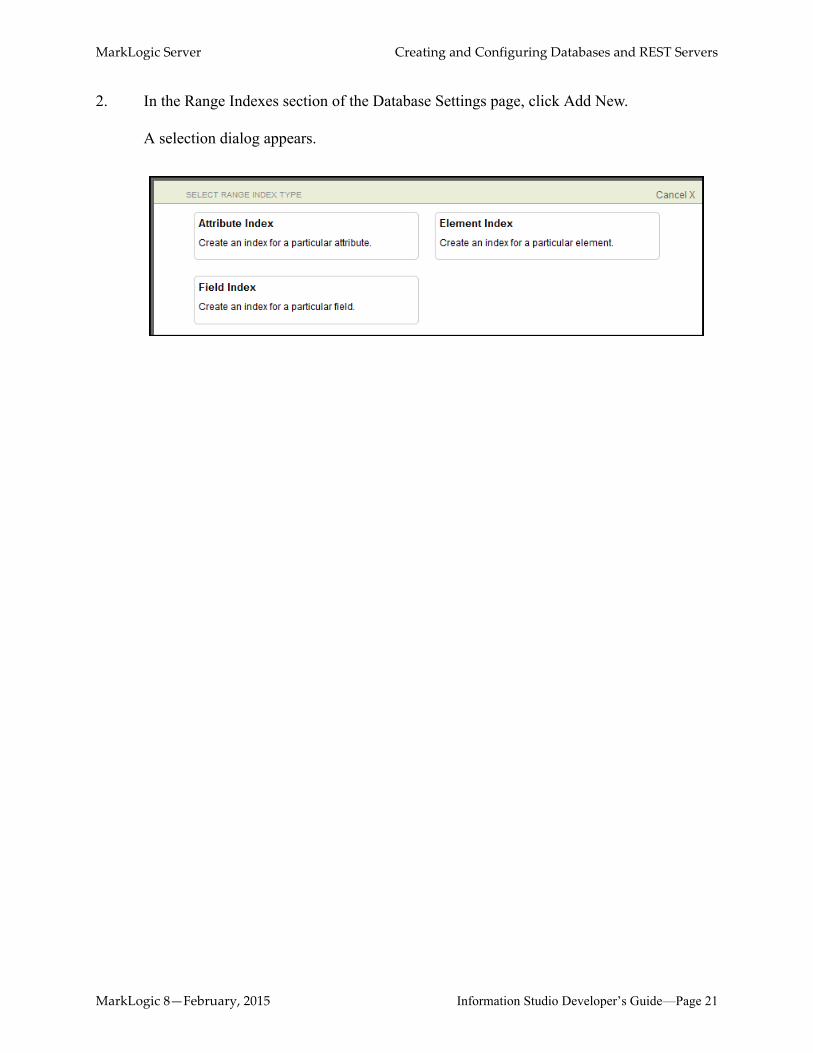
2. In the Range Indexes section of the Database Settings page, click Add New.
A selection dialog appears.
MarkLogic 8—February, 2015 Information Studio Developer’s Guide—Page 21
MarkLogic Server Creating and Configuring Databases and REST Servers
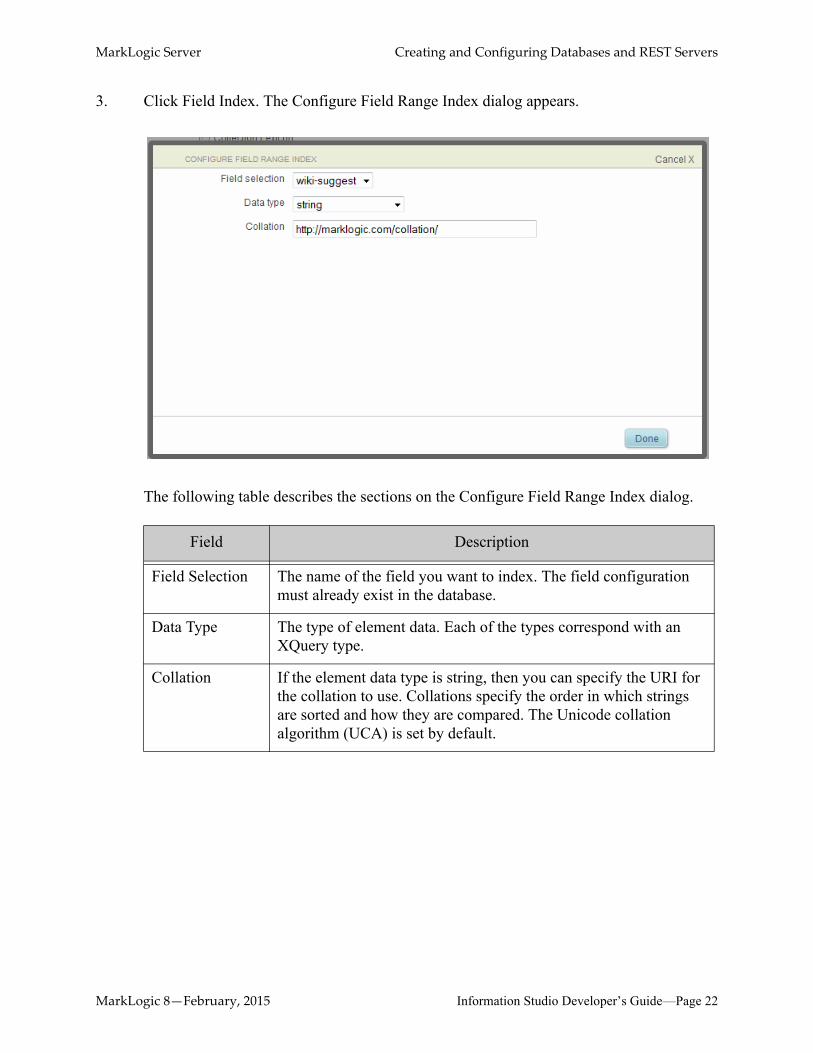
3. Click Field Index. The Configure Field Range Index dialog appears.
The following table describes the sections on the Configure Field Range Index dialog.
Field Description
Field Selection The name of the field you want to index. The field configuration must already exist in the database.
Data Type The type of element data. Each of the types correspond with an XQuery type.
Collation If the element data type is string, then you can specify the URI for the collation to use. Collations specify the order in which strings are sorted and how they are compared. The Unicode collation algorithm (UCA) is set by default.
MarkLogic 8—February, 2015 Information Studio Developer’s Guide—Page 22
MarkLogic Server Creating and Configuring Databases and REST Servers
4. From the Data Type drop-down list, select the data type of the element.
5. Type the collation at the top of the page (if it is a string range index).
6. In the Element text box, type the name of the element to be indexed and click Find. If content similar to that being loaded is already present in the database, all of the elements that match the specified name appear.
7. Select the element to be indexed.
8. Click Done to save the index settings.
MarkLogic 8—February, 2015 Information Studio Developer’s Guide—Page 23
MarkLogic Server Creating and Configuring Databases and REST Servers
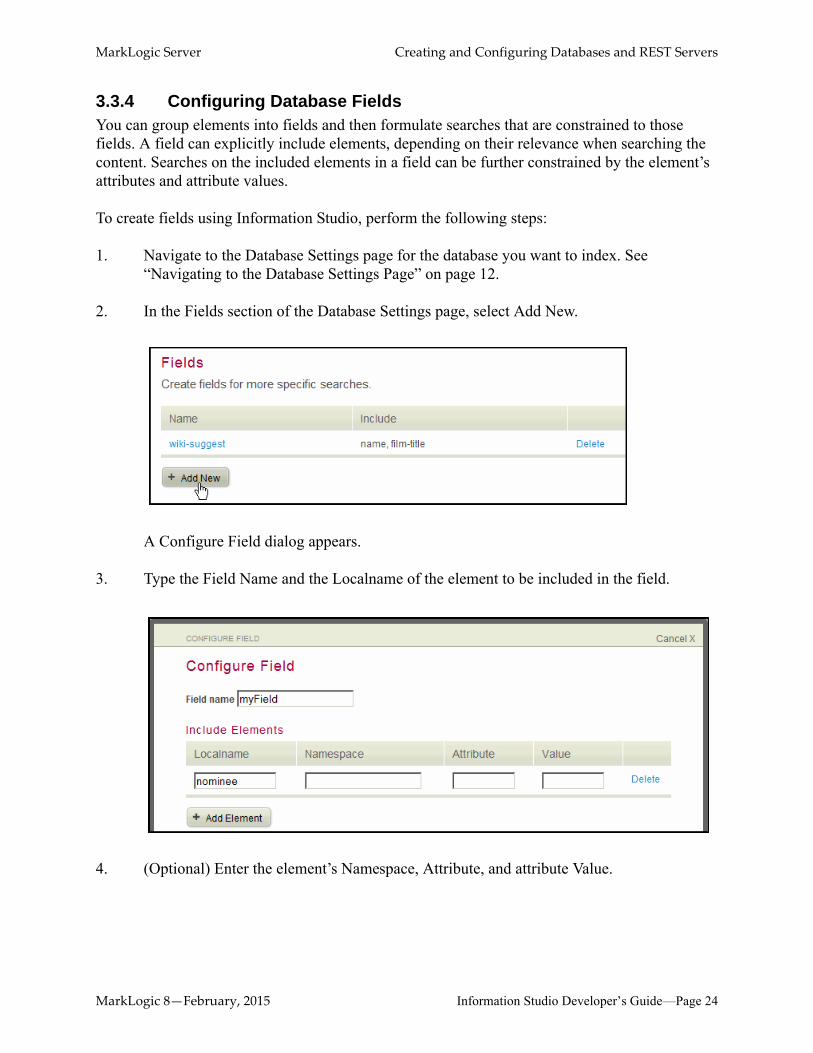
3.3.4 Configuring Database FieldsYou can group elements into fields and then formulate searches that are constrained to those fields. A field can explicitly include elements, depending on their relevance when searching the content. Searches on the included elements in a field can be further constrained by the element’s attributes and attribute values.
To create fields using Information Studio, perform the following steps:
1. Navigate to the Database Settings page for the database you want to index. See “Navigating to the Database Settings Page” on page 12.
2. In the Fields section of the Database Settings page, select Add New.
A Configure Field dialog appears.
3. Type the Field Name and the Localname of the element to be included in the field.
4. (Optional) Enter the element’s Namespace, Attribute, and attribute Value.
MarkLogic 8—February, 2015 Information Studio Developer’s Guide—Page 24
MarkLogic Server Creating and Configuring Databases and REST Servers
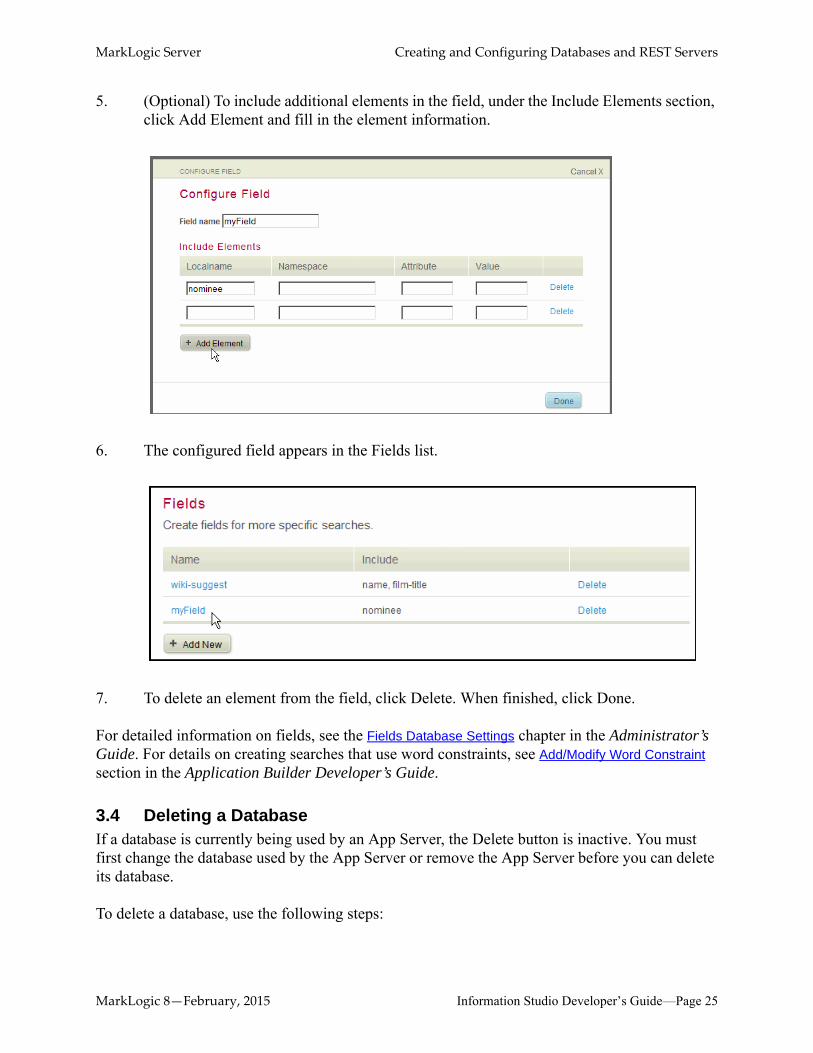
5. (Optional) To include additional elements in the field, under the Include Elements section, click Add Element and fill in the element information.
6. The configured field appears in the Fields list.
7. To delete an element from the field, click Delete. When finished, click Done.
For detailed information on fields, see the Fields Database Settings chapter in the Administrator’s Guide. For details on creating searches that use word constraints, see Add/Modify Word Constraint section in the Application Builder Developer’s Guide.
3.4 Deleting a DatabaseIf a database is currently being used by an App Server, the Delete button is inactive. You must first change the database used by the App Server or remove the App Server before you can delete its database.
To delete a database, use the following steps:
MarkLogic 8—February, 2015 Information Studio Developer’s Guide—Page 25

MarkLogic Server Creating and Configuring Databases and REST Servers
1. At the top of the Application Services page, select the database from the Database drop- down list:
2. Click Delete.
A pop-up window appears with the message “Are you sure you'd like to delete this database?”
3. Click OK. Both the database and its respective forest are deleted.
3.5 Creating a REST API InstanceYou can use Information Studio to create a REST API instance to service the REST API and/or the Java API. A REST API instance is an HTTP App Server that is configured to run the REST API against a particular database. For more details on the REST API and the Java API, see the REST Application Developer’s Guide and the Java Application Developer’s Guide.
To create a REST API instance using Information Studio, perform the following steps:
1. Navigate to the Database Settings page for the database for which you want a REST API instance. See “Navigating to the Database Settings Page” on page 12.
2. Scroll down to the REST API Instance section and click Add New.
MarkLogic 8—February, 2015 Information Studio Developer’s Guide—Page 26

MarkLogic Server Creating and Configuring Databases and REST Servers
3. Enter a name, optionally a different port, and optionally a different group for the new REST API App Server.
4. Click Create REST API Instance.
The REST server is created. To test the REST server, click the server name in the list of REST API Instances. When you are prompted for login credentials (in a new window or tab), enter the login credentials, and you will see some basic links that you can use to test the new REST App Server.
To delete a REST API instance, click the delete button corresponding to the server you want to delete. Deleting a REST API instance will cause a MarkLogic Server resart to free up the port.
MarkLogic 8—February, 2015 Information Studio Developer’s Guide—Page 27
MarkLogic Server Creating and Configuring Flows
4.0 Creating and Configuring Flows63
This chapter describes how to use Information Studio to create flows that load content into a database.
The main topics are:
• Accessing Information Studio
• Creating a New Flow
• Selecting a Collector
• Transforming Content During Ingestion
• Selecting Database Load Settings
• Launching Ingestion and Tracking Status
• Deleting a Flow
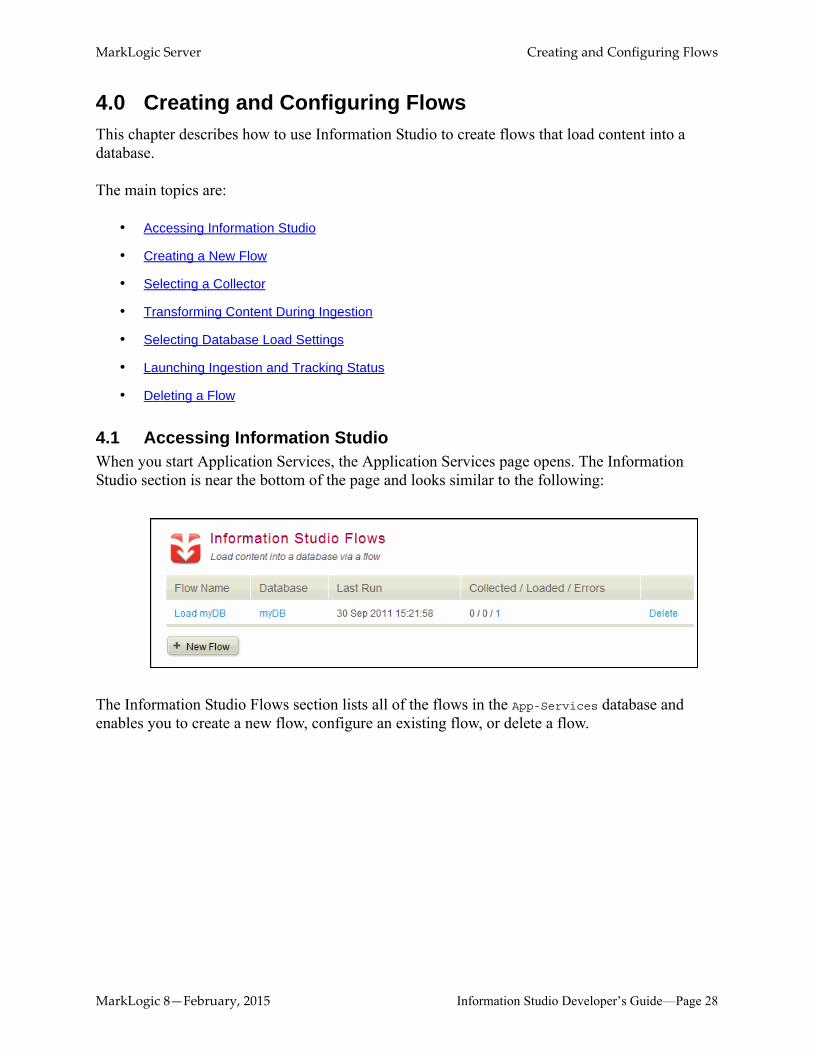
4.1 Accessing Information StudioWhen you start Application Services, the Application Services page opens. The Information Studio section is near the bottom of the page and looks similar to the following:
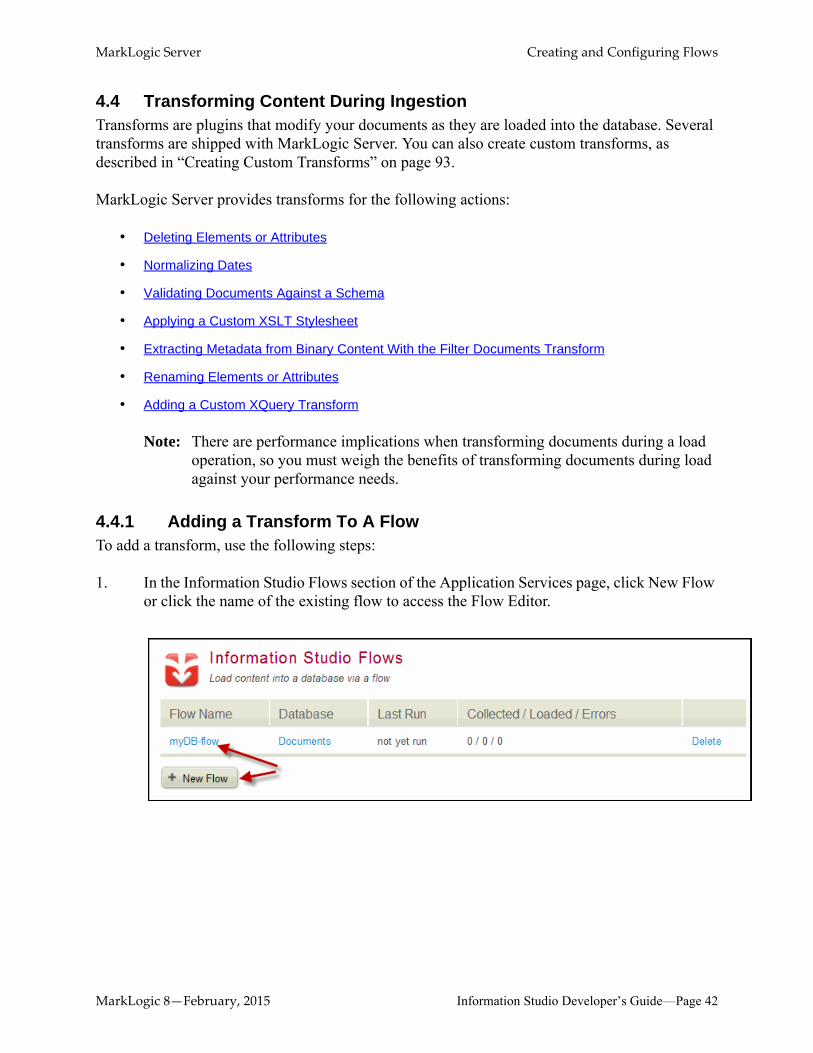
The Information Studio Flows section lists all of the flows in the App-Services database and enables you to create a new flow, configure an existing flow, or delete a flow.
MarkLogic 8—February, 2015 Information Studio Developer’s Guide—Page 28

MarkLogic Server Creating and Configuring Flows
The Information Studio Flows section provides the following actions:
4.2 Creating a New FlowTo create a new flow, use the following steps:
1. In the Information Studio Flows section of the Application Services page, click New Flow.
A flow named "Untitled" is created and the Flow Editor appears.
2. In the Flow Editor, click Edit next to the flow name:
Action Description
New Flow Creates a new flow. See “Creating a New Flow” on page 29.
Configure Click the flow name to configure an existing flow.
Delete Permanently delete a flow from the App-Services database. See “Deleting a Flow” on page 63.
MarkLogic 8—February, 2015 Information Studio Developer’s Guide—Page 29
MarkLogic Server Creating and Configuring Flows
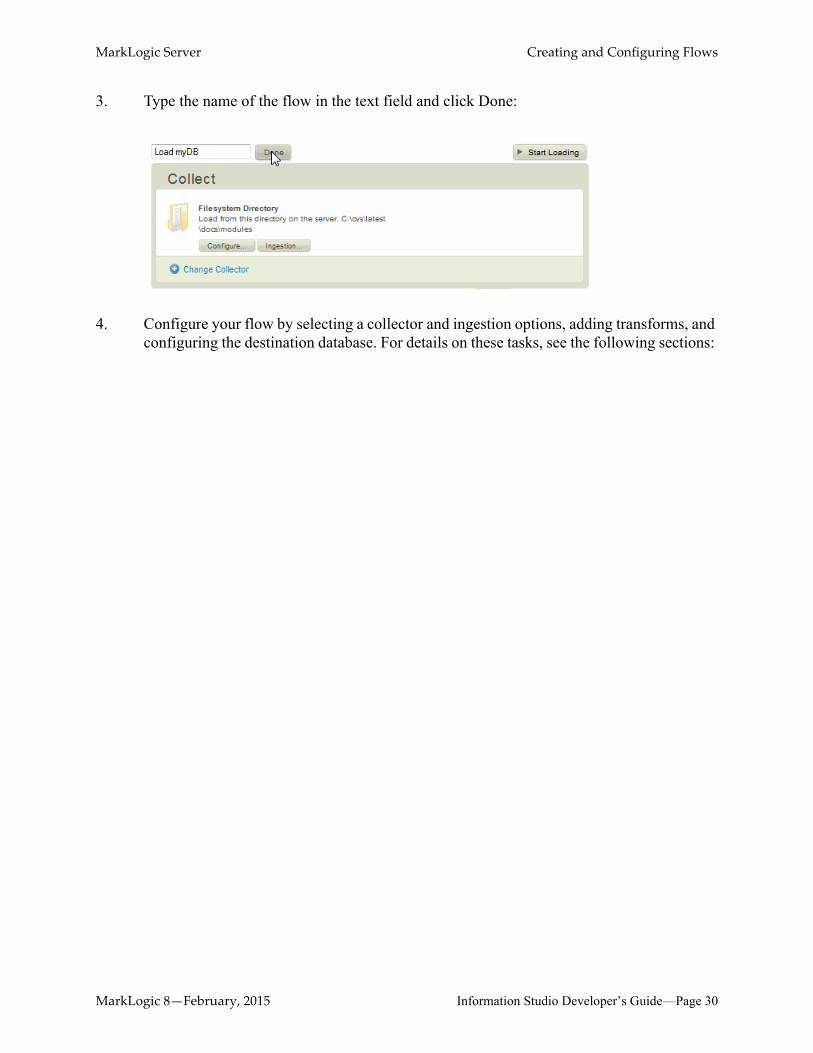
3. Type the name of the flow in the text field and click Done:
4. Configure your flow by selecting a collector and ingestion options, adding transforms, and configuring the destination database. For details on these tasks, see the following sections:
MarkLogic 8—February, 2015 Information Studio Developer’s Guide—Page 30
MarkLogic Server Creating and Configuring Flows
4.3 Selecting a CollectorA collector is a plugin that accumulates content to be loaded into a MarkLogic Server database. Collectors enable you to specify how the files are to be loaded into the database. Different collectors gather content in different ways. For example, one collector scans and loads files from a filesystem directory in a single pass. Another collector monitors and mirrors a directory.
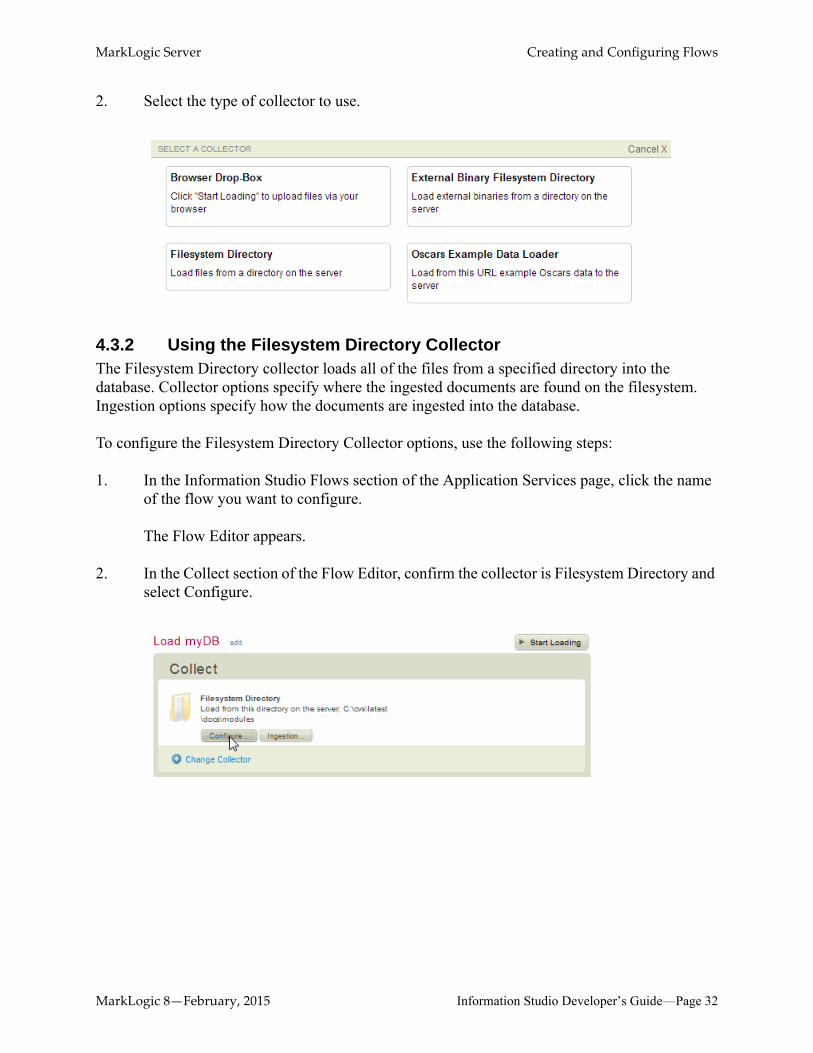
The following collectors are shipped with MarkLogic Server:
• The Filesystem Directory collector loads files from a specified directory.
• The Browser Drop-Box collector loads files dropped into a browser window.
• The External Binary Filesystem Directory collector loads files from a specified directory as external binary documents. See Working With Binary Documents in the Application Developer’s Guide.
You can also create custom collectors as described in “Creating Custom Collectors” on page 80.
The topics in this section are as follows:
• Changing the Default Collector
• Using the Filesystem Directory Collector
• Using the Browser Drop-Box Collector
• Using the External Binary Filesystem Collector
• Using the Oscars Example Data Loader Collector
• Configuring Ingestion Options
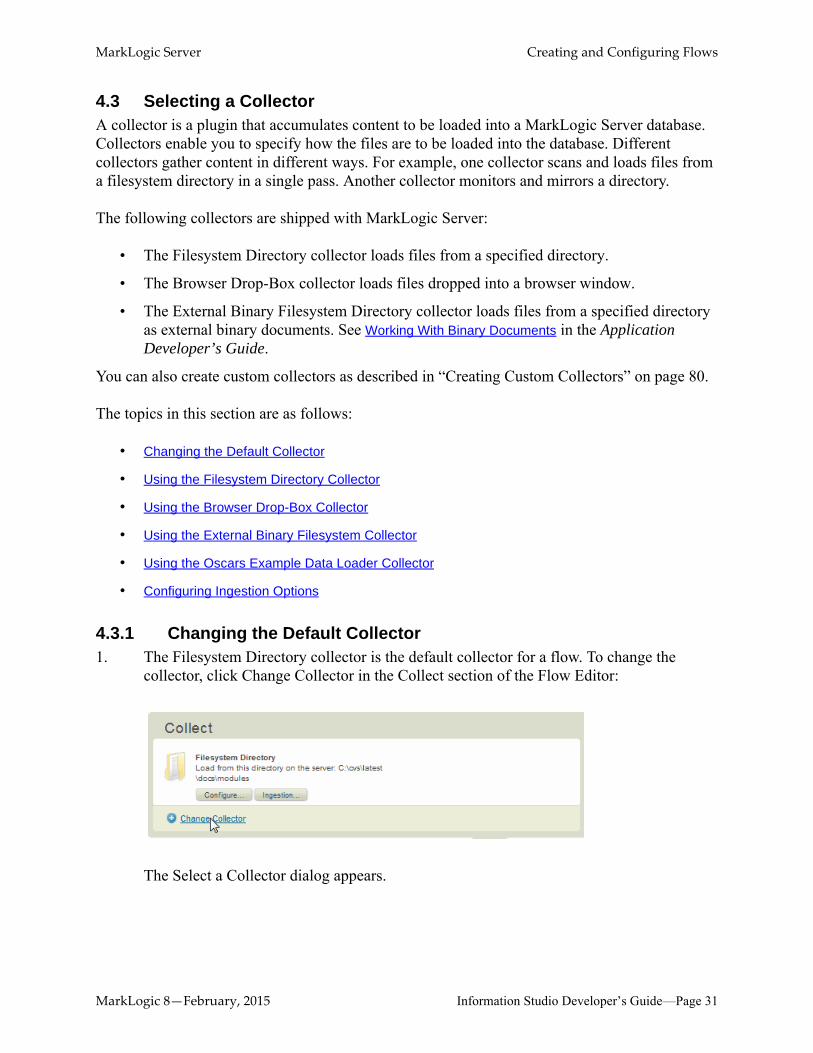
4.3.1 Changing the Default Collector1. The Filesystem Directory collector is the default collector for a flow. To change the
collector, click Change Collector in the Collect section of the Flow Editor:
The Select a Collector dialog appears.
MarkLogic 8—February, 2015 Information Studio Developer’s Guide—Page 31
MarkLogic Server Creating and Configuring Flows
2. Select the type of collector to use.
4.3.2 Using the Filesystem Directory CollectorThe Filesystem Directory collector loads all of the files from a specified directory into the database. Collector options specify where the ingested documents are found on the filesystem. Ingestion options specify how the documents are ingested into the database.
To configure the Filesystem Directory Collector options, use the following steps:
1. In the Information Studio Flows section of the Application Services page, click the name of the flow you want to configure.
The Flow Editor appears.
2. In the Collect section of the Flow Editor, confirm the collector is Filesystem Directory and select Configure.
MarkLogic 8—February, 2015 Information Studio Developer’s Guide—Page 32
MarkLogic Server Creating and Configuring Flows
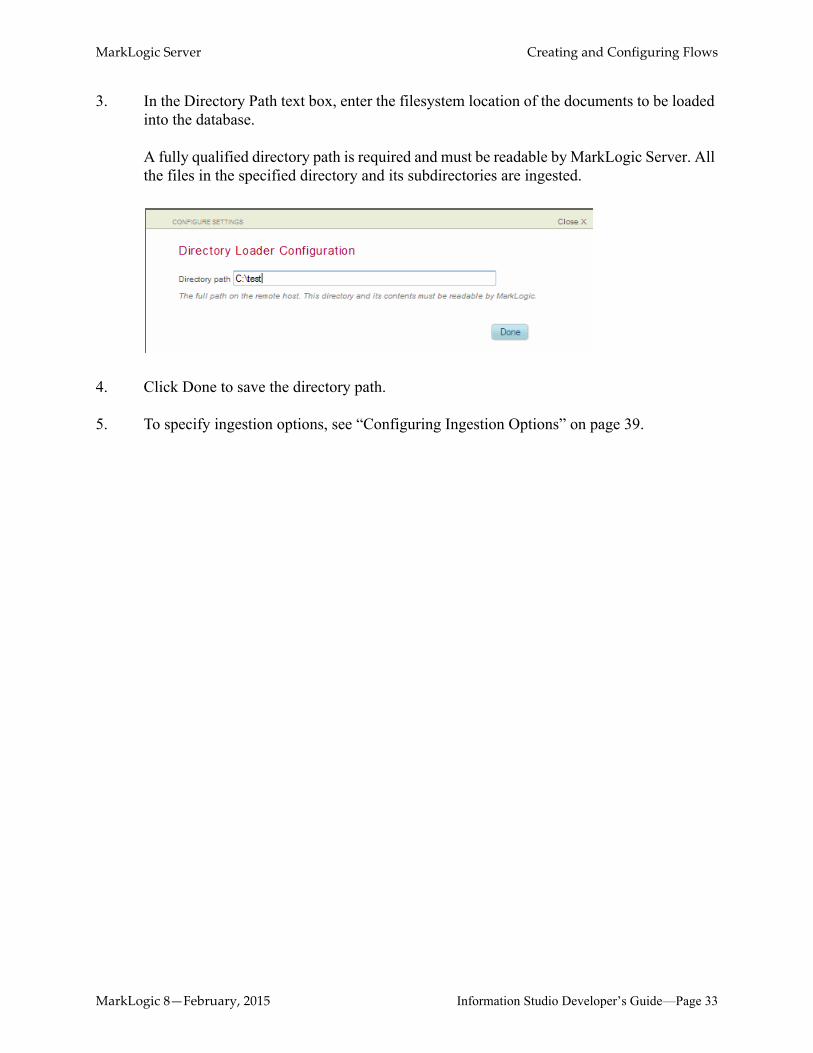
3. In the Directory Path text box, enter the filesystem location of the documents to be loaded into the database.
A fully qualified directory path is required and must be readable by MarkLogic Server. All the files in the specified directory and its subdirectories are ingested.
4. Click Done to save the directory path.
5. To specify ingestion options, see “Configuring Ingestion Options” on page 39.
MarkLogic 8—February, 2015 Information Studio Developer’s Guide—Page 33
MarkLogic Server Creating and Configuring Flows
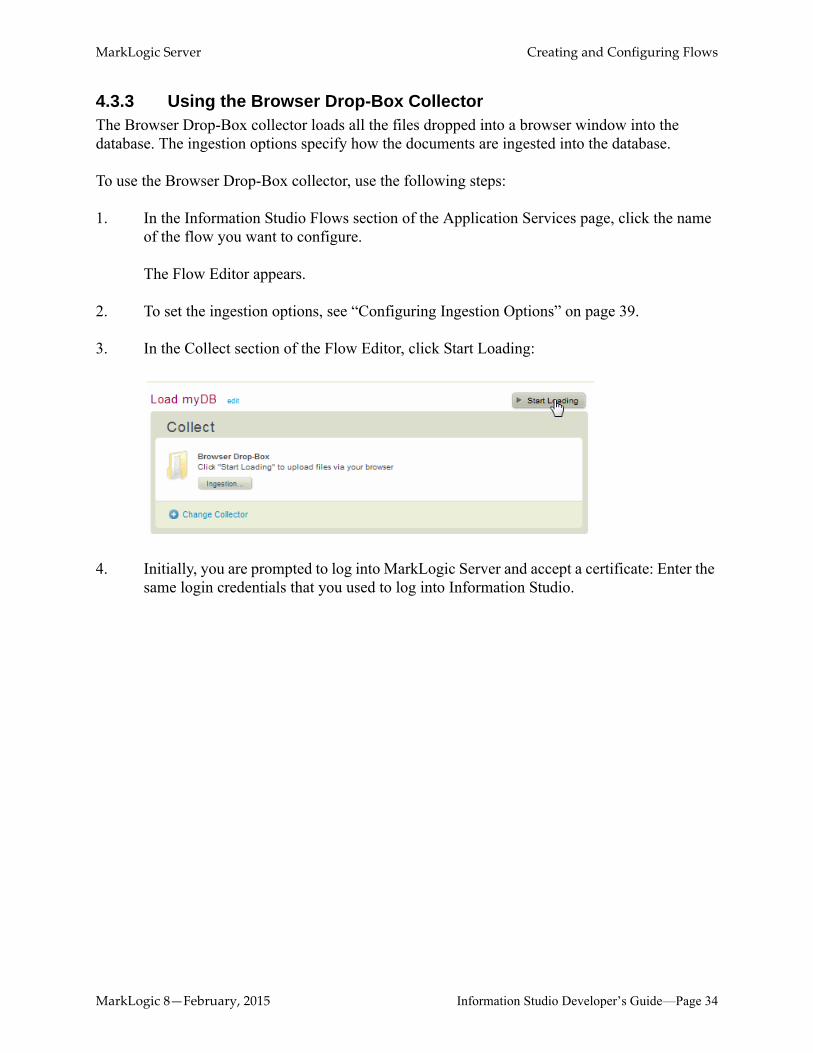
4.3.3 Using the Browser Drop-Box CollectorThe Browser Drop-Box collector loads all the files dropped into a browser window into the database. The ingestion options specify how the documents are ingested into the database.
To use the Browser Drop-Box collector, use the following steps:
1. In the Information Studio Flows section of the Application Services page, click the name of the flow you want to configure.
The Flow Editor appears.
2. To set the ingestion options, see “Configuring Ingestion Options” on page 39.
3. In the Collect section of the Flow Editor, click Start Loading:
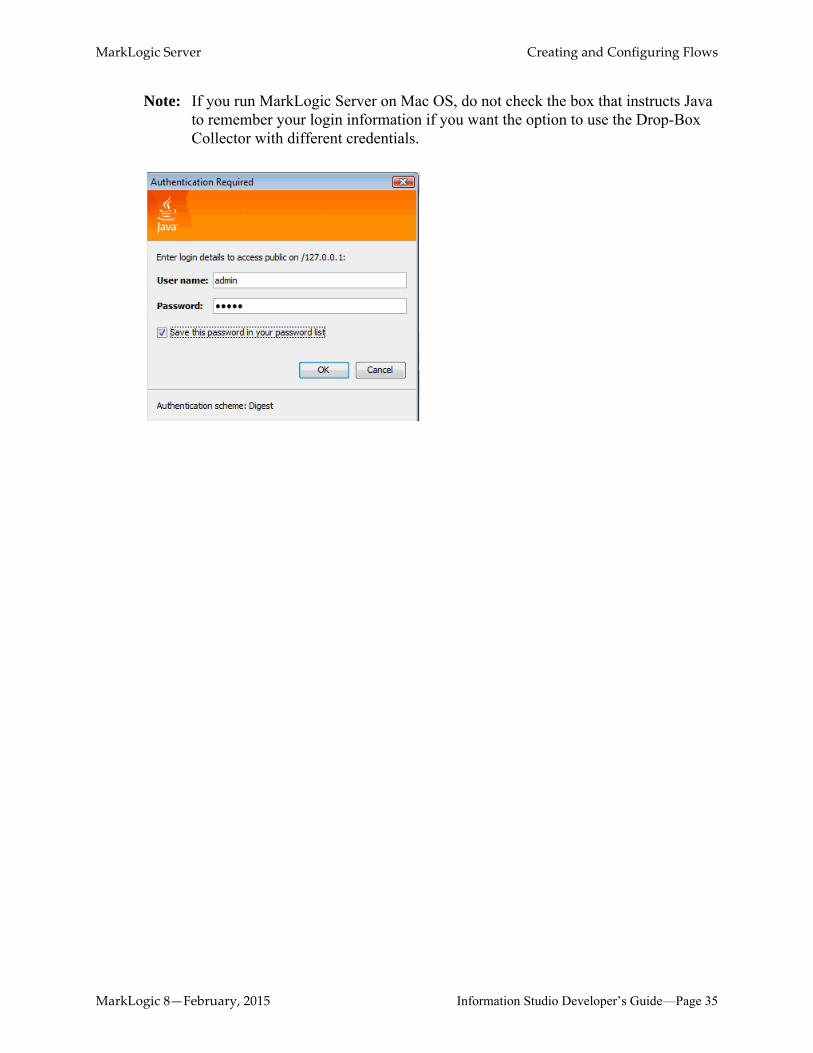
4. Initially, you are prompted to log into MarkLogic Server and accept a certificate: Enter the same login credentials that you used to log into Information Studio.
MarkLogic 8—February, 2015 Information Studio Developer’s Guide—Page 34
MarkLogic Server Creating and Configuring Flows
Note: If you run MarkLogic Server on Mac OS, do not check the box that instructs Java to remember your login information if you want the option to use the Drop-Box Collector with different credentials.
MarkLogic 8—February, 2015 Information Studio Developer’s Guide—Page 35
MarkLogic Server Creating and Configuring Flows
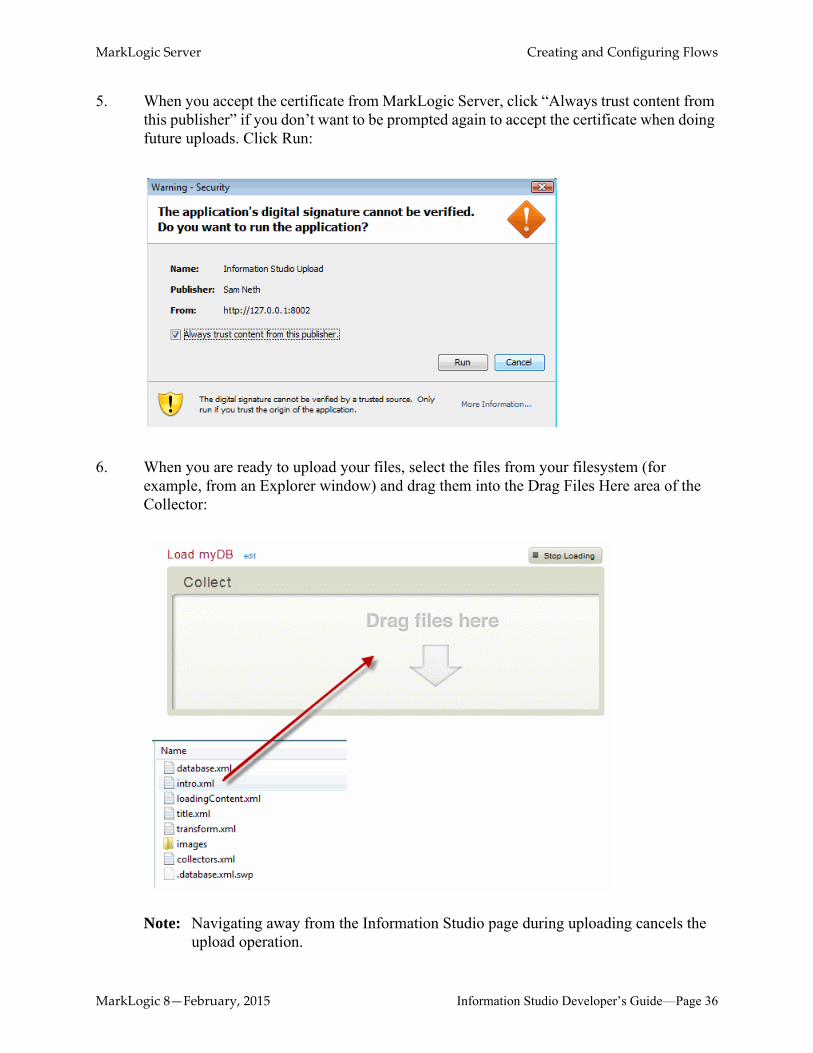
5. When you accept the certificate from MarkLogic Server, click “Always trust content from this publisher” if you don’t want to be prompted again to accept the certificate when doing future uploads. Click Run:
6. When you are ready to upload your files, select the files from your filesystem (for example, from an Explorer window) and drag them into the Drag Files Here area of the Collector:
Note: Navigating away from the Information Studio page during uploading cancels the upload operation.
MarkLogic 8—February, 2015 Information Studio Developer’s Guide—Page 36
MarkLogic Server Creating and Configuring Flows
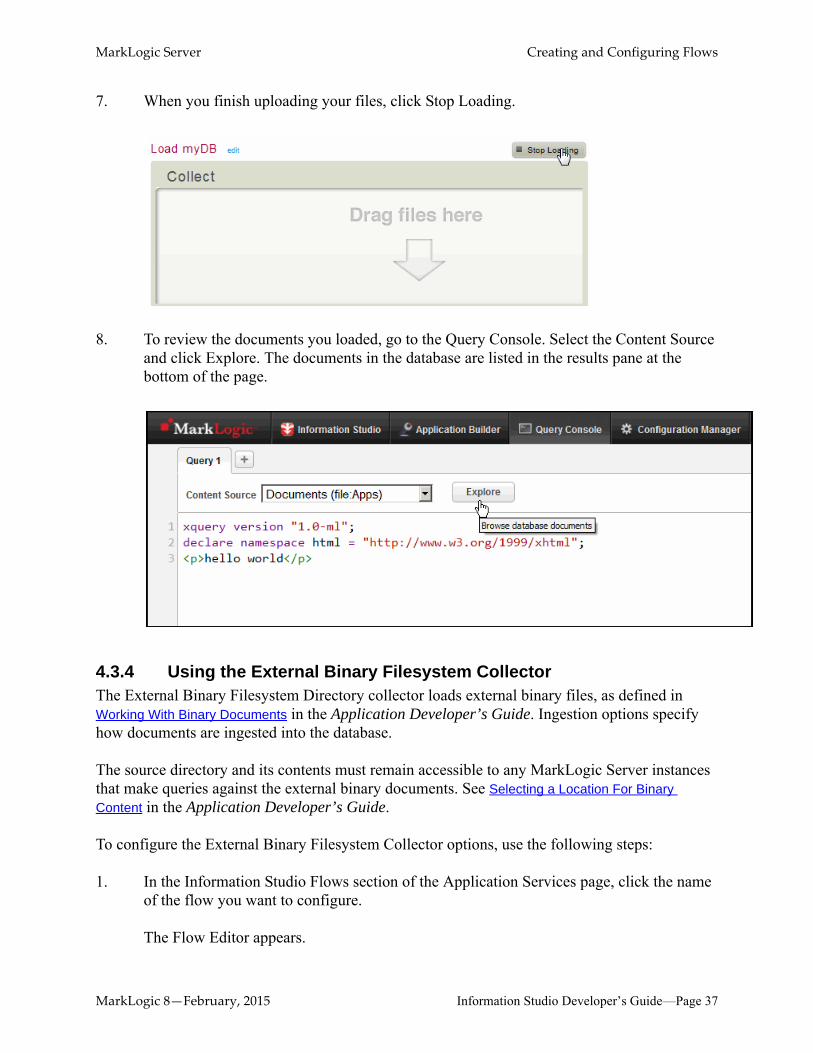
7. When you finish uploading your files, click Stop Loading.
8. To review the documents you loaded, go to the Query Console. Select the Content Source and click Explore. The documents in the database are listed in the results pane at the bottom of the page.
4.3.4 Using the External Binary Filesystem CollectorThe External Binary Filesystem Directory collector loads external binary files, as defined in Working With Binary Documents in the Application Developer’s Guide. Ingestion options specify how documents are ingested into the database.
The source directory and its contents must remain accessible to any MarkLogic Server instances that make queries against the external binary documents. See Selecting a Location For Binary Content in the Application Developer’s Guide.
To configure the External Binary Filesystem Collector options, use the following steps:
1. In the Information Studio Flows section of the Application Services page, click the name of the flow you want to configure.
The Flow Editor appears.
MarkLogic 8—February, 2015 Information Studio Developer’s Guide—Page 37
MarkLogic Server Creating and Configuring Flows
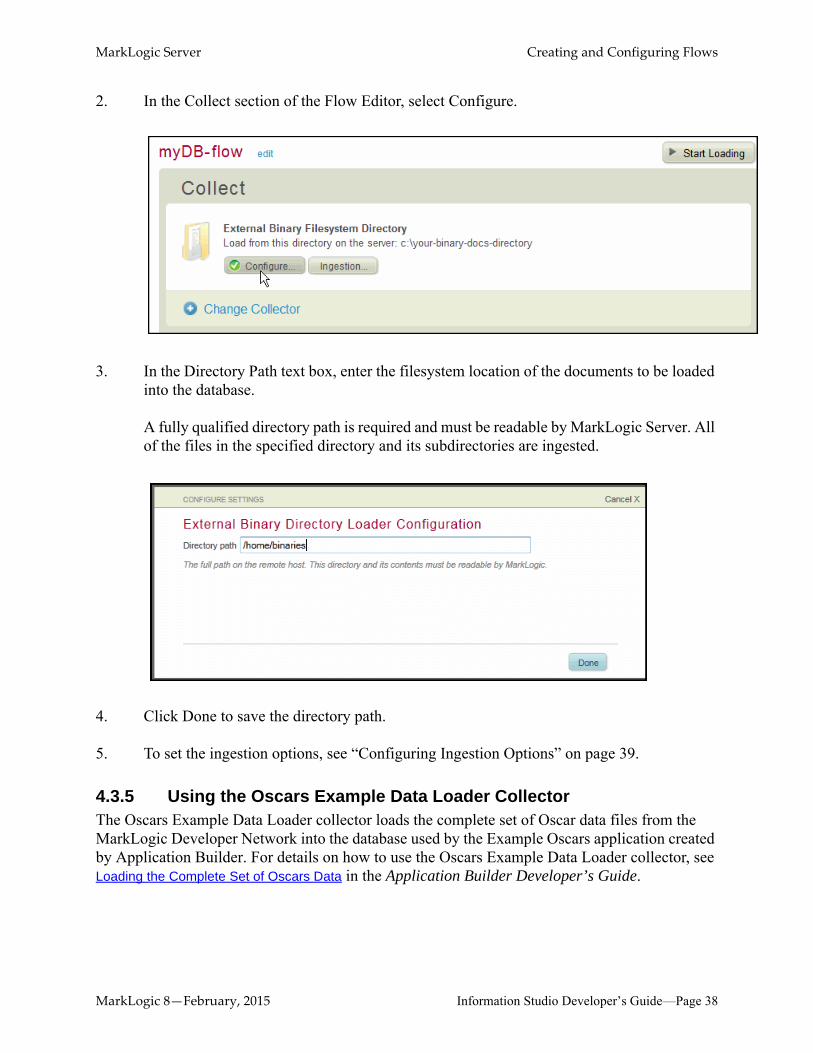
2. In the Collect section of the Flow Editor, select Configure.
3. In the Directory Path text box, enter the filesystem location of the documents to be loaded into the database.
A fully qualified directory path is required and must be readable by MarkLogic Server. All of the files in the specified directory and its subdirectories are ingested.
4. Click Done to save the directory path.
5. To set the ingestion options, see “Configuring Ingestion Options” on page 39.
4.3.5 Using the Oscars Example Data Loader CollectorThe Oscars Example Data Loader collector loads the complete set of Oscar data files from the MarkLogic Developer Network into the database used by the Example Oscars application created by Application Builder. For details on how to use the Oscars Example Data Loader collector, see Loading the Complete Set of Oscars Data in the Application Builder Developer’s Guide.
MarkLogic 8—February, 2015 Information Studio Developer’s Guide—Page 38
MarkLogic Server Creating and Configuring Flows
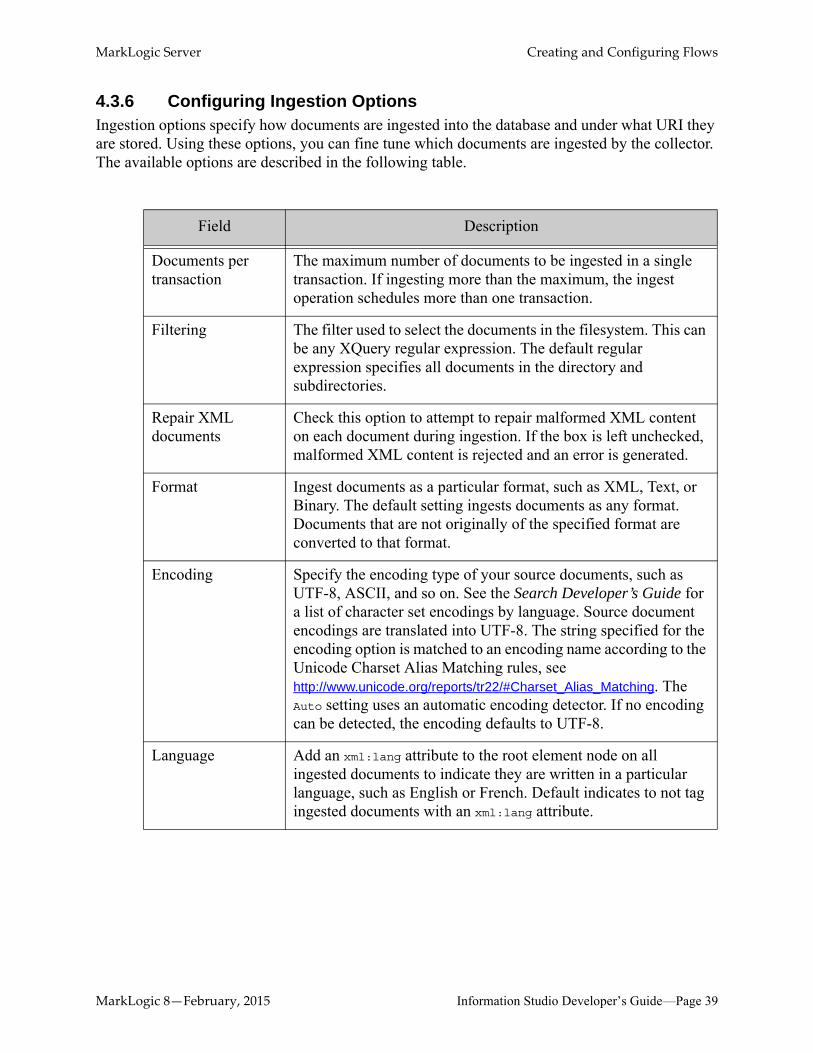
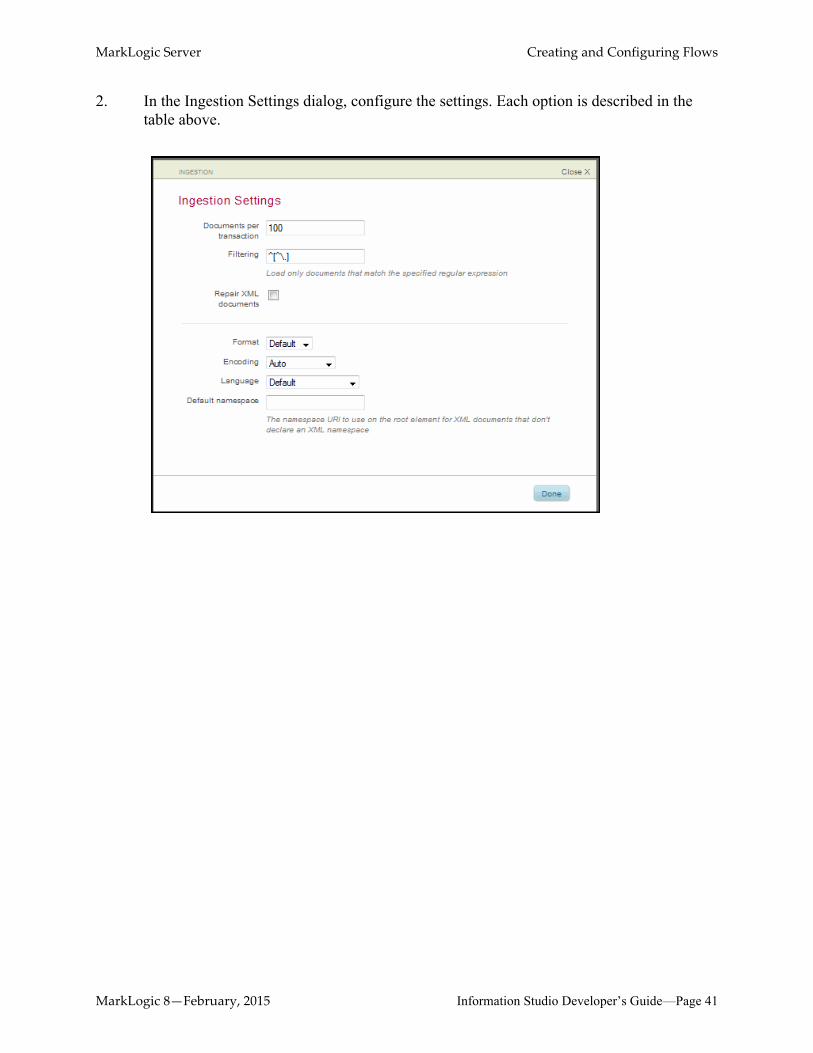
4.3.6 Configuring Ingestion OptionsIngestion options specify how documents are ingested into the database and under what URI they are stored. Using these options, you can fine tune which documents are ingested by the collector. The available options are described in the following table.
Field Description
Documents per transaction
The maximum number of documents to be ingested in a single transaction. If ingesting more than the maximum, the ingest operation schedules more than one transaction.
Filtering The filter used to select the documents in the filesystem. This can be any XQuery regular expression. The default regular expression specifies all documents in the directory and subdirectories.
Repair XML documents
Check this option to attempt to repair malformed XML content on each document during ingestion. If the box is left unchecked, malformed XML content is rejected and an error is generated.
Format Ingest documents as a particular format, such as XML, Text, or Binary. The default setting ingests documents as any format. Documents that are not originally of the specified format are converted to that format.
Encoding Specify the encoding type of your source documents, such as UTF-8, ASCII, and so on. See the Search Developer’s Guide for a list of character set encodings by language. Source document encodings are translated into UTF-8. The string specified for the encoding option is matched to an encoding name according to the Unicode Charset Alias Matching rules, see http://www.unicode.org/reports/tr22/#Charset_Alias_Matching. The Auto setting uses an automatic encoding detector. If no encoding can be detected, the encoding defaults to UTF-8.
Language Add an xml:lang attribute to the root element node on all ingested documents to indicate they are written in a particular language, such as English or French. Default indicates to not tag ingested documents with an xml:lang attribute.
MarkLogic 8—February, 2015 Information Studio Developer’s Guide—Page 39
MarkLogic Server Creating and Configuring Flows
Note: Most of the ingestion options are the same as the options passed to the xdmp:document-load function.
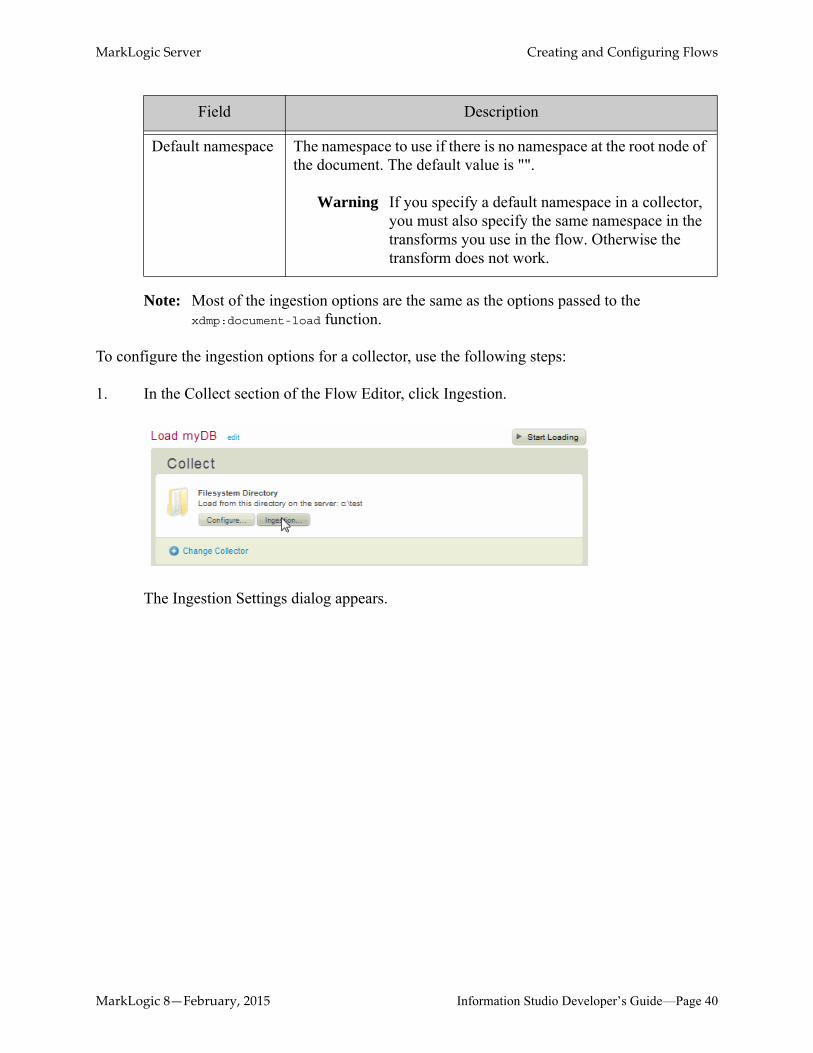
To configure the ingestion options for a collector, use the following steps:
1. In the Collect section of the Flow Editor, click Ingestion.
The Ingestion Settings dialog appears.
Default namespace The namespace to use if there is no namespace at the root node of the document. The default value is "".
Warning If you specify a default namespace in a collector, you must also specify the same namespace in the transforms you use in the flow. Otherwise the transform does not work.
Field Description
MarkLogic 8—February, 2015 Information Studio Developer’s Guide—Page 40
MarkLogic Server Creating and Configuring Flows
2. In the Ingestion Settings dialog, configure the settings. Each option is described in the table above.
MarkLogic 8—February, 2015 Information Studio Developer’s Guide—Page 41
MarkLogic Server Creating and Configuring Flows
4.4 Transforming Content During IngestionTransforms are plugins that modify your documents as they are loaded into the database. Several transforms are shipped with MarkLogic Server. You can also create custom transforms, as described in “Creating Custom Transforms” on page 93.
MarkLogic Server provides transforms for the following actions:
• Deleting Elements or Attributes
• Normalizing Dates
• Validating Documents Against a Schema
• Applying a Custom XSLT Stylesheet
• Extracting Metadata from Binary Content With the Filter Documents Transform
• Renaming Elements or Attributes
• Adding a Custom XQuery Transform
Note: There are performance implications when transforming documents during a load operation, so you must weigh the benefits of transforming documents during load against your performance needs.
4.4.1 Adding a Transform To A FlowTo add a transform, use the following steps:
1. In the Information Studio Flows section of the Application Services page, click New Flow or click the name of the existing flow to access the Flow Editor.
MarkLogic 8—February, 2015 Information Studio Developer’s Guide—Page 42
MarkLogic Server Creating and Configuring Flows
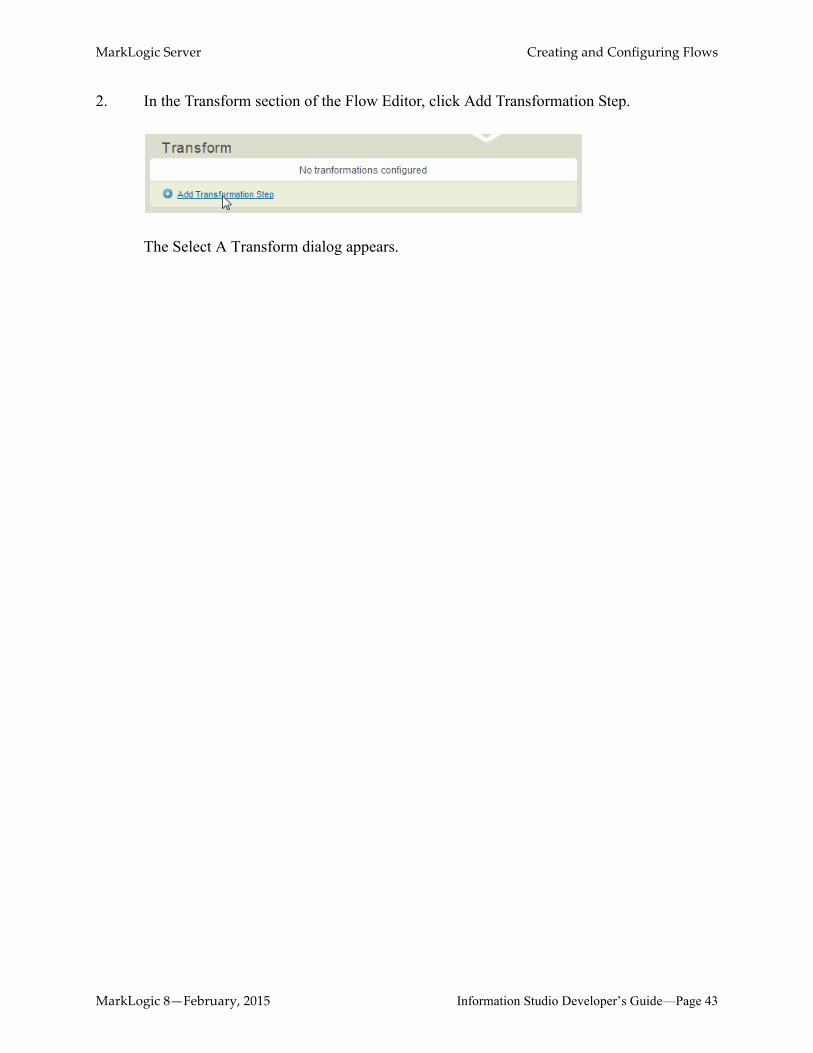
2. In the Transform section of the Flow Editor, click Add Transformation Step.
The Select A Transform dialog appears.
MarkLogic 8—February, 2015 Information Studio Developer’s Guide—Page 43
MarkLogic Server Creating and Configuring Flows
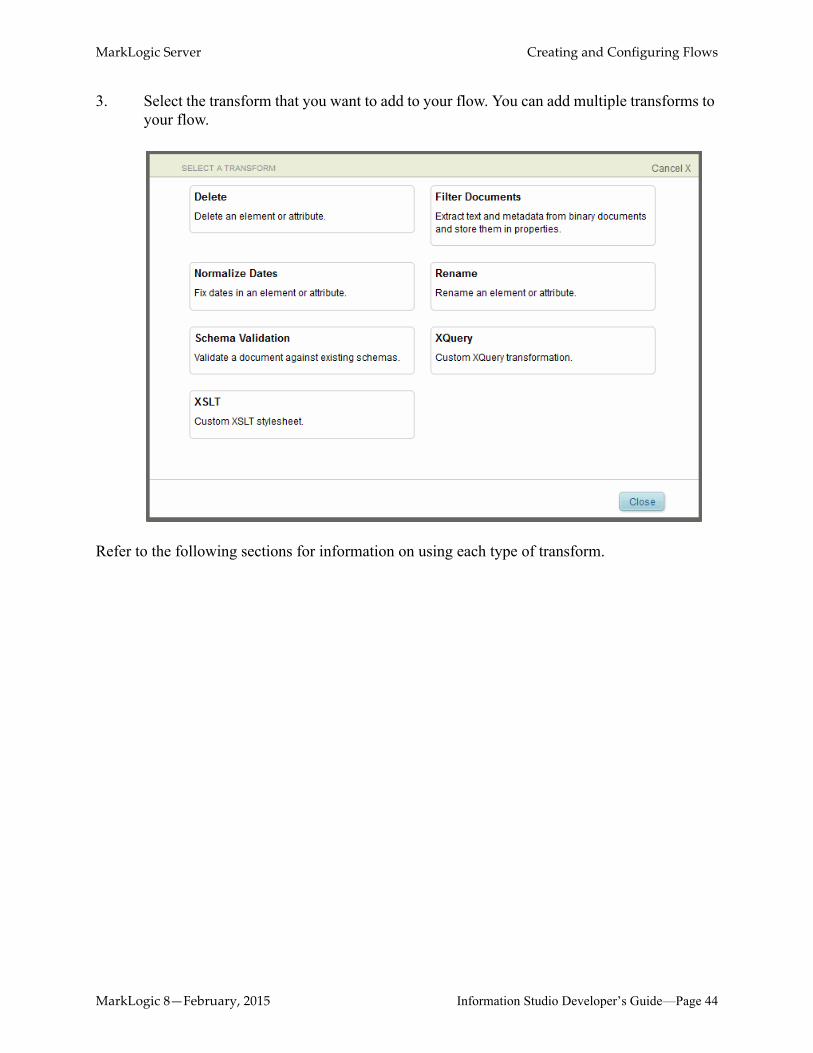
3. Select the transform that you want to add to your flow. You can add multiple transforms to your flow.
Refer to the following sections for information on using each type of transform.
MarkLogic 8—February, 2015 Information Studio Developer’s Guide—Page 44
MarkLogic Server Creating and Configuring Flows
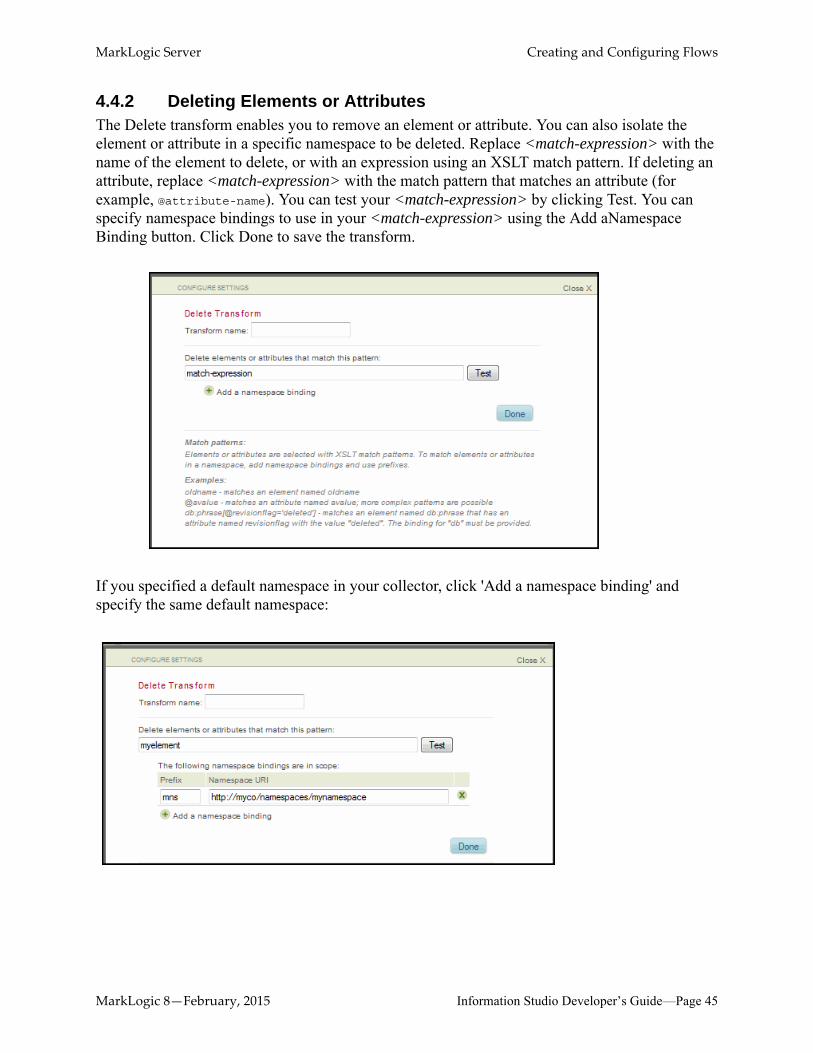
4.4.2 Deleting Elements or AttributesThe Delete transform enables you to remove an element or attribute. You can also isolate the element or attribute in a specific namespace to be deleted. Replace <match-expression> with the name of the element to delete, or with an expression using an XSLT match pattern. If deleting an attribute, replace <match-expression> with the match pattern that matches an attribute (for example, @attribute-name). You can test your <match-expression> by clicking Test. You can specify namespace bindings to use in your <match-expression> using the Add aNamespace Binding button. Click Done to save the transform.
If you specified a default namespace in your collector, click 'Add a namespace binding' and specify the same default namespace:
MarkLogic 8—February, 2015 Information Studio Developer’s Guide—Page 45
MarkLogic Server Creating and Configuring Flows
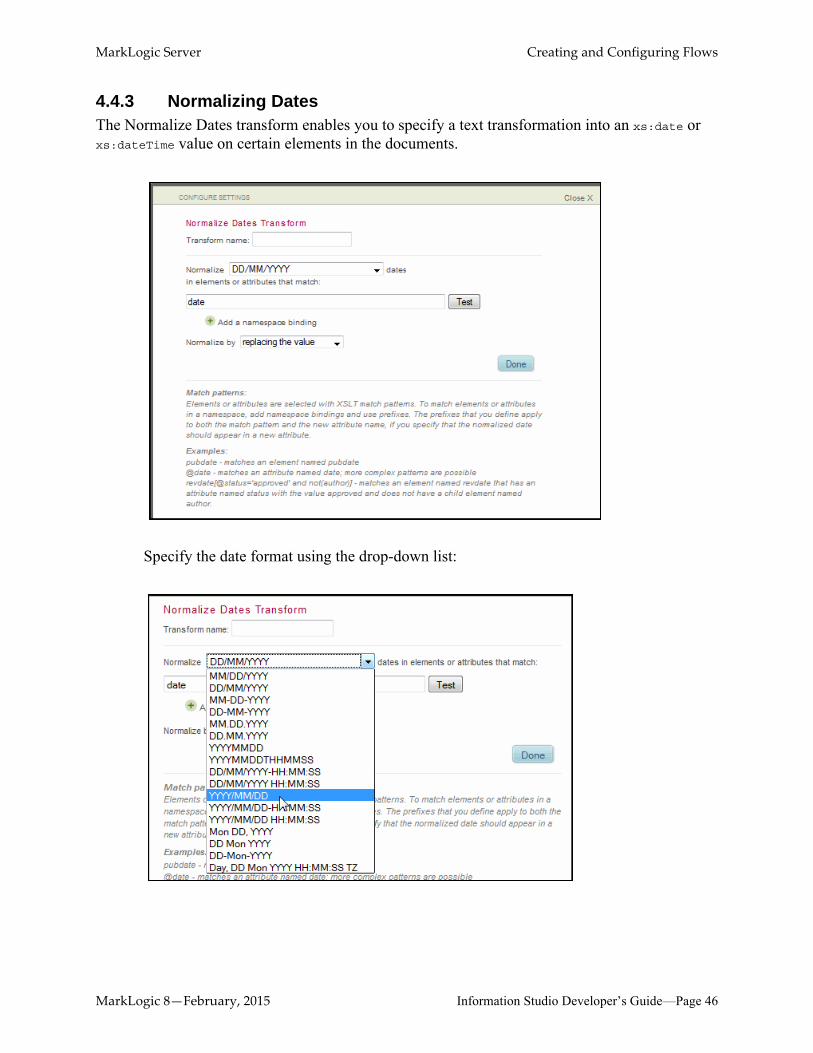
4.4.3 Normalizing DatesThe Normalize Dates transform enables you to specify a text transformation into an xs:date or xs:dateTime value on certain elements in the documents.
Specify the date format using the drop-down list:
MarkLogic 8—February, 2015 Information Studio Developer’s Guide—Page 46
MarkLogic Server Creating and Configuring Flows
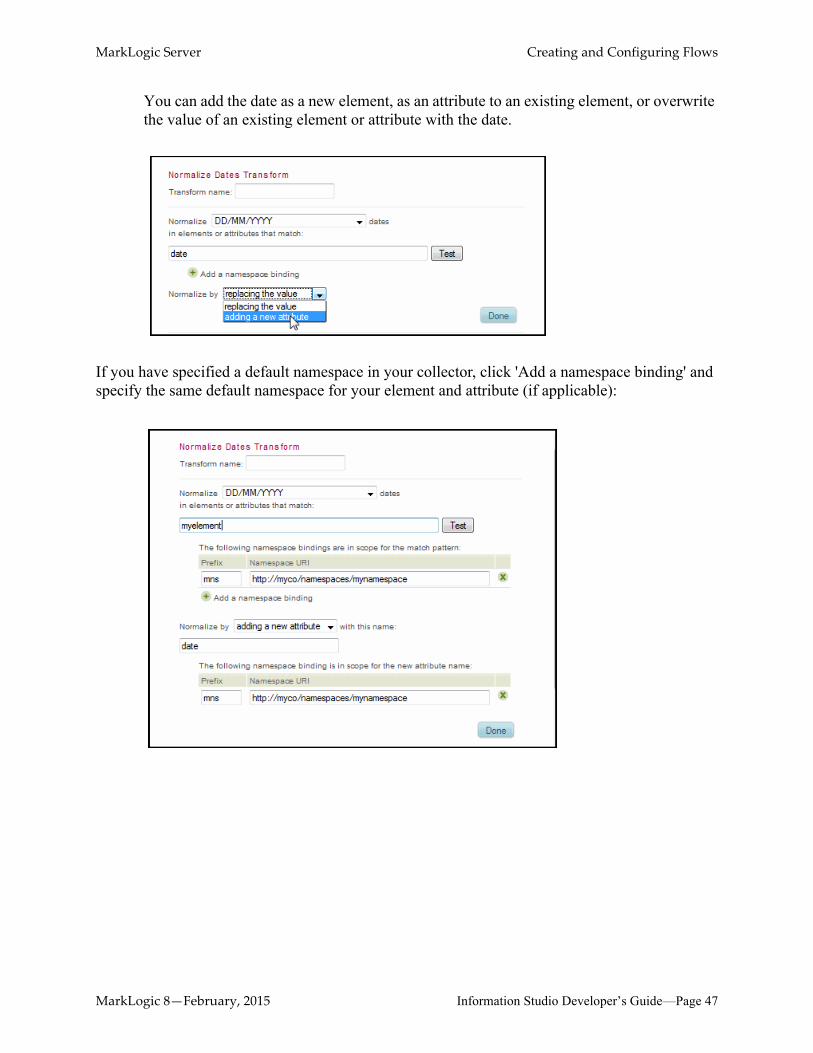
You can add the date as a new element, as an attribute to an existing element, or overwrite the value of an existing element or attribute with the date.
If you have specified a default namespace in your collector, click 'Add a namespace binding' and specify the same default namespace for your element and attribute (if applicable):
MarkLogic 8—February, 2015 Information Studio Developer’s Guide—Page 47
MarkLogic Server Creating and Configuring Flows
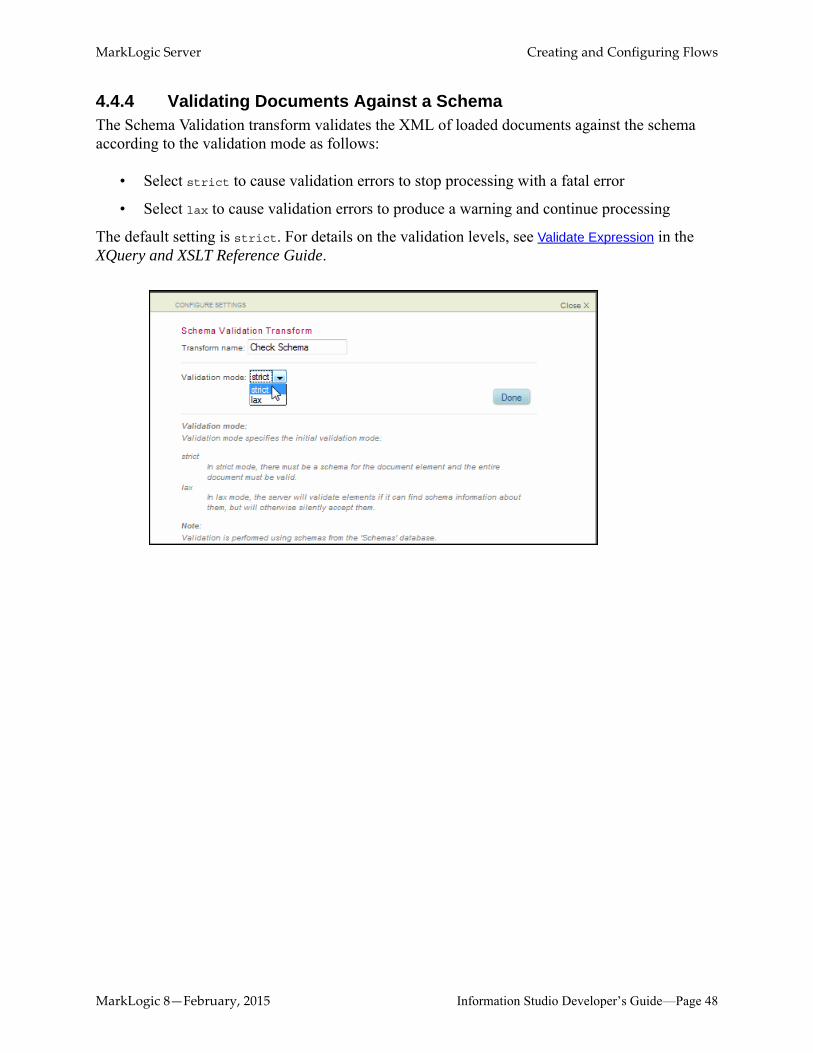
4.4.4 Validating Documents Against a SchemaThe Schema Validation transform validates the XML of loaded documents against the schema according to the validation mode as follows:
• Select strict to cause validation errors to stop processing with a fatal error
• Select lax to cause validation errors to produce a warning and continue processing
The default setting is strict. For details on the validation levels, see Validate Expression in the XQuery and XSLT Reference Guide.
MarkLogic 8—February, 2015 Information Studio Developer’s Guide—Page 48
MarkLogic Server Creating and Configuring Flows
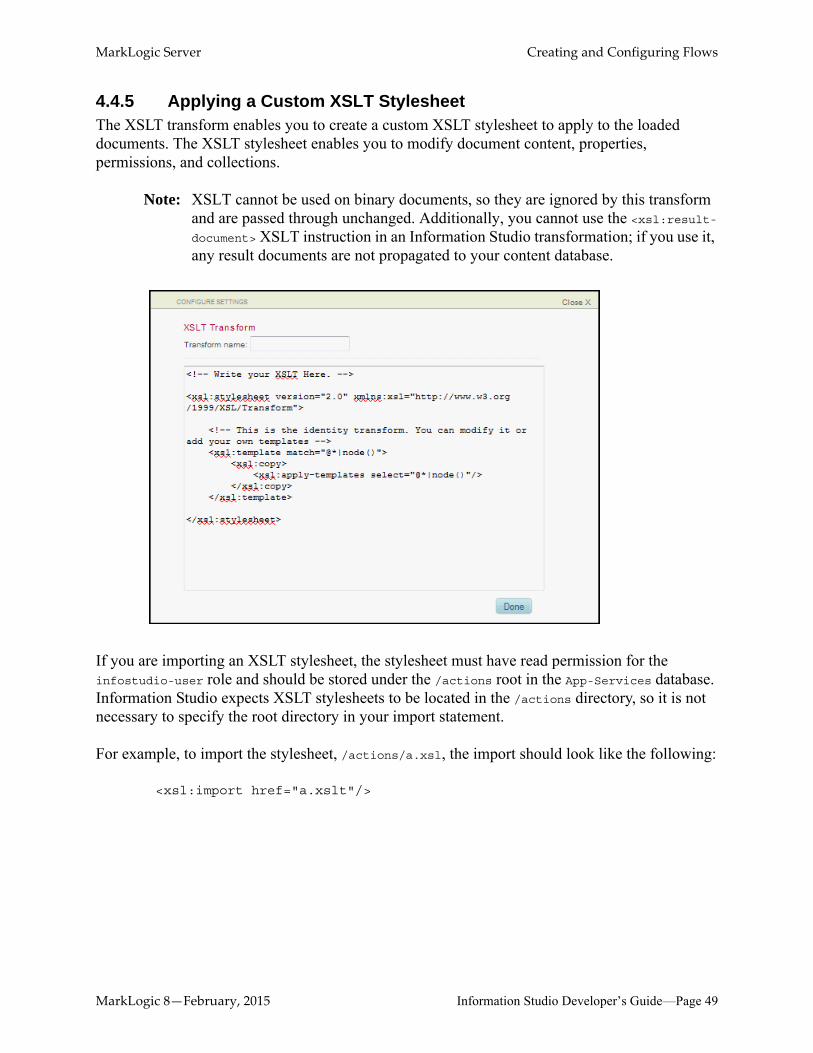
4.4.5 Applying a Custom XSLT StylesheetThe XSLT transform enables you to create a custom XSLT stylesheet to apply to the loaded documents. The XSLT stylesheet enables you to modify document content, properties, permissions, and collections.
Note: XSLT cannot be used on binary documents, so they are ignored by this transform and are passed through unchanged. Additionally, you cannot use the <xsl:result-document> XSLT instruction in an Information Studio transformation; if you use it, any result documents are not propagated to your content database.
If you are importing an XSLT stylesheet, the stylesheet must have read permission for the infostudio-user role and should be stored under the /actions root in the App-Services database. Information Studio expects XSLT stylesheets to be located in the /actions directory, so it is not necessary to specify the root directory in your import statement.
For example, to import the stylesheet, /actions/a.xsl, the import should look like the following:
<xsl:import href="a.xslt"/>
MarkLogic 8—February, 2015 Information Studio Developer’s Guide—Page 49
MarkLogic Server Creating and Configuring Flows
4.4.6 Extracting Metadata from Binary Content With the Filter Documents Transform
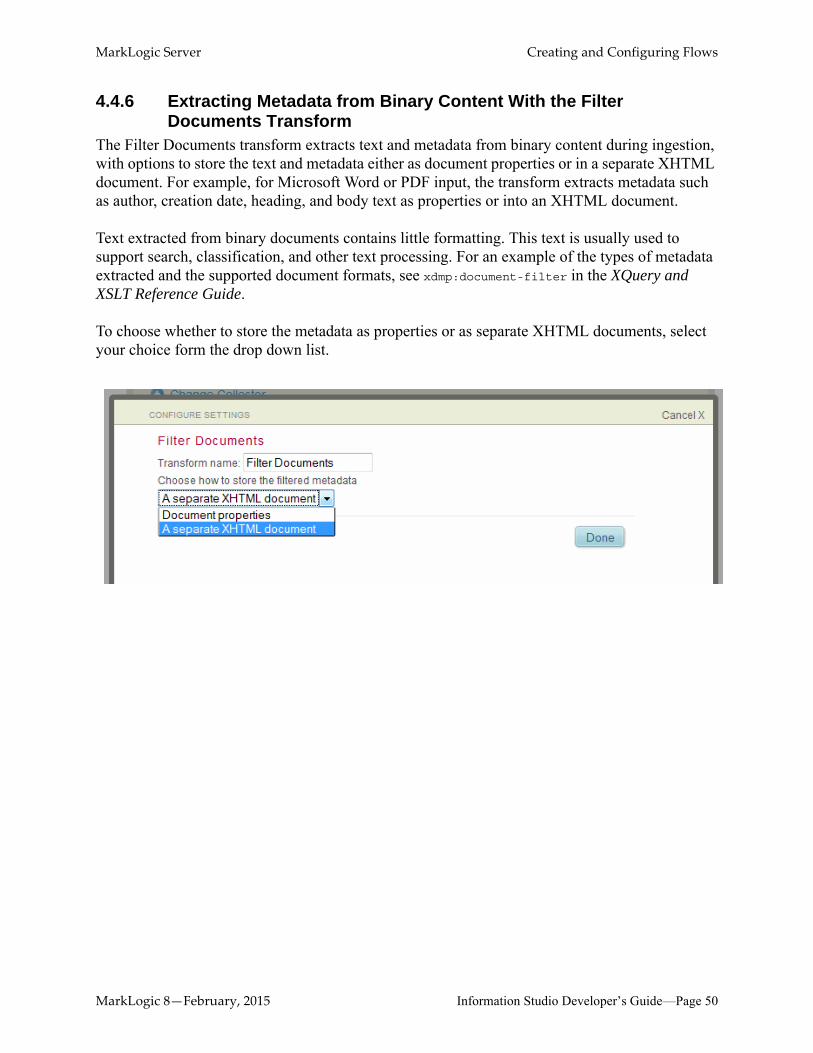
The Filter Documents transform extracts text and metadata from binary content during ingestion, with options to store the text and metadata either as document properties or in a separate XHTML document. For example, for Microsoft Word or PDF input, the transform extracts metadata such as author, creation date, heading, and body text as properties or into an XHTML document.
Text extracted from binary documents contains little formatting. This text is usually used to support search, classification, and other text processing. For an example of the types of metadata extracted and the supported document formats, see xdmp:document-filter in the XQuery and XSLT Reference Guide.
To choose whether to store the metadata as properties or as separate XHTML documents, select your choice form the drop down list.
MarkLogic 8—February, 2015 Information Studio Developer’s Guide—Page 50
MarkLogic Server Creating and Configuring Flows
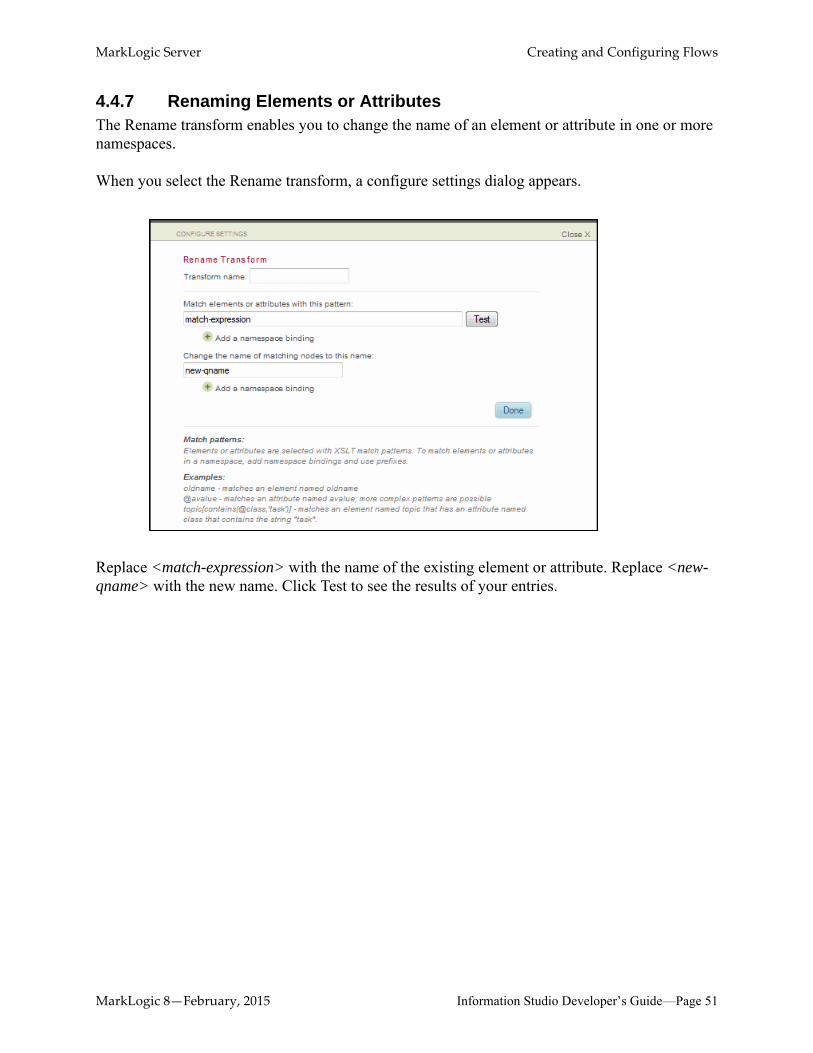
4.4.7 Renaming Elements or AttributesThe Rename transform enables you to change the name of an element or attribute in one or more namespaces.
When you select the Rename transform, a configure settings dialog appears.
Replace <match-expression> with the name of the existing element or attribute. Replace <new-qname> with the new name. Click Test to see the results of your entries.
MarkLogic 8—February, 2015 Information Studio Developer’s Guide—Page 51
MarkLogic Server Creating and Configuring Flows
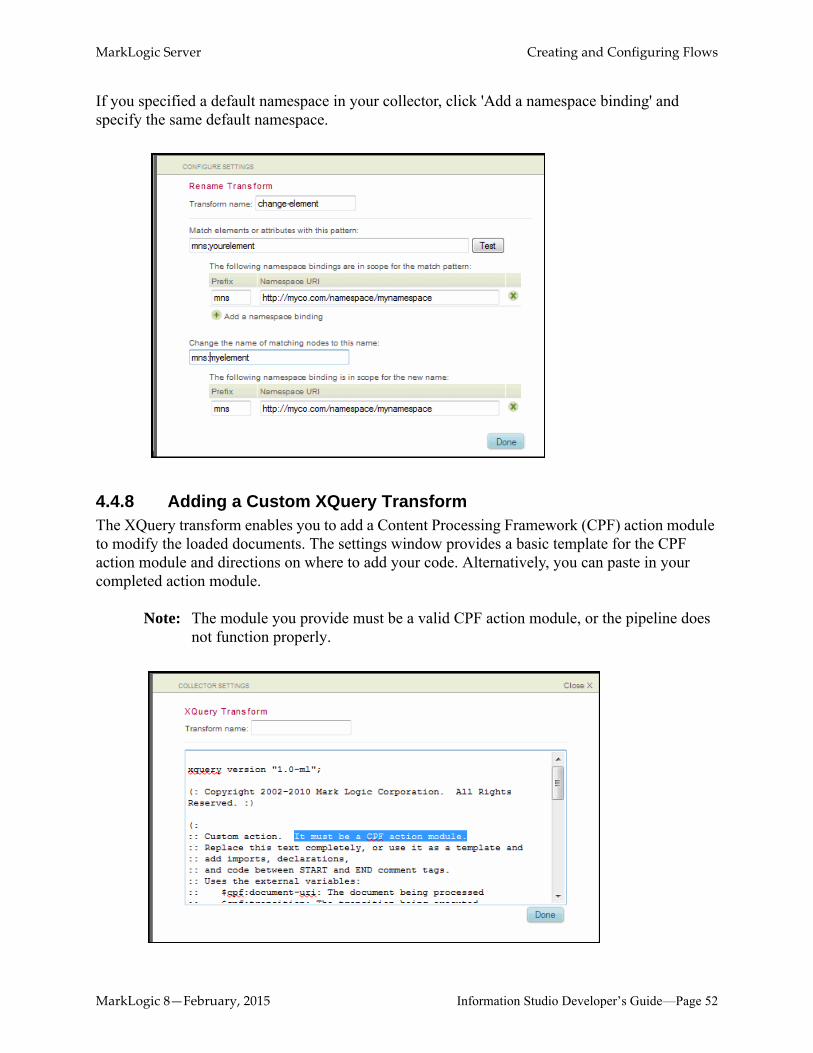
If you specified a default namespace in your collector, click 'Add a namespace binding' and specify the same default namespace.
4.4.8 Adding a Custom XQuery TransformThe XQuery transform enables you to add a Content Processing Framework (CPF) action module to modify the loaded documents. The settings window provides a basic template for the CPF action module and directions on where to add your code. Alternatively, you can paste in your completed action module.
Note: The module you provide must be a valid CPF action module, or the pipeline does not function properly.
MarkLogic 8—February, 2015 Information Studio Developer’s Guide—Page 52
MarkLogic Server Creating and Configuring Flows
4.5 Selecting Database Load SettingsThe Load section of the Flow Editor enables you to select the destination database and to configure a number of document settings, such as the following:
• URI structure under which the documents are to be loaded
• Document access permissions
• Collections under which the documents are to be grouped
The topics in this section are:
• Selecting the Destination Database
• Document Settings
MarkLogic 8—February, 2015 Information Studio Developer’s Guide—Page 53
MarkLogic Server Creating and Configuring Flows
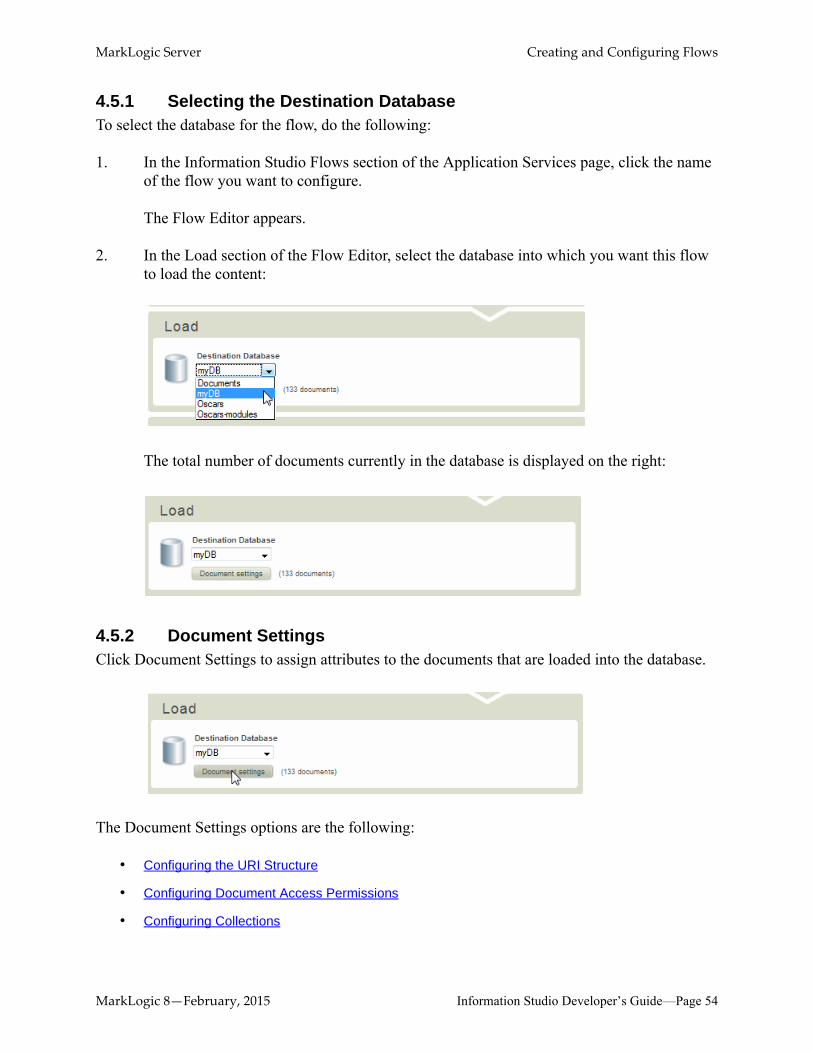
4.5.1 Selecting the Destination DatabaseTo select the database for the flow, do the following:
1. In the Information Studio Flows section of the Application Services page, click the name of the flow you want to configure.
The Flow Editor appears.
2. In the Load section of the Flow Editor, select the database into which you want this flow to load the content:
The total number of documents currently in the database is displayed on the right:
4.5.2 Document SettingsClick Document Settings to assign attributes to the documents that are loaded into the database.
The Document Settings options are the following:
• Configuring the URI Structure
• Configuring Document Access Permissions
• Configuring Collections
MarkLogic 8—February, 2015 Information Studio Developer’s Guide—Page 54

MarkLogic Server Creating and Configuring Flows
• Configuring Quality Boost
MarkLogic 8—February, 2015 Information Studio Developer’s Guide—Page 55
MarkLogic Server Creating and Configuring Flows
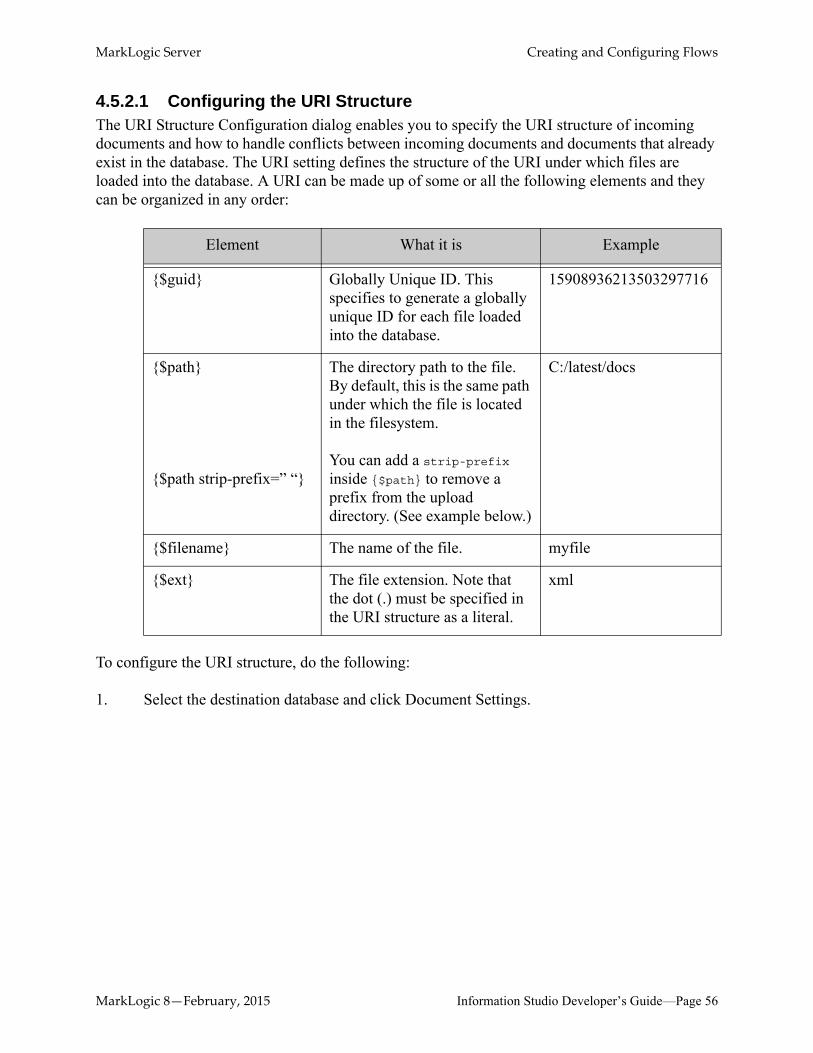
4.5.2.1 Configuring the URI StructureThe URI Structure Configuration dialog enables you to specify the URI structure of incoming documents and how to handle conflicts between incoming documents and documents that already exist in the database. The URI setting defines the structure of the URI under which files are loaded into the database. A URI can be made up of some or all the following elements and they can be organized in any order:
To configure the URI structure, do the following:
1. Select the destination database and click Document Settings.
Element What it is Example
{$guid} Globally Unique ID. This specifies to generate a globally unique ID for each file loaded into the database.
15908936213503297716
{$path}
{$path strip-prefix=” “}
The directory path to the file. By default, this is the same path under which the file is located in the filesystem.
You can add a strip-prefix inside {$path} to remove a prefix from the upload directory. (See example below.)
C:/latest/docs
{$filename} The name of the file. myfile
{$ext} The file extension. Note that the dot (.) must be specified in the URI structure as a literal.
xml
MarkLogic 8—February, 2015 Information Studio Developer’s Guide—Page 56
MarkLogic Server Creating and Configuring Flows
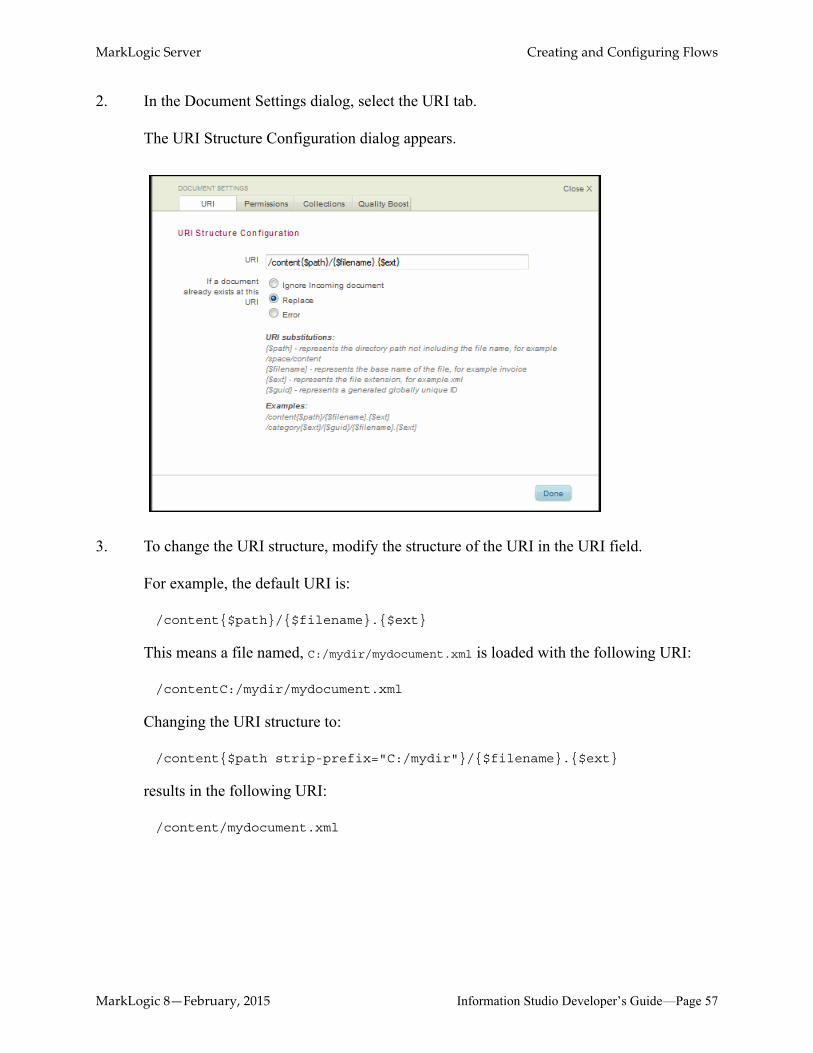
2. In the Document Settings dialog, select the URI tab.
The URI Structure Configuration dialog appears.
3. To change the URI structure, modify the structure of the URI in the URI field.
For example, the default URI is:
/content{$path}/{$filename}.{$ext}
This means a file named, C:/mydir/mydocument.xml is loaded with the following URI:
/contentC:/mydir/mydocument.xml
Changing the URI structure to:
/content{$path strip-prefix="C:/mydir"}/{$filename}.{$ext}
results in the following URI:
/content/mydocument.xml
MarkLogic 8—February, 2015 Information Studio Developer’s Guide—Page 57
MarkLogic Server Creating and Configuring Flows
Changing the URI structure to:
/http://mydir/{$filename}.{$ext}
results in the URI:
/http://mydir/mydocument.xml
Changing the URI structure to:
/mydir/{$filename}
results in the URI:
/mydir/mydocument
4. To handle incoming documents that have the same URI as an existing document in the database, select the 'If a document already exists at this URI' radio button from the following options :
Option Description
Ignore Incoming document Do not update an existing document in the database with the incoming document.
Replace Replace the existing document in the database with the incoming document.
Error Generate an error if an existing document in the database has the same URI as the incoming document.
MarkLogic 8—February, 2015 Information Studio Developer’s Guide—Page 58
MarkLogic Server Creating and Configuring Flows
4.5.2.2 Configuring Document Access PermissionsAs described in Document Permissions in the Understanding and Using Security Guide Guide, you can specify permissions on the ingested documents to control which users can access them and in what manner.
To set the permissions for the documents ingested by this flow, do the following:
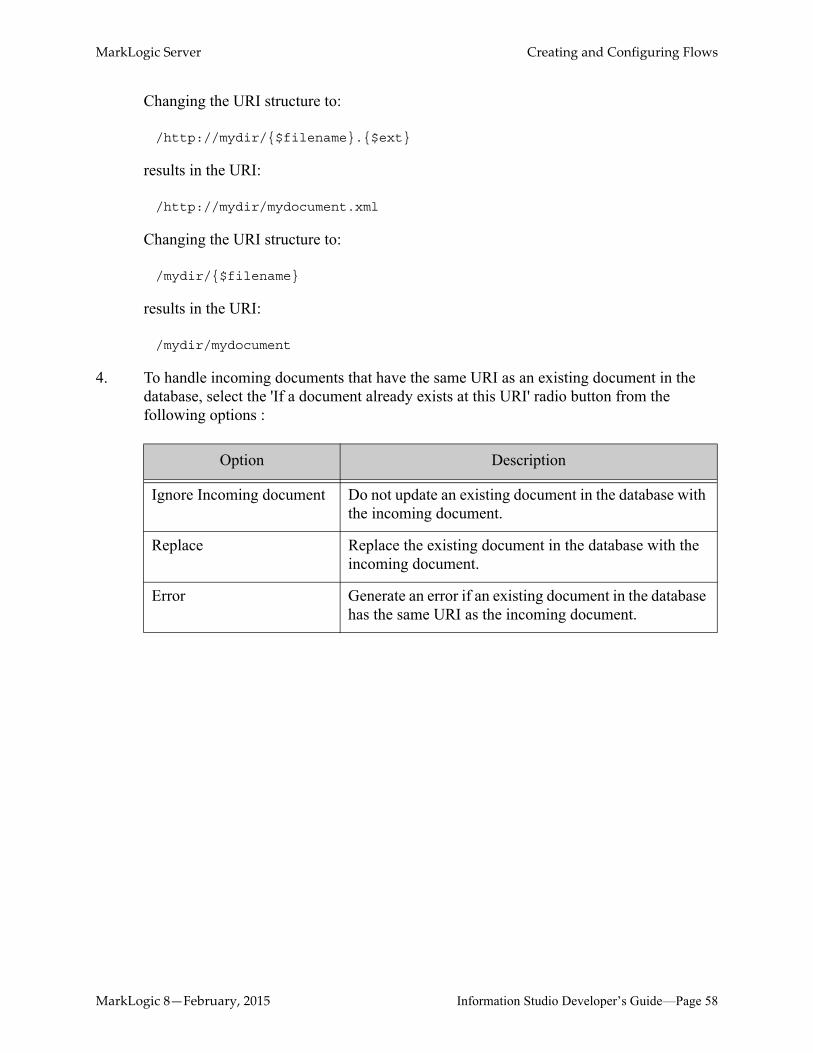
1. In the Document Settings dialog, select the Permissions tab.
2. Enter the name of the Role, then select the permission to assign to the role from drop-down list.
3. To add a new permission, click New Permission and repeat the procedure described in the previous step. You can add as many permissions for as many roles as you like.
MarkLogic 8—February, 2015 Information Studio Developer’s Guide—Page 59
MarkLogic Server Creating and Configuring Flows
4.5.2.3 Configuring CollectionsCollections are described in detail in Protected Collections in the Administrator’s Guide. This section describes how to specify the collections to associate with the documents ingested by a flow.
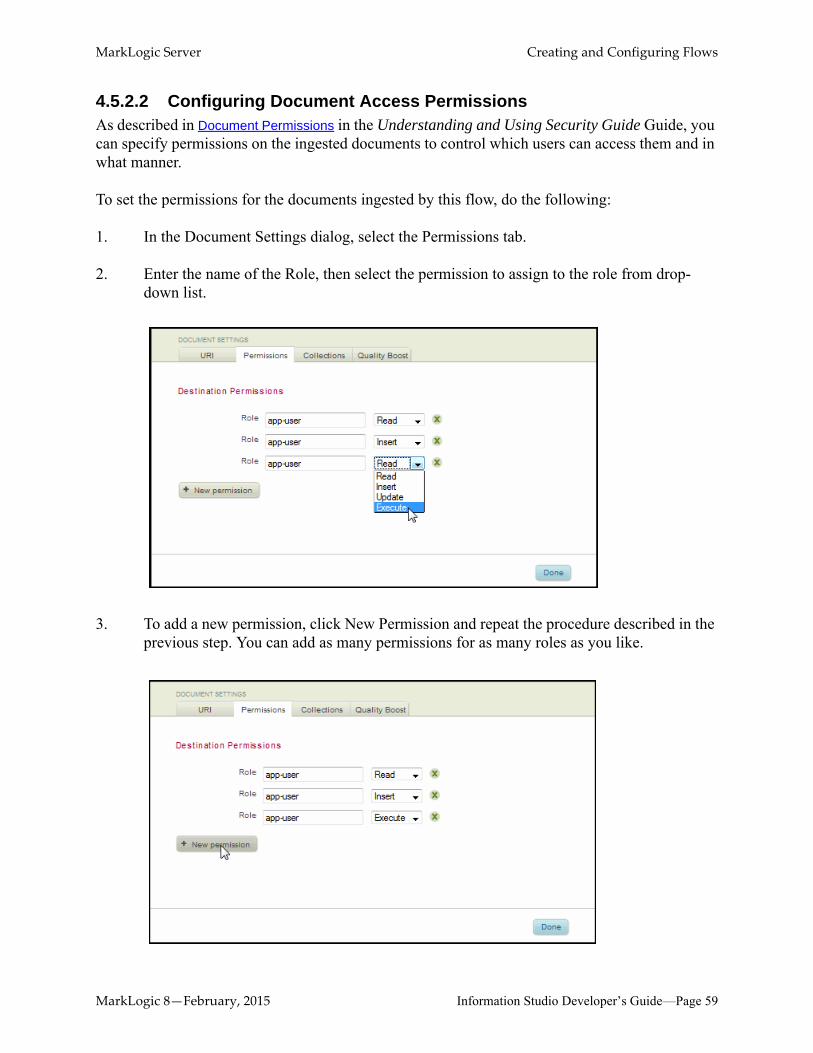
To set the collections for the documents ingested by a flow, use the following steps:
1. In the Document Settings dialog, select the Collections tab.
2. Add or remove collections in the Destination Collections dialog.
MarkLogic 8—February, 2015 Information Studio Developer’s Guide—Page 60
MarkLogic Server Creating and Configuring Flows
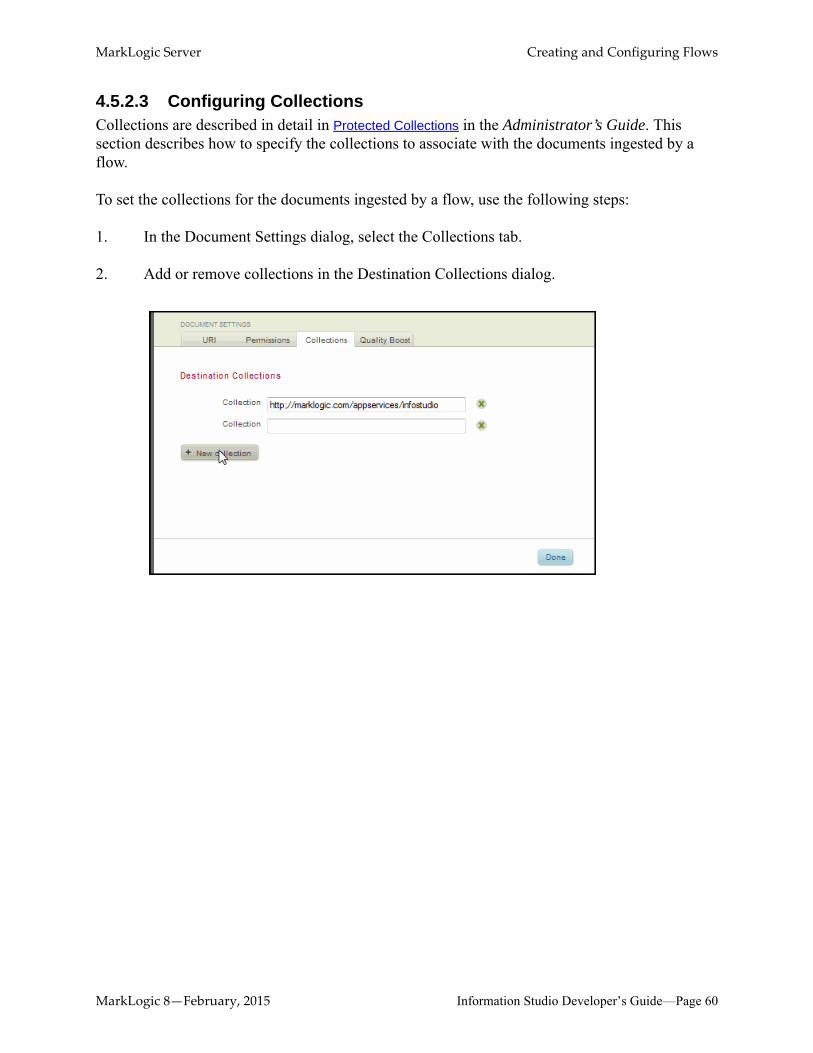
4.5.2.4 Configuring Quality BoostQuality Boost associates all ingested documents with the specified quality value. A positive value increases the relevance score of the document in text search functions. The converse is true for a negative value. Leaving this field blank specifies the default document quality, which is 0.
To set the quality boost for the documents ingested by a flow, select the Quality Boost tab in the Document Settings dialog.
MarkLogic 8—February, 2015 Information Studio Developer’s Guide—Page 61

MarkLogic Server Creating and Configuring Flows
4.6 Launching Ingestion and Tracking StatusThe Status portion of the Flow Editor displays the status of the ingest operations and any resulting errors when ingestion has completed.
1. To begin ingesting documents into the database, click Start Loading.
• The Status section displays the ticket status and progress of the documents at the Collecting, Processing, and Loaded stages of the flow.
• When the ingestion is complete, the Status indicates the ticket status as 'completed' and displays the number of documents that were successfully ingested into the database. If there are errors, you can click on the errors link. The errors window includes both collection errors and processing errors.
2. (Optional) Click on an error for more detail.
MarkLogic 8—February, 2015 Information Studio Developer’s Guide—Page 62
MarkLogic Server Creating and Configuring Flows
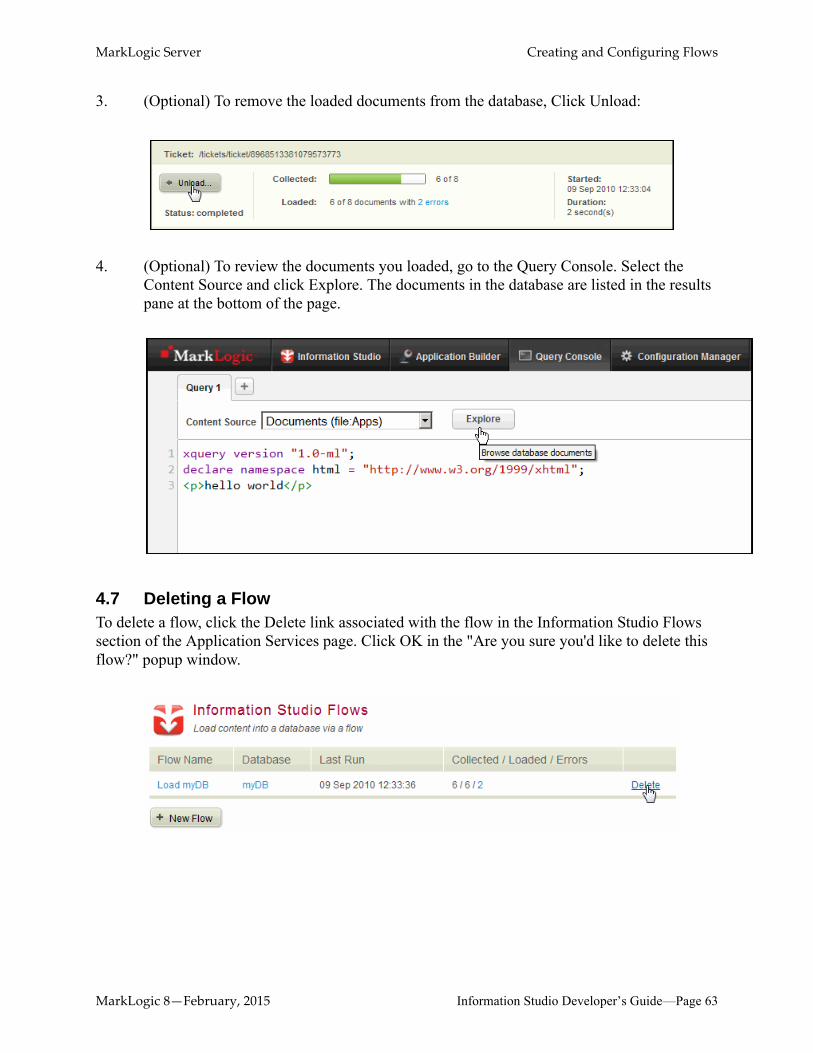
3. (Optional) To remove the loaded documents from the database, Click Unload:
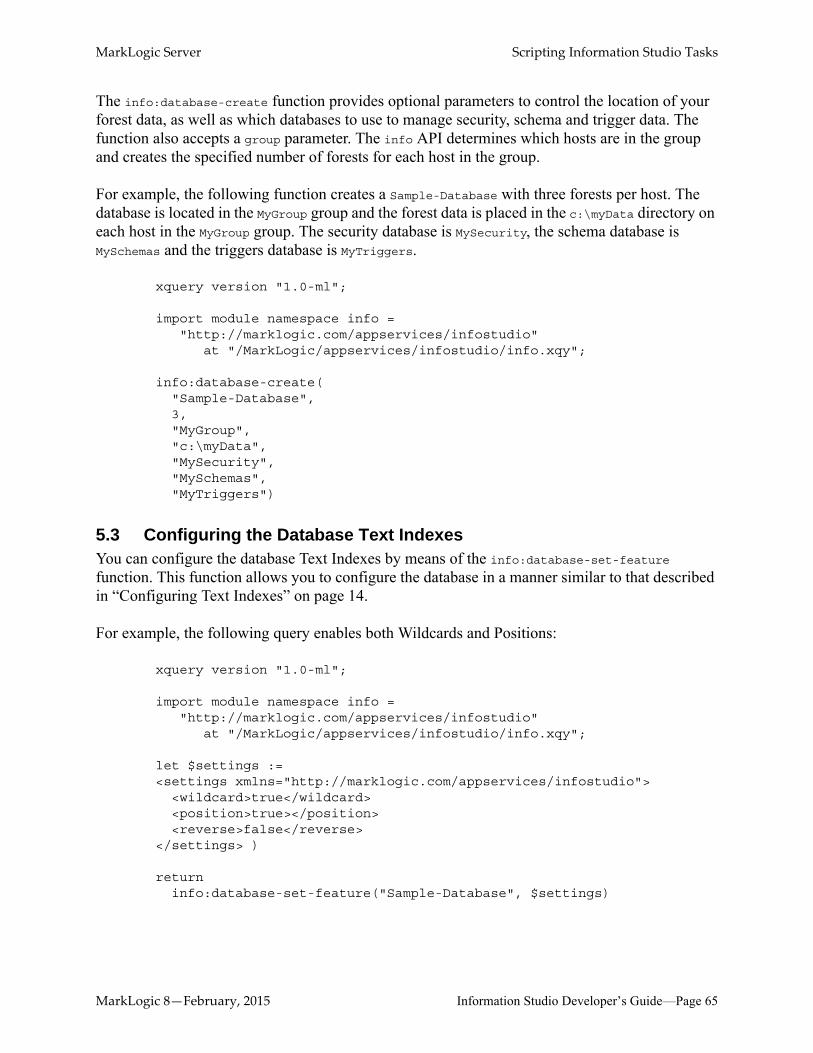
4. (Optional) To review the documents you loaded, go to the Query Console. Select the Content Source and click Explore. The documents in the database are listed in the results pane at the bottom of the page.
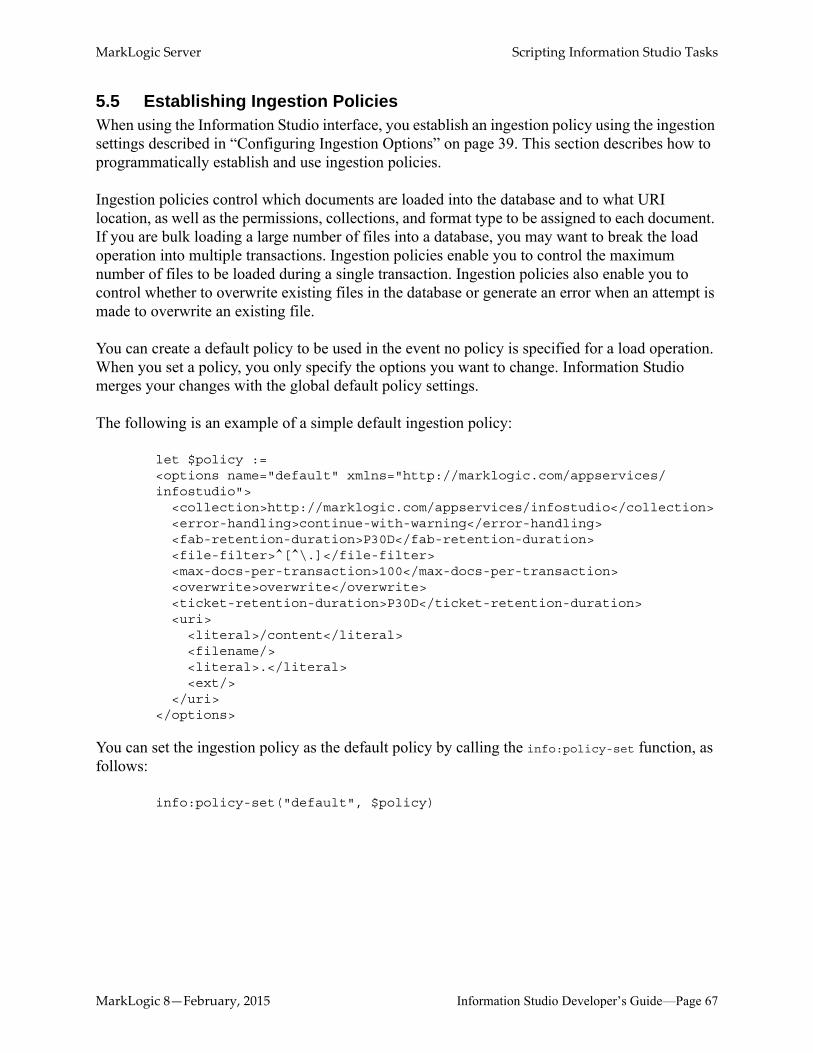
4.7 Deleting a FlowTo delete a flow, click the Delete link associated with the flow in the Information Studio Flows section of the Application Services page. Click OK in the "Are you sure you'd like to delete this flow?" popup window.
MarkLogic 8—February, 2015 Information Studio Developer’s Guide—Page 63

MarkLogic Server Scripting Information Studio Tasks
5.0 Scripting Information Studio Tasks75
You can use the info API to programmatically accomplish the same tasks as described for the Information Studio interface in chapters “Creating and Configuring Databases and REST Servers” on page 10 and “Creating and Configuring Flows” on page 28.
This chapter describes:
• The info API
• Creating a Database
• Loading Data into Databases
• Establishing Ingestion Policies
• Applying Ingestion Policies
• Ingestion Policies and Multiple Load Operations
5.1 The info APIThe info API provides functions to create databases and load them with data. The info API functions that manage databases are built on top of the admin API described in the Scripting Administrative Tasks Guide. In addition, the info API provides functions that simplify and enhance database load operations.
5.2 Creating a DatabaseThe info:database-create function simplifies the task of programmatically creating forests and databases. Creating forests and databases using the admin API is described in Creating and Configuring Forests and Databases in the Scripting Administrative Tasks Guide. When using the info:database-create function, you are trading the finer-level control provided by the admin functions for simplicity.
For example, the following function creates a new database, named Sample-Database, with two forests per host. By default, the database is located in the Default group and the forest data is placed in the default location (/MarkLogic/Data/Forests) on each host in the Default group. Each forest is given a name like Sample-Database-<unique-id>, where <unique-id> is a unique number generated by the API. The Sample-Database database is configured with the default security and schema databases, Security and Schemas.
xquery version "1.0-ml";
import module namespace info = "http://marklogic.com/appservices/infostudio"
at "/MarkLogic/appservices/infostudio/info.xqy";
info:database-create("Sample-Database", 2)
MarkLogic 8—February, 2015 Information Studio Developer’s Guide—Page 64
MarkLogic Server Scripting Information Studio Tasks
The info:database-create function provides optional parameters to control the location of your forest data, as well as which databases to use to manage security, schema and trigger data. The function also accepts a group parameter. The info API determines which hosts are in the group and creates the specified number of forests for each host in the group.
For example, the following function creates a Sample-Database with three forests per host. The database is located in the MyGroup group and the forest data is placed in the c:\myData directory on each host in the MyGroup group. The security database is MySecurity, the schema database is MySchemas and the triggers database is MyTriggers.
xquery version "1.0-ml";
import module namespace info = "http://marklogic.com/appservices/infostudio"
at "/MarkLogic/appservices/infostudio/info.xqy";
info:database-create("Sample-Database",3,"MyGroup","c:\myData","MySecurity","MySchemas","MyTriggers")
5.3 Configuring the Database Text IndexesYou can configure the database Text Indexes by means of the info:database-set-feature function. This function allows you to configure the database in a manner similar to that described in “Configuring Text Indexes” on page 14.
For example, the following query enables both Wildcards and Positions:
xquery version "1.0-ml";
import module namespace info = "http://marklogic.com/appservices/infostudio"
at "/MarkLogic/appservices/infostudio/info.xqy";
let $settings :=<settings xmlns="http://marklogic.com/appservices/infostudio">
<wildcard>true</wildcard><position>true></position><reverse>false</reverse>
</settings> )
returninfo:database-set-feature("Sample-Database", $settings)
MarkLogic 8—February, 2015 Information Studio Developer’s Guide—Page 65

MarkLogic Server Scripting Information Studio Tasks
The following table lists the possible elements in a database settings node, their purpose, and possible values:
5.4 Loading Data into DatabasesThe info API enables you to script the operations described in “Creating and Configuring Flows” on page 28.
When a database load operation is initiated, Information Studio immediately returns a ticket URI. You can pass the ticket URI to the info:ticket function to return the contents of the ticket, which includes the status of the load and any errors encountered. Load operations are asynchronous, so the ticket is returned before the load operation has completed. Information Studio updates the status of the ticket during the load operation. Initially, the ticket status is ‘active.’ When the load has completed, the ticket status is updated to ‘completed.’ Under special circumstances, other statuses can be set on the ticket.
The simplest way to load data into the database is to call the info:load function. The following example loads the files from the C:\mydocs directory into the Sample-Database:
xquery version "1.0-ml";
import module namespace info = "http://marklogic.com/appservices/infostudio"
at "/MarkLogic/appservices/infostudio/info.xqy";
info:load("C:\mydocs", (), (), "Sample-Database")
The info:load function also enables you to specify an ingestion policy and/or deltas for an ingestion policy to fine-tune how documents are to be loaded into the database. Ingestion policies are discussed in “Establishing Ingestion Policies” on page 67.
Element Description Possible Values
wildcard Enables three character searches and codepoint word lexicon indexing. Use this setting for more efficient wildcard searches on the documents in your database.
truefalse
position Enables word positions indexing. Use this setting for more efficient phrase searches on the documents in your database.
truefalse
reverse Enables fast reverse searches. Use this setting to index saved queries in order to speed up reverse query searches. This option requires a special license.
truefalse
MarkLogic 8—February, 2015 Information Studio Developer’s Guide—Page 66
MarkLogic Server Scripting Information Studio Tasks
5.5 Establishing Ingestion PoliciesWhen using the Information Studio interface, you establish an ingestion policy using the ingestion settings described in “Configuring Ingestion Options” on page 39. This section describes how to programmatically establish and use ingestion policies.
Ingestion policies control which documents are loaded into the database and to what URI location, as well as the permissions, collections, and format type to be assigned to each document. If you are bulk loading a large number of files into a database, you may want to break the load operation into multiple transactions. Ingestion policies enable you to control the maximum number of files to be loaded during a single transaction. Ingestion policies also enable you to control whether to overwrite existing files in the database or generate an error when an attempt is made to overwrite an existing file.
You can create a default policy to be used in the event no policy is specified for a load operation. When you set a policy, you only specify the options you want to change. Information Studio merges your changes with the global default policy settings.
The following is an example of a simple default ingestion policy:
let $policy :=<options name="default" xmlns="http://marklogic.com/appservices/infostudio">
<collection>http://marklogic.com/appservices/infostudio</collection><error-handling>continue-with-warning</error-handling><fab-retention-duration>P30D</fab-retention-duration><file-filter>^[^\.]</file-filter><max-docs-per-transaction>100</max-docs-per-transaction><overwrite>overwrite</overwrite><ticket-retention-duration>P30D</ticket-retention-duration><uri>
<literal>/content</literal><filename/><literal>.</literal><ext/>
</uri></options>
You can set the ingestion policy as the default policy by calling the info:policy-set function, as follows:
info:policy-set("default", $policy)
MarkLogic 8—February, 2015 Information Studio Developer’s Guide—Page 67
MarkLogic Server Scripting Information Studio Tasks
The following table lists all of the possible elements in an ingestion policy, their purpose, and possible values:
Element Description Possible Values and Default Value
annotation A description of the policy, or any other notation.
Any string
Default: None
overwrite Specify how to manage files that already exist in the database.
Specify overwrite to overwrite existing files in the database; skip to not overwrite the files, but continue with the load, or error to not overwrite the files and generate an error.
overwriteskiperror
Default: overwrite
error-handling How to handle load errors. Specify continue-with-warning to continue the load or error to abort the load when an error is encountered.
continue-with-warningerror
Default: continue-with-warning
collection The URI of a collection.
By default, existing collections are overridden by the specified collection. You can use the add attribute to add the collection to any existing collections, rather than overriding them.
The collection URI.
Default: None
max-docs-per-transaction
The maximum number of documents to be ingested in a single transaction. If ingesting more than the maximum, the ingest operation is scheduled as more than one transaction.
Any xs:unsignedInt
Default: 100
file-filter The filter used to select the documents in the filesystem. This can be any XQuery regular expression. The default regular expression specifies all documents in the directory and its subdirectories except for those that start with a dot, such as .mydoc.
Any valid XQuery regular expression
Default: ^[^\.]
MarkLogic 8—February, 2015 Information Studio Developer’s Guide—Page 68

MarkLogic Server Scripting Information Studio Tasks
repair Specify full to attempt to repair malformed XML content on each document during ingestion. Specifying no value or none causes documents containing malformed XML content to be rejected with an error.
nonefull
Default: None
format Ingest documents as a particular format, such as XML, text, or binary. No value indicates to ingest documents as any format. Documents that are not of the specified format generate an error.
xmltextbinary
Default: None
default-namespace Apply a default namespace to all the nodes that do not have an associated namespace.
The namespace URI.
Default: None
default-language Add an xml:lang attribute to the root element node on all ingested documents to indicate they are written in a particular language, such as English or French. Default indicates to not tag ingested documents with an xml:lang attribute.
ardeenesfafritkonlptruzhzh-Hant
Default: None
uri The URI structure for the ingested documents in the database. For a complete discussion, see “Configuring the URI Structure” on page 56.
<literal/><path @[strip-prefix]/><guid/><filename/><ext/>
Default:
<literal>/content
</literal><path/><literal>/</literal><filename/><literal>.</literal><ext/>
Element Description Possible Values and Default Value
MarkLogic 8—February, 2015 Information Studio Developer’s Guide—Page 69
MarkLogic Server Scripting Information Studio Tasks
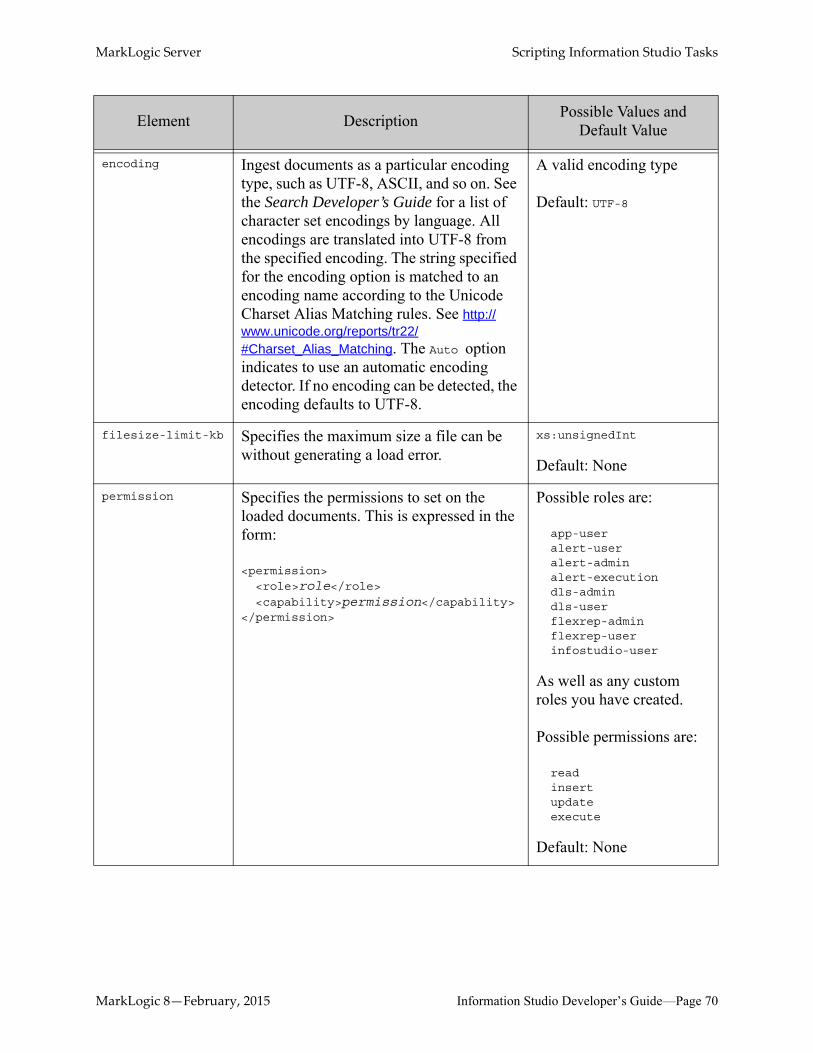
encoding Ingest documents as a particular encoding type, such as UTF-8, ASCII, and so on. See the Search Developer’s Guide for a list of character set encodings by language. All encodings are translated into UTF-8 from the specified encoding. The string specified for the encoding option is matched to an encoding name according to the Unicode Charset Alias Matching rules. See http://www.unicode.org/reports/tr22/#Charset_Alias_Matching. The Auto option indicates to use an automatic encoding detector. If no encoding can be detected, the encoding defaults to UTF-8.
A valid encoding type
Default: UTF-8
filesize-limit-kb Specifies the maximum size a file can be without generating a load error.
xs:unsignedInt
Default: None
permission Specifies the permissions to set on the loaded documents. This is expressed in the form:
<permission><role>role</role> <capability>permission</capability>
</permission>
Possible roles are:
app-useralert-useralert-adminalert-executiondls-admindls-userflexrep-adminflexrep-userinfostudio-user
As well as any custom roles you have created.
Possible permissions are:
readinsertupdateexecute
Default: None
Element Description Possible Values and Default Value
MarkLogic 8—February, 2015 Information Studio Developer’s Guide—Page 70
MarkLogic Server Scripting Information Studio Tasks
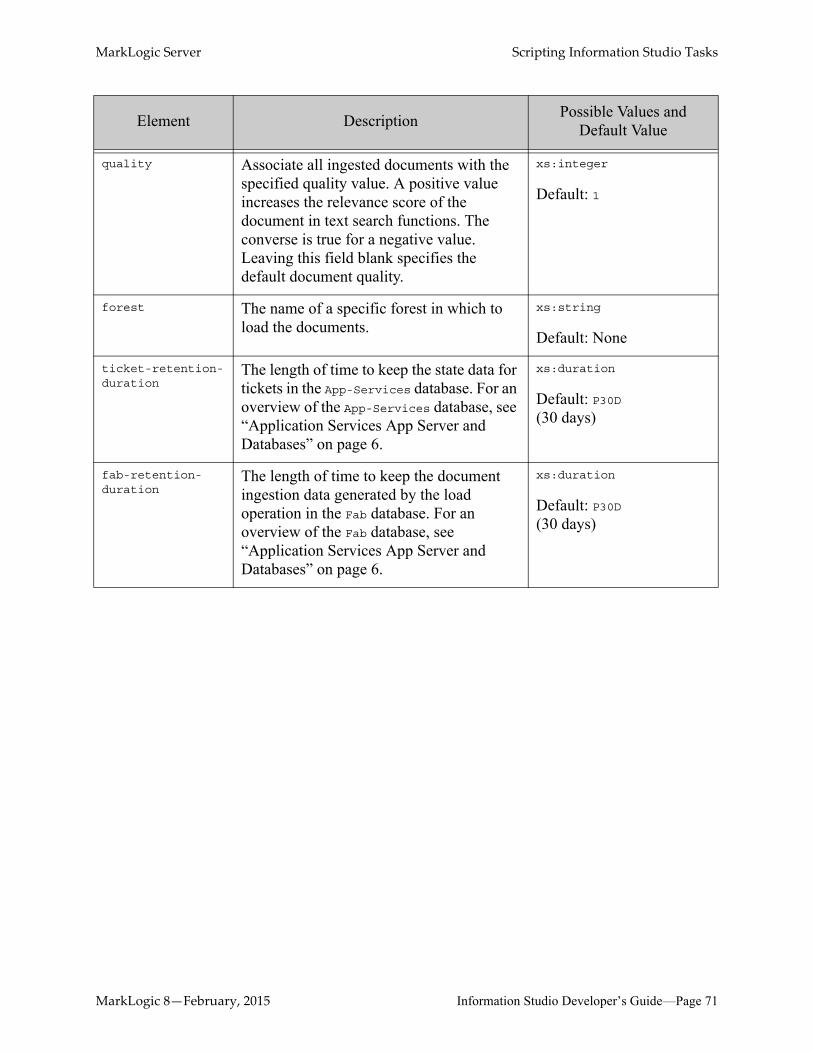
quality Associate all ingested documents with the specified quality value. A positive value increases the relevance score of the document in text search functions. The converse is true for a negative value. Leaving this field blank specifies the default document quality.
xs:integer
Default: 1
forest The name of a specific forest in which to load the documents.
xs:string
Default: None
ticket-retention-duration
The length of time to keep the state data for tickets in the App-Services database. For an overview of the App-Services database, see “Application Services App Server and Databases” on page 6.
xs:duration
Default: P30D(30 days)
fab-retention-duration
The length of time to keep the document ingestion data generated by the load operation in the Fab database. For an overview of the Fab database, see “Application Services App Server and Databases” on page 6.
xs:duration
Default: P30D(30 days)
Element Description Possible Values and Default Value
MarkLogic 8—February, 2015 Information Studio Developer’s Guide—Page 71

MarkLogic Server Scripting Information Studio Tasks
5.6 Applying Ingestion PoliciesThe info:load function enables you to name a stored ingestion policy to use for the load operation, and a set of specific options (deltas) that selectively overrides the stored policy. If no ingestion policy is specified for a load operation, the default policy is used. If no default policy is specified, then a policy consisting of the global defaults is applied to the load operation.
For example, the following query loads the documents from the C:\mydocs directory into the Sample-Database using the above default ingestion policy:
xquery version "1.0-ml";
import module namespace info = "http://marklogic.com/appservices/infostudio"
at "/MarkLogic/appservices/infostudio/info.xqy";
returninfo:load("C:\test", (), (), "Sample-Database")
To change the URI to http://docs/mydocs, you can define a delta that changes the literal value in the URI. This delta change only applies to this load operation and leaves the URI in the default ingestion policy unchanged.
xquery version "1.0-ml";
import module namespace info = "http://marklogic.com/appservices/infostudio"
at "/MarkLogic/appservices/infostudio/info.xqy";
let $delta :=<options name="default"
xmlns="http://marklogic.com/appservices/infostudio"><uri>
<literal>http://docs/mydocs/</literal><filename/><literal>.</literal><ext/>
</uri></options>
returninfo:load("C:\test", (), $delta, "Sample-Database")
Note: When defining deltas, only the children elements of the root element are preserved in the ingestion policy. So, in the above example, the children of the uri element must be defined in their entirety in order for the filenames and extensions to be included in the URI.
MarkLogic 8—February, 2015 Information Studio Developer’s Guide—Page 72
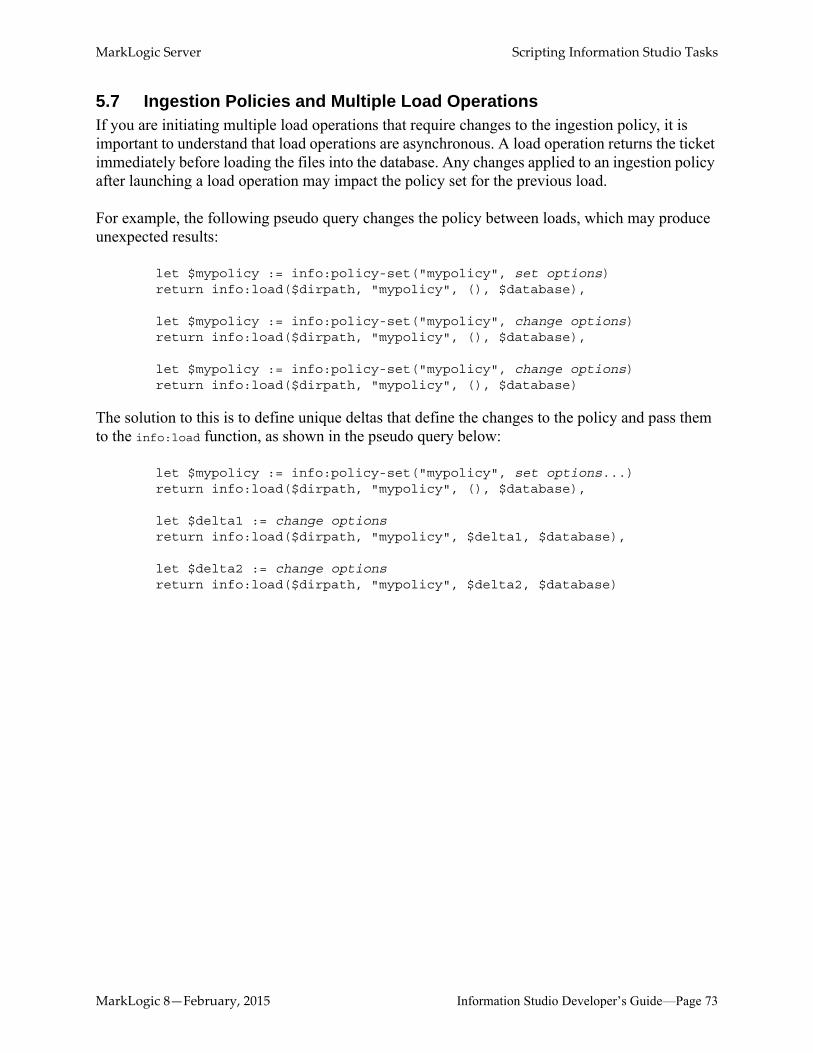
MarkLogic Server Scripting Information Studio Tasks
5.7 Ingestion Policies and Multiple Load OperationsIf you are initiating multiple load operations that require changes to the ingestion policy, it is important to understand that load operations are asynchronous. A load operation returns the ticket immediately before loading the files into the database. Any changes applied to an ingestion policy after launching a load operation may impact the policy set for the previous load.
For example, the following pseudo query changes the policy between loads, which may produce unexpected results:
let $mypolicy := info:policy-set("mypolicy", set options)return info:load($dirpath, "mypolicy", (), $database),
let $mypolicy := info:policy-set("mypolicy", change options)return info:load($dirpath, "mypolicy", (), $database),
let $mypolicy := info:policy-set("mypolicy", change options)return info:load($dirpath, "mypolicy", (), $database)
The solution to this is to define unique deltas that define the changes to the policy and pass them to the info:load function, as shown in the pseudo query below:
let $mypolicy := info:policy-set("mypolicy", set options...)return info:load($dirpath, "mypolicy", (), $database),
let $delta1 := change optionsreturn info:load($dirpath, "mypolicy", $delta1, $database),
let $delta2 := change optionsreturn info:load($dirpath, "mypolicy", $delta2, $database)
MarkLogic 8—February, 2015 Information Studio Developer’s Guide—Page 73
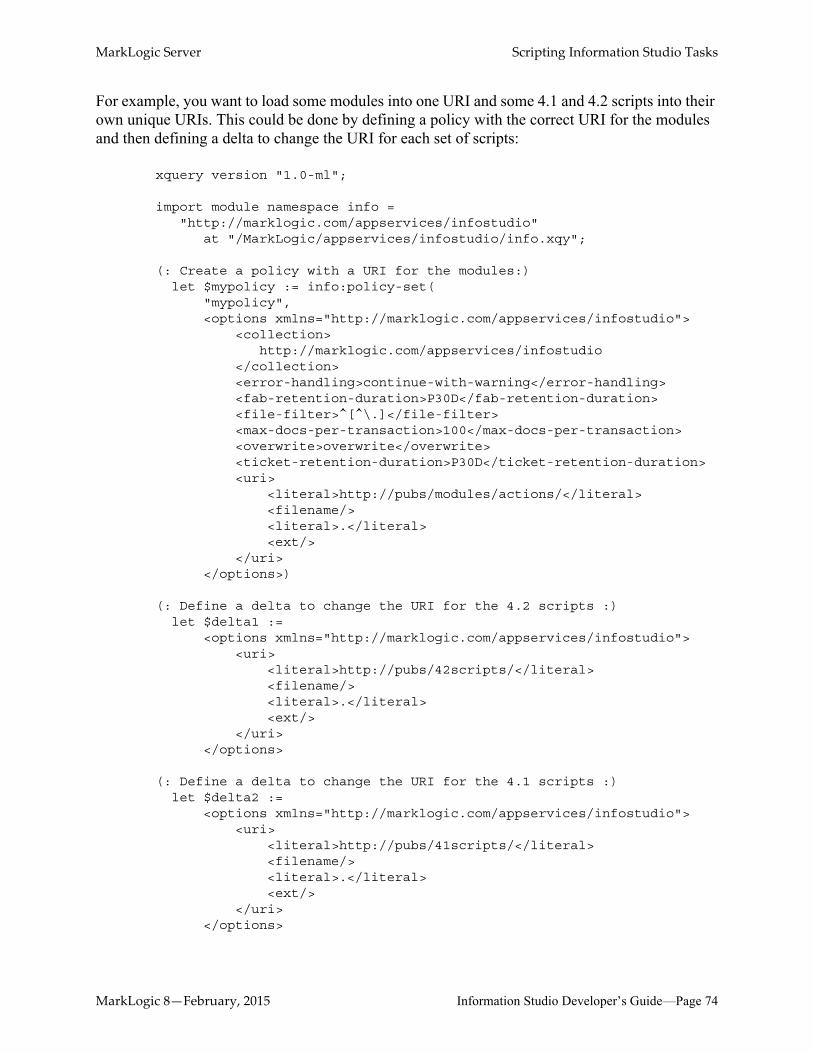
MarkLogic Server Scripting Information Studio Tasks
For example, you want to load some modules into one URI and some 4.1 and 4.2 scripts into their own unique URIs. This could be done by defining a policy with the correct URI for the modules and then defining a delta to change the URI for each set of scripts:
xquery version "1.0-ml";
import module namespace info = "http://marklogic.com/appservices/infostudio"
at "/MarkLogic/appservices/infostudio/info.xqy";
(: Create a policy with a URI for the modules:)let $mypolicy := info:policy-set(
"mypolicy",<options xmlns="http://marklogic.com/appservices/infostudio">
<collection>http://marklogic.com/appservices/infostudio
</collection><error-handling>continue-with-warning</error-handling><fab-retention-duration>P30D</fab-retention-duration><file-filter>^[^\.]</file-filter><max-docs-per-transaction>100</max-docs-per-transaction><overwrite>overwrite</overwrite><ticket-retention-duration>P30D</ticket-retention-duration><uri>
<literal>http://pubs/modules/actions/</literal><filename/><literal>.</literal><ext/>
</uri></options>)
(: Define a delta to change the URI for the 4.2 scripts :)let $delta1 :=
<options xmlns="http://marklogic.com/appservices/infostudio"><uri>
<literal>http://pubs/42scripts/</literal><filename/><literal>.</literal><ext/>
</uri></options>
(: Define a delta to change the URI for the 4.1 scripts :)let $delta2 :=
<options xmlns="http://marklogic.com/appservices/infostudio"><uri>
<literal>http://pubs/41scripts/</literal><filename/><literal>.</literal><ext/>
</uri></options>
MarkLogic 8—February, 2015 Information Studio Developer’s Guide—Page 74
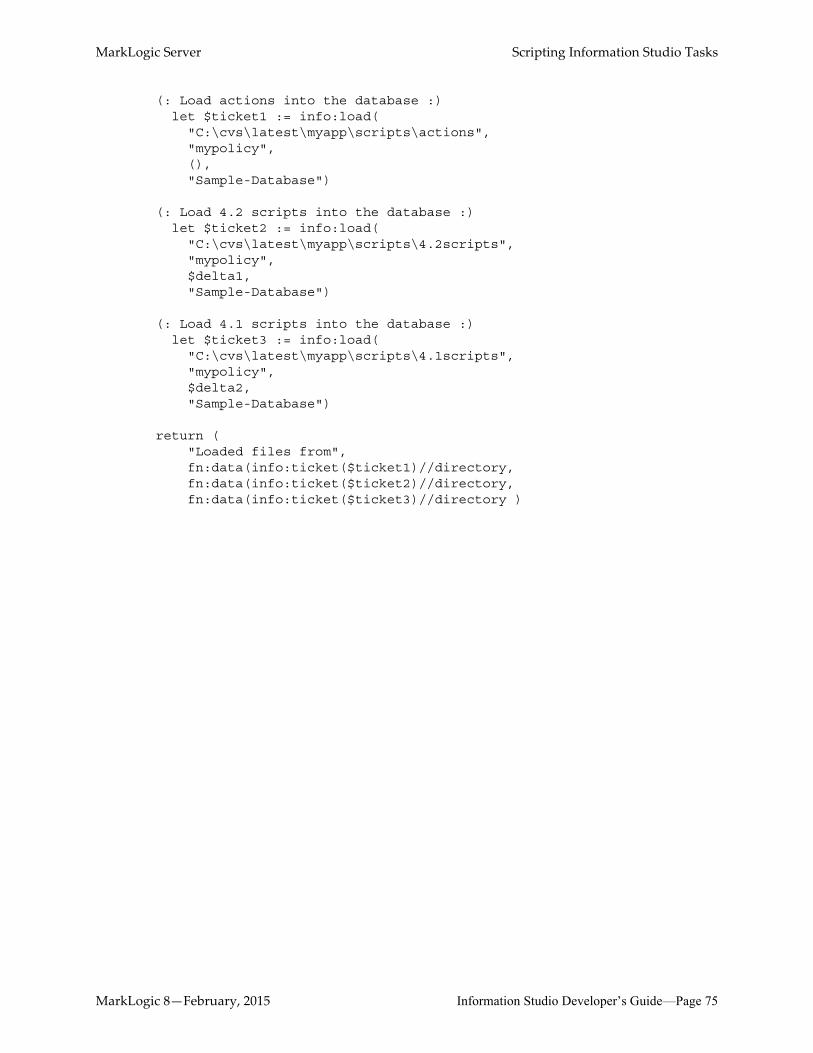
MarkLogic Server Scripting Information Studio Tasks
(: Load actions into the database :)let $ticket1 := info:load(
"C:\cvs\latest\myapp\scripts\actions","mypolicy",(),"Sample-Database")
(: Load 4.2 scripts into the database :)let $ticket2 := info:load(
"C:\cvs\latest\myapp\scripts\4.2scripts","mypolicy",$delta1,"Sample-Database")
(: Load 4.1 scripts into the database :)let $ticket3 := info:load(
"C:\cvs\latest\myapp\scripts\4.1scripts","mypolicy",$delta2,"Sample-Database")
return ("Loaded files from",fn:data(info:ticket($ticket1)//directory,fn:data(info:ticket($ticket2)//directory,fn:data(info:ticket($ticket3)//directory )
MarkLogic 8—February, 2015 Information Studio Developer’s Guide—Page 75
MarkLogic Server Creating Custom Collectors and Transforms
6.0 Creating Custom Collectors and Transforms101
Information Studio is shipped with built-in collectors and transforms. These collectors and transforms are implemented as plugins, which are located in the <marklogic-dir>/Assets/plugins/marklogic/appservices directory and described in “Selecting a Collector” on page 31 and “Transforming Content During Ingestion” on page 42.
Information Studio provides a plugin framework that enables you to create custom collectors and transforms to meet your own special needs. The main topics in this chapter are:
• The infodev and plugin APIs
• Information Studio Plugin Framework
• Creating Custom Collectors
• Creating Custom Transforms
6.1 The infodev and plugin APIsThe infodev and plugin APIs provide functions that allow you to create custom collector and transform plugins. Both APIs are documented in detail in the MarkLogic XQuery and XSLT Function Reference.
6.2 Information Studio Plugin FrameworkInformation Studio provides a graphical interface for configuring and running collectors and transforms. The Plugin Framework described in this chapter provides a set of tools for creating your own custom plugins for use by Information Studio. The general Plugin Framework is described in the System Plugin Framework chapter in the Application Developer’s Guide. This section includes the following parts:
• Plugin Directory
• Upgrading 4.2 Custom Plugins to MarkLogic 8
• Collector or Transform Plugin Module
• Example: Basic Capabilities Manifest
MarkLogic 8—February, 2015 Information Studio Developer’s Guide—Page 76
MarkLogic Server Creating Custom Collectors and Transforms
6.2.1 Plugin DirectoryCollector and Transform plugins are located in the following directory:
<marklogic-dir>/Assets/plugins/marklogic/appservices
For example, the Filesystem Directory collector, described in “Using the Filesystem Directory Collector” on page 32, is stored in the following directory:
Assets/plugins/marklogic/appservices/collector-filescan
Each plugin directory contains a manifest.xml file that describes the plugin capabilities, a lib/ subdirectory containing one or more library module files that implement the plugin capabilities, and an assets/ subdirectory containing one or more one or more asset file, such as HTML, JS, CSS, XSLT, and image files. Sub-directories of the assets/ directory are ignored.
For example, the collector-filescan directory contains the following files:
manifest.xmllib/collector-filescan.xqy
Modules referenced by your plugin can be located in either the plugin lib/ directory, the <marklogic-dir>/Modules directory, or in your modules database, if your code is stored in the database instead of the filesystem.
Warning An error in a plugin in the <marklogic-dir>/Assets/plugins/marklogic/appservices directory will cause that plugin to be ignored. Always test your plugins on a non-production server before installing them on a production server.
6.2.2 Upgrading 4.2 Custom Plugins to MarkLogic 8The directory where Information Studio looks for its application plugins has changed. In 4.2, the plugins were in the system plugin directory. In MarkLogic 8, they are under the directory shown in “Plugin Directory” on page 77.
If you have plugins created in MarkLogic Server 4.2, you must move them from the old directory:
<marklogic-dir>/Plugins
to the new directory:
<marklogic-dir>/Assets/plugins/marklogic/appservices
MarkLogic 8—February, 2015 Information Studio Developer’s Guide—Page 77
MarkLogic Server Creating Custom Collectors and Transforms
6.2.3 Collector or Transform Plugin ModuleEvery collector or transform application plugin contains a manifest of capabilities and a plugin module that implements the functions defined by the manifest. The available collector capabilities are described in “Collector Capabilities and Function Signatures” on page 80. The available transform capabilities are described in “Transform Capabilities and Function Signatures” on page 93.
A function pointer takes the form:
xdmp:function(xs:QName("prefix:functionName"))
A collector capability name takes the form:
"http://marklogic.com/appservices/infostudio/collector/capability"
A transform capability name takes the form:
"http://marklogic.com/appservices/infostudio/transformer/capability"
A capability must have a name argument that identifies the capability and either:
• an ns and local-name element that identifies the module namespace and name of the function that implements the capability, or
• an asset-reference element that identifies an asset in the assets/ directory that is used to implement the capability.
A capability that makes use of a function implemented by a library module in either the plugin lib/ directory or the MarkLogic/modules directory is identified by a module namespace and function name. For example, a collector capability, named model, that makes use of the mycollector:model function in the lib/mycollector.xqy module may be defined as:
<capability name="http://marklogic.com/appservices/infostudio/collector/model"><ns>http://marklogic.com/extension/plugin/mycollector</ns> <local-name>model</local-name>
</capability>
A capability that makes use of an asset, such as an HTML, JS, CSS, XSLT, or image file, located in the plugin’s assets/ subdirectory, is identified by an asset-reference element. For example, a collector capability, named picture, that makes use of the assets/picture.jpg image may be defined as:
<capability name="http://marklogic.com/appservices/infostudio/collector/picture"><asset-reference>picture.jpg</asset-reference>
</capability>
Note: Do not specify the assets/ prefix when identifying an asset.
MarkLogic 8—February, 2015 Information Studio Developer’s Guide—Page 78
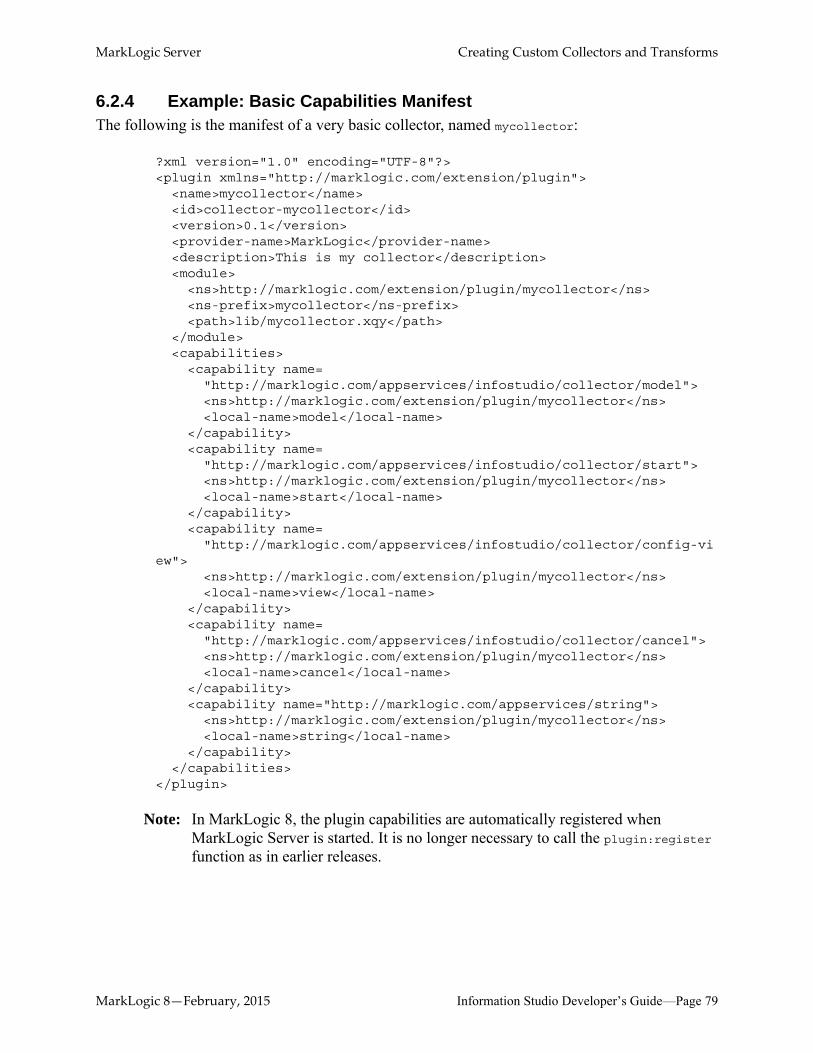
MarkLogic Server Creating Custom Collectors and Transforms
6.2.4 Example: Basic Capabilities ManifestThe following is the manifest of a very basic collector, named mycollector:
?xml version="1.0" encoding="UTF-8"?><plugin xmlns="http://marklogic.com/extension/plugin">
<name>mycollector</name> <id>collector-mycollector</id> <version>0.1</version> <provider-name>MarkLogic</provider-name> <description>This is my collector</description><module>
<ns>http://marklogic.com/extension/plugin/mycollector</ns> <ns-prefix>mycollector</ns-prefix><path>lib/mycollector.xqy</path>
</module><capabilities>
<capability name="http://marklogic.com/appservices/infostudio/collector/model"><ns>http://marklogic.com/extension/plugin/mycollector</ns> <local-name>model</local-name>
</capability><capability name=
"http://marklogic.com/appservices/infostudio/collector/start"><ns>http://marklogic.com/extension/plugin/mycollector</ns><local-name>start</local-name>
</capability><capability name=
"http://marklogic.com/appservices/infostudio/collector/config-view">
<ns>http://marklogic.com/extension/plugin/mycollector</ns><local-name>view</local-name>
</capability><capability name=
"http://marklogic.com/appservices/infostudio/collector/cancel"><ns>http://marklogic.com/extension/plugin/mycollector</ns><local-name>cancel</local-name>
</capability><capability name="http://marklogic.com/appservices/string">
<ns>http://marklogic.com/extension/plugin/mycollector</ns><local-name>string</local-name>
</capability></capabilities>
</plugin>
Note: In MarkLogic 8, the plugin capabilities are automatically registered when MarkLogic Server is started. It is no longer necessary to call the plugin:register function as in earlier releases.
MarkLogic 8—February, 2015 Information Studio Developer’s Guide—Page 79
MarkLogic Server Creating Custom Collectors and Transforms
6.3 Creating Custom CollectorsThis section describes how to create custom collectors. For example, you might want to write a collector that unzips zip files and ingests the contents into the database or a collector that ingests RSS feeds. Another type of collector might recognize a particular user and set the ingestion policy specifically for that user or extract files from one database and ingest them into another database.
The main topics in this section are:
• Types of Collectors
• Collector Capabilities and Function Signatures
• Collector Interaction with Information Studio
• Collector Type and MarkLogic Server Restart
• An Example Collector
• Initializing the Example Collector
6.3.1 Types of CollectorsThere are two basic types of collectors:
• One-shot
• Long-running
An example of a one-shot collector is the Filesystem Directory collector, which is started, completes a specific ingestion operation, and then automatically stops. An example of a long-running collector is the Browser Drop-Box collector, which once started, continues to “listen” for input until it is explicitly stopped by a user.
The collector type impacts how you implement the collector, as described in “Collector Interaction with Information Studio” on page 84, as well as how the collector behaves in the event of a MarkLogic Server restart, as described in “Collector Type and MarkLogic Server Restart” on page 86.
6.3.2 Collector Capabilities and Function SignaturesAt a minimum, a collector must do the following:
• Define a data model that specifies the data to be passed into the start function.
• Define a start function that initiates the load.
• Define a string function that specifies all of the labels needed for display.
• Call the infodev:ingest function to ingest the files into the database.
If the collector is long-running it must also define a function that returns a plugin:listener-view element.
MarkLogic 8—February, 2015 Information Studio Developer’s Guide—Page 80
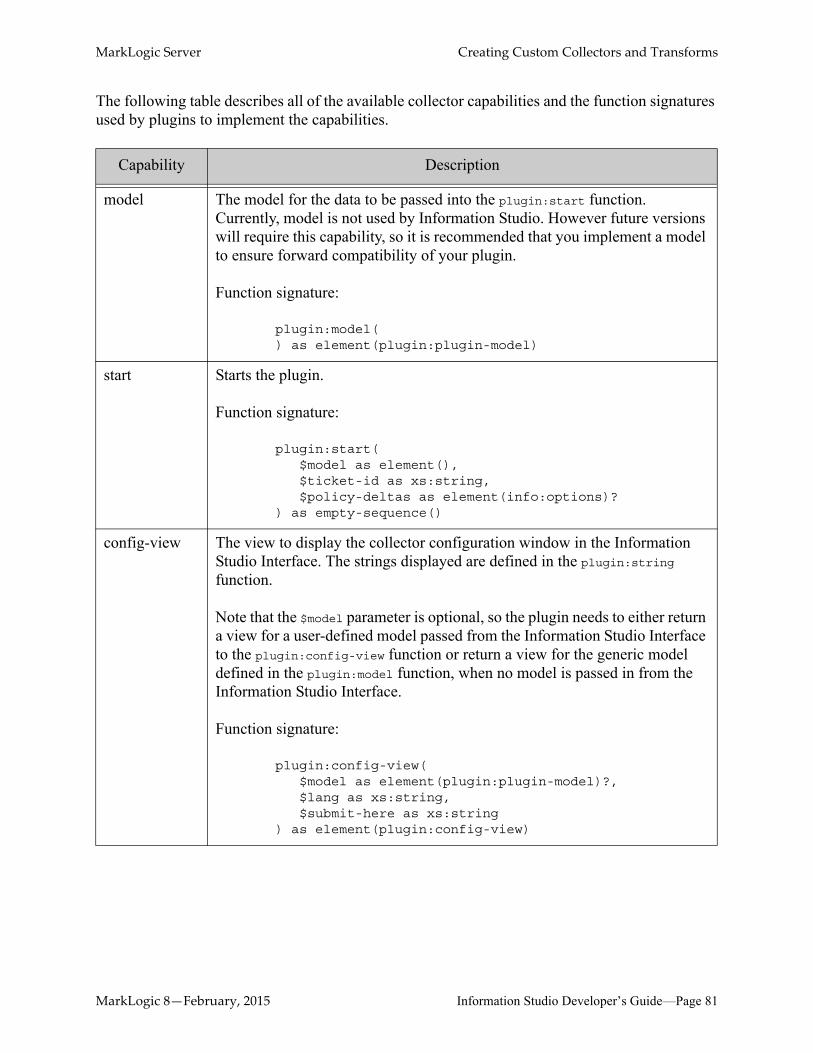
MarkLogic Server Creating Custom Collectors and Transforms
The following table describes all of the available collector capabilities and the function signatures used by plugins to implement the capabilities.
Capability Description
model The model for the data to be passed into the plugin:start function. Currently, model is not used by Information Studio. However future versions will require this capability, so it is recommended that you implement a model to ensure forward compatibility of your plugin.
Function signature:
plugin:model() as element(plugin:plugin-model)
start Starts the plugin.
Function signature:
plugin:start($model as element(),$ticket-id as xs:string,$policy-deltas as element(info:options)?
) as empty-sequence()
config-view The view to display the collector configuration window in the Information Studio Interface. The strings displayed are defined in the plugin:string function.
Note that the $model parameter is optional, so the plugin needs to either return a view for a user-defined model passed from the Information Studio Interface to the plugin:config-view function or return a view for the generic model defined in the plugin:model function, when no model is passed in from the Information Studio Interface.
Function signature:
plugin:config-view($model as element(plugin:plugin-model)?,$lang as xs:string,$submit-here as xs:string
) as element(plugin:config-view)
MarkLogic 8—February, 2015 Information Studio Developer’s Guide—Page 81
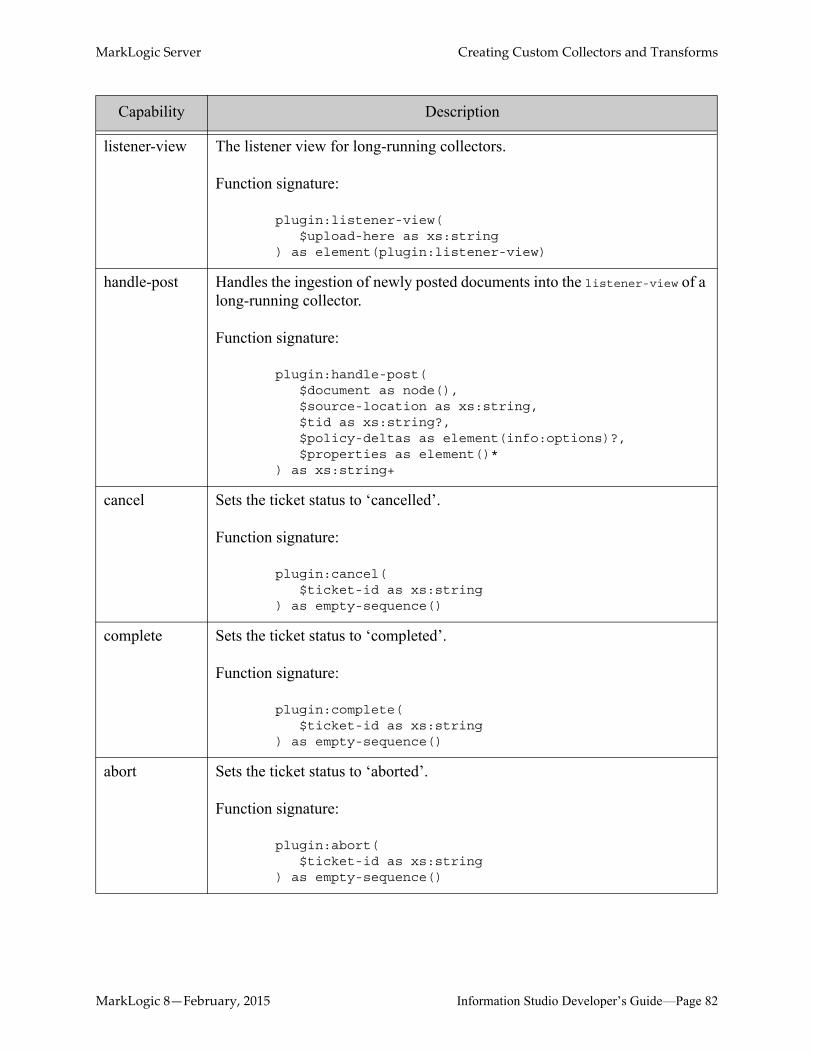
MarkLogic Server Creating Custom Collectors and Transforms
listener-view The listener view for long-running collectors.
Function signature:
plugin:listener-view($upload-here as xs:string
) as element(plugin:listener-view)
handle-post Handles the ingestion of newly posted documents into the listener-view of a long-running collector.
Function signature:
plugin:handle-post($document as node(),$source-location as xs:string,$tid as xs:string?,$policy-deltas as element(info:options)?,$properties as element()*
) as xs:string+
cancel Sets the ticket status to ‘cancelled’.
Function signature:
plugin:cancel($ticket-id as xs:string
) as empty-sequence()
complete Sets the ticket status to ‘completed’.
Function signature:
plugin:complete($ticket-id as xs:string
) as empty-sequence()
abort Sets the ticket status to ‘aborted’.
Function signature:
plugin:abort($ticket-id as xs:string
) as empty-sequence()
Capability Description
MarkLogic 8—February, 2015 Information Studio Developer’s Guide—Page 82
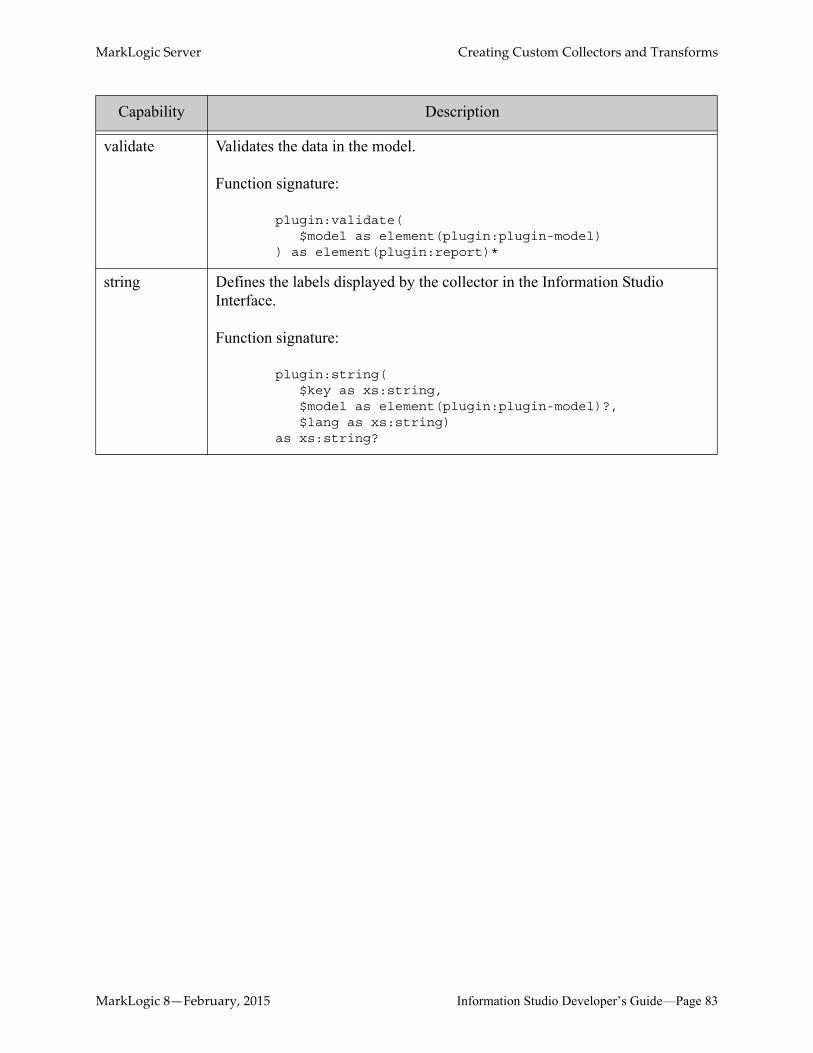
MarkLogic Server Creating Custom Collectors and Transforms
validate Validates the data in the model.
Function signature:
plugin:validate($model as element(plugin:plugin-model)
) as element(plugin:report)*
string Defines the labels displayed by the collector in the Information Studio Interface.
Function signature:
plugin:string($key as xs:string, $model as element(plugin:plugin-model)?, $lang as xs:string)
as xs:string?
Capability Description
MarkLogic 8—February, 2015 Information Studio Developer’s Guide—Page 83
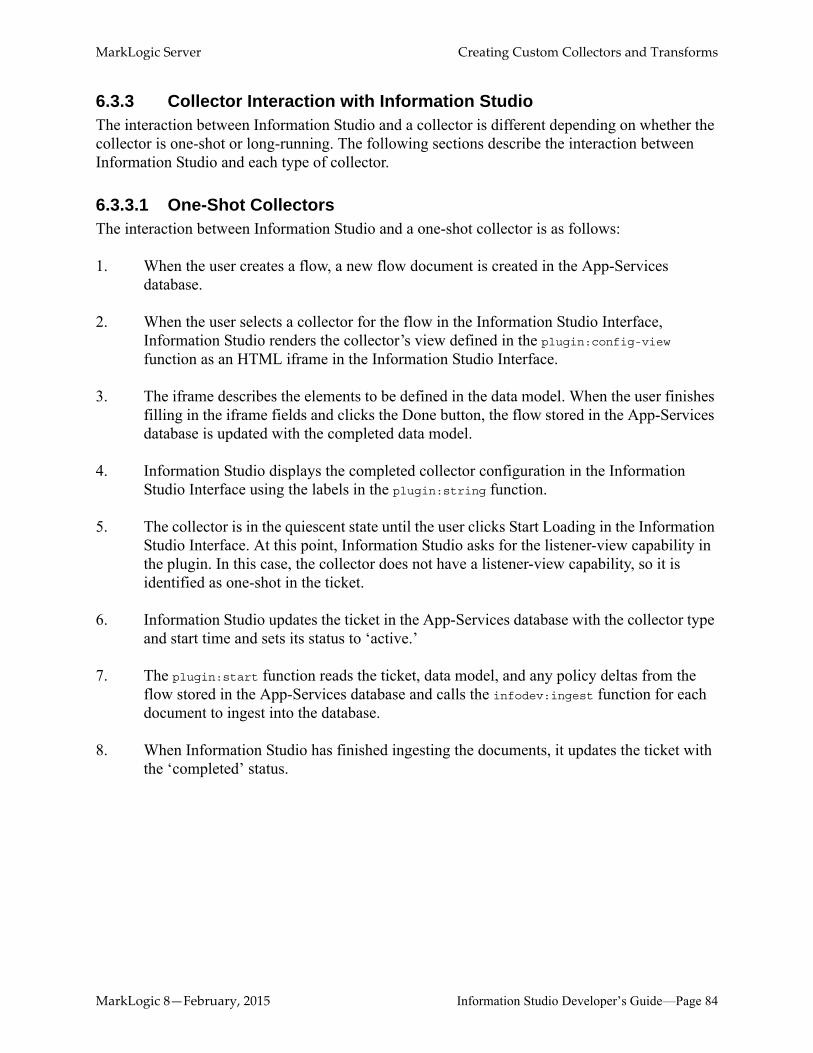
MarkLogic Server Creating Custom Collectors and Transforms
6.3.3 Collector Interaction with Information StudioThe interaction between Information Studio and a collector is different depending on whether the collector is one-shot or long-running. The following sections describe the interaction between Information Studio and each type of collector.
6.3.3.1 One-Shot CollectorsThe interaction between Information Studio and a one-shot collector is as follows:
1. When the user creates a flow, a new flow document is created in the App-Services database.
2. When the user selects a collector for the flow in the Information Studio Interface, Information Studio renders the collector’s view defined in the plugin:config-view function as an HTML iframe in the Information Studio Interface.
3. The iframe describes the elements to be defined in the data model. When the user finishes filling in the iframe fields and clicks the Done button, the flow stored in the App-Services database is updated with the completed data model.
4. Information Studio displays the completed collector configuration in the Information Studio Interface using the labels in the plugin:string function.
5. The collector is in the quiescent state until the user clicks Start Loading in the Information Studio Interface. At this point, Information Studio asks for the listener-view capability in the plugin. In this case, the collector does not have a listener-view capability, so it is identified as one-shot in the ticket.
6. Information Studio updates the ticket in the App-Services database with the collector type and start time and sets its status to ‘active.’
7. The plugin:start function reads the ticket, data model, and any policy deltas from the flow stored in the App-Services database and calls the infodev:ingest function for each document to ingest into the database.
8. When Information Studio has finished ingesting the documents, it updates the ticket with the ‘completed’ status.
MarkLogic 8—February, 2015 Information Studio Developer’s Guide—Page 84
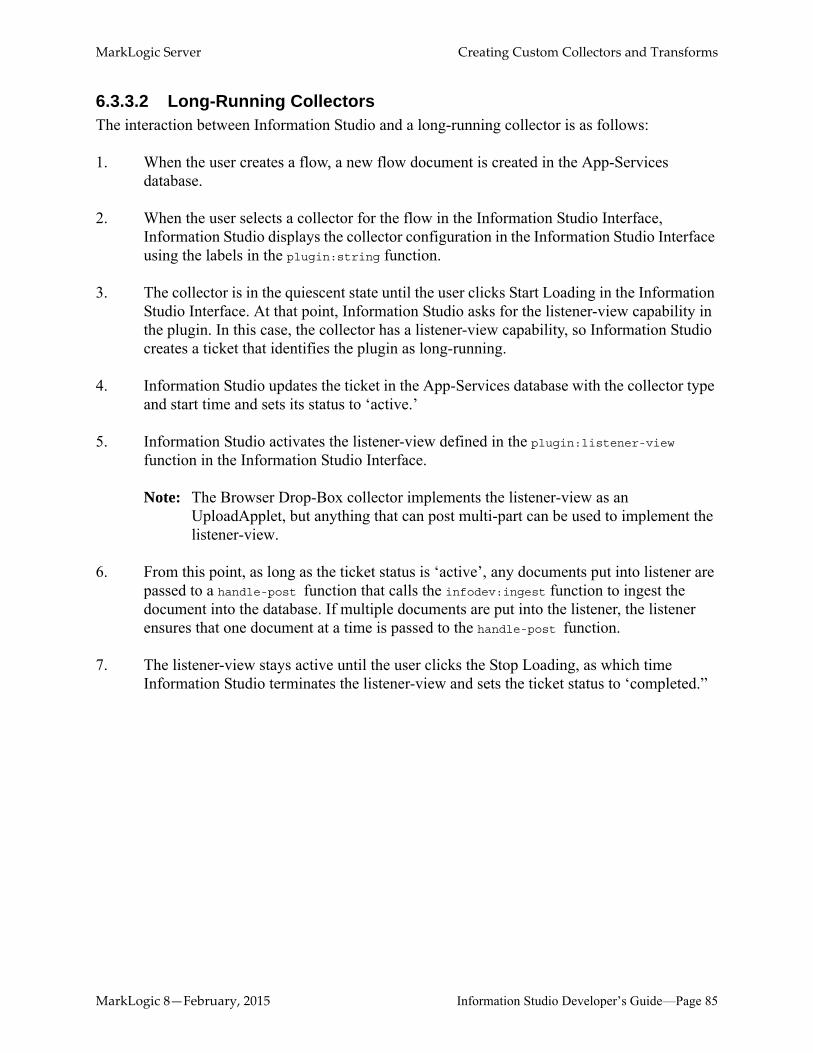
MarkLogic Server Creating Custom Collectors and Transforms
6.3.3.2 Long-Running CollectorsThe interaction between Information Studio and a long-running collector is as follows:
1. When the user creates a flow, a new flow document is created in the App-Services database.
2. When the user selects a collector for the flow in the Information Studio Interface, Information Studio displays the collector configuration in the Information Studio Interface using the labels in the plugin:string function.
3. The collector is in the quiescent state until the user clicks Start Loading in the Information Studio Interface. At that point, Information Studio asks for the listener-view capability in the plugin. In this case, the collector has a listener-view capability, so Information Studio creates a ticket that identifies the plugin as long-running.
4. Information Studio updates the ticket in the App-Services database with the collector type and start time and sets its status to ‘active.’
5. Information Studio activates the listener-view defined in the plugin:listener-view function in the Information Studio Interface.
Note: The Browser Drop-Box collector implements the listener-view as an UploadApplet, but anything that can post multi-part can be used to implement the listener-view.
6. From this point, as long as the ticket status is ‘active’, any documents put into listener are passed to a handle-post function that calls the infodev:ingest function to ingest the document into the database. If multiple documents are put into the listener, the listener ensures that one document at a time is passed to the handle-post function.
7. The listener-view stays active until the user clicks the Stop Loading, as which time Information Studio terminates the listener-view and sets the ticket status to ‘completed.”
MarkLogic 8—February, 2015 Information Studio Developer’s Guide—Page 85
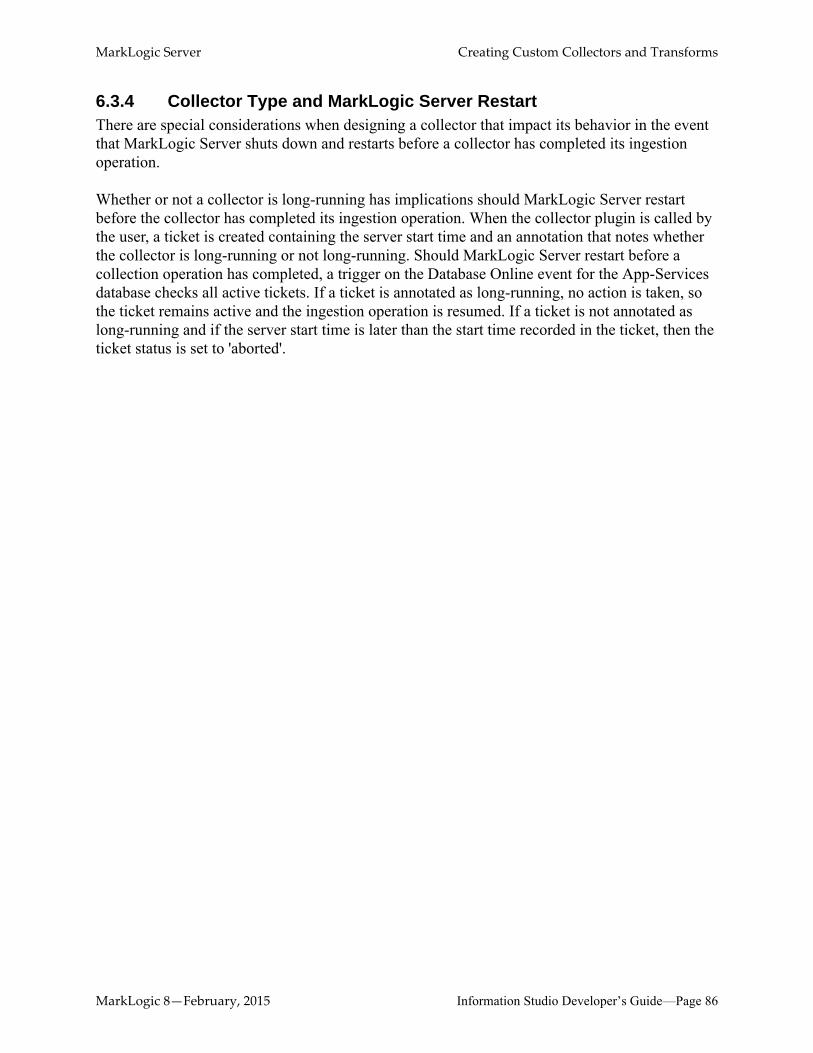
MarkLogic Server Creating Custom Collectors and Transforms
6.3.4 Collector Type and MarkLogic Server RestartThere are special considerations when designing a collector that impact its behavior in the event that MarkLogic Server shuts down and restarts before a collector has completed its ingestion operation.
Whether or not a collector is long-running has implications should MarkLogic Server restart before the collector has completed its ingestion operation. When the collector plugin is called by the user, a ticket is created containing the server start time and an annotation that notes whether the collector is long-running or not long-running. Should MarkLogic Server restart before a collection operation has completed, a trigger on the Database Online event for the App-Services database checks all active tickets. If a ticket is annotated as long-running, no action is taken, so the ticket remains active and the ingestion operation is resumed. If a ticket is not annotated as long-running and if the server start time is later than the start time recorded in the ticket, then the ticket status is set to 'aborted'.
MarkLogic 8—February, 2015 Information Studio Developer’s Guide—Page 86
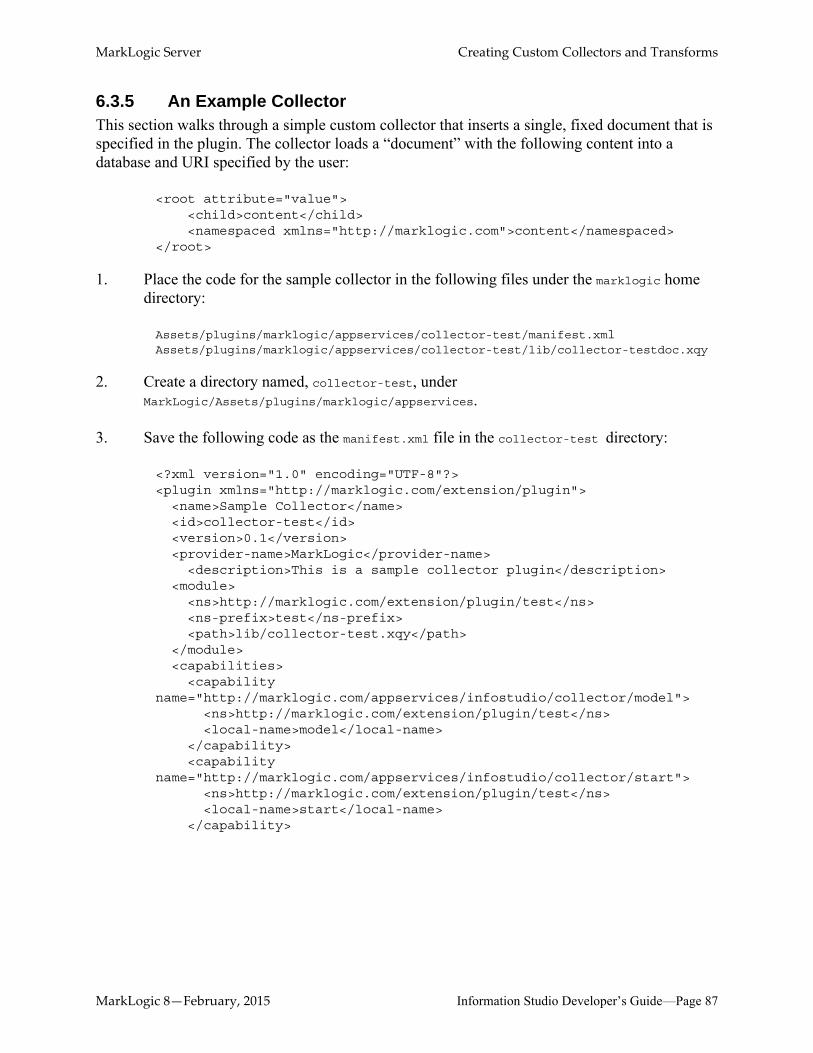
MarkLogic Server Creating Custom Collectors and Transforms
6.3.5 An Example CollectorThis section walks through a simple custom collector that inserts a single, fixed document that is specified in the plugin. The collector loads a “document” with the following content into a database and URI specified by the user:
<root attribute="value"><child>content</child><namespaced xmlns="http://marklogic.com">content</namespaced>
</root>
1. Place the code for the sample collector in the following files under the marklogic home directory:
Assets/plugins/marklogic/appservices/collector-test/manifest.xmlAssets/plugins/marklogic/appservices/collector-test/lib/collector-testdoc.xqy
2. Create a directory named, collector-test, under MarkLogic/Assets/plugins/marklogic/appservices.
3. Save the following code as the manifest.xml file in the collector-test directory:
<?xml version="1.0" encoding="UTF-8"?><plugin xmlns="http://marklogic.com/extension/plugin">
<name>Sample Collector</name> <id>collector-test</id> <version>0.1</version> <provider-name>MarkLogic</provider-name>
<description>This is a sample collector plugin</description><module>
<ns>http://marklogic.com/extension/plugin/test</ns> <ns-prefix>test</ns-prefix><path>lib/collector-test.xqy</path>
</module><capabilities>
<capability name="http://marklogic.com/appservices/infostudio/collector/model">
<ns>http://marklogic.com/extension/plugin/test</ns> <local-name>model</local-name>
</capability><capability
name="http://marklogic.com/appservices/infostudio/collector/start"><ns>http://marklogic.com/extension/plugin/test</ns><local-name>start</local-name>
</capability>
MarkLogic 8—February, 2015 Information Studio Developer’s Guide—Page 87
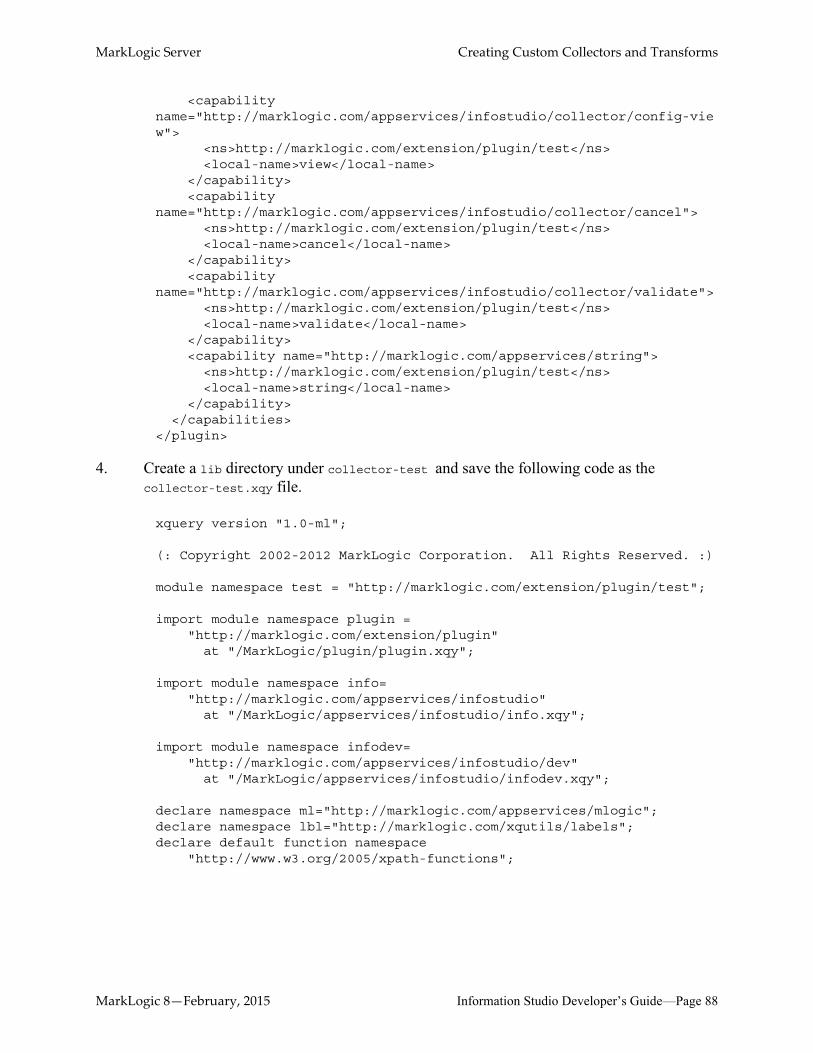
MarkLogic Server Creating Custom Collectors and Transforms
<capability name="http://marklogic.com/appservices/infostudio/collector/config-view">
<ns>http://marklogic.com/extension/plugin/test</ns><local-name>view</local-name>
</capability><capability
name="http://marklogic.com/appservices/infostudio/collector/cancel"><ns>http://marklogic.com/extension/plugin/test</ns><local-name>cancel</local-name>
</capability><capability
name="http://marklogic.com/appservices/infostudio/collector/validate"><ns>http://marklogic.com/extension/plugin/test</ns><local-name>validate</local-name>
</capability><capability name="http://marklogic.com/appservices/string">
<ns>http://marklogic.com/extension/plugin/test</ns><local-name>string</local-name>
</capability></capabilities>
</plugin>
4. Create a lib directory under collector-test and save the following code as the collector-test.xqy file.
xquery version "1.0-ml";
(: Copyright 2002-2012 MarkLogic Corporation. All Rights Reserved. :)
module namespace test = "http://marklogic.com/extension/plugin/test";
import module namespace plugin ="http://marklogic.com/extension/plugin"
at "/MarkLogic/plugin/plugin.xqy";
import module namespace info="http://marklogic.com/appservices/infostudio"
at "/MarkLogic/appservices/infostudio/info.xqy";
import module namespace infodev="http://marklogic.com/appservices/infostudio/dev"
at "/MarkLogic/appservices/infostudio/infodev.xqy";
declare namespace ml="http://marklogic.com/appservices/mlogic";declare namespace lbl="http://marklogic.com/xqutils/labels";declare default function namespace
"http://www.w3.org/2005/xpath-functions";
MarkLogic 8—February, 2015 Information Studio Developer’s Guide—Page 88
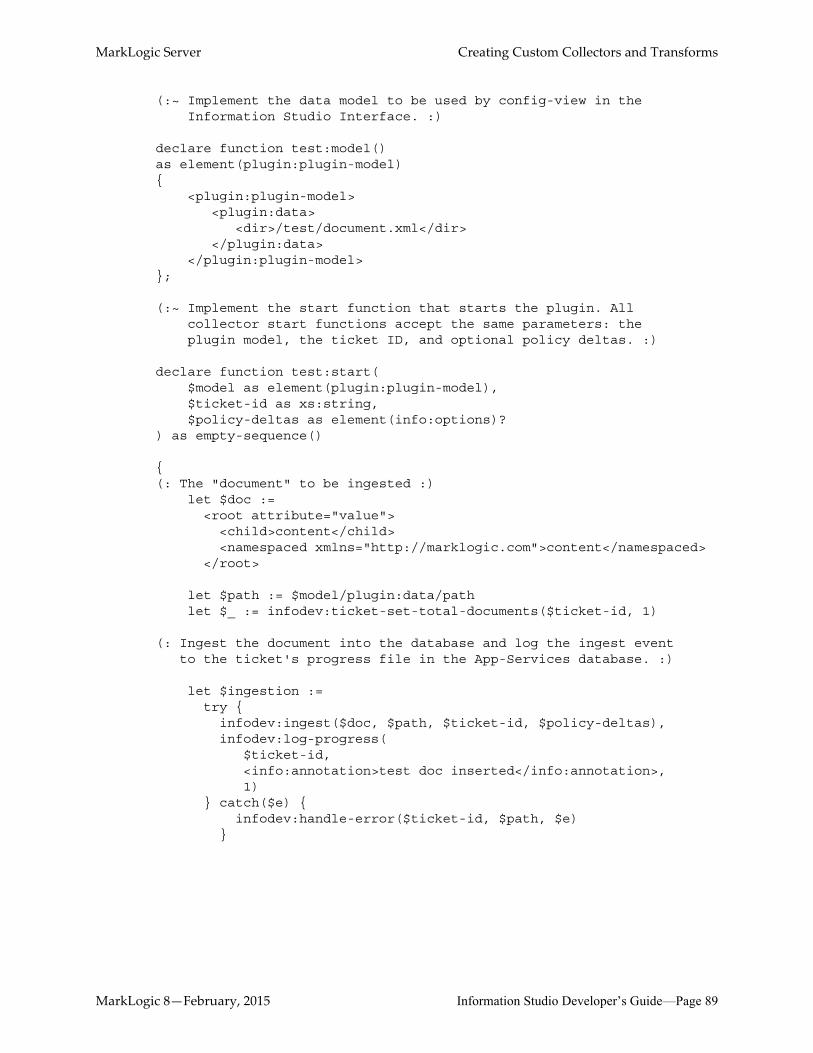
MarkLogic Server Creating Custom Collectors and Transforms
(:~ Implement the data model to be used by config-view in theInformation Studio Interface. :)
declare function test:model() as element(plugin:plugin-model) {
<plugin:plugin-model><plugin:data>
<dir>/test/document.xml</dir></plugin:data>
</plugin:plugin-model>};
(:~ Implement the start function that starts the plugin. All collector start functions accept the same parameters: the plugin model, the ticket ID, and optional policy deltas. :)
declare function test:start($model as element(plugin:plugin-model),$ticket-id as xs:string,$policy-deltas as element(info:options)?
) as empty-sequence()
{(: The "document" to be ingested :)
let $doc :=<root attribute="value"><child>content</child><namespaced xmlns="http://marklogic.com">content</namespaced>
</root>
let $path := $model/plugin:data/pathlet $_ := infodev:ticket-set-total-documents($ticket-id, 1)
(: Ingest the document into the database and log the ingest eventto the ticket's progress file in the App-Services database. :)
let $ingestion :=try {infodev:ingest($doc, $path, $ticket-id, $policy-deltas),infodev:log-progress(
$ticket-id, <info:annotation>test doc inserted</info:annotation>,1)
} catch($e) {infodev:handle-error($ticket-id, $path, $e)
}
MarkLogic 8—February, 2015 Information Studio Developer’s Guide—Page 89
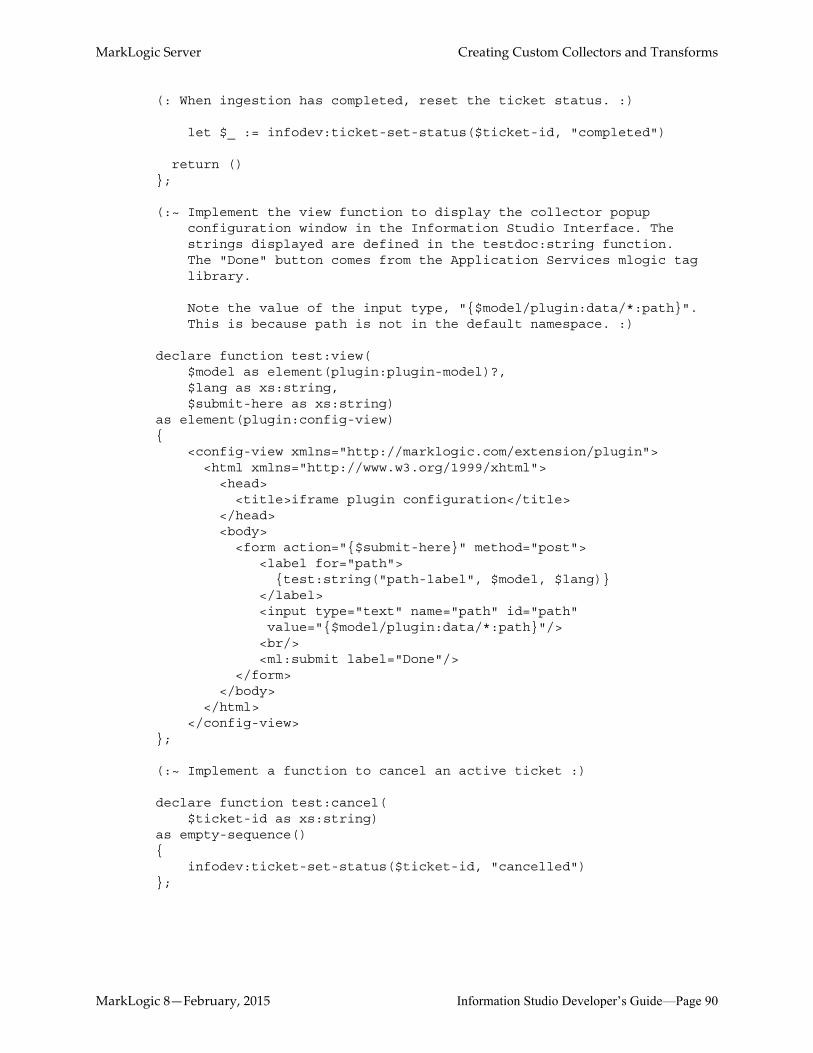
MarkLogic Server Creating Custom Collectors and Transforms
(: When ingestion has completed, reset the ticket status. :)
let $_ := infodev:ticket-set-status($ticket-id, "completed")
return ()};
(:~ Implement the view function to display the collector popupconfiguration window in the Information Studio Interface. Thestrings displayed are defined in the testdoc:string function. The "Done" button comes from the Application Services mlogic taglibrary.
Note the value of the input type, "{$model/plugin:data/*:path}".This is because path is not in the default namespace. :)
declare function test:view($model as element(plugin:plugin-model)?, $lang as xs:string, $submit-here as xs:string)
as element(plugin:config-view){
<config-view xmlns="http://marklogic.com/extension/plugin"><html xmlns="http://www.w3.org/1999/xhtml"><head>
<title>iframe plugin configuration</title></head><body>
<form action="{$submit-here}" method="post"><label for="path">
{test:string("path-label", $model, $lang)}</label><input type="text" name="path" id="path" value="{$model/plugin:data/*:path}"/>
<br/><ml:submit label="Done"/>
</form></body>
</html></config-view>
};
(:~ Implement a function to cancel an active ticket :)
declare function test:cancel($ticket-id as xs:string)
as empty-sequence(){
infodev:ticket-set-status($ticket-id, "cancelled")};
MarkLogic 8—February, 2015 Information Studio Developer’s Guide—Page 90
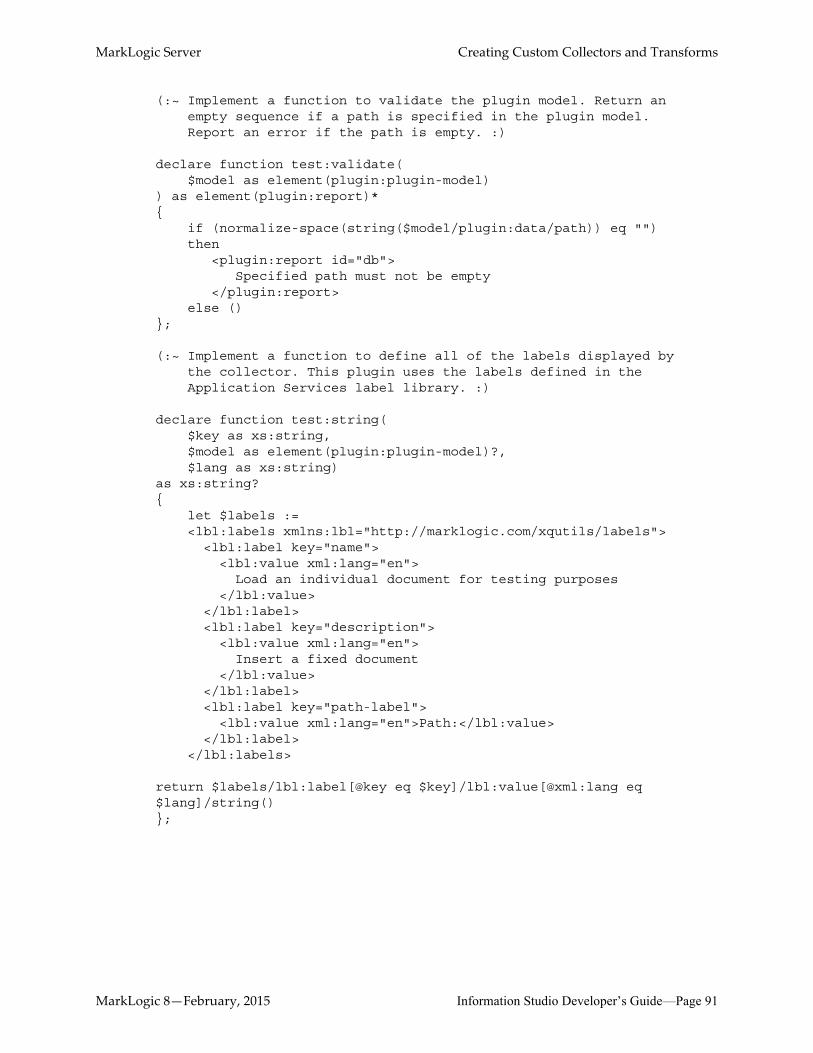
MarkLogic Server Creating Custom Collectors and Transforms
(:~ Implement a function to validate the plugin model. Return an empty sequence if a path is specified in the plugin model.Report an error if the path is empty. :)
declare function test:validate($model as element(plugin:plugin-model)
) as element(plugin:report)*{
if (normalize-space(string($model/plugin:data/path)) eq "")then
<plugin:report id="db">Specified path must not be empty
</plugin:report>else ()
};
(:~ Implement a function to define all of the labels displayed by the collector. This plugin uses the labels defined in the Application Services label library. :)
declare function test:string($key as xs:string,$model as element(plugin:plugin-model)?, $lang as xs:string)
as xs:string?{
let $labels :=<lbl:labels xmlns:lbl="http://marklogic.com/xqutils/labels">
<lbl:label key="name"><lbl:value xml:lang="en">
Load an individual document for testing purposes</lbl:value>
</lbl:label><lbl:label key="description"><lbl:value xml:lang="en">
Insert a fixed document</lbl:value>
</lbl:label><lbl:label key="path-label"><lbl:value xml:lang="en">Path:</lbl:value>
</lbl:label></lbl:labels>
return $labels/lbl:label[@key eq $key]/lbl:value[@xml:lang eq $lang]/string()};
MarkLogic 8—February, 2015 Information Studio Developer’s Guide—Page 91
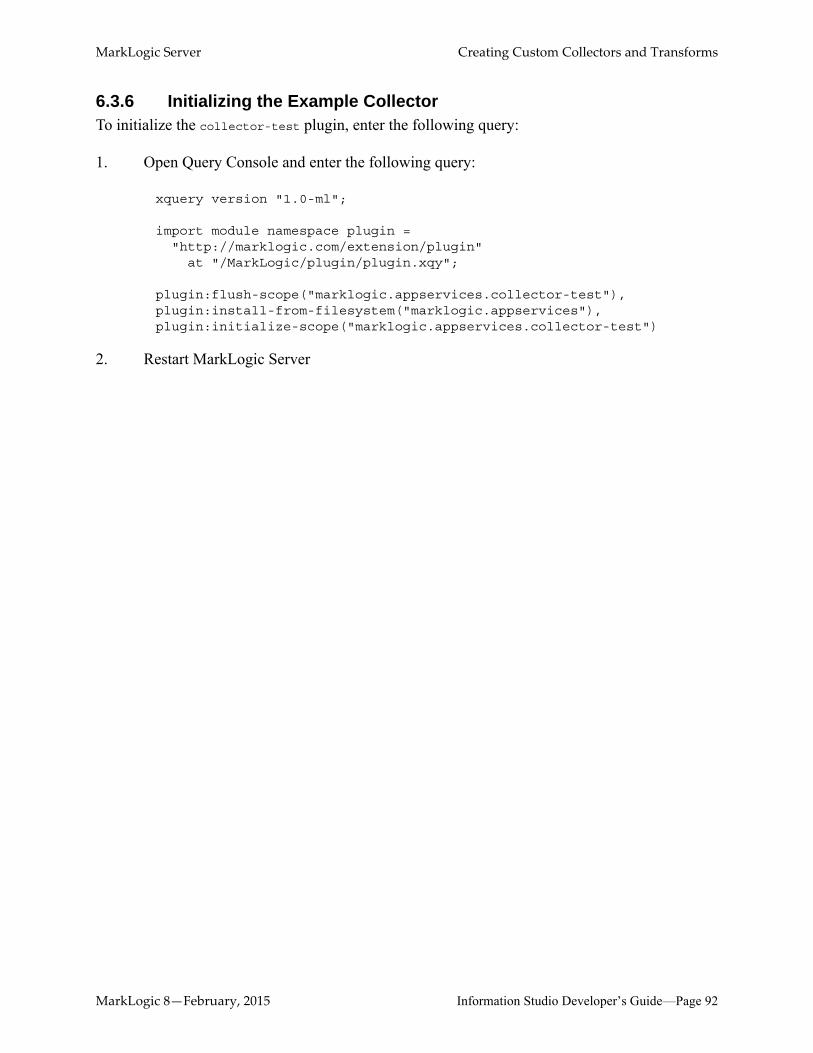
MarkLogic Server Creating Custom Collectors and Transforms
6.3.6 Initializing the Example CollectorTo initialize the collector-test plugin, enter the following query:
1. Open Query Console and enter the following query:
xquery version "1.0-ml";
import module namespace plugin ="http://marklogic.com/extension/plugin"
at "/MarkLogic/plugin/plugin.xqy";
plugin:flush-scope("marklogic.appservices.collector-test"), plugin:install-from-filesystem("marklogic.appservices"), plugin:initialize-scope("marklogic.appservices.collector-test")
2. Restart MarkLogic Server
MarkLogic 8—February, 2015 Information Studio Developer’s Guide—Page 92

MarkLogic Server Creating Custom Collectors and Transforms
6.4 Creating Custom TransformsThis section describes how to create custom transforms. Transforms utilize MarkLogic Server Content Processing Framework (CPF) to modify one document at a time as it is loaded into the database. Information Studio automatically configures CPF domains, pipelines, and triggers on the Fab database for each transform. A transformation process must be linear, so branching and conditional operations are not possible.
The main topics in this section are:
• Transform Capabilities and Function Signatures
• Transform Interaction with Information Studio
• An Example Transform
6.4.1 Transform Capabilities and Function SignaturesAll transforms must do the following:
• Define a data model that specifies the data to be passed to the compile function.
• Define a configuration view to display the transform configuration window in the UI.
• Define a compile function that modifies the data in the model.
• Define a string function that specifies all of the labels needed for display.
The following table describes all of the available transform capabilities and the function signatures used by plugins to implement the capabilities.
Capability Description
model The data model for the UI. This represents the data to be passed into the plugin:compile function. Currently, model is not used by Information Studio. However future versions will require this capability, so it is recommended that you implement a model to ensure forward compatibility of your plugin.
Function signature:
plugin:model() as element(plugin:plugin-model)
MarkLogic 8—February, 2015 Information Studio Developer’s Guide—Page 93
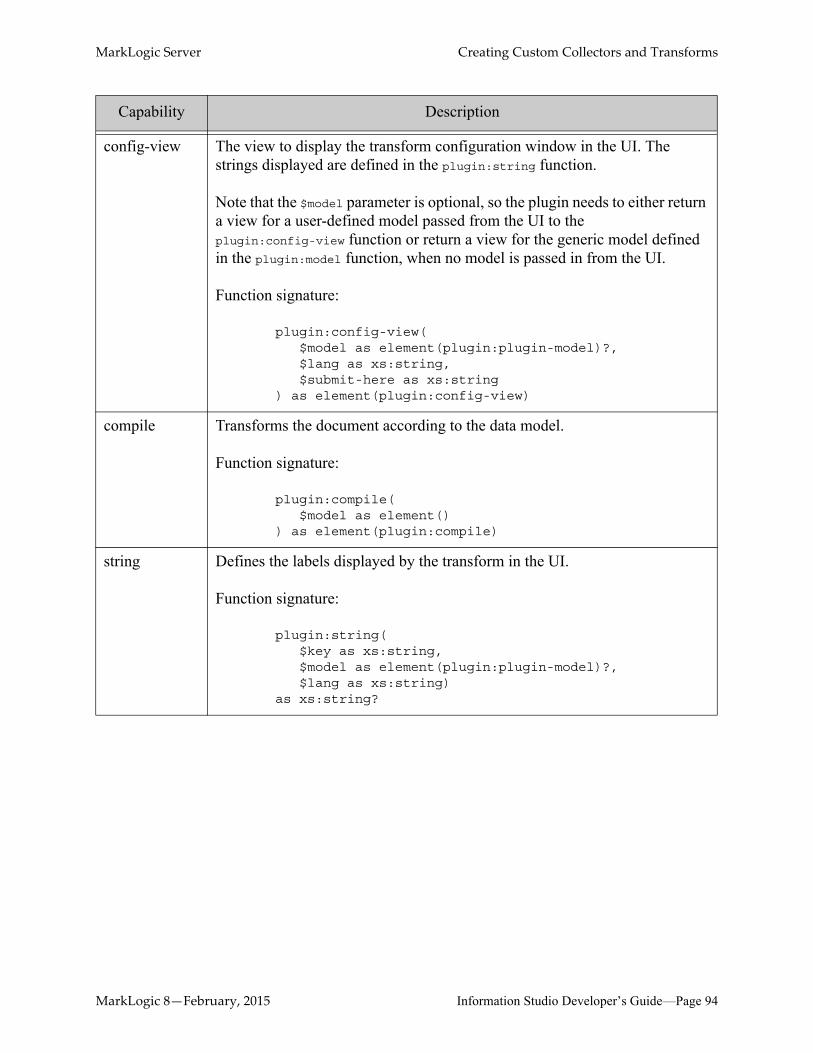
MarkLogic Server Creating Custom Collectors and Transforms
config-view The view to display the transform configuration window in the UI. The strings displayed are defined in the plugin:string function.
Note that the $model parameter is optional, so the plugin needs to either return a view for a user-defined model passed from the UI to the plugin:config-view function or return a view for the generic model defined in the plugin:model function, when no model is passed in from the UI.
Function signature:
plugin:config-view($model as element(plugin:plugin-model)?,$lang as xs:string,$submit-here as xs:string
) as element(plugin:config-view)
compile Transforms the document according to the data model.
Function signature:
plugin:compile($model as element()
) as element(plugin:compile)
string Defines the labels displayed by the transform in the UI.
Function signature:
plugin:string($key as xs:string, $model as element(plugin:plugin-model)?, $lang as xs:string)
as xs:string?
Capability Description
MarkLogic 8—February, 2015 Information Studio Developer’s Guide—Page 94
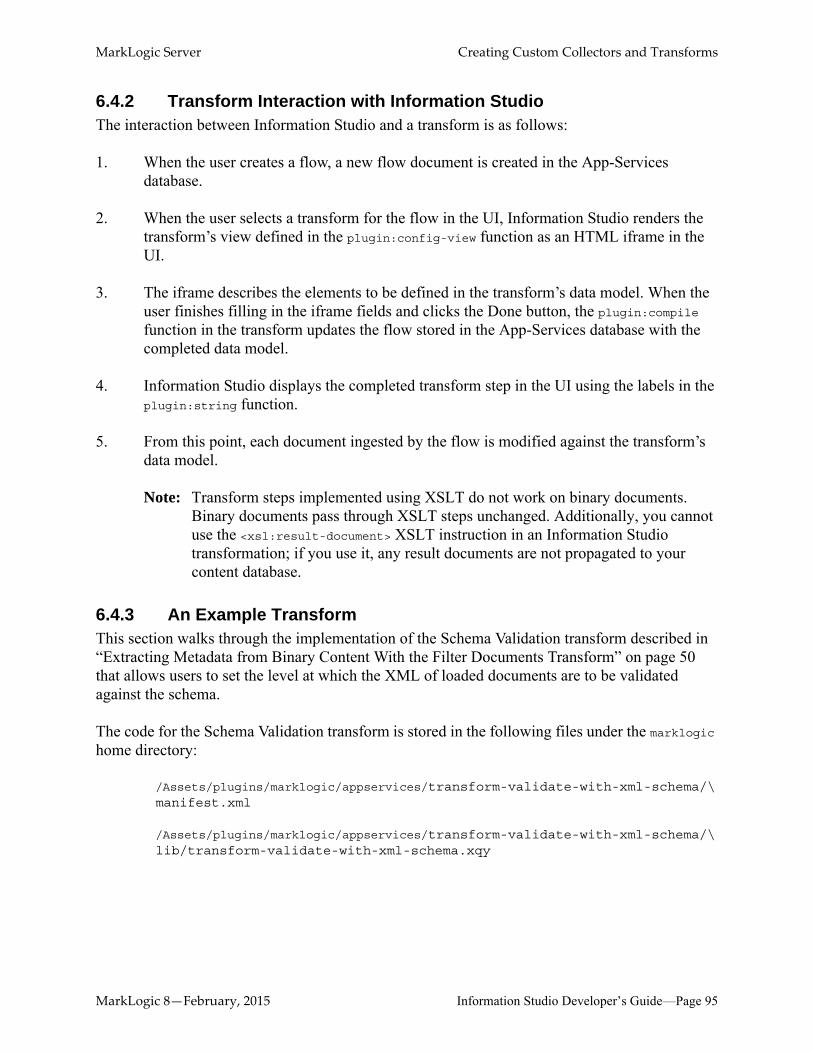
MarkLogic Server Creating Custom Collectors and Transforms
6.4.2 Transform Interaction with Information StudioThe interaction between Information Studio and a transform is as follows:
1. When the user creates a flow, a new flow document is created in the App-Services database.
2. When the user selects a transform for the flow in the UI, Information Studio renders the transform’s view defined in the plugin:config-view function as an HTML iframe in the UI.
3. The iframe describes the elements to be defined in the transform’s data model. When the user finishes filling in the iframe fields and clicks the Done button, the plugin:compile function in the transform updates the flow stored in the App-Services database with the completed data model.
4. Information Studio displays the completed transform step in the UI using the labels in the plugin:string function.
5. From this point, each document ingested by the flow is modified against the transform’s data model.
Note: Transform steps implemented using XSLT do not work on binary documents. Binary documents pass through XSLT steps unchanged. Additionally, you cannot use the <xsl:result-document> XSLT instruction in an Information Studio transformation; if you use it, any result documents are not propagated to your content database.
6.4.3 An Example TransformThis section walks through the implementation of the Schema Validation transform described in “Extracting Metadata from Binary Content With the Filter Documents Transform” on page 50 that allows users to set the level at which the XML of loaded documents are to be validated against the schema.
The code for the Schema Validation transform is stored in the following files under the marklogic home directory:
/Assets/plugins/marklogic/appservices/transform-validate-with-xml-schema/\manifest.xml
/Assets/plugins/marklogic/appservices/transform-validate-with-xml-schema/\lib/transform-validate-with-xml-schema.xqy
MarkLogic 8—February, 2015 Information Studio Developer’s Guide—Page 95
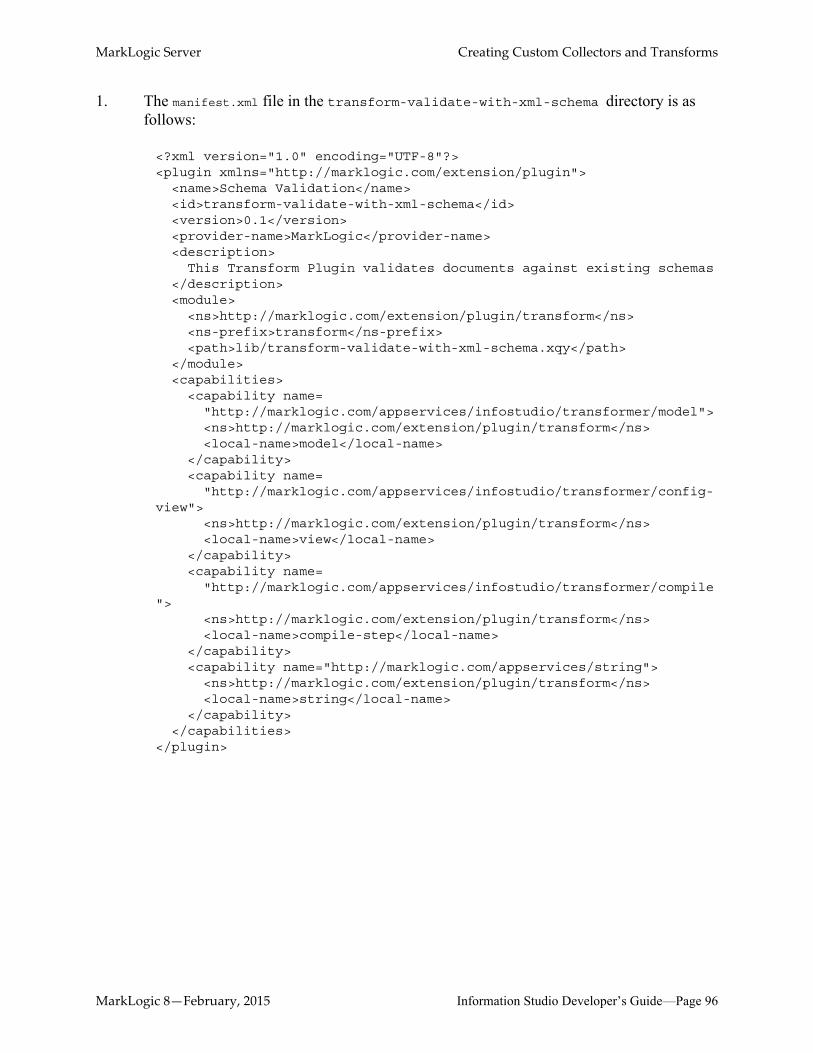
MarkLogic Server Creating Custom Collectors and Transforms
1. The manifest.xml file in the transform-validate-with-xml-schema directory is as follows:
<?xml version="1.0" encoding="UTF-8"?><plugin xmlns="http://marklogic.com/extension/plugin">
<name>Schema Validation</name><id>transform-validate-with-xml-schema</id><version>0.1</version><provider-name>MarkLogic</provider-name><description>
This Transform Plugin validates documents against existing schemas</description><module>
<ns>http://marklogic.com/extension/plugin/transform</ns><ns-prefix>transform</ns-prefix><path>lib/transform-validate-with-xml-schema.xqy</path>
</module><capabilities>
<capability name="http://marklogic.com/appservices/infostudio/transformer/model"><ns>http://marklogic.com/extension/plugin/transform</ns><local-name>model</local-name>
</capability><capability name=
"http://marklogic.com/appservices/infostudio/transformer/config-view">
<ns>http://marklogic.com/extension/plugin/transform</ns><local-name>view</local-name>
</capability><capability name=
"http://marklogic.com/appservices/infostudio/transformer/compile">
<ns>http://marklogic.com/extension/plugin/transform</ns><local-name>compile-step</local-name>
</capability><capability name="http://marklogic.com/appservices/string">
<ns>http://marklogic.com/extension/plugin/transform</ns><local-name>string</local-name>
</capability></capabilities>
</plugin>
MarkLogic 8—February, 2015 Information Studio Developer’s Guide—Page 96
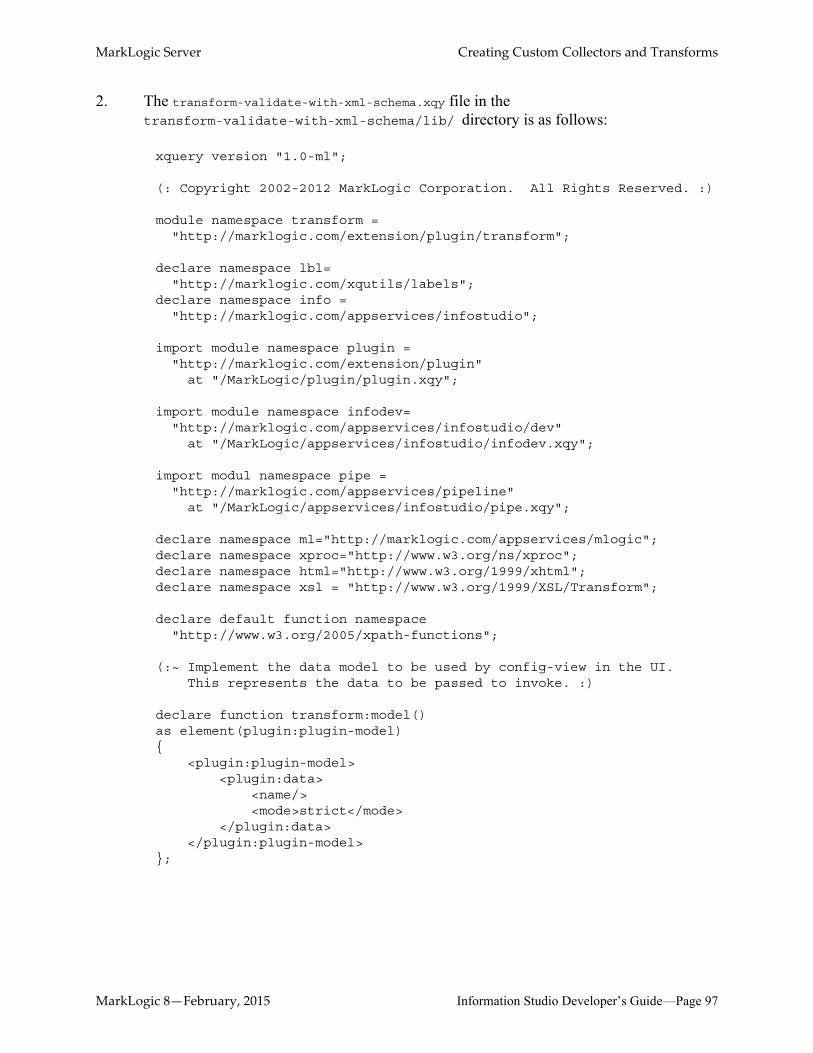
MarkLogic Server Creating Custom Collectors and Transforms
2. The transform-validate-with-xml-schema.xqy file in the transform-validate-with-xml-schema/lib/ directory is as follows:
xquery version "1.0-ml";
(: Copyright 2002-2012 MarkLogic Corporation. All Rights Reserved. :)
module namespace transform ="http://marklogic.com/extension/plugin/transform";
declare namespace lbl="http://marklogic.com/xqutils/labels";
declare namespace info ="http://marklogic.com/appservices/infostudio";
import module namespace plugin ="http://marklogic.com/extension/plugin"
at "/MarkLogic/plugin/plugin.xqy";
import module namespace infodev="http://marklogic.com/appservices/infostudio/dev"
at "/MarkLogic/appservices/infostudio/infodev.xqy";
import modul namespace pipe ="http://marklogic.com/appservices/pipeline"
at "/MarkLogic/appservices/infostudio/pipe.xqy";
declare namespace ml="http://marklogic.com/appservices/mlogic";declare namespace xproc="http://www.w3.org/ns/xproc";declare namespace html="http://www.w3.org/1999/xhtml";declare namespace xsl = "http://www.w3.org/1999/XSL/Transform";
declare default function namespace"http://www.w3.org/2005/xpath-functions";
(:~ Implement the data model to be used by config-view in the UI. This represents the data to be passed to invoke. :)
declare function transform:model() as element(plugin:plugin-model){
<plugin:plugin-model><plugin:data>
<name/><mode>strict</mode>
</plugin:data></plugin:plugin-model>
};
MarkLogic 8—February, 2015 Information Studio Developer’s Guide—Page 97
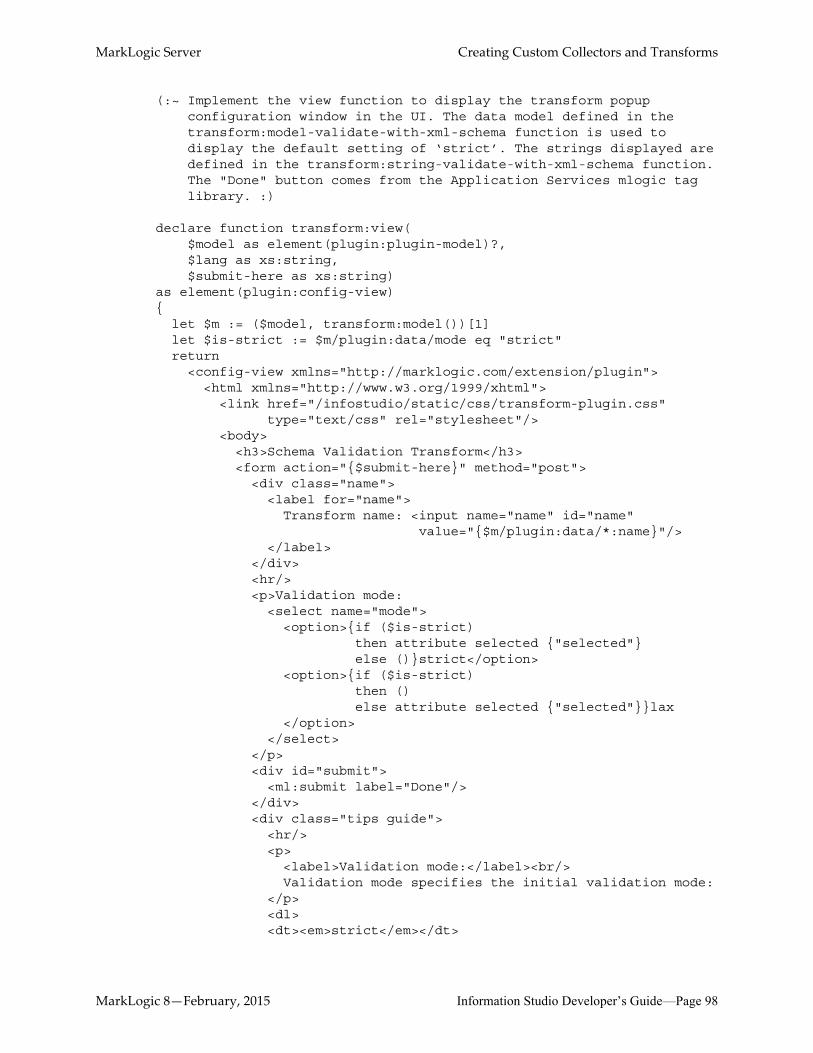
MarkLogic Server Creating Custom Collectors and Transforms
(:~ Implement the view function to display the transform popupconfiguration window in the UI. The data model defined in thetransform:model-validate-with-xml-schema function is used todisplay the default setting of ‘strict’. The strings displayed aredefined in the transform:string-validate-with-xml-schema function.The "Done" button comes from the Application Services mlogic taglibrary. :)
declare function transform:view($model as element(plugin:plugin-model)?,$lang as xs:string,$submit-here as xs:string)
as element(plugin:config-view){
let $m := ($model, transform:model())[1]let $is-strict := $m/plugin:data/mode eq "strict"return
<config-view xmlns="http://marklogic.com/extension/plugin"><html xmlns="http://www.w3.org/1999/xhtml"><link href="/infostudio/static/css/transform-plugin.css"
type="text/css" rel="stylesheet"/><body>
<h3>Schema Validation Transform</h3><form action="{$submit-here}" method="post">
<div class="name"><label for="name">
Transform name: <input name="name" id="name"value="{$m/plugin:data/*:name}"/>
</label></div><hr/><p>Validation mode:
<select name="mode"><option>{if ($is-strict)
then attribute selected {"selected"} else ()}strict</option>
<option>{if ($is-strict)then ()else attribute selected {"selected"}}lax
</option></select>
</p><div id="submit">
<ml:submit label="Done"/></div><div class="tips guide">
<hr/><p>
<label>Validation mode:</label><br/>Validation mode specifies the initial validation mode:
</p><dl><dt><em>strict</em></dt>
MarkLogic 8—February, 2015 Information Studio Developer’s Guide—Page 98
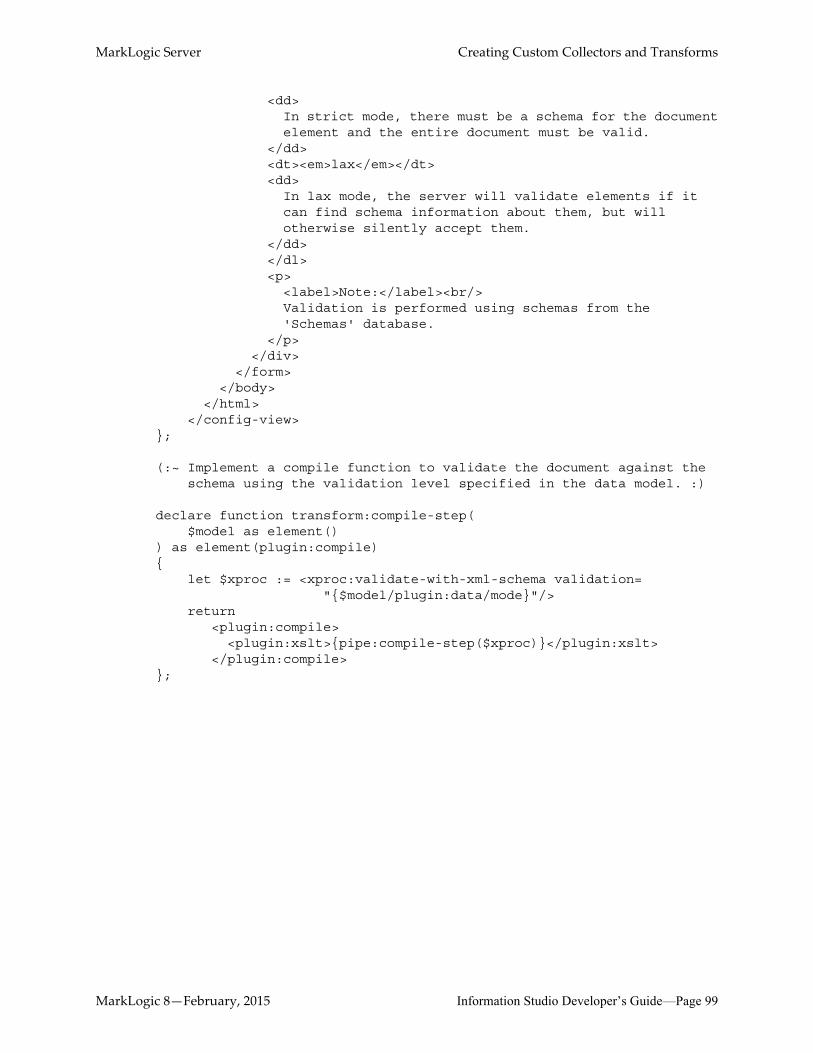
MarkLogic Server Creating Custom Collectors and Transforms
<dd>In strict mode, there must be a schema for the documentelement and the entire document must be valid.
</dd><dt><em>lax</em></dt><dd>
In lax mode, the server will validate elements if itcan find schema information about them, but willotherwise silently accept them.
</dd></dl><p>
<label>Note:</label><br/>Validation is performed using schemas from the'Schemas' database.
</p></div>
</form></body>
</html></config-view>
};
(:~ Implement a compile function to validate the document against theschema using the validation level specified in the data model. :)
declare function transform:compile-step($model as element()
) as element(plugin:compile){
let $xproc := <xproc:validate-with-xml-schema validation="{$model/plugin:data/mode}"/>
return<plugin:compile><plugin:xslt>{pipe:compile-step($xproc)}</plugin:xslt>
</plugin:compile>};
MarkLogic 8—February, 2015 Information Studio Developer’s Guide—Page 99
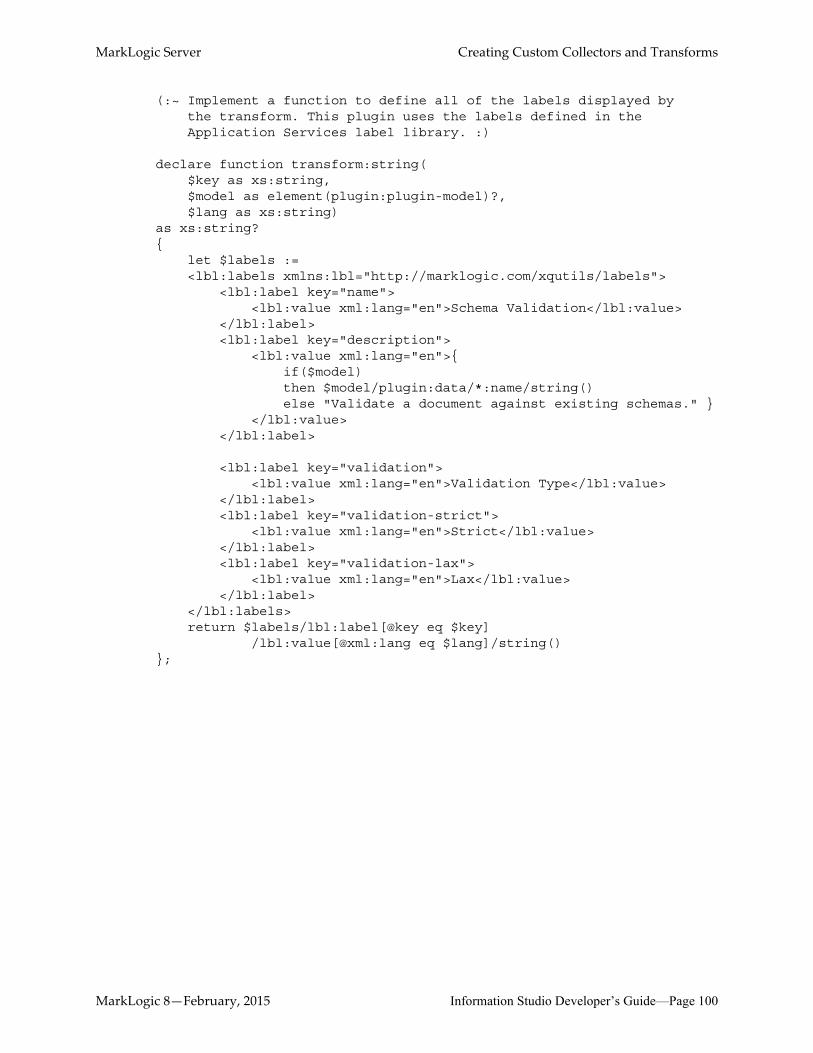
MarkLogic Server Creating Custom Collectors and Transforms
(:~ Implement a function to define all of the labels displayed by the transform. This plugin uses the labels defined in the Application Services label library. :)
declare function transform:string($key as xs:string,$model as element(plugin:plugin-model)?,$lang as xs:string)
as xs:string?{
let $labels :=<lbl:labels xmlns:lbl="http://marklogic.com/xqutils/labels">
<lbl:label key="name"><lbl:value xml:lang="en">Schema Validation</lbl:value>
</lbl:label><lbl:label key="description">
<lbl:value xml:lang="en">{ if($model)then $model/plugin:data/*:name/string()else "Validate a document against existing schemas." }
</lbl:value></lbl:label>
<lbl:label key="validation"><lbl:value xml:lang="en">Validation Type</lbl:value>
</lbl:label><lbl:label key="validation-strict">
<lbl:value xml:lang="en">Strict</lbl:value></lbl:label><lbl:label key="validation-lax">
<lbl:value xml:lang="en">Lax</lbl:value></lbl:label>
</lbl:labels>return $labels/lbl:label[@key eq $key]
/lbl:value[@xml:lang eq $lang]/string()};
MarkLogic 8—February, 2015 Information Studio Developer’s Guide—Page 100
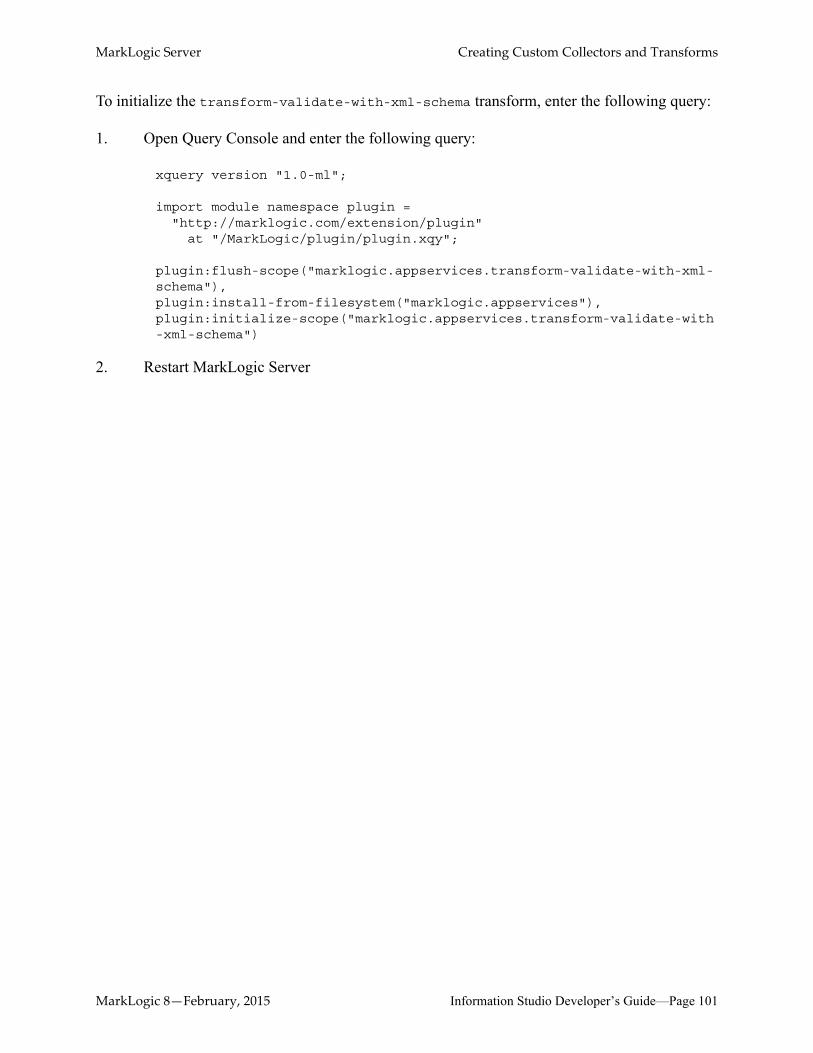
MarkLogic Server Creating Custom Collectors and Transforms
To initialize the transform-validate-with-xml-schema transform, enter the following query:
1. Open Query Console and enter the following query:
xquery version "1.0-ml";
import module namespace plugin ="http://marklogic.com/extension/plugin"
at "/MarkLogic/plugin/plugin.xqy";
plugin:flush-scope("marklogic.appservices.transform-validate-with-xml-schema"), plugin:install-from-filesystem("marklogic.appservices"), plugin:initialize-scope("marklogic.appservices.transform-validate-with-xml-schema")
2. Restart MarkLogic Server
MarkLogic 8—February, 2015 Information Studio Developer’s Guide—Page 101
MarkLogic Server Technical Support
MarkLogic 8
7.0 Technical Support102
MarkLogic provides technical support according to the terms detailed in your Software License Agreement or End User License Agreement.
We invite you to visit our support website at http://help.marklogic.com to access information on known and fixed issues, knowledge base articles, and more. For licensed customers with an active maintenance contract, see the Support Handbook for instructions on registering support contacts and on working with the MarkLogic Technical Support team.
Complete product documentation, the latest product release downloads, and other useful information is available for all developers at http://developer.marklogic.com. For general questions, join the general discussion mailing list, open to all MarkLogic developers.
MarkLogic Server Copyright
MarkLogic 8
8.0 Copyright999
MarkLogic Server 8.0 and supporting products.
NOTICECopyright © 2018 MarkLogic Corporation.
This technology is protected by one or more U.S. Patents 7,127,469, 7,171,404, 7,756,858, 7,962,474, 8,935,267, 8,892,599 and 9,092,507.
All MarkLogic software products are protected by United States and international copyright, patent and other intellectual property laws, and incorporate certain third party libraries and components which are subject to the attributions, terms, conditions and disclaimers found at http://docs.marklogic.com/guide/copyright/legal.
MarkLogic and the MarkLogic logo are trademarks or registered trademarks of MarkLogic Corporation in the United States and other countries. All other trademarks are property of their respective owners.
For all copyright notices, including third-party copyright notices, see the Combined Product Notices for your version of MarkLogic.