Embed Size (px)
Citation preview

12
NOTES:
Compiled For Cambridgeshire Scouts September2013
Information Booklet 3
Basic Pioneering

2
It is important that you read this before attempting any Pioneering Project. Pioneering can be both enjoyable, and rewarding, learning the different knots and lashing can be daunting at first. Once learnt the number of things you can do with this new found skill is almost endless. Remember before you start any pioneering project, no matter how small, you must first consider all the SAFETY aspects ;
Is your equipment in good condition and suitable to your project.
Are you competent enough to do the job, or do you need someone better trained to help
Although pioneering is fun, it is not without risk and should always be undertaken with proper supervision. You must never start any pioneering project with out do-ing a doing a RISK ASSESSMENT. HOW to START. Firstly, it is necessary to know how to tie the required knots and lashings; sec-ondly, you must have spars or poles from which to build your project. The next consideration is ropes and pulleys to bridge and secure your project and lastly some know how and loads of common sense. Each project should be ap-proached in a logical way
What are we trying to do
What equipment do we have
What is the best way to use this equipment
Designing the project
Planning the steps to complete the project
Testing and safety
Dismantling the project Every project should be approached in this way. The designs suggested are tried and tested however you rarely find a level river bed or trees in the right places for rope bridges etc. so each of the basic designs suggested will have to be modified to suit the conditions you encounter. THE BASICS—Ropes Ropes come in many types and sizes and to simplify matters you should use the following as a guide. 75mm rope (25 mm diameter) or larger, certainly no smaller than 75mm, should be used whenever it is intended to hold weight such as in the case of a monkey bridge - foot and hand rails, aerial runways, and commando rope bridges. 50 mm rope (16 mm diameter) should be used for ‘reeving’ up pulleys and an-
Basic Pioneering
11
should be protected by means of a safety belt and fixed loops on to the main tree. You should also be careful when using tools on the platform so that those on the ground are not injured from items falling on their heads. Once the platform is constructed you can then consider building the rest of the structure.
Now for the next stage. With your confidence growing you might like to try your hand at the following
Out Back Bridge
Friction Bridge No lashings are used in the construction, you rely rather on the friction and tension of each log in the bridge to hold the structure together
Square Tower
10
stable. These pyramids are then locked together to make more complex structures. It is important how-ever that you maintain the pyramid shape in your de-sign as it adds stability to the final project. It may also be necessary to peg down the structure to the ground in case of windy conditions.
Why not try some fun Projects first The first step in building a tree house or sleeping platform is to find a suitable tree or collection of trees growing in a group. Look for a tree that has branches which are strong and suitably spread apart so that a platform can be con-structed. Gather together all the equip-ment you will require - tools, timber, pal-lets or plywood sheeting, ropes and safety equipment. The design of your tree house will be determined by the shape of the tree you select, as a result many designs are possible. Start off by making a simple sketch taking into account the branches available in particular the ‘branch elbows’ where the branch at-taches itself to the main trunk. Use pulleys and ropes to lift logs up to Tree houses and raised sleeping platforms the platform area. This should be done carefully so as to avoid any unnecessary acci-dents. The base of the platform can be constructed using spars to get a rustic feel or you can also use a number of pallets or a sheet of shuttering plywood. Be prepared to cut any sheeting to shape. Anyone working up the tree
3
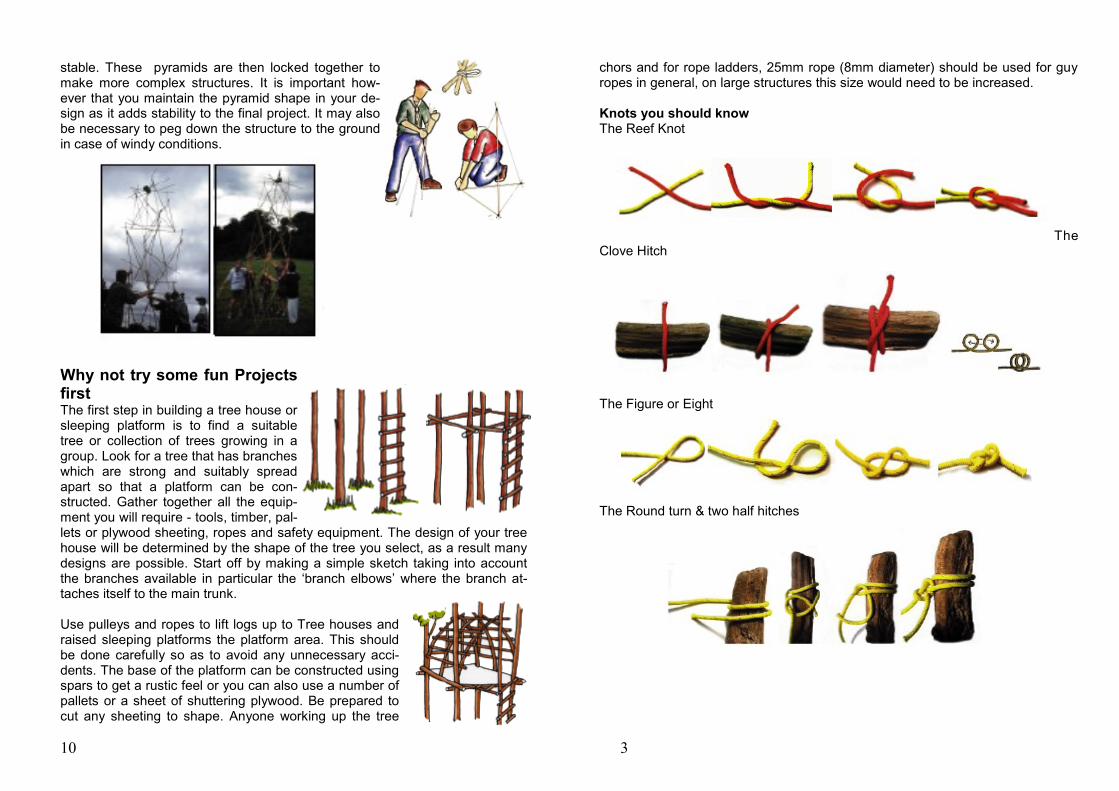
chors and for rope ladders, 25mm rope (8mm diameter) should be used for guy ropes in general, on large structures this size would need to be increased. Knots you should know The Reef Knot
The Clove Hitch
The Figure or Eight The Round turn & two half hitches

4
The Timber Hitch , For securing logs normally for pulling out or as an alterna-tive to a clove hitch for starting a lashing. Lashing you need Lashing use a method of 'wrapping' the rope around the spars, this 'wrapping' is called binding. The binding of the spars coupled with frapping - binding be-tween the spars so as to tighten the bindings - create the lashing. There are four types of lashing - square, diagonal, sheer, tripod. Each lashing has a spe-cific use and its strengths are best realised by using the correct lashing at each stage of the project. When lashing spars together it's important to use ropes of the correct thickness and length. For staves and spars up to 30 mm in diameter, use sisal. For spars up to 75mm in diameter use light rope. As to length, 1 meter of rope for each 25mm of the combined diameter of the spars. For example, when using timbers of 75mm - 100mm spars you will need approx. 7 meters of rope per lashing. Square Lashings The square lashing is used whenever spars cross at right angles to each other. There are three common types of lashings used in this way. The tradi-tional square lashing, the Japanese square lashing, and the Norwegian square lashing. Traditional Square Lashing This lashing is started by tying a clove hitch to the upright spar under the spar crossing it. The lashing is then bound as shown completing 4 - 5 turns and with the bindings side by side. Frapping should then be applied between the spars so as to tighten the bindings. The lashing is finished with a clove hitch around the cross spar.
9
spar you should be careful not to damage the bark. This can be done by using some sacking or old canvas to protect the bark from friction. It may also be necessary to use sacking or padding on a structure if the rope will be subject to excessive friction, particularly in the case of a monkey bridge. This is par-
ticularly important when using synthetic ropes as they are prone to melt if in a friction situation or if two ropes are rubbing off each other.
What happens next? Before you venture to the next step take some time out to practice the knots and lashings shown. Consider using models or try you hand at bamboo and elastic band pioneering, this can be used to practice with smaller material and to see what the problems are before moving on to the ’Heavy’ equipment Simple and elaborate structures can be built using bamboo canes and elastic bands. The secret is to construct small pyramid shapes which are strong and

8
Reeving a simple single & double pulley system Cats Paw
Pickets & Anchors If at all possible you should anchor your ropes to a fixed object such as a 'big' tree or rock. However, they are rarely available in the right places so we have to create our own anchors. There are three possibilities the 3-2-1 picket, the picket and log anchor and the dead-man anchor. They are illustrated below; in each case the pickets should be at least 160cms long and put in position with a sledge hammer or large mallet. If the ground is soft they may need to be longer. The pickets should be set in the ground at 60 degrees and the bindings between pickets should always run from the top of one picket to the bottom of as a rule of thumb Pickets should be positioned in the ground approx. 3 times the height from which the main rope leaves the structure, i.e. if the main rope passes over the sheer legs at 3 metres above the ground then the pickets should be set in the ground 9 meters from the base of the sheer legs. It would be normal practice to fix the rope to a log and picket anchor / dead-man an-chors and fix the pulley assembly to a 3-2-1 picket.
Fixed anchors With fixed anchors, such as trees, you need to create a loop of rope on which to fix pulleys. This is done by wrapping a rope around a tree a number of times as shown. The collective strength of the loops of rope must exceed the strength of the rope being strained otherwise the loops are the weakest part of the struc-ture. It is therefore suggested that 25mm rope is used for this job and is wound around the tree at least 4 times. Protection of trees if you are fixing a rope or
5
Diagonal lashing The diagonal lashing is used to 'spring' two spars together that do not touch where they cross. Be-gin with a timber hitch around both spars. Tighten it to draw the two spars together. Three or four binding turns are made around one fork, four more around the other fork. The turns should be beside each other not on top of each other. A number of frapping should be made between the spars to tighten up the lashing bindings. Finish the lashing with a clove hitch. Sheer lashing The sheer lashing is used to lash to spars together that will ultimately be spread apart to form a shear legs which are used in a number of pio-neering projects. This lashing can also be used to join two spars to-gether so as to give you a longer spar. When the lashing is used in this way you need to tie two lashings one at each end of the joint. The lashing is made by making a clove hitch around one of the spars and then binding the two spars together by a number of turns side by side, usually about eight turns. When the binding is complete, a number of frapping are tied between the spars, finishing the lashing with a clove hitch around the second spar. You can now open the spars to form your sheer legs. Tripod lashing The tripod lashing is used to create a tripod with three spars or extended to four spars to form a quad lashing. Start the lashing by placing the spars side up side ends to ends butts to butts. Start with a clove hitch on one of the outside spars and weave the rope around the spars in a figure of eight mo-tion. There should have eight or so bindings side by side be-fore you should apply a number of frapping between each spar. Finish the lashing with a clove hitch on the opposite outside spar. The three spars should then be lifted upright before the legs are spread. This lashing unlike other must not be oversight oth-erwise it will not be possible to spread the legs correctly.

6
Quick Tripod Lashing Keeping the end of the rope safe—Whipping The ends of a freshly-cut rope will rapidly fray and unlay if nothing is done to prevent it. Before using a rope, whip the two ends to keep them from unravel-ling. There are various methods of whipping a rope, shown here is simple. Simple or Whipping To whip a knotting rope, use a thin twine about 30 cm long. Make one end into a loop and place it at the end of the rope. End A should be fairly short. Wind the longer end of the twine around the rope and the loop, spiralling away and drawing each turn tight. When the whipping is as wide as the di-ameter of the rope, thread the twine through the end of the loop. Pull end A hard until the loop has disappeared under the whipping. Trim off the two ends.
The next Stage Spars (poles) Spars come in all shapes and sizes, for general spars of 4 meters by 10cm di-ameter are suitable for most projects. It is a good idea to have varying lengths and diameters to offer versatility. There are some general rules for spars 1. Always store outside under
cover, always off the ground 2. Never let them dry out completely 3. Always check Spars before use,
tap them or drop a listen for a ’ringing’ tone
4. Check for rotten sections, remember wood is living and will rot in time. 5. To save time identify differing lengths by colour coding the ends. Spars can be sourced from various suppliers such as The Forest Commission.
7
Ropes and Pulleys For pioneering purposes all kinds of cords and ropes are essential, and the proper selection of these and the proper construction of a knot or lashing is a matter of great importance, since an insecure lashing, wrong knot, or rope which will not carry the strain demanded of it may involve considerable risk of accident. Working with Scouts especially it is obvious that we must take every care and precautions to see that the materials we use are sound and that any risk is minimised as much as possible. At the same time we should certainly not avoid pioneering practices because there may be a certain amount of risk in-volved in them. To do so would be to defeat the Scout objective of training Scouts to be self reliant and to be prepared to deal with emergencies. What we have to do is to see the dangers, guard against them in all possible ways, teach our Scouts where such dangers lie, and train them to overcome them. (For sizes see Ropes on page 2)
Pulleys
Most pioneering projects can be completed using 2 pulleys - a single block and a double block. However, it is best to aim for 2 single blocks and 2 double blocks and perhaps a number of small blocks - the ones used for clothesline and sailing. This will allow you to complete most projects you undertake.
Mousing Blocks generally have hooks on and so ropes can slip off of these hooks if the tension is changing. So in interests of safety we need to prevent this happen-ing by 'mousing' the hook. This is done using sisal which is bound around the 'bill' and back of the hook as shown. Mousing is not 100% effective so it should be checked at regular intervals when in use on a structure the picture be-low is a step- by-step guide to this. Start with a clove hitch in the centre of a piece of sisal on the hook. Work both ends (a & b) around the lip of the hook as shown in the second picture. Using both ends put Thumb Knots around the 'rope' you have created. Finish with a Reef Knot.