Embed Size (px)
Citation preview

Reference Manual for Health Care Facilities with Limited Resources
Module 3. Personal Protective EquipmentAuthors Melanie S. Curless, MPH, RN, CIC Bria S. Graham-Glover, MPH, CIC
Infection Prevention and Control.

The authors have made every effort to check the accuracy of all information, the dosages of any drugs, and instructions for use of any devices or equipment. Because the science of infection prevention and control is rapidly advancing and the knowledge base continues to expand, readers are advised to check current product information provided by the manufacturer of: • Each drug, to verify the recommended dose, method of administration, and precautions for use • Each device, instrument, or piece of equipment to verify recommendations for use and/or operating
instructions In addition, all forms, instructions, checklists, guidelines, and examples are intended as resources to be used and adapted to meet national and local health care settings’ needs and requirements. Finally, neither the authors, editors, nor the Jhpiego Corporation assume liability for any injury and/or damage to persons or property arising from this publication. Jhpiego is a nonprofit global leader in the creation and delivery of transformative health care solutions that save lives. In partnership with national governments, health experts, and local communities, we build health providers’ skills, and we develop systems that save lives now and guarantee healthier futures for women and their families. Our aim is revolutionizing health care for the planet’s most disadvantaged people. Jhpiego is a Johns Hopkins University affiliate. Jhpiego Corporation Brown’s Wharf 1615 Thames Street Baltimore, MD 21231-3492, USA www.jhpiego.org © 2018 by Jhpiego Corporation. All rights reserved. Editors: Melanie S. Curless, MPH, RN, CIC Chandrakant S. Ruparelia, MD, MPH Elizabeth Thompson, MHS Polly A. Trexler, MS, CIC Editorial assistance: Karen Kirk Design and layout: AJ Furay Dana Lewison Young Kim Joan Taylor Bekah Walsh Module 3 Jhpiego technical reviewers: Oniyire Adetiloye, Nigeria
Silvia Kelbert, USA Marion Subah, Liberia

Infection Prevention and Control: Module 3 1
Module 3. Personal Protective Equipment Chapter 1. Personal Protective Equipment .............................................................................. 2
Key Topics ................................................................................................................................................. 2
Key Terms .................................................................................................................................................. 2
Background ............................................................................................................................................... 3
Types of Personal Protective Equipment .................................................................................................. 5
Instructions for Putting On and Removing Personal Protective Equipment .......................................... 25
Preventing Contamination during the Use of Personal Protective Equipment ...................................... 27
Compliance with Guidance on the Use of Personal Protective Equipment ........................................... 27
Summary ................................................................................................................................................. 28
References .............................................................................................................................................. 29
Chapter 2. Use of Personal Protective Equipment during Outbreaks of Viral Hemorrhagic Fever ..................................................................................................................................... 33
Key Topics ............................................................................................................................................... 33
Key Terms ................................................................................................................................................ 33
Background ............................................................................................................................................. 33
Essential Messages about Effective Use of Personal Protective Equipment to Prevent Transmission during Outbreaks of Viral Hemorrhagic Fever ........................................................................................ 34
Types of Personal Protective Equipment to Prevent Transmission during Disease Outbreaks ............. 34
PPE specifications are available on the WHO website: .......................................................................... 35
Use of Personal Protective Equipment in Health Care Settings during Management of Viral Hemorrhagic Fever Patients in Isolation Rooms ..................................................................................... 38
Summary ................................................................................................................................................. 40
Appendix 2-A. Checklist for Putting on Personal Protective Equipment before Treating Patients during Outbreaks of Viral Hemorrhagic Fever ................................................................................................... 41
Appendix 2-B. Checklist for Removing Personal Protective Equipment after Treating Patients during Outbreaks of Viral Hemorrhagic Fever ................................................................................................... 44
References .............................................................................................................................................. 47

Personal Protective Equipment
Infection Prevention and Control: Module 3, Chapter 1 2
Chapter 1. Personal Protective Equipment
Key Topics Types and uses of personal protective equipment (PPE)
Putting on and removing PPE without contamination
Factors that affect compliance with PPE guidance
Key Terms Airborne transmission is the spread of an infectious agent carried through the air by particles
smaller than 5 µm in size. This transmission can occur either through airborne droplet nuclei or dust particles containing the infectious microorganisms, which can be produced by coughing, sneezing, talking, or by procedures (e.g., bronchoscopy or suctioning). Due to their tiny size, airborne particles can remain in the air for up to several hours and can be spread widely within a room or over longer distances on air currents. Special air handling and ventilation are needed to ensure prevention of airborne transmission of infectious agents. Airborne particles do not land on and contaminate surfaces.
Bloodborne pathogens are infectious microorganisms (viruses, bacteria, and other microorganisms) contained in blood and other potentially infectious body fluids (including urine, respiratory secretions, cerebrospinal, peritoneal, pleural, pericardial, and synovial amniotic fluids, semen, vaginal secretions, breast milk, and saliva). The pathogens of primary concern are hepatitis B virus, hepatitis C virus, and HIV.
Colonization is the establishment of a site of pathogen reproduction in or on a host individual that does not necessarily result in clinical symptoms or findings (e.g., cellular change or damage). A colonized individual may transmit the colonizing pathogens to their immediate surroundings and other individuals.
Contact transmission occurs when infectious agents/pathogens (e.g., bacteria, viruses, fungi, parasites) are transmitted directly or indirectly from one infected or colonized individual to a susceptible host. This can occur through physical contact (e.g., touching) with the infected individual or with contaminated equipment/environmental surfaces. Infectious agents/pathogens can often survive on physical surfaces from several hours up to several months.
Droplet nuclei are small particles involved in airborne transmission of pathogen-containing respiratory secretions expelled into the air by coughing. They are reduced by evaporation to small, dry particles that can remain airborne for long periods of time and distance.
Droplet transmission occurs when infectious droplets larger than 5 µm in size are spread and land directly on or come in contact with a susceptible host’s mucous membranes of the nose or mouth or conjunctivae of the eye. Droplets can be produced by coughing, sneezing, talking, or during procedures (e.g., bronchoscopy or suctioning). Due to their size, particles remain airborne briefly and travel approximately 1 meter (3 feet) or less. Droplet transmission requires close proximity or contact between the source and the susceptible host. Droplets may also land on surfaces and then be transferred by contact transmission.
Engineering controls are methods that are built into the design of the environment, equipment, or a process to minimize the hazards associated with use. An example is a medical device or piece of equipment that limits exposure to bloodborne pathogen hazards in the workplace, such as sharps disposal containers, self-sheathing needles (a barrel or cover that automatically slides over the

Personal Protective Equipment
Infection Prevention and Control: Module 3, Chapter 1 3
needle and locks in place once the needle has been removed from the patient), sharps with injury protection, and needleless systems.
Personal protective equipment (PPE) items are the protective barriers and respirators used alone or in combination by a health care worker (HCW) to protect mucous membranes, airways, skin, and clothing from contact with harmful or infectious agents. PPE may also be used on an infectious patient to prevent the spread of infectious agents (e.g., surgical mask worn by a patient to control the spread of illness).
Respirator fit testing is a test protocol conducted to verify that a respirator is both comfortable and correctly fits the user without leakage. Fit testing uses a test agent, either qualitatively detected by the wearer’s sense of taste, smell, or involuntary cough (irritant smoke) or quantitatively measured by an instrument, to verify the respirator’s fit. The benefits of this testing include better protection for the HCW/user and verification that the user is wearing a correctly fitting model and size of respirator.
Seal check is a procedure conducted by the wearer of a particulate respirator to determine if the respirator is properly sealed to the face. The user seal check can be either a positive pressure check (i.e., breathing out to check for leak on exhalation), or negative pressure check (i.e., breathing in to check for leak on inhalation), or both.
Standard Precautions are a set of infection prevention and control practices (IPC) used for every patient encounter to reduce the risk of transmission of bloodborne and other pathogens from both recognized and unrecognized sources. They are the basic level of IPC to be used, at a minimum, in preventing the spread of infectious agents to all individuals in the health care facility.
Background Protective barriers are recommended to guard HCWs from a number of serious hazards present in the health care environment. Hazards to HCWs include bloodborne pathogens and other microorganisms that may be transmitted from patients and the health care environment, as well as numerous drugs, chemicals, and equipment used in the health care setting. Various types of PPE are used to protect mucous membranes, airways, skin, and clothing of HCWs. In addition, PPE also helps protect patients from infectious or potentially infectious agents from HCWs, other patients, or the health care environment. PPE usually refers to gloves (e.g., non-sterile, sterile, and utility gloves), masks/respirators, protective eyewear (e.g., face shields, goggles, or safety glasses), gowns, aprons, and other items (e.g., caps, closed-toe shoes, and shoe covers). Examples of how PPE can reduce the risk of spreading microorganisms and who is protected by the equipment (e.g., patients, staff, or the community) are shown in Table 1-1. (Siegel et al. 2007) Table 1-1. How Personal Protective Equipment and Other Precautions Prevent the Spread of Microorganisms
Where Microorganisms Are
Found
How Microorganisms Are Spread Protective Barriers Who Is Protected
Health care facility staff
Hands Touching Hand hygiene and gloves Patients, staff
Body and skin Touching Scrub suit (“scrubs”), uniform, gown, apron Patients, staff
Nose and mouth Coughing, talking Mask, N95 Patients, staff

Personal Protective Equipment
4 Infection Prevention and Control: Module 3, Chapter 1
Where Microorganisms Are
Found
How Microorganisms Are Spread Protective Barriers Who Is Protected
Hair and scalp Shedding skin or hair Cap, facial hair cover Patients, staff
Patients’ mucous membranes and non-intact skin
Touching Hand hygiene and gloves Patients, staff
Patients’ blood and body fluids
Splashing or spraying Gloves, protective eyewear, mask, drapes, gown, apron, cap
Staff
Touching (contact) Environmental cleaning and instrument processing; utility gloves
Patients, staff
Accidental exposure to contaminated sharps
Protective footwear, decontamination, and disposal; use of a safe or neutral zone during surgery
Staff
Infectious waste
Utility gloves, apron, eye protection, mask, overall/apron, plastic bins and bags, and appropriate disposal
Staff, community
Patients’ un-prepped skin during surgery
Touching non-sterile area with sterile clothing/ instruments
Skin preparation, drapes, gloves Patients, staff
Clinic or hospital environment Touching Hand hygiene,
environmental cleaning Staff and their families
Respiratory secretions Splashing or spraying Surgical mask, N95 (for staff)
Staff, patients, community
Adapted from: Tietjen et al. 2003. The most common occupational risk faced by HCWs is the potential for infection with bloodborne pathogens resulting from contact with infected blood and body fluids. Exposures to blood and other body fluids occur across a wide variety of health care settings, but especially in operating theaters, delivery and emergency rooms, and laboratories. Housekeeping staff and other individuals whose duties involve handling blood-contaminated items also are at risk. Occupational exposure to blood or other body fluids can result from needle sticks or other sharps injuries and by splashes of these fluids into the eyes, nose, and mouth, or contact with non-intact skin. The pathogens of primary concern are bloodborne viruses such as HIV, hepatitis B virus, and hepatitis C virus. It is estimated that more than 90% of infections by bloodborne pathogen in HCWs occur in low- and middle-income countries (WHO 2003). Most exposures in health care settings are preventable by implementation of available engineering controls and safe work practices that include the appropriate use of PPE to protect HCWs. (CDC 2012b; WHO 2003)

Personal Protective Equipment
Infection Prevention and Control: Module 3, Chapter 1 5
Types of Personal Protective Equipment For PPE to be effective, it must be available, provide adequate protection, be utilized correctly, and be used in the appropriate situations and settings. Each type of PPE and its intended use is described separately below. In many instances, various types of PPE are used in combination to adequately protect HCWs. The proper order for putting on and removing PPE is described at the end of this chapter.
Gloves
Types of gloves and their purposes There are three types of gloves for use in health care facilities:
Sterile gloves are used when performing invasive medical or surgical procedures when sterility is required.
Non-sterile gloves are used by HCWs to protect themselves from blood and body fluids when performing routine patient care.
Utility or heavy-duty household gloves are worn for processing instruments, cleaning equipment and other items, environmental cleaning, handling soiled textile items, and handling contaminated waste to conserve other gloves for patient care.
The most appropriate type of gloves to be worn in a particular circumstance should be carefully selected. Reprocessing and reusing gloves, except for heavy-duty utility gloves, should not be done. (WHO and World Alliance for Patient Safety 2006) Non-sterile gloves for routine patient care are made of a variety of materials (latex, vinyl, and nitrile) (see Table 1-2). If a choice is available, deciding which type of non-sterile glove should be purchased or is most suited for a task should be determined by the following:
Degree of risk (low or high) of exposure to blood or potentially infected body fluids
Length of time required for the procedure
Possibility of allergies (e.g., to latex) to the different types of gloves
Note: Wash hands or use an alcohol-based handrub (ABHR) before putting on gloves and after removing them.
Note: Wearing gloves is not a substitute for hand hygiene. Gloves MUST be changed after contact with contaminated items and between patients.
Note: In health care facilities with limited resources, there should be a priority to provide adequate PPE to the HCWs to implement, at a minimum, Standard Precautions.

Personal Protective Equipment
6 Infection Prevention and Control: Module 3, Chapter 1
Table 1-2. Advantages and Disadvantages of Different Types of Non-Sterile Gloves
Material Type Advantages Disadvantages Latex • Offer best fit, natural feel, and dexterity
• Approved by regulatory authorities • Provide protection against most chemicals,
including acids and bases, chlorine, iodine, and formaldehyde
• Offer better puncture resistance than other gloves (e.g., vinyl gloves)
• Long contact with fatty substances (e.g., fatty tissue and vegetable oils) will disintegrate latex gloves
• Not recommended for HCWs with known allergies to latex
Vinyl • First synthetic material gloves available on the market
• Least expensive of the three types and generally available in low- and middle-income countries
• Recommended if they are the only type of non-sterile glove available and the risk of exposure to blood and body fluids is high
• Acceptable for short procedures/tasks (e.g., suctioning endotracheal secretions, removing IV lines) that involve minimum risk of glove tears, have low risk of exposure to contaminants, and involve minimal stress on the gloves
• Allergy-free
• Loose-fitting (i.e., baggy), have limited elasticity, and tear easily
• Have higher failure rates than latex or nitrile gloves because they tear more easily and they are loose-fitting around the wrist, which can allow fluids to contaminate an HCW’s hand
Nitrile • Preferred choice for HCWs with latex allergies • Made from synthetic materials and are very
elastic • Can be used with petroleum-based
substances, including hand moisturizers • 3–5 times more puncture-resistant than latex
gloves • Fit well on hands like latex gloves • More elastic than vinyl gloves • Available in various thicknesses and colors
• Not recommended for HCWs with known allergies to nitrile compounds
Why wear gloves Gloves have been shown to protect the hands of HCWs from contamination with infectious materials and protect patients from microorganisms on HCWs’ hands. Gloves are the most important physical barrier for preventing the spread of infection. Nevertheless, wearing even the best-quality gloves does not provide complete protection against hand contamination. Bacterial flora from colonizing patients have been recovered from the hands of up to 30% of HCWs who wear gloves during patient contact. Hand hygiene, before and after patient contact, is still necessary. (Bhalla et al. 2004; Duckro et al. 2005; WHO and World Alliance for Patient Safety 2006)
Note: The World Health Organization (WHO 2009b) provides details, with clinical examples, on the types of patient care procedures for which gloves are and are not indicated. Hand hygiene should be performed when appropriate, regardless of when glove use is indicated.

Personal Protective Equipment
Infection Prevention and Control: Module 3, Chapter 1 7
It is important to remember that gloves:
Are themselves potential sources of transmission between patients if not changed after contact with contaminated items (such as soiled dressings) and between patient contacts; therefore, hand hygiene is recommended before putting on gloves and after removing them
Are not manufactured to be cleaned with soap and water or alcohol-based handrub (ABHR) between patients because cleansing products (e.g., soap, ABHR) may damage the gloves and impact how effectively they can protect an individual’s hands
Are single-use items and are not manufactured to be reprocessed or reused
May have small, hidden defects (i.e., even the best-quality latex sterile surgical gloves may have small holes in them) and can tear during use, contaminating hands during use and removal
(WHO 2009a) When to use gloves It is important to know the difference between clinical situations when gloves should be worn and changed and situations in which their use is not recommended in order to help conserve resources. Appropriate use of gloves in specific clinical settings1 Sterile gloves:
Surgical procedures
Vaginal delivery
Invasive radiological procedures
Vascular access and procedures (invasive)
Preparation of total parenteral nutrition
Non-sterile gloves—(indicated by clinical situations):
Contact with blood body fluids, secretions, excretions, and items visibly soiled by body fluids
Potential for contact with blood, body fluids, secretions, excretions, and items visibly soiled by body fluids (e.g., during IV insertion and removal, blood drawing, pelvic and vaginal examination, and suctioning of endotracheal tubes, with exception of those with an in-line suctioning system)
Potential presence of highly infectious and dangerous organisms
Epidemic or emergency situations in which there is a high possibility of contact with pathogens Utility gloves (if utility gloves are not available, non-sterile gloves can be used for these tasks):
Emptying emesis basins
Handling/cleaning instruments
Handling waste
Cleaning up spills of body fluids
Environmental cleaning 1 Adapted from: WHO Guidelines on Hand Hygiene in Health Care: First Global Patient Safety Challenge. Clean Care Is Safer Care, page 140. Geneva, Switzerland. © World Health Organization (2009).
Note: All gloves should be changed as soon as possible when visibly soiled, torn, or punctured.
Personal Protective Equipment
8 Infection Prevention and Control: Module 3, Chapter 1
Following Standard Precautions, normally, gloves are not indicated for the following except when using Contact or Droplet Precautions because there is no potential for exposure to blood, body fluids, or contaminated environments during the following activities:
Direct patient care when contacting only intact skin:
Taking blood pressure, temperature, or pulse
Performing subcutaneous and intramuscular injections
Assisting with bathing and dressing the patient
Transporting patients
Caring for eyes and ears (without secretion)
Placing non-invasive ventilation equipment and oxygen cannula
Indirect patient care:
Using the telephone
Writing in the patient’s chart
Giving oral medications
Distributing or collecting patient dietary trays
Removing and replacing textile items for the patient’s bed
Moving patient furniture
Personal Protective Equipment
Infection Prevention and Control: Module 3, Chapter 1 9
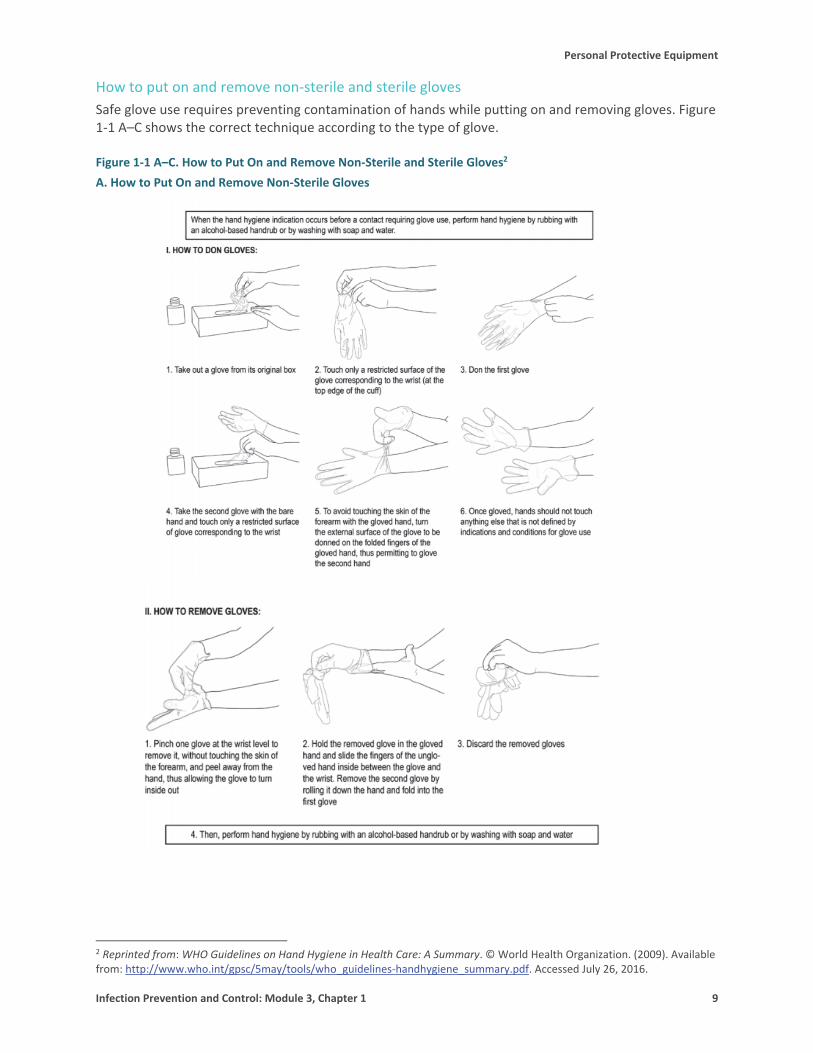
How to put on and remove non-sterile and sterile gloves Safe glove use requires preventing contamination of hands while putting on and removing gloves. Figure 1-1 A–C shows the correct technique according to the type of glove. Figure 1-1 A–C. How to Put On and Remove Non-Sterile and Sterile Gloves2 A. How to Put On and Remove Non-Sterile Gloves
2 Reprinted from: WHO Guidelines on Hand Hygiene in Health Care: A Summary. © World Health Organization. (2009). Available from: http://www.who.int/gpsc/5may/tools/who_guidelines-handhygiene_summary.pdf. Accessed July 26, 2016.

Personal Protective Equipment
10 Infection Prevention and Control: Module 3, Chapter 1
B. How to Put On Sterile Gloves

Personal Protective Equipment
Infection Prevention and Control: Module 3, Chapter 1 11
C. How to Remove Sterile Gloves

Personal Protective Equipment
12 Infection Prevention and Control: Module 3, Chapter 1
Double gloving Although double gloving cannot prevent needle sticks, it may lower the risk of blood-hand contact (Mischke et al. 2014). The following are guidelines for when to use double gloving:
Procedures that involve contact with large amounts of blood or other body fluids (e.g., vaginal deliveries and cesarean sections)
Orthopedic procedures where sharp bone fragments, wire sutures, and other sharps are likely to be encountered
Procedures that include the risk of developing severe/potentially fatal disease (e.g., Ebola Virus Disease [EVD] and other hemorrhagic fevers) following the smallest amount of exposure to contaminated blood and body fluid (See Chapter 2, Use of Personal Protective Equipment during Outbreaks of Viral Hemorrhagic Fever, in this module.)
Gloves for obstetric procedures In 25% of vaginal deliveries and 35% of cesarean sections, HCWs’ skin and mucous membranes come into contact with patients’ blood (Davis 2001). Furthermore, large volumes of amniotic fluid contaminated with blood are routine in obstetrics. When performing deliveries, HCWs, including skilled birth attendants, should wear sterile gloves and avoid frequent contact with the patient’s vaginal area as much as possible, especially after her membrane has ruptured. If their gloved hands become heavily contaminated with blood or amniotic fluid, HCWs should change gloves and wash their hands to minimize the risk of exposure. (WHO 2009a)
Elbow-length gloves Elbow-length gloves (i.e., gauntlet gloves) should be used when the hand and forearm need to be inserted into the vagina (e.g., manual removal of a retained placenta postpartum, bimanual compression) or deep into the uterus to deliver the infant’s head (e.g., cesarean section). This will help protect the HCW from significant blood and amniotic fluid contamination. When the HCW wears elbow-length gloves, the mother also will be protected by exposure to the microorganisms on the provider’s skin through the wet gown sleeve (if gown is non-fluid resistant). If sterile gauntlet gloves or a surgical gown with impervious sleeves is not available, the HCW should wear a second pair of sterile gloves with the fingers cut off, and pulled over the gown and first pair of gloves to the elbows. Make sure there is no gap and tuck the fingerless glove underneath the first pair of gloves.
STEP 1: Perform hand hygiene.
STEP 2: Put on a pair of sterile gloves.
STEP 3: Open a new pair of sterile gloves and, with sterile scissors, cut off the four fingers of the glove, leaving the thumb intact.
STEP 4: Pull on the fingerless gloves.
STEP 5: Tuck the fingerless gloves inside the cuff of the intact gloves.
Accidental contamination of sterile gloves Sterile gloves may become contaminated in several ways:
Note: Surgical staff wearing sterile gloves should be careful not to contaminate gloved hands inadvertently by touching non-sterile items, unprepped skin, or mucous membranes.

Personal Protective Equipment
Infection Prevention and Control: Module 3, Chapter 1 13
Tearing or puncturing the glove
Touching any non-sterile or high-level disinfected object with the glove
Touching the outside of the glove with an ungloved hand
Touching the outside of the glove with a soiled gloved hand
Regloving after removing a contaminated glove To reglove after contaminating a glove during a surgical procedure:
Have the circulating nurse or another trained HCW working outside the sterile field open the sterile glove pack, laying the glove package on a clean surface.
Pick up the sterile glove with the gloved hand, holding it from the wrist area, and put on the replacement glove in the usual manner.
Alternative procedure for regloving
Have the circulating nurse or another trained HCW open the sterile glove package.
Have the surgical assistant, scrub nurse, or a trained HCW, who is wearing non-contaminated sterile-gloves, remove a sterile glove from the package and hold the glove open by the cuff with the glove fingers pointing down.
Put one hand into the glove without touching the outside of the glove.
Adjust the glove after the surgical assistant, scrub nurse, or trained HCW lets go of the cuff.
(AORN 2015)
Some dos and don’ts about gloves
Do wear the correct size glove, particularly surgical gloves. A poorly fitting glove can limit the ability to perform the task and may be damaged (i.e., torn or cut) more easily.
Do change sterile surgical gloves periodically during long procedures because the protective effect of sterile gloves decreases with time and unapparent tears may occur. The Association of periOperative Registered Nurses (AORN) recommends changing sterile gloves every 90–150 minutes. (AORN 2013)
Do change gloves when a perforation or defect is noticed or when there is a suspected perforation from a needle, suture, bone, or other object.
Do keep natural fingernails short (i.e., less than 0.5 cm, or 1/5 of an inch, long) to reduce the risk of tears.
Do pull gloves up over the cuffs of the gown (if worn) to protect the wrists.
Do not use oil-based or perfumed hand lotions or creams because these will damage latex rubber gloves. In addition, fragrant lotions can irritate the skin under gloves.
Do not store gloves in areas where there are extreme changes in temperatures (e.g., in the sun or near a heater, air conditioner, ultraviolet light, fluorescent light, or X-ray machine). These conditions may damage the gloves (i.e., cause breakdown of their material), thus reducing their effectiveness as a protective barrier.

Personal Protective Equipment
14 Infection Prevention and Control: Module 3, Chapter 1
Gowns
Types of gowns and their purposes Gowns should fully cover the torso of the HCW, fit comfortably over the body, and have long sleeves that fit snuggly at the wrists. There are three types of protective gowns used in health care facilities: isolation gowns, surgical gowns, and coverall suits (see Chapter 2, Use of Personal Protective Equipment during Outbreaks of Viral Hemorrhagic Fever, in this module). Clinical and laboratory coats or jackets that HCWs wear over their clothing for comfort and/or purposes of identity are not considered PPE. (Siegel et al. 2007) Isolation gowns should be long-sleeved, fluid-resistant, single-use, and preferably disposable. Isolation gowns are designed to prevent contamination of HCWs’ arms, exposed areas of the body, and clothing from blood and body fluids and other potentially infectious material.
Surgical gowns are sterile and preferably fluid-resistant, with sleeves that either taper gently toward the wrists or end with elastic or ties around the wrists. Large, droopy sleeves are not recommended because they can cause accidental contamination. Surgical gowns are used during surgery or procedures to protect patients and the sterile field from microorganisms from blood and other body fluids (e.g., amniotic fluid) present on the HCW’s clothing, the front of the HCW’s body, and the HCW’s arms. When the surgical gowns are put on, the cuffs of sterile surgical gloves should completely cover the end of the sleeves of the gowns. Lightweight cloth or paper gowns are not recommended because they offer little protection against moisture, which can easily pass through, allowing the passage of microorganisms. If a cloth or paper gown is used, always wear a plastic apron over it. If a protective covering fails (e.g., during a large spill) and skin/clothing becomes contaminated with blood or body fluids, clothing should be removed and laundered immediately. The HCW should bathe as soon as possible after completing the operation or procedure.
When to wear gowns The type of gown to use is based on the type of patient interaction, including the anticipated degree of contact with infectious material and the potential for blood and body fluid penetration of the barrier and the type of task to be carried out by the HCW:
During Standard Precautions, an isolation gown (with gloves) is worn if blood or body fluid contact, spills, or splashes onto clothing is anticipated.
During Contact and Droplet Precautions, an isolation gown (with gloves) is used to prevent transmission of an infectious agent that cannot be prevented by Standard Precautions alone.
During surgical procedures, deliveries, or other aseptic procedures, a sterile surgical gown is worn to protect the sterile field and the clothes of the scrub team or those performing the procedure.
Note: Isolation gowns should be worn in combination with gloves and other PPE, as recommended.

Personal Protective Equipment
Infection Prevention and Control: Module 3, Chapter 1 15
How to wear and remove gowns Full coverage of the arms and body front, from the neck to the mid-thigh or below, will ensure that clothing and exposed areas of the upper body are protected. Isolation gowns are always worn in combination with gloves and other PPE (e.g., masks, eye protection) according to the type of transmission being prevented (contact, droplet etc.). Isolation gowns are usually the first piece of PPE to be put on (see Figure 1-2 A). HCWs should remove isolation gowns before leaving the patient care area to prevent possible contamination of the environment outside of the patient care area (see Figure 1-2 B). (Siegel et al. 2007) Figure 1-2 A and B. Putting on and Removing an Isolation Gown A. Proper Way to Put On an Isolation Gown
B. Proper Way to Remove an Isolation Gown
Release the knot around the neck, being sure not to contaminate the neck, followed by the side knot.
Slowly pull the gown away from your body, pulling it inside out, as you remove your hands, one after the other.
Fold the gown inside out, ensuring that you avoid touching the outer surface of the gown.
Dispose of the gown in a contaminated-waste container.
Adapted from: Siegel et al. 2007.
Plastic Aprons
Perform hand hygiene. Unfold the gown and insert both hands in the
sleeves of the gown, one after the other. Secure both sides using the tie at the neck and at
the waist. Make sure that you tie the waist knot on the side so that it is easy to untie at the time of removal.

Personal Protective Equipment
16 Infection Prevention and Control: Module 3, Chapter 1
Types of aprons and their purposes Plastic aprons provide a waterproof barrier along the front of the body, protecting the skin of the HCW from contamination with blood and other body fluids during patient care (e.g., during cesarean section or vaginal delivery), cleaning, and handling of textiles and other soiled items (see Figure 1-3). (CDC 2004) Masks
Types of masks and their purposes There are many different types of masks used to cover the mouth and nose. Masks made from cotton or paper are comfortable but are not fluid-resistant (do not protect from splashes) and are not an effective filter to prevent inhalation of microorganisms transmitted via droplet nuclei (≤ 5 µm). Masks made from synthetic materials provide protection from large droplets (> 5 µm) spread by coughs or sneezes. They may be more difficult to breathe through than cotton or paper masks. The use of masks during patient care is part of Standard Precautions when there is a potential for splashes or droplet transmission and is part of Droplet Precautions. (Siegel et al. 2007) There are two types of masks:
Surgical masks—Regulating bodies (such as The United States Food and Drug Administration [FDA], the European Union, and WHO) require surgical masks to have fluid-resistant properties.
Procedure/isolation masks—These are not regulated and they do not have any specifications for their manufacture.
When to wear masks Masks are primary used for the following purposes in health care settings:
1. To protect HCWs from contact with infectious materials from patients (e.g., respiratory secretions and sprays of blood or body fluids). For sprays of blood or body fluids, either masks (water-resistant procedure/isolation masks) or face shields may be used. N95 respirators, when worn to protect from airborne transmission, will also protect the wearer’s nose and mouth from sprays and splashes.
2. To limit potential dissemination of infectious respiratory secretions from patients with suspected or confirmed infection who are coughing or sneezing (Siegel 2007). The protective effect of masks for HCWs against severe acute respiratory syndrome (SARS) has been found in several health care facility-based studies (Loeb et al. 2004; Seto et al. 2003).
3. To protect patients from exposure to infectious respiratory secretions from the mouth and nose of the HCW during procedures that require sterile techniques. Either masks (water-resistant procedure/isolation masks) or face shields may be used for this purpose. Studies have demonstrated that the effectiveness of a surgical mask decreases after 4 hours of continuous use. (AORN 2015)
How to wear and remove a mask Put on a new mask every time a different patient is treated:
1. Place the mask over the nose and cover the nose, mouth, and chin.
2. Fit the flexible nosepiece over the bridge of the nose.
Figure 1-3. Plastic Apron

Personal Protective Equipment
Infection Prevention and Control: Module 3, Chapter 1 17
3. Secure it on the head with ties or elastic.
4. Adjust to fit.
5. When removing, handle masks by the strings because the center of the mask contains the most contamination (see Figure 1-4). (Siegel et al. 2007)
Figure 1-4. Face Mask Removal and Disposal
Sources: CDC 2014c; Tietjen et al. 2003.
Respirators Respirators are specialized masks, called particulate respirators, which are used to prevent inhalation of small particles that may contain infectious agents transmitted via the airborne route (see Figure 1-5). They are recommended for situations in which infections transmitted by the airborne route are suspected or confirmed, and therefore filtering tiny particles from inhaled air is important, such as during aerosolizing procedures or when caring for a person with pulmonary tuberculosis. Respirators contain multiple layers of filter material and fit the face tightly. Models of particulate respirators are selected based on inherent fit and the protective factor expected (i.e., N95 designation means that when subjected to careful testing, the respirator blocks at least 95% of very small [0.3 micron] test particles). They are more difficult to breathe through and more expensive than surgical masks.

Personal Protective Equipment
18 Infection Prevention and Control: Module 3, Chapter 1
Figure 1-5. N95 Respirator
Source: Banej (CC BY-SA 3.0), via Wikimedia Commons. https://commons.wikimedia.org/wiki/File%3A3M_N95_Particulate_Respirator.JPG. Airborne particles 5 µm or less in size are expelled into the air when individuals with certain infectious diseases (e.g., TB, chicken pox) cough, sneeze, talk, or undergo aerosol-generating procedures (see Module 1, Chapter 2, Standard and Transmission-Based Precautions). These particles can contain infectious microorganisms, either on airborne droplet nuclei or dust particles, and can remain in the air for several hours and spread widely on air currents. Fit and seal testing should be performed before use of a respirator for the first time and with any change in physical characteristics affecting the fit. A fit test should be performed annually. Powered air-purifying respirators (PAPRs) use high-efficiency particulate air filters (HEPA) and a battery powered blower to provide filtered air to a hood, which is worn over the head, with clear visor. PAPRs are an alternative to particulate respirators (such as N-95s) for use by HCWs during Airborne Precautions and use when protection is needed during aerosol-generating procedures. PAPRs are more expensive than particulate respirators and require electricity to charge the battery.
When to wear a respirator Particulate respirators are recommended for situations in which filtering inhaled air is important (e.g., those infectious microorganisms transmitted by airborne particles). Contact with infectious microorganisms increases during aerosol-generating procedures such as suctioning, collecting sputum samples, intubation, and resuscitation. (WHO 2008; WHO 2009)
Steps for putting on a respirator The following are steps for putting on a particulate (N95) respirator (see Figures 1-6 to 1-8):
STEP 1: Cup the respirator in one hand, with the nosepiece at the fingertips, allowing the headbands to hang freely below your hand.
STEP 2: Position the respirator under the chin with the nosepiece up. Pull the top strap over your head, resting it high at the top of the back of your head. Pull the bottom strap over your head and position it around the neck, below the ears. (see Figure 1-6).

Personal Protective Equipment
Infection Prevention and Control: Module 3, Chapter 1 19
Figure 1-6. Putting On a Respirator
STEP 3: Perform a user “fit test” (see Figure 1-7). Place two fingertips from both hands at the top of the metal nose clip. Slide fingertips down both sides of the metal strip to mold the nose area to the shape of your nose. Figure 1-7. Fit Test
STEP 4: Perform a user “seal check” (see Figure 1-8). At a minimum, a seal check should be performed by the wearer of a respirator each time a respirator is worn to minimize air leakage around the facepiece. If either test fails, adjust the respirator and seal check again.
Positive pressure seal check—put on the respirator and exhale gently while blocking the paths for exhaled breath to exit the facepiece. A successful check is when the facepiece is slightly pressurized before increased pressure causes outward leakage.
Negative pressure seal check—put on the respirator and inhale sharply while blocking the paths for inhaled breath to enter the facepiece. A successful check is when the facepiece collapses slightly under the negative pressure that is created with this procedure.
Figure 1-8. Seal Check

Personal Protective Equipment
20 Infection Prevention and Control: Module 3, Chapter 1
Steps for removing a respirator The respirator or mask should be removed last, after removing all other PPE, including gloves. Remove it from the face without touching the front of the respirator, which may be contaminated (see Figure 1-9). Discard the used respirator immediately. (CDC 2014c)

Personal Protective Equipment
Infection Prevention and Control: Module 3, Chapter 1 21
Figure 1-9. Removing an N95 Respirator
Source: CDC. 2014c.
Protective Eyewear
Types of protective eyewear There are four different types of eye protection that are effective in preventing infection in health care facilities (see Figure 1-10):
1. Goggles
2. Safety glasses
3. Masks with attached shield
4. Face shields Eye protection should be comfortable, allow for sufficient peripheral vision (i.e., the area that is visible outside the central area of focus), and must be adjustable to ensure a secure fit. Compared to older styles of goggles, newer styles may provide better indirect airflow properties to reduce fogging, provide better peripheral vision, and offer more size options for fitting goggles to different HCWs. Indirectly vented goggles with a manufacturer’s anti-fog coating may provide the most reliable practical eye protection from splashes, sprays, and respiratory droplets coming from multiple angles. Many styles of goggles fit adequately over prescription eyeglasses with minimal gaps. While an effective form of eye protection, goggles do not provide protection from splashes or sprays to other parts of the face. Disposable or non-disposable face shields may be used as an alternative to goggles. Face shields extending from the chin to the crown of the head provide better face and eye protection from splashes and sprays. Face shields that wrap around the sides may reduce splashes around the edge of the shield. (Siegel et al. 2007)
Note: Personal eyeglasses and contact lenses are NOT considered adequate eye protection. (Siegel et al. 2007)

Personal Protective Equipment
22 Infection Prevention and Control: Module 3, Chapter 1
Figure 1-10. Protective Eyewear
Source: Tietjen et al. 2003.
Why wear protective eyewear Eye protection is required (e.g., goggles or a face shield) for procedures that generate splashes or sprays of blood, body fluids, secretions, or excretions (e.g., endotracheal suctioning, bronchoscopy, invasive vascular procedures). The mucous membranes of the eyes are susceptible portals of entry for infectious agents (e.g., bloodborne pathogens and those causing respiratory diseases). Infection can be transmitted via splashes of blood or other body fluids, especially respiratory secretions emitted during specimen collection, suctioning, or intubation. (WHO 2008)
When to wear protective eyewear Protective eyewear is used to shield eyes and the surrounding skin from potential risks of a splash or spray of blood and body fluids during patient care or waste disposal. The eye protection chosen for specific work situations (e.g., goggles or face shield) depends upon the circumstances of exposure, other PPE used, and the HCW’s vision needs. Eye protection should be worn:
1. As part of Standard Precautions
2. As part of Droplet Precautions to protect from respiratory secretions
3. During procedures and surgery when splashing is likely to happen
4. During specimen collection or aerosol-generating procedures on patients with specific respiratory tract pathogens (e.g., TB or novel respiratory viruses) (WHO 2008)
How to wear protective eyewear Put on eye protection after putting on the isolation gown and mask (if used) but before putting on gloves (see Figure 1-11).

Personal Protective Equipment
Infection Prevention and Control: Module 3, Chapter 1 23
Figure 1-11. Putting on Eye Protection
Source: Siegel et al. 2007. Removal of face shield, goggles, and mask can be performed safely after gloves have been removed (see Figure 1-12). The ties, ear pieces, and/or head band used to secure the equipment to the head are considered “clean” and safe to touch with bare hands. If the ties, ear pieces, and/or head band are found to be contaminated, they should be removed using gloved hands and the skin/face should be rinsed using ample running water and soap. The front of a mask, goggles, and face shield is considered contaminated. Figure 1-12. Taking off Eye Protection
Source: Siegel et al. 2007.
Head Covering/Caps
Types of head coverings/caps Head covers are most commonly used as part of surgical attire in surgical and procedure areas. When used, head covers or caps should be large enough to cover the entire scalp and hair (see Figure 1-13 A, B, and C). Facial hair is also required to be covered for surgical procedures in sterile areas (e.g., in the operating theater) using a facial hair covering. They can be disposable or made of reusable cloth that can be laundered. In the surgical and procedure areas, a new clean head covering should be worn each day and changed sooner when soiled with blood or body fluids. The same standard and regularity of cleaning expected for surgical scrubs should be applied when cleaning head/facial coverings (e.g., laundered at the hospital and changed at least daily).
Why wear head coverings/caps Head covers or caps are used to keep the hair, beard, and scalp covered so that flakes of skin and hair are not shed into the sterile field.

Personal Protective Equipment
24 Infection Prevention and Control: Module 3, Chapter 1
When to wear head coverings/caps Head covers or caps are most often worn during surgery and in procedure areas where a sterile field is required. They are not necessary for most other areas in the health care facility. Head covers are not part of routine PPE for Contact, Droplet or Airborne Precautions but are used for during outbreaks for VHF (See Chapter 2, Use of Personal Protective Equipment during Outbreaks of Viral Hemorrhagic Fever, in this module for use of headcovers in during outbreaks of VHF). Figure 1-13 A–C. Surgical Head Coverings
A. Head covering Adapted from: Blue Sky Scrubs 2015.
B. Surgical Cap Adapted from: Halyard Health, Inc. 2018.
C. Surgical Hood Source: Jhpiego 2015.
How to wear head coverings/caps Caps and facial coverings must cover all hair, and jewelry must be removed or contained within the head covering.
Footwear
Types of footwear All footwear should have closed toes, low heels, and nonskid soles. Rubber boots or leather shoes provide the best protection. They must be kept clean. Open-toe slippers and flip flops are not appropriate footwear in health care settings. Clean, sturdy shoes are recommended for all clinical areas. Shoe covers are not recommended, with the exception of use in the surgical area, and they are unnecessary for procedures with minimal blood or body fluid spillage if clean, sturdy shoes are available. Shoe covers are not meant to prevent transmission of bacteria from the floor but rather prevent contamination of shoes with blood and body fluids. (AORN 2015; Bearman et al. 2014)

Personal Protective Equipment
Infection Prevention and Control: Module 3, Chapter 1 25
Why wear protective footwear Proper footwear decreases the risk of exposure to blood or other potentially infectious materials, sharps injuries, and slipping or falling. The choice of HCWs’ footwear should be driven by a concern for safety.
How to maintain protective footwear Using gloved hands, wipe any blood or body fluids from the shoes as soon as possible. If shoe covers are used, dispose of them properly and perform hand hygiene immediately after removing them.
Instructions for Putting On and Removing Personal Protective Equipment Putting on and removing PPE in the proper order and manner is just as important as wearing PPE. Failure to properly put on or remove PPE could lead to exposure to or lack of protection against infectious agents. The order of putting on PPE and removing PPE depends upon the purpose for which the PPE is being used. PPE is used for Standard Precautions, operating theaters, isolation rooms during Transmission-Based Precautions, and during disease outbreaks (e.g., novel respiratory disease, VHF). (See Chapter 2, Use of Personal Protective Equipment during Outbreaks of Viral Hemorrhagic Fever, in this module.)
Choosing PPE for Standard and Transmission-based Precautions For the purpose of Standard Precautions, PPE are chosen based on the risk of exposure to blood or body fluids during patient care. The choice could be simply a pair of non-sterile gloves if touching contaminated surfaces or gown, gloves, mask and eye protection if extensive splashing is expected. For the purpose of transmission-based precautions septic items of PPE are designated for each type (e.g. only an N95 respirator if providing care to a suspected case of TB, as Airborne Precautions do not require use of gown or gloves). (For more information on appropriate PPE for each precaution, see Module 1, Chapter 2, Standard and Transmission-Based Precautions.) In case you need to wear multiple PPE, the sequence described below should be followed for safely putting on and removing PPE. For details about putting on or removing PPE, see the sections earlier in this chapter about each specific item of PPE.
Sequence for Putting On PPE for Standard and Transmission-based Precautions
1. Put on protective boots or shoe covers (if needed).
2. Perform hand hygiene.
3. Put on a gown.
4. Put on a procedure mask/N95 respirator.
5. Put on goggles or a face shield.
6. Lastly, put on gloves. Source: CDC 2004.
Sequence for Removing PPE PPE should be removed at the doorway before leaving the patient room or in the outer room:
1. Remove gloves.
2. Remove goggles/face shield by the “clean” head band or ear pieces.

Personal Protective Equipment
26 Infection Prevention and Control: Module 3, Chapter 1
3. Remove the gown.
4. Remove the mask or respirator.
5. Dispose of single-use and reusable PPE in designated containers.
6. Remove shoe covers or boots (if used) before leaving the area.
7. Perform hand hygiene.
Sequence for Putting On PPE for Sterile Surgical Procedures in the Operating Theater
1. Change from street clothes to a clean scrub suit (one that has been processed in the health care facility laundry). Remove all jewelry.
2. Put on non-skid, low-heel shoes with closed toes and back, rubber boots, or shoe covers when there is a risk of gross contamination with blood or body fluids.
3. Perform hand hygiene.
4. Put on a plastic apron if the sterile surgical gown is not fluid-resistant.
5. Put on a surgical head cover (and facial hair cover, if needed) to ensure that hair on the head (and beard) are fully covered.
6. Put on a surgical mask, one that fits well and fully covers the mouth and the nose.
7. Put on appropriate sized, well-fitting goggles or a chin-length face shield.
8. Perform a surgical hand scrub using soap and water and ABHR (see Module 2, Chapter 1, Hand Hygiene).
9. Put on a sterile surgical gown without contamination (see Figure 1-2 A).
10. Lastly, put on sterile surgical gloves without contamination (see Figure 1-1 B).
Sequence for Removing PPE following Sterile Surgical Procedures in the Operating Theater
1. Remove the gloves following the recommended steps and dispose of in a waste container; do not reprocess or reuse the gloves.
2. Remove the gown, avoid touching the outer side of the gown, and dispose of in a waste container (if a single-use gown) or place the used gown in a container for processing later.
3. Remove the plastic apron, if one was used, and dispose of in a waste container (if a single-use apron) or place the used apron in a container for processing later.
4. Remove eye protection.
5. Remove the surgical mask.
6. Perform hand hygiene.
These steps will be performed at the end of day unless any item becomes soiled.
7. Remove the head cover (and facial cover).
8. Remove shoe covers (if worn).
Note: There may be instances where PPE to protect the HCW from infectious disease may be required in addition to surgical attire, such as a respirator for surgery on a patient with known or suspected TB or additional skin coverage for surgery on a patient with known or suspected viral hemorrhagic fever.

Personal Protective Equipment
Infection Prevention and Control: Module 3, Chapter 1 27
9. Remove shoes.
10. Remove scrub suit.
11. Lastly, perform hand hygiene. Adapted from: AORN 2015.
Preventing Contamination during the Use of Personal Protective Equipment Research using a fluorescent dye as a contaminating agent in simulations showed that removal of contaminated gloves and gowns at the end of use resulted in contamination of skin or clothing in 46% of the simulated removals. Contamination occurred more frequently during removal of gloves than gowns (52.9% vs. 37.8%). Palms, thumbs, index fingers, and middle fingers were most likely to become contaminated during removal of gloves, and the neck and the chest were most likely to become contaminated during gown removal. (Thomas et al. 2015) The risk of accidental exposures to contamination among HCWs can be reduced through use of the following measures:
Selecting appropriate-quality PPE
Frequently conducting short training courses practicing the skills of PPE removal
Instituting systems to observe and provide feedback by colleagues and supervisors
Having validated protocols in place for putting on and removing PPE and ensuring compliance with such protocols
Promptly managing accidental exposures during PPE removal
Compliance with Guidance on the Use of Personal Protective Equipment Reviews of published literature by Gammon et al. (2008) and Valim et al. (2014) reveal that compliance with PPE guidance by HCWs is below the standard, particularly in resource-limited settings. Reasons for non-compliance cited by HCWs in these studies included:
Lack of time for PPE use
Using PPE puts patients at risk
Lack of material or human resources to use PPE
PPE is perceived as not needed or the patient is not perceived to be at risk
PPE interferes with patient care
HCW forgetfulness
Lack of knowledge about PPE
Lack of professional experience
Lack of institutional commitment by management

Personal Protective Equipment
28 Infection Prevention and Control: Module 3, Chapter 1
Factors influencing compliance can be categorized into the following:
Health care facility factors, including attitude of management and staff toward safety and standard operating procedures for IPC, including PPE
Environmental factors, including the availability and location of PPE for easy access and instructions for use displayed in strategic places for reinforcement
Individual factors, including HCWs’ knowledge and perceptions about effectiveness or acceptability of PPE (Gralton et al. 2013)
Thus, PPE interventions involve behavioral, environmental (institutional), and management actions that go beyond the individual. Most institutions, however, address the issue of low usage of PPE by focusing on the HCWs’ lack of compliance. (Valim et al. 2014) It should be noted that although planned and structured interventions can be successful at increasing compliance in the short term, the majority of studied interventions have failed to demonstrate sustained improvement with PPE usage. Improving compliance following educational and behavior change efforts can be enhanced by:
Consistent support for safety by health care management (e.g., resources are available, identified deficiencies are corrected, dangerous practices are eliminated, and staff are actively encouraged to seek inexpensive, doable solutions).
Regular feedback from supervisors and reward of appropriate behavior by the HCWs improves compliance.
Role models (e.g., physicians and other senior staff and faculty) actively supporting recommended IPC practices and modeling appropriate behavior can also assist in improving PPE usage. (Lipscomb and Rosenstock 1997)
Summary The use of PPE is recommended to protect HCWs from hazards encountered during their regular, daily duties. An adequate supply of PPE should be available for use at the point of care. In addition, management staff should be aware when and how to replenish PPE supplies. In situations with limited resources, PPE should be prioritized to provide, at a minimum, implementation of Standard Precautions. Staff should be educated and trained on the indications for PPE, the benefits and limitations of specific PPE, and the correct procedure for putting on, wearing, and removing PPE so that PPE can be used effectively and efficiently. Health care facility support and feedback from supervisors is also necessary to create sustained compliance with PPE guidance.

Personal Protective Equipment
Infection Prevention and Control: Module 3, Chapter 1 29
References Association of periOperative Registered Nurses (AORN). 2013. Recommended practices for sterile technique. In: Perioperative Standards and Recommended Practices, 2013 Edition. Denver, CO: AORN, Inc.
AORN. 2015. Guideline for Surgical Attire. Denver, CO: AORN, Inc.
Bearman G, Bryant K, Leekha S, et al. 2014. Healthcare personnel attire in non-operating-room settings. Infect Control Hosp Epidemiol. 35(2):107–121.
Bhalla A, Pultz NJ, Gries DM, et al. 2004. Acquisition of nosocomial pathogens on hands after contact with environmental surfaces near hospitalized patients. Infect Control Hosp Epidemiol. 25(2):164–167.
Blue Sky Scrubs. 2015. Quartz Poppy Scrub Hat. http://www.blueskyscrubs.com/quartz-poppy-scrub-hat.html.
Centers for Disease Control and Prevention (CDC). 2004. Guidance for the Selection and Use of Personal Protective Equipment (PPE) in Healthcare Settings. http://www.cdc.gov/HAI/pdfs/ppe/PPEslides6-29-04.pdf.
CDC. 2012a. The National Personal Protective Technology Laboratory (NPPTL). Respirator Trusted-Source Information. http://www.cdc.gov/niosh/npptl/topics/respirators/disp_part/RespSource3fittest.html#fita.
CDC. 2012b. The National Institute for Occupational Safety and Health. Bloodborne Infectious Diseases: HIV/AIDS, Hepatitis B, Hepatitis C. http://www.cdc.gov/niosh/topics/bbp/.
CDC. 2014a. Guidance on Personal Protective Equipment to Be Used by Healthcare Workers During Management of Patients with Ebola Virus Disease in U.S. Hospitals, Including Procedures for Putting On (Donning) and Removing (Doffing). http://www.cdc.gov/vhf/ebola/healthcare-us/ppe/guidance.html.
CDC. 2014b. Ebola: Personal Protective Equipment (PPE) Donning and Doffing Procedures. Doffing PPE: Remove Outer Apron. Video. http://www.cdc.gov/vhf/ebola/hcp/ppe-training/n95Respirator_Coveralls/doffing_04.html.
CDC. 2014c. Sequence for Putting on Personal Protective Equipment (PPE). http://www.cdc.gov/hai/pdfs/ppe/ppeposter8511.pdf.
CDC. 2015. The National Personal Protective Technology Laboratory (NPPTL): Considerations for Selecting Protective Clothing used in Healthcare for Protection against Microorganisms in Blood and Body Fluids. http://www.cdc.gov/niosh/npptl/topics/protectiveclothing/.
Davis MS. 2001. Advanced Precautions for Today’s OR: The Operating Room Professional's Handbook for the Prevention of Sharps Injuries and Bloodborne Exposures, 2nd ed. Atlanta, GA: Sweinbinder Publications LLC.
Duckro AN, Blom DW, Lyle EA, Weinstein RA Hayden MK. 2005. Transfer of vancomycin-resistant enterococci via health care worker hands. Arch Intern Med. 165(3):302–307.
Gammon J, Morgan-Samuel H, Gould D. 2008. A review of the evidence for suboptimal compliance of healthcare practitioners to standard/universal infection control precautions. J Clin Nurs. 17(2):157–167.
Gralton J, Rawlinson WD, McLaws ML. 2013. Health care workers’ perceptions predicts uptake of personal protective equipment. Am J Infect Control. 41(1):2–7.
International Labour Organization (ILO), World Health Organization (WHO). 2005. Joint ILO/WHO Guidelines on Health Services and HIV/AIDS. Geneva, Switzerland: ILO and WHO. http://www.who.int/hiv/pub/prev_care/ilowhoguidelines.pdf?ua=1.

Personal Protective Equipment
30 Infection Prevention and Control: Module 3, Chapter 1
Lipscomb J, L Rosenstock. 1997. Health care workers: protecting those who protect our health. Infect Control Hosp Epidemiol. 18(6):397–399.
Loeb M, McGeer AM, Henry B, et al. 2004. SARS among critical care nurses, Toronto. Emerg Infect Dis. 10(2):251–255.
Mischke C, Verbeek JH, Saarto A, et al. 2014. Gloves, extra gloves or special types of gloves for preventing percutaneous exposure injuries in healthcare personnel. Cochrane Database Syst Rev. 3(CD009573).
Occupational Safety & Health Administration (OSHA), US Department of Labor. 2001. Revision to OSHA's Bloodborne Pathogens Standard: Technical Background and Summary. https://www.osha.gov/needlesticks/needlefact.html.
Secured Medical Direction UK Co, Ltd. 2012. Products: Surgical Gown. http://www.smd-medical.com/productsinfo.asp?proID=387#Menu=ChildMenu73.
Seto WH, Tsang D, Yung RWH, et al. 2003. Effectiveness of precautions against droplets and contact in prevention of nosocomial transmission of severe acute respiratory syndrome (SARS). Lancet. 361(9368):1519–1520.
Siegel JD, Rhinehart E, Jackson M, Chiarello L, the Healthcare Infection Control Practices Advisory Committee (HICPAC). 2007. 2007 Guideline for Isolation Precautions: Preventing Transmission of Infectious Agents in Healthcare Settings. Atlanta, GA: CDC/HICPAC. http://www.cdc.gov/hicpac/2007ip/2007isolationprecautions.html.
Thomas EM, Kundrapu S, Thota P, et al. 2015. Contamination of health care personnel during removal of personal protective equipment. JAMA Intern Med. 175(12):1904–1910.
Tietjen LG, Bossemeyer D, McIntosh N. 2003. Infection Prevention: Guidelines for Healthcare Facilities with Limited Resources. Baltimore, MD: Jhpiego.
Tietjen LG, Cronin W, McIntosh N. 1992. Infection Prevention Guidelines for Family Planning Service Programs: Handwashing and Gloving. Durant, OK: Essential Medical Information Systems, Inc.
Valim MD, Marziale MH, Richart-Martínez M, Sanjuan-Quiles A. 2014. Instruments for evaluating compliance with infection control practices and factors that affect it: an integrative review. J Clin Nurs. 23(11–12):1502–1519.
Watt AM, Patkin M, Sinnott MJ, Black RJ, Maddern GJ. 2010. Scalpel safety in the operative setting: a systematic review. Surgery. 147(1):98–106.
World Health Organization (WHO). 2003. Aide-Memoire for a Strategy to Protect Health Workers from Infection with Bloodborne Viruses. http://www.who.int/occupational_health/activities/1am_hcw.pdf.
WHO. 2004. Making Pregnancy Safer: The Critical Role of the Skilled Attendant: A Joint Statement by WHO, ICM and FIGO. Geneva, Switzerland: WHO. http://www.unscn.org/layout/modules/resources/files/Making_pregnancy_safer_the_critical_role.pdf.
WHO. 2007a. Standard Precautions in Health Care. Aide-Memoire. http://www.who.int/csr/resources/publications/standardprecautions/en/.
WHO. 2007b. How to Put On and Take Off Personal Protective Equipment (PPE). http://www.who.int/csr/resources/publications/PPE_EN_A1sl.pdf.
WHO. 2008. Infection Control Strategies for Specific Procedures in Health-Care Facilities: Epidemic-Prone and Pandemic-Prone Acute Respiratory Diseases: A Quick Reference Guide. http://www.who.int/csr/resources/publications/WHO_CDS_HSE_2008_2/en/.

Personal Protective Equipment
Infection Prevention and Control: Module 3, Chapter 1 31
WHO. 2009a. WHO Guidelines on Hand Hygiene in Health Care: First Global Patient Safety Challenge. Clean Care Is Safer Care. Geneva, Switzerland: WHO. http://whqlibdoc.who.int/publications/2009/9789241597906_eng.pdf.
WHO. 2009b. Glove Use Information Leaflet. http://www.who.int/gpsc/5may/Glove_Use_Information_Leaflet.pdf.
WHO, World Alliance for Patient Safety. 2006. Information Sheet 6: The First Global Patient Safety Challenge: Clean Care Is Safer Care. http://www.who.int/gpsc/tools/Infsheet6.pdf?ua=1.

Personal Protective Equipment
32 Infection Prevention and Control: Module 3, Chapter 1

PPE during Viral Hemorrhagic Fever Outbreaks
Infection Prevention and Control: Module 3, Chapter 2 33
Chapter 2. Use of Personal Protective Equipment during Outbreaks of Viral Hemorrhagic Fever
Key Topics Essential messages about effective use of personal protective equipment (PPE) during outbreaks of
viral hemorrhagic fever (VHF)
Types and use of PPE during VHF outbreaks
Use of PPE during VHF isolation
Key Terms Full skin coverage is the use of PPE in such a way that no skin or mucous membranes are exposed to
protect a health care worker (HCW) from any exposure to blood and body fluids, even on intact skin, during patient care.
Personal protective equipment (PPE) items are the protective barriers and respirators used alone or in combination by an HCW to protect mucous membranes, airways, skin, and clothing from contact with harmful or infectious agents. PPE may also be used on an infectious patient to prevent the spread of infectious agents (e.g., surgical mask worn by a patient to control the spread of illness).
Respirator fit testing is a test protocol conducted to verify that a respirator is both comfortable and correctly fits the user. Fit testing uses a test agent, either qualitatively detected by the wearer’s sense of taste, smell, or involuntary cough (irritant smoke) or quantitatively measured by an instrument, to verify the respirator’s fit. The benefits of this testing include better protection for the HCW/user of the respirator and verification that the user is wearing a correctly fitting model and size of respirator.
Respirator seal check is a procedure conducted by the wearer of a particulate respirator to determine if the respirator is properly sealed to the face. The user seal check can be either a positive pressure check (i.e., breathing out to check for leak on exhalation), or negative pressure check (i.e., breathing in to check for leak on inhalation), or both.
Trained observer is an HCW who has been trained in methodically observing the process of putting on and removing PPE using a checklist. The trained observer provides instructions to fellow HCWs to appropriately put on PPE and ensures that the HCWs’ skin and mucous membranes are fully covered before entering into the isolation area. The trained observer also observes and provides instruction for the safe removal of PPE to minimize the risk of accidental exposure to blood and body fluids during removal. Based on the local clinic guidelines, the trained observer may or may not assist in the process of PPE removal.
Background During 2014 and 2015, the West African nations of Guinea, Sierra Leone, and Liberia experienced a devastating outbreak of Ebola Virus Disease (EVD). EVD is one of a group of infections collectively termed viral hemorrhagic fevers, which include Lassa, Rift Valley, Marburg, yellow fever, and others. By the end of 2015, a total of 28,601 cases of EVD and 11,300 deaths had been reported in these three countries—881 HCWs were infected and 513 died (WHO 2015). While a substantial number of these infections occurred outside of Ebola treatment settings, the main reasons for infection during patient care were thought to be the failure to meticulously follow PPE guidelines, low quality of the PPE, and

PPE during Viral Hemorrhagic Fever Outbreaks
34 Infection Prevention and Control: Module 3, Chapter 2
inadequate training on how to appropriately put on and remove PPE (WHO 2014a). (Detailed descriptions and steps for using individual PPE are covered in Chapter 1, Personal Protective Equipment, in this module.) This chapter provides detailed information on the relevant PPE for care of patients with EVD and other highly infectious VHFs. (For more information, see Jhpiego’s reference manual Prevention and Control of Ebola Virus Disease in Health Care Facilities with Limited Resources.)
Essential Messages about Effective Use of Personal Protective Equipment to Prevent Transmission during Outbreaks of Viral Hemorrhagic Fever HCWs should practice Standard Precautions and empiric Transmission-Based Isolation Precautions
(see Module 1, Chapter 2, Standard and Transmission-Based Precautions) at all times for all patients to prevent transmission from unidentified cases.
In settings where VHF patients are managed, appropriate PPE should be used in conjunction with proper isolation facilities, workflow organization, hand hygiene, waste management, and adequate hygiene, sanitation, and ventilation.
HCWs engaged in providing care for suspected, probable, or confirmed cases of any highly infectious disease should receive mandatory training in appropriate selection, use, and disposal of PPE. PPE must be made available for practice and training purposes.
Full skin coverage with PPE should be practiced by all HCWs in treatment units in outbreak settings and at referral facilities.
Trained observers should watch, supervise, and assist with PPE use (especially removal) to ensure that HCWs meticulously follow each step when putting on and removing PPE and that any break in the process is recognized immediately. (See Appendix 2-A, Checklist for Putting on Personal Protective Equipment before Treating Patients during Outbreaks of Viral Hemorrhagic Fever and Appendix 2-B, Checklist for Removing Personal Protective Equipment after Treating Patients during Outbreaks of Viral Hemorrhagic Fever.)
Adequate supplies of appropriately sized PPE should be made available as early in an outbreak as possible.
(Ruparelia et al. 2015)
Types of Personal Protective Equipment to Prevent Transmission during Disease Outbreaks List of Personal Protective Equipment PPE recommended by the World Health Organization (WHO) for HCWs who provide care and treatment to VHF patients includes:
Fluid-resistant coverall or gown:
Without an attached hood
With thumb holes or loops
Waterproof apron
Waterproof boots
Fluid-resistant isolation mask with a design that does not collapse against the mouth
Face shield

PPE during Viral Hemorrhagic Fever Outbreaks
Infection Prevention and Control: Module 3, Chapter 2 35
Respirator—required when performing aerosol-generating procedures is anticipated
Head cover that covers head and neck (separate from the gown or coverall)
Double gloves with cuffs to mid-forearm (nitrile preferred over latex)
(Ruparelia et al. 2015) PPE specifications are available on the WHO website: http://www.who.int/csr/resources/publications/ebola/ppe-guideline/en/. Coveralls Coveralls are full-body suits made from materials that are lightweight, breathable, and impermeable to liquids (see Figure 2-1). These are to be worn by all HCWs who work in isolation areas for treating highly infectious diseases (e.g., VHF). They are designed to go over a scrub suit and create a barrier to eliminate or reduce contact exposure to blood, body fluids, and highly infectious microorganisms (CDC 2015). Coveralls without attached hood and with thumbholes are recommended.
Steps for putting on coverall suits
Make sure that a trained observer is watching and monitoring the steps.
Perform hand hygiene.
Put on the scrub suit, rubber boots or shoe covers, and a pair of sterile or non-sterile gloves.
Unfold the coverall suit and unzip.
Slide legs, one by one, into the suit.
Slide arms, one by one, into the suit.
Tuck the cuffs of the first pair of gloves under the sleeves of the coverall suit.
Insert thumbs into thumb hole (if provided).
Close the zip by pulling it up to the neck.
Cover the zip with the additional flap if available.
Assess the garment for any visible tears or compromise to integrity.
Steps for removing coverall suits
Make sure that a trained observer is watching and monitoring the removal process and is ready to assist, if needed.
See the step-by-step PPE removal checklist in Appendix 2-B for essential steps leading up to removal of the coverall.
Disinfect inner gloves using alcohol-based handrub (ABHR) or 0.5% chlorine solution covering all surfaces of the gloved hands.
Lift the chin.
Find the zip at the level of the belly and carefully trace fingers of one hand up to find the zip tab.
Figure 2-1. Coverall Suit

PPE during Viral Hemorrhagic Fever Outbreaks
36 Infection Prevention and Control: Module 3, Chapter 2
Hold the outside of the top of suit with the other hand (do not let it go).
Unzip or unfasten the suit completely (still holding the top near the zip).
Gently pull the side of the suit being held partially over the shoulder.
Perform a rotating movement of the shoulder inside out (one by one) to remove the coverall and carefully move the coverall down the body, turning inside out.
Do a “moon walk” to remove the legs of the suit over the boots.
Carefully place it in the waste bag, touching only the inside.
Avoid contact of the scrub suit with the outer surface of the gown.
Disinfect gloved hands using ABHR or 0.5% chlorine solution, covering all surfaces of the gloved hands.
See the step-by-step PPE removal checklist for essential next steps in removal of PPE.
Gowns Gowns should fully cover the torso of the HCW, fit comfortably over the body, and have long sleeves that fit snuggly at the wrists. Long-sleeved and fluid-resistant single use gowns are an effective alternative to coveralls in the context of highly infectious diseases such as VHF. (See Chapter 1, Personal Protective Equipment, in this module for detailed instructions on use of gowns.)
Make sure that a trained observer is watching and monitoring the steps
Secure all ties at the neck and at the waist. Make sure that you tie the waist on the side so that it is easy to untie at the time of removal.
Tuck the cuffs of the first pair of gloves under the sleeves of the gown.
Make sure that the gown is covering all areas of the body in the back and covers at least to the calves.
Steps for removing gowns
Make sure that a trained observer is watching and monitoring the removal process and is ready to assist, if needed.
See the step-by-step PPE removal checklist for essential steps leading up to removal of the gown.
Disinfect the inner gloves using ABHR or 0.5% chlorine solution, covering all surfaces of the gloved hands.
Have a trained observer undo the ties at the back and waist. Alternatively, grasp the shoulders of the gown and pull forward to break the ties at the neck.
Gently pull arms out of the gown, turning the sleeves inside out.
Roll the gown so the contaminated inside surface is contained.
Carefully place it in the waste bag.
Avoid contact of the scrub suit with the outer surface of gown.
Disinfect gloved hands using ABHR or 0.5% chlorine solution, covering all surfaces of the gloved hands.
See the step-by-step PPE removal guide for essential next steps in removal of PPE.

PPE during Viral Hemorrhagic Fever Outbreaks
Infection Prevention and Control: Module 3, Chapter 2 37
Respirators Respirators are specialized masks, called particulate respirators, which are used to prevent inhalation of small particles that may contain infectious agents transmitted via the airborne route. They are recommended for situations in which filtering inhaled air is important, including during disease outbreaks with unknown mode of transmission or when procedures might create mechanically generated aerosols that could be infectious. Respirators contain multiple layers of filter material and fit the face tightly. Models of particulate respirators are selected based on inherent fit and the protective factor expected (i.e., N95 designation means that when subjected to careful testing, the respirator blocks at least 95% of very small [0.3 micron] test particles). They are more difficult to breathe through and more expensive than surgical masks (see Chapter 1, Personal Protective Equipment, in this module for detailed instructions on the use of respirators).
Plastic Aprons Plastic aprons are the last PPE to put on in the context of disease outbreaks. They are worn over the gown or the coverall suit to provide additional protection. Put the apron on after putting on the outer gloves and respirator.
Steps for putting on plastic aprons
Make sure that a trained observer is watching and monitoring the removal process and is ready to assist, if needed.
See the step-by-step PPE removal guide for essential steps needed before putting on apron.
Make sure that the apron is the last PPE to put on.
Unfold the apron.
Tie the straps at the back of the neck or put the apron on by placing it over the head, depending on the design of the apron.
Tie the straps at the waist to secure the apron in place.
Steps for removing plastic aprons
Make sure that a trained observer is watching and monitoring the removal process and is ready to assist, if needed.
See the step-by-step PPE removal guide for essential steps leading up to removal of apron.
Disinfect the outer gloves with ABHR or 0.5% chlorine solution.
Wipe the front of the apron with chlorine wipes.
Hold the apron by the straps.
Remove the apron by pulling the straps away from the body to break the straps.
Turn the apron and roll it inside out.
Put it in a container for contaminated waste.
Disinfect the outer gloves with ABHR or 0.5% chlorine solution.
See the step-by-step PPE removal guide for essential next steps in removal of PPE.
(CDC 2014b)

PPE during Viral Hemorrhagic Fever Outbreaks
38 Infection Prevention and Control: Module 3, Chapter 2
Use of Personal Protective Equipment in Health Care Settings during Management of Viral Hemorrhagic Fever Patients in Isolation Rooms Working in an isolation room for patients with VHF is a very high-risk activity. HCWs tasked to work in VHF patient care areas should receive training in using PPE to ensure that they have the required competence in its use. In addition, there should be clear and well-defined protocols for putting on and taking off PPE, high-quality and appropriately sized PPE, a trained assistant to help with putting on and taking off PPE, and systems to promptly manage accidental exposure and continuously monitor the physical condition of anyone exposed.
Principles of Effective PPE Use
1. Achievement of competence:
Rigorous and repeated training
Ongoing practice
2. Clear, standardized method to put on and remove PPE:
Putting on and taking off PPE in a systematic manner
Easy-to-understand instructions provided and, if possible, pictorially represented on the wall of the designated room
Cleaning of PPE before removing each piece
3. Oversight:
Mentoring for all users before engaging in any clinical care
Trained assistant
Optional addition: Trainer/monitor
VHF site manager
4. Type:
Correct size for the user
Covers all exposed skin
5. Complies with WHO standards (e.g., fluid-resistance, type, shape) (WHO 2014c)
Sequence for Putting On PPE for Use in VHF Isolation Rooms Work with a trained observer:
1. Perform hand hygiene using soap and water or ABHR.
2. Change from street clothes to a clean scrub suit (one that has been processed in the health care facility laundry).
3. Put on rubber boots (or shoe covers if rubber boots are not available). Rubber boots are preferred because there is a high risk of gross contamination of foot coverings. Boots should cover the lower end of scrub pants.
4. Put on the first pair of clean non-sterile gloves; nitrile gloves are preferred over latex gloves.

PPE during Viral Hemorrhagic Fever Outbreaks
Infection Prevention and Control: Module 3, Chapter 2 39
5. Put on the coverall suit/gown (WHO recommends wearing a coverall suit without a head cover). Use the appropriate size to allow for freedom of movement. The gown should fully cover the torso from the neck to below the knees, and the arms to the ends of the wrists, and wrap around the neck.
6. Tuck the inner gloves under the sleeves of the coverall suit/gown. With the help of the trained observer, insert the thumb into the thumb hole at the border of the cuff of the gown.
7. Put on the medical mask/N95 respirator. Follow instruction for wearing N95 masks and complete the seal test to ensure better protection.
8. Put on the head cover/surgical hood. Ensure that the face, neck, and head to eyebrows are fully covered. The surgical hood should fully cover the head and extend onto the shoulders.
9. Put on the face shield.
10. Put on the second pair of gloves. Depending on the procedure, select sterile or clean, non-sterile gloves.
11. Put on the plastic apron.
(See Appendix 2-A in this chapter for more details.) (CDC 2014a; Ruparelia et al. 2015)
Sequence for Removing PPE after Use in VHF Isolation Rooms
1. Disinfect the outer gloves using 0.5% chlorine solution or ABHR.3
2. Remove the plastic apron. If the apron is disposable, snap the apron away from the body in front, holding it near the top, and dispose of it in the appropriate container for contaminated waste. If it is reusable, open the ties, move the apron away from the body, and place it in the appropriate bin for reprocessing.
3. Disinfect the outer gloves using ABHR or 0.5% chlorine solution.
4. Remove the outer gloves.
5. Inspect the inner gloves for cuts or tears.
6. Remove the face shield.
7. Disinfect the inner gloves using ABHR or 0.5% chlorine solution.
8. Remove the head cover/surgical hood and facial covering.
9. Disinfect the inner gloves using ABHR or 0.5% chlorine solution.
10. Remove the coverall suit/gown.
11. Disinfect the inner gloves using ABHR or 0.5% chlorine solution.
12. Remove the shoe covers using a hands-free technique (removing shoe covers without touching them with hands).
13. Disinfect the inner gloves using ABHR or 0.5% chlorine solution and remove the gloves.
14. Perform hand hygiene using ABHR or 0.05% chlorine solution.
15. Put on a new pair of non-sterile gloves.
16. Remove the mask/N95 respirator.
17. Disinfect the inner gloves using ABHR or 0.5% chlorine solution.
3 Disinfect gloved hands with 0.05% chlorine solution or ABHR every time an item of PPE is removed or touched during removal.

PPE during Viral Hemorrhagic Fever Outbreaks
40 Infection Prevention and Control: Module 3, Chapter 2
18. Spray the shoes with 0.5% chlorine solution and remove shoes.
19. Disinfect the inner gloves using ABHR or 0.5% chlorine solution.
20. Remove the gloves.
21. Perform hand hygiene with ABHR or 0.05% chlorine solution.
(See Appendix 2-B in this chapter for more details.) (CDC 2014a; Ruparelia et al. 2015)
Summary To ensure full protection while managing patients with VHF, HCWs should strictly follow the steps for putting on PPE. A trained observer should see that no skin is left exposed before an HCW enters a VHF isolation ward. It was observed during the outbreaks in West Africa that most exposures to infectious blood and body fluids among HCWs occurred during removal of PPE. A trained observer should closely observe and alert an HCW about any potential exposure during removal of the PPE. By following recommendations in this chapter for putting on and removing PPE, HCWs will be able to better protect themselves while managing cases of VHF. In practice, gloves should be disinfected with 0.5% chlorine solution or hand hygiene should be performed using ABHR or 0.05% chlorine solution every time an item of PPE is touched or removed.

PPE during Viral Hemorrhagic Fever Outbreaks
Infection Prevention and Control: Module 3, Chapter 2 41
Appendix 2-A. Checklist for Putting on Personal Protective Equipment before Treating Patients during Outbreaks of Viral Hemorrhagic Fever
CHECKLIST FOR PUTTING ON PPE
STEP/TASK CASES
PREPARATION
Check that: a. Scrub suit, appropriate size rubber boots, and hand hygiene supplies are
available. b. All PPE of the appropriate size that you need (gloves, plastic apron, gown,
mask or respirator, face shield, head cover/cap, and footwear) is available. c. There is a designated area for putting on and removing PPE.
Find a trained observer to help you in putting on and removing PPE.
Tie back hair; for eyeglasses, use anti-fog coating and secure with tape (or remove); remove jewelry/tie/ID/cell phone, etc.
Use the bathroom.
Wash hands with soap or use alcohol-based handrub.
Put on scrub suit and rubber boots in the changing room. If rubber boots are not available, wear closed, puncture- and fluid-resistant shoes with no laces or opening at top of foot.
Perform a BRIEFING to review plan for time in isolation area and ensure that all needed equipment is prepared.
Trained observer reads the following step-by-step instructions and ensures that the health care worker putting on PPE follows them.
Perform hand hygiene with soap and water or alcohol-based handrub; if they cannot be made available, use the interim option of 0.05% chlorine solution.
If not wearing rubber boots, put on shoe covers.
Put on first pair of gloves (if you have a short-cuff pair, put them on now).
Coverall suit: Put on coverall suit of an appropriate size to allow free movements. Gown: Put on gown and ensure that it fully covers torso from neck to knees, arms to end of wrists, and wraps around the back.
Coverall suit: Zip up and fasten the zip and neck tabs of the suit. Gown: Fasten the gown at the back of the neck and waist.

PPE during Viral Hemorrhagic Fever Outbreaks
42 Infection Prevention and Control: Module 3, Chapter 2
CHECKLIST FOR PUTTING ON PPE
STEP/TASK CASES
Tuck cuff of the inner gloves under the sleeves of the gown.
Insert thumbs into thumb holes (if appropriate).
Medical mask: Put on, tie securely, and pinch the bridge of the nose to ensure that the mask is correctly positioned. N95 respirator: a. Cup the respirator in hand with the nosepiece at fingertips. b. Allow the head bands to hang freely below hand. c. Position the respirator under chin with the nosepiece up. d. Pull the top strap over the head; rest it high at back of head. e. Pull the bottom strap over the head and position it around the neck below the
ears. f. Place fingertips of both hands at the top of the metal nosepiece and mold the
nosepiece (USING TWO FINGERS OF EACH HAND) to the shape of your nose. (Note: Pinching the nosepiece using one hand may result in less effective respirator performance.)
g. Perform fit test: − Exhale sharply: If positive pressure builds inside, there is no leakage. If
pressure does not build, adjust the respirator. − Inhale deeply: If there is no leakage, the respirator will cling to the face. If
it does not, adjust the mask.
Put on head cover, ensuring that face, neck, and head to eyebrows are fully covered.
Spray face shield with anti-fog coating and wipe with clean cloth.
Put on face shield and tighten to fit head securely and hold head cover in place.
Put on a second pair of gloves (these should have a long cuff pulled over the sleeves of the gown or suit).
Put on apron and tie at the back.
Have the trained observer check: All skin is covered. Comfort: HCW is able to extend the arms, bend at the waist, and do range of
motions, and no skin shows during movement. Anything that is not in place, and correct it.
If using a mirror, check all PPE, and correct as needed.
Ensure that the trained observer asks the HCW in PPE to move arms up and down to ensure that no area of skin or mucous membrane is exposed.

PPE during Viral Hemorrhagic Fever Outbreaks
Infection Prevention and Control: Module 3, Chapter 2 43
CHECKLIST FOR PUTTING ON PPE
STEP/TASK CASES
Enter the isolation room or patient care area after clearance from the trained observer.
DO NOT TOUCH OR ADJUST PPE once in the isolation area; any movement of PPE is considered a breach.
Source: Ruparelia et al. 2015.

PPE during Viral Hemorrhagic Fever Outbreaks
44 Infection Prevention and Control: Module 3, Chapter 2
Appendix 2-B. Checklist for Removing Personal Protective Equipment after Treating Patients during Outbreaks of Viral Hemorrhagic Fever
CHECKLIST FOR REMOVING PPE
STEP/TASK CASES
PREPARATION
Ensure that there is a separate area for removing PPE, other than the one used for putting on PPE.
The location of the area for removing PPE should allow the health care worker (HCW) to move into a low-risk area when PPE is removed.
Prepare a container with 0.5% chlorine solution in which to place reusable PPE to be reprocessed.
Prepare a container with 0.05% chlorine solution for hand hygiene if ABHR and/or soap and water are not available.
Have a waste bag in a rigid waste container (no lid) ready to safely place used, disposable PPE (depending on workflow, two may be needed).
Ensure that there is a trained observer available to help in removing PPE.
The trained observer completes the following tasks: a. Put on PPE: Gown, shoe covers, goggles or face shield, mask, double gloves
(one long-cuff). b. Remind the HCW to avoid automatic actions that may put him/her at risk (e.g.,
touching the face or forehead). c. Read aloud each step of the procedure. d. Ensure that the HCW repeats back the step he/she is about to perform (talk
back) and confirms completing the step. e. Observe and confirm visually that the PPE has been removed properly.
Minimize touching of PPE. Disinfect gloves after any contact.
Inspect the PPE to assess for visible contamination, cuts, or tears before starting to remove. Have the trained observer spray the front and the back of the PPE with 0.5% chlorine solution, pointing the spray nozzle downward. Alternative: Trained observer hands 0.5% chlorine solution to HCW to wipe front of PPE and gloves.
Decontaminate outer gloves with ABHR or 0.5% chlorine solution, ensuring that all surfaces of the gloved hands are cleaned.
Remove apron by pulling it away from the body and rolling contaminated front inward, and place it in the waste bag. DO NOT TOUCH THE FRONT OF THE APRON. If reprocessing apron, put it in the container with 0.5% chlorine solution.

PPE during Viral Hemorrhagic Fever Outbreaks
Infection Prevention and Control: Module 3, Chapter 2 45
CHECKLIST FOR REMOVING PPE
STEP/TASK CASES
Inspect the PPE under the apron to assess for visible contamination, cuts, or tears. If any breach, spray or wipe the area with 0.5% chlorine solution. If no breach, move to the next step.
Disinfect outer gloves with ABHR or 0.5% chlorine solution, ensuring that all surfaces of the gloved hands are cleaned.
Remove outer gloves and place them in waste bag.
Inspect inner gloves to assess for cuts or tears. If any breach, spray or wipe the area with 0.5% chlorine solution, release thumb from the hole in the coverall suit, remove gloves, perform hand hygiene on hands, and put on clean gloves up to the edge of the coverall suit. If no breach, move to next step.
Remove face shield: by tilting the head slightly forward, grabbing the rear strap, and pulling it over the head, gently allowing the face shield to fall forward. Note: Avoid touching the front surface of the shield.
Disinfect inner gloves with ABHR or 0.5% chlorine solution, ensuring that all surfaces of the gloved hands are cleaned.
Remove head cover by grasping it from the back and pulling it away from head (not touching face or skin).
Disinfect inner gloves with ABHR or 0.5% chlorine solution, ensuring that all surfaces of the gloved hands are cleaned.
Remove gown: Grasp shoulders of gown and pull forward to break ties (or have trained observer undo ties at back). Roll gown so contaminated inside surface is contained. Or Remove coverall suit: Undo sticky tabs or ties (use mirror as appropriate): a. Lift chin. b. Find zip at the level of your belly and carefully trace your fingers up to find the
zip tab and fasteners with one hand. c. Hold outside of the top of suit at collarbone level near to zip line with the other
hand (do not let it go). d. Unzip or unfasten suit completely (still holding top near zip). e. Gently pull the side of the suit you are holding partially over the shoulder. f. Perform rotating movement of the shoulders (one by one) to remove coverall
and carefully move coverall down body, turning inside out. g. Do a “moon-walk” to remove legs of suit over your boots. h. Carefully place in waste bag, touching only the inside. i. Avoid contact of scrubs with outer surface of gown or suit.
Disinfect inner gloves with ABHR or 0.5% chlorine solution, ensuring that all surfaces of the gloved hands are cleaned.
If wearing shoe covers, remove them using hands-free technique, if possible, and place them in waste bag, touching only the inside of the shoe covers.
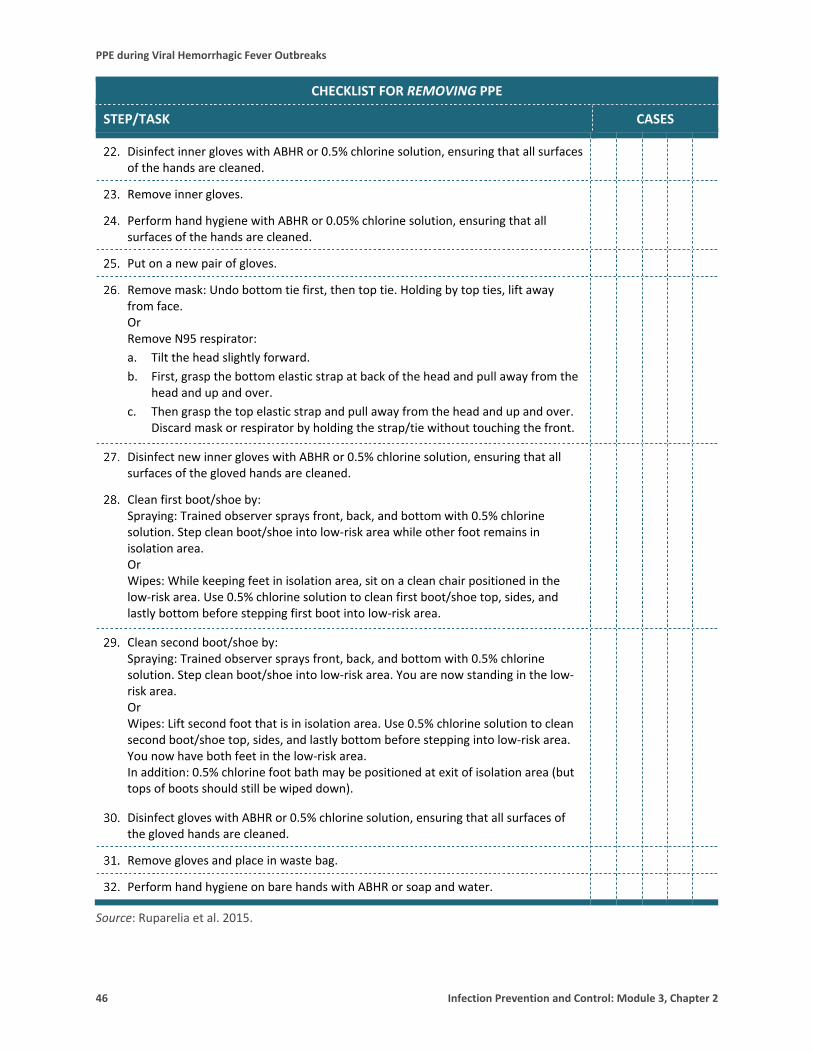
PPE during Viral Hemorrhagic Fever Outbreaks
46 Infection Prevention and Control: Module 3, Chapter 2
CHECKLIST FOR REMOVING PPE
STEP/TASK CASES
Disinfect inner gloves with ABHR or 0.5% chlorine solution, ensuring that all surfaces of the hands are cleaned.
Remove inner gloves.
Perform hand hygiene with ABHR or 0.05% chlorine solution, ensuring that all surfaces of the hands are cleaned.
Put on a new pair of gloves.
Remove mask: Undo bottom tie first, then top tie. Holding by top ties, lift away from face. Or Remove N95 respirator: a. Tilt the head slightly forward. b. First, grasp the bottom elastic strap at back of the head and pull away from the
head and up and over. c. Then grasp the top elastic strap and pull away from the head and up and over.
Discard mask or respirator by holding the strap/tie without touching the front.
Disinfect new inner gloves with ABHR or 0.5% chlorine solution, ensuring that all surfaces of the gloved hands are cleaned.
Clean first boot/shoe by: Spraying: Trained observer sprays front, back, and bottom with 0.5% chlorine solution. Step clean boot/shoe into low-risk area while other foot remains in isolation area. Or Wipes: While keeping feet in isolation area, sit on a clean chair positioned in the low-risk area. Use 0.5% chlorine solution to clean first boot/shoe top, sides, and lastly bottom before stepping first boot into low-risk area.
Clean second boot/shoe by: Spraying: Trained observer sprays front, back, and bottom with 0.5% chlorine solution. Step clean boot/shoe into low-risk area. You are now standing in the low-risk area. Or Wipes: Lift second foot that is in isolation area. Use 0.5% chlorine solution to clean second boot/shoe top, sides, and lastly bottom before stepping into low-risk area. You now have both feet in the low-risk area. In addition: 0.5% chlorine foot bath may be positioned at exit of isolation area (but tops of boots should still be wiped down).
Disinfect gloves with ABHR or 0.5% chlorine solution, ensuring that all surfaces of the gloved hands are cleaned.
Remove gloves and place in waste bag.
Perform hand hygiene on bare hands with ABHR or soap and water.
Source: Ruparelia et al. 2015.

PPE during Viral Hemorrhagic Fever Outbreaks
Infection Prevention and Control: Module 3, Chapter 2 47
References Centers for Disease Control and Prevention (CDC). 2014a. Guidance on Personal Protective Equipment to Be Used by Healthcare Workers During Management of Patients with Ebola Virus Disease in U.S. Hospitals, Including Procedures for Putting On (Donning) and Removing (Doffing). http://www.cdc.gov/vhf/ebola/healthcare-us/ppe/guidance.html.
CDC. 2014b. Doffing PPE: Remove Outer Apron. Video. http://www.cdc.gov/vhf/ebola/hcp/ppe-training/n95Respirator_Coveralls/doffing_04.html.
CDC. 2014c. Sequence for Putting on Personal Protective Equipment (PPE). http://www.cdc.gov/hai/pdfs/ppe/ppeposter8511.pdf.
CDC. 2015. The National Personal Protective Technology Laboratory (NPPTL): Considerations for Selecting Protective Clothing Used in Healthcare for Protection against Microorganisms in Blood and Body Fluids. http://www.cdc.gov/niosh/npptl/topics/protectiveclothing/.
Ruparelia C, Curless M, Trexler P, Black M. 2015. Prevention and Control of Ebola Virus Disease in Health Care Facilities with Limited Resources: Guide for Facilitators. Baltimore, MD: Jhpiego.
World Health Organization (WHO). 2008. Infection Control Strategies for Specific Procedures in Health-care Facilities: Epidemic and Pandemic Prone Respiratory Diseases: A Quick Reference Guide. http://www.who.int/csr/resources/publications/WHO_CDS_HSE_2008_2/en/.
WHO. 2009. WHO Policy on TB Infection Control in Health-Care Facilities, Congregate Settings and Households. http://www.who.int/tb/publications/2009/infection_control/en/.
WHO. 2014a. Ebola Response Roadmap Situation Report Update—7 November 2014. http://apps.who.int/iris/bitstream/10665/137592/1/roadmapsitrep_7Nov2014_eng.pdf?ua=1.
WHO. 2014b. Ebola Response Roadmap Update—16 September 2014. http://apps.who.int/iris/bitstream/10665/133546/1/roadmapupdate16sept14_eng.pdf?ua=1.
WHO. 2014c. Personal Protective Equipment in the Context of Filovirus Disease Outbreak Response. http://www.who.int/csr/resources/publications/ebola/ppe-guideline/en/.
WHO. 2015. Ebola Situation Report—30 December 2015. http://apps.who.int/ebola/current-situation/ebola-situation-report-30-december-2015.

PPE during Viral Hemorrhagic Fever Outbreaks
48 Infection Prevention and Control: Module 3, Chapter 2