Embed Size (px)
Citation preview

iN2 Polara FS Android Application Manual
350-076
Revision A - 11/1/2018
Polara
iN2 Polara FS Android Application Manual
350-076 Rev. A
11/1/2018

iN2 Polara FS Android Application Manual
350-076
Revision A - 11/1/2018
Contents
1. Using the Polara Field Service App for Android to Change iCCU-X Settings ......................................... 3
1.1 Wi-Fi Connection ..........................................................................................................................................3
1.2 Changing the Password .................................................................................................................................5
1.3 Advanced Communications Settings ..............................................................................................................6
1.4 Channel and Phase Setup ..............................................................................................................................7
1.4.1 Ped Interval Source Selection ............................................................................................................................ 7
1.4.2 View Interval Status ........................................................................................................................................... 9
1.4.3 Advanced iCCU Settings – Channel Assignment .............................................................................................. 10
1.4.4 Advanced iCCU Settings – Ped Call Connection Setup..................................................................................... 11
1.5 Assigning iN2 PBSs to Phases ...................................................................................................................... 12
1.6 Setting the iCCU Time/Date, SNTP & DST Settings........................................................................................ 13
1.7 Setting Ethernet Configuration .................................................................................................................... 14
1.8 General Purpose Input and Preemption (iCCU-S Only) ................................................................................. 15
1.9 Ped Isolator ................................................................................................................................................ 16
2. Using the Polara Field Service App for iOS to Change iN2 PBS Settings ............................................. 17
2.1 Bluetooth Connection ................................................................................................................................. 17
2.1.1 Connection Example: Samsung S7 running Android 7.0.................................................................................. 17
2.1.2 Connection Example: Google Pixel running Android 9.0 ................................................................................. 18
2.1.3 Connection Example: Nvidia Shield K1 Tablet running Android 7.0 ................................................................ 19
2.2 PBS Configuration Options .......................................................................................................................... 20
2.3 Quiet Time ................................................................................................................................................. 23
2.4 Preparing Audio Files .................................................................................................................................. 24
2.4.1 Opening .ogg files as an e-mail attachment .................................................................................................... 25
2.4.2 Opening .ogg files via Android File System ...................................................................................................... 26
2.4.3 Browsing for .ogg files via Polara FS App ......................................................................................................... 27
2.5 Updating Audio Files ................................................................................................................................... 28
2.6 Extract Audio Files ...................................................................................................................................... 30
3. Using the Polara Field Service App to Access the Health Log ............................................................ 31
3.1 Accessing the Health Log ............................................................................................................................. 31
4. Getting Button Info and Diagnostics ................................................................................................ 32
5. Using the Polara Field Service App for Firmware Updates ................................................................ 33
5.1 Checking for the Latest Firmware ................................................................................................................ 33
5.2 Performing a Firmware Update ................................................................................................................... 34

iN2 Polara FS Android Application Manual
350-076
Revision A - 11/1/2018
1. Using the Polara Field Service App for Android to Change iCCU-X
Settings
All of the available setup and maintenance procedures may be performed using a compatible Android device. The device
must have Android version 5.0 (Lollipop) or higher.
We have tested the Polara FS app on a number of Android devices, but we cannot guarantee that it will function properly
on all devices. We have tested the app on a number of Samsung phones including the Galaxy S5, Galaxy S7 and Galaxy
S8, Galaxy Note 4, Google Pixel (1), LG K20+, LG V20. A small number of devices we have tested have unsupported
Bluetooth capability and are unable to connect via BLE: Motorola Moto E4, Kyocera Duraforce XD.
We have also tested the app on a few Tablet devices such as the NVidia Shield K1 and Asus ZenPad S.
The app is not compatible with any Amazon Fire devices.
The Polara Field Service application is available free in the Google Play Store. Search for Polara and locate the app, then
tap the install button.
The App supports Bluetooth connection to any PBS, and Wi-Fi connection to the iCCU-X. All PBS and iCCU-X
configuration options are accessible using either connection. File uploads containing firmware or audio must be performed
by connecting directly to the target unit. Skip to section 2 for instructions on connecting via Bluetooth.
1.1 Wi-Fi Connection
While a Bluetooth connection will allow complete system configuration access, a Wi-Fi connection is also available.
Before connection is possible, Wi-Fi must be enabled on the iCCU-X. This is done by pressing the SELECT button on the
iCCU-X front panel while the main start-up screen is visible. The display should confirm that Wi-Fi is enabled.

iN2 Polara FS Android Application Manual
350-076
Revision A - 11/1/2018
Go to Settings on your Android device and tap Wi-Fi. Locate the Polara iCCU-X in the list of available devices. Tap the
name to select (SSID indicated on LCD of iCCU-X), then enter the Wi-Fi password as requested. The Wi-Fi password is
“DEFAULT1” (all caps, no quotes). After the connection is made, you may exit Settings and start the Polara Field Service
(FS) App. The start page will display a list of available devices. Tap iCCU at the top of the list and enter the password
(factory default is 1234), then tap “Connect”. You will then be presented with the Main Menu.

iN2 Polara FS Android Application Manual
350-076
Revision A - 11/1/2018
1.2 Changing the Password
To change the password, scroll down on the menu under the iCCU Configuration category and choose Password. Enter in
the appropriate fields: the current password, new password, and retype new password. Then tap the Save button in the
upper right corner of the screen. This will update the password in the iCCU. Once the password has been updated, the
screen will clear. Open the main menu (via the three lines in the upper left corner or swipe your finger in from the left of
the screen), then choose another task to exit the password screen.

iN2 Polara FS Android Application Manual
350-076
Revision A - 11/1/2018
1.3 Advanced Communications Settings
All iN2 PBSs connected to the interconnect board communicate with the iCCU via the field wires, using one of two
communication channels A or B.
During initial startup, the iCCU will operate in Channel A by default. The first time an iN2 PBS powers up, it will auto
calibrate by finding the communication channel the iCCU is operating on, and then adjust its signal until it establishes
communication with the iCCU. This process typically takes 1-3 minutes. Once calibrated, each iN2 will save its
communications settings in non-volatile memory and use them during any subsequent restart. Once a PBS’
communications settings are calibrated and it makes a successful connection to the iCCU, it will flash its pilot light in a
four-flash pattern. This four-flash pattern will continue until the PBS is assigned to a phase that is receiving pedestrian
Walk, Don’t Walk or Clearance intervals.
If a calibrated PBS loses connection to the iCCU for an extended period of time or if it cannot connect to the iCCU at start
up, the PBS will restart itself and come up in an un-calibrated mode. It will search for the iCCU on both communication
channels and calibrate itself once it locates the iCCU’s operating channel. If no iCCU is available, the PBS will continue to
search until it finds the iCCU. If one or more PBSs cannot connect to the iCCU during the calibration process (two flash
pattern continues), the Communication Channel on the iCCU should be changed.
Any PBS can be manually forced to re-calibrate by using the Advanced Communication Settings. This may be necessary
if the PBS is already calibrated but moved to a different location in the intersection.
If all the iN2 PBSs can connect to the iCCU, but one or more experiences timeout errors when reading remote health logs,
or while trying to set PBS parameters to all PBSs, the gain on an individual iN2 PBS may need to be adjusted. Use the
Advanced Communications Settings menu and try increasing the communications gain to the next highest level from what
the auto calibration set it to.
To change the Communications Channel of the iCCU, connect and login to the iCCU and find the Adv. Comm. Settings
option near the top of the menu. Tap Communication Channel and select Channel B and press “Save”. Before changing
the Communications Channel, the iCCU will signal all connected buttons to disconnect, restart, and recalibrate so the
automatic recalibration function will happen automatically.
If one or more iN2 PBSs still cannot connect
to the iCCU, the communication gain can be
adjusted on the iCCU as well.
Because of the various types and states of
field wiring, communication may not work in
all field wiring conditions, so Polara cannot
guarantee an iN2 system will work on all
intersections. If the above steps fail in
establishing reliable communication between
a PBS and iCCU, a 3-Wire system is the only
option.
Polara recommends the use of a 12/2 IMSA
50-2 cable.

iN2 Polara FS Android Application Manual
350-076
Revision A - 11/1/2018
1.4 Channel and Phase Setup
The iCCU-S can obtain Ped interval information by monitoring the outputs of the load switches (via the 50-pin harness’
Cable #4) or by monitoring the SDLC bus. The iCCU-C obtains Ped interval information via the C4 cable adapter and has
automatic source selection. Follow the appropriate setup steps below, depending on which iCCU-X model you have
installed, and how it is wired in the cabinet. The iCCU-S supports four phases. The system identifies four channels,
named A, B, C, and D. Each pedestrian phase will be associated with a channel.
1.4.1 Ped Interval Source Selection
Begin by going to the iCCU Configuration section in the Main Menu and selecting the Cabinet Ped Interface menu item.
If Using Cable #4 of the 50-pin harness for Load Switch Monitoring:
Select the 4 Channel option. Then tap Save in the upper-right of the screen.
If using the iCCU-C and the cabinet input file is wired differently than the Cal-Trans standard such that the ped call
wiring in the backplane is different than the C4 connection, select the Advanced 4-Chan Settings option and tap the
Advanced Options button to change the configuration of the input file phase mapping.
Proceed to Assigning iN2 PBSs to Phases in section 1.5.

iN2 Polara FS Android Application Manual
350-076
Revision A - 11/1/2018
If using an SDLC cable to monitor Ped Intervals only:
Typically, the there are two options for load switch configurations in
cabinets using channels 9 through 12 or channels 13 through 16 for PED
load switches. Select the appropriate SDLC option based on the load
switch setup in your cabinet. Tap the save button in the upper right corner
to store the setting, then tap the back button to return to the previous
screen and proceed to Assigning iN2 PBSs to Phases in section 1.5.
If your setup differs from one of these options, select either of the SDLC
options, tap the Save button in the upper right corner of the screen, and
then tap the Advanced Settings button at the bottom of the screen to
modify the setup for your specific needs.
If using an SDLC cable in BIU Mode (no 50-pin harness):
The NEMA TS 2 2003 specification defines SDLC command and
response frames for 4 detector BIUs. The iCCU-S can be configured to
operate as any one of these four BIUs for the purpose of placing
pedestrian calls to the traffic controller. Typically, there are 4 pedestrian
phases (2, 4, 6 and 8), however the iCCU-S can be configured for up to 8
pedestrian phases. By default, detector BIUs are used to places vehicle
calls in the traffic controller. In order to use the iCCU-S configured as a
detector BIU, the traffic controller needs to be programmed to map the
vehicle call inputs to pedestrian call inputs. The process to do this varies
by traffic controller. Consult your traffic controller manual or manufacturer
for instructions on how to do this.
Each detector BIU communicates call status for up to 16 detector inputs.
When configured as a detector BIU, the iCCU-S uses the first 8 detectors.
See the table below for detector input numbers and how they need to map
to pedestrian inputs.
Note: A NEMA TS 2 traffic controller can only communication with a single
BIU at each SDLC address. If the iCCU-S is configured to a BIU number
that already has a BIU device with the same number (address), then the
other BIU device with the matching number needs to be disconnected.
To configure the iCCU-S as a BIU, tap the SDLC/BIU option, then select
an available detector BIU number and the proper pedestrian load switch
configuration for the cabinet. If the pedestrian load switch configuration is not listed, or more than 4 pedestrian phases
BIU#1 BIU#2 BIU#3 BIU#4
Pedestrian
Mapping
Det Input 1 Det Input 17 Det Input 33 Det Input 49 Ped Input 2
Det Input 2 Det Input 18 Det Input 34 Det Input 50 Ped Input 4
Det Input 3 Det Input 19 Det Input 35 Det Input 51 Ped Input 6
Det Input 4 Det Input 20 Det Input 36 Det Input 52 Ped Input 8
Det Input 5 Det Input 21 Det Input 37 Det Input 53 Ped Input 1
Det Input 6 Det Input 22 Det Input 38 Det Input 54 Ped Input 3
Det Input 7 Det Input 23 Det Input 39 Det Input 55 Ped Input 5
Det Input 8 Det Input 24 Det Input 40 Det Input 56 Ped Input 7

iN2 Polara FS Android Application Manual
350-076
Revision A - 11/1/2018
are needed, select the “Adv. Load Switch Settings option, then tap the Advanced Options button and assign the
appropriate phases to load switch channels.
Configure the traffic controller to enable the detector BIU number selected. Program the traffic controller to remap the
detector inputs to Ped inputs according to the table above. Consult your traffic controller manual or manufacturer for
instruction on how to do this.
1.4.2 View Interval Status
While selecting the Cabinet Ped Interface type, you can view the status of the interval information coming into the
iCCU unit by tapping on the View Interval Status button. In 4-Channel mode, the interval information will be displayed
for the 4 Channels wired to the load switches (or C4 connector for iCCU-C). When in SDLC mode, all 16 SDLC
channels will be displayed showing the interval information. This can be useful to determine which Load Switch
setting is desired (9-12 or 13-16) or if the advanced options are necessary.
Note: In 4-Channel mode on iCCU-S, the status displays the information received directly from the load switch. If the
Walk signal is on, the status will be displayed as Walk, and in Don’t Walk the status will show as Don’t Walk. In the
flashing Don’t Walk interval, the status will toggle between Don’t Walk and Off matching the Ped Head state.
If no SDLC information is being received by the iCCU-S, the notice will be displayed with that information. Check the
SDLC cable to ensure a good connection.
iN2 Polara FS Android Application Manual
350-076
Revision A - 11/1/2018
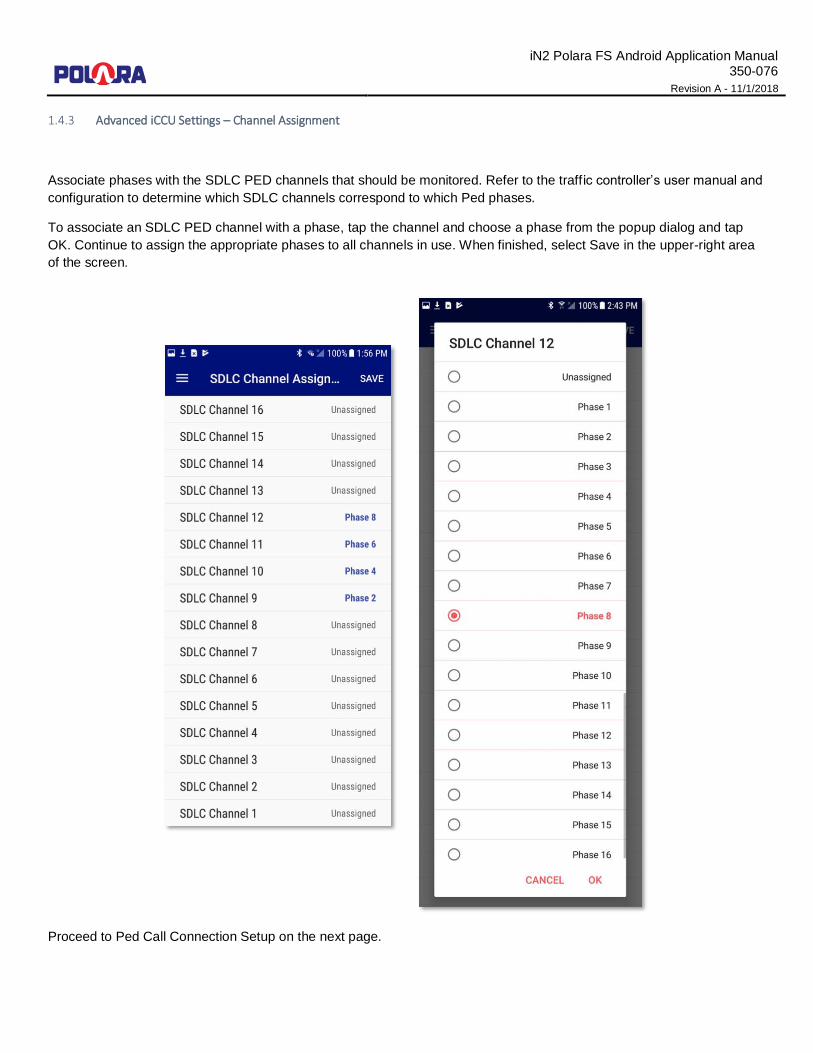
1.4.3 Advanced iCCU Settings – Channel Assignment
Associate phases with the SDLC PED channels that should be monitored. Refer to the traff ic controller’s user manual and
configuration to determine which SDLC channels correspond to which Ped phases.
To associate an SDLC PED channel with a phase, tap the channel and choose a phase from the popup dialog and tap
OK. Continue to assign the appropriate phases to all channels in use. When finished, select Save in the upper-right area
of the screen.
Proceed to Ped Call Connection Setup on the next page.
iN2 Polara FS Android Application Manual
350-076
Revision A - 11/1/2018
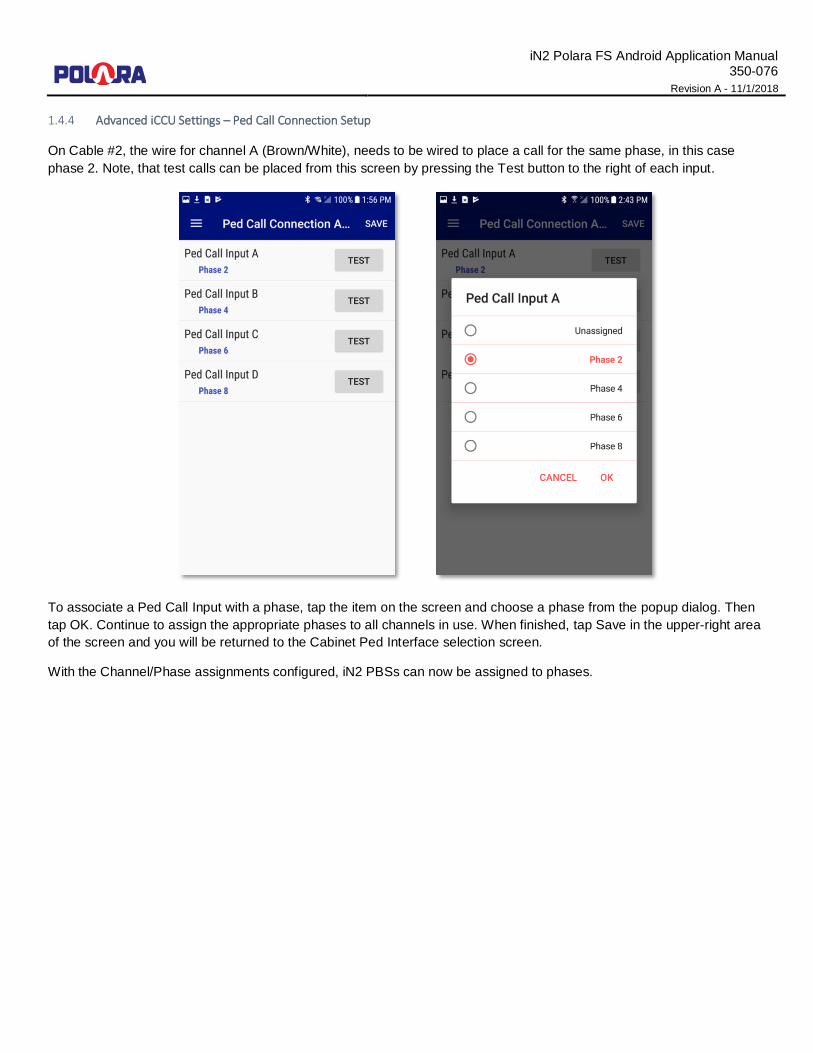
1.4.4 Advanced iCCU Settings – Ped Call Connection Setup
On Cable #2, the wire for channel A (Brown/White), needs to be wired to place a call for the same phase, in this case
phase 2. Note, that test calls can be placed from this screen by pressing the Test button to the right of each input.
To associate a Ped Call Input with a phase, tap the item on the screen and choose a phase from the popup dialog. Then
tap OK. Continue to assign the appropriate phases to all channels in use. When finished, tap Save in the upper-right area
of the screen and you will be returned to the Cabinet Ped Interface selection screen.
With the Channel/Phase assignments configured, iN2 PBSs can now be assigned to phases.

iN2 Polara FS Android Application Manual
350-076
Revision A - 11/1/2018
1.5 Assigning iN2 PBSs to Phases
Following the Cabinet Ped Interface Setup process, each connected iN2 PBS must be named and be assigned a phase.
At this point, all buttons need to have been installed and powered. From the iCCU Configuration section of the Main
Menu, select “Phase Setup”. It is suggested to name the PBS with something that identifies the installed location and the
phase (must be 4 to 15 characters). If unsure of the location of a PBS, press Flash LED button to the right of the name to
cause the PBS’ red LED to flash briefly. Assign the appropriate Phase by tapping the white box below the Flash LED
button and selecting the phase in which to assign the PBS. When finished naming all buttons and assigning phases,
select Save on the upper-right of the screen.
After these steps, the system should be fully operational. The steps
leading up to this point must have been completed without error to
ensure that the PBS walk indications are matched to the correct
crosswalks. Walk the intersection and verify that each PBS is linked to
the correct phase.
From the main menu, tap the PBS Status button to see a screen with all iN2
units and their status.
On this PBS Status screen, the information is shown live from what is
occurring in the intersection. There is a 2-5 second delay on the information.
Tapping on the Flash LED button will flash the pilot LED on the selected PBS
for a few seconds.

iN2 Polara FS Android Application Manual
350-076
Revision A - 11/1/2018
1.6 Setting the iCCU Time/Date, SNTP & DST
Settings
In the iCCU Configuration section of the Main Menu, select the
Date/Time menu option. When the radio button is set to
Synchronize with Android device, the time on the iCCU will be set
to the time currently detected on your Android device. Tap the
three dots on the upper right corner of the screen and select Set
Time.
If you wish to specify a specific date/time that is different from your
device’s time, select the Manually Set Time option and set the
desired time. Tap the three dots on the upper right corner of the
screen, then select Set Time to apply the changes.
Note that setting the time on the iCCU also sends the updated time
to any iN2 PBSs currently connected to the network. Also, when
new iN2 units establish a connection with the iCCU, the time is
synchronized with the iN2 units automatically.
The iCCU has the ability to connect to a network time server to
periodically obtain the current time. The time server cannot be a
device on the open internet but must be a local server connected to
the same network as the iCCU. Check with your IT Administrator
for the appropriate IP Addresses to use. The iCCU uses the
industry standard port 123 (UDP) for SNTP. The Refresh Interval setting adjusts how often (in hours) the iCCU will ask the
server for the updated time. Select the appropriate time zone for the area. If daylight savings time is used in the selected
time zone, then the daylight savings time switch will automatically be set to the appropriate state.
Click the Test button next to the SNTP server to test and the server will be queried for the current time. If successful, a
dialog will appear with the current time in GMT and the time converted using the selected Time Zone and DST settings.

iN2 Polara FS Android Application Manual
350-076
Revision A - 11/1/2018
You can manually enable and disable the daylight savings time adjustment and can also modify the date that DST starts
and ends.
Tap the three dots on the upper right corner of the screen, then tap
Save Settings to save the changes made to SNTP and DST settings.
1.7 Setting Ethernet Configuration
From the iCCU Configuration screen, select the Network icon at the
bottom of the screen. Enter the desired IP, Subnet Mask, Gateway,
and Port. Choose Save from the upper-right of the screen.
In order to apply the settings to the iCCU, the unit must be restarted
before the IP Address changes will take effect.
The iCCU has the ability to respond to SNMP queries for basic
information and send out SNMP Trap notifications when critical
actions occur within the unit.
Set appropriate information in the Name/Location/Contact fields for
display in your SNTP manager to identify the unit. Enter IP Address
of up to three SNTP managers to receive the SNTP traps. Tap the
Save button to save the settings. After saving the settings, tap the
Send Test Trap button to have the iCCU send a test trap to each IP
in the list.
In order to receive and manage the reception of trap notifications
you will need an SNMP network management system. Most SNMP
managers have the ability to monitor for traps and there are many
free dedicated trap receiver applications available for download
online. Traps are sent to port 162 on your PC and this port will need
to be unblocked from your firewall. Once you have your network
management system installed, you can configure it to send you
automatic email notifications any time a trap is received.
The SNMP MIB for the iCCU is available for download on
Polara.com website under the iCCU/iN2 Installation downloads
section.

iN2 Polara FS Android Application Manual
350-076
Revision A - 11/1/2018
1.8 General Purpose Input and Preemption (iCCU-S Only)
From the iCCU Configuration section of the Main Menu, select the GPIn/Preemption option.
For each General Purpose Input to be used, select the desired function, the effective channels, and the desired volume.
Preemption may be configured in the same way.
Each of the three General Purpose Inputs can be configured to a different function which will be activated by the
corresponding input wire. The 4 Preemption input wires on the 50-pin cable all correspond to the Preemption Input (on the
bottom of the screen).
Tap the Save button to write the configuration changes to the iCCU.
You can view the status of the GPIn/Preemption inputs by tapping on the View Gpin/Preemption Status button. This will
provide a live-updating dialog with the status of each input. Asserting an input will change its status to Active.
See the wiring diagram on page Error! Bookmark not defined. for connecting the GPIn/Preemption wires.

iN2 Polara FS Android Application Manual
350-076
Revision A - 11/1/2018
1.9 Ped Isolator
Tap on the Ped Isolator Switches menu item under the iCCU Configuration section. From this screen, single calls can be
placed on individual phases by tapping the Call button. Also, calls can be locked in for any phase. As long as the lock call
switch is activated, the call will remain locked, even after disconnecting from the Wi-Fi connection. The iCCU will continue
to lock calls until the switch is deactivated or the iCCU is power-cycled.
These options are also available on the front LCD panel of the iCCU.

iN2 Polara FS Android Application Manual
350-076
Revision A - 11/1/2018
2. Using the Polara Field Service App for iOS to Change iN2 PBS
Settings
2.1 Bluetooth Connection
Bluetooth LE is built into each PBS. All configuration settings may be performed by connection to any PBS
currently operating with the iCCU-X. Audio file updates and firmware file updates may only be performed by
connection to the target device.
Before starting the Polara FS App, make sure your Android device has Bluetooth turned on in Settings. Then, start the app. This will display a list of all available devices. Tap a name to select the device to connect to. When the password prompt appears, type in the password (factory default is 1234) and tap connect. Once logged in, the main menu will appear.
The connection procedure differs slightly depending on which Android device is in use. The below has three examples of typical connection behavior.
2.1.1 Connection Example: Samsung S7 running Android 7.0
The most straight forward behavior shown below:
Tap on the BTLE device upon which to connect. After a few seconds, the password prompt will appear.

iN2 Polara FS Android Application Manual
350-076
Revision A - 11/1/2018
2.1.2 Connection Example: Google Pixel running Android 9.0
On some of the newer devices running the latest Android versions, once you tap on the BTLE device for connection, a
Pairing request will appear. Tap on Pair & Connect, and then another confirmation box may appear. Tap pair on the
confirmation box and then after a few seconds, the password box should appear.

iN2 Polara FS Android Application Manual
350-076
Revision A - 11/1/2018
2.1.3 Connection Example: Nvidia Shield K1 Tablet running Android 7.0
On some devices such as tablets, the busy indicator will appear in the center of the screen, but it will not appear to pair. In order to connect, you must swipe down to view the notification center and see if there is an item listed as a Pairing request. Tap the pairing request and then a pairing confirmation dialog should appear. Tap the Pair button and then the password prompt should appear.

iN2 Polara FS Android Application Manual
350-076
Revision A - 11/1/2018
2.2 PBS Configuration Options
From the main menu, tap the Settings item under the PBS Configuration category. This presents an extensive list of operational settings that may be adjusted according to desired operation. You can swipe the list up and down to find the setting to be changed.
Tap the setting to access the options for that setting. Make your value changes and tap OK to confirm the new value or CANCEL to proceed without any change. Tap the INFO button for more information regarding the setting.

iN2 Polara FS Android Application Manual
350-076
Revision A - 11/1/2018
Options for selecting sounds have a button with a speaker symbol. To listen to sounds, use the slider to Enable Audio Playback or press the icon next to the sound you wish to hear. For safety, the unit will need to go into Maintenance Mode and the LED will perform a three-flash pattern. Press Yes to enable Maintenance Mode. In this mode, the unit’s main button will not operate or respond to interval changes so a pedestrian cannot use it. This will only be done on the iN2 unit you are directly connected to, so a remote button cannot be made to play a walk sound and confuse a pedestrian.
Tap the speaker symbol to listen to the selected sound. Sounds will play out of the PBS’s speaker. Turn off the Enable Audio Playback switch to resume the unit’s normal operation.
When you are finished selecting desired settings, tap the Write button to write the settings to the connected button. Alternatively, tap the menu symbol at the top right to access additional options including saving to all buttons in the intersection. If you wish to copy the settings to only a select few buttons instead of the entire intersection, tap the Write button to write the settings to the unit you are connected to, then tap the units name in the top bar and choose another button from the list. Then tap Write to write the settings to that unit. In this manner, you can read from any unit and write to any unit in the intersection by only connecting to a single unit.
After saving new settings to buttons, walk the entire intersection to test each PBS for proper operation to verify that the new settings work as intended.
By default, when saving settings, all configuration settings are written to the unit. When saving settings to all units, this may not be the desired behavior. For example, if you have customized audio volume settings separately for each unit, they may not all have the same settings, but if you wish to make an intersection wide change to a single setting, such as Walk Mode Sound, then saving settings to all would overwrite the volume settings. In this instance, you can enable the Write Changes Only option. To use the option, make sure the settings on the page match the settings on the device you are connected to by tapping the read button. Then enable the Write Changes Only switch. Now make the settings changes you wish to send to all units. Those settings will change to a red background informing you that they are the settings that will be written. When your changes are complete, perform a save to all operation and only those settings will be changed on all buttons.

iN2 Polara FS Android Application Manual
350-076
Revision A - 11/1/2018
The currently displayed settings may be saved to a file and recalled for later uploading to other PBSs. Tap the three dots in the upper right corner to display the action menu and tap “Save As File” and enter a file name to create a file.
Tap “Load From File” to browse previously saved configuration files. Tap a file name and then tap OK to load the settings into the settings list. Then tap WRITE to save settings to the PBS.
Note: The configuration files only save the PBS Settings listed on this screen and does not apply to additional parameters
on other screens such as Quiet Time or Network Settings and also does not save audio files. Audio files must be
extracted and uploaded separately.
While in the File Browser, you can delete files, if necessary. To delete files, swipe from the right to the left. You can also export the file for use in other apps by tapping the E-MAIL button. The configuration files are the same between all apps (iOS, Android, & PC) and can be used interchangeably.
Save Dialog File Options

iN2 Polara FS Android Application Manual
350-076
Revision A - 11/1/2018
2.3 Quiet Time
The iN2 PBS has a feature to easily allow the button to become quieter at a specified time of day. This is useful, for
example, when a residential street experiences a lot of traffic during the day, but very little in the evening. In this scenario,
it may be useful to have the iN2 PBS set loud enough to be heard over traffic during the day, but be nearly inaudible in the
evening hours, as not to disturb residents living nearby. Quiet Time allows for a reduction in volume between a specified
time interval, within a 24-hour day. The details of the feature’s operation are such that if the current time of day falls
between the selected start and end time of the Quiet Time period, then all Minimum and Maximum volume settings will be
reduced by the specified reduction amount.
Note: The “Minimum” volume setting can be reduced down to 0%, but the “Maximum” volume setting will only be reduced
down to 25%. This follows what is settable in the configuration parameters or settings screen.
The table below shows what the effective volume settings would be with the Quiet Time set to reduce the volume by 30%.
With the values set as shown in the screenshots, between the hours of 9:00am and 7:59pm, the volume will be as set
configured in settings (shown in the “set value” column). At 8:00pm to 8:59am the following morning, the volumes will be
reduced as shown in the “reduced value” column:
Setting Name Set Value Reduced Value
Locate Volume Minimum 0% 0%
Locate Volume Maximum 50% 25%
Information Message Minimum 65% 35%
Information Message Maximum 100% 70%
Std Walk Minimum 30% 0%
Std Walk Maximum 60% 30%
Ext Walk Minimum 60% 30%
Ext Walk Maximum 80% 50%
From the PBS Configuration section of the Main Menu, select Quiet Time. Turn the Quiet Time switch On, then enter the
desired settings, select the 3 dots at the top right of the screen, then select the desired Save option.

iN2 Polara FS Android Application Manual
350-076
Revision A - 11/1/2018
2.4 Preparing Audio Files
The audio files which are played in the iNav units are encoded using the open-source Ogg Vorbis codec. Polara provides professionally recorded custom audio files on the website. Go to Polara.com and click on the Audio Library option. You can search for audio files which have already been recorded if the streets on the desired intersection are common. However, you can also request to have messages recorded for you by clicking on the Request Custom Message option and filing out the form on the website.
If you wish to record your own messages or already have messages in another format (such as .wav or .mp3), these messages can be converted to the specific Ogg Vorbis format needed by the iNav devices by downloading the Intelligent Config application (also available on the Polara.com website) and using the Convert Audio option.
Once you have your .ogg files prepared, they must be transferred onto your Android device. There are multiple ways to accomplish this. The below are a few ways of transferring the files.
• Send the files as an e-mail attachment to an account on your Android device.
• Use the USB cable connected from the Android device to your PC and transfer the files directly to the device’s file system.
• Copy the files to the microSD card of the Android device.
• Download the Polara.com files using the web browser on the Android device. Any of these methods can be used as long as the .ogg files appear in the file browser of the Android device. An easy location would be to copy these to the Downloads directory on the Android device for easy retrieval.

iN2 Polara FS Android Application Manual
350-076
Revision A - 11/1/2018
2.4.1 Opening .ogg files as an e-mail attachment
If you have sent the files to an e-mail account that is associated with your Android device, open the e-mail to view the
attachments.
Tap on the main part of the attachment (not the download arrow or the Google Drive icon). You should be presented with
the Open With popup. Tap on Polara FS to import the file into the Polara Field Service app.

iN2 Polara FS Android Application Manual
350-076
Revision A - 11/1/2018
2.4.2 Opening .ogg files via Android File System
If you have downloaded the .ogg file into the Android device’s file system, open a file browsing application. The
application will vary depending on the device. On Samsung devices, this is the My Files application.
Example: Samsung Galaxy S7
Using the Samsung My Files
application to import .ogg files
into the Polara FS app.
Example: Google Pixel
Using the ES File Explorer
application to import .ogg files
into the Polara FS app.

iN2 Polara FS Android Application Manual
350-076
Revision A - 11/1/2018
2.4.3 Browsing for .ogg files via Polara FS App
If you have .ogg files stored in your Android device’s internal or SD card memory, you can import it directly using the
Polara FS app file manager. Open the Polara FS app and select the File Manager option from the main menu.
Tap the three dots in the upper right corner of the screen and select Browse to Import Files.
You will be presented with a file browser. Browse to the location with your saved .ogg files, and then tap on one of the
files to import it. Repeat the process for each file to import.

iN2 Polara FS Android Application Manual
350-076
Revision A - 11/1/2018
2.5 Updating Audio Files From the main menu, tap on the Audio Update option.
To add a new Information Message file, tap on “Information Message”. This displays a list of available voice files loaded into the Polara App. Tap on the name of the file you wish to load as the Information Message sound in the PBS. Then tap the OK button.
Note: Files ending with the suffix VOL should be loaded as an Information Message and files with the suffix WALK should be loaded as Custom Walk.
Tap OK on the confirmation box and the file will begin uploading. Once the file has completed uploading, you will be returned to the Audio Update screen.
iN2 Polara FS Android Application Manual
350-076
Revision A - 11/1/2018
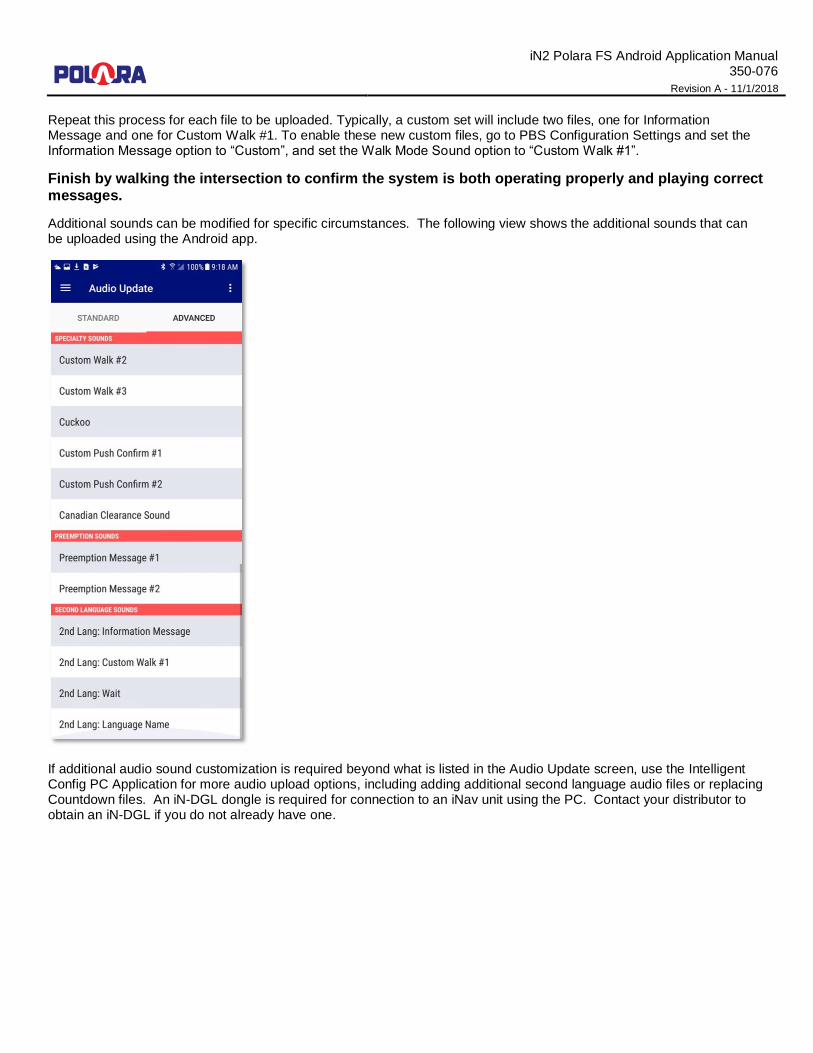
Repeat this process for each file to be uploaded. Typically, a custom set will include two files, one for Information Message and one for Custom Walk #1. To enable these new custom files, go to PBS Configuration Settings and set the Information Message option to “Custom”, and set the Walk Mode Sound option to “Custom Walk #1”.
Finish by walking the intersection to confirm the system is both operating properly and playing correct messages.
Additional sounds can be modified for specific circumstances. The following view shows the additional sounds that can be uploaded using the Android app.
If additional audio sound customization is required beyond what is listed in the Audio Update screen, use the Intelligent Config PC Application for more audio upload options, including adding additional second language audio files or replacing Countdown files. An iN-DGL dongle is required for connection to an iNav unit using the PC. Contact your distributor to obtain an iN-DGL if you do not already have one.

iN2 Polara FS Android Application Manual
350-076
Revision A - 11/1/2018
2.6 Extract Audio Files
The same messages that are available to be changed via Audio Update can be extracted from the PBS. This feature requires firmware version v3.199 or greater in the iNx unit.
While in the Audio Update screen, tap the three dots in the upper right corner and select Extract Audio.
All options on screen should change to add the word “Extract” to the front to indicate that you will be extracting the selected message from the unit.
It is recommended that you listen to the message on the unit prior to extracting it so you know how the message should be named. Perform an extended push on the unit to hear the Information Message and then wait to hear the Walk message, or use the sound play feature in the Settings screen.
To extract the Information Message, tap the Extract Information Message option.
You will be prompted to add a filename for the extracted file. Name the file appropriately for the intersection streets. For example, the intersection of Broadway and Main would have an information message named “Broadway_Main_VOL” and the corresponding walk message would be “Broadway_WALK”.
Tap OK to begin extraction.
Once extraction is complete, you can extract additional messages from the unit or tap the three dots in the upper right corner and select the Upload Audio button to switch back to upload mode.
You can view the extracted messages by selecting the File Manager from the Main Menu. Tap on one of the .ogg files to bring up the action menu. From there you can play the sound and hear it from the Android device’s speaker or e-mail/export the file.

iN2 Polara FS Android Application Manual
350-076
Revision A - 11/1/2018
3. Using the Polara Field Service App to Access the Health Log
3.1 Accessing the Health Log
The Health Log contains a list of events, including both normal conditions and error conditions. Each PBS maintains a separate log. These can be very useful for troubleshooting.
Tap the box for “Health Log” at the Polara App main menu. The Name / ID of the currently connected device is visible at the top. To read the Health Log from this device tap “Read”. The current log is downloaded and displayed. Swipe the screen to browse through the log. Tap the menu symbol at the top right to access a list of actions. The menu symbol is shown as three dots. You can choose to clear the log, export the log to an email address, or view the log file as text in another external application. For help with a particular issue, or a message of concern, email the log to [email protected].

iN2 Polara FS Android Application Manual
350-076
Revision A - 11/1/2018
4. Getting Button Info and Diagnostics
The Button Info/Diagnostics page in the PBS Configuration section of the main menu shows additional details about the
iNav unit.
• Press the Rename button to change the units name that appears when connecting via Bluetooth.
• To view a list of all information and settings configured for a unit, tap the View All Unit Information button. This
will display detailed information about all factory and user-settable settings. Note: This information is also
prepended to the health log when exported to file.
• The Reboot PBS button will cause a soft-reset of the unit.
• Pressing the Run Diagnostic button will perform a self-test of each of the listed items and return a Pass/Fail result.
This does not absolutely mean that the unit is functioning perfectly, but that the software does not detect any
abnormalities in the data or responses from the specified test.

iN2 Polara FS Android Application Manual
350-076
Revision A - 11/1/2018
5. Using the Polara Field Service App for Firmware Updates
5.1 Checking for the Latest Firmware
Firmware files are automatically bundled with the Polara Field Service App. The latest firmware at the time of App release is ready and pre-installed for updating.
The Android App also has the ability to connect to polara.com to check for new updates directly from within the App. Your device must be connected to the internet in order to perform the check. This can be done while connected to a unit or while working without a Bluetooth connection. Tap on the File Manager option in the main menu to browse all files on your Android device. Tap the three dots in the upper right corner of the File Manager screen. Tap the Check For Updates button. The device will connect to the internet and check for the latest firmware files from polara.com and provide them for download. You can tap on View Release Notes to see what the changes are from the previous version or tap the Download button to download the file to your device.
Firmware files to be uploaded can also be received using the same methods used to transfer .ogg files to the Polara FS App. Follow the same instructions as in section Error! Reference source not found. to import the files.

iN2 Polara FS Android Application Manual
350-076
Revision A - 11/1/2018
5.2 Performing a Firmware Update
To perform a firmware update, tap Firmware Update from the main menu. On the firmware update page, you can view the current firmware device you are connected to. Tap the Update Firmware button. The list of available firmware update files will appear. Tap the file you wish to upload and tap OK to begin the select the file. Tap OK on the confirmation dialog to start the update process. When the process is complete, a message is displayed confirming update success.