Embed Size (px)
Citation preview

DO NOT RETURN THIS PRODUCT TO RETAILERShould you have any technical issues with this product you must first contact the manufacturer to obtain a
Return Merchandise Authorization Number (RMA#).
To obtain RMA#, Technical Support or to review Troubleshooting Videos and Step-By-Step Troubleshooting Procedures, please visit www.AquaProducts.com/Service.
IN GROUNDROBOTIC SWIMMING POOL CLEANER
OPERATOR’S MANUAL &TROUBLESHOOTING GUIDE
Read and Follow All Instructions Before Using Your Pool Cleaner
This manual is for use with a variety of Aqua Products robotic pool cleaners
IMPORTANT SAFETY INSTRUCTIONS
SAVE THESE INSTRUCTIONS

2www.AquaProducts.com/Service
TABLE OF CONTENTSOperating Features ......................................................................................................................... 3-4
Quick Start Instructions .................................................................................................................. 5
Setting Up Your Cleaner ............................................................................................................ 6-7Floating Handle................................................................................................................................ 6
Setting up the Power Supply ......................................................................................................... 7
Cleaner Start Position ..................................................................................................................... 7
Knowing / Using Model Features ........................................................................................... 8-10Setting the Power Supply Timer .................................................................................................... 8-9
Operation of Models with Remote Control (using the Remote Control) ................................... 9
Debris Intake Port Width Selector ................................................................................................. 10
Variable Intake Port Depth Extensions .......................................................................................... 10
NeverStuck™ Rollers ...................................................................................................................... 10
Power Washing Jet System ........................................................................................................... 10
Cleaning Patterns / Directional Guidance Mechanisms ................................................. 11-13Diagonal Locked Floating Handle .................................................................................................. 11 & 12
Cable Float or Cable Float + 3 Directional Remote Control ......................................................... 11 & 12
Handle Float + Split Wheel Tube with Directional Guidance Clutch .......................................... 11 & 13
Magnet
Split Wheel Tube + 4 Directional Remote Control ....................................................................... 11 & 13
Cleaning Patterns ............................................................................................................................ 12-13
Maintaining Your Pool Cleaner ............................................................................................... 14-20Cleaning and Changing the Filter Bag ........................................................................................... 14
Flotation ........................................................................................................................................... 15
Propeller Care .................................................................................................................................. 16
Floating Cable Care ......................................................................................................................... 16
Scrubbing Brushes (Molded, Super, Foam, PVA) Care & Replacement .................................... 16-17
Changing Drive Tracks .................................................................................................................... 18
Changing Drive Belts ...................................................................................................................... 18-19
Cleaner Storage ............................................................................................................................... 20
Preparing Your Cleaner for Shipping .................................................................................... 20-21Troubleshooting Guide (Summary) ........................................................................................ 22-23Troubleshooting Guide (In Depth) ......................................................................................... 24-30
Never operate your cleaner when it is not totally submersed in the pool water! Doing so will void warranty and may cause severe damage to motors and require costly repairs!
Never allow anyone to swim in the pool while the cleaner is in the pool!
WARNING: Using the Floating Cable to lift the cleaner out of the water will cause severe damage to your cleaner and may result in costly repair!
WARNING: The Power Supply must be at least 12 feet / 4 meters from the pool’s edge at all times!
WARNING! A Ground Fault Circuit Interrupter (GFCI) / Residual Current Device (R.C.D), must be installed to protect your electric outlet and to prevent and possible electrical shock!

3www.AquaProducts.com/Service
OPERATING FEATURESBelow and throughout this manual, we show two different models
to represent all of the Aqua Products models.
Although the shape and color of cleaners and components featured herein may not be identical to those of your cleaner, their operating and service procedures are. Please know that there are a variety of features and some pages may show features which may not be relevant to your model. The reference numbers below are used throughout this manual.
* Some models have split Wheel Tubes and Brushes to allow one or both sides to turn independently depending on model.* Some models with split Wheel Tubes and Handle Floats may have a Directional Guidance Clutch built into their Wheel Tubes.
Figure 1
1. Floating Handle2. Outlet Top3. Propeller4. Handle Spring Lock5. Standard Drive Track6. Side Plate
7. Wheel Tube Retaining Ring8. Brushes*9. Pump Motor10. Drive Motor11. Filter Bag12. Bottom Lid Assembly (see page 4)
13. Filter Screen14. Floating Cable (see below)15. G-Tooth™ Drive Track16. Handle Float17. Power Washing Tubes18. Wheel Tube
1 1
2 2
12 12
3
14 14
15
14a14
FLOATING CABLE FEATURESFigure 2
StandardFemale
Connection
4 ProngMale
Connection
2 ProngMale
Connection
4
5
6
8
7
9
10
11
13
4
5
6
7
8
9
10
11
13
16
17
*
18
3
Cable Guard
14b
14c
14d 14e 14f
14. Floating Cable14a. Cable Protector14b. Cable Float
14c. E-Z Swivel14d. Cable Plug (female connection)14e. Cable Float (4 prong male connection)
14f. Cable Float (2 prong male connection)

4www.AquaProducts.com/Service
Figure 4a:(No Timer or Remote Control)
Figure 4c:(Dial Timer)
Figure 4d:(Digital Timer / Digital Timer With
Remote Control)
Figure 4b:(No Timer with Remote Control)
* Fuse Holder may be located on the back of the Power Supply in some cases.
POWER SUPPLY FEATURES
Figure 3a
Figure 3b
Figures 4a, 4b, 4c, 4d
BOTTOM LID ASSEMBLY
12. Bottom Lid12a. Wire Frame Bag Support12b. “H” - Float (Fig. 3a)12c. Side Pocket Floats (Fig. 3a)
19. Power Supply Handle20. Power Switch - ON/OFF21. Fuse Holder*
22. Power Supply (Housing)23. Floating Cable Socket24. Power Supply Cable (115VAC)
25. Antenna (Fig. 4b)26. Safety Reset Button (Fig. 4c, 4d)27. Adjustable Timer / Timer Display (Fig. 4c, 4d)
* *
12d. Debris Intake Port Flap12e. Filter Bag12f. Square Floats (Fig. 3b)12g. Float Screw & Washers (Fig. 3b)
12h. Variable Port Depth Extension (Fig. 3b)12i. NeverStuck™ Rollers (Fig. 3b)12j. Debris Intake Port Width Selector (Fig. 3b)
12a
12
12e
12
12c
12d
12b
12d
12a
12j
12d12
12 12d 12i12f
12g
12h
19 20 21 22 23 24 19 20 21 22 23 24 25 19 20 22 23 26 24 27 19
27
26
20 22 23 24

5www.AquaProducts.com/Service
QUICK START INSTRUCTIONSSETTING UP YOUR NEW ROBOTIC POOL CLEANER IS AS EASY AS 1, 2, 3!
NOTE: Models without Floating Handle, Floating Handles permanently locked parallel to cleaner body or models with a Handle Float (Page 3; Fig. 1) around the Floating Handle do not require this step.
WARNING: The Power Supply must be placed at least 12 feet / 4 meters from the pool’s edge!
IMPORTANT: Alternate the diagonal locked position of the Floating Handle with each use of your cleaner! This will help reduce possible twisting of your Floating Cable and enable cleaning of any areas missed during the prior cleaning cycle!
Handle Spring Lock(Version A)
Figure 5a2 Diagonal Positions
Figure 5b3 Diagonal Positions
Smaller angle allows slower movement when at waterline, Larger angle provides faster movement.
Lock Floating Handle diagonally across cleaner body.
Handle Spring Lock(Version B)
Handle Spring Lock(Version A)
Power SupplyGFCI / RCD
outletFloatingCable
Figure 5e
NOTE: Power Supplies with adjustable Timed Operation – Please consult this operator manual for further instructions on how to set its operating time and automatic shut down.
WARNING: A Ground Fault Circuit Interrupter (GFCI) / Residual Current Device (R.C.D.) must be installed to protect your electric outlet and to prevent any possible electrical shock!
TIP! To help protect your Floating Cable from potentially getting wrapped around your cleaner’s brushes, it is suggested to turn off your pool’s filtration system while your cleaner is in operation.
NOTE: It is suggested to unplug the Power Supply when the cleaner is not in use.
Power Supply Floating Cable12’ / 4m
from pool’s edge
Make sure that the power supply is positioned and the cleaner enters at the center of the long side of the pool
Figure 5dFigure 5c
NOTE: If your Power Supply features a Safety Reset Button (Page 4, Fig. 4.26) to prevent unintentional, “out of water” operation due to power surges or accidental pressing of the Power Supply ON / OFF Switch – press the Switch to ON and then press the Reset Button to start your cleaner.
Handle Spring Lock(Version B)

6www.AquaProducts.com/Service
SETTING UP YOUR ROBOTIC POOL CLEANER1. FLOATING HANDLEThe Floating Handle (Page 3; Fig. 1.1) is a flotation device that helps your cleaner climb, is a handle to hold and carry your cleaner, and with some models acts as a guidance mechanism, directing it to move left or right while the cleaner scrubs the waterline. For proper operation of your pool cleaner, the Handle must be locked diagonally* across the top of the cleaner’s body.
To Lock The Floating Handle:
1. Pull / Push down the right front Handle Spring Lock (Page 5; Figs. 5a & 5b) while sliding that side of the Floating Handle towards you as far as it can go (Fig. 6). Release the Handle Spring Lock to secure the “Handle” in place.
2. Pull / Push down the left rear Handle Spring Lock down and slide the Handle away from you as far as it can go. Release the Handle Spring Lock to secure the Handle in place.
To reverse diagonal position of the Floating Handle, simply reverse the above procedure and lock the Handle diagonally across the cleaner’s body in the opposite direction.
NOTE: Models with Fig. 6, Version B Spring Locks offer 3 locking positions, providing 2 different speeds when the cleaner moves laterally (left or right) along the waterline.
POSITION 1: Larger angle provides faster movement at waterline and total pool coverage.POSITION 2: Smaller angle provides slower movement for more detailed waterline cleaning attention and slower
total pool coverage.POSITION 3: Keeps the cleaner at a fixed position at the waterline, before reversing down the wall, for slowest total
pool coverage.
NOTE: Occasionally new cleaner’s may require a bit of force in order to slide the Floating Handle into place the first few times until the internal slot becomes smooth.
NOTE: Some models’ Spring Locks will point upwards, not down. Simply pull up on the Spring Locks and slide the Floating Handle into position as described above.
Figure 6
Position 1 Position 2 Position 3
Handle Spring Lock(Version A)
Handle Spring Lock(Version B)
IMPORTANT: It is necessary to reverse* the diagonal Handle direction after every use of your cleaner to insure that the Floating Cable (Page 3; Fig. 2) does not become twisted or kinked and does not limit the cleaning coverage of your cleaner!
* Some models have either a permanently fixed Floating Handle, no Floating Handle or Handle Float (Page 3; Fig. 1). These models do not require locking the Handle diagonally.

7www.AquaProducts.com/Service
12ft. / 4m
Power Supply
Cleaner
Figure 7aFigure 7b
Long side of pool
NOTE: It is suggested to unplug your Power Supply when not in use to prevent accidental starts!
WARNING: The Power Supply must be placed at least 12 feet / 4 meters from the pool’s edge at all times!
WARNING: A Ground Fault Circuit Interrupter (GFCI) / Residual Current Device (R.C.D.) must be installed to protect your electric outlet and to prevent any possible electrical shock!
3. CLEANER START POSITION1. Holding the Floating Handle, submerge your cleaner
upside down, and gently rock it back and forth under the water to allow any trapped air to escape, which is critical for proper balancing or it may not clean and cover your pool as designed.
2. While submerged turn upright, then let go allowing your cleaner to settle to a level area on the pool floor near the shallow end. Starting it on an incline (like a deep end hopper) may cause the cleaner, program and sensors to mistakenly consider the incline as the floor, and conversly on the floor as a wall. This would offset its cleaning program and coverage, resulting in missed areas. Be sure to start the cleaner on a level surface every time.
3. Turn ON Power Supply to begin cleaning. (See page 8: SETTING THE POWER SUPPLY TIMER for specific information on timed settings and automatic shut down)
Plug the Power Supply Cord into a standard Ground Fault Circuit Interrupted (GFCI) / Residual Current Device (R.C.D.) protected outlet. If your GFCI outlet is too far away and your cleaner does not have enough Cable to properly enter the pool at the midpoint of its longest side then you may use a proper outdoor grounded extension cord, but always keep the Power Supply at least 12’ / 4 m from the pool’s edge!
The Power Supply (Page 4; Fig. 4a-d) should be placed in a sheltered area, at least twelve (12) feet / four (4) meters away from the pool at all times. (Fig 7a). While the Power Supply is weather-resistant, it is not waterproof and therefore should be placed in an elevated dry area where it will not be allowed to sit in puddles of water. Less is More: For optimum cleaning performance locate the Power
Supply at the mid-point of your pool’s longest side (Fig. 7b). This will allow your cleaner to make the best use of its length of Floating Cable without using excess Cable length. Excess Cable in the pool may result in it unnecessarily twisting, kinking or getting entangled within your cleaner’s rotating scrubbing Brush system. Excess Cable should be kept coiled outside the pool near the Power Supply.
2. SETTING UP THE POWER SUPPLY
TIP! To help protect your Cable from potentially getting pulled into your cleaner when at the waterline, it is suggested to turn off your pool’s filtration system while your cleaner is in operation to reduce the pool’s filter circulation effect that may push the Cable against the waterline.

8www.AquaProducts.com/Service
Internal Timed OperationInternal Timed Operation enables owners of Power Supply models equipped with either Dial or Digital timers to customize their cleaner’s automatic operating cycle to clean anywhere from 1 to 7 hours and then automatically shut OFF. Once shut OFF the Internal Timed mode will not automatically turn the cleaner back ON.1. Press the Main Power ON / OFF switch to the “ON” position.2. Adjust the Timer Control to the desired cleaning time (1 to 7 hours) depending on suggested cleaning cycle for your
model, pool size and amount of debris in pool (i.e. more debris = longer cleaning time).
Dial Timers (Fig 8a): Rotate Dial Timer clockwise to increase time (corresponding with the hour represented on the face of the Dial Timer) and counterclockwise to decrease operating time.
Digital Timers (Fig 8b): Press the Time Selector Arrows Button upwards to increase time or downwards to decrease operating time. Each time you press up or down the digital face will display the number of hours of timed operation for.
(DIGITAL TIMERS) NOTE: When pressing the Main Power Switch to “ON” should the Green LED above the C-RUN Button blink continuously then the Power Supply is currently set to the External Timed Operation mode and needs to be reset to the Internal Timed Operation mode by doing the following. Press and hold the C-RUN Button for approximately 5 seconds until the Green LED stops blinking and remains off. If it has stopped blinking and is off then the Internal Timed Operation mode is set.
3. Press the Safety Reset Button (Fig. 8a, 8b). Your cleaner is now set to its Internal Timer and will begin cleaning for the amount of time set.
NOTE: Your Power Supply will remain in the Internal Timed Operation mode until you physically reset it to the External Timed Operation mode and will not reset to the External Timed Operation mode even if the power to the Power Supply is turned off or is set to the OFF position.
Digital Timer (Fig. 8b)
1. Turn the Main Power ON / OFF Switch to “ON.
2. Press the “C-Run” (Continuous Run) button until it is lit. Your cleaner is now set to Continuous Run mode.
Dial Timer (Fig. 8a)
1. With your Power Supply OFF, rotate Dial Timer counter-clockwise until you feel it “click”.
2. Press the Main Power ON / OFF Switch to “ON”. Your cleaner is now set to Continuous Run mode.
Figure 8a(Dial Timer)
Figure 8b(Digital Timer)
SafetyReset button
Dial Timer Display
Continuous Run (CRUN)
button
IMPORTANT: In “Continuous Run” External Timed mode, the Safety Reset button feature becomes inactive and can not protect models with this feature from accidental “out of water” start up. Therefore, it is imperative that you always unplug the Floating Cable from its Power Supply when removing your cleaner from the pool!
WARNING: The mode for operating your cleaner should be set after the cleaner has been placed in the pool, the Floating Cable has been plugged into the Power Supply and the Power Supply has been plugged into the Ground Fault Circuit Interrupted (GFCI) / Residual Current Device (R.C.D.) protected 115V electrical outlet with the Power Supply located at least 12 feet / 4 meters from the pool’s edge!
Time Selector Arrow Buttons
Red “ON” LED
Digital Timer Display
Green LED
Continuous Run Operation (C-RUN)Continuous Run mode means that the cleaner will operate continuously until the ON / OFF Switch to is physically pressed OFF or an external time source automatically turns OFF the power to the Power Supply. When manually pressing OFF, to restart its operation you must physically press the Switch back to ON. For automatic ON / OFF operation in “C-Run” mode, please refer to External Timed Operation instructions (Page 9).
No Adjustable TimerIf your Power Supply does not have an Adjustable Timer (Dial or Digital), then it is considered to always be in Continuous Run mode.
1. Press the Main Power ON / OFF Switch to “ON”. Your cleaner is now set to Continuous Run mode.
KNOWING / USING MODEL FEATURESSETTING THE POWER SUPPLY TIMER (INTERNAL AND / OR EXTERNAL)If your cleaner has an adjustable Dial or Digital timer, you can set it for Continuous Run or Internal Timed Operation. All Power Supplies (Page 4; Fig. 4a-d) may be connected to an external, separately purchased timer, such as a house-type timer or pool control system. In this External Timed Operation mode you cleaner can externally be set to automatically turn ON / OFF / ON / OFF as needed.

9www.AquaProducts.com/Service
Using the Remote ControlIf your cleaner has a Remote Control feature, you have the ability to direct it to various areas of the pool to pick up dirt and debris.
There are two types of radio remote controlled models:3 Directional Remote Control and 4 Directional Remote Control.
3 Directional Remote Control (Fig. 9a):This model has 1 Drive Motor (Page 3; Fig. 1.10), full length Wheel Tubes (Page 3; Fig. 1.18) and a Cable Float on the Floating Cable (Page 3; Fig. 2) about one foot from the cleaner’s body. This model can be controlled to move forward, reverse and turn in an arc-radius towards to the direction it is traveling.
4 Directional Remote Control (Fig. 9b):This model has 2 Drive Motors (Page 3; Fig. 1.10) internally and center split Wheel Tubes (Page 3; Fig. 18). This model can be controlled to move forward, reverse, left and right.
NOTE: All Remote Control cleaners turn on their own periodically. This is a normal occurrence as part of their internal program to ensure complete coverage and cleaning of all pool shapes. IMPORTANT: Your wireless radio Remote Controller functions best when operated within 100 feet / 30 meters of the Power Supply.
Figure 9a Figure 9b
Remote Control SystemRemote Control System
TURN
External Timed OperationAll Power Supplies, including without Adjustable Timers, Dial Timer and Digital Timer models, may be connected to an external separately purchased timer, such as a house-type timer or pool control system. In this External Timed Operation mode your cleaner can externally be set to automatically turn ON and OFF repeadly per the external timer schedule set.
To connect your cleaner to your pool control system relay, please consult an electrician, your control system manufacturer or dealer for appropriate instructions.
No Adjustable Timers
1. Connect your Power Supply to an external timer (that is plugged into a GFCI / R.C.D. protected outlet).
2. Press the Main Power Switch to “ON”. Your cleaner is now set to Continuous Run mode and will operate according to the External Time source (i.e. house-type timer or pool control system).
Dial Timer (Fig. 8a)
1. Connect your Power Supply to an external timer (that is plugged into a GFCI / R.C.D. protected outlet).
2. Turn the Power Supply to the OFF position and rotate Dial Timer counterclockwise until you feel it “click”.
3. Press the Main Power ON / OFF Switch to “ON”. Your cleaner is now set to Continuous Run mode and will operate according to the External Time source (i.e. house-type timer or pool control system).
Digital Timer (Fig. 8b)
1. Connect your Power Supply to an external timer (that is plugged into a GFCI / R.C.D. protected outlet).
2. Press the Main Power Switch to “ON” and after a few seconds the Digital Timer Display will flash two horizontal lines. If the Green LED above the C-RUN Button blinks then the External Timed Operation mode is set.
3. If the Green LED above the C-RUN Button does not blink then it is still set to the adjustable Internal Timed Operation mode and needs to be reset to the External Timed Operation mode by doing the following.
4. Press the C-RUN Button once. The Green LED should illuminate.
5. Press and hold the C-RUN Button for approximately 5 seconds until the Green LED starts to blink. When it blinks then the External Timed Operation mode is set.
NOTE: Your Power Supply will remain in the External Timed Operation mode until you physically reset it to the Internal Timed Operation mode and will not reset to the Internal Timed Operation mode even if the power to the Power Supply is turned off or is set to the OFF position.
IMPORTANT: “Continuous Run” External Timed mode: The Safety Reset button feature becomes inactive and can not protect models with this feature from accidental “out of water” start up! Therefore, it is imperative that you always unplug the Floating Cable from its Power Supply when removing your cleaner from the pool!
10www.AquaProducts.com/Service
Debris may vary due to geography, landscape or season. Therefore, your cleaner has been equipped with the ability to adjust the opening size of its Debris Intake Ports to accommodate larger or smaller debris.
For smaller dirt like pine needles, sand and pollen slide the Intake Port Width Selector (Fig. 10a), located on the inside of the Bottom Lid Assembly, in the direction of the arrow indicating “LESS”. This will restrict the opening ability of the Port Flaps thus increasing its suction velocity to improve the removal of sediment dirt.
For larger debris like leaves, twigs and acorns slide the Intake Port Width Selector (Fig. 10b) away from LESS to increase the Port opening size to accommodate larger dirt and debris.
Similar to a house vacuum that offers varied heights to clean carpet and hard floors separately, your pool cleaner is equipped with the patented Variable Intake Port Depth Extensions. There are 2 pairs provided, each of different thickness / depths, offering varied depth suction points to access different types of dirt from different types of pool surfaces.
Use either the thicker pair to access heavy dirt like sand, algae or silt embedded in porous surfaces like gunite, plaster or pebbled textures or the thinner pair to access lighter dirt like pollen and dust in less porous surfaces like vinyl liners. You may even use one of each of the Port Depth Extension thicknesses to provide varied dirt accessibility or use none at all and allow the cleaner’s standard suction depth of the Bottom Lid Assembly to do the job should your pool surface be virtually porous-free like fiberglass.
1. To install simply align each Variable Port Depth Extension tab to fit into its corresponding receptacle in the Bottom Lid Assembly. Be sure that the angled side of each “Extension” is facing the nearest Brushes (Fig. 11).
Figure 10a
Figure 10b
Figure 11
Figure 12
Two NeverStuck™ Rollers (Fig. 12) are located adjacent to the Vacuum Intake Ports (Figure 11) on the Bottom Lid Assembly. These help prevent the cleaner from being stuck on obstacles like raised drain covers, convex lights or in-floor pop-up heads. If they are not needed, the Rollers my be removed with a phillips head screwdriver.
DEBRIS INTAKE PORT WIDTH SELECTOR (Page 4; Fig. 3b, 12)
Selector moved toward LESS
Selector moved away from LESS
VARIABLE INTAKE PORT DEPTH EXTENSIONS (Page 4; Fig. 3b, 12h)
NEVERSTUCK™ ROLLERS (Page 4; Fig. 3b, 12)
POWER WASHING JET SYSTEMSome models come equipped with the Power Wash Hydroscrubbing Jet system (Fig. 13). An internal centrifugal pump produces two pressurized streams of water that help dislodge dirt like sand from seams, pores and corners where brushes can’t reach. Periodically check the Power Washing Tubes (Fig. 13) to make sure that they are not clogged.
Close up of Power Wash exit port nozzle after removal of the Bottom Lid Assembly and Filter Screen.
Figure 13
11www.AquaProducts.com/Service
CLEANING PATTERNS / DIRECTIONAL GUIDANCE MECHANISMS
TWO POSITION DIAGONAL LOCKING FLOATING HANDLE + FULL LENGTH WHEEL TUBESThe Floating Handle (Page 3; Fig. 1) acts as a flotation device that guides your cleaner to move laterally (left or right), depending on the diagonal angle it is locked in, when it is scrubbing the waterline. This allows your cleaner to climb the walls, move laterally and reverse down the wall so that it is repositioned elsewhere in the pool on the floor. (see Pages 12-13 CLEANING PATTERNS). For proper operation of your pool cleaner and to avoid tangling the Floating Cable, the Floating Handle diagonal angle must be reversed with every use.
CABLE FLOAT or CABLE FLOAT + 3 DIRECTIONAL REMOTE CONTROLThe Cable Float (Page 3; Fig. 2) is a flotation device that enables your cleaner to turn on the floor (rather than the wall), with limited lateral waterline movements, allowing your cleaner to spend more time on the floor, where the majority of debris resides. This offers faster, more efficient and complete coverage of virtually any pool configuration. Your cleaner will move down the wall and about halfway across the pool floor and then reverse. When it reverses its internal Pump Motor will temporarily turn off allowing the Cable Float to lift its side of the cleaner allowing only the opposing side to have traction. As the cleaner reverses, the side with traction will cause your cleaner to turn in an arc-radius manner. The internal Pump will turn back on and full traction will be regained, allowing the cleaner to continue in a straight line to the wall.
3 Directional Remote Control models (Page 9; Fig. 9a) offer the ability to override the automatic mode and guide the cleaner to move immediately forwards, reverse, and when on the floor, create an arc-radius turn in the direction it is moving for spot cleaning.
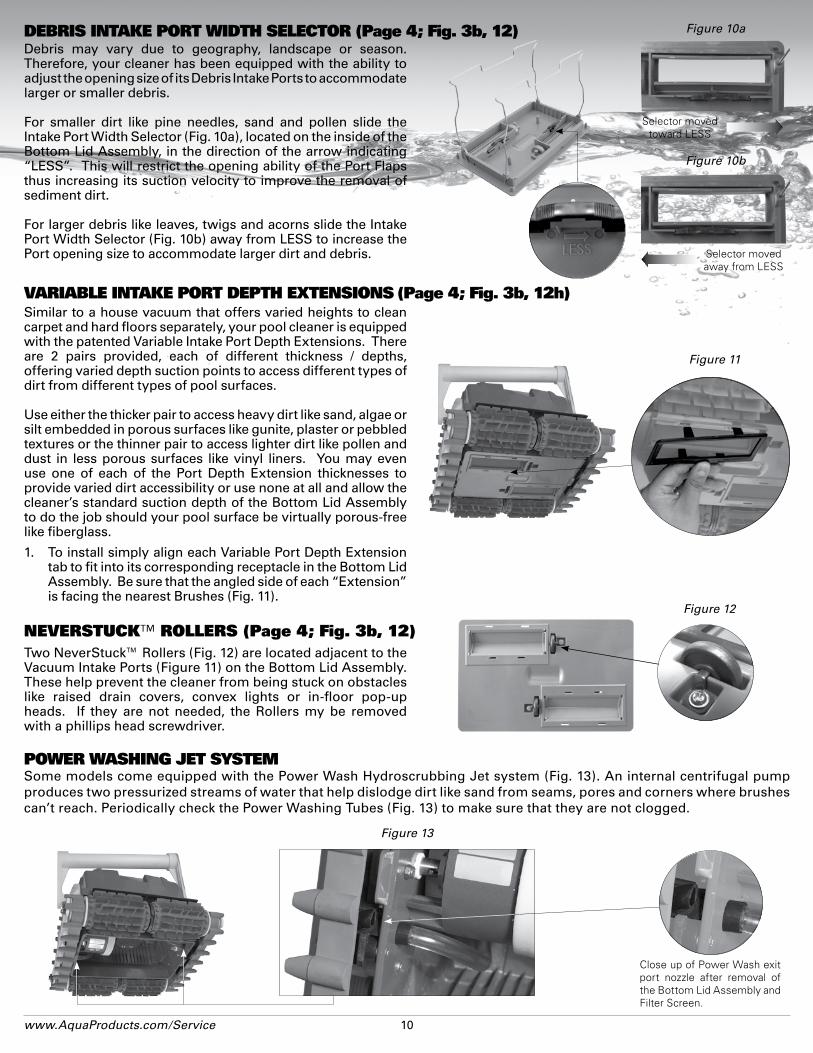
HANDLE FLOAT + SPLIT WHEEL TUBE WITH DIRECTIONAL GUIDANCE CLUTCHThe Handle Float (Page 3; Fig. 1) and “split” Wheel Tube with the Directional Guidance Clutch (Fig. 1), within the “split” area of the Wheel Tube, enables your cleaner to systematically pivot on the spot with every reverse movement. These features enable your cleaner to spend the majority of its time on the floor, where the majority of debris resides, without the need for consistent lateral waterline movements, yet with periodic wall climbing to provide adequate waterline attention. This offers faster, more efficient and complete coverage of virtually and pool configuration.
NOTE: Should your cleaner get stuck in an area of the pool and not be able to get out of its cleaning pattern, you may modify its pivot to allow for a greater turn to overcome this very rare issue by simply removing the small Screw located near the “split” on each Wheel Tube. To reduce the pivot back to original factory setting rotate the free-spinning side of the Wheel Tube until it can no longer turn and then reinsert the Screw. Repeat on opposing Wheel Tube.
ClutchScrew
Magnet
Figure 14
Magnet Float
(Magnet appearance may vary) Swipe across theAQUAPRODUCTS logo
MagnetNon-Remote Control models with a Handle Float and / or split Wheel Tube with Directional Guidance Clutch come equipped with a Magnet (provided in plastic bag with Operator Manual. See Fig. 14). The Magnet is only needed in the very rare instances a cleaner gets stuck in a pattern in an area of the pool and is unable to continue to clean elsewhere. The Magnet can be used to increase or decrease the number of seconds your cleaner travels forward and reverse along the width of the floor enabling it to perform as needed. Please refer to the Troubleshooting Guide (In Depth), DOES NOT CLEAN ENTIRE POOL (MISSES AREAS) OR DOES NOT CLIMB WALLS for specific instructions on how to use this feature (see Page 27, #5).
BumperIf your cleaner is becoming stuck or “stalled” against the pool wall on a regular basis, you should install Bumpers on the ends of the Sideplates. See Page 30 for installation instructions.
SPLIT WHEEL TUBE + 4 DIRECTIONAL REMOTE CONTROLModels with “split” Wheel Tubes (Page 3; Fig.1 ) and 4 Directional Remote Control (Page 9; Fig. 9b) capability feature 2 internal Drive Motors with each Motor controlling its corresponding side of the cleaner. The free-spinning Wheel Tube sides and Drive Motors provide 4 Direction movements of immediate forwards, reverse, left and right. This provides your cleaner with total mobility and systematic scanned movements from side wall to side wall with right angle turns to cover the full length of the pool. This offers faster, more efficient and complete coverage of virtually and pool configuration.
4 Directional Remote Control models offer the ability to override the automatic mode and guide the cleaner to move immediately forwards, reverse, left and right for pin-point spot cleaning and total control.

12www.AquaProducts.com/Service
Models with Two Position Diagonal Locking Floating Handle + Full Length Wheel Tubes
Pattern Description:
Your cleaner runs this pattern in SETS of side to side “half laps”. Each set consists of 7 “half” laps.
Set 1: In the first 6 half laps your cleaner finds the wall, goes up the wall for about 30 seconds, while at the waterline, moves laterally and then reverses to travel to the opposite wall (A). The cleaner goes up the opposing wall for about 30 seconds, moves laterally at the waterline and reverses to travel back again (B).
On the 7th half lap, your cleaner climbs the wall, finds the waterline and moves laterally across the waterline for several minutes (C).
Set 2: In the next 6 half laps your cleaner finds the wall, goes up the wall for about 30 seconds, moves laterally at the waterline and then reverses to travel to the opposite wall (D). Your cleaner goes up the wall for about about 30 seconds, moves laterally at the waterline and reverses to travel back again (E).
On the 7th half lap, your cleaner climbs the wall, finds the waterline and moves laterally across the waterline for approximately a shorter period of time (F).
In the next two sets, the 7th half laps will vary by traveling for about 2 minutes laterally across the waterline. After which, your cleaner will repeat the entire program again.
EAB
C
D
F
CLEANING PATTERNSDepending on your cleaner type, you will notice a different cleaning pattern produced. Please reference the illustrations according to your cleaner.
Pattern Description:
A. Your cleaner searches for the wall and climbs it.
B. Then spends a number of seconds moving across the waterline and then climbs down the wall.
C. Your Cleaner moves across the floor to about half the width of the pool and then reverses backwards for a few seconds. The cleaner turns slightly and moves towards the wall again.
D. Your cleaner climbs the wall for a couple of seconds.
E. Your cleaner reverses to move back across the floor to about half the width of the pool and then reverses backwards for a few seconds. The cleaner turns slightly and moves towards the wall again.
F. Your cleaner climbs the wall for a couple of seconds.
G. Your cleaner moves across the floor to about half the width of the pool and then reverses backwards for a few seconds. The cleaner turns slightly and moves towards the wall again.
H. Your cleaner climbs the wall for a couple of seconds.
I. Your cleaner moves to the opposite wall to restart the full pattern.
Models with Cable Float or Cable Float + 3 Directional Remote Control
B
AC
D
E
F H
IG
**
* Internal program has a preset number of seconds for climbing. In deep ends, it may not reach the waterline.
* Models with NO Floating Handle are designed to climb partially – not to waterline.
NOTE: All models are equipped with a safety feature that automatically reverses your cleaner after a number of minutes should it not encounter a wall and tilt to approximately 90º. This protects your cleaner should it encounter the underside of a ladder for example. Most models have a safety shut-off timer that periodically shuts off the power to your cleaner for a few seconds to allow it to float down from its position as an additional measure of protection against getting stuck.
NOTE: For cleaning with the 3 directional remote control, your cleaner uses the Cable Float on the Floating Cable to lift itself on one side, which will allow your cleaner to pivot on the opposite side in order to turn.
NOTE: Remote Control guidance can override automatic program.
Remote Control System
TURN

13www.AquaProducts.com/Service
Models withSplit Wheel Tube+ 4 Directional Remote Control
Pattern Description:
A. Cleaner searches for the wall, climbs it for a couple of seconds and then climbs down the wall.
B. Cleaner moves to the opposite end of the pool, finds the wall and climbs to the waterline. Cleaner moves across the wall for a longer number seconds and then climbs down the wall.
C. Cleaner searches for the wall, climbs it for a couple of seconds and then climbs down the wall.
D. Cleaner moves to the opposite end of the pool, finds the wall and climbs to the waterline. Cleaner moves across the wall for a longer number seconds and then climbs down the wall.
E. Cleaner searches for the wall, climbs it for a couple of seconds and then climbs down the wall.
F. Cleaner moves along the floor for several seconds, then turns 90º to the right to move along the length of the pool.
G. Cleaner will restart the pattern, but will alternate the 90º turn to the left.
H. Remote Control can override automatic program.A
GB
C
D
E
F
Pattern Description:
A. Cleaner searches for the wall, climbs it for a couple of seconds and then reverses down the wall.
B. Upon reversing from the wall, the Wheel Tube Clutch slightly turns your cleaner to move on an angle and travels away from the wall moving along the floor for a number of seconds. Cleaner stops and reverses, engaging the Clutch, turning your cleaner on an angle and moves towards the wall again.
C. Cleaner searches for the wall, climbs it for a couple of seconds and then reverses down the wall.
D. Upon reversing from the wall, the Wheel Tube Clutch slightly turns your cleaner to move on an angle and travels away from the wall moving along the floor for a longer number of seconds. Cleaner stops and reverses, engaging the clutch, turning your cleaner on an angle and moves towards the wall again.
E. Cleaner searches for the wall, climbs it for a couple of seconds and then reverses down the wall.
F. Upon reversing from the wall, the Wheel Tube Clutch slightly turns your cleaner to move on an angle and travels away from the wall moving along the floor for a fewer number of seconds. Cleaner stops and reverses, engaging the Clutch, turning your cleaner on an angle and moves towards the wall again.
G. Cleaner searches for the wall and climbs, spending a number of seconds moving across the waterline and then climbs down the wall.
H. Cleaner moves across the floor for a slightly longer number of seconds to the opposite end of the pool. The cleaner will now restart the pattern.
Models with Handle Float + Split Wheel Tube with Directional Guidance Clutch
A
B
C
D
E
F
G
H
**
*
*
*
*
*
*
* Should your cleaner not reach and clean the center portion of your pool, you can change the number of seconds your cleaner travels along the floor using the Magnet provided (Page 11; See Fig. 14).
** Internal program has a preset number of seconds for climbing. In deep ends, it may not reach the waterline.
NOTE: Manual guidance can override current program.
NOTE: All models are equipped with a safety feature that automatically reverses your cleaner after a number of minutes should it not encounter a wall and tilt to approximately 90º. This protects your cleaner should it encounter the underside of a ladder for example. Most models have a safety shut-off timer that periodically shuts off the power to your cleaner for a few seconds to allow it to float down from its position as an additional measure of protection against getting stuck.
Remote Control System
* Internal program has a preset number of seconds for climbing. In deep ends, it may not reach the waterline.
* Models with NO Floating Handle are designed to climb partially – not to waterline.

14www.AquaProducts.com/Service
MAINTAINING YOUR POOL CLEANERCLEANING AND CHANGING THE FILTER BAG (CLEAN THE BAG! CLEAN THE BAG! ...)Thoroughly cleaning the Filter Bag after every use is the most important maintenance step you can take to ensure optimum performance of your cleaner. The Filter Bag’s (Page 4; Fig. 3a) holding capacity is large in comparison to all other brands of independent pool cleaners, but far smaller than that of a pool’s main filter. Additionally, your cleaner’s Filter Bag can filter out particles down to 20 times smaller than what many main filters can. This means that the fine particles such as algae and bacteria, invisible to the naked eye, which slip through the main filter and back into the pool to settle into the pores of the pool’s surface, will be scrubbed loose and vacuumed up by your cleaner and retained in its Filter Bag. When the Filter Bag becomes saturated with debris the flow of water through it becomes restricted and suction is reduced. This will result in remaining dirt and debris not being completely removed from the pool.
Also, strong water flow is required to force the cleaner against the wall when climbing. A dirty Filter Bag weighs the cleaner down, making it hard for your cleaner to climb due to the added weight and reduced water flow. With models whose Floating Handles are required to be locked in the diagonal position, this lack of climbing will not allow the cleaner to move left or right at waterline and thus not cover or clean the entire pool. Therefore, it is important to clean the Filter Bag thoroughly with every use so that the fine particles that get trapped within the fibers of the Filter Bag are removed.
To Clean The Filter Bag:
1. Unplug the Power Supply (Page 4; Fig. 4a-d).
2. If your cleaner is in the pool, gently pull it toward you using the Floating Cable (Page 3; Fig. 2) until the Floating Handle (Page 3; Fig 1) is within reach. Use the Floating Handle (not the Floating Cable) to slowly pull your cleaner out of the pool after allowing most of the water to drain from your cleaner back into the pool.
IMPORTANT: Using the Floating Cable to lift the cleaner out of the water will cause severe damage to your cleaner and may result in costly repair!
Power SupplyGFCI / R.C.D.
outletFloatingCable
3. Lay your cleaner on its back or side on a soft surface to avoid scratching it. Individually pull each Lock Tab gently away from your cleaner’s body to free the Bottom Lid (Fig. 15a).
4. Remove the Filter Bag from the Wire Frame Bag Supports (Fig. 15b), turn it inside out and with a high pressure garden hose, wash off all the dirt from the inside out or dunk it in a clean bucket of water and wring the Bag continuously until the rinse water is clear. If necessary, you may machine wash (Gentle Cycle / Cold Water only) the Bag with NO DETERGENT. You may re-install the bag immediately or allow it to air dry (never iron or machine dry the Filter Bag).
5. Re-install the Bag on the Wire Frames of the Bottom Lid Assembly, making sure that the “felt” (soft) side of the Fine Filter Bag is facing in. To ensure a proper fit of the Filter Bag onto the Bottom Lid Assembly, locate the Small Label near the Filter Bag’s elastic bottom. Position the Filter Bag so that the Small Label is at the center of either long side of the Bottom Lid (Fig. 15c). Then pull the elastic bottom over each Wire (Fig. 15b) and slide the Filter Bag down along the Wires until the Bag reaches the Bottom Lid. At that point the Filter Bag’s elastic bottom should be stretched over the plastic ridges located at the base of the Bottom Lid. This holds the Filter Bag in place. Pull the Filter Bag corners to the top corners of the Wire Frame and pull the extra Bag material from each corner inwards along the top center of the Wire Frames (Fig. 15c).
6. Re-install the Bottom Lid Assembly into the bottom of your cleaner. Be sure that the Filter Bag’s fabric is not interfering with the locking of the Lock Tabs and that you clearly hear each Tab lock shut.
Figure 15cFigure 15b
Figure 15a
Small Label
Wire Frame Bag Support
Lock TabsBottom LidAssembly
IMPORTANT: Although a Filter Bag may appear clean it is capable of microfiltering out particulates 20 times smaller than what the naked eye can see! It is crucial to thoroughly clean the Bag with each use to ensure its ability to properly cover and clean your pool!

15www.AquaProducts.com/Service
FLOTATIONYour cleaner is a universal pool cleaner which performs under varying chemical and temperature conditions in your pool. Your cleaner offers the best possible performance when it is virtually weightless in your pool. Therefore, careful balancing of its weight is important for proper operation. Generally, a new cleaner is universally balanced when used for the first time and additional Flotation (Fig. 16 a-c) is not required on start-up.
Most pool conditions allow your cleaner to climb most stairs and pool walls effortlessly up to the waterline. *However, in some instances the pool environment (e.g. temperature, chemicals, water, etc.) may offset your cleaner’s natural buoyancy. Therefore, flotation devices (Fig. 16a-c) have been included in the packaging with your new cleaner to assist its buoyancy.
* Models with NO Floating Handle are designed to climb partially – not to waterline.
Figure 16a
Figure 16cFigure 16b
Adding Flotation on Bottom Lid Assembly (Page 4; Fig. 3a):
1. Remove the Filter Bag. Then place the “H”-Float (Fig. 16a), foam side down, against the inside base of the Bottom Lid Assembly (Fig. 17a). Secure the “H”-Float with the 2 screws provided by fastening them in from the outside of (from under) the Bottom Lid Assembly. This should provide adequate buoyancy.
2. Should your cleaner require more Flotation, then add the 2 remaining Side Pocket Floats (Fig. 16c) 1 at a time until adequate buoyancy is achieved. Pocket Floats do not require any screws or glue. Simply place them into the open rectangular areas next to the Debris Intake Port Flaps (Fig. 17b).
Adding Flotation on Bottom Lid Assembly (Page 4; Fig. 3b):
1. Remove the Filter Bag (Fig. 17c). Then place the 2 Square Floats (Fig. 16b), foam side down, against the inside base of the Bottom Lid Assembly (Fig. 17d). Secure the Square Floats with the 2 Screws provided by fastening them in from the inside of the Bottom Lid Assembly. This should provide adequate buoyancy.
2. Should your cleaner require more Flotation, then repeat step 1 and add the 2 remaining Square Floats.
Figure 17a
Figure 17c
Figure 17b
Figure 17d
IMPORTANT: Careful removal of air trapped in the housing is critical. Each time you place your cleaner in the pool use the Floating Handle (while submersed) to turn it upside down and gently rock it back and forth to allow any possible trapped air to escape! (See page 7, #3)
IMPORTANT: Temperature and chemical composition changes can greatly affect the buoyancy of your cleaner! Therefore, if you have previously installed Flotation devices in your cleaner to assist its buoyancy, it may be necessary to remove the devices one-by-one until proper buoyancy is restored!

16www.AquaProducts.com/Service
FLOATING CABLE CAREOccasionally you should stretch the Floating Cable (Page 3; Fig. 2) out to its full length to prevent a memory from forming and ensure your Cable will not impede your cleaner from reaching all areas of your pool. At that time you should also check the Floating Cable for external damage. Continual rubbing against sharp or rough surfaces may abrade the Floating Cable resulting in damage and possible short-circulating your cleaner. Animal bites may puncture or fray the cable as well. For these reasons it is important to periodically inspect the Floating Cable. The following is not applicable to models with NO Handle, permanently fixed Handle or Handle with a Handle Float.
Models with Diagonally Locking Floating Handle: With every use, you must reverse the diagonal locked position. This will reverse the direction your cleaner travels in your pool ensuring that it reaches any areas possibly missed during its previous use and ensuring a tangle free Cable.
Models with Fixed Floating Handle and Handle Float: With every use, you must reverse the position of the Handle Float along the Floating Handle by simply sliding it to the same area on the Handle on the opposing side of your cleaner. This will reverse the direction your cleaner travels in your pool ensuring that it reaches any areas possibly missed during its previous use and ensuring a tangle free Cable.
PROPELLER CAREIt is a good practice to inspect the Propeller (Page 3; Fig. 1) once or twice per season to check for obstructions, which may reduce water flow and thus vacuuming ability and pool coverage.
1. First unplug the cleaner from the Power Supply (Fig. 18a).2. Then remove the Screws that secure the Outlet Top (Page 3; Fig. 1) to the
body (Fig. 18b, 18c). Depending on your model the Outlet Top may have 2 or 4 Screws. Using a screwdriver or similar instrument, not your finger, turn the Propeller to check that it spins freely and inspect the Propeller for clogs: hair, twigs or other debris, which may keep it from spinning freely. Remove any accumulated material and replace the Outer Top.
Figure 18c
Figure 18a
Figure 18b
TIP! Cable straightening and untangling is made fast and simple with Aqua Products’ optional E-Z Swivel Cable Detangler. The “E-Z Swivel” is available to purchase through your Aqua Products Authorized Dealer or online at AquaProducts.com.
IMPORTANT: To protect against personal injury and damage to your cleaner always unplug your cleaner from its Power Supply prior to performing any maintenance or repair procedures!
IMPORTANT: Be careful not to over-tighten the Screws or you may “strip” the screw holes or crack the Outlet Top when re-assembling!
IMPORTANT: Never lift your cleaner out of the pool using the Floating Cable! Your may use the Floating Cable to pull the cleaner to the side of the pool, but always use the Floating Handle to remove it from the pool! Using the Floating Cable to remove the cleaner from the pool will result in internal connections being broken and costly damage being caused to your cleaner! (See page 14, #2)
Power SupplyGFCIoutlet
Your cleaner’s Scrubbing Brushes provide traction and give it the ability to loosen debris. It is important that you not let the Brushes get worn down otherwise your cleaner may lose the ability to scrub, climb, turn and move to clean and cover all areas of the pool. Eventually you will need to changes the Brushes on your cleaner. When they need replacement will depend upon how often you use your cleaner and upon the conditions of your pool. High chemical concentrations and rough surfaces will cause faster Brush wear. We recommend that you inspect Brushes frequently to check for excessive wear.
NOTE: Molded and Super Brushes stiffen in water less than 70ºF which may lessen their ability to climb pool walls.
The Molded Rubber Brushes that come standard on most cleaner models will function well on most any surface (including concrete, plaster, gunite, vinyl and pebble). The Super Brushes will work on virtually all surfaces other than highly polished tile. Foam Brushes are recommended for fiberglass and vinyl surfaces only. PVA Brushes are recommended for fiberglass, vinyl and highly polished tile.
Super BrushMolded Rubber Brush
PVA Brush*Foam Brush
* It is recommended that PVA Brushes are installed only by Aqua Products or an Aqua Products Authorized Service Center.
SCRUBBING BRUSHES CARE AND REPLACEMENT

17www.AquaProducts.com/Service
To Change Super Brushes for full length and “split” Wheel Tubes: (Fig. 20)
1. Using a pair of pliers, grab one end of the stainless steel Rod that is securing the old Brushes onto the Wheel Tube. Pull away from the Wheel Tube slowly until the entire existing Brush is freed and removed (Fig. 20).
2. Wrap the new Super Brush around the Wheel Tube.
3. Join the ends of the replacement Super Brush using the Metal Rod supplied in the package. Slide the Rod through the Tabs molded into the ends of the Brush (Fig. 20). Make sure that the Rod is inserted through every Tab.
To Change Molded Rubber Brushes for full length Wheel Tubes (Fig. 19a, 19b):
1. Carefully cut the Tabs with scissors facing away from you and your hands clear from the cutting direction (Fig. 19b).
2. Wrap the new Brush around the Wheel Tube (Fig. 19a).
3. Insert one of the center rubber Tabs into the corresponding Slot on the other end of the Brush (Fig. 19a). Gently rock the Tab back and forth until the Tab pulls through and is secure. Be careful not to tear the rubber Tabs.
4. Once secure you may cut the excess Tab Flap away from the Brush. Be careful not to cut the Tab base that secures the Brush around the Wheel Tube (Fig. 19b).
Figure 19a
Figure 19b
To protect against personal injury and damage to your cleaner always unplug your cleaner from its Power Supply prior to performing any maintenance or repair procedures!
TIP! Start by working the Tabs at the center of the Brush and working outwards.
TIP! Leave Molded Rubber Brushes and Super Brushes in direct sunlight to warm up before mounting. They will be more pliable and easier to work with.
TIP! Leave Molded Rubber Brushes and Super Brushes in direct sunlight to warm up before mounting. They will be more pliable and easier to work with.
TIP! Using needle-nosed pliers will make it easier to grasp and pull the Tabs as needed.
Figure 20
Figure 21
TIP! Lubricate the Rod with soapy water and use a pair of pliers to hold the Rod to make it easier to insert.
To Change Foam Brushes for full length Wheel Tubes: (Fig. 21)
1. Grab each plastic Brush Tab and pull away from the plastic Buttons that secure the Brush to free the Brush from the Wheel Tube.
2. Wrap the new Brushes around the Wheel Tube.
3. Pull the Tabs with the Holes over the corresponding Buttons found on the opposite end of the plastic Brush Grid (Fig. 21). Make sure that they fit snugly. Repeat this process with all of the Tabs and Buttons.
IMPORTANT: When using a cutting instrument, such as scissors, always wear protective attire such as protective goggles and gloves and be sure to always cut away from yourself to prevent unnecessary injury!

18www.AquaProducts.com/Service
CHANGING DRIVE TRACKSDrive Tracks (Fig. 22a) may become worn over the normal course of use and will require replacement based on the frequency of use, the pool’s chemical balance, pool surface and length of season. Worn (stretched, loose or “flat-spotted”) Drive Tracks will impede your cleaner’s ability to climb stairs and obstacles and may effect the cleaning pattern impeding its ability to cover the entire pool. If during your periodic inspection you find that your Drive Tracks are worn, please contact your Aqua Products Authorized Dealer for replacement Drive Tracks or visit AquaProducts.com
1. Unplug your cleaner from its Power Supply and remove your cleaner from the pool.
2. Place your cleaner on its side, on a soft surface which will not scratch the Body’s finish.
3. With your thumbs pushing against the Side Plate (Fig. 22b), hook your fingers under the Drive Track and pull it toward the Side Plate. When you get the Drive Track over the “lip” of the Side Plate, hold it there with one hand, and with the other hand, grip the Wheel Tube (Fig. 16) and rotate it away from the cleaner until the Drive Track “walks” over the Side Plate. Continue this until the Drive Track is free (Fig. 22b).
4. To mount the new Track, hook it around the lower Wheel Tube end and pull it upward as you guide it between the cleaner’s Body and Side Plate.
5. Push inward on the Drive Track and force it over the edge of the Side Plate. Rotate the Wheel Tube, towards you, until the Drive Track properly seats itself on the Wheel Tube between the Side Plate and the cleaner’s body
6. Repeat steps 1 through 5 with the Drive Track on the other side of the cleaner.
Figure 22b
Figure 22a
StandardDrive Track
G-Tooth™Drive Track
CHANGING DRIVE BELTSDrive Belts (Page 19; Fig. 26a, 26b) may become worn over the normal course of use and will require replacement based on the frequency of use, the pool’s chemical balance and length of season. Worn Drive Belts will impede your cleaner’s ability to move or climb and may effect the cleaning pattern impeding its ability to cover the entire pool. If during your periodic inspection you find that your Drive Belts are stretched, loose or “flat-spotted please contact your Aqua Products Authorized Dealer for replacement Drive Belts or visit AquaProducts.com.
1. Remove Drive Tracks (See CHANGING DRIVE TRACKS).
2. Place the cleaner on a non-abrasive surface and turn cleaner upside down. Remove Bottom Lid Assembly (Fig. 23).
3. Remove the Wheel Tube Retaining Rings (Fig. 24a, 24b).
4. Locate and remove 4 screws (see Figure 25) on Drive Motor side, which holds Side Plate in place.
Figure 23
Figure 24a Figure 24b
Wheel Tube Retaining Ring
“E” Clip “C” Clip
TIP! We suggest using needle nose pliers to remove the Wheel Tube Retaining Rings.
IMPORTANT: When ordering replacements specify the type of Track you are replacing; i.e. “Standard” or “G-Tooth™” Drive Tracks
IMPORTANT: Always replace both Tracks at the same time! Replacing only one will adversely effect the cleaner’s cleaning pattern!

19www.AquaProducts.com/Service
Drive Pulley Drive Belt
Side PlateWheel Tube
Small Rollers
Stepped Sleeve Rollers
Figure 26aInside View
Figure 26bTop View
NOTE: When re-assembling be sure that the Drive Tracks are positioned so that they press against the thick side of the Stepped Sleeve Rollers.
When re-assembling, please make sure that the teeth of the Drive Belts are facing inward.
NOTE: Before removing the screws, notice how the Drive Belts, Drive Pulley, Stepped Sleeve Rollers, Small Rollers and Bushings are positioned for re-assembly (Fig. 26a, 26b)
5. Remove old Drive Belts and replace them with new Drive Belts, being careful to properly position the replacements: One Belt from the Drive Pulley to the Front Wheel Tube and one from the Drive Pulley to the Rear Wheel Tube. The Belts must press against the thicker side of the Stepped Sleeve Rollers for proper tension (Fig. 26a, 26b).
6. To re-assemble, reverse steps 5 through 2.
*4-Directional Remote Control Cleaners with Two Drive Motors have a total of 4 Drive Belts, 2 located behind each Side Plate.
4 Screws on Drive Motor side
Figure 25

20www.AquaProducts.com/Service
PREPARING YOUR CLEANER FOR SHIPPING
In the event that you should have to send your cleaner in for repair, you must package the cleaner properly to ensure it reaches the repair facility safely and without incurring damage during transport. This will delay your repair turnaround time and require you to contact your shipper directly to dispute damages.
If the troubleshooting methods shown within the Troubleshooting Guide (Summary or In Depth; Pages 22 - 30) have not corrected your technical service issue or has proven that your cleaner requires review by an Aqua Products Authorized Service Center, please visit Aqua Products’ Customer Service Department online at AquaProducts.com/Service to locate your local Authorized Service Center.
NOTE: A log of all information from your contact with an Aqua Products technical service analyst (i.e. RMA, name of analyst, dates, cleaner model and serial number, etc.) should be kept with your operator manual and / or other important documents for your reference (See page 31: NOTES).
Ask the technical service analyst whether the Power Supply needs to accompany the cleaner. If yes, the Power Cord should be coiled (Fig. 27a) and the Power Supply should be entirely well wrapped in bubble-wrap or equivalent protective material (Fig. 27b). The Power Supply should be positioned in the center of the base of the shipping box and the shipping box base must be firmly sealed (Fig. 27b).
IMPORTANT: A Return Authorization Number (RMA) must be obtained from Aqua Products prior to shipping cleaner to its repair facility. Any item shipped to Aqua Products without a proper RMA number will be refused and returned!
Figure 27a Figure 27b
Correct Incorrect(do not coil cable in afigure 8 configuration)
Incorrect(do not place cleaner
on top of power supply)
CLEANER STORAGEWhen not in use it is important that your cleaner, its Floating Cable and Power Supply are properly stored in a clean and dry area, away from direct sunlight, protected from below freezing temperatures and exposure to chemicals and their fumes (i.e. chlorine). This will help prevent any unnecessary wear or damage to your cleaner or its components. Prior to storing your cleaner, thoroughly clean your Filter Bag and dry off your cleaner. Ensure that its Floating Cable is untangled, not twisted nor in a figure eight, but rather coiled either around your cleaner’s body or in large circular loops and positioned under your cleaner. Be sure to rest your cleaner on its side so that its Brushes do not get flat spots.

21www.AquaProducts.com/Service
Your cleaner’s Floating Handle should be locked in a horizontal position, not diagonal and laid parallel along the face of the cleaner (Fig. 30a).
Your cleaner should be completely wrapped in bubble-wrap or equivalent protective material. The protected cleaner should be positioned in the center at the base of the protective barrier that is shielding the cleaner from the Power Supply and the Floating Cable underneath. Insulated protective material like bubble-wrap should be placed between the cleaner and the shipping box at walls and top to secure the cleaner and around shipping during transit (Fig. 30b).
Include a copy of all information obtained during your contact with the technical service analyst and / or Authorized Service Center, including your contact information and cleaner’s serial number in an envelope (Fig. 31a). A copy of the information relevant to the current technical issue should be sent in the packaging with your cleaner in an envelope. Please include a letter indicating the following:
• Technical issue
• Troubleshooting procedures that you completed
• Who you spoke with, when and what was determined (Aqua Products and, if applicable, the Authorized Service Center)
• RMA # if being sent to Aqua Products
• Your contact information (name, email, phone number, address cleaner model name and serial number)
IMPORTANT: Prominently list the RMA number on all six sides of the shipping box (preferably with magic marker). See Fig. 31b!
IMPORTANT: Keep a copy of your shipping information for tracking purposes! See page 31.
Figure 30a Figure 30b
Figure 31b
The cleaner’s Floating Cable should be coiled and encircled around the Power Supply located at the base of the shipping box (Fig. 28).
A protective barrier (preferably thick cardboard) should be placed on top of the Floating Cable and Power Supply (Fig. 29).
Figure 28 Figure 29
Figure 31a
AquA Products
correspondence

22www.AquaProducts.com/Service
TROUBLESHOOTING GUIDE~ SUMMARY ~
The most common troubleshooting issues are presented in this summary. Should you wish a more detailed description of a procedure or have other troubleshooting issues please refer to the complete Troubleshooting Guide on pages 10-14
or visit www.AquaProducts.com for the most up-to-date troubleshooting information.
1. PUMPS WATeR, BUT DOeS NOT MOve OR MOveS SLOWLYA. Remove any foreign matter that may be obstructing Drive Track (Page 18; Fig. 22b) movement.B. Check Drive Belts and Drive Tracks (Page 18, Page 19; Fig. 26a, 26b). Make sure they have not slipped out of
place and that they are not loose.C. With cleaner upside down on a soft surface (to protect from scratching its body) plug Power Supply in and
turn it on for less than a minute to observe whether the Drive Pulley (Page 19; Fig. 26a) is turning. If it is not moving please visit Aqua Products’ Customer Service Department online at AquaProducts.com/Service to locate your local Authorized Service Center.
2. MOveS BUT DOeS NOT PICK UP DIRT AND DeBRIS (DOeS NOT PUMP WATeR)A. Clean the Filter Bag (Page 4; Fig. 3a) thoroughly.B. Ensure that the Debris Intake Port Flaps (Page 4; Fig 3a, 3b) on the underside of the Bottom Lid (Fig 3a, 3b) are
free to open and close.C. Models with Bottom Lid Assembly (Page 4, Fig. 3b): Adjust Intake Port Width Selector Switch (Page 10; Fig.
10a, 10b) towards “LESS”.D. Inspect / Clean Power Washing Tubes (Page 10; Fig. 13).E. Remove Outlet Top (Page 16; Fig. 18b, 18c) by removing screws located at the top and clean any hair or debris
on or around the propeller (see Page 16 PROPELLER CARE). When reassembling the Outlet Top, BE CAREFUL NOT TO OVER-TIGHTEN THE SCREWS.
3. FLOATINg CABLe (Page 3; Fig. 2) geTS WRAPPeD AROUND THe CLeANeR OR PULLeD INTO THe CLeANeRA. Make sure Floating Handle (Page 5; Fig. 5a, 5b, Page 6) is locked at an angle across the cleaner’s body.
Reverse the diagonal direction of the Floating Handle with each use (not applicable to models with permanently fixed Handles).
B. If your pool’s main filter is on while you are using your cleaner, turn off the filter.C. Remove any trapped air and additional Flotation that you may have added (see FLOTATION, Page 15).D. Power Supply (Page 4; Fig. 4a-d) must be at least 12 feet / 4 meters from the pool’s edge and positioned at the
mid-point of the pool’s longest side allowing only enough Floating Cable in the pool. This allows the cleaner to reach all areas.
E. Please visit Aqua Products Customer Service Department online at AquaProducts.com/Service to locate your local Authorized Service Center. It is advised that you purchase and have a Cable Guard installed (Page 3; Fig. 1)
4. FALLS OR FLIPS BACKWARD OFF OF THe WALLA. Remove obstructions from pool walls and floor if possible.
B. Check Scrubbing Brushes (see Page 16, SCRUBBING BRUSHES CARE AND REPLACEMENT) for wear.
C. Remove Flotation (see Page 15, FLOTATION).
D. Floating Handle (Page 5; Fig. 5a-b) should be locked diagonally (not applicable to models with permanently fixed Handles) and be sure that no water is present within. If water is present, please visit Aqua Products Customer Service Department online at AquaProducts.com/Service to locate your local Authorized Service Center.
WARNING: Before performing any troubleshooting maintenance procedures on your cleaner, it should be disconnected from the Power Supply (transformer) and the Power Supply should be unplugged from the electrical outlet to prevent the possibility of personal injury or damage to the cleaner!
5. DeBRIS COMeS OUT OF THe CLeANeR WHeN ReMOvINg IT FROM THe POOL - BOTTOM LID (Page 4; Fig. 3a, 3b) DOeS NOT CLOSe PROPeRLY
A. Make sure Filter Bag (Page 14; Fig. 15a-b) is mounted properly onto the Bottom Lid Assembly (Page 4; Fig. 3a, 3b).
B. Make sure Debris Intake Port Flaps on underside of your cleaner move freely to open and close (Page 4; Fig. 3a, 3b).
C. Make sure Pump Motor (Page 3; Fig. 1) is working properly and that the Propeller is not being slowed or stopped due to debris caught around it. Please refer to PROPELLER CARE (Page 16; Fig. 18b, 18c).

23www.AquaProducts.com/Service
7. DOeS NOT CLeAN eNTIRe POOL (MISSeS AReAS) OR DOeS NOT CLIMB WALLS
A. Make sure cleaner climbs walls up to the waterline and moves left or right before reversing. Lateral waterline movement is not required by models with permanently fixed Handles, no Handles or with Handle Floats. See pages 5-6, FLOATING HANDLE. See also pages 11-13, CLEANING PATTERNS.
B. Floating Handle should be locked at an angle across the unit’s body, and be sure that no water is present in the Floating Handle. If water is present, please visit Aqua Products’ Customer Service Department online at AquaProducts.com/Service to locate your local Authorized Service Center.
C. Clean Filter Bag thoroughly (See page 14).D. Install Flotation to help the cleaner climb (See page 15).E. Operate the cleaner several cycles (up to 7 hours depending upon model), each time locking the Floating
Handle in opposite directions (not applicable to models with permanently fixed or no handles) and starting the cleaner in different areas of the pool. You may also adjust the programs with the Magnet. See page 11.
8. geTS STUCK ON LADDeRS, MAIN DRAINS, ReTURN FITTINgS, LIgHTS, STAIRS OR IN CORNeRSA. Remove obstructions from pool walls and floor if possible.B. Check Scrubbing Brushes for wear (see Page 16-17 SCRUBBING BRUSHES).C. Adjust Flotation (see page 15, FLOTATION).D. Models with the New Generation Bottom Lid Assembly: Inspect / Clean NeverStuck™ Rollers (Page 10; Fig. 12)
so that they spin freely.
9. POWeR SUPPLY APPeARS TO SHUT OFF BeFORe COMPLeTINg A CLeANINg CYCLeA. Unplug the Power Supply and check the Fuse. Page 4; Fig. 4a-d.B. Make sure that the timer (if applicable) is set correctly. Page 8-9.
10. DOeS NOT SINK OR FLOATS AWAY FROM THe WALLA. Check that the Floating Handle is locked and in the correct position.B. Remove any additional flotation and trapped air. See page 7, CLEANER START POSITION).C. Check for squeaking or grinding.
11. MAKeS LOUD NOISeSA. Allow your Filter Bag to continue to trap debris and particles until your cleaner no longer climbs as high at the
waterline and its top Debris Intake Ports begin to submerse and the noise lessens.B. Remove any added flotation (Page 15) one-by-one until proper buoyancy has been restored.C. Apply non-water soluble grease or oil to components.D. Check Drive Belts and Drive Tracks (Page 18, Page 19; Fig. 26a, 26b) for proper alignment and tension.
12. CLIMBS TO THe WATeRLINe THeN MOveS LeFT WHeN FLOATINg HANDLe IS LOCKeD IN ONe DIReCTION, BUT DOeS NOT MOve RIgHT WHeN HANDLe DIReCTION IS ReveRSeD
A. Check that the Floating Handle (Page 5-6) is locked and in the correct position.B. (Applicable models) Insert one Side Pocket Float (Page 15; Fig. 17b) into the Bottom Lid Assembly.
WARNING: Before performing any troubleshooting maintenance procedures on your cleaner, it should be disconnected from the Power Supply (transformer) and the Power Supply should be unplugged from the electrical outlet to prevent the possibility of personal injury or damage to the cleaner!
C. Make sure Cable Plug (Page 3; Fig. 2) fits tightly into Power Supply.
D. If your Power Supply is equipped with a Safety Reset Button make sure that the Power Switch is “ON”. Then press the Safety Reset Button (Page 8).
E. First, unplug the Power Supply from the outlet! Then, using a cotton swab, dry any moisture within Fuse Holder (Page 4; Fig. 4a-d) and on fuse itself.
F. Check Floating Cable (Page 3; Fig. 2) and Power Cord for possible cuts or damage.
6. DOeS NOT PUMP WATeR OR MOve, OR POWeR SUPPLY (Page 4; Fig. 4a-d) DOeS NOT TURN ON
A. Check to see if electrical outlet has power.
B. Check the Fuse in the Power Supply (Page 4; Fig 4a-d). If necessary, replace with the same type / amperage Fuse. If unsure as to Fuse type, please contact Aqua Products’ Customer Service Department online at AquaProducts.com/Service.

24www.AquaProducts.com/Service
PUMPS WATER, BUT CLEANER DOES NOT MOVE OR MOVES SLOWLY
Remove the cleaner from the pool and place it upside down (on a non-abrasive surface so that it won’t become scratched or scuffed) and unplug it from the Power Supply.
1. Check for and remove any debris such as hair, string, or leaves that may be obstructing the free movement of the Drive Pulley (Page 19; Fig. 26a), Drive Belts or Drive Tracks (Page 18, Page 19; Fig. 26a, 26b).
2. Check that the Drive Belts and Drive Tracks (Page 18, Page 19; Fig. 26a, 26b) are properly aligned and are taut (see Page 18). Adjust or replace if necessary.
Then, plug the cleaner into the Power Supply , grab the Floating Handle, lift your cleaner off the ground and turn it on outside the water while still upside down. Allow the cleaner to run a maximum of 1 minute to check the following:
3. Check that the drive Pulley (Page 19; Fig. 26a) is turning. If it is not, grip one Wheel Tube with both hands and rotate it forward and reverse to see if the Drive Motor (Page 3; Fig. 1), to which the Drive Pulley is connected, loosens and begins to operate correctly.
If you have checked all of the options offered and the problem has not been corrected then please visit Aqua Products’ Customer Service Department online at AquaProducts.com/Service to locate your local Authorized Service Center.
TROUBLESHOOTING GUIDE~ IN DEPTH ~
IMPORTANT: Before performing any troubleshooting maintenance procedures on your cleaner, it should be disconnected from the Power Supply (transformer) and the Power Supply should be unplugged from the electrical outlet to prevent the possibility of personal injury or damage to the cleaner.
MOVES BUT DOES NOT PICK UP DIRT AND DEBRIS (DOES NOT PUMP WATER)
1. Turn off the Power Supply, remove the cleaner from the pool, and unplug it from the Power Supply.
2. Clean the Filter Bag (Page 14) thoroughly so that the fine particles of dirt that get trapped within the fibers of the Filter Bag are removed. Keep in mind that the Filter Bag is capable of trapping particulates 20 times smaller than what the naked eye is capable of seeing. To ensure that the Filter Bag is not the issue and is cleaned, remove the Bag from your cleaner and operate it. If it now operates properly, then the Filter Bag requires a more thorough cleaning to remove the particulates from the fibers of the Bag.
3. Check the Intake Valve Flaps (Page 4; Fig. 3b) on the underside of your cleaner. The Flaps should move freely to open and close. Clean and free the Valve Flaps if necessary.
4. Adjust Intake Port Width Selector Switch (Page 4; Fig 3b and Page 10; Fig. 10a, 10b) towards “LESS”.
5. Inspect / Clean Power Washing Jet Tubes (Page 10; Fig. 13).
6. If the Pump is operating properly replace the Outlet Top. Be careful not to over tighten and “strip” the screws.
7. Using a screwdriver, remove the screws that secure the Outlet Top to the body (see page 16 PROPELLER CARE) and inspect the Propeller for clogs, hair or other debris which may keep it from spinning freely. If it appears to be frozen and no debris is blocking it movement, or if the Propeller moves freely when spun manually but not when the cleaner is turned on, or if the propeller is loose and wobbles when spun manually, please visit Aqua Products’ Customer Service Department online at AquaProducts.com/Service to locate your local Authorized Service Center.
8. Check the operation of the Pump Motor (Page 3; Fig. 1). While the cleaner is in the pool, and with the Power Supply (Page 4; Fig. 4) switched on, hold the cleaner by its Floating Handle (Page 3; Fig. 1) so that the Outlet Top (Page 3; Fig. 1) breaks the pool surface. Water should gush from the Outlet Top.
IMPORTANT: Models with Cable Float, Cable Float with 3 directional Remote Control and Handle Float with “split” Wheel Tubes and Directional Guidance Clutch: These models are equipped with a special safety device that allows the cleaner to sense the Floating Cable being pulled into the Wheel Tubes and will try to immediately reverse its movement to push the Cable back out! If unsuccessful the cleaner will automatically turn off to protect it from twisting the Cable! Simply turn your Power Supply OFF correct the Cable and turn your Power Supply ON as normal to continue cleaning.
FLOATING CABLE GETS WRAPPED AROUND BRUSHES OR PULLED INTO THE CLEANERFloating Handle (see Page 6 FLOATINg HANDLe)
Check that the Floating Handle is locked diagonally across top of body and diagonal angle is reversed with each use (see Page 6 FLOATING HANDLE).
25www.AquaProducts.com/Service
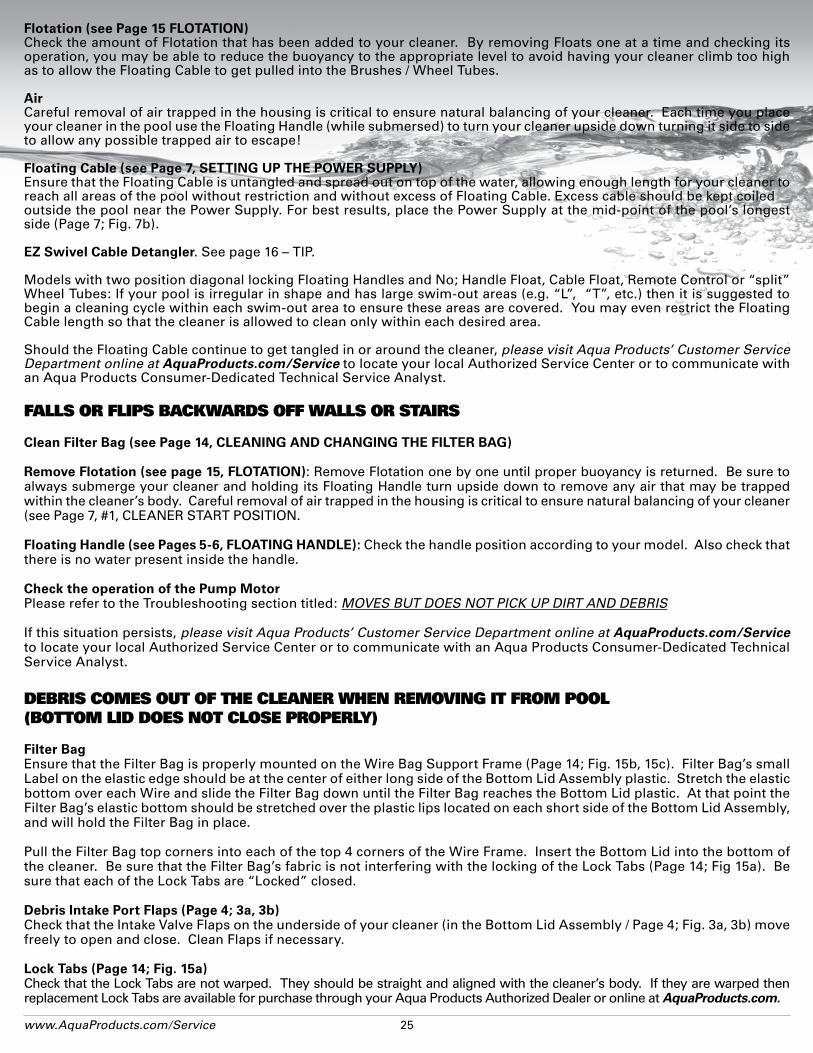
Flotation (see Page 15 FLOTATION)Check the amount of Flotation that has been added to your cleaner. By removing Floats one at a time and checking its operation, you may be able to reduce the buoyancy to the appropriate level to avoid having your cleaner climb too high as to allow the Floating Cable to get pulled into the Brushes / Wheel Tubes.
AirCareful removal of air trapped in the housing is critical to ensure natural balancing of your cleaner. Each time you place your cleaner in the pool use the Floating Handle (while submersed) to turn your cleaner upside down turning it side to side to allow any possible trapped air to escape!
Floating Cable (see Page 7, SeTTINg UP THe POWeR SUPPLY)Ensure that the Floating Cable is untangled and spread out on top of the water, allowing enough length for your cleaner to reach all areas of the pool without restriction and without excess of Floating Cable. Excess cable should be kept coiledoutside the pool near the Power Supply. For best results, place the Power Supply at the mid-point of the pool’s longest side (Page 7; Fig. 7b).
eZ Swivel Cable Detangler. See page 16 – TIP.
Models with two position diagonal locking Floating Handles and No; Handle Float, Cable Float, Remote Control or “split” Wheel Tubes: If your pool is irregular in shape and has large swim-out areas (e.g. “L”, “T”, etc.) then it is suggested to begin a cleaning cycle within each swim-out area to ensure these areas are covered. You may even restrict the Floating Cable length so that the cleaner is allowed to clean only within each desired area.
Should the Floating Cable continue to get tangled in or around the cleaner, please visit Aqua Products’ Customer Service Department online at AquaProducts.com/Service to locate your local Authorized Service Center or to communicate with an Aqua Products Consumer-Dedicated Technical Service Analyst.
FALLS OR FLIPS BACKWARDS OFF WALLS OR STAIRS
Clean Filter Bag (see Page 14, CLeANINg AND CHANgINg THe FILTeR BAg)
Remove Flotation (see page 15, FLOTATION): Remove Flotation one by one until proper buoyancy is returned. Be sure to always submerge your cleaner and holding its Floating Handle turn upside down to remove any air that may be trapped within the cleaner’s body. Careful removal of air trapped in the housing is critical to ensure natural balancing of your cleaner (see Page 7, #1, CLEANER START POSITION.
Floating Handle (see Pages 5-6, FLOATINg HANDLe): Check the handle position according to your model. Also check that there is no water present inside the handle.
Check the operation of the Pump MotorPlease refer to the Troubleshooting section titled: MOVES BUT DOES NOT PICK UP DIRT AND DEBRIS
If this situation persists, please visit Aqua Products’ Customer Service Department online at AquaProducts.com/Service to locate your local Authorized Service Center or to communicate with an Aqua Products Consumer-Dedicated Technical Service Analyst.
DEBRIS COMES OUT OF THE CLEANER WHEN REMOVING IT FROM POOL(BOTTOM LID DOES NOT CLOSE PROPERLY)
Filter BagEnsure that the Filter Bag is properly mounted on the Wire Bag Support Frame (Page 14; Fig. 15b, 15c). Filter Bag’s small Label on the elastic edge should be at the center of either long side of the Bottom Lid Assembly plastic. Stretch the elastic bottom over each Wire and slide the Filter Bag down until the Filter Bag reaches the Bottom Lid plastic. At that point the Filter Bag’s elastic bottom should be stretched over the plastic lips located on each short side of the Bottom Lid Assembly, and will hold the Filter Bag in place.
Pull the Filter Bag top corners into each of the top 4 corners of the Wire Frame. Insert the Bottom Lid into the bottom of the cleaner. Be sure that the Filter Bag’s fabric is not interfering with the locking of the Lock Tabs (Page 14; Fig 15a). Be sure that each of the Lock Tabs are “Locked” closed.
Debris Intake Port Flaps (Page 4; 3a, 3b)Check that the Intake Valve Flaps on the underside of your cleaner (in the Bottom Lid Assembly / Page 4; Fig. 3a, 3b) move freely to open and close. Clean Flaps if necessary.
Lock Tabs (Page 14; Fig. 15a)Check that the Lock Tabs are not warped. They should be straight and aligned with the cleaner’s body. If they are warped then replacement Lock Tabs are available for purchase through your Aqua Products Authorized Dealer or online at AquaProducts.com.

26www.AquaProducts.com/Service
DOES NOT PUMP WATER OR MOVE, OR POWER SUPPLY DOES NOT TURN ON
It is unlikely that both Motors (Drive Motor and Pump Motor) are experiencing mechanical problems. In most cases the issue lies with something that is hindering the flow of electricity from the electrical outlet to the Power Supply (Page 4; Fig. 4) or through the Floating Cable (Page 3; Fig. 2) to the cleaner itself. To locate and resolve where electrical flow is being hindered check the following:
electrical Outlet & ConnectionsMake sure that the Power Supply is firmly plugged into a grounded electrical outlet which has power. To test the outlet, plug in another electrical instrument that you know works to the outlet.
Check that the Floating Cable is securely plugged into the Power Supply.
Power Supply and Fuse (Page 4; Fig. 4a-d)
1. Check that the Power Switch is pressed upwards to the “ON” position.
NOTE: Some models have a Safety Reset Button, which must be pressed each time you switch the power “ON”. The Safety Reset button does not need to be pressed each time if your Power Supply has is operating off of an External Timer.
2. Switch the Power Supply “OFF” and “ON” several times, allowing approximately 30 seconds between each “ON” and “OFF”. Remember, if your cleaner is not set to an External timer and comes equipped with a Reset Switch it must be pressed each time after pressing the “ON” button.
3. Unplug the Power Supply from the electrical outlet. Check that the Fuse (Page 4; Fig. 4a-d) in the Power Supply’s Fuse Holder appears operational. If the Fuse appears burned out, then replacement Fuses are available for purchase through most major electronic supply stores, your Aqua Products Authorized Dealer or online at AquaProducts.com. Please not that there are various Power Supply model types and the location of the Fuse may be in either the front or the back of your Power Supply.
4. After unplugging the Power Supply from the electrical outlet, use a cotton swab to dry all sides of the Fuse and Fuse Holder (inside and out). Reinsert Fuse and plug in and start Power Supply.
Cable Assemblies (Page 3; Fig. 2)With the Power Supply unplugged, check the Power Cable (Page 4; Fig. 4a-d) and the Floating Cable (Page 3; Fig. 2) for cuts or damage. if you detect damage to either Cable, please visit Aqua Products’ Customer Service Department online at AquaProducts.com/Service to locate your local Authorized Service Center or to communicate with an Aqua Products Consumer-Dedicated Technical Service Analyst.
DOES NOT CLEAN ENTIRE POOL (MISSES AREAS) OR DOES NOT CLIMB WALLS
Your cleaner is designed to clean the pool many times over within its recommended cleaning cycle (up to 7 hours) by moving along the width of the pool (side wall towards side wall), not the length.
Models with Two Position Diagonally Locking Floating Handle + Full Length Wheel Tube:Diagonally locked Floating Handles (See Page 5; Figs. 5a and 5b, Page 6) enable these models to operate by moving down a side wall, across the floor (pool width) to the opposing wall, climb the opposing wall, move laterally at the waterline and reverse down the wall. This process is repeated to clean the pool in laps, side wall to side wall, section by section. The cleaner basically climbs the walls and move laterally every pass with extended lateral movements every 7th climb. (See Page 11-13, CLEANING PATTERNS).
Models with Cable Float or Cable Float + 3 Directional Remote ControlModels with Handle Float + Split Wheel Tube with Direction guidance Clutch:These cleaners operate by moving down 1 side wall, then crossing over 50% of the floor’s width, stop and reverse on an angle or arc to move back towards the original side wall. Once the cleaner reaches the original wall it will reverse and repeat this process with varied distances across the width of the pool. It will only climb the original wall every 4 times. These models do not require constant lateral waterline movement to navigate the pool due to their patented turning systems. 3 Directional Remote Control models may be guided forward, reverse and in an arc radius turn (in the direction it is moving) using the handheld wireless Remote Control at any time to clean areas that may have been missed, need extra attention or for quick spot cleaning (see Page 9; Fig. 9a, 9b). (See also Pages 11-13, CLEANING PATTERNS)
Models with Split Wheel Tube + 4 Directional Remote Control:These highly mobile models start by searching for a side wall. At that side wall it will tilt to 90º incline and immediately reverse, cross the pool and climb the opposing side wall up to the waterline, move laterally and then reverse, repeating

27www.AquaProducts.com/Service
this moving pattern again and then on the third time when it reverses from the wall it will turn 90º and move to repeat the same sequence of movements along the length of the pool. Then it will repeat the steps from side wall to side wall and so forth for the most complete and thorough coverage (see Pages 13). Using the handheld wireless Remote Control you may guide the cleaner at any time to move forward, reverse, left or right to clean areas that may have been missed, need extra attention or for quick spot cleaning (see Page 9; Fig. 9b).
If large portions of the pool are missed, then please check the following:
1. Be sure that the Power Supply (Page 4; Fig. 4a-d) and is located in the center of either one of the long sides of the pool (Page 7; Fig. 7b). This will allow optimum use of the Floating Cable’s length (Page 7; SETTING UP THE POWER SUPPLY). Make sure the Floating Cable is untangled and spread out on the water’s surface and that there is adequate Cable length for cleaner to reach all areas of the pool.
2. The Fine Filter Bag may remove particulates 20 times smaller than what is visible to the naked eye. Thoroughly clean the Filter Bag to remove it of the fine particles embedded within the Bag fibers (See Page 14, CLEANING AND CHANGING THE FILTER BAG). To test if the Filter Bag is inhibiting the cleaner’s performance, simply remove the Filter Bag from the Bottom Lid Assembly (Page 14). Then re-insert the Bottom Lid Assembly into the cleaner and operate the cleaner without the Bag. If the cleaner pumps water strongly, and climbs the walls properly, then you have confirmed that the Filter Bag requires a thorough cleaning.
NOTE: When at the waterline a portion of the Brushes should be out of the water. Most models are engineered to move left or right at the waterline. Should they not reach the waterline per their respective cleaning programs (See Pages. 11-13, CLEANING PATTERNS), they will not reach and clean all areas of the pool.
3. Models with Two Position Diagonally Locking Floating Handle + Full Length Wheel Tube AND Split Wheel Tube + 4 Directional Remote Control must have the Floating Handle (Page 3; Fig. 1) locked diagonally across the top of your cleaner’s body (See Page 5; Figs. 5a and 5b, Page 6, Fig. 6).
4. Models with Handle Float + Split Wheel Tube with Directional guidance Clutch have a small screw located on each of the Wheel Tubes near the center split (Page 11; Clutch Screw image). The revolutions of the free spinning Wheel Tube is about 1.5, which enables a modest turn whenever the cleaner reverses. By removing each of the 2 screws (1 per Wheel Tube) you may increase the total revolutions of the free spinning Wheel Tube to about 3, which enables a greater turn whenever it reverses. This is a helpful modification that can be made to this model’s operation in cases that it is essentially stuck in a pattern in an area of the pool and unable to get out and continue to clean elsewhere. To re-insert the screws back into the Wheel Tubes, rotate the free spinning Wheel Tube all the way till it can not turn any more and then reinsert the screw and do the same with the opposing Wheel Tube.
5. Models with Handle Float + Split Wheel Tube with Directional guidance Clutch (Page 3; Fig. 1) come equipped with a Magnet, (Page 11; Fig. 14) (provided in zipper lock plastic packaging with Operator Manual). The distance this cleaner model travels along the width of the floor is set at about 18 seconds. The Magnet can be used to increase or decrease the number of seconds in increments of 3 seconds. This is an essential modification that can be made to this model’s operation in cases that it is essentially gets stuck in a pattern in an area of the pool and unable to get out and continue to clean elsewhere. The increase (or decrease) in the cleaner’s forward / reverse timed movements can enable it to perform as needed. To change the cleaner’s internal program do the following.
1. Turn the cleaner’s Power Supply OFF and remove the cleaner from the pool.2. Holding the cleaner’s Floating Handle lift the cleaner off the floor and turn the cleaner’s power ON (press
Reset button if applicable) allowing the cleaner to operate outside the pool for no more than 2 minutes.3. On side of cleaner where the Floating Cable protrudes from its body, there is an “AQUAPRODUCTS” sticker
over that Side Plate (Page 11; Fig. 14). With the Magnet close to the cleaner, swipe it across the sticker once. When the cleaner stops moving for approximately 3 second immediately following the swipe it is acknowledging that its program has been changed to modify the forward movement to:
a. The first swipe: increases approximately 3 seconds. b. The second swipe: increases approximately 6 seconds.c. The third swipe: increases to a maximum of approximately 9 seconds, which is the maximum. d. The fourth swipe; actually decreases the cleaner’s forward movement to minus 3 seconds from
the original setting (prior to any swiping). e. A final fifth swipe would reset the forward movement to the original factory setting
number of seconds.
IMPORTANT: Swipe only once and test your cleaner’s operation! Typically 1 swipe is sufficient!

28www.AquaProducts.com/Service
Any additional swiping would continue the cycle in the order noted above.
6. Shake the Floating Handle (Page 3; Fig. 1). Listen for the presence of water within it. The Handle should be lightweight and airtight without water in it. If water is present, please visit Aqua Products’ Customer Service Department online at AquaProducts.com/Service to locate your local Authorized Service Center.
7. Check that the Pump Motor (Page 3; Fig. 1) is operating. Please refer to the Troubleshooting Guide (In Depth) section titled MOVES BUT DOES NOT PICK UP DIRT AND DEBRIS (Page 24).
8. Remove obstructions from your pool. Objects protruding from walls may impede the left/right movement of your cleaner when it is at the waterline causing the cleaner to remain in one or two sections while missing others. For optimal performance, it is recommended to remove objects from the pool walls when operating your cleaner. If some objects, such as ladders, can not be removed during your cleaner’s cleaning cycle, place the cleaner in each of the ‘separate’ portions of the pool allowing each portion separate complete cleaning cycles. In this case place the Power Supply at the farthest points of the pool during each cleaning cycle.
9. Check that the Drive Belts and Drive Tracks are properly aligned and are taut (See page 18, Page 19). Adjust or replace if necessary.
10. Check excessive wear of the Scrubbing Brushes and replace is necessary (see Pages 16 and 17 SCRUBBING BRUSHES).
NOTE: Rubber Brushes begin to stiffen in water less than 70ºF which lessens their ability to climb pool walls.
11. You may need to add Flotation. Your cleaner needs to properly climb the walls and to move left or right scrubbing the waterline in order to properly clean the entire pool (see page 15).
12. Check the surface of your pool walls. In rare instances (e.g., new pools) the pool walls may be slippery and require cleaning/brushing first.
If algae has accumulated in your pool and there is a slick green or clear layer along the base of the walls, this impedes the climbing ability of your cleaner. We suggest you “Shock” your pool, and then manually brush and vacuum the dead algae from all surfaces to “waste” (not through the main filter) to remove the bulk of the algae from the pool.If you use your cleaner to remove the dead algae be aware that the Filter Bag may clog quickly, requiring several cleaning cycles and many through Filter Bag cleanings. Your cleaner’s Brushes will become covered with algae. Thoroughly clean them to ensure traction for further use.
13. If you use a non-chlorine solution (i.e. Baquacil®) to clean your pool a clear slick film may form along your pool’s walls impeding the cleaner’ ability to climb. We suggest adding 225 to 300 parts per million of Calcium Hardener to your pool water to combat the film build-up.
14. If your pool is irregular in shape (T, L, freeform) or has large swim out areas your, cleaner may not be able to properly negotiate coming out of or entering all pool areas in a standard cleaning cycle. To ensure cleaning of all areas, we suggest placing the cleaner in each of the ‘separate’ areas of the pool allowing each area a complete cleaning cycle.
IMPORTANT: When shocking your pool water, remove your cleaner from the water for at least 24 hours to allow proper dilution before returning the cleaner to the pool! Otherwise premature discoloration and wear of plastic and rubber components will occur!
GETS STUCK ON LADDERS, MAIN DRAINS, RETURN FITTINGS, LIGHTS,STAIRS OR IN CORNERS
Cleaners have approximately one inch of clearance between the floor and its underside. The Brushes (Page 16, SCRUBBING BRUSHES CARE AND REPLACEMENT) enable the cleaner to climb over most obstacles like main drains, return filters, lights, and pop-up, in-floor systems, and to climb up stairs in most pools. But, in some cases, the size or convex surface of some of these obstacles (i.e. lights, raised main drains) are too great and stop the cleaner from moving forward or reverse by catching on the underside of the cleaner.
Follow these recommendations to assist your cleaner with the following obstacles:
Ladders, Return Fittings, Lane Hooks, Lighting FixturesObjects protruding from walls may impede the left / right (lateral) movement of your cleaner when it is at the waterline. For optimal performance, it is recommended to remove objects from the pool walls when operating your cleaner. The greater the number of objects on the pool walls, the greater the difficulty your cleaner will have covering the entire pool. Two or more objects in the pool positioned either directly opposite one another, or diagonally across from one another, will restrict your cleaner to primarily clean only one section of the pool on one side of the objects during its cleaning cycle.

29www.AquaProducts.com/Service
MAKES LOUD NOISES
gurglingYour cleaner may make gurgling noises when at the waterline. There are two Debris Intake Ports (Page 4, Fig. 3) on the underside (Bottom Lid Assembly) of your cleaner. When at the waterline, one of the Debris Intake Ports may be partially or entirely out of water and taking in air. This will not affect the water and oil cooled motors that are located within your cleaner for the second Debris Intake Ports is completely submersed and taking in sufficient water to keep the motors cool. In this case:
Allow your Filter Bag to continue to trap debris and particles until your cleaner no longer climbs as high at the waterline and its top Debris Intake Ports begins to submerse and the noise lessens. Remember: Models that require lateral waterline movements must reach the waterline to and have a portion of their scrubbing Brushes out of the water to achieve this.
DOES NOT SINK OR FLOATS AWAY FROM THE WALL
Check that the Floating Handle (Pages 5-6) is locked in a diagonal position (only applicable to models whose handles require diagonal locking) and does not have water present within it.
Remove any additional Flotation (See Page 15, FLOTATION)Clean the Filter Bag thoroughly as it may trap air (See Page 14, CLEANING AND CHANGING THE FILTER BAG)
Remove any trapped air (See Page 7, CLeANeR START POSITION)
POWER SUPPLY APPEARS TO SHUT OFF BEFORE COMPLETING A CLEANING CYCLE1. If you have a cleaner (which does not have a timer) or a cleaner with Remote Control (which has an external timer),
unplug the Power Supply and check the Fuse (Page 4; Fig. 4a-d) to see if it is blown. If the Fuse appears burned out, then replace it with the same type / amperage Fuse. If unsure as to what type replacement Fuse is needed or if this does not correct the issue, please call Aqua Products’ Customer Service Department at 1-800-845-4856.
2. If you have a cleaner with an adjustable timer or a cleaner with an external timer, check to make sure that the timer is set for the desired cleaning cycle. If the cleaning cycle is correct then first, unplug the Power Supply from the outlet! Then check the Fuse to see if it is blown..
If these objects can not be removed then place the cleaner in each of the ‘separate’ areas of the pool, allowing each a separate complete cleaning cycle, starting your cleaner at the farthest points of the pool at the beginning of each cleaning cycle.
Main DrainsContact an Authorized Dealer location to purchase a main drain guard, which will prevent your cleaner from becoming stuck on the Main Drain. Certain models come equipped with the patented NeverStuck™ Rollers (Page 10; Fig. 12) to help overcome this situation. If your model does not have the Bottom Lid Assembly with this feature, it is available to purchase through your Aqua Products Authorized Dealer or online at AquaProducts.com.
Return FittingsContact your Authorized Dealer for return fittings of the same diameter as your current fittings, yet with smaller extensions (under 1” height). This should provide the clearance needed for your cleaner to climb freely.
NOTE: The bottom step of a ladder may stop your cleaner from freely climbing and tilting 90º up the wall from the floor. This means the cleaner will remain in the forward mode, ‘spinning its wheels’, under the ladder, not allowing its internal incline sensors to detect the wall. Fortunately, your cleaner is equipped with safety timer that will automatically reverse your cleaner after a period of time. This means the cleaner may not reach the waterline in that specific area and may slightly affect its cleaning pattern.
Scrubbing Brushes (Pages. 16-17)Check that your Brushes are plush and not worn. Should they require replacement, replacement sets are available for purchase through your Aqua Products Authorized Dealer or online at AquaProducts.com. The replacement Brushes are a different style with larger diameter, providing increased ground clearance and a faster speed to climb over obstacles. (For replacement instructions see page 16-17).
Incline SensorsAlways start your cleaner on a horizontal level surface with both Brushes touching the floor. Should your cleaner begin its cleaning cycle in a incline, the Incline Senors within the Drive Motor may begin operating assuming that the incline angle is a level floor. When the cleaner does become level, the Incline Sensors will tilt and consider the floor to be the wall. This will offset its operation, resulting in insufficient cleaning due to remaining in forward or reverse positions for great lengths of time when not needed.

30www.AquaProducts.com/Service
CLIMBS TO WATERLINE THEN MOVES LEFT WHEN FLOATING HANDLE IS LOCKED IN ONE DIRECTION, BUT DOES NOT MOVE RIGHT WHEN HANDLE DIRECTION IS REVERSED
Should your cleaner not move left/right when at the waterline in a consistent manner throughout its cleaning cycle due to an obstruction or for an unknown reason, then your cleaner may not be able to reach and clean all areas of the pool and may remain in one or two portions of the pool while missing others.
Check that the Floating Handle (Page 6. Fig. 6) is locked in a diagonal position (only applicable to models whose handles require diagonal locking)
Side Pocket Floats (Page 15)In rare situations the composition or temperature of the water may directly affect the buoyancy of a pool cleaner, whereby it will move on one direction at the waterline, but not the other. Most models have two motors: a Pump Motor located in the center of the cleaner’s body and a Drive Motor on one side of its body (Page 3, Fig. 1). In such cases the Drive Motor side may be heavier than the non-motor side. To increase the buoyancy of the Drive Motor side, do the following:
Models with Bottom Lid Assembly (Page 4; Fig. 3a): Insert one Side Pocket Float into the Bottom Lid Assembly (Page 15, FLOTATION), in one of the open slots beside the Debris Intake Ports. When reinserting the Bottom Lid Assembly back into the body of the cleaner, be sure that the Side Pocket Float is on the Drive Motor side of your cleaner. Lock the Handle diagonally.
If you have previously added any (combination) of the Flotation (Page 4; Fig. 3) provided into your cleaner, to assist its buoyancy, it is suggested that you remove the devices one-by-one until proper buoyancy is restored and the noise has lessened.
SqueakingThe cleaner is built from plastic, rubber and stainless steel components which may squeak as the cleaner operates. Apply non-water soluble grease or oil to component contact points [i.e. where the Wheel Tube meets the Side Plate (Page 3, Fig. 1), where the Drive Pulley meets the Bushing (Page 19; Fig. 26a, 26b), etc.] to assure the smooth movement of these parts and reduce squeaking.
grindingCheck Drive Belts and Drive Tracks (Page 18, Page 19; Fig. 26a, 26b) for proper tension and alignment. Adjust or replace if necessary.
BUMPERIf your cleaner is becoming stuck or “stalled” against the pool wall on a regular basis, you should install Bumpers on the ends of the Sideplates.
Figure 1This shows the assembly of the Bumper to the Sideplate of the cleaner when viewed from the underside. Be sure that the Bumper fits over the horizontal rib on the Sideplate for proper assembly.
Figure 2Note that it is normal for the Bumper to extend beyond the bottom edge of the Sideplate when properly installed.
Figure 2Bumper Assembly: Viewed from the side
Figure 2Bumper Assembly: Viewed from underneath
Bumper
Side Plate
Bumper
Brass Insert
Screw
Washer
Wheel Tube Axle
Horizontal Rib
Side Plate
Wheel Tube Axle

31www.AquaProducts.com/Service
MAKE A RECORD FOR FUTURE USE
MODEL
PURCHASE DATE
PLACE PURCHASED
SERIAL NUMBER
NOTE: Serial number can be found on the warranty card, the packing carton and your cleaner.
QUESTIONS?Contact the Retailer you purchased your cleaner from or visit the Manufacturer online at www.AquaProducts.com
LIVE TECHNICAL SUPPORT (NORTH AMERICA)1-800-845-4856
June - August9:00am - 8:00pm (Mon. - Fri.)
9:00am - 1:00pm (Sat.)
September - April9:00am - 5:00pm (Mon. - Fri.)
(All Times are Eastern Standard Time Zone)
ONLINE TECHNICAL SUPPORT AND PRODUCT INFORMATIONwww.AquaProducts.com/Service
ADDITIONAL NOTES:

Part #820120
DO NOT RETURN CLEANER TO RETAILER!
If you have a technical service issuePLEASE REFER TO THIS MANUAL OR
CONTACT AQUA PRODUCTSto receive a
Return Merchandise Authorization (RMA) number1-800-845-4856
www.AquaProducts.com/Service
Simple, Quick and Easy Technical Instructions May Fix Your Service Issue
SAVE THESE INSTRUCTIONS