Embed Size (px)
Citation preview

0
��������
���� ���� ���� ���� ����
1
Important Safety Information
Please keep this manual in a safe place for reference. 1. It is important to read this entire manual before assembling and using the equipment.
Safe and efficient use can only be achieved if the equipment is assembled, maintained and used properly. It is your responsibility to ensure that all users of the equipment are informed of all warnings and precautions.
2. Before starting any exercise program you should consult your doctor to determine if you have any physical or health conditions that could create a risk to your health and safety, or prevent you from using the equipment properly. Your doctor's advice is essential if you are taking medication that affects your heart rate, blood pressure or cholesterol level.
3. Be aware of your body's signals. Incorrect or excessive exercise can damage your health.Stop exercising if you experience any of the following symptoms: Pain, tightness in your chest, irregular heartbeat, extreme shortness of breath, feeling light headed, dizzy or nauseous. If you do experience any of these conditions you should consult your doctor before continuing with your exercise program. 4. Keep children and pets away from the equipment. The equipment is designed for adult use only. 5. Use the equipment on a solid, flat levei surface with a protective cover for your floor or
carpet. For safety , the equipment should have at least 0.5 metre of free space all around it.
6. Before using the equipment, check the nuts and bolts are securely tightened. 7. The safety level of the equipment can only be maintained if it is regularly examined for damage and/or wear and tear. 8. Always use the equipment as indicated. If you find any defective components whilst assembling or checking the equipment, or if you hear any unusual noise coming from the equipment during use, stop. Do not use the equipment until the problem has been rectified. 9. Wear suitable clothing whilst using the equipment. Avoid wearing loose clothing which may get caught in the equipment or that may restrict or prevent movement. 10. The equipment has been tested and certified to EN957 under class H.C. Suitable for
domestic, home use only. Maximum weight of user, 100kg. 11. The equipment is not suitable for therapeutic use. 12. Care must be taken when lifting or moving the equipment so as not to injure your
back. Always use proper lifting techniques and/or use assistance

2
FITNESS HOME GYM PARTS LIST
NAME
Upper support
Stabilizer base
Main base
Right arm
Left arm
Vertical support
Pulley holder support
Prop support
Left pulley support
Right pulley support
Chrome bars
Chest press
Oval shaped rubber feet
Seat support
Upper weight
Weight selector
Cylinder holder shaft L=390mm
Weights
Tension bar
Bar for upper pulley
Screw plates for pulleys
Extension lever
Padded back
Double crutch for pulleys
Foam cylinders L=160mm
Foam protector L=250mm
Seat
Bushing diam.10x18x24mm
Bushing diam.12.5x29x8.5mm
Pulley diam. 9.6x90x30mm
Pulley diam. 9.6x90x22mm
Ball pin 10x75mm
Pin for weight selector
L-shaped block lever
Handle screw for block lever
Oval plastic stopper
PVC protecto
Rubber protector
Cylindrical rubber stop
Pin for upper weight socket
Harness clip
Q’TY 1 2 1 1 1 1 1 1 1 1 2 1 6 1 1 1 2 9 1 1 2 1 1 1 4 2 1 6 8 9 3 2 1 1 2 3 3 1 2 1 4
No.
1
2
3
4
5
6
7
8
9
10
11
12
13
14
15
16
17
18
19
20
21
22
23
24
25
26
27
28
29
30
31
32
33
34
35
36
37
38
39
40
41
Q’TY 1 1 1 1 1 1 1 16 4 1 1 2 1 1 1 1 1 2 1 2 15 15 1 1 2 1 1 4 1 2 1 1 1 1 1 1 2
No.
42
43
44
45
46
47
48
49
50
51
52
53
54
55
56
57
58
62
63
64
65
66
67
68
69
70
71
72
73
74
75
76
77
78
79
80
81
NAME
Chain
Selection bar cable
Butterfly arms cable
Lower pulley cable
Upper weight socket
Plastic stopper diam. 25mm
Upper weight washer
Foam sleeve for grips
Metal grip
Cushion for biceps pad
Metal support for biceps pad
Handle knob to fix rest
Threaded bar to fix rest
Padded ankle strap
Round plastic guide
Saddle support plate
Front platform
Bushing diam 8.5x13.5x14.5mm
Cylinder holder shaft L=430mm
Saddle support plate
Plastic Bush
Plastic guide
Push up bar (Right)
Push up bar (Left)
Cushion Holder
Back Cashion
Cross Tube L=570
Circular Foam Grip
Back Cushion Board
Dumbbells
Cushion Support Frame
Stabilizer base
Locking Knob
Rear Support Tube
Cylinder holder shaft L=315mm
Cylinder holder shaft L=290mm
Hand back

3

4

5
1) Place the rubber feet (13) on the ends of the central, back and front stabilising bases (2).
2) Attach the front and back stabilising bases (2) to the main base (3), Front plat form 58) and the Stabilizer base (76) using screws (1a) or (1b), washers (2a) and nuts (3a). Then Attach the stabilizer base (76) to the main base (3) using screws (1b) washers (2a) and nuts (3a), Note:and this time screws(1b) must be attached from up to down.
3) Attach the push up bar (right) (67) and the push up bar (left) (68) to the stabilizer base (76) using screws (la) washers (2a) and nuts (3a)
4) Attach the vertical support (6) and the plate (64) to the main base (3) using screws (1a), washers(2a) and nuts (3a).Attach the cushing support Frame (75) and the plate (64) to the stabilizer base(76)using screws (la) washers (2a) and nuts (3a)
5) Insert the chrome bars (11) putting previously one of the weight cover support (59) together with the cylindrical rubber stops (39) on the main base (3) as shown in the drawing, and screw the bars to the base (3) using screws (1I), washers (2e) and nuts (4a). Slide each weight (18) along the bars(11) (sticking on the weight labels). IMPORTAND NOTE : The groove for the weight selector pin (33)should be facing downwards. If not, the pin will not slide across.
6) Slide the weight selector (16) through the hole in the center of the weights (18). 7) Pass the socket (46) through the weight selector (16) and join blth parts to the pin (40).
Pass the upper weight (15) through the bars and position the socket (46) in such a way that it fits in the base of the upper weight (15). Place the upper weight washer (48) over the hole in the center of the upper weight (15).

6
1) Place the seat support (14) in the vertical support (6), and attach using the plate (57), screws (1L), washers (2b) and nuts (4a). 2) Mount the extension lever (22) on the seat support (14) and attach using the threaded
bar (54), the two sockets (29)(62) and the two handle screws (53). 3) Join the metal support for the biceps rest (52) to its cushion (51), using screws (1c)
and washers (2c). Insert the round plastic guide (56) in the extension lever (22). If you wish to exercise with the biceps pad : Insert the pad in the extension lever (22), after previously removing the threaded bar (54) which should be replaced once the biceps pad has been mounted.
4) Insert the cylinder holder shafts (17)(63) and the foam cylinders (25). 5) Attach the padded back (23) to the vertical support (6) and the seat (27) to the seat support (14) using screws (1d) and washers (2b).

7
1) Insert the Rear support Tube (78) in the holes in the cushion support Fame (75). 2) Insert the chrome bars (11) in the holes in the Rear support Tube (78) and join using
screws (1i), washers (2e) and nuts (4a).Place the upper support (1) over the vertical support (6) and attach the upper support (1) to the Rear support tube (78) using screws (1b), washers (2a) and nuts (3a). then to the vertical support (6)using screws (1b), washers (2a) and nuts (3a). AT THIS TIME, DO NOT SCREW ON TOO TIGHT.
3) Attach the oval plastic stoppers (36) to the upper support (1). join both the Rear support tube (78) and the cushion support fame (75) using screws (1n)washers (2b) and nuts (4a)
4) Using the bushings (29), one screw (1f), washers (2f) and one nut (3f), attach the chest press (12).
5) Join both the left (5) and right arms (4) to the chest press (12) using ball pins (32) and attach using bushings (29), screws (1g), washers (2f) and nuts (3f). NOTE: 2 WASHERS, 2 BUSHINGS, 1SCREW AND 1 NUT FOR EACH ARM.
6) Attach the PVC protectors (37) to both sides of the chest press (12), in such a way that the chest press(12) is protected from damage by the arms (4 & 5).
7) Attach the foam cylinders (26) to both arms (4 & 5), and fit the foam sleeves (49) on the grips (50) and the grips soldered to the arms (4 & 5). Moisten the inside of the foam with a little soap water to make this step easier.
8) Attach the metal grips (50) to both arms (4 & 5), facing outwards or inwards (as you prefer), using one screw (1h), washers (2h) and nuts (3a).
9) Mount the prop support (8) on the front of the vertical support (6) and place the pulley holder support (7) on the back of the vertical support (6) using screws (1L), washers (2b) and nuts (4a).
10) Attach the right hand pulley support (10) and the left hand pulley support (9) to the pulley holder support (7) using screws (1g), washers (2f) and nuts (3f).
11) Place the rubber protector (38) on the end of the prop support (8). 12) Insert the block lever (34) through the hole in the chest press (12), and attach on the
other side using the handle screw (35), inserting the curved end of the lever in the hole in the prop support (8). Depending on the exercise you wish to do, you will need to insert the lever in the hole or not.
8
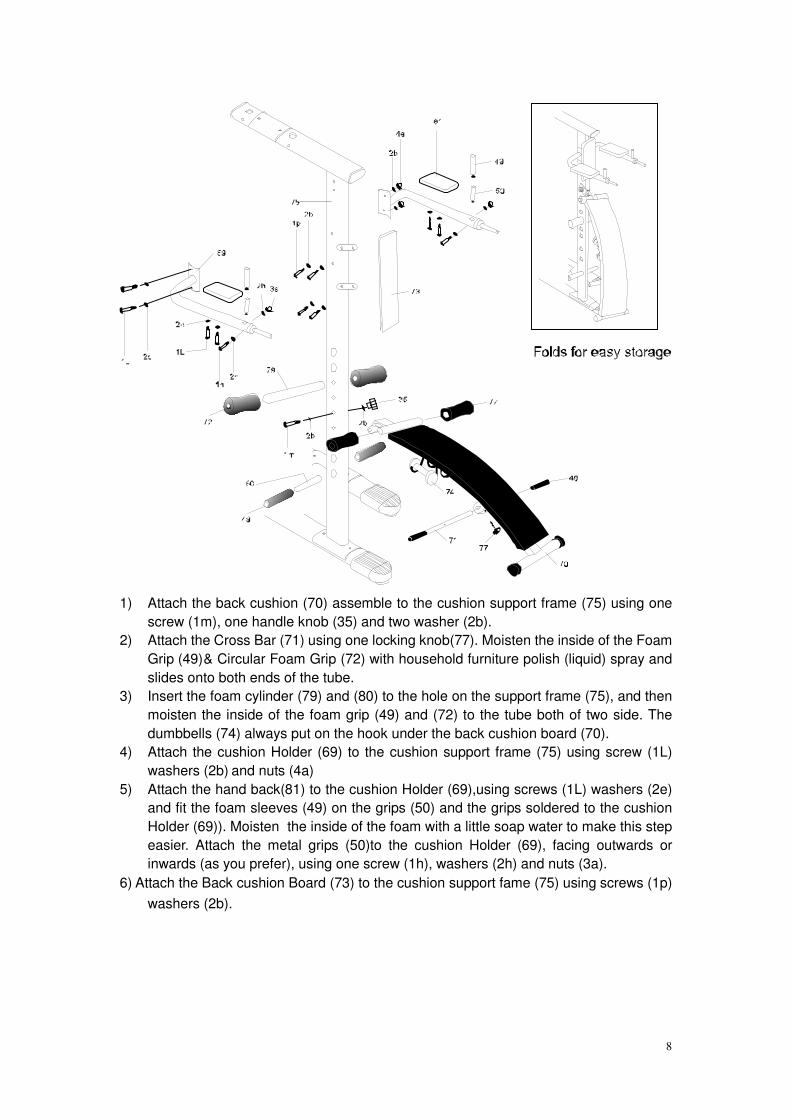
1) Attach the back cushion (70) assemble to the cushion support frame (75) using one screw (1m), one handle knob (35) and two washer (2b).
2) Attach the Cross Bar (71) using one locking knob(77). Moisten the inside of the Foam Grip (49) & Circular Foam Grip (72) with household furniture polish (liquid) spray and slides onto both ends of the tube.
3) Insert the foam cylinder (79) and (80) to the hole on the support frame (75), and then moisten the inside of the foam grip (49) and (72) to the tube both of two side. The dumbbells (74) always put on the hook under the back cushion board (70).
4) Attach the cushion Holder (69) to the cushion support frame (75) using screw (1L) washers (2b) and nuts (4a)
5) Attach the hand back(81) to the cushion Holder (69),using screws (1L) washers (2e) and fit the foam sleeves (49) on the grips (50) and the grips soldered to the cushion Holder (69)). Moisten the inside of the foam with a little soap water to make this step easier. Attach the metal grips (50)to the cushion Holder (69), facing outwards or inwards (as you prefer), using one screw (1h), washers (2h) and nuts (3a).
6) Attach the Back cushion Board (73) to the cushion support fame (75) using screws (1p) washers (2b).

9

10
1) The three cables of the body building apparatus should be installed at the same time the pulley protectors as the pulleys, as shown in the detailed drawings.
2) The position of each cable is as follows: The lower pulley cable (45) goes from the extension lever to the main base where it joins the chain (42) which maintains cable tension. The butterfly arms cable (44) goes from the left arm (5) to the right arm (4), and is attached to both arms of the chest press. The selection bar cable (43) goes from the upper pulley, were the bar for exercise of back muscles is attached (20) to the upper weight (15).
3) To adjust cable tension, use the chain (42) and the harness clips (41). 4) Do not forget to tighten well all nuts and screws. 5) Connect the tension bar (19) to the end of the cable (45) located on the lower pulley
which is at the extension lever (22), using the harness clip attached to the bar. 6) Connect the upper pulley bar (20) to the end of the cable (43) located on the upper
pulley on the upper support (1). 7) Once the cables are installed, you are able to select the weight with which you wish to
exercise using the weight selector pin (33). The purpose of the pulley guide protectors is to prevent these from catching your fingers. Fit the protectors to the pulleys: A, B, C, D, E, F, G and H. 99% of cases of breakage of the cables are due to them coming out of the grooves in the pulleys. The cables can come loose due to a slackening in tension. Check that they are not slack; should they be, tighten them by using the chain & the spring hooks (i.e. shorten the chain by link).

11
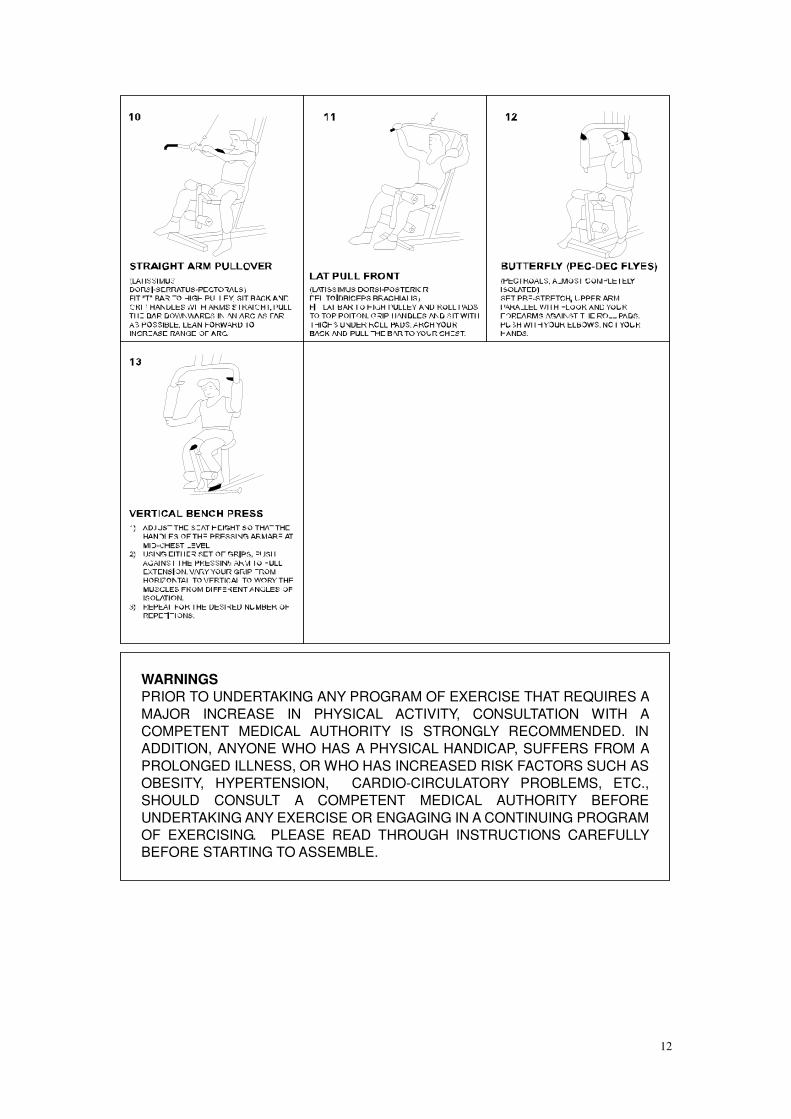
EXERCISE INSTRUCTION
12
WARNINGS PRIOR TO UNDERTAKING ANY PROGRAM OF EXERCISE THAT REQUIRES A MAJOR INCREASE IN PHYSICAL ACTIVITY, CONSULTATION WITH A COMPETENT MEDICAL AUTHORITY IS STRONGLY RECOMMENDED. IN ADDITION, ANYONE WHO HAS A PHYSICAL HANDICAP, SUFFERS FROM A PROLONGED ILLNESS, OR WHO HAS INCREASED RISK FACTORS SUCH AS OBESITY, HYPERTENSION, CARDIO-CIRCULATORY PROBLEMS, ETC., SHOULD CONSULT A COMPETENT MEDICAL AUTHORITY BEFORE UNDERTAKING ANY EXERCISE OR ENGAGING IN A CONTINUING PROGRAM OF EXERCISING. PLEASE READ THROUGH INSTRUCTIONS CAREFULLY BEFORE STARTING TO ASSEMBLE.