Embed Size (px)
Citation preview

© 2013 Directed. All rights Reserved. 1
Quick Reference User’s GuideVSS3001 Remote Start with Keyless Entry
BT
BT
Important information
Government Regulations and Safety information
Read the Government Regulations and Warning! Safety First sections of this manual prior to operating this system.
Warning! Failure to heed this information can result in death, personal injury or property damage and may also result in the illegal use of the system beyond its intended purpose.
Your warrantyYour system comes with a warranty. The warranty terms are detailed at the end of this guide. Make sure that you receive the proof of purchase from your dealer, indicating the product was installed by an authorized Directed dealer.
Optional Remote KitThis system can be used with a companion remote control which offers you additional features. This remote kit is available through your authorized dealer or by visiting us at www.directedstore.com to order. The remote kit part number is 9656V.
Using Your System
Note: The following instructions may differ for some vehicles, particularly if your vehicle is started by using a push-to-start button. Make sure to ask your authorized dealer for the vehicle-specific system operating details that are part of the downloaded installation manual.
Remote StartThis feature allows you to remotely start and run your vehicle for a programmable period of time. This makes it possible to warm up the engine, as well as adjust the interior temperature of the vehicle with the climate control system. If interior heating or cooling is desired, the climate controls must be preset, and the fan blower must be set to the desired level prior to remote starting the vehicle.
Important! (1) Never remote start the vehicle with the vehicle in gear, and (2) Never remote start the vehicle with the key in the ignition.
For instructions on how to activate/deactivate your remote start system, refer to the SmartStart User’s guide.
When you are ready to drive the vehicle:1. Insert the ignition key and turn it to the ON (not the START) position.2. Press the brake pedal. The remote start system shuts down but the motor continues to run because
the ignition has been turned on.The vehicle now operates as usual.
Note: If the brake pedal is pressed before the key is in the ON position, the engine will shut down.
While the vehicle is running during remote start operation, the system monitors the vehicle and auto-matically shuts down the engine if the system receives any of the following Shut-down inputs:
• The brake pedal is pressed.• The hood is opened.• The shutdown toggle switch is put into the OFF position• The pre-programmed run time has elapsed.• The procedure to activate remote start is repeated.
1. Download the free Viper SmartStart application to your smartphone from iTunes App Store, Google Play, Windows Phone Store, or BlackBerry App World depending on your smartphone model. Links to download Viper SmartStart apps are also available at www.viper.com/SmartStart/GetSmartStart.aspx
2. Have the SmartStart system installed by your authorized Viper dealer. Once installed and activated by the installer, you will receive an e-mail prompting you to activate your account. Your installer can also provide you with information about your system.
3. After you activate your account, enter your username and password on the More/Settings/SmartStart Login page of the handset app to activate your SmartStart app.
4. Once you have completed the log-in process on your smartphone, you can begin using your app to control your vehicle(s). From the Car screen, select the vehicle you wish to send commands to.
Note 1: Accessing SmartStart GPS features in the app requires installation of VSM250 SmartStart GPS module.Note 2: Accessing Home Control features in the app requires compatible home security panel. See www.viper.com/SmartStart for more details
on compatible home security hardware.Note 3: Smartphone coverage for GPS and other features may differ by platform. Please visit www.viper.com/SmartStart for the most current
information on app/smartphone coverage.
System Commands
Menu Bar
Start HereBefore you can start using your system, the following steps must be performed:
Congratulations on the purchase of your state-of-the-art Viper SmartStart system. Reading this user’s guide prior to using your system will get you off to a quick and smooth start.
Basic Commands at a GlanceSystem Commands Description
Select this icon to lock the vehicle. When a confirma-tion message is received, select it to clear.
Select this icon to unlock the vehicle. When a confir-mation message is received, select it to clear.
Select this icon to remote start* your vehicle. When a confirmation message is received, select it to clear. The vehicle remote starts and stays running for the pro-grammed run time*. Select this icon again to turn off the engine during the run time.
Select this icon to open trunk. A dialog box will open, asking you to confirm you want to open the trunk. Select "Yes" to confirm, or "No" to cancel the request. If you selected "Yes", select again to clear the confir-mation message when it pops up.
Select this icon to activate panic mode for 30 sec-onds. Select again during this time to turn off. This feature is used to attract attention if in a threatened position.
* See your Remote Start system user's guide or installer for important information about starting a manual transmission vehicle and how long the engine will run when remote started.
For more information on app features, use the in-app Help function.
Menu Bar and ScreensMenu Bar Description
Home This screen is the default screen for direct access to all your remote commands. Select any command on the Home screen to perform it.
Cars This screen allows you to access and personalize your vehicle settings.
Status Use this tab to check the status of your vehicle and Viper SmartStart system.
GPS This screen allows you to access SmartStart GPS features (requires SmartStart GPS hardware and GPS Secure service plans).
More Access settings and other advanced app features. Go to More/Settings to log in to SmartStart, and use in-app Help function to explore additional feature details.
Screens
Home Screen Cars Screen Status Screen GPS Screen More Screen
Please visit www.viper.com/SmartStart for the latest updates and information about your SmartStart system.
For any additional questions please contact your authorized Directed dealer or contact Directed at 1-800-753-0600. Additional support is also available at: http://support.directed.com
Note: Your SmartStart module automatically checks for updates once every 24 hours. During updates, system operation is dis-rupted for approximately one minute.
Note: The amount of time it takes for your vehicle to respond to a command can be affected by cellular coverage or network congestion.
© 2013 Directed. All rights Reserved. 2
QRGVSS3001 2013-09
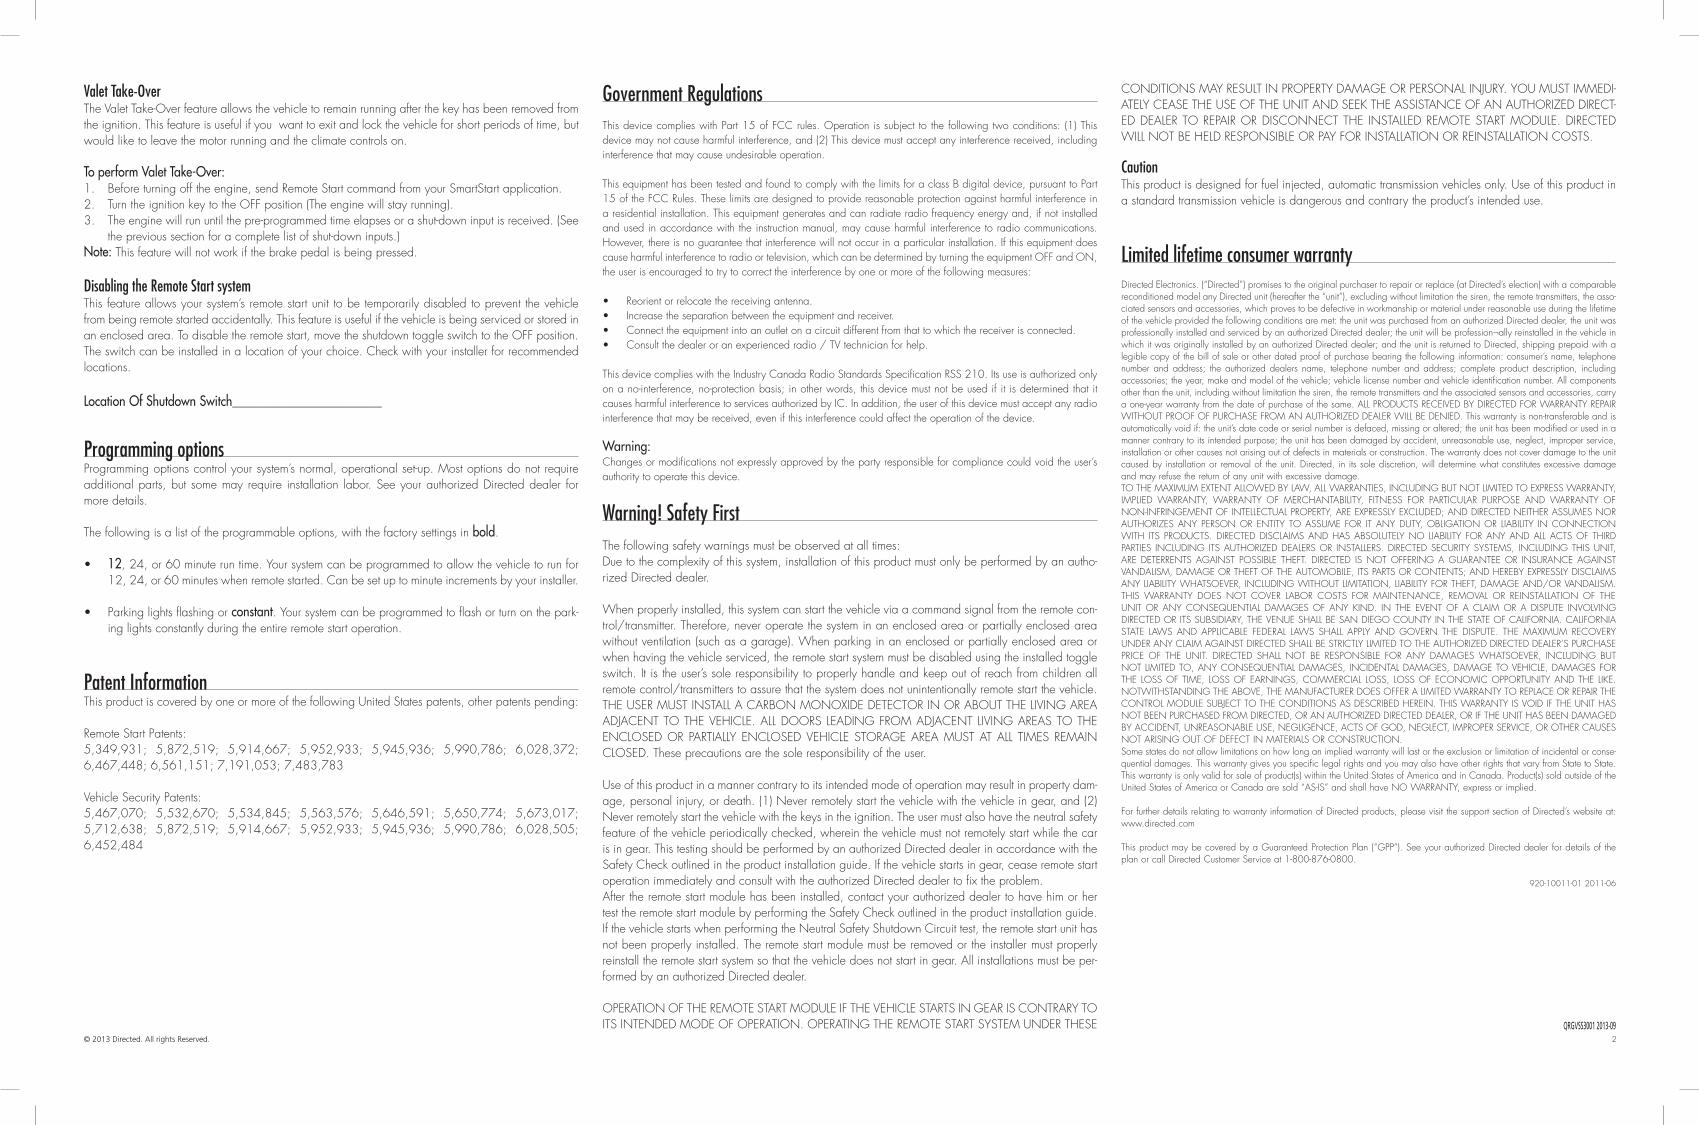
Valet Take-OverThe Valet Take-Over feature allows the vehicle to remain running after the key has been removed from the ignition. This feature is useful if you want to exit and lock the vehicle for short periods of time, but would like to leave the motor running and the climate controls on.
To perform Valet Take-Over:1. Before turning off the engine, send Remote Start command from your SmartStart application. 2. Turn the ignition key to the OFF position (The engine will stay running). 3. The engine will run until the pre-programmed time elapses or a shut-down input is received. (See
the previous section for a complete list of shut-down inputs.)Note: This feature will not work if the brake pedal is being pressed.
Disabling the Remote Start systemThis feature allows your system’s remote start unit to be temporarily disabled to prevent the vehicle from being remote started accidentally. This feature is useful if the vehicle is being serviced or stored in an enclosed area. To disable the remote start, move the shutdown toggle switch to the OFF position. The switch can be installed in a location of your choice. Check with your installer for recommended locations.
Location Of Shutdown Switch_________________________
Programming optionsProgramming options control your system’s normal, operational set-up. Most options do not require additional parts, but some may require installation labor. See your authorized Directed dealer for more details.
The following is a list of the programmable options, with the factory settings in bold.
• 12, 24, or 60 minute run time. Your system can be programmed to allow the vehicle to run for 12, 24, or 60 minutes when remote started. Can be set up to minute increments by your installer.
• Parking lights flashing or constant. Your system can be programmed to flash or turn on the park-ing lights constantly during the entire remote start operation.
Patent InformationThis product is covered by one or more of the following United States patents, other patents pending:
Remote Start Patents:5,349,931; 5,872,519; 5,914,667; 5,952,933; 5,945,936; 5,990,786; 6,028,372; 6,467,448; 6,561,151; 7,191,053; 7,483,783
Vehicle Security Patents:5,467,070; 5,532,670; 5,534,845; 5,563,576; 5,646,591; 5,650,774; 5,673,017; 5,712,638; 5,872,519; 5,914,667; 5,952,933; 5,945,936; 5,990,786; 6,028,505; 6,452,484
Government RegulationsThis device complies with Part 15 of FCC rules. Operation is subject to the following two conditions: (1) This device may not cause harmful interference, and (2) This device must accept any interference received, including interference that may cause undesirable operation.
This equipment has been tested and found to comply with the limits for a class B digital device, pursuant to Part 15 of the FCC Rules. These limits are designed to provide reasonable protection against harmful interference in a residential installation. This equipment generates and can radiate radio frequency energy and, if not installed and used in accordance with the instruction manual, may cause harmful interference to radio communications. However, there is no guarantee that interference will not occur in a particular installation. If this equipment does cause harmful interference to radio or television, which can be determined by turning the equipment OFF and ON, the user is encouraged to try to correct the interference by one or more of the following measures:
• Reorient or relocate the receiving antenna.• Increase the separation between the equipment and receiver.• Connect the equipment into an outlet on a circuit different from that to which the receiver is connected.• Consult the dealer or an experienced radio / TV technician for help.
This device complies with the Industry Canada Radio Standards Specification RSS 210. Its use is authorized only on a no-interference, no-protection basis; in other words, this device must not be used if it is determined that it causes harmful interference to services authorized by IC. In addition, the user of this device must accept any radio interference that may be received, even if this interference could affect the operation of the device.
Warning:Changes or modifications not expressly approved by the party responsible for compliance could void the user’s authority to operate this device.
Warning! Safety FirstThe following safety warnings must be observed at all times:Due to the complexity of this system, installation of this product must only be performed by an autho-rized Directed dealer.
When properly installed, this system can start the vehicle via a command signal from the remote con-trol/transmitter. Therefore, never operate the system in an enclosed area or partially enclosed area without ventilation (such as a garage). When parking in an enclosed or partially enclosed area or when having the vehicle serviced, the remote start system must be disabled using the installed toggle switch. It is the user’s sole responsibility to properly handle and keep out of reach from children all remote control/transmitters to assure that the system does not unintentionally remote start the vehicle. THE USER MUST INSTALL A CARBON MONOXIDE DETECTOR IN OR ABOUT THE LIVING AREA ADJACENT TO THE VEHICLE. ALL DOORS LEADING FROM ADJACENT LIVING AREAS TO THE ENCLOSED OR PARTIALLY ENCLOSED VEHICLE STORAGE AREA MUST AT ALL TIMES REMAIN CLOSED. These precautions are the sole responsibility of the user.
Use of this product in a manner contrary to its intended mode of operation may result in property dam-age, personal injury, or death. (1) Never remotely start the vehicle with the vehicle in gear, and (2) Never remotely start the vehicle with the keys in the ignition. The user must also have the neutral safety feature of the vehicle periodically checked, wherein the vehicle must not remotely start while the car is in gear. This testing should be performed by an authorized Directed dealer in accordance with the Safety Check outlined in the product installation guide. If the vehicle starts in gear, cease remote start operation immediately and consult with the authorized Directed dealer to fix the problem.After the remote start module has been installed, contact your authorized dealer to have him or her test the remote start module by performing the Safety Check outlined in the product installation guide. If the vehicle starts when performing the Neutral Safety Shutdown Circuit test, the remote start unit has not been properly installed. The remote start module must be removed or the installer must properly reinstall the remote start system so that the vehicle does not start in gear. All installations must be per-formed by an authorized Directed dealer.
OPERATION OF THE REMOTE START MODULE IF THE VEHICLE STARTS IN GEAR IS CONTRARY TO ITS INTENDED MODE OF OPERATION. OPERATING THE REMOTE START SYSTEM UNDER THESE
CONDITIONS MAY RESULT IN PROPERTY DAMAGE OR PERSONAL INJURY. YOU MUST IMMEDI-ATELY CEASE THE USE OF THE UNIT AND SEEK THE ASSISTANCE OF AN AUTHORIZED DIRECT-ED DEALER TO REPAIR OR DISCONNECT THE INSTALLED REMOTE START MODULE. DIRECTED WILL NOT BE HELD RESPONSIBLE OR PAY FOR INSTALLATION OR REINSTALLATION COSTS.
CautionThis product is designed for fuel injected, automatic transmission vehicles only. Use of this product in a standard transmission vehicle is dangerous and contrary the product’s intended use.
Limited lifetime consumer warrantyDirected Electronics. (“Directed”) promises to the original purchaser to repair or replace (at Directed’s election) with a comparable reconditioned model any Directed unit (hereafter the “unit”), excluding without limitation the siren, the remote transmitters, the asso-ciated sensors and accessories, which proves to be defective in workmanship or material under reasonable use during the lifetime of the vehicle provided the following conditions are met: the unit was purchased from an authorized Directed dealer, the unit was professionally installed and serviced by an authorized Directed dealer; the unit will be profession¬ally reinstalled in the vehicle in which it was originally installed by an authorized Directed dealer; and the unit is returned to Directed, shipping prepaid with a legible copy of the bill of sale or other dated proof of purchase bearing the following information: consumer’s name, telephone number and address; the authorized dealers name, telephone number and address; complete product description, including accessories; the year, make and model of the vehicle; vehicle license number and vehicle identification number. All components other than the unit, including without limitation the siren, the remote transmitters and the associated sensors and accessories, carry a one-year warranty from the date of purchase of the same. ALL PRODUCTS RECEIVED BY DIRECTED FOR WARRANTY REPAIR WITHOUT PROOF OF PURCHASE FROM AN AUTHORIZED DEALER WILL BE DENIED. This warranty is non-transferable and is automatically void if: the unit’s date code or serial number is defaced, missing or altered; the unit has been modified or used in a manner contrary to its intended purpose; the unit has been damaged by accident, unreasonable use, neglect, improper service, installation or other causes not arising out of defects in materials or construction. The warranty does not cover damage to the unit caused by installation or removal of the unit. Directed, in its sole discretion, will determine what constitutes excessive damage and may refuse the return of any unit with excessive damage. TO THE MAXIMUM EXTENT ALLOWED BY LAW, ALL WARRANTIES, INCLUDING BUT NOT LIMITED TO EXPRESS WARRANTY, IMPLIED WARRANTY, WARRANTY OF MERCHANTABILITY, FITNESS FOR PARTICULAR PURPOSE AND WARRANTY OF NON-INFRINGEMENT OF INTELLECTUAL PROPERTY, ARE EXPRESSLY EXCLUDED; AND DIRECTED NEITHER ASSUMES NOR AUTHORIZES ANY PERSON OR ENTITY TO ASSUME FOR IT ANY DUTY, OBLIGATION OR LIABILITY IN CONNECTION WITH ITS PRODUCTS. DIRECTED DISCLAIMS AND HAS ABSOLUTELY NO LIABILITY FOR ANY AND ALL ACTS OF THIRD PARTIES INCLUDING ITS AUTHORIZED DEALERS OR INSTALLERS. DIRECTED SECURITY SYSTEMS, INCLUDING THIS UNIT, ARE DETERRENTS AGAINST POSSIBLE THEFT. DIRECTED IS NOT OFFERING A GUARANTEE OR INSURANCE AGAINST VANDALISM, DAMAGE OR THEFT OF THE AUTOMOBILE, ITS PARTS OR CONTENTS; AND HEREBY EXPRESSLY DISCLAIMS ANY LIABILITY WHATSOEVER, INCLUDING WITHOUT LIMITATION, LIABILITY FOR THEFT, DAMAGE AND/OR VANDALISM. THIS WARRANTY DOES NOT COVER LABOR COSTS FOR MAINTENANCE, REMOVAL OR REINSTALLATION OF THE UNIT OR ANY CONSEQUENTIAL DAMAGES OF ANY KIND. IN THE EVENT OF A CLAIM OR A DISPUTE INVOLVING DIRECTED OR ITS SUBSIDIARY, THE VENUE SHALL BE SAN DIEGO COUNTY IN THE STATE OF CALIFORNIA. CALIFORNIA STATE LAWS AND APPLICABLE FEDERAL LAWS SHALL APPLY AND GOVERN THE DISPUTE. THE MAXIMUM RECOVERY UNDER ANY CLAIM AGAINST DIRECTED SHALL BE STRICTLY LIMITED TO THE AUTHORIZED DIRECTED DEALER’S PURCHASE PRICE OF THE UNIT. DIRECTED SHALL NOT BE RESPONSIBLE FOR ANY DAMAGES WHATSOEVER, INCLUDING BUT NOT LIMITED TO, ANY CONSEQUENTIAL DAMAGES, INCIDENTAL DAMAGES, DAMAGE TO VEHICLE, DAMAGES FOR THE LOSS OF TIME, LOSS OF EARNINGS, COMMERCIAL LOSS, LOSS OF ECONOMIC OPPORTUNITY AND THE LIKE. NOTWITHSTANDING THE ABOVE, THE MANUFACTURER DOES OFFER A LIMITED WARRANTY TO REPLACE OR REPAIR THE CONTROL MODULE SUBJECT TO THE CONDITIONS AS DESCRIBED HEREIN. THIS WARRANTY IS VOID IF THE UNIT HAS NOT BEEN PURCHASED FROM DIRECTED, OR AN AUTHORIZED DIRECTED DEALER, OR IF THE UNIT HAS BEEN DAMAGED BY ACCIDENT, UNREASONABLE USE, NEGLIGENCE, ACTS OF GOD, NEGLECT, IMPROPER SERVICE, OR OTHER CAUSES NOT ARISING OUT OF DEFECT IN MATERIALS OR CONSTRUCTION.Some states do not allow limitations on how long an implied warranty will last or the exclusion or limitation of incidental or conse-quential damages. This warranty gives you specific legal rights and you may also have other rights that vary from State to State. This warranty is only valid for sale of product(s) within the United States of America and in Canada. Product(s) sold outside of the United States of America or Canada are sold “AS-IS” and shall have NO WARRANTY, express or implied.
For further details relating to warranty information of Directed products, please visit the support section of Directed’s website at: www.directed.com
This product may be covered by a Guaranteed Protection Plan (“GPP”). See your authorized Directed dealer for details of the plan or call Directed Customer Service at 1-800-876-0800.
920-10011-01 2011-06


![PERSONAL INFORMATION Name: Rio Sumarni Bt Shariffudin ... - PM[1]. Dr. Rio Sumarni.pdf · PERSONAL INFORMATION . 1. Name: Rio Sumarni Bt Shariffudin . 2. Identification number: 560728-71-5136](https://img.dokumen.tips/doc/110x75/5d5f21cd88c993d45d8bcbe6/personal-information-name-rio-sumarni-bt-shariffudin-pm1-dr-rio-.jpg)


