Embed Size (px)
Citation preview

IM User Guide
ACTICO Rules – Identity Management
IM User Guide
Version 6.8
ACTICO GmbH
www.actico.com

Identity Management – IM User Guide
© ACTICO GmbH 2/122
Copyright Notice
© ACTICO GmbH, 2017. All rights reserved, also regarding any disposal, exploitation, reproduction, editing, distribution, as well as in the event of applications for industrial property rights.

Identity Management – IM User Guide
© ACTICO GmbH 3/122
Table of Contents
Chapter 1 – Introduction ................................................................................................................................................................. 7
1.1 Identity Management ....................................................................................................................................................... 7
1.2 About this Guide ................................................................................................................................................................ 7
1.3 Schematic view of an Identity Management installation ....................................................................................... 7
Chapter 2 – IM Administrative User Interface ........................................................................................................................... 8
2.1 About this Guide ................................................................................................................................................................ 8
2.2 Basic Concepts ................................................................................................................................................................... 9
2.2.1 Getting Started - Cheat sheet on basic icons and operations .............................................................................. 9
Create ................................................................................................................................................................................. 10
Read .................................................................................................................................................................................... 11
Update ................................................................................................................................................................................ 11
Delete ................................................................................................................................................................................. 11
Recycle bin - Restore or permanently delete elements ....................................................................................... 11
Assign - Create a relationship between different element types....................................................................... 12
Delete Assignment .......................................................................................................................................................... 12
Search ................................................................................................................................................................................. 12
Filter .................................................................................................................................................................................... 12
Multi-selection in tables ............................................................................................................................................... 13
Operation on hold - Actions that are not yet stored in the IM database ......................................................... 13
Refresh - Update the content displayed ................................................................................................................... 14
User related configuration............................................................................................................................................ 14
Help ..................................................................................................................................................................................... 14
2.3 Login - Logout .................................................................................................................................................................. 15
2.4 User's own password management ........................................................................................................................... 16
2.4.1 Change your own password .......................................................................................................................................... 16
2.4.2 Change your initial or an expired password ............................................................................................................ 18
2.5 Tenant Management....................................................................................................................................................... 20
2.5.1 Create Tenant ................................................................................................................................................................... 21
2.5.2 Read Tenant ...................................................................................................................................................................... 22
2.5.3 Update Tenant ................................................................................................................................................................. 23
2.5.4 Delete Tenant ................................................................................................................................................................... 24
2.5.5 Restore Tenant ................................................................................................................................................................. 25
2.5.6 Delete Tenant permanently .......................................................................................................................................... 26
2.5.7 External User Management........................................................................................................................................... 27
Synchronized External Identity Providers ................................................................................................................ 27
Configuring an External Identity Provider for a Tenant ........................................................................................ 28
Synchronizing a Tenant's users with its External Identity Provider ................................................................... 30
2.6 User Management ........................................................................................................................................................... 32
2.6.1 Create User ....................................................................................................................................................................... 33

Identity Management – IM User Guide
© ACTICO GmbH 4/122
2.6.2 Read User .......................................................................................................................................................................... 34
2.6.3 Update User ...................................................................................................................................................................... 34
2.6.4 Delete User ....................................................................................................................................................................... 36
2.6.5 Restore User ..................................................................................................................................................................... 37
2.6.6 Delete User permanently .............................................................................................................................................. 37
2.6.7 Create a User-Group assignment ................................................................................................................................ 38
2.6.8 Delete a User-Group assignment ................................................................................................................................ 39
2.6.9 Create a User-Role assignment ................................................................................................................................... 40
2.6.10 Delete a User-Role assignment ................................................................................................................................... 41
2.6.11 Create a User-Permission assignment....................................................................................................................... 42
2.6.12 Delete a User-Permission assignment....................................................................................................................... 42
2.6.13 Unlock User ....................................................................................................................................................................... 43
2.7 Group Management ........................................................................................................................................................ 46
2.7.1 Create Group..................................................................................................................................................................... 47
Create a Sub-Group ........................................................................................................................................................ 47
2.7.2 Read Group ....................................................................................................................................................................... 48
2.7.3 Update Group ................................................................................................................................................................... 49
2.7.4 Delete Group..................................................................................................................................................................... 50
2.7.5 Restore Group .................................................................................................................................................................. 52
2.7.6 Delete Group permanently ........................................................................................................................................... 52
2.7.7 Create a Group-User assignment ................................................................................................................................ 53
2.7.8 Delete a Group-User assignment ................................................................................................................................ 53
2.7.9 Create a Group-Role assignment ................................................................................................................................ 53
2.7.10 Delete a Group-Role assignment ................................................................................................................................ 54
2.7.11 Create a Group-Permission assignment .................................................................................................................... 55
2.7.12 Delete a Group-Permission assignment .................................................................................................................... 55
2.8 Role Management ........................................................................................................................................................... 57
2.8.1 Create Role ........................................................................................................................................................................ 58
2.8.2 Read Role .......................................................................................................................................................................... 59
Filter roles list .................................................................................................................................................................. 59
Read a role's details .......................................................................................................................................................60
2.8.3 Update Role ...................................................................................................................................................................... 60
2.8.4 Delete Role ........................................................................................................................................................................ 61
2.8.5 Restore Role ..................................................................................................................................................................... 62
2.8.6 Delete Role permanently .............................................................................................................................................. 63
2.8.7 Create a Role-User assignment ................................................................................................................................... 63
2.8.8 Delete a Role-User assignment ................................................................................................................................... 63
2.8.9 Create a Role-Group assignment ................................................................................................................................ 63
2.8.10 Delete a Role-Group assignment ................................................................................................................................ 64
2.8.11 Create a Role-Permission assignment ....................................................................................................................... 64
2.8.12 Delete a Role-Permission assignment ....................................................................................................................... 65
2.8.13 Create a Role-Offering assignment ............................................................................................................................ 66
Identity Management – IM User Guide
© ACTICO GmbH 5/122
2.8.14 Delete a Role-Offering assignment ............................................................................................................................ 66
2.9 Permission Management............................................................................................................................................... 67
2.9.1 Read Permission .............................................................................................................................................................. 68
Filter permission list....................................................................................................................................................... 69
2.9.2 Create a Permission-User assignment....................................................................................................................... 69
2.9.3 Delete a Permission-User assignment....................................................................................................................... 69
2.9.4 Create a Permission-Role assignment ....................................................................................................................... 70
2.9.5 Delete a Permission-Role assignment ....................................................................................................................... 70
2.9.6 Create a Permission-Offering assignment ................................................................................................................ 70
2.9.7 Delete a Permission-Offering assignment ................................................................................................................ 70
2.10 Domain Management ..................................................................................................................................................... 71
2.10.1 Create Domain ................................................................................................................................................................. 72
2.10.2 Read Domain .................................................................................................................................................................... 73
2.10.3 Update Domain ................................................................................................................................................................ 74
2.10.4 Delete Domain.................................................................................................................................................................. 74
2.10.5 Restore Domain ............................................................................................................................................................... 76
2.10.6 Delete Domain permanently ........................................................................................................................................ 76
2.10.7 Create a Domain-Application assignment ................................................................................................................ 76
2.10.8 Delete a Domain-Application assignment ................................................................................................................. 77
2.11 Application Management .............................................................................................................................................. 78
2.11.1 Create Application........................................................................................................................................................... 79
2.11.2 Read Application ............................................................................................................................................................. 79
2.11.3 Update Application ......................................................................................................................................................... 80
2.11.4 Delete Application........................................................................................................................................................... 80
2.11.5 Restore Application ........................................................................................................................................................ 81
2.11.6 Delete Application permanently ................................................................................................................................. 82
2.11.7 Create an Application-Domain assignment .............................................................................................................. 82
2.11.8 Delete an Application-Domain assignment .............................................................................................................. 83
2.12 Offering Management .................................................................................................................................................... 85
2.12.1 Create an Offering ........................................................................................................................................................... 86
2.12.2 Read an Offering .............................................................................................................................................................. 87
2.12.3 Update an Offering ......................................................................................................................................................... 89
2.12.4 Delete an Offering ........................................................................................................................................................... 90
2.12.5 Restore an Offering ......................................................................................................................................................... 91
2.12.6 Delete an Offering permanently .................................................................................................................................. 91
2.12.7 Create an Offering-Role assignment .......................................................................................................................... 92
2.12.8 Delete an Offering-Role assignment .......................................................................................................................... 93
2.12.9 Create an Offering-Permission assignment ............................................................................................................. 94
2.12.10 Delete an Offering-Permission assignment ............................................................................................................. 95
2.12.11 Create an Offering-Tenant Relation assignment .................................................................................................... 96
2.12.12 Delete an Offering-Tenant Relation assignment .................................................................................................... 97
2.13 Tenant Relation Management ..................................................................................................................................... 99

Identity Management – IM User Guide
© ACTICO GmbH 6/122
2.13.1 General structure of a tenant relation ...................................................................................................................... 99
2.13.2 Examples of tenant relations ..................................................................................................................................... 100
Tenant allows another tenant to manage users for him (Principal-Agent Relationship) .......................... 100
Tenant extends a software service to another tenant (Service Provider-Consumer Relationship) ........ 101
2.13.3 Offering roles and / or permissions ......................................................................................................................... 102
2.13.4 Propagation of offered roles and permissions ..................................................................................................... 103
2.13.5 Create a Tenant Relation element ............................................................................................................................ 104
2.13.6 Create a Tenant Relation-Offering assignment ..................................................................................................... 105
2.13.7 Create a Tenant Relation-Tenant assignment ....................................................................................................... 105
2.13.8 Delete a Tenant Relation element ............................................................................................................................ 107
2.13.9 Delete a Tenant Relation element permanently ................................................................................................... 108
2.13.10 Delete a Tenant Relation-Offering assignment ..................................................................................................... 108
2.13.11 Delete a Tenant Relation-Tenant assignment ....................................................................................................... 109
2.13.12 Read a Tenant Relation element ............................................................................................................................... 109
2.13.13 Restore a Tenant Relation element .......................................................................................................................... 110
2.13.14 Update a Tenant Relation element .......................................................................................................................... 110
2.14 Further examples ...........................................................................................................................................................111
2.14.1 Default Roles and Permissions ................................................................................................................................... 111
2.14.2 Default Offerings and Tenant Relations ................................................................................................................... 112
Default Offering ............................................................................................................................................................. 112
Default Tenant Relation............................................................................................................................................... 113
2.14.3 Role assignment via All Users group ........................................................................................................................ 114
2.14.4 Role assignment using hierarchical groups ........................................................................................................... 114
2.14.5 Role assignment via tenant relations ...................................................................................................................... 116
DEFAULT tenant activity ............................................................................................................................................... 116
Agency tenant activity ................................................................................................................................................... 117
2.14.6 Act on behalf of another tenant ............................................................................................................................... 118
2.14.7 Share your applications with other tenants ...........................................................................................................119
Chapter 3 – Glossary .................................................................................................................................................................... 121
Table of Contents

Identity Management – IM User Guide
© ACTICO GmbH 7/122
Chapter 1 – Introduction
1.1 Identity Management
The ACTICO Identity Management (IM) component provides services to other systems which they can use to administrate their usage policy: user authentication and authorization. The main scope of IM integration in a customer application is to manage the permissions to read, write or execute operations (as parts of the customer application).
The users can be organized in groups according to the current structure of a company in order to support a flexible and scalable business organization, which can be restructured without the need to involve the IT-specialists. The user permissions are not derived from their membership of a group or tenant, but according to roles. The decisions to give a user access to certain functions are based on the roles that individual users perform as a part of an organization. Access security is provided by describing complex access control policies.
This reduces the source of administrative errors and consequently the costs for a secure user-administration.
1.2 About this Guide
The first part of the document is intended to help administrators understand how to use the Identity Management (IM) to manage users, organizations, tenants, and authorities (e.g. roles, permissions).
End users can use as well some of the functionality described. The range of options mainly depends on the user's role (thus, implicitly the permissions granted).
This document assumes that you are versed in using Web technologies. Further, it assumes, that the IM is already up and running.
1.3 Schematic view of an Identity Management installation
Following figure depicts how an Identity Management installation could look like.

Identity Management – IM User Guide
© ACTICO GmbH 8/122
Chapter 2 – IM Administrative User Interface
2.1 About this Guide
This document is intended to help administrators understand how to use the Identity Management (IM) to manage users, organizations, tenants, and authorities (e.g. roles, permissions).
End users can also use some of the functions described. The range of options mainly depends on the user's role (thus, implicitly, the permissions granted).
This document assumes that you are versed in using Web technologies. Further, it assumes, that the IM is already up and running.

Identity Management – IM User Guide
© ACTICO GmbH 9/122
2.2 Basic Concepts
The Identity Management user interface is accessible in a Web browser.
If you are authorized to manage users, groups etc. your first screen after login might look like the screenshot below.
2.2.1 Getting Started - Cheat sheet on basic icons and operations
This section focuses on the main options for managing an IM element using the user element as an example. All other IM elements follow the same behavioral pattern. For a detailed description on certain operations, please consult the sections linked accordingly.
Create
Read
Update
Delete
Recycle bin - Restore or permanently delete elements
Assign - Create a relationship between different element types
Delete Assignment
Search
Filter
Multi-selection in tables
Operation on hold - Actions that are not yet stored in the IM database
Refresh - Update the content displayed
User related configuration
o Change my password
o Table length
Help

Identity Management – IM User Guide
© ACTICO GmbH 10/122
Create
Use the appropriate element icon with a + to add a new user, group, role etc. A corresponding dialog box providing input fields will then appear.
Icon Function
Add tenant The required fields will be highlighted in the dialog box that appears. Once successfully created, the new tenant will be displayed. Note: The newly created admin for the new tenant will not appear even after a refresh, as the new tenant is "data owner" of this user.
To see and re-edit the tenant name, click the tenant icon . See also Tenant Management
Add user The required fields will be highlighted in the dialog box that appears. Once successfully created, the user will be displayed.
To see and re-edit the details, click the user icon . See also User Management
Add group The required fields will be highlighted in the dialog box that appears. Once successfully created, the group will be displayed.
Group hierarchy If you need to create a sub-group, select the parent group while creating the new group. To expand or collapse hierarchically-ordered groups, use the arrow next to the appropriate parent group.
To see and re-edit the details, click the group icon . See also Group Management
Add role The required fields will be highlighted in the dialog box that appears. Once successfully created, the role will be displayed.
To see and re-edit the details, click the role icon . See also Role Management
Roles created this way are "tenant roles", whereas "application roles" (which are defined by
applications and get imported into the IM system) have a slightly different icon .
Add domain The required fields will be highlighted in the dialog box that appears. Once successfully created, the domain will be displayed.
To see and re-edit the details, click the domain icon . See also Domain Management
Add offering The required fields will be highlighted in the dialog box that appears. Once successfully created, the offering will be displayed.
To see and re-edit the details, click the offering icon . See also Offering Management
Add tenant relation The required fields will be highlighted in the dialog box that appears. Once successfully created, the tenant relation will be displayed.

Identity Management – IM User Guide
© ACTICO GmbH 11/122
To see and re-edit the details click on the tenant relation icon . See also Tenant Relation Management
Note: The user interface will not enable you to create an application , application role , or
permission , but only to assign these to other elements (e.g. by grouping a permission set to a role and binding it to a group or user). Creating permissions and setting operations to require permission is part of application development.
Read
Moving the mouse pointer over an element will reveal a pin icon on the right-hand side. By clicking this icon all related elements will be highlighted. E.g. click a user's pin icon to see all groups in which the user is a member, as well as all roles and permissions assigned to that user. In addition, the related elements will move to the upper part of the corresponding column and the total number of elements assigned to the pinned one will be displayed at the foot of the column.
To read the user's details, click the element's icon. A click on Close brings you back to the column displaying all users.
Groups marked with a small arrow have at least one subordinate group. To inspect a child group, click first on the arrow, then the group you are interested in.
See also Search.
See also Filter.
Update
To update a user, click the corresponding icon in the table cell.
The read view will display the details (all information edited so far and the technical ID, which cannot be changed).
Click Edit and a dialog box displaying the input fields will appear.
Click Save, Save & Close, or Cancel to resume the dialog.
Delete
Drag the element you want to delete and drop it on the recycle bin area . This action deletes the user, group, role, etc., along with all assignments the element was involved in.
Deleted elements can be found in the recycle bin.
To view the recycle bin, click the "switch to recycle bin" icon .
Recycle bin - Restore or permanently delete elements
The recycle bin displays all elements that were marked as "deleted". Deleted elements also have a deletion
marker ( ) next to the corresponding table cell icon.
To view the recycle bin, click the "switch to recycle bin" icon .
While the recycle bin is displayed, you will see the recycle bin icon and the headline Recycle bin above all element tables. In this view you can

Identity Management – IM User Guide
© ACTICO GmbH 12/122
o restore a deleted element by dragging and dropping it onto the "restore" icon or
o permanently delete an element by dragging and dropping it onto the "delete permanently" icon
.
To leave the recycle bin, and switch back to the default view, click the "exit recycle bin" icon .
Some actions cannot be performed within the recycle bin, e.g. showing related elements, or creating or deleting assignments.
Assign - Create a relationship between different element types
Drag the element and drop it into the corresponding entry in another row. E.g. users that should be added to the members of a group should be dropped into the group table cell.
While an element is pinned, all related elements will appear at the top of the column and are highlighted green. Additionally, the total number of elements assigned to the pinned one will be displayed at the foot of the column.
Indirectly assigned elements are indicated by a "chain" icon, e.g. a role that was not assigned directly to a
user but inherited as a result of group membership would be indicated thus:
New assignments are not immediately activated. First they are collected - corresponding messages will appear above the columns - and then they can be applied all at once.
Delete Assignment
Drag the element you want to un-assign and drop it on the "remove assignment" area .
This action will only delete the relation between the elements, not the elements themselves.
Dropped assignments are not immediately activated. First they are collected - corresponding messages will appear above the columns - and then they can be applied all at once.
Search
Each column has a quick-search field .
You can search using either single or multiple terms. E.g. to find the user "Paul Paulsen" with email address "[email protected]", you can edit the search criteria by typing "Paul web.de" in the search field.
Note: At the moment wildcards (e.g. *) are not supported.
Filter
Columns with a "filter" icon in the header can be restricted to display only the items connected to a specific element. The roles list, for example, can be restricted to show only the roles provided by a specific application.
Click on the filter icon to reveal the options for restricting the list. Example: Roles can be filtered according to a specific application.

Identity Management – IM User Guide
© ACTICO GmbH 13/122
Drag the element that should restrict the column content into the column's header area and drop it there. The column is immediately restricted to the specified element. Example: Setting the IM application as filter will hide all roles that are not related to the IM application. Thus, this function allows you to see which particular application exposed that role.
To remove the filter, click the "x" next to the filter criterion that you want to remove.
In general: A list can be filtered by one element per element type only.
For the roles column: it is possible to specify only one application as a filter. The roles cannot be filtered according to multiple applications at the same time. More details about filtering roles can be found at Read Role > Filter roles list .
Multi-selection in tables
Selecting multiple elements (users, groups, roles, etc.) is helpful if you want to create multiple assignments of the same type all at once. E.g. you may wish to assign all roles containing "Administrator" (using the search) to one single user or to assign multiple users to one group.
Multi-selection can be used in several ways, as can be explained in relation to the users column:
Selecting a "block" of users: Select one user, hold down the Shift key, and select a second user above or below the first one, then release the Shift key again. All users located between those two are now selected and can be used for drag and drop operations.
Selecting multiple single users: Select one user, hold down the Ctrl key, and select another user. Still holding down the Ctrl key, you can select several more users. Once you have selected all the users you want, release the Ctrl key again. All the selected users can now be used for drag and drop operations.
Multi-selection for power users (without use of the mouse): Click on one user. Now you can navigate the table with the Up and Down arrow keys on your keyboard:
o Holding down the Shift key while navigating up or down with the arrow keys selects all user rows downwards or upwards.
o Holding down the Ctrl key while navigating up or down shows a slightly dotted border around the table row that is currently selected. Pressing the Space bar on your keyboard while still holding down the Ctrl key adds the row in question to the selection.
Operation on hold - Actions that are not yet stored in the IM database
Some actions (e.g. creating and deleting assignments) will not be executed automatically (not sent to the back end) because you might want to create various other relations first and only then synchronize with the back end, all at once.
Any operations awaiting your final approval are displayed in the upper part of the IM user interface.
You can review each action before applying it.
You can cancel ALL or send ALL changes to the IM server for completion.

Identity Management – IM User Guide
© ACTICO GmbH 14/122
Refresh - Update the content displayed
If a large number of IM administrators are working at the same time, the situation might arise where a user you are trying to update has already been updated by one of your colleagues. To avoid such overlap, you can
frequently refresh the data display by clicking the "refresh data" icon at the top right of the page.
Using the refresh functionality of your browser (i.e. pressing the F5 key) does not reload the displayed data. It only reconstructs the UI without fetching any changes from the database.
User related configuration
Change my password
Each user has at least permission to change his own password. Find a detailed description at User's own password management.
Table length
Click the user settings icon to adjust the length of the table. The number on the slider refers to the amount of elements to be displayed per column.
Help
A quick-start guide will appear when you click on the help icon . In addition, many icons will offer a useful tooltip when you hover over them.

Identity Management – IM User Guide
© ACTICO GmbH 15/122
2.3 Login - Logout
The Identity Management user interface provides a login page.
The initial default credentials are DEFAULT / Admin / Admin.
For security reasons, it is strongly recommended that you change your password after your first login. However, the system will only force you to do so, if the IM Server is configured accordingly.
Example:
Details on how to change your password can be found at Change your own password, and for changing another user's settings at Update User.
For security reasons, your session will automatically time out according to the settings configured by your administrator. Closing all browser windows without an explicit logout does finish your working session as well. Nevertheless, we cannot guarantee that all temporal actions that were not sent to the back-end are stored.
To properly terminate the session you must log out. The appropriate icon is always displayed at the top right
of the page . However, you cannot be logged in with different users in different tabs of the same browser.
As an authenticated user, your authorization to read, write or execute other applications can be managed using the Identity Management application.

Identity Management – IM User Guide
© ACTICO GmbH 16/122
2.4 User's own password management
The IM provides its users the possibility to change their own password according to the security rules configured by the IM server administrator.
Users with a certain amount of unsuccessful login attempts (the number is again configured by the IM server administrator) can be locked. In that case you need to address an administrative user.
Users imported from an external identity provider cannot be unlocked via the IM user interface, nor can they change their passwords as described above. Instead they need to address the utilities of their external content provider.
2.4.1 Change your own password
Preconditions
You will need to be logged in as the user whose password needs to be changed.
Procedure Description
1. Open the user settings.
2. Click the Change my password entry.
3. The Change my password dialog box appears.
4. Enter your old password and the new password (the required fields are marked * )
5. The requirements regarding the characters to be used or minimum length for the new password etc. can be configured by the administrator and thus will differ per IM server installation. However the user interface will support you by providing the password rules defined for your instance.

Identity Management – IM User Guide
© ACTICO GmbH 17/122
Example with the default configuration.
6. The field to verify the new password will be marked as required once you have entered the new password. This additional check is meant to guard against typos occurring in the new password.
7. Confirm by clicking one of the buttons at the end of the dialog box:

Identity Management – IM User Guide
© ACTICO GmbH 18/122
a. Save password - will save the new password. From now on you must authenticate with the new password.
b. Close - will ignore the entries and close the dialog box. Your old password will remain valid, and you can simply continue the existing session.
Results
If you have successfully changed your password, you must use the new password from the next login onward.
If you can not change your password, e.g. because you are "locked" please contact your administrator, who is allowed to update your user settings.
A user can be locked after a certain amount of unsuccessful attempts to log in. Administrative users can unlock the user and provide him a new password. The requirements regarding the characters to be used or minimum length for the new password etc. can be configured by the administrator and thus will differ per IM server installation. However the user interface will support you by providing the password rules defined for your instance.
Users imported from an external identity provider cannot be unlocked via the IM user interface, nor can they change their passwords as described above. Instead they need to address the utilities of their external content provider.
2.4.2 Change your initial or an expired password
Preconditions
You must be a known user and also have permission to change your own password.
You will need to provide the correct old password that needs to be changed.
Procedure Description

Identity Management – IM User Guide
© ACTICO GmbH 19/122
IM provides the possibility to configure the IM Sever in a way that users are forced to change their password. This can be configured for example for the initial password or for passwords older then a pre-defined period. If this is the case for your installation, the IM user interface will support you in changing the password.
1. Login with the credentials known so far.
2. If the system needs to force you to change the password due to security configurations you will automatically get an according dialog.
3. Enter your old password and the new password (the required fields are marked * )
4. The requirements regarding the characters to be used or minimum length for the new password etc. can be configured by the administrator and thus will differ per IM server installation. However the user interface will support you by providing the password rules defined for your instance.
5. The field to verify the new password will be marked as required once you have entered the new password. This additional check is meant to guard against typos occurring in the new password.
6. Confirm by Change password at the end of the dialog box:
Results
If you have successfully changed your password, you must use the new password from the next login onward.
Apart of this functionality you can change your own password at any time using the Change your own password.
If you can not change your password, e.g. because you are "locked" please contact your administrator, who is allowed to update your user settings.
A user can be locked after a certain amount of unsuccessful attempts to log in. Administrative users can unlock the user and provide him a new password. The requirements regarding the characters to be used or minimum length for the new password etc. can be configured by the administrator and thus will differ per IM server installation. However the user interface will support you by providing the password rules defined for your instance.
Users imported from an external identity provider cannot be unlocked via the IM user interface, nor can they change their passwords as described above. Instead they need to address the utilities of their external content provider.

Identity Management – IM User Guide
© ACTICO GmbH 20/122
2.5 Tenant Management
Tenant
A tenant is a legal organizational unit that is generally the representative of a company.
Within the Web user interface, the following icon is used for a tenant .
There is a default tenant, i.e. the tenant where the IM itself is installed. (The name of this tenant is set as "DEFAULT", however it can be changed before the first installation of the IM.)
When managing a tenant, keep the following concepts and restrictions in mind:
A tenant's name must be unique per IM installation and may consist only of upper-case letters, underscores, and digits.
A tenant is the "owner" of all entities created using that tenant (this is also true for any tenants that are created).
A tenant can be marked as "deleted", in which case the entity will not appear on the user interface, neither will it be considered in lists, queries etc. (except for the "recycle bin" view).
Deleting a tenant includes deleting its whole organizational structure (incl. groups, users, roles, and all other entities owned by this tenant), as well as all tenants created by this tenant, and all existing relations to other tenants, domains, etc.
Moreover, a deleted tenant can only be restored by a user who has update-tenant permission in the context of the tenant that created this tenant (owning tenant).
A user who has read-, update-, delete-, or erase-tenant permission for a tenant can perform these operations also on any tenants created by this tenant.
Depending on the permissions assigned, a tenant can be allowed to manipulate other tenant's data.
Examples

Identity Management – IM User Guide
© ACTICO GmbH 21/122
2.5.1 Create Tenant
Preconditions
You will need to be logged in and have permission to create tenants. The administrator of the DEFAULT tenant should already have assigned all permissions defined by the IM application.
Procedure Description
1. Click the "add tenant" icon .
2. The Tenants column will display a form for completing all the information required to create a tenant.
3. You must complete at least all required fields in the dialog box (marked * ).
a. The Technical name must contain only upper-case alphabetic character, underscore and digits. It must be at least 2, and maximum 24 characters long.
b. The Admin username must NOT contain any blank spaces.
c. The requirements regarding the characters to be used or minimum length for the password etc. can be configured by the administrator and thus will differ per IM server installation. However the user interface will support you by providing the password rules defined for your instance.

Identity Management – IM User Guide
© ACTICO GmbH 22/122
4. Confirm by clicking one of the buttons at the bottom of the dialog box.
a. Save - will display a preview of the entries edited so far. From there you can continue with
i. Edit - to amend your entries
ii. Close - to store the new tenant.
b. Save & Close - will store your entries and display all tenants in the Tenants column.
c. Cancel - will ignore the entries and resume the creation dialog, displaying all tenants in the Tenants column.
5. The newly created administrator is created automatically and can now log in.
6. Check your work
a. Log out the default admin user.
b. Log in with the newly created admin user's credentials
c. The admin user should be displayed in the Users column.
d. Click the admin user's pin icon to check that he was automatically assigned the role of IM Tenant Administrator.
There is no automatic announcement to other systems. Thus, you should inform the person who will act as the new tenant's administrator about the rights and duties assumed in your organization.
Results
The new tenant is now available and will be displayed in alphabetical order in the Tenants column.
2.5.2 Read Tenant
Preconditions
You will need to be logged in (e.g. as the DEFAULT Admin) and have permission to read tenants.
Procedure Description
1. The Tenants column displays all tenants in alphabetical order.
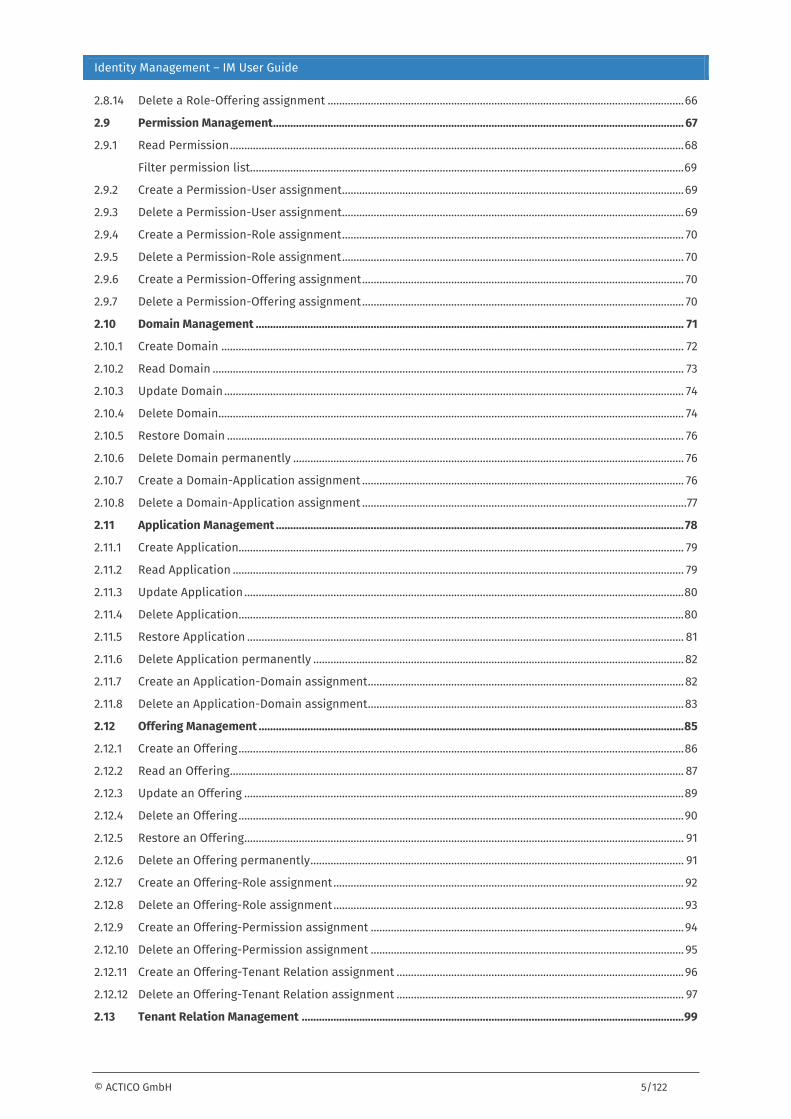
2. For a quick-view of a tenant's details, hover your mouse pointer over the tenant. A tooltip appears, displaying some of the tenant's details.
Identity Management – IM User Guide
© ACTICO GmbH 23/122
3. Click the tenant's icon to read more details.
4. Click Close to return to the list of all tenants.
Alternatively: Use the search field at the top of the Tenants column to quickly find a tenant.
Results
The tenant details are displayed like a tooltip.
To see all units that are in the ownership of a particular tenant, log in e.g. with the appropriate tenant's administrator credentials.
2.5.3 Update Tenant
Preconditions
You will need to be logged in (e.g. as the DEFAULT Admin) and have permission to update tenants.
Procedure Description
1. Click the icon in the left area of the tenant's cell in the Tenants column.

Identity Management – IM User Guide
© ACTICO GmbH 24/122
2. The tenant's details appear in read-only format as they were entered when the tenant was created (except the fields for creating the admin user).
3. Click Edit to change the content of any of the fields. Our example shows how to provide a German tenant description.
4. Resume the dialog using the buttons at the bottom of the form (as explained for Create Tenant).
Results
The updated tenant attributes are now stored on the back end. Other IM administrative users will need to refresh their view to see your changes.
For information on updating a tenant's identity provider configuration, see Configuring an External Identity Provider for a Tenant.
2.5.4 Delete Tenant
Preconditions
You will need to be logged in (e.g. as the DEFAULT Admin) and have permission to read and delete tenants.
Procedure Description
1. Drag the tenant you want to delete.
2. Drop him on the recycle bin

Identity Management – IM User Guide
© ACTICO GmbH 25/122
3. A dialog box appears with the option of confirming or canceling the deletion .
4. Click Delete to confirm deleting the tenant.
Results
The tenant is marked as "deleted" in the back end and will disappear from the default view of the Web UI; it
can now only be found in the recycle bin view ( ). Other IM administrative users will need to refresh their view to see your changes.
Deleting a tenant will delete all that tenant's elements (e.g. users, groups, roles etc., as shown in the notification) and their assignments to other entities, as well as any tenants created by this tenant.
The IM user interface will not enable you to update or delete the initial set of IM entities (i.e. the IM application itself including its group, roles and permissions, the default domain, tenant, offering, tenant relation) as these are elementary parts of the application and are therefore protected for manipulation. It is also not possible to remove or to create new assignments between IM entities. When trying to manipulate such entities or relations, an Exception will be thrown by the IM server. There are three IM entities which have some special rules:
The default user (Admin) can be updated, deleted and erased. However, in case of deleting this user, make sure another user has the same privileges.
The default tenant (DEFAULT) can be updated but not deleted. The All Users group cannot be updated, deleted or erased.
It is not possible to remove users from this group (all users are assigned) but it is possible to assign roles to this group.
Example when trying to delete the IM application.
2.5.5 Restore Tenant
Preconditions

Identity Management – IM User Guide
© ACTICO GmbH 26/122
You will need to be logged in (e.g. as the DEFAULT Admin) and have permission to read and update tenants.
Procedure Description
1. Open the recycle bin view ( ).
2. Click the tenant you want to restore.
3. Drag and drop him on the "restore" area .
.
4. As already discussed in Create Tenant, you will always need an administrative user. Thus a dialog box will appear displaying the fields for creating a new user.
a. The Admin username must NOT contain any blank spaces.
b. The requirements regarding the characters to be used or minimum length for the password etc. can be configured by the administrator and thus will differ per IM server installation. However the user interface will support you by providing the password rules defined for your instance.
5. Click Restore to confirm.
6. Click the following icon to switch back to the default view.
7. Log in as the restored tenant's administrative user to check whether other administrative users exist. If so, the new one generated while restoring can be deleted or permanently deleted.
Results
The tenant is restored in the back end and will now appear in the default view. Other IM administrative users will need to refresh their view to see your changes.
2.5.6 Delete Tenant permanently
Preconditions
You will need to be logged in (e.g. as the DEFAULT Admin) and have permission to read and permanently delete tenants.
Procedure Description
1. Open the recycle bin view ( ).
2. Click the tenant you want to delete permanently.

Identity Management – IM User Guide
© ACTICO GmbH 27/122
3. Drag and drop him on the "delete permanently" area.
4. A dialog box appears with the option of confirming or canceling the permanent deletion.
5. Click Delete permanently to confirm.
Click the following icon to switch back to the default view.
Results
The tenant is permanently deleted from the back end with no option to restore. Other IM administrative users will need to refresh their view to see your changes.
2.5.7 External User Management
Users managed within an external identity provider (e.g. LDAP, Active Directory) can be imported into IM in order to assign them to groups, roles etc. These users will be authenticated based on the credentials persisted in the external authentication provider.
LDAP and Active Directory are synchronized external identity providers. Their users are typically synchronized to IM on a regular basis.
External users are identified with following icon . The Admin's user interface will support you in creating and deleting assignments to other IM entities.
For authentication purposes (i.e. credential check) IM accesses the external provider in real time (for both, synchronized and non-synchronized external identity providers). As a result, authentication will fail if the external provider is unavailable.
Synchronized External Identity Providers
To synchronize external users to the IM data store, a synchronized external identity provider must be configured within IM.
A Base Configuration which can be read by the tenant must exist at the IM server. The Base Configuration for the connection to the external LDAP/AD server is XML-based and can be created either via REST call or by creating a configured XML file on the server as described in detail at IM Administrator Guide > Configuring a Synchronized External Identity Provider.
Each tenant's setting can be adjusted in the IM Admin's user interface according to following description:
o Configuring an External Identity Provider for a Tenant
o Synchronizing a Tenant's users with its External Identity Provider
Synchronized external users are regularly updated with data from the external data source, thus the IM user interface does not allow for updating or deleting these users.

Identity Management – IM User Guide
© ACTICO GmbH 28/122
External identity provider access for synchronization The users of synchronized external identity providers are synchronized by IM using scheduled tasks. The synchronization job retrieves the users from the provider and adds, modifies or deletes the corresponding users in IM. That includes all mapped user attributes but not the users credentials.
Configuring an External Identity Provider for a Tenant
Preconditions
You will need to be logged in (e.g. as the Admin of the DEFAULT tenant) and have the necessary permission SYNCHRONIZATION_ADMINISTRATION. You will also need permission to read tenants in order to configure a tenant's identity provider.
We further assume that the connection to the external LDAP/AD server has already been configured with a base configuration. If there is no "External Identity provider" selection field, add a base configuration (see IM Administrator Guide > Configuring the connection to an external identity provider (LDAP Active Directory).)
Procedure description
1. Click the tenant's icon to open its details view.
2. Click Edit to get writing access to the fields displayed.
3. In the section External identity provider you should see the name of the current base configuration (initially it would be empty)

Identity Management – IM User Guide
© ACTICO GmbH 29/122
4. Click Configure to create, read, or update the identity provider configuration. A dialog box to configure the identity provider appears. Select your external identity provider.
5. The dialog box gets expanded for further configuration.
6. Edit the configuration data as appropriate.
7. Click Preview to see how many users would be imported when triggering a synchronization based on this configuration (without importing the users).
8. Resume the dialog with Save or Cancel to store or discard your changes.

Identity Management – IM User Guide
© ACTICO GmbH 30/122
Results
The newly created or updated identity provider configuration is now stored on the back end. The configured identity provider is used to synchronize this tenant's users which will happen at a regular interval defined in the base configuration.
Synchronizing a Tenant's users with its External Identity Provider
Preconditions
You will need to be logged in (e.g. as the Admin of the DEFAULT tenant) and have the necessary permission SYNCHRONIZATION_ADMINISTRATION. You will also need permissions to read and update tenants in order to be able to synchronize a tenant's users with the configured identity provider.
We further assume that the external identity provider has already been configured.
Procedure description
1. Open the read view for the tenant whose users need to be synchronized
2. In the section External identity provider click Synchronize now to trigger a new synchronization.
3. A progress bar is displayed while synchronizing takes place with the tenant's external identity provider.

Identity Management – IM User Guide
© ACTICO GmbH 31/122
4. After synchronizing, the information about the Last synchronization will be updated.
Results
The tenant's users are updated accordingly (e.g. new external users are added and existing external users are updated).
If the synchronization fails, check the identity provider configuration (see Configuring an External Identity Provider for a Tenant).
Wherever a conflicting user is detected, IM will skip synchronizing that user. The user interface will not report such a conflict, but the conflict will be logged on the IM server.
To solve a conflict you can either delete the self-generated user permanently, adjust the LDAP filter, or delete the entity within the external provider.
The interval for automatic synchronization can be configured by adjusting the basic configuration: see IM Administrator Guide > Configuring the connection to an external identity provider (LDAP Active Directory).

Identity Management – IM User Guide
© ACTICO GmbH 32/122
2.6 User Management
User
A user can be a human being, machine, network, etc. that is allocated to use a part of an application.
Within the Web user interface the following icon is used for a user . A user provided by an
external system is represented by the following icon and cannot be modified within the Web user interface.
A default user is generated during the initialization of an IM server instance. This user is granted the role "Administrator" and is usually responsible for creating and managing all other entities.
When managing a user, keep the following concepts and restrictions in mind:
Each user belongs to exactly one tenant.
Each user is implicitly assigned to the All Users Group of the tenant he belongs to.
The user's name must be unique within that tenant.
The set of permissions that a user holds is a union of all permissions from:
o user - group assignments
o user - role assignments.
A user can be marked as "deleted". In this case the entity does not appear on the user interface, neither is it considered in lists, queries, etc. (except for the "recycle bin" view).
Deleting a user also deletes all his existing relationships to groups, roles etc.
Examples
Examples for own password management using the IM Administrative User Interface
Change your own password
Change your initial or an expired password

Identity Management – IM User Guide
© ACTICO GmbH 33/122
2.6.1 Create User
Preconditions
You will need to be logged in and have permission to create users.
Procedure Description
1. Click the "add user" icon .
2. The Users column will display a form for completing all the information required to create a user.
3. You must complete at least all required fields in the dialog box (marked * )
a. The Username must NOT contain any blank spaces.
b. The requirements regarding the characters to be used or minimum length for the new password etc. can be configured by the administrator and thus will differ per IM server installation.
4. Confirm by clicking one of the buttons at the bottom of the dialog box
a. Save - will display a preview of the entries edited so far. From there you can continue with
i. Edit - to amend your entries
ii. Close - to store the new user.
b. Save & Close - will store your entries and display all users in the Users column.
c. Cancel - will ignore the entries and resume the creation dialog, displaying all users in the Users column.

Identity Management – IM User Guide
© ACTICO GmbH 34/122
Results
The new user is now available and will be displayed in alphabetical order in the Users column.
2.6.2 Read User
Preconditions
You will need to be logged in and have permission to read users.
Procedure Description
1. The Users column displays all users in alphabetical order.
2. For a quick-view of a user's details hover your mouse pointer over the user. A tooltip appears, displaying some of the user's details.
3. Click the user's icon to read more details.
4. For a quick-view of the relations to other elements click the pin icon, which is revealed by moving the mouse pointer over the user cell.
Click the pin icon again to clear the highlighting.
5. Alternatively:
a. Use the search field at the top of the Users column to quickly find a user.
b. If you don't know the exact spelling of a user's name, click the pin icon of a group in which he is a member, and the user list of that group will be re-ordered automatically at the top of the Users column. Clicking the pin icon of a user's role or permission will highlight the relevant related elements.
Results
The user's details are displayed like a tooltip.
Clicking the pin icon, which is revealed by moving the mouse pointer over the user cell, will highlight all groups to which the user belongs, as well as all roles and permissions assigned to that user. In addition, the related elements will move to the upper part of the corresponding column and the total number of elements assigned to the pinned one will be displayed at the foot of the column.
2.6.3 Update User
Preconditions
You will need to be logged in and have reading and writing permission for users.
Procedure Description

Identity Management – IM User Guide
© ACTICO GmbH 35/122
1. Click the icon in the left area of the user's cell in the Users column.
2. The user details will appear in read-only format as they were entered when the user was created.
3. Click Edit to change the content of any of the fields. Our example shows how to provide a German user description.
4. Resume the dialog using the buttons at the bottom of the form (as explained for Create User).
Results
The updated user attributes are now stored on the back end. Other IM administrative users will need to refresh their view to see your changes.
Identity Management – IM User Guide
© ACTICO GmbH 36/122
A user can be locked after a certain amount of unsuccessful attempts to log in. Administrative users can unlock the user and provide him a new password. The requirements regarding the characters to be used or minimum length for the new password etc. can be configured by the administrator and thus will differ per IM server installation. However the user interface will support you by providing the password rules defined for your instance.
For information on updating the relation to other units, please see the appropriate section:
Create a User-Group assignment
Delete a User-Group assignment
Create a User-Role assignment
Delete a User-Role assignment
Create a User-Permission assignment
Delete a User-Permission assignment
2.6.4 Delete User
Preconditions
You will need to be logged in and have permission to read and delete users.
Procedure Description
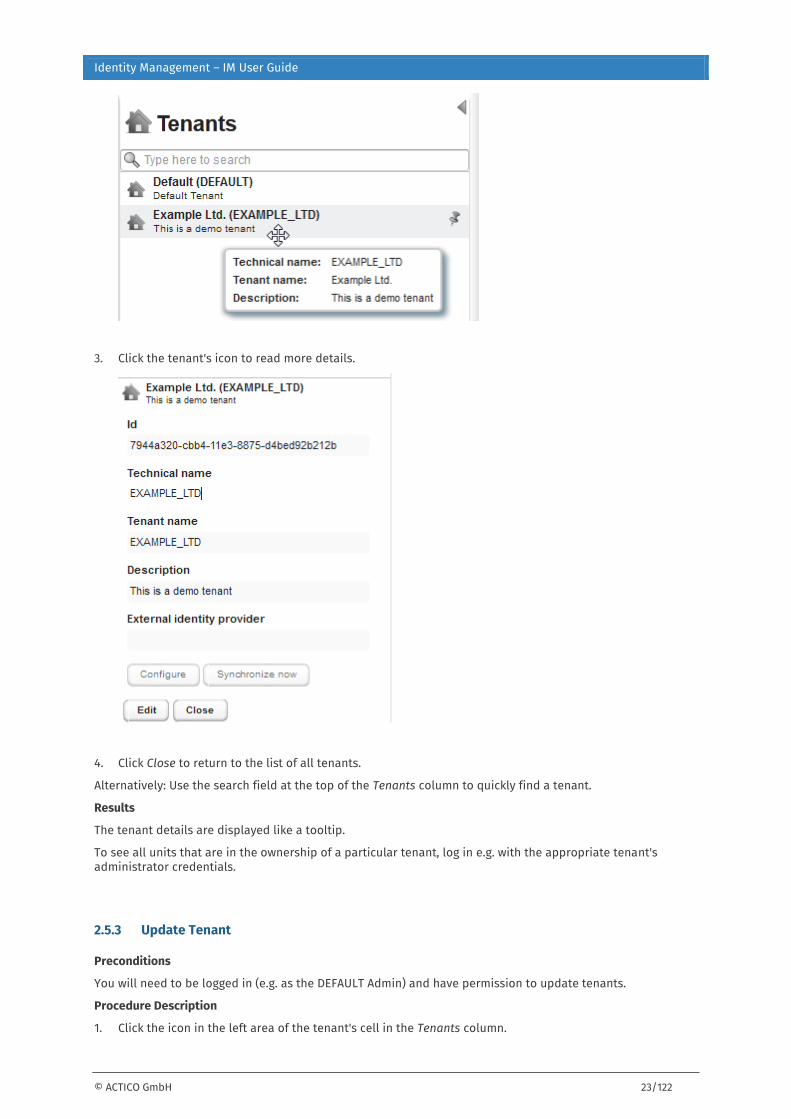
1. Drag the user you want to delete.
2. Drop him on the recycle bin
3. A dialog box appears with the option of confirming or canceling the deletion.
4. Click Delete to confirm deleting the user.
Results
The user is marked as "deleted" in the back end and will disappear from the default view of the Web UI; it can
now only be found in the recycle bin view ( ). Other IM administrative users will need to refresh their view to see your changes.

Identity Management – IM User Guide
© ACTICO GmbH 37/122
2.6.5 Restore User
Preconditions
You will need to be logged in and have permission to read and update users.
Procedure Description
1. Open the recycle bin view ( ).
2. Click the user you want to restore.
3. Drag and drop him on the "restore" area .
4. A dialog box appears with the option of confirming or canceling the restore action.
5. Click Restore to confirm.
Click the following icon to switch back to the default view.
Results
The user is restored in the back end and will now appear in the default view. Other IM administrative users will need to refresh their view to see your changes.
In case you need to restore a user who accidentally deleted his user account, that state is visible as well.
2.6.6 Delete User permanently
Preconditions
You will need to be logged in and have permission to read and permanently delete users.
Procedure Description
1. Open the recycle bin view ( ).
2. Click the user you want to delete permanently.
3. Drag and drop him on the "delete permanently" area .
4. A dialog box appears with the option of confirming or canceling the permanent deletion.
5. Click Delete permanently to confirm.
Click the following icon to switch back to the default view.
Results
The user is permanently deleted from the back end with no option to restore. Other IM administrative users will need to refresh their view to see your changes.

Identity Management – IM User Guide
© ACTICO GmbH 38/122
2.6.7 Create a User-Group assignment
Preconditions
You will need to be logged in and have permission to create user-group relations.
The user and group you want to relate must both pre-exist (otherwise see Create User and Create Group).
Procedure Description
1. Select and drag the user that should be added to the members of a particular group.
2. Drop him on that group. In our example, Mr. Arnold becomes a member of the "Technical support team".
3. The assignment is not automatically sent to the back end because you might want to create various other relations first and only then synchronize with the back end, all at once.
4. To resume the assignment, use the appropriate link provided in the upper part of the application, or go to your list of outstanding actions and decide whether to proceed or cancel.
5. To complete the assignment click Save changes.
Results
The new user-group relation is now stored on the back end. Other IM administrative users for the same tenant will need to use the refresh button to see your changes.
To check your work, simply pin one of the related units:
Click the pin icon of the newly assigned user. The group will be highlighted. Additionally, the group now displays the "chain" icon.
Click the pin icon of the group. Now the new member will appear at the top of the Users column displaying the "chain" icon.

Identity Management – IM User Guide
© ACTICO GmbH 39/122
If the group is allocated particular roles and permissions, these will be highlighted as well, as the newly-created relation grants them automatically to all members.
In addition, the related elements will move to the upper part of the corresponding column and the total number of elements assigned to the pinned one will be displayed at the foot of the column.
2.6.8 Delete a User-Group assignment
Preconditions
You will need to be logged in and have permission to delete user-group relations.
The user-group relation you want to delete must pre-exist (otherwise see Create a User-Group assignment).
Procedure Description
1. Starting with the User:
a. Click the user's pin icon to highlight the groups of which he is a member.
b. Select and drag the relevant group and drop it at the end of the columns, on the "remove
assignment" area .
2. Alternatively: Starting with the Group:
a. Click the pin icon of the group to highlight the users.
b. Drag the relevant user and drop it at the end of the columns, on the Remove assignment icon.
3. The action is not immediately sent to the back end but stored in your list of actions pending execution. The relation icon next to the group changes, now displaying a red marker.
4. Complete the action by either following the Save link in the upper section, or go to your list of unsaved changes and confirm with Save changes.
Results

Identity Management – IM User Guide
© ACTICO GmbH 40/122
The removal of the user-group relation is now stored on the back end. Other IM administrative users for the same tenant will need to use the refresh button to see your changes.
To check your work, simply pin the user and you will see that the attributes stemming from the old group assignment (i.e. all roles and permissions assigned implicitly) have also disappeared.
2.6.9 Create a User-Role assignment
Preconditions
You will need to be logged in and have permission to create user-role relations.
The user and role you want to relate must both pre-exist (otherwise see Create User and Create Role).
Procedure Description
In our example, Mr. Arnold should be specifically accorded the privileges of a "Manager" role (as opposed to simply becoming a manager, e.g. via group membership as described in Create a User-Group assignment).
1. Select and drag the user who should be allocated a particular role.
2. Drop him on the role in question
3. The assignment is not automatically sent to the back end, because you might want to create various other relations first and only then synchronize with the back end, all at once. To resume the assignment use the appropriate link provided in the upper part of the application or go to your list of outstanding actions and decide whether to proceed or cancel.
4. To complete the role assignment, click Save changes.
Results
The new user-role relation is now stored on the backend. Other IM administrative users for the same tenant will need to use the refresh button to see your changes.
To check your work, simply pin one of the related units:
Click the pin icon of the "Manager" role. The newly-assigned user will be highlighted. As you might have noticed "Arnold, John" now displays the chain icon, indicating some relation to other units:
Click the user's pin icon. All the roles granted to that user are highlighted.

Identity Management – IM User Guide
© ACTICO GmbH 41/122
In addition, the related elements will move to the upper part of the corresponding column and the total number of elements assigned to the pinned one will be displayed at the foot of the column.
2.6.10 Delete a User-Role assignment
Preconditions
You will need to be logged in and have permission to delete user-role relations.
The user-role relation you want to delete must pre-exist (otherwise see Create a User-Role assignment)
Procedure Description
1. Starting with the User
a. Click the pin icon of the user to highlight the roles he has been allocated.
b. Select and drag the role and drop it at the end of the columns, on the "remove assignment" area
.
c. Our example shows the assigned directly "Manager" role, as well as other roles that were assigned by virtue of group membership.
d. Drag the "Manager" role and drop it on the "remove assignment" area .
e. If you try to drag and drop the "Network Administrator" role on the field for removing an assignment, this will not succeed, as the assignment was created via group (note this role’s chain icon)
2. Alternatively: Starting with the Role:
a. Click the pin icon of the role in question to highlight the users.
b. Drag the user (displaying a chain icon) and drop him at the end of the columns, on the "remove
assignment" area .

Identity Management – IM User Guide
© ACTICO GmbH 42/122
3. The action is not immediately sent to the back end but stored in your list of actions pending execution. The relation icon next to the unit changes, now displaying a red marker.
4. Complete the action by either following the Save link in the upper section, or go to your list of unsaved changes and confirm with Save changes.
Results
The removal of the user-role relation is now stored on the back end. Other IM administrative users for the same tenant will need to use the refresh button to see your changes.
To check your work, simply pin one of the related units, and the other one should no longer be highlighted.
See also Role assignment using hierarchical groups.
2.6.11 Create a User-Permission assignment
Preconditions
You will need to be logged in and have permission to create user-group and user-role relations.
The user and group or role you want to relate must pre-exist (otherwise see Create User, Create Group, and Create Role).
Procedure Description
A permission cannot be directly assigned to a user; thus, you will need to grant the user a permission via a group or role.
1. Select the permission the user needs, and decide whether assigning it via a group or role would be more efficient (in order to still restrict permissions as much as possible).
2. Drag and drop the user on the appropriate group or role.
3. The assignment is not automatically sent to the back end, because you might want to create various other relations first and only then synchronize with the back end, all at once. To resume the assignment, use the appropriate link provided in the upper part of the application, or go to your list of outstanding actions and decide whether to proceed or cancel.
4. To complete the assignment click Save changes.
Results
The new user-group or user-role relation is now stored on the back end. Other IM administrative users for the same tenant will need to use the refresh button to see your changes.
To check your work, simply pin one of the related units. The related elements will move to the upper part of the corresponding column and the total number of elements assigned to the pinned one will be displayed at the foot of the column.
For further details see also:
Create a User-Group assignment
Create a User-Role assignment
2.6.12 Delete a User-Permission assignment
Preconditions
You will need to be logged in and have permission to delete user-group and user-role relations.
Procedure Description
A permission cannot be directly assigned or un-assigned to a user; thus, if you have to restrict a user's permission, first you must analyze whether it was inherited via a group or role.
1. Starting with the permission:
a. Click the pin icon of the permission to highlight the roles and groups.

Identity Management – IM User Guide
© ACTICO GmbH 43/122
b. Drag and drop the role or group at the end of the columns, on the "remove assignment" area
.
2. If the permission remains assigned, try to un-link also another related role or group.
3. The un-link action is not immediately sent to the back end but stored in your list of actions pending execution. The relation icon next to any units you are un-linking now display a red marker.
4. Complete the actions by either following the Save link in the upper section, or go to your list of unsaved changes and confirm with Save changes.
Results
The removal of the user-role (and/or user-group) relation is now stored on the back end. Other IM administrative users for the same tenant will need to use the refresh button to see your changes.
To check your work, simply pin the permission and make sure the user you want to restricted is no longer highlighted.
For further details see also:
Delete a User-Group assignment
Delete a User-Role assignment
2.6.13 Unlock User
Preconditions
A user can be locked after a certain amount of unsuccessful attempts to log in. Administrative users can unlock the user and provide him a new password.
The requirements regarding the characters to be used or minimum length for the new password etc. can be configured by the administrator and thus will differ per IM server installation. However the user interface will support you by providing the password rules defined for your instance.
You will need to be logged in and have reading and writing permission for users.
Procedure Description
1. Click the icon in the left area of the user's cell in the Users column.
2. The user details will appear in read-only format as they were entered when the user was created.
3. Click Edit to change the content of any of the fields.

Identity Management – IM User Guide
© ACTICO GmbH 44/122
a. Provide a new password.
b. Repeat the new password to avoid typos.
c. Activate the No Locked radio button.
4. Resume the dialog using the buttons at the bottom of the form (as explained for Create User).
Results
The updated user attributes are now stored on the back end. Other IM administrative users will need to refresh their view to see your changes.
Users imported from an external identity provider cannot be unlocked via the IM user interface, nor can they change their passwords as described above. Instead they need to address the utilities of their external content provider.

Identity Management – IM User Guide
© ACTICO GmbH 45/122
By default, IM is configured in a way that the password never expires. However, in case the IM server is configured to mark passwords as expired after a configured number of days, and given the user knows his old password, he will be able to do this using the dialog described at Change your initial or an expired password. Thus an administrative user only needs to interfere when a user is locked.
The common dialog to edit a user's details will not empower administrative users to activate the locking radio buttons unless the user is locked already. However if the aim is to make sure the user cannot authenticate for a certain time, he can be deleted and restored later on.
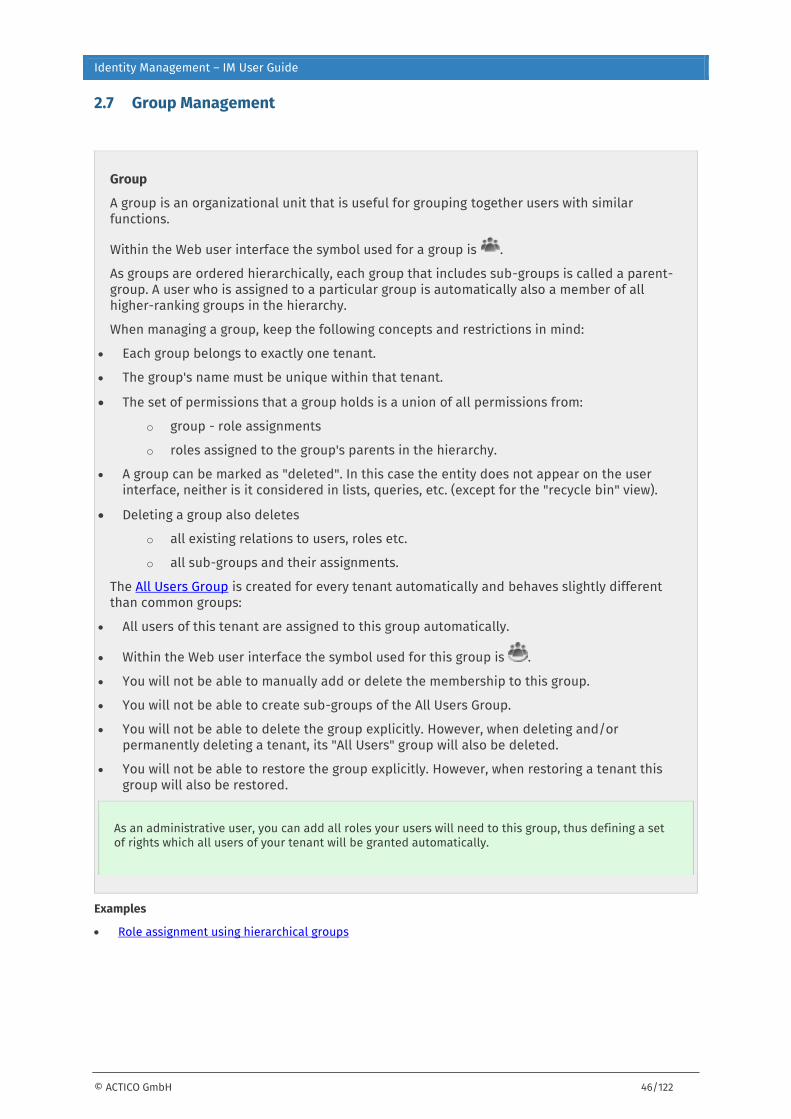
Identity Management – IM User Guide
© ACTICO GmbH 46/122
2.7 Group Management
Group
A group is an organizational unit that is useful for grouping together users with similar functions.
Within the Web user interface the symbol used for a group is .
As groups are ordered hierarchically, each group that includes sub-groups is called a parent-group. A user who is assigned to a particular group is automatically also a member of all higher-ranking groups in the hierarchy.
When managing a group, keep the following concepts and restrictions in mind:
Each group belongs to exactly one tenant.
The group's name must be unique within that tenant.
The set of permissions that a group holds is a union of all permissions from:
o group - role assignments
o roles assigned to the group's parents in the hierarchy.
A group can be marked as "deleted". In this case the entity does not appear on the user interface, neither is it considered in lists, queries, etc. (except for the "recycle bin" view).
Deleting a group also deletes
o all existing relations to users, roles etc.
o all sub-groups and their assignments.
The All Users Group is created for every tenant automatically and behaves slightly different than common groups:
All users of this tenant are assigned to this group automatically.
Within the Web user interface the symbol used for this group is .
You will not be able to manually add or delete the membership to this group.
You will not be able to create sub-groups of the All Users Group.
You will not be able to delete the group explicitly. However, when deleting and/or permanently deleting a tenant, its "All Users" group will also be deleted.
You will not be able to restore the group explicitly. However, when restoring a tenant this group will also be restored.
As an administrative user, you can add all roles your users will need to this group, thus defining a set of rights which all users of your tenant will be granted automatically.
Examples
Role assignment using hierarchical groups

Identity Management – IM User Guide
© ACTICO GmbH 47/122
2.7.1 Create Group
Preconditions
You will need to be logged in and have permission to create groups.
Procedure Description
1. Click the "add group" icon .
2. The Groups column will display a form for completing all the information required to create a group.
3. You must complete at least all required fields in the dialog box (marked * )
4. Confirm by clicking one of the buttons at the bottom of the dialog box:
a. Save - will display a preview of the entries edited so far. From there you can continue with
i. Edit - to amend your entries
ii. Close - to store the new user.
b. Save & Close - will store your entries and display all groups in the Groups column.
c. Cancel - will ignore the entries and resume the creation dialog, displaying all groups in the Groups column.
Results
The new group is now available and will be displayed in alphabetical order in the Groups column.
Create a Sub-Group

Identity Management – IM User Guide
© ACTICO GmbH 48/122
For a fine-grained assignment of permissions to just part of a group, you can organize your users in sub-groups. The members of a sub-group will automatically inherit all roles and permissions granted to the parent group, but they can also be granted exclusive additional permissions.
The user interface offers two ways to create sub-groups:
Select the parent group at creation
Edit an existing group (see Update Group) and assign a parent.
Further details and examples are available at Role assignment using hierarchical groups.
2.7.2 Read Group
Preconditions
You will need to be logged in and have permission to read groups.
Procedure Description
1. The Groups column displays all groups in alphabetical order.
2. For a quick-view of a group's details, hover your mouse pointer over the group.
3. Click the group's icon to read more details.

Identity Management – IM User Guide
© ACTICO GmbH 49/122
4. For a quick-view of the relations to other elements, click the pin icon, which is revealed by moving the mouse pointer over the group cell.
Click the group's pin icon again to clear the highlighting.
5. Alternatively: Use the search field at the top of the Groups column to quickly find a group.
Results
The group's details are now displayed like a tooltip.
Clicking the pin icon, which is revealed by moving the mouse pointer over the group cell, will highlight all users as well as all roles and permissions assigned to that group. In addition, the related elements will move to the upper part of the corresponding column and the total number of elements assigned to the pinned one will be displayed at the foot of the column.
2.7.3 Update Group
Preconditions
You will need to be logged in and have reading and writing permission for groups.
Procedure Description
1. Click the icon in the left area of the group's cell in the Groups column.
2. The group details will appear in read-only format as they were entered when the group was created.
3. Click Edit to change the content of any of the fields. Our example shows how to provide a German group description.

Identity Management – IM User Guide
© ACTICO GmbH 50/122
4. Resume the dialog by using the buttons at the bottom of the form (as explained for Create Group).
Results
The updated group attributes are now stored on the back end. Other IM administrative users will need to refresh their view to see your changes.
For information on updating the relation to other elements, please see the appropriate section:
Create a Group-User assignment
Delete a User-Group assignment
Create a Group-Role assignment
Delete a Group-Role assignment
2.7.4 Delete Group
Preconditions
You will need to be logged in and have permission to read and delete groups.
Procedure Description
1. Drag the group you want to delete.
2. Drop it on the recycle bin

Identity Management – IM User Guide
© ACTICO GmbH 51/122
3. A dialog box appears with the option of confirming or canceling the deletion.
4. Click Delete to confirm deleting the group.
Note: Deleting a group that was assigned as a parent to other groups will also delete all its sub-groups.
Results
The group is marked as "deleted" in the back end and will disappear from the default view of the Web UI; it
can now only be found in the recycle bin view ( ). Other IM administrative users will need to refresh their view to see your changes.
Deleting a group will also delete any related assignments of roles, users etc. If a user was automatically granted permissions via the group that has now been deleted, the new restriction will apply immediately (without notifying the user), at the latest when the user next makes a request requiring such a permission,
The IM user interface will not enable you to update or delete the initial set of IM entities (i.e. the IM application itself including its group, roles and permissions, the default domain, tenant, offering, tenant relation) as these are elementary parts of the application and are therefore protected for manipulation. It is also not possible to remove or to create new assignments between IM entities. When trying to manipulate such entities or relations, an Exception will be thrown by the IM server. There are three IM entities which have some special rules:
The default user (Admin) can be updated, deleted and erased. However, in case of deleting this user, make sure another user has the same privileges.
The default tenant (DEFAULT) can be updated but not deleted. The All Users group cannot be updated, deleted or erased.
It is not possible to remove users from this group (all users are assigned) but it is possible to assign roles to this group.
Example when trying to delete the IM application.

Identity Management – IM User Guide
© ACTICO GmbH 52/122
2.7.5 Restore Group
Preconditions
You will need to be logged in and have permission to read and update groups.
Procedure Description
1. Open the recycle bin view ( ).
2. Click the group you want to restore.
3. Drag and drop it on the "restore" area .
4. A dialog box appears with the option of confirming or canceling the restore action.
5. Click Restore to confirm.
Note: Restoring a group (e.g. Accounting) does not automatically restore any of its sub-groups (e.g. Controlling). Thus, in our example you would need to perform the procedure twice over. However, you can select both and drop them in the restore area simultaneously.
Click the following icon to switch back to the default view.
Results
The groups are restored in the back end and will now appear in the default view. Other IM administrative users will need to refresh their view to see your changes.
2.7.6 Delete Group permanently
Preconditions
You will need to be logged in and have permission to read and permanently delete groups.
Procedure Description
1. Open the recycle bin view ( ).
2. Click the group you want to delete permanently.
3. Drag and drop it on the "delete permanently" area .
4. A dialog box appears with the option of confirming or canceling the permanent deletion.
5. Click Delete permanently to confirm.

Identity Management – IM User Guide
© ACTICO GmbH 53/122
Click the following icon to switch back to the default view.
Results
The group is permanently deleted from the back end with no option to restore. Other IM administrative users will need to refresh their view to see your changes.
2.7.7 Create a Group-User assignment
A description of this procedure is provided in the section Create a User-Group assignment.
Example
Mr. Arnold should become a member of the Controlling group:
This assignment automatically grants the user all roles that were assigned to the group and all its parent groups.
2.7.8 Delete a Group-User assignment
A description of this procedure is provided in the section Delete a User-Group assignment.
2.7.9 Create a Group-Role assignment
Preconditions
You will need to be logged in and have permission to create group-role relations.
The group and role you want to relate to each other must both pre-exist (otherwise see Create Group and Create Role).
The most efficient way to provide all users of your tenant with an initial set of rights is to assign all roles
they will need to the "All Users" group (decorated ).
Procedure Description

Identity Management – IM User Guide
© ACTICO GmbH 54/122
In our example, the "Technical support team" will be assigned the "User Admin" role. Thus, all members of the group - see Create a User-Group assignment - are also automatically granted the same role, and thus, all permissions associated with this role.
1. Select and drag the group that should be allocated the particular role.
2. Drop it on the role in question
3. The assignment is not automatically sent to the back end because you might want to create various other relations first and only then synchronize with the back end, all at once. To resume the assignment, use the appropriate link provided in the upper part of the application, or go to your list of outstanding actions and decide whether to proceed or cancel.
4. To complete the assignment, click Save changes.
Results
The new group-role relation is now stored on the back end. Other IM administrative users for the same tenant will need to use the refresh button to see your changes.
To check your work, simply pin one of the related units:
Click on the pin icon of the "User Admin" role. The newly-assigned group will be highlighted. Our example shows that "Mr. Arnold" was assigned the role via group membership, while the "Admin, Admin" was assigned the role directly.
Click on the pin icon of the "Technical support team" group. All roles granted to the group will be highlighted.
In addition, the related elements will move to the upper part of the corresponding column and the total number of elements assigned to the pinned one will be displayed at the foot of the column.
The steps to assign an element to a role are pretty much the same for all types of units. If you need a restrictive role assignment, however, keep in mind that assigning a role to a group grants the associated permissions to all members of this group and to all members of its sub-groups. See Role assignment using hierarchical groups.
2.7.10 Delete a Group-Role assignment
Preconditions
You will need to be logged in and have permission to delete group-role relations.
Procedure Description
The steps to delete the assignment between two elements are pretty much the same for all types of element.
Just drag one of the related elements and drop it on the remove assignment area . Then confirm to save the change.

Identity Management – IM User Guide
© ACTICO GmbH 55/122
If you need a liberal role assignment, however, keep in mind that deleting a group-role relation will restrict not only the rights of all members of this group but also those of all members of its sub-groups. See Role assignment using hierarchical groups.
Example
You cannot simply un-assign the "Controlling" group from the "Accountant" role as the role was assigned to the parent group. If you remove the assignment between "Accounting" group and "Accountant" role, all members of both groups will be affected.
Results
The removal of the group-role relation is now stored on the back end. Other IM administrative users for the same tenant will need to use the refresh button to see your changes.
To check your work, simply pin the group and you will see, that the attributes stemming from the old role assignment (i.e. all permissions assigned automatically) have also disappeared.
2.7.11 Create a Group-Permission assignment
A permission cannot be directly assigned to a group; thus, you will need to grant the permission via a role.
If you need to create a relation between a permission and a group, proceed as follows:
1. Create a Role.
2. Assign the Permission to the Role.
3. Assign the Role to the Group.
If you need to provide a permission to all users of your tenant, assign the Role to the "All Users" group
(decorated ).
If you need a restrictive permission assignment, however, keep in mind that a group assignment provides permission to all members of this group and all members of its sub-groups.
2.7.12 Delete a Group-Permission assignment
A permission cannot be directly assigned or un-assigned to a user; thus, if you have to restrict a user's permission you must first analyze whether it was inherited via a group or role.
See Delete a User-Permission assignment.

Identity Management – IM User Guide
© ACTICO GmbH 56/122
If you need a liberal permission assignment, however, keep in mind that by deleting a group-permission relation you will restrict not only the rights of all members of this group but also those of all members of its sub-groups.

Identity Management – IM User Guide
© ACTICO GmbH 57/122
2.8 Role Management
Role
A role is a job function within the context of an organization. The associated semantic regards rights and duties (the authority and responsibility) conferred on the user to whom the role is assigned. Usually, a role encapsulates a range of permissions that are necessary to perform its function.
A role can be defined either by a tenant or by an application. While application roles are delivered as part of the application, tenant roles are created by an administrator user. In the
Web user interface, the following icon is used for representing a tenant role . A role
provided by an application is marked by the following icon and cannot be modified in the Web user interface.
There are predefined roles that are generated during the initialization of an IM server instance, namely "Administrator", "ApplicationInstaller" and "TenantAdministrator".
When managing a role, keep the following concepts and restrictions in mind:
Each role has exactly one tenant or one application instance responsible for its creation.
The tenant role's name must be unique per tenant.
The application role's name must be unique per application.
A role can group permissions, and the same permission can be assigned to multiple roles.
A tenant role can be marked as "deleted". In this case the entity does not appear on the user interface, neither is it considered in lists, queries etc. (except for the "recycle bin" view).
Deleting a role does not delete the permissions themselves but the association of these permissions to users, groups, etc.
The IM user interface will not enable you to create, update or delete application roles (marked with the
icon ) as those entities are within the responsibility of the application itself.
Examples

Identity Management – IM User Guide
© ACTICO GmbH 58/122
2.8.1 Create Role
Preconditions
You will need to be logged in and have permission to create roles.
Procedure Description
1. Click the "add role" icon .
2. The Roles column will display a form for completing all the information required to create a role.
3. You must complete at least all required fields in the dialog box (marked * )
4. Confirm by clicking one of the buttons at the bottom of the dialog box:
a. Save - will display a preview of the entries edited so far. From there you can continue with
i. Edit - to amend your entries
ii. Close - to store the new role.
b. Save & Close - will store your entries and display all roles in the Roles column.
c. Cancel - will ignore the entries and resume the creation dialog, displaying all roles in the Roles column.
Results
The new role is now available and will be displayed in alphabetical order in the Roles column.
Application Role The Roles required within an Application cannot be created with this user interface but are part of the Application itself and are just imported within the IM system. However, these Application Roles can be offered/related to groups and users the same way as assigning a tenant-generated role.

Identity Management – IM User Guide
© ACTICO GmbH 59/122
2.8.2 Read Role
Preconditions
You will need to be logged in and have permission to read roles.
Procedure Description
1. The Roles column displays all roles in alphabetical order.
2. For a quick-view of a role's details hover your mouse pointer over the role. A tooltip appears, displaying some of the role's details.
3. Click the role's icon to read more details.
4. For a quick-view of the relations to other elements, click the pin icon, which is revealed by moving the mouse pointer over the role cell.
Click the pin icon again to clear the highlighting.
5. Alternatively: Use the search field at the top of the Roles column to quickly find a role.
Results
The role's details are displayed like a tooltip.
Clicking the pin icon, which is revealed by moving the mouse pointer over the role cell, will highlight all users as well as all groups, permissions etc. that have been assigned. In addition, the related elements will move to the upper part of the corresponding column and the total number of elements assigned to the pinned one will be displayed at the foot of the column.
Filter roles list
Click the filter icon in the column header to show which units are supported for filtering roles. Drag the unit that should restrict the list and drop it onto the column header.

Identity Management – IM User Guide
© ACTICO GmbH 60/122
The Roles column can be filtered by ONE specific application.
If an application is applied as a filter, the following entries will be displayed:
the roles that are defined by this application and
the roles that include permissions from this application.
Read a role's details
Click the role's icon to open its details view.
Example:
Click Close to collapse the details view.
2.8.3 Update Role
Preconditions
You will need to be logged in and have reading and writing permission for roles.
Procedure Description
1. Click the icon in the left area of the role's cell in the Roles column.
2. The role's details will appear in read-only format as they were entered when the role was created.
3. Click Edit to change the content of any of the fields. Our example shows how to provide a German role description.
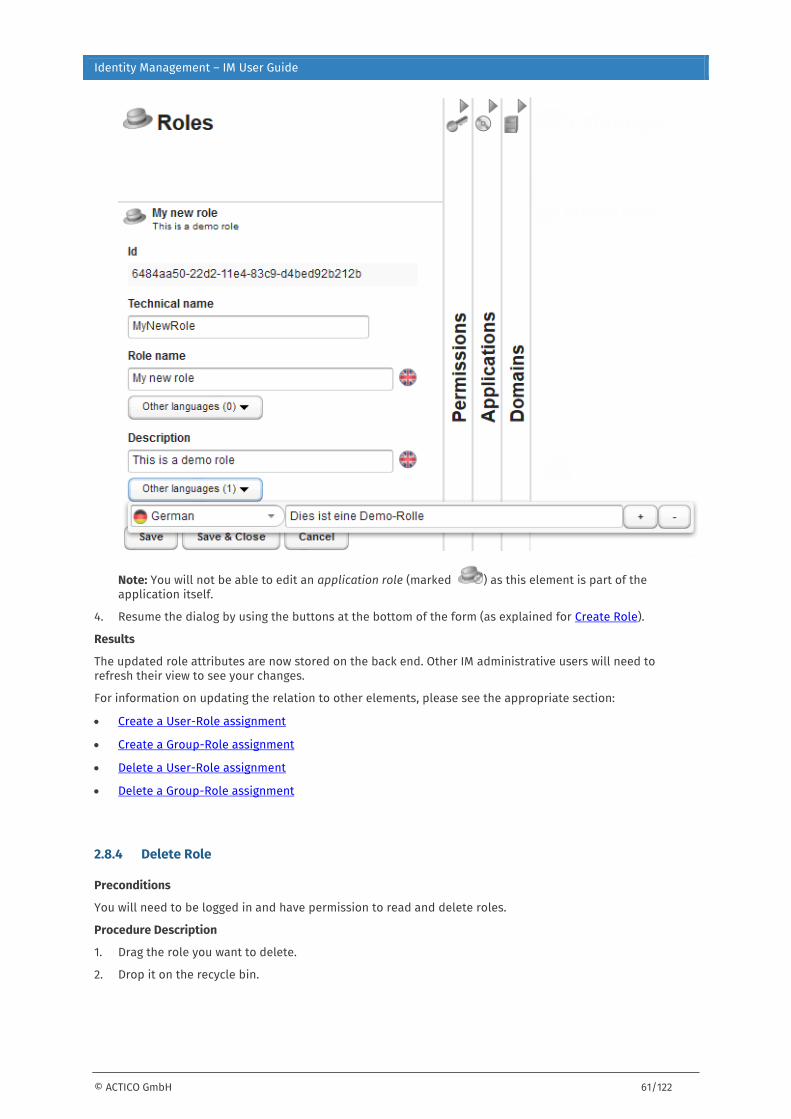
Identity Management – IM User Guide
© ACTICO GmbH 61/122
Note: You will not be able to edit an application role (marked ) as this element is part of the application itself.
4. Resume the dialog by using the buttons at the bottom of the form (as explained for Create Role).
Results
The updated role attributes are now stored on the back end. Other IM administrative users will need to refresh their view to see your changes.
For information on updating the relation to other elements, please see the appropriate section:
Create a User-Role assignment
Create a Group-Role assignment
Delete a User-Role assignment
Delete a Group-Role assignment
2.8.4 Delete Role
Preconditions
You will need to be logged in and have permission to read and delete roles.
Procedure Description
1. Drag the role you want to delete.
2. Drop it on the recycle bin.

Identity Management – IM User Guide
© ACTICO GmbH 62/122
3. A dialog box appears with the option of confirming or canceling the deletion.
4. Click Delete to confirm deleting the role.
Note: You will not be able to delete an application role (marked ), as this element is part of the application itself.
Results
The role is marked as "deleted" in the back end and will disappear from the default view of the Web UI; it can
now only be found in the recycle bin view . Other IM administrative users will need to refresh their view to see your changes.
Deleting a role will not automatically delete the permissions grouped within the role, but it will automatically delete the potentially existing relations with users, groups, or offerings. If a user was automatically granted permissions via the role that has now been deleted, the new restriction will apply immediately (without notifying the user), at the latest when the user next makes a request requiring such a permission.
2.8.5 Restore Role
Preconditions

Identity Management – IM User Guide
© ACTICO GmbH 63/122
You will need to be logged in and have permission to read and update roles.
Procedure Description
1. Open the recycle bin view ( ).
2. Click the role you want to restore.
3. Drag and drop it on the "restore" area .
4. A dialog box appears with the option of confirming or canceling the restore action.
5. Click Restore to confirm.
Click the following icon to switch back to the default view.
Results
The role is restored in the back end and will now appear in the default view. Other IM administrative users will need to refresh their view to see your changes.
2.8.6 Delete Role permanently
Preconditions
You will need to be logged in and have permission to read and permanently delete roles.
Procedure Description
1. Open the recycle bin view ( ).
2. Click the role you want to delete permanently.
3. Drag and drop it on the "delete permanently" area .
4. A dialog box appears with the option of confirming or canceling the permanent deletion.
5. Click Delete permanently to confirm.
Click the following icon to switch back to the default view.
Results
The role is permanently deleted from the back end with no option to restore. Other IM administrative users will need to refresh their view to see your changes.
2.8.7 Create a Role-User assignment
A description of this procedure is provided in the section Create a User-Role assignment.
2.8.8 Delete a Role-User assignment
A description of this procedure is provided in the section Delete a User-Role assignment.
2.8.9 Create a Role-Group assignment
A description of this procedure is provided in the section Create a Group-Role assignment.

Identity Management – IM User Guide
© ACTICO GmbH 64/122
2.8.10 Delete a Role-Group assignment
A description of this procedure is provided in the section Delete a Group-Role assignment.
2.8.11 Create a Role-Permission assignment
Preconditions
You will need to be logged in and have permission to create role-permission relations.
The role and permission you want to relate to each other must both pre-exist.
Procedure Description
In our example, the self-generated "My new role" is allocated some query permissions (these permissions are exposed by the IM application itself).
1. Use "query" as the search criterion in the Permissions column.
2. Select all the results you want to have grouped within the role and drop them on the role.
3. The assignment is not automatically sent to the back end because you might want to create various other relations first and only then synchronize with the back end, all at once. To resume the assignment, use the appropriate link provided in the upper part of the application, or go to your list of outstanding actions and decide whether to proceed or cancel.
4. To complete the assignment click Save changes.

Identity Management – IM User Guide
© ACTICO GmbH 65/122
Results
The new role-permission relation is now stored on the back end. Other IM administrative users for the same tenant will need to use the refresh button to see your changes.
To check your work, simply pin one of the related units:
Click the permission's pin icon. All roles granted this permission will be highlighted.
Click the role's pin icon. All assigned permissions will be highlighted.
In addition, the related elements will move to the upper part of the corresponding column and the total number of elements assigned to the pinned one will be displayed at the foot of the column.
2.8.12 Delete a Role-Permission assignment
Preconditions

Identity Management – IM User Guide
© ACTICO GmbH 66/122
You will need to be logged in and have permission to delete role-permission relations.
Procedure Description
The steps to delete the assignment between two elements are pretty much the same for all types of element.
Just drag one of the related elements and drop it on the "remove assignment" area . Then confirm to save the change.
Results
The removal of the role-permission relation is now stored on the back end. Other IM administrative users for the same tenant will need to use the refresh button to see your changes.
To check your work, simply pin the role and you will see, that the attributes stemming from the old permission assignment (i.e. the relation to its domains and application) have also disappeared.
2.8.13 Create a Role-Offering assignment
A description of this procedure is provided in the section Create an Offering-Role assignment.
2.8.14 Delete a Role-Offering assignment
A description of this procedure is provided in the section Delete an Offering-Role assignment.

Identity Management – IM User Guide
© ACTICO GmbH 67/122
2.9 Permission Management
Permission
A permission is a fine-grained concept for granting access to operations and/or data. Usually, a role encapsulates a set of permissions that are required for performing its tasks.
Within the Web user interface, the following icon is used to indicate a permission .
There is a set of predefined permissions in IM to facilitate the management of the IM system itself (e.g., "CREATE_TENANT", "CREATE_USER", "DELETE_USER", etc.). These permissions are grouped already for the default roles "Administrator", "ApplicationInstaller" and "TenantAdministrator". The default tenant's administrator, for example, needs all permissions (grouped within the "Administrator" role) to set up the system and the infrastructure needed to manage your application's user identities. In order to delegate some duties to other users, the administrator can easily assign his roles, such as the "TenantAdministrator" role, to the administrator users of other tenants.
Currently, the IM user interface will not assist you in creating permissions. They are delivered as part of the applications.
When managing a permission, keep the following concepts and restrictions in mind:
Each permission has exactly one application instance responsible for its creation.
A permission's name must be unique per application.
The same permission can be assigned to multiple roles.
Deleting a role does not delete the permissions themselves but the association of these permissions to users, groups, etc.
The IM user interface will not enable you to create, update or delete permissions, as those entities fall under the responsibility of the application itself.
Examples
Starting with IM 3.3.0 the user interface will display a special permission related to the possibility of getting the identity context of another user. This feature is disabled by default but according assignments would take effect as soon as the feature is enabled by the system administrator (See IM Administrator Guide > Configuring the IM Server > com.bosch.im.authentication.masqueradedUserAuthenticationEnabled). This permission is not meant to be assigned to a common user but should help developers to integrate IM protected applications. Thus, we highly recommend to handle this permission with special vigilance.
Starting with IM 3.6.0 the user interface will display a special permission related to the possibility of deleting the own user account. This permission is not part of any default role defined by IM.

Identity Management – IM User Guide
© ACTICO GmbH 68/122
2.9.1 Read Permission
Preconditions
You will need to be logged in (e.g. as the DEFAULT Admin) and have permission to read permissions.
Procedure Description
1. Expand the Permissions column.
2. The column displays all permissions (defined by the applications installed in IM) in alphabetical order. By default there should be ca. 60 permissions defined by IM itself. Their names should be self-explanatory.
3. For a quick-view of a permission's details hover your mouse pointer over the permission. A tooltip appears, displaying some of the permission's details.
4. Click the permission's icon to read more details.
5. Click Close to return to the list of all permissions.
Alternatively: Use the search field at the top of the Permissions column to quickly find a permission.
Clicking the pin icon, which is revealed by moving the mouse pointer over the permission cell, will highlight the related elements (e.g. the application they belong to, roles assigned to the permission). In addition, the related elements will move to the upper part of the corresponding column and the total number of elements assigned to the pinned one will be displayed at the foot of the column.
Example

Identity Management – IM User Guide
© ACTICO GmbH 69/122
Filter permission list
Click the filter icon in the column header to show which units are supported for filtering permissions. Drag the unit that should restrict the list and drop it onto the column header.
The Permissions column can be filtered by a specific application. If an application is applied as a filter, the permissions that are defined by this application will be shown.
2.9.2 Create a Permission-User assignment
A permission cannot be directly assigned to a user; thus, you will need to grant the user a permission via a group or role.
See Create a User-Permission assignment.
2.9.3 Delete a Permission-User assignment
A permission cannot be directly assigned or un-assigned to a user; thus, if you need to restrict a user's permission you must first analyze whether it was inherited via group or role.
Example
According to the following figure, two users were granted the permission "Users - create":
1. "Admin, Admin" was assigned the permission via the role "IM Administrator" (these are the default names that can be configured at installation).
2. "Arnold, John", was assigned the permission via the group "Technical support team", which was assigned the role "User Admin".

Identity Management – IM User Guide
© ACTICO GmbH 70/122
2.9.4 Create a Permission-Role assignment
A description of this procedure is provided in the section Create a Role-Permission assignment.
The following figure shows an example of a self-generated role for reading basic IM elements:
2.9.5 Delete a Permission-Role assignment
A description of this procedure is provided in the section Delete a Role-Permission assignment.
2.9.6 Create a Permission-Offering assignment
A description of this procedure is provided in the section Create an Offering-Permission assignment.
2.9.7 Delete a Permission-Offering assignment
A description of this procedure is provided in the section Delete an Offering-Permission assignment.

Identity Management – IM User Guide
© ACTICO GmbH 71/122
2.10 Domain Management
Domain
A domain is an infrastructure entity that defines a realm of administrative autonomy, authority, or control within IM.
Within the Web user interface, the following icon is used for a domain .
There is a default domain assigned to the default tenant that is reserved for the IM instance itself. (The default the name is "IAP", however the initial name can be configured before the first installation of IM.)
Usually, the main task of a domain is to group the application instances whose authorization is to be managed.
When managing a domain, keep the following concepts and restrictions in mind:
A domain's name must be unique per tenant.
A domain can be marked as "deleted". In this case the entity does not appear on the user interface, neither is it considered in lists, queries, etc. (except for the "recycle bin" view).
Deleting a domain will also delete all application instances, their roles, permissions, etc.
Examples

Identity Management – IM User Guide
© ACTICO GmbH 72/122
2.10.1 Create Domain
Preconditions
You will need to be logged in and have permission to create domains. The Administrator of the DEFAULT tenant should already have assigned all permissions defined by the IM application.
Procedure Description
1. Click the "add domain" icon .
2. The Domains column will display a form for completing all the information required to create a domain.
3. You must complete at least all the required fields in the dialog box (marked * )
4. Confirm by clicking one of the buttons at the bottom of the dialog box:
a. Save - will display a preview of the entries edited so far. From there you can continue with:
i. Edit - to amend your entries
ii. Close - to store the new domain.
b. Save & Close - will store your entries and display all domains in the Domains column.
c. Cancel - will ignore the entries and resume the creation dialog, displaying all domains in the Domains column.
Results
The new domain is now created and will be displayed in alphabetical order in the Domains column.
Now the administrator can inform users that need to install an application (programmatically) of the appropriate domain. If the same "Application A" is installed on two domains, the application roles and permissions will appear twice in the user interface. Supported by the feature of highlighting related elements the DEFAULT Admin can decide which domain to relate to the tenants he is administrating.

Identity Management – IM User Guide
© ACTICO GmbH 73/122
2.10.2 Read Domain
Preconditions
You will need to be logged in (e.g. as the DEFAULT Admin) and have permission to read domains.
Procedure Description
1. The Domains column displays all domains in alphabetical order.
2. For a quick-view of a domain's details hover your mouse pointer over the domain. A tooltip appears, displaying some of the domain's details.
3. Click the domain's icon to read more details.
4. For a quick-view of the relations to other units, click the pin icon, which is revealed by moving the mouse pointer over the domain.
Results
The domain's details are displayed like a tooltip.
To see all units that are related to the domain, just click its pin icon, and these units will be highlighted. In addition, the related elements will move to the upper part of the corresponding column and the total number of elements assigned to the pinned one will be displayed at the foot of the column. Click the pin icon again to clear the highlighting.

Identity Management – IM User Guide
© ACTICO GmbH 74/122
2.10.3 Update Domain
Preconditions
You will need to be logged in (e.g. as the DEFAULT Admin) and have permission to update domains.
Procedure Description
1. Click the icon in the left area of the domain's cell in the Domains column.
2. The domain's details appear in read-only format as they were entered when the domain was created.
3. Click Edit to change the content of any of the fields. Our example shows how to provide a German domain description.
4. Resume the dialog using the buttons at the bottom of the form (as explained for Create Domain).
Results
The updated domain attributes are now stored on the back end. Other IM administrative users will need to refresh their view to see your changes.
For information on updating the relation to other elements, please see the appropriate section:
Create a Domain-Application assignment
Delete a Domain-Application assignment
2.10.4 Delete Domain
Preconditions
You will need to be logged in (e.g. as the DEFAULT Admin) and have permission to read and delete domains.

Identity Management – IM User Guide
© ACTICO GmbH 75/122
Procedure Description
1. Drag the domain you want to delete.
2. Drop it on the recycle bin
3. A dialog box appears with the option of confirming or canceling the deletion.
4. Click Delete to confirm deleting the domain.
Results
The domain is marked as "deleted" in the back end and will disappear from the default view of the Web UI; it
can now only be found in the recycle bin view ( ). Other IM administrative users will need to refresh their view to see your changes.
Deleting a domain will also delete all its subordinate units (e.g. applications incl. application roles, permissions) and all relations to other tenants (e.g. permissions exposed toward another tenant). If a user was automatically granted permissions via the domain that has now been deleted, the new restriction will apply immediately (without notifying the user), at the latest when the user next makes a request requiring such a permission.
The IM user interface will not enable you to update or delete the initial set of IM entities (i.e. the IM application itself including its group, roles and permissions, the default domain, tenant, offering, tenant relation) as these are elementary parts of the application and are therefore protected for manipulation. It is also not possible to remove or to create new assignments between IM entities. When trying to manipulate such entities or relations, an Exception will be thrown by the IM server. There are three IM entities which have some special rules:
The default user (Admin) can be updated, deleted and erased. However, in case of deleting this user, make sure another user has the same privileges.
The default tenant (DEFAULT) can be updated but not deleted. The All Users group cannot be updated, deleted or erased.
It is not possible to remove users from this group (all users are assigned) but it is possible to assign roles to this group.
Example when trying to delete the IM application.

Identity Management – IM User Guide
© ACTICO GmbH 76/122
2.10.5 Restore Domain
Preconditions
You will need to be logged in and have permission to read and update domains.
Procedure Description
1. Open the recycle bin view ( ).
2. Click the domain you want to restore.
3. Drag and drop it on the "restore" area .
4. A dialog box appears with the option of confirming or canceling the restore action.
5. Click Restore to confirm.
Click the following icon to switch back to the default view.
Results
The domain is restored in the back end and will now appear in the default view. Other IM administrative users will need to refresh their view to see your changes.
2.10.6 Delete Domain permanently
Preconditions
You will need to be logged in and have permission to read and permanently delete domains.
Procedure Description
1. Open the recycle bin view ( ).
2. Click the domain you want to delete permanently.
3. Drag and drop it on the "delete permanently" area .
4. A dialog box appears with the option of confirming or canceling the permanent deletion.
5. Click Delete permanently to confirm.
Click the following icon to switch back to the default view.
Results
The domain is permanently deleted from the back end with no option to restore. Other IM administrative users will need to refresh their view to see your changes.
2.10.7 Create a Domain-Application assignment
Currently, the IM user interface will not assist you in assigning a domain to an application (or an application to a domain).
The domain where the application should be displayed must be specified while installing the application.
For more details see IM Developer Guide > Application Instance Resource.

Identity Management – IM User Guide
© ACTICO GmbH 77/122
2.10.8 Delete a Domain-Application assignment
Currently, the IM user interface will not assist you in assigning a domain to an application (or an application to a domain).
The domain where the application should be displayed must be specified while installing the application.
For more details see IM Developer Guide > Application Instance Resource.

Identity Management – IM User Guide
© ACTICO GmbH 78/122
2.11 Application Management
Application Instance
An application instance is a logical instance (e.g. one installation of a business application) that defines permissions and roles and uses the IM authentication and authorization services.
Within the Web user interface, the following icon is used for an application . Currently, the user interface will not support you with creating or updating an application instance.
There is a default application instance (assigned to the default domain and the default tenant) that is reserved for the IM application itself. (The default name is "IM", however, this initial name can be configured before the first installation of IM. The default role to grant all permissions that are necessary for an administrator user to be able to install an application instance is "ApplicationInstaller".)
When managing an application instance, keep the following concepts and restrictions in mind:
An application instance's name must be unique per domain.
Deleting a domain will also delete all application instances, their roles, permissions, etc.
Deleting an application will also delete all application roles, permissions, etc.
The owner of an application instance is a tenant (i.e. the domain owner).
The application itself is responsible for defining the roles and permissions to properly restrict the execution of the application's operations. The IM system only checks whether the user trying to perform a task has the required permissions (especially if the user's context covers more than the data of the tenant to which he belongs).
The IM user interface will not enable you to update or delete the initial set of IM entities (i.e. the IM application itself including its group, roles and permissions, the default domain, tenant, offering, tenant relation) as these are elementary parts of the application and are therefore protected for manipulation. It is also not possible to remove or to create new assignments between IM entities. When trying to manipulate such entities or relations, an Exception will be thrown by the IM server. There are three IM entities which have some special rules:
The default user (Admin) can be updated, deleted and erased. However, in case of deleting this user, make sure another user has the same privileges.
The default tenant (DEFAULT) can be updated but not deleted. The All Users group cannot be updated, deleted or erased.
It is not possible to remove users from this group (all users are assigned) but it is possible to assign roles to this group.
Example when trying to delete the IM application.
Examples

Identity Management – IM User Guide
© ACTICO GmbH 79/122
2.11.1 Create Application
The user interface will not support you with creating or updating an application, application role, or application permission, but only in assigning these to other units (e.g. by grouping a permission set to a role and binding it to a group, user or offering).
Creating permissions and attaching permission checks on executing some application is the task of application development.
Detailed information about the Application Instance Resource can be found in our IM Developer Guide. There, we also provide an example of how to "Register a complete application instance using the IM REST API".
2.11.2 Read Application
All applications are listed in alphabetical order in the Applications column.
For a quick-view of the relations to other elements click the pin icon, which is revealed by moving the mouse pointer over the application's cell. While an element is pinned, all related elements will appear at the top of the column and are highlighted green. Additionally, the total number of elements assigned to the pinned one will be displayed at the foot of the column.
Read an application's details
Click the application's icon to open its details view.
Example:

Identity Management – IM User Guide
© ACTICO GmbH 80/122
Click Close to collapse the details view.
2.11.3 Update Application
The user interface will not support you with creating or updating an application, application role, or application permission, but only in assigning these to other units (e.g. by grouping a permission set to a role and binding it to a group, user or offering).
Creating permissions and attaching permission checks on executing some application is the task of application development.
Detailed information about the Application Instance Resource can be found in our IM Developer Guide. There, we also provide an example of how to "Register a complete application instance using the IM REST API".
2.11.4 Delete Application
Preconditions
You will need to be logged in and have permission to read and delete applications.
Procedure Description
1. Drag the application you want to delete.
2. Drop it on the recycle bin .
3. A dialog box appears with the option of confirming or canceling the deletion. There you get an overview of all applications which will be deleted.
4. Click Delete to confirm deleting the application. This action deletes the application, roles, permissions, etc., along with all assignments these elements were involved in.
Results
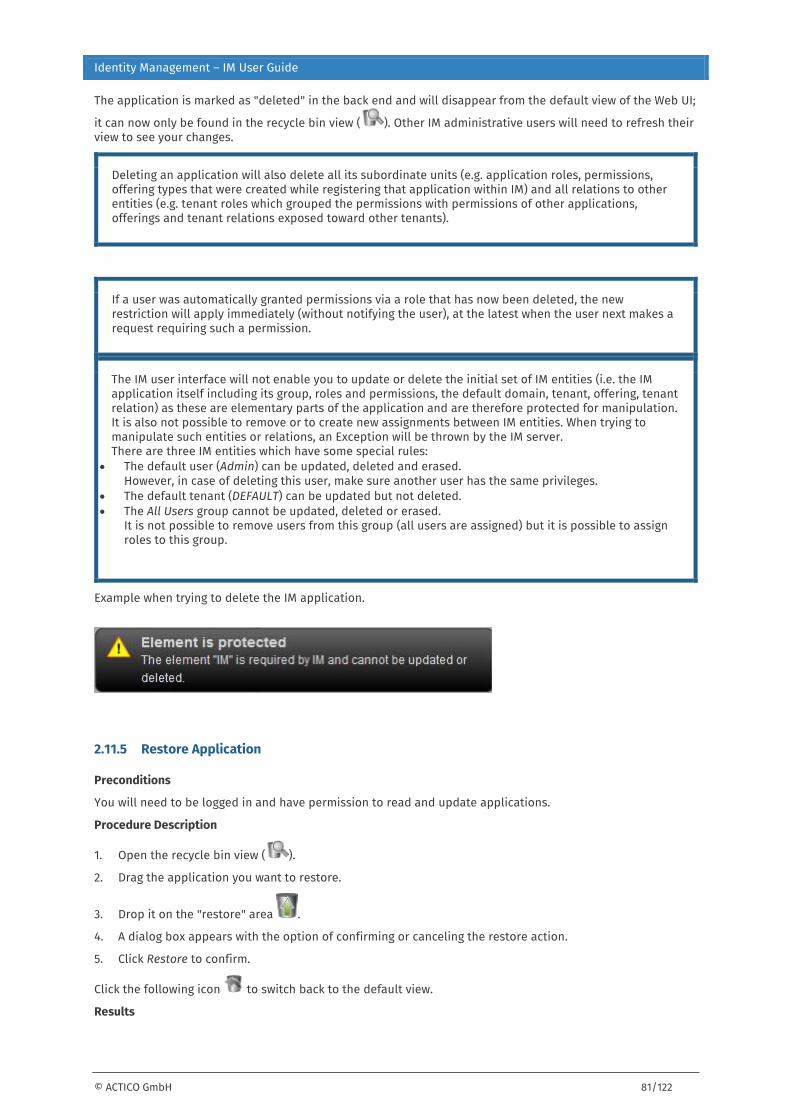
Identity Management – IM User Guide
© ACTICO GmbH 81/122
The application is marked as "deleted" in the back end and will disappear from the default view of the Web UI;
it can now only be found in the recycle bin view ( ). Other IM administrative users will need to refresh their view to see your changes.
Deleting an application will also delete all its subordinate units (e.g. application roles, permissions, offering types that were created while registering that application within IM) and all relations to other entities (e.g. tenant roles which grouped the permissions with permissions of other applications, offerings and tenant relations exposed toward other tenants).
If a user was automatically granted permissions via a role that has now been deleted, the new restriction will apply immediately (without notifying the user), at the latest when the user next makes a request requiring such a permission.
The IM user interface will not enable you to update or delete the initial set of IM entities (i.e. the IM application itself including its group, roles and permissions, the default domain, tenant, offering, tenant relation) as these are elementary parts of the application and are therefore protected for manipulation. It is also not possible to remove or to create new assignments between IM entities. When trying to manipulate such entities or relations, an Exception will be thrown by the IM server. There are three IM entities which have some special rules:
The default user (Admin) can be updated, deleted and erased. However, in case of deleting this user, make sure another user has the same privileges.
The default tenant (DEFAULT) can be updated but not deleted. The All Users group cannot be updated, deleted or erased.
It is not possible to remove users from this group (all users are assigned) but it is possible to assign roles to this group.
Example when trying to delete the IM application.
2.11.5 Restore Application
Preconditions
You will need to be logged in and have permission to read and update applications.
Procedure Description
1. Open the recycle bin view ( ).
2. Drag the application you want to restore.
3. Drop it on the "restore" area .
4. A dialog box appears with the option of confirming or canceling the restore action.
5. Click Restore to confirm.
Click the following icon to switch back to the default view.
Results

Identity Management – IM User Guide
© ACTICO GmbH 82/122
The application is restored in the back end and will now appear in the default view. Other IM administrative users will need to refresh their view to see your changes.
Restoring the application will not implicitly restore its permissions, roles, etc.
Thus, if your application really needs to be restored (instead of being permanently deleted and re-registered via REST API) a good order would be restoring:
1. The application itself
2. The permissions
3. The roles
4. The offerings
After restoring all entities completely, the users, groups etc. which were formerly granted those permissions will be able to use them again. Mind however, that if the time the application was deleted overlaps with a user's session it might happen that the user needs to explicitly refresh his context (by logout and re-login).
2.11.6 Delete Application permanently
Preconditions
You will need to be logged in and have permission to read and permanently delete applications.
Procedure Description
1. Open the recycle bin view ( ).
2. Click the application you want to delete permanently.
3. Drag and drop it on the "delete permanently" area .
4. A dialog box appears with the option of confirming or canceling the permanent deletion.
5. Click Delete permanently to confirm.
Click the following icon to switch back to the default view.
Results
The application is permanently deleted from the back end with no option to restore. Other IM administrative users will need to refresh their view to see your changes.
Deleting an application will also delete all its subordinate units (e.g. application roles, permissions, offering types that were created while registering that application within IM) and all relations to other entities (e.g. tenant roles which grouped the permissions with permissions of other applications, offerings and tenant relations exposed toward other tenants).
2.11.7 Create an Application-Domain assignment
Currently, the IM user interface will not assist you in assigning a domain to an application (or an application to a domain).
The domain where the application should be displayed must be specified while installing the application.
For more details see IM Developer Guide > Application Instance Resource.

Identity Management – IM User Guide
© ACTICO GmbH 83/122
2.11.8 Delete an Application-Domain assignment
Currently, the IM user interface will not assist you in assigning a domain to an application (or an application to a domain).
The domain where the application should be displayed must be specified while installing the application.
For more details see IM Developer Guide > Application Instance Resource.

Identity Management – IM User Guide
© ACTICO GmbH 84/122

Identity Management – IM User Guide
© ACTICO GmbH 85/122
2.12 Offering Management
Offering
An offering is a set of roles and permissions that can be offered by one tenant to others. Thus, an IM-protected service or function can be spread outside the boundaries of the owning tenant. Further, the offering can combine roles and permissions that come with an application instance registered at IM, on the one hand, and self-generated roles (using the Web user interface) on the other.
Within the Web user interface, the following icon is used for representing an offering .
When managing an offering, keep the following concepts and restrictions in mind:
Each offering has exactly one owner (i.e. the providing tenant, who created the offering). The offering's name must be unique within this tenant.
The offering's permission is a union of all permissions granted:
o directly
o via a role.
The offering has exactly one applicable scope ( ApplicableScope), i.e. the definition of the context in which an offered permission or role is applicable.
o Applicable scope PROVIDER: The permissions will affect the data of the providing tenant. Using this scope, the providing tenant can allow other tenants to act on his behalf.
o Applicable scope CONSUMER: The permissions will affect the data of the consuming tenant. Using this scope, the providing tenant can allow other tenants to use his applications. The data resulting from using the application will be in the ownership of the consuming tenant.
An offering can be marked as "deleted". In this case the entity does not appear on the user interface, neither is it considered in lists, queries, etc. (except for the "recycle bin" view).
Deleting an offering will delete all existing assignments to the permissions, roles, and the tenant relations.
In order to become active, a so called "Tenant Relation" must be created, to which the offering can then be added.
The IM application instance itself already provides a default offering. Thus, a basic set of IM roles and permissions is automatically offered to all tenants managed within one instance.
Examples

Identity Management – IM User Guide
© ACTICO GmbH 86/122
2.12.1 Create an Offering
Preconditions
You will need to be logged in and have permission to create tenant relations. E.g. the administrator of the DEFAULT tenant should already have assigned all permissions defined by the IM application.
Procedure Description
1. Click the "add offering" icon .
2. The Offerings column will display a form for completing all the information required to create an offering.
3. You must complete at least all required fields in the dialog box (marked * ).
Note: The Technical name must NOT contain any blank spaces.
4. Set the Applicable scope. For further information, hover your mouse pointer over Applicable scope to reveal the tooltip:

Identity Management – IM User Guide
© ACTICO GmbH 87/122
a. Provider: The permissions will affect the data of the providing tenant. Using this scope, the providing tenant can allow other tenants to act on his behalf.
b. Consumer: The permissions will affect the data of the consuming tenant. Using this scope, the providing tenant can allow other tenants to use his applications. The data resulting from using the application will be in the ownership of the consuming tenant.
5. The option to assign the offering automatically to all tenants is disabled by default (No). However, when creating the offering programmatically and registering it in line with the application itself, the value can be set to Yes.
6. Confirm by clicking one of the buttons at the bottom of the dialog box:
a. Save - will display a preview of the entries edited so far. From there you can continue with
i. Edit - to amend your entries
ii. Close - to store the new offering.
b. Save & Close - will store your entries and display all offerings in the Offerings column.
c. Cancel - will ignore the entries and resume the creation dialog, displaying all offerings in the Offerings column.
Results
The new offering is now available and will be displayed in alphabetical order in the Offerings column.
Self-generated roles, application roles, and permissions can now be assigned to the newly-created offering.
2.12.2 Read an Offering
Preconditions
You will need to be logged in (e.g. as the DEFAULT Admin) and have permission to read tenant relations.
Procedure Description
1. The Offerings column displays all offerings in alphabetical order.
2. For a quick-view of an offering's details hover your mouse pointer over an offering. A tooltip appears displaying some offering's details.

Identity Management – IM User Guide
© ACTICO GmbH 88/122
3. Click the offering's icon to read more details.
4. For a quick-view of the relations to other units click the pin icon, which is revealed by moving the mouse pointer over the offering cell.
Click the pin icon again to clear the highlighting.
5. Alternatively:
a. Use the search field at the top of the Offerings column to quickly find an offering.
b. If you don't know the exact spelling of an offering's name, click the pin icon of a role or permission that the offering groups, and the list of that role's offerings will be re-ordered automatically at the top of the Offerings column.
Results
The offering's details are displayed like a tooltip.

Identity Management – IM User Guide
© ACTICO GmbH 89/122
Clicking the pin icon, which is revealed by moving the mouse pointer over the offering cell, will highlight all roles and permissions assigned to the offering. In addition, the related elements will move to the upper part of the corresponding column and the total number of elements assigned to the pinned one will be displayed at the foot of the column.
2.12.3 Update an Offering
Preconditions
You will need to be logged in (e.g. as the DEFAULT Admin) and have permission to update offerings.
Procedure Description
1. Click the icon in the left area of the offering's cell in the Offerings column.
2. The offering's details appear in read-only format as they were entered when the offering was created.
3. Click Edit to change the content of any of the fields. Our example shows how to change the applicable scope and how to provide a German offering description.
4. Resume the dialog by using the buttons at the bottom of the form (as explained for Create an Offering).
Results

Identity Management – IM User Guide
© ACTICO GmbH 90/122
The updated offering attributes are now stored on the back end. Other IM administrative users will need to refresh their view to see your changes.
Changing the Applicable scope of an offering affects automatically and without further notice ALL tenants connected via tenant relation.
For information on updating the relation to other elements, please see the appropriate section:
Create an Offering-Role assignment
Delete an Offering-Role assignment
Create an Offering-Permission assignment
Delete an Offering-Permission assignment
Create an Offering-Tenant Relation assignment
Delete an Offering-Tenant Relation assignment
2.12.4 Delete an Offering
Preconditions
You will need to be logged in (e.g. as the DEFAULT Admin) and have permission to read and delete tenant relations.
Procedure Description
1. Drag the offering you want to delete.
2. Drop it on the recycle bin
3. A dialog box appears with the option of confirming or canceling the deletion.
4. Click Delete to confirm deleting the offering.
Results
The offering is marked as "deleted" in the back end and will disappear from the default view of the Web UI; it
can now only be found in the recycle bin view ( ). Other IM administrative users will need to refresh their view to see your changes.

Identity Management – IM User Guide
© ACTICO GmbH 91/122
Deleting an offering will not automatically delete the roles and permissions grouped within that offering, but it will automatically delete the potentially existing relations with the roles/permissions and the tenants assigned to the offering. If a user was automatically granted permissions via the offering that has now been deleted, the new restriction will apply immediately (without notifying the user), at the latest when the user next makes a request requiring such a permission.
The IM user interface will not enable you to update or delete the initial set of IM entities (i.e. the IM application itself including its group, roles and permissions, the default domain, tenant, offering, tenant relation) as these are elementary parts of the application and are therefore protected for manipulation. It is also not possible to remove or to create new assignments between IM entities. When trying to manipulate such entities or relations, an Exception will be thrown by the IM server. There are three IM entities which have some special rules:
The default user (Admin) can be updated, deleted and erased. However, in case of deleting this user, make sure another user has the same privileges.
The default tenant (DEFAULT) can be updated but not deleted. The All Users group cannot be updated, deleted or erased.
It is not possible to remove users from this group (all users are assigned) but it is possible to assign roles to this group.
Example when trying to delete the IM application.
2.12.5 Restore an Offering
Preconditions
You will need to be logged in and have permission to read and update offerings.
Procedure Description
1. Open the recycle bin view ( ).
2. Click the offering you want to restore.
3. Drag and drop it on the "restore" area .
4. A dialog box appears with the option of confirming or canceling the restore action.
5. Click Restore to confirm.
Click the following icon to switch back to the default view.
Results
The offering is restored in the back end and will now appear in the default view. Other IM administrative users will need to refresh their view to see your changes.
2.12.6 Delete an Offering permanently
Preconditions
You will need to be logged in and have permission to read and permanently delete offerings.

Identity Management – IM User Guide
© ACTICO GmbH 92/122
Procedure Description
1. Open the recycle bin view ( ).
2. Click the offering you want to delete permanently.
3. Drag and drop it on the "delete permanently" area .
4. A dialog box appears with the option of confirming or canceling the permanent deletion.
5. Click Delete permanently to confirm.
Click the following icon to switch back to the default view.
Results
The offering is permanently deleted from the back end with no option to restore. Other IM administrative users will need to refresh their view to see your changes.
2.12.7 Create an Offering-Role assignment
Preconditions
You will need to be logged in and have permission to create offering-role relations.
The offering and role you want to relate must both pre-exist (otherwise see Create an Offering and Create Role).
Procedure Description
In our example we need to assign the "User Admin" role to the "User Management" offering.
1. Select the role and drop it on the offering with which it should be related.
2. The assignment is not automatically sent to the back end because you might want to create various other relations first and only then synchronize with the back end, all at once. To resume the assignment, use the appropriate link provided in the upper part of the application, or go to your list of outstanding actions and decide whether to proceed or cancel.
3. To complete the assignment click Save changes.
Results
The new offering-role relation is now stored on the back end. Other IM administrative users for the same tenant will need to use the refresh button to see your changes.
To check your work, simply pin one of the related units:
Click the pin icon of the "User Admin" role. The newly-assigned offering is highlighted.

Identity Management – IM User Guide
© ACTICO GmbH 93/122
Click the pin icon of the "User Management" offering. The newly-assigned role is highlighted.
In addition, the related elements will move to the upper part of the corresponding column and the total number of elements assigned to the pinned one will be displayed at the foot of the column.
2.12.8 Delete an Offering-Role assignment
Preconditions
You will need to be logged in and have permission to delete offering-role relations.
The offering-role relation you want to delete must pre-exist (otherwise see Create an Offering-Role assignment)
Procedure Description
The steps to delete the assignment between two elements are pretty much the same for all types of element.

Identity Management – IM User Guide
© ACTICO GmbH 94/122
Just drag one of the related elements and drop it on the "remove assignment" area . Then confirm to save the change.
Results
The removal of the offering-role relation is now stored in the back end. Other IM administrative users for the same tenant will need to use the refresh button to see your changes.
To check your work, simply pin the offering and you will see that the role is no longer related to the offering.
2.12.9 Create an Offering-Permission assignment
Preconditions
You will need to be logged in and have permission to create offering-permission relations.
The offering and the permission(s) you want to connect must both pre-exist.
Procedure Description
In our example the self-generated "User Management" offering is given all permissions for managing users (revealed by the IM application itself). We are assuming there is no such role as "User Admin" that could already group together these permissions.
1. Use "user" as the search criterion in the Permissions column.
2. Select all results and drop them on the offering to which they should be related.
3. The assignment is not automatically sent to the back end because you might want to create various other relations first and only then synchronize with the back end, all at once. To resume the assignment, use the appropriate link provided in the upper part of the application, or go to your list of outstanding actions and decide whether to proceed or cancel.
4. To complete the assignment click Save changes.

Identity Management – IM User Guide
© ACTICO GmbH 95/122
Results
The new offering-permission relations are now stored on the back end. Other IM administrative users for the same tenant will need to use the refresh button to see your changes.
To check your work, simply pin one of the related units:
Click the pin icon of the "User - create" permission. All offerings containing this permission are highlighted.
Click the pin icon of the "User Management" offering. All related permissions (directly or via a role) are highlighted.
In addition, the related elements will move to the upper part of the corresponding column and the total number of elements assigned to the pinned one will be displayed at the foot of the column.
2.12.10 Delete an Offering-Permission assignment
Preconditions
You will need to be logged in and have permission to delete offering-permission relations.
The offering-permission relation you want to delete must pre-exist (otherwise see Create an Offering-Permission assignment)
Procedure Description

Identity Management – IM User Guide
© ACTICO GmbH 96/122
The steps to delete the assignment between two elements are pretty much the same for all types of element.
Just drag one of the related elements and drop it on the "remove assignment" area . Then confirm to save the change.
Results
The removal of the offering-permission relation is now stored in the back end. Other IM administrative users for the same tenant will need to use the refresh button to see your changes.
To check your work, simply pin the offering and you will see that the permission is no longer related to the offering.
2.12.11 Create an Offering-Tenant Relation assignment
Preconditions
You will need to be logged in and have permission to create relations between offerings and tenant relation elements.
The offering and the tenant relation element you want to relate must both pre-exist (otherwise see Create an Offering and Create a Tenant Relation element).
Procedure Description
In our example we need to empower a tenant with the permissions grouped as the "User Management" offering.
1. Drag and drop the offering on the tenant relation element to which it should be related.
2. The assignment is not automatically sent to the back end because you might want to create various other relations first and only then synchronize with the back end, all at once. To resume the assignment, use the appropriate link provided in the upper part of the application, or go to your list of outstanding actions and decide whether to proceed or cancel.
3. To complete the assignment click Save changes.
Result
The new relation between the offering and the tenant relation element is now stored on the back end. Other IM administrative users will need to use the refresh button to see your changes.

Identity Management – IM User Guide
© ACTICO GmbH 97/122
As the scope defined in our example is applicable to the "Data of consuming tenant" (see respective radio button in Create an Offering), all tenants that are assigned to that tenant relation will receive all permissions needed for their own user management. To delegate your own users' management to another tenant that acts on behalf of your tenant, you will need to
Change the applicable scope to "Data of providing tenant" (see Update an Offering) and
Assign the tenant relation to the tenant that should get permission to work on your data (see Create a Tenant Relation-Tenant assignment).
To check your work, simply pin one of the related elements:
2.12.12 Delete an Offering-Tenant Relation assignment
Preconditions
You will need to be logged in and have permission to delete relations between offerings and tenant relation elements.
Procedure Description
The steps to delete the assignment between two elements are pretty much the same for all types of element.
Just drag one of the related elements and drop it on the "remove assignment" area . Then confirm to save the change.
Results
The removal of the assignment between the offering and the tenant relation element is stored in the back end. Other IM administrative users will need to refresh their view to see your changes.
To check your work, simply pin the tenant relation element and you will see that the offering is no longer highlighted.

Identity Management – IM User Guide
© ACTICO GmbH 98/122
Deleting an assignment between an offering and a tenant relation also deletes all implicit assignments of the roles and permissions grouped within the offering assignments to other tenants. If a user was automatically granted permissions via the relation that has now been deleted, the new restriction will apply immediately (without notifying the user), at the latest when the user next makes a request requiring such a permission.

Identity Management – IM User Guide
© ACTICO GmbH 99/122
2.13 Tenant Relation Management
Entities to describe relations between tenants
IM offers increased support for multi-tenancy. In addition to the strict data separation for multiple tenants hosted within the same database, IM also allows the definition of relationships between tenants.
This feature enables tenants to share data and permissions with each other in a controlled way. Thus, a "consumer" tenant so empowered by another one can act on behalf of that "provider" tenant, accomplishing contracts similar to agents.
Within the Web user interface, the following icon is used for a tenant relation .
General structure of a tenant relation
Examples of tenant relations
o Tenant allows another tenant to manage users for him (Principal-Agent Relationship)
o Tenant extends a software service to another tenant (Service Provider-Consumer Relationship)
Offering roles and / or permissions
Propagation of offered roles and permissions
In addition to the strict data separation for multiple tenants hosted within the same database, IM also allows the definition of relationships between tenants.
2.13.1 General structure of a tenant relation
Like all other entities, a tenant relation is owned by a tenant.
This tenant (the providing tenant) can use a tenant relation to offer roles and permissions to other tenants (consuming tenants).
In order to do so, he must assign at least one offering to the tenant relation.
The applicable scope of the assigned offering defines whether the consuming tenant is either:
provided with service access (protected by IM roles and permissions) that he can apply on his own/consumer data (scope is CONSUMER) or
provided with provider data access (scope is PROVIDER) including the necessary service access in order to do so.
Note Scope provider does not include scope consumer, i.e. if a tenant has to manage its own data with a service and the data of another tenant with the same, he has to be provided with the service by the service-owning tenant (scope CONSUMER) and data access by the data-owning tenant (scope PROVIDER).

Identity Management – IM User Guide
© ACTICO GmbH 100/122
The following diagram shows the general structure of a tenant relation, including possible assignments to/between the entities offering, role, and permission.
2.13.2 Examples of tenant relations
Tenant allows another tenant to manage users for him (Principal-Agent Relationship)
This example shows the usage of an IM tenant relation to provide data access to another tenant.
This tenant relation would allow Tenant T_Y (i.e. the Agent) to administrate the users of Tenant T_X (i.e. the Principal).
The applicable scope for the offering is PROVIDER.
To put it another way: Tenant T_Y has the permissions to create, modify, and delete users in the data store of Tenant T_X.

Identity Management – IM User Guide
© ACTICO GmbH 101/122
Tenant extends a software service to another tenant (Service Provider-Consumer Relationship)
This example shows the usage of an IM tenant relation to provide extended service access to another tenant. The service in this example is IM itself and it shows that IM uses the tenant relationships internally as any external application would do.
This tenant relation provides IM permissions from Tenant T_X (i.e. the Service Provider) to Tenant T_Y (i.e. the Service Consumer) to manage further child tenants in addition to the standard offering for user/group/role management.
The applicable scope for the offering is CONSUMER.
To put it another way: Tenant T_Y has the permissions to create, modify, and delete child tenants in its own data store.

Identity Management – IM User Guide
© ACTICO GmbH 102/122
2.13.3 Offering roles and / or permissions
An offering can contain either roles, permissions or a combination of roles and permissions.
With the help of the following table you should be able to find out what fits best for your scenario:
Offering contains
Effect for the consuming tenant When to use
only permissions
He is able to assign the permissions to his users via groups or roles (which he needs to create on his own).
Your application has no standard / useful roles that can be offered.
only roles He is able to assign the roles to his users, thus enableing them to use the role and the contained permissions. He is not able to see or modify the contained permissions.
You want to be able to change contained permissions transparently.
Your application has no permissions (it provides only roles).
roles and permissions
He is able to assign the roles to his users, thus enableing them to use the role and the contained permissions. He is able to assign the permissions to his users via groups or roles (which he needs to create on his own).
This is the most flexible approach but it might not be appropriate when the permissions which are contained in the offered roles are likely to change often.

Identity Management – IM User Guide
© ACTICO GmbH 103/122
2.13.4 Propagation of offered roles and permissions
When roles and permissions are offered to a consuming tenant, this tenant can use these on his own data (scope CONSUMER) or on the data of the providing tenant (scope PROVIDER).
But what happens if the consuming tenant has the permissions required to establish tenant relations and creates one which includes the offered roles or permissions, i.e. somehow forwards the permissions granted to him to third parties?
The following table shows the effects of an offering chain:
Tenant A (T_A) to Tenant B (T_B)
Tenant B (T_B) to Tenant C (T_C)
Scope of the Offering from T_A -> T_B
Scope of the Offering from T_B -> T_C
Effective Roles / Permissions available for T_C
PROVIDER CONSUMER / PROVIDER
T_B is not allowed to use the roles / permissions on his own data and therefore is also not able to propagate them to T_C.
CONSUMER CONSUMER T_B is allowed to use the roles / permissions on his own data but he is not allowed to propagate them to T_C to use the roles/permissions on T_C's data.
CONSUMER PROVIDER T_B is allowed to use the roles / permissions on his own data. T_B is also able to propagate the roles / permissions. As a consequence, T_C is enabled to use them on the data of T_B.
This means that a consuming tenant T_B, which has the permissions required to establish tenant relations, is able to propagate roles and permissions to another tenant T_C. But the latter is only able to use those roles and permissions if they were offered to T_B with scope CONSUMER and were propagated to T_C with scope PROVIDER. All other combinations are not valid, and T_C will therefore not be able to see or use them.
For example:
The application IM is owned by T_A.
T_A allows T_B to create, update, and delete its own users (scope CONSUMER) by an according relationship.
T_B can now give T_C the permission to read its own users (scope PROVIDER), i.e. T_C can read users of T_B.
When a providing tenant (T_A) removes a role / permission from an offering, all direct (T_B) and indirect (T_C) consuming tenants are no longer able to see or use it. The same applies when the tenant relation associated with the offering is or becomes invalid (e.g. end date is reached) or is deleted / erased.
Examples
Further examples to enable workflows beyond a tenant's boundaries
Role assignment via tenant relations (How to delegate a role to another tenant)
Act on behalf of another tenant (How to work on the data of another tenant)

Identity Management – IM User Guide
© ACTICO GmbH 104/122
Share your applications with other tenants (How to offer services)
2.13.5 Create a Tenant Relation element
Preconditions
You will need to be logged in and have permission to create tenant relations.
Procedure Description
1. Click the "add tenant relation" icon .
2. The Tenant Relations column will display a form for completing all the information required to create a tenant relation element.
3. You must complete at least all required fields in the dialog box (marked * )
Note: Although the date picker displays end dates later than 12/31/2037 11:59 PM for selection, no value that exceeds this limitation will be accepted. That is currently the maximum accepted value for TIMESTAMP columns of a MySQL database.
4. Confirm by clicking one of the buttons at the bottom of the dialog box:
a. Save - will display a preview of the entries edited so far. From there you can continue with
i. Edit - to amend your entries
ii. Close - to store the new tenant relation element.
b. Save & Close - will store your entries and display all elements in the Tenant Relations column.
c. Cancel - will ignore the entries and resume the creation dialog, displaying all elements in the Tenant Relations column.
Results

Identity Management – IM User Guide
© ACTICO GmbH 105/122
The new tenant relation element is now available and will be displayed in alphabetical order in the Tenant Relations column.
2.13.6 Create a Tenant Relation-Offering assignment
A description of this procedure is provided in the section Create an Offering-Tenant Relation assignment.
Further examples to enable workflows beyond a tenant's boundaries
Role assignment via tenant relations (How to delegate a role to another tenant)
Act on behalf of another tenant (How to work on the data of another tenant)
Share your applications with other tenants (How to offer services)
2.13.7 Create a Tenant Relation-Tenant assignment
Preconditions
You will need to be logged in and have permission to create relations between tenant relation elements and consuming tenants.
The tenant relation element and the other tenant you want to relate must both pre-exist (otherwise see Create a Tenant Relation element and Create Tenant).
Procedure Description
1. Drag the tenant relation element that should be offered and drop it on the other tenant. In our example, the "Agency" tenant is empowered with the offerings grouped within the tenant relation element "Update my users".
2. The assignment is not automatically sent to the back end because you might want to create various other relations first and only then synchronize with the back end, all at once.
3. To resume the assignment, use the appropriate link provided in the upper part of the application, or go to your list of outstanding actions and decide whether to proceed or cancel.
4. To complete the assignment click Save changes.

Identity Management – IM User Guide
© ACTICO GmbH 106/122
Please Note:
The direction in which you create the assignment (whether you drag and drop the tenant relation element or the consuming tenant) has no impact at all on the "applicable scope". The scope of the tenant's data to which the permissions apply does not depend on the tenant relation element, but on the offering element (see Update an Offering).
Results
The new relation between the tenant relation element and the other tenant is now stored on the back end. Other IM administrative users will need to refresh their view to see your changes.
To check your work, simply pin one of the related units:
Click the pin icon of the newly-assigned tenant relation element. The related tenants and offerings will be highlighted.
Note: The tenant providing the tenant relation displays additionally the icon , identifying him as provider. However the "applicable scope" (i.e. on whose tenants data the permissions will apply) is defined within the offering (see Update an Offering).
Click the pin icon of the newly-assigned tenant. The tenant relation element now also displays the chain icon and is sorted at the top of the Tenant Relations column.
Note: All tenants automatically receive the "IM Default Offering" (provided by the IM application itself) via "IM Tenant Creation Relation".
If the offering included roles and permissions, these are highlighted as well, as the newly-created relation grants them automatically to all members.
In addition, the related elements will move to the upper part of the corresponding column and the total number of elements assigned to the pinned one will be displayed at the foot of the column.
Further examples to enable workflows beyond a tenant's boundaries
Role assignment via tenant relations (How to delegate a role to another tenant)
Act on behalf of another tenant (How to work on the data of another tenant)
Share your applications with other tenants (How to offer services)

Identity Management – IM User Guide
© ACTICO GmbH 107/122
2.13.8 Delete a Tenant Relation element
Preconditions
You will need to be logged in and have permission to read and delete tenant relations.
Procedure Description
1. Drag the tenant relation element you want to delete.
2. Drop it on the recycle bin
3. A dialog box appears with the option of confirming or canceling the deletion.
4. Click Delete to confirm deleting of the tenant relation.
Note: Deleting a tenant relation that was assigned to other tenants - and, thus, provided other tenants' users with roles and permissions (grouped as offerings) - will not delete the offering elements too, but it will delete the assignments between the users and permissions.
Results
The tenant relation is marked as "deleted" in the back end and will disappear from the default view of the
Web UI; it can now only be found in the recycle bin view ( ). Other IM administrative users will need to refresh their view to see your changes.
Deleting a tenant relation also deletes all assignments to offerings and other tenants. If a user was automatically granted permissions via the tenant relation that has now been deleted, the new restriction will apply immediately (without notifying the user), at the latest when the user next makes a request requiring such a permission.
The IM user interface will not enable you to update or delete the initial set of IM entities (i.e. the IM application itself including its group, roles and permissions, the default domain, tenant, offering, tenant relation) as these are elementary parts of the application and are therefore protected for manipulation. It is also not possible to remove or to create new assignments between IM entities. When trying to manipulate such entities or relations, an Exception will be thrown by the IM server. There are three IM entities which have some special rules:
The default user (Admin) can be updated, deleted and erased. However, in case of deleting this user, make sure another user has the same privileges.
The default tenant (DEFAULT) can be updated but not deleted. The All Users group cannot be updated, deleted or erased.
It is not possible to remove users from this group (all users are assigned) but it is possible to assign roles to this group.

Identity Management – IM User Guide
© ACTICO GmbH 108/122
Example when trying to delete the IM application.
2.13.9 Delete a Tenant Relation element permanently
Preconditions
You will need to be logged in and have permission to read and permanently delete tenant relations.
Procedure Description
1. Open the recycle bin view ( ).
2. Click the tenant relation element you want to delete permanently.
3. Drag and drop it on the "delete permanently" area .
4. A dialog box appears with the option of confirming or canceling the permanent deletion.
5. Click Delete permanently to confirm.
Click the following icon to switch back to the default view.
Results
The tenant relation is permanently deleted from the back end with no option to restore. Other IM administrative users will need to refresh their view to see your changes.
2.13.10 Delete a Tenant Relation-Offering assignment
A description of this procedure is provided in the section Delete an Offering-Tenant Relation assignment.

Identity Management – IM User Guide
© ACTICO GmbH 109/122
2.13.11 Delete a Tenant Relation-Tenant assignment
Preconditions
You will need to be logged in and have permission to delete relations between tenant relation elements and other tenants.
Procedure Description
The steps to delete the assignment between two elements are pretty much the same for all types of element.
Just drag one of the related elements and drop it on the "remove assignment" area . Then confirm to save the change.
Results
The removal of the assignment between the tenant relation element and the other tenant is now stored in the back end. Other IM administrative users will need to refresh their view to see your changes.
To check your work, simply pin the tenant, and you will see that the tenant relation element is no longer highlighted.
Deleting an assignment between a tenant relation element and another tenant also deletes all implicit assignments of the roles and permissions (grouped within the offering) to other tenants. If a user was automatically granted permissions via the relation that has now been deleted, the new restriction will apply immediately (without notifying the user), at latest when the user next makes a request requiring such a permission.
2.13.12 Read a Tenant Relation element
Preconditions
You will need to be logged in and have permission to read tenant relations.
Procedure Description
1. The Tenant Relations column displays all elements in alphabetical order.
2. For a quick-view of a tenant relation's details, hover your mouse pointer over the element. A tooltip appears, displaying some of the tenant relation's details.
3. Click the tenant relation's icon to read more details.
4. For a quick-view of the references to other units, click the pin icon, which is revealed by moving the mouse pointer over the tenant relation's cell. Click the pin icon again to clear the highlighting..
5. Alternatively: Use the search field at the top of the Tenant Relations column to quickly find a tenant relation element.
Results
The tenant relation details are displayed like a tooltip.

Identity Management – IM User Guide
© ACTICO GmbH 110/122
Clicking the pin icon, which is revealed by moving the mouse pointer over the tenant relation cell, will highlight all offerings as well as all tenants assigned to the tenant relation in question. In addition, the related elements will move to the upper part of the corresponding column and the total number of elements assigned to the pinned one will be displayed at the foot of the column. See examples in section Create a Tenant Relation-Tenant assignment.
2.13.13 Restore a Tenant Relation element
Preconditions
You will need to be logged in and have permission to read and update tenant relations.
Procedure Description
1. Open the recycle bin view ( ).
2. Click the tenant relation element you want to restore.
3. Drag and drop it on the "restore" area .
4. A dialog box appears with the option of confirming or canceling the restore action.
5. Click Restore to confirm.
Note: Restoring a tenant relation will just make it visible again in the default view, preserving the start and end date as it was at the time of deleting the element, even if the validity period has expired.
Click the following icon to switch back to the default view.
Results
The tenant relation is restored in the back end and will now appear in the default view. Other IM administrative users will need to refresh their view to see your changes.
2.13.14 Update a Tenant Relation element
Preconditions
You will need to be logged in and have reading and writing permission for tenant relations.
Procedure Description
1. Click the icon in the left area of the tenant relation's cell in the Tenant Relations column.
2. The tenant relation's details appear in read-only format as they were entered when the tenant relation was created.
3. Click Edit to change the content of any of the fields. Our example shows how to provide a German description.

Identity Management – IM User Guide
© ACTICO GmbH 111/122
4. Resume the dialog using the buttons at the bottom of the form (as explained for Create a Tenant Relation element).
Results
The updated tenant relation attributes are now stored on the back end. Other IM administrative users will need to refresh their view to see your changes.
For information on updating the relation to other elements, please see the appropriate section:
Create a Tenant Relation-Tenant assignment
Delete a Tenant Relation-Tenant assignment
Create a Tenant Relation-Offering assignment
Delete a Tenant Relation-Offering assignment
2.14 Further examples
2.14.1 Default Roles and Permissions
IM provides very fine-grained permission to read, create, delete, permanently delete, etc. every type of IM element. The user interface enables the administrative users to assign them to custom roles and those to

Identity Management – IM User Guide
© ACTICO GmbH 112/122
users. At the time of writing, IM offers 60 permissions, and groups them into 6 default roles.
However, some of the permissions are only necessary for developers (e.g. "CREATE_INSTANCE_ROLE"), thus, you will find no corresponding actions using the graphical user interface.
An example of how you can compose a tenant-defined role that binds IM permissions is shown in the sections Create Role and Create a Role-Permission assignment.
2.14.2 Default Offerings and Tenant Relations
Identity Management provides the possibility of registering application instances that define offerings which are automatically assigned to all tenants. IM itself offers its permissions to all other tenants, grouping the permissions within the "IM Default Offering" and assigning them to all tenants using the "IM Tenant Creation Relation"
Default Offering
Default Tenant Relation
Default Offering
Example of the "IM Default Offering" that is attributed by default with the applicable scope "Data of consuming tenant"
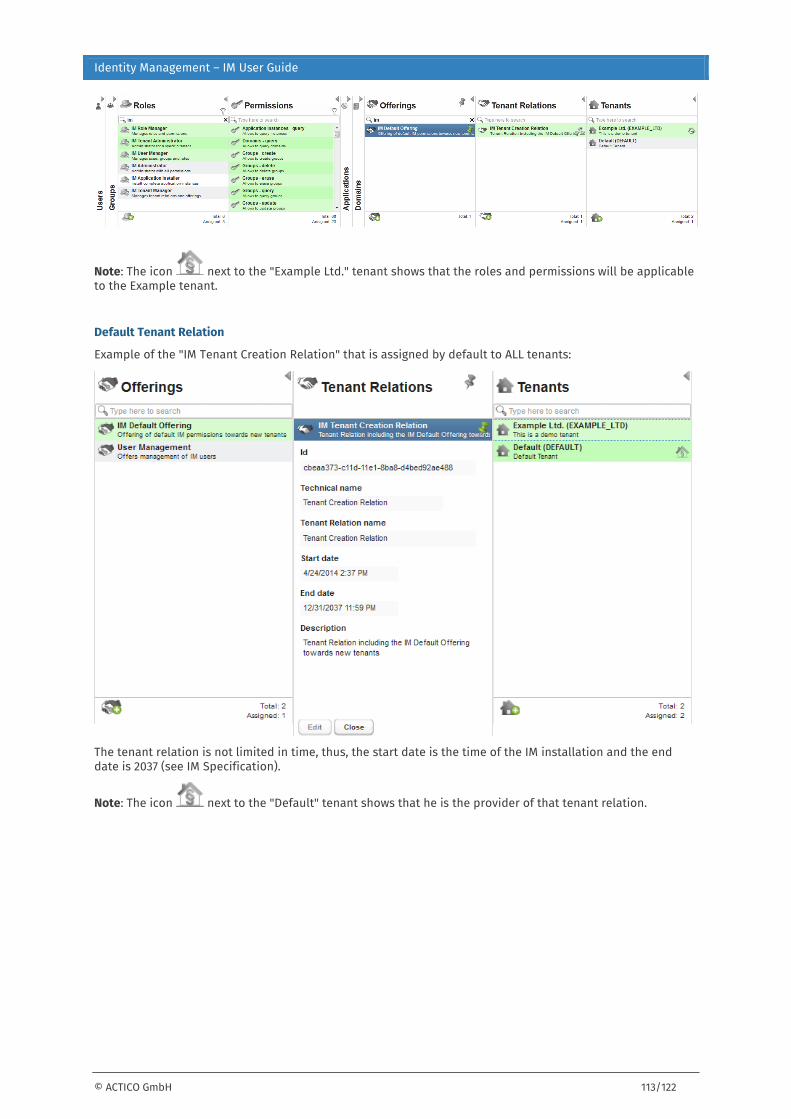
Identity Management – IM User Guide
© ACTICO GmbH 113/122
Note: The icon next to the "Example Ltd." tenant shows that the roles and permissions will be applicable to the Example tenant.
Default Tenant Relation
Example of the "IM Tenant Creation Relation" that is assigned by default to ALL tenants:
The tenant relation is not limited in time, thus, the start date is the time of the IM installation and the end date is 2037 (see IM Specification).
Note: The icon next to the "Default" tenant shows that he is the provider of that tenant relation.

Identity Management – IM User Guide
© ACTICO GmbH 114/122
2.14.3 Role assignment via All Users group
The "All Users" group is created for every tenant automatically and behaves slightly different than common groups.
Within the Web user interface the symbol used for this group is .
As an administrative user, you can add all roles your users will need to this group, thus defining a set of rights which all users of your tenant will be granted automatically.
As soon as a new users is created, he is automatically a member of the "All Users" group and is thus already empowered with the rights defined for this group.
Find details at Group Management.
2.14.4 Role assignment using hierarchical groups
We assume that the following users, hierarchical groups, and roles exist:
1. A role can be assigned to a user either directly or indirectly (via a group). Our example assumes the following group - role assignments:
2. Next, the following users become members of the following groups:
3. These relations enable the users as follows:
o User A
o User B

Identity Management – IM User Guide
© ACTICO GmbH 115/122
o User C
4. Deleting Group 1.1 will also delete its sub-group Group 1.1.1 and all relations these groups were involved in.
Note: Restoring Group 1.1 will not restore Group 1.1.1.

Identity Management – IM User Guide
© ACTICO GmbH 116/122
2.14.5 Role assignment via tenant relations
This example assumes you want to delegate the task of managing user settings to an agency.
A setup similar to this scenario is shown in the section Create a Tenant Relation-Tenant assignment and would allow the "Agency" to act on behalf of the DEFAULT tenant, but restrict the permissions on users' management.
DEFAULT tenant activity
If you want to reproduce the scenario you should complete following steps:
1. Log in as the "Admin" of the "DEFAULT" tenant.
2. Create a role "User Admin".
a. Assign all IM user-related permissions to that role.
b. Assign the permissions to read groups and roles, if you want to enable the agency to relate such elements to a user.
3. Create an offering "User Management" with applicable scope "Data of providing tenant".
4. Assign the "User Admin" role to the offering.
5. Create a tenant relation element "Update my users".
6. Assign the offering to the tenant relation.
7. Create an "Agency" tenant (and automatically its admin user).
8. Assign the "Agency" tenant to the tenant relation.
Results of the Default admin's activity
"DEFAULT" is the provider and "Agency" is the consumer of the tenant relation element "Update my users".
As the only offering involved in that relation is with applicable scope "Data of providing tenant" the users of the "DEFAULT" tenant (i.e. the providing tenant) can be managed.

Identity Management – IM User Guide
© ACTICO GmbH 117/122
Now you can log out the DEFAULT Admin user and change to the Agency's point of view.
Agency tenant activity
1. Log in as the Agency admin user.
2. Pin the admin user to find out which roles he has been assigned so far. As of now, you should have only the (default) "IM Tenant Administrator" role.
3. Assign yourself the "User Manager" role (that was granted by the DEFAULT Admin user via "Update my users" tenant relation in the previous steps).
4. Log out and log in again to get your new identity context (which now includes the new role as well as the permissions assigned to that role).
Results of the Agency admin's activity
The Agency's administrator is granted all the necessary permissions for administrating the entities of its own tenant.
Pinning the new role shows to which tenant's data the permissions are applicable. In our case, the Agency's admin is allowed to manage another tenant's users (i.e. act on behalf of another tenant). The DEFAULT tenant is highlighted and displays the "applicable" icon.
To actually apply the new role to the other tenant's data (namely DEFAULT), select this one from the drop-down list that appears on the upper part of the UI.
After the switch, you can apply the role that was assigned via tenant relations. See Act on behalf of another tenant.

Identity Management – IM User Guide
© ACTICO GmbH 118/122
2.14.6 Act on behalf of another tenant
IM provides the possibility for users to act on behalf of another tenant. This means that if a tenant offers permissions (e.g. to manage its users) with applicable scope PROVIDER, it is possible to switch the identity context to the providing tenant. In that case, users of a consuming tenant (granted with those permissions) are able to see, manipulate, and create data on behalf of the providing tenant (i.e. transparently act as if the user's entity would belong to the other tenant).
Precondition
You will need to log in as a user who has been granted permissions to act on behalf of another tenant.
The corresponding setup is described in section Role assignment via tenant relations.
Procedure description
1. Use the login mask to authenticate (using the tenant's name to which your user belongs).
2. If you are granted permissions that would apply to another tenant's data, the name of that tenant should appear on the upper part of the user interface.
3. Select the tenant you need to work for
4. The context changes immediately, thus, you will see only those entities of the other tenant for which you have permission (in our case all other columns except for the Users column are collapsed, as you have no permission for these entities).
5. Here you can, for example, create a new user.
Results
To leave the context of the tenant you are active for, switch back to your own tenant.
Restrictions Acting on behalf of another tenant cannot be used in nested form. This means that if the tenant on whose behalf you are acting itself has a tenant relation granting permission to work for a third-party, these rights cannot be assigned. Thus, all tenants that delegate permissions need a tenant relation with your tenant.

Identity Management – IM User Guide
© ACTICO GmbH 119/122
2.14.7 Share your applications with other tenants
Preconditions
As the user interface does not support the registration of new applications into IM by simple users, let us assume that the "New Application" has already been installed.
Your task in this example is to enable other tenants to use the "New Application" for themselves.
Procedure description
Create an offering "Use Application" with applicable scope consumer.
Create an assignment between the "New Application" role and the offering.
Create a tenant relation "May use New Application".
Create an assignment between the "Use Application" offering and the tenant relation.
Assign the tenant relation to other tenants.
Results
The consuming tenants now have permission to use the "New Application", including all permissions.
The administrative user of the "Agency" tenant can now empower his users by assigning them the "New Application Role".
The simple permissions defined by the new application are not visible, as they were grouped within the role.

Identity Management – IM User Guide
© ACTICO GmbH 120/122
The output data from using the "New Application" will be stored on the consumer's own database, not on the provider's database.

Identity Management – IM User Guide
© ACTICO GmbH 121/122
Chapter 3 – Glossary
Application / Application Instance
An application is a logical instance (e.g. business application) that defines permissions and roles and uses the IM authentication and authorization services.
Applicable scope
The offering has exactly one applicable scope (ApplicableScope), i.e. the definition of the context in which an offered permission or role is applicable.
Applicable scope PROVIDER: The permissions will affect the data of the providing tenant. Using this scope, the providing tenant can allow other tenants to act on his behalf.
Applicable scope CONSUMER: The permissions will affect the data of the consuming tenant. Using this scope, the providing tenant can allow other tenants to use his applications. The data resulting from using the application will be in the ownership of the consuming tenant.
Authentication A user is authenticated after a successful login, as the existence of the username and the corresponding valid password are found in the IM database.
Authorization A user is authorized for an operation if the appropriate permission is assigned to the user in the IM database.
Domain A domain is an infrastructure element that defines a realm of administrative autonomy, authority, or control within IM.
Element / Entity An element is an entity of IM that contains or receives information. In the case of IM, the User, Group, Role, Tenant, Permission, etc. are regarded as elements/entities. Furthermore, the operations these elements can execute may also refer to entities of a custom application (e.g. application role).
Email template An email template is the pattern for the content of a specific email. Commonly the IM related templates hold text, a hyperlink and placeholders. Placeholders (e.g. the name of the user which will receive the email) can be used within the template, to easy personalizing the email at runtime, before sending the email.
Group A group is regarded as an element within the organizational structure. As a group can have sub-groups, whenever the term group is mentioned in this guide all group hierarchies are referred to as well.
Instance See Application.
Offering An offering is a set of roles and permissions offered by one tenant to another. Thus, the permissions can be spread outside the boundaries of a tenant.
Operation An operation is an executable image of the program, which upon invocation executes some function for the user.
Permissions A permission assigned to a user (by assigning a role) grants the approval for this user to perform an operation.
Relation / Assignment
A relation is created when assigning elements to one another.
E.g. a user can be assigned to a group or a role, thus, becoming related to that element.

Identity Management – IM User Guide
© ACTICO GmbH 122/122
Role A role is a job function within the context of an organization. The associated semantic regards rights and duties (the authority and responsibility) conferred upon the user (or group of users) assigned to that role.
Scope See Applicable scope.
Tenant A tenant is a legal organizational element that is mostly representative of a company. As only one tenant can be active at once, on user login the Identity Management can assign different permission to the same user based on the tenant for which the user is active.
Tenant Relation A tenant relation is an element used to assign an offering to another tenant.
User A user is a human being, a machine, network etc. subscribing to use a part of an application.
User attributes / User Profile
A generic map of attributes which are directly assigned to a user, like a telephone number or an address.
The IM User Profile consists of several user attributes. The key-value pairs which are used in the User Profile are based on the vCard version 4 standard [RFC 6350].