Embed Size (px)
Citation preview

I’m here to deliver the latest rant and rave about Wicked Color’s smokin’ new Wicked Glow White! As an industry professional in digital and traditional media I was intrigued by the op-portunity to rip into Wicked Glow White, Pandora’s box for a whole new look using a sophis-ticated pallet of UV colors. Join me as I have at it. =>
By GEARBOXXX

www.airbrushaction.com | 53
STEP 2I mixed Wicked Opaque White, Wicked Opaque Black, and the new Wicked Glow White (one part each; 1:1:1) to make a 50% UV Grey.
STEP 5I applied the UV Grey with an Anest-Iwata HVLP spray gun with a light first coat. I aimed for 40% coverage on the second coat, 70-80% for the third, and 100% on the final coat. With Wicked Colors the lighter the coat, the better; build them slowly and light.
STEP 8Okay, kids now let’s digitize this beast! I ad-justed my scanner settings to import the im-age at 300-DPI—that should be in Photoshop under FILE–>Import–>and the name of your scanner.
STEP 3I poured the paint in a 2.5-quart bucket, and thoroughly mixed it with a drill with a paint mix-ture attachment. Also, remember to add Wicked Reducer while mixing to attain the desired vis-cosity. *BE CAREFUL!* This could get messy.
STEP 6I finalized the sketch.
STEP 9So, here’s where you want to throw your mouse out the window and get a tablet. I recommend buying any high-end tablet to maximize your pressure sensitive options (the ability to control opacity and thickness of line on your tablet) and capability in any digital illustration program.
STEP 1Alright, time to get rockin’! We have a 60 by 72-inch canvas, pre-gessoed, and ready for paint!
STEP 4To avoid clogging, I strained the Wicked UV Grey before pouring it into the airbrush. Clogging means downtime, and you want to avoid that to keep the job rockin’!
STEP 7I used a combination of gouache, AB brand black marker with a brush tip, and Blue Lake colored pencil by Prisma Color. Then, I highlighted the eyes and nose area with Wicked White.
54 | AIRBRUSH ACTION | SEPTEMBER–OCTOBER 2011
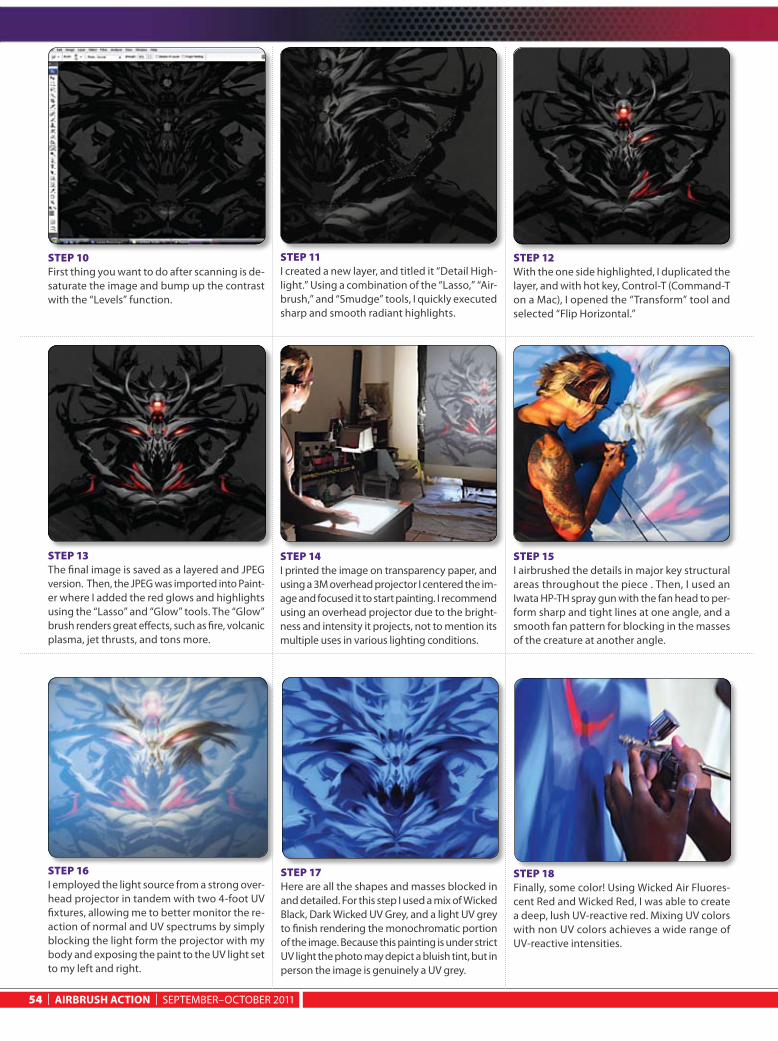
STEP 11I created a new layer, and titled it “Detail High-light.” Using a combination of the “Lasso,” “Air-brush,” and “Smudge” tools, I quickly executed sharp and smooth radiant highlights.
STEP 14I printed the image on transparency paper, and using a 3M overhead projector I centered the im-age and focused it to start painting. I recommend using an overhead projector due to the bright-ness and intensity it projects, not to mention its multiple uses in various lighting conditions.
STEP 16I employed the light source from a strong over-head projector in tandem with two 4-foot UV fixtures, allowing me to better monitor the re-action of normal and UV spectrums by simply blocking the light form the projector with my body and exposing the paint to the UV light set to my left and right.
STEP 12With the one side highlighted, I duplicated the layer, and with hot key, Control-T (Command-T on a Mac), I opened the “Transform” tool and selected “Flip Horizontal.”
STEP 15I airbrushed the details in major key structural areas throughout the piece . Then, I used an Iwata HP-TH spray gun with the fan head to per-form sharp and tight lines at one angle, and a smooth fan pattern for blocking in the masses of the creature at another angle.
STEP 18Finally, some color! Using Wicked Air Fluores-cent Red and Wicked Red, I was able to create a deep, lush UV-reactive red. Mixing UV colors with non UV colors achieves a wide range of UV-reactive intensities.
STEP 10First thing you want to do after scanning is de-saturate the image and bump up the contrast with the “Levels” function.
STEP 13The final image is saved as a layered and JPEG version. Then, the JPEG was imported into Paint-er where I added the red glows and highlights using the “Lasso” and “Glow” tools. The “Glow” brush renders great effects, such as fire, volcanic plasma, jet thrusts, and tons more.
STEP 17Here are all the shapes and masses blocked in and detailed. For this step I used a mix of Wicked Black, Dark Wicked UV Grey, and a light UV grey to finish rendering the monochromatic portion of the image. Because this painting is under strict UV light the photo may depict a bluish tint, but in person the image is genuinely a UV grey.

www.airbrushaction.com | 55
STEP 20I applied the translucent light-orange color for a nice subtle glow around the third eye and nose area. I didn’t need too much for this step; some-times, less is more.
STEP 23All the key areas that warranted the most in-tense glow were solidly filled in with Wicked Opaque White.
STEP 25Here, I airbrushed a mixture of fluorescent yel-low and Wicked Glow White to achieve the next color.
STEP 21With a pure UV red, I started punching up some of the key areas that I wanted to call attention to.
STEP 24Notice that, under full UV lighting, the hottest areas of the piece have no UV-reactiveness whatsoever. Once again, Wicked Opaque White is the perfect foundation for the subsequent colors to bounce off of.
STEP 27Still using a paintbrush, I mixed Wicked Glow White and fluorescent yellow, matched the de-sired color from the previous step, added a bit of reducer, and got ready to fire up this puppy!
STEP 19I airbrushed a nice washed out sci-fi glow around the third eye and nose area using a mix of Wick-ed Gear White, Wicked Fluorescent Orange, and transparent base. I reduced this quite a bit and added the transparent base to maintain the body, and to apply a very translucent layer.
STEP 22With a mix of Wicked Opaque White and a bit of reducer I airbrushed a white base for the most intense glow area of the piece. This allows me to glide the paint on and achieve sharp, clean edges. You will definitely want to apply three or four coats for a nice solid base.
STEP 26Here, I used a paintbrush with a dab of fluo-rescent yellow and Wicked Glow White. This technique conserves paint and lends itself to the perfect combination of color and desired effect.

56 | AIRBRUSH ACTION | SEPTEMBER–OCTOBER 2011
STEP 29I completed the highlights for the eyes, third eye, and nasal area.
STEP 32The UV light resulted in a completely undesir-able effect, but don’t worry kids, this is quickly going to change. This is where we start hitting this out of the ball park!
STEP 34I used a combination of fingers and different parts of my hand to achieve a soft, semi-organic mask versus free-hand templates. Often when painting, I use my hand—formed in different shapes—for masking. This may seem unortho-dox, but it’s effective.
STEP 30Some of the tight details come into play here. Using a Iwata Micron C airbrush and free-hand templates I rendered the highest level of details with Wicked Air Opaque White. Again, I estab-lished a detailed Wicked Opaque White base for the brand new super hot Wicked Glow White.
STEP 33The side-by-side comparison with step 32 shows the dramatic difference between the Wicked Glow White and the opaque white. Once again, the Wicked Opaque White provides the perfect springboard from which Wicked Glow White jumps at you.
STEP 36This piece really pops off the canvas. This paint gives us the ability to create a new, stylized, and even sophisticated approach to art. I’m very curious to see what you come up with. And remember, you are what the universe is doing. Now go paint! n
STEP 28I went back over the white base with color from the previous step and added glow effects to the key areas to attract the viewer’s eyes to the major highlights, details, and focal point of the illustration.
STEP 31The painting is lit with a combination of UV and normal lighting. Notice how the final white high-light pops intensely under the normal light.
STEP 35Okay, kids, here’s the final piece, a dazzling dem-onstration of the use and combination of UV and non-UV colors. Also, the effects hold up under non-UV and UV lighting conditions.

>> E-mail your results to [email protected] and you may be published in an upcoming gallery in Airbrush Action.
GEARBOXXX’s innovative style has rapidly become highly sought-after, attract-ing quite a diverse range of clients, including Jonathon Davis of the band Korn, and Universal Studios. Gear, a graduate of the Gnomon School of Visual FX, Holly-wood, also freelances as a creature and weapons de-signer for CRYPTARCHY VFX Studios, is currently working with Createx to develop a new florescent color, and has begun work developing instructional tutorials with
Airbrush Action. Gearboxxx’s shop, Air Fusion, is based in Las Vegas. Con-tinually growing and exploring new media, Gear is also trying his hand in the tattoo industry with Redemption Tattoo Family, a custom tattoo shop that specializes in high quality one-of-a-kind pieces.