Embed Size (px)
Citation preview

Radiating Cables RCL/RCH
March 6,2014
INSTALLATION GUIDE


Radiating Cables
ProSoft Technology, Inc. Page 3 of 20 March 6, 2014
Your Feedback Please
We always want you to feel that you made the right decision to use our products. If you have suggestions, comments, compliments or complaints about our products, documentation, or support, please write or call us.
How to Contact Us
ProSoft Technology
5201 Truxtun Ave., 3rd Floor Bakersfield, CA 93309 +1 (661) 716-5100 +1 (661) 716-5101 (Fax) www.prosoft-technology.com [email protected]
Copyright © 2014 ProSoft Technology, Inc., All Rights Reserved.
Radiating Cables Installation Guide
March 6, 2014
ProSoft Technology ®, ProLinx
®, inRAx
®, ProTalk
®, and RadioLinx
® are Registered Trademarks of ProSoft
Technology, Inc. All other brand or product names are or may be trademarks of, and are used to identify products and services of, their respective owners.
ProSoft Technology® Product Documentation
In an effort to conserve paper, ProSoft Technology no longer includes printed manuals with our product shipments. User Manuals, Datasheets, Sample Ladder Files, and Configuration Files are provided from our web site: www.prosoft-technology.com
Disclaimer
This installation manual is provided to help assist in part selection and Radiating Cable installation. Please
contact ProSoft Technology Technical Support to review and assist with your application.

Radiating Cables
Page 4 of 20 ProSoft Technology, Inc. March 6, 2014

Radiating Cables
ProSoft Technology, Inc. Page 5 of 20 March 6, 2014
Contents
Your Feedback Please ........................................................................................................................ 3 How to Contact Us .............................................................................................................................. 3 ProSoft Technology
® Product Documentation .................................................................................... 3
Disclaimer ........................................................................................................................................... 3
1 Start Here 7
1.1 Safety ........................................................................................................................ 7
2 Slot Orientation for Radiating Cables 9
3 Installing Radiating Cable 11
3.1 Installing the Clip Hanger ........................................................................................ 12 3.2 Installing the Clic Clamp .......................................................................................... 12
4 Cable Termination 13
5 Cable Hanging and Fixing 15
5.1 Bending RF Cables ................................................................................................. 15 5.2 Connector Installation for Radiating Cables ½-inch ................................................ 16 5.3 Radiating Cable Positioning in Tunnels .................................................................. 17
6 Support, Service & Warranty 19
6.1 Contacting Technical Support ................................................................................. 19 6.2 Warranty Information ............................................................................................... 20


Start Here
ProSoft Technology, Inc. Page 7 of 20 March 6, 2014
1 Start Here
1.1 Safety
Please use proper safety guidelines when installing Radiating Cable. This can be achieved by:
Cordoning-off the Working Area using:
Warning Signs
Warning Cones
Warning Lights
Warning Tape
Keeping Emergency Access and Emergency Routes Clear of:
Materials
Tolls
Vehicles
Taking proper Fire Precautions by ensuring that easily inflammable materials should be:
Kept to a minimum
Disposed of immediately if not necessary
Brought into the area only in the amount required
Caution: You must be able to complete the application without exposing personnel or equipment to unsafe or inappropriate working conditions.


Slot Orientation for RC Cables
ProSoft Technology, Inc. Page 9 of 20 March 6, 2014
2 Slot Orientation for Radiating Cables
Radiating Cable is constructed with slots. These slots must be oriented toward the area requiring coverage. The slots are located 180° opposite to an embossed line on the jacket.
The diagram below shows the electric field lines in various installations.
Embossed Line
RF Signal


Cable Hanging and Fixing
ProSoft Technology, Inc. Page 11 of 20 March 6, 2014
3 Installing Radiating Cable
The RC cable is mounted with hangers. A hanger should be mounted every 3 feet (1 meter). Every 33 feet (10 meters), the hanger should be fire resistant.
The recommended hangers are the Clip Hander (fire resistant) and Clic Clamp.
There are multiple installation options for the Clip Hanger and Clic Camp possible, depending on your environment. Contact ProSoft Technology for more information.
Cable Hanging and Fixing
Page 12 of 20 ProSoft Technology, Inc. March 6, 2014
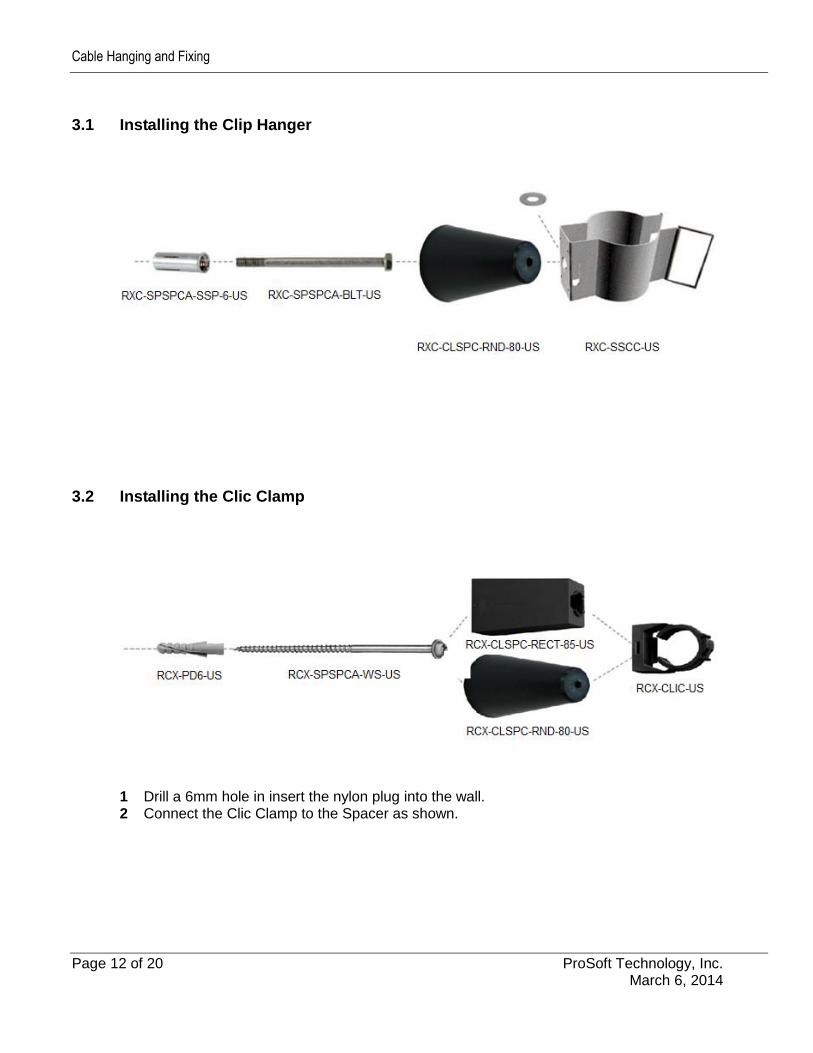
3.1 Installing the Clip Hanger
3.2 Installing the Clic Clamp
1 Drill a 6mm hole in insert the nylon plug into the wall. 2 Connect the Clic Clamp to the Spacer as shown.
RXC-SSCC-US
Cable Hanging and Fixing
ProSoft Technology, Inc. Page 13 of 20 March 6, 2014
4 Cable Termination
Radiating Cable must be terminated. Use ProSoft Technology part number RLX-LFTR-40 to terminate the cable.
Cable Hanging and Fixing
Page 14 of 20 ProSoft Technology, Inc. March 6, 2014

Cable Hanging and Fixing
ProSoft Technology, Inc. Page 15 of 20 March 6, 2014
5 Cable Hanging and Fixing
5.1 Bending RF Cables
Care should be taken when bending RF cables. The following diagram shows the right and wrong way to bend cable. Bending the wrong way may cause damage to the cable.

Cable Hanging and Fixing
Page 16 of 20 ProSoft Technology, Inc. March 6, 2014
5.2 Connector Installation for Radiating Cables ½-inch

Radiating Cable Positioning in Tunnels
ProSoft Technology, Inc. Page 17 of 20 March 6, 2014
5.3 Radiating Cable Positioning in Tunnels

Service, Support, and Warranty
ProSoft Technology, Inc. Page 18 of 20 March 6, 2014

Radiating Cables ♦ Error! No text of specified style in document. Support, Service & Warranty RCL/RCH Installation Guide
ProSoft Technology, Inc. Page 19 of 20 March 6, 2014
6 Support, Service & Warranty
6.1 Contacting Technical Support
ProSoft Technology, Inc. (ProSoft) is committed to providing the most efficient and effective support possible. Before calling, please gather the following information to assist in expediting this process:
1 Product Version Number 2 System architecture 3 Network details
If the issue is hardware related, we will also need information regarding:
1 Module configuration and associated ladder files, if any 2 Module operation and any unusual behavior 3 Configuration/Debug status information 4 LED patterns 5 Details about the serial, Ethernet or fieldbus devices interfaced to the module,
if any.
Note: For technical support calls within the United States, an after-hours answering system allows 24-hour/7-days-a-week pager access to one of our qualified Technical and/or Application Support Engineers. Detailed contact information for all our worldwide locations is available on the following page.

Support, Service & Warranty
Page 20 of 20 ProSoft Technology, Inc. March 6, 2014
Internet Web Site: www.prosoft-technology.com/support
E-mail address: [email protected]
Asia Pacific
(location in Malaysia)
Tel: +603.7724.2080, E-mail: [email protected]
Languages spoken include: Chinese, English
Asia Pacific
(location in China)
Tel: +86.21.5187.7337 x888, E-mail: [email protected]
Languages spoken include: Chinese, English
Europe
(location in Toulouse, France)
Tel: +33 (0) 5.34.36.87.20,
E-mail: [email protected]
Languages spoken include: French, English
Europe
(location in Dubai, UAE)
Tel: +971-4-214-6911,
E-mail: [email protected]
Languages spoken include: English, Hindi
North America
(location in California)
Tel: +1.661.716.5100,
E-mail: [email protected]
Languages spoken include: English, Spanish
Latin America
(Oficina Regional)
Tel: +1-281-2989109,
E-Mail: [email protected]
Languages spoken include: Spanish, English
Latin America
(location in Puebla, Mexico)
Tel: +52-222-3-99-6565,
E-mail: [email protected]
Languages spoken include: Spanish
Brasil
(location in Sao Paulo)
Tel: +55-11-5083-3776,
E-mail: [email protected]
Languages spoken include: Portuguese, English
6.2 Warranty Information
For complete details regarding ProSoft Technology’s TERMS & CONDITIONS OF SALE, WARRANTY, SUPPORT, SERVICE AND RETURN MATERIAL AUTHORIZATION INSTRUCTIONS please see the documents on the Product DVD or go to www.prosoft-technology/warranty
Documentation is subject to change without notice.