Embed Size (px)
Citation preview
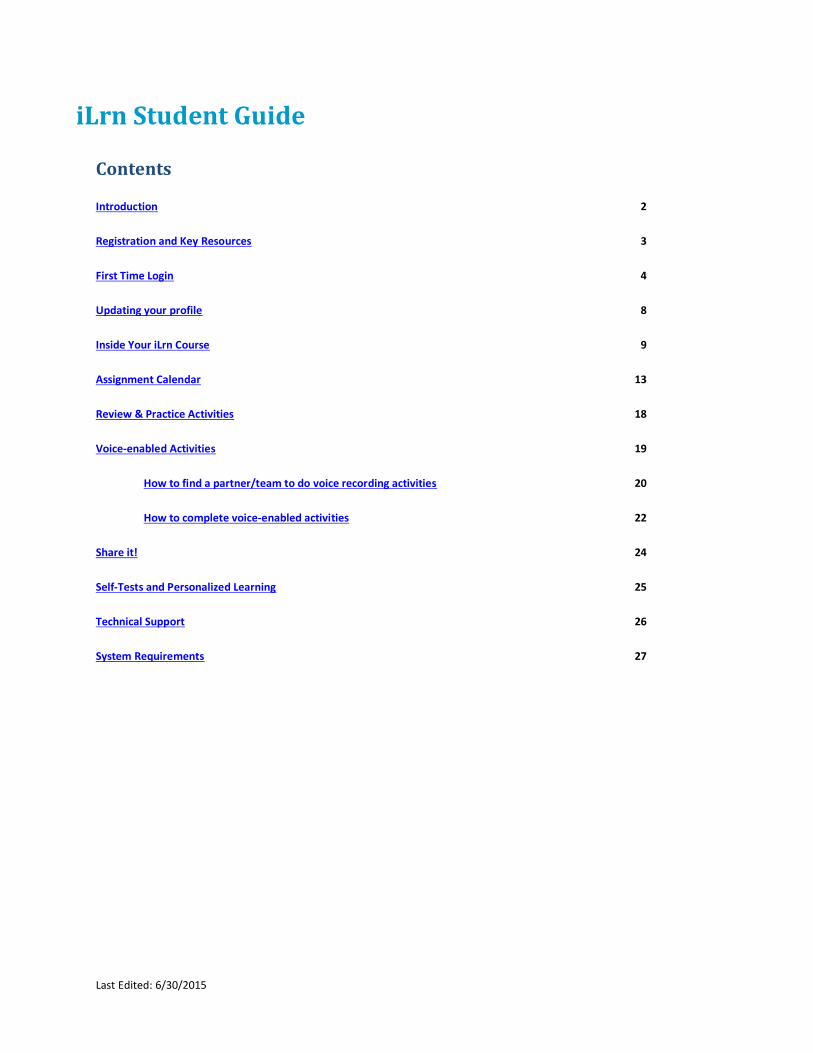
Last Edited: 6/30/2015
iLrn Student Guide
Contents
Introduction 2
Registration and Key Resources 3
First Time Login 4
Updating your profile 8
Inside Your iLrn Course 9
Assignment Calendar 13
Review & Practice Activities 18
Voice-enabled Activities 19
How to find a partner/team to do voice recording activities 20
How to complete voice-enabled activities 22
Share it! 24
Self-Tests and Personalized Learning 25
Technical Support 26
System Requirements 27

iLrn Student Guide Page 2 of 27
Introduction
Congratulations on working with a Cengage Learning book! iLrn is an easy-to-use platform that was developed specifically to
support your language learning. The system gives immediate feedback when you complete activities, provides you with a
personalized study plan via the Self Tests, and gives you access to a wealth of data about your performance, enabling you to
learn more effectively.
iLrn setup is quick and requires only that you have the Student Book Key you purchased bundled with your textbook or online.

iLrn Student Guide Page 3 of 27
Registration and Key Resources
Whether you’re logging in for the first time or returning to your course, you begin at the iLrn
homepage:
http:www.cengage.com/ilrn
To go to the login page, click the red Sign in button in the upper right-hand corner.
To see short videos that demonstrate key aspects and uses of iLrn, click the Training & Support tab in the middle of the tan
navigation bar.
iLrn Student Guide Page 4 of 27
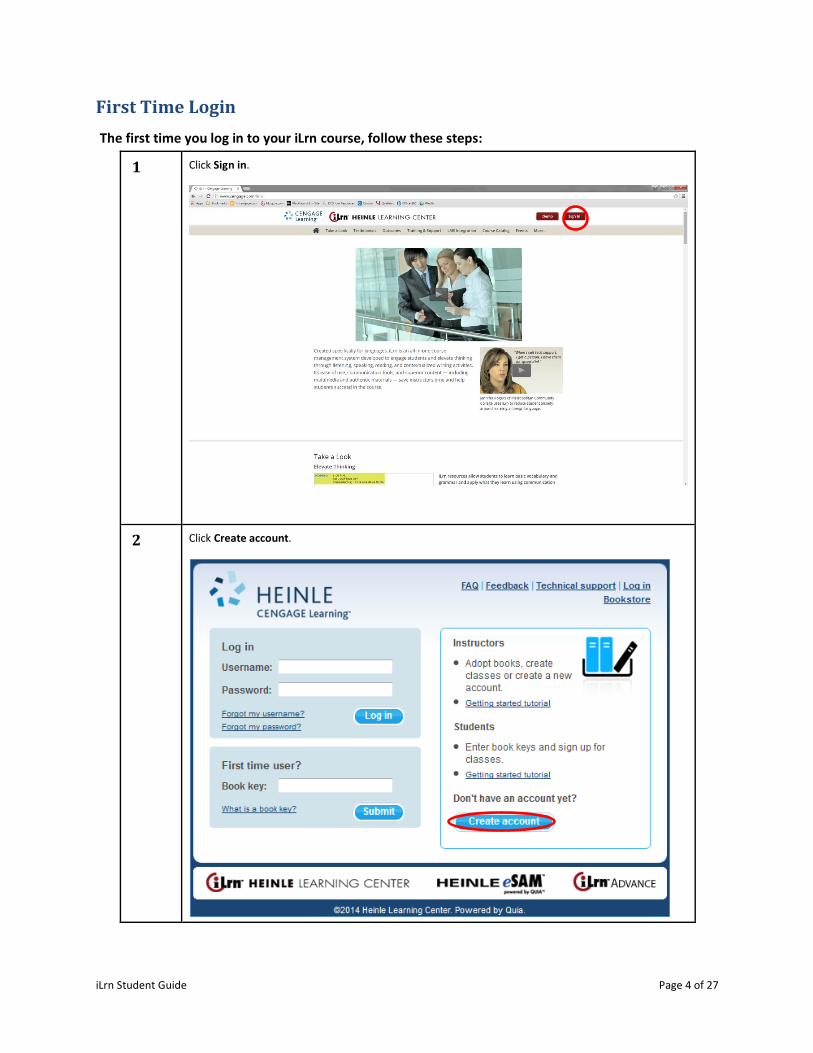
First Time Login
The first time you log in to your iLrn course, follow these steps:
1 Click Sign in.
2 Click Create account.

iLrn Student Guide Page 5 of 27
3 Enter your user information and click Submit.
4 You are prompted to enter your 16-character Book Key. You will find your Book Key printed inside the
sleeve that came bundled with your book or you can purchase an Instant Access Book Key from
cengagebrain.com. Click Go.
NOTE: If you do not yet have a book key when registering for iLrn, skip to Step 5. You can purchase a
book key or access a 3-week trial after logging in.

iLrn Student Guide Page 6 of 27
5 Your book also requires an instructor’s Course Code. Get the course code from your instructor to gain
access to your course. If you already have it, enter it when prompted. Otherwise you can enter it the
next time you log in. NOTE: If you are accessing via a Blackboard Learn linked course you will not need
a Course Code.
6 To access your book after you have added it to your account, return to the iLrn homepage, click Login,
enter your username and password, and then click Log in. This will take you to the Student
Workstation.

iLrn Student Guide Page 7 of 27
7 Click on your book’s cover to access your iLrn course materials.

iLrn Student Guide Page 8 of 27
Updating your profile
When creating your iLrn: Heinle Learning Center account, the information you enter, such as your
name and email address, is saved in your profile.
Step Action
1 Login to the Student Workstation and click Profile in the upper right corner of your screen.
2 Update the information and click Save changes.
Make sure your email address is current in your profile, as IXL/Quia, Cengage Learning’s partner in iLrn
development, uses this email address to respond to technical support questions and provide
forgotten username/password information.

iLrn Student Guide Page 9 of 27
Inside Your iLrn Course
Once you have clicked on your book’s cover to enter iLrn, you will see the iLrn interface:
Function Looks like this…
Every page of iLrn
is designed to give
you quick access
to all of the
resources
available for your
course. The tabs
on the right side
each link to key
resources to
support your
language learning.
The Assignment
Calendar is where
you can access all
of your
assignments. You
can locate your
assignments by
due date (as to
the right) or
chapter (as
above).

iLrn Student Guide Page 10 of 27
Function Looks like this…
The eBook is a
page-for-page
electronic
reproduction of
the printed book
that features
embedded audio,
video, as well as
note-taking and
highlighting
capabilities. You
can also complete
textbook activities
directly from the
eBook pages.
The Activities tab
allows you to
locate all activities
(both textbook
and Student
Activities
Manual).
iLrn Student Guide Page 11 of 27
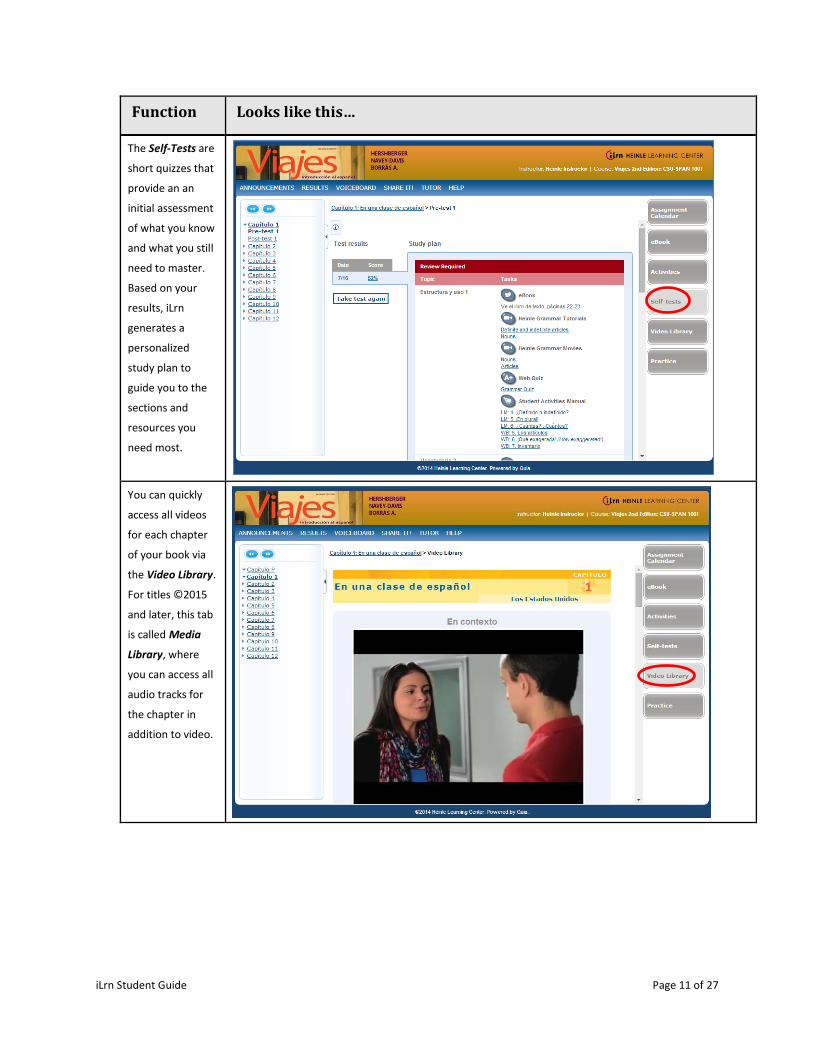
Function Looks like this…
The Self-Tests are
short quizzes that
provide an an
initial assessment
of what you know
and what you still
need to master.
Based on your
results, iLrn
generates a
personalized
study plan to
guide you to the
sections and
resources you
need most.
You can quickly
access all videos
for each chapter
of your book via
the Video Library.
For titles ©2015
and later, this tab
is called Media
Library, where
you can access all
audio tracks for
the chapter in
addition to video.

iLrn Student Guide Page 12 of 27
Function Looks like this…
The Practice tab
provides access to
a variety of
additional
activities and
study tools, such
as flashcards,
grammar
tutorials, auto-
graded quizzes,
etc. All of these
resources are also
linked at the point
of use in the
eBook.
iLrn Student Guide Page 13 of 27
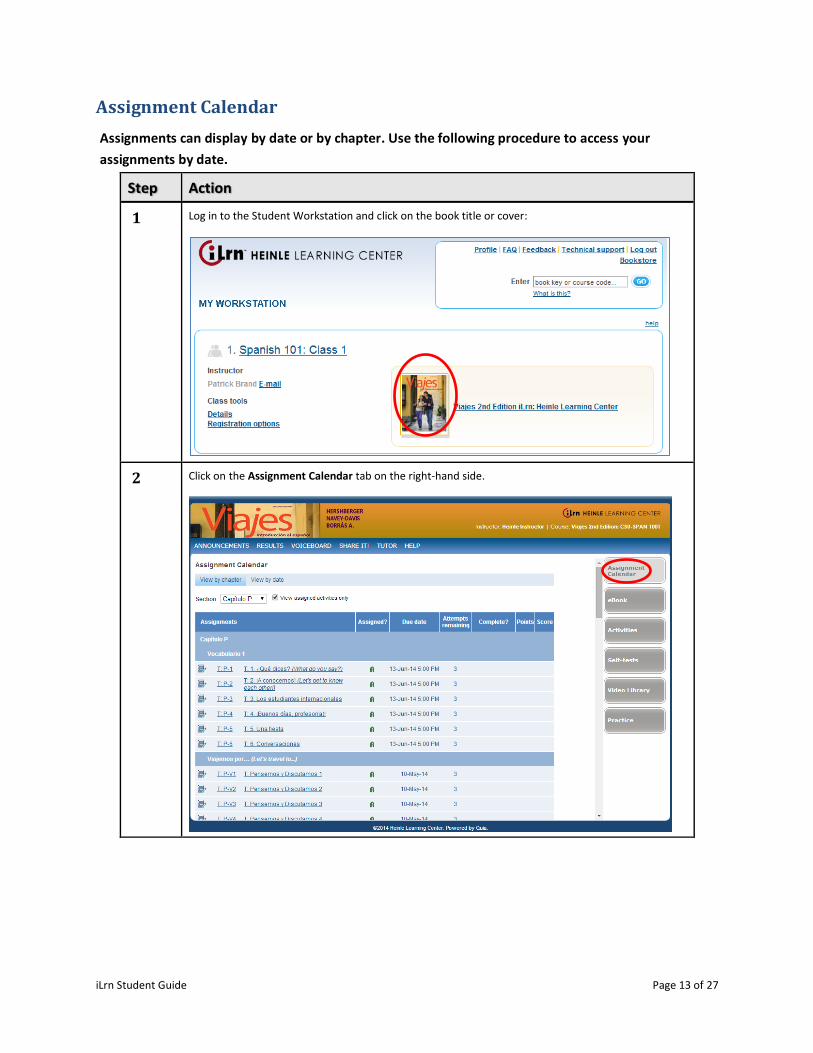
Assignment Calendar
Assignments can display by date or by chapter. Use the following procedure to access your
assignments by date.
Step Action
1 Log in to the Student Workstation and click on the book title or cover:
2 Click on the Assignment Calendar tab on the right-hand side.
iLrn Student Guide Page 14 of 27
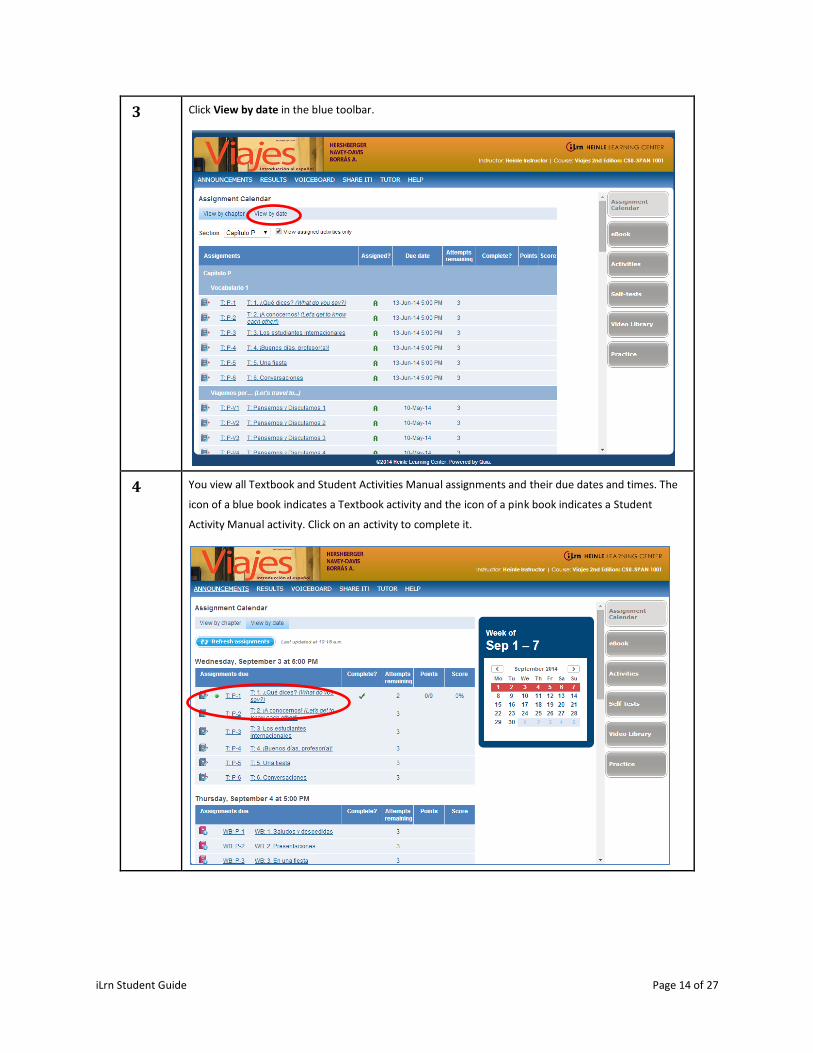
3 Click View by date in the blue toolbar.
4 You view all Textbook and Student Activities Manual assignments and their due dates and times. The
icon of a blue book indicates a Textbook activity and the icon of a pink book indicates a Student
Activity Manual activity. Click on an activity to complete it.

iLrn Student Guide Page 15 of 27
5 You can also check your grades on completed assignments. Green dots to the left of the activity title
indicate that the assignment has been graded, either by the computer or by your instructor. Red dots
indicate that the activity has not yet been graded by your instructor.
6 To see assignments for previous or future weeks, select a date from the calendar for the date you
wish to view.

iLrn Student Guide Page 16 of 27
Use the following procedure to access your assignments by chapter.
Step Action
1 Click on the Assignment Calendar tab on the right-hand side.
2 Click View by chapter in the blue toolbar.
iLrn Student Guide Page 17 of 27
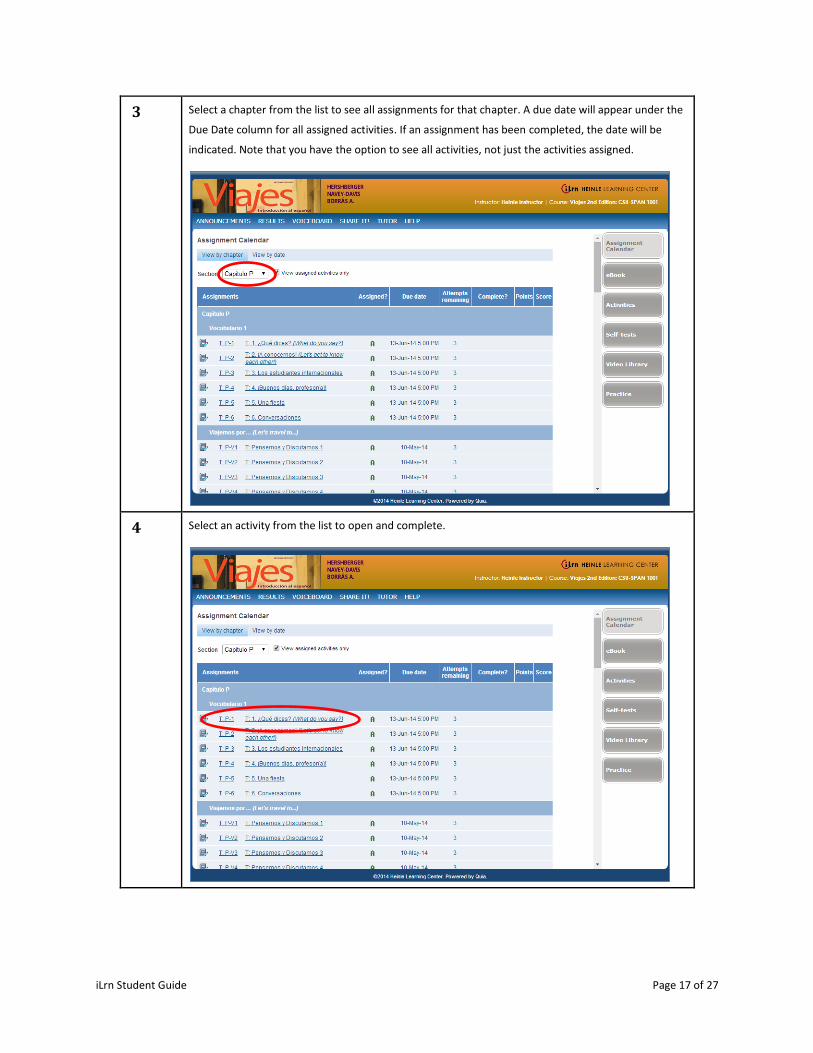
3 Select a chapter from the list to see all assignments for that chapter. A due date will appear under the
Due Date column for all assigned activities. If an assignment has been completed, the date will be
indicated. Note that you have the option to see all activities, not just the activities assigned.
4 Select an activity from the list to open and complete.

iLrn Student Guide Page 18 of 27
Review & Practice Activities
With enhanced feedback, students are given additional support. At the end of each chapter students will find additional auto-
graded grammar activities with specific explanations to their answers. This way, students are given direct support and guidance
while practicing.
Example:
The Review It! button appears with grammar and vocabulary activities and links to relevant resources in the eBook and Student
Activities Manual. Located next to the accent toolbar in an activity, you’ll see links to eBook pages covering relevant lessons,
flashcards for vocabulary terms, tutorials that review grammar lessons, and other iLrn resources. These links are all in one place
and they give you the practice you need to grasp the material.

iLrn Student Guide Page 19 of 27
Voice-enabled Activities
Voice-enabled activities can be completed alone, with a partner, or with a group. You can talk to your partner or team and
write instant messages to plan your responses together, then record a conversation that your instructor will grade. Please note
that voice-enabled activities do not work on mobile devices at this time.
Tips for setting up your computer:
Microphone — The latest browser versions and Adobe Flash work best with USB (Universal Serial Bus) connected
microphones. Internal microphones, WebCam microphones, and the older stereo-jack (male connection)
microphones can be problematic and may not provide the quality needed for effective comprehension and grading.
Adobe Flash — You should have the latest version of Adobe Flash installed. Also make sure your Flash settings are
configured on your web browser for the program to recognize the microphone being used for Voiceboard. To this
follow this steps:
o Open a voiceboard exercise and right-click on the Record button. Select Settings.
o At the bottom of the menu, click the second tab from the left (it looks like a monitor with an eye on it).
Make sure the Allow option and the Remember check box are selected.
o Click the fourth tab (the one with a microphone on it). Make sure the record volume is up all the way and
the correct microphone is selected from the drop-down list.
Lab environment— In a “Lab” environment, your IT department needs to make sure that the network port “1935” is
enabled for voice. If this port is disabled on the school’s network your voice recording will not function.

iLrn Student Guide Page 20 of 27
How to find a partner/team to do voice recording activities:
Step Action
1 Click on Voiceboard at the top of the Welcome page.

iLrn Student Guide Page 21 of 27
2 From the Voice activities dropdown list, select the activity you want to complete.
3 If you need a partner, click the Find a partner link at the top of the Partner Record and Chat box. This
will take you to the partner switchboard where you can invite someone online to partner with you.
4 If you are working with one partner, his or her name will appear at the top of the Partner Record and
Chat box.
5 If the assignment requires you to work in teams, you will either need to join an existing team, or invite
others to join you. To join an existing team, check the Partnership/Team column and find the name of
a person whose team you would like to join. Click his/her name and send him/her a private chat to
request and invitation.
6 To form your own team, find an available partner from the Partnership/Team column, click his/her
name and the Invite to partner link. To add more team members, click their names and the Invite to
team link. Note that if you have four teammates, you cannot invite more – teams are restricted to five
members.

iLrn Student Guide Page 22 of 27
How to complete voice-enabled activities:
Step Action
1 To send instant messages to your partner or team, type in the text box and press Send or press the
Enter key.
2 To talk to your partner or team before recording, press the Talk to your partner button. Make sure
that you and your partner have microphones and a headset or speakers, and that the volume is
turned on. Note: Your partner cannot speak to you or hear what you say until he or she presses Talk
to your partner as well. Your conversation will not be recorded unless you click the Record button.
3 Coordinate with your partner or team on what you’d like to say. When you’re ready to record the
conversation, press the Record your conversation button. The recording will start ONLY after all
partners or teammates have clicked the Record button. You will know it is recording because a
message in red appears saying “recording...” until someone in the group presses Stop recording.

iLrn Student Guide Page 23 of 27
4 Press Stop when you want to stop recording. You can still talk with your partner or team when the
recording stops.
5 To listen to your recording, press Play. You can pause the recording at any time by pressing Pause. If
you are not satisfied with your recording, you may record again. Each recording is saved and you can
choose which recording (from a drop-down list) you want to submit.
6 When you are satisfied with your recording, press Submit answers to submit your recording to your
instructor for grading. Note: Each partner must select a recording and click the Submit button. Anyone
who does not will not submit a recording for grading.
7 If you can’t find a partner or team, you can record answers on your own. Click Record to record your
voice, then stop the recording and submit it when you’re done. Check with your instructor to see if an
individual recording is acceptable, since these activities are designed to be done with a partner.

iLrn Student Guide Page 24 of 27
Share it!
The Share It! feature allows you to upload a file, image or video to the Share It! community for your class where your
classmates can comment and rate your file. You can make comments on your classmates’ files as well, including audio
comments.
Your instructor may assign Share It! activities. These will be prompts asking you to upload a file to complete the assignment.
When you submit the activity, it will go to the gradebook for your instructor to assign a grade. It will also publish directly the
Share It! tab.

iLrn Student Guide Page 25 of 27
Self-Tests and Personalized Learning
You may take an online self-test before or after working through a specific chapter to get an initial assessment of what you
know and what you still need to master. Your results are graded automatically and displayed according to learning outcomes. A
Personalized Study Plan, based on the automatically graded test, directs you to additional study aids available in iLrn: Heinle
Learning Center, including Student Activities Manual activities and pages in the eBook that focus your efforts and study time on
the areas where you need the most help.
Pre-Test (What Do I Know?) provides an evaluation of what you already know.
Personalized Study Plan (What Do I Need to Learn?) provides a focus for your work. Chapter sections and additional study
materials are chosen to cover concepts that you had problems with in the pre-test.
Post-Test (What Have I Learned?) provides an evaluation of what you have learned after working through the personalized
study plan.

iLrn Student Guide Page 26 of 27
Technical Support
Visit http://books.quia.com/support
View FAQs at http://books.quia.com/help/books/faq.html for immediate answers to common problems.
Send an e-mail to [email protected]
Call Toll-free 1-877-282-4400 (Ext 2), Monday-Friday, 7am-5pm Pacific Time

iLrn Student Guide Page 27 of 27
System Requirements
You need one of the following operating systems for iLrn:
Microsoft®
o Windows 98
o NT, 2000
o ME
o Windows XP
o Windows VISTA
o Windows 7
o Windows 8
Macintosh OS X
You need one of the following browsers:
Internet Explorer 7.x or higher (Windows only)
Firefox version 3.x or higher
Safari 3.x or higher (Mac only)
Additional Requirements
A high-speed connection with throughput of 256 Kbps or more is recommended to use audio and video components.
Screen resolution: 1024 x 768 or higher
CPU: 233MHz
RAM: 128MB
Flash Player 10 or higher
You will need speakers or a headset to listen to audio and video components, and a microphone is necessary for
recording activities.