Embed Size (px)
Citation preview

IGCSE ICT
Section 11 – Data Manipulation
Microsoft Access Skills Booklet
Mr Nicholls
Cairo English School

Mr Nicholls
Page | 2 Data Manipulation
Document Production
Contents
Learning Outcomes…………………………………………………………………………………. Page 3
In this section you will learn how to:
Understand database structures Create a database from an existing data file Define database structures Enter different forms of data into a database Search for subsets of data Produce a report Export data and reports to use within another package Use formulae within a database Sort data within a database
For this section you will need these source files from your teacher:
CARS.CSV
STATIONARY.CSV

Mr Nicholls
Page | 3 Data Manipulation
11.1 - Understanding Database Structures
Databases work by storing data using a system of files, records and fields. These are
described below:
• Field:
A field is a single item of data (like a name or a date of birth). Each field has a
fieldname which is used to identify it within the database.
Each field is assigned a data type, for example numbers, text or a date.
• Record:
A record is a collection of fields. For example: all of the information about a
person or an item. Records may contain different data types.
• File:
A file (in a database) is an organised collection of records all stored together in
the same location.
For the purposes of this workbook you will be using Microsoft Access.
Access stores its data in the form of tables which are organised by Rows and Columns.
Each row in a table
contains a record.
Each column in the
table represents a
field.

Mr Nicholls
Page | 4 Data Manipulation
11.1a - Field Types
Each field must be assigned a ‘Field Type’. These tell Access how to ‘treat’ and ‘store’
the data for each field.
There are a number of field types that you must learn:
1. Text
Text fields can store characters (letters/symbols) and numeric data (numbers).
Text fields can also store a combination of characters and numbers.
2. Number
Used to store number values that may be used for calculations or other
purposes (like storing peoples ages).
NOTE: Numbers with more than 2 digits should be set to ‘long integer’.
3. Currency
Used for values of money. Access gives you the ability to change the currency
symbol to a wide range of formats (£, $ etc).
4. Date/Time
Used to store dates and times in various formats.
5. Boolean (Yes/No)
Used to store options. For example: Yes/No, True/False etc.

Mr Nicholls
Page | 5 Data Manipulation
11.2 – Creating a Database from an Existing File
How to do it:
Open Microsoft Access.
Click the Office Button followed by New to open the
Blank Database pane on the right-hand side in the
window.
Enter a meaningful File Name: for the database.
For example ‘Cars’ would make sense as this is the
type of information that the database will hold.
Click on and you will be presented with a
new database similar to this:
Task A
You work for a small garage called ‘Dodgy Dave’s Motors’. The garage sells used cars. Using a
database package, import the file ‘CARS.CSV’. Assign the following data types to the fields:
Make Text
Model Text
Colour Text
PPrice Currency/2 decimal places
SPrice Currency/2 decimal places
Year Number/Long Integer
Extras Text
Valet Boolean(Yes/No)
You may add another field as a primary key field if your software requires this.
Save the database.

Mr Nicholls
Page | 6 Data Manipulation
11.2a Importing Data:
To import the file ‘CARS.CSV’ select the External Data tab then click on the
Import Text File icon.
IMPORTANT NOTE: Files saved in .csv format are considered text files. Each data
item is separated from the next by a comma.
This icon opens up the Get
External Data window like this:
Use the button to find
the file ‘CARS.CSV’ .
NOTE: Ensure the top option
button is selected. This ensures
the data is saved in a new table.
Click on .
IMPORTANT NOTE: A large number of students perform poorly in this section of the
exam because they select the bottom option instead of the top
one.

Mr Nicholls
Page | 7 Data Manipulation
The Import Text Wizard window will open.
Select the ‘Delimited’ option. This option
is for data that is separated by a comma
(as is the case in .csv files)
Click on .
For the next part of the wizard make sure
that the Comma option is selected using
the option buttons.
Examine the first row of the data and
decide if it contains the fieldnames that
you need or if it contains the first row of
data.
If the first row contains the fieldnames,
click on the First Row Contains Field
Names tick box. As you tick the box the
first row changes from this to this.

Mr Nicholls
Page | 8 Data Manipulation
Click on to open the Import
Specification window.
Check that all fieldnames and data types match
those specified in the task. In this case the PPrice,
SPrice and Valet fields are not correct. Make the
following changes:
PPrice field needs changing to Currency
SPrice field needs changing to Currency
Valet field needs changing to Boolean
(Yes/No)
To make these changes, click on the Data Type cell
for each of the fields and use the drop-down list to
select the correct options as described in the list
above.
Your completed fields and data types list should
look like the following screenshot.
When all of the changes have been made, click
on .
Select twice.
On the screen where Access is asking you about
a Primary Key you should ensure that you
select the option ‘Let Access add primary key’.
This adds a new field called ID to
the table.
NOTE: Primary Keys ensure that
each record can be uniquely
identified.

Mr Nicholls
Page | 9 Data Manipulation
Click on .
In the Import to Table: box enter ‘tblCars’.
NOTE: This is a meaningful table name. The ‘tbl’ shows you that it is a table and the
‘Cars’ gives an idea of what kind of data is being held.
Click on to import the data and then to close the wizard.
Double click on tblCars to display the imported information which should look like
this:
11.2b Amending Field Properties:
Changes to the field types, or other properties, can be made from the Home
tab. In the Views section, click on the Design View icon.
The task instructed you to set the PPrice field
to 2 decimal places. You can check this by
clicking the left mouse button in the PPrice
field and viewing the number of
Decimal Places in the General tab at the
bottom of the window.
As you can see this is not set to 2 decimal
places but set to ‘Auto’.
Imported
records
tblCars – containing
the imported .csv data

Mr Nicholls
Page | 10 Data Manipulation
Click on the cell containing ‘Auto’
and use the drop-down list to set
this to 2 decimal places.
Repeat this for the SPrice field.
To change the Boolean field so that it
displays ‘Yes’ or ‘No’, click in the Valet
field and in the General tab select the
Format cell.
Use the drop-down list to select the
Yes/No option.
Save the database for later use by
clicking the symbol.
Activity 1
You work for a shop selling office supplies called ‘Easy as ABC’. Import the file ‘STATIONARY.CSV’.
Assign the following data types to the fields:
Code Numeric/Long Integer
Type Text
Description Text
Quantity Numeric/Long Integer
Colour Text
SPrice Currency/2 decimal places
PPrice Currency/2 decimal places
Discount Boolean/Yes No
NOTE: Use the Code Field as your primary key field. Save the database with a suitable name.

Mr Nicholls
Page | 11 Data Manipulation
Imported data should look like this when completed:
11.3 – Entering New Records
How to do it:
Open the database saved in Activity 1.
Double Click on the table name to open the table in Datasheet
View.
Make sure that you can see all of the data stored within the
table by moving the cursor between the fieldnames until it looks like this.
Task B
Open the database file you created during Activity 1.
Add this new car to the database:
Make Model Colour PPrice SPrice Year Extras Valet
Ford Escort Silver 4350 5285 2002 Alarm Central Locking Alloy Wheels
Yes
Save the database.

Mr Nicholls
Page | 12 Data Manipulation
When the cursor looks like the image shown above, Double Click the left mouse
button to automatically adjust the widths of each column.
Scroll down the list of cars until you get to the bottom. Here you should see a blank
entry with a star next to it. This is where you can enter a New Record.
Click the cursor in the Make Cell and then type in ‘Ford’.
NOTE: The new ID number will automatically appear in the ID Field as we set this
field as an AutoNumber type.
Enter the Model, Colour, Year, Extras and Valet in the same way.
For the PPrice and SPrice fields, enter only the numbers and decimal points (if
required). DO NOT enter any other characters such as currency symbols. After
entering the prices, Access will automatically set them to the currency we selected
during table design.
NOTE: Double check your spellings for accuracy by comparing them to the
information given in Task B above. This is very important as you will run into
problems later if anything is inaccurate.
Star indicates where new
entries can be made. Columns resized so that all
information can be read.

Mr Nicholls
Page | 13 Data Manipulation
Completed new entry should look like this:
Save the database for later use by clicking the symbol.
11.4 – Creating New Fields
How to do it:
Open the database and open the table tblCars in Design View.
Move to the empty row below the Valet field
and enter the Fieldname PDate.
In the Data Type box use the drop-down list to
select the Date/Time data type.
Choose the most appropriate Format for the
question (in this case Long Date is the best
choice).
Task C
Open the database file you created during Task B.
Add a new field to the database called PDate.
Add the purchase date of 30 September 2009 for the next record.
Save the database.

Mr Nicholls
Page | 14 Data Manipulation
Save the database and then select Datasheet View.
Move the cursor into the PDate field for record 68 (the record we added in TaskB).
Use the Calendar icon to select the required date (30 September 2009).
Save the database for later use by clicking the symbol.
Record 68. PDate Field.
Activity 2
Open the database saved in Activity 1.
Add these three items of stationary to the database:
Code Type Description Quantity Colour SPrice PPrice Discount
44282 Lever Arch File Laminated Lever Arch Files
1 Red 57.22 28.96 No
44283 Lever Arch File Laminated Lever Arch Files
1 Yellow 57.22 28.96 No
47478 Spine Label Eastlight Spine Labels
100 30 13.86 Yes
Save the database for later use.

Mr Nicholls
Page | 15 Data Manipulation
11.5 – Performing Searches (Queries)
In Access you can search for data using Queries.
NOTE: Queries are an important part of the examination and many marks hinge on
you performing them accurately.
How to do it:
Open the database that you saved at the end of Task C.
Select the Create tab and find the Other section. Click on the Query Wizard icon.
This opens the New Query window.
Select the Simple Query Wizard and
then click on .
Task D
Open the database file you created during Task C.
A customer would like a car made by Ford.
Find the customer a list of all the cars in the garage made by Ford.
Save the database.

Mr Nicholls
Page | 16 Data Manipulation
In the Simple Query Wizard window select the table name (tblCars in this case).
NOTE: As this is your first query tblCars is your only option in this box. As you
create more queries they will also be shown in the drop-down list.
It is important that you select tables AND NOT queries for use in your
searches or you will get incorrect results.
For this task it would be appropriate to show
the customer all of the fields except:
ID field
PPrice (Price garage bought the car for).
PDate (Date garage purchased the car).
To do this, move all of the fields into the query using the Double Arrow key.
Select the ID field and click on the
Single Arrow key to remove them from the
selection.
Repeat this for the PPrice field and the
PDate field.
When you have removed the unneeded
fields from the query click .
Click again.

Mr Nicholls
Page | 17 Data Manipulation
Enter a suitable name for the query.
NOTE: It is important to carefully select a meaningful name as you need to be able
to identify each query correctly when you come to use them within Reports.
Select the Option Button for Modify
the query design before clicking on
.
This opens the query in Design View.
This is where we perform the actual
search.
Notice how the ID, PPrice and PDate
fields are not included.
NOTE: Until we add some Search Criteria the query will simply just find ALL records
in the database and NOT the Ford cars.
Suitable Name

Mr Nicholls
Page | 18 Data Manipulation
To perform the query, move the cursor into the Criteria: row of the Make field and
type Ford.
This will search for and extract only the cars made by Ford. All other makes will be
filtered out.
NOTE: You DO NOT need to use speech marks, as Access will put these in for you.
Now select Datasheet View to see the results of the query.
The number of records can be seen at the bottom of the window in this view. There
should be 25 Ford cars found in the query. Only Ford cars have been found:
Save the query for later use.

Mr Nicholls
Page | 19 Data Manipulation
How to do it:
Create a query in a similar way to the one for Task D (make sure you use tblcars).
Use the Query Wizard to select all of the
fields except ID.
When you Modify the query design you
should enter the following Criteria:
Ford in the Make column
Yes in the Valet column.
The design should look like this:
Select Datasheet View to look at the results of the query. There should be 2 records
found within this search. Only Ford cars that need Valeting have been found:
Task E
Open the Cars database.
The manager wants to see all of the Ford cars that need Valeting. Create a new query to show this
information.
Save the database.

Mr Nicholls
Page | 20 Data Manipulation
Save the Query for later use.
How to do it:
Create a query in a similar way to the one for Task E (make sure you use tblcars).
NOTE: Make sure you use the table name
in the Tables/Queries box. If you
use one of the previous queries
rather than the table you will get
incorrect results.
Select all of the fields (including ID).
When you Modify the query design you should enter the following Criteria:
Ford or Vauxhall in the Make column
The design should look like this:
Select Datasheet View to look at the results of the query. There should be 37 records
found within this search. Only Ford or Vauxhall cars have been found:
Task F
Open the Cars database.
The manager wants to see all the details of the cars made by Ford OR Vauxhall. Create a new
query to show this information.
Save the database.

Mr Nicholls
Page | 21 Data Manipulation
How to do it:
Create a query in a similar way to the one for Task F (make sure you use tblcars).
Select all of the fields (including ID).
When you Modify the query design you
should enter the following Criteria:
Not Ford in the Make column
The design should look like this:
Select Datasheet View to look at the results of the query. There should be 43 records
found within this search. No Ford cars have been found:
Task G
Open the Cars database.
The manager wants to see all the details of the cars NOT made by Ford. Create a new query to
show this information.
Save the database.
Mr Nicholls
Page | 22 Data Manipulation
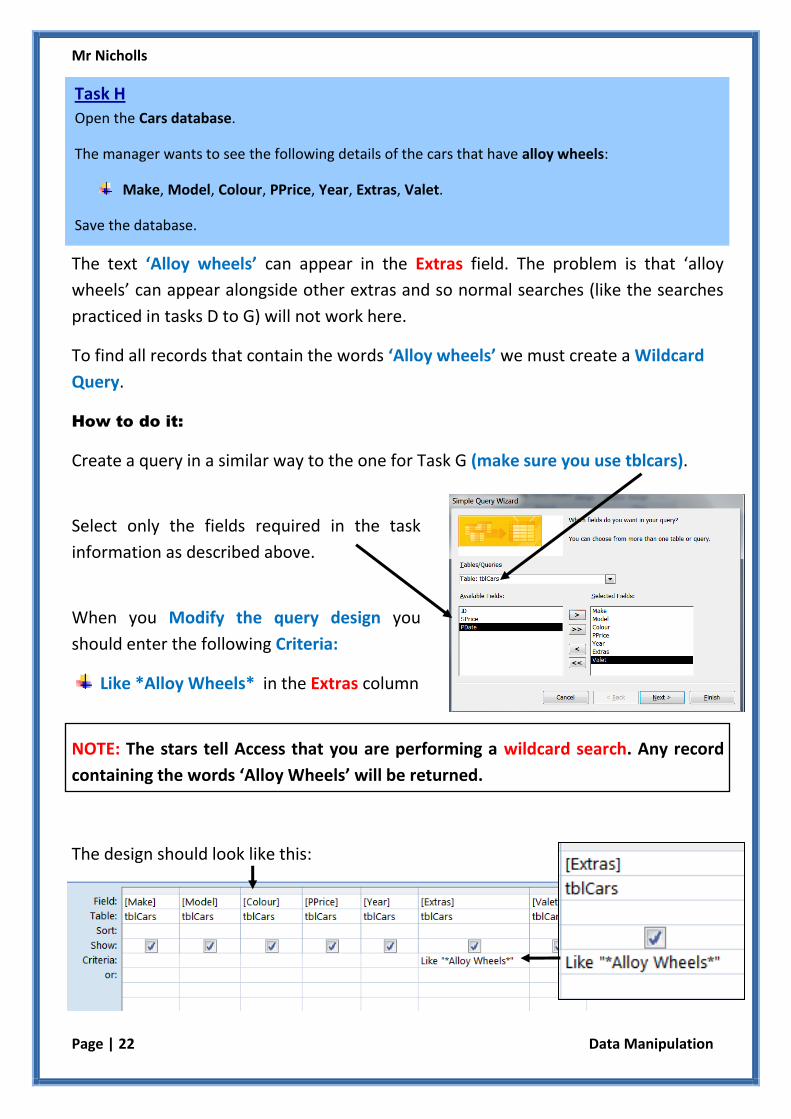
The text ‘Alloy wheels’ can appear in the Extras field. The problem is that ‘alloy
wheels’ can appear alongside other extras and so normal searches (like the searches
practiced in tasks D to G) will not work here.
To find all records that contain the words ‘Alloy wheels’ we must create a Wildcard
Query.
How to do it:
Create a query in a similar way to the one for Task G (make sure you use tblcars).
Select only the fields required in the task
information as described above.
When you Modify the query design you
should enter the following Criteria:
Like *Alloy Wheels* in the Extras column
NOTE: The stars tell Access that you are performing a wildcard search. Any record
containing the words ‘Alloy Wheels’ will be returned.
The design should look like this:
Task H
Open the Cars database.
The manager wants to see the following details of the cars that have alloy wheels:
Make, Model, Colour, PPrice, Year, Extras, Valet.
Save the database.

Mr Nicholls
Page | 23 Data Manipulation
Select Datasheet View to look at the results of the query. There should be 35 records
found within this search. Only cars with extras including Alloy Wheels have been
found:

Mr Nicholls
Page | 24 Data Manipulation
How to do it:
Create a query in a similar way to the one for Task H (make sure you use tblcars).
Select only the fields required in the task
information as described above.
When you Modify the query design you
should enter the following Criteria:
<=4125 in the SPrice column
The design should look like this:
NOTE: Similar mathematical criteria can be used within Number, Currency and
Date/Time fields. They cannot be used in fields which involve Text.
Mathematical formulae include:
< for less than > for greater than = for equal to
>= for greater than or equal to <= for less than or equal to
Task I
Open the Cars database.
The manager wants to see the following details of the cars that have a sale price of less than or
equal to £4125:
Make, Model, Colour, SPrice, Year, Extras, Valet.

Mr Nicholls
Page | 25 Data Manipulation
Select Datasheet View to look at the results of the query. There should be 18 records
found within this search. None of the cars found will have a Sale Price of more than
£4125:

Mr Nicholls
Page | 26 Data Manipulation
How to do it:
Create a query in a similar way to the one for Task I (make sure you use tblcars).
Select only the fields required in the task
information as described above.
When you Modify the query design you
should enter the following Criteria:
Between 1999 and 2004 in the Year
column
The design should look like this:
NOTE: The ‘Between And’ criteria can only be used within Number, Currency and
Date/Time fields. They cannot be used in fields which involve Text.
Task J
Open the Cars database.
The manager wants to see the following details of all the cars that were made between 1999 and
2004:
Make, Model, Colour, SPrice, Year, Extras, Valet.

Mr Nicholls
Page | 27 Data Manipulation
Select Datasheet View to look at the results of the query. There should be 22 records
found within this search. None of the cars found will have been made before 1999 or
after 2004:

Mr Nicholls
Page | 28 Data Manipulation
How to do it:
Create a query in a similar way to the one for Task J (make sure you use tblcars).
Select only the fields required in the task
information as described above.
When you Modify the query design you should enter the following Criteria:
Ford or Vauxhall or Mercedes in the Make column
Not Silver in the Colour column
Between 5000 and 16000 in the SPrice column
>2003 in the Year column
Like*Alarm* in the Extras column
No in the Valet column
Task K
Open the Cars database.
The manager wants to see the details of cars that meet the following criteria:
Ford or Vauxhall or Mercedes makes
Do not come in the colour Silver
Sale price of Between £5000 and £16000
Were produced After the year 2003
Include Alarms as extras
Do not require Valeting
Only use the fields that are necessary to return the details of the above list:
Make, Colour, SPrice, Year, Extras, Valet.

Mr Nicholls
Page | 29 Data Manipulation
The design should look like this:
Select Datasheet View to look at the results of the query. There should be 4 records
found within this search. None of the cars found should have specs outside of the
criteria that we specified during query design:
Activity 3
Open the database saved in Activity 2.
Create 12 separate queries that will search the database to find the following information for your
manager. For each search show ALL of the fields in the table.
1. Find all of the Blue stationary items
2. Find all of the Blue or Black stationary items
3. Find all of the items where the colour is NOT Blue
4. Find all the Red items where the discount is Yes
5. Find all the items where the type contains the word ‘File’
6. Find all the items where the description contains the word ‘File’
7. Find all items with a quantity of less than or equal to 10
8. Find all items where the quantity is equal to 10
9. Find all items with a quantity of greater than 1
10. Find all items with a quantity of greater than or equal to 10
11. Find all items where the sales price is less than £10
12. Find all items where the purchase price is between £5 and £12
Save the database for later use.

Mr Nicholls
Page | 30 Data Manipulation
11.6 – Producing Reports
Reports are used to display information generated in tables and queries.
Reports can be tailored to improve the presentation of the information.
How to do it:
Open the database last saved at the end of Task J.
Select the Create tab and find
the Reports section.
Click on Report Wizard icon to open the Report Wizard window.
In the Tables/Queries box, select the correct
query. In this task the report will be based
upon the query which found all of the cars
made by Ford (I named mine ‘Ford Cars’).
NOTE: This is why naming your queries
sensibly is important.
Use the arrow buttons to move the correct
fields from the Available Fields: into the Selected Fields: box.
Task L
Open the Cars database.
Produce a report that:
Shows all the cards made by Ford
Displays only the Make, Model, Colour, SPrice, Extras and Valet fields within the width of a
landscape page
Has your name on the left in the header of each page
Has a title of ‘All Ford cars in stock’ centre aligned at the top of the first page. Title should
be Arial font and a 24 point font size.
Has a subtitle ‘Request for Mr David Watson’ right aligned at the top of the first page.
Subtitle should be Arial font and a 12 point font size.

Mr Nicholls
Page | 31 Data Manipulation
Click on .
Grouping is not needed at GCSE level so click again.
This task does not require sorting (this will be covered later) so click again.
On the screen which allows you to setup the
layout and orientation of your report you
should choose the Landscape option.
Leave the Layout set to Tabular.
Click on .
Choose the style for your report (Any style
you like) and click on .
Change the report name so that it says ‘All
Ford cars in stock’.
Select the Modify the report’s design
option and click on .
Modify the report’s design option lets us
add subtitles and ensure that the layout
is correct.

Mr Nicholls
Page | 32 Data Manipulation
11.6a – Modifying Report Design
As stated earlier, Report Design View is where we can fully customise our reports
and add things like subtitles, colour and generally tidy them up.
Sections of the report
Each section of the report is shown with a light blue bar.
The top section is the Report Header. Anything placed in this section only appears
once at the start of the document.
The next section is the Page Header. Anything placed here is shown at the top of each
page (usually fieldnames).
The Detail section is the most important. This is where the data is shown for each
car. The Detail section consists of as many Rows as are necessary to show all the data.

Mr Nicholls
Page | 33 Data Manipulation
The Page Footer shows information at the bottom of each page (page numbers etc).
The Report Footer shows information at the end of the entire report (for example
Calculated Fields – see later).
Placing your name in the header of each page
Move the cursor into the Page Header section. Position the cursor just to the top of
the Detail bar so that the cursor changes to an arrow.
Hold the left mouse button down and drag the Detail row down a little bit.
Select all of the Fieldname objects in the Page Header by dragging and holding the
mouse button. Move all of the Fieldname objects down a little bit to make room for
your name in the Header. It should look like this:

Mr Nicholls
Page | 34 Data Manipulation
In the Design tab, find the Controls section and click on the Label icon.
Move the cursor into left side of the Page Header and click and drag the left mouse
button to draw a new label.
Type your name into the
label.
The label needs editing so that the text is clearly visible and it is left aligned.
Select the label and use the
tools in the Font section of the
Design tab to change the colour
and the alignment to left.
Switching between Design View and Report View
To see what the report will look like after you have made your modifications you need
to find the Views section of the Design tab and
select the Report View icon.
You can switch back to Design View in the
same way.
This is our report so far with a name in the Page Header:
Mr Nicholls
Page | 35 Data Manipulation
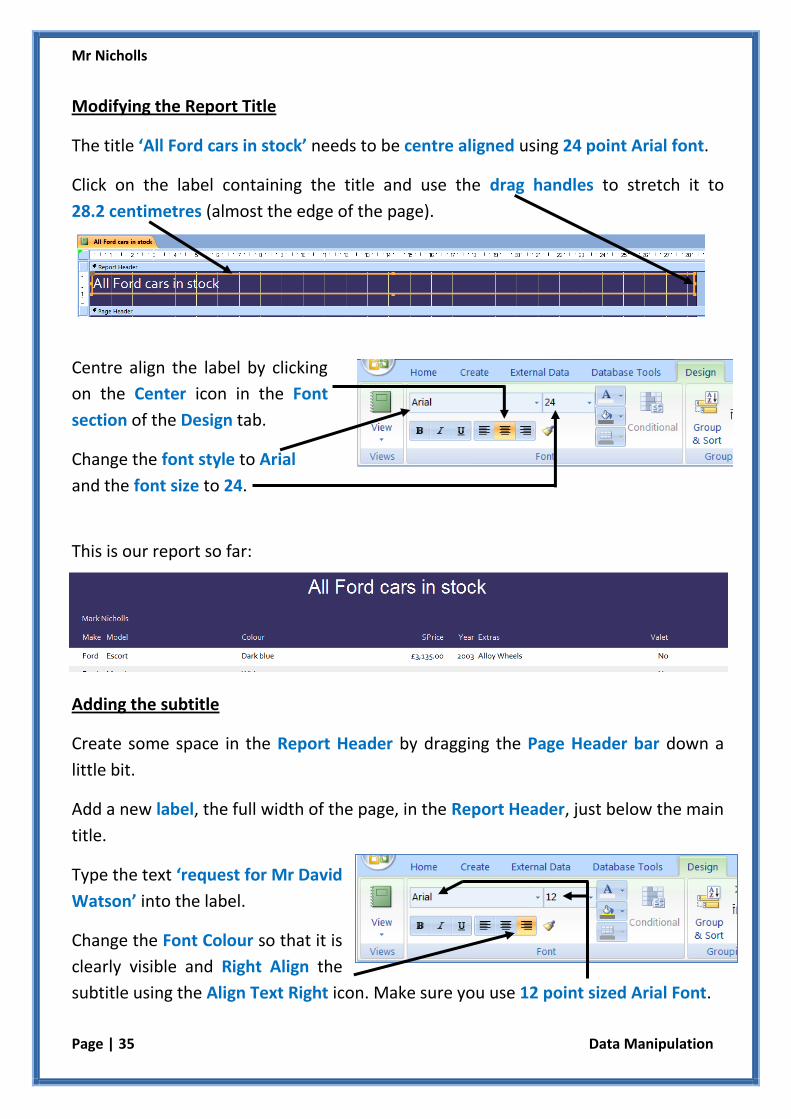
Modifying the Report Title
The title ‘All Ford cars in stock’ needs to be centre aligned using 24 point Arial font.
Click on the label containing the title and use the drag handles to stretch it to
28.2 centimetres (almost the edge of the page).
Centre align the label by clicking
on the Center icon in the Font
section of the Design tab.
Change the font style to Arial
and the font size to 24.
This is our report so far:
Adding the subtitle
Create some space in the Report Header by dragging the Page Header bar down a
little bit.
Add a new label, the full width of the page, in the Report Header, just below the main
title.
Type the text ‘request for Mr David
Watson’ into the label.
Change the Font Colour so that it is
clearly visible and Right Align the
subtitle using the Align Text Right icon. Make sure you use 12 point sized Arial Font.

Mr Nicholls
Page | 36 Data Manipulation
This is our completed report:
Activity 4 should look something like this:
Name in Page
Header
Modified Title
Subtitle
Activity 4
Open the database saved in Activity 3.
Produce a report which:
1. Displays all the data held in the STATIONARY table within a landscape page
2. Has your name in the right header of each page
3. Has a title ‘All stationary in stock’ centre aligned at the top of the first page
4. Has a subtitle ‘request for the manager’ right aligned at the top of the first page
Save the database for later use.

Mr Nicholls
Page | 37 Data Manipulation
How to do it:
Open the Cars database.
Select the Create tab and find
the Reports section.
Click on Report Wizard icon to open the Report Wizard window.
In the Tables/Queries box, select the correct
query. In this task the report will be based upon
the query which found all of the cars with alloy
wheels (I named mine ‘Cars with alloy wheels).
NOTE: This is why naming your queries
sensibly is important.
Move all of the fields from Available Fields: to the Selected Fields: box.
Click on .
Grouping is not needed at GCSE level so click again.
This task does not require sorting (this will be covered later) so click again.
Task M
Open the Cars database.
Produce a report that:
Displays the data for all the cars with alloy wheels
Fits into the width of a portrait page
Has your name in the report header followed by ‘Cars with alloy wheels’
Report should be neat and tidy.
Mr Nicholls
Page | 38 Data Manipulation
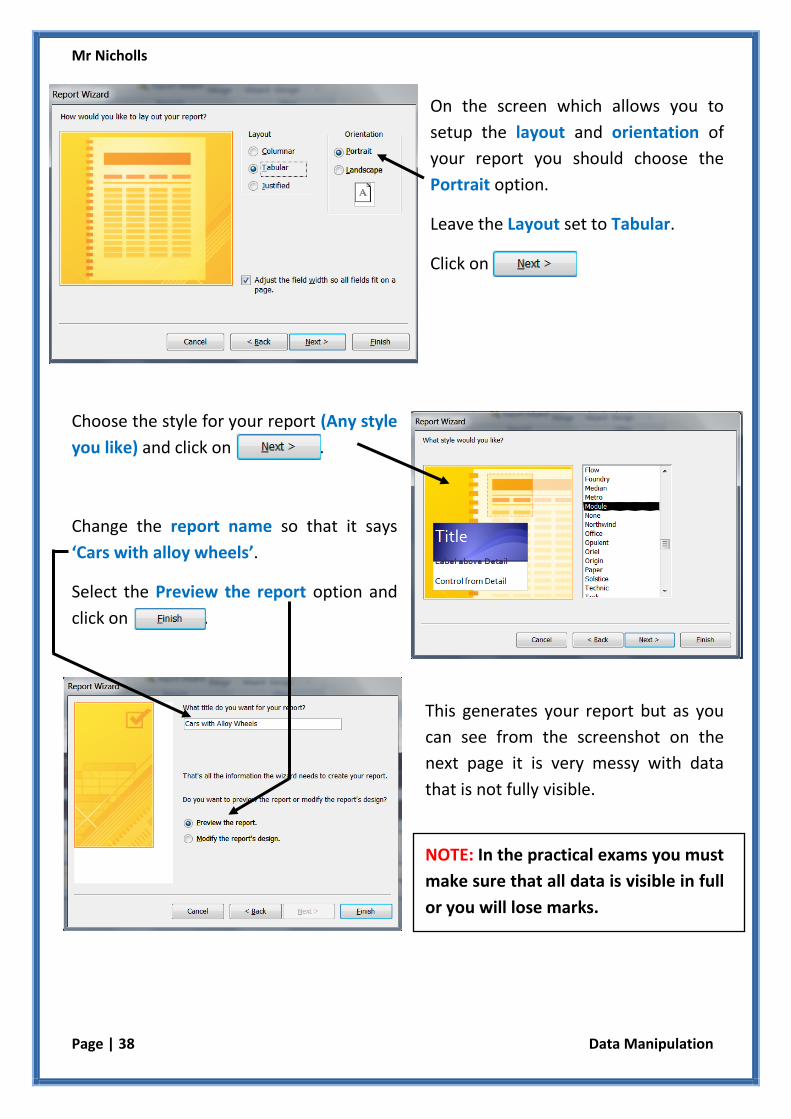
On the screen which allows you to
setup the layout and orientation of
your report you should choose the
Portrait option.
Leave the Layout set to Tabular.
Click on .
Choose the style for your report (Any style
you like) and click on .
Change the report name so that it says
‘Cars with alloy wheels’.
Select the Preview the report option and
click on .
This generates your report but as you
can see from the screenshot on the
next page it is very messy with data
that is not fully visible.
NOTE: In the practical exams you must
make sure that all data is visible in full
or you will lose marks.

Mr Nicholls
Page | 39 Data Manipulation
11.6b – Tidying up reports and making sure data is visible
Select the Home tab and in the Views section click on the arrow to
expose a drop-down menu.
Use the drop-down menu to select Design View.
Resizing Fields (Bigger)
Find the Make field in the Detail section of the report and click it.
Drag the right side of the Field out to make it a little larger. It should
change from this to this.
NOTE: The field label (in Page Header)
will also stretch out to match the size
of the Detail field.
Use the View icon to change back to Report View to see the effect that
this has made to the report.
The Make field is
now large
enough to display
the data.
Partially visible data
Messy layout
Partially visible data

Mr Nicholls
Page | 40 Data Manipulation
Resizing Fields (Smaller)
Some of the fields have the opposite problem – they take up too much room.
For example Model and Colour fields need to be reduced in size. This will create more
space for larger fields such as Extras.
Click on the Model field and position the cursor over the right side. The cursor should
change to a double arrow:
Drag the cursor to the left until the field becomes smaller. It should go from
this to this:
Too much space taken up

Mr Nicholls
Page | 41 Data Manipulation
Repeat for the Colour field.
Use the Report View to make sure that all of the data is available whilst not using up
too much space.
NOTE: You will need to scroll through all of the records to check each one.
Repeat this method for the rest of the fields. Use Report View to ensure that all of
the data is visible without taking up too much room. Your report should end up
looking something like this:
NOTE: Fields can also be resized to make them higher instead of wider. This is
useful to force longer pieces of data onto a new line and, therefore, take up less
room widthways.
Less space used but all data still visible

Mr Nicholls
Page | 42 Data Manipulation
Aligning Fields
Our report is still not perfect as some of the fields are too close together.
For example Year and Extras fields could benefit from being further apart. This will
make them easier to read.
Select the Home tab and in the Views section use the drop-down
menu to select Design View
Move the cursor into the Page Header section and click on the Year
label.
Centre the label using the Centre
Alignment tool in the Design tab.
Repeat this for the Year field in the
Detail section.
Centre aligning Year field moves
it away from the Extras field

Mr Nicholls
Page | 43 Data Manipulation
Completed activity 5 should look similar to this:
Activity 5
Open the database saved in Activity 4.
Produce a report which:
1. Displays all the data for the items where the quantity is greater than or equal to 10
2. Has your name in the header of each page
3. Has a title ‘Quantity >=10‘centre aligned at the top of the first page.
Save the database for later use.

Mr Nicholls
Page | 44 Data Manipulation
11.7 – Exporting Data
Sometimes the practical examinations will ask you to export information from a
database for use in other packages (like Word documents). Information can also be
exported to create a graph or chart.
Information can be exported from:
Reports
Queries
Whole tables.
How to do it:
Open the Cars database.
In the Navigation pane, find the query
that lists all cars with alloy wheels.
Right click the query to get the drop-
down menu.
Select the Export and in the next drop-
down menu you should select Word
RTF file.
This opens the Export – RTF File window.
Click on the button to select a folder to save the document into.
Select the option Open the destination file after the export operation is complete,
and then click on .
Task N
Open the Cars database.
Export the ‘Cars with alloy wheels’ query that you made during Task M.
The report should be exported to rich text format so that it can be included in a Word document.
Mr Nicholls
Page | 45 Data Manipulation
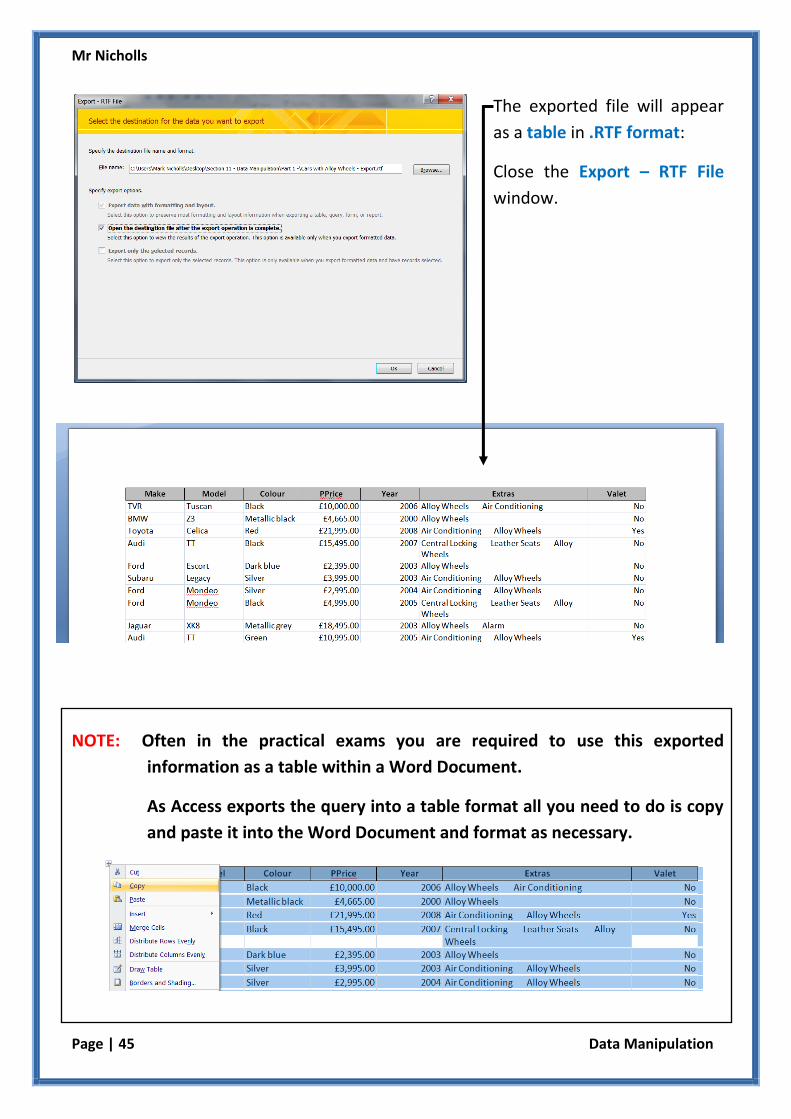
The exported file will appear
as a table in .RTF format:
Close the Export – RTF File
window.
NOTE: Often in the practical exams you are required to use this exported
information as a table within a Word Document.
As Access exports the query into a table format all you need to do is copy
and paste it into the Word Document and format as necessary.
Mr Nicholls
Page | 46 Data Manipulation
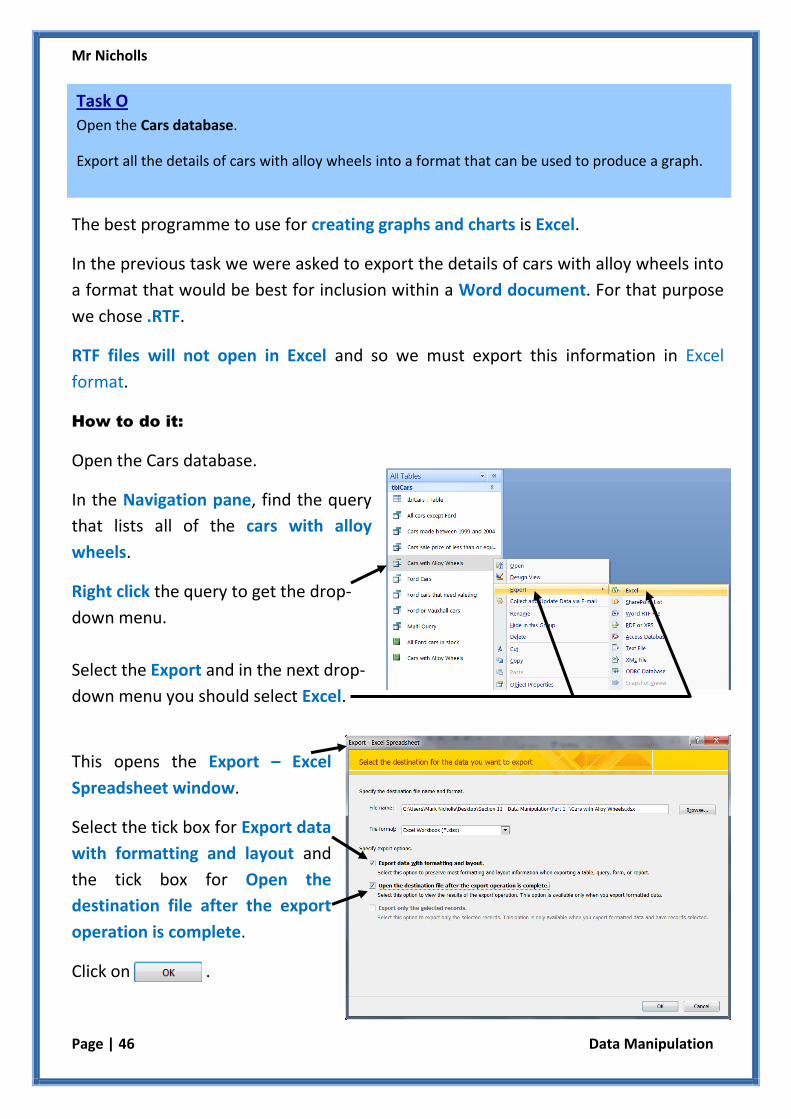
The best programme to use for creating graphs and charts is Excel.
In the previous task we were asked to export the details of cars with alloy wheels into
a format that would be best for inclusion within a Word document. For that purpose
we chose .RTF.
RTF files will not open in Excel and so we must export this information in Excel
format.
How to do it:
Open the Cars database.
In the Navigation pane, find the query
that lists all of the cars with alloy
wheels.
Right click the query to get the drop-
down menu.
Select the Export and in the next drop-
down menu you should select Excel.
This opens the Export – Excel
Spreadsheet window.
Select the tick box for Export data
with formatting and layout and
the tick box for Open the
destination file after the export
operation is complete.
Click on .
Task O
Open the Cars database.
Export all the details of cars with alloy wheels into a format that can be used to produce a graph.

Mr Nicholls
Page | 47 Data Manipulation
The exported information will appear as an Excel file:
Close the Export – Excel Spreadsheet window.
NOTE: Often in the practical exams you will be required to create a graph/chart
out of the exported Excel information.
The graph/chart would then be copied and pasted into the Word
Document.