Embed Size (px)
Citation preview

1 User Guide| Ritenergy International, LLC
Ritelock Pro
(Version 1.XX)
iCode Programming Guide
2 User Guide| Ritenergy International, LLC
TABLE OF CONTENTS
RITELOCK PRO PROGRAMMING GUIDE 3
System Requirement 3
System Components 3
Programming with keypad 4
Install Ritelock Pro Software 4
Login 4
Steps to program the locks 5
Programming with Software Kit 8
Install Ritelock Pro Software 8
Login 8
Steps to program the locks 8
iCode 13
General Code 13
Management Daily Code 14
Management Monthly Code 15
Retrieve Information from the lock 16
Download Audit Trails 16
Terminology 17
3 User Guide| Ritenergy International, LLC
RITELOCK PRO PROGRAMMING GUIDE
SYSTEM REQUIREMENT
The following hardware and software minimum requirements are recommended to use
the Ritelock Pro software:
IBM compatible PC (Pentium II or greater) capable of running Windows with an
available USB port for an iButton USB Encoder
Screen area resolution capability of 1024 x 768 pixels
CD-RW driver for installing the software and for backing up the database
Hard disk drive with at least 100 MB of disk free space
Minimum system memory of 128 MB, or as recommended by the operating
system
Microsoft® Windows® 7 32-Bit/64-Bit, Microsoft Windows Vista® 32-Bit and
Microsoft Windows XP
SYSTEM COMPONENTS
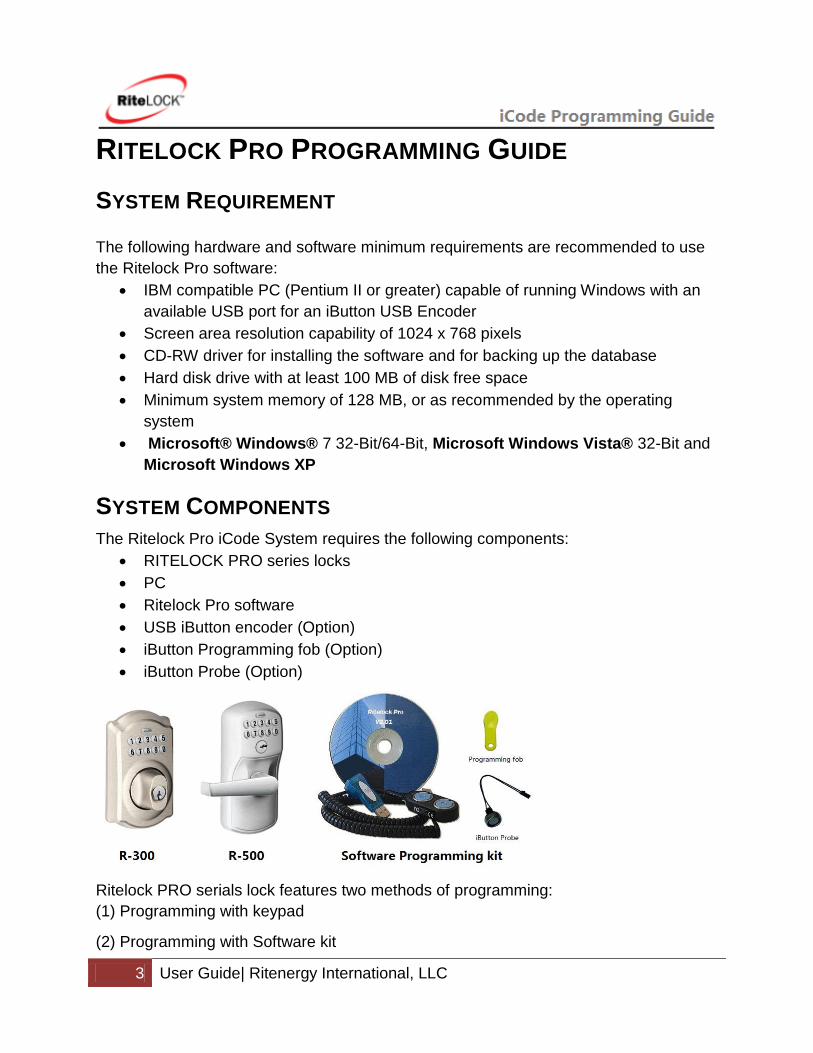
The Ritelock Pro iCode System requires the following components:
RITELOCK PRO series locks
PC
Ritelock Pro software
USB iButton encoder (Option)
iButton Programming fob (Option)
iButton Probe (Option)
Ritelock PRO serials lock features two methods of programming:
(1) Programming with keypad
(2) Programming with Software kit

4 User Guide| Ritenergy International, LLC
PROGRAMMING WITH KEYPAD
INSTALL RITELOCK PRO SOFTWARE
Please read the readme.txt file for the latest information about your Ritelock Pro
software and System Requirements.
1. Place Software CD into the CD-ROM drive. Copy the pre-installed programming
files (Ritelock.exe and RitelockDB) to your PC
2. Install 1-Wire USB Driver. After finished installation, connect the USB encode to
the PC, the computer will find the new device and prompt you through the
process. You can find the USB driver and download it from:
http://www.maxim-ic.com/products/ibutton/software/tmex/download_drivers.cfm
3. Run Ritelock.exe
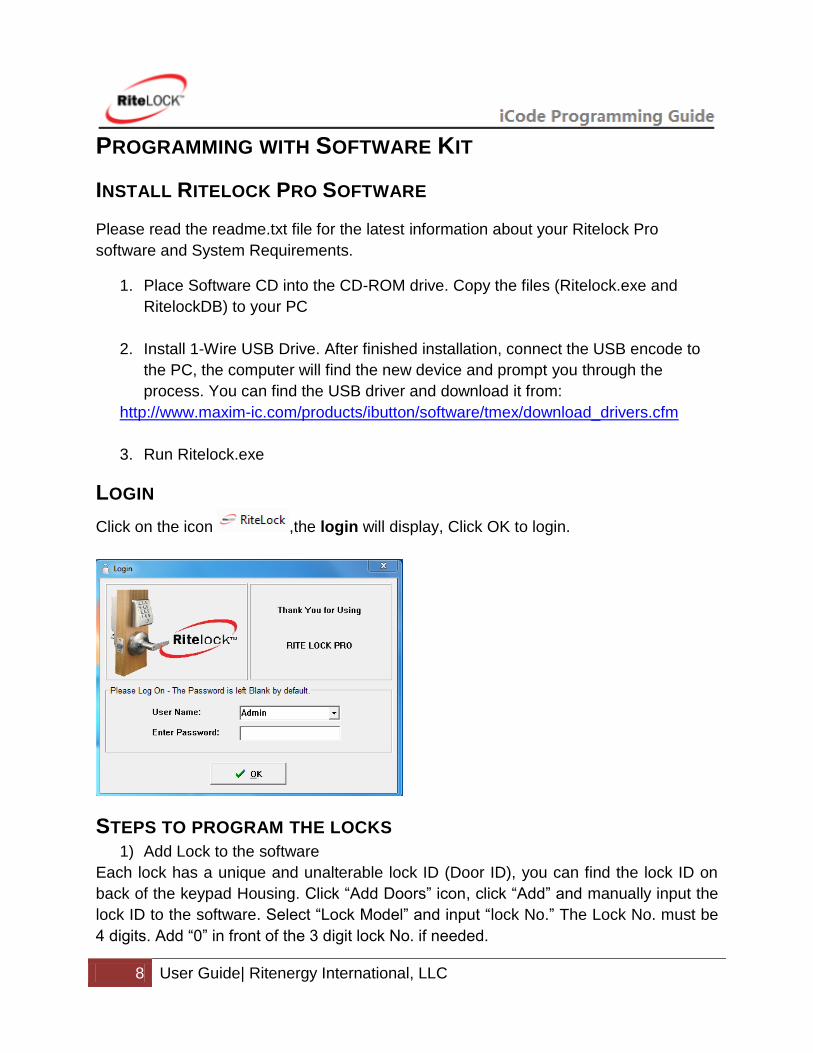
LOGIN
Click on the icon ,the login screen will display, Click OK to login.
Note: The default User Name is “Admin” and Password is left blank. Click OK to login.

5 User Guide| Ritenergy International, LLC
STEPS TO PROGRAM THE LOCKS 1) Add Lock to the software
Each lock has a unique and unalterable lock ID (Door ID), you can find the lock ID on
back of the keypad Housing. Click “Add Doors” icon, click “Add” and manually input the
Lock ID to the software. Select “Lock Model” and input “Lock No” (Door No.).The Lock
No. must be 4 digits. Add “0” in front of the Lock No. if needed.
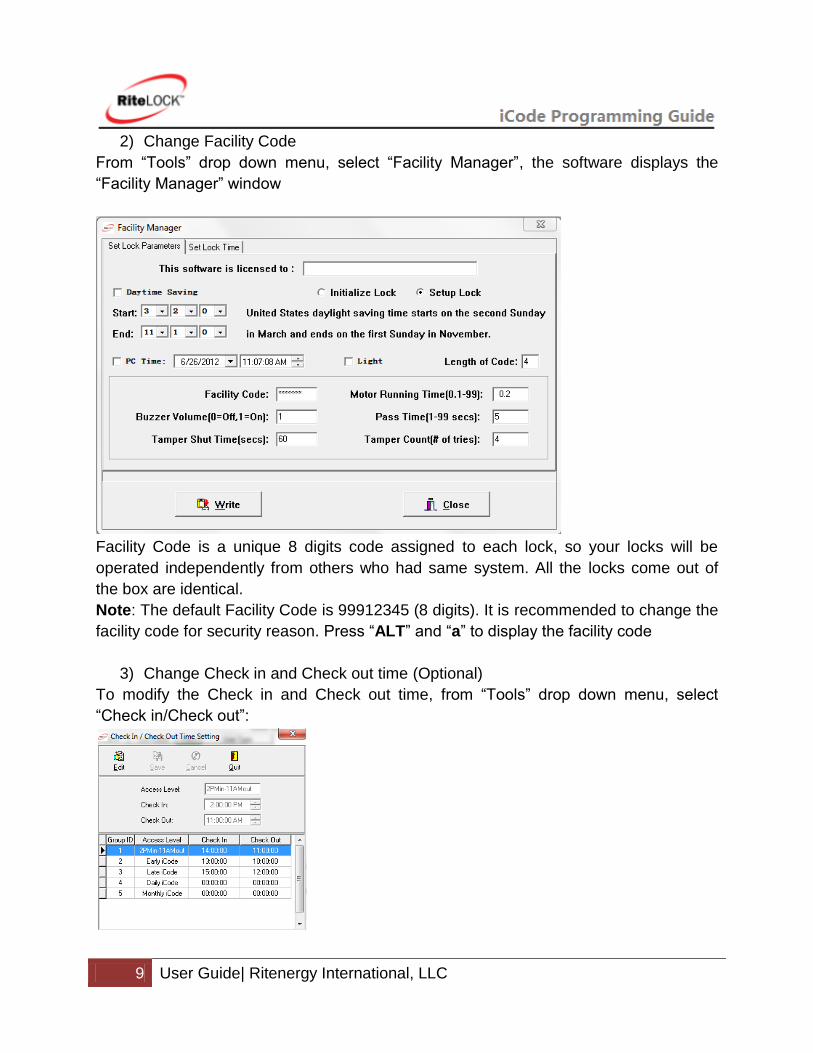
2) Change Facility Code
From “Tools” drop down menu, select “Facility Manager”, the software displays the
“Facility Manager” window
Facility Code is a unique 8 digits code assigned to each lock, so your locks will be
operated independently from others who had same system. All the locks come out of
the box are identical.
Note: The default Facility Code is 99912345 (8 digits). It is recommended to change the
facility code for security reason. Press “ALT” and “a” to display the facility code
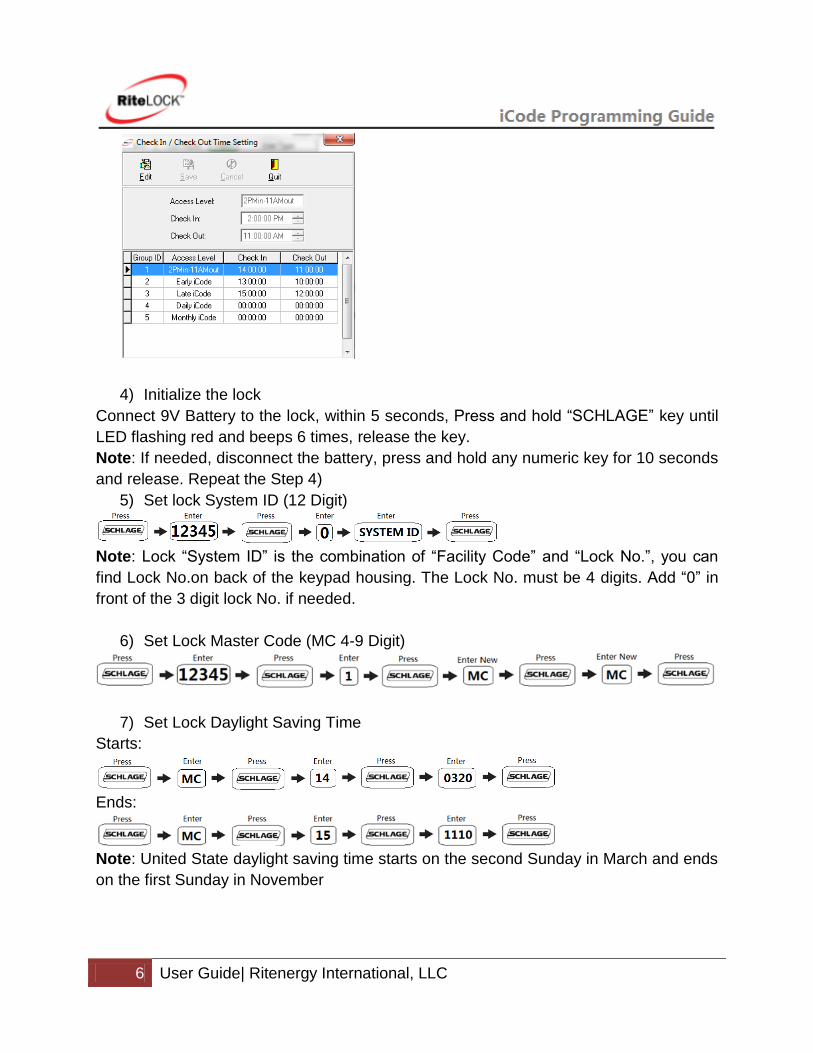
3) Change Software Check in and Check out time (Optional)
You can modify Check in and Check out time, from “Tools” drop down menu, select
“Check in/Check out”:
6 User Guide| Ritenergy International, LLC
4) Initialize the lock
Connect 9V Battery to the lock, within 5 seconds, Press and hold “SCHLAGE” key until
LED flashing red and beeps 6 times, release the key.
Note: If needed, disconnect the battery, press and hold any numeric key for 10 seconds
and release. Repeat the Step 4)
5) Set lock System ID (12 Digit)
Note: Lock “System ID” is the combination of “Facility Code” and “Lock No.”, you can
find Lock No.on back of the keypad housing. The Lock No. must be 4 digits. Add “0” in
front of the 3 digit lock No. if needed.
6) Set Lock Master Code (MC 4-9 Digit)
7) Set Lock Daylight Saving Time
Starts:
Ends:
Note: United State daylight saving time starts on the second Sunday in March and ends
on the first Sunday in November

7 User Guide| Ritenergy International, LLC
8) Set Lock Clock Time
Note: We use 24 hour clock format to define the hour, for example, if it’s May 29, 2009
3:26PM, then you will enter: 0529091526
9) Set Lock Check in and Check out time (optional)
Note: If you have modified software Check in and Check out time, then you need set
lock Check in and Check out time, so the system and locks will understand each other.
1: Regular iCode, 2: Early iCode, 3: Late iCode, 4: Daily iCode, 5: Monthly iCode
8 User Guide| Ritenergy International, LLC
PROGRAMMING WITH SOFTWARE KIT
INSTALL RITELOCK PRO SOFTWARE
Please read the readme.txt file for the latest information about your Ritelock Pro
software and System Requirements.
1. Place Software CD into the CD-ROM drive. Copy the files (Ritelock.exe and
RitelockDB) to your PC
2. Install 1-Wire USB Drive. After finished installation, connect the USB encode to
the PC, the computer will find the new device and prompt you through the
process. You can find the USB driver and download it from:
http://www.maxim-ic.com/products/ibutton/software/tmex/download_drivers.cfm
3. Run Ritelock.exe
LOGIN
Click on the icon ,the login will display, Click OK to login.
STEPS TO PROGRAM THE LOCKS 1) Add Lock to the software
Each lock has a unique and unalterable lock ID (Door ID), you can find the lock ID on
back of the keypad Housing. Click “Add Doors” icon, click “Add” and manually input the
lock ID to the software. Select “Lock Model” and input “lock No.” The Lock No. must be
4 digits. Add “0” in front of the 3 digit lock No. if needed.
9 User Guide| Ritenergy International, LLC
2) Change Facility Code
From “Tools” drop down menu, select “Facility Manager”, the software displays the
“Facility Manager” window
Facility Code is a unique 8 digits code assigned to each lock, so your locks will be
operated independently from others who had same system. All the locks come out of
the box are identical.
Note: The default Facility Code is 99912345 (8 digits). It is recommended to change the
facility code for security reason. Press “ALT” and “a” to display the facility code
3) Change Check in and Check out time (Optional)
To modify the Check in and Check out time, from “Tools” drop down menu, select
“Check in/Check out”:

10 User Guide| Ritenergy International, LLC
4) Change Access Level (Optional)
To modify the Access Level, from “Tools” drop down menu, select “Access Level”:
5) Initialize the lock
From “Tools” drop down menu, select “Facility Manager”, check “Daylight Saving”, “PC
Time” and select “Initialize Lock”. With the USB encoder connect to the PC, snap your
Programming key (Yellow Fob) onto USB encoder reader (make sure only one key fob
attach to the reader), Click “Write”, the system information will write onto the
Programming key, and a successful massage will pop up. From the keypad, connect the
ibutton probe to the lock. (You will locate the connector inside the battery housing next
to the battery clip) short inner circle to outside ring of the probe until "SCHLAGE" button
light up, remove the jumper and place the programming key against the probe.
“SCHLAGE” button will flashing green followed by two beeps.
11 User Guide| Ritenergy International, LLC
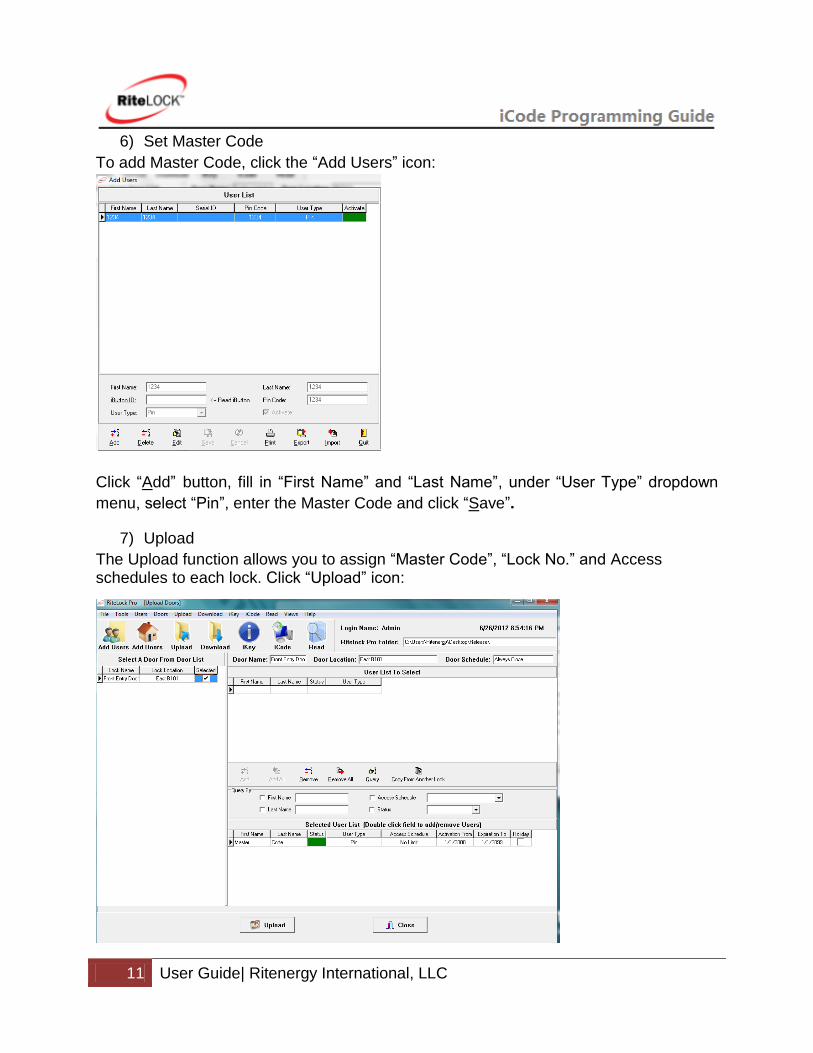
6) Set Master Code
To add Master Code, click the “Add Users” icon:
Click “Add” button, fill in “First Name” and “Last Name”, under “User Type” dropdown
menu, select “Pin”, enter the Master Code and click “Save”.
7) Upload
The Upload function allows you to assign “Master Code”, “Lock No.” and Access schedules to each lock. Click “Upload” icon:
12 User Guide| Ritenergy International, LLC
Select a lock from the lock list
Add Master Code to the lock by click “Add”, or “Add All” button
Snap the Programming key (Yellow Fob) onto USB encoder reader and Click
“Upload”
The Upload information will write into the Programming key, and a successful
massage will pop up.
Unplug the Programming key from USB encoder reader. Make sure the ibutton
probe was connected to the lock, and place the programming key against the
probe. “SCHLAGE” button will flashing green followed by two beeps.
Enter the Master Code to confirm the job
Disconnect the iButton Probe from the lock and secure the back cover with two
screws

13 User Guide| Ritenergy International, LLC
ICODE
iCode is a revolutionary new PIN code-based electronic locking system that allows managers and/or owners to instantly and remotely provide access to specific properties for specific periods of time, without the need for a key or keycard. It eliminates the need to visit a front desk or rental office, providing increased convenience and privacy. Because the code is software generated, it can be easily sent to users through remote media, such as text messaging or email. Others requiring access to a property, such as housekeeping and maintenance staff can also be given individual remote access codes with separate time restraints, making it easy to manage and track all access to individual units. iCode is a fully time generated keyless locking System; made up of a "stand-alone" door access control unit (Lock) combined with iCode Generator. Click the “iCode” icon, the iCode window will open; select the locks from the lock list
GENERAL CODE General Code is designed specifically for the vocation rental customer; there are two
type of the iCode
Click here to select
the lock from list
14 User Guide| Ritenergy International, LLC
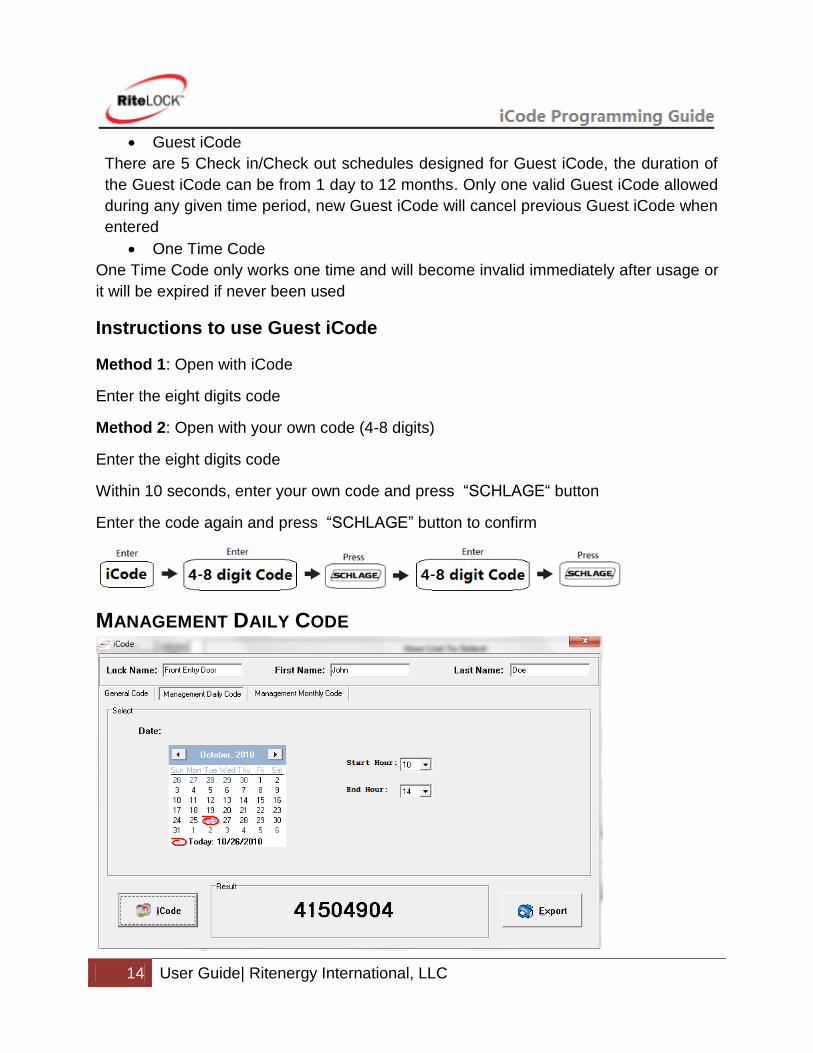
Guest iCode
There are 5 Check in/Check out schedules designed for Guest iCode, the duration of
the Guest iCode can be from 1 day to 12 months. Only one valid Guest iCode allowed
during any given time period, new Guest iCode will cancel previous Guest iCode when
entered
One Time Code
One Time Code only works one time and will become invalid immediately after usage or
it will be expired if never been used
Instructions to use Guest iCode
Method 1: Open with iCode
Enter the eight digits code
Method 2: Open with your own code (4-8 digits)
Enter the eight digits code
Within 10 seconds, enter your own code and press “SCHLAGE“ button
Enter the code again and press “SCHLAGE” button to confirm
MANAGEMENT DAILY CODE
15 User Guide| Ritenergy International, LLC
Management Daily Code is an ideal solution for maintenance staffs or temporary
contractors, those who don’t have routine schedules. Daily Code will last from 1 hour to
16 hours within the day and Daily Code will co-exist and overlap from each other.
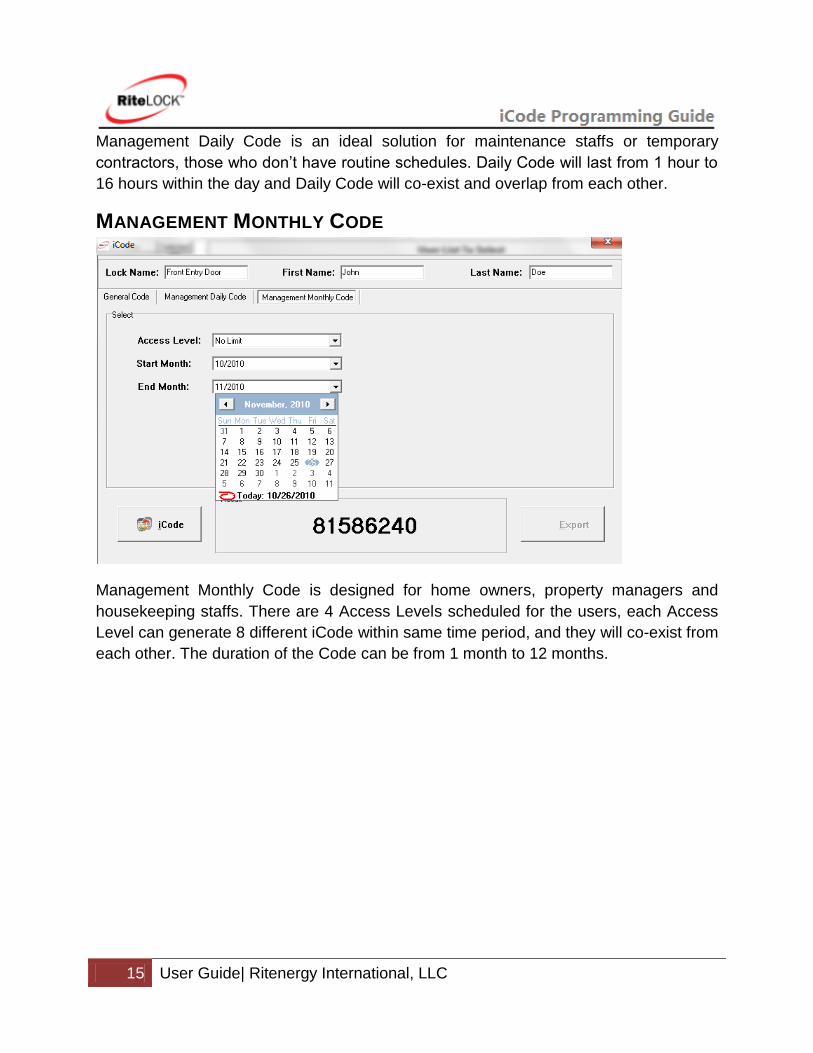
MANAGEMENT MONTHLY CODE
Management Monthly Code is designed for home owners, property managers and
housekeeping staffs. There are 4 Access Levels scheduled for the users, each Access
Level can generate 8 different iCode within same time period, and they will co-exist from
each other. The duration of the Code can be from 1 month to 12 months.
16 User Guide| Ritenergy International, LLC
RETRIEVE INFORMATION FROM THE LOCK
Retrieve information from the lock to your computer is accomplished via iButton Programming key (yellow fob); this eliminates the need for direct physical or electronic connection between the lock and the PC.
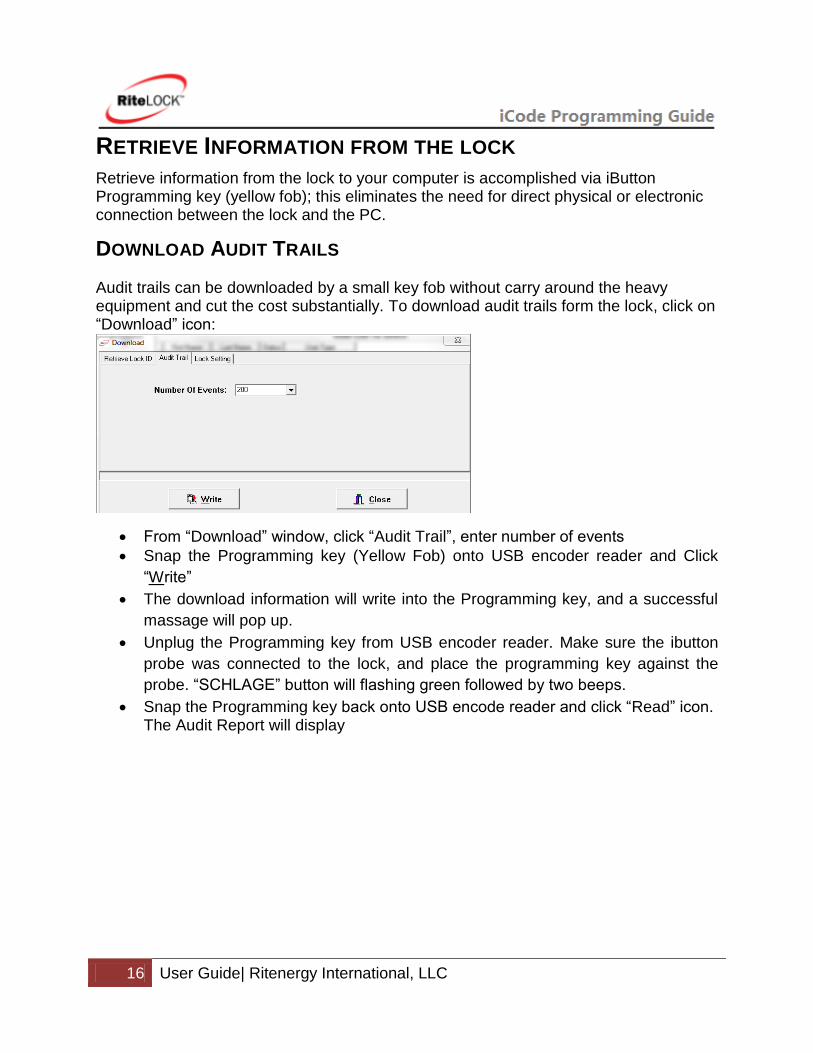
DOWNLOAD AUDIT TRAILS
Audit trails can be downloaded by a small key fob without carry around the heavy equipment and cut the cost substantially. To download audit trails form the lock, click on “Download” icon:
From “Download” window, click “Audit Trail”, enter number of events
Snap the Programming key (Yellow Fob) onto USB encoder reader and Click
“Write”
The download information will write into the Programming key, and a successful
massage will pop up.
Unplug the Programming key from USB encoder reader. Make sure the ibutton
probe was connected to the lock, and place the programming key against the
probe. “SCHLAGE” button will flashing green followed by two beeps.
Snap the Programming key back onto USB encode reader and click “Read” icon. The Audit Report will display
17 User Guide| Ritenergy International, LLC
TERMINOLOGY
Facility Code
Facility Code is a unique 8 digits code assigned to each lock, so your locks will be
operated independently from others who had same system. All the locks come out of
the box are identical.
Lock System ID
The combination of the Facility Code and Door No. will be assigned to each lock. The
Lock System ID is the most important parameter for iCode generator.
Lock ID
Each Lock has a unique and unalterable address laser etched onto its CPU inside the
lock control board. The address (e.g. 2D0101000C4FBE01) can be used as a ID or
identifier for each lock.
Door No.
A random 4 digits number will be created for each lock, so each individual unit will
operate independently from each other within same system.
Factory Master Code
Factory Master Code 12345 is used to initialize the lock for a new installation or full
reset. This Code must be entered to set the Lock System ID and the new Master Code
(MC). After the Master Code is set, the FACTORY MASTER CODE will no longer be
valid and is only re-enabled after a full reset.
Master Code
Master Code is set for system administrator. The master Code has ultimate authority to
control the system, this control include setting the lock parameters, editing users at all
levels, setting time and date, setting up groups and controlling their access.
Audit Trail
Audit trail or audit log is a chronological sequence of audit records, each of which
contains evidence directly pertaining to and resulting from the execution of access
events.


![Welcome [lib.store.yahoo.net]lib.store.yahoo.net/lib/classic-motoring/BestofBest.pdf · random, swirl-free polishing action that will not scratch or burn the paint or clear coat.An](https://img.dokumen.tips/doc/110x75/60617323a83b262349417c78/welcome-libstoreyahoonetlibstoreyahoonetlibclassic-motoring-random.jpg)


