Embed Size (px)
Citation preview

1
Ice Station Zulu
A Stand-Alone Adventure for the Star Wars: Edge of the Empire
Roleplaying Game by Fantasy Flight Games
WRITTEN BY David Villegas
Experience the advantage and triumph of Star Wars Roleplaying with the Order 66 Podcast! www.d20radio.com
This work is not intended for publication or sale. It is a fan-based creation designed to work with a highly
popular role-playing game, but has no official ties or attachment to that game, its designers, or its respective
parent companies. Please note that no person involved in the creation of this work is affiliated with Fantasy
Flight Publishing, Inc. or Lucasfilm, Ltd.
Fantasy Flight Games The Star Wars: Edge of the Empire® game is a registered trademark of Fantasy Flight Publishing, Inc. All rights reserved to their respective owners. Any use of trademarks or copyright material in this document should not be viewed as a challenge to those trademarks/copyrights, and are used without authorization, endorsement, or specific permission. Any commercial use of trademarks or copyrighted material without express permission is prohibited. Under no circumstances will any of this material be made available for profit or compensation in any form. Star Wars All characters, names and titles © 2014 Lucasfilm Limited. All rights reserved to their respective owners. The mention of or reference to any title or product in this document is not a challenge to the trademark or copyright concerned. Any commercial use of trademarks or copyrighted material without express permission is prohibited. Under no circumstances will any of this material to be made available for profit or compensation in any form.

2
Ice Station Zulu - Overview
Ice Station Zulu is a stand-alone adventure for the Star Wars: Edge of the Empire Roleplaying Game, designed to introduce
new players to the rules, as well as give experienced players a fun adventure filled with intrigue and dangerous situations. It
can easily be inserted into an existing campaign, to provide a unique adventure and story arc across a few sessions of play.
This adventure is intended for ADULTS. It contains mature themes and a rather excessive (and highly entertaining) amount of
violence and horror-themed scenarios. The player characters also deal with addictions and other adult subject matter. This is
a fun module, but strives to communicate horror – and all that implies. As such, it’s written for mature players.
Included are six pre-generated player characters, whose abilities are well suited to the adventure. But if the players wish to
come to the table with their own characters, they may create their own, following the rules for creating beginner characters
in the Star Wars: Edge of the Empire Core Rulebook. The adventure assumes the use of the pre-generated characters, so
player-created characters may necessitate adjustment of the scenarios in regards to the use of Obligation.
The pre-generated player characters are a group of former “fixers” forced into a job they’d rather not take, where
environmental hazards await and investigation reveals horrors that they are not prepared for. If you are planning to act as
Game Master, then read on. You should read through the entire adventure prior to the start of the first session. If you are
planning to play a hero in the adventure, then STOP READING NOW to avoid spoiling the adventure for you and your group.
Instead, turn to the last section of the adventure, where the Player Character biographies are located.
Adventure Summary Ice Station Zulu involves a covert group of disreputable
PCs who comprise a small, but effective, smuggling and
grifting team, working jobs as specialist thieves for a
crime syndicate on Bespin known as The Triumvirate. The
Triumvirate has learned of an opportunity to deal a blow
to the Empire by stealing a new and revolutionary
Stimpack prototype, rumored to be ready for development
inside an imperial penal facility on Hoth. The PCs are
selected for this job, based in large part on the obligations
the party has to one of the captains of the syndicate (due
to an unfortunate loss at the sabacc tables, followed up
by an ill-advised bet on a long shot in a pod race). The
PCs are unaware that this mission is not what it seems,
and The Triumvirate has an ulterior motive which they are
not telling the PCs about.
Scene 1 – Arrival on Hoth The adventure begins with the party leaving a local
cantina on Bespin, after receiving their orders to steal the
components and prototype of the Stimpack, as well as any
all research notes - in return for completing this task, The
Triumvirate will forgive a portion of the gambling debts
owed by the party.
Arriving on Hoth, disguised as Imperials with prisoners for
transfer, they are instead by security personnel who are
confused and attempting to gain access to the prison
facility, which has gone into lockdown due to an assumed
prison riot. The platform personnel notice something
“off” about the party and engage them in a social
encounter which may escalate to combat.
Unless the party is successful in the social encounter, they
must fight their way through the dock, but will eventually
find that the lockdown has overridden all external
systems, preventing easy access to the facility. The team
will be forced to use a maintenance entrance on the other
side of the complex, but it requires the party to go outside
and brave the elements.
Scene 2 – The Caverns Traveling outside, the party will face survival in the icy
conditions of Hoth – they could all suffer consequences
that impact them for the rest of the adventure. As they
arrive at the maintenance entrance, they discover that
they must traverse an underground cave network to get
into the proper facility.
Not only must they navigate through the maze of
cavernous tunnels, they’ll need to contend with a group
of hungry wampas who’ve made the tunnels their home.
Scene 3 – Gaining Access After dispatching the Wampas, the PCs can attempt to
gain access to the facility, but if they fail, they’ll trigger
an alarm – which will lead to increased difficulties inside
the penal facility. The interior of the prison will lead the
team on a horrific series of grisly encounters, as they
discover a dark facility filled with mangled corpses and
biological terrors from another age.

3
Outside of a main detention area, they’ll discover a
wounded guard clinging to life outside of a locked door,
who may transform into a ghastly figure – an attacking
rakghoul!
Scene 4 – The Detention Area Inside the detention area, the party must contend with an
ever-increasing series of Fear Checks as they encounter
monstrous rakghouls and mass carnage, eventually
discovering a lone surviving prisoner. Who will reveal
secrets about the facility and direct the team to an
underground lab complex. But before they get there,
they’ll need to fend off another swarm of rakghoul
monstrosities!
Scene 5 – The Lab Trekking down a spiraling hallway leads to an expansive
laboratory complex, filled with horrors of genetic and viral
manipulation – and a few more threats to contend with.
The main lab has the answers the team seeks, along with a
pair of dangerous guards driven insane by the events in
the facility, who are “protecting” two of the worst
specimens in the lab. The PCs will have to contend with
the guards – and most likely the released specimens –
while finding a way to deal with a triggered failsafe
system designed to vaporize everything in the facility.
If successful, the team can recover the virus behind this
insanity – and its cure. But the truth of their mission will
leave them with more questions, and difficult decisions
about what to do now.
Preparing for the Session The majority of the action in the Ice Station Zulu
adventure takes place in a very isolated location without
access to the larger resources of the galaxy. Be sure to
consider the following, perhaps reviewing necessary
points with your players at the start of the game.
Planning for Healing There is a great deal of physical danger in this adventure,
and the pre-generated PCs have access to a fair number
of Stimpacks as a part of their standard gear, but if they
manage to expend these resources too early – they’re not
in an easy position to “go buy more”. The GM should
consider the location of the party (a secret biological
research facility) and can easily present the characters
with accessible Stimpacks or even medical equipment, if
it’s truly needed. But the tense nature of this adventure
should preclude the GM from allowing characters too
much time to heal themselves through medical treatment.
Strain suffered during a scene can be removed through
Resilience checks, after a character has had ten minutes of
rest to attempt to shake it off.
Obligation Roll obligation results for the party prior to the start of
the session, as detailed in the Star Wars: Edge of the
Empire Core Rulebook. An Obligation Table is provided at
the start of the adventure, and assumes the game is
running with a party of six PCs. (The Game Master should
adjust the table according to the party makeup.)
Accompanying the Obligation Table are suggested
consequences for the party, should an obligation be
triggered.
Destiny At the start of the session generate a Destiny Pool by
asking each player to roll a Force die .
Running the Adventure As you read through the Ice Station Zulu adventure, you
will notice several side-bars inserted throughout. These
are designed to provide context and ready information for
the Game Master.
Read Aloud Text Several areas of the adventure will contain green side-
bars (as seen below). These represent optional narrative
text to be read to the players to establish mood, explain a
scene, or relate events.
Rules Reminders Sometimes, an encounter or scenario might involve
certain rules that aren’t commonly remembered off the
top of your headThe adventure will sometimes include
blue side-bars (as seen below) to provide quick references.
Read-Aloud Text will appear in a text box like this,
and you are encouraged to read this text to your
players. But feel free to substitute your own
narrative description as needs arise. The Read-Aloud
text is merely meant to provide an aid to the GM.
Quick Rule Summary These summaries are not meant to replace the
proper rules, however, but to simply remind the GM
of how a rule works.
When in doubt, remember to err on the side of fun!
YOU are the GM, and your rulings should be what
are best for your group.

4
Triumph & Despair In certain encounters and scenes, you might find a yellow
and red side-bar (as seen below). This represents
suggested Triumph and Despair results for the scene.
Remember: while you, the GM, determine how Despair is
spent, Triumph results are suggested by the Player. The
Triumph suggestions listed should simply represent solid
suggestions you can offer your player, if they are having
a tough time deciding what to do with their Triumph.
Encounter Maps All encounters are described throughout the module, but
maps are not strictly needed to play this adventure. If you
choose to use pre-created maps, or to create your own,
simply follow the details laid out in the module.
Triumph results, unique to the encounter
area and scene, will be present here to
provide a quick suggestive tool to inspire
your players.
Recommended Despair results, unique to
the encounter area and scene will be
present here, to give the GM creative
options ahead of time.

5

6
Ice Station Zulu
Obligation Check For the start of the adventure, the party has a much
higher obligation total than normally expected. This
represents the PCs’ situation (which led them into this
adventure), and helps ensure the Triumvirate captain has
the leverage he needs to gain the party’s compliance.
Prior to the start of the adventure, roll potential
obligation effects on the chart below.
Obligation Chart
VALUE TYPE CONTROLLING CHARACTER 1-20 Debt Brek Corsen
21-30 Addiction Flyx Byx
31-40 Criminal Mella Myson
41-60 Debt Vor’la
61-70 Addiction Soril Darkrider
71-80 Family Yorbacca
Suggested Obligation Effects If your obligation check is at or below the group’s total
threshold, the weight of their collective obligations is
pressing down on their minds – leading to a great deal of
stress. Each character reduces his Strain Threshold by 1
for the remainder of the adventure.
When a specific PC is indicated by the Obligation check,
then that character’s specific obligation is brought to bear
against them, in an attempt to gain the compliance of the
group. Brek and Vor’la have the largest obligations and
are most likely to trigger – but even if another PC’s
obligation triggers, the Triumvirate will still appeal to
outstanding gambling debts that are owed, but also offer
to deal with that particular PC’s issue directly. Should no
obligation trigger, the Triumvirate will still offer a
reduction in their collective obligations – which should be
motivation enough to let the players know why they
accepted the mission.
Setting up the Adventure Before the adventure begins, the GM needs to set the
stage and story for the group. Driven by the obligations
of the party (which are quite high), the team has been
offered the chance to work off a significant debt by doing
a job for a criminal syndicate, the Triumvirate. The team
just lost a lot of credits on some bad bets, and the
Triumvirate will clear their markers in exchange for their
successful completion of a dangerous job.
Should Brek or Vor’la’s obligations trigger directly, it’s not
so much an “offer” as a demand – in lieu of a bounty on
their heads for their outstanding gambling markers. If
another PC’s obligation triggers, the Triumvirate will
target their specific obligations.
Flyx: the Triumvirate will offer a free (rather large)
supply of Booster Blue.
Mella: the Triumvirate offers to use their influence to
provide her with a new identity.
Soril: the Triumvirate offers him exclusive membership
with a core worlds escort service.
Yorbacca: the Triumvirate knows the location of his
sister, and will provide it.
Any of these secondary offerings by the Triumvirate will
only be granted after the team’s successful mission.
One of the Triumvirate’s captains, Delagray, has tasked the
PCs with infiltrating an Imperial prison facility on the
remote and desolate ice world of Hoth, where the Empire
is supposedly developing a new and powerful Stimpack.
Masquerading as Imperials with a load of new prisoners, a
Triumvirate agent will grant them access. It’s up to them
to find and steal the prototype and all research – then
bring it back to Delagray. Read the following to the party
to set the scene:
As you leave the cantina meeting with Captain
Delagray, you feel lucky to be alive. The bad beat at
the sabacc tables was one thing, but to lose another
10 thousand credits on that pod race was just foolish.
You’ve avoided a bounty on your heads, for now, but
must proceed to the remote planet of Hoth and steal
some kind of new, advanced Stimpack that will help
the Triumvirate deal a blow to the Imperial forces
trying to gain a stronghold in the area. The only
problem: the Stimpack is being developed by the
Empire, inside one of their penal facilities on the
desolate ice world.
With sets of counterfeit Imperial uniforms and
prisoner’s clothing – you are headed to your ship. The
Triumvirate Captain’s instructions were simple: Land
and talk to the ground crew. Let them know you are
there to meet with “Dr. Tui about the XR-12
deployment”. A Triumvirate agent inside will grant
you clearance into the facility. Once inside, find the
prototype Stimpack and steal it, along with all the
research on it. Simple. Right?

7
Scene 1 – Arrival on Hoth This scene begins as the PCs land inside a covered hangar
platform at Ice Station Zulu. As they disembark, they find
that something is a little odd. There are no ground
personnel meeting their ship, all of them seem to be
tending to the entrance door to the facility and its
adjacent computer terminal. Read the following to the
PCs:
Considering the scenario – it’s likely that only the three
human PCs (in their counterfeit Imperial uniforms) are
armed. The other three PCs in “prisoner” smocks would be
unwise to carry weapons openly. Doing so will
immediately force a confrontation with the security
personnel.
However, the party does have a repulsor-sled crate
(silhouette 1) aboard their ship with a keypad
combination lock. It could be used to easily hide weapons
on the way in – and the advance Stimpack and its
research on the way out. It hovers about half a meter off
the ground, and any character can move it as a Maneuver.
If any of the party wants to conceal weaponry in their
clothing, they’ll have ample time to do so aboard their
ship. But there is a chance it may be noticed when
interacting with the Guard Captain in the hangar.
Concealing a weapon requires an opposed Skullduggery
check, with a difficulty increased by the encumbrance of
the weapon:
Weapon Encumbrance Difficulty
Encumbrance 0-1
vibroknife
blaster pistol
Encumbrance 2
heavy blaster pistol
truncheon
Encumbrance 3
blaster carbine
vibrosword
Encumbrance 4+
vibro-ax
blaster rifle
The ensuing encounter will hopefully not resort to
combat. It is intended to be a social encounter between
the party and the Guard Captain. The goal of the
encounter is to simply get the guards to trust that the PCs
really are a group of Imperial operatives there to transfer
prisoners to the head of the facility’s research team. The
Guard Captain has been locked out of his facility with a
prison riot alert in progress. He’s highly agitated and
annoyed – and doesn’t have the computer access to verify
the party’s “Imperial identities”.
The PCs may decide to immediately fight it out with the
few guards that are there, and in their distracted state,
the PCs will be given boost die ( ) on their first actions if
they initiate combat before the social encounter ends.
Convincing the Captain The party can attempt to convince the Guard Captain and
his men of their validity with a variety of opposed
influence checks, as long as they can justify the narrative.
Deception should require the least amount of justification,
as it would represent a straight-forward lie; Negotiation is
extremely difficult – as conditioned Imperial soldiers are
nearly impossible to bribe. Coercion is possible, but a
single failed check will immediately push the agitated
guards into a firefight.
Flying through the swirling snows of Hoth, you
transmit the landing codes provided by the
Triumvirate, but get no response from Ice Station
Zulu. You begin to grow worried that the codes
aren’t good – but soon realize that you can’t hail the
station at all. There are power and life readings,
though. Scanning the area, you land in one of the
covered hangars for the facility – the only one with
the exterior doors open.
As you exit your vessel, something is not right; the
platform personnel are huddled around a computer
near the door that leads into the facility. They barely
take notice of a ship landing, much less your group of
“Imperials” with “prisoners” in tow.
You notice one massive, heavily muscled human
guard standing at the computer terminal barking
instructions, and you seek him out. “I don’t have time
for you right now, we have a prison riot in progress
and the facility has gone into lockdown.”
Drawing a Concealed Weapon The GM should feel free to constrain the easy drawing
of a properly concealed weapon:
Consider mandating that a concealed weapon
requires a full action to draw it (or perhaps a full
maneuver for a character with the Quick Draw
talent).
Multiple , or a on the check to conceal the
weapon may allow the character to draw it faster,
or to conceal more than one weapon.

8
The PCs must have 4 successful checks before 3 failed
checks (except Coercion) to succeed in the social
encounter.
Any character can attempt a check, with the following
difficulties (and potential consequences):
Skill Difficulty
Coercion*
Charm
Deception
Leadership
Negotiation *One failed check immediately leads to combat
and on a check can be used to add Boost ( )
and Setback ( ) dice to subsequent checks, as normal.
and have special consequences, as noted below.
If the PCs fail 3 checks before succeeding on 4 checks,
the guards will not assist them. They won’t necessarily
attack the party, but will insist that they all remain on
the platform until the situation is under control.
If the PCs are successful with 4 checks before they
encounter 3 failures (except Coercion) then they gain
the trust of the Guard Captain and his men. They’ll
allow the PCs to attempt to slice into the computer
terminal – as they’re anxious to get inside.
If the party gains the Captain’s trust, he’ll allow them to
slice the terminal to open the doors (see the “Slicing the
Terminal” section, below). He’ll also inform them of a
secondary maintenance entrance, which his men haven’t
been willing to use, as it’s through a cavern on the other
side of the facility that requires a trek through the ice and
snow to reach.
Combat Encounter Details Should the party decide to fight, instead of talk (or if they
fail the social encounter very badly), the guards will
respond with violent force. The hangar platform is a
relatively small area, protected from the elements by a
completely enclosed alcove. Should combat break out,
the following are the pertinent details of the area:
The door to enter the facility is at long range from the
PCs’ ship as it lands on the platform.
The entire area is well lit and there are no areas of
darkness.
2 clusters of cargo crates dot the area, within Short and
Medium range of the facility door – respectively.
The Guard Captain (a huge, muscled human) starts
behind the computer terminal. He commands a trio of
guards (minions) who huddle near the door.
If the PCs initiate combat before the social encounter is
concluded, they’ll surprise the guards, gaining a Boost
die ( ) on their first checks in combat.
The guards (minions) will spread behind cover and use
their pistols, if possible.
The Guard Captain will first draw his rifle, firing from
the cover of the computer terminal and switching to his
Brass Knuckled fists if he becomes engaged.
The conditioned Imperials will never surrender, and will
fight to the death.
FACILITY GUARDS (3 MINIONS)
Brawn 2 Cunning 2 Presence 2
Agility 3 Intellect 1 Willpower 1
Skills: (for group of 3; downgrade by 1 for each
dead minion): Cool ( ), Melee ( ), Ranged
(Light) ( )
Soak: 4 Defense: 0
Wound Threshold: 15 (5 each) (Crit deals 5 wounds)
Strain Threshold: – (Suffers wounds instead)
Equipment: Blaster Pistol - Integrated (Ranged
[Light] [ ]; Damage: 6; Critical: 3; Range:
Medium; Stun Setting), Vibro-knife (Melee [ ];
Damage: 3; Critical: 2; Range: Engaged; Pierce 2,
Vicious 1)
GUARD CAPTAIN (RIVAL)
Brawn 4 Cunning 2 Presence 1
Agility 3 Intellect 3 Willpower 2
Skills: Brawl 2 ( ), Ranged (Heavy) 1
( ), Survival 2 ( ), Vigilance 1 ( )
Adversary 1: Upgrade incoming attack by 1
Soak: 5 Defense: 0
Wound Threshold: 15
Strain Threshold: – (Suffers wounds instead)
Equipment: Blaster Rifle (Ranged [Heavy] [ ];
Damage: 9; Critical: 3; Range: Long; Stun Setting),
Brass Knuckles (Brawl [ ]; Damage: 5;
Critical: 4; Range: Engaged; Disorient 3)
The Captain accepts your credentials
without question and you gain his trust
immediately, ending the social encounter.
You are immediately exposed as imposters
and a fire fight begins, as well an alarm
sounded.

9
Slicing the Terminal Should the party gain the trust of the guards, they may
suggest being allowed to slice the terminal and open the
doors (perhaps even “forcing” one of their “prisoners” a
“known slicer” to do the job). If combat occurs, victorious
PCs might simply decide to slice the terminal on their
own.
Slicing the terminal isn’t easy to begin with, but with the
facility on lockdown, the slicer would have to overcome a
Daunting ( ) Computers check with setback
dice imposed by the lockdown security protocols.
If the attempt fails, the Captain (if alive) will suggest an
alternate path inside the facility, but explains that it will
be a journey through the ice and snow to a cavern at the
far side of the complex. If the slicing attempt fails, and
there are no guards left alive to communicate this, the
GM should allow basic access to the terminal to
communicate the “status” of the varying entrances into
the facility, and their locations. All hangar platforms are
on permanent lockdown; the only possibly accessible
entrance is a maintenance dock (through a cavern) at the
far side of the base.
In the unlikely event the slicing attempt succeeds, read
this text to the players:
If the Guard Captain and his men are still alive, they’ll
then refuse to allow the doors to be opened again
(though they won’t stop the PCs from heading to the
maintenance entrance). After the direct lockdown from
the (now dead) security man, any subsequent attempt to
open this door should be discouraged by the GM. (Should
players persist in trying, the new difficulty will be
[ ] to slice the door open).
Scene 2 – The Caverns It’s a 15 minute walk through the howling snows and ice
storms of Hoth to reach the cavern entrance. The cold is
beyond anything the PCs have encountered before, and
they’ll need to make checks to avoid Strain from the
environment. Once inside, they’ll face an unexpected
threat before they gain access to the prison.
Dealing with the Cold Traversing the snows of Hoth will require Survival or
Endurance checks by each PC (or a group Survival check
at a doubly upgraded difficulty).
A well spent destiny point by the party (or proper
preparation before they left) might allow them to “have
remembered” to pack cold-weather clothing onboard their
ship, or perhaps to have “discovered” some at the guard
station outside the hangar platform door. Any such
clothing or gear will provide a Boost die ( ) on any
checks made to deal with the cold weather environment.
Each PC must succeed at a Hard ( ) Resilience or
Survival check while traveling outside. Some team
members may also consider pooling their skills for a group
check. This will be possible for Survival (but obviously not
for Resilience) – but will require a slower pace, careful
planning, and execution, doubly upgrading the difficulty
for any group Survival checks ( ).
Failure on a check will cause the PC to immediately suffer
2 Strain. This strain cannot be recovered through
Resilience checks until the PC is in a warm location (even
the caverns are too cold – the PC will have to be inside
the facility). Each on a failed check forces an
additional Strain on the PC. A on a failed check also
reduces the PC’s Strain Threshold by 1 until they can
receive medical treatment (requiring an Average [ ]
Medicine check to heal).
Success will allow the PC to make it to the caverns while
resisting the biting cold of Hoth. Once inside the caverns,
it’s still frigid, but warm enough for the party to avoid
having to make checks.
The door opens with a freezing whine to a horrific
sight. In the darkness of the facility, you can see
bodies strewn everywhere, and you hear the shrieks of
animals in the adjacent security room.
A bloodied guard staggers out of the security room
and stares at you with wild eyes – immediately
slapping a large red button near the entrance. As the
doors immediately begin closing, you see a shadowy
clawed hand grasp the man’s legs and yank him off
his feet, dragging him back into the room!
The door slams shut just as you hear him scream with
terror beneath that same animal shriek and a grisly
sound of rending flesh which silences him…
Group Skill Checks When two or more party members make checks as a
group, the GM may call for a single check
combining the highest relevant skill rank and
characteristic between the participating PCs.
This will generate a “group dice pool” to be rolled
against the difficulty.
ALL participating PCs in the group check suffer the
benefits and drawbacks of the roll, however.

10
If the party managed to convince the Captain of their
sincerity, and successfully maintained the illusion of
“Imperials delivering prisoners”, they could very well be
hauling their repulsor-sled crate with them, stashed with
weapons and gear. Once out-of-sight of the guards, they
are free to gather their things and abandon it. Without
adjustments to withstand the cold temperatures, the
repulsor-sled will malfunction within a matter of minutes,
requiring an average Mechanics check ( ) to fix in a
proper technical bay.
Arrival at the Caverns After their cold weather trek, the party will reach a cave
entrance at the far side of the facility. Read the
following:
If the team heads the wrong way, they’ll get ambushed –
but they may have the chance to prepare for it. They’ll
have a few minutes to examine the scene. (Upon closer
inspection, the sign between the right and center tunnels
simply reads “BEWARE”.) The GM should call for an
opposed group Perception check ( ) for the entire
party, to both ascertain the scene and sense the presence
of the wampas stalking the caves.
If the PCs are successful, they notice a faint indention
where it seems vehicles have passed in the center cavern.
With or more they also notice a partially frozen
carcass hanging against the wall of the right cavern path
and what appears to be a large amount of frozen blood
pooled on the ice floor of the left cavern path – some
distance ahead.
If the group manages or a on the check, then
they also hear the hungry growl of a beast coming from
the left tunnel – and recognize it as a wampa!
If the players gain the knowledge to guide themselves
through the central cavern path, they’ll avoid an ambush
and face the hungry wampas with a bit of an advantage.
If they head down either the left or right tunnel paths,
they’ll be ambushed by the wampas.
When Wampas Attack If the group did not succeed on their Perception check
and chose either the right or the left caverns, they will
immediately meet 2 wampas springing towards them out
of the darkness. If they managed to succeed and move
into the middle cavern, the hungry wampas will give
chase. Read the following to set the scene:
The following are the details of the encounter scene:
If the wampa threat was recognized by the party,
they’re ready for trouble, and roll Cool for initiative –
otherwise, Vigilance is used.
If the party navigated to the center cavern path, both
wampas begin at the entrance to the center cavern – at
Medium range, behind the PCs.
If the party chose the right or left path, both wampas
ambush them from opposite sides of the cavern wall –
at Short range. The wampas also receive a Boost die
( ) on their initiative checks.
The center cavern is free of obstructions or cover
(vehicles regularly pass through it), but the left and
right caverns have numerous stalagmites and columns
of ice, which can provide cover.
Traveling even a few minutes outdoors on Hoth was
very taxing on your bodies, and as you reach the cave
opening you are relieved to find shelter from the
wind and bitter cold – but it’s still freezing in the
cavern air. The caverns appear natural, but has also
been excavated somewhat, and you see very sparse
glow rods sticking out of the icy walls in various
directions.
Your information didn’t include which way to go once
you got here, and there appears to be three distinct
cavern paths: left, center and right. Each seems to
open into more expansive cavern tunnels beyond, and
it is not readily identifiable as to which path you
should take.
There is some kind of small metal sign that looks
chewed and tattered, tacked between the right
cavern and the center one. But, as you move closer
to it, you hear a faint noise echoing somewhere in the
chambers ahead.
Group Skill Checks When the party makes checks as a whole, the GM
calls for a single check combining the highest
relevant skill rank and characteristic in the party.
For the Perception check (if using the pre-
generated PCs), the group Perception check would
be (using Brek’s Cunning of 3 and
Mella’s Force Talent and Perception rank of 1).
Suddenly, you hear rushing steps behind you and turn
to see two giant white-furred beasts racing towards
you! Curled tusk-like horns extend down to blood-
stained jaws that snarl as thick, clawed arms rise to
attack. Wampas!
Moving toward you with unexpected speed, you see a
cold and desperate hunger in their eyes. They are
out for blood and you are definitely on the menu.
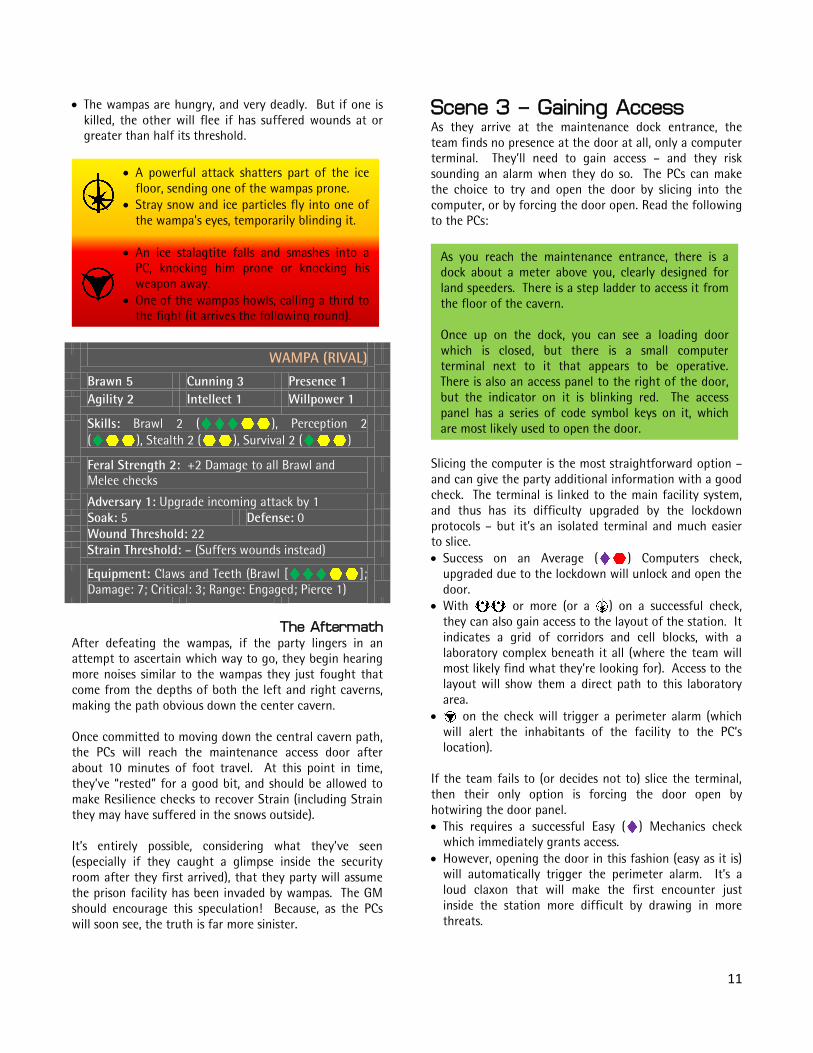
11
The wampas are hungry, and very deadly. But if one is
killed, the other will flee if has suffered wounds at or
greater than half its threshold.
WAMPA (RIVAL)
Brawn 5 Cunning 3 Presence 1
Agility 2 Intellect 1 Willpower 1
Skills: Brawl 2 ( ), Perception 2
( ), Stealth 2 ( ), Survival 2 ( )
Feral Strength 2: +2 Damage to all Brawl and
Melee checks
Adversary 1: Upgrade incoming attack by 1
Soak: 5 Defense: 0
Wound Threshold: 22
Strain Threshold: – (Suffers wounds instead)
Equipment: Claws and Teeth (Brawl [ ];
Damage: 7; Critical: 3; Range: Engaged; Pierce 1)
The Aftermath After defeating the wampas, if the party lingers in an
attempt to ascertain which way to go, they begin hearing
more noises similar to the wampas they just fought that
come from the depths of both the left and right caverns,
making the path obvious down the center cavern.
Once committed to moving down the central cavern path,
the PCs will reach the maintenance access door after
about 10 minutes of foot travel. At this point in time,
they’ve “rested” for a good bit, and should be allowed to
make Resilience checks to recover Strain (including Strain
they may have suffered in the snows outside).
It’s entirely possible, considering what they’ve seen
(especially if they caught a glimpse inside the security
room after they first arrived), that they party will assume
the prison facility has been invaded by wampas. The GM
should encourage this speculation! Because, as the PCs
will soon see, the truth is far more sinister.
Scene 3 – Gaining Access As they arrive at the maintenance dock entrance, the
team finds no presence at the door at all, only a computer
terminal. They’ll need to gain access – and they risk
sounding an alarm when they do so. The PCs can make
the choice to try and open the door by slicing into the
computer, or by forcing the door open. Read the following
to the PCs:
Slicing the computer is the most straightforward option –
and can give the party additional information with a good
check. The terminal is linked to the main facility system,
and thus has its difficulty upgraded by the lockdown
protocols – but it’s an isolated terminal and much easier
to slice.
Success on an Average ( ) Computers check,
upgraded due to the lockdown will unlock and open the
door.
With or more (or a ) on a successful check,
they can also gain access to the layout of the station. It
indicates a grid of corridors and cell blocks, with a
laboratory complex beneath it all (where the team will
most likely find what they’re looking for). Access to the
layout will show them a direct path to this laboratory
area.
on the check will trigger a perimeter alarm (which
will alert the inhabitants of the facility to the PC’s
location).
If the team fails to (or decides not to) slice the terminal,
then their only option is forcing the door open by
hotwiring the door panel.
This requires a successful Easy ( ) Mechanics check
which immediately grants access.
However, opening the door in this fashion (easy as it is)
will automatically trigger the perimeter alarm. It’s a
loud claxon that will make the first encounter just
inside the station more difficult by drawing in more
threats.
A powerful attack shatters part of the ice
floor, sending one of the wampas prone.
Stray snow and ice particles fly into one of
the wampa’s eyes, temporarily blinding it.
An ice stalagtite falls and smashes into a
PC, knocking him prone or knocking his
weapon away.
One of the wampas howls, calling a third to
the fight (it arrives the following round).
As you reach the maintenance entrance, there is a
dock about a meter above you, clearly designed for
land speeders. There is a step ladder to access it from
the floor of the cavern.
Once up on the dock, you can see a loading door
which is closed, but there is a small computer
terminal next to it that appears to be operative.
There is also an access panel to the right of the door,
but the indicator on it is blinking red. The access
panel has a series of code symbol keys on it, which
are most likely used to open the door.

12
Once Inside After the PCs have opened the doors, they are treated to a
gruesome sight, and the GM reads this out loud to them:
This shouldn’t be what the party is expecting. PCs can
make individual checks (with the following difficulties) to
learn more from the carcass:
Knowledge (Xenology), Hard ( ): Success will
reveal that this is likely a “rakghoul” – a near mythic
creature from the days of the Old Republic. Each on
a successful check can reveal one of the following
additional pieces of information:
- Rakghouls are not “born” but created when a
humanoid is exposed to a virus – which is
transmitted by the creatures themselves. Legend
has it that the virus was first created by a deranged
Sith Lord.
- There was supposedly a cure developed for the
Rakghoul Virus; a “Rakghoul Serum” – but no
known samples survived (if they ever existed).
Medicine, Hard ( ): Success will reveal that the
carcass was originally human, but underwent some kind
of radical physical transformation. Each on a
successful check can reveal one of the following
additional pieces of information:
- Scans show the subject underwent rapid
metamorphic change at a genetic level – most
likely the result of some kind of retro-viral
infection.
- The subject’s cranial capacity has been reduced by
half, and its stomach is filled with human flesh.
- Traces of the mutagenic retro-virus are in the
subject’s saliva and the mucous on its claws.
Fear of the Unknown At this point, the group should be stricken with fear (even
more so if successful checks give them insight into what
they’re facing). But even without that knowledge, they
know there’s some kind of monster(s) rampaging through
the facility – and probably packs of hungry wampas in the
caves outside. And if the team doesn’t make good on
their deal with the Triumvirate, they’ve got a life-
threatening bounty waiting for them. The situation is
grim, and could take an immediate toll on the team.
Each PC must make a Fear Check of upgraded Average
( ) difficulty. The effects of the PCs’ Fear Checks will
take hold in the subsequent encounter with the prison
guard, detailed in the “A Man in Need” section, below.
A Man in Need As the party continues down the corridor, just a few
meters from the corpse of the creature, they’ll they see a
guard lying on the floor, shaking, and obviously wounded.
At first glance, he has gashes across his chest and a wide
bite mark on his thigh. The instant he notices the PCs, the
guard begins screaming to them for help. (Within a few
moments, he’ll begin his transformation.)
To help the man, a PC can attempt first aid with a
Formidable ( ) Medicine check. If the check
fails, the guard will utter the words “They change or kill
As the door open, the stench of death hits you first;
unmistakable. Stepping inside, you are shocked to see
half-eaten corpses of what used to be support staff,
guards and some prisoners strewn about. Fear begins
to take hold as you hear animalistic shrieks coming
from the distance, you know not where.
In front of you is a long dark corridor, and the room
you are now in is a square receiving bay that has very
little light, only provided by the arc shorts of the
exposed wires that used to be light fixtures.
Everything in this room has been destroyed in what
looks like a terrible fight. On the floor you see a
figure that looks like an animal – but nothing you’ve
ever seen before.
Bi-pedal, but with long, loping arms ending in sharp
claws; a grotesquely wide, fanged maw; and splotchy
gray skin slick with mucous. The thing is clearly dead,
after being impaled with what looks like shelving that
was fashioned into a spear. Perhaps the most
disturbing thing about the creature is its garb; it
appears to be wearing a torn prison uniform, or at
least pieces of it.
Fear Checks When making a Fear Check, the character can decide
whether to use Cool or Discipline, with various
effects, depending on the results:
: The character adds to any check he makes
during the encounter.
: The character suffers Strain equal to the
number of . If the check generates or
more, the character can instead be staggered for
his first turn (unable to take any actions).
: The character is so frightened, all checks he
makes have their difficulty upgraded by 1 until the
end of the encounter.
or multiple : The character avoids any fear
effects, except those triggered by .
: Gain on your next check in the encounter.
Spend multiple to grant to other character’s
next checks.
: Cancels all penalties from Fear Checks for the
rest of the encounter – no matter the source.

13
everything… everything…” He’ll then drop a code
cylinder, motion down the corridor, and then start
convulsing violently. (He then immediately begins to
transform.)
If the PCs attempt to question him about what
happened, he will only utter the words noted above,
drop the code cylinder, and then start convulsing
violently. (He then immediately begins to transform.)
If the PCs are successful with the Medicine check, they
will have abated the flow of the virus (and the guard’s
transformation). He’ll give them the code cylinder and
explain that it’s a guard-key to the detention area. He’ll
pass out from his strain momentarily, but will be able to
answer a few questions before then.
- He’s just a prison guard, recently out of the
academy.
- He’ll tell them that “monsters” are killing
everything and changing some people into
monsters.
- If asked about the Stimpack research or “XR-12”,
he’ll reveal that there are labs in the lower levels,
and that the researchers were using the prisoners
as test subjects. But he doesn’t know what they
were working on
- If the PC’s mention “Dr. Tui”, he’ll respond that Dr.
Tui is the lead researcher at the facility.
If the guard begins convulsing, he then starts to change
into a monstrous being like the corpse the party saw in
the receiving area. If this occurs, read the following:
Reacting quickly, the PCs may elect to kill him
immediately. But if they wait, he will become a rakghoul
and will immediately attack them.
If the party triggered the perimeter alarm when entering
through the maintenance bay – then the noise will also
have attracted another group of rakghouls, which will
arrive via a maintenance duct while the guard transforms
(or after the PCs save him). If this occurs, the GM should
use the stat block for a Rakghoul Pack (in Scene 4 of the
adventure). The trio of rakghoul minions will burst into
the room at Medium range from the PCs.
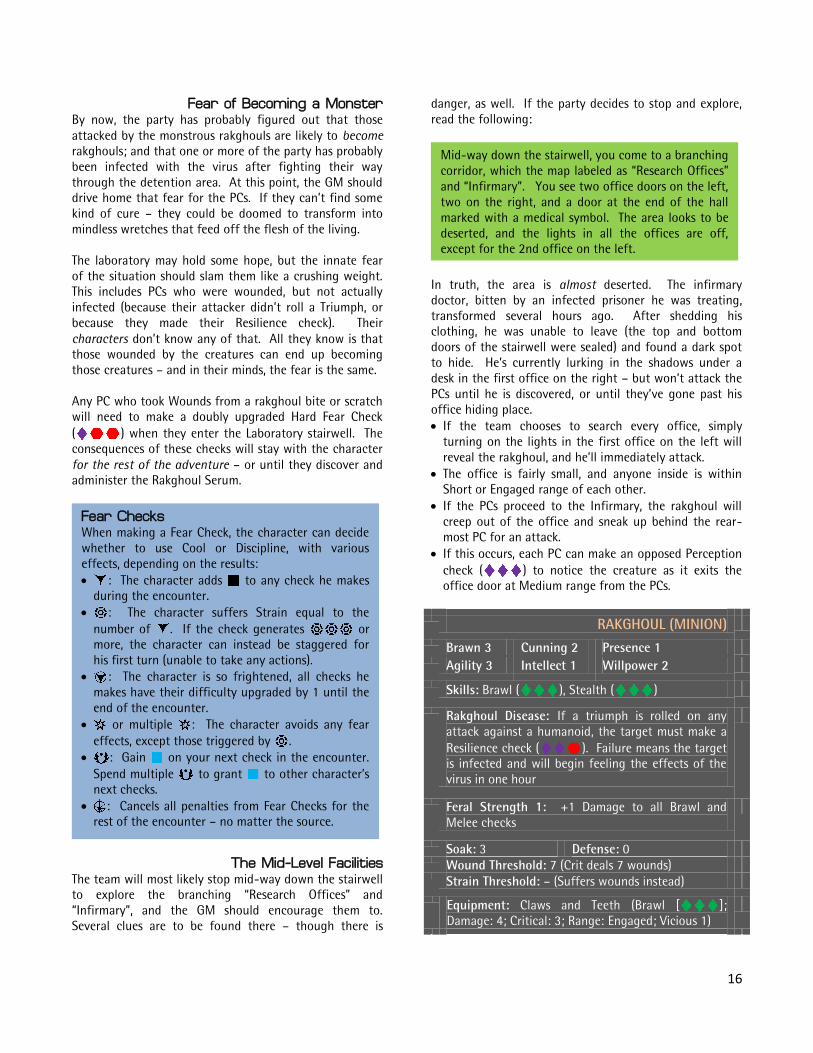
RAKGHOUL (MINION)
Brawn 3 Cunning 2 Presence 1
Agility 3 Intellect 1 Willpower 2
Skills: Brawl ( ), Perception ( )
Rakghoul Disease: If a triumph is rolled on any
attack against a humanoid, the target must make a
Resilience check ( ). Failure means the target
is infected and will begin feeling the effects of the
virus in one hour
Feral Strength 1: +1 Damage to all Brawl and
Melee checks
Soak: 3 Defense: 0
Wound Threshold: 7 (Crit deals 7 wounds)
Strain Threshold: – (Suffers wounds instead)
Equipment: Claws and Teeth (Brawl [ ];
Damage: 4; Critical: 3; Range: Engaged; Vicious 1)
After the encounter, the party can use the guard’s code
cylinder to open the detention area door at the far side of
the corridor. Make sure the PCs do not discard this
cylinder as it will access many areas of the prison, acting
as a guard’s key to move about.
Suddenly, his shaking turns into violent convulsions!
He groans and his eyes roll back into his head as his
skin grows wet, clammy, and begins to dull. He howls
as you hear bones and sinews pop and snap; his arms
and legs lengthen and his fingers erupt with sharp
claws! The corners of his mouth split open to reveal a
gaping maw filled with needle-like teeth! He stares
at you with what are (for now) still human eyes – and
gives you a look of pleading fear…
The Rakghoul Disease When a rakghoul successfully attacks a humanoid
with its teeth or claws, and rolls a , it has passed
the virus to its target.
The targeted character must immediately make a
Resilience check ( ).
If they succeed, they have fended off the virus.
If they fail, they have become infected; and within
1 hour, the transformation may begin.
1 hour after infection, the target can attempt
another Resilience check ( ) to hold off the
transformation for a time. If successful, they keep
the transformation at bay – but must attempt
another Resilience check every hour, with an
upgraded difficulty each time.
If the infected target fails one of these checks, they
immediately transform into a mindless rakghoul.
In lieu of a Resilience check, a Daunting
( ) Medicine check can be made to slow
the spread of the virus and hold off transformation
for an hour, but the infection cannot be cured
without administering the Rakghoul Serum.
Even with the Rakghoul Serum, a fully transformed
rakghoul cannot be “cured.”

14
Scene 4 – The Detention Area Entering the detention area, the team will find more
chaos and grisly violence than any of them have seen in
their careers. The stench of blood is everywhere, thick
enough to permeate everything in the environment.
Heaven knows how many of these monsters are in the
facility. Read the following to the PCs:
Fear of a Gruesome Death Trapped in an enclosed space with monsters that don’t
just kill and eat you – but can turn you into one of their
own kind – is a terrifying proposition. Throughout Scene
4, the party runs the risk of encountering groups of
rakghouls. Each time they do, every PC must make
another Fear Check of doubly upgraded Average ( )
difficulty at the start of that encounter. The effects stay
with them until they make a new check (at the start of a
new encounter) or they leave the detention area.
Navigating through the Cell Blocks The PCs have entered the detention area from the south.
If the party elects not to follow the tapping sounds to the
west, they can wander the length of the detention area in
search of the entrance to the lower-level labs. The
detention area is constructed like a grid, with lengthy
corridors crisscrossing between squares of four cell blocks.
This provides plenty of cover, for both the PCs and the
rakghouls. Each cell they pass is deserted. Many of the
cell doors are open, blood caking the floors. Most are
filled with bodies (or pieces of bodies) too mangled to
make out.
Off of the east wall is an access causeway that will
ultimately lead back to the landing platforms (and the
party’s ship); but it is filled with rakghouls. The northern
wall of the detention area has numerous corridors that
lead to barracks, offices, and other maintenance sections
of the prison. But to the west is the sound of that
tapping – and the direction where the team will find the
entrance to the lab levels below.
Heading that direction is the smartest thing to do – but if
the PCs persist in exploring elsewhere, the GM should
present an encounter with 1 to 2 Rackghoul Packs
(detailed below) each time the group decides to explore
away from the tapping sounds. Each encounter will
require a new Fear Check ( ) from all PCs.
The Panicked Prisoner If the PCs follow the tapping sounds, they will find a
solitary cell in the northwest corner of the detention area
that has a prisoner inside, quite panicked. He appears
uninjured, but his eyes are hollow with fear. He
spastically bangs his head on his cot (the tapping sound
they heard) and wrings his hands constantly. Though
nearly insane with terror, he is coherent, and can
communicate. A brief exchange with the prisoner will
reveal several pieces of information:
He was in his cell when the lights went out. He
watched the first monster come and attack the guards,
biting several before they killed it. Just before lunch
time, he watched the first guard return from the
infirmary – then transform into a monster just outside
his cell.
More monsters came, and the guards opened the cells
to give them “new targets” – but they forgot about him.
If asked about “Dr. Tui” or “XR-12”, he’ll have no
knowledge of either.
If asked about the “research” going on in the labs, the
prisoner will point the way to the lab entrance (down a
nearby hallway) and admit that several prisoners were
often taken down there – though he never was. Some
never came back.
The area is poorly lit; and you hear more shrieks of
animals that you know to be monstrously consuming
any flesh they can find.
Fear courses through you as a few flashes of light
illuminate the detention area. You also hear a steady
tapping noise coming from the right side of the room,
but you cannot see far enough to know what it is.
You are aware that the entrance to the lab is in that
general direction, but there is no way to know if that
entrance is blocked or if you will find more monsters
there.
Fear Checks When making a Fear Check, the character can decide
whether to use Cool or Discipline, with various
effects, depending on the results:
: The character adds to any check he makes
during the encounter.
: The character suffers Strain equal to the
number of . If the check generates or
more, the character can instead be staggered for
his first turn (unable to take any actions).
: The character is so frightened, all checks he
makes have their difficulty upgraded by 1 until the
end of the encounter.
or multiple : The character avoids any fear
effects, except those triggered by .
: Gain on your next check in the encounter.
Spend multiple to grant to other character’s
next checks.
: Cancels all penalties from Fear Checks for the
rest of the encounter – no matter the source.

15
He’ll also relate that a group of surviving guards locked
themselves inside the lab after all this started – no one’s
come out since.
The PCs’ new code cylinder will open his cell door – but
he will resolutely REFUSE any attempt to be let out of
his cell. It has kept him safe, and he won’t leave it. If
the party chooses to open it anyway – he won’t leave
and will demand they close the door and lock it again.
Any discussion with the prisoner will eventually attract
the attention of two Rakghoul Packs and another combat
encounter will ensue. The following are the pertinent
details of the scene:
2 Rakghoul Packs will come rampaging down the
northern and western hallways, heading toward the
corner cell. Both begin at Medium range from the PCs.
The PCs must begin the encounter by making Fear
Checks ( ), as normal.
If the prisoner’s door is open, one of the rakghouls will
attack and kill him as soon as they can reach his cell.
Nearby corners and open cells can provide cover for the
PCs.
RAKGHOUL PACK (3 MINIONS)
Brawn 3 Cunning 2 Presence 1
Agility 3 Intellect 1 Willpower 2
Skills: (for group of 3; downgrade by 1 for each
dead minion): Brawl ( ), Perception ( )
Rakghoul Disease: If a triumph is rolled on any
attack against a humanoid, the target must make a
Resilience check ( ). Failure means the target
is infected and will begin feeling the effects of the
virus in one hour
Feral Strength 1: +1 Damage to all Brawl and
Melee checks
Soak: 3 Defense: 0
Wound Threshold: 21 (7 each) (Crit deals 7 wounds)
Strain Threshold: – (Suffers wounds instead)
Equipment: Claws and Teeth (Brawl [ ];
Damage: 4; Critical: 3; Range: Engaged; Vicious 1)
Getting to Safety After being clued in to the location of the entrance to the
lab, the PCs should be eager to get there – and away from
this nightmare. But as they make their way down hallway
to the lab entrance, they hear more shrieks and the sound
of Rakghouls advancing toward them. Read the following
to the PCs:
If the players immediately ask to open the door by using
the code cylinder, then the GM should allow them to
immediately open it, scramble in, and lock it behind them
before the rakghouls reach them.
But if they take too long or make any attempt to open the
door other than using the guard’s code cylinder, they’ll be
forced into another encounter with 1 Rakghoul Pack.
They’ll need to make another Fear Check ( ) and take
on the rakghouls in a cramped hallway with no cover.
After (or during) the encounter, if the PCs don’t think to
use the code cylinder on the door, the lock can by
bypassed with a Hard ( ) Mechanics or Skullduggery
check.
Scene 5 – The Laboratory Finally gaining access to the Laboratory Complex under
the facility, the team finds it mostly well-lit and empty. A
wide stairwell extends deep into the ground, with
branching offices and medical facilities along the way. At
the bottom of the stairwell is the main “Experimental
Lab”, where the team will find their answers. Read the
following to the PCs:
A PC’s attack forces or lures one of the
rakghouls into a nearby cell, then slams the
door shut on it.
With a barking cry, one of the rakghouls
alerts another pack (it arrives the following
round).
As you plod down the hallway towards a white access
door marked “Laboratory”, you hear a piercing shriek
and turn to see three more of the monsters loping
towards you, drool streaming from their mouths!
Turning, you race towards the Lab door – only to find
it locked…
As the door seals shut behind you, you turn to see a
stark white and very well-lit stairwell. It’s wide, and
leads down over 50 meters into the ground. You spy
an exit corridor about halfway down; and a sign
across from you on the wall lays out a simple iconic
map that labels that area as “Research Offices” and
“Infirmary”. At the bottom of the stairwell, the map
indicates a large area marked with a Biohazard
symbol, labeled “Experimental Lab”. You hear nothing
but your own breathing, and there doesn’t appear to
be anyone in sight…
16
Fear of Becoming a Monster By now, the party has probably figured out that those
attacked by the monstrous rakghouls are likely to become
rakghouls; and that one or more of the party has probably
been infected with the virus after fighting their way
through the detention area. At this point, the GM should
drive home that fear for the PCs. If they can’t find some
kind of cure – they could be doomed to transform into
mindless wretches that feed off the flesh of the living.
The laboratory may hold some hope, but the innate fear
of the situation should slam them like a crushing weight.
This includes PCs who were wounded, but not actually
infected (because their attacker didn’t roll a Triumph, or
because they made their Resilience check). Their
characters don’t know any of that. All they know is that
those wounded by the creatures can end up becoming
those creatures – and in their minds, the fear is the same.
Any PC who took Wounds from a rakghoul bite or scratch
will need to make a doubly upgraded Hard Fear Check
( ) when they enter the Laboratory stairwell. The
consequences of these checks will stay with the character
for the rest of the adventure – or until they discover and
administer the Rakghoul Serum.
The Mid-Level Facilities The team will most likely stop mid-way down the stairwell
to explore the branching “Research Offices” and
“Infirmary”, and the GM should encourage them to.
Several clues are to be found there – though there is
danger, as well. If the party decides to stop and explore,
read the following:
In truth, the area is almost deserted. The infirmary
doctor, bitten by an infected prisoner he was treating,
transformed several hours ago. After shedding his
clothing, he was unable to leave (the top and bottom
doors of the stairwell were sealed) and found a dark spot
to hide. He’s currently lurking in the shadows under a
desk in the first office on the right – but won’t attack the
PCs until he is discovered, or until they’ve gone past his
office hiding place.
If the team chooses to search every office, simply
turning on the lights in the first office on the left will
reveal the rakghoul, and he’ll immediately attack.
The office is fairly small, and anyone inside is within
Short or Engaged range of each other.
If the PCs proceed to the Infirmary, the rakghoul will
creep out of the office and sneak up behind the rear-
most PC for an attack.
If this occurs, each PC can make an opposed Perception
check ( ) to notice the creature as it exits the
office door at Medium range from the PCs.
RAKGHOUL (MINION)
Brawn 3 Cunning 2 Presence 1
Agility 3 Intellect 1 Willpower 2
Skills: Brawl ( ), Stealth ( )
Rakghoul Disease: If a triumph is rolled on any
attack against a humanoid, the target must make a
Resilience check ( ). Failure means the target
is infected and will begin feeling the effects of the
virus in one hour
Feral Strength 1: +1 Damage to all Brawl and
Melee checks
Soak: 3 Defense: 0
Wound Threshold: 7 (Crit deals 7 wounds)
Strain Threshold: – (Suffers wounds instead)
Equipment: Claws and Teeth (Brawl [ ];
Damage: 4; Critical: 3; Range: Engaged; Vicious 1)
Fear Checks When making a Fear Check, the character can decide
whether to use Cool or Discipline, with various
effects, depending on the results:
: The character adds to any check he makes
during the encounter.
: The character suffers Strain equal to the
number of . If the check generates or
more, the character can instead be staggered for
his first turn (unable to take any actions).
: The character is so frightened, all checks he
makes have their difficulty upgraded by 1 until the
end of the encounter.
or multiple : The character avoids any fear
effects, except those triggered by .
: Gain on your next check in the encounter.
Spend multiple to grant to other character’s
next checks.
: Cancels all penalties from Fear Checks for the
rest of the encounter – no matter the source.
Mid-way down the stairwell, you come to a branching
corridor, which the map labeled as “Research Offices”
and “Infirmary”. You see two office doors on the left,
two on the right, and a door at the end of the hall
marked with a medical symbol. The area looks to be
deserted, and the lights in all the offices are off,
except for the 2nd office on the left.

17
The party should be able to make short work of the
creature; and can then fully explore the offices and
infirmary. Without the need for skill checks, the team can
easily discover several pieces of data, clues, and computer
files in each of the offices and the Infirmary. If the party
spends time searching each room, they discover the
following:
There is torn and discarded lab coat under a desk in one
of the offices. Clipped to it is an Imperial ID card for
the infirmary doctor, and in the coat pocket is an
unmarked code cylinder (which will open, among other
things, the Experimental Lab door at the bottom of the
stairwell).
In the lit second office on the left, there is a secure
cabinet labeled “Fox Echo Tango Tango 1”. But it is
locked.
- The code cylinder in the lab coat will open it.
- A PC could also force the cabinet open with a Hard
( ) Mechanics check.
- Inside is a tiny, portable freezer unit with a vial of
liquid, labeled “Juliet Foxtrot Alpha”.
- No more details are apparent, but the freezer unit
looks portable (about the size of a datapad) and
has plenty of power.
Examining purchase orders and transfer papers logged
in the offices, it’s clear the penal facility was
transporting more prisoners in than out; and far more
than the facility could support.
The doctor’s personal terminal in the Infirmary logs
several internal communications to a “Dr. Tui”.
- They note frustration at “being unable to treat the
rakghoul infection in the prisoners without the
antigen” and requests that samples of the “antigen”
be made available.
- A single reply is saved from “Dr. Tui”, explaining
that the antigen is not fully tested, and cannot be
clinically administered at this time.
To Your Health The Infirmary is also well stocked with state-of-the-art
medical treatment equipment – even a bacta tank.
Realistically, there won’t be time for a dip in a bacta tank
for any of them. But the PCs may attempt to use the
facility perform First Aid. Any such checks will take at
least 10 minutes, each – so the party must be wary. Some
may have less than an hour before they succumb to the
rakghoul virus. (Checks to heal critical injuries require at
least an hour to attempt.) Use of a liter of bacta from the
tank, in conjunction with a Medicine check for First Aid,
will automatically provide a Boost die ( ) to the check,
and reduce the time needed to make the check by half.
Though much of the day-to-day infirmary supplies were
exhausted during the outbreak, the GM may also consider
allowing an Average ( ) group Perception check to
discover a stash of 6 normal Stimpacks hidden behind a
drawer in the Infirmary doctor’s desk.
The communication from “Dr. Tui” should clue the team in
on the fact that there is a cure for the virus, even if it is
“untested”. And that should be their primary motivator to
get to the lower lab.
Accessing the Experimental Lab If the party is ready to move on, a trip to the bottom of
the stairwell will take them to the large, medically sealed
doors of the “Experimental Lab”. The doors are locked,
and there is no computer terminal – though there is a
code cylinder access panel beside the doors.
If the players use the code cylinder discovered in the lab
coat, they’ll find that the doors immediately open. If the
party bypassed the mid-level facilities or did not discover
the doctor’s code cylinder, the one they have from the
guard will not work. They can attempt to bypass the lock
with an upgraded Hard ( ) Mechanics or
Skullduggery check. If they fail, the GM may suggest
searching for additional clues in the offices and guide the
players back to the lab coat.
Experimental Abominations Entering the “Experimental Lab”, the PCs will finally
discover the truth about their mission, and the ultimate
fate of “Dr. Tui”. Read the following to the PCs as they
enter:
Group Skill Checks When the party makes checks as a whole, the GM
calls for a single check combining the highest
relevant skill rank and characteristic in the party.
For the Perception check (if using the pre-
generated PCs), the group Perception check would
be (using Brek’s Cunning of 3 and
Mella’s Force Talent and Perception rank of 1).
With a soft puff of air, the laboratory doors open to a
startling research facility. The room is circular, with a
massive, pulsing power conduit that stretches from
the floor to the ceiling, ringed by computer terminals.
Lab stations and unrecognizable medical equipment
are placed with some strategic purpose, leaving
walkways to two unmarked doors at opposite ends of
the room. Several flat tables with restraining cuffs
lay empty, and banks of test tubes and vials crowd
the area. But the most disturbing sight is the “tanks”
which dominate the far wall.

18
It’s here the PCs can begin their search. But they must be
careful, as they’re likely to alert a pair of insane laboratory
guards behind the left door, both bent on protecting the
contents of the lab.
The PCs will not have to search too hard to find what they
seek. Success on an Average ( ) Perception check will
lead them to notice a closed glass storage unit labeled
“XR-12”. Inside are 20 vials in two neat rows: the top
row of 10 vials are labeled “XR-12 Virus” and the bottom
row of 10 vials are labeled “XR-12 Antigen”. Any
generated on a successful check can also reveal one of the
following details:
From the research notes, it’s clear that “Dr. Tui” is (or
was) the research head of Ice Station Zulu – and had
extensive knowledge in genetics and virology.
The team discovers a message from “Cpt. Delagray”
(their Triumvirate handler) to Dr. Tui, arranging for a
“group of agents” to arrive and take possession of “XR-
12 samples” – though it’s not clear why the Doctor
would have agreed.
Based on medical logs and personal notes, it seems that
one of the “subjects” (in the busted tank) unexpectedly
awoke from stasis 6 days ago and attacked 2 lab
technicians before it was killed. Dr. Tui knew the
subject was contagious, but his research notes make it
clear that he elected to “not administer the antigen” to
its victims, hoping for the chance to watch the
progression of the virus in an uncontrolled
environment.
Much of the above information can also be gleaned with
an Average ( ) Computers check at the lab’s terminals.
If a is rolled on the check, the PCs notice a crucial
detail. The XR-12 vial case is not locked, but it does have
a nearly invisible alarm mechanism. Disabling the alarm
will require a Formidable ( ) Mechanics or
Skullduggery check. But in their rush to access the
“antigen” (Rakghoul Serum), the PCs are likely to throw
caution to the wind and immediately open the case to
administer it.
Opening the case without disabling the alarm will have
two very bad (and very likely, considering the need for a
) consequences. The first will be to alert the pair of
Laboratory Guards in the next room, who will enter and
confront the party. The second will be the triggering of a
station-wide failsafe system intended to prevent an
outbreak. If the PCs trigger the alarm, read the following:
A dozen massive tanks, filled with what looks like
bacta, house a grotesque menagerie floating in their
depths. Clearly rakghouls, like those you encountered
in the levels above, some appear smaller and partially
developed. They look much different from the others,
sporting patches of fur, scales, and extra limbs –
almost as if they’d been “infused” with the DNA of
other creatures.
What draws your eye immediately are the 2 center
tanks, much larger than the rest. They house normal
looking rakghouls – as “normal” as these creatures
can get, at any rate – except for their increased size;
they’re almost a meter taller than the others, and lack
the hunched stature and elongated arms. One is
clearly wearing the torn remnants of a lab coat, the
other, an Imperial Officer’s uniform.
The very last tank, next to the far door to the right,
has clearly been shattered. Shards of glass surround
it, and the nearby floor is still wet with the tank fluid.
You see no sign of an occupant, and it suddenly
occurs to you how all this undoubtedly started.
As you open the door to the case, a chirping alarm
begins to sound in the lab. You then hear the pulsing
power conduit in the center of the room begin to
thrum faster, along with the sound of an opening
door at the far side of the lab.
Stepping out of some kind of lounge, you see a pair
of security guards in black Imperial armor, wielding
force pikes, with carbines slung at their sides. They
wear no helmets, and their muscled necks twitch with
fear and confusion. Blood-shot eyes with vacant
stares peer at you with a manic insanity as they speak
to you in a low monotone.
“You must not wake the sleepers…” one says.
“We protect them,” says the other, “They are
changing. They will change us. They will change the
galaxy…”
The first one stares at you, his eyes finally coming
into focus, “Will… you be changed as well?”
You swallow, and pause – just now noticing a small
countdown timer that has blinked to life on the main
console of the power conduit: 10 minutes, and
counting down. You’re not sure what that means, but
it can’t be good, as the conduit begins growing
warmer and thrumming faster and faster.
Meanwhile, the two large rakghouls in the center
tanks appear to be stirring at the sound of the alarm,
their claws twitching and bubbles escaping from their
mouths. This is just perfect.

19
The 10 minute countdown to a station-wide incineration
has already begun, and the PCs are faced with two nasty
rakghoul fiends about to “hatch” and heavily armed crazy
guards intent on protecting them. Their ultimate goal is
to get back to their ship with samples of the XR-12 Virus
and Antigen (after most likely dosing themselves), but
getting out alive is a much bigger concern right now.
The guards are confused, but won’t attack the PCs until
they are convinced of their motives. Or, if one of the PCs
attempts to remove any of the XR-12 vials or destroy the
rakghouls, the guards will grow enraged and attack. But
if the PCs can hold their cool – and make no sudden
movements – they can attempt to talk down the
Laboratory Guards and convince them to abandon this
insanity.
If the Party Gets Very Lucky… It’s possible (but highly unlikely) that the PCs noticed the
alarm on the XR-12 case, and managed to successfully
disarm it. If this occurs, not only does the station failsafe
not begin, but the lab guards are not immediately alerted.
The team can abscond with the vials, and if they don’t
disturb the lounge where the guards are, they could
escape via the emergency hatch. If this occurs, the GM
will need to modify the above narration and skip directly
to the “Conclusion” of the adventure.
But even in the above scenario, it’s likely that the PCs will
stumble upon the guards in the lounge as they explore. In
that event, proceed as normal with the sections below,
just without the threat of the station failsafe.
Additionally, if the team is unable to talk down the
guards, the rakghouls will awaken at the sound of combat
(not the alarm) and emerge from their tanks in the 3rd
round of initiative.
Talking down the Guards The Laboratory Guards have spent the last few days in a
horror unlike anything they’ve experienced – and it’s
broken their minds. Their Imperial conditioning forced
them to devote themselves to a mad scientist who viewed
the rakghoul outbreak as a “gift” to the galaxy, so much
so that he subjected himself and the prison warden to a
modified version of the virus, indoctrinating the guards
with his perverse philosophy and commanding them to
protect him while he “slept”.
Breaking the mental fugue of the guards can be
accomplished with a variety of opposed influence checks,
as long as the PC can justify the narrative. Charm, lies,
threats, or appeals to the “chain of command” are all
possible avenues; but Negotiation is nearly an Impossible
option – as the guards care little for money or reward.
In their conditioned state, this will be a difficult task, and
the threat of the countdown timer will also upgrade the
difficulty for the PCs.
The PCs must have 4 successful checks before 2 failed
checks to succeed in this social encounter.
Any character can attempt a check, with the following
difficulties:
Skill Difficulty
Coercion
Charm
Deception
Leadership
Negotiation
and on a check can be used to add Boost ( )
and Setback ( ) dice to subsequent checks, as normal.
and have special consequences, as noted below.
If the PCs fail 2 checks before succeeding on 4 checks,
the guards will immediately attack.
If the PCs are successful with 4 checks before they
encounter 2 failures then they’ll talk down the guards
and break them out of their mental delusion.
If the guards attack (due to a failed social encounter, or a
too-soon action by the PCs), refer to the “Combat
Encounter Details” section, below.
If the guards are talked down, they’ll allow the PCs to
leave with the XR-12 samples, as long as they can come
with them. They’ll also point to the other door out of the
lab, explaining that it leads to an emergency hatch to the
docking platforms up top. The PCs might also decide to
immediately focus on disarming the station failsafe. But
before they can get too far, the pair of rakghouls awake
and burst forth from their tanks! Refer to the “Combat
Encounter Details” section, below.
Combat Encounter Details If combat breaks out, the PCs may face multiple
dangerous threats. Without the guards on their side, this
encounter is extremely difficult; and is complicated by a
looming self-destruct countdown that could vaporize
everything if not dealt with quickly. The following are the
details of the encounter scene:
The guards are immediately brought back
to reality, and abandon their delusion,
ending the social encounter.
Your words enrage one of the guards, who
screams, “YOU WILL NOT STOP THE
CHANGE!” They immediately attack.

20
The massive power conduit (and control terminal to
disable the failsafe countdown) are located in the
center of the room, at Medium range from each of the
room’s 3 doors.
- Disabling the failsafe countdown requires 3
separate successful Hard ( ) Computers or
Mechanics checks made as an Action at the control
terminal.
- The PCs have 10 rounds to disable the failsafe, or
the entire facility will be incinerated in a fusion
blast!
Aside from the entrance door the PCs came through (at
Long range, opposite the rakghoul tanks), there are 2
doors at opposite ends of the lab (at Long range from
each other) which lead to a lounge and an escape
hatchway.
The lab is filled with scientific and medical machinery
and equipment, providing ample cover.
The XR-12 vial case is next to the power conduit, at
Medium range from the lounge door the Laboratory
Guards will enter from.
- As an Action, a PC can administer a vial of the
antigen (Rakghoul Serum), immediately curing and
immunizing themselves against the virus.
If the Lab Guards attack the PCs to start the encounter,
the lounge door is where they’ll begin. They’ll focus on
engaging their enemies and using their force pikes,
unless forced into a ranged scenario.
The 2 Rakghoul Fiends will fully awaken and burst forth
from their tanks in the 2nd round of initiative, unless the
PCs talked down the Lab Guards, in which case the
Rakghoul Fiends will burst out of their tanks to start the
encounter.
Regardless of the Laboratory Guards’ disposition toward
the PCs, the Rakghoul Fiends will attack ALL of them,
seeking to kill the guards as readily as the PCs.
- In the Lab Guards’ psychologically damaged state,
they cannot bring themselves to attack the
Rakghoul Fiends, and will cower in fear if attacked.
- After killing them, the Rakghoul Fiends are
intelligent enough to grab the guards’ carbines –
and use them!
When the Rakghoul Fiends enter initiative, read the
following:
LABORATORY GUARD (RIVAL)
Brawn 3 Cunning 2 Presence 1
Agility 3 Intellect 3 Willpower 2
Skills: Melee 2 ( ), Ranged (Heavy) 1
( ), Perception 1 ( ), Vigilance 1 ( )
Soak: 4 Defense: 1
Wound Threshold: 15
Strain Threshold: – (Suffers wounds instead)
Equipment: Blaster Carbine (Ranged [Heavy]
[ ]; Damage: 9; Critical: 3; Range: Medium;
Stun Setting), Force Pike (Melee [ ]; Damage:
6; Critical: 2; Range: Engaged; Pierce 2; Stun
Setting)
RAKGHOUL FIEND (RIVAL)
Brawn 4 Cunning 2 Presence 1
Agility 3 Intellect 2 Willpower 2
Skills: Brawl 1 ( ), Perception 1 ( ),
Ranged (Heavy) 1 ( ), Vigilance 1 ( )
Rakghoul Disease: If a triumph is rolled on any
attack against a humanoid, the target must make a
Resilience check ( ). Failure means the target
is infected and will begin feeling the effects of the
virus in one hour
Feral Strength 1: +1 Damage to all Brawl and
Melee checks
Adversary 1: Upgrade incoming attacks by 1
Soak: 4 Defense: 0
Wound Threshold: 16
Strain Threshold: – (Suffers wounds instead)
Equipment: Claws and Teeth (Brawl [ ];
Damage: 5; Critical: 3; Range: Engaged; Vicious 1)
A lucky ricochet hits the failsafe control
terminal, ending the countdown.
One of your foes is hurled into caustic
chemicals, staggering them for a round.
A poor ricochet hits the failsafe control
terminal, and the countdown speeds up!
(The station will explode 2 rounds sooner.)
Shattered medical beakers spill across the
floor, creating difficult terrain.
Suddenly, you hear a sickly growl and the two large
tanks rupture, spraying fluid throughout the lab.
Emerging are the two large rakghouls, which stand
almost upright and stare at you with a spark of
intelligence in their eyes, hissing as if they are trying
to speak…
Staring at you, then at the Laboratory Guards, they
shriek and race to attack!

21
The former doctor and prison warden are now rakghoul
fiends, possessing enough intelligence to fight with real
tactics and strategy. Believing themselves to be superior
life forms, they will not stop until everyone in the lab is
dead or infected. (However, they don’t have the presence
of mind to realize that the failsafe countdown is in
effect).
If the PCs are unable to stop the countdown, they may
elect to leave through the emergency hatch in the midst
of combat. Depending on the scenario, this could be
entirely reasonable, and could create an exciting scene!
The emergency hatch door opens onto a 50 meter ladder
that climbs to an escape hatch (secured from the inside)
at the perimeter of the docking platform the PCs’ ship is
on.
The Aftermath
Ideally, the PCs will have disabled the station failsafe
during the combat encounter – but if the encounter ends
before they can finish (and there’s enough time left), the
GM should allow the team to complete the disabling of
the failsafe – or race to the emergency hatch and take off
before the station explodes.
It’s up to the team whether they honor their bargain and
return with samples of the XR-12 virus and antigen – but
they’d be wise to take samples of both with them.
A clever party might also suggest re-setting the station
failsafe, after they’ve disarmed it, giving them time to get
to their ship while ensuring every remnant horror on Ice
Station Zulu is destroyed. The GM should allow this as a
narrative action, if the PCs suggest it.
Once the party returns to their ship, advance to the
“Conclusion” of the adventure.
Conclusion Once the PCs emerge from the emergency hatch from the
lab, they’ll find themselves back in their original landing
bay, with ready access to their ship; though the platform
is deserted and the facility doors are wide open. Read the
following to the PCs:
Plot Hooks and Further Adventures Obviously, the PCs will need to decide just what to do
with both the virus and the serum. Their deal with the
Triumvirate will require closer scrutiny, and the team will
have to face the decision of handing over such an
abominable plague to a criminal syndicate. Complicating
matters further, it’s possible the Triumvirate may not even
know there’s a serum, giving the team an extra bargaining
chip or opportunity for credits.
Some players may be wondering about the frozen vial
(“Juliet Foxtrot Alpha”) taken from the “Fox Echo Tango
Tango 1” storage cabinet. In truth, it has nothing to do
with the rakghoul virus – but is a relic of Dr. Tui’s. A
prized possession of historical value to any geneticist: one
of the last known samples of the original DNA of Jango
Fett, a bounty hunter who provided the source for DNA
for the Republic’s Clone Army during the Clone Wars. This
could create a whole new series of events and dangers for
the team to follow (or a new bargaining chip for the
Triumvirate).
Climbing out of the emergency hatch, you find that it
opens up into the floor of one of the exterior hangar
platforms; and with amazement – you realize it’s
YOUR platform! You are meters away from your ship.
Scrambling up, you notice the platform is completely
deserted. No personnel, or even bodies, can be found;
and the heavy door to the facility is wide open. From
this distance, you stare into the blackness of the
interior security room, but see nothing.
Moving towards your ship, you spy tiny droplets of
blood leading across the platform, past your ship, and
out into the snow and ice. At a glance, you can
almost make out several sets of tracks heading off
into the wilds of Hoth – but you don’t spend much
time pondering it. Unlocking your ship, and ensuring
it’s unoccupied, you punch up nav controls and begin
the pre-flight warm up. In minutes, you’ve departed
Ice Station Zulu and fly through the eerily peaceful
snows of Hoth until you reach orbit.
You struggle with what you just saw and experienced,
and ponder the uses of this mysterious virus that you
were obviously misled about. You will be faced with a
decision when you return, and must decide whether
to dig deeper into the Triumvirate’s plans for the virus
– and whether to give it to them at all.
And then there’s the “cure”… If any of the rakghouls
survived, or if the Empire has a secondary facility,
then the serum could fetch a hefty price on the black
market. But if the mythical rakghoul is really back to
terrorize the galaxy – after all you have just seen –
could you live with yourselves if you sold the cure to
the highest bidder?
You shudder as your nav computer finishes its
calculations and rockets you to light speed.
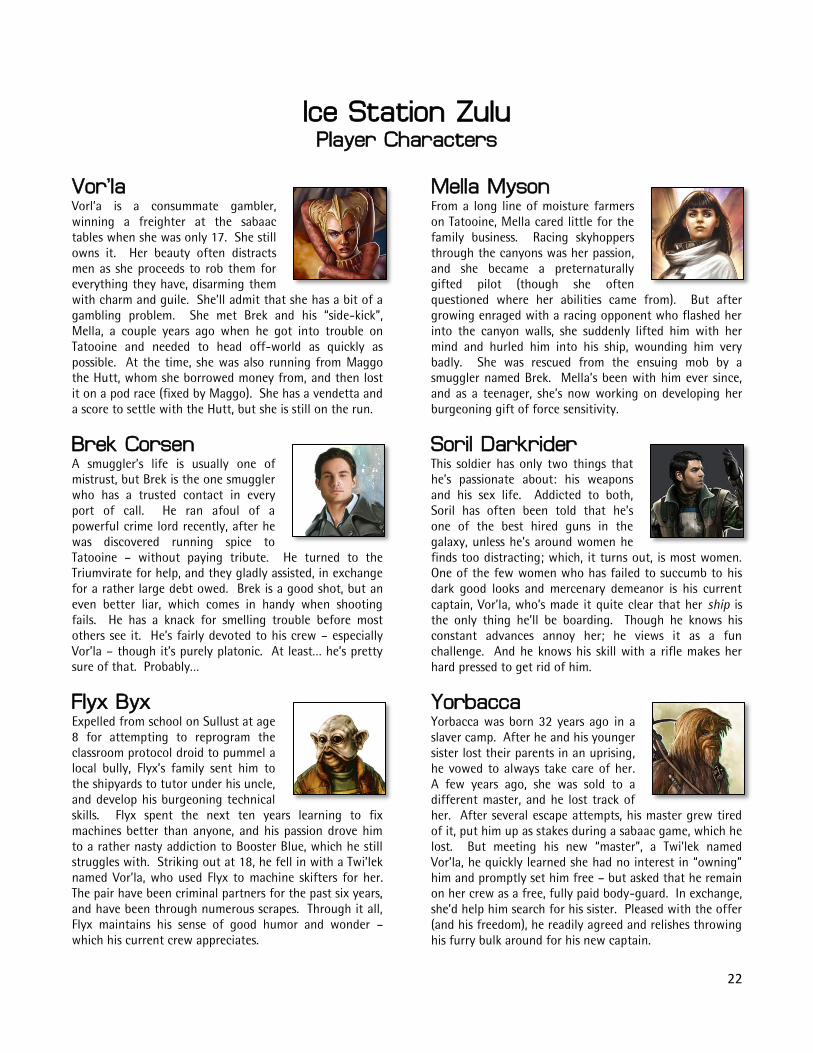
22
Ice Station Zulu Player Characters
Vor’la Vorl’a is a consummate gambler,
winning a freighter at the sabaac
tables when she was only 17. She still
owns it. Her beauty often distracts
men as she proceeds to rob them for
everything they have, disarming them
with charm and guile. She’ll admit that she has a bit of a
gambling problem. She met Brek and his “side-kick”,
Mella, a couple years ago when he got into trouble on
Tatooine and needed to head off-world as quickly as
possible. At the time, she was also running from Maggo
the Hutt, whom she borrowed money from, and then lost
it on a pod race (fixed by Maggo). She has a vendetta and
a score to settle with the Hutt, but she is still on the run.
Brek Corsen A smuggler’s life is usually one of
mistrust, but Brek is the one smuggler
who has a trusted contact in every
port of call. He ran afoul of a
powerful crime lord recently, after he
was discovered running spice to
Tatooine – without paying tribute. He turned to the
Triumvirate for help, and they gladly assisted, in exchange
for a rather large debt owed. Brek is a good shot, but an
even better liar, which comes in handy when shooting
fails. He has a knack for smelling trouble before most
others see it. He’s fairly devoted to his crew – especially
Vor’la – though it’s purely platonic. At least… he’s pretty
sure of that. Probably…
Flyx Byx Expelled from school on Sullust at age
8 for attempting to reprogram the
classroom protocol droid to pummel a
local bully, Flyx’s family sent him to
the shipyards to tutor under his uncle,
and develop his burgeoning technical
skills. Flyx spent the next ten years learning to fix
machines better than anyone, and his passion drove him
to a rather nasty addiction to Booster Blue, which he still
struggles with. Striking out at 18, he fell in with a Twi’lek
named Vor’la, who used Flyx to machine skifters for her.
The pair have been criminal partners for the past six years,
and have been through numerous scrapes. Through it all,
Flyx maintains his sense of good humor and wonder –
which his current crew appreciates.
Mella Myson From a long line of moisture farmers
on Tatooine, Mella cared little for the
family business. Racing skyhoppers
through the canyons was her passion,
and she became a preternaturally
gifted pilot (though she often
questioned where her abilities came from). But after
growing enraged with a racing opponent who flashed her
into the canyon walls, she suddenly lifted him with her
mind and hurled him into his ship, wounding him very
badly. She was rescued from the ensuing mob by a
smuggler named Brek. Mella’s been with him ever since,
and as a teenager, she’s now working on developing her
burgeoning gift of force sensitivity.
Soril Darkrider This soldier has only two things that
he’s passionate about: his weapons
and his sex life. Addicted to both,
Soril has often been told that he’s
one of the best hired guns in the
galaxy, unless he’s around women he
finds too distracting; which, it turns out, is most women.
One of the few women who has failed to succumb to his
dark good looks and mercenary demeanor is his current
captain, Vor’la, who’s made it quite clear that her ship is
the only thing he’ll be boarding. Though he knows his
constant advances annoy her; he views it as a fun
challenge. And he knows his skill with a rifle makes her
hard pressed to get rid of him.
Yorbacca Yorbacca was born 32 years ago in a
slaver camp. After he and his younger
sister lost their parents in an uprising,
he vowed to always take care of her.
A few years ago, she was sold to a
different master, and he lost track of
her. After several escape attempts, his master grew tired
of it, put him up as stakes during a sabaac game, which he
lost. But meeting his new “master”, a Twi’lek named
Vor’la, he quickly learned she had no interest in “owning”
him and promptly set him free – but asked that he remain
on her crew as a free, fully paid body-guard. In exchange,
she’d help him search for his sister. Pleased with the offer
(and his freedom), he readily agreed and relishes throwing
his furry bulk around for his new captain.