Embed Size (px)
Citation preview
IBM WebSphere Adapter for Enterprise Content Management 7.5.0.0
Quick Start Scenarios
Note: Before using this information and the product it supports, read the information in the “Notices” sec-tion, at the end of this document.
This edition applies to version 7, release 5, and modification 0 of IBM WebSphere Adapter for Enterprise Content Management and to all subsequent releases and modifications, until otherwise indicated in new edi-tions.
© Copyright International Business Machines Corporation 2011. US Government Users Restricted Rights – Use, duplication or disclosure restricted by GSA ADP Schedule Contract with IBM Corp.
Table of Contents C h a p t e r 1 . Introduction to Outbound processing 1
Learning objectives...................................................................... 1 Audience 1 Software prerequisites ................................................................. 1
C h a p t e r 2 . Processing Outbound documents 2
Outbound Scenario...................................................................... 2 Configuring the adapter for outbound processing ....................... 2 Creating the project ..................................................................... 3 Setting connection properties for external service wizard ........... 6 Generating business object definitions and related artifacts ....... 9 Deploying the module to the test environment .......................... 14 Testing the assembled adapter application ............................... 16
C h a p t e r 3 . Introduction to Inbound processing 22
Learning objectives.................................................................. 22 Audience 22 Software prerequisites .............................................................. 22
C h a p t e r 4 . Processing Inbound documents 23
Inbound Scenario....................................................................... 23 Configuring the adapter for inbound processing........................ 23
Creating the project 23 Deploying and testing the module ............................................. 36
C h a p t e r 5 . Notices................................................... 77

C h a p t e r 1 . Introduction to Outbound processing
WebSphere® Adapter for Enterprise Content Management version 7.5.0.0 exchanges business data between Content Management Repositories and J2EE applications. The adapter creates, deletes, retrieves, and updates the documents and folders in Content Management System repositories.
The document demonstrates the following scenario:
1. Creating the document in an Enterprise Content Management system and retrieving the docu-ment from the system using the retrieveAll operation, using WebSphere Adapter for Enterprise Content Management.
This scenario demonstrates how WebSphere Adapter for Enterprise Content Management per-forms outbound operations.
Learning objectives After completing this tutorial, you should be able to perform the following tasks:
Create an adapter project in IBM Integration Designer.
Discover services and associated business objects from an enterprise information system (EIS) and make them part of the adapter project.
Create a deployable module that you install on IBM Business Process Manager or IBM WebSphere Enterprise Service Bus.
Test the module and validate the results.
Audience This tutorial is for integration developers who design, assemble, test, and deploy business integra-tion solutions.
Software prerequisites To use this tutorial, you must have the following applications installed:
IBM Integration Designer 7.5
IBM Process Server version 7.5
C h a p t e r 2 . Processing Outbound documents
This tutorial demonstrates how you can use WebSphere Adapter for Enterprise Content Manage-ment to create and retrieve a document from an Enterprise Content Management system.
Outbound Scenario You can perform operations such as creating a document and retrieving the document from an En-terprise Content Management system, by using the outbound processing with the WebSphere Adapter for Enterprise Content Management version 7.5.0.0.
1) The following steps demonstrate the workflow:
2) The user application needs to create the document at the system and retrieve the document from the system.
3) The adapter helps the user application to connect to an Enterprise Content Management system.
4) The adapter creates the document at the system and retrieves the documents from the sys-tem.
5) The adapter converts the output of the program into the required format for the user appli-cation.
Configuring the adapter for outbound processing Run the New External Service to specify business objects, services, and the configuration used in this tutorial
Creating the project 1. Launch IBM Integration Designer by clicking Start > Programs > IBM WebSphere > IBM Integration Designer 7.5.
2. In IBM Integration Designer, switch to the Business Integration perspective by clicking Win-dows > Open perspective > Other. In the Select perspective screen, select Show all, then select Business Integration from the list and click OK.
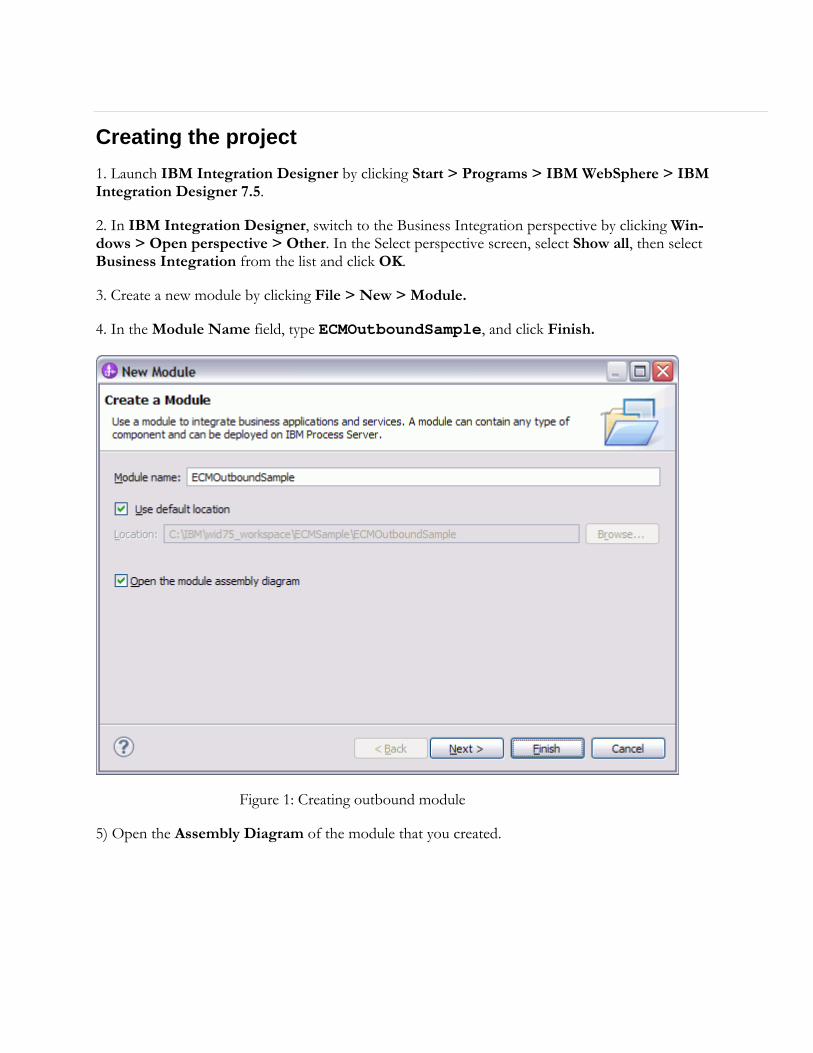
3. Create a new module by clicking File > New > Module.
4. In the Module Name field, type ECMOutboundSample, and click Finish.
Figure 1: Creating outbound module
5) Open the Assembly Diagram of the module that you created.
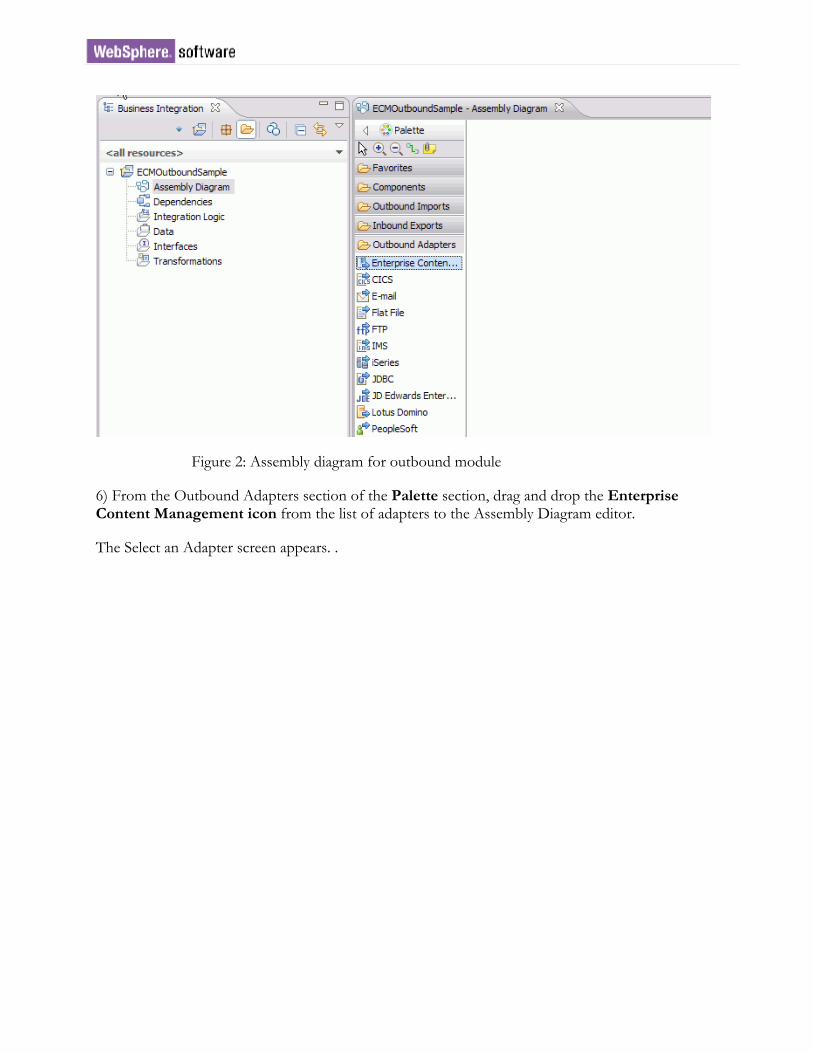
Figure 2: Assembly diagram for outbound module
6) From the Outbound Adapters section of the Palette section, drag and drop the Enterprise Content Management icon from the list of adapters to the Assembly Diagram editor.
The Select an Adapter screen appears. .
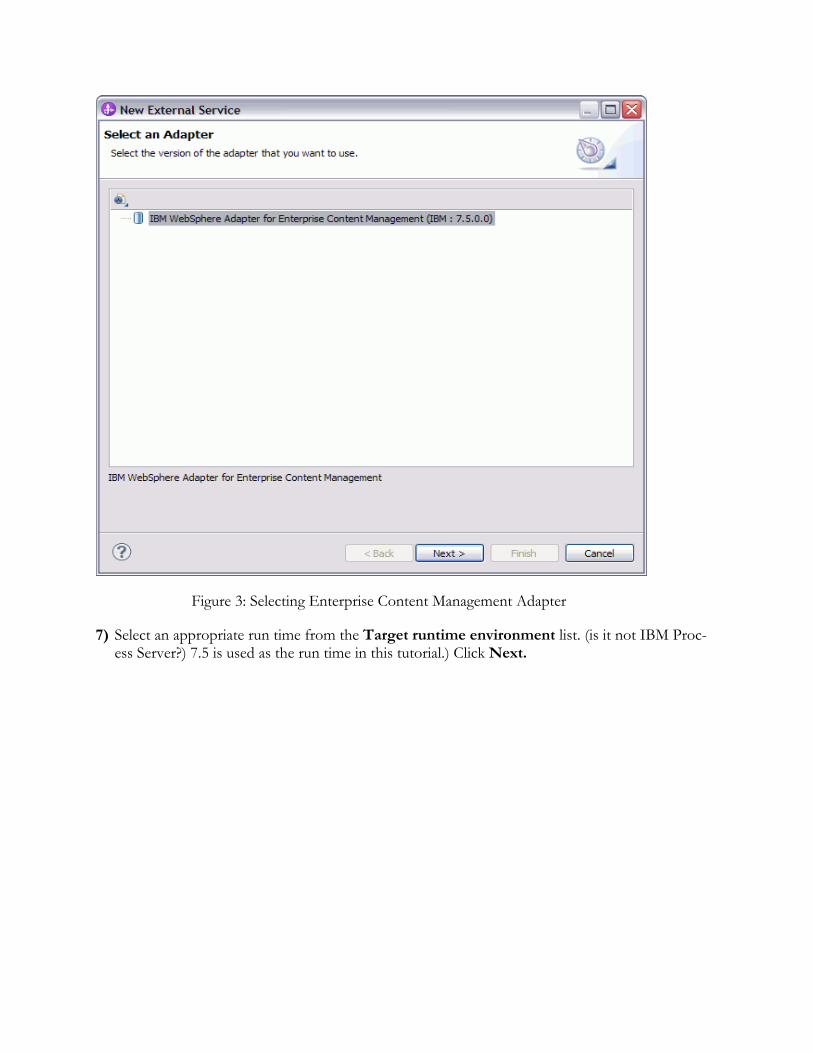
Figure 3: Selecting Enterprise Content Management Adapter
7) Select an appropriate run time from the Target runtime environment list. (is it not IBM Proc-ess Server?) 7.5 is used as the run time in this tutorial.) Click Next.
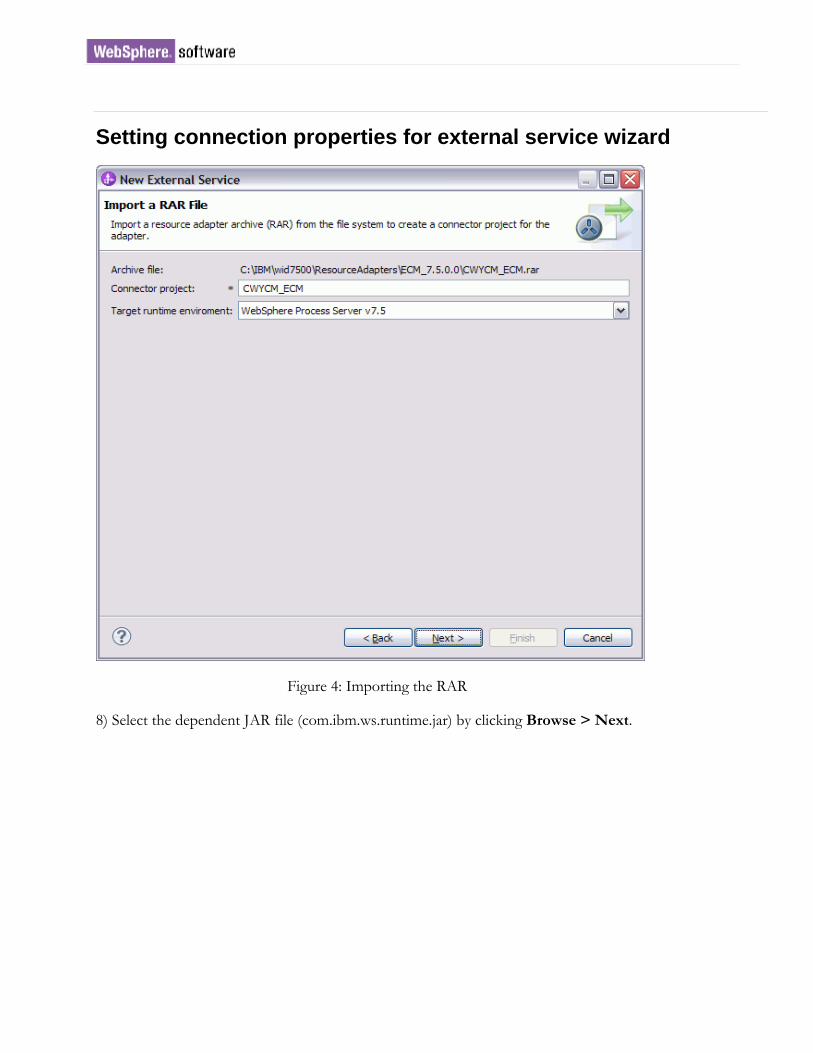
Setting connection properties for external service wizard
Figure 4: Importing the RAR
8) Select the dependent JAR file (com.ibm.ws.runtime.jar) by clicking Browse > Next.
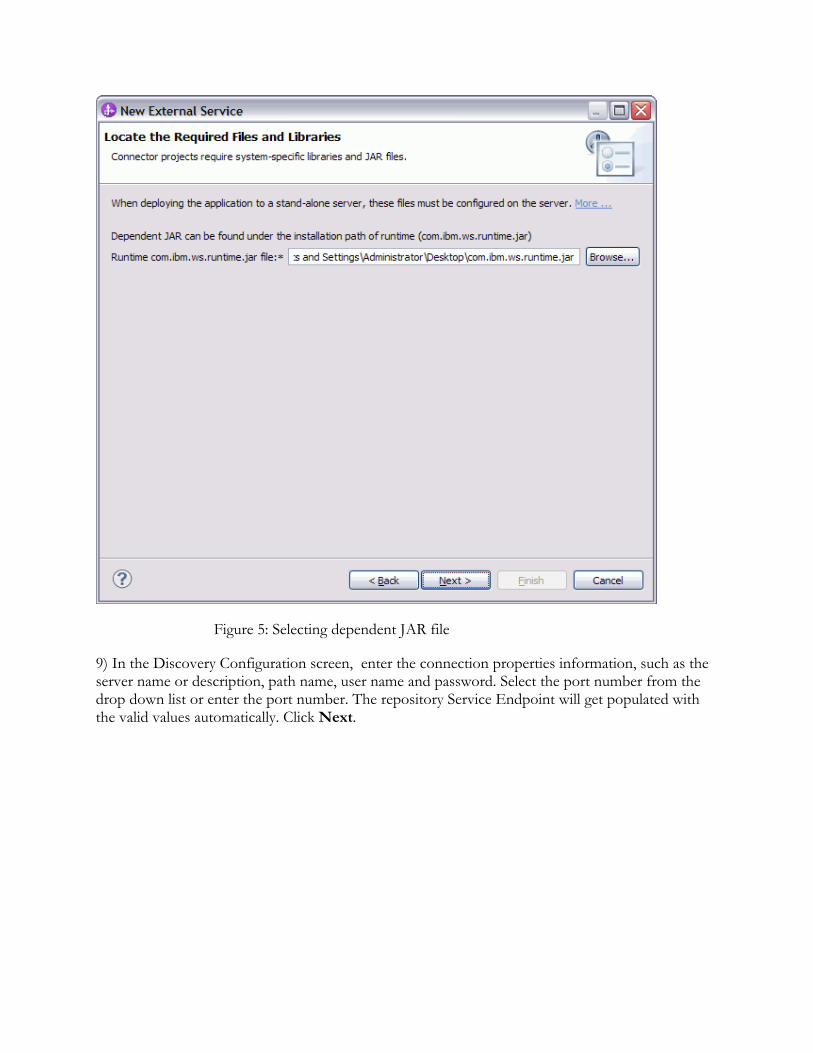
Figure 5: Selecting dependent JAR file
9) In the Discovery Configuration screen, enter the connection properties information, such as the server name or description, path name, user name and password. Select the port number from the drop down list or enter the port number. The repository Service Endpoint will get populated with the valid values automatically. Click Next.
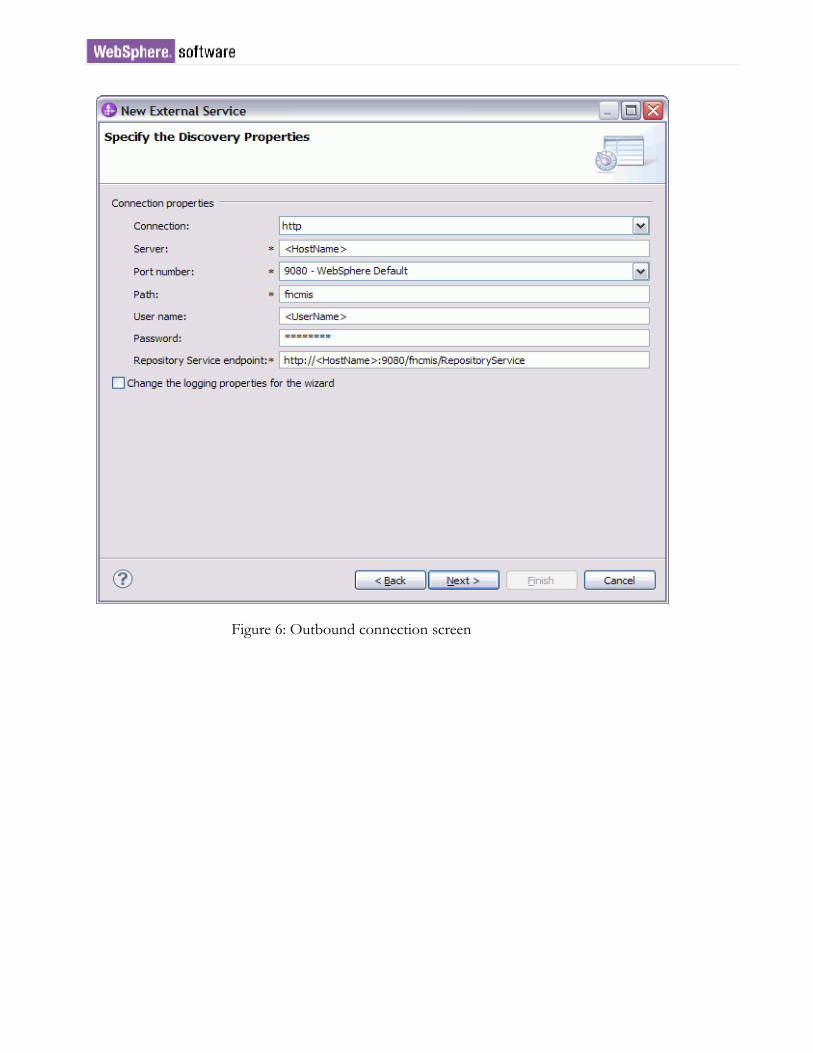
Figure 6: Outbound connection screen
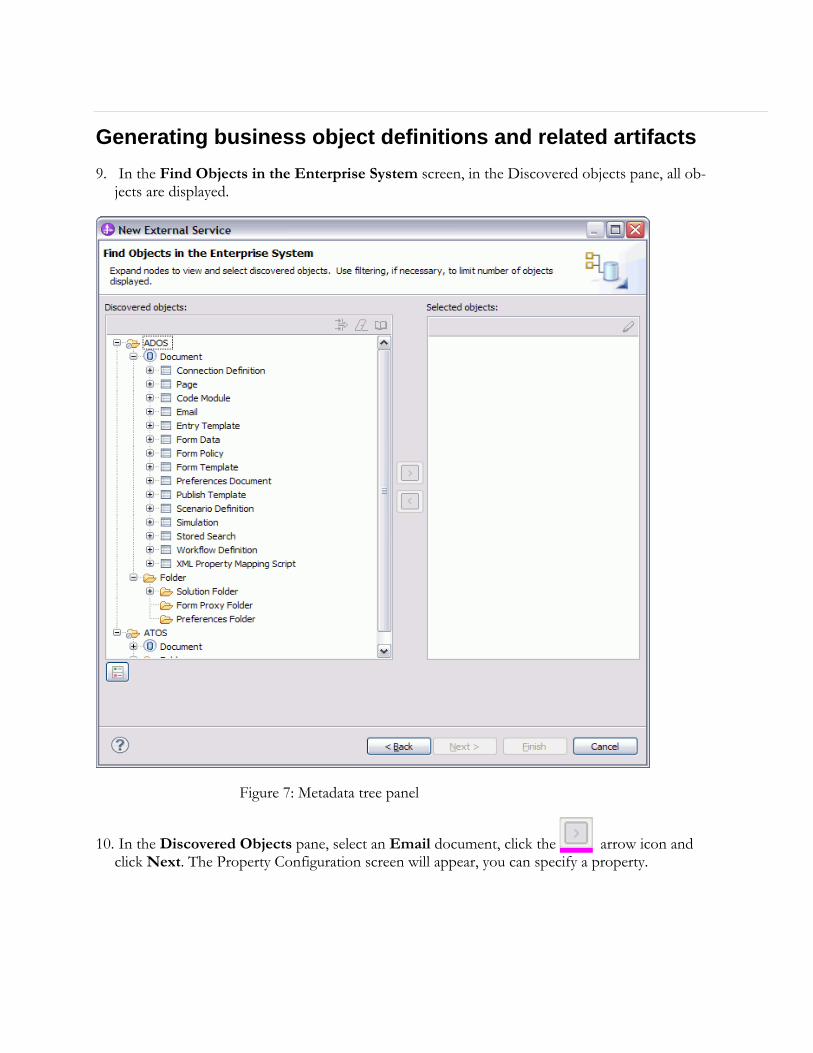
Generating business object definitions and related artifacts 9. In the Find Objects in the Enterprise System screen, in the Discovered objects pane, all ob-
jects are displayed.
Figure 7: Metadata tree panel
10. In the Discovered Objects pane, select an Email document, click the arrow icon and click Next. The Property Configuration screen will appear, you can specify a property.
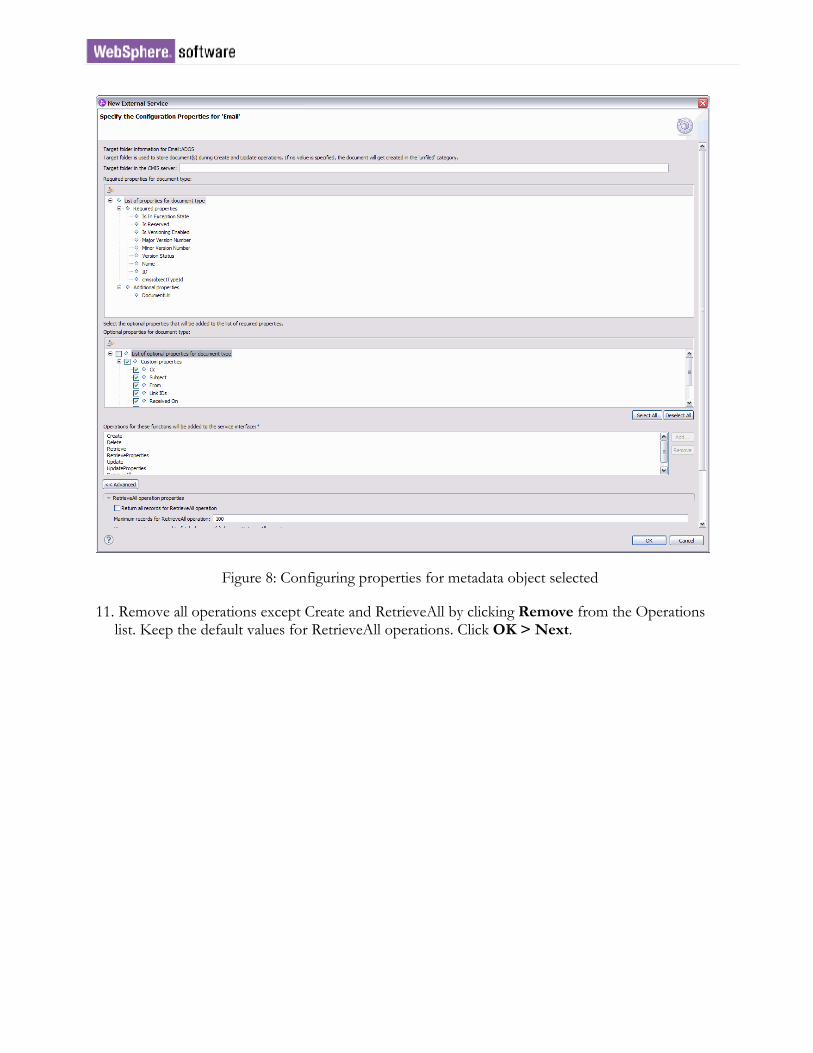
Figure 8: Configuring properties for metadata object selected
11. Remove all operations except Create and RetrieveAll by clicking Remove from the Operations list. Keep the default values for RetrieveAll operations. Click OK > Next.

Figure 9: Operation screen for outbound
12. Click Next in the Specify Composite Properties screen.
.
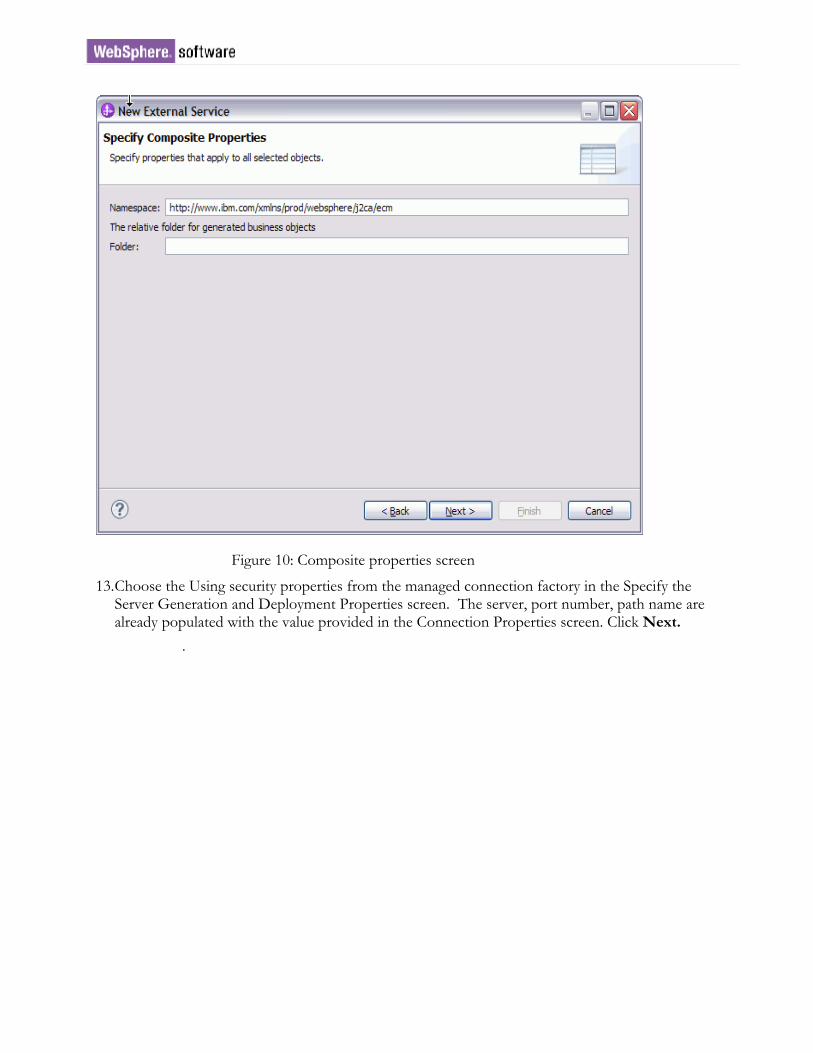
Figure 10: Composite properties screen
13. Choose the Using security properties from the managed connection factory in the Specify the Server Generation and Deployment Properties screen. The server, port number, path name are already populated with the value provided in the Connection Properties screen. Click Next.
.

Figure 11: Service description screen
14. A default name is provided for the interface. Click Finish to complete the configuration.

Deploying the module to the test environment 1. The result of running the external service wizard is an SCA module that contains an EIS import or export. Install this SCA module in the IBM Integration Designer test client. If IBM Process Server is not in the ‘Started’ state, you need to start the server.
2. Add the module you created earlier to the server using the server panel in IBM Integrity De-signer. Right-click the server selection and then select Add and Remove….
Figure 12: Deploying the outbound module
3. Add the SCA module to the server by moving your selection to the right pane with the click of
the button.
4. Click Finish.

Figure 13: Module added to server
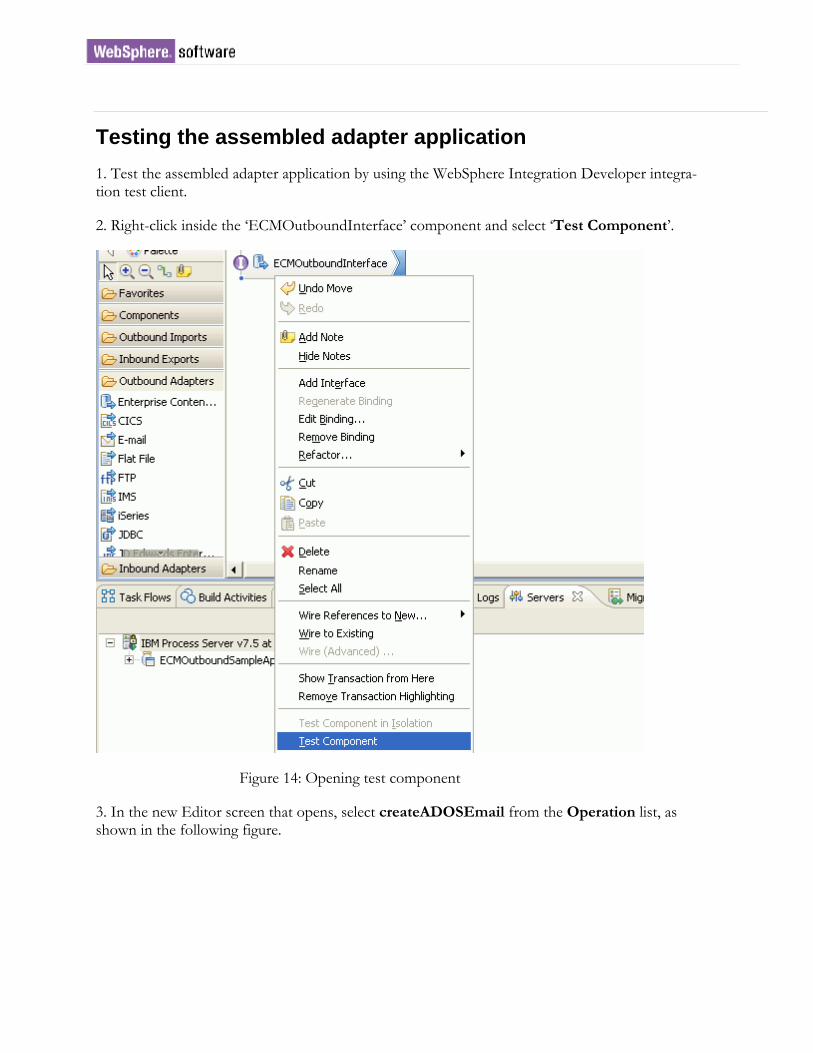
Testing the assembled adapter application 1. Test the assembled adapter application by using the WebSphere Integration Developer integra-tion test client.
2. Right-click inside the ‘ECMOutboundInterface’ component and select ‘Test Component’.
Figure 14: Opening test component
3. In the new Editor screen that opens, select createADOSEmail from the Operation list, as shown in the following figure.
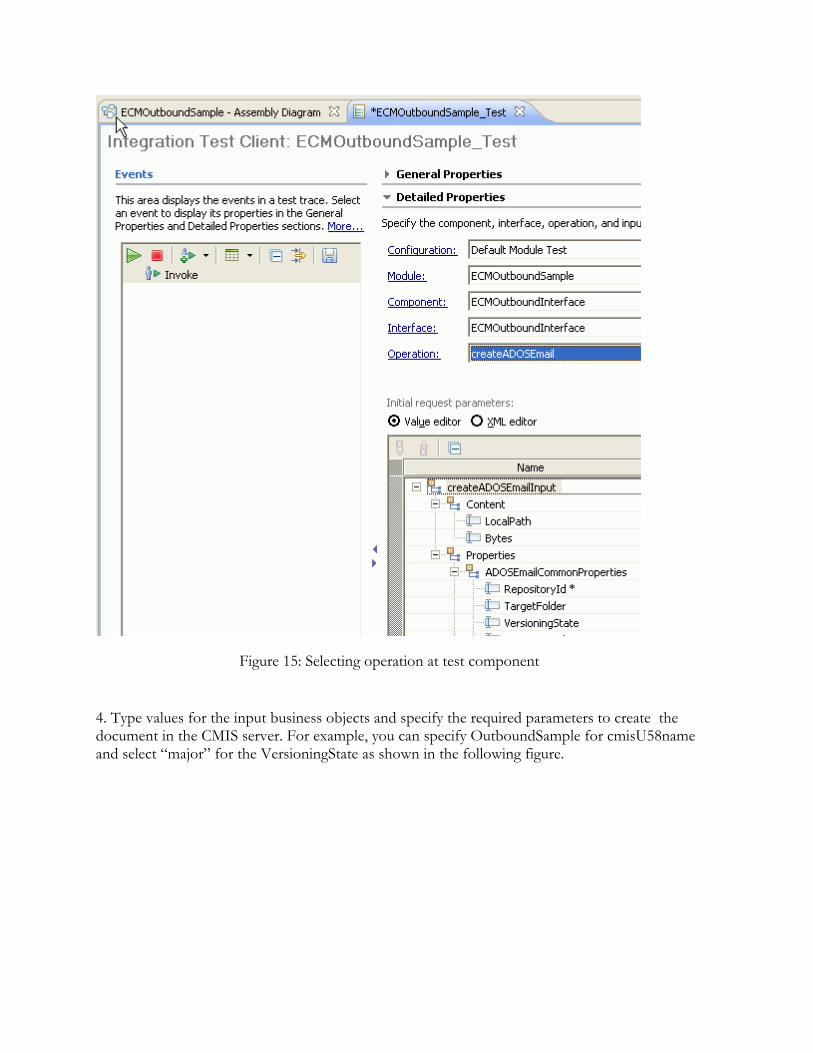
Figure 15: Selecting operation at test component
4. Type values for the input business objects and specify the required parameters to create the document in the CMIS server. For example, you can specify OutboundSample for cmisU58name and select “major” for the VersioningState as shown in the following figure.
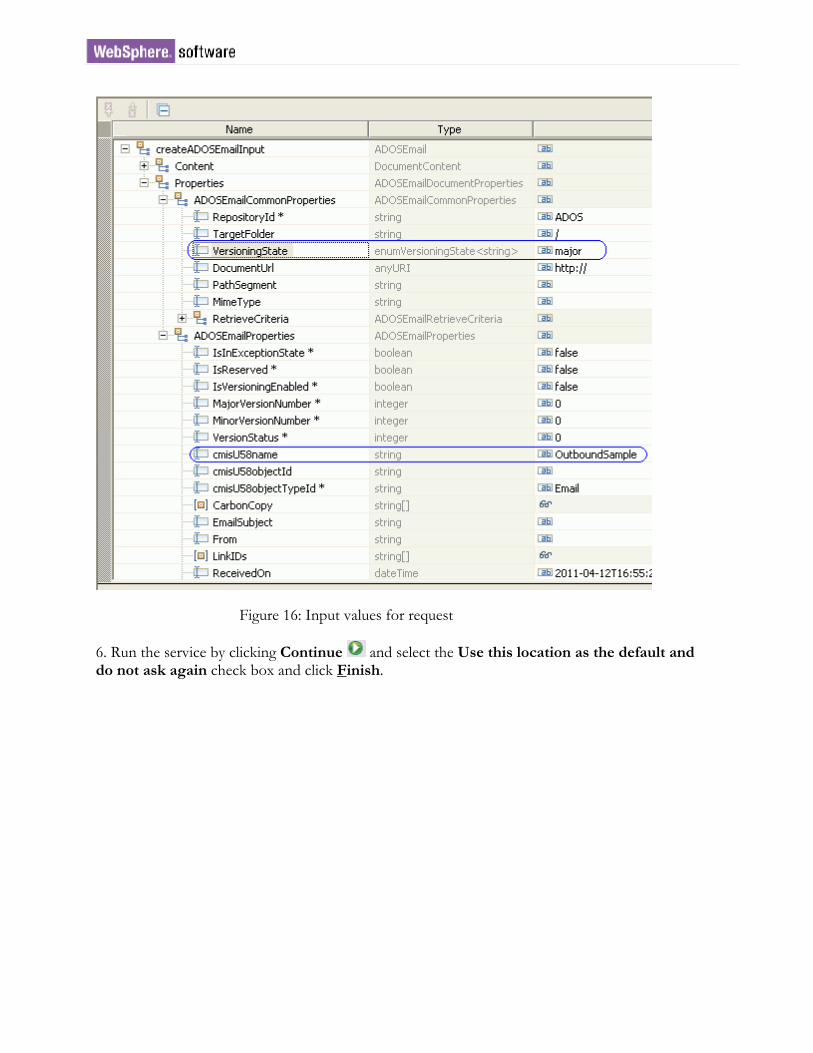
Figure 16: Input values for request
6. Run the service by clicking Continue and select the Use this location as the default and do not ask again check box and click Finish.
The document 'OutboundSample' will be created in the CMIS system and the returned object will get populated in the same business object, as shown in the following figure.
Figure 17: Output for outbound request
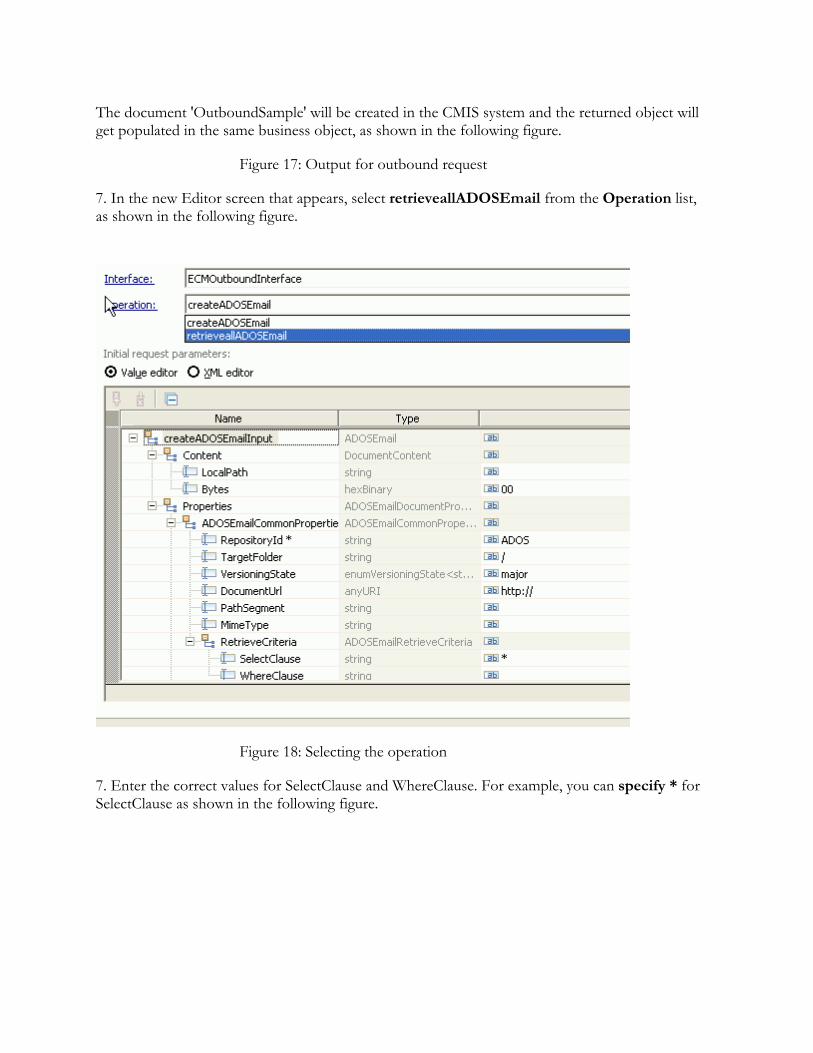
7. In the new Editor screen that appears, select retrieveallADOSEmail from the Operation list, as shown in the following figure.
Figure 18: Selecting the operation
7. Enter the correct values for SelectClause and WhereClause. For example, you can specify * for SelectClause as shown in the following figure.
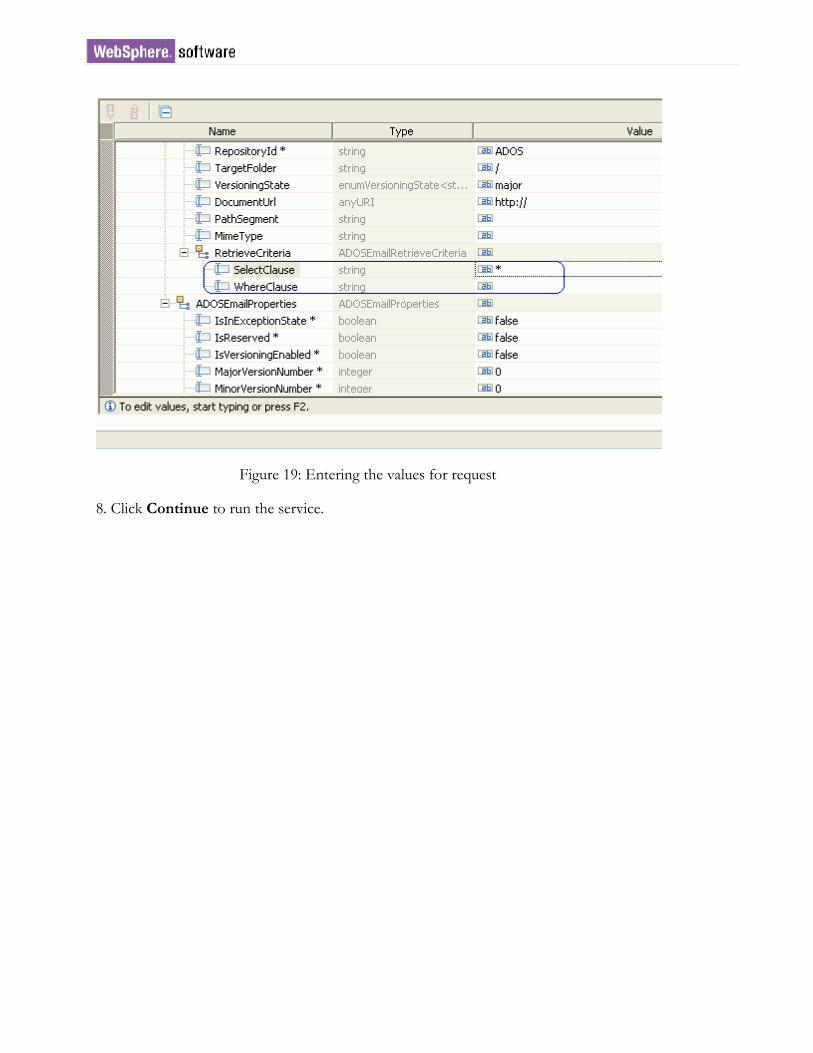
Figure 19: Entering the values for request
8. Click Continue to run the service.
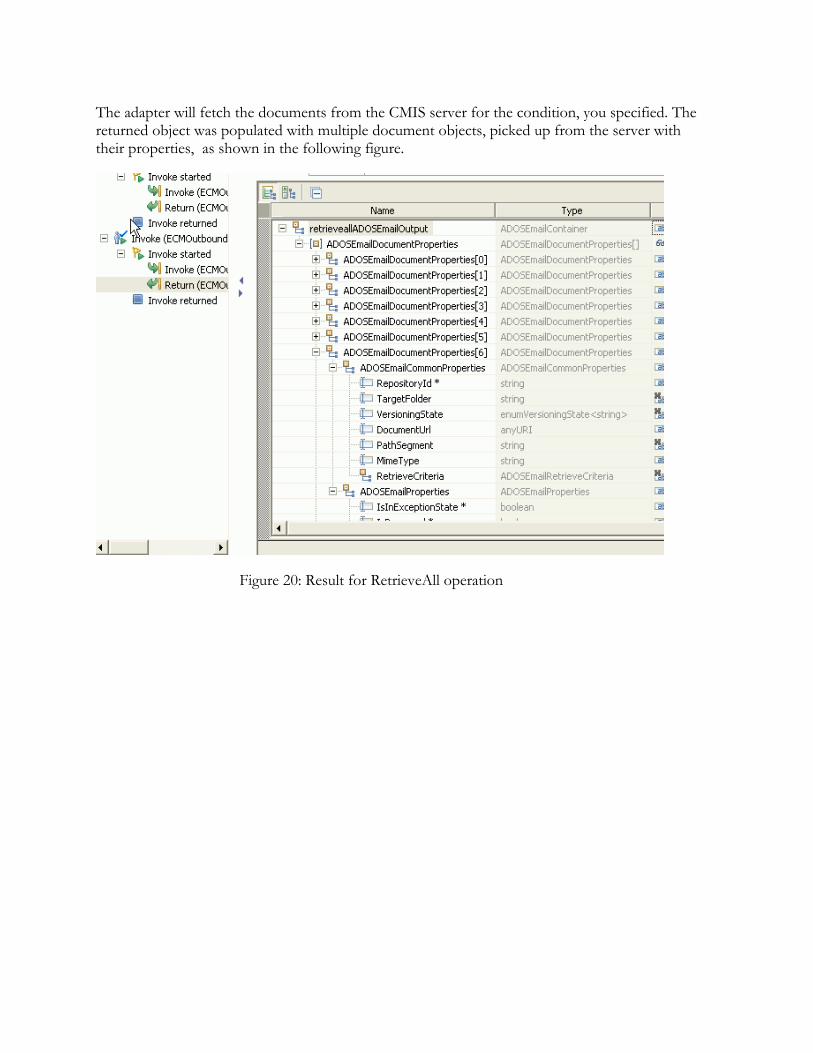
The adapter will fetch the documents from the CMIS server for the condition, you specified. The returned object was populated with multiple document objects, picked up from the server with their properties, as shown in the following figure.
Figure 20: Result for RetrieveAll operation
C h a p t e r 3 . Introduction to Inbound processing
The WebSphere® Adapter for Enterprise Content Management V7.5 exchanges business data be-tween the CMIS server and JEE applications. The adapter polls the event database in the CMIS server for events at specified intervals. Events in the CMIS server gets generated when any of the activities like creation of a new document and update of properties for document, and so on occur.
These scenarios demonstrate how WebSphere Adapter for Enterprise Content Management per-forms inbound operations. Everything you need to complete for each tutorial is contained in the tutorial. If you have performed the prerequisite tasks, you can complete each tutorial within an hour.
Learning objectives After completing this tutorial, you should be able to perform the following tasks:
1. .Create an adapter project in Integration Designer. .
2. . Discover services and associated business objects from the enterprise information system part of the adapter project.
3. Create a deployable module that you install on IBM Business Process Manager or IBM WebSphere Enterprise Service Bus.
4. Test the module and validate the results.
Audience These tutorials are for integration developers who design, assemble, test, and deploy business inte-gration solutions.
Software prerequisites To use these tutorials, you must have the following applications installed:
• IBM Integration Designer V7.5
• IBM Process Server version V7.5
C h a p t e r 4 . Processing Inbound documents
This tutorial demonstrates how WebSphere Adapter for Enterprise Content Management can be used to poll the events from an Enterprise Content Management system and send the messages to the endpoint application.
Inbound Scenario You may want to notify the changes occurring in the CMIS server for a particular document, and perform other tasks, depending on the changes to be made to the document state. The document changes may be to create, update or delete the document, from at the CMIS server.
Configuring the adapter for inbound processing Run the New External Service to specify business objects, services, and the configuration, used in this tutorial.
Creating the project
1. Launch IBM Integration Designer by clicking Start > Programs > IBM WebSphere > IBM Integration Designer 7.5.
2. In IBM Integration Designer, switch to the Business Integration perspective by clicking Win-dows > Open perspective > Other. In the Select perspective screen, select Show all, then select Business Integration from the list and click OK.
3. Create a new module by clicking File > New > Module.
4. In the Module Name field, type ECMInboundSample, and click Finish.
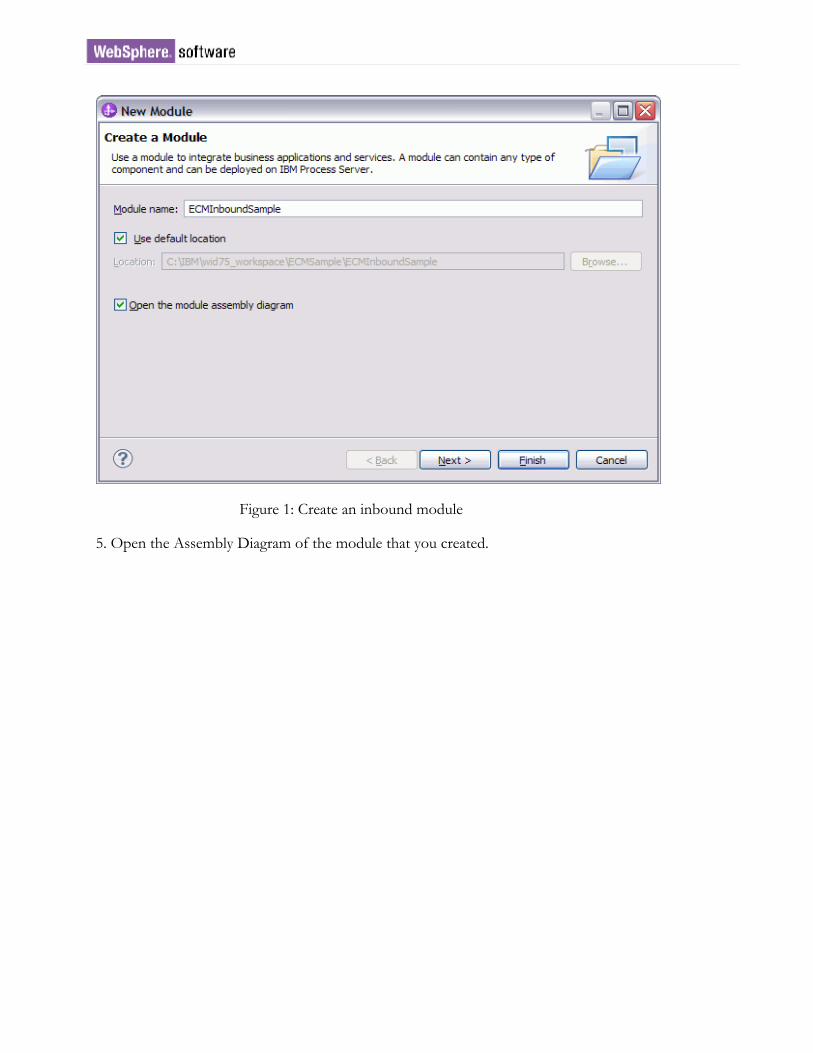
Figure 1: Create an inbound module
5. Open the Assembly Diagram of the module that you created.
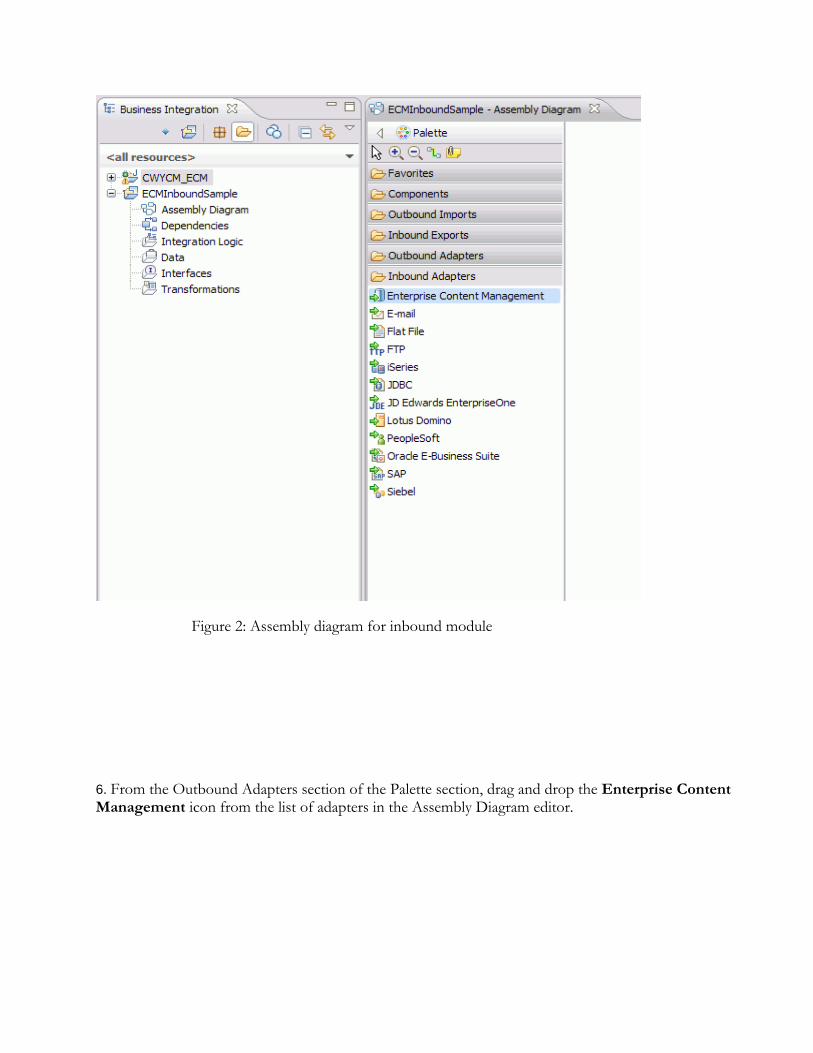
Figure 2: Assembly diagram for inbound module
6. From the Outbound Adapters section of the Palette section, drag and drop the Enterprise Content Management icon from the list of adapters in the Assembly Diagram editor.

Figure 3: Selecting Enterprise Content Management Adapter
7. Select an appropriate run time from the Target runtime environment list. Click Next.
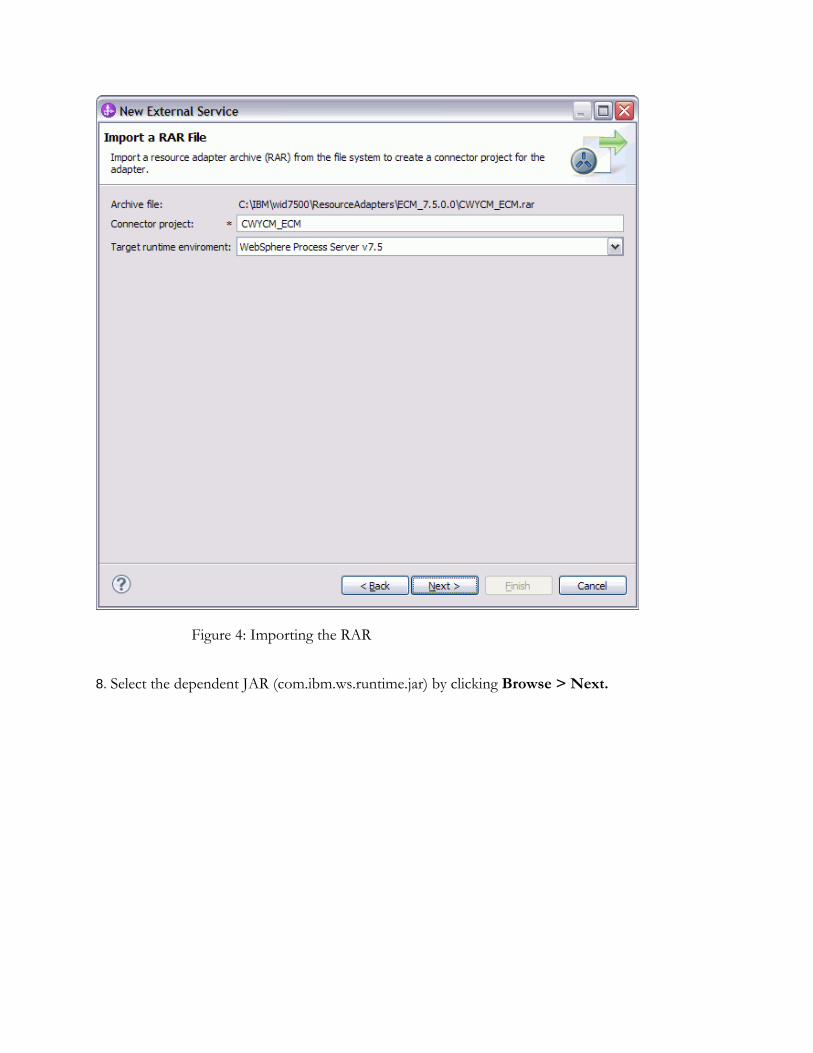
Figure 4: Importing the RAR
8. Select the dependent JAR (com.ibm.ws.runtime.jar) by clicking Browse > Next.

Figure 5: Selecting dependent JAR file
9. In the Discovery Configuration screen, enter the connection properties information such as the server information, path name, user name and password. The Repository Service Endpoint will get updated automatically.
10. Enter the FileNet P8 connection information, such as the Endpoint URI, JAAS stanza, user name and Password. Note that you must have a FileNet P8 permission to create subscriptions in the FileNet P8. server. Click Next.
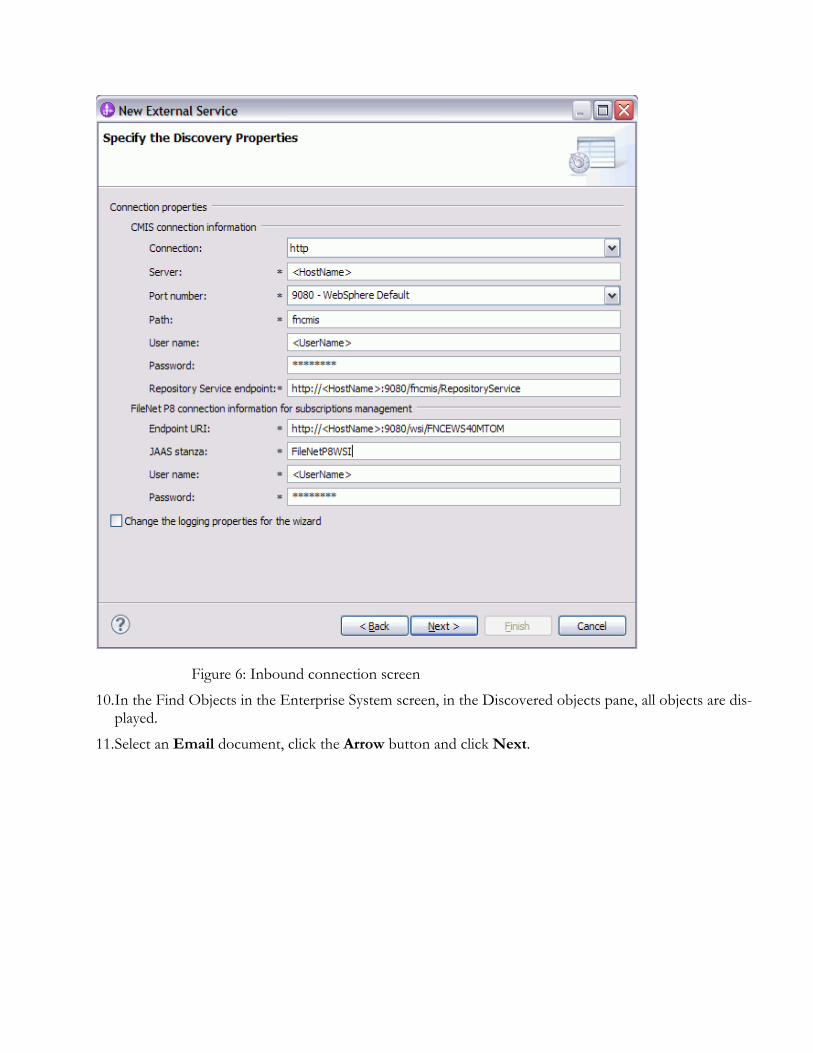
Figure 6: Inbound connection screen
10. In the Find Objects in the Enterprise System screen, in the Discovered objects pane, all objects are dis-played.
11. Select an Email document, click the Arrow button and click Next.

Figure 7: Metadata tree panel
12. The property Configuration screen will appear, where you can choose the properties you want.
13. Choose the option for creating a new subscription.
14. Enter the Subscription Name as SampleEmailSub..
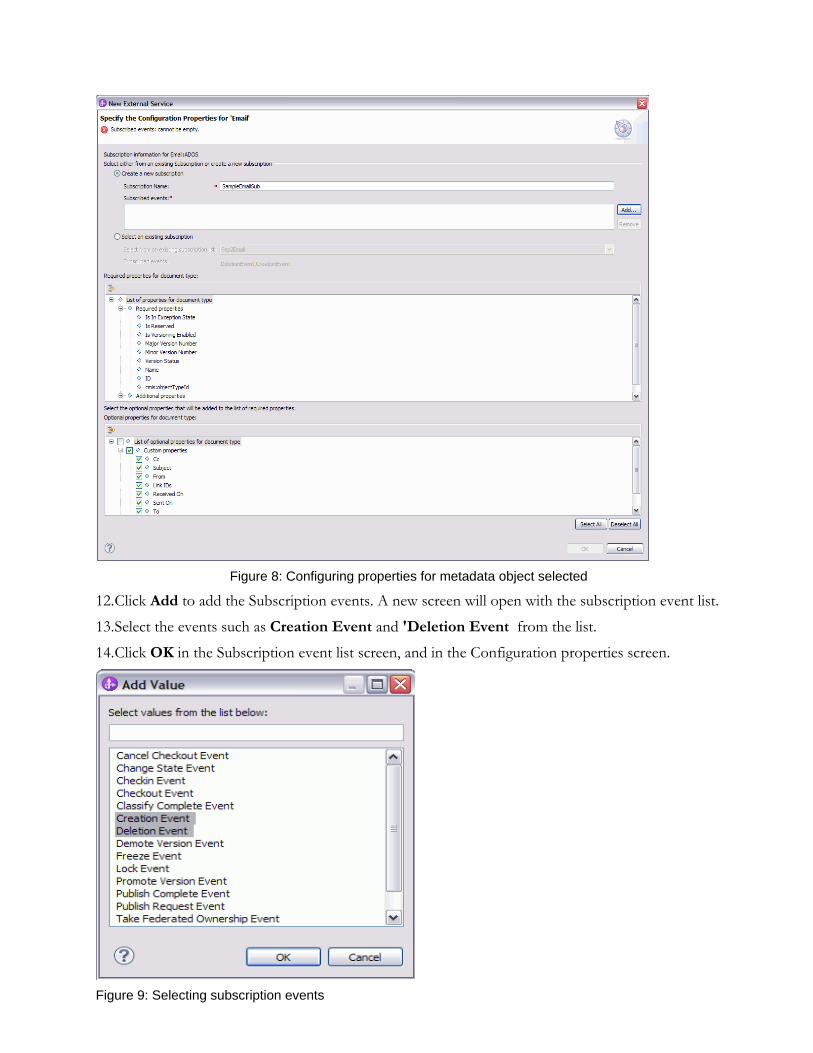
Figure 8: Configuring properties for metadata object selected
12. Click Add to add the Subscription events. A new screen will open with the subscription event list.
13. Select the events such as Creation Event and 'Deletion Event from the list.
14. Click OK in the Subscription event list screen, and in the Configuration properties screen.
Figure 9: Selecting subscription events
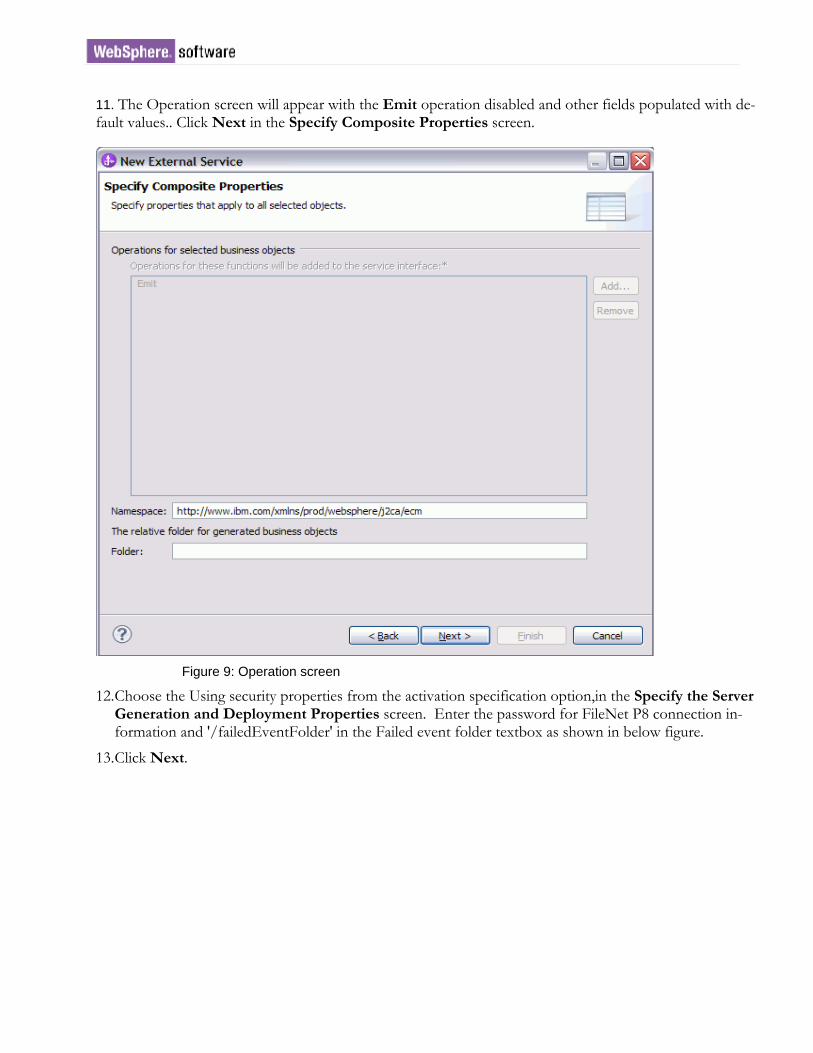
11. The Operation screen will appear with the Emit operation disabled and other fields populated with de-fault values.. Click Next in the Specify Composite Properties screen.
Figure 9: Operation screen
12. Choose the Using security properties from the activation specification option,in the Specify the Server Generation and Deployment Properties screen. Enter the password for FileNet P8 connection in-formation and '/failedEventFolder' in the Failed event folder textbox as shown in below figure.
13. Click Next.
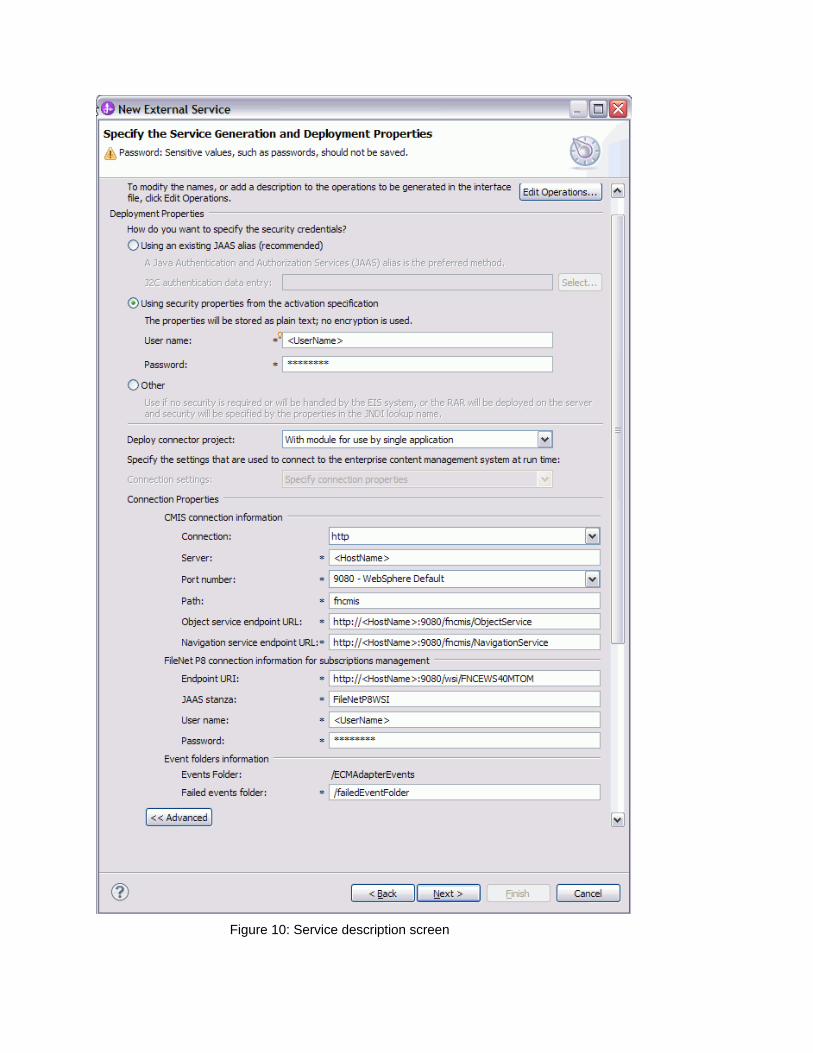
Figure 10: Service description screen
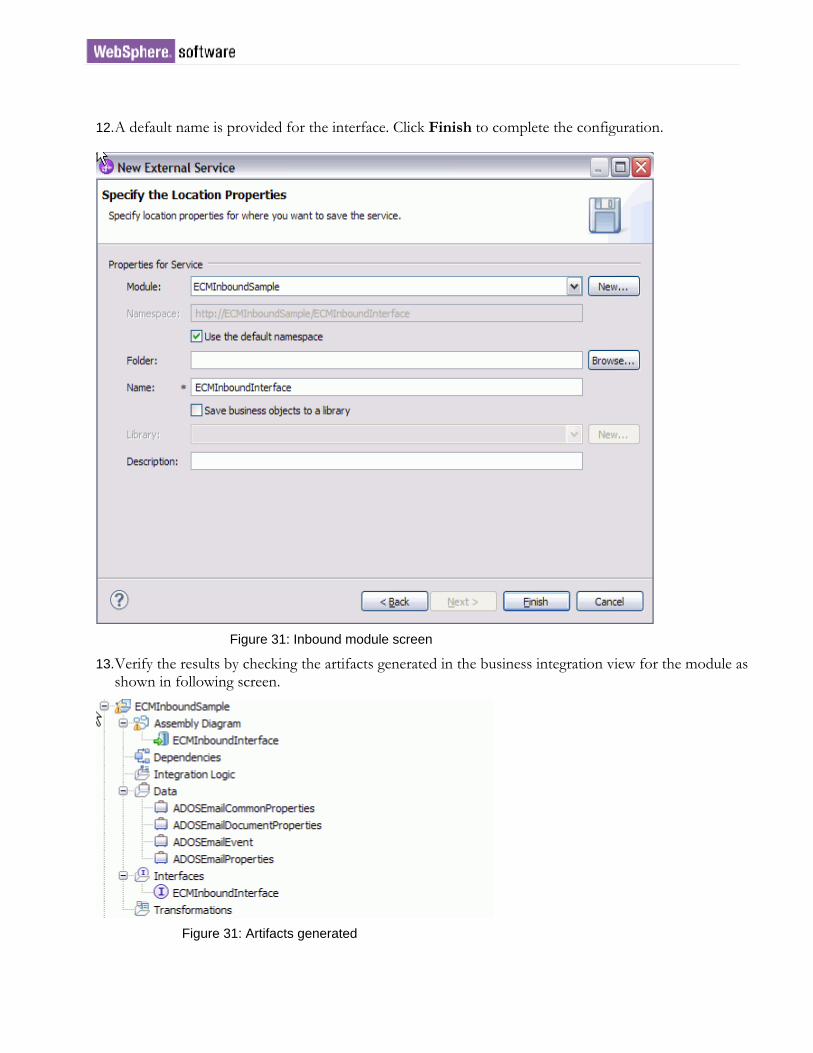
12. A default name is provided for the interface. Click Finish to complete the configuration.
Figure 31: Inbound module screen
13. Verify the results by checking the artifacts generated in the business integration view for the module as shown in following screen.
Figure 31: Artifacts generated
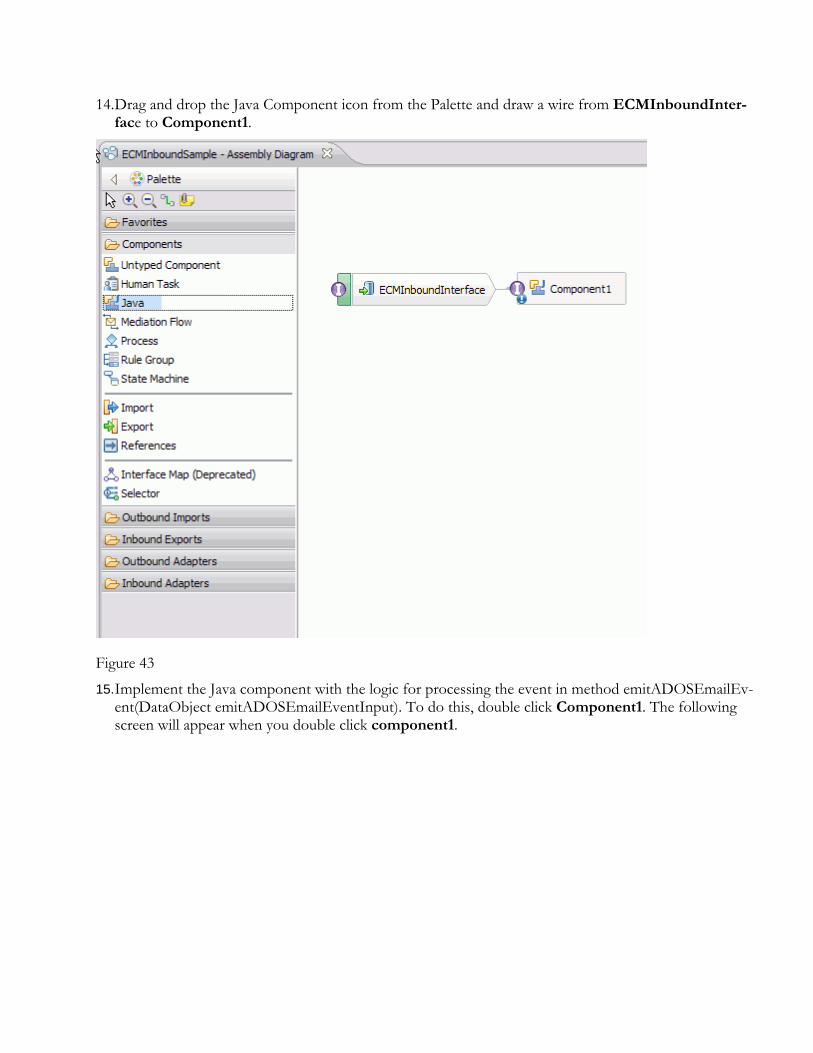
14. Drag and drop the Java Component icon from the Palette and draw a wire from ECMInboundInter-face to Component1.
Figure 43
15. Implement the Java component with the logic for processing the event in method emitADOSEmailEv-ent(DataObject emitADOSEmailEventInput). To do this, double click Component1. The following screen will appear when you double click component1.
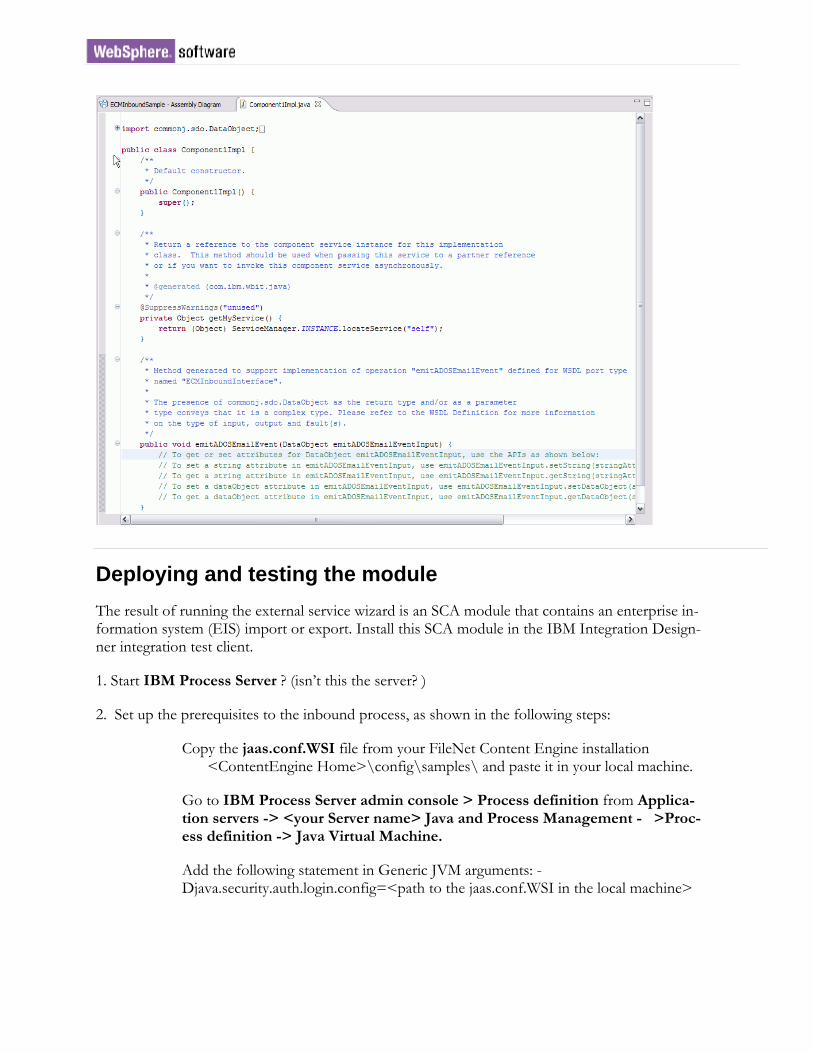
Deploying and testing the module The result of running the external service wizard is an SCA module that contains an enterprise in-formation system (EIS) import or export. Install this SCA module in the IBM Integration Design-ner integration test client.
1. Start IBM Process Server ? (isn’t this the server? )
2. Set up the prerequisites to the inbound process, as shown in the following steps:
Copy the jaas.conf.WSI file from your FileNet Content Engine installation <ContentEngine Home>\config\samples\ and paste it in your local machine.
Go to IBM Process Server admin console > Process definition from Applica-tion servers -> <your Server name> Java and Process Management - >Proc-ess definition -> Java Virtual Machine.
Add the following statement in Generic JVM arguments: - Djava.security.auth.login.config=<path to the jaas.conf.WSI in the local machine>
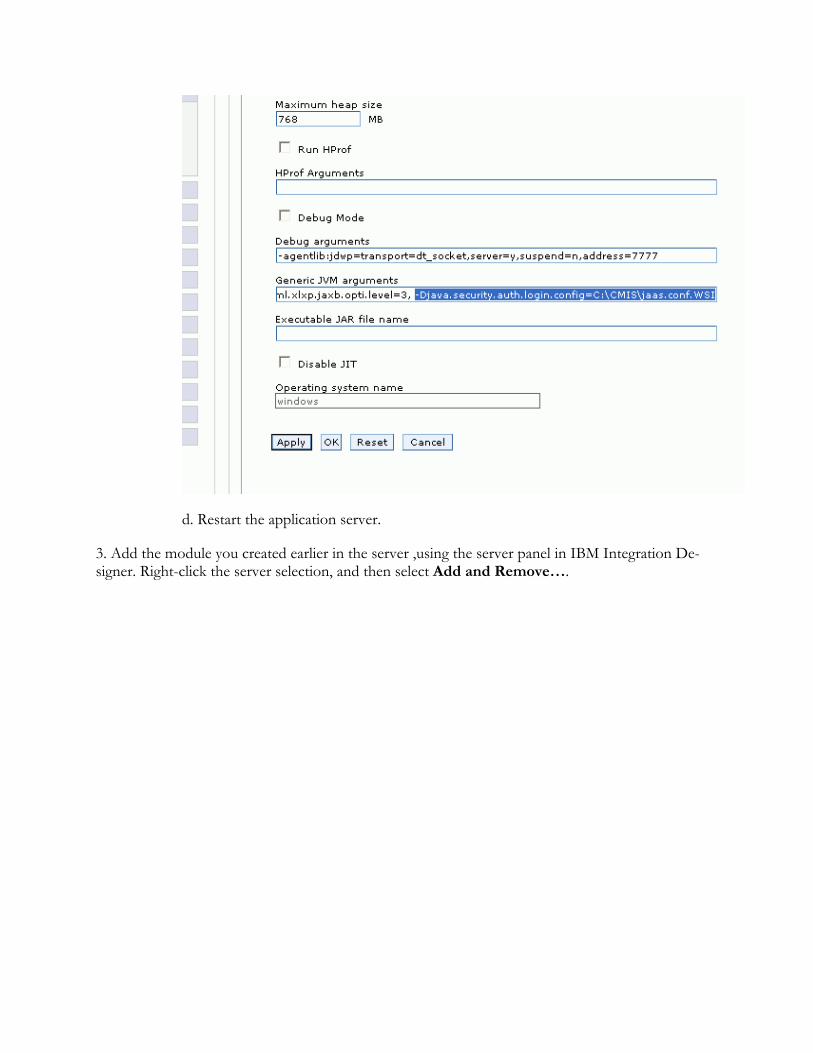
d. Restart the application server.
3. Add the module you created earlier in the server ,using the server panel in IBM Integration De-signer. Right-click the server selection, and then select Add and Remove….
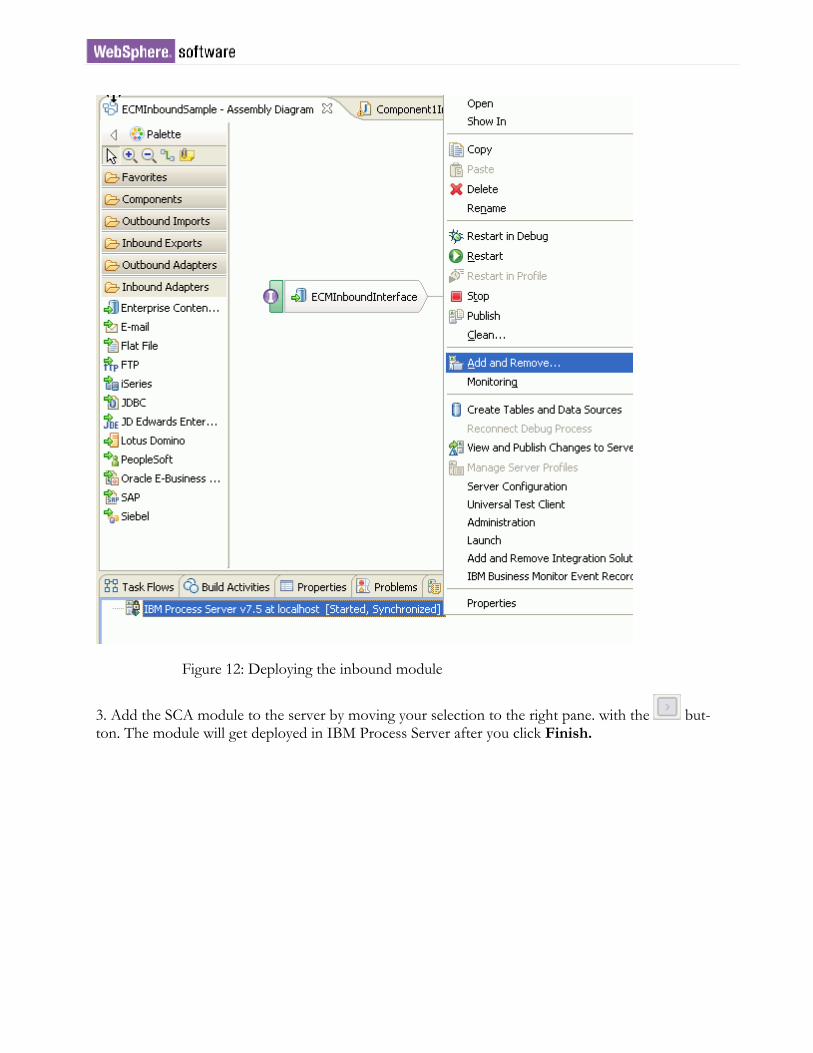
Figure 12: Deploying the inbound module
3. Add the SCA module to the server by moving your selection to the right pane. with the but-ton. The module will get deployed in IBM Process Server after you click Finish.
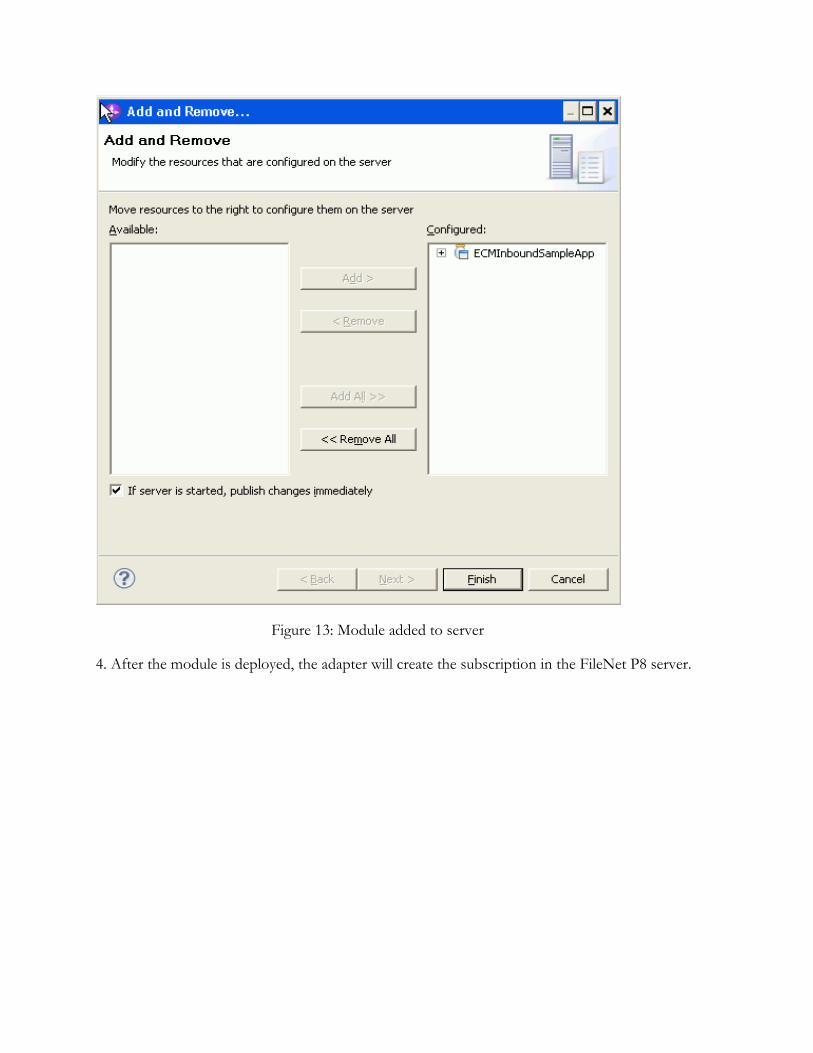
Figure 13: Module added to server
4. After the module is deployed, the adapter will create the subscription in the FileNet P8 server.
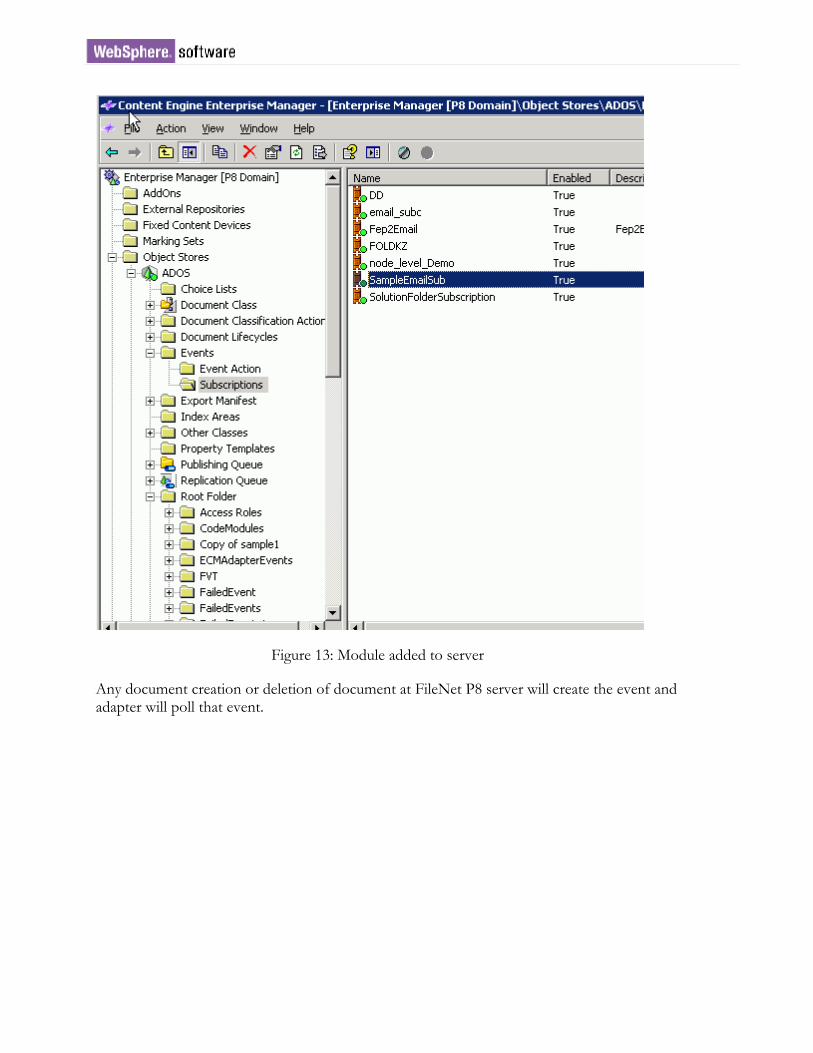
Figure 13: Module added to server
Any document creation or deletion of document at FileNet P8 server will create the event and adapter will poll that event.
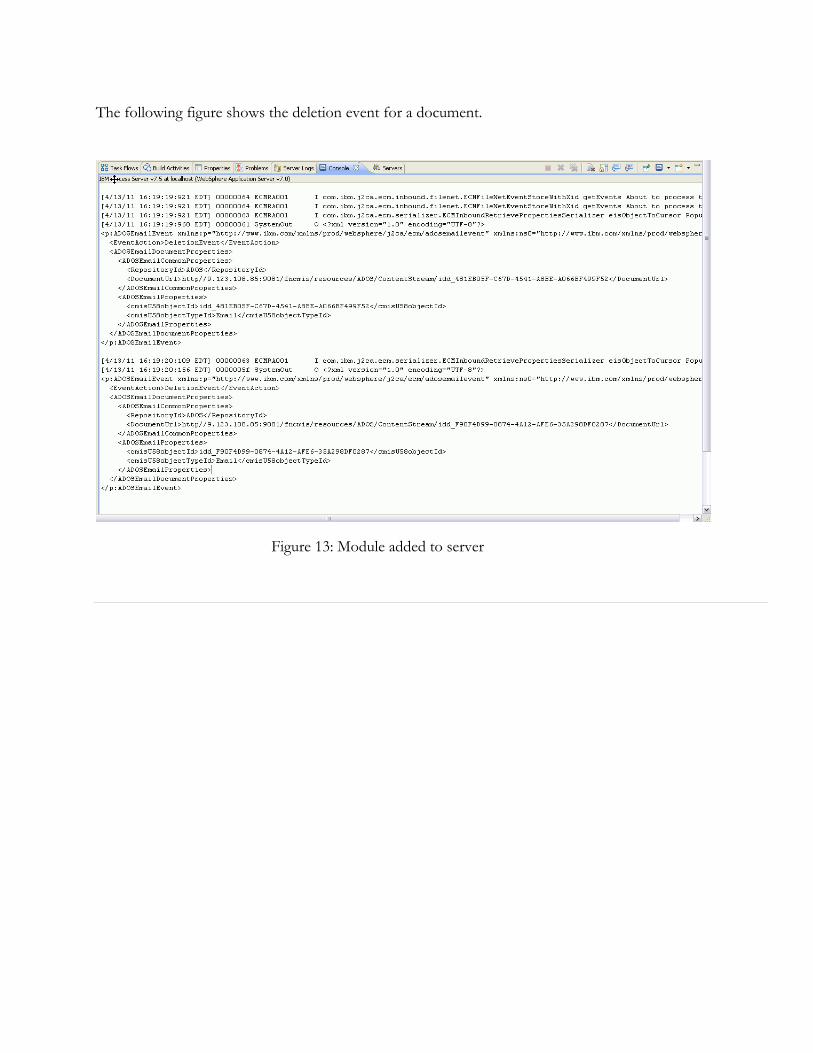
The following figure shows the deletion event for a document.
Figure 13: Module added to server
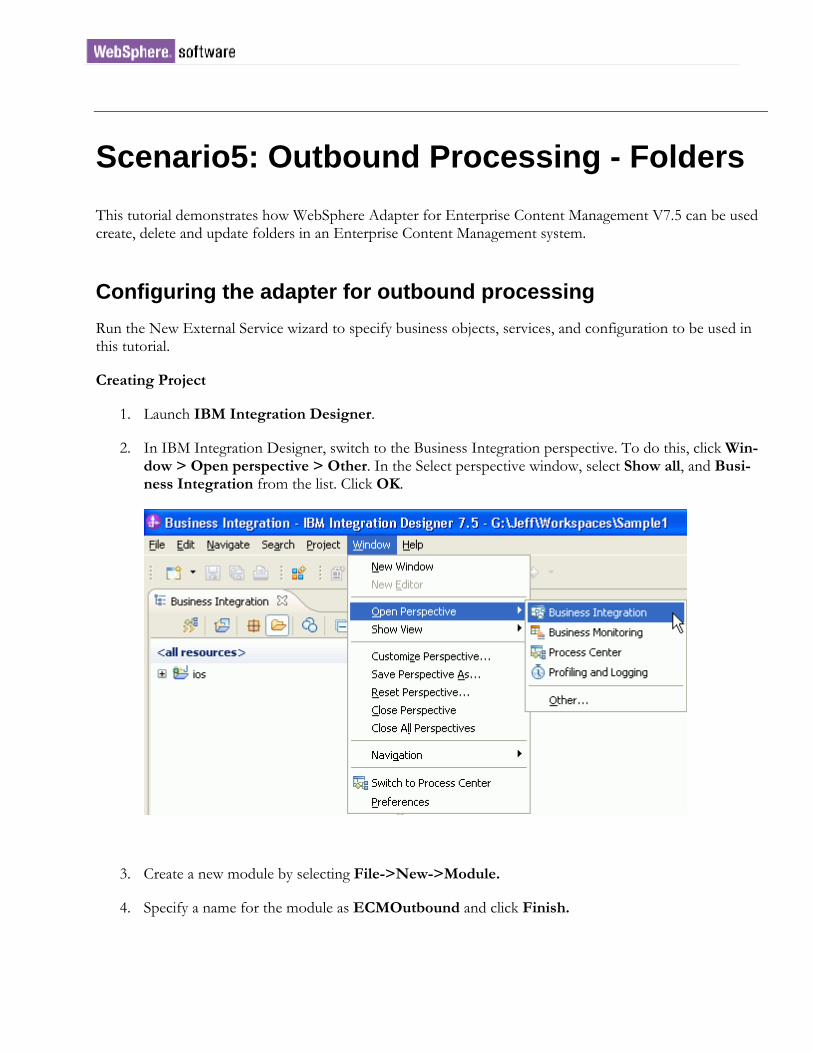
Scenario5: Outbound Processing - Folders This tutorial demonstrates how WebSphere Adapter for Enterprise Content Management V7.5 can be used create, delete and update folders in an Enterprise Content Management system.
Configuring the adapter for outbound processing Run the New External Service wizard to specify business objects, services, and configuration to be used in this tutorial.
Creating Project
1. Launch IBM Integration Designer.
2. In IBM Integration Designer, switch to the Business Integration perspective. To do this, click Win-dow > Open perspective > Other. In the Select perspective window, select Show all, and Busi-ness Integration from the list. Click OK.
3. Create a new module by selecting File->New->Module.
4. Specify a name for the module as ECMOutbound and click Finish.
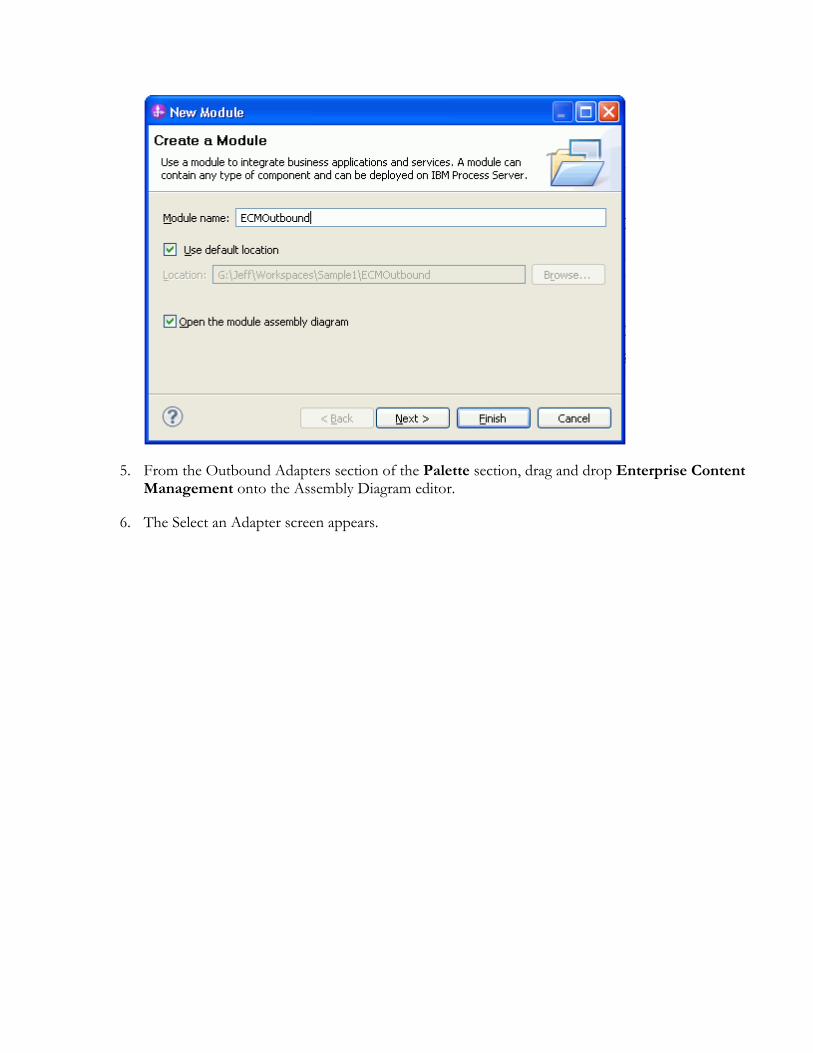
5. From the Outbound Adapters section of the Palette section, drag and drop Enterprise Content Management onto the Assembly Diagram editor.
6. The Select an Adapter screen appears.
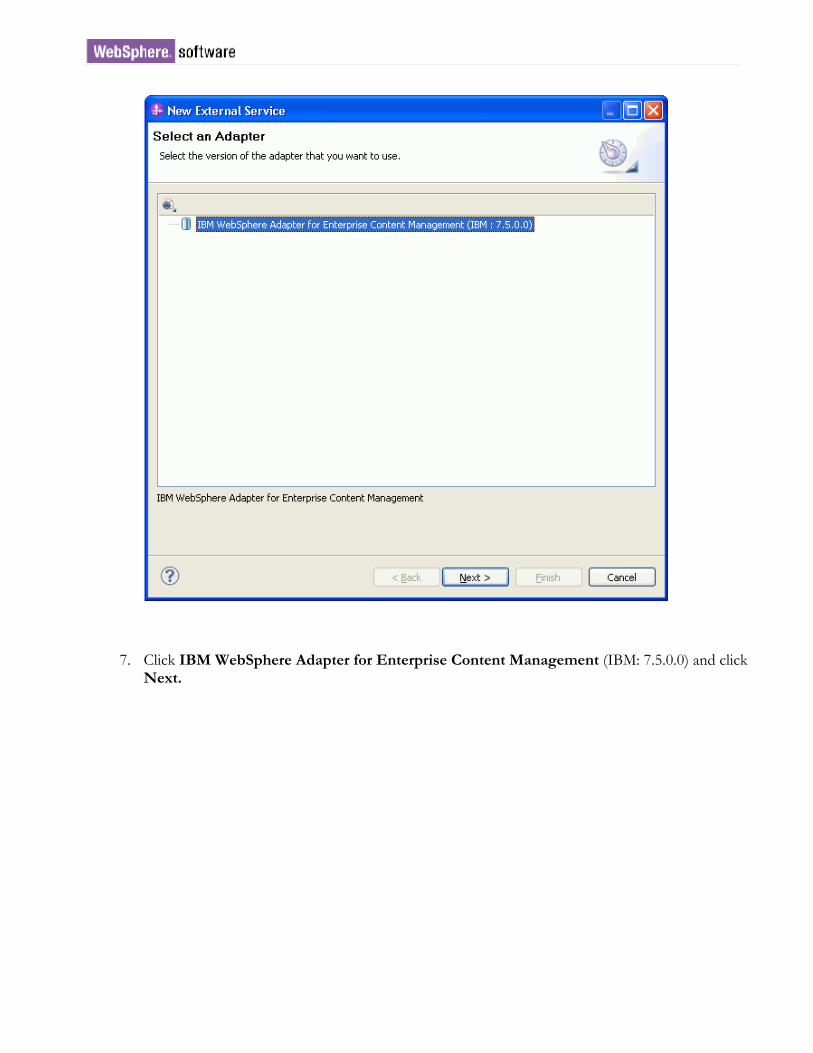
7. Click IBM WebSphere Adapter for Enterprise Content Management (IBM: 7.5.0.0) and click Next.

8. Select an appropriate run time from the Target runtime list. (IBM Process Server v7.5 is used as the run time in this tutorial). Click Next.
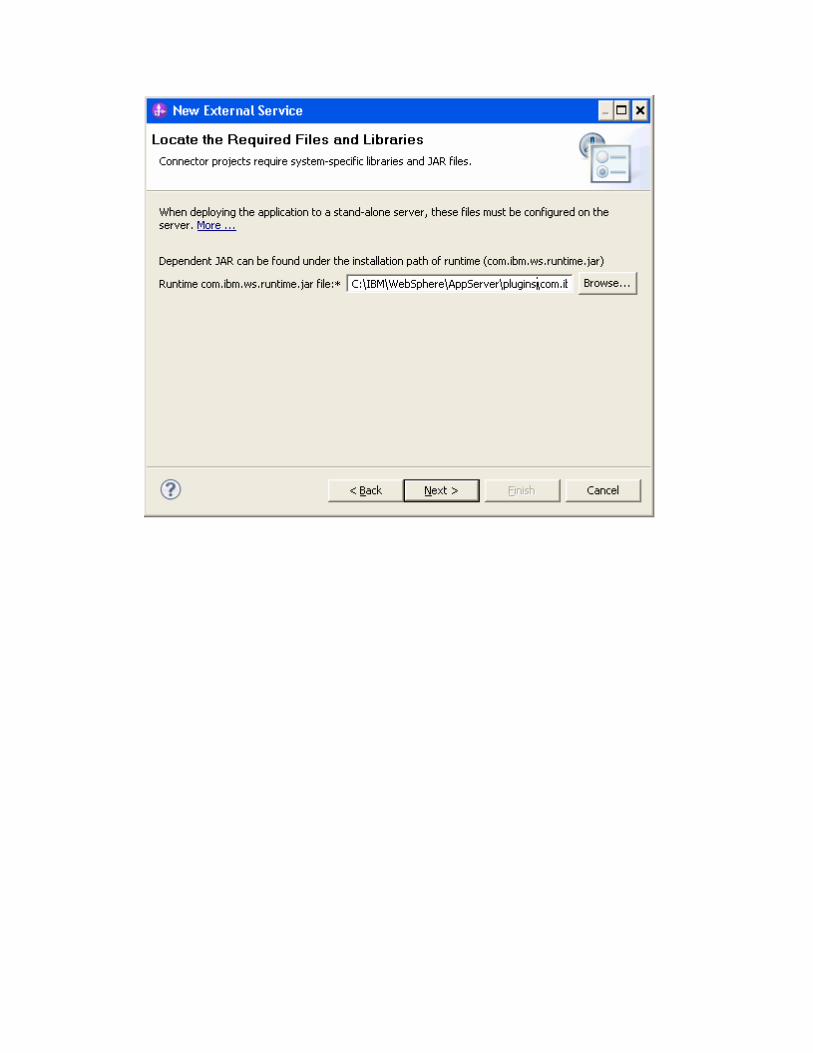
9. In the Locate the Required Files and Libraries window, enter the path to the dependent JAR file. (com.ibm.ws.runtime.jar). The JAR file is available in the <IBM Process Server Install Loca-tion>/plugins directory.
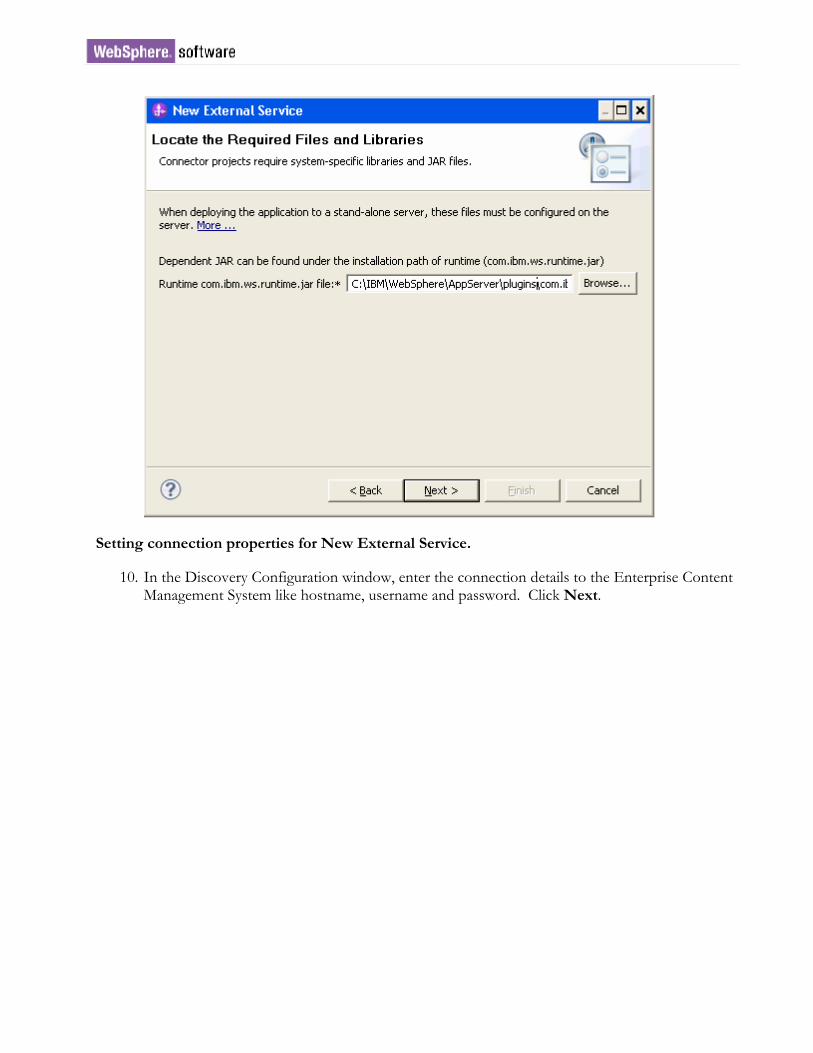
Setting connection properties for New External Service.
10. In the Discovery Configuration window, enter the connection details to the Enterprise Content Management System like hostname, username and password. Click Next.
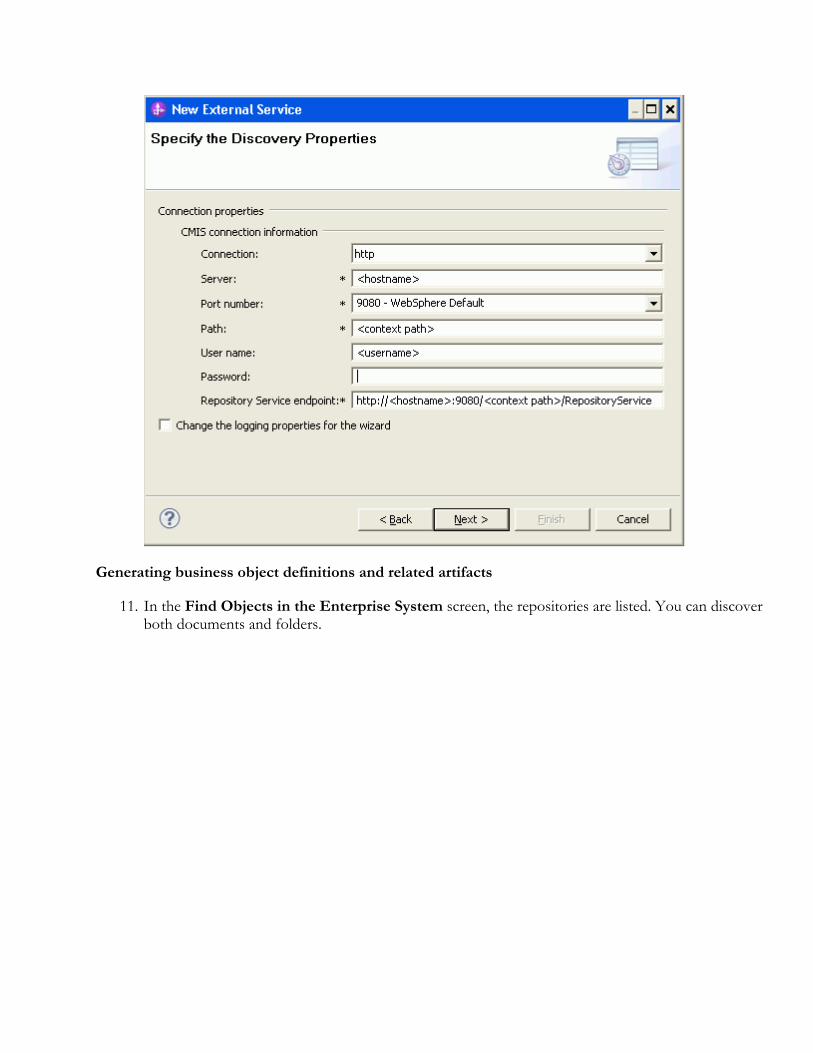
Generating business object definitions and related artifacts
11. In the Find Objects in the Enterprise System screen, the repositories are listed. You can discover both documents and folders.

12. You can select any of the objects in the discovered objects pane. For this scenario, select Solution Folder from ADOS repository. Click Add.
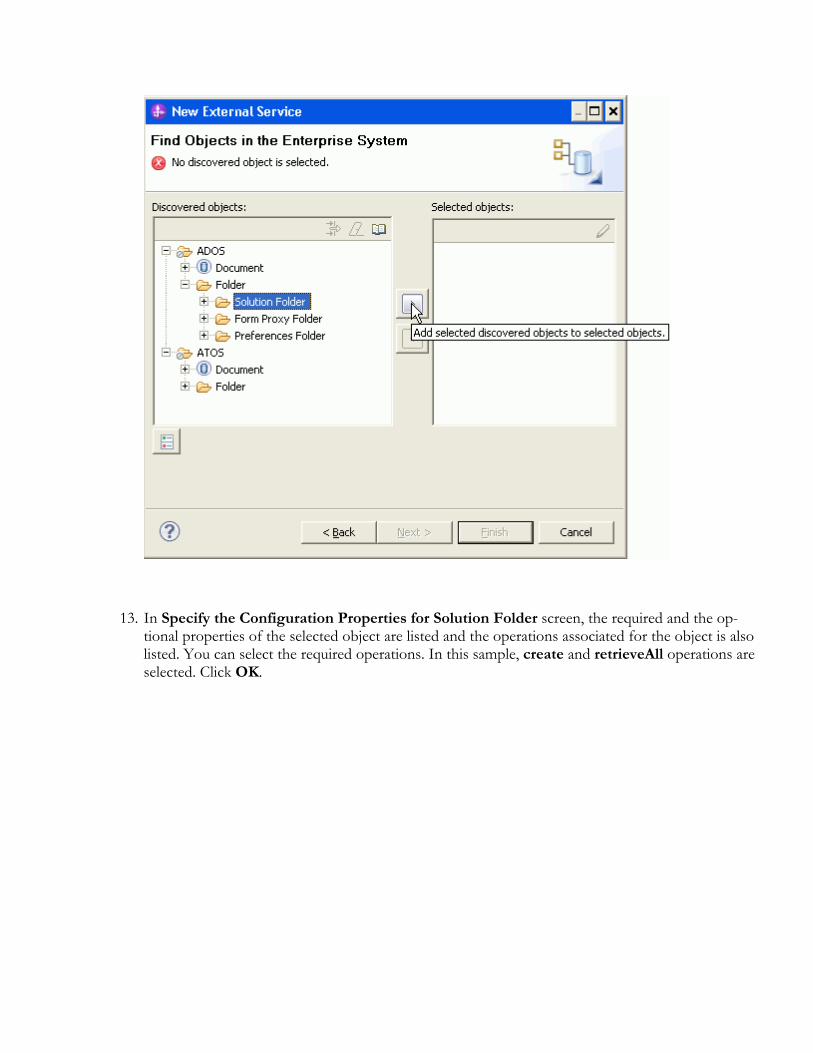
13. In Specify the Configuration Properties for Solution Folder screen, the required and the op-tional properties of the selected object are listed and the operations associated for the object is also listed. You can select the required operations. In this sample, create and retrieveAll operations are selected. Click OK.
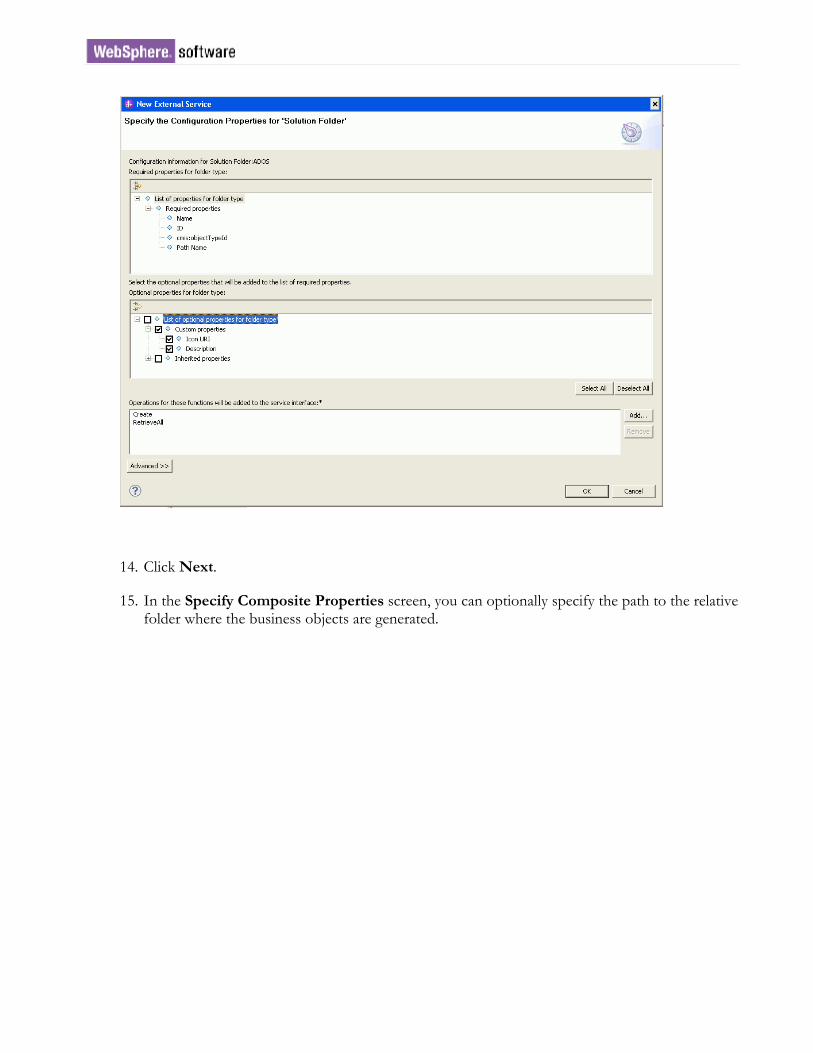
14. Click Next.
15. In the Specify Composite Properties screen, you can optionally specify the path to the relative folder where the business objects are generated.

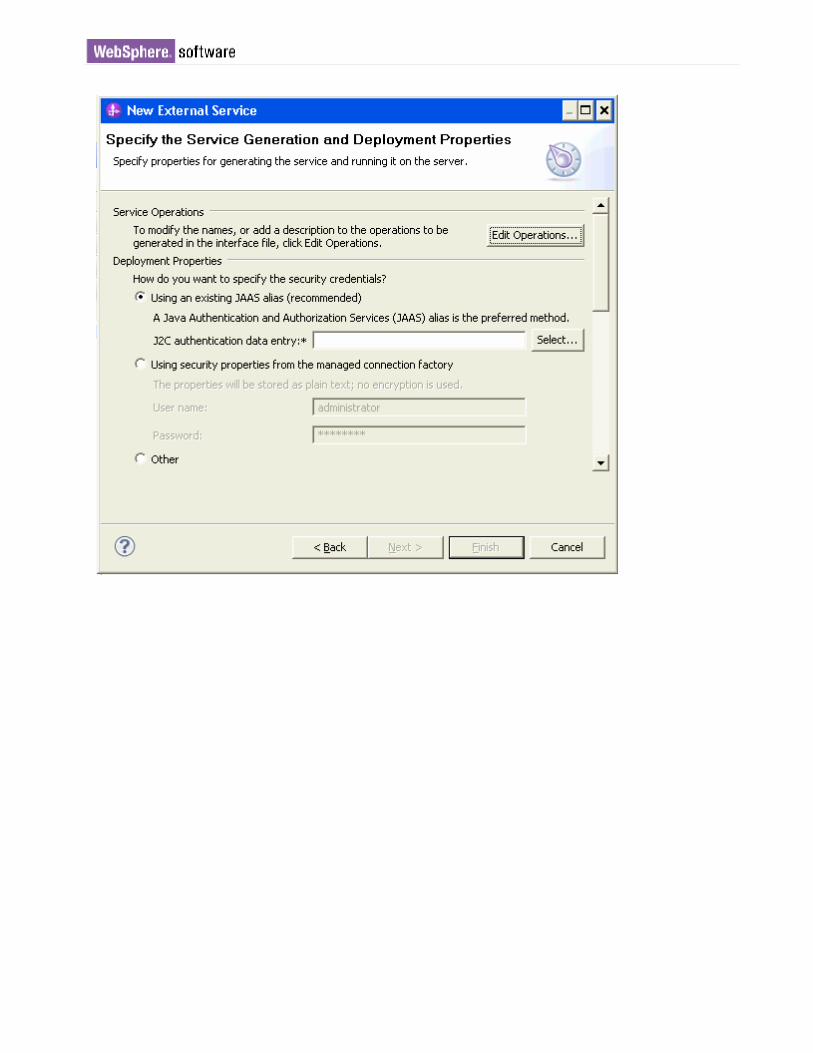
16. In the Specify the Service Generation and Deployment Properties screen, the security proper-ties from Managed connection Factory are used for Deployment properties. The connection proper-ties are automatically populated with values. The screen is split into two screenshots. Click Next.

17. In the Specify the Location Properties screen, the name for the service can be provided. In this sample, the default (ECMImport) is used. Click Finish.

Deploying the module to the test environment 1. The result of running the New Externaal Service is an SCA module that contains an EIS import. In-
stall this SCA module in the IBM Integration Designer integration test client. If IBM Process Server is not in ‘Started’ state, start the server.
2. Add the module you created earlier to the server using the server panel in WebSphere Integration Developer. Right-click the server, and then select Add and Remove…
3. Add the SCA module ECMOutbound to the server by clicking ‘Add >’ button.
4. Click Finish.
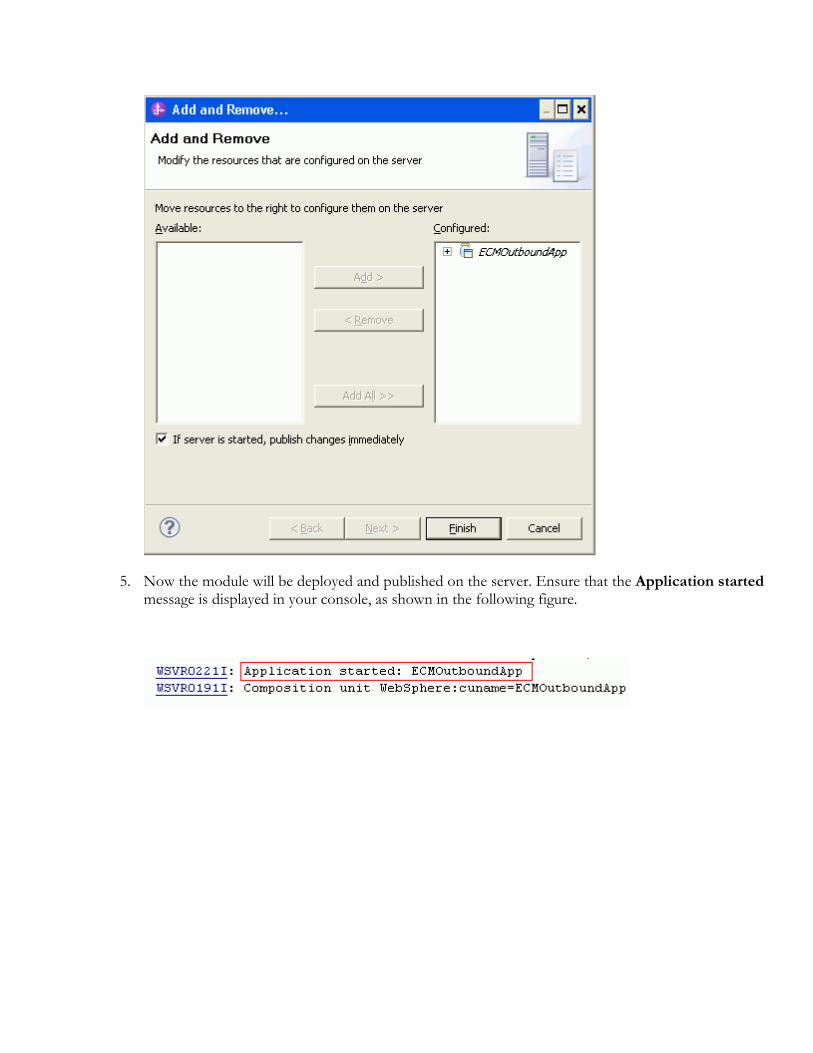
5. Now the module will be deployed and published on the server. Ensure that the Application started message is displayed in your console, as shown in the following figure.

Testing the assembled adapter application <Describe the steps to test the adapter you have assembled, here>
1. The application can be tested using the integration test client.
2. To test, right click on ECMImport component and select Test Component.
3. You can use the integration test client to test the operations. In this sample, Create and RetrieveAll operations will be used.
Create Operation

4. Select the Create operation from the list of operations.
5. Populate the request, by providing either the path or the ObectID of the parent folder and the name of the folder to be created. All the other properties are optional.
6. In this sample, an instance of SolutionFolder, MySolutionFolder will be created in the root folder (/) of the Enterprise Content Management system.
7. Select the current instance of IBM process server in the Select a Deployment Location screen. And provide the user credentials for the server.
8. In the response object, the ObjectId of the folder that was created in the EIS is populated.
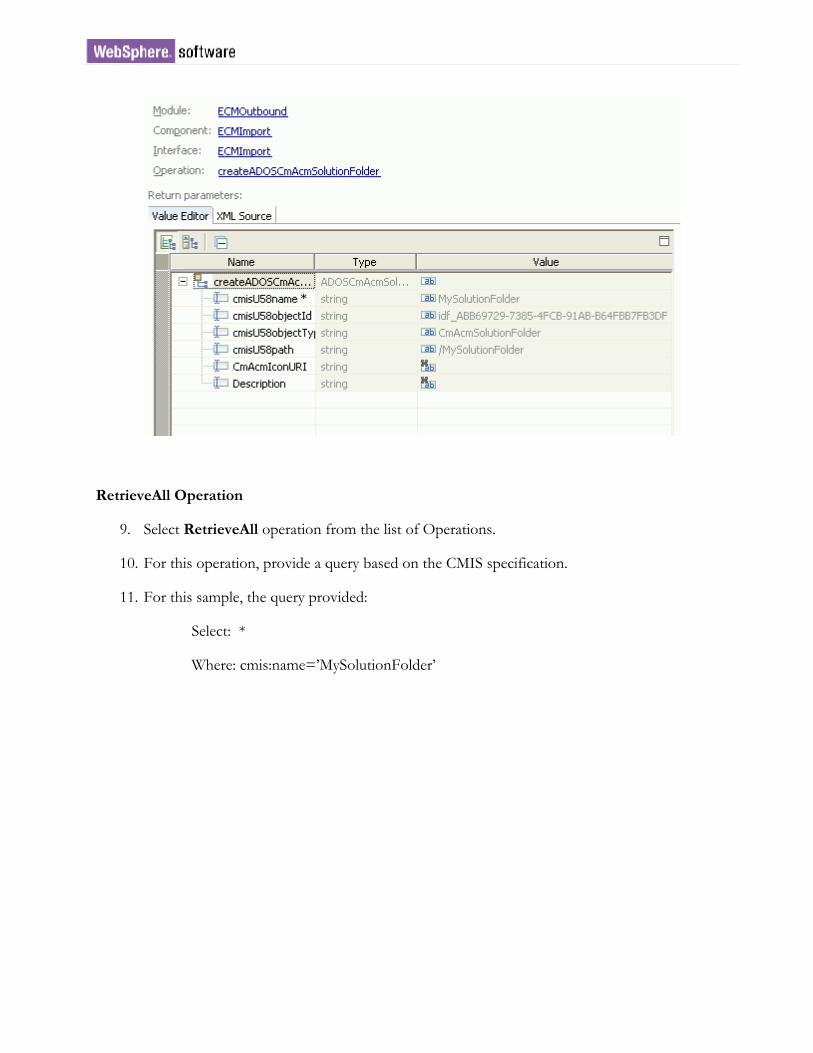
RetrieveAll Operation
9. Select RetrieveAll operation from the list of Operations.
10. For this operation, provide a query based on the CMIS specification.
11. For this sample, the query provided:
Select: *
Where: cmis:name=’MySolutionFolder’

12. Now the response object is populated with an array of all the Solution folder objects with name=MySolutionFolder. In the following image, two objects are returned.
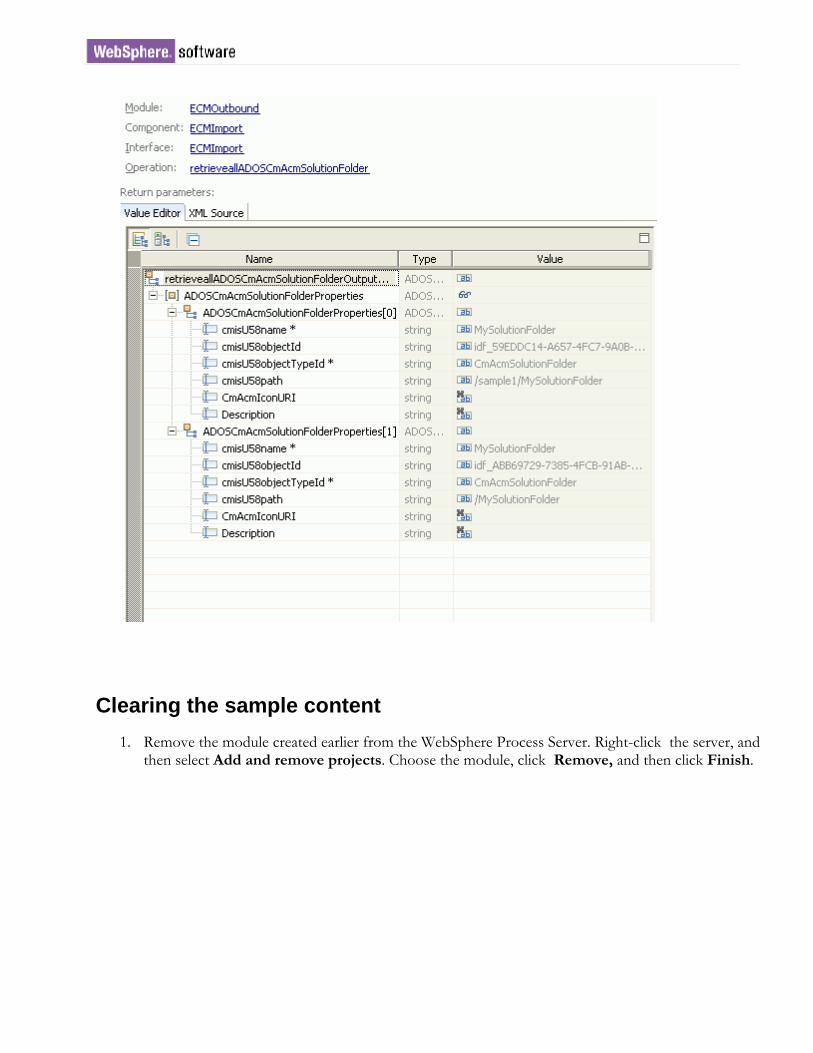
Clearing the sample content 1. Remove the module created earlier from the WebSphere Process Server. Right-click the server, and
then select Add and remove projects. Choose the module, click Remove, and then click Finish.

Chapter 6: Inbound Processing - Folders This tutorial demonstrates how you can use WebSphere Adapter for Enterprise Content Management ver-sion 7.5.0.0, to understand the changes in a folder, and notify the end point application about that change.
Configuring the adapter for inbound processing Run the New External Service wizard to specify business objects, services, and configuration to be used in this tutorial.
Creating Project
18. Launch IBM Integration Designer.
19. In IBM Integration Designer, switch to the Business Integration perspective. To do this, click Win-dow > Open perspective > Other. In the Select perspective window, select Show all, and Busi-ness Integration from the list. Click OK.
20. Create a new module by selecting File->New->Module.
21. Specify a name for the module as ECMInbound and click Finish.

22. From the Inbound Adapters section of the Palette section, drag and drop the Enterprise Content Management icon onto the Assembly Diagram editor.
23. The Select an Adapter screen appears.
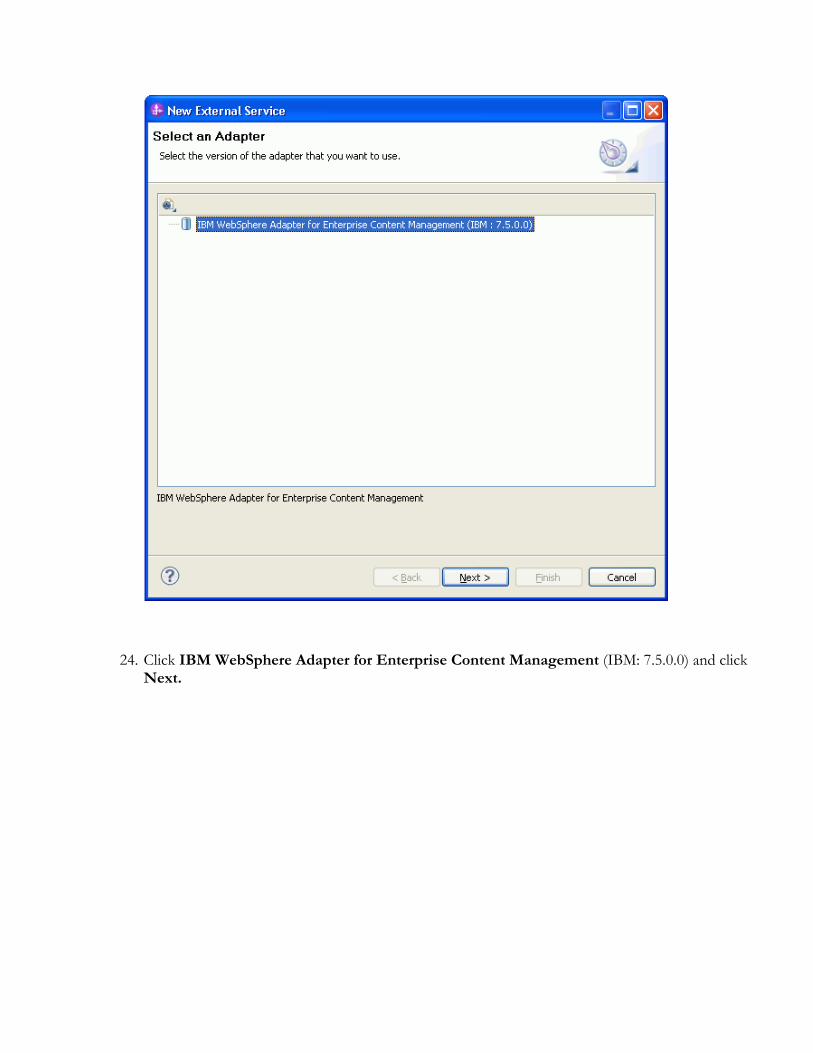
24. Click IBM WebSphere Adapter for Enterprise Content Management (IBM: 7.5.0.0) and click Next.
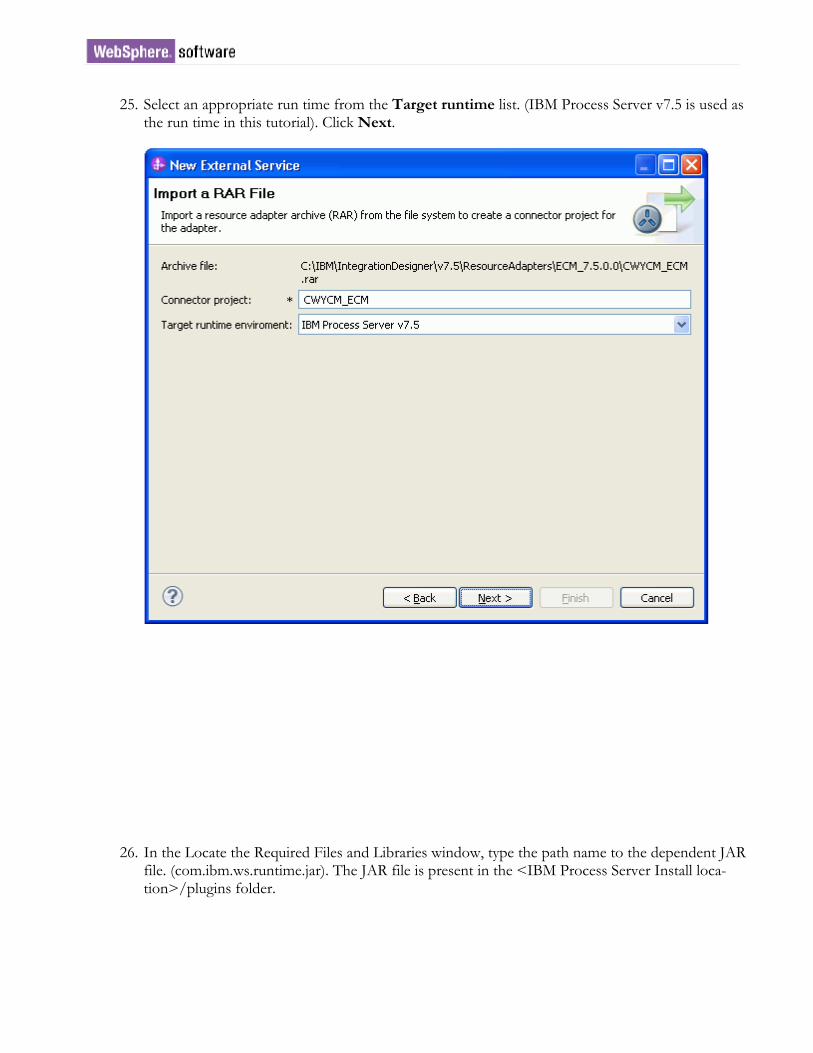
25. Select an appropriate run time from the Target runtime list. (IBM Process Server v7.5 is used as the run time in this tutorial). Click Next.
26. In the Locate the Required Files and Libraries window, type the path name to the dependent JAR file. (com.ibm.ws.runtime.jar). The JAR file is present in the <IBM Process Server Install loca-tion>/plugins folder.

Setting connection properties for external service wizard
27. In the Discovery Configuration screen, type the connection details to the Enterprise Content Management system, such as the host name, user name and password. Make sure that you also enter the FileNet P8 connection details for the subscription management. Click Next.
Generating business object definitions and related artifacts

28. In the Find Objects in the Enterprise System screen, the repositories are listed. You can dis-cover both documents and folders from these repositories.
29. You can select any of the objects in the Discovered objects pane. For this scenario, select Solution Folder from the ADOS repository. This inbound component will respond to all the Solution Folder events, and notify the endpoint application. Click Add.
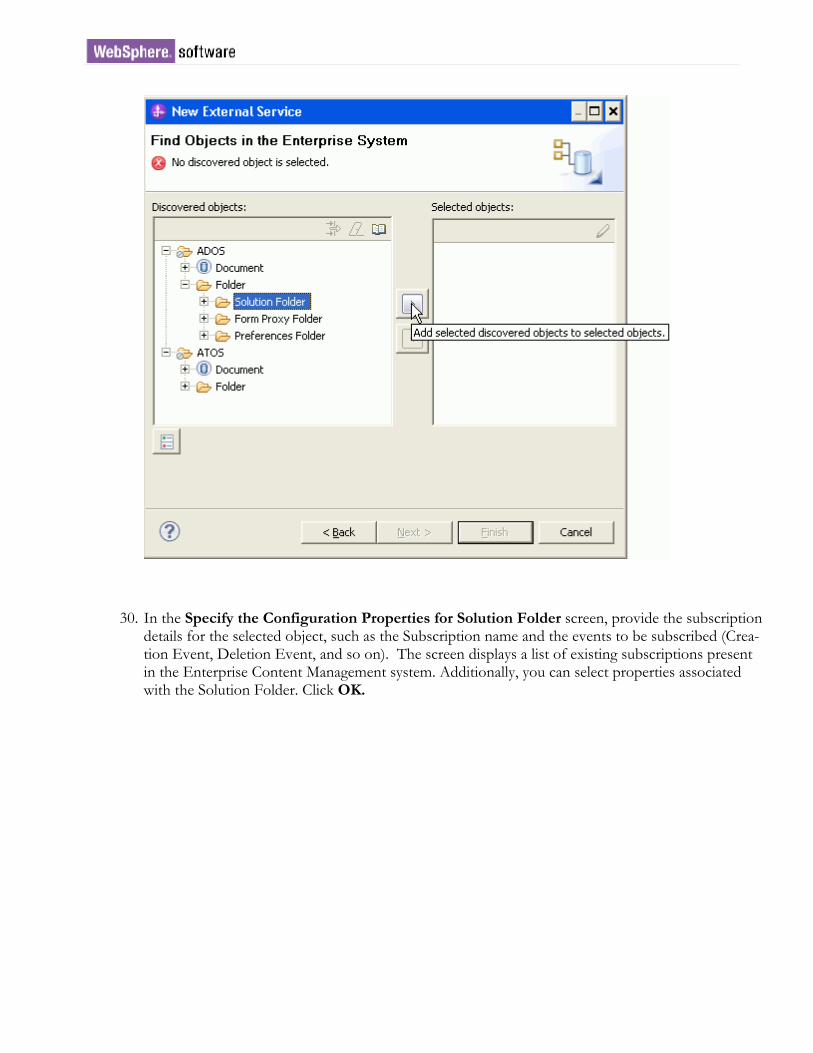
30. In the Specify the Configuration Properties for Solution Folder screen, provide the subscription details for the selected object, such as the Subscription name and the events to be subscribed (Crea-tion Event, Deletion Event, and so on). The screen displays a list of existing subscriptions present in the Enterprise Content Management system. Additionally, you can select properties associated with the Solution Folder. Click OK.
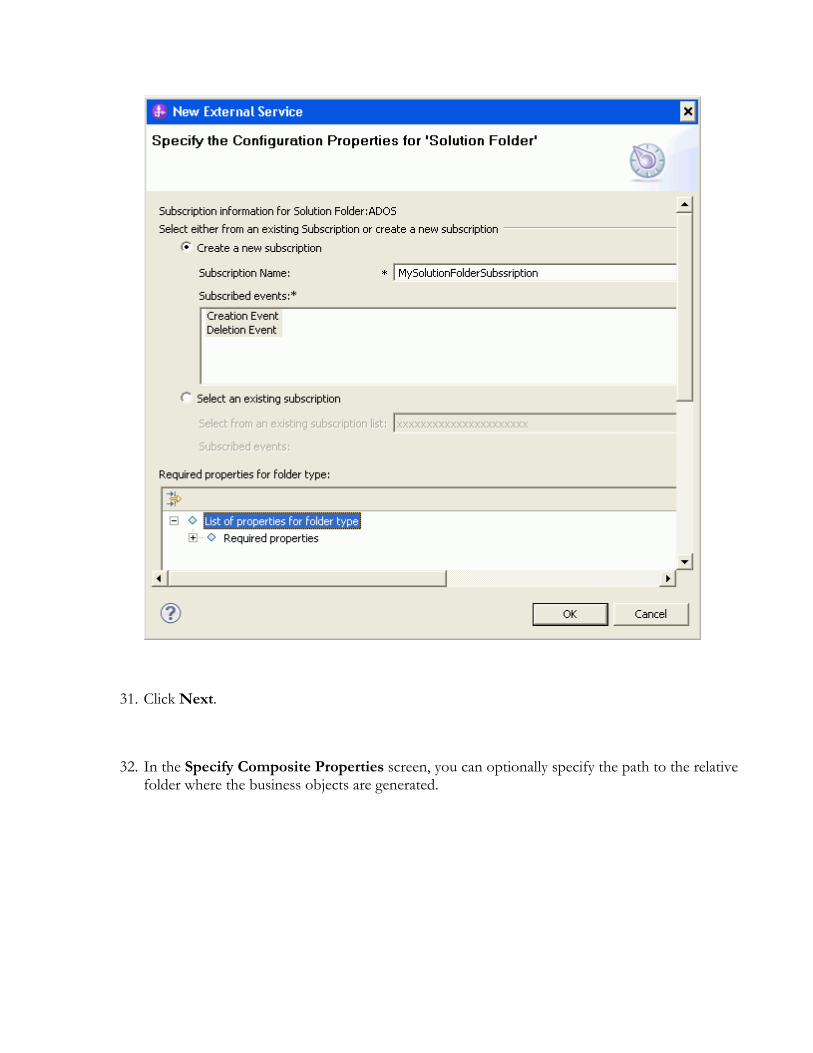
31. Click Next.
32. In the Specify Composite Properties screen, you can optionally specify the path to the relative folder where the business objects are generated.
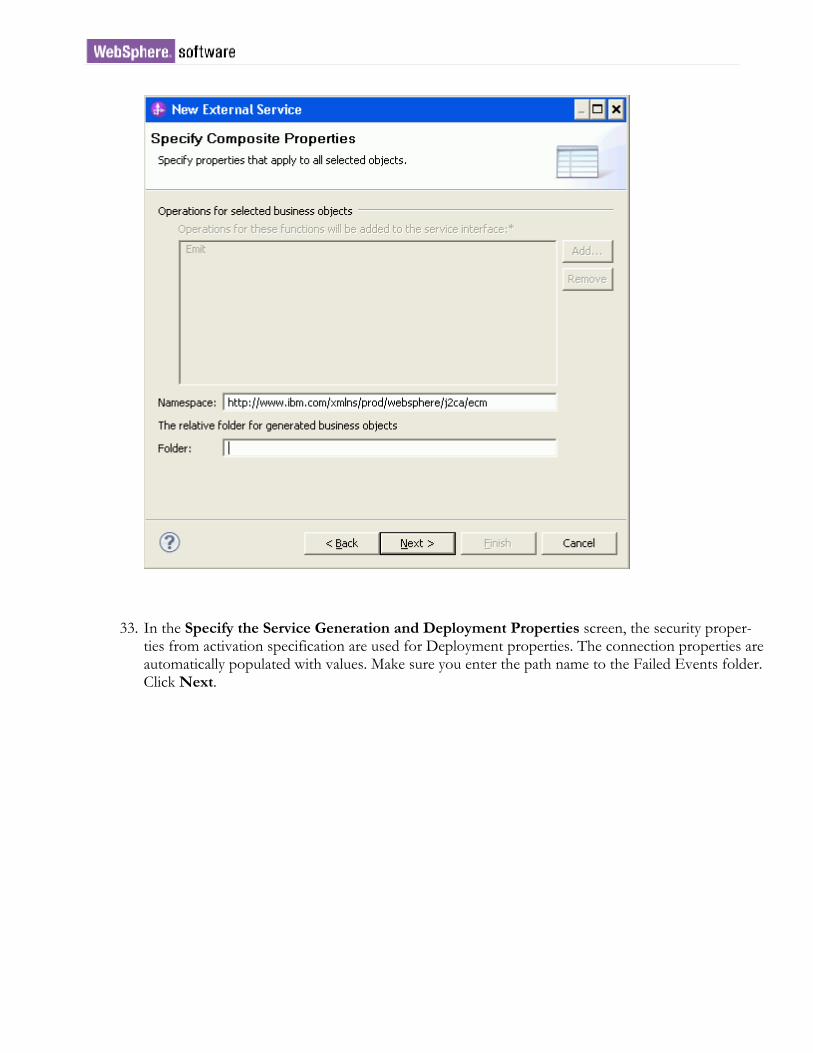
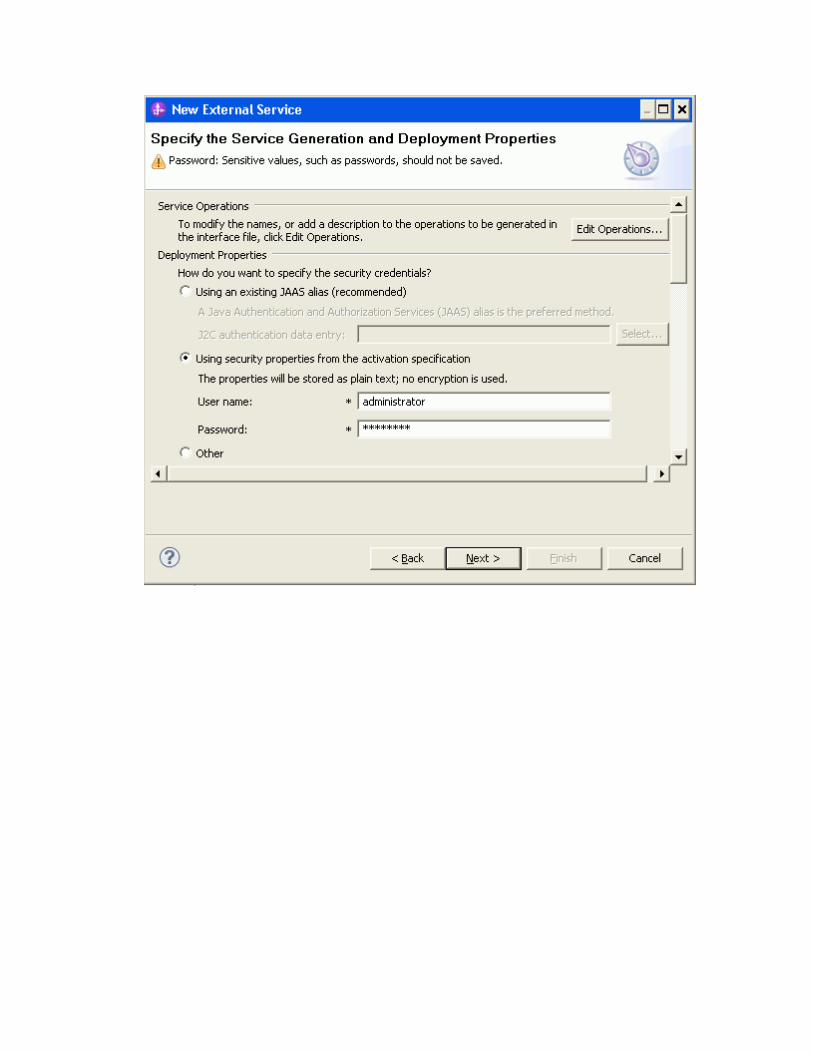
33. In the Specify the Service Generation and Deployment Properties screen, the security proper-ties from activation specification are used for Deployment properties. The connection properties are automatically populated with values. Make sure you enter the path name to the Failed Events folder. Click Next.

34. In the Specify the Location Properties screen, provide the name of the service. In this sample, the default (ECMExport) is used. Click Finish.
35. You must now add a Java component, to simulate an endpoint application. To add a Java compo-nent, drag and drop the Java Component from the Palette and draw a wire from ECMExport to Component1.

36. Implement the Java component with the logic for processing the event. In this sample, the event is printed in the console. To do this, double click Component1.
37. Save the module.

Deploying the module to the test environment 6. The result of running the New External Service is an SCA module that contains an EIS import. In-
stall this SCA module in the IBM Integration Designer integration test client. If IBM Process Server is not in ‘Started’ state, start the server.
7. Add the module you created earlier to the server using the server panel in WebSphere Integration Developer. Right-click the server link, and then select Add and Remove…
8. Add the SCA module ECMOutbound to the server by clicking Add. .
9. Click Finish.

10. Now the module will be deployed and published on the server. Ensure that the Application started message is displayed in your console, as shown in the following figure.
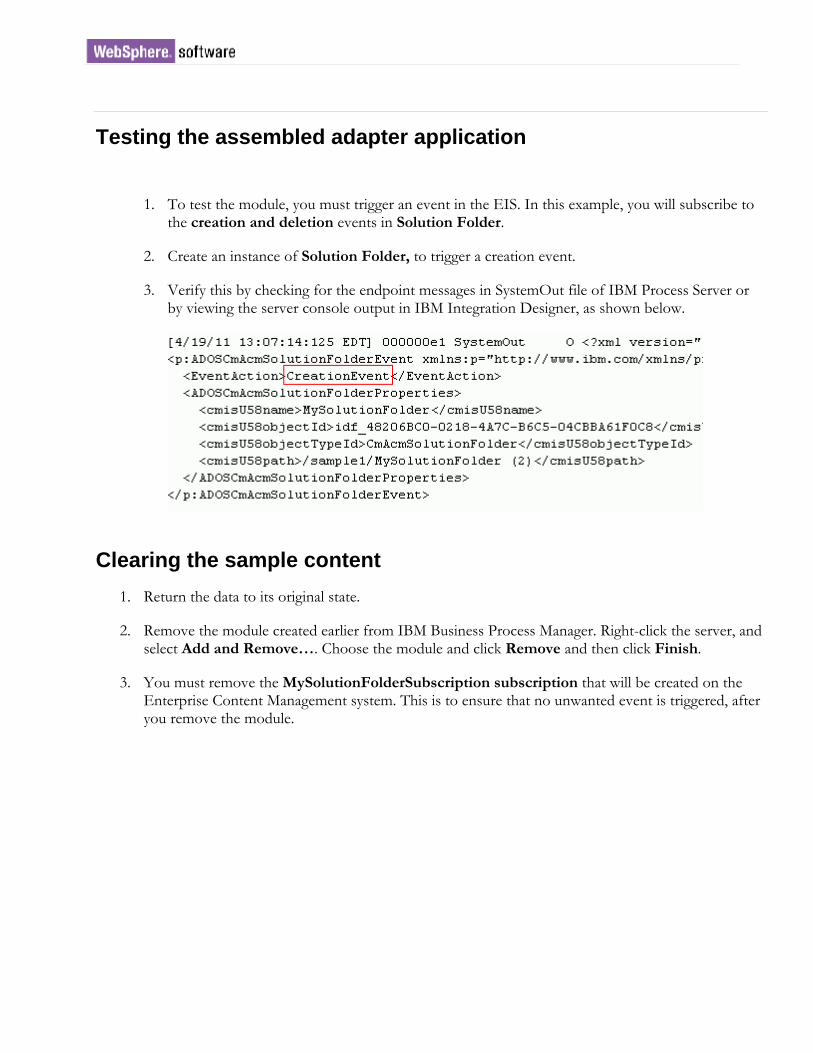
Testing the assembled adapter application
1. To test the module, you must trigger an event in the EIS. In this example, you will subscribe to the creation and deletion events in Solution Folder.
2. Create an instance of Solution Folder, to trigger a creation event.
3. Verify this by checking for the endpoint messages in SystemOut file of IBM Process Server or by viewing the server console output in IBM Integration Designer, as shown below.
Clearing the sample content 1. Return the data to its original state.
2. Remove the module created earlier from IBM Business Process Manager. Right-click the server, and select Add and Remove…. Choose the module and click Remove and then click Finish.
3. You must remove the MySolutionFolderSubscription subscription that will be created on the Enterprise Content Management system. This is to ensure that no unwanted event is triggered, after you remove the module.

C h a p t e r 5 . Notices
This information was developed for products and services offered in the U.S.A.
IBM may not offer the products, services, or features discussed in this document in other countries. Consult your local IBM representative for information on the products and services currently available in your area. Any reference to an IBM product, program, or service is not intended to state or imply that only that IBM product, program, or service may be used. Any functionally equivalent product, program, or service that does not infringe any IBM intellectual property right may be used instead. However, it is the user's respon-sibility to evaluate and verify the operation of any non-IBM product, program, or service.
IBM may have patents or pending patent applications covering subject matter described in this document. The furnishing of this document does not grant you any license to these patents. You can send license in-quiries, in writing, to:
IBM Director of Licensing
IBM Corporation
North Castle Drive
Armonk, NY 10504-1785
U.S.A.
For license inquiries regarding double-byte (DBCS) information, contact the IBM Intellectual Property De-partment in your country or send inquiries, in
writing, to:
IBM World Trade Asia Corporation Licensing
2-31 Roppongi 3-chome, Minato-ku
Tokyo 106-0032, Japan
The following paragraph does not apply to the United Kingdom or any other country where such provisions are inconsistent with local law:
INTERNATIONAL BUSINESS MACHINES CORPORATION PROVIDES THIS PUBLICATION "AS IS" WITHOUT WARRANTY OF ANY KIND, EITHER EXPRESS OR IMPLIED, INCLUDING, BUT NOT LIMITED TO, THE IMPLIED WARRANTIES OF NON-INFRINGEMENT, MER-CHANTABILITY OR FITNESS FOR A PARTICULAR PURPOSE. Some states do not allow disclaimer of express or implied warranties in certain transactions, therefore, this statement may not apply to you.
This information could include technical inaccuracies or typographical errors. Changes are periodically made to the information herein; these changes will be incorporated in new editions of the publication.
IBM may make improvements and/or changes in the product(s) and/or the program(s) described in this publication at any time without notice.
Any references in this information to non-IBM Web sites are provided for convenience only and do not in any manner serve as an endorsement of those Web sites.
The materials at those Web sites are not part of the materials for this IBM product and use of those Web sites is at your own risk.
IBM may use or distribute any of the information you supply in any way it believes appropriate without in-curring any obligation to you.
Licensees of this program who wish to have information about it for the purpose of enabling: (i) the ex-change of information between independently created programs and other programs (including this one) and (ii) the mutual use of the information which has been exchanged, should contact:
IBM Corporation Department
2Z4A/SOM1 294 Route 100
Somers, NY 10589-0100 U.S.A.
Information concerning non-IBM products was obtained from the suppliers of those products, their pub-lished announcements or other publicly available sources. IBM has not tested those products and cannot confirm the accuracy of performance, compatibility or any other claims related to non-IBM products. Ques-tions on the capabilities of non-IBM products should be addressed to the suppliers of those products.
This information contains examples of data and reports used in daily business operations. To illustrate them as completely as possible, the examples include the names of individuals, companies, brands, and products. All of these names are fictitious and any similarity to the names and addresses used by an actual business enterprise is entirely coincidental.
COPYRIGHT LICENSE:
This information contains sample application programs in source language, which illustrate programming techniques on various operating platforms. You may copy, modify, and distribute these sample programs in any form without payment to IBM, for the purposes of developing, using, marketing or distributing applica-tion programs conforming to the application programming interface for the operating platform for which the sample programs are written. These examples have not been thoroughly tested under all conditions. IBM, therefore, cannot guarantee or imply reliability, serviceability, or function of these programs.
If you are viewing this information softcopy, the photographs and color illustrations may not appear.
Programming interface information
Programming interface information, if provided, is intended to help you create application software using this program.
General-use programming interfaces allow you to write application software that obtains the services of this program's tools.

However, this information may also contain diagnosis, modification, and tuning information. Diagnosis, modification and tuning information is provided to help you debug your application software.
Warning:
Do not use this diagnosis, modification, and tuning information as a programming interface because it is subject to change.
Trademarks
IBM, the IBM logo, and ibm.com are trademarks or registered trademarks of International Business Ma-chines Corporation in the United States, other countries, or both. These and other IBM trademarked terms are marked on their first occurrence in this information with the appropriate symbol (® or ™), indicating US registered or common law trademarks owned by IBM at the time this information was published.
Such trademarks may also be registered or common law trademarks in other countries. A complete and cur-rent list of IBM trademarks is available on the Web at http://www.ibm.com/legal/copytrade.shtml
Linux is a registered trademark of Linus Torvalds in the United States, other countries, or both.
Microsoft and Screens are trademarks of Microsoft Corporation in the United States, other countries, or both.
Java and all Java based trademarks and logos are trademarks of Sun Microsystems, Inc. in the United States, other countries, or both.*
UNIX is a registered trademark of The Open Group in the United States and other countries.
Other company, product, or service names may be trademarks or service marks of others.
This product includes software developed by the Eclipse Project (http://www.eclipse.org).