Embed Size (px)
Citation preview
IBM Tivoli Storage ManagerVersion 7.1.3
Multisite Disk Solution Guide
IBM


IBM Tivoli Storage ManagerVersion 7.1.3
Multisite Disk Solution Guide
IBM

Note:Before you use this information and the product it supports, read the information in “Notices” on page 157.
First edition (September 2015)
This edition applies to version 7, release 1, modification 3 of IBM Tivoli Storage Manager (product numbers5608-E01, 5608-E02, 5608-E03), and to all subsequent releases and modifications until otherwise indicated in neweditions.
© Copyright IBM Corporation 1993, 2015.US Government Users Restricted Rights – Use, duplication or disclosure restricted by GSA ADP Schedule Contractwith IBM Corp.
Contents
About this publication . . . . . . .. vWho should read this guide . . . . . . . .. vPublications . . . . . . . . . . . . .. v
New for Tivoli Storage ManagerVersion 7.1.3 . . . . . . . . . . .. vii
Part 1. Planning for a multisite diskdata protection solution. . . . . .. 1
Chapter 1. Selecting a system size . .. 3
Chapter 2. Planning the sites . . . .. 5
Chapter 3. System requirements for amultisite disk solution . . . . . . .. 7Hardware requirements. . . . . . . . . .. 7Software requirements . . . . . . . . . .. 9
Chapter 4. Planning worksheets . . .. 11
Chapter 5. Planning for storage . . .. 21Planning the storage arrays . . . . . . . .. 21
Chapter 6. Planning for security . . .. 23Planning for administrator roles . . . . . .. 23Planning for secure communications . . . . .. 24Planning for storage of encrypted data . . . .. 24Planning firewall access . . . . . . . . .. 25
Part 2. Tivoli Storage Managermultisite disk implementation . .. 27
Chapter 7. Setting up the system . .. 29Configuring the storage hardware . . . . . .. 29Installing the server operating system . . . .. 29
Installing on AIX systems. . . . . . . .. 29Installing on Linux systems . . . . . . .. 31Installing on Windows systems . . . . . .. 35
Configuring multipath I/O . . . . . . . .. 36AIX systems . . . . . . . . . . . .. 36Linux systems . . . . . . . . . . .. 37Windows systems . . . . . . . . . .. 38
Creating the user ID for the Tivoli Storage Managerserver instance . . . . . . . . . . . .. 39Preparing file systems for Tivoli Storage Manager 40
AIX systems . . . . . . . . . . . .. 40Linux systems . . . . . . . . . . .. 41Windows systems . . . . . . . . . .. 42
Chapter 8. Installing the Tivoli StorageManager server and Operations Center . 45Installing on AIX and Linux systems . . . . .. 45
Installing prerequisite RPM files for the graphicalwizard . . . . . . . . . . . . . .. 46
Installing on Windows systems . . . . . . .. 47
Chapter 9. Configuring the TivoliStorage Manager server and theOperations Center . . . . . . . . .. 49Configuring the server instance. . . . . . .. 49Installing the Tivoli Storage Managerbackup-archive client . . . . . . . . . .. 50Setting options for the server . . . . . . .. 51Configuring secure communications with TransportLayer Security . . . . . . . . . . . .. 52Configuring the Operations Center . . . . .. 53
Securing communications between theOperations Center and the hub server . . .. 54
Registering your Tivoli Storage Manager license .. 56Configuring data deduplication. . . . . . .. 57Defining data retention rules for your business .. 57Defining schedules for server maintenance activities 58Defining client schedules . . . . . . . . .. 60
Chapter 10. Installing and configuringclients . . . . . . . . . . . . . .. 61Registering and assigning clients to schedules . .. 61Installing the client management service. . . .. 62
Verifying the client management service isinstalled correctly . . . . . . . . . .. 62Configuring the Operations Center to use theclient management service . . . . . . .. 63
Chapter 11. Configuring the secondserver . . . . . . . . . . . . . .. 65Configuring SSL communications between the hubserver and a spoke server . . . . . . . .. 65Adding the second server as a spoke . . . . .. 67Enabling replication . . . . . . . . . .. 67
Chapter 12. Completing theimplementation . . . . . . . . . .. 69
Part 3. Monitoring a multisite disksolution . . . . . . . . . . . . .. 71
© Copyright IBM Corp. 1993, 2015 iii

Chapter 13. Daily monitoring checklist 73
Chapter 14. Periodic monitoringchecklist . . . . . . . . . . . . .. 79
Chapter 15. Verifying licensecompliance . . . . . . . . . . . .. 85
Chapter 16. Selecting, configuring, andusing monitoring tools . . . . . . .. 87Tracking system status by using daily email reports 89
Part 4. Managing operations . . .. 93
Chapter 17. Managing the OperationsCenter . . . . . . . . . . . . . .. 95Adding and removing spoke servers . . . . .. 95
Adding a spoke server . . . . . . . .. 95Removing a spoke server . . . . . . . .. 96
Starting and stopping the web server . . . . .. 96Restarting the initial configuration wizard . . .. 97Changing the hub server . . . . . . . . .. 98Restoring the configuration to the preconfigurationstate . . . . . . . . . . . . . . . .. 98
Chapter 18. Protecting applications,virtual machines, and systems . . .. 101Adding clients . . . . . . . . . . . .. 101
Selecting the software and planning theinstallation . . . . . . . . . . . .. 102Specifying rules for backing up and archivingclient data . . . . . . . . . . . .. 104Scheduling backup and archive operations .. 107Registering clients . . . . . . . . . .. 108Installing and configuring clients . . . . .. 109
Managing client operations . . . . . . . .. 114Evaluating errors in client error logs. . . .. 115Stopping and restarting the client acceptordaemon . . . . . . . . . . . . .. 115Resetting passwords . . . . . . . . .. 117Modifying the scope of a client backup . . .. 118
Managing client upgrades . . . . . . . .. 118Decommissioning a client node . . . . . .. 120Deactivating data to free storage space . . . .. 122
Chapter 19. Managing data storage 123Auditing a storage pool . . . . . . . . .. 123Managing inventory capacity . . . . . . .. 124Managing memory and CPU usage . . . . .. 126Tuning scheduled activities . . . . . . . .. 127
Moving clients from one server to another. .. 128
Chapter 20. Managing replication . .. 129Enabling node replication . . . . . . . .. 129Protecting data in storage pools . . . . . .. 129Modifying replication settings . . . . . . .. 130Setting different retention policies for the sourceserver and target server . . . . . . . . .. 132
Chapter 21. Securing the TivoliStorage Manager server . . . . . .. 133Security concepts . . . . . . . . . . .. 133Managing administrators . . . . . . . .. 134Changing password requirements . . . . .. 135Securing Tivoli Storage Manager on the system .. 137
Restricting user access to the server . . . .. 137Limiting access through port restrictions . .. 137
Chapter 22. Stopping and starting theserver . . . . . . . . . . . . .. 139Stopping the server . . . . . . . . . .. 139Starting the server for maintenance orreconfiguration tasks . . . . . . . . . .. 140
Chapter 23. Planning to upgrade theTivoli Storage Manager server . . .. 143
Chapter 24. Implementing a disasterrecovery plan . . . . . . . . . .. 145Preparing for an outage or system update . . .. 145Completing recovery drills . . . . . . . .. 145
Chapter 25. Recovering from data lossor system outages . . . . . . . .. 147Restoring the database . . . . . . . . .. 149Recovering damaged data from a replicated copy 151Repairing storage pools . . . . . . . . .. 152
Part 5. Appendixes . . . . . . .. 153
Appendix. Accessibility features forthe Tivoli Storage Manager productfamily. . . . . . . . . . . . . .. 155
Notices . . . . . . . . . . . . .. 157
Glossary . . . . . . . . . . . .. 161
Index . . . . . . . . . . . . . .. 163
iv IBM Tivoli Storage Manager: Multisite Disk Solution Guide

About this publication
This publication provides information about planning for, implementing,monitoring, and operating a data protection solution that uses IBM® Tivoli®
Storage Manager best practices.
Who should read this guideThis guide is intended for anyone who is registered as an administrator for TivoliStorage Manager. A single administrator can manage Tivoli Storage Manager, orseveral people can share administrative responsibilities.
You should be familiar with the operating system on which the server resides andthe communication protocols required for the client/server environment. You alsoneed to understand the storage management practices of your organization, suchas how you are currently backing up workstation files and how you are usingstorage devices.
PublicationsThe Tivoli Storage Manager product family includes IBM Tivoli StorageFlashCopy® Manager, IBM Tivoli Storage Manager for Space Management, IBMTivoli Storage Manager for Databases, and several other storage managementproducts from IBM.
To view IBM product documentation, see http://www.ibm.com/support/knowledgecenter.
© Copyright IBM Corp. 1993, 2015 v

vi IBM Tivoli Storage Manager: Multisite Disk Solution Guide
New for Tivoli Storage Manager Version 7.1.3
Many features in IBM Tivoli Storage Manager Version 7.1.3 are new for TivoliStorage Manager users. These new features are designed to optimize data storageand improve product usability.
For a complete list of new features in this release, see What's new(http://www.ibm.com/support/knowledgecenter/SSGSG7_7.1.3/srv.common/r_wn_tsmserver.html).
© Copyright IBM Corp. 1993, 2015 vii

viii IBM Tivoli Storage Manager: Multisite Disk Solution Guide
Part 1. Planning for a multisite disk data protection solution
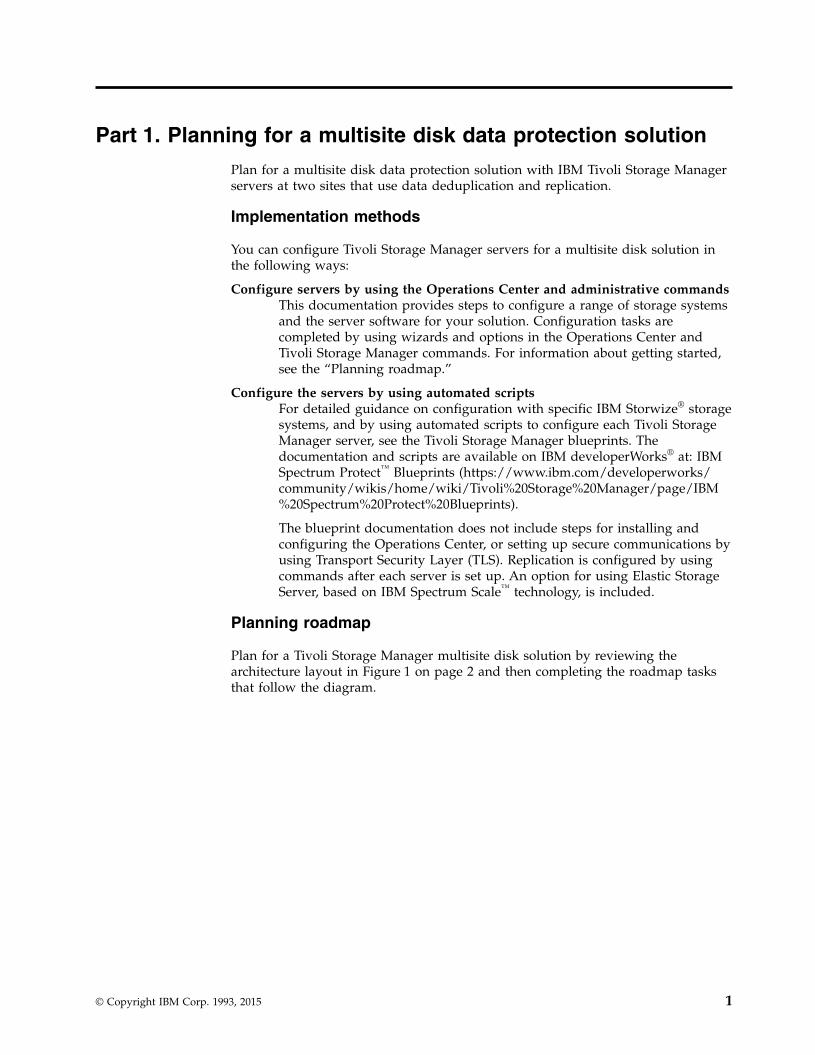
Plan for a multisite disk data protection solution with IBM Tivoli Storage Managerservers at two sites that use data deduplication and replication.
Implementation methods
You can configure Tivoli Storage Manager servers for a multisite disk solution inthe following ways:
Configure servers by using the Operations Center and administrative commandsThis documentation provides steps to configure a range of storage systemsand the server software for your solution. Configuration tasks arecompleted by using wizards and options in the Operations Center andTivoli Storage Manager commands. For information about getting started,see the “Planning roadmap.”
Configure the servers by using automated scriptsFor detailed guidance on configuration with specific IBM Storwize® storagesystems, and by using automated scripts to configure each Tivoli StorageManager server, see the Tivoli Storage Manager blueprints. Thedocumentation and scripts are available on IBM developerWorks® at: IBMSpectrum Protect™ Blueprints (https://www.ibm.com/developerworks/community/wikis/home/wiki/Tivoli%20Storage%20Manager/page/IBM%20Spectrum%20Protect%20Blueprints).
The blueprint documentation does not include steps for installing andconfiguring the Operations Center, or setting up secure communications byusing Transport Security Layer (TLS). Replication is configured by usingcommands after each server is set up. An option for using Elastic StorageServer, based on IBM Spectrum Scale™ technology, is included.
Planning roadmap
Plan for a Tivoli Storage Manager multisite disk solution by reviewing thearchitecture layout in Figure 1 on page 2 and then completing the roadmap tasksthat follow the diagram.
© Copyright IBM Corp. 1993, 2015 1
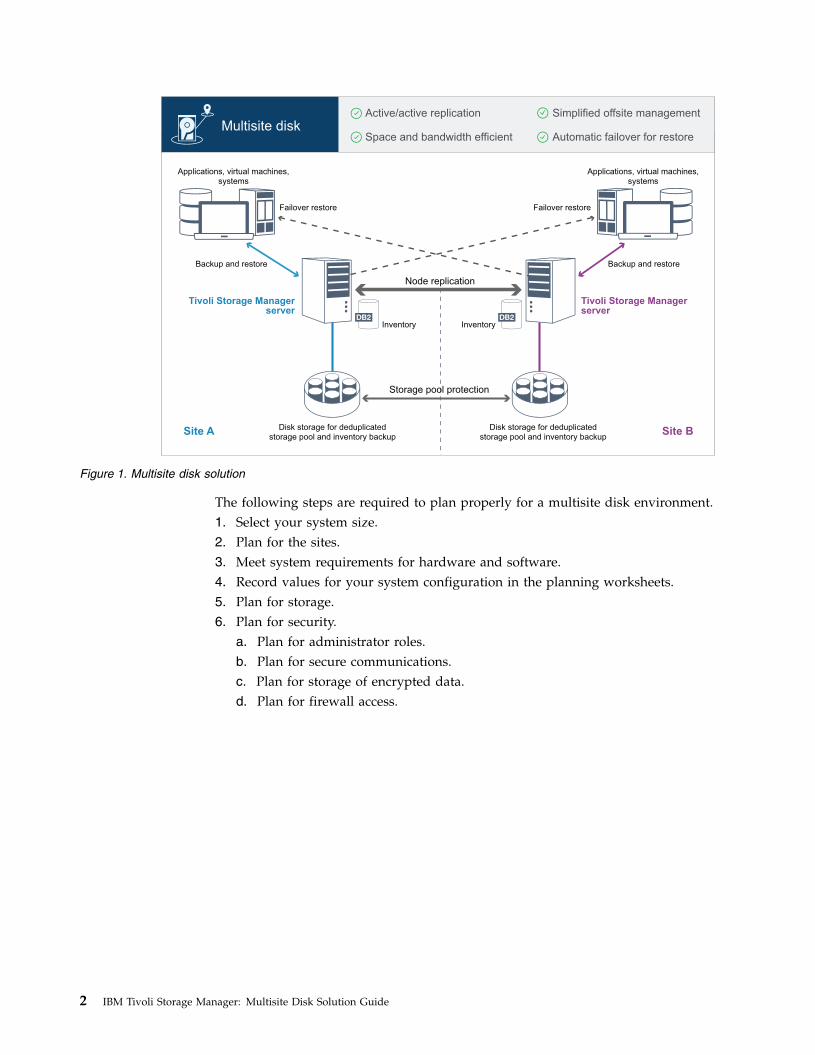
The following steps are required to plan properly for a multisite disk environment.1. Select your system size.2. Plan for the sites.3. Meet system requirements for hardware and software.4. Record values for your system configuration in the planning worksheets.5. Plan for storage.6. Plan for security.
a. Plan for administrator roles.b. Plan for secure communications.c. Plan for storage of encrypted data.d. Plan for firewall access.
Active/active replication
Automatic failover for restoreSpace and bandwidth efficient
Simplified offsite management
Multisite disk
Node replication
Inventory
Applications, virtual machines,systems
Backup and restore
Failover restoreFailover restore
Tivoli Storage Manager server
Applications, virtual machines,systems
Tivoli Storage Managerserver
Backup and restore
Site A Site BDisk storage for deduplicatedstorage pool and inventory backup
Disk storage for deduplicatedstorage pool and inventory backup
Inventory
Storage pool protection
Figure 1. Multisite disk solution
2 IBM Tivoli Storage Manager: Multisite Disk Solution Guide

Chapter 1. Selecting a system size
Select the size of the Tivoli Storage Manager server based on the amount of datathat you manage and the systems to be protected.
About this task
You can use the information in the table to determine the size of Tivoli StorageManager server that is required, based on the amount of data that you manage.
The following table describes the volume of data that a server manages. Thisamount includes all versions. The daily amount of data is how much new data youback up each day. Both the total managed data and daily amount of new data aremeasured as the size before any data reduction.
Table 1. Determining the size of the Tivoli Storage Manager server
Total managed dataDaily amount of new data toback up Required server size
45 TB - 180 TB Up to 6 TB per day Small
200 TB - 800 TB 6 - 20 TB per day Medium
1000 TB - 4000 TB 20 - 100 TB per day Large
The daily backup values in the table are based on test results with 128 MB sizedobjects, which are used by Tivoli Storage Manager for Virtual Environments.Workloads that consist of objects that are smaller than 128 KB might not be able toachieve these daily limits.
© Copyright IBM Corp. 1993, 2015 3

4 IBM Tivoli Storage Manager: Multisite Disk Solution Guide
Chapter 2. Planning the sites
Review use cases and evaluate the factors to provide the most efficient dataprotection for the multisite disk solution for Tivoli Storage Manager.
Use cases
The multisite disk solution creates at least one copy of backed-up data. If the TivoliStorage Manager servers are at separate locations, the backed-up replica ismaintained offsite. Although your company might benefit from a multisite disksolution for various reasons, the most common reasons to use a multisite disksolution include the following replication scenarios:
Replication from the primary site to the disaster recovery site
In this scenario, data that is backed up from the primary site, Site A, isreplicated to a Tivoli Storage Manager server at the secondary, disasterrecovery site, Site B. If a disaster occurs at Site A, such as failure of theserver, you can use the Tivoli Storage Manager server at Site B to recoversystems. Alternatively, you can use the server at Site A to restore primarystorage pool data at Site B, such as after a disk storage failure at Site B..
Mutual replication at two active sites
In this scenario, local data at each site is backed up by the Tivoli StorageManager servers at both Site A and Site B. Data that is backed up from SiteA is replicated to Site B, and backed-up data from Site B is replicated toSite A. If data that was backed up is lost at Site A, you can use the serverat Site B to recover storage pool data to the server at Site A. If Site A is nolonger available, you can recover the replicated data for Site A to a newsystem at Site B. You must size the server resources to ensure that eitherserver has sufficient capacity to back up and restore all client nodes as partof your disaster recovery plan.
Protect remote Tivoli Storage Manager servers to the primary site
In this scenario, you configure remote Tivoli Storage Manager servers thatare relatively small to replicate data that is backed up to a larger TivoliStorage Manager server at the primary site. If bandwidth is limited, itmight not be practical to restore systems to the remote sites. In this case,you might want to recover systems at the primary site before you replicatethe backed-up data to the remote servers.
Factors to evaluate
Before you implement a multisite disk solution, evaluate the following factors:
Network bandwidth
The network must have sufficient bandwidth for the expected datatransfers between nodes, for replication, and for the cross-site restoreoperations that are required for disaster recovery. Before you proceed withtesting replication throughput, ensure that your network can handle thereplication traffic. Calculate the required network bandwidth for thesteady-state requirement by applying the guidelines in Estimating network
© Copyright IBM Corp. 1993, 2015 5

bandwidth required for replication (V7.1.1) (http://www.ibm.com/support/knowledgecenter/SSGSG7_7.1.1/com.ibm.itsm.srv.doc/t_repl_est_bw.html).
The network connection is often a shared resource. Plan the time of day toschedule node replication to run to avoid a conflict with other resourceusers. Also, network controls might limit Tivoli Storage Manager activity toonly a portion of the bandwidth. There are no controls in Tivoli StorageManager to restrict network usage.
Resources for the initial replication
To set up the data protection solution across two sites, you must replicatedata initially from Site A to the target server at Site B. To ensure that theinitial replication is successful, you must determine whether you have thenetwork bandwidth, processor resources, and time available to replicate thedata. You might have to plan for replicating the initial full backups acrossseveral days. If you cannot extend the schedule for the initial backups, youcan replicate data from Site A to Site B without using the network. Forexample, you can export and import the backed-up data by using media oryou can temporarily locate the source and target servers on the same site.
Daily data ingestion
For the multisite disk solution, the daily data ingestion and total dataretention must be within the capacity of the Tivoli Storage Managerconfigurations. For example, a large Tivoli Storage Manager configurationhas a data ingestion capacity of up to 100 TB per day, including nodereplication. In cases where the backup requirements exceed the capacity ofa single Tivoli Storage Manager server, you can configure a solution thatuses multiple Tivoli Storage Manager servers to achieve the requiredcapacity.
Server configuration
The Tivoli Storage Manager server configuration must meet or exceed therequirements for the multisite disk solution.
Single replica of backed-up data
The multisite disk solution is most efficient when a single, offsite copy ofthe backed-up data meets your data protection and risk mitigationrequirements. In this case, the single copy of the data is maintained off-siteat the location of a Tivoli Storage Manager replication server.
Related reference:Chapter 3, “System requirements for a multisite disk solution,” on page 7
6 IBM Tivoli Storage Manager: Multisite Disk Solution Guide

Chapter 3. System requirements for a multisite disk solution
After you select the solution that best fits your data protection requirements,review the system requirements to plan for implementation of the data protectionsolution.
Ensure that your system meets the hardware and software prerequisites for thesize of server that you plan to use.Related information:
Tivoli Storage Manager Supported Operating Systems (http://www.ibm.com/support/docview.wss?uid=swg21243309)
Hardware requirementsHardware requirements are based on system size. Choose equivalent or bettercomponents than those items that are listed to ensure optimum performance foryour environment.
For a definition of system sizes, see Chapter 1, “Selecting a system size,” on page3.
The following table includes minimum hardware requirements for the server andstorage, based on the size of the server that you plan to build. If you are usinglocal partitions (LPARs) or work partitions (WPARs), adjust the networkrequirements to take account of the partition sizes.
Hardware requirements for the Operations Center are included in the table, exceptfor the database and archive log space that the Operations Center uses to holdrecords for managed clients. This value is based on the number of clients that aremonitored on a server. For guidance about how to calculate this estimate, seeEstimating database space requirements for the Operations Center.
If you do not plan to install the Operations Center on the same system as theserver, you can estimate system requirements separately. For details aboutcalculating system requirements for the Operations Center, see Tivoli StorageManager Operations Center system requirements calculator (http://www.ibm.com/support/docview.wss?uid=swg21641684).
Hardware component Small system Medium system Large system
Server processor AIX
6 processor
cores, 3.42 GHz or faster
Linux
Windows
12
processor cores, 1.9 GHz orfaster
AIX
8 processor
cores, 3.42 GHz or faster
Linux
Windows
16
processor cores, 2.0 GHz orfaster
AIX
20 processor
cores, 3.42 GHz
Linux
Windows
32
processor cores, 2.0 GHz orfaster
Server memory 64 GB RAM 128 GB RAM 192 GB RAM
Network v 10 GB Ethernet (1 port)
v 8 GB Fibre Channeladapter (2 ports)
v 10 GB Ethernet (2 ports)
v 8 GB Fibre Channeladapter (2 ports)
v 10 GB Ethernet (4 ports)
v 8 GB Fibre Channeladapter (4 ports)
© Copyright IBM Corp. 1993, 2015 7
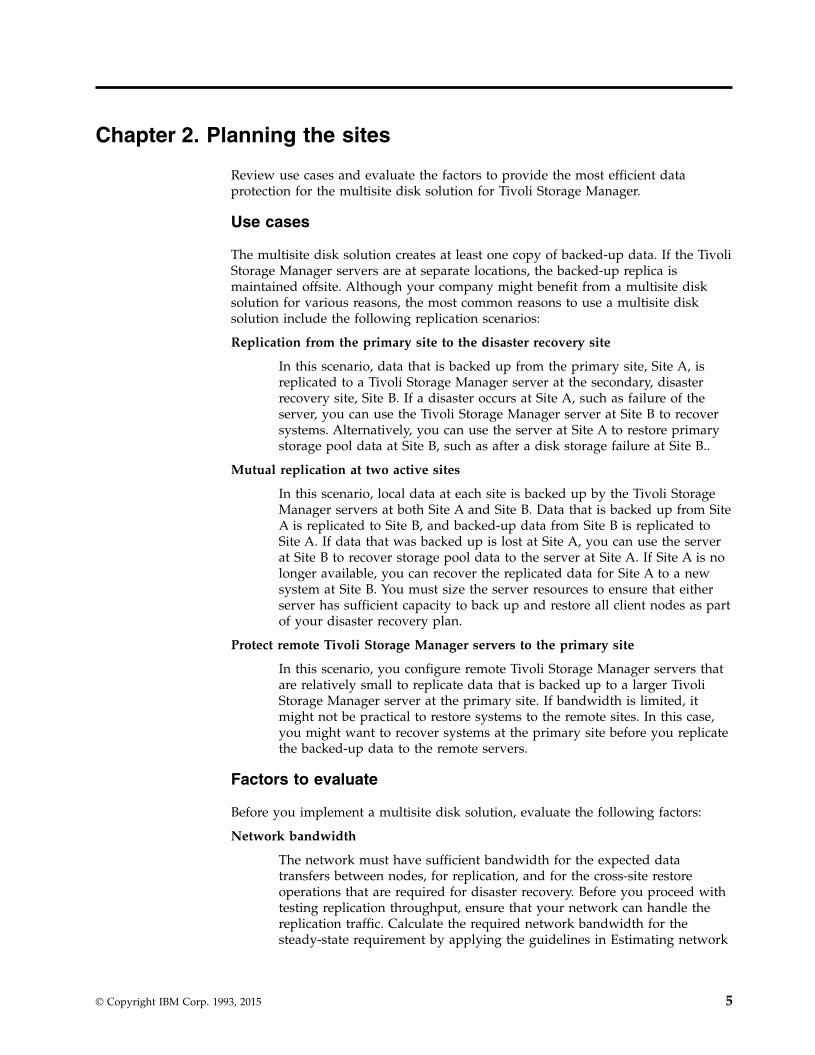
Hardware component Small system Medium system Large system
Storage v 1.3 TB inventory1
v 46 TB deduplicateddirectory-containerstorage pool
v 2 TB inventory1
v 200 TB deduplicateddirectory-containerstorage pool
v 4 TB inventory1
v 1000 TB deduplicateddirectory-containerstorage pool
1Plus extra space that is required to hold records that are managed by the Operations Center.
Estimating database space requirements for the Operations Center
Managing the Operations Center on a Tivoli Storage Manager server represents anextra workload. This workload requires extra space for database operations.Review the following guidelines to help estimate how much space your serverrequires.
Database spaceThe Operations Center uses approximately 1.2 GB of database space forevery 1000 clients that are monitored on a server. For example, consider ahub server with 2000 clients that also manages three spoke servers, eachwith 1500 clients. This configuration has a total of 6500 clients across thefour Tivoli Storage Manager servers and requires approximately 8.4 GB ofdatabase space. This value is calculated by rounding the 6500 clients up tothe next closest 1000, which is 7000:7 x 1.2 GB=8.4 GB
Archive log spaceThe Operations Center uses approximately 8 GB of archive log space every24 hours, for every 1000 clients. In the example of 6500 clients across thehub server and the spoke servers, 56 GB of archive log space is used overa 24-hour period for the hub server.
For a given spoke server in the example, the archive log space that is usedover 24 hours would be 16 GB. These estimates are based on the defaultstatus collection interval of 5 minutes. If you lower the collection intervalfrom once every 5 minutes to once every 3 minutes, the space requirementsincrease. The following examples show the approximate increase in the logspace requirement with a collection interval of once every 3 minutes:v Hub server: 56 GB to approximately 94 GBv Each spoke server: 16 GB to approximately 28 GB
Increase the archive log space so that you have sufficient space available tosupport the Operations Center, without affecting the existing serveroperations.
Hardware requirements for the second server
If you are planning to set up your sites so that everything at the first site isreplicated to the second site, hardware requirements will be identical at both sites.If you want to only replicate a subset of data to your second site, storage andnetwork requirements might be reduced.
8 IBM Tivoli Storage Manager: Multisite Disk Solution Guide
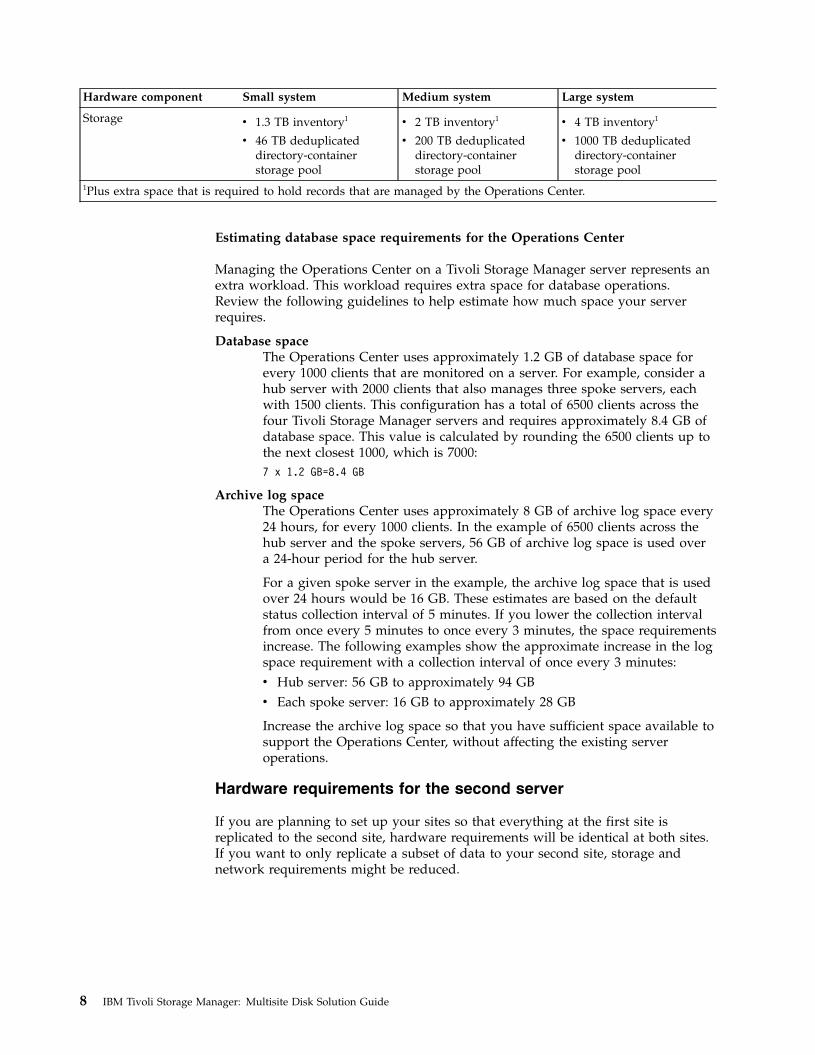
Software requirementsDocumentation for the multisite disk solution includes installation andconfiguration tasks for the following operating systems. You must meet theminimum software requirements that are listed.
AIX® systems
Type of software Minimum software requirements
Operating system IBM AIX 7.1
Gunzip utility The gunzip utility must be available on your system before youinstall or upgrade the Tivoli Storage Manager Version 7 server.Ensure that the gunzip utility is installed and the path to it is setin the PATH environment variable.
File system type JFS2 file systems
AIX systems can cache a large amount of file system data, whichcan reduce memory that is required for Tivoli Storage Managerserver and DB2® processes. To avoid paging with the AIX server,use the rbrw mount option for the JFS2 file system. Less memoryis used for the file system cache and more is available for TivoliStorage Manager.
Do not use the file system mount options, Concurrent I/O (CIO),and Direct I/O (DIO), for file systems that contain the TivoliStorage Manager database, logs, or storage pool volumes. Theseoptions can cause performance degradation of many serveroperations. Tivoli Storage Manager and DB2 can still use DIOwhere it is beneficial to do so, but Tivoli Storage Manager doesnot require the mount options to selectively take advantage ofthese techniques.
Other software Korn Shell (ksh)
Linux systems
Type of software Minimum software requirements
Operating system Red Hat Enterprise Linux 7 (x86_64)
Libraries GNU C libraries, Version 2.3.3-98.38 or later that is installed onthe Tivoli Storage Manager system.
Red Hat Enterprise Linux Servers:
v libaio
v libstdc++.so.6 (32-bit and 64-bit packages are required)
v numactl.x86_64
File system type Format database-related file systems with ext3 or ext4.
For storage pool-related file systems, use XFS.
Other software Korn Shell (ksh)
Windows systems
Type of software Minimum software requirements
Operating system Microsoft Windows 2012 R2 (64-bit)
Chapter 3. System requirements for a multisite disk solution 9
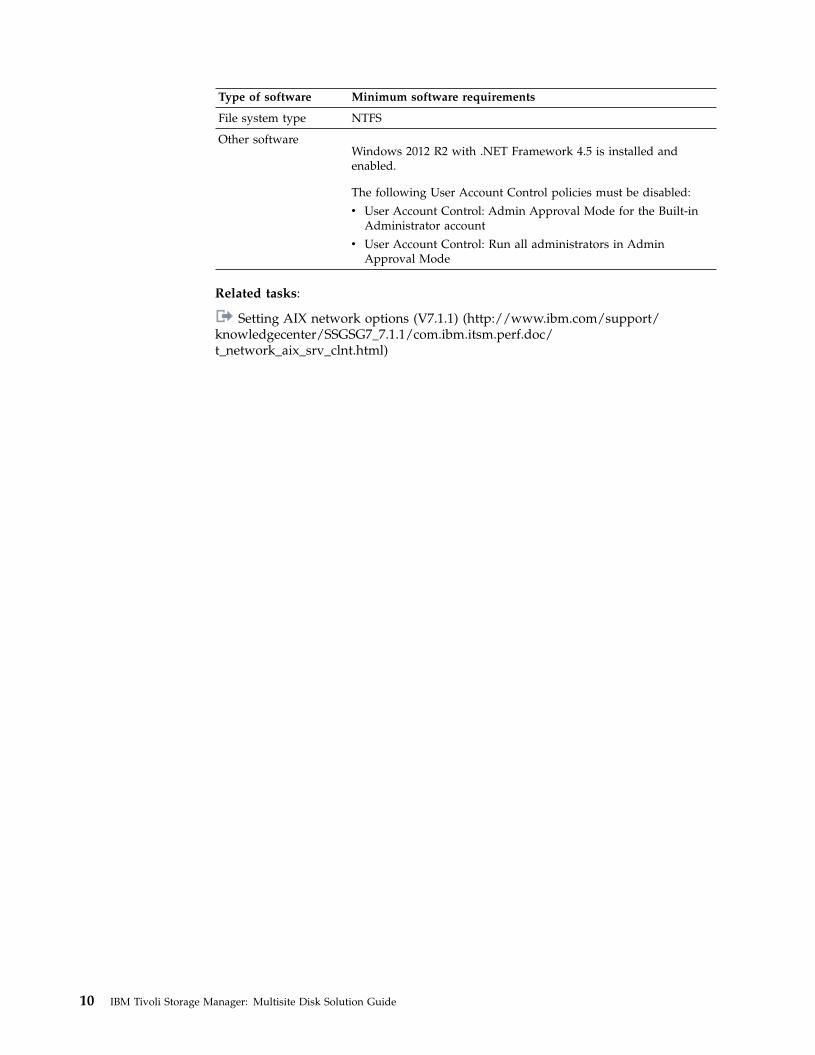
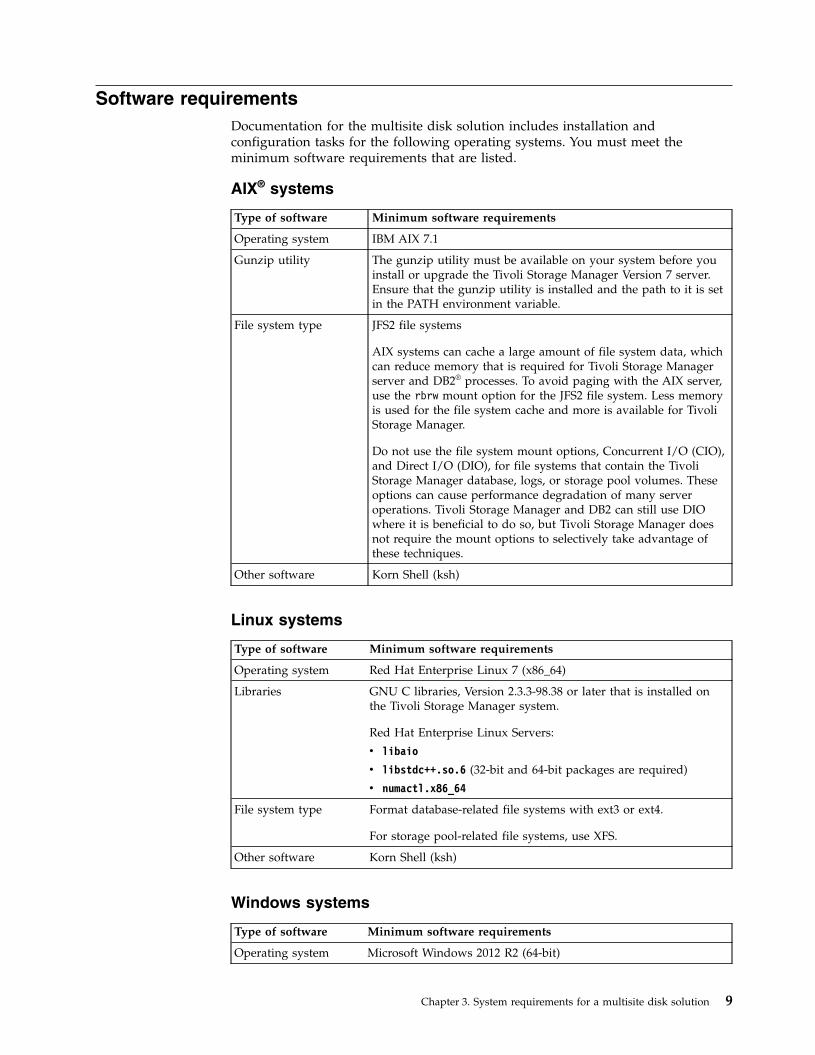
Type of software Minimum software requirements
File system type NTFS
Other softwareWindows 2012 R2 with .NET Framework 4.5 is installed andenabled.
The following User Account Control policies must be disabled:
v User Account Control: Admin Approval Mode for the Built-inAdministrator account
v User Account Control: Run all administrators in AdminApproval Mode
Related tasks:
Setting AIX network options (V7.1.1) (http://www.ibm.com/support/knowledgecenter/SSGSG7_7.1.1/com.ibm.itsm.perf.doc/t_network_aix_srv_clnt.html)
10 IBM Tivoli Storage Manager: Multisite Disk Solution Guide
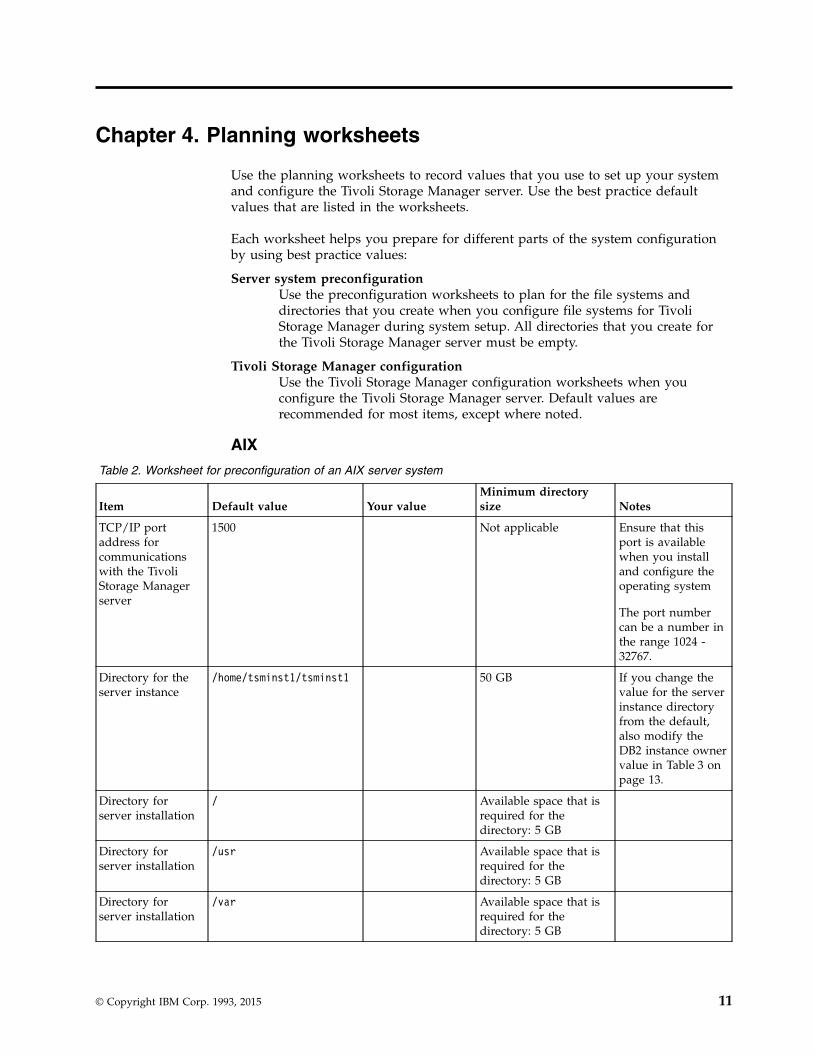
Chapter 4. Planning worksheets
Use the planning worksheets to record values that you use to set up your systemand configure the Tivoli Storage Manager server. Use the best practice defaultvalues that are listed in the worksheets.
Each worksheet helps you prepare for different parts of the system configurationby using best practice values:
Server system preconfigurationUse the preconfiguration worksheets to plan for the file systems anddirectories that you create when you configure file systems for TivoliStorage Manager during system setup. All directories that you create forthe Tivoli Storage Manager server must be empty.
Tivoli Storage Manager configurationUse the Tivoli Storage Manager configuration worksheets when youconfigure the Tivoli Storage Manager server. Default values arerecommended for most items, except where noted.
AIX
Table 2. Worksheet for preconfiguration of an AIX server system
Item Default value Your valueMinimum directorysize Notes
TCP/IP portaddress forcommunicationswith the TivoliStorage Managerserver
1500 Not applicable Ensure that thisport is availablewhen you installand configure theoperating system
The port numbercan be a number inthe range 1024 -32767.
Directory for theserver instance
/home/tsminst1/tsminst1 50 GB If you change thevalue for the serverinstance directoryfrom the default,also modify theDB2 instance ownervalue in Table 3 onpage 13.
Directory forserver installation
/ Available space that isrequired for thedirectory: 5 GB
Directory forserver installation
/usr Available space that isrequired for thedirectory: 5 GB
Directory forserver installation
/var Available space that isrequired for thedirectory: 5 GB
© Copyright IBM Corp. 1993, 2015 11

Table 2. Worksheet for preconfiguration of an AIX server system (continued)
Item Default value Your valueMinimum directorysize Notes
Directory forserver installation
/tmp Available space that isrequired for thedirectory: 5 GB
Directory forserver installation
/opt Available space that isrequired for thedirectory: 10 GB
Directory for theactive log
/tsminst1/TSMalog v Small and medium:140 GB
v Large: 300 GB
When you createthe active logduring the initialconfiguration of theserver, set the sizeto 128 GB.
Directory for thearchive log
/tsminst1/TSMarchlog v Small: 1 TB
v Medium: 3 TB
v Large: 4 TB
Directories for thedatabase
/tsminst1/TSMdbspace00/tsminst1/TSMdbspace01/tsminst1/TSMdbspace02/tsminst1/TSMdbspace03...
Minimum total spacefor all directories:
v Small: At least 1 TB
v Medium: At least 2TB
v Large: At least 4 TB
Create a minimumnumber of filesystems for thedatabase,depending on thesize of your TivoliStorage Managersystem:
v Small: At least 4file systems
v Medium: At least8 file systems
v Large: At least 8file systems
Directories forstorage
/tsminst1/TSMfile00/tsminst1/TSMfile01/tsminst1/TSMfile02/tsminst1/TSMfile03...
Minimum total spacefor all directories:
v Small: At least 38 TB
v Medium: At least 180TB
v Large: At least 980TB
Create a minimumnumber of filesystems for storage,depending on thesize of your TivoliStorage Managersystem:
v Small: At least 10file systems
v Medium: At least20 file systems
v Large: At least 40file systems
12 IBM Tivoli Storage Manager: Multisite Disk Solution Guide

Table 2. Worksheet for preconfiguration of an AIX server system (continued)
Item Default value Your valueMinimum directorysize Notes
Directories fordatabase backup
/tsminst1/TSMbkup00/tsminst1/TSMbkup01/tsminst1/TSMbkup02/tsminst1/TSMbkup03
Minimum total spacefor all directories:
v Small: At least 3 TB
v Medium: At least 10TB
v Large: At least 16 TB
Create a minimumnumber of filesystems for backingup the database,depending on thesize of your TivoliStorage Managersystem:
v Small: At least 2file systems
v Medium: At least4 file systems
v Large: At least 4file systems
Table 3. Worksheet for Tivoli Storage Manager configuration
Item Default value Your value Notes
DB2 instance owner tsminst1 If you changed the valuefor the server instancedirectory in Table 2 on page11 from the default, alsomodify the value for theDB2 instance owner.
DB2 instance ownerpassword
passw0rd Select a different value forthe instance ownerpassword than the default.Ensure that you record thisvalue in a secure location.
Primary group forthe DB2 instanceowner
tsmsrvrs
Server name The default value for theserver name is the system hostname.
Server password passw0rd Select a different value forthe server password thanthe default. Ensure that yourecord this value in a securelocation.
Tivoli StorageManageradministrator ID(user ID for theTivoli StorageManager serverinstance)
admin
Tivoli StorageManageradministrator IDpassword
passw0rd Select a different value forthe administrator passwordthan the default. Ensurethat you record this valuein a secure location.
Chapter 4. Planning worksheets 13

Table 3. Worksheet for Tivoli Storage Manager configuration (continued)
Item Default value Your value Notes
Schedule start time 22:00 The default schedule starttime begins the clientworkload phase, which ispredominantly the clientbackup and archiveactivities. During the clientworkload phase, serverresources support clientoperations. Normally, theseoperations are completedduring the nightly schedulewindow.
Schedules for servermaintenance operations aredefined to begin 10 hoursafter the start of the clientbackup window.
Linux
Table 4. Worksheet for preconfiguration of a Linux server system
Item Default value Your valueMinimum directorysize Notes
TCP/IP portaddress forcommunicationswith the TivoliStorage Managerserver
1500 Not applicable Ensure that thisport is availablewhen you installand configure theoperating system
The port numbercan be a number inthe range 1024 -32767.
Directory for theserver instance
/home/tsminst1/tsminst1 25 GB If you change thevalue for the serverinstance directoryfrom the default,also modify theDB2 instance ownervalue in Table 5 onpage 15.
Directory for theactive log
/tsminst1/TSMalog v Small and medium:140 GB
v Large: 300 GB
Directory for thearchive log
/tsminst1/TSMarchlog v Small: 1 TB
v Medium: 3 TB
v Large: 4 TB
14 IBM Tivoli Storage Manager: Multisite Disk Solution Guide

Table 4. Worksheet for preconfiguration of a Linux server system (continued)
Item Default value Your valueMinimum directorysize Notes
Directories for thedatabase
/tsminst1/TSMdbspace00/tsminst1/TSMdbspace01/tsminst1/TSMdbspace02/tsminst1/TSMdbspace03...
Minimum total spacefor all directories:
v Small: At least 1 TB
v Medium: At least 2TB
v Large: At least 4 TB
Create a minimumnumber of filesystems for thedatabase,depending on thesize of your TivoliStorage Managersystem:
v Small: At least 4file systems
v Medium: At least8 file systems
v Large: At least 8file systems
Directories forstorage
/tsminst1/TSMfile00/tsminst1/TSMfile01/tsminst1/TSMfile02/tsminst1/TSMfile03...
Minimum total spacefor all directories:
v Small: At least 38 TB
v Medium: At least 180TB
v Large: At least 980TB
Create a minimumnumber of filesystems for storage,depending on thesize of your TivoliStorage Managersystem:
v Small: At least 10file systems
v Medium: At least20 file systems
v Large: At least 40file systems
Directories fordatabase backup
/tsminst1/TSMbkup00/tsminst1/TSMbkup01/tsminst1/TSMbkup02/tsminst1/TSMbkup03
Minimum total spacefor all directories:
v Small: At least 3 TB
v Medium: At least 10TB
v Large: At least 16 TB
Create a minimumnumber of filesystems for backingup the database,depending on thesize of your TivoliStorage Managersystem:
v Small: At least 2file systems
v Medium: At least4 file systems
v Large: At least 4file systems
Table 5. Worksheet for Tivoli Storage Manager configuration
Item Default value Your value Notes
DB2 instance owner tsminst1 If you changed the valuefor the server instancedirectory in Table 4 on page14 from the default, alsomodify the value for theDB2 instance owner.
Chapter 4. Planning worksheets 15
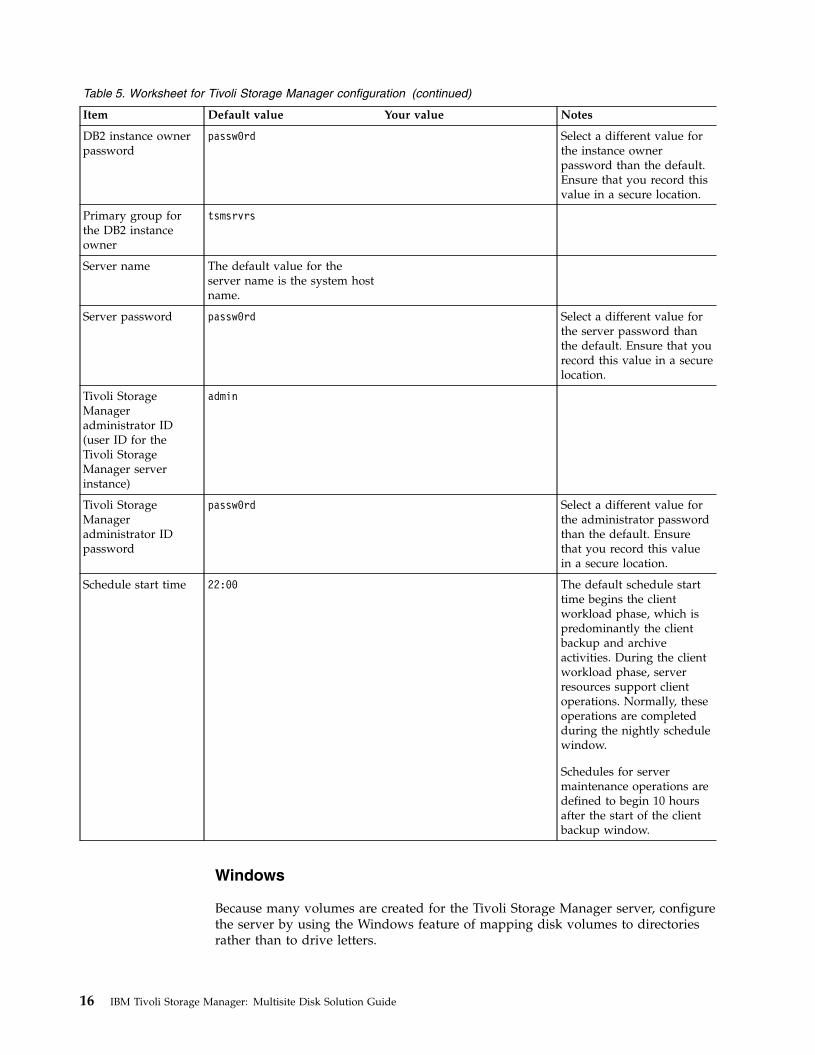
Table 5. Worksheet for Tivoli Storage Manager configuration (continued)
Item Default value Your value Notes
DB2 instance ownerpassword
passw0rd Select a different value forthe instance ownerpassword than the default.Ensure that you record thisvalue in a secure location.
Primary group forthe DB2 instanceowner
tsmsrvrs
Server name The default value for theserver name is the system hostname.
Server password passw0rd Select a different value forthe server password thanthe default. Ensure that yourecord this value in a securelocation.
Tivoli StorageManageradministrator ID(user ID for theTivoli StorageManager serverinstance)
admin
Tivoli StorageManageradministrator IDpassword
passw0rd Select a different value forthe administrator passwordthan the default. Ensurethat you record this valuein a secure location.
Schedule start time 22:00 The default schedule starttime begins the clientworkload phase, which ispredominantly the clientbackup and archiveactivities. During the clientworkload phase, serverresources support clientoperations. Normally, theseoperations are completedduring the nightly schedulewindow.
Schedules for servermaintenance operations aredefined to begin 10 hoursafter the start of the clientbackup window.
Windows
Because many volumes are created for the Tivoli Storage Manager server, configurethe server by using the Windows feature of mapping disk volumes to directoriesrather than to drive letters.
16 IBM Tivoli Storage Manager: Multisite Disk Solution Guide
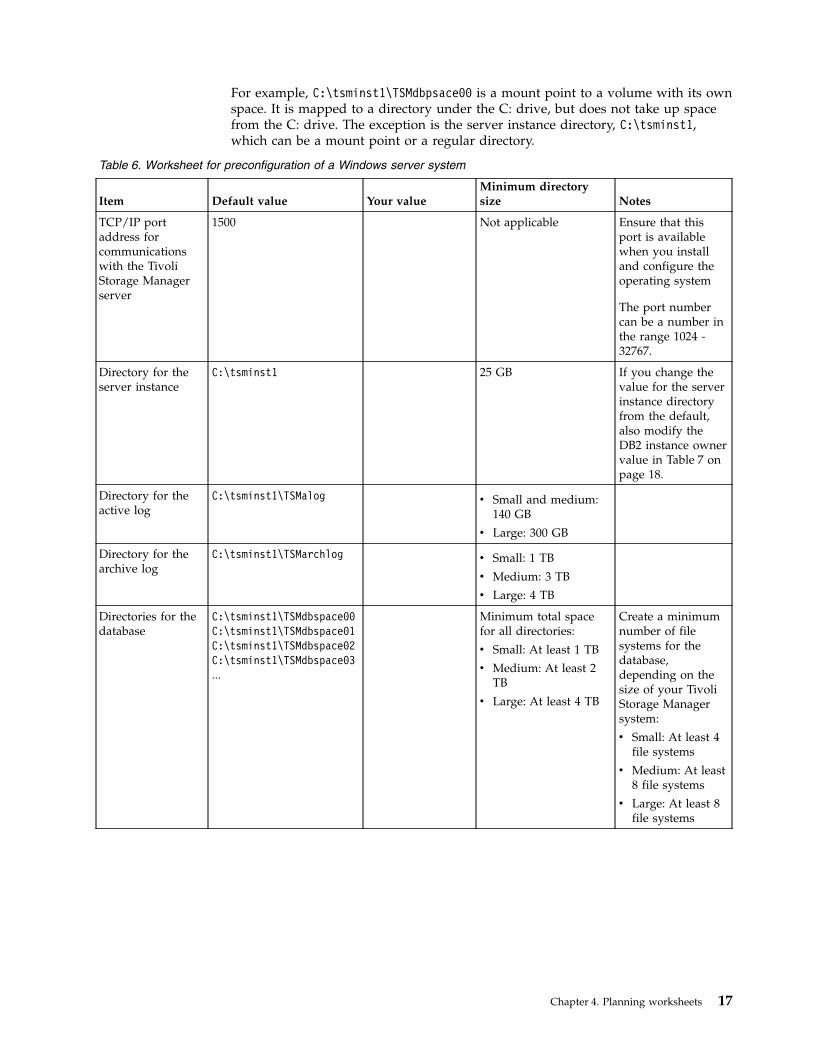
For example, C:\tsminst1\TSMdbpsace00 is a mount point to a volume with its ownspace. It is mapped to a directory under the C: drive, but does not take up spacefrom the C: drive. The exception is the server instance directory, C:\tsminst1,which can be a mount point or a regular directory.
Table 6. Worksheet for preconfiguration of a Windows server system
Item Default value Your valueMinimum directorysize Notes
TCP/IP portaddress forcommunicationswith the TivoliStorage Managerserver
1500 Not applicable Ensure that thisport is availablewhen you installand configure theoperating system
The port numbercan be a number inthe range 1024 -32767.
Directory for theserver instance
C:\tsminst1 25 GB If you change thevalue for the serverinstance directoryfrom the default,also modify theDB2 instance ownervalue in Table 7 onpage 18.
Directory for theactive log
C:\tsminst1\TSMalog v Small and medium:140 GB
v Large: 300 GB
Directory for thearchive log
C:\tsminst1\TSMarchlog v Small: 1 TB
v Medium: 3 TB
v Large: 4 TB
Directories for thedatabase
C:\tsminst1\TSMdbspace00C:\tsminst1\TSMdbspace01C:\tsminst1\TSMdbspace02C:\tsminst1\TSMdbspace03...
Minimum total spacefor all directories:
v Small: At least 1 TB
v Medium: At least 2TB
v Large: At least 4 TB
Create a minimumnumber of filesystems for thedatabase,depending on thesize of your TivoliStorage Managersystem:
v Small: At least 4file systems
v Medium: At least8 file systems
v Large: At least 8file systems
Chapter 4. Planning worksheets 17

Table 6. Worksheet for preconfiguration of a Windows server system (continued)
Item Default value Your valueMinimum directorysize Notes
Directories forstorage
C:\tsminst1\TSMfile00C:\tsminst1\TSMfile01C:\tsminst1\TSMfile02C:\tsminst1\TSMfile03...
Minimum total spacefor all directories:
v Small: At least 38 TB
v Medium: At least 180TB
v Large: At least 980TB
Create a minimumnumber of filesystems for storage,depending on thesize of your TivoliStorage Managersystem:
v Small: At least 10file systems
v Medium: At least20 file systems
v Large: At least 40file systems
Directories fordatabase backup
C:\tsminst1\TSMbkup00C:\tsminst1\TSMbkup01C:\tsminst1\TSMbkup02C:\tsminst1\TSMbkup03
Minimum total spacefor all directories:
v Small: At least 3 TB
v Medium: At least 10TB
v Large: At least 16 TB
Create a minimumnumber of filesystems for backingup the database,depending on thesize of your TivoliStorage Managersystem:
v Small: At least 2file systems
v Medium: At least4 file systems
v Large: At least 4file systems
Table 7. Worksheet for Tivoli Storage Manager configuration
Item Default value Your value Notes
DB2 instance owner tsminst1 If you changed the valuefor the server instancedirectory in Table 6 on page17 from the default, alsomodify the value for theDB2 instance owner.
DB2 instance ownerpassword
pAssW0rd Select a different value forthe instance ownerpassword than the default.Ensure that you record thisvalue in a secure location.
Server name The default value for theserver name is the system hostname.
Server password passw0rd Select a different value forthe server password thanthe default. Ensure that yourecord this value in a securelocation.
18 IBM Tivoli Storage Manager: Multisite Disk Solution Guide

Table 7. Worksheet for Tivoli Storage Manager configuration (continued)
Item Default value Your value Notes
Tivoli StorageManageradministrator ID(user ID for theTivoli StorageManager serverinstance)
admin
Tivoli StorageManageradministrator IDpassword
passw0rd Select a different value forthe administrator passwordthan the default. Ensurethat you record this valuein a secure location.
Schedule start time 22:00 The default schedule starttime begins the clientworkload phase, which ispredominantly the clientbackup and archiveactivities. During the clientworkload phase, serverresources support clientoperations. Normally, theseoperations are completedduring the nightly schedulewindow.
Schedules for servermaintenance operations aredefined to begin 10 hoursafter the start of the clientbackup window.
Chapter 4. Planning worksheets 19

20 IBM Tivoli Storage Manager: Multisite Disk Solution Guide

Chapter 5. Planning for storage
Choose the most effective storage technology for Tivoli Storage Managercomponents to ensure efficient server performance and operations.
Storage hardware devices have different capacity and performance characteristics,which determine how they can be used effectively with Tivoli Storage Manager.For general guidance on selecting the right storage hardware and set up for yoursolution, review the following guidelines.
Database and active log
v Use a fast disk for the Tivoli Storage Manager database and active log,for example with the following characteristics:– High performance, 15k rpm disk with Fibre Channel or
serial-attached SCSI (SAS) interface– Solid-state disk (SSD)
v Isolate the active log from the database unless you use SSD or flashhardware
v When you create arrays for the database, use RAID level 5
Storage pool
v You can use less expensive and slower disks for the storage poolv The storage pool can share disks for the archive log and database
backup storagev Use RAID level 6 for storage pool arrays to add protection against
double drive failures when you use large disk types
Planning the storage arraysPrepare for disk storage configuration by planning for RAID arrays and volumes,according to your system size.
You design storage arrays with size and performance characteristics that aresuitable for one of the Tivoli Storage Manager server storage components, such asthe server database or a storage pool. The storage planning activity must takeaccount of drive type, RAID level, number of drives, the number of spare drives,and so on. In the solution configurations, storage groups contain internal-storageRAID arrays and consist of multiple physical disks that are presented as logicalvolumes to the system. When you configure the disk storage system, you createstorage groups, or data storage pools, and then create storage arrays in the groups.
You create volumes, or LUNs, from the storage groups. The storage group defineswhich disks provide the storage that makes up the volume. When you createvolumes, make them fully allocated. Faster disks types are used to hold thedatabase volumes and active log volumes. Slower disk types can be used for thestorage pool volumes, archive log, and database backup volumes.
Table 8 on page 22 and Table 9 on page 22 describe the layout requirements forstorage groups and volume configuration.
© Copyright IBM Corp. 1993, 2015 21

Table 8. Components of storage group configuration
Component Details
Server storagerequirement
How the storage is used by the Tivoli Storage Manager server.
Disk type Size and speed for the disk type that is used for the storagerequirement.
Disk quantity Number of each disk type that is needed for the storagerequirement.
Hot spare capacity Number of disks that are reserved as spares to take over if diskfailures occur.
RAID level Level of RAID array that is used for logical storage. The RAIDlevel defines the type of redundancy that is provided by thearray, for example 5 or 6.
RAID array quantity Number of RAID arrays to be created.
DDMs per RAID array How many disk drive modules (DDMs) are to be used in each ofthe RAID arrays.
Usable size per RAIDarray
Size that is available for data storage in each RAID array afteraccounting for space that is lost due to redundancy.
Total usable size Total size that is available for data storage in the RAID arrays:[Quantity x Usable size].
Suggested storage groupand array names
Preferred name to use for MDisks and MDisk groups.
Usage Tivoli Storage Manager server component that uses part of thephysical disk.
Table 9. Components of volume configuration
Component Details
Server storagerequirement
Requirement for which the physical disk is used.
Volume name Unique name that is given to a specific volume.
Storage group Name of the storage group from which the space is obtained tocreate the volume.
Size Size of each volume.
Intended server mountpoint
Directory on the Tivoli Storage Manager server system where thevolume is mounted.
Quantity Number of volumes to create for a specific requirement. Use thesame naming standard for each volume that is created for thesame requirement.
Usage Tivoli Storage Manager server component that uses part of thephysical disk.
Examples
Configuration examples for storage groups and volumes are available at thefollowing link: Example worksheets for planning storage arrays. The examplesshow how to plan the storage for different server sizes. In the exampleconfigurations, there is a one-to-one mapping between disks and storage groups.You can download the examples and edit the worksheets to plan the storageconfiguration for your server.
22 IBM Tivoli Storage Manager: Multisite Disk Solution Guide

Chapter 6. Planning for security
Plan to protect the security of systems in the Tivoli Storage Manager solution withaccess and authentication controls, and consider encrypting data and passwordtransmission.
Planning for administrator rolesDefine the authority levels that you want to assign to administrators who haveaccess to the Tivoli Storage Manager solution.
You can assign one of the following levels of authority to administrators:
SystemAdministrators who have system authority have the highest level ofauthority. Administrators with this level of authority can complete anytask. They can manage all policy domains and storage pools, and grantauthority to other administrators.
Policy Administrators who have policy authority can manage all of the tasks thatare related to policy management. This privilege can be unrestricted, or canbe restricted to specific policy domains.
StorageAdministrators who have Storage authority can allocate and controlstorage resources for the server.
OperatorAdministrators who have Operator authority can control the immediateoperation of the server and the availability of storage media such as tapelibraries and drives.
The scenarios in Table 10 provide examples about why you might want to assignvarying levels of authority so that administrators can perform tasks:
Table 10. Scenarios for administrator roles
Scenario Type of administrator ID to set up
An administrator at a small company manages the serverand is responsible for all server activities.
v System authority: 1 administrator ID
An administrator for multiple servers also manages theoverall system. Several other administrators manage theirown storage pools.
v System authority on all servers: 1 administrator ID forthe overall system administrator
v Storage authority for designated storage pools: 1administrator ID for each of the other administrators
An administrator manages 2 servers. Another personhelps with the administration tasks. Two assistants areresponsible for helping to ensure that important systemsare backed up. Each assistant is responsible formonitoring the scheduled backups on one of the TivoliStorage Manager servers.
v System authority on both servers: 2 administrator IDs
v Operator authority: 2 administrator IDs for theassistants with access to the server that each person isresponsible for
© Copyright IBM Corp. 1993, 2015 23

Planning for secure communicationsPlan for protecting communications among the solution components.
Determine the level of protection that is required for your data, based onregulations and business requirements under which your company operates.
If your business requires a high level of security for passwords and datatransmission, plan on implementing secure communication with Transport LayerSecurity (TLS) or Secure Sockets Layer (SSL) protocols.
TLS and SSL provide secure communications between the server and client, butcan affect system performance. TLS, a form of SSL, is required for all LDAPpassword communications. If you decide to use TLS or SSL, use the protocol onlyfor sessions where it is necessary and add processor resources on the server tomanage the increased requirements. You can also try other options, such asnetworking devices such as routers and switches that provide the TLS or SSLfunction.
You can use TLS and SSL to protect some or all of the different possiblecommunication paths, for example:v Operations Center: browser to hub; hub to spokev Client to serverv Server to server: node replicationRelated tasks:
Securing communications (http://www.ibm.com/support/knowledgecenter/SSGSG7_7.1.3/srv.admin/r_comms_securing.html)
Planning for storage of encrypted dataDetermine whether your company requires stored data to be encrypted, andchoose the option that best suits your needs.
If your company requires the data in storage pools to be encrypted, then you havethe option of using Tivoli Storage Manager encryption, or an external device suchas tape for encryption.
If you choose Tivoli Storage Manager to encrypt the data, extra computingresources are required at the client that might affect the performance for thebacking up and restore processes.Related information:
Technote 1963635 (http://www.ibm.com/support/docview.wss?uid=swg21963635)
24 IBM Tivoli Storage Manager: Multisite Disk Solution Guide
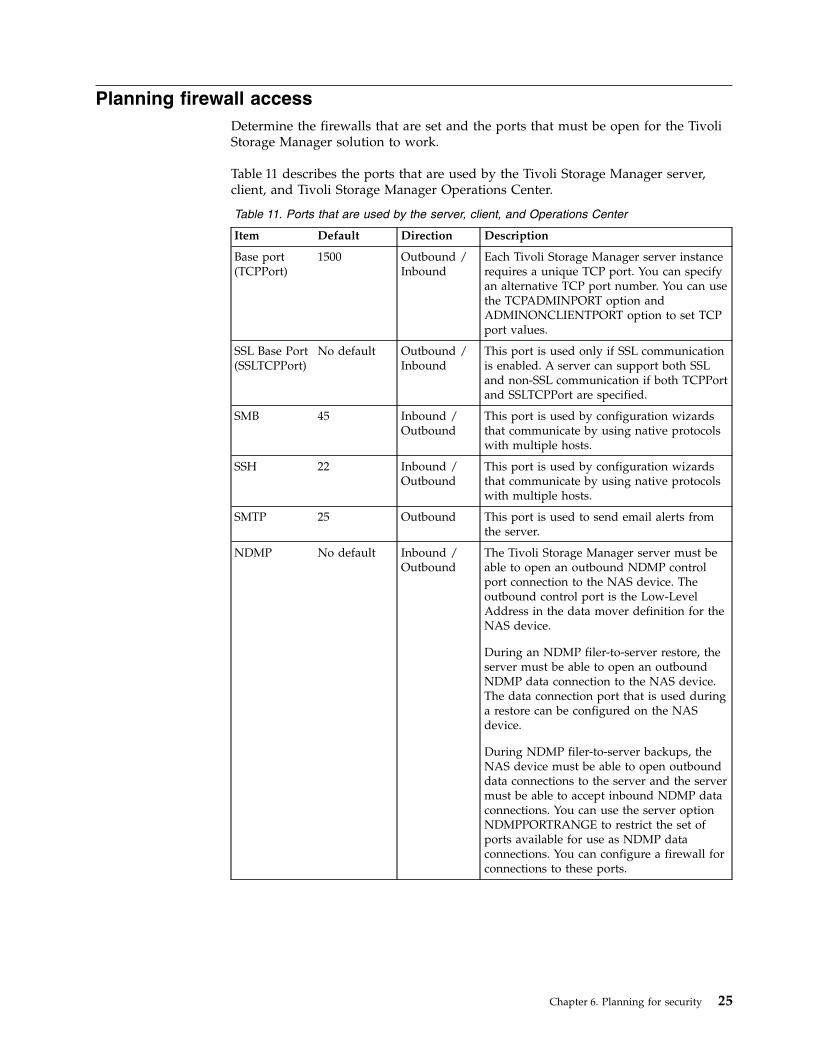
Planning firewall accessDetermine the firewalls that are set and the ports that must be open for the TivoliStorage Manager solution to work.
Table 11 describes the ports that are used by the Tivoli Storage Manager server,client, and Tivoli Storage Manager Operations Center.
Table 11. Ports that are used by the server, client, and Operations Center
Item Default Direction Description
Base port(TCPPort)
1500 Outbound /Inbound
Each Tivoli Storage Manager server instancerequires a unique TCP port. You can specifyan alternative TCP port number. You can usethe TCPADMINPORT option andADMINONCLIENTPORT option to set TCPport values.
SSL Base Port(SSLTCPPort)
No default Outbound /Inbound
This port is used only if SSL communicationis enabled. A server can support both SSLand non-SSL communication if both TCPPortand SSLTCPPort are specified.
SMB 45 Inbound /Outbound
This port is used by configuration wizardsthat communicate by using native protocolswith multiple hosts.
SSH 22 Inbound /Outbound
This port is used by configuration wizardsthat communicate by using native protocolswith multiple hosts.
SMTP 25 Outbound This port is used to send email alerts fromthe server.
NDMP No default Inbound /Outbound
The Tivoli Storage Manager server must beable to open an outbound NDMP controlport connection to the NAS device. Theoutbound control port is the Low-LevelAddress in the data mover definition for theNAS device.
During an NDMP filer-to-server restore, theserver must be able to open an outboundNDMP data connection to the NAS device.The data connection port that is used duringa restore can be configured on the NASdevice.
During NDMP filer-to-server backups, theNAS device must be able to open outbounddata connections to the server and the servermust be able to accept inbound NDMP dataconnections. You can use the server optionNDMPPORTRANGE to restrict the set ofports available for use as NDMP dataconnections. You can configure a firewall forconnections to these ports.
Chapter 6. Planning for security 25
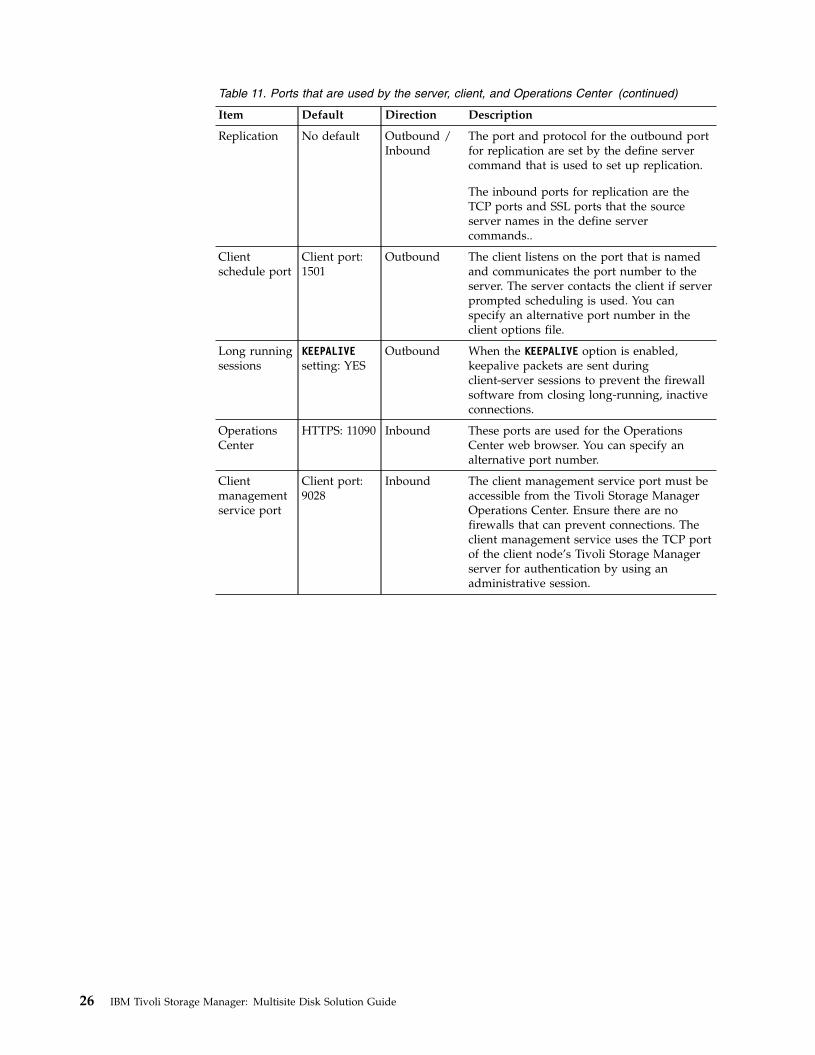
Table 11. Ports that are used by the server, client, and Operations Center (continued)
Item Default Direction Description
Replication No default Outbound /Inbound
The port and protocol for the outbound portfor replication are set by the define servercommand that is used to set up replication.
The inbound ports for replication are theTCP ports and SSL ports that the sourceserver names in the define servercommands..
Clientschedule port
Client port:1501
Outbound The client listens on the port that is namedand communicates the port number to theserver. The server contacts the client if serverprompted scheduling is used. You canspecify an alternative port number in theclient options file.
Long runningsessions
KEEPALIVEsetting: YES
Outbound When the KEEPALIVE option is enabled,keepalive packets are sent duringclient-server sessions to prevent the firewallsoftware from closing long-running, inactiveconnections.
OperationsCenter
HTTPS: 11090 Inbound These ports are used for the OperationsCenter web browser. You can specify analternative port number.
Clientmanagementservice port
Client port:9028
Inbound The client management service port must beaccessible from the Tivoli Storage ManagerOperations Center. Ensure there are nofirewalls that can prevent connections. Theclient management service uses the TCP portof the client node’s Tivoli Storage Managerserver for authentication by using anadministrative session.
26 IBM Tivoli Storage Manager: Multisite Disk Solution Guide

Part 2. Tivoli Storage Manager multisite disk implementation
The multisite disk solution is configured at two sites and uses Tivoli StorageManager data deduplication and replication.
Implementation roadmap
The following steps are required to set up a Tivoli Storage Manager multisite diskenvironment.1. Set up the system.
a. Configure the storage hardware and set up storage arrays for yourenvironment size.
b. Install the server operating system.c. Configure multipath I/O.d. Create the user ID for the Tivoli Storage Manager server instance.e. Prepare file systems for Tivoli Storage Manager.
2. Install the Tivoli Storage Manager server and Operations Center.3. Configure the Tivoli Storage Manager server and Operations Center.
a. Complete the initial configuration of the server.b. Set server options.c. Configure Secure Sockets Layer for the server and client.d. Configure the Operations Center.e. Register your Tivoli Storage Manager license.f. Configure data deduplication.
Active/active replication
Automatic failover for restoreSpace and bandwidth efficient
Simplified offsite management
Multisite disk
Node replication
Inventory
Applications, virtual machines,systems
Backup and restore
Failover restoreFailover restore
Tivoli Storage Manager server
Applications, virtual machines,systems
Tivoli Storage Managerserver
Backup and restore
Site A Site BDisk storage for deduplicatedstorage pool and inventory backup
Disk storage for deduplicatedstorage pool and inventory backup
Inventory
Storage pool protection
© Copyright IBM Corp. 1993, 2015 27
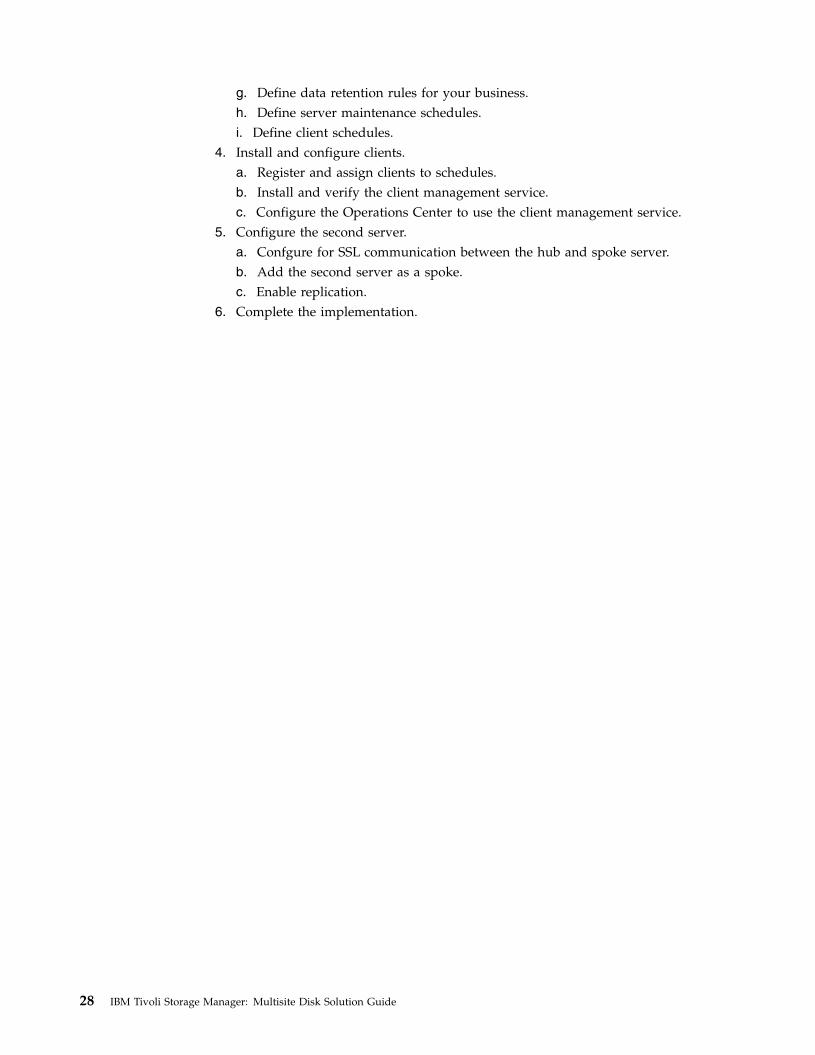
g. Define data retention rules for your business.h. Define server maintenance schedules.i. Define client schedules.
4. Install and configure clients.a. Register and assign clients to schedules.b. Install and verify the client management service.c. Configure the Operations Center to use the client management service.
5. Configure the second server.a. Confgure for SSL communication between the hub and spoke server.b. Add the second server as a spoke.c. Enable replication.
6. Complete the implementation.
28 IBM Tivoli Storage Manager: Multisite Disk Solution Guide

Chapter 7. Setting up the system
To set up the system, you must first configure your disk storage hardware and theserver system for Tivoli Storage Manager.
Configuring the storage hardwareTo configure your storage hardware, review general guidance for disk systems andTivoli Storage Manager.
Procedure1. Provide a connection between the Tivoli Storage Manager server and the
storage.v Use a switch or direct connection for Fibre Channel connections.v Consider the number of ports that will be connected and account for the
amount of bandwidth that is needed.v Consider the number of ports on the Tivoli Storage Manager server and the
number of host ports on the disk system that are connected.2. Verify that device drivers and firmware for the server system, adapters, and
operating system are current and at the recommended levels.3. Configure storage arrays. Make sure that you have planned properly to ensure
optimal performance. Refer to Chapter 5, “Planning for storage,” on page 21 formore information.
4. The Tivoli Storage Manager server system needs access to disk volumes thatare created. Ensure the following are completed:v If the system is connected to a Fibre Channel switch, zone the server to see
the disks.v Map all of the volumes to tell the disk system that this specific server should
be allowed to see each disk.
Installing the server operating systemInstall the operating system on the server system and ensure that Tivoli StorageManager server requirements are met. Adjust operating system settings as directed.
Installing on AIX systemsComplete the following steps to install AIX on the server system.
Procedure1. Install AIX Version 7.1 TL3, SP4 or later according to the manufacturer
instructions.2. Configure your TCP/IP settings according to the operating system installation
instructions.3. Open the /etc/hosts file and complete the following actions:v Update the file to include the IP address and host name for the server. For
example if your IP address is 192.0.2.7 and your server host name isserver.yourdomain.com:192.0.2.7 server.yourdomain.com server
© Copyright IBM Corp. 1993, 2015 29
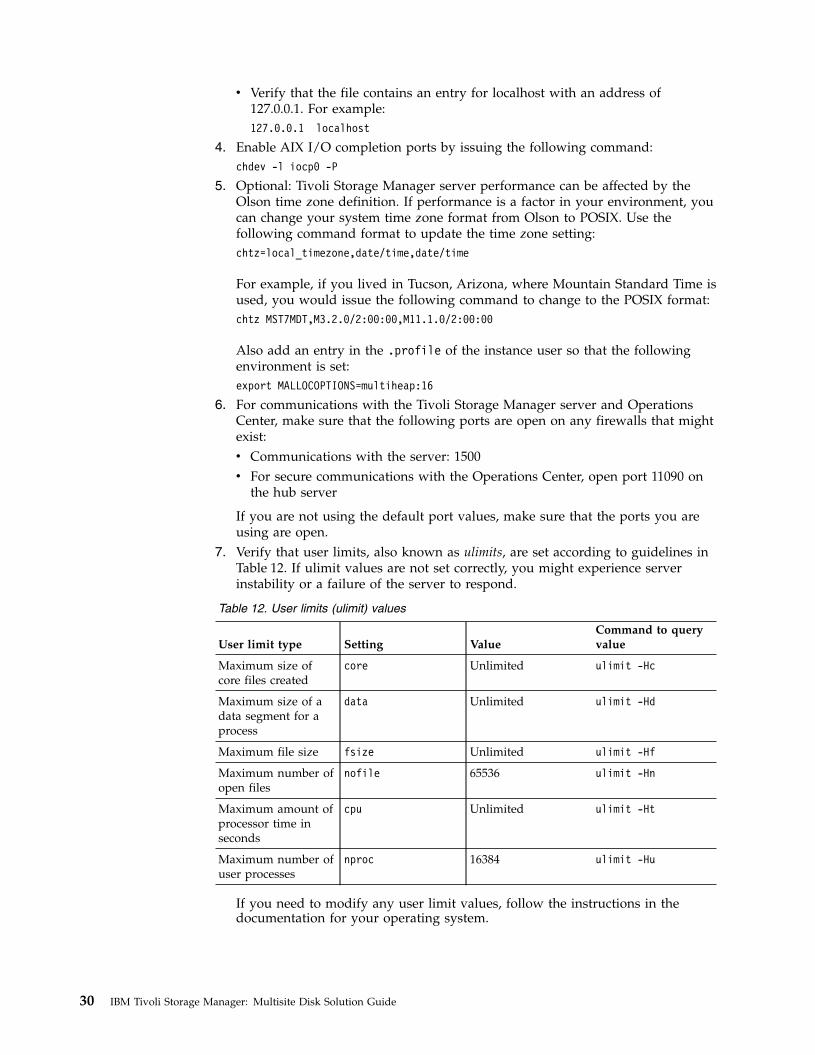
v Verify that the file contains an entry for localhost with an address of127.0.0.1. For example:127.0.0.1 localhost
4. Enable AIX I/O completion ports by issuing the following command:chdev -l iocp0 -P
5. Optional: Tivoli Storage Manager server performance can be affected by theOlson time zone definition. If performance is a factor in your environment, youcan change your system time zone format from Olson to POSIX. Use thefollowing command format to update the time zone setting:chtz=local_timezone,date/time,date/time
For example, if you lived in Tucson, Arizona, where Mountain Standard Time isused, you would issue the following command to change to the POSIX format:chtz MST7MDT,M3.2.0/2:00:00,M11.1.0/2:00:00
Also add an entry in the .profile of the instance user so that the followingenvironment is set:export MALLOCOPTIONS=multiheap:16
6. For communications with the Tivoli Storage Manager server and OperationsCenter, make sure that the following ports are open on any firewalls that mightexist:v Communications with the server: 1500v For secure communications with the Operations Center, open port 11090 on
the hub server
If you are not using the default port values, make sure that the ports you areusing are open.
7. Verify that user limits, also known as ulimits, are set according to guidelines inTable 12. If ulimit values are not set correctly, you might experience serverinstability or a failure of the server to respond.
Table 12. User limits (ulimit) values
User limit type Setting ValueCommand to queryvalue
Maximum size ofcore files created
core Unlimited ulimit -Hc
Maximum size of adata segment for aprocess
data Unlimited ulimit -Hd
Maximum file size fsize Unlimited ulimit -Hf
Maximum number ofopen files
nofile 65536 ulimit -Hn
Maximum amount ofprocessor time inseconds
cpu Unlimited ulimit -Ht
Maximum number ofuser processes
nproc 16384 ulimit -Hu
If you need to modify any user limit values, follow the instructions in thedocumentation for your operating system.
30 IBM Tivoli Storage Manager: Multisite Disk Solution Guide
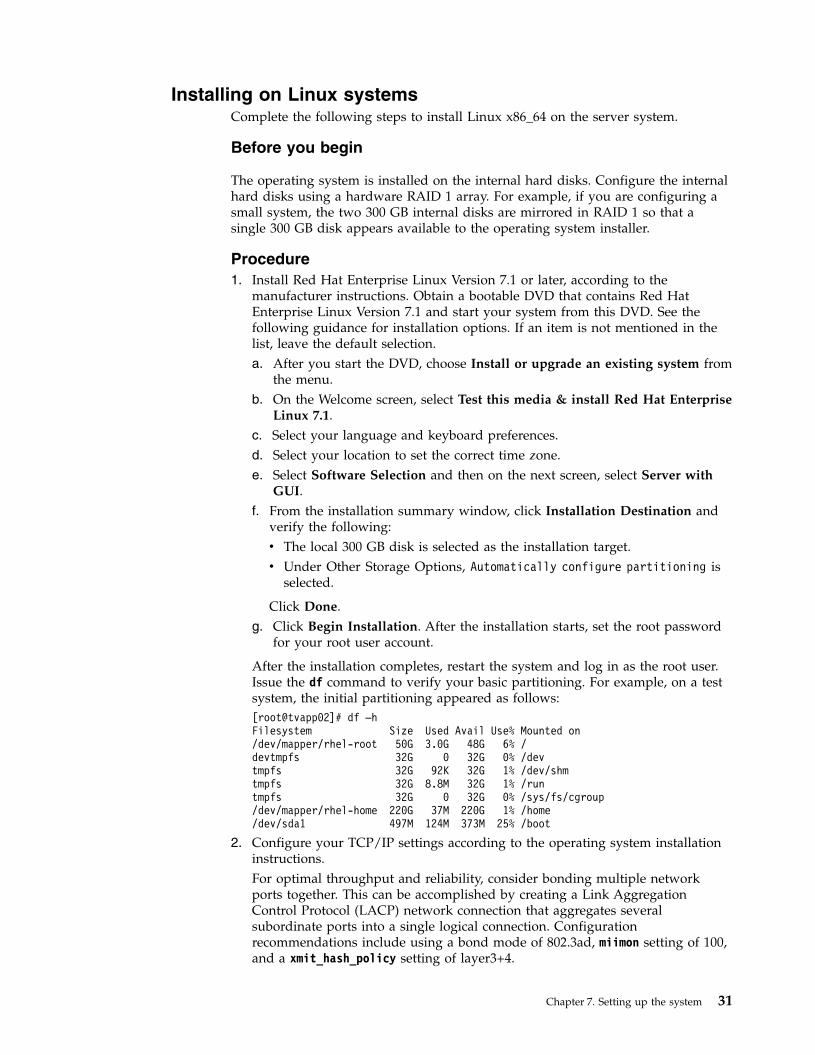
Installing on Linux systemsComplete the following steps to install Linux x86_64 on the server system.
Before you begin
The operating system is installed on the internal hard disks. Configure the internalhard disks using a hardware RAID 1 array. For example, if you are configuring asmall system, the two 300 GB internal disks are mirrored in RAID 1 so that asingle 300 GB disk appears available to the operating system installer.
Procedure1. Install Red Hat Enterprise Linux Version 7.1 or later, according to the
manufacturer instructions. Obtain a bootable DVD that contains Red HatEnterprise Linux Version 7.1 and start your system from this DVD. See thefollowing guidance for installation options. If an item is not mentioned in thelist, leave the default selection.a. After you start the DVD, choose Install or upgrade an existing system from
the menu.b. On the Welcome screen, select Test this media & install Red Hat Enterprise
Linux 7.1.c. Select your language and keyboard preferences.d. Select your location to set the correct time zone.e. Select Software Selection and then on the next screen, select Server with
GUI.f. From the installation summary window, click Installation Destination and
verify the following:v The local 300 GB disk is selected as the installation target.v Under Other Storage Options, Automatically configure partitioning is
selected.
Click Done.g. Click Begin Installation. After the installation starts, set the root password
for your root user account.
After the installation completes, restart the system and log in as the root user.Issue the df command to verify your basic partitioning. For example, on a testsystem, the initial partitioning appeared as follows:[root@tvapp02]# df –hFilesystem Size Used Avail Use% Mounted on/dev/mapper/rhel-root 50G 3.0G 48G 6% /devtmpfs 32G 0 32G 0% /devtmpfs 32G 92K 32G 1% /dev/shmtmpfs 32G 8.8M 32G 1% /runtmpfs 32G 0 32G 0% /sys/fs/cgroup/dev/mapper/rhel-home 220G 37M 220G 1% /home/dev/sda1 497M 124M 373M 25% /boot
2. Configure your TCP/IP settings according to the operating system installationinstructions.For optimal throughput and reliability, consider bonding multiple networkports together. This can be accomplished by creating a Link AggregationControl Protocol (LACP) network connection that aggregates severalsubordinate ports into a single logical connection. Configurationrecommendations include using a bond mode of 802.3ad, miimon setting of 100,and a xmit_hash_policy setting of layer3+4.
Chapter 7. Setting up the system 31

For additional instructions on configuring bonded network connections withRed Hat Enterprise Linux Version 7, see https://access.redhat.com/documentation/en-US/Red_Hat_Enterprise_Linux/7/html/Networking_Guide/sec-Network_Bonding_Using_the_Command_Line_Interface.html#sec-Create_a_Channel_Bonding_Interface.
3. Open the /etc/hosts file and complete the following actions:v Update the file to include the IP address and host name for the server. For
example:192.0.2.7 server.yourdomain.com server
v Verify that the file contains an entry for localhost with an address of127.0.0.1. For example:127.0.0.1 localhost
4. Install components that are required for Tivoli Storage Manager serverinstallation. Complete the following steps to create a Yellowdog UpdaterModified (YUM) repository and install the prerequisite packages.a. Mount your Red Hat Enterprise Linux installation DVD to a system
directory. For example, to mount it to the /mnt directory, issue the followingcommand:mount -t iso9660 -o ro /dev/cdrom /mnt
b. Verify that the DVD mounted by issuing the mount command. You shouldsee output similar to the following:/dev/sr0 on /mnt type iso9660
c. Change to the YUM repository directory by issuing the following command:cd /etc/yum/repos.d
If the repos.d directory does not exist, create it.d. List directory contents:
ls rhel-source.repo
e. Rename the original repo file by issuing the mv command. For example:mv rhel-source.repo rhel-source.repo.orig
f. Create a new repo file by using a text editor. For example, to use the vieditor, issue the following command:vi rhel71_dvd.repo
g. Add the following lines to the new repo file. The baseurl parameterspecifies your directory mount point:[rhel71_dvd]name=DVD Redhat Enterprise Linux 7.1baseurl=file:///mntenabled=1gpgcheck=0
h. Install the prerequisite package ksh.x86_64, which is required for TivoliStorage Manager, by issuing the yum command. For example:yum install ksh.x86_64
Note: You do not need to install the compat-libstdc++-33-3.2.3-69.el6.i686 and libstdc++.i686 libraries for Red Hat Enterprise LinuxVersion 7.1.
5. When the software installation is complete, you can restore the original YUMrepository values by completing the following steps:
32 IBM Tivoli Storage Manager: Multisite Disk Solution Guide
a. Unmount the Red Hat Enterprise Linux installation DVD by issuing thefollowing command:unmount /mnt
b. Change to the YUM repository directory by issuing the following command:cd /etc/yum/repos.d
c. Rename the repo file that you created:mv rhel71_dvd.repo rhel71_dvd.repo.orig
d. Rename the original file to the original name:mv rhel-source.repo.orig rhel-source.repo
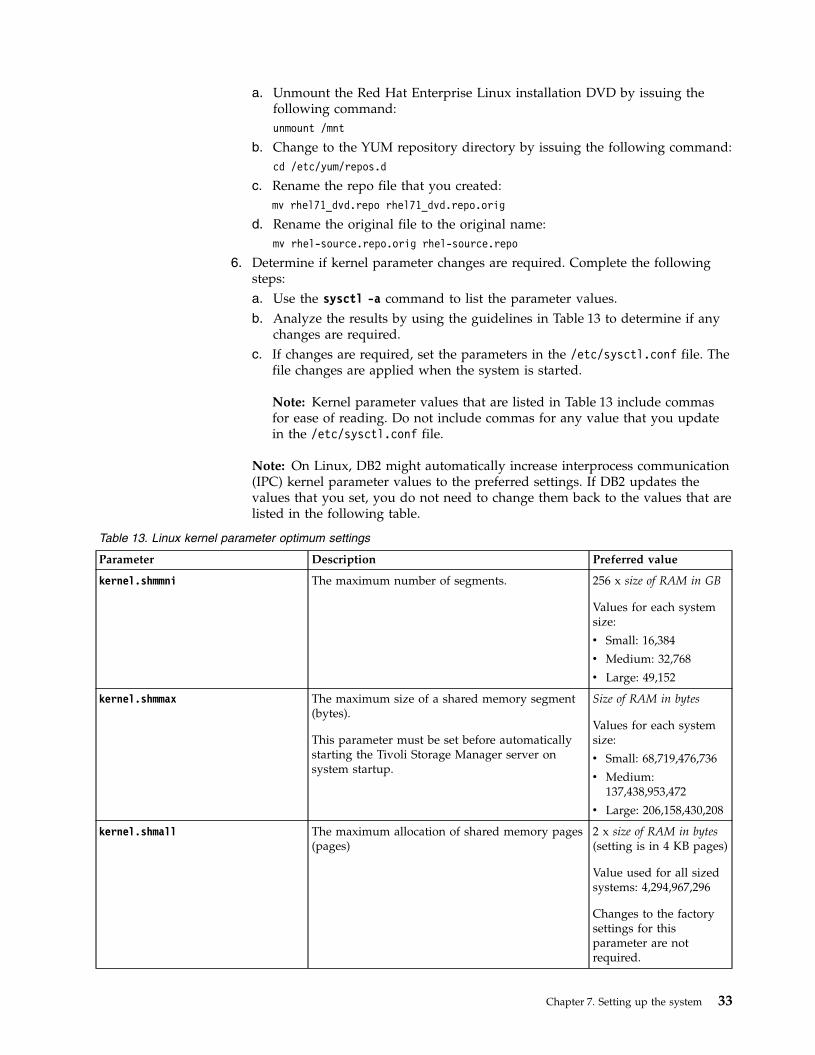
6. Determine if kernel parameter changes are required. Complete the followingsteps:a. Use the sysctl -a command to list the parameter values.b. Analyze the results by using the guidelines in Table 13 to determine if any
changes are required.c. If changes are required, set the parameters in the /etc/sysctl.conf file. The
file changes are applied when the system is started.
Note: Kernel parameter values that are listed in Table 13 include commasfor ease of reading. Do not include commas for any value that you updatein the /etc/sysctl.conf file.
Note: On Linux, DB2 might automatically increase interprocess communication(IPC) kernel parameter values to the preferred settings. If DB2 updates thevalues that you set, you do not need to change them back to the values that arelisted in the following table.
Table 13. Linux kernel parameter optimum settings
Parameter Description Preferred value
kernel.shmmni The maximum number of segments. 256 x size of RAM in GB
Values for each systemsize:
v Small: 16,384
v Medium: 32,768
v Large: 49,152
kernel.shmmax The maximum size of a shared memory segment(bytes).
This parameter must be set before automaticallystarting the Tivoli Storage Manager server onsystem startup.
Size of RAM in bytes
Values for each systemsize:
v Small: 68,719,476,736
v Medium:137,438,953,472
v Large: 206,158,430,208
kernel.shmall The maximum allocation of shared memory pages(pages)
2 x size of RAM in bytes(setting is in 4 KB pages)
Value used for all sizedsystems: 4,294,967,296
Changes to the factorysettings for thisparameter are notrequired.
Chapter 7. Setting up the system 33

Table 13. Linux kernel parameter optimum settings (continued)
Parameter Description Preferred value
kernel.sem
You must specify four values for thekernel.sem parameter. When youupdate this parameter, include allvalues on one line in the followingorder:
kernel.sem = SEMMSLSEMMNS SEMOPM SEMMNI
For example, to update the parameterfor a medium system, enter thefollowing on one line in the/etc/sysctl.conf file:
kernel.sem = 250256000 32 32768
(SEMMSL)
The maximum semaphores per array
250
(SEMMNS)
The maximum semaphores per system
256,000
(SEMOPM)
The maximum operations per semaphore call
32
(SEMMNI)
The maximum number of arrays
256 x size of RAM in GB
Values for each systemsize:
v Small: 16,384
v Medium: 32,768
v Large: 49,152
kernel.msgmni The maximum number of system-wide messagequeues
1024 x size of RAM in GB
Values for each systemsize:
v Small: 65,536
v Medium: 131,072
v Large: 196,608
kernel.msgmax The maximum size of messages (bytes) 65,536
kernel.msgmnb The default maximum size of queue (bytes) 65,536
kernel.randomize_va_space The kernel.randomize_va_space parameterconfigures the use of memory ASLR for thekernel. Disable ASLR because it can cause errorsfor the DB2 software. To learn more details aboutthe Linux ASLR and DB2, see Technote 1365583at: http://www.ibm.com/support/docview.wss?uid=swg21365583.
0
vm.swappiness The vm.swappiness parameter defines whether thekernel can swap application memory out ofphysical random access memory (RAM). For moreinformation about kernel parameters, see the DB2information center.
0
vm.overcommit_memory The vm.overcommit_memory parameter influenceshow much virtual memory the kernel can permitto be allocated. For more information about kernelparameters, see the DB2 information center.
0
7. Open firewall ports that Tivoli Storage Manager will use. Complete thefollowing steps:a. Determine the zone that is used by the network interface. The zone is
public, by default.Issue the following command:# firewall-cmd --get-active-zonespublic
interfaces: ens4f0
34 IBM Tivoli Storage Manager: Multisite Disk Solution Guide
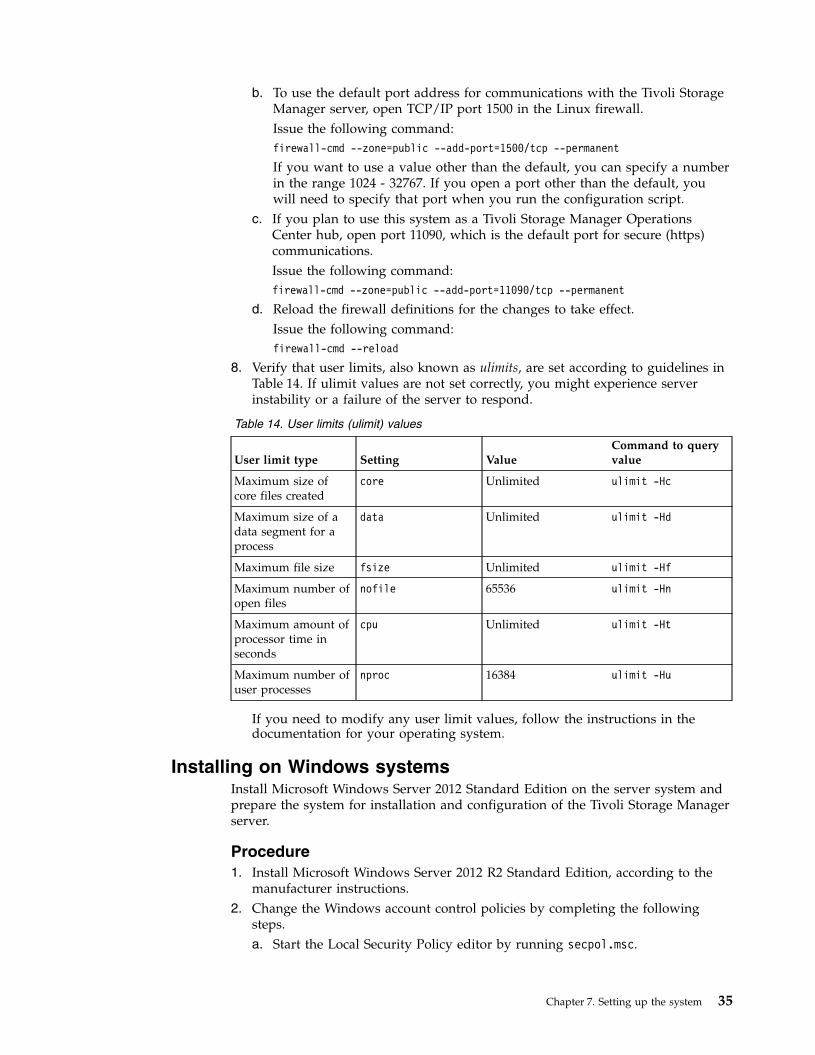
b. To use the default port address for communications with the Tivoli StorageManager server, open TCP/IP port 1500 in the Linux firewall.Issue the following command:firewall-cmd --zone=public --add-port=1500/tcp --permanent
If you want to use a value other than the default, you can specify a numberin the range 1024 - 32767. If you open a port other than the default, youwill need to specify that port when you run the configuration script.
c. If you plan to use this system as a Tivoli Storage Manager OperationsCenter hub, open port 11090, which is the default port for secure (https)communications.Issue the following command:firewall-cmd --zone=public --add-port=11090/tcp --permanent
d. Reload the firewall definitions for the changes to take effect.Issue the following command:firewall-cmd --reload
8. Verify that user limits, also known as ulimits, are set according to guidelines inTable 14. If ulimit values are not set correctly, you might experience serverinstability or a failure of the server to respond.
Table 14. User limits (ulimit) values
User limit type Setting ValueCommand to queryvalue
Maximum size ofcore files created
core Unlimited ulimit -Hc
Maximum size of adata segment for aprocess
data Unlimited ulimit -Hd
Maximum file size fsize Unlimited ulimit -Hf
Maximum number ofopen files
nofile 65536 ulimit -Hn
Maximum amount ofprocessor time inseconds
cpu Unlimited ulimit -Ht
Maximum number ofuser processes
nproc 16384 ulimit -Hu
If you need to modify any user limit values, follow the instructions in thedocumentation for your operating system.
Installing on Windows systemsInstall Microsoft Windows Server 2012 Standard Edition on the server system andprepare the system for installation and configuration of the Tivoli Storage Managerserver.
Procedure1. Install Microsoft Windows Server 2012 R2 Standard Edition, according to the
manufacturer instructions.2. Change the Windows account control policies by completing the following
steps.a. Start the Local Security Policy editor by running secpol.msc.
Chapter 7. Setting up the system 35

b. Go to Local Policies > Security Options and ensure that the following UserAccount Control policies are disabled:v Admin Approval Mode for the Built-in Administrator accountv Run all administrators in Admin Approval Mode
3. Configure your TCP/IP settings according to installation instructions for theoperating system.
4. Apply Windows updates and enable optional features by completing thefollowing steps:a. Apply the latest Windows 2012 updates.b. Install and enable the Windows 2012 feature Microsoft .NET Framework 3.5
from the Windows Server Manager.c. Update HBA device drivers as needed.d. Install the multipath I/O driver that is appropriate for the disk system that
you are using.5. Open the default TCP/IP port, 1500, for communications with the Tivoli
Storage Manager server. For example, issue the following command:netsh advfirewall firewall add rule name="TSM server port 1500"dir=in action=allow protocol=TCP localport=1500
6. On the Operations Center hub server, open the default port for secure (https)communications with the Operations Center. The port number is 11090. Forexample, issue the following commandnetsh advfirewall firewall add rule name="TSM Operations Center port 11090"dir=in action=allow protocol=TCP localport=11090
Configuring multipath I/OComplete the following steps to enable and configure multipathing for diskstorage. Use the documentation that is provided with your hardware for detailedinstructions.
AIX systems
Procedure1. Determine the Fibre Channel port address that you must use for the host
definition on the disk subsystem. Issue the lscfg command for every port.v On small and medium systems, issue the following commands:
lscfg -vps -l fcs0 | grep "Network Address"lscfg -vps -l fcs1 | grep "Network Address"
v On large systems, issue the following commands:lscfg -vps -l fcs0 | grep "Network Address"lscfg -vps -l fcs1 | grep "Network Address"lscfg -vps -l fcs2 | grep "Network Address"lscfg -vps -l fcs3 | grep "Network Address"
2. Ensure that the following AIX file sets are installed:v devices.common.IBM.mpio.rtev devices.fcp.disk.array.rtev devices.fcp.disk.rte
3. Issue the cfgmgr command to have AIX rescan the hardware and discoveravailable disks. For example:cfgmgr
4. To list the available disks, issue the following command:
36 IBM Tivoli Storage Manager: Multisite Disk Solution Guide
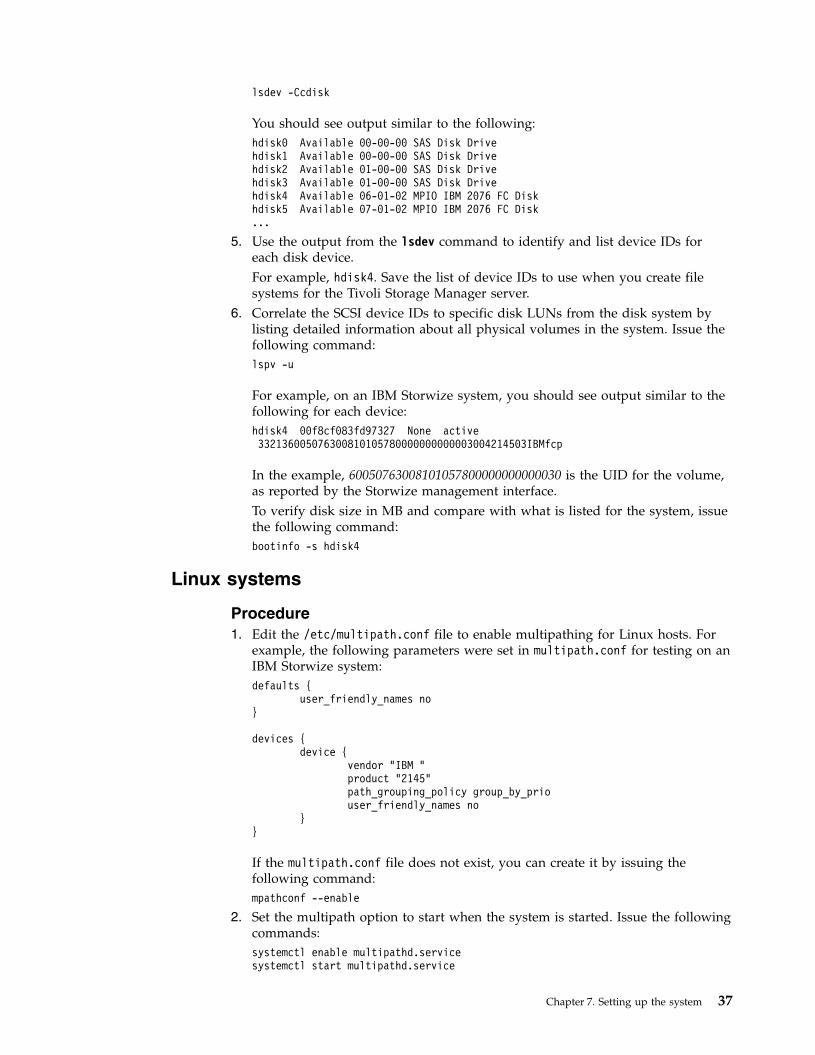
lsdev -Ccdisk
You should see output similar to the following:hdisk0 Available 00-00-00 SAS Disk Drivehdisk1 Available 00-00-00 SAS Disk Drivehdisk2 Available 01-00-00 SAS Disk Drivehdisk3 Available 01-00-00 SAS Disk Drivehdisk4 Available 06-01-02 MPIO IBM 2076 FC Diskhdisk5 Available 07-01-02 MPIO IBM 2076 FC Disk...
5. Use the output from the lsdev command to identify and list device IDs foreach disk device.For example, hdisk4. Save the list of device IDs to use when you create filesystems for the Tivoli Storage Manager server.
6. Correlate the SCSI device IDs to specific disk LUNs from the disk system bylisting detailed information about all physical volumes in the system. Issue thefollowing command:lspv -u
For example, on an IBM Storwize system, you should see output similar to thefollowing for each device:hdisk4 00f8cf083fd97327 None active332136005076300810105780000000000003004214503IBMfcp
In the example, 60050763008101057800000000000030 is the UID for the volume,as reported by the Storwize management interface.To verify disk size in MB and compare with what is listed for the system, issuethe following command:bootinfo -s hdisk4
Linux systems
Procedure1. Edit the /etc/multipath.conf file to enable multipathing for Linux hosts. For
example, the following parameters were set in multipath.conf for testing on anIBM Storwize system:defaults {
user_friendly_names no}
devices {device {
vendor "IBM "product "2145"path_grouping_policy group_by_priouser_friendly_names no
}}
If the multipath.conf file does not exist, you can create it by issuing thefollowing command:mpathconf --enable
2. Set the multipath option to start when the system is started. Issue the followingcommands:systemctl enable multipathd.servicesystemctl start multipathd.service
Chapter 7. Setting up the system 37

3. To verify that disks are visible to the operating system and are managed bymultipath, issue the following command:multipath -l
4. Ensure that each device is listed and that it has as many paths as you expect.You can use size and device ID information to identify which disks are listed.For example, on an IBM Storwize system, the following output shows that a 2TB disk has two path groups and four active paths. The 2 TB size confirms thatthe disk corresponds to a pool file system. Use part of the long device IDnumber (12, in this example) to search for the volume on the disk-systemmanagement interface.[root@tapsrv01 code]# multipath -l36005076802810c509800000000000012 dm-43 IBM,2145size=2.0T features=’1 queue_if_no_path’ hwhandler=’0’ wp=rw|-+- policy=’round-robin 0’ prio=0 status=active| |- 2:0:1:18 sdcw 70:64 active undef running| `- 4:0:0:18 sdgb 131:112 active undef running`-+- policy=’round-robin 0’ prio=0 status=enabled
|- 1:0:1:18 sdat 66:208 active undef running`- 3:0:0:18 sddy 128:0 active undef running
a. If needed, correct disk LUN host assignments and force a bus rescan. Forexample:echo "- - -" > /sys/class/scsi_host/host0/scanecho "- - -" > /sys/class/scsi_host/host1/scanecho "- - -" > /sys/class/scsi_host/host2/scan
You can also restart the system to rescan disk LUN host assignments.b. Confirm that disks are now available for multipath I/O by reissuing the
multipath -l command.5. Use the multipath output to identify and list device IDs for each disk device.
For example, the device ID for your 2 TB disk is36005076802810c509800000000000012.Save the list of device IDs to use in the next step.
Windows systems
Procedure1. Ensure that the Multipath I/O feature is installed. If needed, install additional
vendor-specific multipath drivers.2. To verify that disks are visible to the operating system and are managed by
multipath I/O, issue the following command:c:\program files\IBM\SDDDSM\datapath.exe query device
3. Review the multipath output and ensure that each device is listed and that ithas as many paths as you expect. You can use size and device serialinformation to identify which disks are listed.For example, by using part of the long device serial number (34, in thisexample) you can search for the volume on the disk-system managementinterface. The 2 TB size confirms that the disk corresponds to a storage pool filesystem.DEV#: 4 DEVICE NAME: Disk5 Part0 TYPE: 2145 POLICY: OPTIMIZEDSERIAL: 60050763008101057800000000000034 LUN SIZE: 2.0TB=====================================================================Path# Adapter/Hard Disk State Mode Select Errors
0 Scsi Port2 Bus0/Disk5 Part0 OPEN NORMAL 0 0
38 IBM Tivoli Storage Manager: Multisite Disk Solution Guide
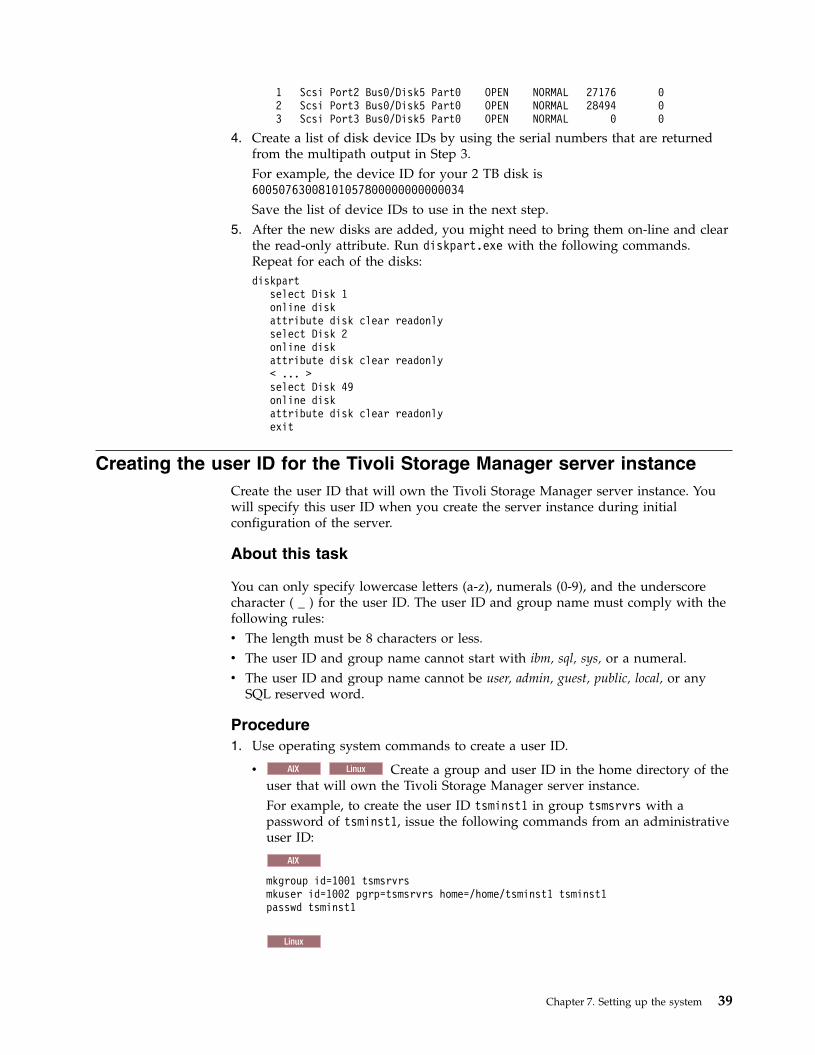
1 Scsi Port2 Bus0/Disk5 Part0 OPEN NORMAL 27176 02 Scsi Port3 Bus0/Disk5 Part0 OPEN NORMAL 28494 03 Scsi Port3 Bus0/Disk5 Part0 OPEN NORMAL 0 0
4. Create a list of disk device IDs by using the serial numbers that are returnedfrom the multipath output in Step 3.For example, the device ID for your 2 TB disk is60050763008101057800000000000034
Save the list of device IDs to use in the next step.5. After the new disks are added, you might need to bring them on-line and clear
the read-only attribute. Run diskpart.exe with the following commands.Repeat for each of the disks:diskpart
select Disk 1online diskattribute disk clear readonlyselect Disk 2online diskattribute disk clear readonly< ... >select Disk 49online diskattribute disk clear readonlyexit
Creating the user ID for the Tivoli Storage Manager server instanceCreate the user ID that will own the Tivoli Storage Manager server instance. Youwill specify this user ID when you create the server instance during initialconfiguration of the server.
About this task
You can only specify lowercase letters (a-z), numerals (0-9), and the underscorecharacter ( _ ) for the user ID. The user ID and group name must comply with thefollowing rules:v The length must be 8 characters or less.v The user ID and group name cannot start with ibm, sql, sys, or a numeral.v The user ID and group name cannot be user, admin, guest, public, local, or any
SQL reserved word.
Procedure1. Use operating system commands to create a user ID.
v AIX Linux Create a group and user ID in the home directory of theuser that will own the Tivoli Storage Manager server instance.For example, to create the user ID tsminst1 in group tsmsrvrs with apassword of tsminst1, issue the following commands from an administrativeuser ID:
AIX
mkgroup id=1001 tsmsrvrsmkuser id=1002 pgrp=tsmsrvrs home=/home/tsminst1 tsminst1passwd tsminst1
Linux
Chapter 7. Setting up the system 39

groupadd tsmsrvrsuseradd -d /home/tsminst1 -m -g tsmsrvrs -s /bin/bash tsminst1passwd tsminst1
Log off, and then log in to your system. Change to the user account that youjust created. Use an interactive login program, such as telnet, so that you areprompted for the password and can change it if necessary.
v Windows Create a user ID and then add the new ID to the Administratorsgroups. For example, to create the user ID tsminst1, issue the followingcommand:net user tsminst1 * /add
After you create and verify a password for the new user, add the user ID tothe Administrators group by issuing the following commands:
net localgroup Administrators tsminst1 /addnet localgroup DB2ADMNS tsminst1 /add
2. Log off the new user ID.
Preparing file systems for Tivoli Storage ManagerYou must complete file system configuration for your disk storage to be used withTivoli Storage Manager.
AIX systemsYou must create volume groups, logical volumes, and file systems for the TivoliStorage Manager server by using the AIX Logical Volume Manager.
Procedure1. Increase the queue depth and maximum transfer size for all of the available
hdiskX disks that were listed in the previous step. Issue the followingcommands for each disk:chdev -l hdisk4 -a max_transfer=0x100000chdev -l hdisk4 -a queue_depth=32chdev -l hdisk4 -a reserve_policy=no_reservechdev -l hdisk4 -a algorithm=round_robin
Do not run these commands for operating system internal disks, for example,hdisk0.
2. Create volume groups for the Tivoli Storage Manager database, active log,archive log, database backup, and storage pool. Issue the mkvg command,specifying the device IDs for corresponding disks that you previouslyidentified.For example, if the device names hdisk4, hdisk5, and hdisk6 correspond todatabase disks, include them in the database volume group and so on.
Note: The following commands are based on the medium systemconfiguration. The syntax issued for small and large systems will require minoradjustments.mkvg -S -y tsmdb hdisk2 hdisk3 hdisk4mkvg -S -y tsmactlog hdisk5mkvg -S -y tsmarchlog hdisk6mkvg -S -y tsmdbback hdisk7 hdisk8 hdisk9 hdisk10mkvg -S -y tsmstgpool hdisk11 hdisk12 hdisk13 hdisk14 ... hdisk49
40 IBM Tivoli Storage Manager: Multisite Disk Solution Guide
3. Determine the physical volume names and the number of free physicalpartitions to use when you create logical volumes. Issue the lsvg for eachvolume group that you created in the previous step.For example:lsvg -p tsmdb
The output is similar to the following. The FREE PPS column represents thefree physical partitions:tsmdb:PV_NAME PV STATE TOTAL PPs FREE PPs FREE DISTRIBUTIONhdisk4 active 1631 1631 327..326..326..326..326hdisk5 active 1631 1631 327..326..326..326..326hdisk6 active 1631 1631 327..326..326..326..326
4. Create logical volumes in each volume group by using the mklv command. Thevolume size, volume group, and device names vary, depending on the size ofyour system and variations in your disk configuration.For example, to create the volumes for the Tivoli Storage Manager database ona medium system, issue the following commands:mklv -y tsmdb00 -t jfs2 -u 1 -x 1631 tsmdb 1631 hdisk2mklv -y tsmdb01 -t jfs2 -u 1 -x 1631 tsmdb 1631 hdisk3mklv -y tsmdb02 -t jfs2 -u 1 -x 1631 tsmdb 1631 hdisk4
5. Format file systems in each logical volume by using the crfs command.For example, to format file systems for the database on a medium system, issuethe following commands:crfs -v jfs2 -d tsmdb00 -p rw -a logname=INLINE -a options=rbrw-a agblksize=4096 -m /tsminst1/TSMdbspace00 -A yescrfs -v jfs2 -d tsmdb01 -p rw -a logname=INLINE -a options=rbrw-a agblksize=4096 -m /tsminst1/TSMdbspace01 -A yescrfs -v jfs2 -d tsmdb02 -p rw -a logname=INLINE -a options=rbrw-a agblksize=4096 -m /tsminst1/TSMdbspace02 -A yes
6. Mount all of the newly created file systems by issuing the following command:mount -a
7. List all file systems by issuing the df command. Verify that file systems aremounted at the correct LUN and correct mount point. Also, verify the availablespace. The amount of used space should be around one percent.For example:tapsrv07> df -g /tsminst1/*Filesystem GB blocks Free %Used Iused %Iused Mounted on/dev/tsmact00 195.12 194.59 1% 4 1% /tsminst1/TSMalog
8. Verify that the user ID you created in “Creating the user ID for the TivoliStorage Manager server instance” on page 39 has read and write access to thedirectories for Tivoli Storage Manager.
Linux systemsYou must format ext4 or xfs file systems on each of the disk LUNs that the TivoliStorage Manager server will use.
Procedure1. Using the list of device IDs that you generated in the previous step, issue the
mkfs command to create and format a file system for each storage LUN device.Specify the device ID in the command. For example: For the database, formatext4 file systems:mkfs -t ext4 -T largefile -m 2 /dev/mapper/36005076802810c509800000000000012
Chapter 7. Setting up the system 41

For storage pool LUNs, format xfs file systems:mkfs -t xfs /dev/mapper/3600507630081010578000000000002c3
You might issue the mkfs command as many as 50 times, depending on howmany different devices you have.
2. Create mount point directories for Tivoli Storage Manager file systems.Issue the mkdir command for each Tivoli Storage Manager directory that youmust create. Use the directory values that you recorded in the planningworksheets. For example, to create the server instance directory by using thedefault value, issue the following command:mkdir /tsminst1
Repeat the mkdir command for each file system.3. Add an entry in the /etc/fstab file for each file system so that file systems are
mounted automatically when the server is started.For example:/dev/mapper/36005076802810c509800000000000012 /tsminst1/TSMdbspace00 ext4 defaults 0 0
4. Mount the file systems that you added to the /etc/fstab file by issuing themount -a command.
5. List all file systems by issuing the df command. Verify that file systems aremounted at the correct LUN and correct mount point. Also, verify the availablespace. The amount of used space should be around one percent.For example, on an IBM Storwize system, the following output is returned:[root@tapsrv04 ~]# df -h /tsminst1/*Filesystem Size Used Avail Use% Mounted on/dev/mapper/360050763008101057800000000000003 134G 188M 132G 1% /tsminst1/TSMalog
6. Verify that the user ID you created in “Creating the user ID for the TivoliStorage Manager server instance” on page 39 has read and write access to thedirectories for Tivoli Storage Manager.
Windows systemsYou must format NTFS file systems on each of the disk LUNs that the TivoliStorage Manager server will use.
Procedure1. Create mount point directories for Tivoli Storage Manager file systems.
Issue the md command for each Tivoli Storage Manager directory that you mustcreate. Use the directory values that you recorded in the planning worksheets.For example, to create the server instance directory by using the default value,issue the following command:md c:\tsminst1
Repeat the md command for each file system.2. Create a volume for every disk LUN that is mapped to a directory under the
server instance directory by using the Windows volume manager.Go to Server Manager > File and Storage Services and complete the followingsteps for each disk that corresponds to the LUN mapping that was created inthe previous step:a. Bring the disk online.b. Initialize the disk to the GPT basic type, which is the default.c. Create a simple volume that occupies all of the space on the disk. Format
the file system by using NTFS, and assign a label that matches the purpose
42 IBM Tivoli Storage Manager: Multisite Disk Solution Guide

of the volume, such as TSMfile00. Do not assign the new volume to a driveletter. Instead, map the volume to a directory under the instance directory,such as C:\tsminst1\TSMfile00.
Tip: Determine the volume label and directory mapping labels based on thesize of the disk that is reported.
3. Verify that file systems are mounted at the correct LUN and correct mountpoint. List all file systems by issuing the mountvol command and then reviewthe output. For example:\\?\Volume{8ffb9678-3216-474c-a021-20e420816a92}\
C:\tsminst1\TSMdbspace00\
4. After the disk configuration is complete, restart the system.
What to do next
You can confirm the amount of free space for each volume by using WindowsExplorer.
Chapter 7. Setting up the system 43

44 IBM Tivoli Storage Manager: Multisite Disk Solution Guide

Chapter 8. Installing the Tivoli Storage Manager server andOperations Center
Use the IBM Installation Manager graphical wizard to install Tivoli StorageManager components.
Installing on AIX and Linux systemsInstall the Tivoli Storage Manager server and the Operations Center on the firstserver system.
Before you begin
Verify that the operating system is set to the language that you require. By default,the language of the operating system is the language of the installation wizard.
Procedure
1. AIX Verify that the required RPM files are installed on your system.See “Installing prerequisite RPM files for the graphical wizard” on page 46 fordetails.
2. Before you download the installation package, verify that you have enoughspace to store the installation files when they are extracted from the productpackage. Refer to the download document for space requirements:http://www.ibm.com/support/docview.wss?uid=swg24035122
3. Go to Passport Advantage® at: http://www.ibm.com/software/passportadvantage/. Download the package file to an empty directory of yourchoice.
4. Ensure that executable permission is set for the package. If necessary, changethe file permissions by issuing the following command:chmod a+x package_name.bin
5. Extract the package by issuing the following command:./package_name.bin
where package_name is the name of the downloaded file.
6. AIX Ensure that the following command is enabled so that the TivoliStorage Manager wizards work properly:lsuser
By default, the command is enabled.7. Change to the directory where you placed the executable file.8. Start the installation wizard by issuing the following command:
./install.sh
When you select the packages to install, choose both the server and OperationsCenter.
What to do nextv If errors occur during the installation process, the errors are recorded in log files
that are stored in the IBM Installation Manager logs directory.
© Copyright IBM Corp. 1993, 2015 45
You can view installation log files by clicking File > View Log from theInstallation Manager tool. To collect these log files, click Help > Export Data forProblem Analysis from the Installation Manager tool.
v After you install Tivoli Storage Manager, and before you customize it for youruse, go to the following website: http://www.ibm.com/support/entry/portal/Overview/Software/Tivoli/Tivoli_Storage_Manager. Click Support anddownloads and apply any applicable fixes.
Related tasks:
Other methods for installing Tivoli Storage Manager components (AIX)(http://www.ibm.com/support/knowledgecenter/SSGSG7_7.1.3/srv.install/t_srv_inst-aix.html)
Other methods for installing Tivoli Storage Manager components (Linux)(http://www.ibm.com/support/knowledgecenter/SSGSG7_7.1.3/srv.install/t_srv_inst-linux.html)
Installing prerequisite RPM files for the graphical wizardAIX
RPM files are required for the IBM Installation Manager graphical wizard.
Procedure1. Verify that the following files are installed on your system. If the files are not
installed, go to Step 2.atk-1.12.3-2.aix5.2.ppc.rpm libpng-1.2.32-2.aix5.2.ppc.rpmcairo-1.8.8-1.aix5.2.ppc.rpm libtiff-3.8.2-1.aix5.2.ppc.rpmexpat-2.0.1-1.aix5.2.ppc.rpm pango-1.14.5-4.aix5.2.ppc.rpmfontconfig-2.4.2-1.aix5.2.ppc.rpm pixman-0.12.0-3.aix5.2.ppc.rpmfreetype2-2.3.9-1.aix5.2.ppc.rpm xcursor-1.1.7-3.aix5.2.ppc.rpmgettext-0.10.40-6.aix5.1.ppc.rpm xft-2.1.6-5.aix5.1.ppc.rpmglib2-2.12.4-2.aix5.2.ppc.rpm xrender-0.9.1-3.aix5.2.ppc.rpmgtk2-2.10.6-4.aix5.2.ppc.rpm zlib-1.2.3-3.aix5.1.ppc.rpmlibjpeg-6b-6.aix5.1.ppc.rpm
2. Ensure that there is at least 150 MB of free space in the /opt file system.3. From the directory where the installation package file is extracted, go to the gtk
directory.4. Download the RPM files to the current working directory from the IBM AIX
Toolbox for Linux Applications website (http://www.ibm.com/systems/power/software/aix/linux/) by issuing the following command:download-prerequisites.sh
5. From the directory that contains the RPM files that you downloaded, installthem by issuing the following command:rpm -Uvh *.rpm
46 IBM Tivoli Storage Manager: Multisite Disk Solution Guide

Installing on Windows systemsInstall the Tivoli Storage Manager server and the Operations Center on the firstserver system.
Before you begin
Make sure that the following prerequisites are met:v Verify that the operating system is set to the language that you require. By
default, the language of the operating system is the language of the installationwizard.
v Ensure that the user ID that you plan to use during the installation is a userwith local Administrator authority.
Procedure1. Before you download the installation package, verify that you have enough
space to store the installation files when they are extracted from the productpackage. Refer to the download document for space requirements:http://www.ibm.com/support/docview.wss?uid=swg24035122
2. Go to Passport Advantage at: http://www.ibm.com/software/passportadvantage/. Download the package file to an empty directory of yourchoice.
3. Change to the directory where you placed the executable file.4. Double-click the executable file to extract to the current directory.5. In the directory where the installation files were extracted, start the installation
wizard by double-clicking the install.bat file. When you select the packagesto install, choose both the server and Operations Center.
What to do nextv If errors occur during the installation process, the errors are recorded in log files
that are stored in the IBM Installation Manager logs directory.You can view installation log files by clicking File > View Log from theInstallation Manager tool. To collect these log files, click Help > Export Data forProblem Analysis from the Installation Manager tool.
v After you install Tivoli Storage Manager, and before you customize it for youruse, go to the following website: http://www.ibm.com/support/entry/portal/Overview/Software/Tivoli/Tivoli_Storage_Manager. Click Support anddownloads and apply any applicable fixes.
Related tasks:
Other methods for installing Tivoli Storage Manager components(http://www.ibm.com/support/knowledgecenter/SSGSG7_7.1.3/srv.install/t_srv_inst-windows.html)
Chapter 8. Installing the Tivoli Storage Manager server and Operations Center 47

48 IBM Tivoli Storage Manager: Multisite Disk Solution Guide
Chapter 9. Configuring the Tivoli Storage Manager server andthe Operations Center
After you install Tivoli Storage Manager, complete the configuration for the serverand the Operations Center.
Configuring the server instanceUse the Tivoli Storage Manager server instance configuration wizard to completethe initial configuration of the server.
Before you begin
Ensure that the following requirements are met:
AIX
Linux
v The system where you installed Tivoli Storage Manager must have the XWindow System client. You must also be running an X Window System serveron your desktop.
v The system must have the Secure Shell (SSH) protocol enabled. Ensure that theport is set to the default value, 22, and that the port is not blocked by a firewall.You must enable password authentication in the sshd_config file in the/etc/ssh/directory. Also, ensure that the SSH daemon service has access rightsto connect to the system by using the localhost value.
v You must be able to log in to Tivoli Storage Manager with the user ID that youcreated for the server instance, by using the SSH protocol. When you use thewizard, you must provide this user ID and password to access that system.
v If you make changes, restart the server before you proceed with theconfiguration wizard.
Windows
Verify that the remote registry service is started by completing the
following steps:1. Click Start > Administrative Tools > Services. In the Services window, select
Remote Registry. If it is not started, click Start.2. Ensure port 137, 139 and 445 are not blocked by a firewall:
a. Click Start > Control Panel > Windows Firewall.b. Select Advanced Settings.c. Select Inbound Rules in the left pane.d. Select New Rule in the right pane.e. Create a port rule for TCP ports 137, 139 and 445 to allow connections for
domain and private networks.3. Configure the user account control by accessing the local security policy
options and completing the following steps.a. Click Start > Administrative Tools > Local Security Policy. Expand Local
Policies > Security Options.b. If not already enabled, enable the built-in administrator account by selecting
Accounts: Administrator account status > Enable > OK.
© Copyright IBM Corp. 1993, 2015 49
c. If not already disabled, disable user account control for all Windowsadministrators by selecting User Account Control: Run all administratorsin Admin Approval Mode > Disable > OK.
d. If not already disabled, disable the User Account Control for the built-inAdministrator account by selecting User Account Control: Admin ApprovalMode for the Built-in Administrator Account >Disable > OK.
4. If you make changes, restart the server before you proceed with theconfiguration wizard.
About this task
The wizard can be stopped and restarted, but the server is not operational until theentire configuration process is complete.
Procedure1. Start the local version of the wizard.
v AIX Linux Open the dsmicfgx program in the /opt/tivoli/tsm/server/bin directory. This wizard can be only run as a root user.
v Windows Click Start > All Programs > Tivoli Storage Manager >Configuration Wizard.
2. Follow the instructions to complete the configuration. Use the information thatyou recorded in Chapter 4, “Planning worksheets,” on page 11 during TivoliStorage Manager system set up to specify directories and options in the wizard.
AIX
Linux
On the Server Information window, set the server to start
automatically by using the instance user ID when the machine boots.
Windows
By using the configuration wizard, the server is set to start
automatically when rebooted.
Installing the Tivoli Storage Manager backup-archive clientAs a best practice, install the Tivoli Storage Manager backup-archive client on theserver system so that the administrative command-line client and scheduler areavailable.
Procedure
To install the Tivoli Storage Manager backup-archive client, follow the installationinstructions for your operating system.v Installing the UNIX and Linux backup-archive clients (http://www.ibm.com/
support/knowledgecenter/SSGSG7_7.1.3/client/c_inst_baunix.html)v Installing the Windows backup-archive client (http://www.ibm.com/support/
knowledgecenter/SSGSG7_7.1.3/client/t_inst_winclient.html)
50 IBM Tivoli Storage Manager: Multisite Disk Solution Guide

Setting options for the serverReview the server options file that is installed with the Tivoli Storage Managerserver, to verify that the correct values are set for your system.
Procedure1. Go to the server instance directory and open the dsmserv.opt file.2. Review the following table values and verify your server option settings, based
on system size.
Server optionSmall systemvalue
Medium systemvalue
Large systemvalue
ACTIVELOGDIRECTORY Directory path thatwas specifiedduringconfiguration
Directory path thatwas specifiedduringconfiguration
Directory path thatwas specifiedduringconfiguration
ACTIVELOGSIZE 131072 131072 262144
ARCHLOGCOMPRESS Yes No No
ARCHLOGDIRECTORY Directory path thatwas specifiedduringconfiguration
Directory path thatwas specifiedduringconfiguration
Directory path thatwas specifiedduringconfiguration
COMMMETHOD TCPIP TCPIP TCPIP
COMMTIMEOUT 3600 3600 3600
DEDUPREQUIRESBACKUP No No No
DEVCONFIG devconf.dat devconf.dat devconf.dat
EXPINTERVAL 0 0 0
IDLETIMEOUT 60 60 60
MAXSESSIONS 250 500 1000
NUMOPENVOLSALLOWED 20 20 20
TCPADMINPORT 1500 1500 1500
TCPPORT 1500 1500 1500
VOLUMEHISTORY volhist.dat volhist.dat volhist.dat
Update server option settings if necessary, to match the values in the table. Ifyou have to make changes, close the dsmserv.opt file and use the SETOPTcommand from the administrative command-line interface to set the options.For example, to update the IDLETIMEOUT option to 60, issue the followingcommand:setopt idletimeout 60
3. If you have to configure secure communications for the server, clients, and theOperations Center, verify the options in the following table.
Server option All sized systems
SSLDISABLELEGACYTLS YES
SSLFIPSMODE NO
SSLTCPPORT Specify the SSL port number. The server TCP/IPcommunication driver waits for requests on this port forSSL-enabled sessions from the client.
Chapter 9. Configuring the Tivoli Storage Manager server and the Operations Center 51

Server option All sized systems
SSLTCPADMINPORT Specify the port address on which the server waits forrequests for SSL-enabled sessions from the command-lineadministrative client.
SSLTLS12 YES
If any of the option values must be updated, edit the dsmserv.opt file by usingthe following guidelines:v Remove the asterisk at the beginning of a line to enable an option.v Enter only one option and the specified value for the option per line.v If there are multiple entries for an option in the file, the server uses the last
entry.
Save your changes and close the file. If you edit the dsmserv.opt file directly,you must restart the server for the changes to take effect.
Related reference:
Server options reference (http://www.ibm.com/support/knowledgecenter/SSGSG7_7.1.3/srv.reference/r_opt_server.html)
SETOPT (Set a server option for dynamic update) (http://www.ibm.com/support/knowledgecenter/SSGSG7_7.1.3/srv.reference/r_cmd_setopt.html)
Configuring secure communications with Transport Layer SecurityIf your environment requires secure communications, you can set up SecureSockets Layer (SSL) and Transport Layer Security (TLS) on the Tivoli StorageManager server and backup-archive client to encrypt data. An SSL certificate isused to verify communication requests between the server and client.
About this task
As shown in the following figure, you can configure SSL/TLS communicationsbetween the Tivoli Storage Manager server and backup-archive client by settingoptions in the server and client options files, and then transferring the self-signedcertificate that is generated on the server to the client.
When you updated the server options file in “Setting options for the server” onpage 51, the SSLTLS12 and SSLDISABLELEGACYTLS server options were set torestrict secure communications to use TLS 1.2. This setting prevents the use ofprevious TLS protocol levels, which are less secure.
Backup-archive clientTivoli Storage Manager server
Server options file
ssltcpadminport
ssltcpport
ssltls12 yes
Secure communications
Import cert256.arm
Client options file
ssl yes
tcpport = value of ssltcpport on the server
52 IBM Tivoli Storage Manager: Multisite Disk Solution Guide
Procedure
To configure the Tivoli Storage Manager server and clients for SSL/TLS, completethe following steps:1. Create the key database file, dsmcert.kdb, on each client. Issue the following
command in the bin directory on the client:gsk8capicmd_64 -keydb -create -populate-db dsmcert.kdb -pw password -stash
2. Change the default certificate in the cert.kdb key ring database file to the“TSM Server SelfSigned SHA Key” label. Issue the following command fromthe server instance directory:gsk8capicmd_64 -cert -setdefault -db cert.kdb-stashed -label "TSM Server SelfSigned SHA Key"
3. Manually transfer the Tivoli Storage Manager server cert256.arm file to theclient computers.The cert256.arm is created in the server instance directory when theSSLTCPPORT server option is specified.
4. Specify the following options in the client options file:v Set the ssl option to yes.v Set the tcpport option value to match the value of the SSLTCPPORT that is set
on the server.
Configuring the Operations CenterAfter you install the Operations Center, complete the following configuration stepsto start managing your storage environment.
Before you begin
When you connect to the Operations Center for the first time, you must providethe following information:v Connection information for the Tivoli Storage Manager server that you want to
designate as a hub serverv Login credentials for an administrator ID that is defined for that Tivoli Storage
Manager server
Procedure1. Designate the hub server. In a web browser, enter the following address:
https://hostname:secure_port/oc
where:v hostname represents the name of the computer where the Operations Center
is installedv secure_port represents the port number that the Operations Center uses for
HTTPS communication on that computer
For example, if your host name is tsm.storage.mylocation.com and you are usingthe default secure port for the Operations Center, which is 11090, the address is:https://tsm.storage.mylocation.com:11090/oc
When you log in to the Operations Center for the first time, a wizard guidesyou through an initial configuration to set up a new administrator with systemauthority on the server.
Chapter 9. Configuring the Tivoli Storage Manager server and the Operations Center 53
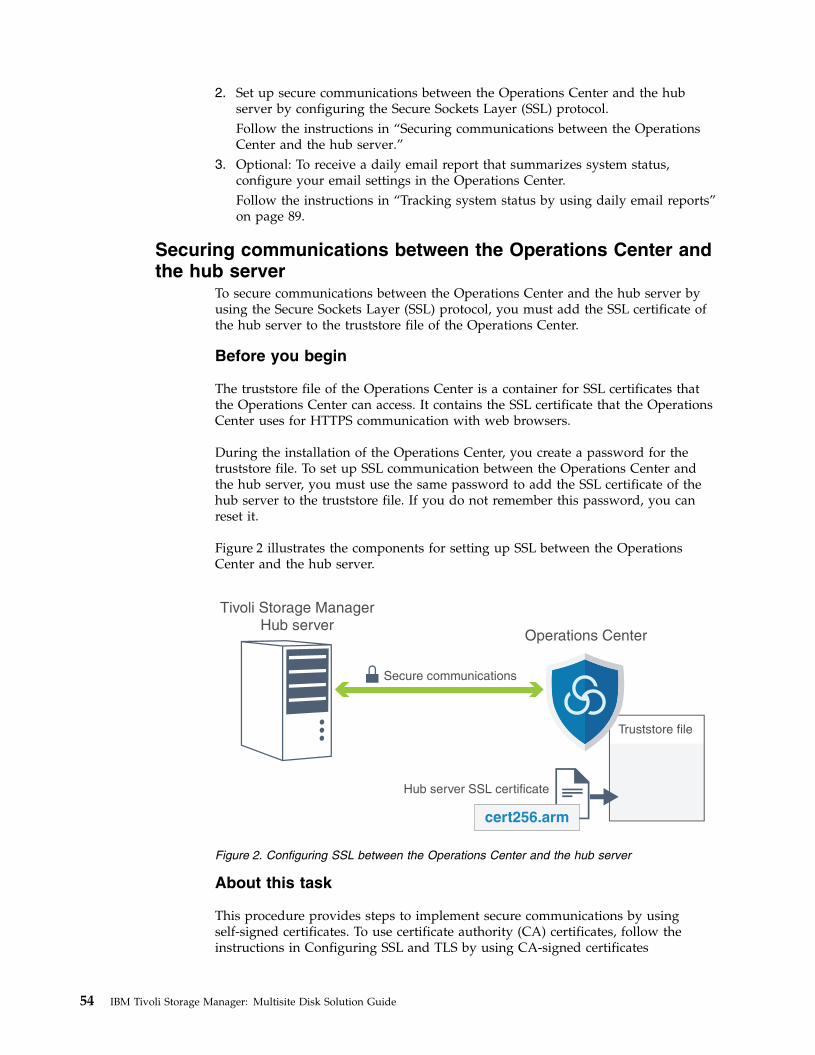
2. Set up secure communications between the Operations Center and the hubserver by configuring the Secure Sockets Layer (SSL) protocol.Follow the instructions in “Securing communications between the OperationsCenter and the hub server.”
3. Optional: To receive a daily email report that summarizes system status,configure your email settings in the Operations Center.Follow the instructions in “Tracking system status by using daily email reports”on page 89.
Securing communications between the Operations Center andthe hub server
To secure communications between the Operations Center and the hub server byusing the Secure Sockets Layer (SSL) protocol, you must add the SSL certificate ofthe hub server to the truststore file of the Operations Center.
Before you begin
The truststore file of the Operations Center is a container for SSL certificates thatthe Operations Center can access. It contains the SSL certificate that the OperationsCenter uses for HTTPS communication with web browsers.
During the installation of the Operations Center, you create a password for thetruststore file. To set up SSL communication between the Operations Center andthe hub server, you must use the same password to add the SSL certificate of thehub server to the truststore file. If you do not remember this password, you canreset it.
Figure 2 illustrates the components for setting up SSL between the OperationsCenter and the hub server.
About this task
This procedure provides steps to implement secure communications by usingself-signed certificates. To use certificate authority (CA) certificates, follow theinstructions in Configuring SSL and TLS by using CA-signed certificates
cert256.arm
Operations Center
Truststore file
Tivoli Storage ManagerHub server
Hub server SSL certificate
Secure communications
Figure 2. Configuring SSL between the Operations Center and the hub server
54 IBM Tivoli Storage Manager: Multisite Disk Solution Guide
(http://www.ibm.com/support/knowledgecenter/SSGSG7_7.1.3/srv.admin/t_ssl_config_ca.html).
Procedure
To set up SSL communication by using self-signed certificates, complete thefollowing steps.1. Specify the cert256.arm certificate as the default certificate in the key database
file of the hub server:a. Issue the following command from the hub server instance directory:
gsk8capicmd_64 -cert -setdefault -db cert.kdb -stashed-label "TSM Server SelfSigned SHA Key"
b. Restart the hub server so that it can receive the changes to the keydatabase file.
c. Verify that the cert256.arm certificate is set as the default. Issue thefollowing command:gsk8capicmd_64 -cert -list -db cert.kdb -stashed
2. Stop the Operations Center web server.3. Open the operating system command-line on the system where the Operations
Center is installed, and change to the following directory:
v AIX Linux installation_dir/ui/jre/bin
v Windows installation_dir\ui\jre\bin
Where installation_dir represents the directory in which the Operations Centeris installed.
4. Open the IBM Key Management window by issuing the following command:ikeyman
5. Click Key Database File > Open.6. Click Browse, and go to the following directory, where installation_dir
represents the directory in which the Operations Center is installed:
v AIX Linux installation_dir/ui/Liberty/usr/servers/guiServer
v Windows installation_dir\ui\Liberty\usr\servers\guiServer
7. In the guiServer directory, select the gui-truststore.jks file.8. Click Open, and click OK.9. Enter the password for the truststore file, and click OK.
10. In the Key database content area of the IBM Key Management window, clickthe arrow, and select Signer Certificates from the list. Click Add.
11. In the Open window, click Browse, and go to the hub server instancedirectory:
v AIX Linux /opt/tivoli/tsm/server/bin
v Windows c:\Program Files\Tivoli\TSM\server1
The directory contains the following SSL certificates:cert.armcert256.arm
If you cannot access the hub server instance directory from the Open window,complete the following steps:
Chapter 9. Configuring the Tivoli Storage Manager server and the Operations Center 55

a. Use FTP or another file-transfer method to copy the cert256.arm files fromthe hub server to the following directory on the computer where theOperations Center is installed:
v AIX Linux installation_dir/ui/Liberty/usr/servers/guiServer
v Windows installation_dir\ui\Liberty\usr\servers\guiServer
b. In the Open window, go to the guiServer directory.12. Select the cert256.arm certificate as the SSL certificate.13. Click Open, and click OK.14. Enter a label for the certificate. For example, enter the name of the hub server.15. Click OK. The SSL certificate of the hub server is added to the truststore file,
and the label is displayed in the Key database content area of the IBM KeyManagement window.
16. Close the IBM Key Management window.17. Start the Operations Center web server.18. Complete the following steps in the login window of the configuration
wizard:a. In the Connect to field, enter the value of the SSLTCPADMINPORT server
option as the port number.b. Select Use SSL.
Registering your Tivoli Storage Manager licenseTo register a license for Tivoli Storage Manager, use the REGISTER LICENSEcommand.
About this task
Licenses are stored in enrollment certificate files, which contain licensinginformation for the product. The enrollment certificate files are on the installationmedia, and are placed on the server during installation. When you register theproduct, the licenses are stored in a NODELOCK file within the current directory.
Procedure
Register a Tivoli Storage Manager license by specifying the name of the enrollmentcertificate file that contains the license. To use the Operations Center commandbuilder for this task, complete the following steps.1. Open the Operations Center.2. Open the Operations Center command builder by hovering over the globe icon
and clicking Command Builder.3. Issue the REGISTER LICENSE command. For example, to register a base Tivoli
Storage Manager license, issue the following command:register license file=tsmbasic.lic
What to do next
Save the installation media that contains your enrollment certificate files. Youmight need to register your license again if, for example, one of the followingconditions occur:v The server is moved to a different computer.
56 IBM Tivoli Storage Manager: Multisite Disk Solution Guide
v The NODELOCK file is corrupted. Tivoli Storage Manager stores license informationin the NODELOCK file, which is in the directory from which the server is started.
v Linux If you change the processor chip that is associated with the server onwhich the Tivoli Storage Manager is installed.
Related reference:
REGISTER LICENSE (Register a new license) (http://www.ibm.com/support/knowledgecenter/SSGSG7_7.1.3/srv.reference/r_cmd_license_register.html)
Configuring data deduplicationCreate a directory-container storage pool and at least one directory to use inlinedata deduplication.
Before you begin
Use the storage pool directory information that you recorded in Chapter 4,“Planning worksheets,” on page 11 for this task.
Procedure1. Open the Operations Center.2. On the Operations Center menu bar, hover over Storage.3. From the list that is displayed, click Storage Pools.4. Click the +Storage Pool button.5. Complete the steps in the Add Storage Pool wizard:v To use inline data deduplication, select a Directory storage pool under
Container-based storage.v When you configure directories for the directory-container storage pool,
specify the directory paths that you created for storage during system setup.6. After you configure the new directory-container storage pool, click Close &
View Policies to update your management class and start using the storagepool.
Defining data retention rules for your businessAfter you create a directory-container storage pool for data deduplication, updatethe default server policy to use the new storage pool. The Add Storage Poolwizard opens the Services page in the Operations Center to complete this task.
Procedure1. On the Services page of the Operations Center, select the STANDARD domain
and click Details.2. On the Summary page for the policy domain, click the Policy Sets tab. The
Policy Sets page indicates the name of the active policy set and lists all of themanagement classes for that policy set.
3. Click the Configure toggle, and make the following changes:v Change the backup destination for the STANDARD management class to the
directory-container storage pool.v Change the value for the Backups column to No limit.v Change the retention period. Set the Keep Extra Backups column to 30 days
or more, depending on your business requirements.
Chapter 9. Configuring the Tivoli Storage Manager server and the Operations Center 57

4. Save your changes and click the Configure toggle again so that the policy set isno longer editable.
5. Activate the policy set by clicking Activate.Related tasks:“Specifying rules for backing up and archiving client data” on page 104
Defining schedules for server maintenance activitiesCreate schedules for each server maintenance task by using the DEFINE SCHEDULEcommand in the Operations Center command builder.
About this task
Schedule server maintenance operations to run after the client backup. You cancontrol the timing of schedules for maintenance tasks by setting the start time incombination with the duration time for each operation.
The following example shows how you can schedule server maintenance processesin combination with the client backup schedule for a multisite disk solution.
Operation Schedule
Client backup Starts at 22:00.
Node replication Starts at 08:00, or 10 hours after the beginning of the clientbackup.
Processing for database anddisaster recovery files
v Database backup starts at 11:00, or 13 hours after thebeginning of the client backup. This process runs untilcompletion.
v Device configuration information and volume historybackup starts at 17:00, or 6 hours after the start of thedatabase backup.
v Volume history deletion starts at 20:00, or 9 hours afterthe start of the database backup.
Inventory expiration Starts at 12:00, or 14 hours after the beginning of the clientbackup window. This process runs until completion.
Procedure
To run the server maintenance operations, set up schedules for each task by usingthe DEFINE SCHEDULE command.You will create the schedule for replication separately, through the OperationsCenter, in a later step.
58 IBM Tivoli Storage Manager: Multisite Disk Solution Guide
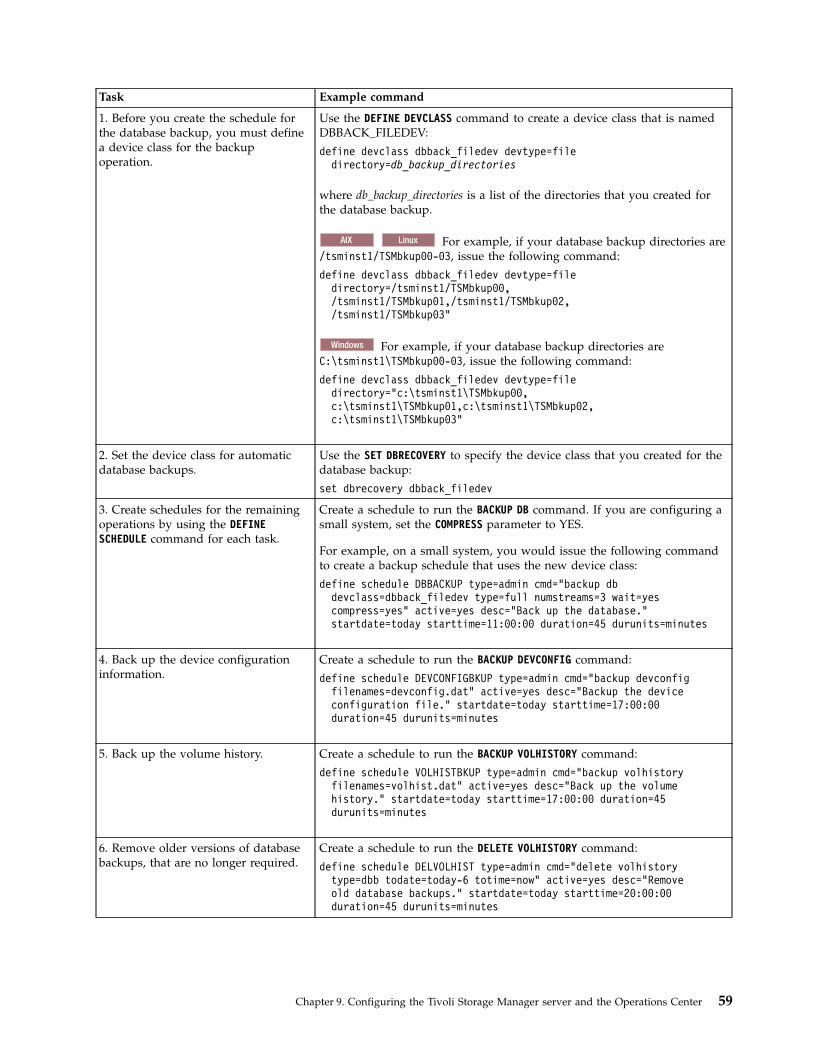
Task Example command
1. Before you create the schedule forthe database backup, you must definea device class for the backupoperation.
Use the DEFINE DEVCLASS command to create a device class that is namedDBBACK_FILEDEV:
define devclass dbback_filedev devtype=filedirectory=db_backup_directories
where db_backup_directories is a list of the directories that you created forthe database backup.
AIX
Linux
For example, if your database backup directories are
/tsminst1/TSMbkup00-03, issue the following command:
define devclass dbback_filedev devtype=filedirectory=/tsminst1/TSMbkup00,/tsminst1/TSMbkup01,/tsminst1/TSMbkup02,/tsminst1/TSMbkup03"
Windows For example, if your database backup directories areC:\tsminst1\TSMbkup00-03, issue the following command:
define devclass dbback_filedev devtype=filedirectory="c:\tsminst1\TSMbkup00,c:\tsminst1\TSMbkup01,c:\tsminst1\TSMbkup02,c:\tsminst1\TSMbkup03"
2. Set the device class for automaticdatabase backups.
Use the SET DBRECOVERY to specify the device class that you created for thedatabase backup:
set dbrecovery dbback_filedev
3. Create schedules for the remainingoperations by using the DEFINESCHEDULE command for each task.
Create a schedule to run the BACKUP DB command. If you are configuring asmall system, set the COMPRESS parameter to YES.
For example, on a small system, you would issue the following commandto create a backup schedule that uses the new device class:
define schedule DBBACKUP type=admin cmd="backup dbdevclass=dbback_filedev type=full numstreams=3 wait=yescompress=yes" active=yes desc="Back up the database."startdate=today starttime=11:00:00 duration=45 durunits=minutes
4. Back up the device configurationinformation.
Create a schedule to run the BACKUP DEVCONFIG command:
define schedule DEVCONFIGBKUP type=admin cmd="backup devconfigfilenames=devconfig.dat" active=yes desc="Backup the deviceconfiguration file." startdate=today starttime=17:00:00duration=45 durunits=minutes
5. Back up the volume history. Create a schedule to run the BACKUP VOLHISTORY command:
define schedule VOLHISTBKUP type=admin cmd="backup volhistoryfilenames=volhist.dat" active=yes desc="Back up the volumehistory." startdate=today starttime=17:00:00 duration=45durunits=minutes
6. Remove older versions of databasebackups, that are no longer required.
Create a schedule to run the DELETE VOLHISTORY command:
define schedule DELVOLHIST type=admin cmd="delete volhistorytype=dbb todate=today-6 totime=now" active=yes desc="Removeold database backups." startdate=today starttime=20:00:00duration=45 durunits=minutes
Chapter 9. Configuring the Tivoli Storage Manager server and the Operations Center 59
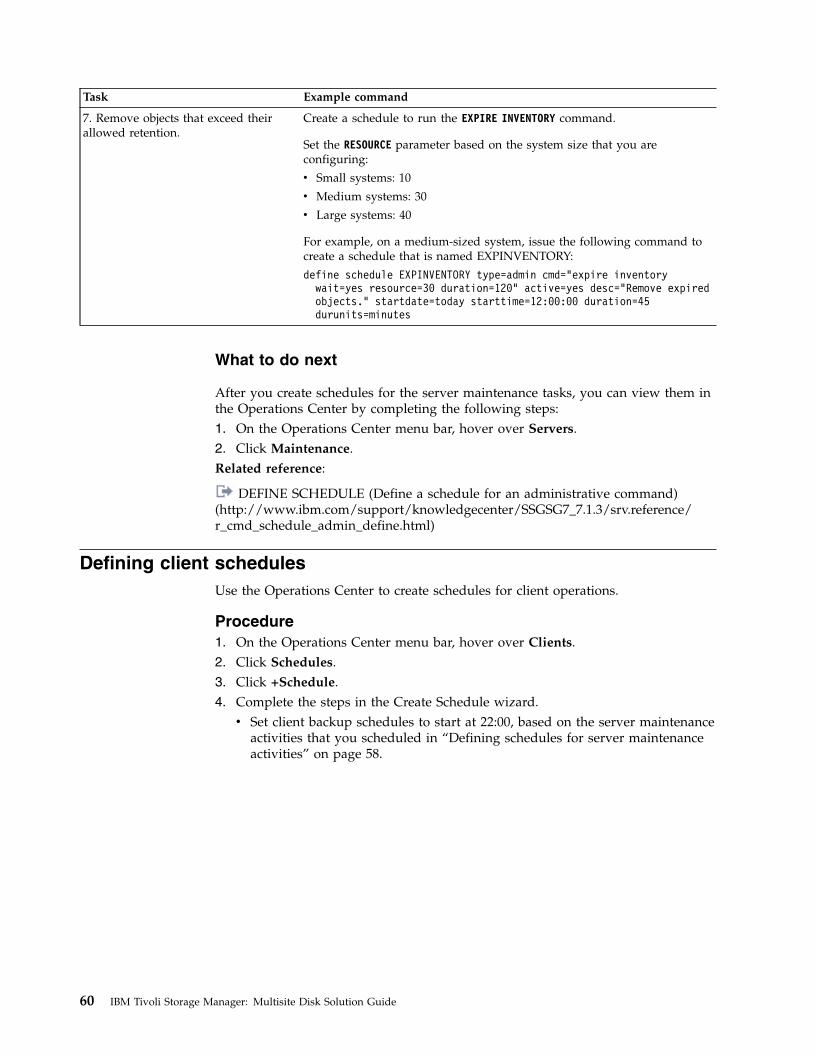
Task Example command
7. Remove objects that exceed theirallowed retention.
Create a schedule to run the EXPIRE INVENTORY command.
Set the RESOURCE parameter based on the system size that you areconfiguring:
v Small systems: 10
v Medium systems: 30
v Large systems: 40
For example, on a medium-sized system, issue the following command tocreate a schedule that is named EXPINVENTORY:
define schedule EXPINVENTORY type=admin cmd="expire inventorywait=yes resource=30 duration=120" active=yes desc="Remove expiredobjects." startdate=today starttime=12:00:00 duration=45durunits=minutes
What to do next
After you create schedules for the server maintenance tasks, you can view them inthe Operations Center by completing the following steps:1. On the Operations Center menu bar, hover over Servers.2. Click Maintenance.Related reference:
DEFINE SCHEDULE (Define a schedule for an administrative command)(http://www.ibm.com/support/knowledgecenter/SSGSG7_7.1.3/srv.reference/r_cmd_schedule_admin_define.html)
Defining client schedulesUse the Operations Center to create schedules for client operations.
Procedure1. On the Operations Center menu bar, hover over Clients.2. Click Schedules.3. Click +Schedule.4. Complete the steps in the Create Schedule wizard.v Set client backup schedules to start at 22:00, based on the server maintenance
activities that you scheduled in “Defining schedules for server maintenanceactivities” on page 58.
60 IBM Tivoli Storage Manager: Multisite Disk Solution Guide

Chapter 10. Installing and configuring clients
Following the successful setup of your server system, install, and configure clientsoftware to begin backing up data.
Procedure
To install the Tivoli Storage Manager backup-archive client, follow the installationinstructions for your operating system.v Installing the UNIX and Linux backup-archive clients (http://www.ibm.com/
support/knowledgecenter/SSGSG7_7.1.3/client/c_inst_baunix.html)v Installing the Windows backup-archive client (http://www.ibm.com/support/
knowledgecenter/SSGSG7_7.1.3/client/t_inst_winclient.html)
What to do next
Register and assign your clients to schedules.
Registering and assigning clients to schedulesAdd and register your clients through the Operations Center by using the AddClient wizard.
Procedure1. On the Operations Center menu bar, click Clients.2. In the Clients table, click +Client.3. Complete the steps in the Add Client wizard:
a. Optional: Specify that redundant data can be eliminated on both the clientand server. In the Client-side deduplication area, select the Enable checkbox.
b. In the Configuration window, copy the TCPSERVERADDRESS, TCPPORT,NODENAME, and DEDUPLICATION option values.
Tip: Record the option values and keep them in a safe place. After youcomplete the client registration and install the software on the client node,use the values to configure the client.
c. Follow the instructions in the wizard to specify the policy domain, schedule,and option set.
d. Optional: Set how risks are displayed for the client by specifying the at-risksetting.
e. Click Add Client.
© Copyright IBM Corp. 1993, 2015 61

Installing the client management serviceInstall the client management service for backup-archive clients that run on Linuxand Windows operating systems. The client management service collects diagnosticinformation about IBM Tivoli Storage Manager backup-archive clients and makesthe information available to the Operations Center for basic monitoring capability.
Procedure
Install the client management service on the same computer as the backup-archiveclient by completing the following steps:1. Obtain the installation package for the client management service from the
product DVD. Alternatively, you can download the installation package for theclient management service from an IBM download site such as IBM PassportAdvantage® or IBM Fix Central. Look for a file name that is similar toversion-TIV-TSMCMS-operating_system.bin.
2. Create a directory on the client system that you want to manage, and copy theinstallation package there.
3. Extract the contents of the installation package file.4. Run the installation batch file from the directory where you extracted the
installation and associated files. This is the directory that you created in step 2.5. To install the client management service, follow the instructions in the IBM
Installation Manager wizard. If IBM Installation Manager is not alreadyinstalled on the client system, you must select both IBM Installation Managerand IBM Tivoli Storage Manager Client Management Services.
Related tasks:
Configuring the client management service for custom client installations(http://www.ibm.com/support/knowledgecenter/SSGSG7_7.1.3/srv.install/t_oc_inst_cms_customcfg.html)
Verifying the client management service is installed correctlyBefore you use the client management service to collect diagnostic informationabout a backup-archive client, you can verify that the client management service iscorrectly installed and configured.
Procedure1. Open a command line on the client system and issue the following command
to view the configuration of the client management service: In a web browser,enter the following address, where:
Linux
<client_install_dir>/cms/bin/CmsConfig.sh list
Windows
<client_install_dir>\cms\bin\CmsConfig.bat list
where client_install_dir is the directory where the backup-archive client isinstalled.
The output is similar to the following: Linux
List:server1.example.com:1500 HOSTNAME
/opt/tivoli/tsm/client/ba/bin/dsmerror.logen_US MM/dd/yyyy HH:mm:ss UTF-8
62 IBM Tivoli Storage Manager: Multisite Disk Solution Guide
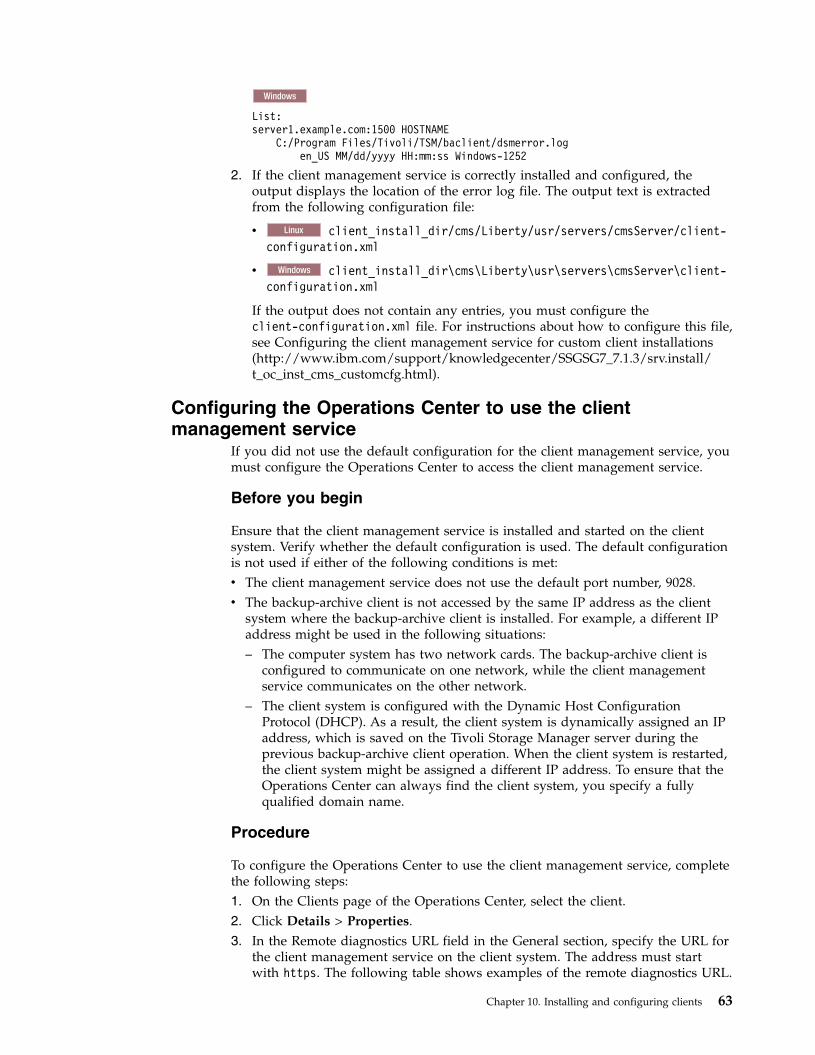
Windows
List:server1.example.com:1500 HOSTNAME
C:/Program Files/Tivoli/TSM/baclient/dsmerror.logen_US MM/dd/yyyy HH:mm:ss Windows-1252
2. If the client management service is correctly installed and configured, theoutput displays the location of the error log file. The output text is extractedfrom the following configuration file:
v Linux client_install_dir/cms/Liberty/usr/servers/cmsServer/client-configuration.xml
v Windows client_install_dir\cms\Liberty\usr\servers\cmsServer\client-configuration.xml
If the output does not contain any entries, you must configure theclient-configuration.xml file. For instructions about how to configure this file,see Configuring the client management service for custom client installations(http://www.ibm.com/support/knowledgecenter/SSGSG7_7.1.3/srv.install/t_oc_inst_cms_customcfg.html).
Configuring the Operations Center to use the clientmanagement service
If you did not use the default configuration for the client management service, youmust configure the Operations Center to access the client management service.
Before you begin
Ensure that the client management service is installed and started on the clientsystem. Verify whether the default configuration is used. The default configurationis not used if either of the following conditions is met:v The client management service does not use the default port number, 9028.v The backup-archive client is not accessed by the same IP address as the client
system where the backup-archive client is installed. For example, a different IPaddress might be used in the following situations:– The computer system has two network cards. The backup-archive client is
configured to communicate on one network, while the client managementservice communicates on the other network.
– The client system is configured with the Dynamic Host ConfigurationProtocol (DHCP). As a result, the client system is dynamically assigned an IPaddress, which is saved on the Tivoli Storage Manager server during theprevious backup-archive client operation. When the client system is restarted,the client system might be assigned a different IP address. To ensure that theOperations Center can always find the client system, you specify a fullyqualified domain name.
Procedure
To configure the Operations Center to use the client management service, completethe following steps:1. On the Clients page of the Operations Center, select the client.2. Click Details > Properties.3. In the Remote diagnostics URL field in the General section, specify the URL for
the client management service on the client system. The address must startwith https. The following table shows examples of the remote diagnostics URL.
Chapter 10. Installing and configuring clients 63

Type of URL Example
With DNS host name and default port, 9028 https://server.example.com
With DNS host name and non-default port https://server.example.com:1599
With IP address and non-default port https://192.0.2.0:1599
What to do next
You can access client diagnostic information such as client log files from theDiagnosis tab in the Operations Center.
64 IBM Tivoli Storage Manager: Multisite Disk Solution Guide

Chapter 11. Configuring the second server
After you complete the configuration for the first server in your system, configurethe second server.
Procedure
To configure a second server that is the same as the first server, complete theinstructions in the following sections:v Chapter 7, “Setting up the system,” on page 29v Chapter 8, “Installing the Tivoli Storage Manager server and Operations Center,”
on page 45Only one server in the multisite disk solution is configured as the hub server, soyou do not need to install the Operations Center on the second server. Whenyou select the installation packages to install on the second server, do not selectthe Operations Center.
v Chapter 9, “Configuring the Tivoli Storage Manager server and the OperationsCenter,” on page 49Skip the tasks for configuring the Operations Center.
v Chapter 10, “Installing and configuring clients,” on page 61
What to do next
Complete the configuration by configuring SSL for the hub and spoke servers,adding the second server as a spoke to the hub server, and enabling replication.
Configuring SSL communications between the hub server and a spokeserver
To secure communications between the hub server and a spoke server by using theSecure Sockets Layer (SSL) protocol, you must define the SSL certificate of thespoke server to the hub server. You must also configure the Tivoli Storage Managerto monitor the spoke server.
Procedure1. To ensure that SSL ports are correctly set on the hub server and each spoke
server, complete the following steps:a. From a Tivoli Storage Manager command line, issue the following
command to each server:QUERY OPTION SSL*
The results include the server options that are shown in the followingexample:Server Option Option Setting-------------------------------------SSLTCPPort 3700SSLTCPADMINPort 3800SSLTLS12 YesSSLFIPSMODE No
b. Ensure the following:
© Copyright IBM Corp. 1993, 2015 65
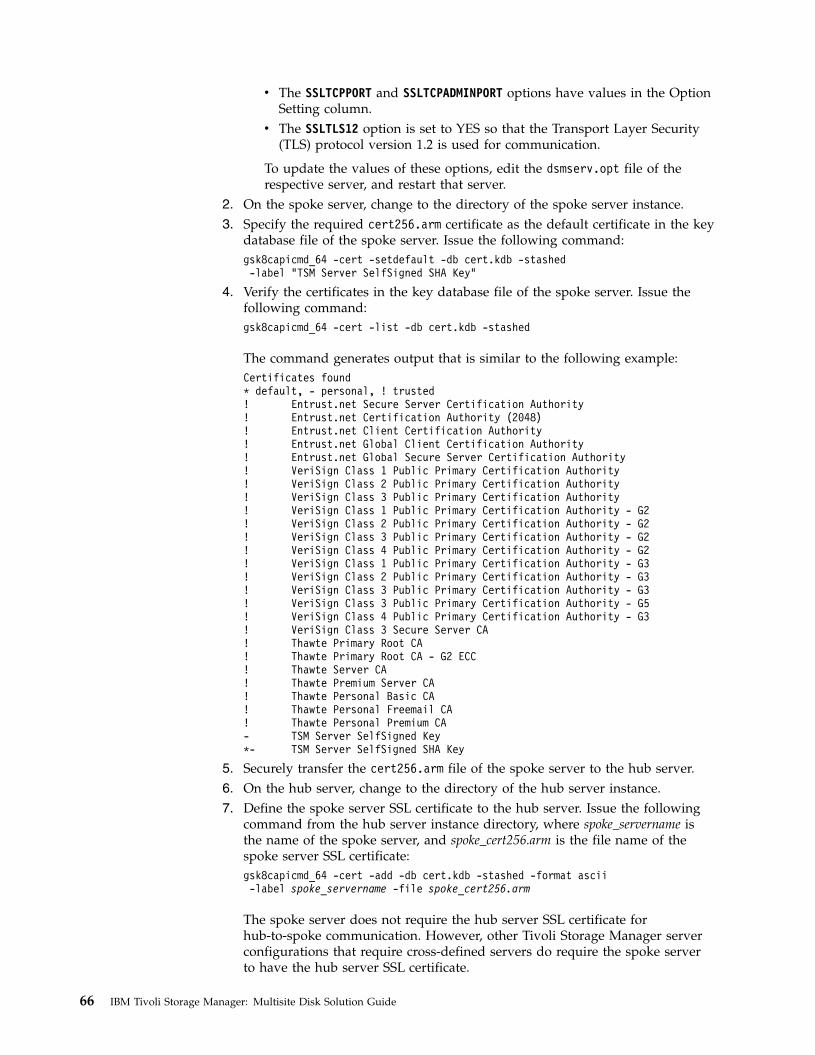
v The SSLTCPPORT and SSLTCPADMINPORT options have values in the OptionSetting column.
v The SSLTLS12 option is set to YES so that the Transport Layer Security(TLS) protocol version 1.2 is used for communication.
To update the values of these options, edit the dsmserv.opt file of therespective server, and restart that server.
2. On the spoke server, change to the directory of the spoke server instance.3. Specify the required cert256.arm certificate as the default certificate in the key
database file of the spoke server. Issue the following command:gsk8capicmd_64 -cert -setdefault -db cert.kdb -stashed-label "TSM Server SelfSigned SHA Key"
4. Verify the certificates in the key database file of the spoke server. Issue thefollowing command:gsk8capicmd_64 -cert -list -db cert.kdb -stashed
The command generates output that is similar to the following example:Certificates found* default, - personal, ! trusted! Entrust.net Secure Server Certification Authority! Entrust.net Certification Authority (2048)! Entrust.net Client Certification Authority! Entrust.net Global Client Certification Authority! Entrust.net Global Secure Server Certification Authority! VeriSign Class 1 Public Primary Certification Authority! VeriSign Class 2 Public Primary Certification Authority! VeriSign Class 3 Public Primary Certification Authority! VeriSign Class 1 Public Primary Certification Authority - G2! VeriSign Class 2 Public Primary Certification Authority - G2! VeriSign Class 3 Public Primary Certification Authority - G2! VeriSign Class 4 Public Primary Certification Authority - G2! VeriSign Class 1 Public Primary Certification Authority - G3! VeriSign Class 2 Public Primary Certification Authority - G3! VeriSign Class 3 Public Primary Certification Authority - G3! VeriSign Class 3 Public Primary Certification Authority - G5! VeriSign Class 4 Public Primary Certification Authority - G3! VeriSign Class 3 Secure Server CA! Thawte Primary Root CA! Thawte Primary Root CA - G2 ECC! Thawte Server CA! Thawte Premium Server CA! Thawte Personal Basic CA! Thawte Personal Freemail CA! Thawte Personal Premium CA- TSM Server SelfSigned Key*- TSM Server SelfSigned SHA Key
5. Securely transfer the cert256.arm file of the spoke server to the hub server.6. On the hub server, change to the directory of the hub server instance.7. Define the spoke server SSL certificate to the hub server. Issue the following
command from the hub server instance directory, where spoke_servername isthe name of the spoke server, and spoke_cert256.arm is the file name of thespoke server SSL certificate:gsk8capicmd_64 -cert -add -db cert.kdb -stashed -format ascii-label spoke_servername -file spoke_cert256.arm
The spoke server does not require the hub server SSL certificate forhub-to-spoke communication. However, other Tivoli Storage Manager serverconfigurations that require cross-defined servers do require the spoke serverto have the hub server SSL certificate.
66 IBM Tivoli Storage Manager: Multisite Disk Solution Guide
Tip: From each server, you can view the certificates in the key database fileby issuing the following command:gsk8capicmd_64 -cert -list -db cert.kdb -stashed
8. Restart the hub server and the spoke server.9. For the hub server, issue the DEFINE SERVER command, according to the
following example:DEFINE SERVER spoke_servername HLA=spoke_addressLLA=spoke_SSLTCPADMINPort SERVERPA=spoke_serverpassword SSL=YES
10. On the Operations Center menu bar, click Servers.In the table on the Servers page, the spoke server that you defined in 9 shouldhave a status of "Unmonitored." Depending on the setting for the statusrefresh interval, you might not see the spoke server immediately.
11. Click the spoke server to highlight it, and in the table menu bar, clickMonitor Spoke.
Related reference:
DEFINE SERVER (Define a server for server-to-server communications)(http://www.ibm.com/support/knowledgecenter/SSGSG7_7.1.3/srv.reference/r_cmd_server_define.html)
QUERY OPTION (Query server options) (http://www.ibm.com/support/knowledgecenter/SSGSG7_7.1.3/srv.reference/r_cmd_option_query.html)
Adding the second server as a spokeAfter you configure both servers in your environment, add the second server as aspoke to the hub server.
Procedure1. Open the Operations Center.2. In the Operations Center menu bar, click Servers.3. Complete one of the following steps:v Click the server to highlight it, and in the table menu bar, click Monitor
Spoke.v If the server that you want to add is not shown in the table, click +Spoke.
4. Complete the steps in the spoke configuration wizard.
Enabling replicationTo protect your data, enable node replication in addition to protecting your storagepools.
Procedure
To enable node replication for all of the clients that are registered to the sourceserver, complete the following steps1. Open the Operations Center.2. On the Operations Center menu bar, hover over Storage and click Replication.3. On the Replication page, click +Server Pair.4. Complete the steps in the Add Server Pair wizard:v Set the source server as the first server that you configured for the multisite
disk solution. The target server is the second server.
Chapter 11. Configuring the second server 67

v Set the node replication schedule to start 10 hours after the client backupwindow, based on the server maintenance activities that you scheduled in“Defining schedules for server maintenance activities” on page 58.
v The wizard sets up storage pool protection schedules for you, based on theamount of data that you are protecting and when client replication isscheduled.
What to do next
If you plan to set up mutual replication between the two sites, run the Add ServerPair wizard again and set the second server as the source and the first server asthe target.
68 IBM Tivoli Storage Manager: Multisite Disk Solution Guide

Chapter 12. Completing the implementation
After the solution is configured and running, test backup operations and set upmonitoring to ensure that everything runs smoothly.
Procedure1. Test backup operations to verify that your data is protected in the way that you
expect.a. On the Clients page of the Operations Center, select the clients that you
want to back up, and click Back Up.b. On the Servers page of the Operations Center, select the server that contains
the database that you want to back up. Click Back Up, and follow theinstructions in the Back Up Server Database window.
c. Verify that the backups completed successfully and there are no warning orerror messages.
2. Set up monitoring for your solution by following the instructions in Part 3,“Monitoring a multisite disk solution,” on page 71.
© Copyright IBM Corp. 1993, 2015 69

70 IBM Tivoli Storage Manager: Multisite Disk Solution Guide
Part 3. Monitoring a multisite disk solution
After you implement a Tivoli Storage Manager multisite disk solution, monitor thesolution to ensure that it operates correctly. By monitoring the solution on a dailyand periodic basis, you can identify existing and potential issues. The informationthat you gather can be used to troubleshoot problems and optimize systemperformance.
About this task
The preferred way to monitor a solution is by using the Operations Center, whichprovides overall and detailed system status in a graphical user interface. Inaddition, you can configure the Operations Center to generate a daily email reportthat summarizes system status.
In some cases, you might want to use advanced monitoring tools to completespecific monitoring or troubleshooting tasks. To select and configure advancedmonitoring tools, see Chapter 16, “Selecting, configuring, and using monitoringtools,” on page 87.
Tip: If you plan to diagnose issues with backup-archive clients on Linux orWindows operating systems, install Tivoli Storage Manager client managementservices on each computer where a backup-archive client is installed. In this way,you can ensure that the Diagnose button is available in the Operations Center fordiagnosing issues with backup-archive clients. To install the client managementservice, follow the instructions in “Installing the client management service” onpage 62.
Procedure1. Complete daily monitoring tasks. For instructions, see Chapter 13, “Daily
monitoring checklist,” on page 73.2. Complete periodic monitoring tasks. For instructions, see Chapter 14, “Periodic
monitoring checklist,” on page 79.3. To verify that your Tivoli Storage Manager solution complies with licensing
requirements, follow the instructions in Chapter 15, “Verifying licensecompliance,” on page 85.
What to do next
Resolve any issues that you detect. To resolve an issue by changing theconfiguration of your solution, follow the instructions in Part 4, “Managingoperations,” on page 93. The following additional resources are available:v To resolve performance issues, see Performance (V7.1.1) (http://www.ibm.com/
support/knowledgecenter/SSGSG7_7.1.1/com.ibm.itsm.perf.doc/c_performance.html).
v To resolve other types of issues, see Troubleshooting (V7.1.1)(http://www.ibm.com/support/knowledgecenter/SSGSG7_7.1.1/com.ibm.itsm.tsm.doc/t_tshoot_tsm.html).
© Copyright IBM Corp. 1993, 2015 71

72 IBM Tivoli Storage Manager: Multisite Disk Solution Guide

Chapter 13. Daily monitoring checklist
To ensure that you are completing the daily monitoring tasks for your solution,review the daily monitoring checklist.
Complete the daily monitoring tasks from the Operations Center Overview page.You can access the Overview page by opening the Operations Center and clickingOverviews.
The following figure shows the location for completing each task.
1
2
5
4
7
8
3
6
9
10
Tip: To run administrative commands for advanced monitoring tasks, use theOperations Center command builder. The command builder provides a type-aheadfunction to guide you as you enter commands. To open the command builder, goto the Operations Center Overview page. On the menu bar, hover over the globeicon
and click Command Builder.
The following table lists the daily monitoring tasks and provides instructions forcompleting each task.
© Copyright IBM Corp. 1993, 2015 73
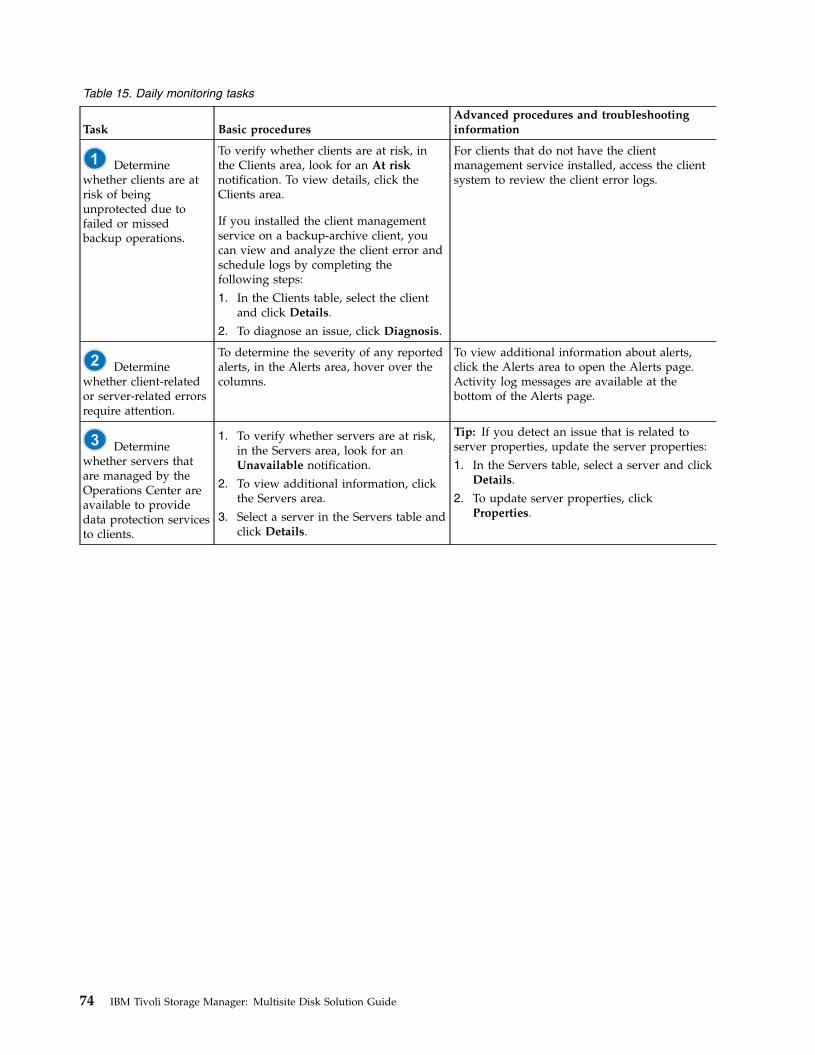
Table 15. Daily monitoring tasks
Task Basic proceduresAdvanced procedures and troubleshootinginformation
1 Determinewhether clients are atrisk of beingunprotected due tofailed or missedbackup operations.
To verify whether clients are at risk, inthe Clients area, look for an At risknotification. To view details, click theClients area.
If you installed the client managementservice on a backup-archive client, youcan view and analyze the client error andschedule logs by completing thefollowing steps:
1. In the Clients table, select the clientand click Details.
2. To diagnose an issue, click Diagnosis.
For clients that do not have the clientmanagement service installed, access the clientsystem to review the client error logs.
2
Determinewhether client-relatedor server-related errorsrequire attention.
To determine the severity of any reportedalerts, in the Alerts area, hover over thecolumns.
To view additional information about alerts,click the Alerts area to open the Alerts page.Activity log messages are available at thebottom of the Alerts page.
3
Determinewhether servers thatare managed by theOperations Center areavailable to providedata protection servicesto clients.
1. To verify whether servers are at risk,in the Servers area, look for anUnavailable notification.
2. To view additional information, clickthe Servers area.
3. Select a server in the Servers table andclick Details.
Tip: If you detect an issue that is related toserver properties, update the server properties:
1. In the Servers table, select a server and clickDetails.
2. To update server properties, clickProperties.
74 IBM Tivoli Storage Manager: Multisite Disk Solution Guide

Table 15. Daily monitoring tasks (continued)
Task Basic proceduresAdvanced procedures and troubleshootinginformation
4 Determinewhether sufficientspace is available forthe server inventory,which consists of theserver database, activelog, and archive log.
1. Click the Servers area.
2. In the Status column of the table,view the status of the server andresolve any issues:
v Normal Sufficient space isavailable for the server database,active log, and archive log.
v Critical Insufficient space isavailable for the server database,active log, or archive log. You mustadd space immediately, or the dataprotection services that areprovided by the server will beinterrupted.
v Warning The server database,active log, or archive log is runningout of space. If this conditionpersists, you must add space.
v Unavailable Status cannot beobtained. Ensure that the server isrunning, and that there are nonetwork issues. This status is alsoshown if the monitoringadministrator ID is locked orotherwise unavailable on the server.This ID is namedIBM-OC-hub_server_name.
v Unmonitored Unmonitoredservers are defined to the hubserver, but are not configured formanagement by the OperationsCenter. To configure anunmonitored server, select theserver, and click Monitor Spoke.
You can also look for related alerts on theAlerts page. For additional instructions abouttroubleshooting, see Resolving server problems(V7.1.1) (http://www.ibm.com/support/knowledgecenter/SSGSG7_7.1.1/com.ibm.itsm.tshoot.doc/r_pdg_rsolvsrvrprobs.html).
Chapter 13. Daily checklist 75

Table 15. Daily monitoring tasks (continued)
Task Basic proceduresAdvanced procedures and troubleshootinginformation
5 Verify serverdatabase backupoperations.
To determine when a server was mostrecently backed up, complete thefollowing steps:
1. Click the Servers area.
2. In the Servers table, review the LastDatabase Backup column.
To obtain more detailed information aboutbackup operations, complete the followingsteps:
1. In the Servers table, select a row and clickDetails.
2. In the DB Backup area, hover over thecheck marks to review information aboutbackup operations.
If a database was not backed up recently (forexample, in the last 24 hours), you can start abackup operation:
1. On the Operations Center Overview page,click the Servers area.
2. In the table, select a server and click BackUp.
To determine whether the server database isconfigured for automatic backup operations,complete the following steps:
1. On the menu bar, hover over the globe icon and click Command Builder.
2. Issue the QUERY DB command:
query db f=d
3. In the output, review the Full Device ClassName field. If a device class is specified, theserver is configured for automatic databasebackups.
6
Monitor otherserver maintenancetasks. Servermaintenance tasks caninclude runningadministrativecommand schedules,maintenance scripts,and related commands.
To search for information about processesthat failed because of server issues,complete the following steps:
1. Click Servers > Maintenance.
2. To obtain the two-week history of aprocess, view the History column.
3. To obtain more information about ascheduled process, hover over thecheck box that is associated with theprocess.
For more information about monitoringprocesses and resolving issues, see theOperations Center online help.
7
Verify that theamount of data thatwas recently sent toand from servers iswithin the expectedrange.
v To obtain an overview of activity in thelast 24 hours, view the Activity area.
v To compare activity in the last 24 hourswith activity in the previous 24 hours,review the figures in the Current® andPrevious areas.
v If more data was sent to the server than youexpected, determine which clients arebacking up more data and investigate thecause. It is possible that client-side datadeduplication is not working correctly.
v If less data was sent to the server than youexpected, investigate whether client backupoperations are proceeding on schedule.
76 IBM Tivoli Storage Manager: Multisite Disk Solution Guide
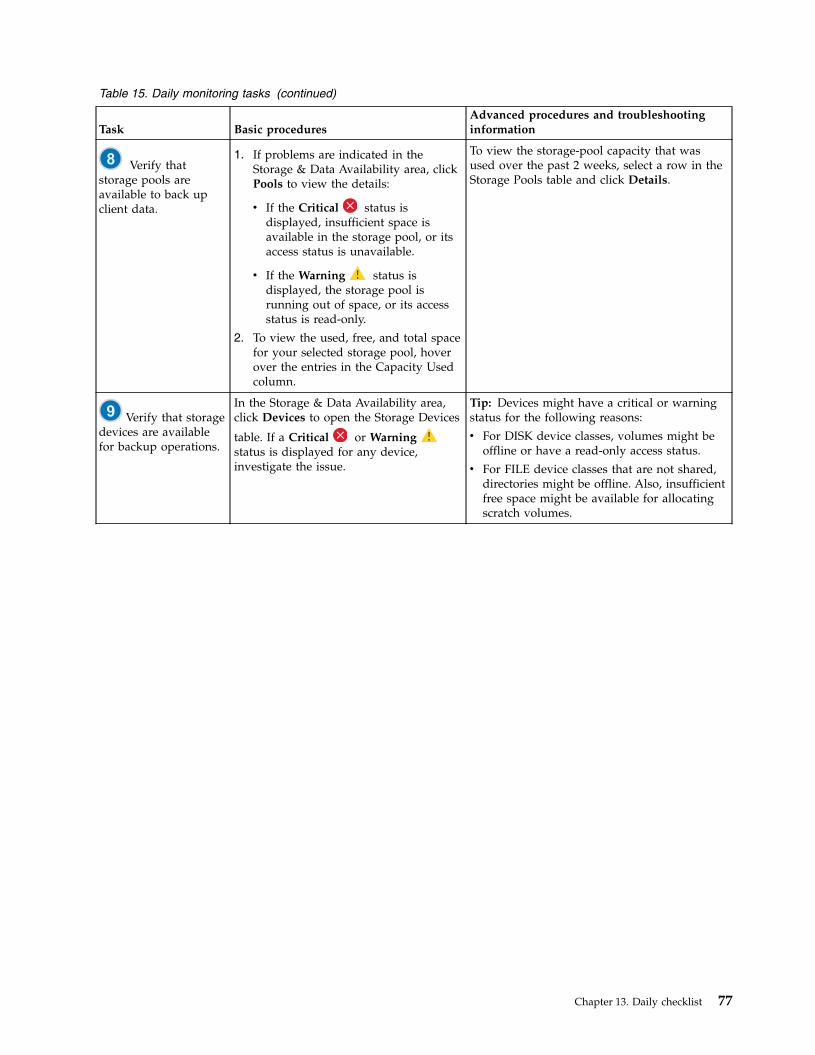
Table 15. Daily monitoring tasks (continued)
Task Basic proceduresAdvanced procedures and troubleshootinginformation
8 Verify thatstorage pools areavailable to back upclient data.
1. If problems are indicated in theStorage & Data Availability area, clickPools to view the details:
v If the Critical status isdisplayed, insufficient space isavailable in the storage pool, or itsaccess status is unavailable.
v If the Warning status isdisplayed, the storage pool isrunning out of space, or its accessstatus is read-only.
2. To view the used, free, and total spacefor your selected storage pool, hoverover the entries in the Capacity Usedcolumn.
To view the storage-pool capacity that wasused over the past 2 weeks, select a row in theStorage Pools table and click Details.
9 Verify that storagedevices are availablefor backup operations.
In the Storage & Data Availability area,click Devices to open the Storage Devices
table. If a Critical or Warningstatus is displayed for any device,investigate the issue.
Tip: Devices might have a critical or warningstatus for the following reasons:
v For DISK device classes, volumes might beoffline or have a read-only access status.
v For FILE device classes that are not shared,directories might be offline. Also, insufficientfree space might be available for allocatingscratch volumes.
Chapter 13. Daily checklist 77
Table 15. Daily monitoring tasks (continued)
Task Basic proceduresAdvanced procedures and troubleshootinginformation
10 Monitor nodereplication processes.
1. To obtain the overall status of nodereplication processes, view theReplication area on the OperationsCenter Overview page.
2. To view information about eachreplicated server pair, click theReplication area.
3. To view the amount of data that wasreplicated over the last 2 weeks andthe speed of replication, select aserver pair and click Details.
4. To view replication information for aclient, on the Operations CenterOverview page, click Clients. Viewthe information in the ReplicationWorkload column.
For advanced monitoring, view informationabout running and ended node replicationprocesses by using commands:
1. On the Operations Center Overview page,
hover over the globe icon
and clickCommand Builder.
2. Issue the QUERY REPLICATIONcommand. For instructions, see QUERYREPLICATION (Query node replicationprocesses) (http://www.ibm.com/support/knowledgecenter/SSGSG7_7.1.3/srv.reference/r_cmd_replication_query.html).If the replication operation was completedsuccessfully, the Total Files To Replicatevalue matches the Total Files Replicatedvalue.
3. To view summary messages, issue theSELECT * FROM SUMMARY WHEREACTIVITY='REPLICATION' command.
To display messages that are related to a nodereplication process on a source replicationserver, complete the following steps:
1. On the Operations Center Overview page,click Servers.
2. Select the replication server and clickDetails:
v To view active tasks, click Active Tasks,select the task, and verify that theRunning state is displayed. For details,view the related activity logs.
v To view completed tasks, clickCompleted Tasks, select the task, andensure that the Completed status isdisplayed. For details, view the relatedactivity logs.
78 IBM Tivoli Storage Manager: Multisite Disk Solution Guide

Chapter 14. Periodic monitoring checklist
To help ensure that your solution operates correctly, complete the tasks in theperiodic monitoring checklist. Schedule periodic tasks frequently enough so thatyou can detect potential issues before they become problematic.
Tip: To run administrative commands for advanced monitoring tasks, use theOperations Center command builder. The command builder provides a type-aheadfunction to guide you as you enter commands. To open the command builder, goto the Operations Center Overview page. On the menu bar, hover over the globeicon
and click Command Builder.
Table 16. Periodic monitoring tasks
Task Basic procedures Advanced procedures and troubleshooting
1. Monitor systemperformance.
Determine the length of time that isrequired for client backupoperations:
1. On the Operations CenterOverview page, click Clients.Find the server that is associatedwith the client.
2. Click Servers. Select the serverand click Details.
3. To view the duration ofcompleted tasks in the last 24hours, click Completed Tasks.
4. To view the duration of tasksthat were completed more than24 hours ago, use the QUERYACTLOG command. Follow theinstructions in QUERY ACTLOG(Query the activity log)(http://www.ibm.com/support/knowledgecenter/SSGSG7_7.1.3/srv.reference/r_cmd_actlog_query.html).
5. If the duration of client backupoperations is increasing and thereasons are not clear, investigatethe cause.
If you installed the clientmanagement service on abackup-archive client, you candiagnose performance issues for thebackup-archive client by completingthe following steps:
1. On the Operations CenterOverview page, click Clients.
2. Select a backup-archive clientand click Details.
3. To retrieve client logs, clickDiagnosis.
For instructions about reducing the time that ittakes for the client to back up data to theserver, see Resolving common clientperformance problems (V7.1.1)(http://www.ibm.com/support/knowledgecenter/SSGSG7_7.1.1/com.ibm.itsm.perf.doc/c_bac_perf_opts.html).
Look for performance bottlenecks. Forinstructions, see Identifying performancebottlenecks (V7.1.1) (http://www.ibm.com/support/knowledgecenter/SSGSG7_7.1.1/com.ibm.itsm.perf.doc/t_perf_pd.html).
For information about identifying and resolvingother performance issues, see Performance(V7.1.1) (http://www.ibm.com/support/knowledgecenter/SSGSG7_7.1.1/com.ibm.itsm.perf.doc/c_performance.html).
© Copyright IBM Corp. 1993, 2015 79
Table 16. Periodic monitoring tasks (continued)
Task Basic procedures Advanced procedures and troubleshooting
2. Determine the disksavings that are provided bydata deduplication.
1. On the Operations CenterOverview page, click Pools.
2. Select a pool and click QuickLook.
3. In the Data Deduplication area,view the Space saved row.
For advanced monitoring, to obtain detailedstatistics about the data-deduplication processfor a specific directory-container storage pool orcloud-container storage pool, complete thefollowing steps:
1. On the Operations Center Overview page,
hover over the globe icon
and clickCommand Builder.
2. Obtain a statistical report by issuing theGENERATE DEDUPSTATS command. Follow theinstructions in GENERATE DEDUPSTATS(Generate data deduplication statistics for adirectory-container storage pool)(http://www.ibm.com/support/knowledgecenter/SSGSG7_7.1.3/srv.reference/r_cmd_dedupstats_generate.html).
3. View the statistical report by issuing theQUERY DEDUPSTATS command. Follow theinstructions in QUERY DEDUPSTATS(Query data deduplication statistics)(http://www.ibm.com/support/knowledgecenter/SSGSG7_7.1.3/srv.reference/r_cmd_dedupstats_query.html).
3. Verify that current backupfiles for device configurationand volume historyinformation are saved.
Access your storage locations toensure that the files are available.The preferred method is to save thebackup files to two locations.
To locate the volume history anddevice configuration files, completethe following steps:
1. On the Operations CenterOverview page, hover over the
globe icon
and clickCommand Builder.
2. To locate the volume history anddevice configuration files, issuethe following commands:
query option volhistory
query option devconfig
3. In the output, review the OptionSetting column to find the filelocations.
If a disaster occurs, both the volumehistory file and the deviceconfiguration file are required torestore the server database.
80 IBM Tivoli Storage Manager: Multisite Disk Solution Guide
Table 16. Periodic monitoring tasks (continued)
Task Basic procedures Advanced procedures and troubleshooting
4. Determine whethersufficient space is availablefor the instance directory filesystem.
Verify that at least 20% of free spaceis available in the instance directoryfile system. Take the action that isappropriate for your operatingsystem:
v AIX To view availablespace in the file system, on theoperating system command line,issue the following command:
df -g instance_directory
where instance_directory specifiesthe instance directory.
v Linux To view availablespace in the file system, on theoperating system command line,issue the following command:
df -h instance_directory
where instance_directory specifiesthe instance directory.
v Windows In the WindowsExplorer program, right-click thefile system and click Properties.View the capacity information.
The preferred location of theinstance directory depends on theoperating system where the serveris installed:
v AIX Linux
/home/tsminst1/tsminst1
v Windows C:\tsminst1
Tip: If you completed a planningworksheet, the location of theinstance directory is recorded in theworksheet.
5. Identify unexpected clientactivity.
To monitor client activity todetermine whether data volumesexceed expected amounts, completethe following steps:
1. On the Operations CenterOverview page, click the Clientsarea.
2. To view activity over the pasttwo weeks, double-click anyclient.
3. To view the number of bytessent to the client, click theProperties tab.
4. In the Last Session area, viewthe Sent to client row.
When you double-click a client in the Clientstable, the Activity over 2 Weeks area displaysthe amount of data that the client sent to theserver each day.
Chapter 14. Periodic checklist 81

Table 16. Periodic monitoring tasks (continued)
Task Basic procedures Advanced procedures and troubleshooting
6. Monitor storage poolgrowth over time.
1. On the Operations CenterOverview page, click the Poolsarea.
2. To view the capacity that wasused over the last two weeks,select a pool and click Details.
Tips:
v To control the duration that must elapsebefore all deduplicated extents are removedfrom a directory-container storage pool orcloud-container storage pool, after they areno longer referenced by the inventory, issuethe UPDATE STGPOOL pool_nameREUSEDELAY=days command.
v To display information about updates to dataextents in directory-container orcloud-container storage pools, issue the QUERYEXTENTUPDATES command. The commandoutput can help you determine what dataextents are no longer referenced and whichones are eligible to be deleted from thesystem.
7. Evaluate the timing ofclient schedules. Ensure thatthe start and end times ofclient schedules meet yourbusiness needs.
On the Operations Center Overviewpage, click Clients > Schedules.
In the Schedules table, the Startcolumn displays the configuredstart time for the scheduledoperation. To see when the mostrecent operation was started, hoverover the clock icon.
Tip: You can receive a warning message if aclient operation runs longer than expected.Complete the following steps:
1. On the Operations Center Overview page,hover over Clients and click Schedules.
2. Select a schedule and click Details.
3. View the details of a schedule by clickingthe blue arrow next to the row.
4. In the Run time alert field, specify the timewhen a warning message will be issued ifthe scheduled operation is not completed.
5. Click Save.
8. Evaluate the timing ofmaintenance tasks. Ensurethat the start and end timesof maintenance tasks meetyour business needs.
On the Operations Center Overviewpage, click Servers > Maintenance.
In the Maintenance table, review theinformation in the Last Run Timecolumn. To see when the lastmaintenance task was started, hoverover the clock icon.
Tip: If a maintenance task is running too long,change the start time or the maximum runtime. Complete the following steps:
1. On the Operations Center Overview page,
hover over the globe icon
and clickCommand Builder.
2. To change the start time or maximum runtime for a task, issue the UPDATE SCHEDULEcommand. For instructions, see UPDATESCHEDULE (Update a client schedule)(http://www.ibm.com/support/knowledgecenter/SSGSG7_7.1.3/srv.reference/r_cmd_schedule_client_update.html).
Related reference:
QUERY ACTLOG (Query the activity log) (http://www.ibm.com/support/knowledgecenter/SSGSG7_7.1.3/srv.reference/r_cmd_actlog_query.html)
UPDATE STGPOOL (Update a directory-container storage pool)(http://www.ibm.com/support/knowledgecenter/SSGSG7_7.1.3/srv.reference/r_cmd_stgpool_cont_update.html)
QUERY EXTENTUPDATES (Query updated data extents) (http://www.ibm.com/support/knowledgecenter/SSGSG7_7.1.3/srv.reference/
82 IBM Tivoli Storage Manager: Multisite Disk Solution Guide

r_cmd_extentupdates_query.html)
Chapter 14. Periodic checklist 83

84 IBM Tivoli Storage Manager: Multisite Disk Solution Guide

Chapter 15. Verifying license compliance
Verify that your Tivoli Storage Manager solution complies with the provisions ofyour licensing agreement. By verifying compliance regularly, you can track trendsin data growth or processor value unit (PVU) usage. Use this information to planfor future license purchasing.
About this task
The method for verifying license compliance varies depending on the provisions ofyour Tivoli Storage Manager licensing agreement:
Front-end capacity licensingThe front-end model determines license requirements based on the amountof primary data that is reported as being backed up by clients. Clientsinclude applications, virtual machines, and systems.
Back-end capacity licensingThe back-end model determines license requirements based on theterabytes of data that are stored in Tivoli Storage Manager primary storagepools and IBM Tivoli Storage Manager FastBack repositories.
Important: To ensure the accuracy of front-end and back-end capacityestimates, install the latest version of the client software on each clientnode. The front-end and back-end capacity estimates that are provided bythe Operations Center are for planning purposes only. You can compare theinformation against your current license terms, and can review theestimates regularly to track growth trends. For the approved methods ofmeasuring front-end or back-end capacity, refer to your licensingagreement.
PVU licensingThe PVU model is based on the use of PVUs by server devices.
Important: The PVU calculations that are provided by Tivoli StorageManager are considered estimates and are not legally binding. The PVUlicensing information that is reported by Tivoli Storage Manager is notconsidered an acceptable substitute for the IBM License Metric Tool.
For the latest information about Tivoli Storage Manager licensing models, see theinformation about comparing bundles at the Tivoli Storage Manager family website(http://www.ibm.com/software/products/tivoli-storage-manager-family). If youhave questions or concerns about licensing requirements, contact your TivoliStorage Manager software provider.
Procedure
To monitor license compliance, complete the steps that correspond to theprovisions of your licensing agreement.
© Copyright IBM Corp. 1993, 2015 85
Option Description
Front-end model 1. On the Operations Center menu bar, hover over the globe icon and click Licensing.
The front-end capacity estimate is displayed on the Front-endUsage page.
2. If a value is displayed in the Not Reporting column, click thenumber to identify clients that did not report capacity usage.
3. To estimate capacity for clients that did not report capacity usage,go to the following FTP site, which provides measuring tools andinstructions:
ftp://public.dhe.ibm.com/storage/tivoli-storage-management/front_end_capacity_measurement_tools
Follow the instructions in the licensing guide to measure front-endcapacity by script.
4. Add the Operations Center estimate and any estimates that youobtained by using a script.
5. Verify that the estimated capacity complies with your licensingagreement.
Back-end model 1. On the Operations Center menu bar, click the globe icon
andclick Licensing.
2. Click the Back-end tab.
3. Verify that the estimated amount of data complies with yourlicensing agreement.
PVU model Follow the instructions in Assessing compliance with the PVUlicensing model (http://www.ibm.com/support/knowledgecenter/SSGSG7_7.1.3/srv.admin/t_verify_compl_pvu_lic.html).
86 IBM Tivoli Storage Manager: Multisite Disk Solution Guide
Chapter 16. Selecting, configuring, and using monitoring tools
Use the Operations Center to obtain an overview of system status and to drilldown to more detailed information. In some cases, you might want to useadvanced tools to collect specific monitoring information.
Procedure
Select and configure the monitoring tools that are appropriate for your solution.
Table 17. Monitoring tools
Tool type Use cases Links to more information
Operations Center v Use the graphical user interface toreview system status and diagnoseissues.
v Set up the Operations Center tosend daily email summary reports.
v Optional: Customize the alerts thatare displayed in the OperationsCenter and set up emailnotifications about the alerts. Forinstructions, hover over theOperations Center menu bar, click
the help icon ? , and clickDocumentation.
v Optional: Monitor the storageenvironment remotely by viewingthe Overview page in the webbrowser of a mobile device. Forexample, you can use the AppleSafari web browser on an AppleiPad device. Other mobile devicescan also be used.
Tip: If you install Tivoli StorageManager client management serviceson a backup-archive client, you canuse the Operations Center to obtaintroubleshooting information for thebackup-archive client. The clientmanagement service can be installedonly on Linux or Windows operatingsystems.
v Part 3, “Monitoring a multisite disk solution,” onpage 71
v Chapter 8, “Installing the Tivoli Storage Managerserver and Operations Center,” on page 45
v “Configuring the Operations Center” on page 53
v “Installing the client management service” onpage 62
v “Tracking system status by using daily emailreports” on page 89
© Copyright IBM Corp. 1993, 2015 87

Table 17. Monitoring tools (continued)
Tool type Use cases Links to more information
Tivoli StorageManageradministrativecommands
Review detailed information. Use themethod that is appropriate for yoursolution:
v To display messages that weregenerated by the server and client,use the QUERY ACTLOG command.Tip: You can run Tivoli StorageManager administrative commandsfrom the Operations Centercommand builder.
v To monitor activities such as servermigration and client logons, use theadministrative client in consolemode. Run the dsmadmc-consolemode command.
v Administrative commands (http://www.ibm.com/support/knowledgecenter/SSGSG7_7.1.3/srv.reference/r_cmd_ref.html)
v QUERY ACTLOG (Query the activity log)(http://www.ibm.com/support/knowledgecenter/SSGSG7_7.1.3/srv.reference/r_cmd_actlog_query.html)
v Monitoring server activities from theadministrative client (http://www.ibm.com/support/knowledgecenter/SSGSG7_7.1.3/srv.reference/t_cmdline_monitor_srv.html)
v Administrative client options(http://www.ibm.com/support/knowledgecenter/SSGSG7_7.1.3/srv.reference/r_cmdline_adclient_options.html)
Event logging Log server messages and most clientmessages as events to one or morerepositories called receivers.
For instructions about using event logging tomonitor a solution, see Logging Tivoli StorageManager events to receivers (V7.1.1)(http://www.ibm.com/support/knowledgecenter/SSGSG7_7.1.1/com.ibm.itsm.srv.doc/t_events_logging_receivers.html).
SQL queries Create and format customized queriesof the server database.
For example, you can query the SQLactivity summary table to viewstatistics about client operations andserver processes. To display allinformation in the summary table,issue the following command fromthe administrative client:
select * from summary
Using SELECT commands (V7.1.1)(http://www.ibm.com/support/knowledgecenter/SSGSG7_7.1.1/com.ibm.itsm.srv.doc/t_cmd_select_issuing.html)
Operating systemtools
Monitor and test system performance.
Device-monitoringtools
Monitor devices for availability,capacity, and performance. Forexample, use IBM Tivoli StorageProductivity Center or tools that areincluded in device hardwarepackages.
To monitor overall device status by using TivoliStorage Productivity Center, follow the instructionsin Monitoring the status of resources(http://www.ibm.com/support/knowledgecenter/SSNE44_5.2.7/com.ibm.tpc_V527.doc/fqz0_c_wg_monitoring_status.html).
To monitor performance by using Tivoli StorageProductivity Center, follow the instructions inMonitoring the performance of resources(http://www.ibm.com/support/knowledgecenter/SSNE44_5.2.7/com.ibm.tpc_V527.doc/fqz0_c_performance_monitoring.html).
88 IBM Tivoli Storage Manager: Multisite Disk Solution Guide
Table 17. Monitoring tools (continued)
Tool type Use cases Links to more information
IBM Tivoli Monitoringfor Tivoli StorageManager
Monitor Tivoli Storage Managerservers and produce historical reportsabout server and client activities.
Tip: The Operations Center is thepreferred tool for monitoring.However, Tivoli Monitoring for TivoliStorage Manager is useful forgenerating historical reports that arebased on IBM Cognos® BusinessIntelligence technology. TivoliMonitoring for Tivoli StorageManager is included in the TivoliStorage Manager software package.
Tivoli Monitoring for Tivoli Storage Manager(http://www.ibm.com/developerworks/community/wikis/home/wiki/Tivoli%20Storage%20Manager/page/Tivoli%20Monitoring%20for%20Tivoli%20Storage%20Manager)
Tracking system status by using daily email reportsSet up the Operations Center to generate daily email reports that summarizesystem status. Specify the recipients and the time of day when they will receive thereport.
Before you begin
Before you set up daily email reports, ensure that the following requirements aremet:v A Simple Mail Transfer Protocol (SMTP) host server is available to send and
receive reports by email. The server must be configured as an open mail relay.You must also ensure that the Tivoli Storage Manager server that sends emailmessages has access to the SMTP server. If the Operations Center is installed ona separate computer, that computer does not require access to the SMTP server.
v You must have system privilege for the Tivoli Storage Manager server to set updaily email reports.
v To specify the recipients, you can enter one or more email addresses oradministrator IDs. If you plan to enter an administrator ID, the ID must beregistered on the hub server and must have an email address associated with it.To specify an email address for an administrator, use the EMAILADDRESSparameter of the UPDATE ADMIN command.
About this task
The daily email report is based on a template and is delivered as an image that issimilar to the Operations Center Overview page. The following figure shows thesummary page of a daily email report.
Chapter 16. Selecting, configuring, and using monitoring tools 89
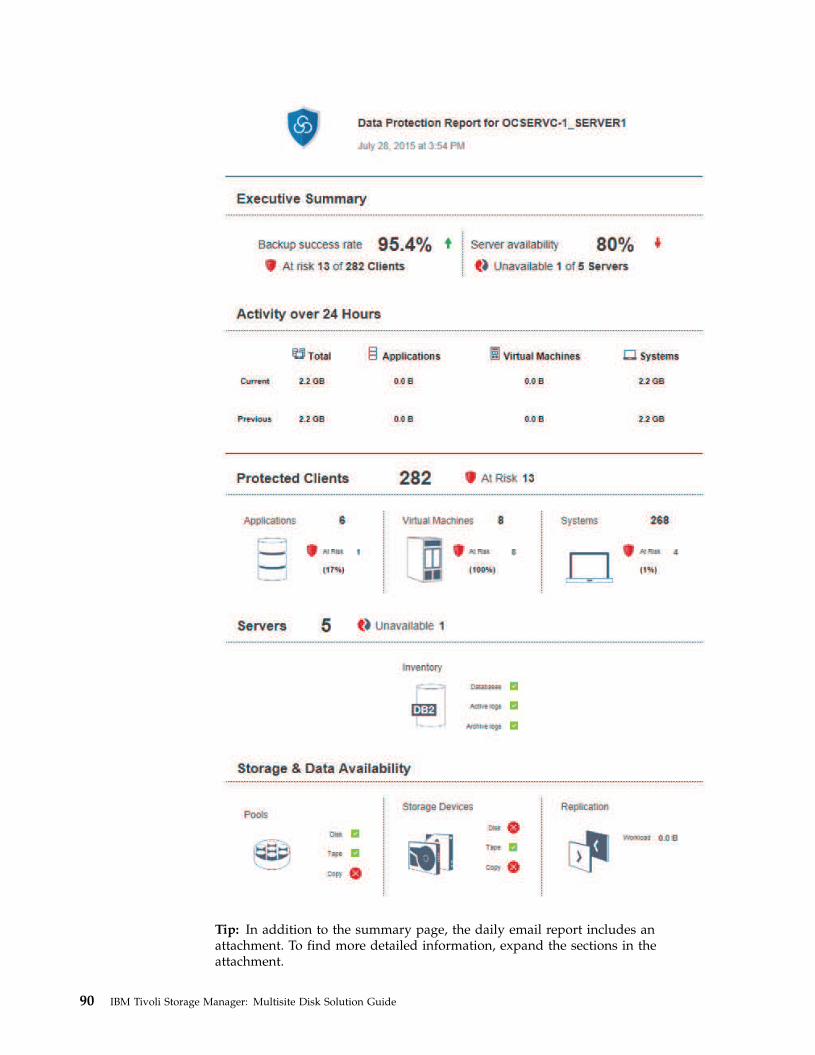
Tip: In addition to the summary page, the daily email report includes anattachment. To find more detailed information, expand the sections in theattachment.
90 IBM Tivoli Storage Manager: Multisite Disk Solution Guide
Procedure
To specify settings for a daily email report, complete the following steps:
1. On the Operations Center Overview page, hover over the globe icon
on themenu bar and click Settings.
2. Click the Daily Reports tab, complete the fields, and click Save.
Results
If you cannot view the image in a daily report, you might be using an email clientthat converts HTML to another format. For information about restrictions, see theOperations Center online help.Related reference:
UPDATE ADMIN (Update an administrator) (http://www.ibm.com/support/knowledgecenter/SSGSG7_7.1.3/srv.reference/r_cmd_admin_update.html)
Chapter 16. Selecting, configuring, and using monitoring tools 91

92 IBM Tivoli Storage Manager: Multisite Disk Solution Guide

Part 4. Managing operations
Use this information to manage operations for a multisite disk implementation,that includes a Tivoli Storage Manager server, that uses data deduplication formultiple locations.
© Copyright IBM Corp. 1993, 2015 93

94 IBM Tivoli Storage Manager: Multisite Disk Solution Guide

Chapter 17. Managing the Operations Center
The Operations Center provides web and mobile access to status information aboutthe Tivoli Storage Manager environment. You can use the Operations Center tomonitor multiple servers and to complete some administrative tasks. TheOperations Center also provides web access to the Tivoli Storage Managercommand line.
Adding and removing spoke serversIn a multiple-server environment, you can connect the other servers, called spokeservers, to the hub server.
About this task
The spoke servers send alerts and status information to the hub server. TheOperations Center shows you a consolidated view of alerts and status informationfor the hub server and any spoke servers.
Adding a spoke serverAfter you configure the hub server for the Operations Center, you can add one ormore spoke servers to the hub server.
Procedure1. In the Operations Center menu bar, click Servers. The Servers page opens.
In the table on the Servers page, a server might have a status of“Unmonitored.” This status means that although an administrator defined thisserver to the hub server by using the DEFINE SERVER command, the server isnot yet configured as a spoke server.
2. Complete one of the following steps:v Click the server to highlight it, and in the table menu bar, click Monitor
Spoke.v If the server that you want to add is not shown in the table, click + Spoke in
the table menu bar.3. Provide the necessary information, and complete the steps in the spoke
configuration wizard.
Tip: If the event-record retention period of the Tivoli Storage Manager server isless than 14 days, the period is automatically reset to 14 days if you configurethe server as a spoke server.
© Copyright IBM Corp. 1993, 2015 95

Removing a spoke serverYou can remove a spoke server from the Operations Center.
About this task
You might need to remove a spoke server in the following situations, for example:v You want to move the spoke server from one hub server to another hub server.v You want to decommission the spoke server.
Procedure
To remove the spoke server from the group of servers that are managed by the hubserver, complete the following steps:1. From the Tivoli Storage Manager command line, issue the following command
on the hub server:QUERY MONITORSETTINGS
2. From the output of the command, copy the name that is in the MonitoredGroup field.
3. Issue the following command on the hub server, where group_name representsthe name of the monitored group, and member_name represents the name of thespoke server:DELETE GRPMEMBER group_name member_name
4. Optional: If you want to move the spoke server from one hub server to anotherhub server, do not complete this step. Otherwise, you can disable alerting andmonitoring on the spoke server by issuing the following commands on thespoke server:SET STATUSMONITOR OFFSET ALERTMONITOR OFF
5. Optional: If the spoke server definition is used for other purposes, such asenterprise configuration, command routing, storing virtual volumes, or librarymanagement, do not complete this step. Otherwise, you can delete the spokeserver definition on the hub server by issuing the following command on thehub server:DELETE SERVER spoke_server_name
Starting and stopping the web serverThe web server of the Operations Center runs as a service and starts automatically.You might need to stop and start the web server, for example, to makeconfiguration changes.
Procedure
Stop and start the web server.
v AIX From the /installation_dir/ui/utils directory, whereinstallation_dir represents the directory where the Operations Center isinstalled, issue the following commands:– To stop the server:
./stopserver.sh
– To start the server:./startserver.sh
96 IBM Tivoli Storage Manager: Multisite Disk Solution Guide

v Linux Issue the following commands:– To stop the server:
service opscenter.rc stop
– To start the server:service opscenter.rc start
– To restart the server:service opscenter.rc restart
To determine whether the server is running, issue the following command:service opscenter.rc status
v Windows From the Services window, stop or start the Tivoli Storage ManagerOperations Center service.
Restarting the initial configuration wizardYou might need to restart the initial configuration wizard of the Operations Center,for example, to make configuration changes.
Before you begin
To change the following settings, use the Settings page in the Operations Centerrather than restarting the initial configuration wizard:v The frequency at which status data is refreshedv The duration that alerts remain active, inactive, or closedv The conditions that indicate that clients are at risk
The Operations Center help includes more information about how to change thesesettings.
About this task
To restart the initial configuration wizard, you must delete a properties file thatincludes information about the hub server connection. However, any alerting,monitoring, at-risk, or multiserver settings that were configured for the hub serverare not deleted. These settings are used as the default settings in the configurationwizard when the wizard restarts.
Procedure1. Stop the Operations Center web server.2. On the computer where the Operations Center is installed, go to the following
directory, where installation_dir represents the directory in which theOperations Center is installed:
v AIX Linux installation_dir/ui/Liberty/usr/servers/guiServer
v Windows installation_dir\ui\Liberty\usr\servers\guiServer
For example:
v AIX Linux /opt/tivoli/tsm/ui/Liberty/usr/servers/guiServer
v Windows c:\Program Files\Tivoli\TSM\ui\Liberty\usr\servers\guiServer
3. In the guiServer directory, delete the serverConnection.properties file.4. Start the Operations Center web server.5. Open the Operations Center.
Chapter 17. Managing the Operations Center 97

6. Use the configuration wizard to reconfigure the Operations Center. Specify anew password for the monitoring administrator ID.
7. On any spoke servers that were previously connected to the hub server, updatethe password for the monitoring administrator ID by issuing the followingcommand from the Tivoli Storage Manager command-line interface:UPDATE ADMIN IBM-OC-hub_server_name new_password
Restriction: Do not change any other settings for this administrator ID. Afteryou specify the initial password, this password is managed automatically bythe Operations Center.
Changing the hub serverYou can remove the hub server of the Operations Center, and configure anotherserver as the hub server.
Procedure1. Restart the initial configuration wizard of the Operations Center. As part of this
procedure, you delete the existing hub server connection.2. Use the wizard to configure the Operations Center to connect to the new hub
server.Related tasks:“Restarting the initial configuration wizard” on page 97
Restoring the configuration to the preconfiguration stateIf certain problems occur, you might want to restore the Operations Centerconfiguration to the preconfigured state where the Tivoli Storage Manager serversare not defined as hub or spoke servers.
Procedure
To restore the configuration, complete the following steps:1. Stop the Operations Center web server.2. Unconfigure the hub server by completing the following steps:
a. On the hub server, issue the following commands:SET MONITORINGADMIN ""SET MONITOREDSERVERGROUP ""SET STATUSMONITOR OFFSET ALERTMONITOR OFFREMOVE ADMIN IBM-OC-hub_server_name
Tip: IBM-OC-hub_server_name represents the monitoring administrator IDthat was automatically created when you initially configured the hub server.
b. Reset the password for the hub server by issuing the following commandon the hub server:SET SERVERPASSWORD ""
Attention: Do not complete this step if the hub server is configured withother servers for other purposes, such as library sharing, exporting andimporting of data, or node replication.
3. Unconfigure any spoke servers by completing the following steps:
98 IBM Tivoli Storage Manager: Multisite Disk Solution Guide
a. On the hub server, to determine whether any spoke servers remain asmembers of the server group, issue the following command:QUERY SERVERGROUP IBM-OC-hub_server_name
Tip: IBM-OC-hub_server_name represents the name of the monitored servergroup that was automatically created when you configured the first spokeserver. This server group name is also the same as the monitoringadministrator ID that was automatically created when you initiallyconfigured the hub server.
b. On the hub server, to delete spoke servers from the server group, issue thefollowing command for each spoke server:DELETE GRPMEMBER IBM-OC-hub_server_name spoke_server_name
c. After all spoke servers are deleted from the server group, issue thefollowing commands on the hub server:DELETE SERVERGROUP IBM-OC-hub_server_nameSET MONITOREDSERVERGROUP ""
d. On each spoke server, issue the following commands:REMOVE ADMIN IBM-OC-hub_server_nameSETOPT PUSHSTATUS NOSET ALERTMONITOR OFFSET STATUSMONITOR OFF
e. On each spoke server, delete the definition of the hub server by issuing thefollowing command:DELETE SERVER hub_server_name
Attention: Do not complete this step if the definition is used for otherpurposes, such as library sharing, exporting and importing of data, or nodereplication.
f. On the hub server, delete the definition of each spoke server by issuing thefollowing command:DELETE SERVER spoke_server_name
Attention: Do not complete this step if the server definition is used forother purposes, such as library sharing, exporting and importing of data, ornode replication.
4. Restore the default settings on each server by issuing the following commands:SET STATUSREFRESHINTERVAL 5SET ALERTUPDATEINTERVAL 10SET ALERTACTIVEDURATION 480SET ALERTINACTIVEDURATION 480SET ALERTCLOSEDDURATION 60SET STATUSATRISKINTERVAL TYPE=AP INTERVAL=24SET STATUSATRISKINTERVAL TYPE=VM INTERVAL=24SET STATUSATRISKINTERVAL TYPE=SY INTERVAL=24SET STATUSSKIPASFAILURE YES TYPE=ALL
5. Restart the initial configuration wizard of the Operations Center.Related tasks:“Restarting the initial configuration wizard” on page 97“Starting and stopping the web server” on page 96
Chapter 17. Managing the Operations Center 99

100 IBM Tivoli Storage Manager: Multisite Disk Solution Guide
Chapter 18. Protecting applications, virtual machines, andsystems
A Tivoli Storage Manager server protects data for clients, which can includeapplications, virtual machines, and systems. To start protecting client data, registerthe client node with the server and select a backup schedule to protect the clientdata.
Adding clientsAfter you implement a Tivoli Storage Manager solution, you can expand thesolution by adding clients.
About this task
The procedure describes basic steps for adding a client. For more specificinstructions about configuring clients, see the documentation for the product thatyou install on the client node. You can have the following types of client nodes:
Application client nodesApplication client nodes include email servers, databases, and otherapplications. For example, any of the following applications can be anapplication client node:v FlashCopy Managerv Tivoli Storage Manager for Databasesv IBM Tivoli Storage Manager for Enterprise Resource Planningv IBM Tivoli Storage Manager for Mailv IBM Tivoli Storage Manager for Virtual Environments
System client nodesSystem client nodes include workstations, network-attached storage (NAS)file servers, and API clients.
Virtual machine client nodesVirtual machine client nodes consist of an individual guest host within ahypervisor. Each virtual machine is represented as a Tivoli StorageManager file space.
Procedure
To add a client, complete the following steps:1. Select the software to install on the client node and plan the installation. Follow
the instructions in “Selecting the software and planning the installation” onpage 102.
2. Specify how to back up and archive client data. Follow the instructions in“Specifying rules for backing up and archiving client data” on page 104.
3. Specify when to back up and archive client data. Follow the instructions in“Scheduling backup and archive operations” on page 107.
4. To allow the client to connect to the server, register the client. Follow theinstructions in “Registering clients” on page 108.
© Copyright IBM Corp. 1993, 2015 101
5. To start protecting a client node, install and configure the selected software onthe client node. Follow the instructions in “Installing and configuring clients”on page 109.
Selecting the software and planning the installationDifferent types of data require different types of protection. Identify the type ofdata that you must protect and select the appropriate software.
About this task
The preferred practice is to install the Tivoli Storage Manager backup-archive clienton all client nodes so that you can configure and start the Tivoli Storage Managerclient acceptor daemon (CAD) on the client node. The CAD is designed toefficiently run scheduled operations.
The CAD runs schedules for the following products: the backup-archive client,Tivoli Storage Manager for Databases, Tivoli Storage Manager for EnterpriseResource Planning, Tivoli Storage Manager for Mail, and Tivoli Storage Managerfor Virtual Environments. If you install a product for which the CAD does not runschedules, you must follow the configuration instructions in the productdocumentation to ensure that scheduled operations can occur.
Procedure
Based on your goal, select the products to install and review the installationinstructions.
Tip: If you install the client software now, you must also complete the clientconfiguration tasks that are described in “Installing and configuring clients” onpage 109 before you can use the client.
Goal Product and description Installation instructions
Protect a fileserver orworkstation
The Tivoli Storage Manager backup-archiveclient backs up and archives files anddirectories from file servers andworkstations to storage. You can also restoreand retrieve backup versions and archivedcopies of files.
v Backup-archive client requirements(http://www.ibm.com/support/knowledgecenter/SSGSG7_7.1.3/client/c_inst_env.html)
v Installing the UNIX and Linux backup-archiveclients (http://www.ibm.com/support/knowledgecenter/SSGSG7_7.1.3/client/c_inst_baunix.html)
v Installing the Windows backup-archive client(http://www.ibm.com/support/knowledgecenter/SSGSG7_7.1.3/client/t_inst_winclient.html)
102 IBM Tivoli Storage Manager: Multisite Disk Solution Guide

Goal Product and description Installation instructions
Protectapplications withsnapshot backupand restorecapabilities
FlashCopy Manager protects data withintegrated, application-aware snapshotbackup and restore capabilities. You canprotect data that is stored by IBM DB2database software and SAP, Oracle,Microsoft Exchange, and Microsoft SQLServer applications.
v Installing and upgrading IBM Tivoli StorageFlashCopy Manager for UNIX and Linux(http://www.ibm.com/support/knowledgecenter/SS36V9_4.1.3/fcm.unx/t_protect_fcmul.html)
v Installing and upgrading Tivoli StorageFlashCopy Manager for VMware(http://www.ibm.com/support/knowledgecenter/SS36V9_4.1.3/fcm.vmware/t_fvm_ins_ovr.html)
v Installing and upgrading IBM Tivoli StorageFlashCopy Manager for Windows(http://www.ibm.com/support/knowledgecenter/SS36V9_4.1.3/fcm.win/c_fcm_installing.html)
Protect an emailapplication on anIBM Dominoserver
Tivoli Storage Manager for Mail: DataProtection for IBM Domino® automates dataprotection so that backups are completedwithout shutting down IBM Domino servers.
v Installation of Data Protection for IBMDomino on a UNIX, AIX, or Linux system(http://www.ibm.com/support/knowledgecenter/SSTG2D_7.1.0/com.ibm.itsm.mail.dom.unx.doc/concept_dominstall.html)
v Installation of Data Protection for IBMDomino on a Windows system(http://www.ibm.com/support/knowledgecenter/SSTG2D_7.1.0/com.ibm.itsm.mail.dom.win.doc/concept_dominstall.html)
Protect an emailapplication on aMicrosoftExchange server
Tivoli Storage Manager for Mail: DataProtection for Microsoft Exchange Serverautomates data protection so that backupsare completed without shutting downMicrosoft Exchange servers.
Installing, upgrading, and migrating IBM TivoliStorage Manager for Mail: Data Protection forMicrosoft Exchange Server (http://www.ibm.com/support/knowledgecenter/SSTG2D_7.1.3/mail.exc/t_dpexc_install_ovr.html)
Protect an IBMDB2 database
The application programming interface (API)of the Tivoli Storage Managerbackup-archive client can be used to back upDB2 data to a Tivoli Storage Manager server.
Installing the Tivoli Storage Managerbackup-archive clients (UNIX, Linux, andWindows) (http://www.ibm.com/support/knowledgecenter/SSGSG7_7.1.3/client/c_inst.html)
Protect an IBMInformix database
The API of the Tivoli Storage Managerbackup-archive client can be used to back upInformix data to a Tivoli Storage Managerserver.
Installing the Tivoli Storage Managerbackup-archive clients (UNIX, Linux, andWindows) (http://www.ibm.com/support/knowledgecenter/SSGSG7_7.1.3/client/c_inst.html)
Protect a MicrosoftSQL database
Tivoli Storage Manager for Databases: DataProtection for Microsoft SQL Server protectsMicrosoft SQL data.
Installing Data Protection for SQL Server onWindows Server Core (http://www.ibm.com/support/knowledgecenter/SSTFZR_7.1.3/db.sql/t_dpfcm_ins_srvcore_sql.html)
Protect an Oracledatabase
Tivoli Storage Manager for Databases: DataProtection for Oracle protects Oracle data.
Data Protection for Oracle installation(http://www.ibm.com/support/knowledgecenter/SSTFZR_7.1.3/db.orc/t_dporc_installing.html)
Chapter 18. Protecting applications, virtual machines, and systems 103

Goal Product and description Installation instructions
Protect an SAPenvironment
Tivoli Storage Manager for EnterpriseResource Planning: Data Protection for SAPprovides protection that is customized forSAP environments. The product is designedto improve the availability of SAP databaseservers and reduce administration workload.
v Installing Tivoli Storage Manager forEnterprise Resource Planning: Data Protectionfor SAP for DB2 (http://www.ibm.com/support/knowledgecenter/SSZHVN_7.1.3/erp.db2/t_dperp_d_install_ovr.html)
v Installing Tivoli Storage Manager forEnterprise Resource Planning: Data Protectionfor SAP for Oracle (http://www.ibm.com/support/knowledgecenter/SSZHVN_7.1.3/erp.orc/t_dperp_o_install_ovr.html)
Protect a virtualmachine
Tivoli Storage Manager for VirtualEnvironments provides protection that istailored for Microsoft Hyper-V and VMwarevirtual environments. You can use TivoliStorage Manager for Virtual Environmentsto create incremental forever backups thatare stored on a centralized Tivoli StorageManager server, create backup policies, andrestore virtual machines or individual files.
Alternatively, use the Tivoli Storage Managerbackup-archive client to back up and restorea full VMware or Microsoft Hyper-V virtualmachine. You can also back up and restorefiles or directories from a VMware virtualmachine.
v Installing Data Protection for MicrosoftHyper-V (http://www.ibm.com/support/knowledgecenter/SS8TDQ_7.1.3/ve.hv/c_ve_hv_inst_plan.html)
v Installing and upgrading Data Protection forVMware (http://www.ibm.com/support/knowledgecenter/SS8TDQ_7.1.3/ve.inst/t_ve_installing.html)
v Installing the Tivoli Storage Managerbackup-archive clients (UNIX, Linux, andWindows) (http://www.ibm.com/support/knowledgecenter/SSGSG7_7.1.3/client/c_inst.html)
Tip: To use the client for space management, you can install Tivoli StorageManager for Space Management or IBM Tivoli Storage Manager HSM forWindows. For product descriptions and installation instructions, see Tivoli StorageManager for Space Management (http://www.ibm.com/support/knowledgecenter/SSSR2R_7.1.3) and Tivoli Storage Manager HSM for Windows(http://www.ibm.com/support/knowledgecenter/SSATMW_7.1.3).
Specifying rules for backing up and archiving client dataBefore you add a client, ensure that appropriate rules are specified for backing upand archiving the client data. During the client registration process, you assign theclient node to a policy domain, which has the rules that control how and whenclient data is stored.
Before you begin
Determine how to proceed:v If you are familiar with the policies that are configured for your solution and
you know that they do not require changes, continue with “Scheduling backupand archive operations” on page 107.
v If you are not familiar with the policies, follow the steps in this procedure.
About this task
Policies affect how much data is stored over time, and how long data is retainedand available for clients to restore. To meet objectives for data protection, you canupdate the default policy and create your own policies. A policy includes thefollowing rules:
104 IBM Tivoli Storage Manager: Multisite Disk Solution Guide

v How and when files are backed up and archived to server storagev The number of copies of a file and the length of time copies are kept in server
storage
During the client registration process, you assign a client to a policy domain. Thepolicy for a specific client is determined by the rules in the policy domain to whichthe client is assigned. In the policy domain, the rules that are in effect are in theactive policy set.
When a client backs up or archives a file, the file is bound to a management classin the active policy set of the policy domain. A management class is the key set ofrules for managing client data. The backup and archive operations on the clientuse the settings in the default management class of the policy domain unless youfurther customize policy. A policy can be customized by defining moremanagement classes and assigning their use through client options.
Client options can be specified in a local, editable file on the client system and in aclient option set on the server. The options in the client option set on the servercan override or add to the options in the local client option file.
Procedure1. Review the policies that are configured for your solution by following the
instructions in “Viewing policies.”2. If you need to make minor changes to meet data retention requirements, follow
the instructions in “Editing policies” on page 106.3. Optional: If you need to create policy domains or make extensive changes to
policies to meet data retention requirements, see Customizing policies(http://www.ibm.com/support/knowledgecenter/SSGSG7_7.1.3/srv.admin/t_mplmntpol_getstrted.html).
Viewing policiesView policies to determine whether they must be edited to meet yourrequirements.
Procedure1. To view the active policy set for a policy domain, complete the following steps:
a. On the Services page of the Operations Center, select a policy domain andclick Details.
b. On the Summary page for the policy domain, click the Policy Sets tab.2. To view inactive policy sets for a policy domain, complete the following steps:
a. On the Policy Sets page, click the Configure toggle. You can now view andedit the policy sets that are inactive.
b. Scroll through the inactive policy sets by using the forward and backarrows. When you view an inactive policy set, the settings that differentiatethe inactive policy set from the active policy set are highlighted.
c. Click the Configure toggle. The policy sets are no longer editable.
Chapter 18. Protecting applications, virtual machines, and systems 105

Editing policiesTo change the rules that apply to a policy domain, edit the active policy set for thepolicy domain. You can also activate a different policy set for a domain.
Before you begin
Changes to policy can affect data retention. Ensure that you continue to back updata that is essential to your organization so that you can restore that data if adisaster occurs. Also, ensure that your system has sufficient storage space forplanned backup operations.
About this task
You edit a policy set by changing one or more management classes within thepolicy set. If you edit the active policy set, the changes are not available to clientsunless you reactivate the policy set. To make the edited policy set available toclients, activate the policy set.
Although you can define multiple policy sets for a policy domain, only one policyset can be active. When you activate a different policy set, it replaces the currentlyactive policy set.
To learn about preferred practices for defining policies, see Customizing policies(http://www.ibm.com/support/knowledgecenter/SSGSG7_7.1.3/srv.admin/t_mplmntpol_getstrted.html).
Procedure1. On the Services page of the Operations Center, select a policy domain and click
Details.2. On the Summary page for the policy domain, click the Policy Sets tab.
The Policy Sets page indicates the name of the active policy set and lists all ofthe management classes for that policy set.
3. Click the Configure toggle. The policy set is editable.4. Optional: To edit a policy set that is not active, click the forward and back
arrows to locate the policy set.5. Edit the policy set by completing any of the following actions:
Option Description
Add a managementclass
1. In the Policy Sets table, click +Management Class.
2. To specify the rules for backing up and archiving data,complete the fields in the Add Management Class window.
3. To make the management class the default management class,select the Make default check box.
4. Click Add.
Delete a managementclass
In the Management Class column, click -.Tip: To delete the default management class, you must first assigna different management class as the default.
106 IBM Tivoli Storage Manager: Multisite Disk Solution Guide
Option Description
Make a managementclass the defaultmanagement class
In the Default column for the management class, click the radiobutton.Tip: The default management class manages client files whenanother management class is not assigned to, or appropriate formanaging, a file. To ensure that clients can always back up andarchive files, choose a default management class that contains rulesfor both backing up and archiving files.
Modify amanagement class
To change the properties of a management class, update the fieldsin the table.
6. Click Save.Attention: When you activate a new policy set, data might be lost. Data thatis protected under one policy set might not be protected under another policyset. Therefore, before you activate a policy set, ensure that the differencesbetween the previous policy set and the new policy set do not cause data to belost.
7. Click Activate. A summary of the differences between the active policy set andthe new policy set is displayed. Ensure that the changes in the new policy setare consistent with your data retention requirements by completing thefollowing steps:a. Review the differences between corresponding management classes in the
two policy sets, and consider the consequences for client files. Client filesthat are bound to management classes in the active policy set will be boundto the management classes with the same names in the new policy set.
b. Identify management classes in the active policy set that do not havecounterparts in the new policy set, and consider the consequences for clientfiles. Client files that are bound to these management classes will bemanaged by the default management class in the new policy set.
c. If the changes to be implemented by the policy set are acceptable, select theI understand that these updates can cause data loss check box and clickActivate.
Scheduling backup and archive operationsBefore you register a new client with the server, ensure that a schedule is availableto specify when backup and archive operations take place. During the registrationprocess, you assign a schedule to the client.
Before you begin
Determine how to proceed:v If you are familiar with the schedules that are configured for the solution and
you know that they do not require modification, continue with “Registeringclients” on page 108.
v If you are not familiar with the schedules or the schedules require modification,follow the steps in this procedure.
About this task
Typically, backup operations for all clients must be completed daily. Carefullyschedule client and server workloads to achieve the best performance for yourstorage environment. To avoid the overlap of client and server operations, considerscheduling client backup and archive operations so that they run at night. If client
Chapter 18. Protecting applications, virtual machines, and systems 107

and server operations overlap or are not given enough time and resources to beprocessed, you might experience decreased system performance, failed operations,and other issues.
Procedure1. Review available schedules by hovering over Clients on the Operations Center
menu bar. Click Schedules.2. Optional: Modify or create a schedule by completing the following steps:
Option Description
Modify a schedule 1. In the Schedules view, select the scheduleand click Details.
2. On the Schedule Details page, viewdetails by clicking the blue arrows at thebeginning of the rows.
3. Modify the settings in the schedule, andclick Save.
Create a schedule In the Schedules view, click +Schedule andcomplete the steps to create a schedule.
3. Optional: To configure schedule settings that are not visible in the OperationsCenter, use a server command. For example, you might want to schedule aclient operation that backs up a specific directory and assigns it to amanagement class other than the default.a. On the Overview page of the Operations Center, hover over the globe icon
and click Command Builder.b. Issue the DEFINE SCHEDULE command to create a schedule or the UPDATE
SCHEDULE command to modify a schedule. For details about the commands,see DEFINE SCHEDULE (Define a client schedule) (http://www.ibm.com/support/knowledgecenter/SSGSG7_7.1.3/srv.reference/r_cmd_schedule_client_define.html) or UPDATE SCHEDULE (Update aclient schedule) (http://www.ibm.com/support/knowledgecenter/SSGSG7_7.1.3/srv.reference/r_cmd_schedule_client_update.html).
Related tasks:
Tuning the schedule for daily operations (V7.1.1) (http://www.ibm.com/support/knowledgecenter/SSGSG7_7.1.1/com.ibm.itsm.perf.doc/t_srv_tuning_daily.html)
Registering clientsRegister a client to ensure that the client can connect to the Tivoli Storage Managerserver, and the server can protect client data. Use the Add Client wizard in theOperations Center to register the client.
Procedure1. On the Operations Center menu bar, click Clients.2. In the Clients table, click +Client.3. Complete the steps in the Add Client wizard:
a. Optional: Specify that redundant data can be eliminated on both the clientand server. In the Client-side deduplication area, select the Enable checkbox.
108 IBM Tivoli Storage Manager: Multisite Disk Solution Guide
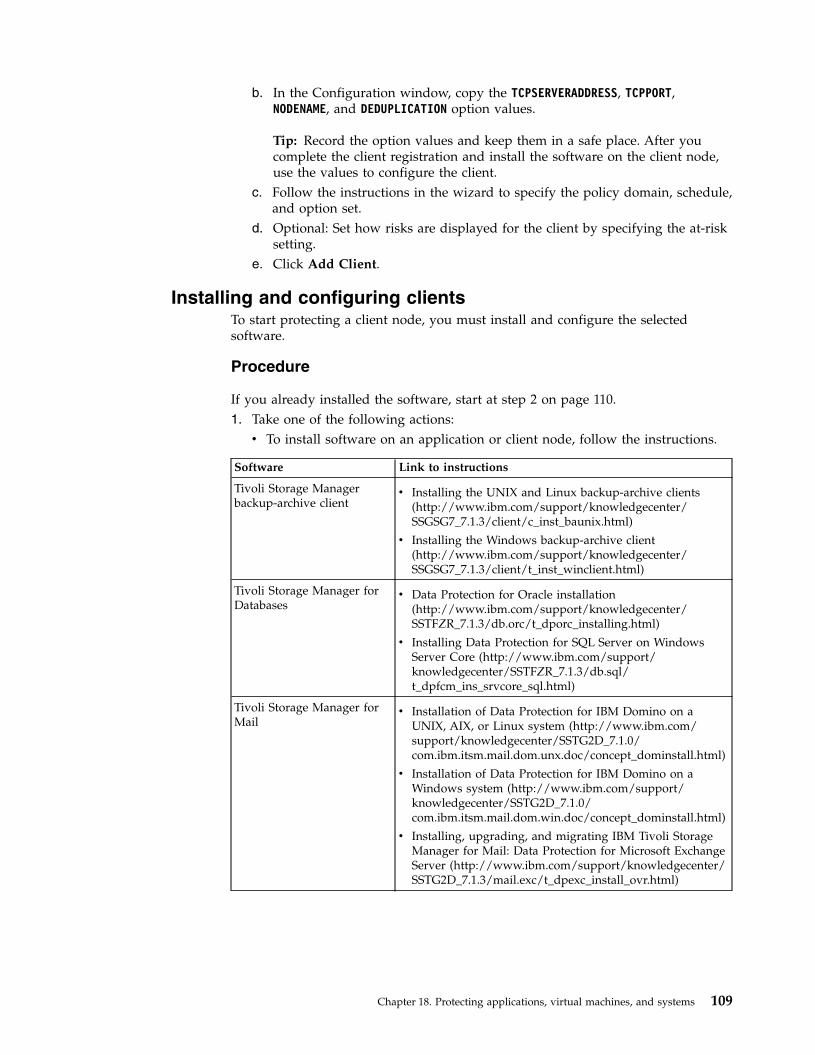
b. In the Configuration window, copy the TCPSERVERADDRESS, TCPPORT,NODENAME, and DEDUPLICATION option values.
Tip: Record the option values and keep them in a safe place. After youcomplete the client registration and install the software on the client node,use the values to configure the client.
c. Follow the instructions in the wizard to specify the policy domain, schedule,and option set.
d. Optional: Set how risks are displayed for the client by specifying the at-risksetting.
e. Click Add Client.
Installing and configuring clientsTo start protecting a client node, you must install and configure the selectedsoftware.
Procedure
If you already installed the software, start at step 2 on page 110.1. Take one of the following actions:v To install software on an application or client node, follow the instructions.
Software Link to instructions
Tivoli Storage Managerbackup-archive client
v Installing the UNIX and Linux backup-archive clients(http://www.ibm.com/support/knowledgecenter/SSGSG7_7.1.3/client/c_inst_baunix.html)
v Installing the Windows backup-archive client(http://www.ibm.com/support/knowledgecenter/SSGSG7_7.1.3/client/t_inst_winclient.html)
Tivoli Storage Manager forDatabases
v Data Protection for Oracle installation(http://www.ibm.com/support/knowledgecenter/SSTFZR_7.1.3/db.orc/t_dporc_installing.html)
v Installing Data Protection for SQL Server on WindowsServer Core (http://www.ibm.com/support/knowledgecenter/SSTFZR_7.1.3/db.sql/t_dpfcm_ins_srvcore_sql.html)
Tivoli Storage Manager forMail
v Installation of Data Protection for IBM Domino on aUNIX, AIX, or Linux system (http://www.ibm.com/support/knowledgecenter/SSTG2D_7.1.0/com.ibm.itsm.mail.dom.unx.doc/concept_dominstall.html)
v Installation of Data Protection for IBM Domino on aWindows system (http://www.ibm.com/support/knowledgecenter/SSTG2D_7.1.0/com.ibm.itsm.mail.dom.win.doc/concept_dominstall.html)
v Installing, upgrading, and migrating IBM Tivoli StorageManager for Mail: Data Protection for Microsoft ExchangeServer (http://www.ibm.com/support/knowledgecenter/SSTG2D_7.1.3/mail.exc/t_dpexc_install_ovr.html)
Chapter 18. Protecting applications, virtual machines, and systems 109

Software Link to instructions
Tivoli Storage FlashCopyManager
v Installing and upgrading IBM Tivoli Storage FlashCopyManager for UNIX and Linux (http://www.ibm.com/support/knowledgecenter/SS36V9_4.1.3/fcm.unx/t_protect_fcmul.html)
v Installing and upgrading Tivoli Storage FlashCopyManager for VMware (http://www.ibm.com/support/knowledgecenter/SS36V9_4.1.3/fcm.vmware/t_fvm_ins_ovr.html)
v Installing and upgrading IBM Tivoli Storage FlashCopyManager for Windows (http://www.ibm.com/support/knowledgecenter/SS36V9_4.1.3/fcm.win/c_fcm_installing.html)
Tivoli Storage Manager forEnterprise ResourcePlanning
v Installing Tivoli Storage Manager for Enterprise ResourcePlanning: Data Protection for SAP for DB2(http://www.ibm.com/support/knowledgecenter/SSZHVN_7.1.3/erp.db2/t_dperp_d_install_ovr.html)
v Installing Tivoli Storage Manager for Enterprise ResourcePlanning: Data Protection for SAP for Oracle(http://www.ibm.com/support/knowledgecenter/SSZHVN_7.1.3/erp.orc/t_dperp_o_install_ovr.html)
v To install software on a virtual machine client node, follow the instructionsfor the selected backup type.
Backup type Link to instructions
If you plan to create fullVMware backups of virtualmachines, install andconfigure the Tivoli StorageManager backup-archiveclient.
v Installing the UNIX and Linux backup-archive clients(http://www.ibm.com/support/knowledgecenter/SSGSG7_7.1.3/client/c_inst_baunix.html)
v Installing the Windows backup-archive client(http://www.ibm.com/support/knowledgecenter/SSGSG7_7.1.3/client/t_inst_winclient.html)
If you plan to createincremental forever fullbackups of virtual machines,install and configure TivoliStorage Manager for VirtualEnvironments and a TivoliStorage Managerbackup-archive client on thesame client node or ondifferent client nodes.
v Tivoli Storage Manager for Virtual Environments onlineproduct documentation (http://www.ibm.com/support/knowledgecenter/SS8TDQ_7.1.3/ve.user/vmware_container_topic.html)
Tip: You can obtain the software for Tivoli StorageManager for Virtual Environments and the Tivoli StorageManager backup-archive client in the Tivoli StorageManager for Virtual Environments installation package.
2. To allow the client to connect to the server, add or update the values for theTCPSERVERADDRESS, TCPPORT, and NODENAME options in the client options file. Usethe values that you recorded when you registered the client (“Registeringclients” on page 108).v For clients that are installed on an AIX, Linux, Mac OS X, or Oracle Solaris
operating system, add the values to the client system-options file, dsm.sys.v For clients that are installed on a Windows operating system, add the values
to the dsm.opt file.
By default, the options files are in the installation directory.
110 IBM Tivoli Storage Manager: Multisite Disk Solution Guide

3. If you installed a backup-archive client on a Linux or Windows operatingsystem, install the client management service on the client. Follow theinstructions in “Installing the client management service” on page 62.
4. Configure the client to run scheduled operations. Follow the instructions in“Configuring the client to run scheduled operations.”
5. Optional: Configure communications through a firewall. Follow the instructionsin “Configuring client/server communications through a firewall” on page 113.
6. Run a test backup to verify that data is protected as you planned. For example,for a backup-archive client, complete the following steps:a. On the Clients page of the Operations Center, select the client that you want
to back up, and click Back Up.b. Verify that the backup completes successfully and that there are no warning
or error messages.7. Monitor the results of the scheduled operations for the client in the Operations
Center.
What to do next
If you need to change what is getting backed up from the client, follow theinstructions in “Modifying the scope of a client backup” on page 118.
Configuring the client to run scheduled operationsYou must configure and start a client scheduler on the client node. The clientscheduler enables communication between the client and server so that scheduledoperations can occur. For example, scheduled operations typically include backingup files from a client.
About this task
The preferred practice is to install the Tivoli Storage Manager backup-archive clienton all client nodes so that you can configure and start the Tivoli Storage Managerclient acceptor daemon (CAD) on the client node. The CAD is designed toefficiently run scheduled operations. The CAD manages the client scheduler so thatthe scheduler runs only when required:v When it is time to query the server about the next scheduled operationv When it is time to start the next scheduled operation
By using the CAD, you can reduce the number of background processes on theclient and help to avoid memory retention problems.
The CAD runs schedules for the following products: the backup-archive client,Tivoli Storage Manager for Databases, Tivoli Storage Manager for EnterpriseResource Planning, Tivoli Storage Manager for Mail, and Tivoli Storage Managerfor Virtual Environments. If you installed a product for which the CAD does notrun schedules, follow the configuration instructions in the product documentationto ensure that scheduled operations can occur.
If your business uses a third-party scheduling tool as standard practice, you canuse that scheduling tool as an alternative to the CAD. Typically, third-partyscheduling tools start Tivoli Storage Manager client programs directly by usingoperating system commands. To configure a third-party scheduling tool, see theproduct documentation.
Chapter 18. Protecting applications, virtual machines, and systems 111

Procedure
To configure and start the client scheduler by using the CAD, follow theinstructions for the operating system that is installed on the client node:
AIX and Oracle Solaris
1. From the Tivoli Storage Manager backup-archive client GUI, click Edit> Client Preferences.
2. Click the Web Client tab.3. In the Managed Services Options field, click Schedule. If you also
want the CAD to manage the web client, click the Both option.4. To ensure that the scheduler can start unattended, in the dsm.sys file,
set the passwordaccess option to generate.5. To store the client node password, issue the following command and
enter the client node password when prompted:dsmc query sess
6. Start the CAD by issuing the following command on the commandline:/usr/bin/dsmcad
7. To enable the CAD to start automatically after a system restart, add thefollowing entry to the system startup file (typically, /etc/inittab):tsm::once:/usr/bin/dsmcad > /dev/null 2>&1 # TSM Client Acceptor Daemon
HP-UXFollow the instructions in Scheduling events using the command-line client(http://www.ibm.com/support/knowledgecenter/SSGSG7_7.1.3/client/t_cfg_cmdlineschedunix.html).
Linux
1. From the Tivoli Storage Manager backup-archive client GUI, click Edit> Client Preferences.
2. Click the Web Client tab.3. In the Managed Services Options field, click Schedule. If you also
want the CAD to manage the web client, click the Both option.4. To ensure that the scheduler can start unattended, in the dsm.sys file,
set the passwordaccess option to generate.5. To store the client node password, issue the following command and
enter the client node password when prompted:dsmc query sess
6. Start the CAD by logging in with the root user ID and issuing thefollowing command:service dsmcad start
7. To enable the CAD to start automatically after a system restart, add theservice by issuing the following command at a shell prompt:# chkconfig --add dsmcad
MAC OS X
1. In the Tivoli Storage Manager backup-archive client GUI, click Edit >Client Preferences.
2. To ensure that the scheduler can start unattended, click Authorizationand select Password Generate. Click Apply.
3. To specify how services are managed, click Web Client and selectSchedule. Click Apply and OK.
112 IBM Tivoli Storage Manager: Multisite Disk Solution Guide
4. To ensure that the generated password is saved, restart thebackup-archive client.
5. Use the Tivoli Storage Manager Tools for Administrators application tostart the CAD.
Windows
1. In the Tivoli Storage Manager backup-archive client GUI, click Utilities> Setup Wizard > Help me configure the TSM Client Scheduler. ClickNext.
2. Read the information on the TSM Scheduler Wizard page and clickNext.
3. On the Scheduler Task page, select Install a new or additionalscheduler and click Next.
4. On the TSM Scheduler Name and Location page, specify a name for theclient scheduler that you are adding. Then, select Use the ClientAcceptor daemon (CAD) to manage the scheduler and click Next.
5. Enter the name that you want to assign to this CAD. The default nameis TSM Client Acceptor. Click Next.
6. Complete the configuration by stepping through the wizard.7. Update the client options file, dsm.opt, and set the passwordaccess
option to generate.8. To store the client node password, issue the following command at the
command prompt:dsmc query sess
Enter the client node password when prompted.9. Start the CAD service from the Services Control page. For example, if
you used the default name, start the TSM Client Acceptor service. Donot start the scheduler service that you specified on the TSM SchedulerName and Location page. The scheduler service is started and stoppedautomatically by the CAD service as needed.
Configuring client/server communications through a firewallIf a client must communicate with a server through a firewall, you must enableclient/server communications through the firewall.
About this task
Attention: Do not configure a firewall in a way that might cause termination ofsessions that are in use by a server or storage agent. Termination of a valid sessioncan cause unpredictable results. Processes and sessions might appear to stop dueto input/output errors. To help exclude sessions from timeout restrictions,configure known ports for Tivoli Storage Manager components. Ensure that theKEEPALIVE server option remains set to the default value of YES. In this way, youcan help to ensure that client/server communication is uninterrupted. Forinstructions about setting the KEEPALIVE server option, see Technote 1642715(http://www.ibm.com/support/docview.wss?uid=swg21642715).
Procedure
Open the following ports to allow access through the firewall:
Chapter 18. Protecting applications, virtual machines, and systems 113

TCP/IP port for the backup-archive client, command-line administrative client,and the client scheduler
Specify the port by using the tcpport option in the client options file:v If you are not using the Secure Sockets Layer (SSL) protocol to secure
communications, the tcpport option in the client option file must matchthe TCPPORT option in the server options file. The default value is 1500. Ifyou decide to use a value other than the default, specify a number in therange 1024 - 32767.
v If you use the SSL protocol to secure communications, the tcpport clientoption must match the value of the SSLTCPPORT server option.
HTTP port to enable communication between the web client and remoteworkstations
Specify the port for the remote workstation by setting the httpport optionin the client options file of the remote workstation. The default value is1581.
TCP/IP ports for the remote workstationThe default value of 0 (zero) causes two free port numbers to be randomlyassigned to the remote workstation. If you do not want the port numbersto be randomly assigned, specify values by setting the webports option inthe client options file of the remote workstation.
TCP/IP port for administrative sessionsSpecify the port on which the server waits for requests for administrativeclient sessions:v If you are not using the SSL protocol to secure communications, the
value of the client tcpadminport option must match the value of theTCPADMINPORT server option. In this way, you can secure administrativesessions within a private network.
v If you are using the SSL protocol to secure communications, the value ofthe client tcpadminport option must match the value of the serverSSLTCPADMINPORT option.
Managing client operationsYou can evaluate and resolve errors that are related to a backup-archive client byusing the Operations Center, which provides suggestions for resolving errors. Forerrors on other types of clients, you must examine the error logs on the client andreview the product documentation.
About this task
In some cases, you can resolve client errors by stopping and starting the clientacceptor daemon (CAD). If client nodes or administrator IDs are locked, you canresolve the issue by unlocking the client node or administrator ID, and thenresetting the password.
For detailed instructions about identifying and resolving client errors, seeResolving Tivoli Storage Manager client problems (V7.1.1) (http://www.ibm.com/support/knowledgecenter/SSGSG7_7.1.1/com.ibm.itsm.tshoot.doc/r_pdg_clidiagtips.html).
114 IBM Tivoli Storage Manager: Multisite Disk Solution Guide
Evaluating errors in client error logsYou can resolve client errors by obtaining suggestions from the Operations Centeror by reviewing error logs on the client.
Before you begin
To resolve errors in a backup-archive client on a Linux or Windows operatingsystem, ensure that the client management service is installed and started. Forinstallation instructions, see “Installing the client management service” on page 62.For instructions about verifying the installation, see “Verifying the clientmanagement service is installed correctly” on page 62.
Procedure
To diagnose and resolve client errors, take one of the following actions:v If the client management service is installed on the client node, complete the
following steps:1. On the Operations Center Overview page, click Clients and select the client.2. Click Details.3. On the client Summary page, click the Diagnosis tab.4. Review the retrieved log messages.
Tips:
– To show or hide the Client Logs pane, double-click the Client Logs bar.– To resize the Client Logs pane, click and drag the Client Logs bar.If suggestions are displayed on the Diagnosis page, select a suggestion. Inthe Client Logs pane, client log messages to which the suggestion relates arehighlighted.
5. Use the suggestions to resolve the problems that are indicated by the errormessages.
Tip: Suggestions are provided for only a subset of client messages.v If the client management service is not installed on the client node, review the
error logs for the installed client.
Stopping and restarting the client acceptor daemonIf you change the configuration of your solution, you must restart the clientacceptor daemon (CAD) on all client nodes where a backup-archive client isinstalled.
About this task
In some cases, you can resolve client scheduling problems by stopping andrestarting the CAD. The CAD must be running to ensure that scheduled operationscan occur on the client. For example, if you change the IP address or domain nameof the Tivoli Storage Manager server, you must restart the CAD.
Procedure
Follow the instructions for the operating system that is installed on the client node:
AIX and Solaris
v To stop the CAD, complete the following steps:
Chapter 18. Protecting applications, virtual machines, and systems 115
1. Determine the CAD process ID by issuing the following commandon the command line:ps -ef | grep dsmcad
Review the output. In the following sample output, 6764 is the CADprocess ID:root 6764 1 0 16:26:35 ? 0:00 /usr/bin/dsmcad
2. Issue the following command on the command line:kill -9 PID
where PID specifies the CAD process ID.v To start the CAD, issue the following command on the command line:
/usr/bin/dsmcad
HP-UXFollow the instructions in Starting and stopping the client service (V7.1.1)(http://www.ibm.com/support/knowledgecenter/SSGSG7_7.1.1/com.ibm.itsm.tshoot.doc/r_pdg_strtstopcli.html).
Linux
v To stop the CAD (and not restart it), issue the following command:# service dsmcad stop
v To stop and restart the CAD, issue the following command:# service dsmcad restart
MAC OS X
Click Applications > Utilities > Terminal.v To stop the CAD, issue the following command:
/bin/launchctl unload -w com.ibm.tivoli.dsmcad
v To start the CAD, issue the following command:/bin/launchctl load -w com.ibm.tivoli.dsmcad
Windows
v To stop the CAD service, complete the following steps:1. Click Start > Administrative Tools > Services.2. Double-click the CAD service.3. Click Stop and OK.
v To restart the CAD service, complete the following steps:1. Click Start > Administrative Tools > Services.2. Double-click the CAD service.3. Click Start and OK.
Related reference:
Resolving client scheduling problems (V7.1.1) (http://www.ibm.com/support/knowledgecenter/SSGSG7_7.1.1/com.ibm.itsm.tshoot.doc/r_pdg_clisched.html)
116 IBM Tivoli Storage Manager: Multisite Disk Solution Guide
Resetting passwordsIf a password for a client node or an administrator ID is lost or forgotten, you canreset the password. Multiple attempts to access the system with an incorrectpassword can cause a client node or administrator ID to be locked. You can takesteps to resolve the issue.
Procedure
To resolve password issues, take one of the following actions:v If a backup-archive client is installed on a client node, and the password is lost
or forgotten, complete the following steps:1. Generate a new password by issuing the UPDATE NODE command:
update node node_name new_password forcepwreset=yes
where node_name specifies the client node and new_password specifies thepassword that you assign.
2. Inform the client node owner about the changed password. When the ownerof the client node logs in with the specified password, a new password isgenerated automatically. That password is unknown to users to enhancesecurity.
Tip: The password is generated automatically if you previously set thepasswordaccess option to generate in the client options file.
v If an administrator is locked out because of password issues, complete thefollowing steps:1. To provide the administrator with access to the server, issue the UNLOCK
ADMIN command. For instructions, see UNLOCK ADMIN (Unlock anadministrator) (http://www.ibm.com/support/knowledgecenter/SSGSG7_7.1.3/srv.reference/r_cmd_admin_unlock.html).
2. Set a new password by using the UPDATE ADMIN command:update admin admin_name new_password forcepwreset=yes
where admin_name specifies the name of the administrator and new_passwordspecifies the password that you assign.
v If a client node is locked, complete the following steps:1. Determine why the client node is locked and whether it must be unlocked.
For example, if the client node is decommissioned, the client node is beingremoved from the production environment. You cannot reverse thedecommission operation, and the client node remains locked. A client nodealso might be locked if the client data is the subject of a legal investigation.
2. If you must unlock a client node, use the UNLOCK NODE command. Forinstructions, see UNLOCK NODE (Unlock a client node)(http://www.ibm.com/support/knowledgecenter/SSGSG7_7.1.3/srv.reference/r_cmd_node_unlock.html).
3. Generate a new password by issuing the UPDATE NODE command:update node node_name new_password forcepwreset=yes
where node_name specifies the name of the node and new_password specifiesthe password that you assign.
Chapter 18. Protecting applications, virtual machines, and systems 117
4. Inform the client node owner about the changed password. When the ownerof the client node logs in with the specified password, a new password isgenerated automatically. That password is unknown to users to enhancesecurity.
Tip: The password is generated automatically if you previously set thepasswordaccess option to generate in the client options file.
Modifying the scope of a client backupWhen you set up client backup operations, the preferred practice is to excludeobjects that you do not require. For example, you typically want to excludetemporary files from a backup operation.
About this task
When you exclude unnecessary objects from backup operations, you get bettercontrol of the amount of storage space that is required for backup operations, andthe cost of storage. Depending on your licensing package, you also might be ableto limit licensing costs.
Procedure
How you modify the scope of backup operations depends on the product that isinstalled on the client node:v For a backup-archive client, you can create an include-exclude list to include or
exclude a file, groups of files, or directories from backup operations. To create aninclude-exclude list, follow the instructions in Creating an include-exclude list(http://www.ibm.com/support/knowledgecenter/SSGSG7_7.1.3/client/t_cfg_crtinclexcl.html).To ensure consistent use of an include-exclude list for all clients of one type, youcan create a client option set on the server that contains the required options.Then, you assign the client option set to each of the clients of the same type. Fordetails, see Controlling client operations through client option sets(http://www.ibm.com/support/knowledgecenter/SSGSG7_7.1.3/srv.admin/t_define_client_optsets.html).
v For a backup-archive client, you can specify the objects to include in anincremental backup operation by using the domain option. Follow theinstructions in Domain client option (http://www.ibm.com/support/knowledgecenter/SSGSG7_7.1.3/client/r_opt_domain.html).
v For other products, to define which objects are included in and excluded frombackup operations, follow the instructions in the product documentation.
Managing client upgradesWhen a fix pack or interim fix becomes available for a client, you can upgrade theclient to take advantage of product improvements. Servers and clients can beupgraded at different times and can be at different levels with some restrictions.
Before you begin1. Review the client/server compatibility requirements in Technote 1053218
(http://www.ibm.com/support/docview.wss?uid=swg21053218). If yoursolution includes servers or clients at a level that is earlier than V7.1, reviewthe guidelines to ensure that client backup and archive operations are notdisrupted.
118 IBM Tivoli Storage Manager: Multisite Disk Solution Guide
2. Verify system requirements for the client in Tivoli Storage Manager SupportedOperating Systems (http://www.ibm.com/support/docview.wss?uid=swg21243309).
3. If the solution includes storage agents or library clients, review the informationabout storage-agent and library-client compatibility with Tivoli StorageManager servers that are configured as library managers. See Technote 1302789(http://www.ibm.com/support/docview.wss?uid=swg21302789).If you plan to upgrade a library manager and a library client, you mustupgrade the library manager first.
Procedure
To upgrade the software, follow the instructions.
Software Link to instructions
Tivoli Storage Managerbackup-archive client
v Upgrading the backup-archive client (http://www.ibm.com/support/knowledgecenter/SSGSG7_7.1.3/client/c_inst_mig.html)
Tivoli Storage FlashCopy Manager v Installing and upgrading IBM Tivoli Storage FlashCopy Manager for UNIXand Linux (http://www.ibm.com/support/knowledgecenter/SS36V9_4.1.3/fcm.unx/t_protect_fcmul.html)
v Installing and upgrading Tivoli Storage FlashCopy Manager for VMware(http://www.ibm.com/support/knowledgecenter/SS36V9_4.1.3/fcm.vmware/t_fvm_ins_ovr.html)
v Installing and upgrading IBM Tivoli Storage FlashCopy Manager forWindows (http://www.ibm.com/support/knowledgecenter/SS36V9_4.1.3/fcm.win/c_fcm_installing.html)
Tivoli Storage Manager forDatabases
v Upgrading Data Protection for SQL Server (http://www.ibm.com/support/knowledgecenter/SSTFZR_7.1.3/db.sql/t_dpsql_upgrade.html)
v Data Protection for Oracle installation (http://www.ibm.com/support/knowledgecenter/SSTFZR_7.1.3/db.orc/t_dporc_installing.html)
v Installing, upgrading, and migrating IBM Tivoli Storage Manager for Mail:Data Protection for Microsoft Exchange Server (http://www.ibm.com/support/knowledgecenter/SSTG2D_7.1.3/mail.exc/t_dpexc_install_ovr.html)
Tivoli Storage Manager forEnterprise Resource Planning
v Upgrading Tivoli Storage Manager for Enterprise Resource Planning: DataProtection for SAP for DB2 (http://www.ibm.com/support/knowledgecenter/SSZHVN_7.1.3/erp.db2/t_dperp_d_install_upgrade.html)
v Upgrading Tivoli Storage Manager for Enterprise Resource Planning: DataProtection for SAP for Oracle (http://www.ibm.com/support/knowledgecenter/SSZHVN_7.1.3/erp.orc/t_dperp_o_install_upgrade.html)
Tivoli Storage Manager for Mail v Installation of Data Protection for IBM Domino on a UNIX, AIX, or Linuxsystem (http://www.ibm.com/support/knowledgecenter/SSTG2D_7.1.0/com.ibm.itsm.mail.dom.unx.doc/concept_dominstall.html)
v Installation of Data Protection for IBM Domino on a Windows system(http://www.ibm.com/support/knowledgecenter/SSTG2D_7.1.0/com.ibm.itsm.mail.dom.win.doc/concept_dominstall.html)
v Installing, upgrading, and migrating IBM Tivoli Storage Manager for Mail:Data Protection for Microsoft Exchange Server (http://www.ibm.com/support/knowledgecenter/SSTG2D_7.1.3/mail.exc/t_dpexc_install_ovr.html)
Chapter 18. Protecting applications, virtual machines, and systems 119

Software Link to instructions
Tivoli Storage Manager for VirtualEnvironments
v Installing and upgrading Data Protection for VMware (http://www.ibm.com/support/knowledgecenter/SS8TDQ_7.1.3/ve.inst/t_ve_installing.html)
v Installing Data Protection for Microsoft Hyper-V (http://www.ibm.com/support/knowledgecenter/SS8TDQ_7.1.3/ve.hv/c_ve_hv_inst_plan.html)
Decommissioning a client nodeIf a client node is no longer required, you can start a process to remove it from theproduction environment. For example, if a workstation was backing up data to aTivoli Storage Manager server, but the workstation is no longer used, you candecommission the workstation.
About this task
When you start the decommission process, the server locks the client node toprevent it from accessing the server. Files that belong to the client node aregradually deleted, and then the client node is deleted. You can decommission thefollowing types of client nodes:
Application client nodesApplication client nodes include email servers, databases, and otherapplications. For example, any of the following applications can be anapplication client node:v FlashCopy Managerv Tivoli Storage Manager for Databasesv Tivoli Storage Manager for Enterprise Resource Planningv Tivoli Storage Manager for Mailv Tivoli Storage Manager for Virtual Environments
System client nodesSystem client nodes include workstations, network-attached storage (NAS)file servers, and API clients.
Virtual machine client nodesVirtual machine client nodes consist of an individual guest host within ahypervisor. Each virtual machine is represented as a Tivoli StorageManager file space.
The simplest method for decommissioning a client node is to use the OperationsCenter. The decommission process runs in the background. If the client isconfigured to replicate client data, the Operations Center automatically removesthe client from replication on the source and target replication servers before itdecommissions the client.
Tip: Alternatively, you can decommission a client node by issuing theDECOMMISSION NODE or DECOMMISSION VM command. You might want to use thismethod in the following cases:v To schedule the decommission process for the future or to run a series of
commands by using a script, specify the decommission process to run in thebackground.
120 IBM Tivoli Storage Manager: Multisite Disk Solution Guide
v To monitor the decommission process for debugging purposes, specify thedecommission process to run in the foreground. If you run the process in theforeground, you must wait for the process to be completed before you continuewith other tasks.
Procedure
Take one of the following actions:v To decommission a client in the background by using the Operations Center,
complete the following steps:1. On the Operations Center Overview page, click Clients and select the client.2. Click More > Decommission.
v To decommission a client node by using an administrative command, completethe following steps:1. Determine whether the client node is configured for node replication by
issuing the QUERY NODE command. For example, if the client node is namedAUSTIN, run the following command:query node austin format=detailed
Review the Replication State output field.2. If the client node is configured for replication, remove the client node from
replication by issuing the REMOVE REPLNODE command. For example, if theclient node is named AUSTIN, issue the following command:remove replnode austin
3. Take one of the following actions:– To decommission an application or system client node in the background,
issue the DECOMMISSION NODE command. For example, if the client node isnamed AUSTIN, issue the following command:decommission node austin
– To decommission an application or system client node in the foreground,issue the DECOMMISSION NODE command and specify the wait=yesparameter. For example, if the client node is named AUSTIN, issue thefollowing command:decommission node austin wait=yes
– To decommission a virtual machine in the background, issue theDECOMMISSION VM command. For example, if the virtual machine is namedAUSTIN, the file space is 7, and the file space name is specified by the filespace ID, issue the following command:decommission vm austin 7 nametype=fsid
– To decommission a virtual machine in the foreground, issue theDECOMMISSION VM command and specify the wait=yes parameter. Forexample, issue the following command:decommission vm austin 7 nametype=fsid wait=yes
Related reference:
DECOMMISSION NODE (Decommission a client node) (http://www.ibm.com/support/knowledgecenter/SSGSG7_7.1.3/srv.reference/r_cmd_node_decommission.html)
DECOMMISSION VM (Decommission a virtual machine) (http://www.ibm.com/support/knowledgecenter/SSGSG7_7.1.3/srv.reference/r_cmd_vm_decommission.html)
Chapter 18. Protecting applications, virtual machines, and systems 121

QUERY NODE (Query nodes) (http://www.ibm.com/support/knowledgecenter/SSGSG7_7.1.3/srv.reference/r_cmd_node_query.html)
REMOVE REPLNODE (Remove a client node from replication)(http://www.ibm.com/support/knowledgecenter/SSGSG7_7.1.3/srv.reference/r_cmd_replnode_remove.html)
Deactivating data to free storage spaceIn some cases, you can deactivate data that is stored on a Tivoli Storage Managerserver. When you run the deactivation process, any backup data that was storedbefore the specified date and time is deactivated and will be deleted as it expires.In this way, you can free space on the server.
About this task
Some application clients always save data to the server as active backup data.Because active backup data is not managed by inventory expiration policies, thedata is not deleted automatically, and uses server storage space indefinitely. To freethe storage space that is used by obsolete data, you can deactivate the data.
When you run the deactivation process, all active backup data that was storedbefore the specified date becomes inactive. The data is deleted as it expires andcannot be restored. The deactivation feature applies only to application clients thatprotect Oracle databases.
Procedure1. From the Operations Center Overview page, click Clients.2. In the Clients table, select one or more clients and click More > Clean Up.
Command-line method: Deactivate data by using the DEACTIVATE DATAcommand.
Related reference:
DEACTIVATE DATA (Deactivate data for a client node) (http://www.ibm.com/support/knowledgecenter/SSGSG7_7.1.3/srv.reference/r_cmd_data_deactivate.html)
122 IBM Tivoli Storage Manager: Multisite Disk Solution Guide

Chapter 19. Managing data storage
Managing your data for efficiency and adding to Tivoli Storage Managersupported devices and media to store your data.Related reference:
Comparing storage pools (http://www.ibm.com/support/knowledgecenter/SSGSG7_7.1.3/srv.admin/r_stgpools_compare.html)
Auditing a storage poolAudit a storage pool container to check for inconsistencies between databaseinformation and a container.
About this task
You audit a storage pool container in the following situations:v When you issue the QUERY DAMAGED command and a problem is detected.v When the server displays messages about damaged data extents.v Your hardware reports an issue and error messages that are associated with the
storage pool container are displayed.
Procedure
To audit a storage pool container, issue the AUDIT CONTAINER command. Forexample, issue the following command to audit a container, 000000000000076c.dcf:audit container c:\tsm-storage\07\000000000000076c.dcf
The output from the ANR4891I message displays information about any damageddata extents.
What to do next
If you detect problems with the storage pool container, you can restore data basedon your configuration. You can repair the contents in the storage pool by using theREPAIR STGPOOL command.
Restriction: You can only repair the contents of the storage pool if you protectedthe storage pool by using the PROTECT STGPOOL command.Related reference:
AUDIT CONTAINER (Verify the consistency of database information for adirectory-container storage pool) (http://www.ibm.com/support/knowledgecenter/SSGSG7_7.1.3/srv.reference/r_cmd_container_audit.html)
QUERY DAMAGED (Query damaged data in a directory-container orcloud-container storage pool) (http://www.ibm.com/support/knowledgecenter/SSGSG7_7.1.3/srv.reference/r_cmd_damaged_query.html)
© Copyright IBM Corp. 1993, 2015 123

Managing inventory capacityManage the capacity of the database, active log, and archive logs to ensure that theinventory is sized for the tasks, based on the status of the logs.
Before you begin
The active and archive logs have the following characteristics:v The active log can be a maximum size of 512 GB. For more information about
the sizing the active log for your system, see Planning the storage arrays(http://www.ibm.com/support/knowledgecenter/SSGSG7_7.1.3/srv.solutions/r_msdisk_arrays_plan.html)
v The archive log size is limited to the size of the file system that it is installed on.The archive log size is not maintained at a predefined size like the active log.Archive log files are automatically deleted after they are no longer needed.
As a best practice, you can optionally create an archive failover log to store archivelog files when the archive log directory is full.
Check the Operations Center to determine the component of the inventory that isfull. Ensure that you stop the server before you increase the size of one of theinventory components.
Procedure1. To increase the size of the database, complete the following steps:v Create one or more directories for the database on separate drives or file
systems.v Issue the EXTEND DBSPACE command to add the directory or directories to the
database. The directories must be accessible to the instance user ID of thedatabase manager. By default, data is redistributed across all databasedirectories and space is reclaimed.
Tips:
– The time that is needed to complete redistribution of data and reclaimingof space is variable, depending on the size of your database. Make surethat you plan adequately.
– Ensure that the directories that you specify are the same size as existingdirectories to ensure a consistent degree of parallelism for databaseoperations. If one or more directories for the database are smaller than theothers, they reduce the potential for optimized parallel prefetching anddistribution of the database.
v Halt and restart the server to fully use the new directories.v Reorganize the database if necessary. Index and table reorganization for the
server database can help to avoid unexpected database growth andperformance issues. For more information about reorganizing the database,see Technote 1683633 (http://www.ibm.com/support/docview.wss?uid=swg21683633).
2. To decrease the size of the database for V7.1 servers and later, issue thefollowing DB2 commands from the server instance directory:
Restriction: The commands can increase I/O activity, and might affect serverperformance. To minimize performance problems, wait until one command iscompleted before you issue the next command. The DB2 commands can beissued when the server is running.
124 IBM Tivoli Storage Manager: Multisite Disk Solution Guide

db2 connect to tsmdb1db2 set schema tsmdb1db2 ALTER TABLESPACE USERSPACE1 REDUCE MAXdb2 ALTER TABLESPACE IDXSPACE1 REDUCE MAXdb2 ALTER TABLESPACE LARGEIDXSPACE1 REDUCE MAXdb2 ALTER TABLESPACE LARGESPACE1 REDUCE MAXdb2 ALTER TABLESPACE REPLTBLSPACE1 REDUCE MAXdb2 ALTER TABLESPACE REPLIDXSPACE1 REDUCE MAXdb2 ALTER TABLESPACE ARCHOBJDATASPACE REDUCE MAXdb2 ALTER TABLESPACE ARCHOBJIDXSPACE REDUCE MAXdb2 ALTER TABLESPACE BACKOBJDATASPACE REDUCE MAXdb2 ALTER TABLESPACE BACKOBJIDXSPACE REDUCE MAXdb2 ALTER TABLESPACE BFABFDATASPACE REDUCE MAXdb2 ALTER TABLESPACE BFABFIDXSPACE REDUCE MAXdb2 ALTER TABLESPACE BFBFEXTDATASPACE REDUCE MAXdb2 ALTER TABLESPACE BFBFEXTIDXSPACE REDUCE MAXdb2 ALTER TABLESPACE DEDUPTBLSPACE1 REDUCE MAXdb2 ALTER TABLESPACE DEDUPIDXSPACE1 REDUCE MAXdb2 ALTER TABLESPACE DEDUPTBLSPACE2 REDUCE MAXdb2 ALTER TABLESPACE DEDUPIDXSPACE2 REDUCE MAXdb2 ALTER TABLESPACE DEDUPTBLSPACE3 REDUCE MAXdb2 ALTER TABLESPACE DEDUPIDXSPACE3 REDUCE MAXdb2 ALTER TABLESPACE DEDUPTBLSPACE4 REDUCE MAXdb2 ALTER TABLESPACE DEDUPIDXSPACE4 REDUCE MAXdb2 ALTER TABLESPACE DEDUPTBLSPACE5 REDUCE MAXdb2 ALTER TABLESPACE DEDUPIDXSPACE5 REDUCE MAX
3. To increase or decrease the size of the active log, complete the following steps:a. Ensure that the location for the active log has enough space for the
increased log size. If a log mirror exists, its location must also have enoughspace for the increased log size.
b. Halt the server.c. In the dsmserv.opt file, update the ACTIVELOGSIZE option to the new size of
the active log, in megabytes.The size of an active log file that is used by Tivoli Storage Manager is basedon the value of the ACTIVELOGSIZE option. Guidelines for space requirementsare in the following table:
Table 18. How to estimate volume and file space requirements
ACTIVELOGSize option value
Reserve this much free space in the activelog directory, in addition to theACTIVELOGSize space
2 GB - 128 GB 5120 MB
129 GB - 256 GB 10240 MB
257 GB - 512 GB 20480 MB
To change the active log to its maximum size of 512 GB, enter the followingserver option:activelogsize 524288
d. If you plan to use a new active log directory, update the directory namethat is specified in the ACTIVELOGDIRECTORY server option. The new directorymust be empty and must be accessible to the user ID of the databasemanager.
e. Restart the server.4. Compress the archive logs to reduce the amount of space that is required for
storage. Enable dynamic compression of the archive log by issuing thefollowing command:SETOPT ARCHLOGCOMPress Yes
Chapter 19. Managing data storage 125
Restriction: Use caution when you enable the ARCHLOGCOMPRESS server optionon systems with sustained high volume usage and heavy workloads. Enablingthis option in this system environment can cause delays in archiving log filesfrom the active log file system to the archive log file system. This delay cancause the active log file system to run out of space. Be sure to monitor theavailable space in the active log file system after archive log compression isenabled. If the active log directory file system usage nears out of spaceconditions, the ARCHLOGCOMPRESS server option must be disabled. You can usethe SETOPT command to disable archive log compression immediately withouthalting the server.
Related reference:
ACTIVELOGSIZE (http://www.ibm.com/support/knowledgecenter/SSGSG7_7.1.3/srv.reference/r_opt_server_activelogsize.html)
EXTEND DBSPACE (Increase space for the database) (http://www.ibm.com/support/knowledgecenter/SSGSG7_7.1.3/srv.reference/r_cmd_dbspace_extend.html)
SETOPT (Set a server option for dynamic update) (http://www.ibm.com/support/knowledgecenter/SSGSG7_7.1.3/srv.reference/r_cmd_setopt.html)
Managing memory and CPU usageEnsure that you manage memory requirements and Central Processing Unit (CPU)usage to ensure that Tivoli Storage Manager server can complete data processessuch as backup and data deduplication. Consider the impact on performance whenyou complete certain processes.
Before you beginv Ensure that your configuration uses the minimum hardware and software
requirements. For more information, see Tivoli Storage Manager SupportedOperating Systems (http://www.ibm.com/support/docview.wss?uid=swg21243309).
v For more information about managing resources such as the database andrecovery log, see Planning the storage arrays (http://www.ibm.com/support/knowledgecenter/SSGSG7_7.1.3/srv.solutions/r_msdisk_arrays_plan.html).
v Add more system memory to determine whether there is a performanceimprovement. Monitor memory usage regularly to determine whether morememory is required.
Procedure1. Release memory from the file system cache where possible.2. To manage the system memory that is used by each server on a system, use the
DBMEMPERCENT server option. Limit the percentage of system memory that can beused by the database manager of each server. If all servers are equallyimportant, use the same value for each server. If one server is a productionserver and other servers are test servers, set the value for the production serverto a higher value than the test servers.
3. Set the user data limit and private memory for the database to ensure thatprivate memory is not exhausted. Exhausting private memory can result inerrors, less than optimal performance, and instability.
126 IBM Tivoli Storage Manager: Multisite Disk Solution Guide
Tuning scheduled activitiesSchedule maintenance tasks daily to ensure that your solution operates correctly.By tuning your solution, you maximize Tivoli Storage Manager server resourcesand effectively use different functions available within your solution.
Procedure1. Monitor system performance regularly to ensure that client backup and server
maintenance tasks are completing successfully. Follow the instructions in Part 3,“Monitoring a multisite disk solution,” on page 71.
2. Optional: If monitoring information shows that the workload that the server ishandling has increased, review the planning information. An increase in thenumber of clients, the amount of data being backed up, or the amount of timethat is available for backups can mean that you must modify the capacity of thesystem is adequate.
3. Determine whether your solution is performing at the level you expect. Reviewthe client schedule to check whether tasks are completing within the scheduledtime frame:a. On the Clients page of the Operations Center, select the client.b. Click Details.c. From the client Summary page, review the Backup Up and Replication
activity to identify any risks.
Adjust the time and frequency of client backup operations, if necessary.4. Schedule enough time for the following maintenance tasks to complete
successfully within a 24-hour period:a. Protect storage pools.b. Replicate node data.c. Back up the database.d. Run expiration processing to remove client backups and archive file copies
from server storage.
Tip: Schedule maintenance tasks to start at an appropriate time and in thecorrect sequence. For example, schedule replication tasks after client backupscomplete successfully.
Related concepts:
Performance (V7.1.1) (http://www.ibm.com/support/knowledgecenter/SSGSG7_7.1.1/com.ibm.itsm.perf.doc/c_performance.html)Related tasks:
Deduplicating data (V7.1.1) (http://www.ibm.com/support/knowledgecenter/SSGSG7_7.1.1/com.ibm.itsm.srv.doc/t_dedup.html)“Defining schedules for server maintenance activities” on page 58
Chapter 19. Managing data storage 127

Moving clients from one server to anotherTo avoid running out of space on a server or to resolve workload issues, youmight have to move client nodes from one Tivoli Storage Manager server toanother.
Before you begin
Plan the capacity for your solution to ensure that you have enough space for clientnodes on the server, which includes space for future growth.
About this task
When you move the client nodes, you can leave their existing backups on theoriginal server to expire according to your expiration policy, or export theirexisting backups to the new server.
Procedure
Complete the following steps to move a client node to another server.1. Export the client node directly to a new server by using the EXPORT NODE
command.2. Update the client options file with the new server name.3. On the new server, assign a schedule for the client node to back up data.
a. On the Operations Center Clients page, select the client node.b. Click More > Schedule Association.c. Select the check box in the rows of schedule to which you want to assign
the selected client node.d. Click Save.
4. Issue the EXPORT NODE command again to incrementally export data from theoriginal server to the new server. By incrementally exporting data, you exportdata that was backed up between the first export process and when youassigned a schedule to the client node.
5. Monitor the client node to ensure that it is backing up data according to theschedule that you set and to monitor whether the client node is at risk. Hoverover Clients and click Schedules.
6. Decommission the client node from the original server by completing thefollowing steps.a. On the Operations Center Overview page, click Clients.b. In the Clients table, select the client node.c. Click More > Decommission.
The client node is removed from the original server. As the data expires, asspecified in your policy settings, the client node data is deleted. After the clientnode data is deleted, the client is removed from the server.
Related reference:
EXPORT NODE (Export client node information) (http://www.ibm.com/support/knowledgecenter/SSGSG7_7.1.3/srv.reference/r_cmd_node_export.html)
IMPORT NODE (Import client node information) (http://www.ibm.com/support/knowledgecenter/SSGSG7_7.1.3/srv.reference/r_cmd_node_import.html)
128 IBM Tivoli Storage Manager: Multisite Disk Solution Guide
Chapter 20. Managing replication
Use replication to recover data at a disaster recovery site and to maintain the samelevel of files on the source and target servers. You can manage replication at nodelevel and you can also protect data at storage-pool level.
Enabling node replicationWith Tivoli Storage Manager, you can enable node replication to protect your data.
About this task
Replicate the client node if you want to replicate all client data, includingmetadata. By default, node replication is disabled when you start the Tivoli StorageManager server for the first time.
Tips:
v As a best practice, protect the storage pool before you replicate the client node.When node replication is started, the data extents that are already replicatedthrough storage pool protection are skipped, which reduces replicationprocessing time.
v Replication requires increased amounts of memory and there must be sufficientbandwidth to complete processing. Size the database and its logs to ensure thattransactions can complete.
Procedure
To enable node replication, complete the following steps in the Operations Center:1. On the Operations Center Servers page, click Details.2. On the Details page, click Properties.3. In the Replication section, select Enabled in the Outbound replication field.4. Click Save.
What to do next
To verify that replication was successful, see Chapter 13, “Daily monitoringchecklist,” on page 73.
Protecting data in storage poolsUse storage pool protection to protect your data in directory-container storagepools.
About this task
By protecting a storage pool, you do not use resources that replicate existing dataand metadata, which improves server performance. You must usedirectory-container storage pools if you want to protect and back up the storagepool only.
© Copyright IBM Corp. 1993, 2015 129

As a best practice, protect the storage pool before you replicate the client node.When node replication is started, the data extents that are already replicatedthrough storage pool protection are skipped, which reduces the replicationprocessing time.
Procedure
To enable storage pool replication, issue the PROTECT STGPOOL command from thesource server to back up data extents in a directory-container storage pool. Forexample, to protect a directory-container storage pool that is named POOL1 issuethe following command:protect stgpool pool1
Restriction: You can repair the storage pool, by using the REPAIR STGPOOLcommand, if the storage pool is protected. If you replicate the node and you donot protect the storage pool, you cannot repair the storage pool.
What to do next
To verify that replication was successful, see Chapter 13, “Daily monitoringchecklist,” on page 73.
Modifying replication settingsModify replication settings in the Operations Center. Change settings such as thenumber of replication sessions, replication rules, the data that you want toreplicate, the replication schedule, and the replication workload.
About this task
You might need to customize your replication settings in the following scenarios:v Changes to data prioritiesv Scheduled processes that negatively affect server performancev Requirement for a different or extra server to be the target serverv Changes to data retention policies
130 IBM Tivoli Storage Manager: Multisite Disk Solution Guide
Procedure
Complete the following tasks to modify replication settings.
Table 19. Replication tasks and procedures
Task Procedure
Change a replication rule. 1. On the Operations Center Servers page,click Details.
2. On the Details page, click Properties.
3. In the Replication section, choose thereplication rule that you want to applyfrom the Default archive rule, Defaultbackup rule, and Defaultspace-management rule drop-downmenu.
4. Click Save.
To set different replication policies, followthe instructions in “Setting differentretention policies for the source server andtarget server” on page 132.
Specify the duration that replication recordsare retained.
1. On the Operations Center Servers page,click Details.
2. On the Details page, click Properties.
3. In the Replication section, enter thenumber of days that replication recordsmust be retained in the Retainreplication history field. Alternatively,select the Do not retain check box if youdo not require replication records.
4. Click Save.
Specify a target replication server. 1. On the Operations Center Servers page,click Details.
2. On the Details page, click Properties.
3. In the Replication section, specify thetarget server.
4. Click Save.
Cancel replication. 1. On the Operations Center Servers page,click Active tasks.
2. Select the process or session that youwant to cancel.
3. Click Cancel.
Chapter 20. Managing replication 131

Setting different retention policies for the source server and targetserver
You can maintain different versions of files on the source replication server and thetarget replication server. To use dissimilar policies, change replication policies onthe target replication server independently from the source replication server.
Procedure1. On the Operations Center Servers page, click Details.2. On the Details page, click Properties.3. In the Replication section, choose the replication rule from the following
drop-down menu that you want to apply to the source replication server:v Default archive rulev Default backup rulev Default space-management rule
4. Click Save.
132 IBM Tivoli Storage Manager: Multisite Disk Solution Guide

Chapter 21. Securing the Tivoli Storage Manager server
Secure the Tivoli Storage Manager server and data by controlling access to serversand client nodes, encrypting data, and maintaining secure access levels andpasswords.
Security conceptsYou can protect Tivoli Storage Manager from security risks by usingcommunication protocols, securing passwords, and providing different accesslevels for administrators.
Transport Layer Security
You can use the Secure Sockets Layer (SSL) or the Transport Layer Security (TLS)protocol to provide transport layer security for a secure connection between TivoliStorage Manager servers, clients, and storage agents. If you send data between theserver, client, and storage agent, use SSL or TLS to encrypt the data.
Tip: Any Tivoli Storage Manager documentation that indicates "SSL" or to "selectSSL" applies to TLS.
SSL is provided by the Global Security Kit (GSKit) that is installed with the TivoliStorage Manager server that the server, client, and storage agent use.
Restriction: Do not use the SSL or TLS protocols for communications with a DB2database instance that is used by a Tivoli Storage Manager server.
Each Tivoli Storage Manager server, client, or storage agent that enables SSL mustuse a trusted self-signed certificate or obtain a unique certificate that is signed by acertificate authority (CA). You can use your own certificates or purchase certificatesfrom a CA. Either certificate must be installed and added to the key database onthe Tivoli Storage Manager server, client, or storage agent. The certificate is verifiedby the SSL client or server that requests or initiates the SSL communication. SomeCA certificates are preinstalled in the key databases, by default.
SSL is set up independently on the Tivoli Storage Manager server, client, andstorage agent.
Tivoli Storage Manager authority levels
With Tivoli Storage Manager server, there are different administrative authoritylevels available that determine the different tasks that an administrator cancomplete.
After registration, an administrator must be granted authority by being assignedone or more administrative authority levels. An administrator with systemauthority can complete any task with the server and assign authority levels toother administrators by using the GRANT AUTHORITY command. Administrators withpolicy, storage, or operator authority can complete subsets of tasks.
© Copyright IBM Corp. 1993, 2015 133

An administrator can register other administrator IDs, grant levels of authority tothem, rename IDs, remove IDs, and lock and unlock them from the Tivoli StorageManager server.
An administrator can control access to specific client nodes for root user IDs andnon-root user IDs. By default a non-root user ID cannot back up data on the node.Use the UPDATE NODE command to change the node settings to enable backup.
Tivoli Storage Manager passwords
By default, the server automatically sets password authentication to “on.” Withpassword authentication set to on, all users must enter a password when youaccess the Tivoli Storage Manager server.
Use Lightweight Directory Access Protocol (LDAP) to apply stricter requirementsfor passwords. For more information, see Managing passwords and logonprocedures (V7.1.1) (http://www.ibm.com/support/knowledgecenter/SSGSG7_7.1.1/com.ibm.itsm.srv.doc/c_mgclinod_managepwlogin.html).
Table 20. Password authentication characteristics
Characteristic More information
Case-sensitivity Not case-sensitive.
Default password expiration 90 days.
The expiration period begins when anadministrator ID or client node is firstregistered to the server. If a user’s passwordis not changed within this period, the usermust change the password the next timethey access the server.
Invalid password attemptsYou can set a limit on consecutive invalidpassword attempts for all client nodes.When the limit is exceeded, the server locksthe node.
Password lengthThe administrator can specify a minimumpassword length that is required for TivoliStorage Manager passwords.
Related reference:
Securing communications (http://www.ibm.com/support/knowledgecenter/SSGSG7_7.1.3/srv.admin/r_comms_securing.html)
Managing administratorsAn administrator with system authority can complete any task with the server,including assigning authority levels to other administrators. To complete someTivoli Storage Manager tasks, you must be granted authority by being assignedone or more authority levels.
134 IBM Tivoli Storage Manager: Multisite Disk Solution Guide

Procedure
Complete the following tasks to modify administrator settings.
Task Procedure
Add an administrator. To add an administrator, ADMIN1, withsystem authority and specify a password,complete the following steps:
1. Register the administrator and specifyPa$#$twO as the password by issuingthe following command:
register admin admin1 Pa$#$twO
2. Grant system authority to theadministrator by issuing the followingcommand:
grant authority admin1 classes=system
Change administrative authority. Change the authority level for anadministrator, ADMIN1.
v Grant system authority to theadministrator by issuing the followingcommand:
grant authority admin1 classes=system
v Revoke authority for the administrator byissuing the following command:
Remove administrators. Remove an administrator, ADMIN1, fromaccessing the Tivoli Storage Manager serverby issuing the following command:
remove admin admin1
Temporarily prevent access to the server. Lock or unlock an administrator by usingthe LOCK ADMIN or UNLOCK ADMIN command.
Changing password requirementsYou can change the minimum password limit, password length, passwordexpiration, and enable or disable authentication.
About this task
By enforcing password authentication and managing password restrictions, youprotect your data and your servers from potential security risks.
Procedure
Complete the following tasks to change password requirements for Tivoli StorageManager servers.
Chapter 21. Securing the server 135
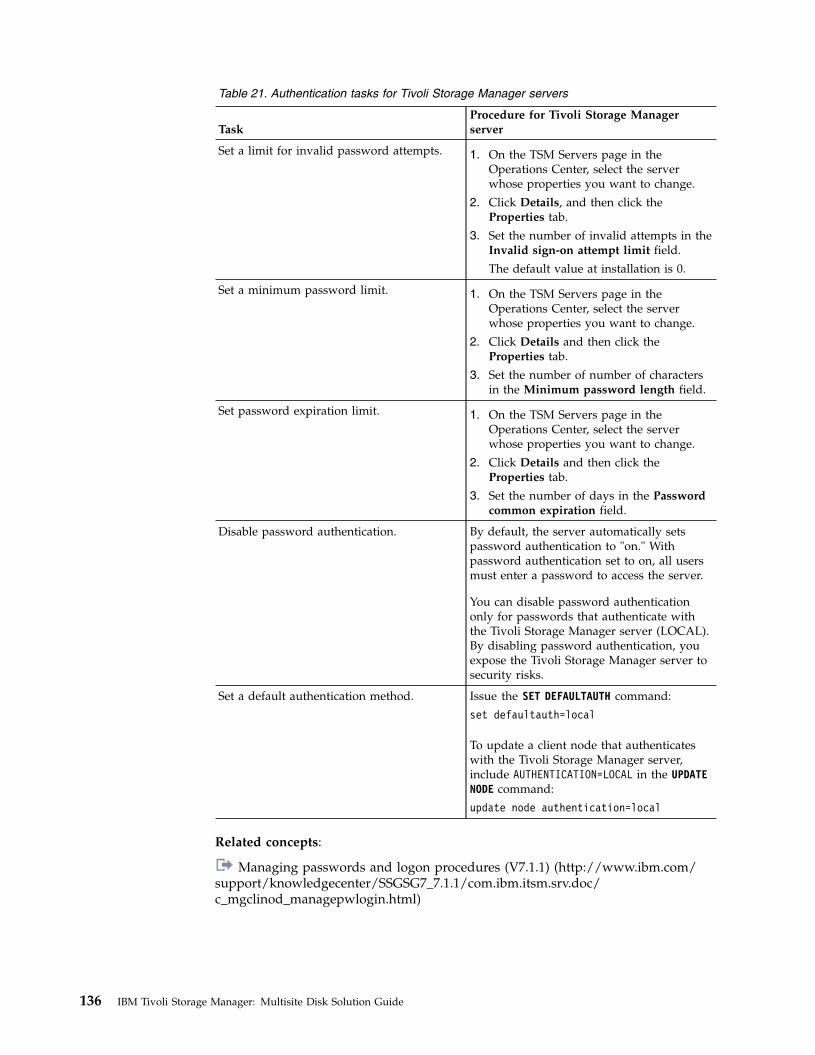
Table 21. Authentication tasks for Tivoli Storage Manager servers
TaskProcedure for Tivoli Storage Managerserver
Set a limit for invalid password attempts. 1. On the TSM Servers page in theOperations Center, select the serverwhose properties you want to change.
2. Click Details, and then click theProperties tab.
3. Set the number of invalid attempts in theInvalid sign-on attempt limit field.
The default value at installation is 0.
Set a minimum password limit. 1. On the TSM Servers page in theOperations Center, select the serverwhose properties you want to change.
2. Click Details and then click theProperties tab.
3. Set the number of number of charactersin the Minimum password length field.
Set password expiration limit. 1. On the TSM Servers page in theOperations Center, select the serverwhose properties you want to change.
2. Click Details and then click theProperties tab.
3. Set the number of days in the Passwordcommon expiration field.
Disable password authentication. By default, the server automatically setspassword authentication to "on." Withpassword authentication set to on, all usersmust enter a password to access the server.
You can disable password authenticationonly for passwords that authenticate withthe Tivoli Storage Manager server (LOCAL).By disabling password authentication, youexpose the Tivoli Storage Manager server tosecurity risks.
Set a default authentication method. Issue the SET DEFAULTAUTH command:
set defaultauth=local
To update a client node that authenticateswith the Tivoli Storage Manager server,include AUTHENTICATION=LOCAL in the UPDATENODE command:
update node authentication=local
Related concepts:
Managing passwords and logon procedures (V7.1.1) (http://www.ibm.com/support/knowledgecenter/SSGSG7_7.1.1/com.ibm.itsm.srv.doc/c_mgclinod_managepwlogin.html)
136 IBM Tivoli Storage Manager: Multisite Disk Solution Guide

Securing Tivoli Storage Manager on the systemProtect the system where the Tivoli Storage Manager server runs to preventunauthorized access.
Procedure
Ensure that unauthorized users cannot access the database directory and the serverinstance directory. Keep the access settings for these directories that you configuredduring implementation.
Restricting user access to the serverAuthority levels determine what an administrator can do with the Tivoli StorageManager server. An administrator with system authority can complete any taskwith the server. Administrators with policy, storage, or operator authority cancomplete subsets of tasks.
Procedure1. After you register an administrator by using the REGISTER ADMIN command, use
the GRANT AUTHORITY command to set the administrator's authority level. Fordetails about setting and changing authority, see “Managing administrators” onpage 134.
2. To control the authority of an administrator to complete some tasks, use thefollowing two server options:a. You can select the authority level that an administrator must have to issue
QUERY and SELECT commands with the QUERYAUTH server option. By default,no authority level is required. You can change the requirement to one of theauthority levels, including system.
b. You can specify that system authority is required for commands that causethe server to write to an external file with the REQSYSAUTHOUTFILE serveroption. By default, system authority is required for such commands.
3. You can restrict data backup on a client node to only root user IDs orauthorized users. For example, to limit backups to the root user ID, issue theREGISTER NODE or UPDATE NODE command and specify theBACKUPINITIATION=root parameter:update node backupinitiation=root
Limiting access through port restrictionsLimit access to Tivoli Storage Manager by applying port restrictions.
About this task
You might need to restrict access to specific Tivoli Storage Manager servers, basedon your business and security requirements. The Tivoli Storage Manager server canbe configured to listen on four TCP/IP ports: two for regular protocols and two forthe Transport Layer Security (TLS) protocols.
Chapter 21. Securing the server 137
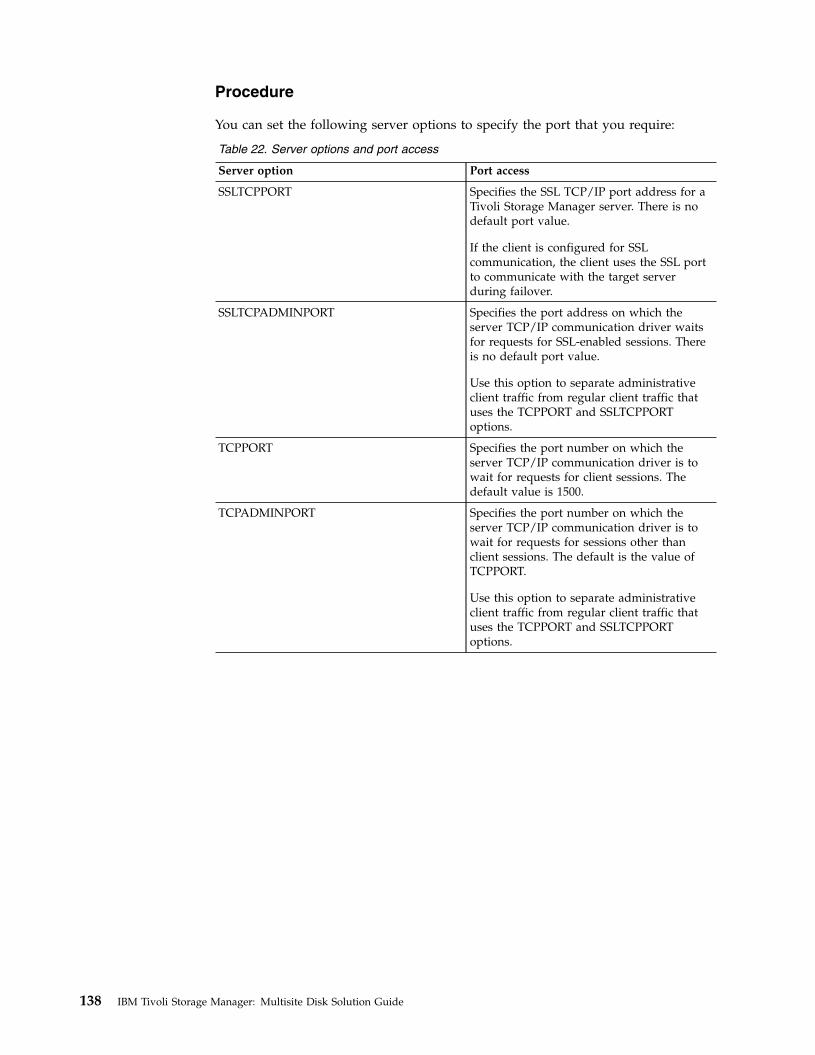
Procedure
You can set the following server options to specify the port that you require:
Table 22. Server options and port access
Server option Port access
SSLTCPPORT Specifies the SSL TCP/IP port address for aTivoli Storage Manager server. There is nodefault port value.
If the client is configured for SSLcommunication, the client uses the SSL portto communicate with the target serverduring failover.
SSLTCPADMINPORT Specifies the port address on which theserver TCP/IP communication driver waitsfor requests for SSL-enabled sessions. Thereis no default port value.
Use this option to separate administrativeclient traffic from regular client traffic thatuses the TCPPORT and SSLTCPPORToptions.
TCPPORT Specifies the port number on which theserver TCP/IP communication driver is towait for requests for client sessions. Thedefault value is 1500.
TCPADMINPORT Specifies the port number on which theserver TCP/IP communication driver is towait for requests for sessions other thanclient sessions. The default is the value ofTCPPORT.
Use this option to separate administrativeclient traffic from regular client traffic thatuses the TCPPORT and SSLTCPPORToptions.
138 IBM Tivoli Storage Manager: Multisite Disk Solution Guide

Chapter 22. Stopping and starting the server
Before you complete maintenance or reconfiguration tasks, stop the Tivoli StorageManager server. Then, start the server in maintenance mode. When you arefinished with the maintenance or reconfiguration tasks, restart the server inproduction mode.
Before you begin
You must have system or operator privilege to stop and start the server.
Stopping the serverBefore you stop the server, prepare the system by ensuring that all databasebackup operations are completed, and all other processes and sessions are ended.In this way, you can safely shut down the server and ensure that data is protected.
About this task
When you issue the HALT command to stop the server, the following actions occur:v All processes and client node sessions are canceled.v All current transactions are stopped. (The transactions will be rolled back when
the server is restarted.)
Procedure
To prepare the system and stop the server, complete the following steps:1. Prevent new client node sessions from starting by issuing the DISABLE SESSIONS
command:disable sessions all
2. Determine whether any client node sessions are in progress by issuing theQUERY SESSION command:query session
If any client node sessions are in progress, a table displays the session numbers.3. Wait until the client node sessions are completed or cancel them:v To cancel all current sessions, issue the CANCEL SESSION command:
cancel session all
v To cancel a specific session, issue the following command:cancel session session_number
where session_number specifies the session number.4. Determine whether any processes are in progress by issuing the QUERY PROCESS
command:query process
If a database backup process is in progress, wait until the process is completed.5. If other processes are in progress, wait until they are completed or cancel them
by issuing the CANCEL PROCESS command:
© Copyright IBM Corp. 1993, 2015 139
cancel process process_number
where process_number specifies the number of the process.
Tip: If the process that you want to cancel is waiting for a tape volume to bemounted, the mount request is canceled. For example, if you issue an EXPORT,IMPORT, or MOVE DATA command, the command might initiate a process thatrequires a tape volume to be mounted. However, if a tape volume is beingmounted by an automated library, the cancel operation might not take effectuntil the mount process is complete. Depending on your system environment,this could take several minutes.
6. Stop the server by issuing the HALT command:halt
Starting the server for maintenance or reconfiguration tasksBefore you begin server maintenance or reconfiguration tasks, start the server inmaintenance mode. When you start the server in maintenance mode, you disableoperations that might disrupt your maintenance or reconfiguration tasks.
About this task
Start the server in maintenance mode by running the DSMSERV utility with theMAINTENANCE parameter.
The following operations are disabled in maintenance mode:v Administrative command schedulesv Client schedulesv Reclamation of storage space on the serverv Inventory expirationv Migration of storage pools
In addition, clients are prevented from starting sessions with the server.
Tips:
v You do not have to edit the server options file, dsmserv.opt, to start the server inmaintenance mode.
v While the server is running in maintenance mode, you can manually start thestorage-space reclamation, inventory expiration, and storage-pool migrationprocesses.
Procedure
To start the server in maintenance mode, issue the following command:dsmserv maintenance
What to do next
To resume server operations in production mode, complete the following steps:1. Shut down the server by issuing the HALT command:
halt
2. Start the server by using the method that you use in production mode. Followthe instructions for your operating system:
140 IBM Tivoli Storage Manager: Multisite Disk Solution Guide

v AIX Starting the server instance (http://www.ibm.com/support/knowledgecenter/SSGSG7_7.1.3/srv.install/t_srv_startsrv-aix.html)
v Linux Starting the server instance (http://www.ibm.com/support/knowledgecenter/SSGSG7_7.1.3/srv.install/t_srv_startsrv-linux.html)
v Windows Starting the server instance (http://www.ibm.com/support/knowledgecenter/SSGSG7_7.1.3/srv.install/t_srv_startsrv_win-windows.html)
Operations that were disabled during maintenance mode are reenabled.
Chapter 22. Stopping and starting the server 141

142 IBM Tivoli Storage Manager: Multisite Disk Solution Guide
Chapter 23. Planning to upgrade the Tivoli Storage Managerserver
When a Tivoli Storage Manager fix pack or interim fix becomes available, you canupgrade the server to take advantage of product improvements. Tivoli StorageManager servers and clients can be upgraded at different times. Ensure that youcomplete the planning steps before you upgrade the server.
About this task
Follow these guidelines:v The preferred method is to upgrade the server by using the Tivoli Storage
Manager installation wizard. After you start the wizard, in the IBM InstallationManager window, click the Update icon; do not click the Install or Modify icon.
v If upgrades are available for both the server component and the OperationsCenter component, select the check boxes to upgrade both components.
Procedure1. Review the list of fix packs and interim fixes. See Technote 1239415
(http://www.ibm.com/support/docview.wss?uid=swg21239415).2. Review product improvements, which are described in readme files.
Tip: When you obtain the installation package file from the Tivoli StorageManager support site (http://www.ibm.com/support/entry/portal/Overview/Software/Tivoli/Tivoli_Storage_Manager), you can also access the readme file.
3. Ensure that the Tivoli Storage Manager version that you upgrade your systemto is compatible with other components, such as clients and storage agents. SeeTechnote 1053218 (http://www.ibm.com/support/docview.wss?uid=swg21053218).
4. If your solution includes servers or clients at a level that is earlier than V7.1,review the guidelines to ensure that client backup and archive operations arenot disrupted. See Technote 1053218 (http://www.ibm.com/support/docview.wss?uid=swg21053218).
5. Review the upgrade instructions. Ensure that you back up the server database,the device configuration information, and the volume history file.
What to do next
To install a fix pack or interim fix, follow the instructions for your operatingsystem:
v AIX Installing a Tivoli Storage Manager server fix pack(http://www.ibm.com/support/knowledgecenter/SSGSG7_7.1.3/srv.install/t_srv_inst_fixpack-aix.html)
v Linux Installing a Tivoli Storage Manager server fix pack(http://www.ibm.com/support/knowledgecenter/SSGSG7_7.1.3/srv.install/t_srv_inst_fixpack-linux.html)
v Windows Installing a Tivoli Storage Manager server fix pack(http://www.ibm.com/support/knowledgecenter/SSGSG7_7.1.3/srv.install/t_srv_inst_fixpack-windows.html)
© Copyright IBM Corp. 1993, 2015 143

144 IBM Tivoli Storage Manager: Multisite Disk Solution Guide
Chapter 24. Implementing a disaster recovery plan
Implement a disaster recovery strategy to recover your applications if a disasteroccurs and to ensure high server availability.
About this task
Determine your disaster recovery requirements by identifying the businesspriorities for client node recovery, the systems that you use to recover data, andwhether client nodes have connectivity to recovery server. You must also determinehow often directory-container storage pools are protected.
For replication, select a hot, warm, or cold recovery site based on your recoveryrequirements.
Preparing for an outage or system updatePrepare Tivoli Storage Manager to maintain your system in a consistent stateduring a power outage or system update.
About this task
Ensure that you schedule activities regularly to manage, protect, and maintain theserver.
Procedure1. Cancel processes and sessions that are in progress by completing the following
steps:a. On the Servers page, select a server for which you want to view processes
and sessions, and click Details.b. Click the Active Tasks tab, and select one or more processes, sessions, or a
combination of both that you want to cancel.c. Click Cancel.
2. Stop the server by issuing the HALT command:halt
Completing recovery drillsSchedule disaster recovery drills to prepare for audits that certify the recoverabilityof the server and to ensure that data can be restored and operations can resumeafter an outage. A drill also helps you ensure that all data can be restored andoperations resumed before a critical situation occurs.
About this task
With a multisite disk solution, use node replication to ensure that data is availableon a target server at recovery site and recovery time is fast. When there is anoutage, the source server can automatically fail over to a target server for datarecovery. If a disaster occurs and the source server is unavailable, client nodes canautomatically record information about the target replication server in the clientoptions file. You might need to manually update the client options file for olderclients.
© Copyright IBM Corp. 1993, 2015 145
Procedure1. Manually restore data from a target replication server, update the client options
file to point to the target replication server. Changes to node replication settingsare not required.
2. Configure a client node to store data on a target replication server.
Restriction: Client nodes that normally back up data to a source replicationserver cannot back up data to the client nodes that are replicated on the targetreplication server.
3. Test client data recovery by completing the following steps:a. Restore the client system to a similar operating system. Use the same file
system names with same amount of file space in the file systemb. On a system that has enough space for the data, restore the data.c. Verify that the client restored successfully. For example, if you restore a
virtual machine, verify that the virtual machine powers on and check thatthe files are available.
Related tasks:
Replicating client node data after a database restore (V7.1.1)(http://www.ibm.com/support/knowledgecenter/SSGSG7_7.1.1/com.ibm.itsm.srv.doc/t_repl_dbrestore.html)Chapter 20, “Managing replication,” on page 129
146 IBM Tivoli Storage Manager: Multisite Disk Solution Guide
Chapter 25. Recovering from data loss or system outages
With Tivoli Storage Manager, you can recover data that was lost when a disaster orsystem outage occurred. You can recover directory-container storage pools, clientdata, and databases.
Procedure
Use the following recovery methods based on the component you must recover.
Component to recover Procedure More information
Directory-containerstorage pool To recover
directory-container storagepools, complete thefollowing steps:
1. Scan for damaged dataextents in thedirectory-containerstorage pool by using theAUDIT CONTAINERcommand and specifyingthe ACTION=SCANALLparameter.
2. Repair damaged dataextents in thedirectory-containerstorage pool by using theREPAIR STGPOOLcommand.Restriction: You can onlyrepair a storage pool ifthe storage pool isprotected.
3. Remove damaged dataextents by using theAUDIT CONTAINERcommand and specifyingtheACTION=REMOVEDAMAGEDparameter.
“Repairing storage pools” on page152
© Copyright IBM Corp. 1993, 2015 147

Component to recover Procedure More information
Client data Prerequisites:
v The source replicationserver, the targetreplication server, and theclient must be at the V7.1level or later. If any of theservers are at an earlierlevel, automatic failover isdisabled and you mustrely on manual failover.
Manually configure theclient to automatically failover to the target server fordata recovery.
If you enabled the client forautomated client failover,you can recover the data byusing automatic failoverfunction. You can verify thatthe usereplicationfailoveroption is either not in theclient options file or is set toyes.Recover data from thetarget server when thesource server is unavailabledue to an outage by usingautomatic failover.Tip:
vv Use the SET
FAILOVERHLADDRESScommand to specify the IPaddress that a client usesto connect to thesecondary replicationserver during failover, ifthe address is differentfrom the IP address that isspecified for thereplication process.
v “Recovering damaged data froma replicated copy” on page 151
v SET FAILOVERHLADDRESS (Seta failover high level address)(http://www.ibm.com/support/knowledgecenter/SSGSG7_7.1.3/srv.reference/r_cmd_failovrhla_set.html)
148 IBM Tivoli Storage Manager: Multisite Disk Solution Guide

Component to recover Procedure More information
Database Prerequisites:
v To restore the databaseafter a disaster, you musthave a copy of the currentdevice configuration file.The device configurationfile cannot be recreated.
v Ensure that you have abacked up version of thedatabase.
Restore the Tivoli StorageManager database to itsmost current state or to aspecific point in time byusing the DSMSERV RESTOREDB server utility.
DSMSERV RESTORE DB (Restorethe database) (http://www.ibm.com/support/knowledgecenter/SSGSG7_7.1.3/srv.reference/r_cmd_dsmserv_restore_db.html)
Related reference:
AUDIT CONTAINER (Verify the consistency of database information for adirectory-container storage pool) (http://www.ibm.com/support/knowledgecenter/SSGSG7_7.1.3/srv.reference/r_cmd_container_audit.html)
DSMSERV RESTORE DB (Restore the database) (http://www.ibm.com/support/knowledgecenter/SSGSG7_7.1.3/srv.reference/r_cmd_dsmserv_restore_db.html)
Restoring the databaseYou might have to restore the database after a disaster. You can restore thedatabase to its most current state or to a specific point in time. You must have full,incremental, or snapshot database backup volumes to restore the database.
Before you begin
If the database and recovery log directories are lost, re-create them before youissue the DSMSERV RESTORE DB server utility. For example, use the followingcommands: AIX Linux
mkdir /tsmdb001mkdir /tsmdb002mkdir /tsmdb003mkdir /activelogmkdir /archlogmkdir /archfaillog
Windows
mkdir e:\tsm\db001mkdir f:\tsm\db001mkdir g:\tsm\db001mkdir h:\tsm\activelogmkdir i:\tsm\archlogmkdir j:\tsm\archfaillog
Restrictions:
Chapter 25. Recovering from data loss or system outages 149
v To restore the database to its latest version, you must locate the archive logdirectory. If you are cannot locate the directory, you can restore the databaseonly to a point in time.
v You cannot use Secure Sockets Layer (SSL) for database restore operations.v You cannot restore a server database if the release level of the database backup
is different from the release level of the server that is being restored. Forexample, if you are using a Version 7.1 Tivoli Storage Manager server and youtry to restore a Version 6.3 database, an error occurs.
About this task
Point-in-time restore operations are typically used for situations such as disasterrecovery or to remove the effects of errors that can cause inconsistencies in thedatabase. To recover the database to the time when the database was lost, recoverthe database to its latest version.
Procedure
Use the DSMSERV RESTORE DB server utility to restore the database. Choose one ofthe following methods depending on which version of the database you want torestore:v Restore a database to its latest version. For example, use the following
command:dsmserv restore db
v Restore a database to a point in time. For example, to restore the database to abackup series that was created on 19 April 2015, use the following command:dsmserv restore db todate=04/19/2015
What to do next
If you restored the database and directory-container storage pools exist on theserver, you must identify inconsistencies between the database and the file system.1. If you restored the database to a point in time and you did not delay reuse of
the directory-container storage pool, you must audit all the containers. To auditall containers, issue the following command:audit container stgpool
2. If the server cannot identify containers on the system, complete the followingsteps:a. From an administrative client, display a list of containers that the server can
identify by issuing the following command:select container_name from containers
b. From the file system, display a list of containers by issuing the followingcommand for the storage pool directory on the source server:
Tip: The storage pool directory is displayed in the command output:AIX Linux
[root@source]$ ls -l
Windows
c:\source_stgpooldir\00>dir
c. Compare the containers that are listed on the file system and the server.
150 IBM Tivoli Storage Manager: Multisite Disk Solution Guide
d. Issue the AUDIT CONTAINER command and specify the container that ismissing from the server output. Specify the ACTION=REMOVEDAMAGEDparameter to delete the container.
e. To ensure that the containers are deleted on the file system, review themessages that are displayed.
Related tasks:
Replicating client node data after a database restore (V7.1.1)(http://www.ibm.com/support/knowledgecenter/SSGSG7_7.1.1/com.ibm.itsm.srv.doc/t_repl_dbrestore.html)Related reference:
AUDIT CONTAINER (Verify the consistency of database information for adirectory-container storage pool) (http://www.ibm.com/support/knowledgecenter/SSGSG7_7.1.3/srv.reference/r_cmd_container_audit.html)
DSMSERV RESTORE DB (Restore the database) (http://www.ibm.com/support/knowledgecenter/SSGSG7_7.1.3/srv.reference/r_cmd_dsmserv_restore_db.html)
Recovering damaged data from a replicated copyIf a source replication server is unavailable, you can recover damaged data from areplicated copy that is stored on the target replication server.
Before you begin
The server name that you specify with the SET REPLSERVER command must matchthe name of an existing server definition. It must also be the name of the server tobe used as the target replication server. If the server name specified by thiscommand does not match the server name of an existing server definition, thecommand fails.
Tip:
v Use care when you change or remove a target replication server. If you change atarget replication server, client-node data that is replicated is sent to a differenttarget replication server. If you remove a target replication server, client nodedata is not replicated.
Procedure1. Verify the replication status of the data on the target server. The replication
status indicates whether the most recent backup was replicated to thesecondary server.
2. Restore data from a target replication server by setting the source replicationserver as the target replication server. For example, if you want to set thesource replication server as the target replication server, server1, issue thefollowing command:set replserver server1
What to do next
When you restore the Tivoli Storage Manager database on a source replicationserver, replication is automatically disabled. Before you re-enable replication,determine whether copies of data that are on the target replication server areneeded.
Chapter 25. Recovering from data loss or system outages 151
Related tasks:
Replicating client node data after a database restore (V7.1.1)(http://www.ibm.com/support/knowledgecenter/SSGSG7_7.1.1/com.ibm.itsm.srv.doc/t_repl_dbrestore.html)
Repairing storage poolsIf a disaster or system outage occurred, you can repair deduplicated data extents ina directory-container storage pool.
Before you begin
Identify inconsistencies between the database and the directory-container storagepool by using the AUDIT CONTAINER command. By identifying the damaged dataextents in the directory-container storage pool, you can determine what dataextents to repair.
Procedure
To repair a directory-container storage pool, use the REPAIR STGPOOL command. Forexample, to repair a storage pool, STGPOOL1, issue the following command:repair stgpool stgpool1
What to do next
Ensure that no damaged data extents are displayed in the output by using theQUERY DAMAGED command.Related reference:
AUDIT CONTAINER (Verify the consistency of database information for adirectory-container storage pool) (http://www.ibm.com/support/knowledgecenter/SSGSG7_7.1.3/srv.reference/r_cmd_container_audit.html)
QUERY DAMAGED (Query damaged data in a directory-container orcloud-container storage pool) (http://www.ibm.com/support/knowledgecenter/SSGSG7_7.1.3/srv.reference/r_cmd_damaged_query.html)
REPAIR STGPOOL (Repair a directory-container storage pool)(http://www.ibm.com/support/knowledgecenter/SSGSG7_7.1.3/srv.reference/r_cmd_stgpool_repair.html)
152 IBM Tivoli Storage Manager: Multisite Disk Solution Guide

Part 5. Appendixes
© Copyright IBM Corp. 1993, 2015 153

154 IBM Tivoli Storage Manager: Multisite Disk Solution Guide
Appendix. Accessibility features for the Tivoli StorageManager product family
Accessibility features help users who have a disability, such as restricted mobilityor limited vision to use information technology products successfully.
Accessibility features
The IBM Tivoli Storage Manager family of products includes the followingaccessibility features:v Keyboard-only operation using standard operating-system conventionsv Interfaces that support assistive technology such as screen readers
The command-line interfaces of all products in the product family are accessible.
Tivoli Storage Manager Operations Center provides the following additionalaccessibility features when you use it with a Mozilla Firefox browser on aMicrosoft Windows system:v Screen magnifiers and content zoomingv High contrast mode
The Operations Center and the Tivoli Storage Manager server can be installed inconsole mode, which is accessible.
The Operations Center help system is enabled for accessibility. For moreinformation, click the question mark icon on the help system menu bar.
Vendor software
The Tivoli Storage Manager product family includes certain vendor software that isnot covered under the IBM license agreement. IBM makes no representation aboutthe accessibility features of these products. Contact the vendor for the accessibilityinformation about its products.
IBM and accessibility
See the IBM Human Ability and Accessibility Center (http://www.ibm.com/able)for information about the commitment that IBM has to accessibility.
© Copyright IBM Corp. 1993, 2015 155

156 IBM Tivoli Storage Manager: Multisite Disk Solution Guide
Notices
This information was developed for products and services offered in the U.S.A.
IBM may not offer the products, services, or features discussed in this document inother countries. Consult your local IBM representative for information on theproducts and services currently available in your area. Any reference to an IBMproduct, program, or service is not intended to state or imply that only that IBMproduct, program, or service may be used. Any functionally equivalent product,program, or service that does not infringe any IBM intellectual property right maybe used instead. However, it is the user's responsibility to evaluate and verify theoperation of any non-IBM product, program, or service.
IBM may have patents or pending patent applications covering subject matterdescribed in this document. The furnishing of this document does not grant youany license to these patents. You can send license inquiries, in writing, to:
IBM Director of LicensingIBM CorporationNorth Castle Drive, MD-NC119Armonk, NY 10504-1785United States of America
For license inquiries regarding double-byte character set (DBCS) information,contact the IBM Intellectual Property Department in your country or sendinquiries, in writing, to:
Intellectual Property LicensingLegal and Intellectual Property LawIBM Japan Ltd.19-21, Nihonbashi-Hakozakicho, Chuo-kuTokyo 103-8510, Japan
The following paragraph does not apply to the United Kingdom or any othercountry where such provisions are inconsistent with local law:INTERNATIONAL BUSINESS MACHINES CORPORATION PROVIDES THISPUBLICATION "AS IS" WITHOUT WARRANTY OF ANY KIND, EITHEREXPRESS OR IMPLIED, INCLUDING, BUT NOT LIMITED TO, THE IMPLIEDWARRANTIES OF NON-INFRINGEMENT, MERCHANTABILITY OR FITNESSFOR A PARTICULAR PURPOSE. Some states do not allow disclaimer of express orimplied warranties in certain transactions, therefore, this statement may not applyto you.
This information could include technical inaccuracies or typographical errors.Changes are periodically made to the information herein; these changes will beincorporated in new editions of the publication. IBM may make improvementsand/or changes in the product(s) and/or the program(s) described in thispublication at any time without notice.
Any references in this information to non-IBM websites are provided forconvenience only and do not in any manner serve as an endorsement of thosewebsites. The materials at those websites are not part of the materials for this IBMproduct and use of those websites is at your own risk.
© Copyright IBM Corp. 1993, 2015 157

IBM may use or distribute any of the information you supply in any way itbelieves appropriate without incurring any obligation to you.
Licensees of this program who want to have information about it for the purposeof enabling: (i) the exchange of information between independently createdprograms and other programs (including this one) and (ii) the mutual use of theinformation which has been exchanged, should contact:
IBM Corporation2Z4A/10111400 Burnet RoadAustin, TX 78758US
Such information may be available, subject to appropriate terms and conditions,including in some cases, payment of a fee.
The licensed program described in this document and all licensed materialavailable for it are provided by IBM under terms of the IBM Customer Agreement,IBM International Program License Agreement or any equivalent agreementbetween us.
Any performance data contained herein was determined in a controlledenvironment. Therefore, the results obtained in other operating environments mayvary significantly. Some measurements may have been made on development-levelsystems and there is no guarantee that these measurements will be the same ongenerally available systems. Furthermore, some measurements may have beenestimated through extrapolation. Actual results may vary. Users of this documentshould verify the applicable data for their specific environment.
Information concerning non-IBM products was obtained from the suppliers ofthose products, their published announcements or other publicly available sources.IBM has not tested those products and cannot confirm the accuracy ofperformance, compatibility or any other claims related to non-IBM products.Questions on the capabilities of non-IBM products should be addressed to thesuppliers of those products.
This information contains examples of data and reports used in daily businessoperations. To illustrate them as completely as possible, the examples include thenames of individuals, companies, brands, and products. All of these names arefictitious and any similarity to the names and addresses used by an actual businessenterprise is entirely coincidental.
COPYRIGHT LICENSE:
This information contains sample application programs in source language, whichillustrate programming techniques on various operating platforms. You may copy,modify, and distribute these sample programs in any form without payment toIBM, for the purposes of developing, using, marketing or distributing applicationprograms conforming to the application programming interface for the operatingplatform for which the sample programs are written. These examples have notbeen thoroughly tested under all conditions. IBM, therefore, cannot guarantee orimply reliability, serviceability, or function of these programs. The sampleprograms are provided "AS IS", without warranty of any kind. IBM shall not beliable for any damages arising out of your use of the sample programs.
158 IBM Tivoli Storage Manager: Multisite Disk Solution Guide

Each copy or any portion of these sample programs or any derivative work, mustinclude a copyright notice as follows:Portions of this code are derived from IBM® Corp. Sample Programs.
© Copyright IBM® Corp. _enter the year or years_. All rights reserved.
Trademarks
IBM, the IBM logo, and ibm.com® are trademarks or registered trademarks ofInternational Business Machines Corp., registered in many jurisdictions worldwide.Other product and service names might be trademarks of IBM or other companies.A current list of IBM trademarks is available on the Web at "Copyright andtrademark information" at www.ibm.com/legal/copytrade.shtml.
Adobe is a registered trademark of Adobe Systems Incorporated in the UnitedStates, and/or other countries.
Linear Tape-Open, LTO, and Ultrium are trademarks of HP, IBM Corp. andQuantum in the U.S. and other countries.
Intel and Itanium are trademarks or registered trademarks of Intel Corporation orits subsidiaries in the United States and other countries.
Linux is a registered trademark of Linus Torvalds in the United States, othercountries, or both.
Microsoft, Windows, and Windows NT are trademarks of Microsoft Corporation inthe United States, other countries, or both.
Java™ and all Java-based trademarks and logos are trademarks or registeredtrademarks of Oracle and/or its affiliates.
UNIX is a registered trademark of The Open Group in the United States and othercountries.
Terms and conditions for product documentation
Permissions for the use of these publications are granted subject to the followingterms and conditions.
ApplicabilityThese terms and conditions are in addition to any terms of use for the IBMwebsite.
Personal useYou may reproduce these publications for your personal, noncommercialuse provided that all proprietary notices are preserved. You may notdistribute, display or make derivative work of these publications, or anyportion thereof, without the express consent of IBM.
Commercial useYou may reproduce, distribute and display these publications solely withinyour enterprise provided that all proprietary notices are preserved. Youmay not make derivative works of these publications, or reproduce,distribute or display these publications or any portion thereof outside yourenterprise, without the express consent of IBM.
Rights Except as expressly granted in this permission, no other permissions,
Notices 159
licenses or rights are granted, either express or implied, to the publicationsor any information, data, software or other intellectual property containedtherein.
IBM reserves the right to withdraw the permissions granted hereinwhenever, in its discretion, the use of the publications is detrimental to itsinterest or, as determined by IBM, the above instructions are not beingproperly followed.
You may not download, export or re-export this information except in fullcompliance with all applicable laws and regulations, including all UnitedStates export laws and regulations.
IBM MAKES NO GUARANTEE ABOUT THE CONTENT OF THESEPUBLICATIONS. THE PUBLICATIONS ARE PROVIDED "AS-IS" ANDWITHOUT WARRANTY OF ANY KIND, EITHER EXPRESSED ORIMPLIED, INCLUDING BUT NOT LIMITED TO IMPLIED WARRANTIESOF MERCHANTABILITY, NON-INFRINGEMENT, AND FITNESS FOR APARTICULAR PURPOSE.
Privacy policy considerations
IBM Software products, including software as a service solutions, (“SoftwareOfferings”) may use cookies or other technologies to collect product usageinformation, to help improve the end user experience, to tailor interactions withthe end user, or for other purposes. In many cases no personally identifiableinformation is collected by the Software Offerings. Some of our Software Offeringscan help enable you to collect personally identifiable information. If this SoftwareOffering uses cookies to collect personally identifiable information, specificinformation about this offering’s use of cookies is set forth below.
This Software Offering does not use cookies or other technologies to collectpersonally identifiable information.
If the configurations deployed for this Software Offering provide you as customerthe ability to collect personally identifiable information from end users via cookiesand other technologies, you should seek your own legal advice about any lawsapplicable to such data collection, including any requirements for notice andconsent.
For more information about the use of various technologies, including cookies, forthese purposes, see IBM’s Privacy Policy at http://www.ibm.com/privacy andIBM’s Online Privacy Statement at http://www.ibm.com/privacy/details in thesection entitled “Cookies, Web Beacons and Other Technologies,” and the “IBMSoftware Products and Software-as-a-Service Privacy Statement” athttp://www.ibm.com/software/info/product-privacy.
160 IBM Tivoli Storage Manager: Multisite Disk Solution Guide
Glossary
A glossary is available with terms and definitions for the IBM Tivoli Storage Manager family of products.
See Tivoli Storage Manager glossary (http://www.ibm.com/support/knowledgecenter/SSGSG7_7.1.3/tsm/glossary.html).
To view glossaries for other IBM products, see http://www.ibm.com/software/globalization/terminology/.
© Copyright IBM Corp. 1993, 2015 161

162 IBM Tivoli Storage Manager: Multisite Disk Solution Guide
Index
AAbout this publication vaccess
limit 137server options 137
accessibility features 155active log capacity 124administrative tasks
scheduling 127archive log capacity 124archive operations
scheduling 107specifying rules 104
AUDIT CONTAINER 123audit container storage pool 123audit storage pool 123authority level 135
Bback-end capacity licensing 85backup operations
modifying scope 118scheduling 107specifying rules 104
CCAD
See client acceptor daemonclient acceptor daemon
configuring 111restarting 115stopping 115
client nodesdecommissioning 120removing from production 120
client/server communicationsconfiguring 113
clientsadding 101configuring 109configuring to run scheduled operations 111connecting to server 108decommission 128installing 109managing operations 114move 128protecting 101registering 108selecting software 102upgrading 118
configurationchanging 115clients 109
cpu usage 126
Ddaily checklist of monitoring tasks 73daily email reports
configuring 89data
deactivating 122data recovery 145
strategy 145database capacity 124deactivation process
backup data 122decommission process
client node 120disability 155
Eerror logs
evaluating 115
Ffile systems
planning for 11firewall 24, 25firewalls
configuring communications through 113front-end capacity licensing 85
Hhardware requirements 7
IIBM Knowledge Center vinstallation
clients 109installing the operating system
AIX server systems 29Linux server systems 31Windows server systems 35
installing Tivoli Storage ManagerAIX systems 45Linux systems 45Windows systems 47
inventory capacity 124issues
diagnosing 71
Kkeyboard 155Knowledge Center v
© Copyright IBM Corp. 1993, 2015 163

Llicense compliance
verifying 85
Mmaintenance mode
starting the server 139maintenance tasks
starting the server in maintenance mode 140managing
access levels 137administrators 135authority 135
managing security 133memory requirements
managing 126monitoring
daily checklist 73goals 71periodic checklist 79tasks
daily checklist 73periodic checklist 79
monitoring toolsconfiguring 87selecting 87
multipath I/Oconfiguring for AIX systems 36configuring for Linux systems 37configuring for Windows systems 38
multisite disk solutionplanning for 1
Nnode replication
enable 67
Ooperating system
security 137outage
prepare 145
Ppassword requirements
LDAP 135Tivoli Storage Manager 135
passwordschanging 135resetting 117
periodic checklist of monitoring tasks 79planning solutions
multisite disk 1planning worksheet 11policies
editing 106specifying 104viewing 105
policy domainsspecifying 104
preparing file systemsAIX server systems 40Linux server systems 41Windows server systems 42
privilege classsystem privilege 135
processor value unit (PVU) licensing 85publications v
Rreconfiguration tasks
starting the server in maintenance mode 140recovery
disaster recovery 145strategy 145
recovery drill 145registration
clients 108replication 67
multisite disk solutiondissimilar policies 132dissimilar policy 132enabling 129managing 129modifying 130retention 132storage pool 129
reportsemail
configuring 89restricting
user access 137rules
editing 106specifying
backup and archive operations 104viewing 105
Sscheduled activities
tuning 127schedules
backup and archive operations 107security 133server
determining the size of 3enabling replication
dissimilar policies 132multisite disk solution 129
managing replicationmultisite disk solution 129
modifying replicationmultisite disk solution 130
node replicationmultisite disk solution 129
upgradeplanning 143
serversstarting in maintenance mode 140stopping 139
softwareselecting 102
Software requirementsLinux 9
164 IBM Tivoli Storage Manager: Multisite Disk Solution Guide
solutionexpanding 101
starting servermaintenance mode 139
status reportsobtaining 89
storage configurationplanning for 11
storage pool replicationmultisite disk solution 129
storage spacereleasing 122
system requirements 7, 9hardware 7
system statustracking 89
system updateprepare 145
TTivoli Storage Manager directories
planning for 11tools
monitoring 87troubleshooting 71
administrator IDs 117errors in client operations 114locked client nodes 117password issues 117
Uupgrade
server 143
Index 165

166 IBM Tivoli Storage Manager: Multisite Disk Solution Guide


IBM®
Product Number: 5608-E015608-E025608-E03
Printed in USA