Embed Size (px)
Citation preview
1
User ManualSegway Personal Transporter (PT)
i2 SEx2 SEx2 SE Turf
24010-00001 ab

2
Copyright, Trademarks, Patent, and Contact InformationCopyright © 2019 Segway Inc. All rights reserved.
TrademarksSegway Inc. ("Segway") owns a number of trademarks including, but not limited to, Segway and the Segway "Rider Design" logo that have been registered in the United States and in other countries. Those trademarks followed by ® are registered trademarks of Segway. All other marks are trademarks or common law marks of Segway. Failure of a mark to appear in this manual does not mean that Segway does not use the mark, nor does it mean that the product is not actively marketed or is not significant within its relevant market. Segway reserves all rights in its trademarks. All other trademarks are the property of their respective companies.
Segway Inc. Patent InformationThe Segway Personal Transporter (PT) is covered by U.S. and foreign patents. For more information go to http://www.segway.com/patents.pdf
Contact InformationFor support, please contact the company from which you bought the products. For a listing of Authorized Segway Dealers and Distributors, visit the Segway website at: http://www.segway.com.
Segway Customer Care: 1-866-4SEGWAY (1-866-473-4929)Fax: 1-603-222-6001E-mail: [email protected]: http://www.segway.com

3
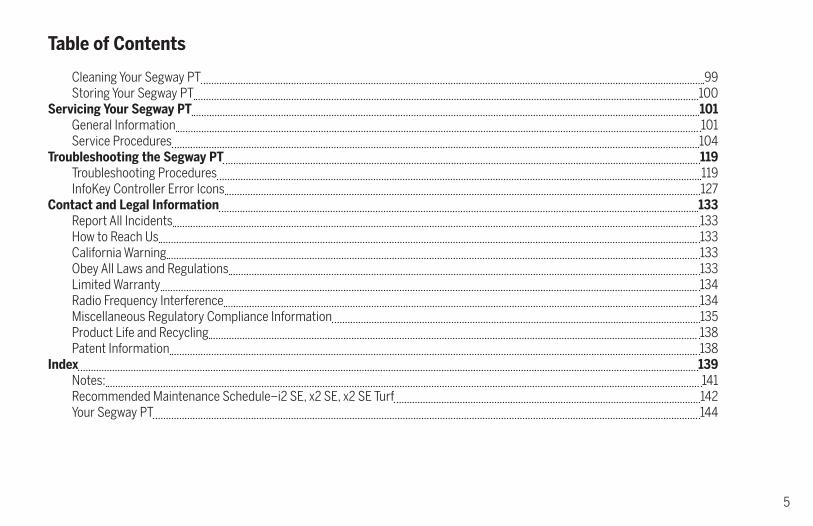
Table of Contents
Copyright, Trademarks, Patent, and Contact Information 2Table of Contents 3Preface 7About This Manual 7The Risk of Injury 7Before You Begin 7Related User Materials 8Safety Messaging 8
Introduction 9Recording Serial Numbers 9Segway PT Model Descriptions 11Segway PT Specifications 12Operating Limits 14Maximizing Range 16
Setting Up Your Segway PT 17Unpacking Your Segway PT 17Assembling Your Segway PT 17
The Segway PT 25How the Segway PT Works 25Segway PT Components and Subsystems 27
The InfoKey Controller 39InfoKey Controller 39
Safety Alerts 51Speed Limiter 52Stick Shake Warning 54Safety Shutdown 57

4
Riding Your Segway PT 61Riding Form 61Avoiding Hazards 62Step 1: Preparing for Your Ride 65Step 2: Powering On the Segway PT 66Step 3: Confirming the Beginner Setting 67Step 4: Before Stepping On 68Step 5: Stepping On 69Step 6: Moving Forward and Backward 71Step 7: Stopping 72Step 8: Turning 73Step 9: Stepping Off 74Step 10: Securing Your Segway PT 75Step 11: Powering Off the Segway PT 76Practice Riding 77Riding Etiquette 79Riding Tips and Safety Guidelines Recap 80Report All Incidents 84
Segway PT Batteries 85Battery Safety 85Charging Your Batteries 87Replacing Batteries 94Battery Transportation, Shipping, and Disposal 95
Maintaining Your Segway PT 97Lifting Your Segway PT 97Maintaining Tires and Wheels 98
Table of Contents (cont.)
5
Cleaning Your Segway PT 99Storing Your Segway PT 100
Servicing Your Segway PT 101General Information 101Service Procedures 104
Troubleshooting the Segway PT 119Troubleshooting Procedures 119InfoKey Controller Error Icons 127
Contact and Legal Information 133Report All Incidents 133How to Reach Us 133California Warning 133Obey All Laws and Regulations 133Limited Warranty 134Radio Frequency Interference 134Miscellaneous Regulatory Compliance Information 135Product Life and Recycling 138Patent Information 138
Index 139Notes: 141Recommended Maintenance Schedule–i2 SE, x2 SE, x2 SE Turf 142Your Segway PT 144
Table of Contents

6

7
PrefaceCongratulations on the purchase of your new Segway Personal Transporter (PT)! The Segway PT is the standard term used to refer to the self-balancing Segway products described in this manual. Each PT model (i2 SE or x2 SE) is different, but the fundamentals found in this manual apply to both models.
About This ManualTo learn to ride your PT, you must read and follow all instructions and warnings in the User Manual and watch the Personal Transporter (PT) Rider Training and Safety Video (Safety Video). It is important that you follow all safety warnings and cautions that appear throughout the User Manual and that you use good judgment when riding your PT. Remember to pass on this User Manual and the Safety Video if you ever resell your PT. If you have questions, or need another copy of the User Manual or Safety Video, contact an Authorized Segway Dealer or Distributor, or Segway Inc. before you attempt to use your PT. For a list of Authorized Segway Dealers and Distributors, call 1-866-473-4929 or visit http://www.segway.com.
Check our website regularly for updates to PT User Materials: http://www.segway.com
The Risk of InjuryThe PT is a self-balancing, personal transporter that uses patented balancing technology. Balancing technology cannot prevent injury if you do not ride the PT safely.
WARNINGWhenever you ride the Segway PT, you risk death or serious injury from loss of control, collisions, and falls. To reduce risk of injury, you must read and follow all instructions and warnings in the user materials.
Before You BeginBefore you begin, it may be necessary to assemble your PT. The Batteries should be charged for 12 hours. To assemble the PT and charge the Batteries for the first time, refer to the instructions in this manual.
8
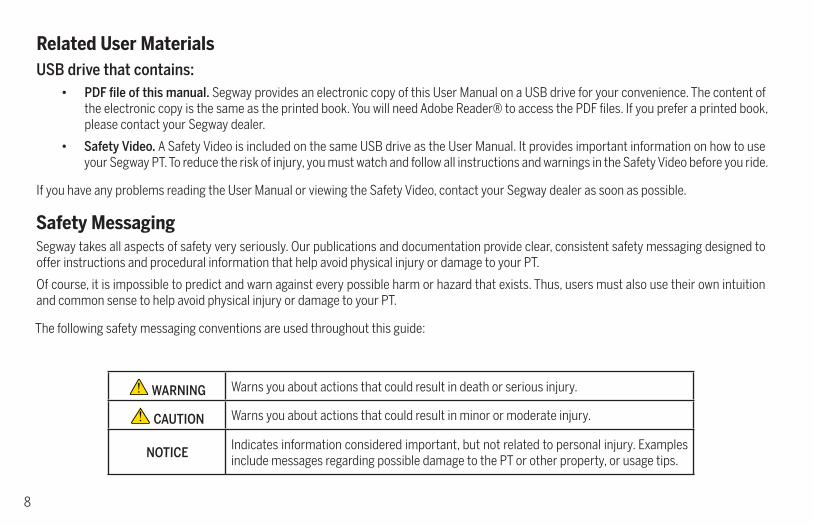
Related User MaterialsUSB drive that contains:
• PDF file of this manual. Segway provides an electronic copy of this User Manual on a USB drive for your convenience. The content of the electronic copy is the same as the printed book. You will need Adobe Reader® to access the PDF files. If you prefer a printed book, please contact your Segway dealer.
• Safety Video. A Safety Video is included on the same USB drive as the User Manual. It provides important information on how to useyour Segway PT. To reduce the risk of injury, you must watch and follow all instructions and warnings in the Safety Video before you ride.
If you have any problems reading the User Manual or viewing the Safety Video, contact your Segway dealer as soon as possible.
Safety MessagingSegway takes all aspects of safety very seriously. Our publications and documentation provide clear, consistent safety messaging designed to offer instructions and procedural information that help avoid physical injury or damage to your PT.
Of course, it is impossible to predict and warn against every possible harm or hazard that exists. Thus, users must also use their own intuition and common sense to help avoid physical injury or damage to your PT.
The following safety messaging conventions are used throughout this guide:
WARNING Warns you about actions that could result in death or serious injury.
CAUTION Warns you about actions that could result in minor or moderate injury.
NOTICEIndicates information considered important, but not related to personal injury. Examples include messages regarding possible damage to the PT or other property, or usage tips.
9
IntroductionThis section introduces the Segway PT. It includes:
• Instructions on how to locate and record the serial number of your PT and the wireless InfoKey™ Controller.
• PT model descriptions and specifications.
• Operating limits of the PT.
Recording Serial NumbersRecord the unique serial numbers for both the PT and the InfoKey Controller. Store this information in a secure location, separate from your PT, in case you need to order a replacement InfoKey Controller.
The PT and InfoKey Controller serial numbers are unique to your machine and InfoKey Controller. These numbers can provide helpful information in the future for asset and warranty tracking, InfoKey Controller replacement, insurance claims, and in case of loss or theft. Store the serial numbers in a secure location, separate from your PT.
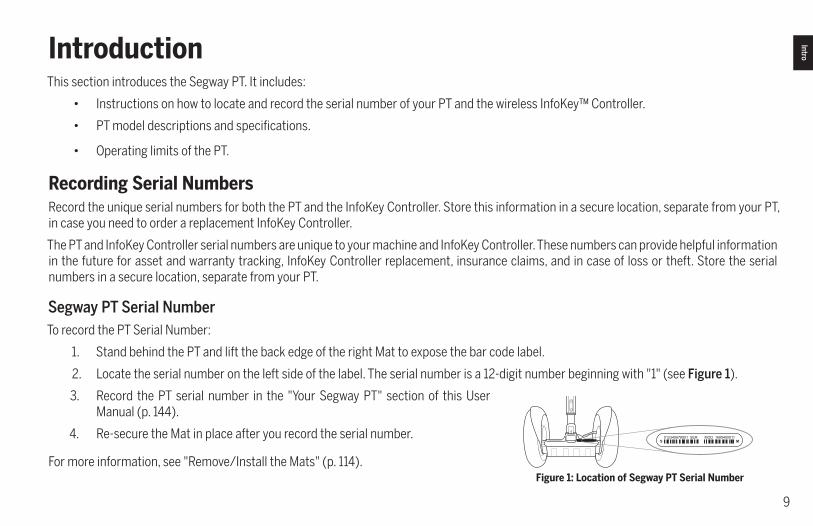
Segway PT Serial NumberTo record the PT Serial Number:
1. Stand behind the PT and lift the back edge of the right Mat to expose the bar code label.
2. Locate the serial number on the left side of the label. The serial number is a 12-digit number beginning with "1" (see Figure 1).
3. Record the PT serial number in the "Your Segway PT" section of this User Manual (p. 144).
4. Re-secure the Mat in place after you record the serial number.
For more information, see "Remove/Install the Mats" (p. 114).
S M012345678901 SER MOD 1680400011
Figure 1: Location of Segway PT Serial Number
Intro
10
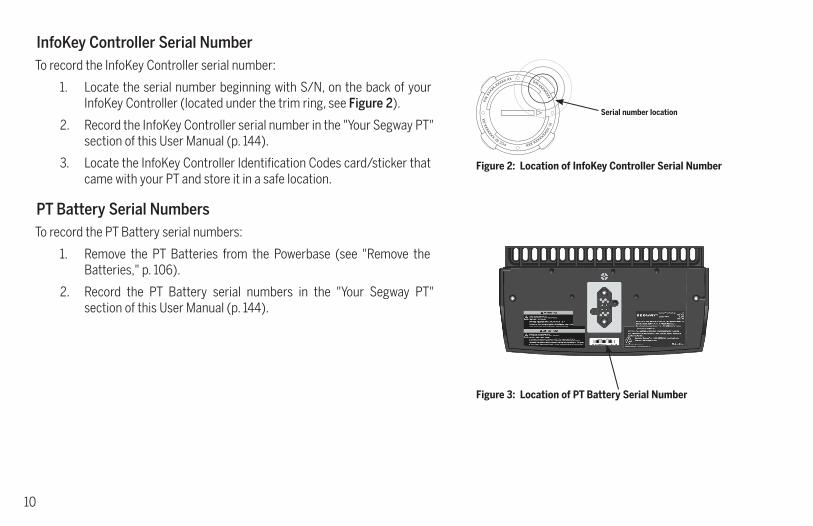
InfoKey Controller Serial NumberTo record the InfoKey Controller serial number:
1. Locate the serial number beginning with S/N, on the back of your InfoKey Controller (located under the trim ring, see Figure 2).
2. Record the InfoKey Controller serial number in the "Your Segway PT" section of this User Manual (p. 144).
3. Locate the InfoKey Controller Identification Codes card/sticker that came with your PT and store it in a safe location.
PT Battery Serial NumbersTo record the PT Battery serial numbers:
1. Remove the PT Batteries from the Powerbase (see "Remove the Batteries," p. 106).
2. Record the PT Battery serial numbers in the "Your Segway PT" section of this User Manual (p. 144).
S/N X
X
XXXXXX
IC:X
XXX
XXXXX-XXXFCC
ID:X
XXXX
XX
-XX
P/N
XXXX
X-X
XXXX XX
Figure 2: Location of InfoKey Controller Serial Number
Serial number location
Figure 3: Location of PT Battery Serial Number
11
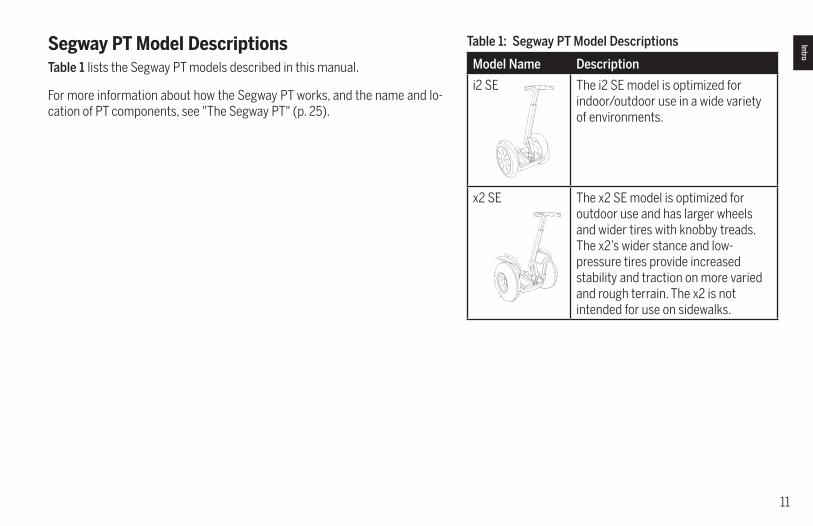
Segway PT Model DescriptionsTable 1 lists the Segway PT models described in this manual.
For more information about how the Segway PT works, and the name and lo-cation of PT components, see "The Segway PT" (p. 25).
Model Name Description
i2 SE The i2 SE model is optimized for indoor/outdoor use in a wide variety of environments.
x2 SE The x2 SE model is optimized for outdoor use and has larger wheels and wider tires with knobby treads. The x2’s wider stance and low-pressure tires provide increased stability and traction on more varied and rough terrain. The x2 is not intended for use on sidewalks.
Table 1: Segway PT Model Descriptions Intro
12
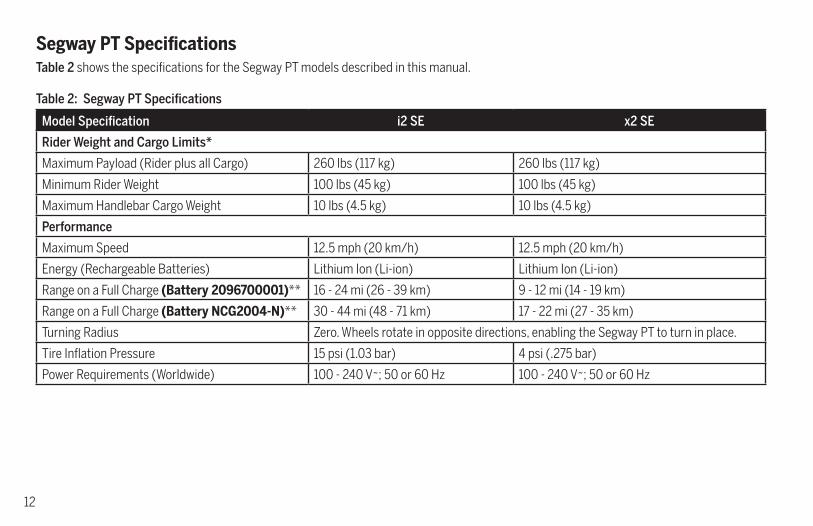
Segway PT SpecificationsTable 2 shows the specifications for the Segway PT models described in this manual.
Model Specification i2 SE x2 SE
Rider Weight and Cargo Limits*
Maximum Payload (Rider plus all Cargo) 260 lbs (117 kg) 260 lbs (117 kg)
Minimum Rider Weight 100 lbs (45 kg) 100 lbs (45 kg)
Maximum Handlebar Cargo Weight 10 lbs (4.5 kg) 10 lbs (4.5 kg)
Performance
Maximum Speed 12.5 mph (20 km/h) 12.5 mph (20 km/h)
Energy (Rechargeable Batteries) Lithium Ion (Li-ion) Lithium Ion (Li-ion)
Range on a Full Charge (Battery 2096700001)** 16 - 24 mi (26 - 39 km) 9 - 12 mi (14 - 19 km)
Range on a Full Charge (Battery NCG2004-N)** 30 - 44 mi (48 - 71 km) 17 - 22 mi (27 - 35 km)
Turning Radius Zero. Wheels rotate in opposite directions, enabling the Segway PT to turn in place.
Tire Inflation Pressure 15 psi (1.03 bar) 4 psi (.275 bar)
Power Requirements (Worldwide) 100 - 240 V~; 50 or 60 Hz 100 - 240 V~; 50 or 60 Hz
Table 2: Segway PT Specifications
13
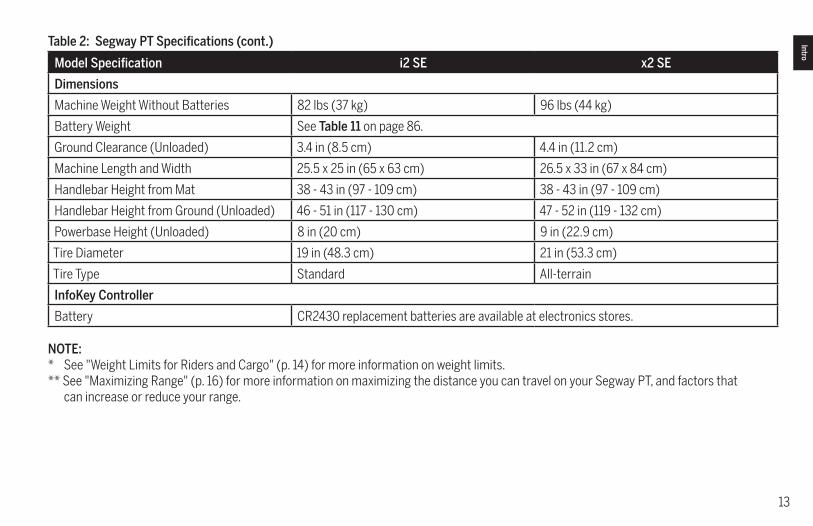
Model Specification i2 SE x2 SE
Dimensions
Machine Weight Without Batteries 82 lbs (37 kg) 96 lbs (44 kg)
Battery Weight See Table 11 on page 86.
Ground Clearance (Unloaded) 3.4 in (8.5 cm) 4.4 in (11.2 cm)
Machine Length and Width 25.5 x 25 in (65 x 63 cm) 26.5 x 33 in (67 x 84 cm)
Handlebar Height from Mat 38 - 43 in (97 - 109 cm) 38 - 43 in (97 - 109 cm)
Handlebar Height from Ground (Unloaded) 46 - 51 in (117 - 130 cm) 47 - 52 in (119 - 132 cm)
Powerbase Height (Unloaded) 8 in (20 cm) 9 in (22.9 cm)
Tire Diameter 19 in (48.3 cm) 21 in (53.3 cm)
Tire Type Standard All-terrain
InfoKey Controller
Battery CR2430 replacement batteries are available at electronics stores.
NOTE:* See "Weight Limits for Riders and Cargo" (p. 14) for more information on weight limits.** See "Maximizing Range" (p. 16) for more information on maximizing the distance you can travel on your Segway PT, and factors that can increase or reduce your range.
Table 2: Segway PT Specifications (cont.) Intro

14
Operating LimitsIt is important that you familiarize yourself with the operating limits of the Segway PT. These limits are set to maximize rider safety while reduc-ing the risk of damage to the Segway PT. The Segway PT will perform better when you observe these limits.
Weight Limits for Riders and CargoSegway sets weight limits for two reasons:
• Rider safety
• To reduce the risk of damage to the Segway PT
Dynamic Weight LimitsTo keep the Segway PT and rider upright, the Segway PT must always have enough power to be able to drive its wheels forward and backward.
WARNINGExceeding the weight limits, especially when combined with other variables that require more power, will increase your risk of falling or damag-ing the Segway PT.
Variables that require more power include:
• Higher payloads (weight of rider and all cargo)
• Steeper slopes
• Bumpier surface conditions
• Higher speeds
• Abrupt maneuvers
The Segway PT monitors the amount of power being used and will activate safety alerts when it senses excessive power demands. It is important that you learn to anticipate and recognize when the Segway PT is reaching the limits of performance.
15
NOTE:For more information on recognizing and responding to Safety Alerts, see "Speed Limiter" (p. 52), "Stick Shake Warning" (p. 54), and "Safety Shutdown" (p. 57).
Minimum Rider WeightThe rider’s weight must not be less than 100 lbs (45 kg). If the rider is below the minimum rider weight, he/she may not be able to ride safely because he/she cannot shift his/her weight far enough back (behind the centerline of the wheels) to safely slow down and stop. This is especially true when riding downhill. Also, riders below the minimum weight may not sufficiently activate the rider detect system, failing to properly interact with the Segway PT’s balancing system.
Handlebar CargoThe total weight of any handlebar payload plus any other attachments hanging from the handlebar must not exceed 10 lbs (4.5 kg).
WARNINGExceeding the handlebar cargo limit interferes with the Segway PT's balancing ability and could cause the Segway PT to accelerate forward, risking injury and/or damage to the Segway PT.
Structural Weight Limits (Maximum Payload)The maximum payload (rider plus all cargo) is 260 lbs (117 kg). Exceeding the maximum weight limit increases the risk of damage to the Segway PT. Heavier payloads place greater stress on the Segway PT. Several factors affect the loads transmitted to the Segway PT:
• Skill level of the rider
• Payload (weight of the rider and all cargo)
• Surface condition (obstacle height, etc.)
NOTICEExceeding the rider or cargo weight limits, especially when riding on uneven terrain, could damage the Segway PT.
Intro

16
Maximizing RangeMaximum range distances are provided in Table 2 (p. 12). The range of your Segway PT is affected by many variables, including:
• Terrain: Riding on smooth, flat terrain improves range, and riding on hilly terrain and unpaved surfaces reduces range.
• Speed and Riding Style: Riding at a consistent, moderate speed will increase range. Frequent starting, stopping, acceleration, and deceleration reduces range.
• Tire Inflation Pressure: Riding with tire pressures below the specified limit reduces range and can result in premature tire wear.
• Rider Weight and Cargo: Lighter riders with less cargo experience better range than heavier riders with more cargo.
• Temperature: Storing, charging, and riding in temperatures close to the median of the recommended temperature range improves range. Riding in colder temperatures reduces range significantly.
• Battery Condition: Properly charged and maintained batteries provide greater range. Old, cold, heavily used, or poorly maintained batteries provide less range (see Table 11, p. 86).
• Wind: Riding with a tailwind increases range. Riding against a headwind reduces range.
17
Setting Up Your Segway PTThis section describes what is included with your Segway PT and gives assembly instructions.
Unpacking Your Segway PTThe following items/parts ship with your Segway PT:
Assembling Your Segway PT
WARNINGAlways shut down your Segway PT and unplug the AC Power Cord before performing any maintenance or installing any part or accessory. Adhere to torque specifications when tightening fasteners. Over tightened or under tightened fasteners could malfunction, leading to damage or serious injury.
NOTE:If your PT is already assembled, you may skip this section and go to "Adjust the Handlebar Height" (p. 21).
Setup
• Handlebar
• LeanSteer Frame
• LeanSteer Frame Fasteners
• Segway PT Powerbase
• Mats
• InfoKey: Controller, Dock, Fastener
• PT Batteries (2, in separate box)
• Power cord (for charging the PT Batteries)
• Wrench set (3 mm and 5 mm hex)
• User Materials & Safety Video (USB drive)
• Segway PT Limited Warranty/Guarantee
18
Assembling Your Segway PT (cont.)
To Set Up your Segway PT, follow the procedures below in the order listed. For the name and location of specific PT components, see "Segway PT Components and Subsystems" (p. 27).
Prepare the LeanSteer FrameTool Required: None
The LeanSteer Frame is collapsed to its shortest length for shipping. Assembly is required before adjusting the Handlebar height for the first time. To extend and assemble the LeanSteer Frame:
1. Remove the Height Adjustment knob (see Figure 9, page 21) by turning the knob counterclockwise.
2. Extend the upper bar of the LeanSteer Frame by sliding it up from its storage position until the slot for the Height Adjustment fastener is visible.
3. Reinstall the Height Adjustment knob by turning and tightening the knob clockwise.
Attach the HandlebarTool Required: Torque wrench with 3 mm bit
To attach the Handlebar to the LeanSteer Frame:
1. Make sure the Segway PT is unplugged and powered off.
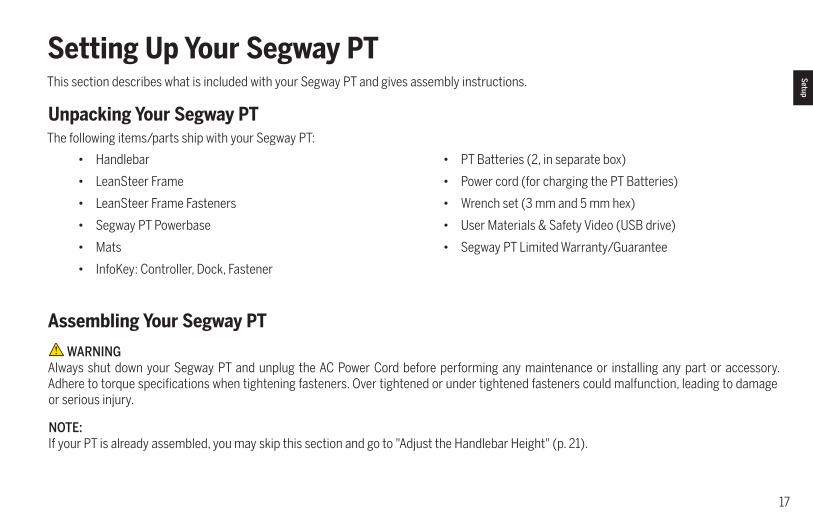
2. Align the Handlebar in place against the LeanSteer Frame using the alignment guides. Figure 4: Attach the Handlebar
Handlebar
FastenersHandlebar clamp
Alignment guide

19
3. Position the Handlebar Clamp against the Handlebar.
4. Insert the 3 fasteners through the Handlebar Clamp into the LeanSteer Frame.
5. Using the 3 mm hex wrench, alternate between the 3 fasteners, evenly tightening in small increments.
6. Check to ensure that the gap between the Handlebar Clamp and the LeanSteer Frame is even, and the same between the top and bottom.
Tighten to 2.0 N-m (18 in-lbf).
Attach the LeanSteer FrameTool Required: Torque wrench with 5 mm bit
WARNINGThe LeanSteer Frame must be properly attached and secured. Failure to properly assemble the LeanSteer Frame and/or maintain torque on the fasteners could lead to an unexpected change in steering and result in serious injury and/or damage to your Segway PT from loss of control, collisions, and falls.
To attach the LeanSteer Frame to the Powerbase:
1. Make sure the PT is unplugged and powered off.
2. Place the LeanSteer Frame onto the stem.
3. Install the two fasteners; do not tighten.
4. Make sure the LeanSteer Frame is standing straight vertically, then torque the fasteners to 11.0 N-m (8.1 ft-lbf).
Setup
Figure 5: Attach LeanSteer Frame to Stem
20
Assembling Your Segway PT (cont.)
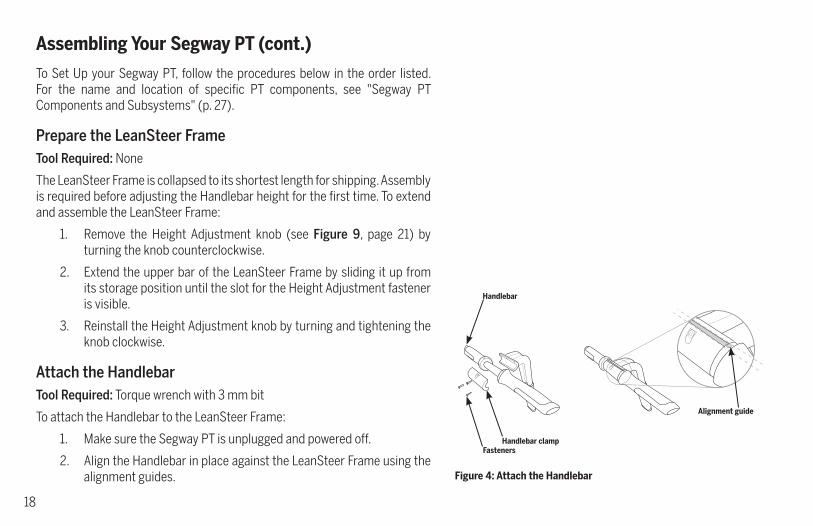
5. With the Segway PT powered down (OFF), lean the LeanSteer Frame fully left and right, until it touches each fender (see Figure 6).
6. Ensure the LeanSteer Frame returns to a straight, upright position.
7. Check the fasteners to be sure they are tight.
NOTE:Check the fasteners at least monthly to be sure they remain tight. If they are loose, tighten the fasteners to 11.0 N-m (8.1 ft-lbf).
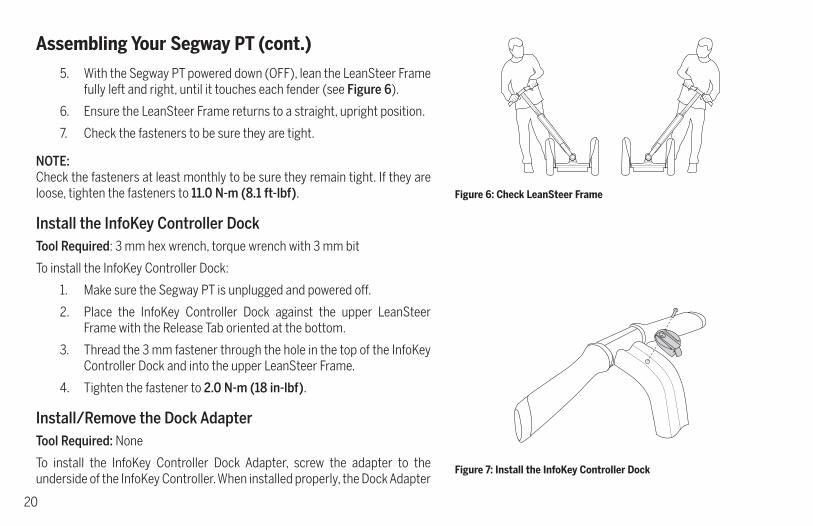
Install the InfoKey Controller DockTool Required: 3 mm hex wrench, torque wrench with 3 mm bit
To install the InfoKey Controller Dock:
1. Make sure the Segway PT is unplugged and powered off.
2. Place the InfoKey Controller Dock against the upper LeanSteer Frame with the Release Tab oriented at the bottom.
3. Thread the 3 mm fastener through the hole in the top of the InfoKey Controller Dock and into the upper LeanSteer Frame.
4. Tighten the fastener to 2.0 N-m (18 in-lbf).
Install/Remove the Dock AdapterTool Required: None
To install the InfoKey Controller Dock Adapter, screw the adapter to the underside of the InfoKey Controller. When installed properly, the Dock Adapter
Figure 6: Check LeanSteer Frame
Figure 7: Install the InfoKey Controller Dock

21
should snap into place when screwed on.
To remove the InfoKey Controller Dock Adapter, unscrew the adapter from the underside of the InfoKey Controller.
Dock the InfoKey ControllerTool Required: None
To dock the InfoKey Controller:
1. Make sure the Segway PT is unplugged and powered off.
2. Ensure the InfoKey Controller Dock Adapter is installed (see "Install the InfoKey Controller Dock," p. 20).
3. Slide the InfoKey Controller up into the InfoKey Controller Dock.
Adjust the Handlebar HeightTool Required: None
To adjust the Handlebar height:
1. Loosen the Height Adjustment knob.
2. Adjust the height of the upper LeanSteer Frame by pulling up on the Handlebar until the Handlebar is just above your elbow or higher while you are standing on the floor and the Powerbase is level. You can adjust as necessary for comfort.
3. Tighten the Height Adjustment knob.
NOTE:The handlebar should be adjusted for each rider. Adjusting the Handlebar to the correct height is important for both safety and comfort.
Figure 8: Dock the InfoKey Controller
Figure 9: Adjust the Handlebar Height
2
3
Setup
22
Assembling Your Segway PT (cont.)
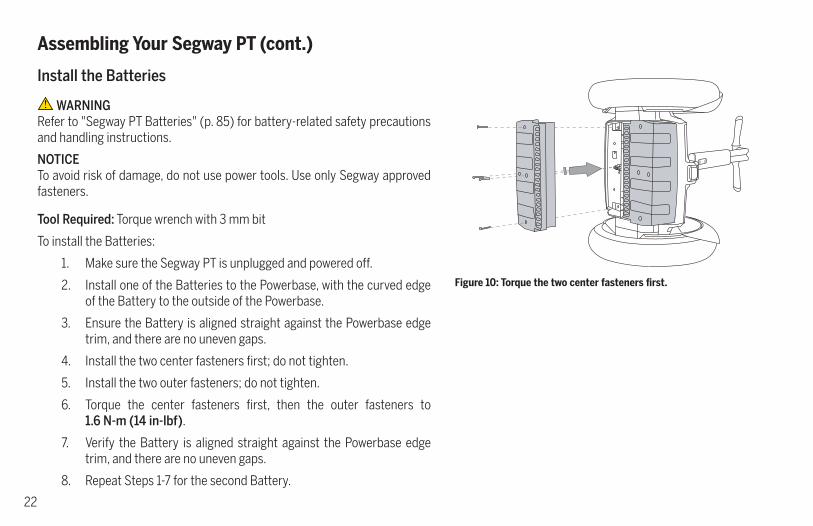
Install the Batteries
WARNINGRefer to "Segway PT Batteries" (p. 85) for battery-related safety precautions and handling instructions.
NOTICETo avoid risk of damage, do not use power tools. Use only Segway approved fasteners.
Tool Required: Torque wrench with 3 mm bit
To install the Batteries:
1. Make sure the Segway PT is unplugged and powered off.
2. Install one of the Batteries to the Powerbase, with the curved edge of the Battery to the outside of the Powerbase.
3. Ensure the Battery is aligned straight against the Powerbase edge trim, and there are no uneven gaps.
4. Install the two center fasteners first; do not tighten.
5. Install the two outer fasteners; do not tighten.
6. Torque the center fasteners first, then the outer fasteners to 1.6 N-m (14 in-lbf).
7. Verify the Battery is aligned straight against the Powerbase edge trim, and there are no uneven gaps.
8. Repeat Steps 1-7 for the second Battery.
Figure 10: Torque the two center fasteners first.

23
Charge the BatteriesNOTE:The PT Batteries should be charged for at least 12 hours prior to first use.
For detailed instructions on charging the PT Batteries, see "Charging Your Batteries" (p. 87).
Setup

24
25
The Segway PTThis chapter describes how the PT works. It includes:
• Information about PT components and subsystems
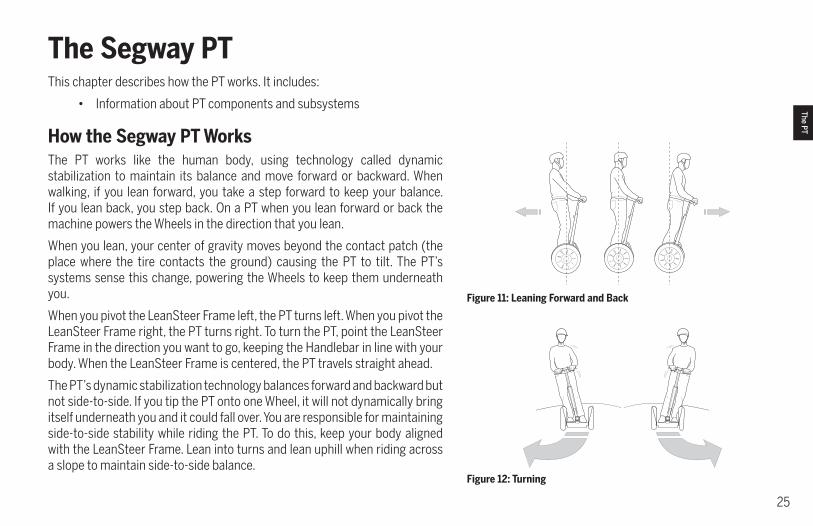
How the Segway PT WorksThe PT works like the human body, using technology called dynamic stabilization to maintain its balance and move forward or backward. When walking, if you lean forward, you take a step forward to keep your balance. If you lean back, you step back. On a PT when you lean forward or back the machine powers the Wheels in the direction that you lean.
When you lean, your center of gravity moves beyond the contact patch (the place where the tire contacts the ground) causing the PT to tilt. The PT’s systems sense this change, powering the Wheels to keep them underneath you.
When you pivot the LeanSteer Frame left, the PT turns left. When you pivot the LeanSteer Frame right, the PT turns right. To turn the PT, point the LeanSteer Frame in the direction you want to go, keeping the Handlebar in line with your body. When the LeanSteer Frame is centered, the PT travels straight ahead.
The PT’s dynamic stabilization technology balances forward and backward but not side-to-side. If you tip the PT onto one Wheel, it will not dynamically bring itself underneath you and it could fall over. You are responsible for maintaining side-to-side stability while riding the PT. To do this, keep your body aligned with the LeanSteer Frame. Lean into turns and lean uphill when riding across a slope to maintain side-to-side balance.
Figure 11: Leaning Forward and Back
Figure 12: Turning
The PT
26
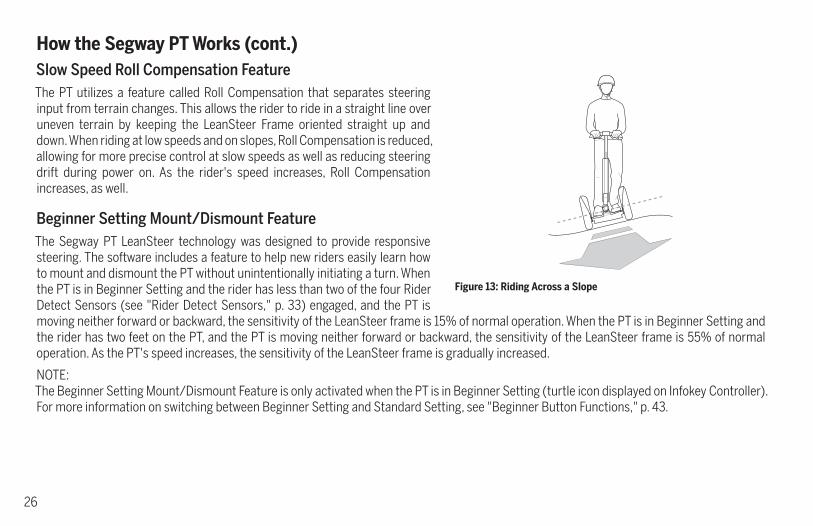
How the Segway PT Works (cont.)Slow Speed Roll Compensation FeatureThe PT utilizes a feature called Roll Compensation that separates steering input from terrain changes. This allows the rider to ride in a straight line over uneven terrain by keeping the LeanSteer Frame oriented straight up and down. When riding at low speeds and on slopes, Roll Compensation is reduced, allowing for more precise control at slow speeds as well as reducing steering drift during power on. As the rider's speed increases, Roll Compensation increases, as well.
Beginner Setting Mount/Dismount FeatureThe Segway PT LeanSteer technology was designed to provide responsive steering. The software includes a feature to help new riders easily learn how to mount and dismount the PT without unintentionally initiating a turn. When the PT is in Beginner Setting and the rider has less than two of the four Rider Detect Sensors (see "Rider Detect Sensors," p. 33) engaged, and the PT is moving neither forward or backward, the sensitivity of the LeanSteer frame is 15% of normal operation. When the PT is in Beginner Setting and the rider has two feet on the PT, and the PT is moving neither forward or backward, the sensitivity of the LeanSteer frame is 55% of normal operation. As the PT's speed increases, the sensitivity of the LeanSteer frame is gradually increased.
NOTE:The Beginner Setting Mount/Dismount Feature is only activated when the PT is in Beginner Setting (turtle icon displayed on Infokey Controller). For more information on switching between Beginner Setting and Standard Setting, see "Beginner Button Functions," p. 43.
Figure 13: Riding Across a Slope
27
Segway PT Components and Subsystems
WARNINGAll Segway PT parts must be approved by Segway, and properly installed. Never attempt to stand on a PT without the LeanSteer Frame attached and secured. Using your PT without all parts properly installed could damage your PT and result in serious injury from loss of control, collisions, and falls.
WARNINGDo not modify the Segway PT. Modifications to the PT could interfere with the operation of the PT, could result in serious injury and/or damage, and could void the Segway PT Limited Warranty.
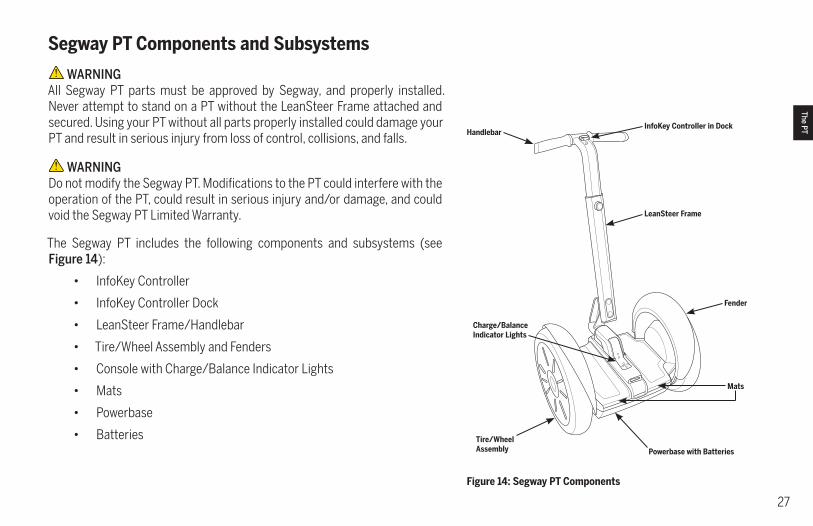
The Segway PT includes the following components and subsystems (see Figure 14):
• InfoKey Controller
• InfoKey Controller Dock
• LeanSteer Frame/Handlebar
• Tire/Wheel Assembly and Fenders
• Console with Charge/Balance Indicator Lights
• Mats
• Powerbase
• Batteries
The PT
Figure 14: Segway PT Components
HandlebarInfoKey Controller in Dock
Mats
LeanSteer Frame
Fender
Powerbase with Batteries
Tire/WheelAssembly
Charge/BalanceIndicator Lights

28
Segway PT Components and Subsystems (cont.)The PT has been designed with concern for the safety of the rider and those who may be nearby. Redundant subsystems maintain controlled operation of the PT in the unlikely event of a component failure. If one component in a subsystem fails, the other component continues to operate, allowing you to come to a complete and safe stop before stepping off. The PT has five redundant subsystems: Controller Boards, Motors, Batteries, the Balance Sensor Assembly, and LeanSteer Sensors.
LeanSteer Frame/HandlebarEnsure the following:
• The Handlebar is attached to the LeanSteer Frame.
• The LeanSteer Frame is attached to the Powerbase.
• The Handlebar is adjusted to the appropriate height.
See "Attach the LeanSteer Frame" (p. 19) for detailed installation instructions.
The LeanSteer Frame pivots at the base to control left/right direction of the PT. If you lean to the left while holding the Handlebar, the LeanSteer Frame pivots and the PT turns left. If you lean to the right while holding the handlebar, the LeanSteer Frame pivots and the PT turns right. Always lean left or right in coordination with the LeanSteer Frame.
Tire/Wheel Assembly and FendersEnsure that Tires are inflated to the proper tire inflation pressure as specified in "Segway PT Specifications" (p. 12).
Tires and Wheels are shipped as an assembly. Do not remove the Tire from the Wheel.
The Fenders on the PT are designed to protect the rider from debris and to safeguard the rider while leaning into turns.
WARNINGDo not remove fenders or ride a Segway PT that has its fenders removed. Doing so could result in loss of control and/or serious personal injury.
29
The PT
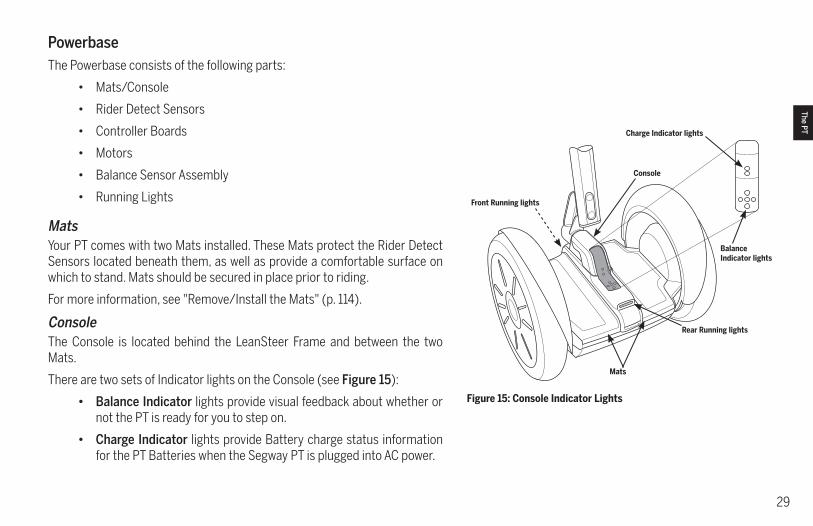
PowerbaseThe Powerbase consists of the following parts:
• Mats/Console
• Rider Detect Sensors
• Controller Boards
• Motors
• Balance Sensor Assembly
• Running Lights
MatsYour PT comes with two Mats installed. These Mats protect the Rider Detect Sensors located beneath them, as well as provide a comfortable surface on which to stand. Mats should be secured in place prior to riding.
For more information, see "Remove/Install the Mats" (p. 114).
ConsoleThe Console is located behind the LeanSteer Frame and between the two Mats.
There are two sets of Indicator lights on the Console (see Figure 15):
• Balance Indicator lights provide visual feedback about whether or not the PT is ready for you to step on.
• Charge Indicator lights provide Battery charge status information for the PT Batteries when the Segway PT is plugged into AC power.
Figure 15: Console Indicator Lights
Console
Mats
Balance Indicator lights
Charge Indicator lights
Front Running lights
Rear Running lights
30
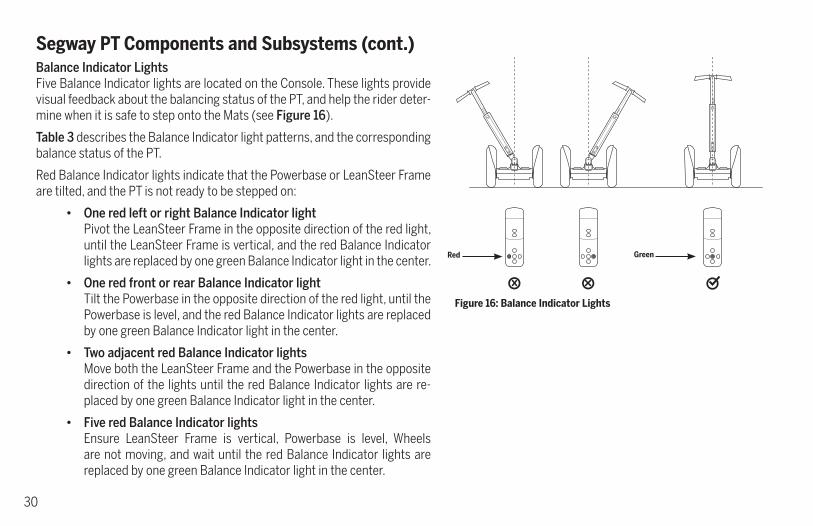
Segway PT Components and Subsystems (cont.)Balance Indicator LightsFive Balance Indicator lights are located on the Console. These lights provide visual feedback about the balancing status of the PT, and help the rider deter-mine when it is safe to step onto the Mats (see Figure 16).
Table 3 describes the Balance Indicator light patterns, and the corresponding balance status of the PT.
Red Balance Indicator lights indicate that the Powerbase or LeanSteer Frame are tilted, and the PT is not ready to be stepped on:
• One red left or right Balance Indicator lightPivot the LeanSteer Frame in the opposite direction of the red light, until the LeanSteer Frame is vertical, and the red Balance Indicator lights are replaced by one green Balance Indicator light in the center.
• One red front or rear Balance Indicator lightTilt the Powerbase in the opposite direction of the red light, until the Powerbase is level, and the red Balance Indicator lights are replaced by one green Balance Indicator light in the center.
• Two adjacent red Balance Indicator lightsMove both the LeanSteer Frame and the Powerbase in the opposite direction of the lights until the red Balance Indicator lights are re-placed by one green Balance Indicator light in the center.
• Five red Balance Indicator lightsEnsure LeanSteer Frame is vertical, Powerbase is level, Wheels are not moving, and wait until the red Balance Indicator lights are replaced by one green Balance Indicator light in the center.
Figure 16: Balance Indicator Lights
GreenRed
31
The PT
Green Balance Indicator lights indicate that the PT is ready to be stepped on, or that a rider is already on:
• One green Balance Indicator light in the centerThe PT is in Standby Mode, ready for the rider to step on.
• Five green Balance Indicator lights pulsingThe PT is in Riderless Balance Mode, ready for the rider to step on.
• Four green Balance Indicator lights rotatingThe PT is in Balance Mode with a rider on.
Balance Mode/Riderless Balance ModeYou ride your PT in Balance Mode. In this mode, the PT detects when you lean forward or backward, or tilt the LeanSteer Frame left or right, and it moves its Wheels in response to your movements. The PT also has a Riderless Balance Mode, which allows you to slowly move the PT when you are not riding it. Step down off the PT, and walk with your PT in Riderless Balance Mode to move around obstacles, stairs, or terrain that is difficult to navigate or dangerous to rider over. When the PT is in Riderless Balance Mode, it is important to hold onto the Handlebar to prevent the PT from moving on its own.
You know your PT is in Balance Mode or Riderless Balance Mode when the Balance Indicator lights on the forward part of the Console are pulsing or rotating green and your InfoKey Controller displays a happy face. For information on how to put your PT into Balance Mode, see “Riding Your Segway PT,” p. 61.
Segway PT Status Light Pattern
Not Ready.Do not step on.
Off: No Balance Indicator lights are illuminated.Red: One or more Balance Indicator lights are red.
Ready.Step on.(Riderless Balance Mode)
Green: Only the center Balance Indicator light is green. All four other lights are not illuminated.Green: All five Balance Indicator lights are pulsing green.
Table 3: Balance Indicator Light Patterns
32
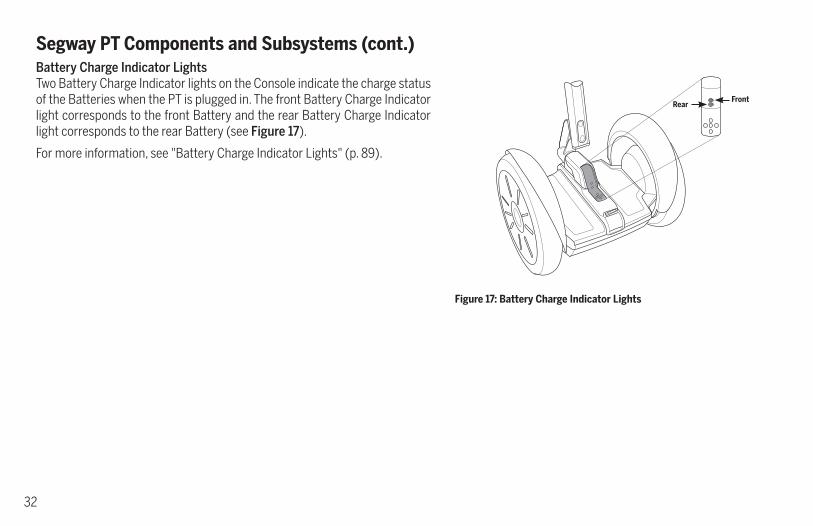
Segway PT Components and Subsystems (cont.)Battery Charge Indicator LightsTwo Battery Charge Indicator lights on the Console indicate the charge status of the Batteries when the PT is plugged in. The front Battery Charge Indicator light corresponds to the front Battery and the rear Battery Charge Indicator light corresponds to the rear Battery (see Figure 17).
For more information, see "Battery Charge Indicator Lights" (p. 89).
Figure 17: Battery Charge Indicator Lights
RearFront
33
The PT
Rider Detect Sensors
WARNINGTo prevent a riderless PT from traveling on its own, never let go of it while it is in Balance Mode. It will travel some distance on its own before shutting down, risking injury to others and damage to the PT.
WARNINGNever place anything on the Mats, except your feet. Doing so could interfere with the Rider Detect Sensors and allow the PT to travel on its own, risking running into a person or property, and causing injury or damage.
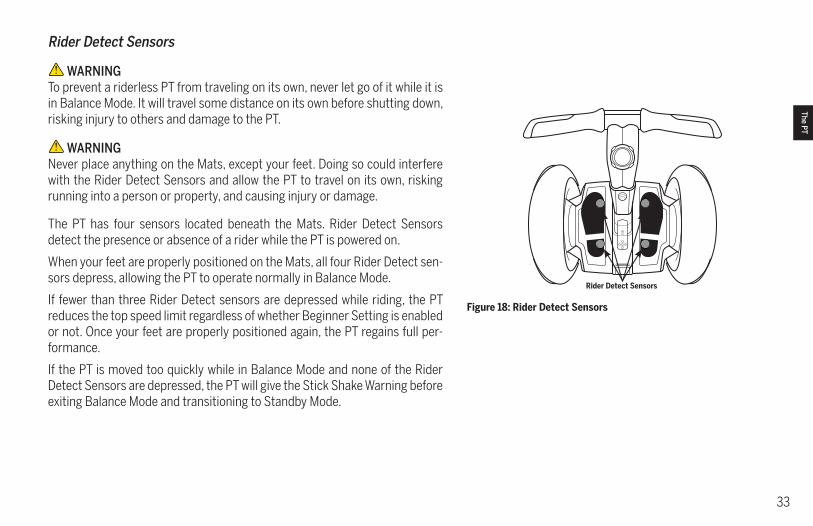
The PT has four sensors located beneath the Mats. Rider Detect Sensors detect the presence or absence of a rider while the PT is powered on.
When your feet are properly positioned on the Mats, all four Rider Detect sen-sors depress, allowing the PT to operate normally in Balance Mode.
If fewer than three Rider Detect sensors are depressed while riding, the PT reduces the top speed limit regardless of whether Beginner Setting is enabled or not. Once your feet are properly positioned again, the PT regains full per-formance.
If the PT is moved too quickly while in Balance Mode and none of the Rider Detect Sensors are depressed, the PT will give the Stick Shake Warning before exiting Balance Mode and transitioning to Standby Mode.
Figure 18: Rider Detect Sensors
Rider Detect Sensors

34
Segway PT Components and Subsystems (cont.)Controller BoardsThe two Controller Boards receive input from the PT’s Batteries, Motors, Rider Detect Sensors, LeanSteer Sensors, rate, and tilt sensors. Based on this input, the Controller Boards send commands to the Motors that turn the Wheels.
If the system senses a malfunction in a critical component or a Battery that is depleted beyond its safe limit, the PT will perform a Safety Shutdown.
For more information on Safety Shutdown, see "Safety Shutdown" (p. 57).
Figure 19: Controller Board Location
35
The PT
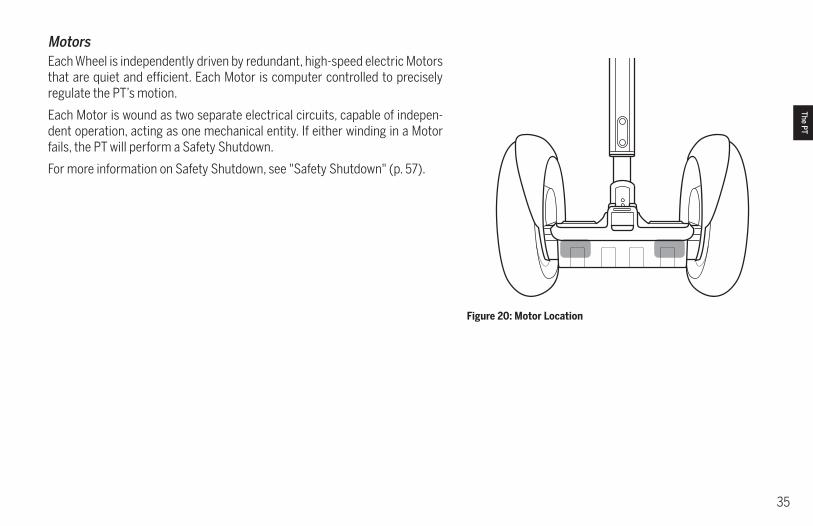
MotorsEach Wheel is independently driven by redundant, high-speed electric Motors that are quiet and efficient. Each Motor is computer controlled to precisely regulate the PT’s motion.
Each Motor is wound as two separate electrical circuits, capable of indepen-dent operation, acting as one mechanical entity. If either winding in a Motor fails, the PT will perform a Safety Shutdown.
For more information on Safety Shutdown, see "Safety Shutdown" (p. 57).
Figure 20: Motor Location
36
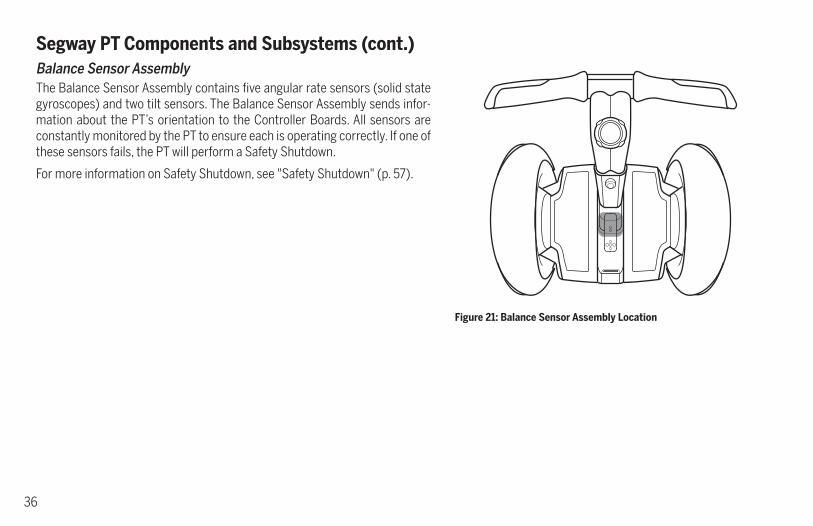
Segway PT Components and Subsystems (cont.)Balance Sensor AssemblyThe Balance Sensor Assembly contains five angular rate sensors (solid state gyroscopes) and two tilt sensors. The Balance Sensor Assembly sends infor-mation about the PT’s orientation to the Controller Boards. All sensors are constantly monitored by the PT to ensure each is operating correctly. If one of these sensors fails, the PT will perform a Safety Shutdown.
For more information on Safety Shutdown, see "Safety Shutdown" (p. 57).
Figure 21: Balance Sensor Assembly Location

37
Running LightsThe PT Running Lights, located at the front and rear of the Powerbase (see Figure 22), are intended to make the PT and rider more visible to others in low-light conditions. The Running Lights turn on automatically and stay on until the PT is powered down.
PT Running Lights are not user-serviceable; if there are any problems with the Running Lights, contact your Segway dealer.
WARNINGTo ride safely, you must be able to clearly see what is in front of you and you must be clearly visible to others.
The PT
Figure 22: Running Lights
38
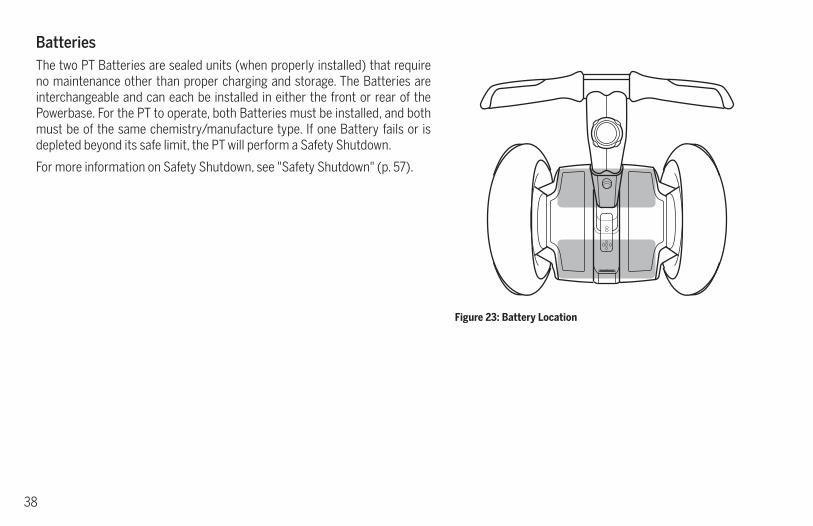
BatteriesThe two PT Batteries are sealed units (when properly installed) that require no maintenance other than proper charging and storage. The Batteries are interchangeable and can each be installed in either the front or rear of the Powerbase. For the PT to operate, both Batteries must be installed, and both must be of the same chemistry/manufacture type. If one Battery fails or is depleted beyond its safe limit, the PT will perform a Safety Shutdown.
For more information on Safety Shutdown, see "Safety Shutdown" (p. 57).
Figure 23: Battery Location
39
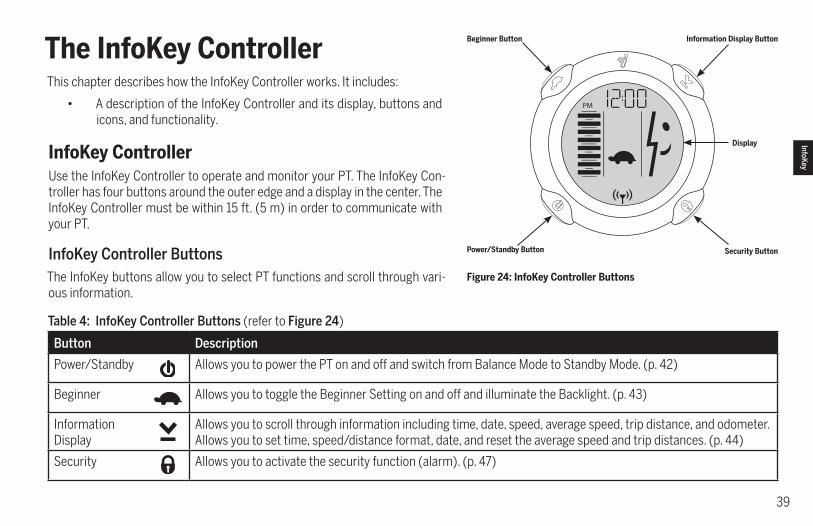
The InfoKey ControllerThis chapter describes how the InfoKey Controller works. It includes:
• A description of the InfoKey Controller and its display, buttons and icons, and functionality.
InfoKey ControllerUse the InfoKey Controller to operate and monitor your PT. The InfoKey Con-troller has four buttons around the outer edge and a display in the center. The InfoKey Controller must be within 15 ft. (5 m) in order to communicate with your PT.
InfoKey Controller ButtonsThe InfoKey buttons allow you to select PT functions and scroll through vari-ous information.
Power/Standby Button
Information Display ButtonBeginner Button
Security Button
Display
Figure 24: InfoKey Controller Buttons
Button Description
Power/Standby Allows you to power the PT on and off and switch from Balance Mode to Standby Mode. (p. 42)
Beginner Allows you to toggle the Beginner Setting on and off and illuminate the Backlight. (p. 43)
InformationDisplay
Allows you to scroll through information including time, date, speed, average speed, trip distance, and odometer.Allows you to set time, speed/distance format, date, and reset the average speed and trip distances. (p. 44)
Security Allows you to activate the security function (alarm). (p. 47)
Table 4: InfoKey Controller Buttons (refer to Figure 24)
InfoKey
40
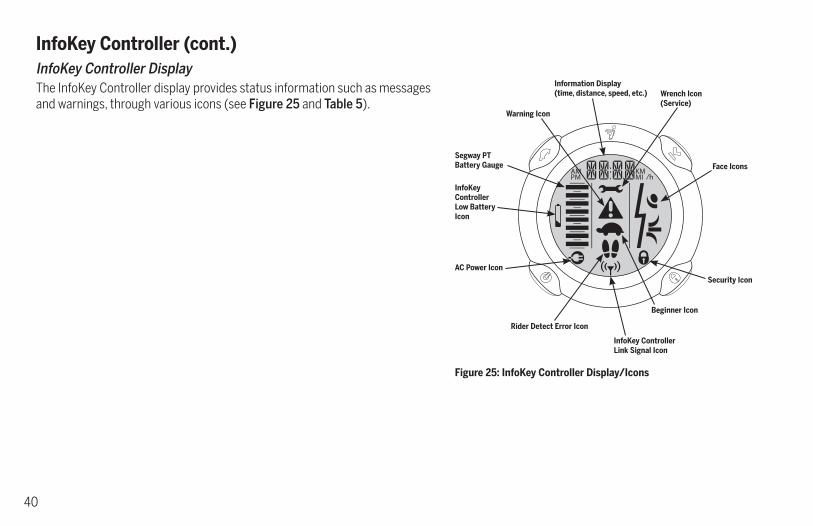
InfoKey Controller (cont.)InfoKey Controller DisplayThe InfoKey Controller display provides status information such as messages and warnings, through various icons (see Figure 25 and Table 5).
Figure 25: InfoKey Controller Display/Icons
Warning Icon
Information Display(time, distance, speed, etc.) Wrench Icon
(Service)
Rider Detect Error Icon
Face Icons
InfoKey ControllerLink Signal Icon
AC Power Icon
InfoKeyControllerLow BatteryIcon
Segway PTBattery Gauge
Security Icon
Beginner Icon
41
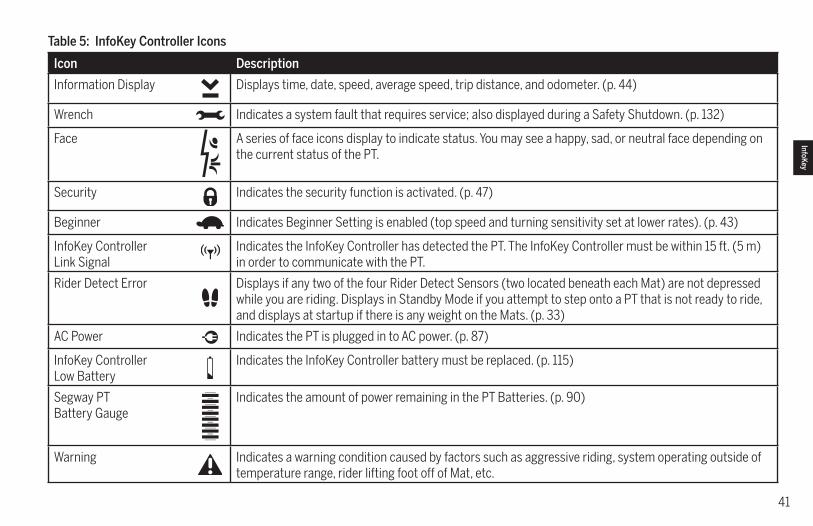
Icon Description
Information Display Displays time, date, speed, average speed, trip distance, and odometer. (p. 44)
Wrench Indicates a system fault that requires service; also displayed during a Safety Shutdown. (p. 132)
Face A series of face icons display to indicate status. You may see a happy, sad, or neutral face depending on the current status of the PT.
Security Indicates the security function is activated. (p. 47)
Beginner Indicates Beginner Setting is enabled (top speed and turning sensitivity set at lower rates). (p. 43)
InfoKey ControllerLink Signal
Indicates the InfoKey Controller has detected the PT. The InfoKey Controller must be within 15 ft. (5 m) in order to communicate with the PT.
Rider Detect Error Displays if any two of the four Rider Detect Sensors (two located beneath each Mat) are not depressed while you are riding. Displays in Standby Mode if you attempt to step onto a PT that is not ready to ride, and displays at startup if there is any weight on the Mats. (p. 33)
AC Power Indicates the PT is plugged in to AC power. (p. 87)
InfoKey ControllerLow Battery
Indicates the InfoKey Controller battery must be replaced. (p. 115)
Segway PTBattery Gauge
Indicates the amount of power remaining in the PT Batteries. (p. 90)
Warning Indicates a warning condition caused by factors such as aggressive riding, system operating outside of temperature range, rider lifting foot off of Mat, etc.
Table 5: InfoKey Controller Icons
InfoKey

42
InfoKey Controller (cont.)Power/Standby Button FunctionsThe following functions can be performed using the Power/Standby button.
Powering On and OffTo power on the PT:
1. Stand no more than 15 ft. (5 m) from your PT.
2. To power on, tap the Power/Standby button.
3. To power off, press the Power/Standby button for 2 seconds.
The PT will only power off when no Rider Detect Sensors are depressed (when there is no weight on the Mats).
Switching to Standby Mode from Balance Mode
1. Ensure the PT is powered on and in Balance Mode.
2. To switch to Standby Mode, tap the Power/Standby button.
3. Confirm that there is no face in the Display and that no Balance Indicator Lights are flashing.
If all four Balance Indicator lights are green and flashing, the PT is still in Balance Mode. The PT will only switch to Standby mode when no Rider Detect Sensors are depressed (when there is no weight on the Mats).
See "Balance Mode/Riderless Balance Mode" for more information (p. 31).
NOTE: If the InfoKey Controller display becomes blank while the PT is being ridden, simply tap the Power/Standby button to refresh the display. The PT will stay in Balance Mode, allowing full and proper operation.
43
Beginner Button Functions
The following functions can be performed using the Beginner button.
Enabling and Disabling the Beginner Setting
1. To disable the Beginner Setting, confirm that the Beginner icon (turtle) is displayed, then tap the Beginner button. The Beginner icon will no longer show in the Display.
2. To enable the Beginner Setting, confirm that the Beginner icon is not displayed, then tap the Beginner button. The Beginner icon will show in the Display.
See "Unlocking and Locking the Beginner Setting" (p. 48) for more information.
The PT will only accept these commands when no Rider Detect Sensors are depressed (when there is no weight on the Mats).
Illuminating the Backlight
1. Press and hold the Beginner button to illuminate the Backlight.
2. Release the Beginner button to turn off the Backlight.
InfoKey
44
InfoKey Controller (cont.)Information Display Button FunctionsThe following functions can be performed using the Information Display Button.
Scrolling Through InformationTap the Information Display button to scroll through the following information:
• Time
• Date
• Current speedThe speed/distance format flashes.
• Average speedThe speed/distance format does not flash; all trips are averaged until you reset the average speed function.
• Trip distanceThe speed/distance format flashes, and shows distance traveled.
• OdometerThe speed/distance format does not flash, and shows total distance traveled on the Segway PT.
NOTE:After replacing the InfoKey Battery, all information will revert to default. Trip distance/average speed will reset to "0." Odometer will not reset.
45
Setting and Resetting InformationThe following procedures are covered in this section:
• Setting time format, hour and minute
• Setting speed/distance format, date format, year, month, and day
• Resetting average speed
• Resetting trip distance
Setting Time Format, Hour, and Minute1. Set Time Format (12- or 24-hour Clock)
Tap the Information Display button until the time displays. Press and hold the Information Display button until the time format segment flashes either "12" or "24." Select the 12- or 24-hour format by tapping the Security button until the desired format is displayed. Release the Information Display button. Tap the Information Display button to confirm and advance to the hour setting.
2. Set HourSelect the hour by tapping the Security button until the desired hour is displayed. Press and hold the Security button to fast-advance hours. Tap the Information Display button to confirm and advance to the minute setting.
3. Set MinuteSelect the minute by tapping the Security button until the desired minute is displayed. Press and hold the Security button to fast-advance minutes. Tap the Information Display button to confirm the time setting. The time is now set.
Setting Speed/Distance Format, Date Format, Year, Month, and Day1. Set Speed/Distance Format (MI or KM)
Tap the Information Display button until you see the month/day or day/month alternating with the year. Press and hold the Information Display button until the MI/h or KM/h shows in the display. Release the Information Display button. Select the MI/h or KM/h format by tapping the Security button until the desired format is displayed. Tap the Information Display button to confirm and advance to the date format setting.
InfoKey
continued
46
InfoKey Controller (cont.)Setting Speed/Distance Format, Date Format, Year, Month, and Day (cont.)
2. Set Date Format (MO.DA or DA.MO)Select the MO.DA (Month.Day) or DA.MO (Day.Month) format by tapping the Security button until the desired format is displayed. Tap the Information Display button to confirm and advance to the year setting.
3. Set YearSelect the year by tapping the Security button until the desired year is displayed. Press and hold the Security button to fast-advance years. Tap the Information Display button to confirm and advance to the month setting.
4. Set MonthSelect the month by tapping the Security button until the desired month is displayed. Press and hold the Security button to fast-advance months. Tap the Information Display button to confirm and advance to the day setting.
5. Set DaySelect the day by tapping the Security button until the desired day is displayed. Press and hold the Security button to fast-advance days. Tap the Information Display button to confirm speed/distance format, date format, year, month, and day. These are now set.
Setting Speed Limits and Shutdown TimeoutSpeed Limit:Press and hold the Information Display button until the odometer is shown on the screen. Then, hold the Information Display button for about two (2) seconds, until you see the Beginner ("SPD1") speed limit. The InfoKey controller screen will alternate between "SPD1" and the current Beginner speed limit setting. Tapping the Security button will show the next available speed limit. Beginner Setting speed limit options range from 4.0 mph to 8.0 mph in 0.5 mph increments. Once your preferred Beginner Setting speed limit is shown on the screen, press the Informa-tion Display button again to save the Beginner Setting speed limit. The Infokey controller screen will now alternate between "SPD2" (Standard Setting) and the current Standard speed limit. Tapping the Security button will show the next available speed limit. Standard Setting speed limit options range from 4.0 mph to 12.5 mph in 0.5 mph increments. Once your Standard Setting speed limit is shown on the screen, press the Information Display button again to save the Standard Setting speed limit. The Infokey controller screen will now alternate between the current Shutdown Timeout setting and "-OFF".
47
Shutdown Timeout:Shutdown timeout is the period of time the PT will remain powered on in standby mode. Tapping the Security button will cycle through the available shutdown timeouts: 4 seconds, 30 seconds, 1 minute, 5 minutes, 15 minutes. Pressing the Information Display button will save your selected timout setting and return the InfoKey controller to normal operation. Your Speed Limit and Shutdown timeout settings will now be activated the next time you power on your PT.
Resetting Average SpeedTap the Information Display button until you see the average speed ("MI/h" or "KM/h" does not flash). Press and hold the Information Display button until average speed resets to "0.0."
Resetting Trip DistanceTap the Information Display button until you see your trip distance ("MI" or "KM" flashes). Press and hold the Information Display button until the trip odometer resets to "0.0."
Security Button FunctionsThe following functions can be performed using the Security Button.
Enabling and Disabling the Security Function
1. To enable the Security Function, tap the Security button. The Security icon (lock) will show in the Display.
2. To disable the Security Function, tap the Security button. The Security icon (lock) will no longer show in the Display.
The PT will only accept these commands when no Rider Detect Sensors are depressed (when there is no weight on the Mats).
The Security Function includes an alarm and a mechanism that makes it difficult to move your PT and discourages tampering. The best way to deter theft of your PT is to keep it in a secure indoor location with the InfoKey Controller stored separately. If you must leave your PT unattended in a location that is not secure, enable the Security Function and remain within audible range so you can respond, should the alarm sound.
InfoKey
48
InfoKey Controller (cont.)Button Combination FunctionsThe following functions require you to simultaneously push a combination of InfoKey Controller buttons.
Unlocking and Locking the Beginner SettingFor your first ride, the PT is set to operate exclusively with the Beginner Setting enabled. If the Beginner icon (turtle) does not display, do NOT ride the PT until you enable the Beginner Setting. The PT ships from the factory with the Beginner Setting locked, to encourage new riders to learn using the Beginner Setting.
To unlock the Beginner Setting:
1. Power on the PT.
2. Press and hold the Beginner Button and the Information Display Button simultaneously for more than 10 seconds. The Information Display button will flash.
3. Make sure the PT has not entered Balance Mode.
4. Confirm that the Beginner icon (turtle) toggles when the Beginner button is tapped.
Once the Beginner Setting is unlocked, you can toggle the Beginner Setting on or off by tapping the Beginner button.
To lock the Beginner Setting:
1. Repeat Steps 1 and 2 above.
2. Confirm that the Beginner icon (turtle) is showing on the InfoKey Display.
3. Test the lock by tapping the Beginner button and confirming that the Beginner icon remains showing in the InfoKey Display.
49
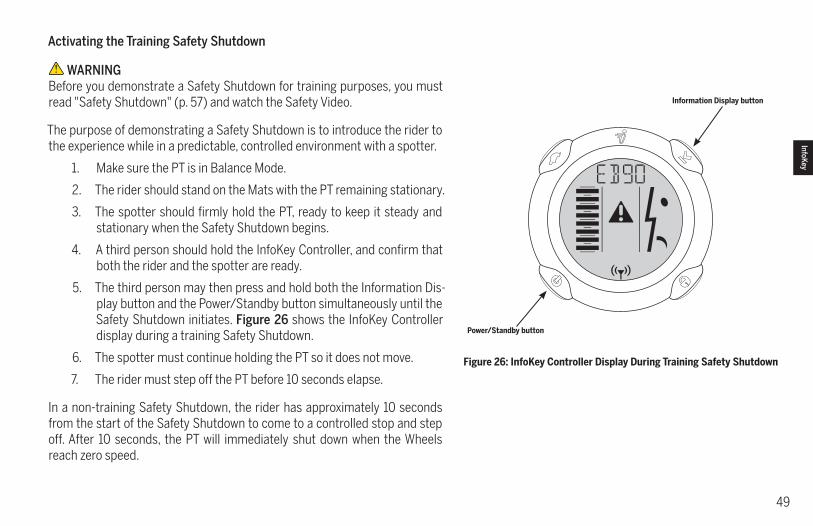
Activating the Training Safety Shutdown
WARNINGBefore you demonstrate a Safety Shutdown for training purposes, you must read "Safety Shutdown" (p. 57) and watch the Safety Video.
The purpose of demonstrating a Safety Shutdown is to introduce the rider to the experience while in a predictable, controlled environment with a spotter.
1. Make sure the PT is in Balance Mode.
2. The rider should stand on the Mats with the PT remaining stationary.
3. The spotter should firmly hold the PT, ready to keep it steady and stationary when the Safety Shutdown begins.
4. A third person should hold the InfoKey Controller, and confirm that both the rider and the spotter are ready.
5. The third person may then press and hold both the Information Dis-play button and the Power/Standby button simultaneously until the Safety Shutdown initiates. Figure 26 shows the InfoKey Controller display during a training Safety Shutdown.
6. The spotter must continue holding the PT so it does not move.
7. The rider must step off the PT before 10 seconds elapse.
In a non-training Safety Shutdown, the rider has approximately 10 seconds from the start of the Safety Shutdown to come to a controlled stop and step off. After 10 seconds, the PT will immediately shut down when the Wheels reach zero speed.
Figure 26: InfoKey Controller Display During Training Safety Shutdown
Information Display button
Power/Standby button
InfoKey

50
51
Safety AlertsThis chapter describes the Segway PT’s safety alerts. The safety alerts include:
• Speed Limiter
• Stick Shake Warning
• Safety Shutdown
It is important that you recognize these alerts and know how to respond appropriately before you ride your PT.
WARNINGRead and follow all the instructions in the User Manual and watch the Safety Video for important safety information about the Speed Limiter, Stick Shake, and Safety Shutdown safety alerts.
NOTE:Not every safety issue triggers an alert. For additional safety tips and guidelines, see "Avoiding Hazards" (p. 62).
Be Safe
52
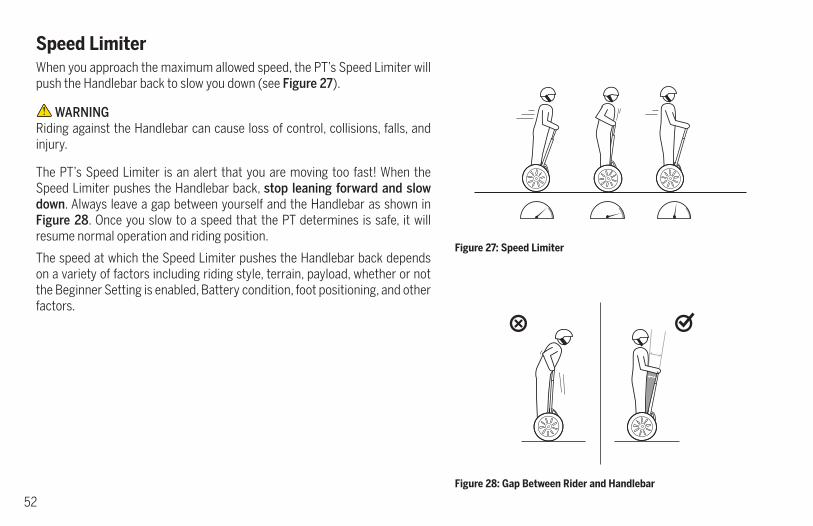
Speed LimiterWhen you approach the maximum allowed speed, the PT’s Speed Limiter will push the Handlebar back to slow you down (see Figure 27).
WARNINGRiding against the Handlebar can cause loss of control, collisions, falls, and injury.
The PT’s Speed Limiter is an alert that you are moving too fast! When the Speed Limiter pushes the Handlebar back, stop leaning forward and slow down. Always leave a gap between yourself and the Handlebar as shown in Figure 28. Once you slow to a speed that the PT determines is safe, it will resume normal operation and riding position.
The speed at which the Speed Limiter pushes the Handlebar back depends on a variety of factors including riding style, terrain, payload, whether or not the Beginner Setting is enabled, Battery condition, foot positioning, and other factors.
Figure 27: Speed Limiter
Figure 28: Gap Between Rider and Handlebar

53
NOTE:Conditions that may cause the Speed Limiter to activate when you are travel-ing at less than the maximum speed allowed for your operating mode include:
• Riding up or down a steep hill
• Riding on bumpy terrain
• Riding with fewer than three Rider Detect Sensors depressed
• The first few seconds after you power on and step on the Powerbase
• Low Battery charge
• Batteries that are too hot or too cold
• Riding down a hill with fully charged Batteries
Because of regenerative charging, if the Batteries are fully charged, the PT will activate the Speed Limiter to avoid overcharging.
Table 6 shows the icons that display on the InfoKey Controller when the Speed Limiter is engaged at a speed lower than the top speed set by the In-foKey Controller. This table also describes the error that has occurred and the recommended action you should take.
Table 6: Speed Limiter
Display Icon Description RecommendedAction
The PT is operating at reduced performance levels due to a temporary condition. The speed limit has been lowered until the condition clears.
When the Speed Limiter pushes the Handlebar back, stop leaning forward and slow down. Always leave a gap between yourself and the Handlebar.
Be Safe
54
Stick Shake WarningOne of the ways that the PT notifies you when you are at risk of falling is by shaking the Handlebar and making growling noises. This is called the Stick Shake Warning. The Stick Shake Warning can occur in conjunction with, or independent of the Speed Limiter and Safety Shutdown alert, depending on your riding situation (see Figure 29).
Rider OnIf the Stick Shake Warning occurs while riding, slow down. If the Stick Shake Warning persists, come to a stop and safely step off the PT. Do not attempt to ride again until the condition that caused the persistent Stick Shake Warning has been identified and corrected. If the Stick Shake Warning occurs while you are stopped or stuck, step off immediately and do not attempt to ride again until:
• You are clear of all obstacles and slopes.
• You are certain that you did not experience a Safety Shutdown.
For additional information, see "Safety Shutdown" (page 57).
Figure 29: Stick Shake Warning

55
When riding, the Stick Shake Warning occurs if you demand too much power from the PT. The Stick Shake Warning can happen when riding on a steep slope, over rough terrain, against an obstacle, or when accelerating or decelerating abruptly. The Stick Shake Warning also occurs if you ride backward too fast or if you try to step on the PT when it is not ready to balance. The Stick Shake Warning is more likely to occur when your Batteries are low, cold, heavily used, or poorly maintained because there is less energy available to keep you balanced.
Table 7 lists possible causes of the Stick Shake Warning and recommended actions to take when the Stick Shake Warning occurs with a Rider on the Mats.
Possible Causes Recommended Action
Riding aggressively, accelerating or stopping abruptly.
Ride more smoothly and slowly.
Riding against the Handlebar.
Leave a gap between you and the Handlebar (p. 52).
Riding on rough terrain or steep slopes.
Ride on smoother, flatter, less demanding terrain. If on a slope, turn perpendicular to the slope, step off, and walk the PT in Riderless Balance Mode (p. 31).
Riding against an obstruction such as a door frame or curb that stops the Wheel.
Stop pushing against the obstruction, stop the PT, step off, and proceed by walking around the obstruction with the PT in Riderless Balance Mode (p. 78).
Riding backwards too quickly.
Stop, turn in place, and proceed forward.
Safety Shutdown has begun.
Come to a controlled stop and safely step off the PT within 10 seconds (p. 57).
Table 7: Stick Shake Warning With a Rider on Mats
Be Safe
56
Stick Shake Warning (cont.)Rider OffYou do not have to be riding the PT for the Stick Shake Warning to occur. The Stick Shake Warning occurs if the PT is moved too quickly while in Riderless Balance Mode. Riderless Balance Mode is when the PT is in Balance mode without a rider standing on the Powerbase. The Stick Shake Warning also occurs if the Wheels spin as you pull the PT over a curb or up stairs.
Table 8 lists possible causes of the Stick Shake Warning and recommended actions to take when the Stick Shake Warning occurs with no Rider on the Mats.
Possible Causes Recommended Action
Moving a PT too quickly with no rider on the Powerbase while in Riderless Balance Mode.
When moving your PT in Riderless Balance Mode, you must move slowly and carefully. Always keep the PT below you (lead it up stairs or slopes and keep it below you when descending stairs or slopes) (p. 78).
Stepping on the PT when it is powered on, but not ready for you to step on.
Step off, center the LeanSteer Frame, and level the Powerbase. Once the center Balance Indicator light turns green (p. 69), step on again.
Table 8: Stick Shake Warning With No Rider on Mats
57
Safety Shutdown
WARNINGDo not get back on the Segway PT after a Safety Shutdown until the condition that caused the Safety Shutdown has been identified and corrected.
WARNINGNever restart and ride your Segway PT after it has indicated an empty Battery condition or performed Safety Shutdown due to low Battery. The PT may not have enough power to keep you balanced, especially if you demand a lot of power at once. If you restart and continue riding, you risk falling. Also, you risk damaging your Batteries, resulting in reduced Battery life and capacity.
If the PT detects a fault in any of its redundant systems or a Battery is depleted beyond its safe limit, it performs a Safety Shutdown (Figure 30).
When a Safety Shutdown occurs, the PT automatically reduces its speed, gives the Stick Shake Warning (shakes the Handlebar and makes growling noises), flashes the Balance Indicator lights, emits a warning tone, and the InfoKey Controller displays an unhappy face.
You have approximately 10 seconds from the start of a Safety Shutdown to come to a controlled stop and step off. After 10 seconds, the PT will immediately shut down when the Wheels reach zero speed.
If a Safety Shutdown occurs:
1. Immediately come to a controlled stop.
2. Carefully step off one foot at a time.
Figure 30: Safety Shutdown
Be Safe
58
Safety Shutdown (cont.)
WARNINGTheft detection systems, such as the type used in some libraries and retail stores can interfere with the Segway PT’s ability to balance and/or cause the PT to perform a Safety Shutdown. Do not ride within 5 feet (1.5 meters) of any theft detection system.
Table 9 shows the InfoKey Controller icon that displays when a Safety Shutdown occurs. The table also describes the recommended action you should take.
Figure 31: Security Systems
Display Icon Description Recommended Action
The system has detected a fault and is slowing to zero speed before shutdown (full PT Battery charge level shown).
If a Safety Shutdown occurs:
1. Immediately come to a controlled stop.
2. Carefully step off one foot at a time. You have approximately 10 seconds from the start of the Safety Shutdown to come to a controlled stop and step off the Powerbase.
Do not resume use of your PT after a Safety Shutdown has occurred until you have identified and corrected the condition that caused it.
See "Troubleshooting the Segway PT" (p. 119).
Table 9: Safety Shutdown
59
Empty Battery ConditionThe PT notifies you of a pending empty Battery condition before starting a Safety Shutdown. An unhappy face icon displays on the InfoKey Controller, the PT’s speed is limited, and the PT emits a warning tone.
Whenever the PT notifies you of a pending empty Battery condition, come to a controlled stop and safely step off of the PT before the Safety Shutdown begins.
Table 10 shows the InfoKey Controller icon that displays when a pending empty Battery notification occurs. The table also describes the recommended action you should take.
NOTE:In some cases, old, cold, heavily used, or poorly maintained Batteries may develop a high resistance condition. This can cause a pending empty Battery condition to occur even if the Batteries were recently charged.
Display Icon Description Recommended Action
The system has detected and notified you of a pending empty Battery condition (empty PT Battery charge level shown).
Come to a controlled stop and safely step off of the PT before the Safety Shutdown begins. Do not resume use of your PT until you have charged the Batteries.
Table 10: Empty Battery Condition
Be Safe

60

61
Riding Your Segway PTThis section describes how to ride the Segway PT. It discusses riding for the first time and gives guidelines and helpful hints for all rides. Follow these steps to learn to ride your PT. It is important that you practice riding in a controlled, familiar environment until you are comfortable using your PT and InfoKey Controller.
Before riding, make sure your PT is assembled and charged. See "Assembling Your Segway PT" (p. 17), and "Charging Your Batteries" (p. 87). Inspect your PT before each use (see "Pre-Ride Checklist" on the inside back cover of this manual). Do not ride if any part is loose, damaged, or if the Tires are not properly inflated. See "Maintaining Your Segway PT" (p. 97). Do not wear loose clothing or jewelry that could get caught in the PT.
Riding FormYour posture and stance affect your ability to ride safely:
• Be alert. Scan both far ahead and in front of the Wheels—your eyes are your best tool for safely avoiding obstacles and slippery sur-faces.
• Keep a firm grip on the Handlebar, your legs loose, and knees and elbows bent. This helps you maintain your balance over rough terrain.
• Leave a gap between yourself and the Handlebar. Do not lean over or into the Handlebar. Leaning over or into the Handlebar dramati-cally increases the risk of collisions, falls, and loss of control.
• Keep your feet centered on the Mats.
• Practice controlled stopping.
• Keep your body aligned with the LeanSteer Frame and lean into turns.
• Point the LeanSteer Frame in the direction you want to travel.
• Make sure the Handlebar is set to the correct height. See "Adjust the Handlebar Height" (p. 21).
Ride

62
Avoiding HazardsThe PT is highly maneuverable and allows you to easily navigate around ob-stacles. However, to prevent the loss of traction, you must always be careful when riding and learn to identify and avoid slippery, icy, or wet surfaces, loose materials (sand/gravel), steep slopes, and obstacles. Stop and step off your PT and use Riderless Balance Mode (p. 79) to move your PT over unsafe sur-faces or terrain.
Avoiding SlipsThe PT Tires must be able to grip the ground for the machine to stay upright! Slips occur when the tires lose traction, potentially causing loss of control and a fall. Abrupt maneuvers, and riding over slippery surfaces, loose objects and materials, or steep slopes can cause the tires to lose traction.
• Avoid abrupt maneuvers, such as fast stopping or starting.
• Avoid riding on slippery surfaces such as snow, ice, wet floors, wet grass, or any other surface that might cause slipping.
• Avoid riding over loose objects or materials such as small branches, litter, or small stones.
• Use caution when riding over any terrain change such as pavement to grass, or over a threshold or speed bump.
• Avoid riding on steep slopes. Maintain Tire contact with the ground.
Figure 32: Navigate Around Obstacles
Figure 33: Avoid Slips

63
Avoiding TripsTrips occur when the PT’s Wheels or Powerbase encounter an obstacle or ter-rain change that prevents the PT from moving, bringing it to an abrupt stop and potentially causing a fall.
• Avoid holes, curbs, steps, and other obstacles.
• Avoid riding over any surface where the bottom of the PT may strike any object.
• Use caution when riding over any terrain change such as pavement to grass, or over a threshold or speed bump.
Avoiding TipsThe PT balances front to back but not side-to-side. You are responsible for maintaining side-to-side balance by leaning into turns. If you fail to actively maintain this side-to-side balance, the PT can tip sideways and fall.
• Avoid riding across steep slopes.
• Lean into turns and lean uphill when riding across gentle slopes.
• Keep the LeanSteer Frame vertical when riding across a slope.
• Avoid turning on slopes or ramps.
• Never let go of the Handlebar when riding across a slope. The PT will turn downhill and you could lose your balance.
Figure 34: Avoid Trips
Figure 35: Lean Uphill on Slopes
Ride
continued
64
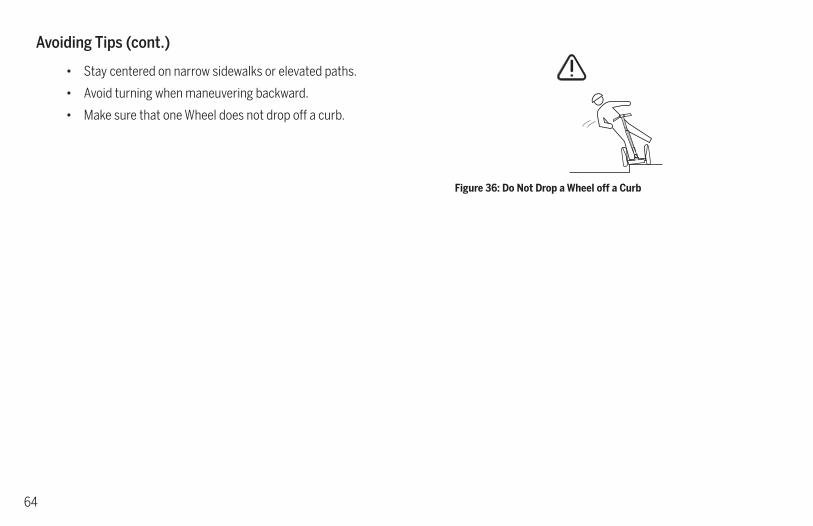
Avoiding Tips (cont.)
• Stay centered on narrow sidewalks or elevated paths.
• Avoid turning when maneuvering backward.
• Make sure that one Wheel does not drop off a curb.
Figure 36: Do Not Drop a Wheel off a Curb
65
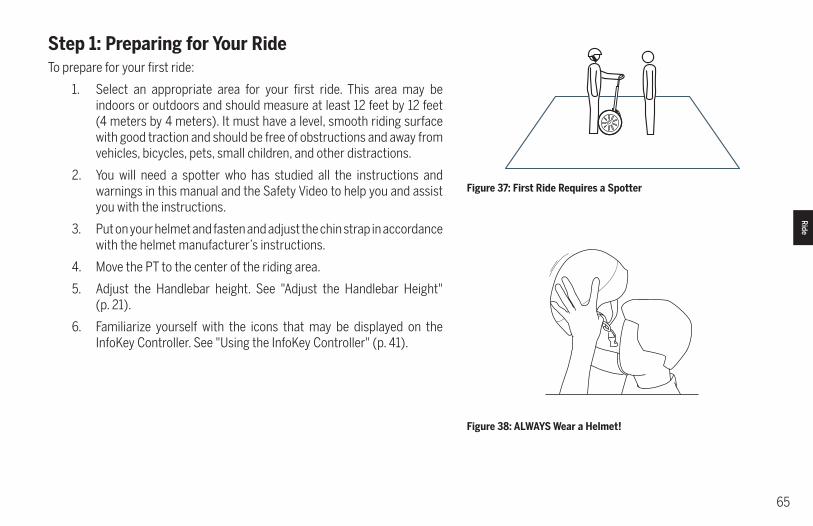
Step 1: Preparing for Your RideTo prepare for your first ride:
1. Select an appropriate area for your first ride. This area may be indoors or outdoors and should measure at least 12 feet by 12 feet (4 meters by 4 meters). It must have a level, smooth riding surface with good traction and should be free of obstructions and away from vehicles, bicycles, pets, small children, and other distractions.
2. You will need a spotter who has studied all the instructions and warnings in this manual and the Safety Video to help you and assist you with the instructions.
3. Put on your helmet and fasten and adjust the chin strap in accordance with the helmet manufacturer’s instructions.
4. Move the PT to the center of the riding area.
5. Adjust the Handlebar height. See "Adjust the Handlebar Height" (p. 21).
6. Familiarize yourself with the icons that may be displayed on the InfoKey Controller. See "Using the InfoKey Controller" (p. 41).
Figure 37: First Ride Requires a Spotter
Figure 38: ALWAYS Wear a Helmet!
Ride
66
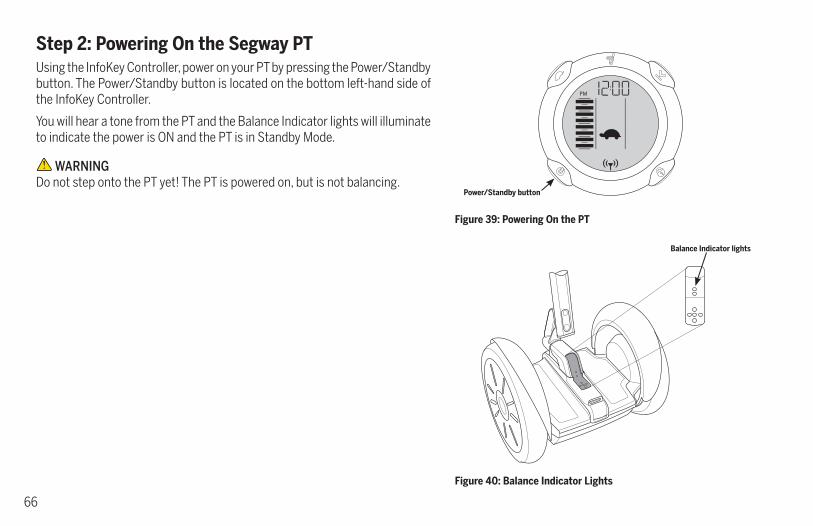
Step 2: Powering On the Segway PTUsing the InfoKey Controller, power on your PT by pressing the Power/Standby button. The Power/Standby button is located on the bottom left-hand side of the InfoKey Controller.
You will hear a tone from the PT and the Balance Indicator lights will illuminate to indicate the power is ON and the PT is in Standby Mode.
WARNINGDo not step onto the PT yet! The PT is powered on, but is not balancing.
Figure 40: Balance Indicator Lights
Balance Indicator lights
Figure 39: Powering On the PT
Power/Standby button
67
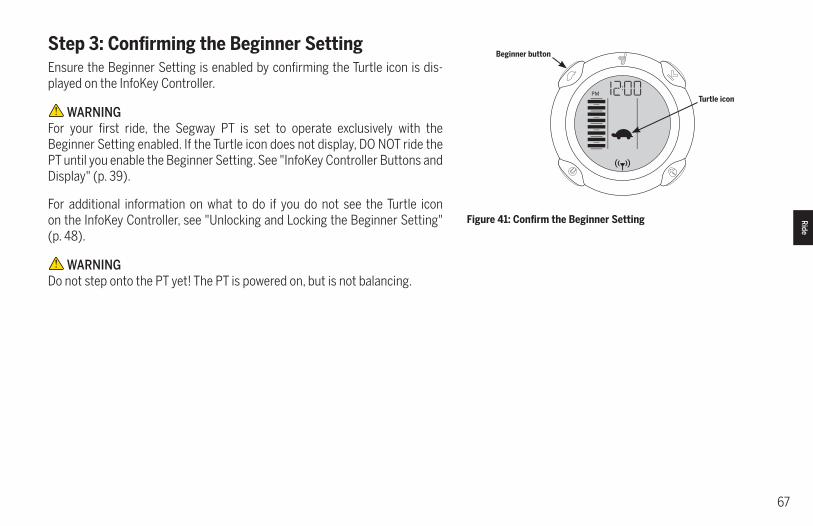
Step 3: Confirming the Beginner SettingEnsure the Beginner Setting is enabled by confirming the Turtle icon is dis-played on the InfoKey Controller.
WARNINGFor your first ride, the Segway PT is set to operate exclusively with the Beginner Setting enabled. If the Turtle icon does not display, DO NOT ride the PT until you enable the Beginner Setting. See "InfoKey Controller Buttons and Display" (p. 39).
For additional information on what to do if you do not see the Turtle icon on the InfoKey Controller, see "Unlocking and Locking the Beginner Setting" (p. 48).
WARNINGDo not step onto the PT yet! The PT is powered on, but is not balancing.
Figure 41: Confirm the Beginner Setting
Beginner button
Turtle icon
Ride
68
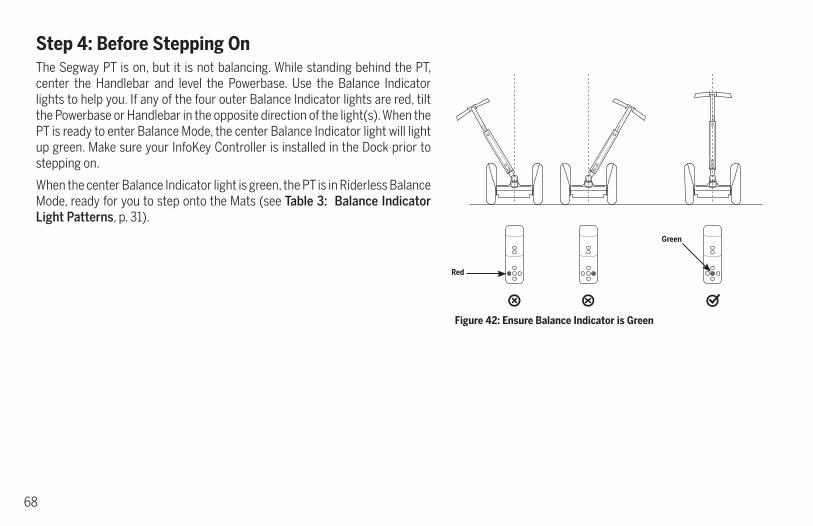
Step 4: Before Stepping OnThe Segway PT is on, but it is not balancing. While standing behind the PT, center the Handlebar and level the Powerbase. Use the Balance Indicator lights to help you. If any of the four outer Balance Indicator lights are red, tilt the Powerbase or Handlebar in the opposite direction of the light(s). When the PT is ready to enter Balance Mode, the center Balance Indicator light will light up green. Make sure your InfoKey Controller is installed in the Dock prior to stepping on.
When the center Balance Indicator light is green, the PT is in Riderless Balance Mode, ready for you to step onto the Mats (see Table 3: Balance Indicator Light Patterns, p. 31).
Figure 42: Ensure Balance Indicator is Green
Green
Red
69
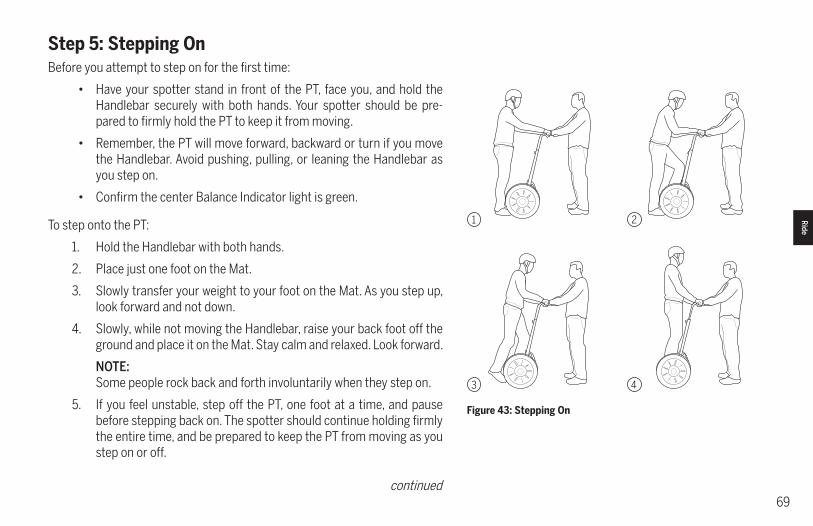
Step 5: Stepping OnBefore you attempt to step on for the first time:
• Have your spotter stand in front of the PT, face you, and hold the Handlebar securely with both hands. Your spotter should be pre-pared to firmly hold the PT to keep it from moving.
• Remember, the PT will move forward, backward or turn if you move the Handlebar. Avoid pushing, pulling, or leaning the Handlebar as you step on.
• Confirm the center Balance Indicator light is green.
To step onto the PT:
1. Hold the Handlebar with both hands.
2. Place just one foot on the Mat.
3. Slowly transfer your weight to your foot on the Mat. As you step up, look forward and not down.
4. Slowly, while not moving the Handlebar, raise your back foot off the ground and place it on the Mat. Stay calm and relaxed. Look forward.
NOTE:Some people rock back and forth involuntarily when they step on.
5. If you feel unstable, step off the PT, one foot at a time, and pause before stepping back on. The spotter should continue holding firmly the entire time, and be prepared to keep the PT from moving as you step on or off.
Figure 43: Stepping On
1 2
3 4
Ride
continued
70
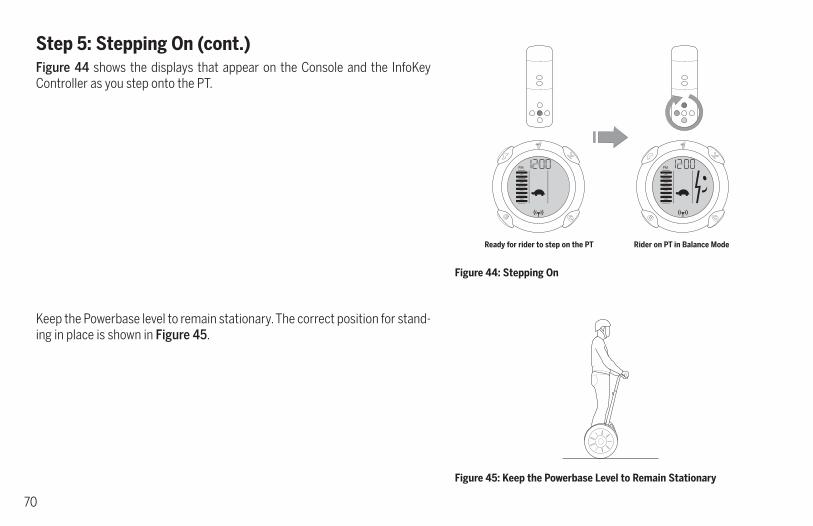
Step 5: Stepping On (cont.)Figure 44 shows the displays that appear on the Console and the InfoKey Controller as you step onto the PT.
Keep the Powerbase level to remain stationary. The correct position for stand-ing in place is shown in Figure 45.
Figure 45: Keep the Powerbase Level to Remain Stationary
Figure 44: Stepping On
Ready for rider to step on the PT Rider on PT in Balance Mode
71
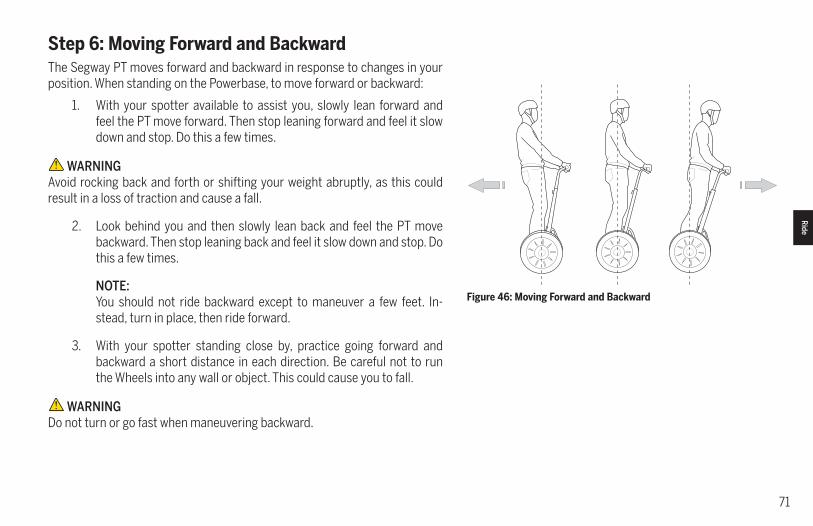
Step 6: Moving Forward and BackwardThe Segway PT moves forward and backward in response to changes in your position. When standing on the Powerbase, to move forward or backward:
1. With your spotter available to assist you, slowly lean forward and feel the PT move forward. Then stop leaning forward and feel it slow down and stop. Do this a few times.
WARNINGAvoid rocking back and forth or shifting your weight abruptly, as this could result in a loss of traction and cause a fall.
2. Look behind you and then slowly lean back and feel the PT move backward. Then stop leaning back and feel it slow down and stop. Do this a few times.
NOTE:You should not ride backward except to maneuver a few feet. In-stead, turn in place, then ride forward.
3. With your spotter standing close by, practice going forward and backward a short distance in each direction. Be careful not to run the Wheels into any wall or object. This could cause you to fall.
WARNINGDo not turn or go fast when maneuvering backward.
Figure 46: Moving Forward and Backward
Ride
72
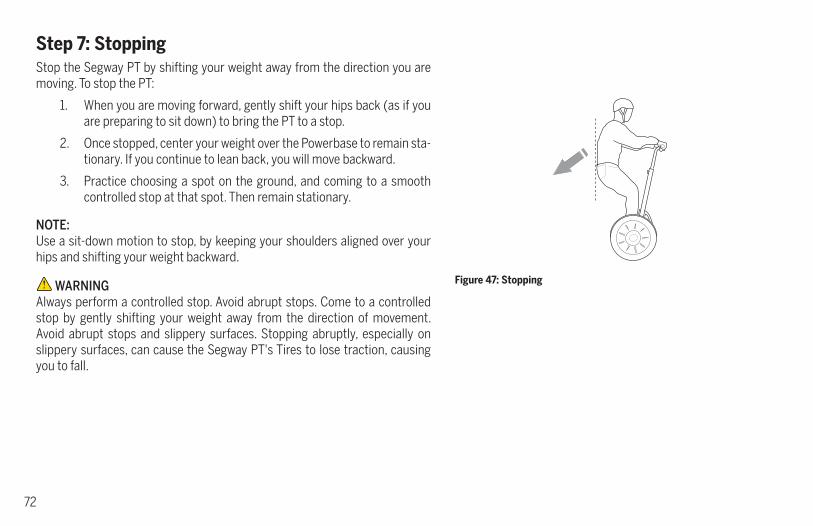
Step 7: StoppingStop the Segway PT by shifting your weight away from the direction you are moving. To stop the PT:
1. When you are moving forward, gently shift your hips back (as if you are preparing to sit down) to bring the PT to a stop.
2. Once stopped, center your weight over the Powerbase to remain sta-tionary. If you continue to lean back, you will move backward.
3. Practice choosing a spot on the ground, and coming to a smooth controlled stop at that spot. Then remain stationary.
NOTE:Use a sit-down motion to stop, by keeping your shoulders aligned over your hips and shifting your weight backward.
WARNINGAlways perform a controlled stop. Avoid abrupt stops. Come to a controlled stop by gently shifting your weight away from the direction of movement. Avoid abrupt stops and slippery surfaces. Stopping abruptly, especially on slippery surfaces, can cause the Segway PT's Tires to lose traction, causing you to fall.
Figure 47: Stopping
73
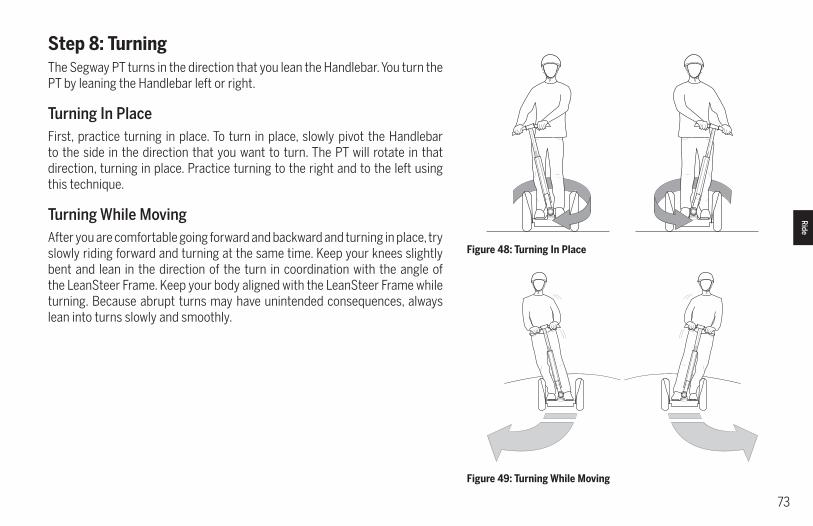
Step 8: TurningThe Segway PT turns in the direction that you lean the Handlebar. You turn the PT by leaning the Handlebar left or right.
Turning In PlaceFirst, practice turning in place. To turn in place, slowly pivot the Handlebar to the side in the direction that you want to turn. The PT will rotate in that direction, turning in place. Practice turning to the right and to the left using this technique.
Turning While MovingAfter you are comfortable going forward and backward and turning in place, try slowly riding forward and turning at the same time. Keep your knees slightly bent and lean in the direction of the turn in coordination with the angle of the LeanSteer Frame. Keep your body aligned with the LeanSteer Frame while turning. Because abrupt turns may have unintended consequences, always lean into turns slowly and smoothly.
Figure 48: Turning In Place
Figure 49: Turning While Moving
Ride
74
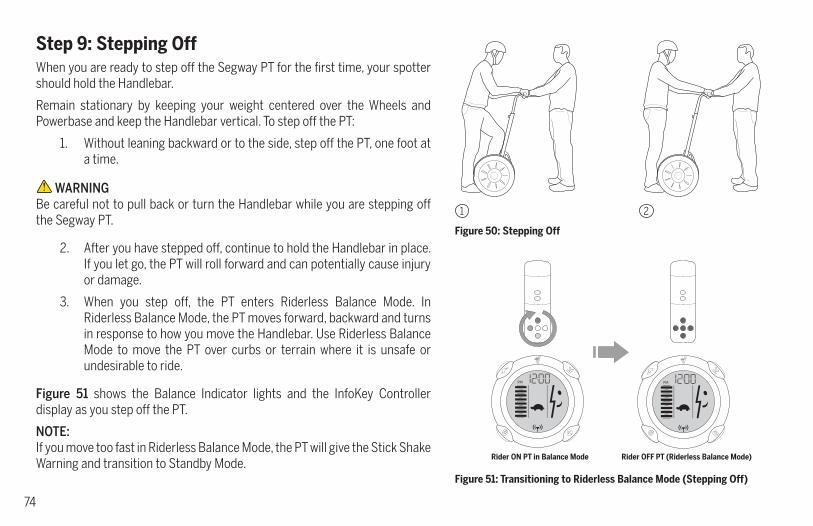
Step 9: Stepping OffWhen you are ready to step off the Segway PT for the first time, your spotter should hold the Handlebar.
Remain stationary by keeping your weight centered over the Wheels and Powerbase and keep the Handlebar vertical. To step off the PT:
1. Without leaning backward or to the side, step off the PT, one foot at a time.
WARNINGBe careful not to pull back or turn the Handlebar while you are stepping off the Segway PT.
2. After you have stepped off, continue to hold the Handlebar in place. If you let go, the PT will roll forward and can potentially cause injury or damage.
3. When you step off, the PT enters Riderless Balance Mode. In Riderless Balance Mode, the PT moves forward, backward and turns in response to how you move the Handlebar. Use Riderless Balance Mode to move the PT over curbs or terrain where it is unsafe or undesirable to ride.
Figure 51 shows the Balance Indicator lights and the InfoKey Controller display as you step off the PT.
NOTE:If you move too fast in Riderless Balance Mode, the PT will give the Stick Shake Warning and transition to Standby Mode.
Figure 50: Stepping Off
1 2
Figure 51: Transitioning to Riderless Balance Mode (Stepping Off)
Rider ON PT in Balance Mode Rider OFF PT (Riderless Balance Mode)
75
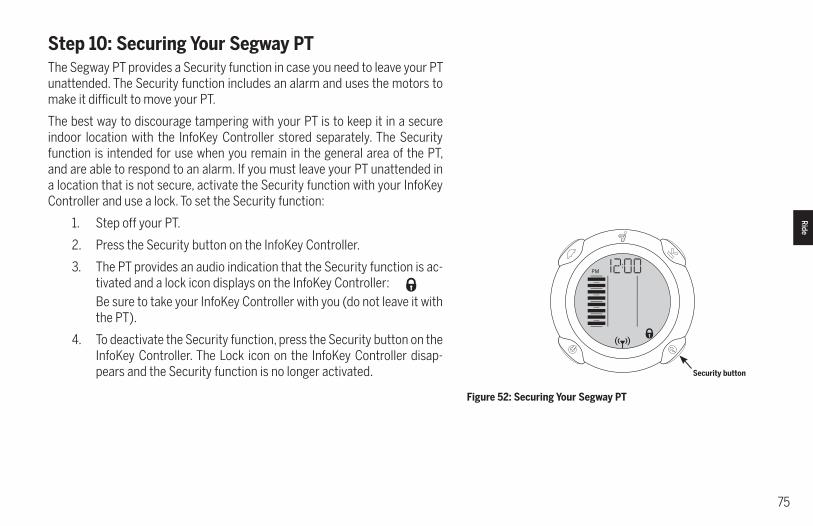
Step 10: Securing Your Segway PTThe Segway PT provides a Security function in case you need to leave your PT unattended. The Security function includes an alarm and uses the motors to make it difficult to move your PT.
The best way to discourage tampering with your PT is to keep it in a secure indoor location with the InfoKey Controller stored separately. The Security function is intended for use when you remain in the general area of the PT, and are able to respond to an alarm. If you must leave your PT unattended in a location that is not secure, activate the Security function with your InfoKey Controller and use a lock. To set the Security function:
1. Step off your PT.
2. Press the Security button on the InfoKey Controller.
3. The PT provides an audio indication that the Security function is ac-tivated and a lock icon displays on the InfoKey Controller:Be sure to take your InfoKey Controller with you (do not leave it with the PT).
4. To deactivate the Security function, press the Security button on the InfoKey Controller. The Lock icon on the InfoKey Controller disap-pears and the Security function is no longer activated.
Figure 52: Securing Your Segway PT
Security button
Ride
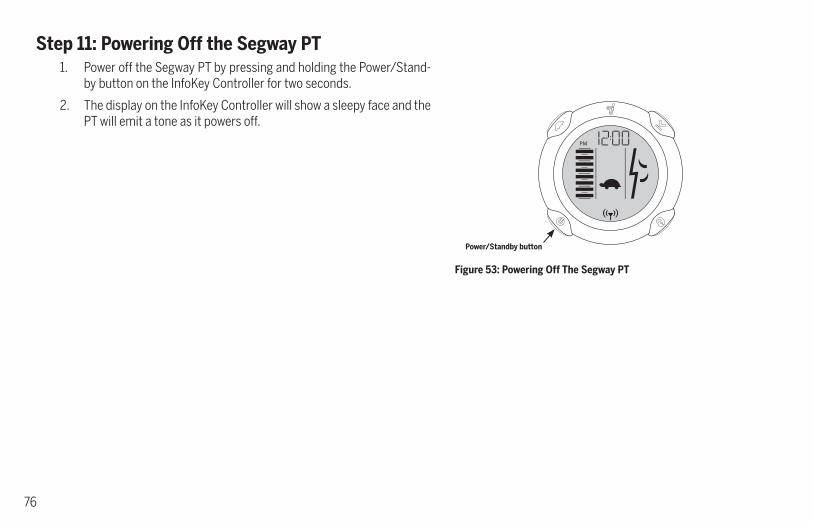
76
Step 11: Powering Off the Segway PT1. Power off the Segway PT by pressing and holding the Power/Stand-
by button on the InfoKey Controller for two seconds.
2. The display on the InfoKey Controller will show a sleepy face and the PT will emit a tone as it powers off.
Figure 53: Powering Off The Segway PT
Power/Standby button
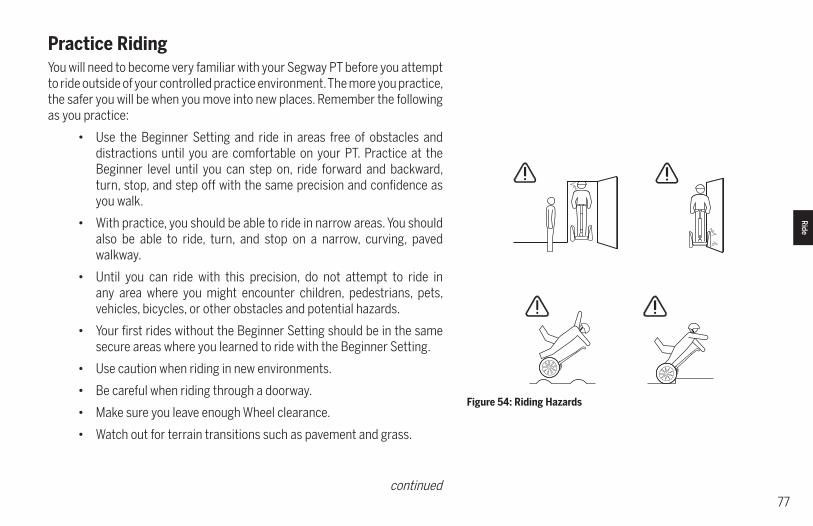
77
Practice RidingYou will need to become very familiar with your Segway PT before you attempt to ride outside of your controlled practice environment. The more you practice, the safer you will be when you move into new places. Remember the following as you practice:
• Use the Beginner Setting and ride in areas free of obstacles and distractions until you are comfortable on your PT. Practice at the Beginner level until you can step on, ride forward and backward, turn, stop, and step off with the same precision and confidence as you walk.
• With practice, you should be able to ride in narrow areas. You should also be able to ride, turn, and stop on a narrow, curving, paved walkway.
• Until you can ride with this precision, do not attempt to ride in any area where you might encounter children, pedestrians, pets, vehicles, bicycles, or other obstacles and potential hazards.
• Your first rides without the Beginner Setting should be in the same secure areas where you learned to ride with the Beginner Setting.
• Use caution when riding in new environments.
• Be careful when riding through a doorway.
• Make sure you leave enough Wheel clearance.
• Watch out for terrain transitions such as pavement and grass.
Figure 54: Riding Hazards
Ride
continued

78
Practice Riding (cont.)Navigating TerrainWith practice, you can learn to ride over many different types of terrain, provided you avoid slippery surfaces, loose materials, steep slopes, and ob-stacles. Always proceed slowly over unfamiliar terrain. Never allow the PT to become airborne, even for short periods of time, because the PT has no trac-tion when airborne, and you could lose control upon landing.
Terrain CompensationThe PT is designed to compensate for uneven terrain. When riding straight on uneven terrain, keep the LeanSteer Frame vertical. Point the LeanSteer Frame in the direction you want to move and allow the Powerbase to follow the con-tour of the ground.
Navigating Stairs and Curbs
WARNINGIf the Wheels slip while guiding the Segway PT up or down stairs or curbs, the PT may exit Riderless Balance Mode and enter Standby Mode. The PT will not "assist" you in moving up or down the stairs while in Standby Mode. Slowly and carefully guide your PT down the stairs. Re-enter Riderless Balance Mode before you try again.
WARNINGKeep the Segway PT below you at all times. Lead it up the stairs, curbs, and slopes and keep it below you when descending stairs, curbs, and slopes.
Figure 55: Keep the LeanSteer Frame Vertical on Slopes
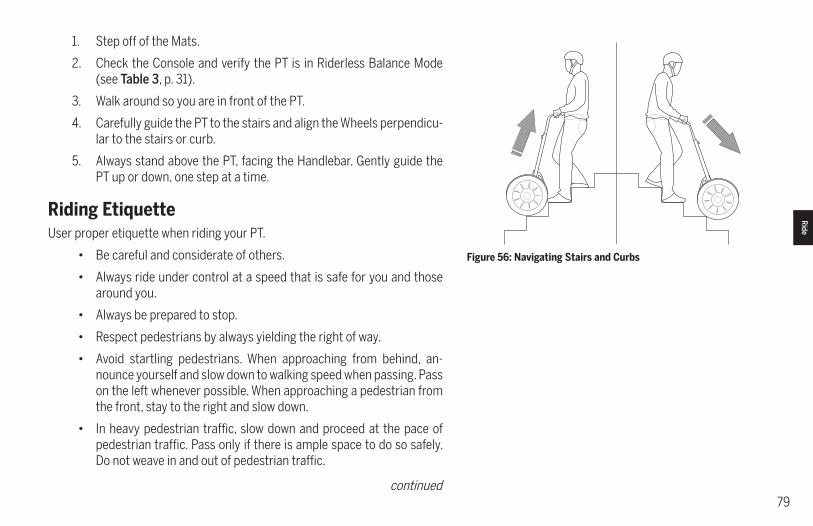
79
Figure 56: Navigating Stairs and Curbs
1. Step off of the Mats.
2. Check the Console and verify the PT is in Riderless Balance Mode (see Table 3, p. 31).
3. Walk around so you are in front of the PT.
4. Carefully guide the PT to the stairs and align the Wheels perpendicu-lar to the stairs or curb.
5. Always stand above the PT, facing the Handlebar. Gently guide the PT up or down, one step at a time.
Riding EtiquetteUser proper etiquette when riding your PT.
• Be careful and considerate of others.
• Always ride under control at a speed that is safe for you and those around you.
• Always be prepared to stop.
• Respect pedestrians by always yielding the right of way.
• Avoid startling pedestrians. When approaching from behind, an-nounce yourself and slow down to walking speed when passing. Pass on the left whenever possible. When approaching a pedestrian from the front, stay to the right and slow down.
• In heavy pedestrian traffic, slow down and proceed at the pace of pedestrian traffic. Pass only if there is ample space to do so safely. Do not weave in and out of pedestrian traffic.
Ride
continued
80
Riding Etiquette (cont.)• When riding with other PT riders, maintain a safe distance, identify hazards and obstacles, and do not ride side-by-side unless there is
plenty of room left for pedestrians.
• Do not park your PT in a way that blocks pedestrian traffic.
• Cross roads at designated crosswalks or signaled intersections. Do not jaywalk/ride.
• Only travel on a road when a pedestrian way is not available or when sidewalk use is not allowed. Do not ride your PT on private property (inside or outside) unless you have obtained permission to do so.
• Learn about and obey applicable laws and regulations.
Riding Tips and Safety Guidelines RecapThe Segway PT's unique balancing ability and ease of use may lead you to become overconfident. If you exceed the ability of the PT to balance, such as by riding over obstacles, uneven terrain, slippery surfaces, loose materials, or steep slopes, you can very quickly lose control, leading to collisions, falls, and injury. As with any other transportation device, using a PT exposes you to risk of injury. You can reduce the risk by following all the instructions and warnings in this Manual, but you cannot eliminate the risk.
• Read this Manual and watch the Safety Video.
• Pre-ride inspection. Inspect your PT before each use (see "Pre-Ride Checklist" on the inside back cover of this manual). Do not use if any part is loose or damaged. If you discover any loose or damaged part, see "Troubleshooting Procedures" (p. 119).
• Do not place any objects on the Mats. This could cause the PT to move on its own when in Balance Mode, possibly damaging your PT and rendering it unsafe for use.
• Do not allow any person to use your PT unless that person has carefully read this Manual and watched the Safety Video.
• Do not use the PT in hazardous atmospheres. The PT has not been certified for use in hazardous atmospheres as defined in NFPA 70, National Electric Code. Hazardous atmospheres are locations where fire or explosion hazards may exist due to flammable gases, vapors, liquids, dust, or fibers.
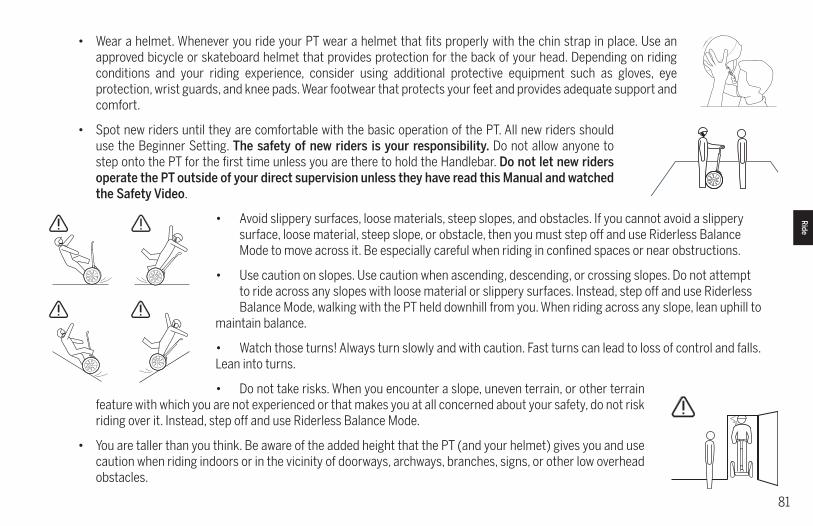
81
• Wear a helmet. Whenever you ride your PT wear a helmet that fits properly with the chin strap in place. Use an approved bicycle or skateboard helmet that provides protection for the back of your head. Depending on riding conditions and your riding experience, consider using additional protective equipment such as gloves, eye protection, wrist guards, and knee pads. Wear footwear that protects your feet and provides adequate support and comfort.
• Spot new riders until they are comfortable with the basic operation of the PT. All new riders should use the Beginner Setting. The safety of new riders is your responsibility. Do not allow anyone to step onto the PT for the first time unless you are there to hold the Handlebar. Do not let new riders operate the PT outside of your direct supervision unless they have read this Manual and watched the Safety Video.
• Avoid slippery surfaces, loose materials, steep slopes, and obstacles. If you cannot avoid a slippery surface, loose material, steep slope, or obstacle, then you must step off and use Riderless Balance Mode to move across it. Be especially careful when riding in confined spaces or near obstructions.
• Use caution on slopes. Use caution when ascending, descending, or crossing slopes. Do not attempt to ride across any slopes with loose material or slippery surfaces. Instead, step off and use Riderless Balance Mode, walking with the PT held downhill from you. When riding across any slope, lean uphill to maintain balance.
• Watch those turns! Always turn slowly and with caution. Fast turns can lead to loss of control and falls. Lean into turns.
• Do not take risks. When you encounter a slope, uneven terrain, or other terrain feature with which you are not experienced or that makes you at all concerned about your safety, do not risk riding over it. Instead, step off and use Riderless Balance Mode.
• You are taller than you think. Be aware of the added height that the PT (and your helmet) gives you and use caution when riding indoors or in the vicinity of doorways, archways, branches, signs, or other low overhead obstacles.
Ride
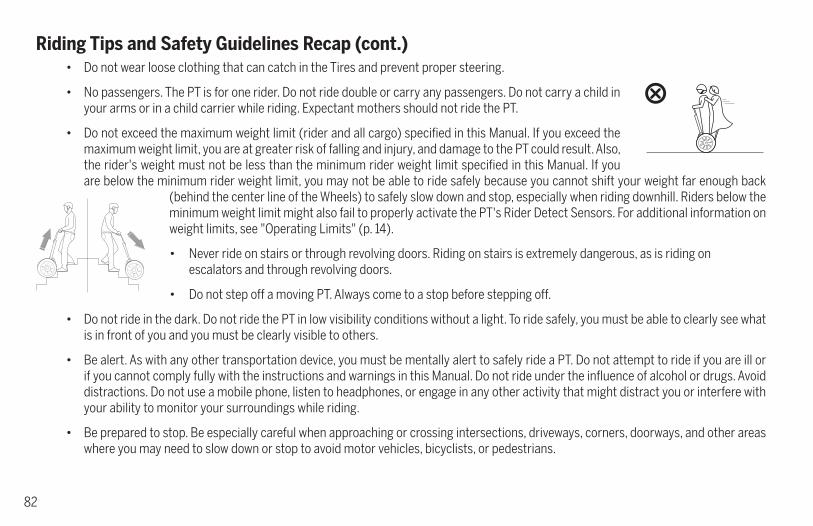
82
Riding Tips and Safety Guidelines Recap (cont.)• Do not wear loose clothing that can catch in the Tires and prevent proper steering.
• No passengers. The PT is for one rider. Do not ride double or carry any passengers. Do not carry a child in your arms or in a child carrier while riding. Expectant mothers should not ride the PT.
• Do not exceed the maximum weight limit (rider and all cargo) specified in this Manual. If you exceed the maximum weight limit, you are at greater risk of falling and injury, and damage to the PT could result. Also, the rider's weight must not be less than the minimum rider weight limit specified in this Manual. If you are below the minimum rider weight limit, you may not be able to ride safely because you cannot shift your weight far enough back
(behind the center line of the Wheels) to safely slow down and stop, especially when riding downhill. Riders below the minimum weight limit might also fail to properly activate the PT's Rider Detect Sensors. For additional information on weight limits, see "Operating Limits" (p. 14).
• Never ride on stairs or through revolving doors. Riding on stairs is extremely dangerous, as is riding on escalators and through revolving doors.
• Do not step off a moving PT. Always come to a stop before stepping off.
• Do not ride in the dark. Do not ride the PT in low visibility conditions without a light. To ride safely, you must be able to clearly see what is in front of you and you must be clearly visible to others.
• Be alert. As with any other transportation device, you must be mentally alert to safely ride a PT. Do not attempt to ride if you are ill or if you cannot comply fully with the instructions and warnings in this Manual. Do not ride under the influence of alcohol or drugs. Avoid distractions. Do not use a mobile phone, listen to headphones, or engage in any other activity that might distract you or interfere with your ability to monitor your surroundings while riding.
• Be prepared to stop. Be especially careful when approaching or crossing intersections, driveways, corners, doorways, and other areas where you may need to slow down or stop to avoid motor vehicles, bicyclists, or pedestrians.
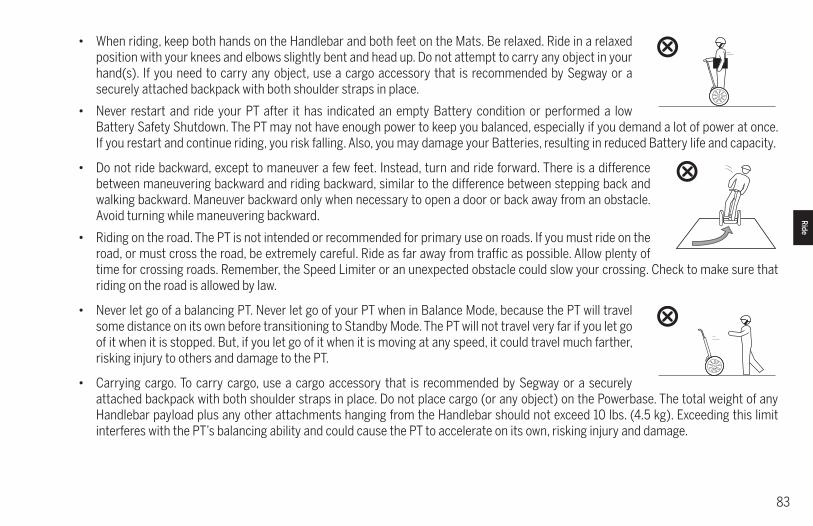
83
• When riding, keep both hands on the Handlebar and both feet on the Mats. Be relaxed. Ride in a relaxed position with your knees and elbows slightly bent and head up. Do not attempt to carry any object in your hand(s). If you need to carry any object, use a cargo accessory that is recommended by Segway or a securely attached backpack with both shoulder straps in place.
• Never restart and ride your PT after it has indicated an empty Battery condition or performed a low Battery Safety Shutdown. The PT may not have enough power to keep you balanced, especially if you demand a lot of power at once. If you restart and continue riding, you risk falling. Also, you may damage your Batteries, resulting in reduced Battery life and capacity.
• Do not ride backward, except to maneuver a few feet. Instead, turn and ride forward. There is a difference between maneuvering backward and riding backward, similar to the difference between stepping back and walking backward. Maneuver backward only when necessary to open a door or back away from an obstacle. Avoid turning while maneuvering backward.
• Riding on the road. The PT is not intended or recommended for primary use on roads. If you must ride on the road, or must cross the road, be extremely careful. Ride as far away from traffic as possible. Allow plenty of time for crossing roads. Remember, the Speed Limiter or an unexpected obstacle could slow your crossing. Check to make sure that riding on the road is allowed by law.
• Never let go of a balancing PT. Never let go of your PT when in Balance Mode, because the PT will travel some distance on its own before transitioning to Standby Mode. The PT will not travel very far if you let go of it when it is stopped. But, if you let go of it when it is moving at any speed, it could travel much farther, risking injury to others and damage to the PT.
• Carrying cargo. To carry cargo, use a cargo accessory that is recommended by Segway or a securely attached backpack with both shoulder straps in place. Do not place cargo (or any object) on the Powerbase. The total weight of any Handlebar payload plus any other attachments hanging from the Handlebar should not exceed 10 lbs. (4.5 kg). Exceeding this limit interferes with the PT’s balancing ability and could cause the PT to accelerate on its own, risking injury and damage.
Ride
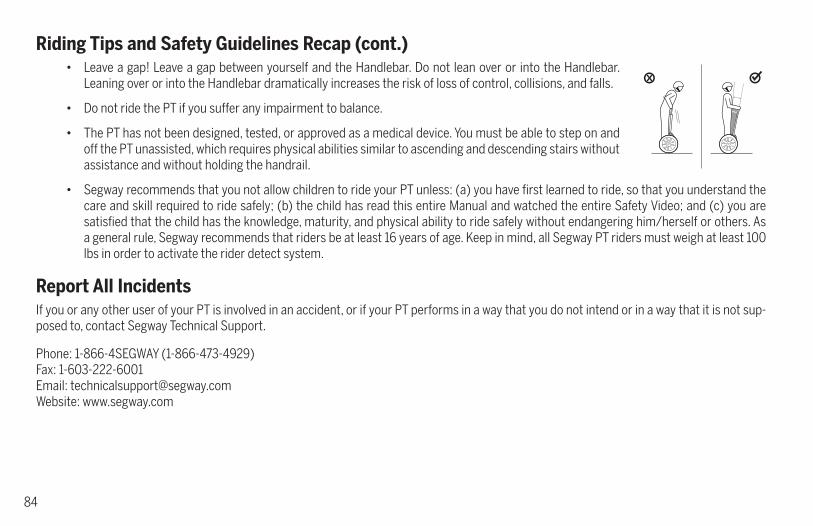
84
Riding Tips and Safety Guidelines Recap (cont.)• Leave a gap! Leave a gap between yourself and the Handlebar. Do not lean over or into the Handlebar.
Leaning over or into the Handlebar dramatically increases the risk of loss of control, collisions, and falls.
• Do not ride the PT if you suffer any impairment to balance.
• The PT has not been designed, tested, or approved as a medical device. You must be able to step on and off the PT unassisted, which requires physical abilities similar to ascending and descending stairs without assistance and without holding the handrail.
• Segway recommends that you not allow children to ride your PT unless: (a) you have first learned to ride, so that you understand the care and skill required to ride safely; (b) the child has read this entire Manual and watched the entire Safety Video; and (c) you are satisfied that the child has the knowledge, maturity, and physical ability to ride safely without endangering him/herself or others. As a general rule, Segway recommends that riders be at least 16 years of age. Keep in mind, all Segway PT riders must weigh at least 100 lbs in order to activate the rider detect system.
Report All IncidentsIf you or any other user of your PT is involved in an accident, or if your PT performs in a way that you do not intend or in a way that it is not sup-posed to, contact Segway Technical Support.
Phone: 1-866-4SEGWAY (1-866-473-4929)Fax: 1-603-222-6001Email: [email protected]: www.segway.com
85
Segway PT Batteries This chapter describes:
• Battery Safety
Battery Safety
WARNING• Do not use a Battery if the Battery casing is broken or if the Battery emits an unusual odor, smoke, or excessive heat or leaks any substance.
Avoid contact with any substance seeping from the Batteries.• Keep out of reach of children and pets. Exposure to Battery voltage could result in death or serious injury.• Unplug or disconnect the PT from AC power before removing or attaching Batteries or performing any service. Never work on any part of
the PT when it is plugged into AC power. You risk serious bodily injury from electric shock as well as damage to the PT.• The cells within the Batteries contain toxic substances. Do not attempt to open the Batteries. Do not insert any object into the Batteries or
use any device to pry at the Battery casing. If you insert an object into any of the Battery ports or openings you could suffer electric shock, injury, burns, or cause a fire. Attempting to open the Battery casing will damage the casing and could release toxic and harmful substances, and will render the pack unusable.
• Observe and follow all safety information on the warning label found on the Batteries.• Failure to charge the Batteries could result in permanent damage to them. Left unplugged, the Batteries could fully discharge over time,
causing permanent damage.• Use only charging devices approved by Segway and never attempt to bypass or override their charging protection circuits.• Do not wash the Segway PT with a power washer or high pressure hose. Avoid getting water into the Charge Port. Always close the Charge
Port Cover after charging. Avoid exposure to heavy downpours or extended periods of heavy rain (including during riding, storage, or while being transported). Clean with soap and water and a soft cloth. Make sure that the Charge Port is dry before you plug in the Power Cord. Failure to follow these instructions could expose you to electric shock, injury, burns, or cause a fire.
• Battery Specifications • Charging the Segway PT Batteries
Batteries
continued
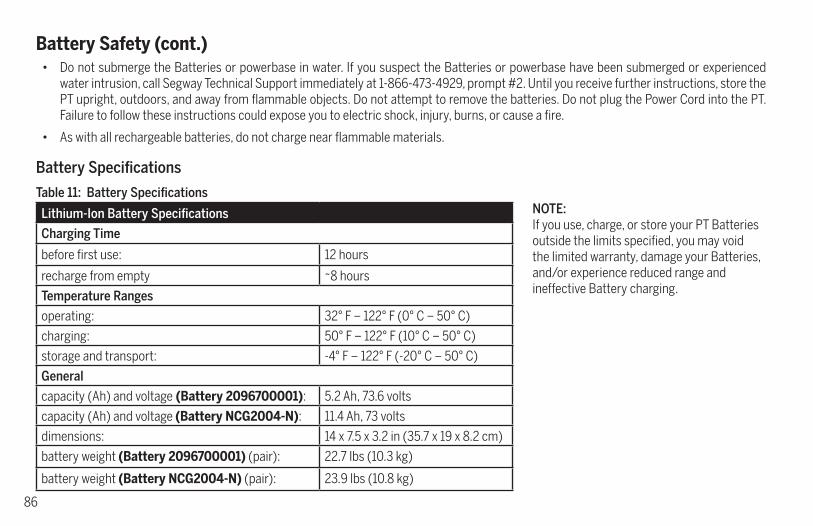
86
Battery Safety (cont.)• Do not submerge the Batteries or powerbase in water. If you suspect the Batteries or powerbase have been submerged or experienced
water intrusion, call Segway Technical Support immediately at 1-866-473-4929, prompt #2. Until you receive further instructions, store the PT upright, outdoors, and away from flammable objects. Do not attempt to remove the batteries. Do not plug the Power Cord into the PT. Failure to follow these instructions could expose you to electric shock, injury, burns, or cause a fire.
• As with all rechargeable batteries, do not charge near flammable materials.
Battery Specifications
Lithium-Ion Battery Specifications
Charging Time
before first use: 12 hours
recharge from empty ~8 hours
Temperature Ranges
operating: 32° F – 122° F (0° C – 50° C)
charging: 50° F – 122° F (10° C – 50° C)
storage and transport: -4° F – 122° F (-20° C – 50° C)
General
capacity (Ah) and voltage (Battery 2096700001): 5.2 Ah, 73.6 volts
capacity (Ah) and voltage (Battery NCG2004-N): 11.4 Ah, 73 volts
dimensions: 14 x 7.5 x 3.2 in (35.7 x 19 x 8.2 cm)
battery weight (Battery 2096700001) (pair): 22.7 lbs (10.3 kg)
battery weight (Battery NCG2004-N) (pair): 23.9 lbs (10.8 kg)
Table 11: Battery SpecificationsNOTE:If you use, charge, or store your PT Batteries outside the limits specified, you may void the limited warranty, damage your Batteries, and/or experience reduced range and ineffective Battery charging.
87
Charging Your BatteriesIn order to maintain the best performance from your Segway PT Batteries, fully charge the Batteries for at least 12 hours once a month, or once every 12 hours of operation—whichever comes first. Charge your Batteries only when they are within the specified charging temperature range (see "Battery Specifications," p. 86).
CAUTIONFailure to charge the Batteries could result in damage to the Batteries. Left unplugged, the Batteries could fully discharge over time, causing permanent damage. Use only charging devices approved by Segway.
Charging times vary depending on the following:
• Amount of charge already stored in the Batteries—The lower the Battery Charge Level is, the longer it will take to complete the charging process.
• Temperature of the Batteries—Batteries that are too hot or too cold may not charge or may take much longer to charge. Batteries charge most efficiently when they are close to the center of the recommended charging temperature range. See "Battery Specifica-tions" (p. 86).
• If storage temperature is below 32° F/0° C, do not charge your batteries. Instead, bring them into a warm (above 50° F/10° C) environ-ment for charging. Doing so will ensure optimal battery life and performance.
Batteries
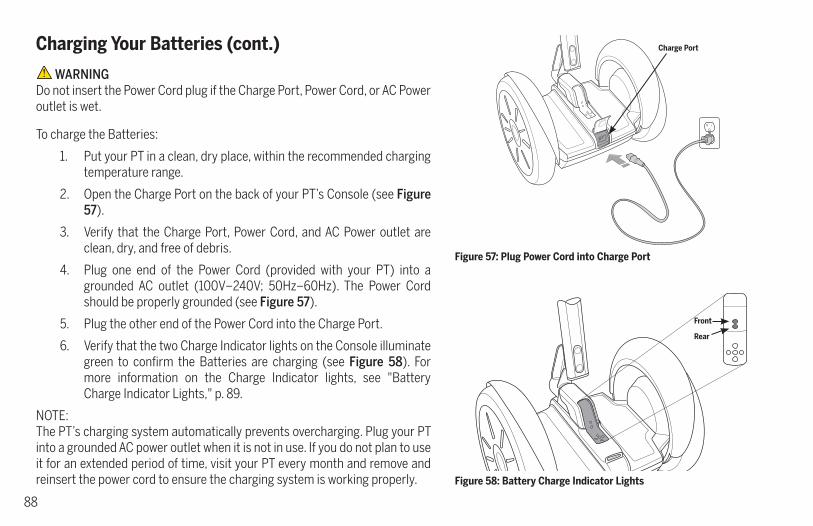
88
Charging Your Batteries (cont.)
WARNINGDo not insert the Power Cord plug if the Charge Port, Power Cord, or AC Power outlet is wet.
To charge the Batteries:
1. Put your PT in a clean, dry place, within the recommended charging temperature range.
2. Open the Charge Port on the back of your PT’s Console (see Figure 57).
3. Verify that the Charge Port, Power Cord, and AC Power outlet are clean, dry, and free of debris.
4. Plug one end of the Power Cord (provided with your PT) into a grounded AC outlet (100V–240V; 50Hz–60Hz). The Power Cord should be properly grounded (see Figure 57).
5. Plug the other end of the Power Cord into the Charge Port.
6. Verify that the two Charge Indicator lights on the Console illuminate green to confirm the Batteries are charging (see Figure 58). For more information on the Charge Indicator lights, see "Battery Charge Indicator Lights," p. 89.
NOTE:The PT’s charging system automatically prevents overcharging. Plug your PT into a grounded AC power outlet when it is not in use. If you do not plan to use it for an extended period of time, visit your PT every month and remove and reinsert the power cord to ensure the charging system is working properly.
Figure 57: Plug Power Cord into Charge Port
Charge Port
Figure 58: Battery Charge Indicator Lights
Front
Rear

89
Unplugging the Segway PTWhen you are ready to use your PT, remove the Power Cord, then close the Charge Port Cover as follows:
1. Disconnect the Power Cord from the Charge Port on the PT.
2. Disconnect the Power Cord from the grounded AC outlet.
3. Store the Power Cord.
4. Close the Charge Port Cover.
CAUTIONAlways keep the Charge Port Cover closed, except when you are charging the Segway PT. Closing the Charge Port Cover prevents water, dirt, dust, and other contaminates from entering the Charge Port and causing damage to your PT.
Battery Charge Indicator LightsTwo Battery Charge Indicator lights on the Console indicate the charge status of the Batteries when the PT is plugged in. The front Battery Charge Indicator light corresponds to the front Battery and the rear Battery Charge Indicator light corresponds to the rear Battery (see Figure 58). The Battery Charge Indicator lights provide independent information regarding whether each Battery is charging. When the PT is plugged in and charging, both Battery Charge Indicator lights will be flashing or solid green. If one or both Battery Charge Indicator lights is red or fails to illuminate, there is a charging problem with the corresponding Battery. For more information, see "Charging Failures" below.
Charging FailuresIf a failure is detected during charging, all charging will stop. Depending on the nature of the failure, a solid red Charge Indicator light displays or the Charge Indicator light will be off. If either or both Charge Indicator lights are red or off, check the following:
1. If the Charge Indicator lights are off, check that AC power is present, and ensure the Power Cord is fully seated in the Charge Port.
2. If AC power is present and the Charge Indicator lights are either red or off, unplug the power cord, then remove and reseat the Batteries. For instructions, see "Remove the Batteries" (p. 106) and "Install the Batteries" (p. 22).
3. If these actions fail to resolve the problem, contact an Authorized Segway Dealer or Distributor.
Batteries
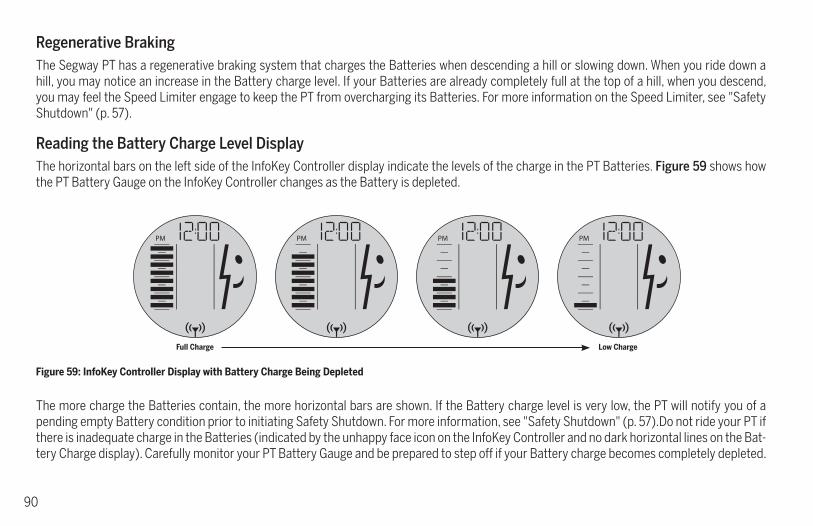
90
Regenerative BrakingThe Segway PT has a regenerative braking system that charges the Batteries when descending a hill or slowing down. When you ride down a hill, you may notice an increase in the Battery charge level. If your Batteries are already completely full at the top of a hill, when you descend, you may feel the Speed Limiter engage to keep the PT from overcharging its Batteries. For more information on the Speed Limiter, see "Safety Shutdown" (p. 57).
Reading the Battery Charge Level DisplayThe horizontal bars on the left side of the InfoKey Controller display indicate the levels of the charge in the PT Batteries. Figure 59 shows how the PT Battery Gauge on the InfoKey Controller changes as the Battery is depleted.
The more charge the Batteries contain, the more horizontal bars are shown. If the Battery charge level is very low, the PT will notify you of a pending empty Battery condition prior to initiating Safety Shutdown. For more information, see "Safety Shutdown" (p. 57).Do not ride your PT if there is inadequate charge in the Batteries (indicated by the unhappy face icon on the InfoKey Controller and no dark horizontal lines on the Bat-tery Charge display). Carefully monitor your PT Battery Gauge and be prepared to step off if your Battery charge becomes completely depleted.
Figure 59: InfoKey Controller Display with Battery Charge Being Depleted
Full Charge Low Charge
91
Surface Charge (Partial Charge)Whenever you do not fully charge the PT’s Batteries, surface charge or partial charge may affect the accuracy of the Battery charge level display, causing it to show a higher charge level than actually exists.
After you power on, check the Battery charge level display and then ride for at least three or four minutes and check the Battery charge level display again. If the Battery charge level display shows rapid charge depletion during this time, the Batteries have received only a surface charge. If necessary, plug the PT back in and recharge.
Batteries
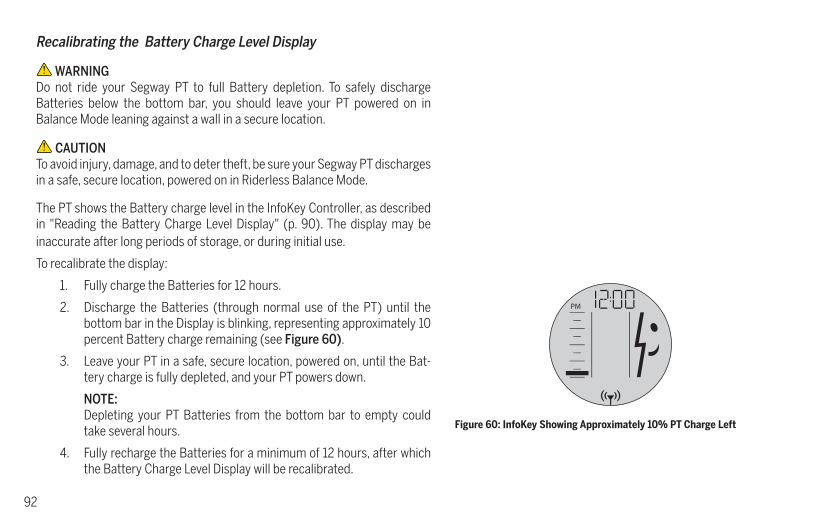
92
Recalibrating the Battery Charge Level Display
WARNINGDo not ride your Segway PT to full Battery depletion. To safely discharge Batteries below the bottom bar, you should leave your PT powered on in Balance Mode leaning against a wall in a secure location.
CAUTIONTo avoid injury, damage, and to deter theft, be sure your Segway PT discharges in a safe, secure location, powered on in Riderless Balance Mode.
The PT shows the Battery charge level in the InfoKey Controller, as described in "Reading the Battery Charge Level Display" (p. 90). The display may be inaccurate after long periods of storage, or during initial use.
To recalibrate the display:
1. Fully charge the Batteries for 12 hours.
2. Discharge the Batteries (through normal use of the PT) until the bottom bar in the Display is blinking, representing approximately 10 percent Battery charge remaining (see Figure 60).
3. Leave your PT in a safe, secure location, powered on, until the Bat-tery charge is fully depleted, and your PT powers down.
NOTE:Depleting your PT Batteries from the bottom bar to empty could take several hours.
4. Fully recharge the Batteries for a minimum of 12 hours, after which the Battery Charge Level Display will be recalibrated.
Figure 60: InfoKey Showing Approximately 10% PT Charge Left
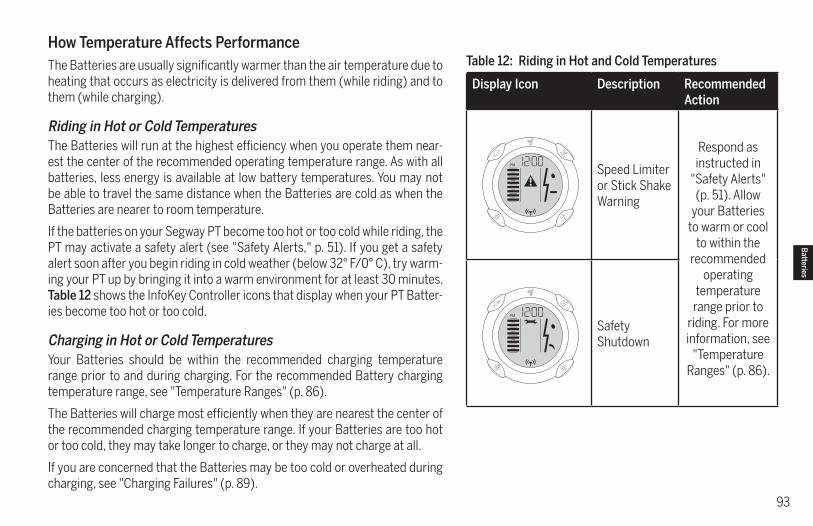
93
How Temperature Affects PerformanceThe Batteries are usually significantly warmer than the air temperature due to heating that occurs as electricity is delivered from them (while riding) and to them (while charging).
Riding in Hot or Cold TemperaturesThe Batteries will run at the highest efficiency when you operate them near-est the center of the recommended operating temperature range. As with all batteries, less energy is available at low battery temperatures. You may not be able to travel the same distance when the Batteries are cold as when the Batteries are nearer to room temperature.
If the batteries on your Segway PT become too hot or too cold while riding, the PT may activate a safety alert (see "Safety Alerts," p. 51). If you get a safety alert soon after you begin riding in cold weather (below 32° F/0° C), try warm-ing your PT up by bringing it into a warm environment for at least 30 minutes. Table 12 shows the InfoKey Controller icons that display when your PT Batter-ies become too hot or too cold.
Charging in Hot or Cold TemperaturesYour Batteries should be within the recommended charging temperature range prior to and during charging. For the recommended Battery charging temperature range, see "Temperature Ranges" (p. 86).
The Batteries will charge most efficiently when they are nearest the center of the recommended charging temperature range. If your Batteries are too hot or too cold, they may take longer to charge, or they may not charge at all.
If you are concerned that the Batteries may be too cold or overheated during charging, see "Charging Failures" (p. 89).
Table 12: Riding in Hot and Cold Temperatures
Display Icon Description RecommendedAction
Speed Limiter or Stick Shake Warning
Respond as instructed in
"Safety Alerts" (p. 51). Allow
your Batteries to warm or cool
to within the recommended
operating temperature
range prior to riding. For more information, see
"Temperature Ranges" (p. 86).
Safety Shutdown
Batteries
94
Replacing BatteriesYour Segway PT is powered by two rechargeable Li-ion Batteries. With normal usage and proper maintenance, Batteries should last the equivalent of 600 to 1000 full charges. As your Batteries near the end of their useful life, they need more frequent charging and your PT’s range will be reduced. To order replacement Batteries, contact an Authorized Segway Dealer or Distributor.
Replacing Batteries in PairsWhenever you need to replace a Battery, consider replacing both Batteries, and always use pairs of Batteries with the same chemistry. Replacing only one Battery will not necessarily increase the performance or range of your PT, because the PT is designed to operate only at the level allowed by the lower-energy Battery. Redundancy is a critical safety feature built into the PT that also applies to the Batteries. Therefore, you should replace Batteries in pairs (except for the unusual situation where a Battery is replaced because of damage or defect and the other Battery is relatively new).
For information on removing and attaching Batteries, see "Remove the Batteries" (p. 106) and "Install the Batteries" (p. 22).
95
Battery Transportation, Shipping, and DisposalIf you are transporting your Segway PT, protect the Batteries to avoid damage. Do not expose the Batteries to direct heat or moisture, and avoid heavy vibration during transportation.
WARNINGDo not use or transport a Battery if the casing breaks open, leaks any substance, becomes excessively hot, or if you detect an unusual odor. Do not handle a damaged or leaking Battery unless you are wearing disposable rubber gloves, eye protection, and are in a well-ventilated area. Dispose of the rubber gloves and damaged Battery properly in accordance with regulations governing disposal of toxic materials.
Shipping Li-ion BatteriesLi-ion Batteries are regulated as "Hazardous Materials" by the U.S. Department of Transportation. For information on shipping Li-ion Batteries, contact the U.S. Department of Transportation at www.phmsa.dot.gov/hazmat/regs or call 1-800-467-4922.
If you need to arrange air shipment of your Segway PT and/or Li-ion Batteries, contact an authorized Segway Dealer or Distributor for assistance.
You must comply with all local, federal, and individual country laws when transporting Segway PT Li-ion Batteries.
Battery DisposalThe Li-ion Batteries used in the Segway PT can be recycled. Recycle or dispose of Batteries in accordance with local environmental regulations. Do no place in fire or incinerate. For more information, contact Segway at 1-866-4SEGWAY (1-866-473-4929) or visit our website at www.segway.com.
Batteries

96
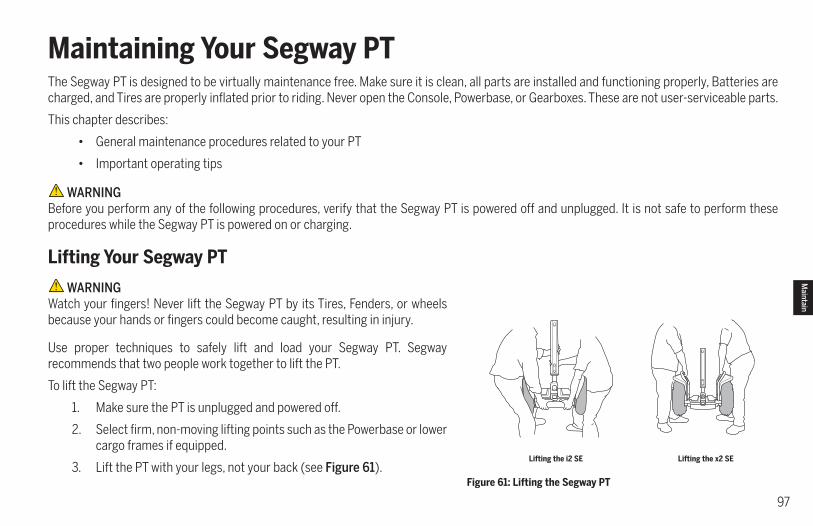
97
Maintaining Your Segway PTThe Segway PT is designed to be virtually maintenance free. Make sure it is clean, all parts are installed and functioning properly, Batteries are charged, and Tires are properly inflated prior to riding. Never open the Console, Powerbase, or Gearboxes. These are not user-serviceable parts.
This chapter describes:
• General maintenance procedures related to your PT
• Important operating tips
WARNINGBefore you perform any of the following procedures, verify that the Segway PT is powered off and unplugged. It is not safe to perform these procedures while the Segway PT is powered on or charging.
Lifting Your Segway PT
WARNINGWatch your fingers! Never lift the Segway PT by its Tires, Fenders, or wheels because your hands or fingers could become caught, resulting in injury.
Use proper techniques to safely lift and load your Segway PT. Segway recommends that two people work together to lift the PT.
To lift the Segway PT:
1. Make sure the PT is unplugged and powered off.
2. Select firm, non-moving lifting points such as the Powerbase or lower cargo frames if equipped.
3. Lift the PT with your legs, not your back (see Figure 61).Figure 61: Lifting the Segway PT
Lifting the i2 SE Lifting the x2 SE
Maintain
98
Maintaining Tires and Wheels
WARNINGThe tire pressure stated on affixed Wheel labels supersedes any recommended pressure stated on the Tires. Higher pressure reduces suspen-sion performance and traction, and increases risk of loss of control, collisions, and falls. Lower pressure reduces range and increases risk of damage to the Tire/ Wheel Assembly. Unequal pressure causes the Segway PT to turn in the direction of the lower pressure tire.
To ensure safe and efficient operation of your Segway PT, be sure to check Tires and Wheels regularly, especially if you have recently performed service on a Tire/Wheel Assembly.
Checking the Tire/Wheel AssemblyTo check the Tires and Wheels:
1. Make sure the PT is unplugged and powered off.
2. Check for Wheel wobble by grasping the Tire/Wheel Assembly and attempt to move it side-to-side. The Tire/Wheel Assembly should not move laterally. If you detect Wheel wobble, check the Wheel nut and tighten if necessary.
For additional information regarding service procedures for the Tire/Wheel Assembly, see "Install the Tire/Wheel Assembly" (p. 109, 111).
Tire Inflation PressureThe Tires on the PT provide suspension and traction. Both functions are affected by tire inflation pressure. Be sure to:
1. Make sure the PT is unplugged and powered off.
2. Check tire inflation pressure regularly (see "Checking Tire Inflation Pressure," p. 107). Improperly inflated Tires will result in less than optimal range.
3. If tire inflation pressure in either Tire is not at the level stated in the "Segway PT Specifications" (p. 12) for your PT model, inflate the Tire to the specified pressure.
4. Check that both Tires are inflated equally and are free of debris or contaminates.
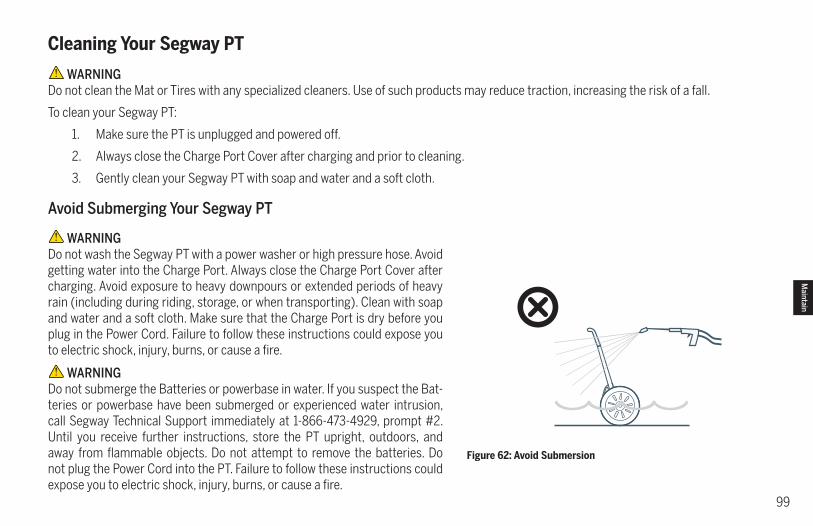
99
Cleaning Your Segway PT
WARNINGDo not clean the Mat or Tires with any specialized cleaners. Use of such products may reduce traction, increasing the risk of a fall.
To clean your Segway PT:
1. Make sure the PT is unplugged and powered off.
2. Always close the Charge Port Cover after charging and prior to cleaning.
3. Gently clean your Segway PT with soap and water and a soft cloth.
Avoid Submerging Your Segway PT
WARNINGDo not wash the Segway PT with a power washer or high pressure hose. Avoid getting water into the Charge Port. Always close the Charge Port Cover after charging. Avoid exposure to heavy downpours or extended periods of heavy rain (including during riding, storage, or when transporting). Clean with soap and water and a soft cloth. Make sure that the Charge Port is dry before you plug in the Power Cord. Failure to follow these instructions could expose you to electric shock, injury, burns, or cause a fire.
WARNINGDo not submerge the Batteries or powerbase in water. If you suspect the Bat-teries or powerbase have been submerged or experienced water intrusion, call Segway Technical Support immediately at 1-866-473-4929, prompt #2. Until you receive further instructions, store the PT upright, outdoors, and away from flammable objects. Do not attempt to remove the batteries. Do not plug the Power Cord into the PT. Failure to follow these instructions could expose you to electric shock, injury, burns, or cause a fire.
Figure 62: Avoid Submersion
Maintain
100
Storing Your Segway PTTo store your Segway PT for the Winter or long periods of time, do the following to ensure it will always be ready to supply you with maximum performance:
Segway PT• Store your PT (and its Batteries) indoors, in a place that is free of moisture and humidity, with an ambient temperature of
-4° F – 122° F (-20° C – 50° C).
• Clean your PT.
• Remove the InfoKey battery.
• Inflate your tires to the proper pressure (p. 12).
• You may want to cover your PT to prevent dust accumulation.
• Do not store your PT on its side.
PT Batteries• Fully charge your Batteries for at least 12 hours once a month, or after every 12 hours of operation—whichever comes first. Charge your
Batteries only when they are within the specified charging temperature range.
• Even if you will not be using your PT for an extended period of time, you should leave it plugged into AC power. Otherwise the Batteries could fully discharge over time, causing permanent damage.
• If storing your PT longer than 1 month, remove the batteries—but be sure to charge them at least every 3 months.
• If storage temperature is below 32° F/0° C, do not charge your batteries. Instead, bring them into a warm (above 50° F/10° C) environment for charging. Doing so will ensure optimal battery life and performance.
CAUTIONFailure to charge the Batteries could result in permanent damage to them. Left unplugged, the Batteries could fully discharge over time, causing permanent damage. Use only charging devices approved by Segway.
101
Servicing Your Segway PTThis chapter describes how to service your Segway PT.
General Information
WARNING• Always shut down your Segway PT and unplug the AC Power Cord before performing any maintenance or installing any part or accessory.
• Do not attempt to open the Powerbase or Console. There are no user-serviceable parts inside. By opening the Powerbase or Console you risk electric shock injury. Also, you could void your limited warranty, damage your PT, and render it unsafe to use.
• Do not open the Gearboxes. There are no user-serviceable parts inside the Gearboxes. You could damage your PT and render it unsafe to use.
• Use only Segway-approved parts, fasteners, and accessories.
• Wear safety glasses. Failure to do so could result in serious injury.
Service
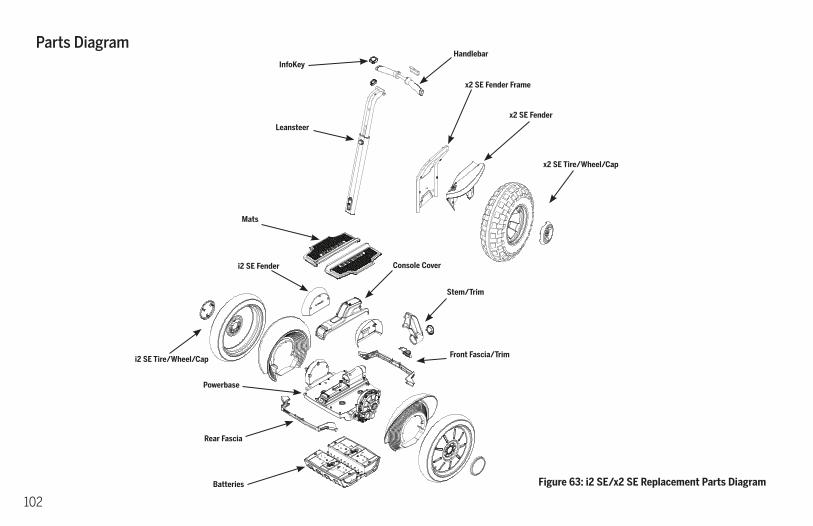
102
Parts Diagram
Figure 63: i2 SE/x2 SE Replacement Parts Diagram
Front Fascia/Trim
Mats
x2 SE Fender
Console Cover
Rear Fascia
i2 SE Fender
i2 SE Tire/Wheel/Cap
Stem/Trim
x2 SE Tire/Wheel/Cap
x2 SE Fender Frame
Leansteer
HandlebarInfoKey
Batteries
Powerbase
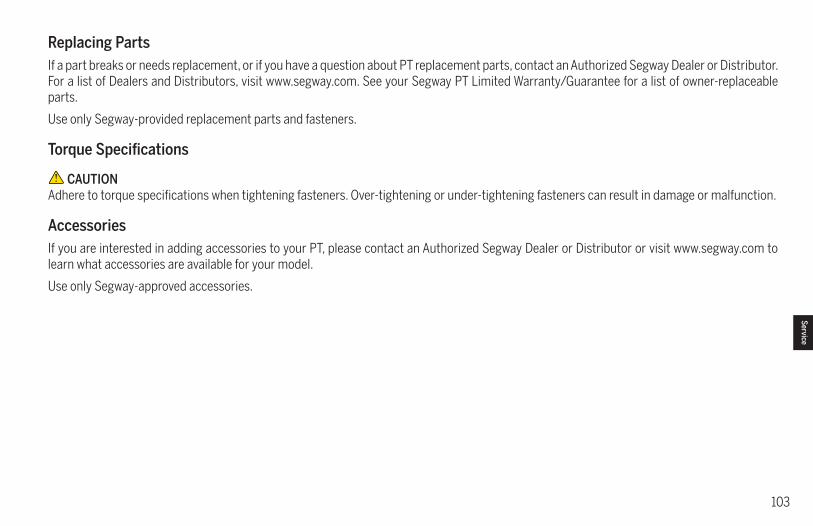
103
Replacing PartsIf a part breaks or needs replacement, or if you have a question about PT replacement parts, contact an Authorized Segway Dealer or Distributor. For a list of Dealers and Distributors, visit www.segway.com. See your Segway PT Limited Warranty/Guarantee for a list of owner-replaceable parts.
Use only Segway-provided replacement parts and fasteners.
Torque Specifications
CAUTIONAdhere to torque specifications when tightening fasteners. Over-tightening or under-tightening fasteners can result in damage or malfunction.
AccessoriesIf you are interested in adding accessories to your PT, please contact an Authorized Segway Dealer or Distributor or visit www.segway.com to learn what accessories are available for your model.
Use only Segway-approved accessories.
Service
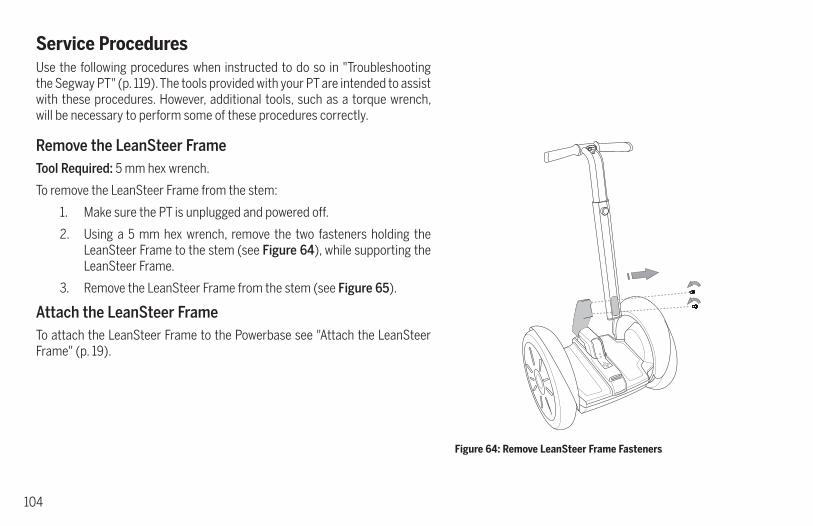
104
Service ProceduresUse the following procedures when instructed to do so in "Troubleshooting the Segway PT" (p. 119). The tools provided with your PT are intended to assist with these procedures. However, additional tools, such as a torque wrench, will be necessary to perform some of these procedures correctly.
Remove the LeanSteer FrameTool Required: 5 mm hex wrench.
To remove the LeanSteer Frame from the stem:
1. Make sure the PT is unplugged and powered off.
2. Using a 5 mm hex wrench, remove the two fasteners holding the LeanSteer Frame to the stem (see Figure 64), while supporting the LeanSteer Frame.
3. Remove the LeanSteer Frame from the stem (see Figure 65).
Attach the LeanSteer FrameTo attach the LeanSteer Frame to the Powerbase see "Attach the LeanSteer Frame" (p. 19).
Figure 64: Remove LeanSteer Frame Fasteners
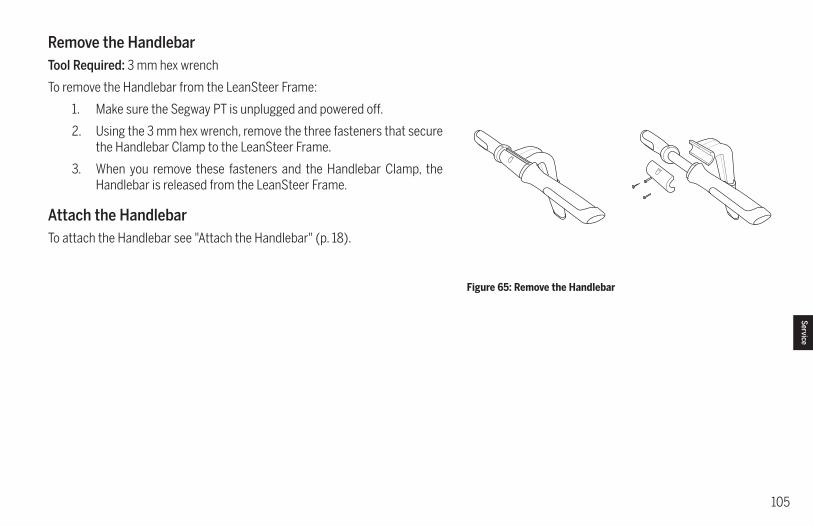
105
Remove the HandlebarTool Required: 3 mm hex wrench
To remove the Handlebar from the LeanSteer Frame:
1. Make sure the Segway PT is unplugged and powered off.
2. Using the 3 mm hex wrench, remove the three fasteners that secure the Handlebar Clamp to the LeanSteer Frame.
3. When you remove these fasteners and the Handlebar Clamp, the Handlebar is released from the LeanSteer Frame.
Attach the HandlebarTo attach the Handlebar see "Attach the Handlebar" (p. 18).
Figure 65: Remove the Handlebar
Service
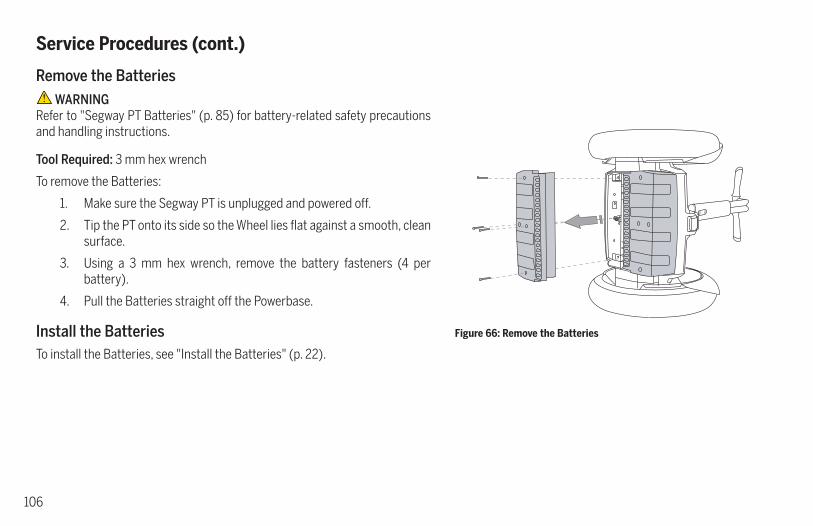
106
Service Procedures (cont.)
Remove the Batteries WARNING
Refer to "Segway PT Batteries" (p. 85) for battery-related safety precautions and handling instructions.
Tool Required: 3 mm hex wrench
To remove the Batteries:
1. Make sure the Segway PT is unplugged and powered off.
2. Tip the PT onto its side so the Wheel lies flat against a smooth, clean surface.
3. Using a 3 mm hex wrench, remove the battery fasteners (4 per battery).
4. Pull the Batteries straight off the Powerbase.
Install the BatteriesTo install the Batteries, see "Install the Batteries" (p. 22).
Figure 66: Remove the Batteries
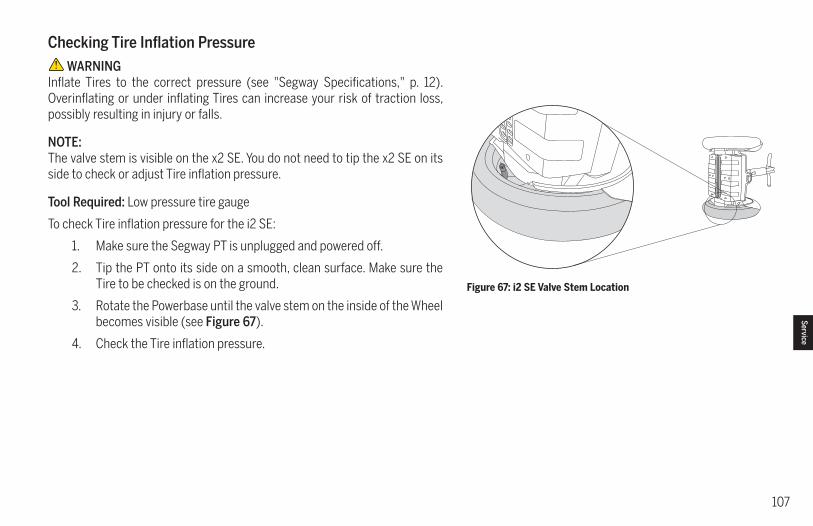
107
Figure 67: i2 SE Valve Stem Location
Checking Tire Inflation Pressure WARNING
Inflate Tires to the correct pressure (see "Segway Specifications," p. 12). Overinflating or under inflating Tires can increase your risk of traction loss, possibly resulting in injury or falls.
NOTE:The valve stem is visible on the x2 SE. You do not need to tip the x2 SE on its side to check or adjust Tire inflation pressure.
Tool Required: Low pressure tire gauge
To check Tire inflation pressure for the i2 SE:
1. Make sure the Segway PT is unplugged and powered off.
2. Tip the PT onto its side on a smooth, clean surface. Make sure the Tire to be checked is on the ground.
3. Rotate the Powerbase until the valve stem on the inside of the Wheel becomes visible (see Figure 67).
4. Check the Tire inflation pressure.
Service
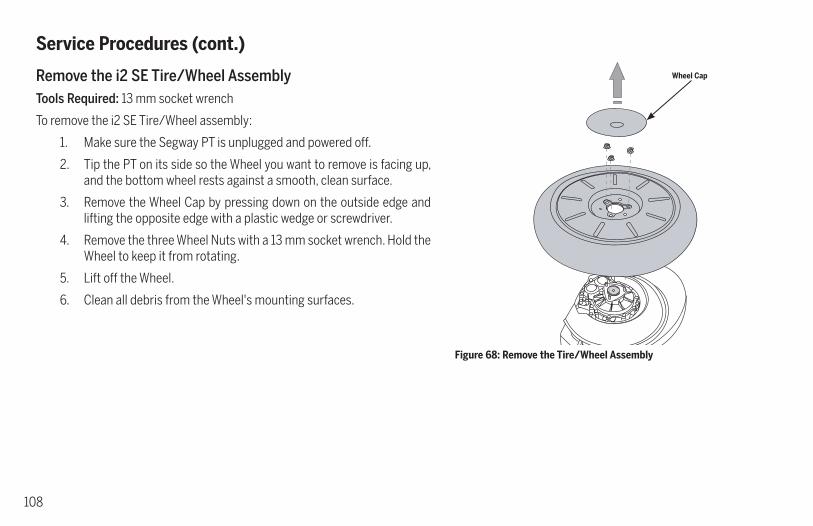
108
Service Procedures (cont.)
Remove the i2 SE Tire/Wheel AssemblyTools Required: 13 mm socket wrench
To remove the i2 SE Tire/Wheel assembly:
1. Make sure the Segway PT is unplugged and powered off.
2. Tip the PT on its side so the Wheel you want to remove is facing up, and the bottom wheel rests against a smooth, clean surface.
3. Remove the Wheel Cap by pressing down on the outside edge and lifting the opposite edge with a plastic wedge or screwdriver.
4. Remove the three Wheel Nuts with a 13 mm socket wrench. Hold the Wheel to keep it from rotating.
5. Lift off the Wheel.
6. Clean all debris from the Wheel's mounting surfaces.
Wheel Cap
Figure 68: Remove the Tire/Wheel Assembly
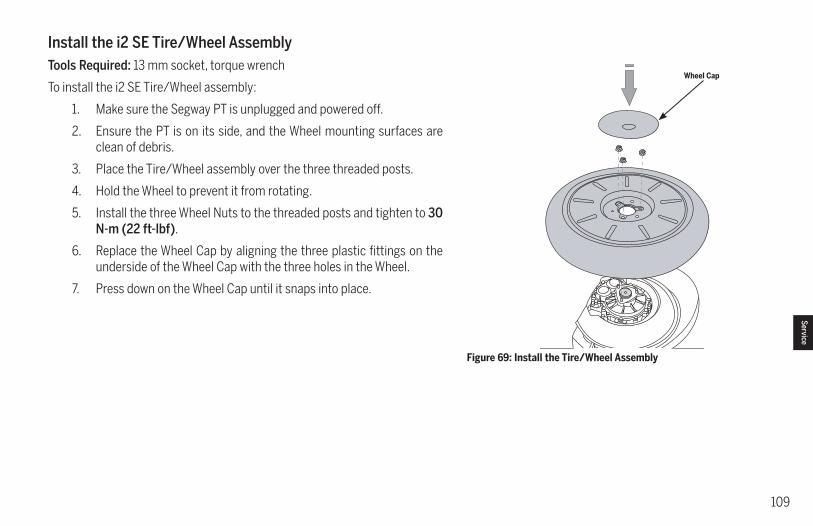
109
Install the i2 SE Tire/Wheel AssemblyTools Required: 13 mm socket, torque wrench
To install the i2 SE Tire/Wheel assembly:
1. Make sure the Segway PT is unplugged and powered off.
2. Ensure the PT is on its side, and the Wheel mounting surfaces are clean of debris.
3. Place the Tire/Wheel assembly over the three threaded posts.
4. Hold the Wheel to prevent it from rotating.
5. Install the three Wheel Nuts to the threaded posts and tighten to 30 N-m (22 ft-lbf).
6. Replace the Wheel Cap by aligning the three plastic fittings on the underside of the Wheel Cap with the three holes in the Wheel.
7. Press down on the Wheel Cap until it snaps into place.
Wheel Cap
Figure 69: Install the Tire/Wheel Assembly
Service
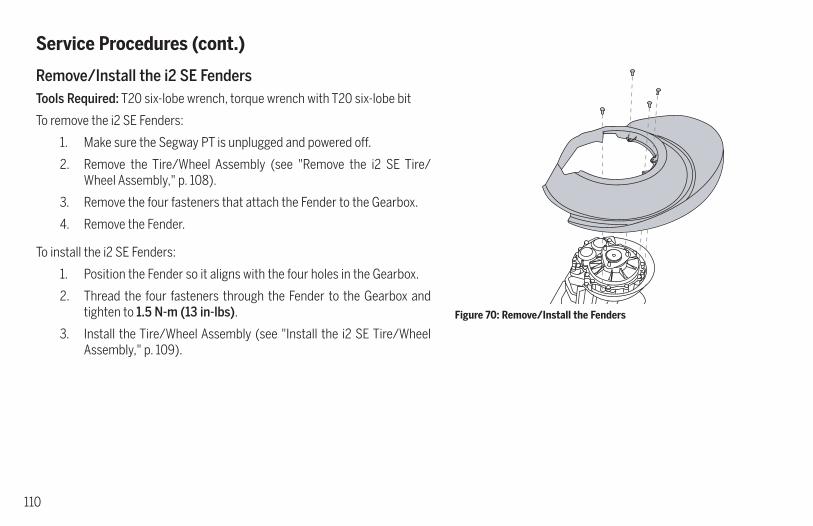
110
Service Procedures (cont.)
Remove/Install the i2 SE FendersTools Required: T20 six-lobe wrench, torque wrench with T20 six-lobe bit
To remove the i2 SE Fenders:
1. Make sure the Segway PT is unplugged and powered off.
2. Remove the Tire/Wheel Assembly (see "Remove the i2 SE Tire/Wheel Assembly," p. 108).
3. Remove the four fasteners that attach the Fender to the Gearbox.
4. Remove the Fender.
To install the i2 SE Fenders:
1. Position the Fender so it aligns with the four holes in the Gearbox.
2. Thread the four fasteners through the Fender to the Gearbox and tighten to 1.5 N-m (13 in-lbs).
3. Install the Tire/Wheel Assembly (see "Install the i2 SE Tire/Wheel Assembly," p. 109).
Figure 70: Remove/Install the Fenders

111
Remove the x2 SE Tire/Wheel AssemblyTools Required: 13 mm socket wrench
1. Make sure the Segway PT is unplugged and powered off.
2. Tip the PT on its side so the Wheel you want to remove is facing up, and the bottom wheel rests against a smooth, clean surface.
3. Using a 13 mm socket wrench, remove the three wheel nuts and dis-card (see Figure 71).
4. Remove the tire/wheel assembly.
Install the x2 SE Tire/Wheel AssemblyTools Required: 13 mm socket, torque wrench
1. Make sure the Segway PT is unplugged and powered off.
2. Ensure the PT is on its side, and the gearbox flange is clean and free of debris.
3. Place the Tire/Wheel assembly onto the gearbox flange (see Figure 71).
4. Holding the wheel to prevent rotation, use a 13 mm socket wrench to tighten the three wheel nuts included with the kit and torque to 30 N-m (22 ft-lbf).
Figure 71: Remove/Install the x2 SE Tire/Wheel Assembly
Wheel Nuts
Tire/Wheel Assembly
Gearbox Flange
Service
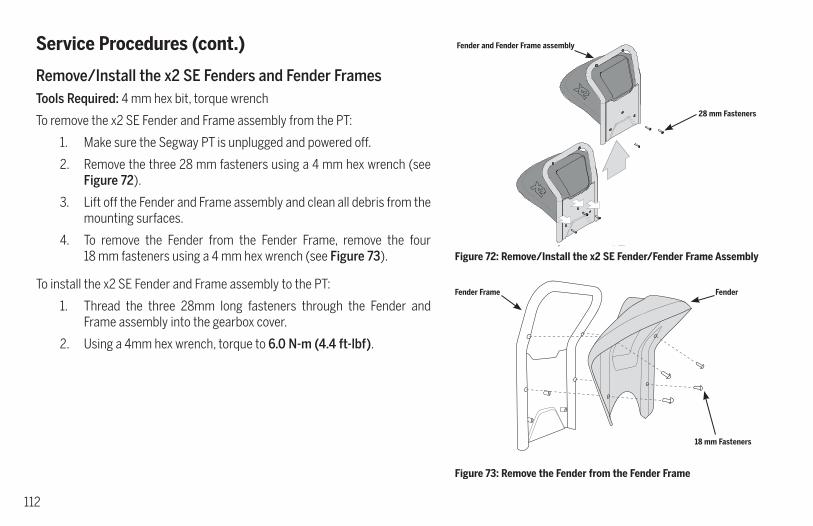
112
Service Procedures (cont.)
Remove/Install the x2 SE Fenders and Fender FramesTools Required: 4 mm hex bit, torque wrench
To remove the x2 SE Fender and Frame assembly from the PT:
1. Make sure the Segway PT is unplugged and powered off.
2. Remove the three 28 mm fasteners using a 4 mm hex wrench (see Figure 72).
3. Lift off the Fender and Frame assembly and clean all debris from the mounting surfaces.
4. To remove the Fender from the Fender Frame, remove the four 18 mm fasteners using a 4 mm hex wrench (see Figure 73).
To install the x2 SE Fender and Frame assembly to the PT:
1. Thread the three 28mm long fasteners through the Fender and Frame assembly into the gearbox cover.
2. Using a 4mm hex wrench, torque to 6.0 N-m (4.4 ft-lbf).
Fender and Fender Frame assembly
28 mm Fasteners
Figure 72: Remove/Install the x2 SE Fender/Fender Frame Assembly
Figure 73: Remove the Fender from the Fender Frame
Fender Frame Fender
18 mm Fasteners
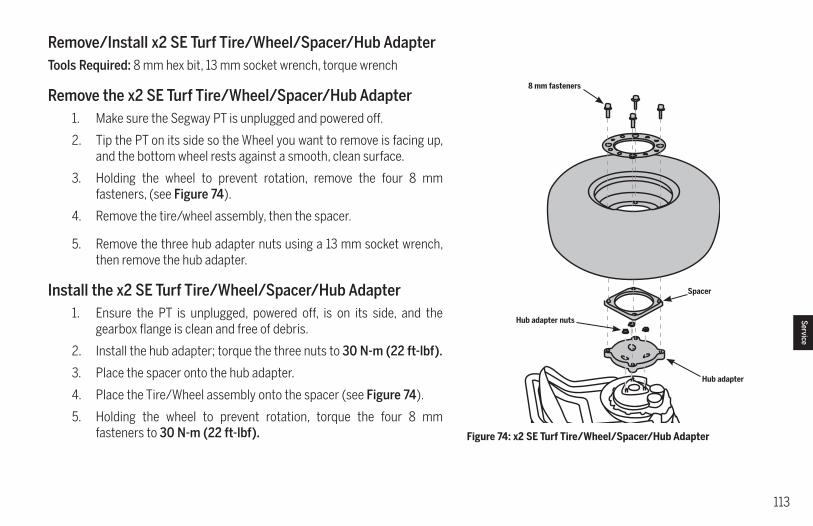
113
Remove/Install x2 SE Turf Tire/Wheel/Spacer/Hub AdapterTools Required: 8 mm hex bit, 13 mm socket wrench, torque wrench
Remove the x2 SE Turf Tire/Wheel/Spacer/Hub Adapter1. Make sure the Segway PT is unplugged and powered off.
2. Tip the PT on its side so the Wheel you want to remove is facing up, and the bottom wheel rests against a smooth, clean surface.
3. Holding the wheel to prevent rotation, remove the four 8 mm fasteners, (see Figure 74).
4. Remove the tire/wheel assembly, then the spacer.
5. Remove the three hub adapter nuts using a 13 mm socket wrench, then remove the hub adapter.
Install the x2 SE Turf Tire/Wheel/Spacer/Hub Adapter1. Ensure the PT is unplugged, powered off, is on its side, and the
gearbox flange is clean and free of debris.
2. Install the hub adapter; torque the three nuts to 30 N-m (22 ft-lbf).
3. Place the spacer onto the hub adapter.
4. Place the Tire/Wheel assembly onto the spacer (see Figure 74).
5. Holding the wheel to prevent rotation, torque the four 8 mm fasteners to 30 N-m (22 ft-lbf). Figure 74: x2 SE Turf Tire/Wheel/Spacer/Hub Adapter
8 mm fasteners
Hub adapter nuts
Spacer
Hub adapter
Service
114
Service Procedures (cont.)
Remove/Install the MatsTools Required: None
To remove a Mat:
1. Make sure the Segway PT is unplugged and powered off.
2. Lift the Mat off the Powerbase.
To install a Mat:
1. Make sure the Segway PT is unplugged and powered off.
2. Verify the top of the Powerbase and bottom of the Mat are clean, dry, and free of debris.
3. Place a Mat on the Powerbase.
4. Fit the Mat's rubber tabs into the Powerbase grooves.
5. Tuck the tabs in place around the entire perimeter of the Mat, begining with the side of the Mat nearest the console. Press down on the Mat while you tuck in the tabs.
6. Visually confirm the Mat is properly aligned and all rubber tabs are tucked in prior to riding.
Figure 75: Install the Mats
115
Replacing the InfoKey Controller BatteryTool Required: Coin or flathead screwdriver
To replace or reseat the InfoKey Controller battery:
1. Make sure the Segway PT is unplugged and powered off.
2. Remove the InfoKey Controller from the Dock and unscrew the InfoKey Controller Dock Adapter (see "Undock the InfoKey Controller," p. 117).
3. Using a coin or Flathead screwdriver, unscrew the back cover of the InfoKey Controller.
4. Remove the InfoKey Controller battery.
5. If you are replacing the battery, verify the new battery is type CR2430. These batteries are available at electronics stores.
NOTE:Dispose of used batteries properly in accordance with local regulations governing disposal of toxic materials.
6. Insert the InfoKey Controller battery with the positive (+) side facing up.
7. Screw on the InfoKey Controller back cover.
8. Screw on the InfoKey Controller Dock Adapter.
+
Figure 76: Replacing the InfoKey Controller Battery
Service
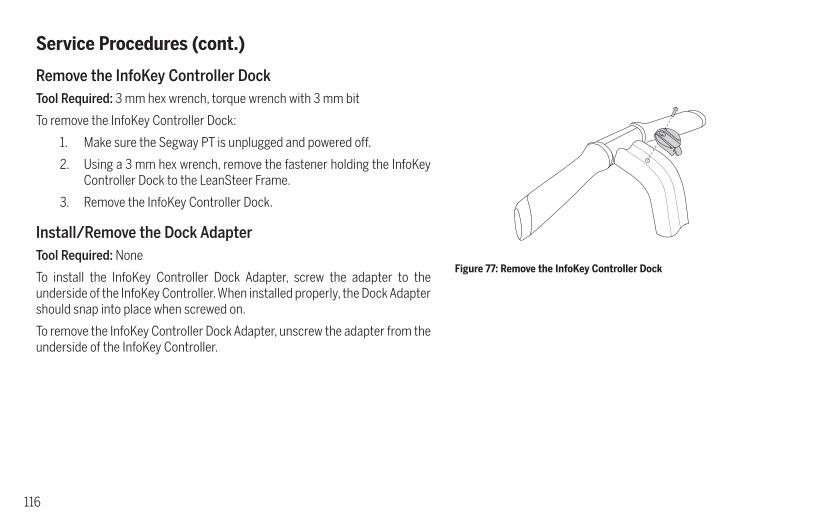
116
Service Procedures (cont.)
Remove the InfoKey Controller DockTool Required: 3 mm hex wrench, torque wrench with 3 mm bit
To remove the InfoKey Controller Dock:
1. Make sure the Segway PT is unplugged and powered off.
2. Using a 3 mm hex wrench, remove the fastener holding the InfoKey Controller Dock to the LeanSteer Frame.
3. Remove the InfoKey Controller Dock.
Install/Remove the Dock AdapterTool Required: None
To install the InfoKey Controller Dock Adapter, screw the adapter to the underside of the InfoKey Controller. When installed properly, the Dock Adapter should snap into place when screwed on.
To remove the InfoKey Controller Dock Adapter, unscrew the adapter from the underside of the InfoKey Controller.
Figure 77: Remove the InfoKey Controller Dock

117
Dock the InfoKey ControllerTo dock the InfoKey Controller see "Dock the InfoKey Controller" (p. 21).
Undock the InfoKey ControllerTool Required: None
To undock the InfoKey Controller:
1. Make sure the Segway PT is unplugged and powered off.
2. Press the Release Tab at the bottom of the InfoKey Controller Dock.
3. Slide the InfoKey Controller out of the InfoKey Controller Dock.
Figure 78: Undock the InfoKey Controller
1
2
Service

118
119
Troubleshooting the Segway PTThis chapter describes:
• Troubleshooting techniques
• Using InfoKey Controller icons to help diagnose an error or failure condition
Troubleshooting ProceduresYou can troubleshoot certain problems with your Segway PT before contacting an Authorized Segway Dealer or Distributor, or Segway Customer Care. This chapter provides lists of problems and recommended actions.
WARNINGAlways shut down your Segway PT and unplug the AC Power Cord before performing any maintenance or installing any part or accessory.
Table 13 lists potential problems. This table directs you to the page in this chapter where you can find more information on resolving the problem.
If you are unable to solve the problem, look through the section showing the InfoKey Controller icons that display during error or failure conditions in “InfoKey Controller Error Icons” on page 127. That section shows the icons and recommended actions to take when you see certain icons. If, after reviewing the troubleshooting procedures and the InfoKey Controller icons, you are still unable to resolve the problem, contact an Authorized Segway Dealer or Distributor, or Segway Customer Care. For a list of Authorized Dealers and Distributors, visit www.segway.com.
Problem: See:
Segway PT will not power on. page 120
Segway PT will not enter Balance Mode. page 121
Tire/Wheel assembly is loose and/or wobbles.
page 122
Segway PT pulls to one side when riding. page 123
Tire is flat or will not maintain inflation pressure.
page 124
Safety Shutdown occurs when you are entering or leaving a store, library, or other building.
page 125
Segway PT will not power down. page 126
Table 13: Segway PT Troubleshooting Procedures
T-shoot
120
Troubleshooting Procedures (cont.)Segway PT Will Not Power OnProblem:Your Segway PT will not power on when you press the InfoKey Controller Power/Standby button.
Review the following service procedures prior to troubleshooting this problem:
• “Remove the Batteries” (p. 106)
• “Install the Batteries” (p. 22)
• “Replace the InfoKey Controller Battery” (p. 115)
Recommended Action:
1. Make sure your PT's Batteries are charged.
2. Make sure you are standing with the InfoKey Controller no further than 15 ft. (5 m) from your PT.
3. Tap the InfoKey Controller Power/Standby button and verify that the Link Signal icon appears in the InfoKey display (see "InfoKey Controller," p. 127).
4. If no Link Signal icon is displayed or the display is blank (no information displayed), remove and reseat the InfoKey Battery.
5. Tap the InfoKey Controller Power/Standby button. If the InfoKey display is blank, replace the InfoKey Controller Battery.
6. If the Warning icon appears in the InfoKey Display when attempting to power on, see “Startup Error Conditions," (p. 127).
7. If your PT will still not power on, remove both PT Batteries and then reattach them.

121
Segway PT Will Not Enter Balance ModeProblem:Your Segway PT will not enter Balance Mode.
Review the following information prior to troubleshooting this problem:
• “Balance Mode/Riderless Balance Mode” (p. 31)
• “Riding Your Segway PT” (p. 61)
Recommended Action:
1. Confirm power has been turned on.
2. Confirm the LeanSteer Frame/Handlebar Assembly is centered and the Powerbase is level. (If you are positioned on a gentle slope, the LeanSteer Frame/Handlebar Assembly must be vertical in relation to the Powerbase.)
3. Confirm there is no weight on the Mats.
4. Check that the center Balance Indicator light is green and all four other Balance Indicator lights are not illuminated.
5. Tap the Mat with your foot without stepping on, then remove your foot. Confirm that all five Balance Indicator lights are pulsing green, and a smiling face icon shows in the InfoKey Controller display.
6. If the PT still will not enter Balance Mode, identify the error icon on the InfoKey Controller, and attempt to clear the fault following the recommended actions in “Startup Error Conditions,” p. 127. T-shoot
122
Troubleshooting Procedures (cont.)Tire/Wheel Assembly is Loose and/or WobblesProblem:The Tire/Wheel assembly is not secure. It appears to be loose and wobbles.
Review the following service procedures prior to troubleshooting this problem:
• “Remove the Tire/Wheel Assembly” (i2 SE, p. 108; x2 SE, p. 111; x2 SE Turf, p. 113)
• “Install the Tire/Wheel Assembly” (i2 SE, p. 109; x2 SE p. 111; x2 SE Turf, p. 113)
Recommended Action:
1. Make sure the Segway PT is unplugged and powered off.
2. Remove the Wheel Cap (i2 SE only) by pressing down on the outside edge, and lifting the opposite outside edge with your fingers or a plastic wedge.
3. Tighten the Wheel Nuts.
4. If the Tire/Wheel Assembly is still loose or wobbles, remove, clean, and reseat the Tire/Wheel Assembly to the flange on which the Tire/Wheel Assembly mounts.
123
T-shoot
Segway PT Pulls to One Side When RidingProblem:Your Segway PT pulls to one side when you are riding.
Review the following service procedures prior to troubleshooting this problem:
• “Checking Tire Inflation Pressure” (p. 107)
Recommended Action:
1. Check to make sure tire inflation pressure is equal, and set to recommended specifications in both Tires (see “Tire Inflation Pressure,” p. 98).
2. If either Tire is not set at the proper tire inflation pressure, inflate the Tire or Tires until both are at equal and correct pressure.
3. Distribute your weight evenly on both feet. If you put more weight on one foot, the Segway PT will pull in that direction.

124
Troubleshooting Procedures (cont.)Tire is Flat or Will Not Hold AirProblem:One of the Tires on your Segway PT is flat or will not hold air.
Review the following service procedure prior to troubleshooting this problem.
• "Checking Tire Inflation Pressure" (p. 107)
Recommended Action:
1. Check for Tire damage. If the Tire is damaged, contact an Authorized Segway Dealer or Distributor to order a replacement Tire/Wheel Assembly.
2. If there is no visible Tire damage, check to make sure the Tire valve stem core is tight. Tighten the valve stem if necessary.
3. Inflate the Tire and check for leaks. If the Tire goes flat or will not maintain inflation pressure, contact your Segway Dealer.
125
Safety Shutdown at Building EntranceProblem:Theft detection systems, such as the type used in some libraries and retail stores can interfere with the Segway PT’s ability to balance and/or cause the PT to perform a Safety Shutdown. Do not ride within 5 feet (1.5 m) of any theft detection system. These systems may not always be visible.
Recommended Action:
1. Step off at least 5 feet (1.5 m) away from theft detection systems and walk through the theft detection system in Standby Mode or with the PT powered off.
2. Once you are at least 5 feet (1.5 m) away from the theft detection system, return to Balance Mode and step on the PT.
T-shoot
126
Troubleshooting Procedures (cont.)The Segway PT Will Not Power DownProblem:Your Segway PT will not power down when you press and hold the Power/Standby button on the InfoKey Controller.
Review the following service procedure prior to troubleshooting this problem.
• "Remove/Install the Mats" (p. 114)
• "Replace the InfoKey Controller Battery" (p. 115)
Recommended Action:
1. Check that your Mats are not sticking to the Powerbase.
2. If a Mat is sticking, lift the Mat to release it, being careful not to move your PT forward or backward or move the LeanSteer Frame.
3. Press and hold the Power/Standby button on the InfoKey Controller for two seconds to confirm the problem is resolved.
4. If your PT still will not power down, check that your InfoKey Controller Battery is not fully depleted and that the InfoKey Controller is not damaged. If necessary, replace or reseat the InfoKey Controller Battery.
5. If reseating the InfoKey Controller Battery did not resolve the problem, and you do not have a replacement InfoKey Controller Battery:Switch your PT to Standby Mode by walking beside it while holding the Handlebar until you hear the Stick Shake Warning and feel the PT switch out of Balance Mode, into Standby Mode.Leave your PT in a secure location for 15 minutes until it automatically powers down.Install a new InfoKey Controller Battery.
6. Reinstall the Mat after your PT is powered down.
7. Tap the Power/Standby button on the InfoKey Controller to power on your PT, then press and hold Power/Standby button for two seconds to confirm the problem is resolved.
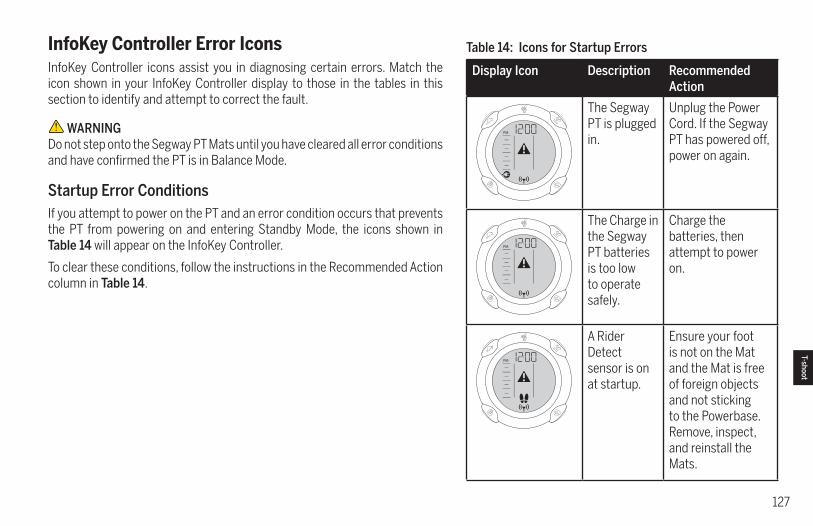
127
InfoKey Controller Error IconsInfoKey Controller icons assist you in diagnosing certain errors. Match the icon shown in your InfoKey Controller display to those in the tables in this section to identify and attempt to correct the fault.
WARNINGDo not step onto the Segway PT Mats until you have cleared all error conditions and have confirmed the PT is in Balance Mode.
Startup Error ConditionsIf you attempt to power on the PT and an error condition occurs that prevents the PT from powering on and entering Standby Mode, the icons shown in Table 14 will appear on the InfoKey Controller.
To clear these conditions, follow the instructions in the Recommended Action column in Table 14.
Table 14: Icons for Startup Errors
Display Icon Description Recommended Action
The Segway PT is plugged in.
Unplug the Power Cord. If the Segway PT has powered off, power on again.
The Charge in the Segway PT batteries is too low to operate safely.
Charge the batteries, then attempt to power on.
A Rider Detect sensor is on at startup.
Ensure your foot is not on the Mat and the Mat is free of foreign objects and not sticking to the Powerbase. Remove, inspect, and reinstall the Mats.
T-shoot
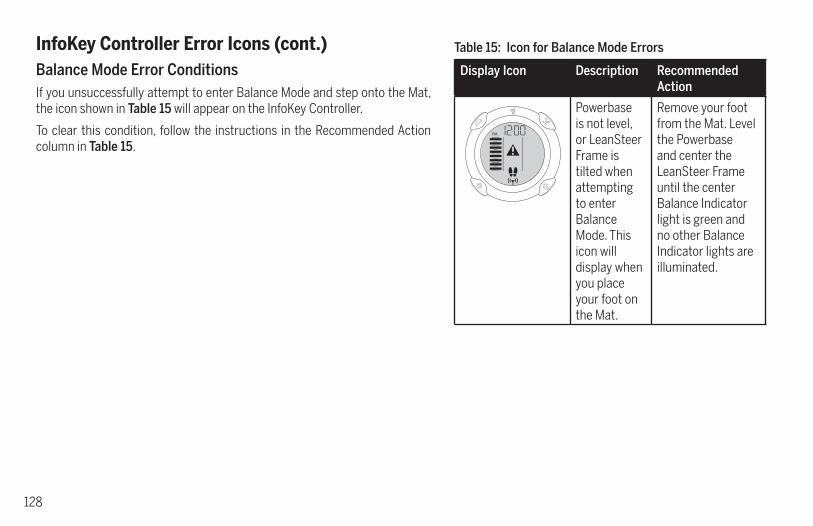
128
InfoKey Controller Error Icons (cont.)Balance Mode Error ConditionsIf you unsuccessfully attempt to enter Balance Mode and step onto the Mat, the icon shown in Table 15 will appear on the InfoKey Controller.
To clear this condition, follow the instructions in the Recommended Action column in Table 15.
Table 15: Icon for Balance Mode Errors
Display Icon Description Recommended Action
Powerbase is not level, or LeanSteer Frame is tilted when attempting to enter Balance Mode. This icon will display when you place your foot on the Mat.
Remove your foot from the Mat. Level the Powerbase and center the LeanSteer Frame until the center Balance Indicator light is green and no other Balance Indicator lights are illuminated.
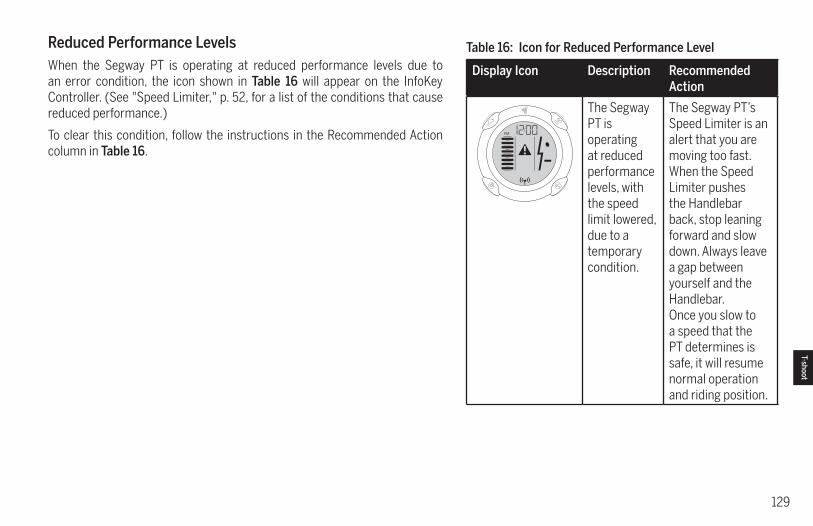
129
Reduced Performance LevelsWhen the Segway PT is operating at reduced performance levels due to an error condition, the icon shown in Table 16 will appear on the InfoKey Controller. (See "Speed Limiter," p. 52, for a list of the conditions that cause reduced performance.)
To clear this condition, follow the instructions in the Recommended Action column in Table 16.
Table 16: Icon for Reduced Performance Level
Display Icon Description Recommended Action
The Segway PT is operating at reduced performance levels, with the speed limit lowered, due to a temporary condition.
The Segway PT’s Speed Limiter is an alert that you are moving too fast. When the Speed Limiter pushes the Handlebar back, stop leaning forward and slow down. Always leave a gap between yourself and the Handlebar.Once you slow to a speed that the PT determines is safe, it will resume normal operation and riding position.
T-shoot
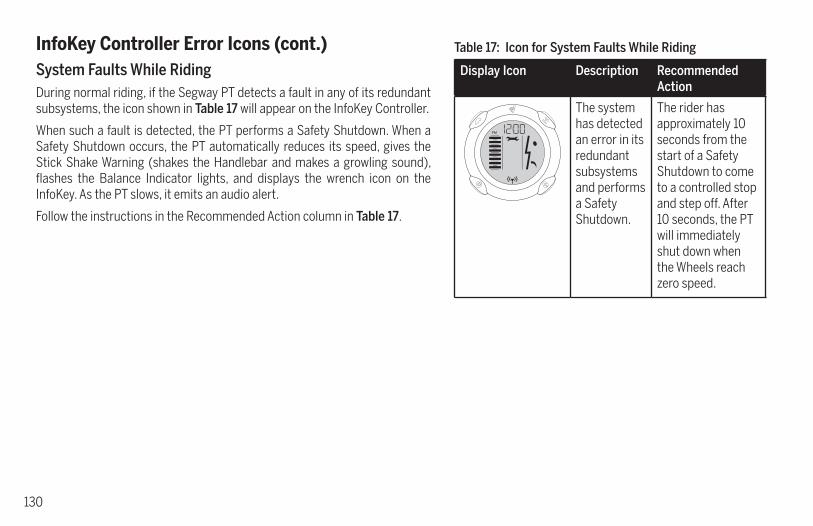
130
InfoKey Controller Error Icons (cont.)System Faults While RidingDuring normal riding, if the Segway PT detects a fault in any of its redundant subsystems, the icon shown in Table 17 will appear on the InfoKey Controller.
When such a fault is detected, the PT performs a Safety Shutdown. When a Safety Shutdown occurs, the PT automatically reduces its speed, gives the Stick Shake Warning (shakes the Handlebar and makes a growling sound), flashes the Balance Indicator lights, and displays the wrench icon on the InfoKey. As the PT slows, it emits an audio alert.
Follow the instructions in the Recommended Action column in Table 17.
Table 17: Icon for System Faults While Riding
Display Icon Description Recommended Action
The system has detected an error in its redundant subsystems and performs a Safety Shutdown.
The rider has approximately 10 seconds from the start of a Safety Shutdown to come to a controlled stop and step off. After 10 seconds, the PT will immediately shut down when the Wheels reach zero speed.
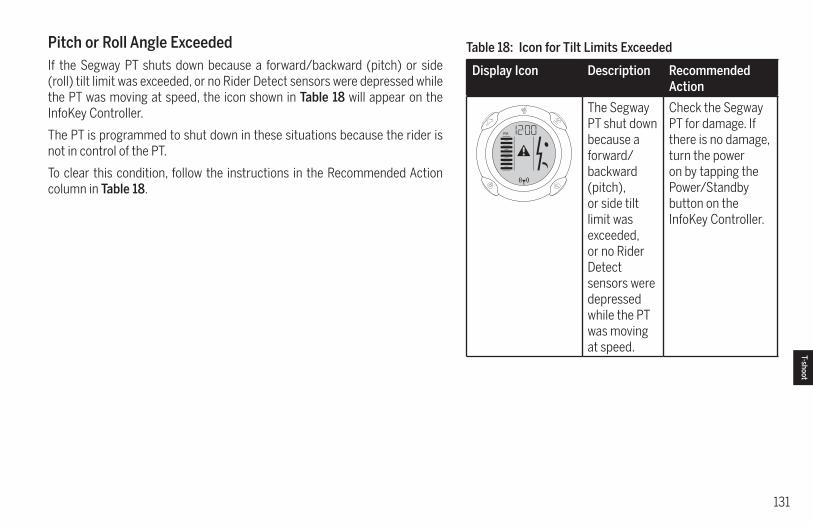
131
Pitch or Roll Angle ExceededIf the Segway PT shuts down because a forward/backward (pitch) or side (roll) tilt limit was exceeded, or no Rider Detect sensors were depressed while the PT was moving at speed, the icon shown in Table 18 will appear on the InfoKey Controller.
The PT is programmed to shut down in these situations because the rider is not in control of the PT.
To clear this condition, follow the instructions in the Recommended Action column in Table 18.
Table 18: Icon for Tilt Limits Exceeded
Display Icon Description Recommended Action
The Segway PT shut down because a forward/backward (pitch), or side tilt limit was exceeded, or no Rider Detect sensors were depressed while the PT was moving at speed.
Check the Segway PT for damage. If there is no damage, turn the power on by tapping the Power/Standby button on the InfoKey Controller.
T-shoot

132
InfoKey Controller Error Icons (cont.)System FaultsIf the Segway PT detects a system fault, the icon shown in Table 19 will appear on the InfoKey Controller.
The PT cannot be used until the fault is cleared. To attempt to clear system faults, follow the instructions in the Recommended Action column in Table 19.
Table 19: Icon for System Faults
Display Icon Description Recommended Action
There is a fault in the Powerbase or Batteries.
1. Power on the Segway PT.
2. If the same icon appears, confirm both PT Batteries are installed correctly.
3. If the Batteries are installed correctly, remove and reseat both Batteries.
4. If the same icon appears, plug in the PT and verify both Battery Charge Indicator lights are green. Charge the PT overnight.
133
Contact and Legal InformationReport All IncidentsIf you or any other user of your Segway PT is involved in an accident, or if your PT performs in a way that you do not intend or in a way that it is not supposed to, contact Segway Customer Care.
How to Reach UsTelephone: (English-language only) 1-866-4SEGWAY (1-866-473-4929)E-mail: (English-language only) [email protected]
An Authorized Segway Dealer or Distributor can answer questions about your Segway PT via the web, email, or phone. For a list of Dealers and Distributors, visit www.segway.com.
California WarningThis product contains chemicals, including lead, known to the State of California to cause cancer, birth defects, or other reproductive harm.
Obey All Laws and RegulationsMany governmental authorities regulate use of Segway PTs on public roads and sidewalks. In addition to other requirements, these laws and regulations may prescribe minimum ages for Segway PT users and may set speed limits and mandate protective gear for riders. Some governmental authorities prohibit use of Segway PTs on public roads and sidewalks. You should consult local authorities to become familiar with applicable laws and regulations. (In the USA, many of these laws use the term “Electric Personal Assistive Mobility Device” or “Personal Motorized Mobility Device,” which are specifically defined to include Segway PTs.)
Contact
134
Limited Warranty
(United States Only)Segway provides with each Segway PT a “Segway® Personal Transporter Limited Warranty.” This is the only warranty applicable to the Segway PT. Consult the “Segway® Personal Transporter Limited Warranty” delivered with your Segway PT for the specific terms of limited warranty coverage.
Radio Frequency Interference
United States FCC Part 15 Class B Radio Frequency Interference (RFI) StatementThe Segway PT has been tested and found to comply with the limits for Class B digital devices pursuant to Part 15 of the FCC rules. These limits are designed to provide reasonable protection against harmful interference in a residential environment. The Segway PT generates, uses, and can radiate radio frequency energy, and, if not installed and used in accordance with the User Materials may cause harmful interference to radio communications.
However, there is no guarantee that interference will not occur in a particular installation. If the Segway PT does cause harmful interference to radio or television reception, which can be determined by turning the Segway PT off and on, the user is encouraged to try and correct the interference by one or more of the following measures:
• Reorient or relocate the receiving antenna.
• Increase the distance between the Segway PT and the receiver.
• Connect the Segway PT into an outlet on a circuit different from that to which the receiver is connected.
• Consult the dealer or an experienced radio/TV technician for help.
• Operation is subject to the following two conditions:1. This device may not cause harmful interference2. This device must accept any interference received, including interference that may cause undesired operation
This product complies with FCC radiation exposure limits set forth for an uncontrolled environment.
135
Modifications: Modifications not expressly approved by Segway may void the user's authority to operate this device under FCC regulations and must not be made.FCC ID: T2Z-23444IC: 6395A-23444
CanadaThe Segway PT is a Class B digital apparatus that complies with Canadian ICES-3/NMB-3B. Cet appareil numérique de la classe b est conforme à la norme ICES-3/NMB-3B du Canada. The Segway PT complies with Industry Canada licence-exempt RSS standard(s). Operation is subject to the following two conditions: (1) this device may not cause interference, and (2) this device must accept any interference, including interference that may cause undesired operation of the device. Le présent appareil est conforme aux CNR d'Industrie Canada applicables aux appareils radio exempts de licence. L'exploitation est autorisée aux deux conditions suivantes: (1) l'appareil ne doit pas produire de brouillage, et (2) l'utilisateur de l'appareil doit accepter tout brouillage radioélectrique subi, même si le brouillage est susceptible d'en compromettre le fonctionnement.
Miscellaneous Regulatory Compliance InformationEuropean DirectivesThe Segway PT complies with the requirements of the following European Directives:
• 2004/108/EC, Electromagnetic Compatibility Directive• 2006/95/EC, Low Voltage Directive• 2006/42/EC, Machinery Directive• 1999/5/EC, Radio & Telecommunications Terminal Equipment Directive• 2011/65/EC, Restriction of the use of certain Hazardous Substances in Electrical and Electronic Equipment (RoHS)• 2012/19/EC, Directive on Waste Electrical and Electronic Equipment (WEEE)• 2006/1907/EC, Directive on Registration, Evaluation, Authorization and Restriction of Chemical Substances (REACH)
Miscellaneous Regulatory Compliance Information (cont.)
Contact
continued

136
Other Standards
The Segway PT also complies under the applicable sections of the following:
• CAN/CSA-C22.2 No. 60950-1-03 Safety of Information Technology Equipment
• CAN/CSA-C22.2 No. 68-09 Motor-operated appliances (household and commercial)
• CAN/CSA-C22.2 No. 94-M91 Special purpose enclosures
• UL 60950-1 Information Technology Equipment – Safety – General Requirements
• UL 73 (9th Edition) Motor-operated Appliances
• UL 50 (11th edition) Enclosure for electrical equipment
• IEC/EN 60335-1 Safety of household and similar electrical appliances – General requirements
• IEC/EN 60950-1 Information technology equipment – Safety – General requirements
• EN ISO 14121-1 Safety of machinery – Risk assessment – Principles
• IEC 60529 Degrees of Protection Provided by Enclosures (IP Code)
• ISO 121001-1 Safety of Machinery – Basic Concepts, General Principles for Design – Part 1: Basic Terminology
• ISO 121001-1 Safety of Machinery – Basic Concepts, General Principles for design – Part 2: Technical Principles
• ETSI EN 301 489-1 Electromagnetic compatibility and Radio spectrum Matters (ERM); ElectroMagnetic Compatibility (EMC) standard for radio equipment and services; Part 1: Common technical requirements
• ETSI EN 301 489-3 Electromagnetic compatibility and Radio spectrum Matters (ERM); ElectroMagnetic Compatibility (EMC) standard for radio equipment and services; Part 3: Specific conditions for Short-Range Devices (SRD) operating on frequencies between 9 kHz and 40 GHz
• ETSI EN 301 489-17 Electromagnetic compatibility and Radio spectrum Matters (ERM); ElectroMagnetic Compatibility (EMC) standard for radio equipment; Part 17: Specific conditions for Broadband Data Transmission Systems
• ETSI EN 300 328 Electromagnetic compatibility and Radio spectrum Matters (ERM); Wideband transmission systems; Data transmission equipment operating in the 2,4 GHz ISM band and using wide band modulation techniques; Harmonized EN covering the essential requirements of article 3.2 of the R&TTE Directive
• CENELEC EN 50371 Generic standard to demonstrate the compliance of low power electronic and electrical apparatus with the basic restrictions related to human exposure to electromagnetic fields (10 MHz–300 GHz) – General public
• FCC 47 CFR Part 15, Subpart A (General), B (Unintentional Radiators), C (Intentional Radiators), Class B
• ICES-003 Interference-Causing Equipment Standard – Digital Apparatus, Class B

137
• EN 55011 Industrial, scientific and medical (ISM) radio-frequency equipment – Electromagnetic disturbance characteristics, Group I Class B
• EN 55022 Information technology equipment – Radio disturbance characteristics, Class B
• EN 61000-3-2 Harmonic current emissions
• EN 61000-3-3 Voltage changes, voltage fluctuations and flicker
• EN 61000-4-2 Electrostatic discharge immunity
• EN 61000-4-3 Radiated, radio-frequency, electromagnetic field immunity
• EN 61000-4-4 Electrical fast transient/burst immunity
• EN 61000-4-5 Surge immunity
• EN 61000-4-6 Immunity to conducted disturbances, induced by radio-frequency fields
• EN 61000-4-8 Power frequency magnetic field immunity
• EN 61000-4-11 Voltage dips, short interruptions and voltage variations immunity
• EN 61000-6-1 Electromagnetic compatibility (EMC) – Immunity for residential, commercial and light-industrial environments
• EN 61000-6-2 Electromagnetic compatibility (EMC) – Immunity for industrial environments
• CAN/CSA-C22.2 NO. 107.2/UL 1012 – Battery Chargers/Power Supplies Other than Class 2
• UL 2575 Lithium Ion Battery Systems for Use in Electric Power Tool and Motor Operated, Heating and Lighting Appliances
• CAN/CSA-C22.2 NO. 0.8-12 – Safety functions incorporating electronic technology
• EN13489 Safety of machinery, Safety-related parts of control systems, Part 1: General principles for design
• EN60335-2-29 Household and similar electrical appliances. Safety Particular requirements for battery chargers
• UL1642 Lithium Batteries
• UL2054 Household and Commercial Batteries
• IEC62133 Secondary cells and batteries containing alkaline or other non-acid electrolytes – Safety requirements for portable sealed secondary cells, and for batteries made from them, for use in portable applications
Contact
138
Product Life and Recycling
This product should be recycled at the end of its useful life. All Segway PT models can be returned to the location at which they were purchased, or to Segway Inc. at:
Segway Inc.Attn: Product Recycling14 Technology Dr.Bedford, NH 03110 USA
To find the nearest Segway dealer or distributor go to http://www.segway.com/dealer-locator/.
Segway PT Li-ion Batteries
Transportation and ShippingLithium-ion Batteries are regulated as “Hazardous Materials” by the U.S. Department of Transportation. For more information, contact the U.S. Department of Transportation at www.phmsa.dot.gov/hazmat/regs or call 1-800-467-4922.
DisposalThe Li-ion Batteries used in the Segway PT can be recycled. Recycle or dispose of Batteries in accordance with local environmental regulations. Do not place in fire or incinerate. For more information, contact Segway at 1-866-4SEGWAY (1-866-473-4929), or visit our website at www.segway.com.
Patent Information
The Segway PT is covered by US and foreign patents.
For patent information go to http://www.segway.com/patents.pdf
Segway Inc. manufactures and sells Segway PTs under a license from DEKA Products Limited Partnership.

139
AAccessories 103BBalance Indicator lights 30Balance Mode/Riderless
Balance Mode 31Balance Sensor Assembly 36Batteries 38, 85
disposal 95install 22remove 106replace 94shipping/transporting 95specifications 86
BatteryInfoKey Controller 115
Battery Charge Indicatorlights 32, 89
Battery charge level display 90Battery safety 85Beginner
button, functions 43icon 41Mount/dismount 26
CCarrying cargo 83Center of gravity, rider 25Charge Port 88Charging Your Batteries 87Charging failures 89Checking the Tire/Wheel
Assembly 98Checking Tire inflation
pressure 107Cleaning your Segway PT 99Console 29Controller Boards 34System faults when riding 130
DDynamic stabilization 25
EEmpty Battery condition 59Errors/Faults
Balance mode 128System faults 130, 131Reduced Performance 129Startup 127System faults 132
FFace icons 40, 41Fenders 110, 112Foreign patents 138
HHandlebar
attach 18cargo weight, maximum 12remove 105
Ii2 SE description 11Indicator lights
Balance 30Battery Charge 32, 89
InfoKey Controllerbattery replacement 115buttons 39display 40Dock Adapter installation20Dock installation 20error icons 127serial number 10
Information Display button 39Install
Batteries 22Fenders 110, 112Handlebar 18InfoKey Controller Dock 20InfoKey Controller DockAdapter 20LeanSteer Frame 19Mats 114Tire/Wheel 109, 111, 113
LLaws and regulations 133LeanSteer Frame
attaching 19removing 104
LeanSteer Frame Preparation 18Lifting Your Segway PT 97
MMaintaining Tires and Wheels 98Maintenance schedule 142Mats, install/remove 114Maximum speed 12Maximum payload 12Minimum rider weight 15Model descriptions 11Motors 35
Index
Index

140
OOperating limits 14
PParts diagram 102Patent information 138Performance and temperature
93Pitch or roll angle exceeded 131Power requirements 12Power/Standby button 39Powerbase height 13Pre-ride checklist IBCProduct Life 138
RRange on a full charge 12Recalibrating the battery charge
level display 92Recycling 138Reduced performance levels
129Redundant subsystems 28Regenerative braking 90Regulatory information 135
RemoveBatteries 106Fenders 110, 112Handlebar 105LeanSteer Frame 104Mats 114Tire/Wheel 108, 111, 113
Replacing parts 103Replacing the InfoKey Controller
Battery 115Rider Detect Sensors 33Running Lights 37
SSafety Alerts 51Safety messaging 8Safety Shutdown 49, 57Security button 39, 47Security icon 41, 47Segway PT
components, subsystems 27how it works 25serial number 9specifications 12
Service procedures 104Servicing your Segway PT 101
Shipping Li-ion Batteries 138Shutdown timeout 47Slow speed roll compensation
26Specifications 12Speed Limiter 52Speed limits, setting 46Startup error conditions 127Stick Shake Warning
description 54system error 130rider off 56rider on 54
Storing your Segway PT 100Structural weight limits 15System faults 132
TTemperature
effect on performance 16operating ranges 86
Tire inflation pressure 98checking 107
Tire Wear 147Tire/Wheel
install 109, 111, 113
remove 108, 111, 113Torque specifications 103Traction 62, 107Transporting and shipping
Batteries 95, 138Your PT 99
Troubleshooting 119flat tire 124pulls to one side 123Safety Shutdown 125, 130will not enter balance mode121will not power down 126will not power on 120
Turning radius 12
UUS patent numbers 138
WWarranty 134Weight limits 12Wrench icon 41, 132
Xx2 SE description 11
Index (cont.)

141
Index
Notes:

142
Maintenance procedure: 1x/month 1x/4 months 1x/6 months 1x/12 months
Check LeanSteer installation and torque: 11 N-m
Check tire wear and pressure: i2 SE = 15 PSI; x2 SE = 4 PSI
Ensure rider mats are intact, secure, and free of debris
Inspect handle bar grips for proper installation/excessive wear
Inspect docking station for condition/functionality
Inspect fenders for cracks/obstructions/debris
Check operation of height adjustment knob
Power on PT. Ensure operability and document hours/miles
Check fastener torque: Handle bar clamp = 6 N-m
Check fastener torque: InfoKey dock = 2 N-m
Check fastener torque: Batteries = 1.6 N-m
Check fastener torque: Wheel = 30 N-m
Check fastener torque: Fascia/Parking stand = 1.5 N-m
Check fastener torque: Gearbox Trim = 6 N-m
Check fastener torque: Fender = 1.5 N-m
Function check: InfoKey operation
Function check: InfoKey battery level
Function check: Inspect LeanSteer for damage
Recommended Maintenance Schedule–i2 SE, x2 SE, x2 SE Turf
Key: = required, 2 = Performed by Level 2 trained Segway Certified Technician only, 3 = Performed by Level 3 trained Segway Certified Technician only
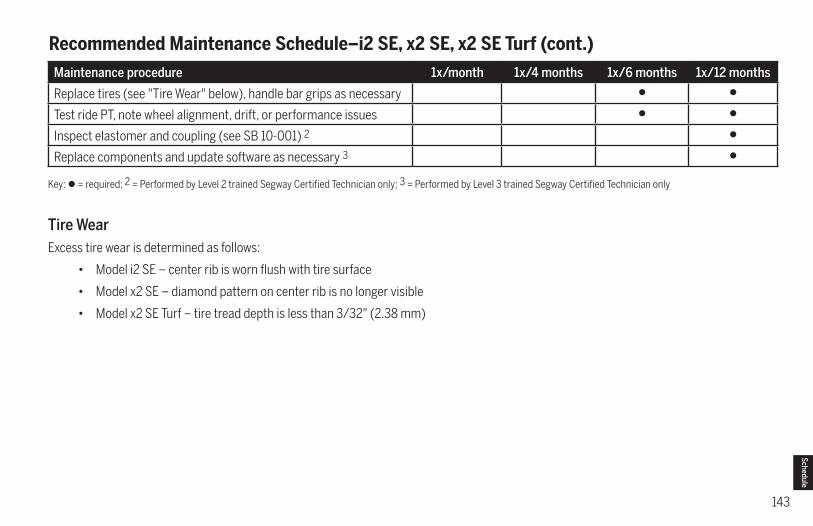
143
Recommended Maintenance Schedule–i2 SE, x2 SE, x2 SE Turf (cont.)
Maintenance procedure: 1x/month 1x/4 months 1x/6 months 1x/12 months
Replace tires (see "Tire Wear" below), handle bar grips as necessary
Test ride PT, note wheel alignment, drift, or performance issues
Inspect elastomer and coupling (see SB 10-001) 2
Replace components and update software as necessary 3
Tire WearExcess tire wear is determined as follows:
• Model i2 SE – center rib is worn flush with tire surface
• Model x2 SE – diamond pattern on center rib is no longer visible
• Model x2 SE Turf – tire tread depth is less than 3/32" (2.38 mm)
Key: = required; 2 = Performed by Level 2 trained Segway Certified Technician only; 3 = Performed by Level 3 trained Segway Certified Technician only
Schedule
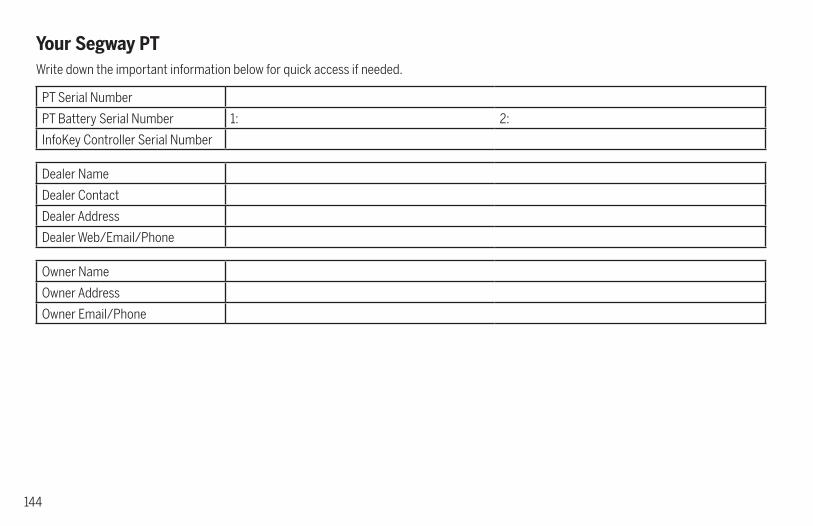
144
Your Segway PT
PT Serial Number
PT Battery Serial Number 1: 2:
InfoKey Controller Serial Number
Dealer Name
Dealer Contact
Dealer Address
Dealer Web/Email/Phone
Owner Name
Owner Address
Owner Email/Phone
Write down the important information below for quick access if needed.