Embed Size (px)
Citation preview

Volume 13: List Generator (Database/Labels)
Simple DIYInstructions
Inside!
DON’T HAVE THE TIMEOR MANPOWER? can do it for you!
© 2
014
CU*A
nsw
ers W
eb S
ervi
ces
~col
lat/
man
agm
ent_
serv
ices
/Bui
ldin
g_th
e_Fa
ctor
y_Co
vers
Find out how toCONTACT MEMBERSWITH LOANS BUT NO CHECKING!
I WANT MORE CHECKING ACCOUNTS

1 CU*Answers Management Services
Vol. 13: Members with Loan but no Checking This document and the following volumes are intended to give a credit union a complete road map to
execute a marketing campaign. This road map will take the user from the very beginning point all the
way through to the end of the process and the evaluation of the campaign. This design will contain all
the steps necessary to create the campaign, the steps to follow through to the end using the referenced
CU*BASE options to mine the data and track the sales success.
What is the Campaign? A member with a loan and no checking account provides huge potential for any credit union. The
member already has a relationship with you, but is likely not using you as their primary financial
institution. Maybe they came to the credit union as an indirect loan or maybe they previously had a
checking account. Regardless, this is an opportunity to reach out to them and entice them into a
checking account. One idea is to use a $50 dollar gift card for new accounts but get creative and find
what works for your members and credit union. We will walk through the process to identify those
members and contact them. Use this as an exercise in establishing or building upon a sales culture.
1. You can take it upon yourself and follow the step by step instructions in the subsequent pages.
-OR-
2. You can contact Xtend at 800-327-3478 or [email protected] and they will handle everything
for you.
How Do I Find the Target Group? This campaign can be started by using the List Generator (Database/Labels) tool in the Member
Communication (MNPRTC) menu.
This tool will allow you to quickly identify all members who have a loan but no checking account, with
the ability to export the information to a file to use with Member Connect.
Entering the Selection Criteria 1. Navigate to the List Generator (Database/Labels) option on the Member Communication
(MNPRTC) menu.

Vol. 13: Members with Loan but no Checking 2
2. On the first screen of the Member List Generator, choose to work with open memberships and then press Enter.
3. On the next screen ensure that “Does Not Matter” is selected for all options and then press Enter.
4. On the next screen, ensure that “Does Not Matter” is selected for all options and then press Enter. Exclusions could be added for members with written off loans, and opt out flags if you so desire.
3 CU*Answers Management Services
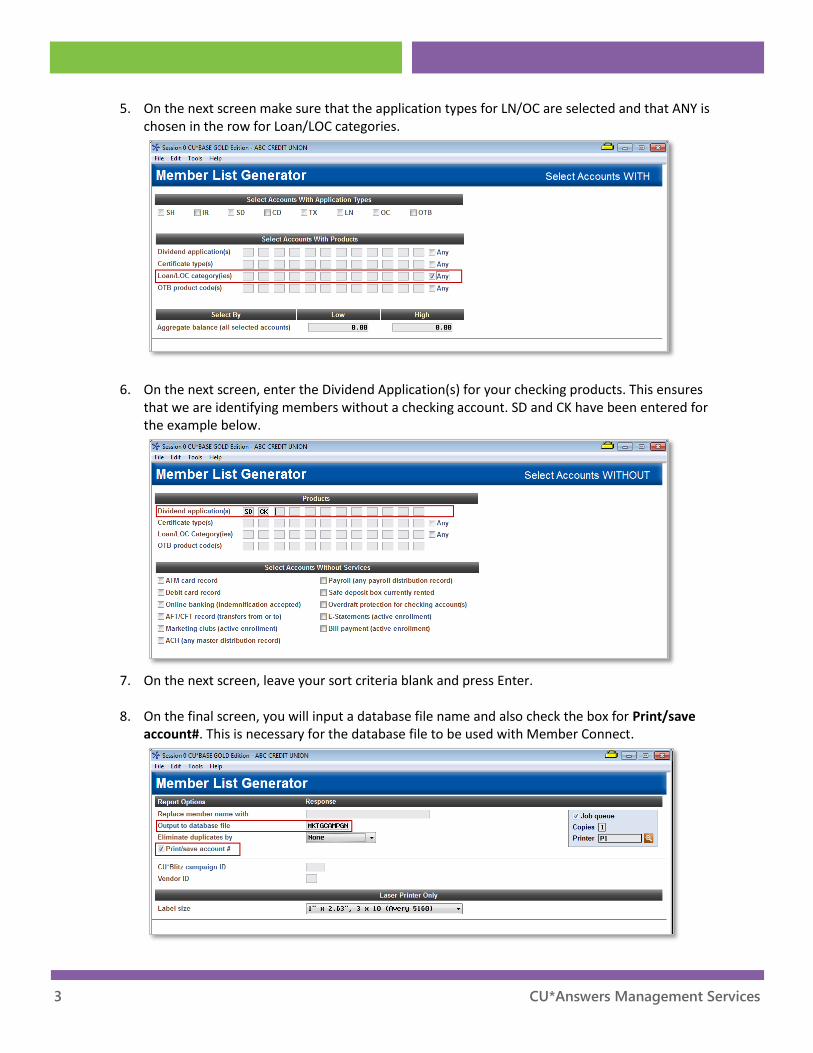
5. On the next screen make sure that the application types for LN/OC are selected and that ANY is chosen in the row for Loan/LOC categories.
6. On the next screen, enter the Dividend Application(s) for your checking products. This ensures that we are identifying members without a checking account. SD and CK have been entered for the example below.
7. On the next screen, leave your sort criteria blank and press Enter.
8. On the final screen, you will input a database file name and also check the box for Print/save
account#. This is necessary for the database file to be used with Member Connect.
Vol. 13: Members with Loan but no Checking 4
9. Now, the database file has been created and can be used to communicate with members. This file can be given any name you desire, but it can be helpful to give the file a timestamp. For example, naming the file NOCHK1014 to indicate the file was created October 2014.
Other Considerations You may wish to exclude certain members form the promotion, or exclude certain checking products
form the promotion as well. Review the product offerings prior to completing the campaign.
Generating the List for Member Connect The list of members to communicate with is created based upon the name that is provided within the
output to database file field.
Note: Selecting to Export the record for Query will create a database file with the information seen on
the screen and all records will be included. Selecting to Export to Member Connect will create a file that
includes only Account Base and will eliminate any duplicate records (preventing you from calling the
same member twice for a single campaign.
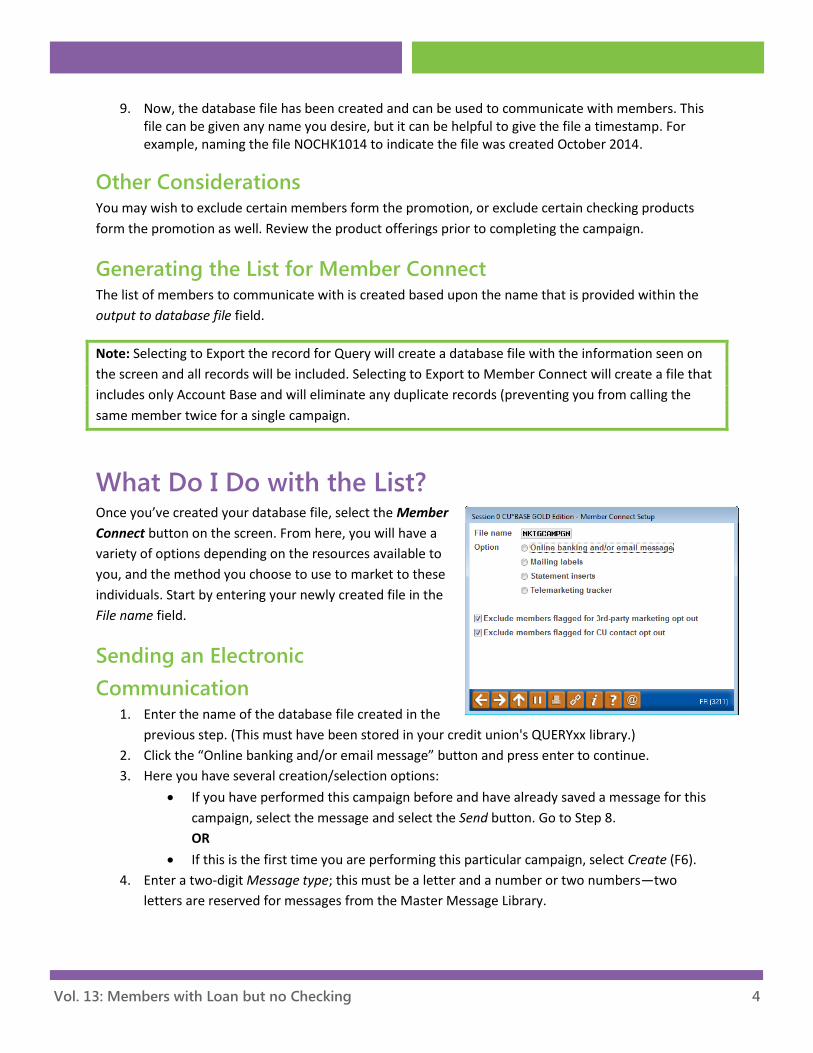
What Do I Do with the List? Once you’ve created your database file, select the Member
Connect button on the screen. From here, you will have a
variety of options depending on the resources available to
you, and the method you choose to use to market to these
individuals. Start by entering your newly created file in the
File name field.
Sending an Electronic
Communication 1. Enter the name of the database file created in the
previous step. (This must have been stored in your credit union's QUERYxx library.)
2. Click the “Online banking and/or email message” button and press enter to continue.
3. Here you have several creation/selection options:
If you have performed this campaign before and have already saved a message for this
campaign, select the message and select the Send button. Go to Step 8.
OR
If this is the first time you are performing this particular campaign, select Create (F6).
4. Enter a two-digit Message type; this must be a letter and a number or two numbers—two
letters are reserved for messages from the Master Message Library.

5 CU*Answers Management Services
5. Enter the Message subject “Get $50 for Opening a Checking Account Today!”
This text will appear in the subject line when the message is sent as an email
message. Enter to continue.
6. Now you are on Member Connect Message Maintenance screen. Here you can
enter or edit the text of the message. Enter your text as follows (the message below is an
example based upon providing $50 to members who open a checking account):
We appreciate your membership and want to make your experience with the credit union
optimal. Open a checking account today and benefit from the convenience of a
______________ Credit Union debit card.
7. Select Save Changes.
8. Now you are ready to send the email or It's Me 247 online banking message. Select the message
and click the Send option.
IMPORTANT: All email messages will have the Signature Line message (SL message) text
automatically appended to them. Editing the Signature Line or (SL message) is similar to
editing a message. SEE ALSO: Editing the Signature Line (or SL Message).
TIP: In your Signature Line, you may want to include text explaining how a member can
“opt out” of receiving future marketing email messages. This can be done by having
them “opt out” using the two options on the Info Center|Contact Preferences page
in It’s Me 247.
9. Select to send the message via Priority. This will send the message to members with email
addresses first, and then to members with online banking accounts without email addresses. Set
a comment purge date one month out from the current date.
10. Click Send (F5).
NOTE: Online banking messages will only be sent to members who have already logged
into online banking.
11. Press Enter to confirm your sending.
Creating a Call Campaign 1. Enter the name of the database file created in the previous step. (This must have been stored in
your credit union's QUERYxx library.)
2. Click the “Telemarketing Tracker” button and press enter to continue.
3. Ensure that Create as Tracker Type is set to ST (Sales Tracker)
4. Choose a memo type of IN for Initiated
5. Choose a tracker key word of “Sales Tracker”
Warning! If you enter a Tracker Key word that is different from an existing Tracker Type, you will
create a new Tracker. This will not, for example, be appended to the member’s Sales Tracker. It is
recommended that you enter Sales Tracker here.
6. Choose a follow-up date of today.
7. Check the box for “Append to Existing Tracker”

Vol. 13: Members with Loan but no Checking 6
8. Enter the tracker text as follows…
Member can get $50 for opening a checking account.
9. Choose a telemarketer ID of the employee who is generating the leads
A pseudo-employee id could be created if you want the effort to be established without
a physical employee id.
10. Choose a need group of Self Service Products
11. Choose a task of eStatements
12. Check the boxes for excluding members that are opted out.
13. Coach your team on reviewing the “Follow-Ups” badge within the member inquiry screens.
Sending a Selective Statement Insert 1. Enter the name of the database file created in the previous step. (This must have been stored in
your credit union's QUERYxx library.)
2. Click the “Statement Inserts” button and press enter to continue
3. Enter the Statement File ID number you wish to use
a. Depending on how many selective statement inserts are used in the month desired, you
may need to change the ID number listed.
4. Check the boxes for excluding members that are opted out.
5. Click on “Process”
6. Choose the Statement Format ID that the insert will be used for
7. Hit Enter through the statement messages
8. Based on the number chosen in step 3, reference the file name of STMTxx (where xx = the file id
number chosen) and enter a description of the insert and make selections for “Leftover Pieces”
and choose “Selective”
9. Press Enter to save and follow standard procedures for getting insert to your statement provider
How Do I Follow Up and See My Results? There are a couple of options for you to track the success of your checking account campaign. The
following are two of our favorites;
1. Review the Tiered Services Monthly Comparison from the Management Analysis Dashboard
(MNMGMD) menu and review the past few months and look for an increased number of
checking accounts.
2. If a Telemarketing Tracker was utilized, use the Cross Sales Analysis Report available from the
Member Tracker Tools (MNTRAK) menu to review how many of the initial tracker conversations
generated ended with a sale.
Choose to sort by Ending Point Employee to provide your team with an analysis of who
closed the most deals.

7 CU*Answers Management Services
Campaign Form
Don’t have time to complete this or another campaign yourself? Let Xtend do the work for you. Assuring
we meet and exceed your expectations is very important to us. The information below will be utilized
for quality assurance purposes. This form serves as your formal written consent for Xtend to deliver
messages using the CU*BASE Member Connect Program on your behalf. Once completed please return
to the Business Support Representative Team via email to [email protected]
☐ I agree to all of the terms & conditions of this Member Connect message request, as specified above.
Credit Union Name
Date Submitted
CU # Employee Name
CU ID Email Address
Campaign Topic ________________________________ (Example: Auto Loans)
Campaign Date (Preferred Option week - 1)
Week of _____________
Campaign Date (Preferred Option week - 2)
Week of _____________
Form of Outbound Communication
Outbound Calls ☐Yes
☐No
It’s Me 247 Online Banking Secure Message
☐Yes
☐No
Email Message ☐Yes
☐No Lobby Banners
☐Yes
☐No
OBC Post (only available for Member Reach clients)
☐Yes
☐No Mailer
☐Yes
☐No


CU*Answers Management Services 6000 28th Street SE Grand Rapids, MI 49546 (800) 327-3478 www.cuanswers.com
Discover More!