Embed Size (px)
DESCRIPTION
Media Content Calendar from HubSpots
Citation preview

01+042How to Use This Calendar
01+03001+0361
This Social Media Content Calendar will let you organize your social media activities far in advance, making it easier to coordinate campaigns, grow your reach, and scale your social media marketing. To make this template easy to use, this section will break down what to do with each tab, highlighting nuances and giving you tips for maximum productivity.
Monthly Planning Calendar
This calendar is meant for you to plan your monthly social media content. Here, you'll write out common themes such as campaigns, holidays, or specific pieces of content you'd like to promote across all social networks on a particular day or week. This calendar will not only help you coordinate efforts across all your social channels, but it will also help you align better with email promotion, blog content, and other team-wide campaigns or promotional channels. In Image 1 below, you'll see an example of types of content or campaigns you might coordinate around. Feel free to change this key depending on the types of content you tend to promote. Additionally, in Image 2, you'll see that you can write in the date next to each day of the week on your calendar, and in the rows below it you can include specific details about your content or campaigns. Finally, in Image 3, you'll see it says "Month + Year," which you should replace with the particular month and year you're planning for. This "Monthly Planning Calendar" tab can even be copied over 12 times and made into a calendar for each month of the year.

01+042How to Use This Calendar
01+03001+0362
Before you go deleting your columns, you'll need to turn your smart "Date & Time" column into a static column. As it is now, this column is set to read your "Date" and "Time" columns and put them together into a "Date & Time" column that HubSpot will be able to read. The reason all three of these columns exist is so you can easily change the dates in the "Date" column every week and keep the times in the "Time" column the same. Here's what you'll do to make your column a static one:
Twitter Updates
Use this tab to plan out all of your Twitter content week-by-week. The first four columns, "Day," "Date," and "Time" are there for your convenience. "Date & Time" might seem repetitive, but it will be useful to you when you go to upload your sheet in bulk. In the "Message" column, simply input the copy you'd like to appear in your tweet, bearing in mind you should keep it under 114 characters to allow room for a link. After you've composed your tweet, paste the URL you'd like to include in your tweet in the "Link" column. In the column labeled "Campaign," include the name of the campaign you'll tag to that tweet so you can report on how well it performed later. Your "Campaign" should align with the same campaign name you used in other marketing materials.
The example below links to a demo of HubSpot's Social Inbox product, so we included the campaign name "Social Inbox" so the reporting shows how many tweets we sent about this particular topic and how well each performed:
The "Character Count" section will auto-calculate the number of characters you've entered with a color-coded system to keep you on point. Green means you're in the clear and you'll be able to attach an image in addition to a link. Once you've hit 95 characters, the box turns yellow. This means you'll only be able to fit a link with no image. If the box turns bright red, that means you've hit 118 characters and you'll no longer be able to include a link or an image -- just text. If you'd like to include an image, check out the section titled, How to Attach an Image to Your Spreadsheet" on page 6. We suggest using 876 x 438 pixels for Twitter images.
When you are ready to upload this sheet into HubSpot's Social Inbox, simply open a new Excel workbook and drag your "Twitter Updates" tab into that new workbook. Once you have this in a separate workbook, make sure you delete the orange columns titled, "Day," "Date," "Time," "Character Count," and "Image." These columns are for organizational purposes only, and will not successfully upload in bulk. If you'd like to include an image in your tweets, simply go back through your tweets once they've been scheduled and attach the images you've set aside in your spreadsheet. What you should keep are the magenta columns listed in the image above. These are, "Date & Time," "Message," "Link," and "Campaign." However, you'll need to change the title "Date & Time" to just "Date" in order for HubSpot to accurately recognize it.

01+042How to Use This Calendar
01+03001+0363
Twitter Updates
Use this tab to plan out all of your Twitter content week-by-week. The first four columns, "Day," "Date," and "Time" are there for your convenience. "Date & Time" might seem repetitive, but it will be useful to you when you go to upload your sheet in bulk. In the "Message" column, simply input the copy you'd like to appear in your tweet, bearing in mind you should keep it under 114 characters to allow room for a link. After you've composed your tweet, paste the URL you'd like to include in your tweet in the "Link" column. In the column labeled "Campaign," include the name of the campaign you'll tag to that tweet so you can report on how well it performed later. Your "Campaign" should align with the same campaign name you used in other marketing materials.
The example below links to a demo of HubSpot's Social Inbox product, so we included the campaign name "Social Inbox" so the reporting shows how many tweets we sent about this particular topic and how well each performed:
The "Character Count" section will auto-calculate the number of characters you've entered with a color-coded system to keep you on point. Green means you're in the clear and you'll be able to attach an image in addition to a link. Once you've hit 95 characters, the box turns yellow. This means you'll only be able to fit a link with no image. If the box turns bright red, that means you've hit 118 characters and you'll no longer be able to include a link or an image -- just text. If you'd like to include an image, check out the section titled, How to Attach an Image to Your Spreadsheet" on page 6. We suggest using 876 x 438 pixels for Twitter images.
When you are ready to upload this sheet into HubSpot's Social Inbox, simply open a new Excel workbook and drag your "Twitter Updates" tab into that new workbook. Once you have this in a separate workbook, make sure you delete the orange columns titled, "Day," "Date," "Time," "Character Count," and "Image." These columns are for organizational purposes only, and will not successfully upload in bulk. If you'd like to include an image in your tweets, simply go back through your tweets once they've been scheduled and attach the images you've set aside in your spreadsheet. What you should keep are the magenta columns listed in the image above. These are, "Date & Time," "Message," "Link," and "Campaign." However, you'll need to change the title "Date & Time" to just "Date" in order for HubSpot to accurately recognize it.
01+042How to Use This Calendar
01+03001+0364
Before you go deleting your columns, you'll need to turn your smart "Date & Time" column into a static column. As it is now, this column is set to read your "Date" and "Time" columns and put them together into a "Date & Time" column that HubSpot will be able to read. The reason all three of these columns exist is so you can easily change the dates in the "Date" column every week and keep the times in the "Time" column the same. Here's what you'll do to make your column a static one:
First, you'll need to highlight the whole "Date & Time" column, right click, and copy. Next, you'll right click and "Paste Special..." Just make sure your column is still highlighted when you do this. A screen will pop up (as you see in image 3 on page 3) and you'll need to select "Values" under "Paste," then click "OK." Once you've pasted your static column, change "Date & Time" to just "Date."
Additionally, you should delete the gray rows that say "Monday," "Tuesday," "Wednesday," etc. and any blank rows with no messages in them. If you leave these rows, they will return an error message when you go to upload your spreadsheet. Here's what your final spreadsheet should look like:
When you've filled out your entire sheet, save your new "Twitter Updates" document as a .CSV file with a title that reflects the week you're working with to stay organized. You'll now be able to upload this sheet using HubSpot's bulk uploader. To do that, hop over to the "Social" tab in HubSpot and select "Publishing." At the top of the page, you should see something that looks like this:
First, click the gray cloud and arrow symbol next to "Compose a message." Next, you'll see a window to select your account and upload your CSV file. Click "Upload" and if you've followed these steps correctly, you'll see a green "Successfully scheduled X messages" screen.

01+042How to Use This Calendar
01+03001+0365
First, you'll need to highlight the whole "Date & Time" column, right click, and copy. Next, you'll right click and "Paste Special..." Just make sure your column is still highlighted when you do this. A screen will pop up (as you see in image 3 on page 3) and you'll need to select "Values" under "Paste," then click "OK." Once you've pasted your static column, change "Date & Time" to just "Date."
Additionally, you should delete the gray rows that say "Monday," "Tuesday," "Wednesday," etc. and any blank rows with no messages in them. If you leave these rows, they will return an error message when you go to upload your spreadsheet. Here's what your final spreadsheet should look like:
When you've filled out your entire sheet, save your new "Twitter Updates" document as a .CSV file with a title that reflects the week you're working with to stay organized. You'll now be able to upload this sheet using HubSpot's bulk uploader. To do that, hop over to the "Social" tab in HubSpot and select "Publishing." At the top of the page, you should see something that looks like this:
First, click the gray cloud and arrow symbol next to "Compose a message." Next, you'll see a window to select your account and upload your CSV file. Click "Upload" and if you've followed these steps correctly, you'll see a green "Successfully scheduled X messages" screen.

01+042How to Use This Calendar
01+03001+0366
Facebook Updates
Facebook updates work similarly to Twitter updates, minus the ability to bulk upload. The first three columns, "Day," "Date," "Time," and "Date and Time" are there for your convenience. Head on over to the column labeled "Message" and input the copy you'd like to appear in your status update. Then move to the "Link" column and input the link you'll be, well, linking to in the update! If you'd like this update to be tagged to a certain campaign, include this in the "Campaigns" column to ensure you can track all of the traffic that comes from Facebook. Lastly, if you'd like to include an image, we suggest 1200 x 900 pixels.
LinkedIn Updates
LinkedIn updates are the most unique of all, because you have both Company Pages and Groups to consider. To demonstrate the difference between Company Page updates and Group updates, let's navigate over to the column labeled "Title (For Group Discussions Only)." Groups let you post a few kinds of updates, one of which is something called a Discussion. You will only fill out this column if you are looking to post a Discussion to your LinkedIn Group -- because Discussions are the only update you'll be posting that requires a title. If you're not posting a Discussion to a LinkedIn Group, you don't need to fill out this field, because your update will not have a title.
You'll fill out the next columns, "Message," for every type of update you post, whether it's for a Company Page or a Group. Simply input your copy into this column, and then navigate to the next two columns, "Link" and "Campaign," to input the URL to which you're directing readers, and the campaign name you'll use to track them. If you'd like to attach an image to your post, we suggest 700 x 520 pixels.
Google+ Updates
Finally, we come to Google+. Start in the "Message" column and input your status update. Then move over to the last two columns and input the link to which you're directing readers, and the campaign name you'll use at the end of that URL to track visitors coming to your site from Google+. If you're attaching an image, you could use multiple different sizes, but 960 x 960 pixels works best.
Content Repository
The Content Repository tab of this spreadsheet will help you keep track of the content you have in your arsenal that can be promoted on social media. As your inbound marketing strategy grows, you'll have accumulated an impressive bank of content and offers that you'll want to resurface and promote via social media. To ensure you don't lose track of all of that great content, record it on this tab so you're never at a loss for social media content! If the content you're promoting is not evergreen, be sure to include an expiration date in the column marked "Expiration."
First, you'll need to highlight the whole "Date & Time" column, right click, and copy. Next, you'll right click and "Paste Special..." Just make sure your column is still highlighted when you do this. A screen will pop up (as you see in image 3 on page 3) and you'll need to select "Values" under "Paste," then click "OK." Once you've pasted your static column, change "Date & Time" to just "Date."
Additionally, you should delete the gray rows that say "Monday," "Tuesday," "Wednesday," etc. and any blank rows with no messages in them. If you leave these rows, they will return an error message when you go to upload your spreadsheet. Here's what your final spreadsheet should look like:
When you've filled out your entire sheet, save your new "Twitter Updates" document as a .CSV file with a title that reflects the week you're working with to stay organized. You'll now be able to upload this sheet using HubSpot's bulk uploader. To do that, hop over to the "Social" tab in HubSpot and select "Publishing." At the top of the page, you should see something that looks like this:
First, click the gray cloud and arrow symbol next to "Compose a message." Next, you'll see a window to select your account and upload your CSV file. Click "Upload" and if you've followed these steps correctly, you'll see a green "Successfully scheduled X messages" screen.

01+042How to Use This Calendar
01+03001+0367
Facebook Updates
Facebook updates work similarly to Twitter updates, minus the ability to bulk upload. The first three columns, "Day," "Date," "Time," and "Date and Time" are there for your convenience. Head on over to the column labeled "Message" and input the copy you'd like to appear in your status update. Then move to the "Link" column and input the link you'll be, well, linking to in the update! If you'd like this update to be tagged to a certain campaign, include this in the "Campaigns" column to ensure you can track all of the traffic that comes from Facebook. Lastly, if you'd like to include an image, we suggest 1200 x 900 pixels.
LinkedIn Updates
LinkedIn updates are the most unique of all, because you have both Company Pages and Groups to consider. To demonstrate the difference between Company Page updates and Group updates, let's navigate over to the column labeled "Title (For Group Discussions Only)." Groups let you post a few kinds of updates, one of which is something called a Discussion. You will only fill out this column if you are looking to post a Discussion to your LinkedIn Group -- because Discussions are the only update you'll be posting that requires a title. If you're not posting a Discussion to a LinkedIn Group, you don't need to fill out this field, because your update will not have a title.
You'll fill out the next columns, "Message," for every type of update you post, whether it's for a Company Page or a Group. Simply input your copy into this column, and then navigate to the next two columns, "Link" and "Campaign," to input the URL to which you're directing readers, and the campaign name you'll use to track them. If you'd like to attach an image to your post, we suggest 700 x 520 pixels.
Google+ Updates
Finally, we come to Google+. Start in the "Message" column and input your status update. Then move over to the last two columns and input the link to which you're directing readers, and the campaign name you'll use at the end of that URL to track visitors coming to your site from Google+. If you're attaching an image, you could use multiple different sizes, but 960 x 960 pixels works best.
Content Repository
The Content Repository tab of this spreadsheet will help you keep track of the content you have in your arsenal that can be promoted on social media. As your inbound marketing strategy grows, you'll have accumulated an impressive bank of content and offers that you'll want to resurface and promote via social media. To ensure you don't lose track of all of that great content, record it on this tab so you're never at a loss for social media content! If the content you're promoting is not evergreen, be sure to include an expiration date in the column marked "Expiration."
First, you'll need to highlight the whole "Date & Time" column, right click, and copy. Next, you'll right click and "Paste Special..." Just make sure your column is still highlighted when you do this. A screen will pop up (as you see in image 3 on page 3) and you'll need to select "Values" under "Paste," then click "OK." Once you've pasted your static column, change "Date & Time" to just "Date."
Additionally, you should delete the gray rows that say "Monday," "Tuesday," "Wednesday," etc. and any blank rows with no messages in them. If you leave these rows, they will return an error message when you go to upload your spreadsheet. Here's what your final spreadsheet should look like:
When you've filled out your entire sheet, save your new "Twitter Updates" document as a .CSV file with a title that reflects the week you're working with to stay organized. You'll now be able to upload this sheet using HubSpot's bulk uploader. To do that, hop over to the "Social" tab in HubSpot and select "Publishing." At the top of the page, you should see something that looks like this:
First, click the gray cloud and arrow symbol next to "Compose a message." Next, you'll see a window to select your account and upload your CSV file. Click "Upload" and if you've followed these steps correctly, you'll see a green "Successfully scheduled X messages" screen.

01+042How to Use This Calendar
01+03001+0368
How to Attach an Image to Your Spreadsheet
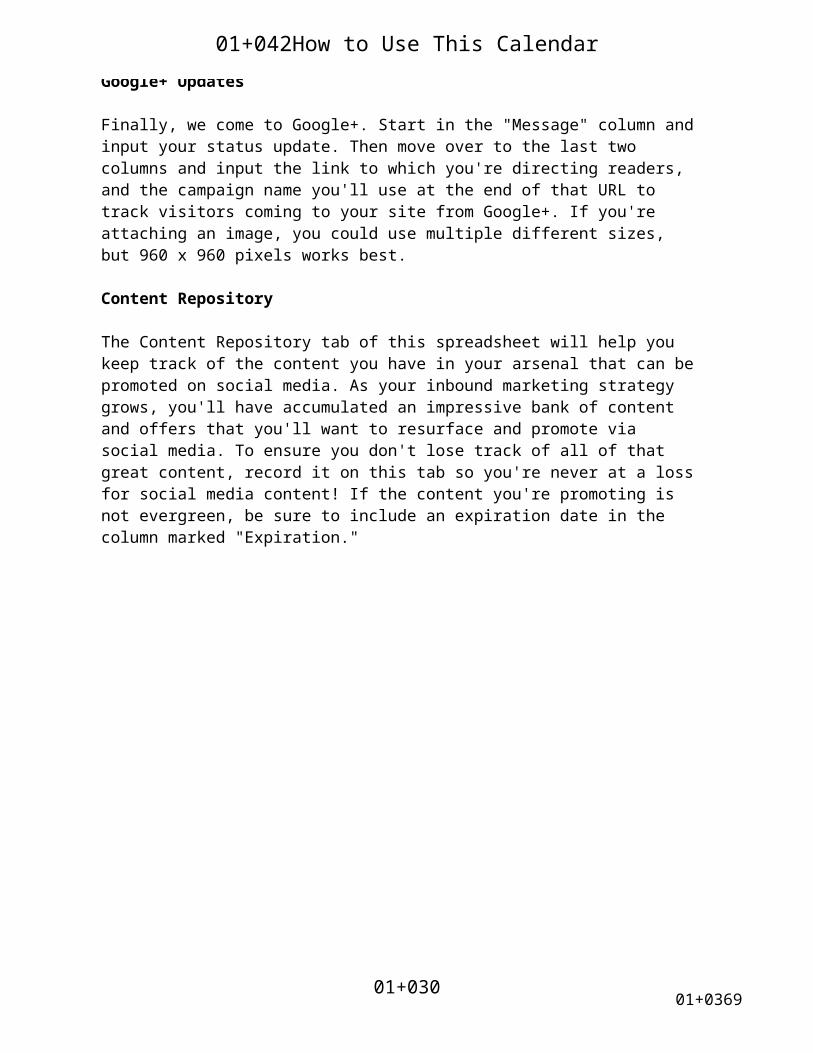
To attach an image, follow steps 1-4 below and on the next page. First, you'll want to right click into the cell you'd like to paste your image into. Next, click "Hyperlink" and you'll see an "Insert Hyperlink" window pop up. Click the "Document" button, and then click "Select..." to choose your image. Once you do this, you'll see a "Choose a File" window where you can select an image from your computer. Once you've selected the correct image, click "Open" and you will see your image attached to the "Insert Hyperlink" screen. Feel free to edit the "Display" text if you'd prefer to name your file something else. Once you've finished, click "OK" and your image will be hyperlinked. Keep in mind this is for organizational purposes only -- this link will not attach when you upload it into your publishing software. Also note that if you share this document with another person on your team, the image link will not work for them, as this file was uploaded locally on your computer and cannot be transferred.
To add images to scheduled tweets in Social Inbox, check out your "Scheduled" dashboard under the "Social" tab. Here, you can edit individual tweets and attach the image you included in your spreadsheet.
Facebook Updates
Facebook updates work similarly to Twitter updates, minus the ability to bulk upload. The first three columns, "Day," "Date," "Time," and "Date and Time" are there for your convenience. Head on over to the column labeled "Message" and input the copy you'd like to appear in your status update. Then move to the "Link" column and input the link you'll be, well, linking to in the update! If you'd like this update to be tagged to a certain campaign, include this in the "Campaigns" column to ensure you can track all of the traffic that comes from Facebook. Lastly, if you'd like to include an image, we suggest 1200 x 900 pixels.
LinkedIn Updates
LinkedIn updates are the most unique of all, because you have both Company Pages and Groups to consider. To demonstrate the difference between Company Page updates and Group updates, let's navigate over to the column labeled "Title (For Group Discussions Only)." Groups let you post a few kinds of updates, one of which is something called a Discussion. You will only fill out this column if you are looking to post a Discussion to your LinkedIn Group -- because Discussions are the only update you'll be posting that requires a title. If you're not posting a Discussion to a LinkedIn Group, you don't need to fill out this field, because your update will not have a title.
You'll fill out the next columns, "Message," for every type of update you post, whether it's for a Company Page or a Group. Simply input your copy into this column, and then navigate to the next two columns, "Link" and "Campaign," to input the URL to which you're directing readers, and the campaign name you'll use to track them. If you'd like to attach an image to your post, we suggest 700 x 520 pixels.
Google+ Updates
Finally, we come to Google+. Start in the "Message" column and input your status update. Then move over to the last two columns and input the link to which you're directing readers, and the campaign name you'll use at the end of that URL to track visitors coming to your site from Google+. If you're attaching an image, you could use multiple different sizes, but 960 x 960 pixels works best.
Content Repository
The Content Repository tab of this spreadsheet will help you keep track of the content you have in your arsenal that can be promoted on social media. As your inbound marketing strategy grows, you'll have accumulated an impressive bank of content and offers that you'll want to resurface and promote via social media. To ensure you don't lose track of all of that great content, record it on this tab so you're never at a loss for social media content! If the content you're promoting is not evergreen, be sure to include an expiration date in the column marked "Expiration."
01+042How to Use This Calendar
01+03001+0369
Facebook Updates
Facebook updates work similarly to Twitter updates, minus the ability to bulk upload. The first three columns, "Day," "Date," "Time," and "Date and Time" are there for your convenience. Head on over to the column labeled "Message" and input the copy you'd like to appear in your status update. Then move to the "Link" column and input the link you'll be, well, linking to in the update! If you'd like this update to be tagged to a certain campaign, include this in the "Campaigns" column to ensure you can track all of the traffic that comes from Facebook. Lastly, if you'd like to include an image, we suggest 1200 x 900 pixels.
LinkedIn Updates
LinkedIn updates are the most unique of all, because you have both Company Pages and Groups to consider. To demonstrate the difference between Company Page updates and Group updates, let's navigate over to the column labeled "Title (For Group Discussions Only)." Groups let you post a few kinds of updates, one of which is something called a Discussion. You will only fill out this column if you are looking to post a Discussion to your LinkedIn Group -- because Discussions are the only update you'll be posting that requires a title. If you're not posting a Discussion to a LinkedIn Group, you don't need to fill out this field, because your update will not have a title.
You'll fill out the next columns, "Message," for every type of update you post, whether it's for a Company Page or a Group. Simply input your copy into this column, and then navigate to the next two columns, "Link" and "Campaign," to input the URL to which you're directing readers, and the campaign name you'll use to track them. If you'd like to attach an image to your post, we suggest 700 x 520 pixels.
Google+ Updates
Finally, we come to Google+. Start in the "Message" column and input your status update. Then move over to the last two columns and input the link to which you're directing readers, and the campaign name you'll use at the end of that URL to track visitors coming to your site from Google+. If you're attaching an image, you could use multiple different sizes, but 960 x 960 pixels works best.
Content Repository
The Content Repository tab of this spreadsheet will help you keep track of the content you have in your arsenal that can be promoted on social media. As your inbound marketing strategy grows, you'll have accumulated an impressive bank of content and offers that you'll want to resurface and promote via social media. To ensure you don't lose track of all of that great content, record it on this tab so you're never at a loss for social media content! If the content you're promoting is not evergreen, be sure to include an expiration date in the column marked "Expiration."
01+042How to Use This Calendar
01+03001+03610
How to Attach an Image to Your Spreadsheet
To attach an image, follow steps 1-4 below and on the next page. First, you'll want to right click into the cell you'd like to paste your image into. Next, click "Hyperlink" and you'll see an "Insert Hyperlink" window pop up. Click the "Document" button, and then click "Select..." to choose your image. Once you do this, you'll see a "Choose a File" window where you can select an image from your computer. Once you've selected the correct image, click "Open" and you will see your image attached to the "Insert Hyperlink" screen. Feel free to edit the "Display" text if you'd prefer to name your file something else. Once you've finished, click "OK" and your image will be hyperlinked. Keep in mind this is for organizational purposes only -- this link will not attach when you upload it into your publishing software. Also note that if you share this document with another person on your team, the image link will not work for them, as this file was uploaded locally on your computer and cannot be transferred.
To add images to scheduled tweets in Social Inbox, check out your "Scheduled" dashboard under the "Social" tab. Here, you can edit individual tweets and attach the image you included in your spreadsheet.

01+042How to Use This Calendar
01+03001+03611
3 Essential Tips for Using This Template:
1) You'll notice some of the cells in this spreadsheet contain little red triangles in their upper right corners. These are comments with tips and clarifications that will make you use this Social Media Publishing Schedule more successfully. To read the tip, simply hover over the cell with your cursor.
2) We've included some recommendations for publishing frequency in this template, but you may find you need to publish more or less, or at different times of day or night, depending on your business. Please edit the dates and times to fit your needs.
3) Once you've published this content to your social media networks, your job isn't over. You still need to monitor each network for engagement, and reply to fans and followers regularly. If you're a HubSpot customer, you can use Social Inbox to do this. If you're not a HubSpot customer and you'd like to learn more, click on the image below:

01+042How to Use This Calendar
01+03001+03612
3 Essential Tips for Using This Template:
1) You'll notice some of the cells in this spreadsheet contain little red triangles in their upper right corners. These are comments with tips and clarifications that will make you use this Social Media Publishing Schedule more successfully. To read the tip, simply hover over the cell with your cursor.
2) We've included some recommendations for publishing frequency in this template, but you may find you need to publish more or less, or at different times of day or night, depending on your business. Please edit the dates and times to fit your needs.
3) Once you've published this content to your social media networks, your job isn't over. You still need to monitor each network for engagement, and reply to fans and followers regularly. If you're a HubSpot customer, you can use Social Inbox to do this. If you're not a HubSpot customer and you'd like to learn more, click on the image below:

MONTH + YEAR
KEY:COLOR-CODING KEY:
HolidayCampaign
EbookWebinar
Blog PostSlideShare
ProductExperiment
SUNDAY MONDAY TUESDAY WEDNESDAY THURSDAY FRIDAY SATURDAY
SUNDAY MONDAY TUESDAY WEDNESDAY THURSDAY FRIDAY SATURDAY
SUNDAY MONDAY TUESDAY WEDNESDAY THURSDAY FRIDAY SATURDAY
SUNDAY MONDAY TUESDAY WEDNESDAY THURSDAY FRIDAY SATURDAY
SUNDAY MONDAY TUESDAY WEDNESDAY THURSDAY FRIDAY SATURDAY

DAY DATE TIME DATE & TIMEMONDAY
4/2/2015 8:00:00 02/04/2015 08:004/2/2015 9:00:00 02/04/2015 09:004/2/2015 10:30:00 02/04/2015 10:304/2/2015 12:00:00 02/04/2015 12:004/2/2015 13:30:00 02/04/2015 13:304/2/2015 15:00:00 02/04/2015 15:004/2/2015 16:30:00 02/04/2015 16:304/2/2015 18:00:00 02/04/2015 18:004/2/2015 20:00:00 02/04/2015 20:00
TUESDAY4/3/2015 8:00:00 03/04/2015 08:004/3/2015 9:00:00 03/04/2015 09:004/3/2015 10:30:00 03/04/2015 10:304/3/2015 12:00:00 03/04/2015 12:004/3/2015 13:30:00 03/04/2015 13:304/3/2015 15:00:00 03/04/2015 15:004/3/2015 16:30:00 03/04/2015 16:304/3/2015 18:00:00 03/04/2015 18:004/3/2015 20:00:00 03/04/2015 20:00
WEDNESDAY4/4/2015 8:00:00 04/04/2015 08:004/4/2015 9:00:00 04/04/2015 09:004/4/2015 10:30:00 04/04/2015 10:304/4/2015 12:00:00 04/04/2015 12:004/4/2015 13:30:00 04/04/2015 13:304/4/2015 15:00:00 04/04/2015 15:004/4/2015 16:30:00 04/04/2015 16:304/4/2015 18:00:00 04/04/2015 18:004/4/2015 20:00:00 04/04/2015 20:00
THURSDAY4/5/2015 8:00:00 05/04/2015 08:004/5/2015 9:00:00 05/04/2015 09:004/5/2015 10:30:00 05/04/2015 10:304/5/2015 12:00:00 05/04/2015 12:004/5/2015 13:30:00 05/04/2015 13:304/5/2015 15:00:00 05/04/2015 15:004/5/2015 16:30:00 05/04/2015 16:304/5/2015 18:00:00 05/04/2015 18:004/5/2015 20:00:00 05/04/2015 20:00
FRIDAY4/6/2015 8:00:00 06/04/2015 08:004/6/2015 9:00:00 06/04/2015 09:004/6/2015 10:30:00 06/04/2015 10:304/6/2015 12:00:00 06/04/2015 12:004/6/2015 13:30:00 06/04/2015 13:304/6/2015 15:00:00 06/04/2015 15:004/6/2015 16:30:00 06/04/2015 16:304/6/2015 18:00:00 06/04/2015 18:004/6/2015 20:00:00 06/04/2015 20:00

SATURDAY4/7/2015 8:00:00 07/04/2015 08:004/7/2015 9:00:00 07/04/2015 09:004/7/2015 10:30:00 07/04/2015 10:304/7/2015 12:00:00 07/04/2015 12:004/7/2015 13:30:00 07/04/2015 13:304/7/2015 15:00:00 07/04/2015 15:004/7/2015 16:30:00 07/04/2015 16:304/7/2015 18:00:00 07/04/2015 18:004/7/2015 20:00:00 07/04/2015 20:00
SUNDAY4/8/2015 8:00:00 08/04/2015 08:004/8/2015 9:00:00 08/04/2015 09:004/8/2015 10:30:00 08/04/2015 10:304/8/2015 13:30:00 08/04/2015 13:304/8/2015 15:00:00 08/04/2015 15:004/8/2015 16:30:00 08/04/2015 16:304/8/2015 18:00:00 08/04/2015 18:004/8/2015 20:00:00 08/04/2015 20:00

MESSAGE LINK
http://www.hubspot.com/products/social-in
Move social media from a side show to a business driver. Try @HubSpot's Social Inbox today:


CAMPAIGN CHARACTER COUNT IMAGE
Social Inbox 9100000000
000000000
000000000
000000000
000000000
Upload an image (size: 876 x 438 pixels), or paste a web link to your image.

000000000
00000000

DAY DATE TIME DATE & TIMEMONDAY
4/2/2015 9:00:00 02/04/2015 09:004/2/2015 12:00:00 02/04/2015 12:004/2/2015 15:00:00 02/04/2015 15:004/2/2015 17:00:00 02/04/2015 17:00
TUESDAY4/3/2015 9:00:00 03/04/2015 09:004/3/2015 12:00:00 03/04/2015 12:004/3/2015 15:00:00 03/04/2015 15:004/3/2015 17:00:00 03/04/2015 17:00
WEDNESDAY4/4/2015 9:00:00 04/04/2015 09:004/4/2015 12:00:00 04/04/2015 12:004/4/2015 15:00:00 04/04/2015 15:004/4/2015 17:00:00 04/04/2015 17:00
THURSDAY4/5/2015 9:00:00 05/04/2015 09:004/5/2015 12:00:00 05/04/2015 12:004/5/2015 15:00:00 05/04/2015 15:004/5/2015 17:00:00 05/04/2015 17:00
FRIDAY4/6/2015 9:00:00 06/04/2015 09:004/6/2015 12:00:00 06/04/2015 12:004/6/2015 15:00:00 06/04/2015 15:004/6/2015 17:00:00 06/04/2015 17:00
SATURDAY4/7/2015 9:00:00 07/04/2015 09:004/7/2015 12:00:00 07/04/2015 12:004/7/2015 15:00:00 07/04/2015 15:004/7/2015 17:00:00 07/04/2015 17:00
SUNDAY4/8/2015 9:00:00 08/04/2015 09:004/8/2015 12:00:00 08/04/2015 12:004/8/2015 15:00:00 08/04/2015 15:004/8/2015 17:00:00 08/04/2015 17:00

MESSAGE LINK
Don’t batch and blast. HubSpot’s social media publishing helps you become smarter about the way you schedule and publish content on social media. http://www.hubspot.com/products/social-inbox

CAMPAIGN IMAGE
Social Inbox
Upload an image (size: 1200 x 900 pixels), or paste a web link to your image.

DAY DATE TIME DATE & TIMEMONDAY
4/2/2015 9:00:00 02/04/2015 09:004/2/2015 12:00:00 02/04/2015 12:004/2/2015 16:00:00 02/04/2015 16:00
TUESDAY4/3/2015 9:00:00 03/04/2015 09:004/3/2015 12:00:00 03/04/2015 12:004/3/2015 16:00:00 03/04/2015 16:00
WEDNESDAY4/4/2015 9:00:00 04/04/2015 09:004/4/2015 12:00:00 04/04/2015 12:004/4/2015 16:00:00 04/04/2015 16:00
THURSDAY4/5/2015 9:00:00 05/04/2015 09:004/5/2015 12:00:00 05/04/2015 12:004/5/2015 16:00:00 05/04/2015 16:00
FRIDAY4/6/2015 9:00:00 06/04/2015 09:004/6/2015 12:00:00 06/04/2015 12:004/6/2015 16:00:00 06/04/2015 16:00
SATURDAY4/7/2015 9:00:00 07/04/2015 09:004/7/2015 12:00:00 07/04/2015 12:004/7/2015 16:00:00 07/04/2015 16:00
SUNDAY4/8/2015 9:00:00 08/04/2015 09:004/8/2015 12:00:00 08/04/2015 12:004/8/2015 16:00:00 08/04/2015 16:00

TITLE (For Group Discussions Only) MESSAGE
N/A
It's frustrating to not be able to tell your boss whether you'll meet your leads goal. But what if you could keep track of your progress every day, figure out what marketing activities work best, and do more of those successful campaigns to ensure you meet your goal? HubSpot's Social Inbox will help you do just that. Your boss will love you; enjoy your raise.

LINK CAMPAIGN IMAGE
Social Inboxhttp://www.hubspot.com/products/social-inbox
Upload an image (size: 700 x 520 pixels), or paste a web link to your image.

DAY DATE TIME DATE & TIMEMONDAY
4/2/2015 9:00:00 02/04/2015 9:004/2/2015 12:00:00 02/04/2015 12:004/2/2015 15:00:00 02/04/2015 15:004/2/2015 18:00:00 02/04/2015 18:00
MONDAY4/3/2015 9:00:00 03/04/2015 9:004/3/2015 12:00:00 03/04/2015 12:004/3/2015 15:00:00 03/04/2015 15:004/3/2015 18:00:00 03/04/2015 18:00
MONDAY4/4/2015 9:00:00 04/04/2015 9:004/4/2015 12:00:00 04/04/2015 12:004/4/2015 15:00:00 04/04/2015 15:004/4/2015 18:00:00 04/04/2015 18:00
MONDAY4/5/2015 9:00:00 05/04/2015 9:004/5/2015 12:00:00 05/04/2015 12:004/5/2015 15:00:00 05/04/2015 15:004/5/2015 18:00:00 05/04/2015 18:00
MONDAY4/6/2015 9:00:00 06/04/2015 9:004/6/2015 12:00:00 06/04/2015 12:004/6/2015 15:00:00 06/04/2015 15:004/6/2015 18:00:00 06/04/2015 18:00
MONDAY4/7/2015 9:00:00 07/04/2015 9:004/7/2015 12:00:00 07/04/2015 12:004/7/2015 15:00:00 07/04/2015 15:004/7/2015 18:00:00 07/04/2015 18:00
MONDAY4/8/2015 9:00:00 08/04/2015 9:004/8/2015 12:00:00 08/04/2015 12:004/8/2015 15:00:00 08/04/2015 15:004/8/2015 18:00:00 08/04/2015 18:00

MESSAGE LINK
We're giving away free trials of our marketing software. Download it to help close the loop on your marketing activities so you can determine which channels drive the most leads and customers. http://www.hubspot.com/products/demo

CAMPAIGN IMAGE
Social Inbox
Upload an image (size: 960 x 960 pixels), or paste a web link to your image.

CONTENT TYPE TITLE LINK
Website Page http://www.hubspot.com/roi
The Return on Investment of Using HubSpot

INTERESTING SNIPPET IMAGE
TBD
In 2014, an MIT Sloan MBA student completed a research study on the ROI of using HubSpot's marketing software. Highlights include: 2.40x more visitors per month within one year, 5.99x more leads per month within one year, and 69% of customers saw an increase in sales revenue within one year.

EXPIRATION
N/A