Embed Size (px)
Citation preview

ROBOT Horizontal articulated
HS-G SERIES
GENERAL INFORMATION ABOUT ROBOT

Copyright © DENSO WAVE INCORPORATED, 2005-2011
All rights reserved. No part of this publication may be reproduced in any form or by any means without permission in writing from the publisher.
Specifications are subject to change without prior notice.
All products and company names mentioned are trademarks or registered trademarks of their respective holders.

Preface
Thank you for purchasing this high-speed, high-accuracy assembly robot.
Before operating your robot, read this manual carefully to safely get the maximum benefit from your robot in your assembling operations.
Robot series and/or models covered by this manual
Model (Note 1) Series
Floor-mount Overhead-mount Overall arm length
HS-G (Small-sized, horizontal articulated)
HS-4535*G HS-4545*G HS-4555*G
— HSS-4545*G HSS-4555*G
350 mm 450 mm 550 mm
NOTE 1: Model names listed above apply to the models of robot systems. The model names of robot units are followed by M. If the robot system model is HS4535*G, for example, the robot unit model is HS4535*E/GM.
Important
To ensure operator safety, be sure to read the precautions and instructions in "SAFETY PRECAUTIONS."

How this book is organized
This book is just one part of the robot documentation set. This book consists of SAFETY PRECAUTIONS, chapters one through five, and appendix.
Chapter 1 Packing List of the Robot Lists the standard components contained in the product package and optional components.
Chapter 2 Configuration of the Robot System Illustrates the configuration of the robot system and describes the component names of the robot unit and controller.
Chapter 3 Specifications of the Robot Unit Describes the specifications, motion space, robot positioning time, air piping and signal wiring, and engineering-design notes for robot hands.
Chapter 4 Specifications of the Robot Controller Lists the specifications of the robot controller and controller setting table (SETPRM LIST).
Chapter 5 Warranty Describes the warranty period and coverage.
Appendix How to Use the Manual Pack CD

Contents
Chapter 1 Packing List of the Robot............................................................................................................................... 1 1.1 Standard Components ........................................................................................................................................... 1 1.2 Optional Components............................................................................................................................................ 2
Chapter 2 Configuration of the Robot System............................................................................................................... 4 2.1 Configurators ........................................................................................................................................................ 4 2.2 Names of Robot Unit Components ....................................................................................................................... 5
2.2.1 Robot Unit Components and Rotation Direction ....................................................................................... 5 2.2.2 Name Plate ................................................................................................................................................. 6 2.2.3 Warning and Caution Labels...................................................................................................................... 7
2.3 Names of the Robot Controller Components ........................................................................................................ 8
Chapter 3 Specifications of the Robot Unit .................................................................................................................... 9 3.1 Robot Specifications (HS/HSS-G) ........................................................................................................................ 9 3.2 Outer Dimensions and Workable Space of the Robot Unit (HS/HSS-G) ............................................................ 11 3.3 Robot Positioning Time (HS/HSS-G) ................................................................................................................. 18 3.4 Notes for Setting the Positioning Speed (HS/HSS-G)......................................................................................... 28 3.5 Air Piping and Signal Wiring .............................................................................................................................. 30
3.5.1 Instructions for Using Splash-proof Connector Sets................................................................................ 33 3.6 Engineering-design Notes for Robot Hands (HS/HSS-G) .................................................................................. 34 3.7 Stopping Time and Distance (Angle) at an Emergency Stop .............................................................................. 37
Chapter 4 Specifications of the Robot Controller........................................................................................................ 42 4.1 Specifications ...................................................................................................................................................... 42 4.2 Outer Dimensions................................................................................................................................................ 44 4.3 Controller Setting Table ...................................................................................................................................... 45
Chapter 5 Warranty ....................................................................................................................................................... 46
Chapter 6 Appendix........................................................................................................................................................ 47 6.1 Conformity with Standards by Robot Model ...................................................................................................... 47


Chapter 1 Packing List of the Robot
1
Chapter 1 Packing List of the Robot
1.1 Standard Components The components listed below are contained in the product package.
Standard Components
No. Item Q'ty
(1) Robot unit 1
(2) Robot controller 1
(3) Power cable (5 m) 1
(4) Motor & encoder cable (Note 1) (Option) 1
(5) Manuals (“Manual Pack CD” and “Safety Precautions”) 1 set
(6) WINCAPSIII Install CD (Trial version) 1
(7) Spare fuses for robot controller 3
(8) Pendantless connector (Dummy connector) (not contained in UL-Listed robot systems) 1
(9) Connector set for hand control signals (for CN20 and CN21) 1 set
(10) Direction indicator label (Note 2) 1
(11) Warning label (Note 3) 1
(12) Spare output IC for robot controller 1
(13) Dowel pins (internally threaded positioning pin and diamond-shaped pin) 1 set
(14) Short sockets for robot controller 2
Note 1: Choose and order a motor & encoder cable from the table below. The 20-m motor & encoder cable (standard/splash-proof) is not available for controllers equipped with extended-joint options or UL-Listed robot units. The internal cable bending radius shall at least be 200 mm. Excessively bending will result in broken lead wires.
Item Part No.
Standard cable 2 m 410141-4400
Standard cable 4 m 410141-3611
Standard cable 6 m 410141-3621
Standard cable 12 m 410141-3631
Standard cable 20 m 410141-4440
Splash-proof cable 2 m 410141-4420
Splash-proof cable 4 m 410141-3681
Splash-proof cable 6 m 410141-3691
Splash-proof cable 12 m 410141-3701
Splash-proof cable 20 m 410141-4460
Note 2: After installation, attach the direction indicator label in a position on the robot unit that can be easily seen.
Note 3: Attach the warning label on the robot safety fence or other location where workers will easily notice it. If necessary, prepare a plate for attaching the seal.
When placing an order for UL-Listed robot systems, be sure to order the optional teach pendant or mini-pendant also which is essential to UL-Listed ones.

2
1.2 Optional Components
The table below lists the optional components.
Optional Components (1)
Classification No. Item Remarks Part No.
(8 m) Incl. Nos. 1-1 and 1-2. 410149-09401 Standard I/O cable set
(15 m) Incl. Nos. 1-1 and 1-2. 410149-0950
(8 m) 410141-27001-1 I/O cable for “Mini I/O” (68pins)
(15 m) 410141-2710
(8 m) 410141-17401-2 I/O cable for “HAND I/O”
(15 m) 410141-1750
(8 m) 410141-30502 I/O cable for “Parallel I/O board” (96 pins)
(15 m) 410141-3060
(8 m) 410141-3580
I/O cables
3 I/O cable for “SAFETY I/O” (36 pins)
(Only for global type) (15 m) 410141-3590
(4 m) With cable 410100-1572
(8 m) With cable 410100-15824 Teach pendant
(12 m) With cable 410100-1592
Japanese indication 410109-0392(4 m)
English indication 410109-0402
Japanese indication 410109-0412(8 m)
English indication 410109-0422
Japanese indication 410109-0432
5 Mini-pendant kit
(Incl. cable and WINCAPSIII Light)
(12 m)English indication 410109-0442
(4 m) For TP, MP 410141-3711
Operation
devices
6 Pendant extension cable (8 m) For TP, MP 410141-3721
Programming
support tool 7 WINCAPSIII
CD-ROM
(common to the
languages--Japanese, English,
German, Korean, and Chinese)
410090-0980
NPN 410010-3320Shipped as installed
on the controller PNP 410010-3330
NPN 410010-33408 Parallel I/O board
Shipped as individual
boards (supply part) PNP 410010-3350
For Slave station 410010-3370
For Master station 410010-3380Shipped as installed
on the controller For Master & slave station 410010-3390
For Slave station 410010-3400
For Master station 410010-3410
9 DeviceNet board
Shipped as individual
boards (supply part)For Master & slave station 410010-3480
Shipped as installed on the
controller 410010-3430
10 CC-Link board Shipped as individual boards
(supply part) 410010-3440
Shipped as installed on the
controller 410010-3460
Optional
boards for the
robot controller
11 Conveyor tracking board Shipped as individual boards
(supply part) 410010-3470

Chapter 1 Packing List of the Robot
3
Optional Components (2)
Classification No. Item Remarks Part No.
Shipped after integrated in the
controller 410006-0260
12 Optional function for RS232C board
Board manufacturer: CONTEC CO., LTD.
Model: COM-2P(PCI)H Added when the board is
purchased as a spare part 410006-0270
Shipped after integrated in the
controller 410006-0280
13 Optional function for S-LINK V board
Board manufacturer: SUNX CO., LTD.
Model: SL-VPCI Added when the board is
purchased as a spare part 410006-0290
Shipped after integrated in the
controller 410006-0300
14
Optional function for PROFIBUS-DP slave
board
Board manufacturer: Hilscher GmbH
Model: CIF50-DPS\DENSO Added when the board is
purchased as a spare part 410006-0310
Shipped after integrated in the
controller 410006-0800
15
EtherNet/IP function
Board manufacturer: Hilscher GmbH
Model: CIFX 50-RE\DENSO Added when the board is
purchased as a spare part 410006-0810
Optional
functions
(For own
optional board
etc.)
16 Optional function for memory extension Extension only upon controller
shipment (3.25MB to 5.5MB) 410006-0320
17 Controller protection box 410181-0091
Optional box 18 I/O conversion box
For interchangeability with RC5
type controller 410181-0100
CD Manuals 19 Manual Pack CD Contained in the robot package. 410002-2661
20 Instruction manual for HS-G, full set Includes No. C and No. D 410009-0360
C Instruction manual for HS-G, basic set Includes No. C-1 to No. C-3 410009-0260
C-1 GENERAL INFORMATION ABOUT ROBOT For HS-G 410002-2610
C-2 RC7M CONTROLLER MANUAL For RC7M controller 410002-2430
C-3 ERROR CODE TABLES 410002-3370
D Instruction manual for HS-G, extension set Includes No. D-1 to No. D-7 410009-0140
D-1 INSTALLATION & MAINTENANCE GUIDE For HS-G 410002-2630
D-2 STARTUP HANDBOOK 410002-2750
D-3 SETTING-UP MANUAL 410002-3310
D-4 PROGRAMMER'S MANUAL (I) 410002-3330
D-5 PROGRAMMER'S MANUAL (II) 410002-3350
D-6 Panel Designer USER’S MANUAL 410002-6480
Optional
manuals
(Printed
materials,
English edition)
D-7 OPTIONS MANUAL For RC7M controller 410002-2650
For robot unit 21 Flange kit 410329-0060

4
Chapter 2 Configuration of the Robot System
2.1 Configurators
The figure below shows configurators of the typical robot system.
(1) Robot unit
(2) Robot controller
(3) Power cable
(4) Motor & encoder cable (Option)
(5) Manuals
(6) WINCAPSIII install CD (Trial version)
(7) Spare fuses for robot controller
(8) Pendantless connector (Note 2)
(9) Connector set for hand control signals (for CN20 and CN21) (10) Direction
indicator label (11) Warning label
(12) Spare output IC for robot controller
(13) Dowel pins
(14) Short sockets for robot controller
I/O conversion box (option)
PLC (prepared by customer)
I/O cable (option)
Optional board Personal computer (prepared by customer)
Printer (prepared by customer)
Teach pendant (option)
Mini pendant (option)
Controller protection box (option)
WINCAPSIII (option)
Note 1: Components with numbers in () are the standard components contained in the product package listed on page 1.
Note 2: The pendantless connector is attached to the robot controller when no teach pendant or mini-pendant is connected.
Configurators of the Robot System (HS-G series)

Chapter 2 Configuration of the Robot System
5
2.2 Names of Robot Unit Components
2.2.1 Robot Unit Components and Rotation Direction The figure below shows the names of the components of the robot unit and the rotation direction of each axis.
Note: The UL-Listed robot unit has the motor ON lamp on the 2nd arm.
Robot Unit Components and Rotation Direction (HS-G series)
Robot Unit Components and Rotation Direction (HSS-G series)

6
2.2.2 Name Plate The name plate is affixed in the base part, which includes serial number of the robot, robot model, and day of manufacturer, etc.
The serial number is the figure which identifies the robot of each customer and it is paired with the figure of the controller.

Chapter 2 Configuration of the Robot System
7
2.2.3 Warning and Caution Labels The robot unit has warning and caution labels pasted as shown below. They alert the user to the dangers of the areas on which they are pasted. Be sure to observe the instructions printed on those labels.
Warning and Caution Labels on the Robot Unit
Location of labels
Warning and caution labels on the robot unit Additional description
Label 1
Contact with the robot unit which is in motion can cause serious
injuries. Observe the following:
(1) Never enter the robot's restricted space when the robot is in motion or the motor power is on.
(2) When you need to enter the robot's restricted space for recovery from robot failures, be sure to cut the power to the robot motors by activating an emergency stop device or the like.
Label 2
(on UL-Listed robot units only)
When the controller power is on, pressing the brake release switch causes the Z axis to fall. It is DANGEROUS. Observe the following: (1) Never press the brake release switch except in an emergency. (2) Before pressing the brake release switch, be sure to check that
there is no danger of injuries or damages on equipment.
Label 3
There is a high voltage part. This label alerts the user to the dangers of electrical shocks.
Label 4
Instructions on how to hold the robot unit for transport.

8
2.3 Names of the Robot Controller Components
The figure below shows the names of the robot controller components.
Note: For warning and caution labels pasted on the controller, refer to the RC7M CONTROLLER MANUAL.
Connectors for the HS-G series (Encoders connected via bus)
Connector No. Marking Name CN1 RS-232C Serial interface connector CN2 USB USB connector (2 lines) CN3 PENDANT Teach pendant connector CN4 LAN Ethernet connector CN5 Mini I/O I/O connector CN6 INPUT AC Power supply connector CN7 MOTOR Motor/encoder connector CN9 HAND I/O HAND I/O connector
CN10 SAFETY I/O SAFETY I/O connector (Only for global type)
Names of Robot Controller Components

Chapter 3 Specifications of the Robot Unit
9
Chapter 3 Specifications of the Robot Unit 3.1 Robot Specifications (HS/HSS-G)
The table below lists the specifications of the HS-/HSS-G series of robot units.
(1) HS-G Series (Floor-mount type)
Item Specifications
Model name of robot system(Note 1)
HS-4535*G (Standard)
HS-4535*G-W (Dust- & splash-proof)
HS-4535*G-P (Cleanroom)
HS-4535*G-UL (UL-Listed)
HS-4545*G (Standard)
HS-4545*G-W (Dust- & splash-proof)
HS-4545*G-P (Cleanroom)
HS-4545*G-UL (UL-Listed)
HS-4555*G (Standard)
HS-4555*G-W (Dust- & splash-proof)
HS-4555*G-P (Cleanroom)
HS-4555*G-UL (UL-Listed)
Model name of robot unit
HS-4535*E/GM (Standard)
HS-4535*E/GM-W (Dust- & splash-proof)
HS-4535*E/GM-P (Cleanroom)
HS-4535*GM-UL (UL-Listed)
HS-4545*E/GM (Standard)
HS-4545*E/GM-W (Dust- & splash-proof)
HS-4545*E/GM-P (Cleanroom)
HS-4545*GM-UL (UL-Listed)
HS-4555*E/GM (Standard)
HS-4555*E/GM-W (Dust- & splash-proof)
HS-4555*E/GM-P (Cleanroom)
HS-4555*GM-UL (UL-Listed)
Overall arm length 125 (J1: 1st axis) + 225 (J2: 2nd axis) = 350 mm
225 (J1: 1st axis) + 225 (J2: 2nd axis) = 450 mm
325 (J1: 1st axis) + 225 (J2: 2nd axis) = 550 mm
Motion angle and stroke J1 (1st axis) 155, J2 (2nd axis) 145, Z (3rd axis): 200 mm if * = 2, 320 mm if * = 3, T (4th axis): 360
Axis combination J1 (1st axis) + J2 (2nd axis) + Z (3rd axis) + T (4th axis)
Maximum payload 5 kg
At the center of the hand
mounting flange 7,200 mm/s 6,300 mm/s 7,100 mm/s Composite
speed
Z and T Z (3rd axis): 2,000 mm/s, T (4th axis): 2400/s
J1 + J2 0.015 mm 0.02 mm 0.02 mm
Z 0.01 mm Position
repeatability (Note 2)
T 0.005
Maximum force-fit 98N (one second or less)
Maximum allowable moment of inertia around T axis
0.1 kgm2 (with 5 kg payload)
Position detection Absolute encoder
Drive motor and brake AC servomotors for all axes Brakes for Z axis (3rd axis) and T axis (4th axis)
Models except UL-Listed ones
(1) Press the brake release switch in the direct teaching mode.
(2) Enter a brake release command with the teach pendant or mini-pendant. Brake releasing
UL-Listed models(1) Press the brake release switch when the controller power is ON.
(2) The teach pendant or mini-pendant cannot release the brakes.
User air piping 4 systems (4x2, 6x2)
User signal lines 19 (for proximity sensor signals, etc.)
Operating pressure 0.05 to 0.35 MPa Air source Max. allowable pressure 0.59 MPa
Degree of protection for dust- & splash-proof type
IP65
(Continued on the following page)
(Note 1) The model name of robot set refers to the model of a complete set including a robot unit and robot controller. An asterisk (*) in model names denotes the Z-axis stroke.
(Note 2) Value at the constant ambient temperature.

10
Item Specifications
Clean class for cleanroom type(FED-STD-209D)
Class 10 (0.1 μ) at point-of-use
Airborne noise (A-weighted equivalent continuous sound
pressure level) 80 dB or less
Weight Approx. 25 kg (55 lbs) (See the name plate on each model.)
(2) HSS-G Series Robot Unit (Overhead-mount type)
Item Specifications
Model name of robot set (Note 1)
HSS-4545*G (Standard)HSS-4545*G-W (Dust- & splash-proof)
HSS-4555*G (Standard)HSS-4555*G-W (Dust- & splash-proof)
Model name of robot unit HSS-4545*E/GM (Standard)HSS-4545*E/GM-W (Dust- & splash-proof)
HSS-4555* E/GM (Standard)HSS-4555* E/GM -W (Dust- & splash-proof)
Overall arm length 225 (J1: 1st axis) + 225 (J2: 2nd axis) = 450 mm
325 (J1: 1st axis) + 225 (J2: 2nd axis) = 550 mm
Motion angle and stroke
J1 (1st axis) 152, J2 (2nd axis) 141, Z (3rd axis): 150 mm if * = 1, 200 mm if * = 2, 320 mm if * = 3, T (4th axis): 360
J1 (1st axis) 155, J2 (2nd axis) 145, Z (3rd axis): 150 mm if * = 1, 200 mm if * = 2, 320 mm if * = 3, T (4th axis): 360
Axis combination J1 (1st axis) + J2 (2nd axis) + Z (3rd axis) + T (4th axis)
Maximum payload 5 kg
At the center of the hand
mounting flange 6,300 mm/s 7,100 mm/s Composite
speed
Z and T Z (3rd axis): 2,000 mm/s, T (4th axis): 2400/s
J1 + J2 0.02 mm 0.02 mm
Z 0.01 mm Position
repeatability (Note 2) T 0.005
Maximum force-fit 98N (one second or less)
Maximum allowable moment of inertia around T axis
0.1 kgm2 (with 5 kg payload)
Position detection Absolute encoder
Drive motor and brake AC servomotors for all axes Brakes for Z axis (3rd axis) and T axis (4th axis)
Brake releasing
Models except UL-Listed ones
(1) Press the brake release switch in the direct teaching mode. (2) Enter a brake release command with the teach pendant or mini-pendant.
User air piping 4 systems (4x2, 6x2)
User signal lines 19 (for proximity sensor signals, etc.)
Operating pressure
0.05 to 0.35 MPa
Air source Maximum allowable pressure
0.59 MPa
Degree of protection for dust- & splash-proof type
IP65
Airborne noise (A-weighted equivalent continuous sound
pressure level) 80 dB or less
Weight Approx. 25 kg (55 lbs) (See the name plate on each model.)
Note: Overhead-mount type robots cannot be installed on the floor to work facing upward.
(Note 1) The model name of robot set refers to the model of a complete set including a robot unit and robot controller. An asterisk (*) in model names denotes the Z-axis stroke.
(Note 2) Value at the constant ambient temperature.

Chapter 3 Specifications of the Robot Unit
11
3.2 Outer Dimensions and Workable Space of the Robot Unit (HS/HSS-G)
The outer dimensions and workable space of the HS/HSS-G series are shown on the following pages.
NOTE: The overhead-mount type of robots is designed with a preset motion-prohibited area where the robot cannot work.
The motion-prohibited area of the overhead-mount type is set to AREA7 that is specified in the defined interference check area setting. Therefore, you may define only up to 31 interference check areas excluding AREA7 for the overhead-mount type while you may usually define up to 32 (AREA0 through AREA31).
Refer to the SETTING-UP MANUAL, Chapter 4, Section 4.1.2, "[ 5 ] Making the defined interference check areas active or inactive."
Operating procedure with the teach pendant
Access: [F2 Arm]—[F6 Aux.]—[F6 Area.]

12
(1) Outer dimensions and workable space (HS-G series; Floor-mount)

Chapter 3 Specifications of the Robot Unit
13
(2) Outer dimensions and workable space (HS-G-UL series; UL-Listed, Floor-mount)

14
(3) Outer dimensions and workable space
(HSS-4545*G; Arm length 450 mm, Overhead-mount, Standard type)

Chapter 3 Specifications of the Robot Unit
15
(4) Outer dimensions and workable space
(HSS-4555*G; Arm length 550 mm, Overhead-mount, Standard type)

16
(5) Outer dimensions and workable space
(HSS-4545*G-W; Arm length 450 mm, Overhead-mount, Dust- & splash-proof type)

Chapter 3 Specifications of the Robot Unit
17
(6) Outer dimensions and workable space
(HSS-4555*G-W; Arm length 550 mm, Overhead-mount, Dust- & splash-proof type)

18
3.3 Robot Positioning Time (HS/HSS-G)
1. The graphs given on the following pages show the positioning times used to calculate the cycle time.
2. Positioning time refers to the time length required from the start of robot operation to the arrival at the target positioning point.
3. After the robot moves to and passes the target positioning point, vibration will be dampened and the robot will be positioned at the target positioning point as shown in the figure below. This vibration dampening time is not considered in those graphs.
Caution (1) The vibration dampening time depends on factors such as the weight of the hand. If the robot is to be used in such a way that it overshoots or if the vibration damping time is of great concern, then test the robot carefully beforehand.
(2) If acceleration begins before residual vibration of the robot stops, an overcurrent error (code starts from ERROR6120 where the first digit represents the axis number) may be displayed. In this case, take one of the following measures:
• Lower the deceleration of the preceding operation with a DECEL command to reduce residual vibration.
• Keep the robot in stand-by with a DELAY command until residual vibration stops.
• Lower acceleration with an ACCEL command.
(3) Run the robot with the optimum payload setting in accordance with weight of the hand and workpiece. If not, a robot failure may result.
(4) In the positioning time graphs, the Z-axis stroke is represented near the upper end. Near the lower end, the horizontal movement time along the J1/J2 axis increases. (Refer to "Notes for setting the positioning speed .")
Vibration Dampening Time

Chapter 3 Specifications of the Robot Unit
19
(1) HS-4535*G
J1 axis (PTP control) on the HS-4535*G
J2 axis (PTP control) on the HS-4535*G

20
Z axis (PTP control) on the HS-4535*G
T axis (PTP control) on the HS-4535*G

Chapter 3 Specifications of the Robot Unit
21
All axes (CP control) on the HS-4535*G

22
(2) HS/HSS-4545*G
J1 axis (PTP control) on the HS/HSS-4545*G
J2 axis (PTP control) on the HS/HSS-4545*G

Chapter 3 Specifications of the Robot Unit
23
Z axis (PTP control) on the HS/HSS-4545*G
T axis (PTP control) on the HS/HSS-4545*G

24
All axes (CP control) on the HS/HSS-4545*G

Chapter 3 Specifications of the Robot Unit
25
(3) HS/HSS-4555*G
J1 axis (PTP control) on the HS/HSS-4555*G
J2 axis (PTP control) on the HS/HSS-4555*G

26
Z axis (PTP control) on the HS/HSS-4555*G
T axis (PTP control) on the HS/HSS-4555*G

Chapter 3 Specifications of the Robot Unit
27
All axes (CP control) on the HS/HSS-4555*G

28
3.4 Notes for Setting the Positioning Speed (HS/HSS-G)
■ To be applied to all models of the HS-G series (Floor-mount type)
(1) To horizontally traverse the robot arm at high speeds, teach the robot so that Z axis comes to be as close as possible to its upper end.
(2) To stabilize positioning of Z axis near its lower end, the following maximum speed limiting control is automatically provided for J1 and J2 axes depending on the Z-axis coordinate value, only when the robot is moved under PTP control.
The positioning time of J1 and J2 axes becomes longer according to the maximum speed limit shown below.
[Movement time in J1/J2 positioning time graphs (sec.)]
x 100 (sec.) Max. speed limit
For example, when the robot arm moves by SP100 from the start point (Z-axis coordinate 26 mm) to the target point (Z-axis coordinated -74 mm), the maximum speed limits are as follows:
91 when Z-axis coordinate is 26 mm 50 when Z-axis coordinate is -74 mm
At this time, the maximum speed is the smaller value (at the lowest end) of 50.
HS-G Series: Maximum Speed Limit on the J1 and J2 (PTP control)
Z-axis coordinate (mm)
There is no speed limit when the hand moves only along the Z axis (SP100).
Ma
x. s
pee
d li
mit
(Con
vert
ed
to S
P v
alu
e)
Chapter 3 Specifications of the Robot Unit
29
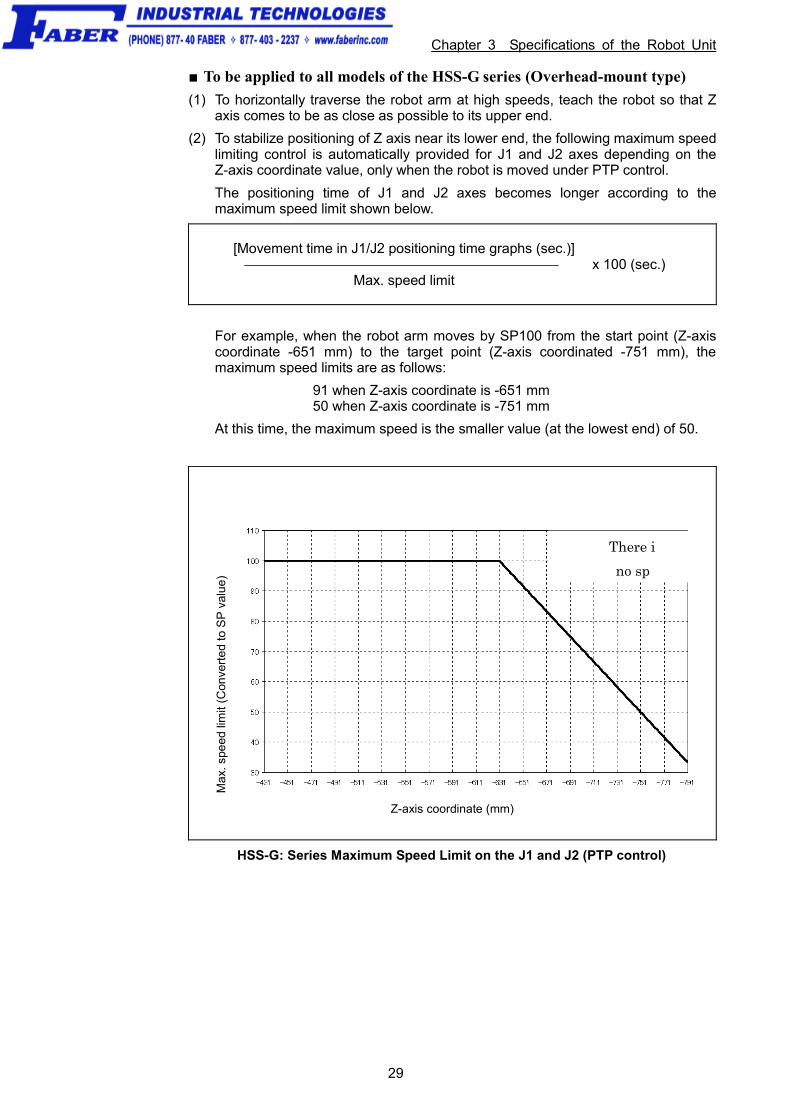
■ To be applied to all models of the HSS-G series (Overhead-mount type)
(1) To horizontally traverse the robot arm at high speeds, teach the robot so that Z axis comes to be as close as possible to its upper end.
(2) To stabilize positioning of Z axis near its lower end, the following maximum speed limiting control is automatically provided for J1 and J2 axes depending on the Z-axis coordinate value, only when the robot is moved under PTP control.
The positioning time of J1 and J2 axes becomes longer according to the maximum speed limit shown below.
[Movement time in J1/J2 positioning time graphs (sec.)]
x 100 (sec.) Max. speed limit
For example, when the robot arm moves by SP100 from the start point (Z-axis coordinate -651 mm) to the target point (Z-axis coordinated -751 mm), the maximum speed limits are as follows:
91 when Z-axis coordinate is -651 mm 50 when Z-axis coordinate is -751 mm
At this time, the maximum speed is the smaller value (at the lowest end) of 50.
Z-axis coordinate (mm)
HSS-G: Series Maximum Speed Limit on the J1 and J2 (PTP control)
There i
no sp
Ma
x. s
pee
d li
mit
(Con
vert
ed
to S
P v
alu
e)

30
3.5 Air Piping and Signal Wiring
The HS/HSS-G series is equipped with 4 air pipes (4x2 and 6x2) for air chuck and 19 signal lines in the robot unit.
(1) HS/HSS-G (Standard type)
Note 1: Pins #1 to #19 on CN21 and those on CN20 are connected with each other. The maximum rated current per line is 1A.
Note 2: Use the attached connector set for CN20 and CN21.
Connector set part No. Part No. Model and name Appearance
410877-0170
(for CN20)
SRCN6A25-24S (Round connector)
(Japan Aviation Electronics Industry Ltd.)
410889-0070
410877-0420 (for CN21)
JMSP2119M (Straight plug)
(DDK Electronics, Inc.)
Air Piping and Signal Wiring (HS-G series; Standard type)
Air No. Air piping joint Maximum
allowable pressure
AIR 1, 2 4, PT1/8
AIR 3, 4 6, PT1/4 0.59 MPa

Chapter 3 Specifications of the Robot Unit
31
(2) HS/HSS-G-W, HS-G-P (Dust- & splash-proof type or Cleanroom type)
Note 1: Pins A to V on CN20 and pins #1 to #19 on CN21 are connected with each other as shown below. The maximum rated current per line is 1A.
CN20 A B C D E F G H J K L M N P R S T U V CN21 1 2 3 4 5 6 7 8 9 10 11 12 13 14 15 16 17 18 19
Note 2: Use the attached connector set for CN20 and CN21.
Connector set part No. Part No. Model and name Appearance
410877-0120 (for CN20)
H/M3106A22-14S (Straight plug)(HIROSE ELECTRIC CO., LTD.)
410877-0130 (for CN20)
H/MS3057-12A (Cord clamp) (HIROSE ELECTRIC CO., LTD.)
Applicable wire diameter
11.4 to 15.9
410877-0140 (for CN20)
H/MS3057-12A1 (Cord clamp) (HIROSE ELECTRIC CO., LTD.)
Applicable wire diameter 8 to 11.6
410889-0080
410877-0440 (for CN21)
EBSP2119M (Straight plug) (DDK Electronics, Inc.)
Air Piping and Signal Wiring (HS-G series; Dust- & splash-proof type or Cleanroom type)
Notes for cleanroom type
*1 Recommended suction air flow rate: 25 to 40 liters/min. Recommended blower: VFC068P (manufactured by Fuji Electric Motor Co., Ltd.)The cleanroom type requires ventilation inside the robot. Exhaust air from the air vent provided in the back of the robot base.
*2 Dimension D at point of use
HS-4535*G-P: 250 mm HS-4545*G-P: 350 mm HS-4555*G-P: 400 mm
Air No. Air piping joint Maximum
allowable pressure
AIR 1, 2 4, PT1/8
AIR 3, 4 6, PT1/4 0.59 MPa

32
(3) HS-G-UL (UL-Listed)
Note 1: Pins A to V on CN20 and pins #1 to #19 on CN21 are connected with each other as shown below.
The maximum rated current per line is 1A.
CN20 A B C D E F G H J K L M N P R S T U V CN21 1 2 3 4 5 6 7 8 9 10 11 12 13 14 15 16 17 18 19
Note 2: Use the attached connector set for CN20 and CN21.
Connector set part No. Part No. Model and name Appearance
410877-0120 (for CN20)
H/M3106A22-14S (Straight plug)(HIROSE ELECTRIC CO., LTD.)
410877-0130 (for CN20)
H/MS3057-12A (Cord clamp) (HIROSE ELECTRIC CO., LTD.)
Applicable wire diameter
11.4 to 15.9
410877-0140 (for CN20)
H/MS3057-12A1 (Cord clamp) (HIROSE ELECTRIC CO., LTD.)
Applicable wire diameter 8 to 11.6
410889-0140
410877-0420 (for CN21)
JMSP2119M (Straight plug) (DDK Electronics, Inc.)
Air Piping and Signal Wiring (HS-G series; UL-Listed)

Chapter 3 Specifications of the Robot Unit
33
3.5.1 Instructions for Using Splash-proof Connector Sets
The splash-proof connector sets for CN20 and CN21 assure the splash-proofness as long as they are properly assembled and connected.
When using those connector sets, be sure to observe the following notes.
(1) The degree of protection of the splash-proof robot unit, which is specified in Section 3.1 "Robot Specifications," is assured as long as the splash-proof connectors are joined with connectors CN20 and CN21 on the robot unit. If there is no connection on CN20 and CN21, the splash-proof rating is not assured.
(2) Use a sheathed cable for a splash-proof connector. Using an unsheathed cable cannot assure the splash-proof rating.
(3) Each connector set contains two types of cord clamps for CN20. Use the one that matches the cable diameter.
(4) Each connector set should be assembled according to the instructions specified by the connector manufacturer.
The table below shows an assembly procedure example of a connector set for CN20, 21. The actual assembly procedure should be in accordance with the instructions specified by the connector manufacturer.
Overview of assembly procedure example of connector set for CN20, 21
Components of connector set for CN20,21
Assembly procedure example
(For straight plug)
(1) Treatment of wire ends: Strip the wire ends of the cable
(prepared by the customer). The cable diameter and the lengths "A" and "B" should be in accordance with the instructions given by the connector manufacturer.
(2) Tinning: Tin both the core wires and the connector contacts.
(3) Pass the cable through the heat-shrinkable tube for splash-proof purpose (with adhesive inside, prepared by the customer) and the rubber bushing.
(4) Solder the core wires onto the connector contacts to connect them each other.
(5) Press the rubber bushing against the shell to fit the hood. Then cover the rubber bushing with the heat-shrinkable tube and apply heat to shrink the tube.

34
3.6 Engineering-design Notes for Robot Hands (HS/HSS-G)
Design a hand (end-effector) so that it will satisfy conditions (1) and (2) described below.
Caution: Strictly observe these engineering-design notes. Otherwise, the clamped sections of the robot unit will become loose, rattle or be out of position. In the worst case, the mechanical parts of the robot unit and the robot controller may be damaged.
(1) Mass of hand The total mass of a hand or tool (including work-piece) should be less than the maximum allowable payload of the robot. Be sure to include the mass of wirings and piping used for a hand or tool.
Total mass of hand or tool (incl. Work-piece) ≤ Max. allowable payload
NOTE: The maximum allowable payload refers to a mass of payload that you have preset.
(2) Hand center of gravity The center of gravity of a hand or tool (including work-piece) should be located within the range specified in Figure below.
Unit: mm
Hand center of gravity (HS/HSS-G)

Chapter 3 Specifications of the Robot Unit
35
(3) Moment of inertia around the T axis The moment of inertia of a hand or tool (including work-piece) around the T axis should be less than the maximum allowable moment of inertia around the T axis of the robot.
Hand's moment of inertia (incl. Work-piece) around the T axis ≤ Max. allowable moment of inertia
Calculate the moment of inertia around the T axis according to the graph given below.
NOTE: You may program the reduced ratio of the speed and acceleration individually within the range specified below. If you set the reduced ratio of the programmed speed only, the controller automatically calculates that of the acceleration according to the formula below.
Acceleration (%) = (Speed/100)2x100 Application sample of hand's moment of inertia To run the robot at 100% of the programmed speed and acceleration: The moment
of inertia around the T axis should be 0.03 kgm2 or less. If the moment of inertia around the T axis is 0.04 kgm2: Run the robot at 90% or less
of the programmed speed and at 81% or less of the programmed acceleration.
0
10
20
30
40
50
60
70
80
90
100
110
0 0.01 0.02 0.03 0.04 0.05 0.06 0.07 0.08 0.09 0.1
When calculating the hand's or tool's moment of inertia around the T axis, refer to the moment-of-inertia formulas on the next page.
Hand's moment of inertia (kgm2)
Speed
Acceleration
Speed and acceleration (%)
(Max.)

36
Moment-of-inertia Formulas
1. Cylinder (1)
(Axis of rotation = Center axis)
4. Sphere
(Axis of rotation = Center axis)
2. Cylinder (2)
(The axis of rotation passes through the center of gravity.)
5. Center of gravity not on the axis of rotation.
Ig: Moment of inertia around center of gravity
3. Rectangular parallelepiped
(The axis of rotation passes through the center of gravity.)
l: Moment of inertia [kgm2]
m: Mass [kg]
r: Radius [m]
a, b, c, : Length [m]
Calculation example : When calculating the moment of inertia of a complicated shape, divide it into simple
parts as much as possible for easier calculations.
As shown in the figure below, divide the hand into three parts ( (1), (2), (3) ).
Calculation Example of Hand's Moment of Inertia Around the T Axis

Chapter 3 Specifications of the Robot Unit
37
3.7 Stopping Time and Distance (Angle) at an Emergency Stop
Pressing the emergency stop button when the robot is in motion stops the robot. The stopping time required from activation of a stop signal and the distance (angle) for major three joints vary with the robot speed as shown in the graphs below. The measuring conditions are: Robot arm extended, 33%, 66% and 100% of the maximum payload.
(1) HS-4535*G series (HS-4535*G / HSS-4535*G)
J1, J2, Z stopping time vs. speed at an emergency stop (HS-4535*G series)
J1, J2 stopping distance vs. speed at an emergency stop (HS-4535*G series)

38
Z stopping distance vs. speed at an emergency stop (HS-4535*G series)
(2) HS-4545*G series (HS-4545*G / HSS-4545*G)
J1, J2, Z stopping time vs. speed at an emergency stop (HS-4545*G series)

Chapter 3 Specifications of the Robot Unit
39
J1, J2 stopping distance vs. speed at an emergency stop (HS-4545*G series)
Z stopping distance vs. speed at an emergency stop (HS-4545*G series)

40
(3) HS-4555*G series (HS-4555*G / HSS-4555*G)
J1, J2, Z stopping time vs. speed at an emergency stop (HS-4555*G series)
J1, J2 stopping distance vs. speed at an emergency stop (HS-4555*G series)

Chapter 3 Specifications of the Robot Unit
41
Z stopping distance vs. speed at an emergency stop (HS-4555*G series)

42
Chapter 4 Specifications of the Robot Controller
4.1 Specifications
The table below lists the specifications of the robot controller.
RC7M Controller Specifications (1) (HS-G series)
Item Specifications
Applicable robot Small-sized, horizontal articulated type (HS-G)
model RC7M-HSG4BA-**
Control system PTP, CP 3-dimensional linear, 3-dimensional circular
No. of controllable axes Up to four axes simultaneously
Drive system All axes: Full-digital AC servo
Language used DENSO robot language (conforming to SLIM)
Memory capacity 3.25 MB (equivalent to 10,000 steps, 30,000 points)
Teaching system 1) Remote teaching 2) Numerical input (MDI)
Mini I/O Input signals: 8 user open points + 11 fixed system points Output signals: 8 user open points + 14 fixed system points Note: In global type, some fixed system points are not used. Standard I/O
HAND I/O Input signals: 8 user open points Output signals: 8 user open points
SAFETY I/O (Only for Global type)
Input signals: 6 fixed system points Output signals: 5 fixed system points
2 boards Input signals: Additional 80 user open points Output signals: Additional 96 user open points Parallel I/O
board (Option) 1 board
Input signals: Additional 40 user open points Output signals: Additional 48 user open points
Master & slave Input signals: 1024 points (Master) + 256 points (Slave) Output signals: 1024 points (Master) + 256 points (Slave)
Master Input signals: 1024 points Output signals: 1024 points
DeviceNet board
(Option)
Slave Input signals: 256 points Output signals: 256 points
External signals
(I/O)
CC-Link board
(option) Slave
Input signals: 384 points Output signals: 384 points (including remote registers RWw and RWr)
External communication
RS-232C: 1 line Ethernet: 1 line USB: 2 lines
Extension slot 3 (For an optional board)
Self-diagnosis function Overrun, servo error, memory error, input error, etc.
Timer function 0.02 to 10 sec. (in units of 1/60 sec.)
Error display Error codes will be outputted on the external I/O. Error messages will be displayed in English on the teach pendant (option). Error codes will be displayed on the mini pendant (option).
Motor & encoder cable (option)
2 m, 4 m, 6 m, 12 m, 20 m (Standard / Splash-proof)
I/O cable (option)
8 m, 15 m (For Mini I/O, HAND I/O, Optional board for parallel I/O and SAFETY I/O)
Cables
Power cable 5 m

Chapter 4 Specifications of the Robot Controller
43
RC7M Controller Specifications (2) (HS-G series)
Item Specifications
Environmental conditions (in operation)
Temperature: 0 to 40C
Humidity: 90% RH or less (no condensation allowed)
Power source Three-phase, 200 VAC-15% to 230 VAC+10%, 50/60 Hz, 1.8 kVA
Single-phase, 230 VAC-10 to 230 VAC+10%, 50/60 Hz, 1.8 kVA
Degree of protection IP20
Weight
Standard type: Approx. 17 kg (38 lbs)
Global type with safety board: Approx. 18 kg (40 lbs)
Global type with safety box: Approx. 21 kg (46 lbs)
WARNING
DO NOT touch fins. Their hot surfaces may cause severe burns.
DO NOT insert fingers or foreign objects into openings. Doing so may cause bodily injury.
Before opening the controller cover and accessing the inside of the controller for maintenance, be sure to turn off the power switch, disconnect the power cable, and wait 3 minutes or more. This is for protecting you from electric shock.
DO NOT connect or disconnect connector to/from the controller while the power switch is on. Doing so may cause electric shock or controller failure.
CAUTION IN INSTALLATION
This controller is not designed to be dust-proof, splash-proof, or explosion-proof.
Read operation-manuals before installation.
Do not place anything on the controller.

44
4.2 Outer Dimensions
Figure below shows the outer dimensions of the robot controller.
Outer Dimensions of Robot Controller (HS-G series)
Outer Dimensions of RC7M Robot Controller

Chapter 4 Specifications of the Robot Controller
45
4.3 Controller Setting Table
The controller setting table given in Figure below is attached to the controller. It shows the software version, the next replacement dates of the memory backup battery and encoder backup battery, etc.
<Content THE SETPRM LIST>
SOFTWARE Ver. The version of the main software for the controller is entered.
DATE OF RENEWING BAT.
The next replacement dates of the memory backup battery and encoder backup battery are entered.
TYPE The model of the robot system is entered.
The coding of the set model is described below.
SUBASSEMBLY The type and position of the controller IPM board are described.
Small-sized, horizontal articulated robot (HS/HSS-G series)
HS – 4 5 35 2 G – W
Variation None: Standard type W: Dust- & splash-proof type
(Robot unit: IP65 equivalent) P: Cleanroom type (Class 10, 0.1µ)
Z-axis stroke 1:150 mm, 2: 200 mm, 3: 320 mm
Arm length 35: 350 mm, 45: 450 mm, 55: 550 mm
Maximum payload (5 kg) Number of axes (4 axes) Horizontal articulated robot, small-sized
HS: Floor-mount type HSS: Overhead-mount type

46
Chapter 5 Warranty DENSO robots are manufactured under strict quality control. In case of failure, we warranty the robot under the following conditions:
Warranty Period The warranty shall be effective for one year from the date of purchase.
Warranty Coverage DENSO WAVE shall repair the robot free of charge when a failure occurs and is attributable to the design, manufacture or material of the robot within the warranty period in spite of proper use.
Items Not Covered Failures, which arise from one of the following, shall not be covered by the warranty even if the robot is under warranty:
(1) Failures caused by improper repair, modification, transfer or handling by you or a third party;
(2) Failures caused by the use of a part or oil/fat other than those specified in the related manuals;
(3) Failures caused by a fire, salt damage, earthquake, storm/flood or other acts of God;
(4) Failures caused by the use of the robot in an environment other than the environment specified in the related manuals, such as dust and water ingress;
(5) Failures caused by a worn-out consumable, such as a fan filter;
(6) Failures caused by improper performance or non-performance of lubrication, maintenance or inspections stated in this owner's manual; and
(7) Damages other than the robot repair costs.

Chapter 6 Appendix
47
Chapter 6 Appendix 6.1 Conformity with Standards by Robot Model
For information on conformity with standards, refer to "Conformity with Standards by Robot Model" in the Additional Information section of the RC7M controller manual pack CD SUPPLEMENT.


Horizontal Articulated Robot HS-G SERIES
GENERAL INFORMATION ABOUT ROBOT
First Edition July 2005 Eleventh Edition April 2011 Twelfth Edition October 2011
DENSO WAVE INCORPORATED
The purpose of this manual is to provide accurate information in the handling and operating of the robot. Please feel free to send your comments regarding any errors or omissions you may have found, or any suggestions you may have for generally improving the manual.
In no event will DENSO WAVE INCORPORATED be liable for any direct or indirect damages resulting from the application of the information in this manual.
10N**C


![Benutzerhandbuch – MAGURA HS · Typ-Name HS 11 HS 22 HS 33 Klemm-Ø Bremsgriff(E) [TD] mm 22+0,3/-0,1 Abstand cantilever-Sockel(F) 80±.2,0 cantilever-Sockel–Bremsflanke min.–max.(G)](https://img.dokumen.tips/doc/110x75/5f06eb277e708231d41a6298/benutzerhandbuch-a-magura-hs-typ-name-hs-11-hs-22-hs-33-klemm-bremsgriffe.jpg)