Embed Size (px)
Citation preview


HRMS Recruitment Module User Manual
August 2018, Version 2.0

Income Tax Department HRMS User Administration User Manual v2.0
Income Tax Business Applcation Internal Use i
1. Getting Started
This section provides information for accessing the application, email services and help desk details.
Browser Requirements
Recommended - IE 9 onwards, Google Chrome 38.0 onwards and Mozilla Firefox 36.0 onwards
Accessing ITBA Portal: http://itba.incometax.gov.in (Production URL)
Accessing Email Messaging Service: http://webmail.incometax.gov.in (Production URL)

Income Tax Department HRMS User Administration User Manual v2.0
Income Tax Business Applcation Internal Use ii
Contact us:
URL of helpdesk - http://itbahelpdesk.incometax.net
Help desk number – 0120-2772828
Email ID – [email protected]
Help desk Timings – 8.30 A.M. – 7.30 P.M. (Monday to Friday)

Income Tax Department HRMS Recruitment Module User Manual v2.0
Income Tax Business Applcation Internal Use 1
2. Table of Contents
Getting Started ................................................................................................................ i
Table of Contents .......................................................................................................... 1
Introduction .................................................................................................................... 2
1. Introduction to Recruitment Module ..................................................................... 4
1.1 Dossier Allocation using Recruitment Module .............................................................................. 4
1.1.1 Uploading Recruitment Vacancies ........................................................................................ 4
1.1.2 Recruitment Vacancy approval by Role Based Approver ..................................................... 9
1.1.3 Uploading candidate staging details ................................................................................... 10
1.1.4 Executing candidate allocation process .............................................................................. 14
1.1.5 Approval for Candidate allocation process ......................................................................... 16
3.

Income Tax Department HRMS Recruitment Module User Manual v2.0
Income Tax Business Applcation Internal Use 2
Introduction
Human Resource Management System (HRMS) system covers processes which help in
better and effective management of personal & administrative functions related to the ITD
officials.
As a part of the HRMS system, the Recruitment module is used to allocate dossiers to
different regions on merit cum preference basis keeping in view DOPT instructions as well as
various court rulings on the matter.
The steps mentioned below are followed while allocating candidates to various regions:
1. First allocate the PH candidates (even though other candidates exist with better ranks than
PH candidates) to respective regions
While allocating PH candidates, deduct the seats from the original category,
irrespective of the vacancy for PH candidates in a particular region
2. Next allocate the Ex-Servicemen (even though other candidates exist with better ranks
than Ex Servicemen) to respective regions
While allocating Ex-Servicemen, deduct the seats from the original category, with
due consideration to the seats reserved for Ex-Servicemen (i.e. once the Ex-
Servicemen vacancies are filled for a particular region, they cannot be allocated
any more seats in that region)
3. Next allocate the rest of the candidates on a merit cum preference basis.
Income Tax Department HRMS Recruitment Module User Manual v2.0
Income Tax Business Applcation Internal Use 3
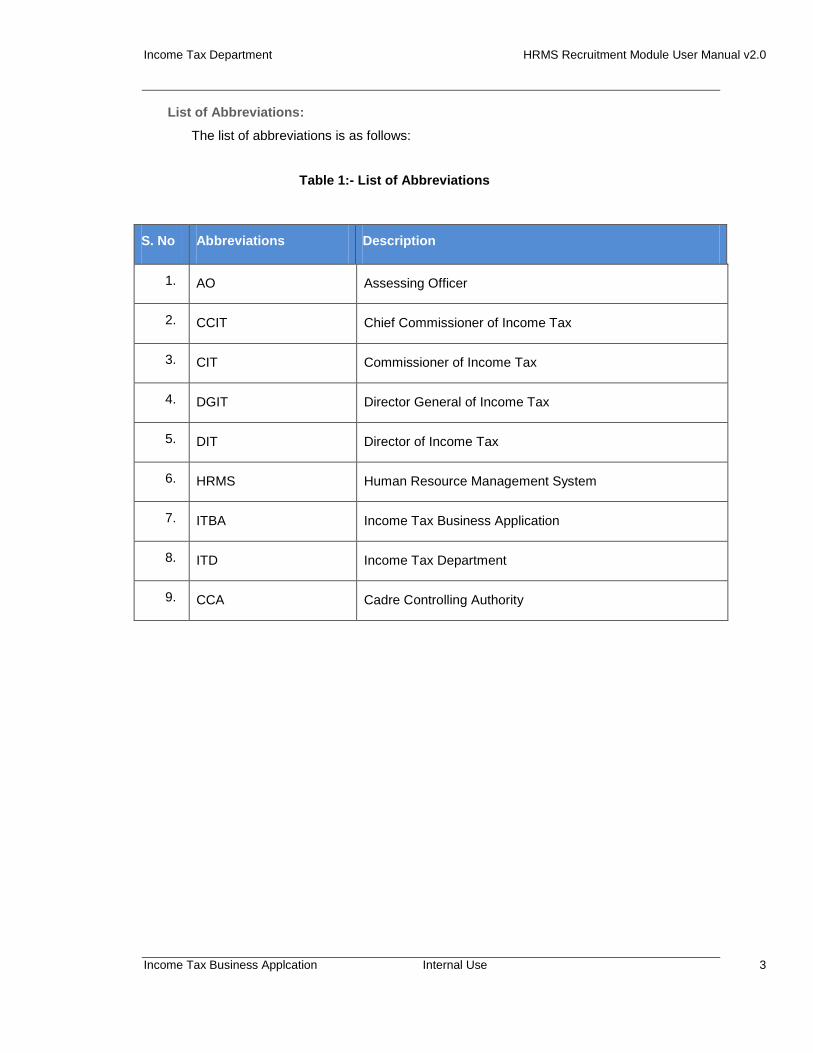
List of Abbreviations:
The list of abbreviations is as follows:
Table 1:- List of Abbreviations
S. No Abbreviations Description
1. AO Assessing Officer
2. CCIT Chief Commissioner of Income Tax
3. CIT Commissioner of Income Tax
4. DGIT Director General of Income Tax
5. DIT Director of Income Tax
6. HRMS Human Resource Management System
7. ITBA Income Tax Business Application
8. ITD Income Tax Department
9. CCA Cadre Controlling Authority

Income Tax Department HRMS Recruitment Module User Manual v2.0
Income Tax Business Applcation Internal Use 4
4. Introduction to Recruitment Module
This section explains how to perform Dossier allocation to various regions using HRMS
Recruitment module
4.1 Dossier Allocation using Recruitment Module
Allocation of dossiers using Recruitment module involves 3 steps:
a) Uploading Recruitment Vacancies: Total Vacancies in each region
b) Uploading candidate staging details: Rank and Location preferences of each candidate
c) Executing candidate allocation process: Allocating candidates to respective regions
4.1.1 Uploading Recruitment Vacancies
Recruitment Vacancy Management Screen is used to upload vacancies corresponding to various regions.
Navigation: Main Menu Workforce Administration Recruitment Recruitment Vacancy
Figure 1: Recruitment Vacancy Management Screen

Income Tax Department HRMS Recruitment Module User Manual v2.0
Income Tax Business Applcation Internal Use 5
Click “Add a New Value” to enter vacancies for a region. The following screen (Figure 2) is
displayed. Specify the post, region and year for which vacancies are being entered and click
“Add”
Figure 2: Recruitment Vacancy: Add a New Value
Fields on Recruitment Vacancy Screen:
Post (Lookup): Post for which vacancies are being entered CCA Region: HRD Admin will have provision to enter Region for which vacancies are being entered, and Region based Admin can only enter the vacancy of their own region. Year: Year for which vacancies are being entered
Income Tax Department HRMS Recruitment Module User Manual v2.0
Income Tax Business Applcation Internal Use 6
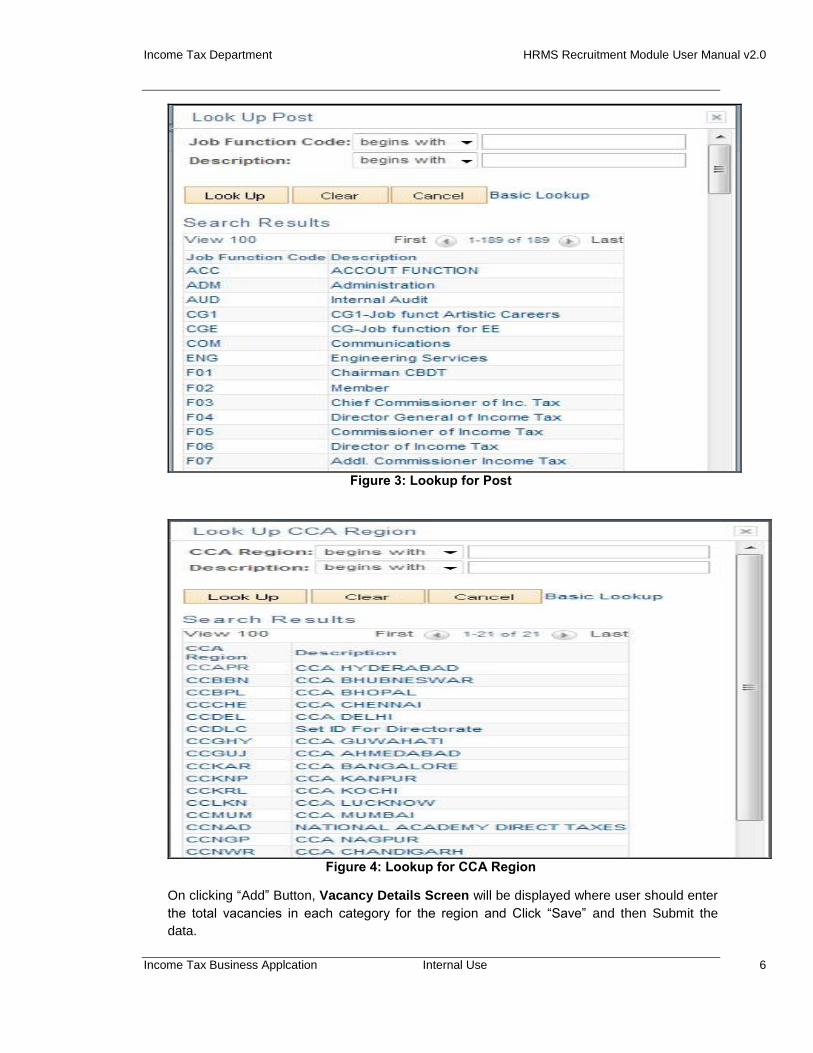
Figure 3: Lookup for Post
Figure 4: Lookup for CCA Region
On clicking “Add” Button, Vacancy Details Screen will be displayed where user should enter
the total vacancies in each category for the region and Click “Save” and then Submit the
data.
Income Tax Department HRMS Recruitment Module User Manual v2.0
Income Tax Business Applcation Internal Use 7
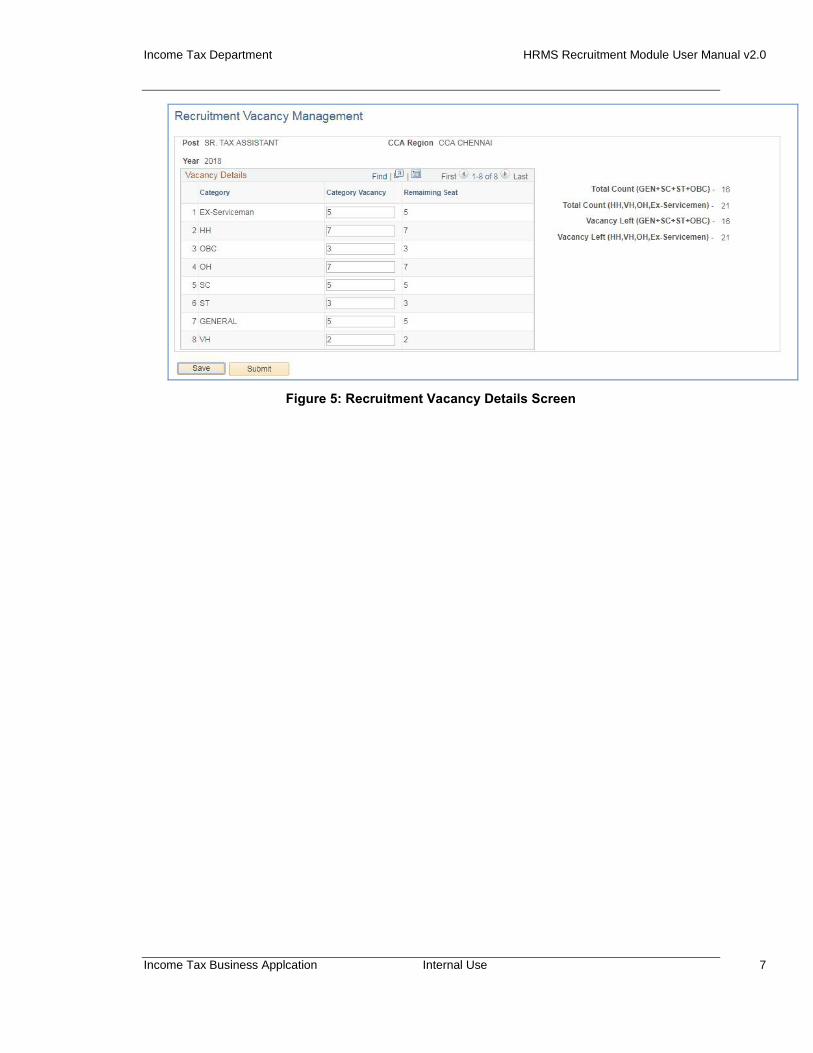
Figure 5: Recruitment Vacancy Details Screen
Income Tax Department HRMS Recruitment Module User Manual v2.0
Income Tax Business Applcation Internal Use 8
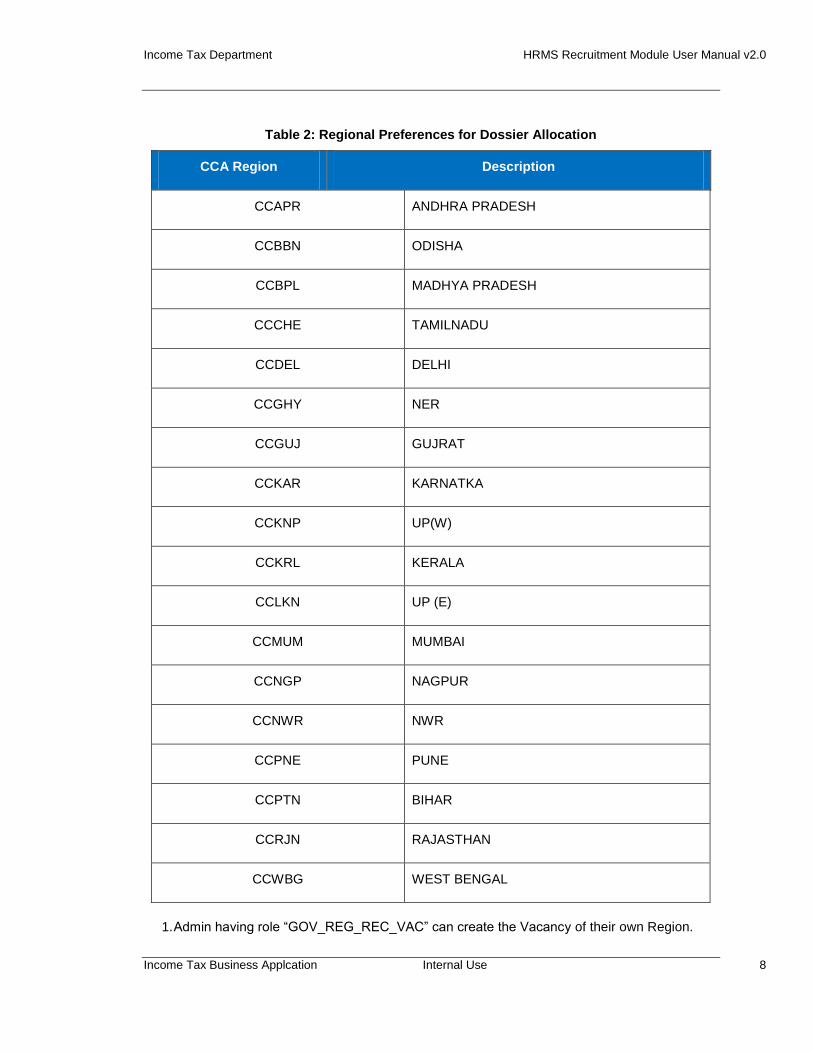
Table 2: Regional Preferences for Dossier Allocation
CCA Region Description
CCAPR ANDHRA PRADESH
CCBBN ODISHA
CCBPL MADHYA PRADESH
CCCHE TAMILNADU
CCDEL DELHI
CCGHY NER
CCGUJ GUJRAT
CCKAR KARNATKA
CCKNP UP(W)
CCKRL KERALA
CCLKN UP (E)
CCMUM MUMBAI
CCNGP NAGPUR
CCNWR NWR
CCPNE PUNE
CCPTN BIHAR
CCRJN RAJASTHAN
CCWBG WEST BENGAL
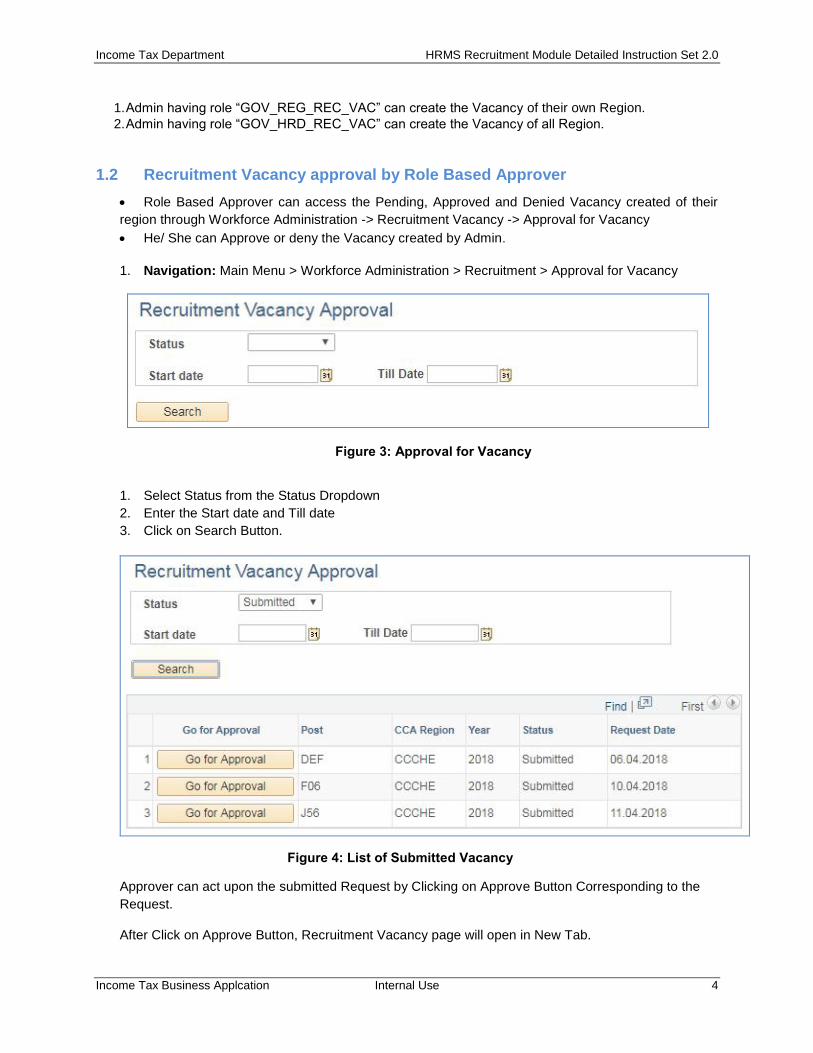
1. Admin having role “GOV_REG_REC_VAC” can create the Vacancy of their own Region.
Income Tax Department HRMS Recruitment Module User Manual v2.0
Income Tax Business Applcation Internal Use 9
2. Admin having role “GOV_HRD_REC_VAC” can create the Vacancy of all Region.
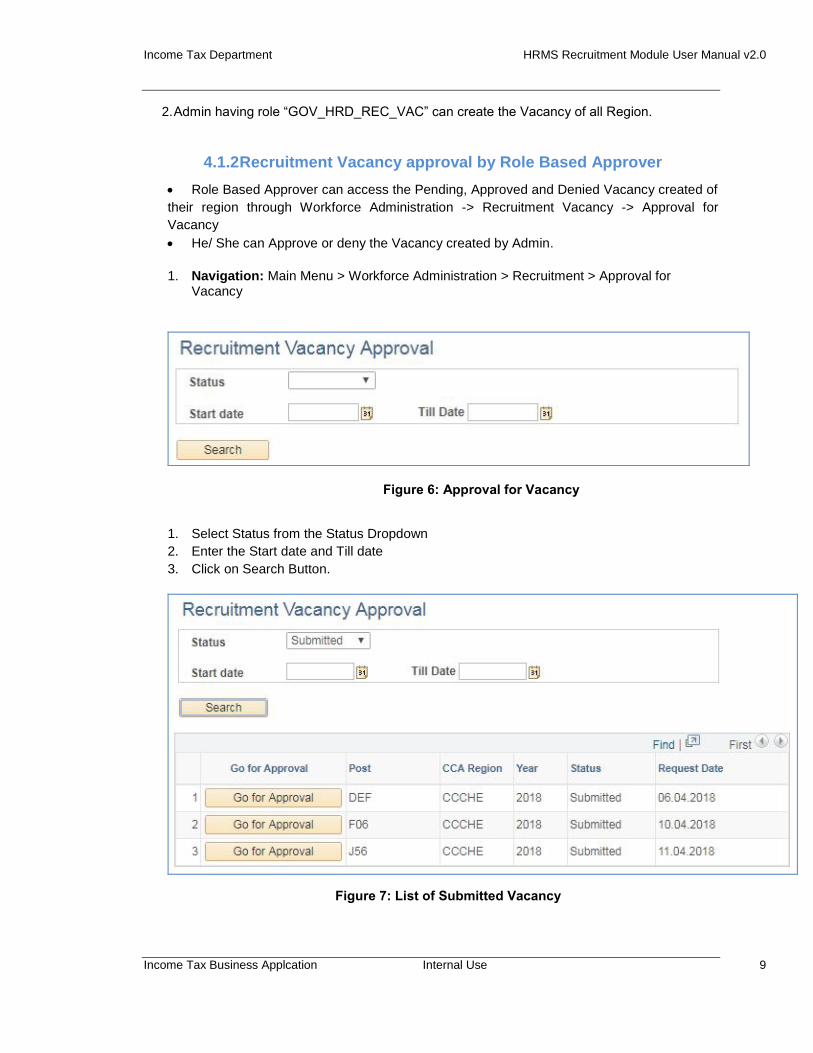
4.1.2 Recruitment Vacancy approval by Role Based Approver
Role Based Approver can access the Pending, Approved and Denied Vacancy created of
their region through Workforce Administration -> Recruitment Vacancy -> Approval for
Vacancy
He/ She can Approve or deny the Vacancy created by Admin.
1. Navigation: Main Menu > Workforce Administration > Recruitment > Approval for
Vacancy
Figure 6: Approval for Vacancy
1. Select Status from the Status Dropdown
2. Enter the Start date and Till date
3. Click on Search Button.
Figure 7: List of Submitted Vacancy
Income Tax Department HRMS Recruitment Module User Manual v2.0
Income Tax Business Applcation Internal Use 10
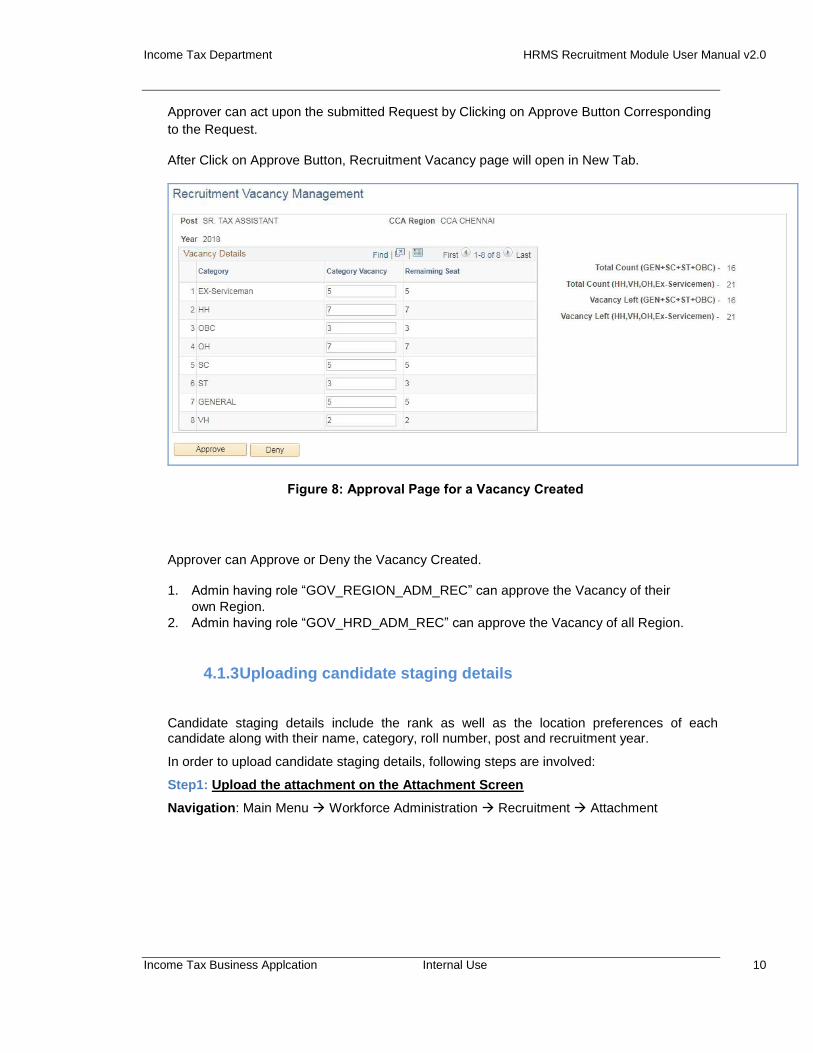
Approver can act upon the submitted Request by Clicking on Approve Button Corresponding
to the Request.
After Click on Approve Button, Recruitment Vacancy page will open in New Tab.
Figure 8: Approval Page for a Vacancy Created
Approver can Approve or Deny the Vacancy Created.
1. Admin having role “GOV_REGION_ADM_REC” can approve the Vacancy of their
own Region.
2. Admin having role “GOV_HRD_ADM_REC” can approve the Vacancy of all Region.
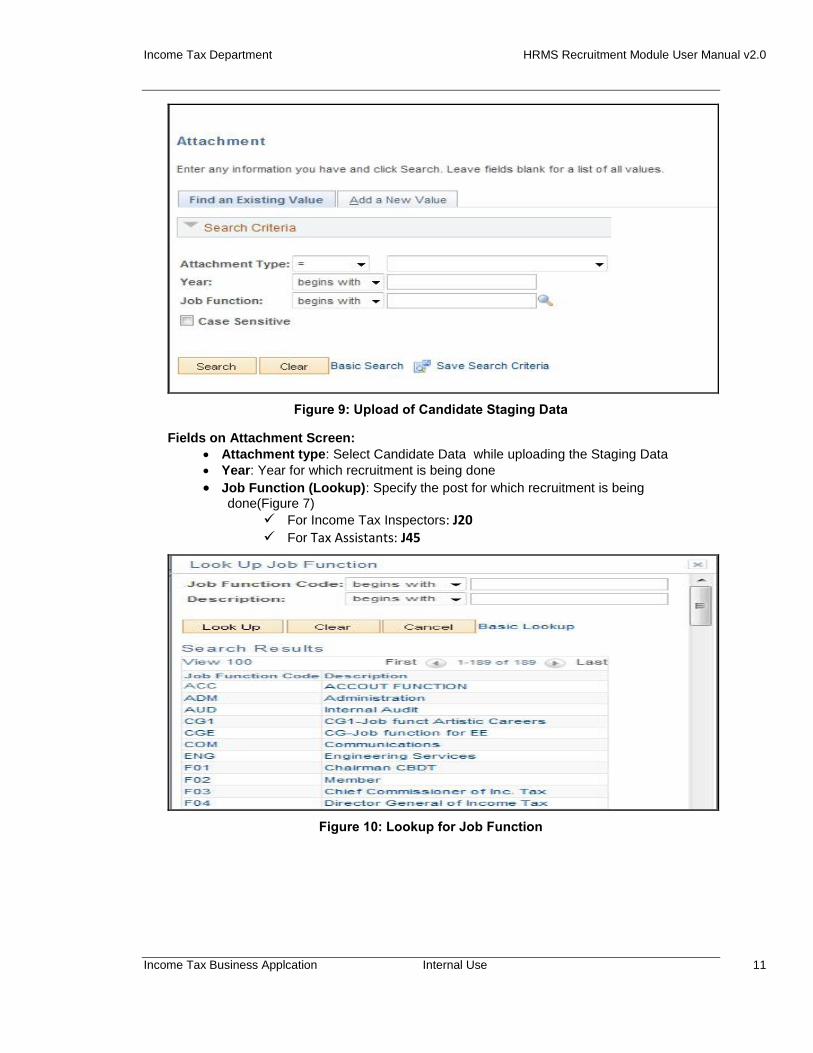
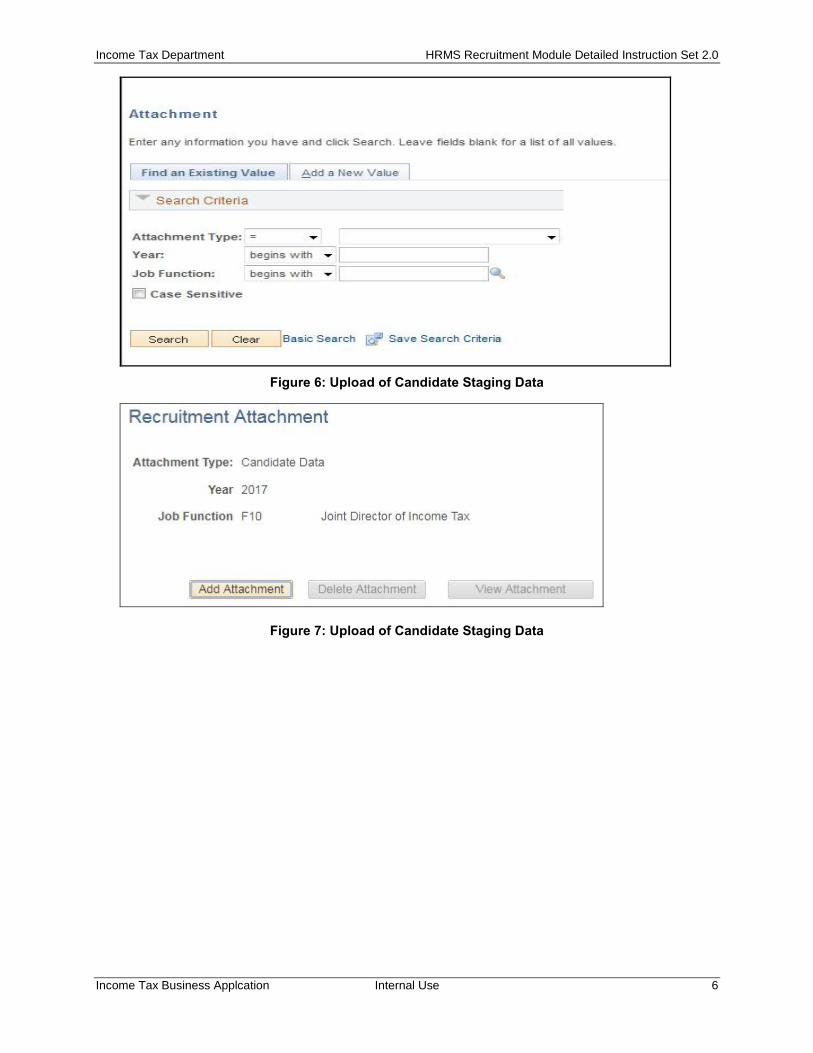
4.1.3 Uploading candidate staging details
Candidate staging details include the rank as well as the location preferences of each candidate along with their name, category, roll number, post and recruitment year.
In order to upload candidate staging details, following steps are involved:
Step1: Upload the attachment on the Attachment Screen
Navigation: Main Menu Workforce Administration Recruitment Attachment
Income Tax Department HRMS Recruitment Module User Manual v2.0
Income Tax Business Applcation Internal Use 11
Figure 9: Upload of Candidate Staging Data
Fields on Attachment Screen:
Attachment type: Select Candidate Data while uploading the Staging Data
Year: Year for which recruitment is being done
Job Function (Lookup): Specify the post for which recruitment is being done(Figure 7)
For Income Tax Inspectors: J20 For Tax Assistants: J45
Figure 10: Lookup for Job Function
Income Tax Department HRMS Recruitment Module User Manual v2.0
Income Tax Business Applcation Internal Use 12
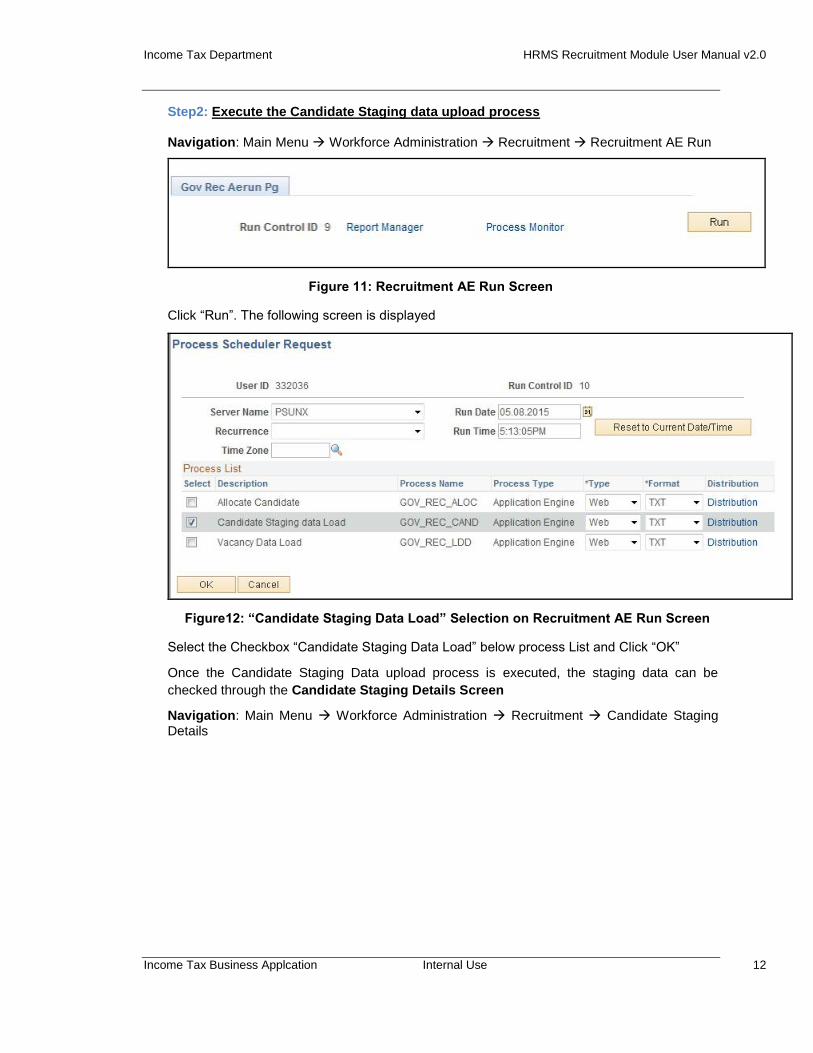
Step2: Execute the Candidate Staging data upload process
Navigation: Main Menu Workforce Administration Recruitment Recruitment AE Run
Figure 11: Recruitment AE Run Screen
Click “Run”. The following screen is displayed
Figure12: “Candidate Staging Data Load” Selection on Recruitment AE Run Screen
Select the Checkbox “Candidate Staging Data Load” below process List and Click “OK”
Once the Candidate Staging Data upload process is executed, the staging data can be
checked through the Candidate Staging Details Screen
Navigation: Main Menu Workforce Administration Recruitment Candidate Staging Details
Income Tax Department HRMS Recruitment Module User Manual v2.0
Income Tax Business Applcation Internal Use 13
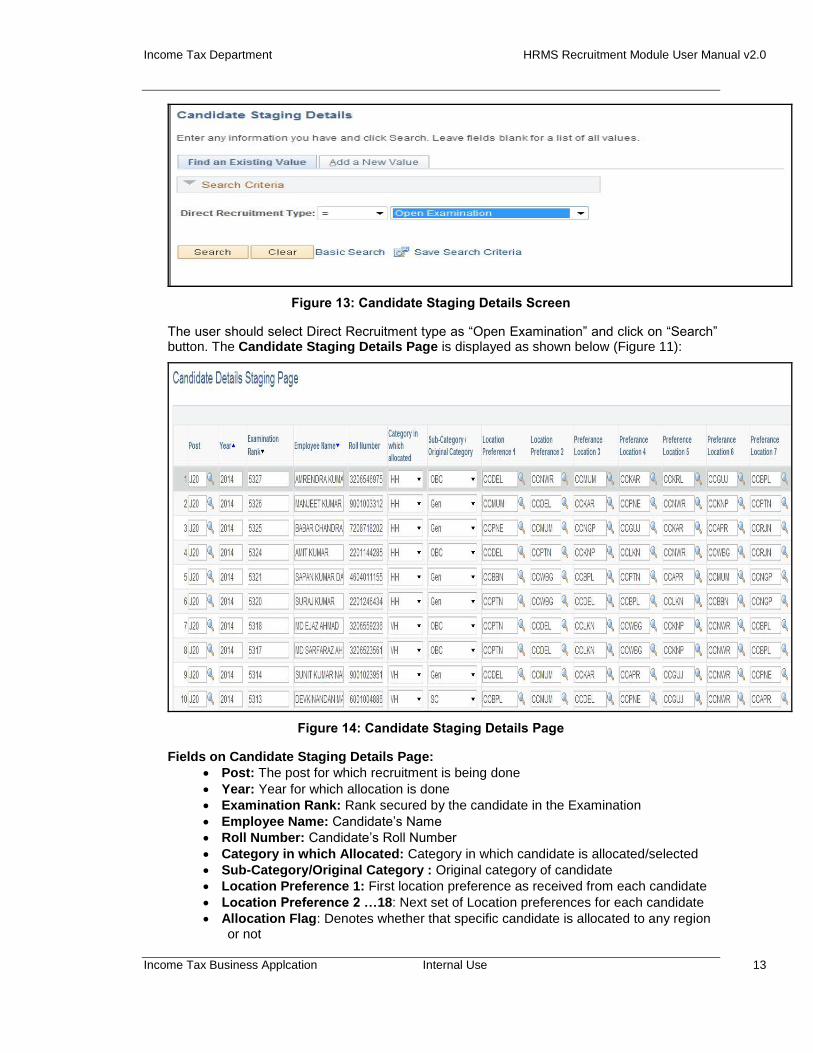
Figure 13: Candidate Staging Details Screen
The user should select Direct Recruitment type as “Open Examination” and click on “Search” button. The Candidate Staging Details Page is displayed as shown below (Figure 11):
Figure 14: Candidate Staging Details Page
Fields on Candidate Staging Details Page:
Post: The post for which recruitment is being done
Year: Year for which allocation is done
Examination Rank: Rank secured by the candidate in the Examination
Employee Name: Candidate’s Name
Roll Number: Candidate’s Roll Number
Category in which Allocated: Category in which candidate is allocated/selected
Sub-Category/Original Category : Original category of candidate
Location Preference 1: First location preference as received from each candidate
Location Preference 2 …18: Next set of Location preferences for each candidate
Allocation Flag: Denotes whether that specific candidate is allocated to any region or not
Income Tax Department HRMS Recruitment Module User Manual v2.0
Income Tax Business Applcation Internal Use 14
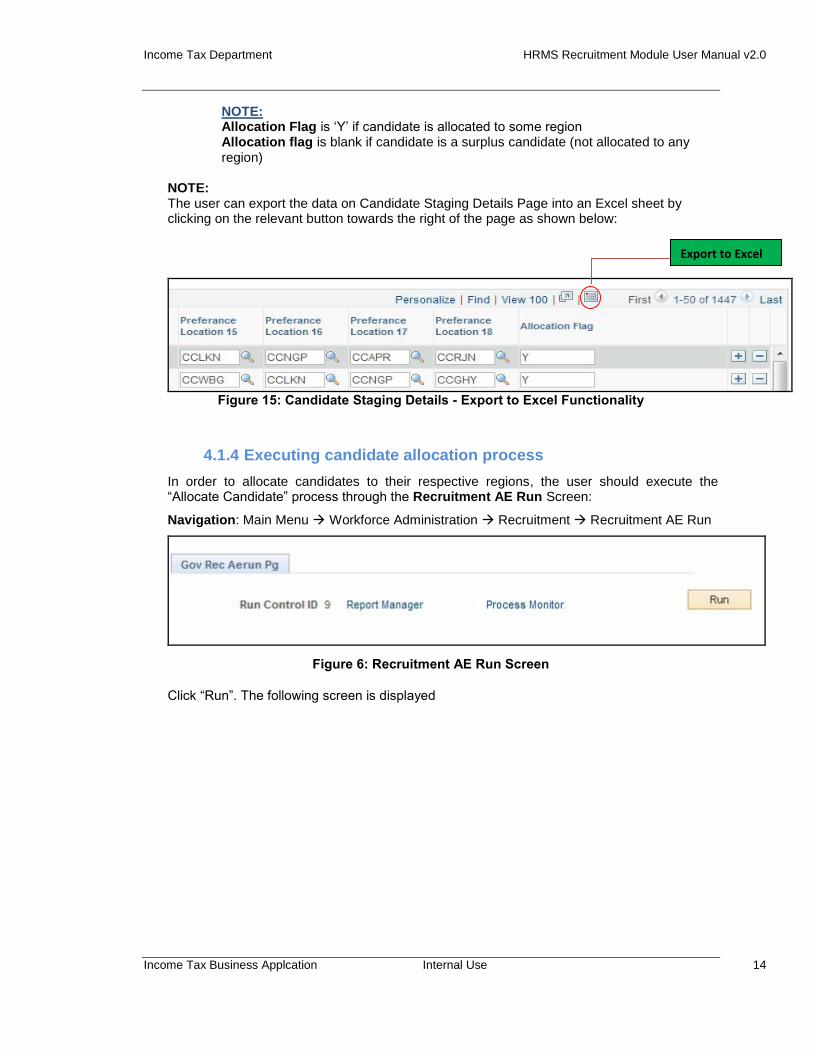
NOTE: Allocation Flag is ‘Y’ if candidate is allocated to some region Allocation flag is blank if candidate is a surplus candidate (not allocated to any region)
NOTE: The user can export the data on Candidate Staging Details Page into an Excel sheet by clicking on the relevant button towards the right of the page as shown below:
Figure 15: Candidate Staging Details - Export to Excel Functionality
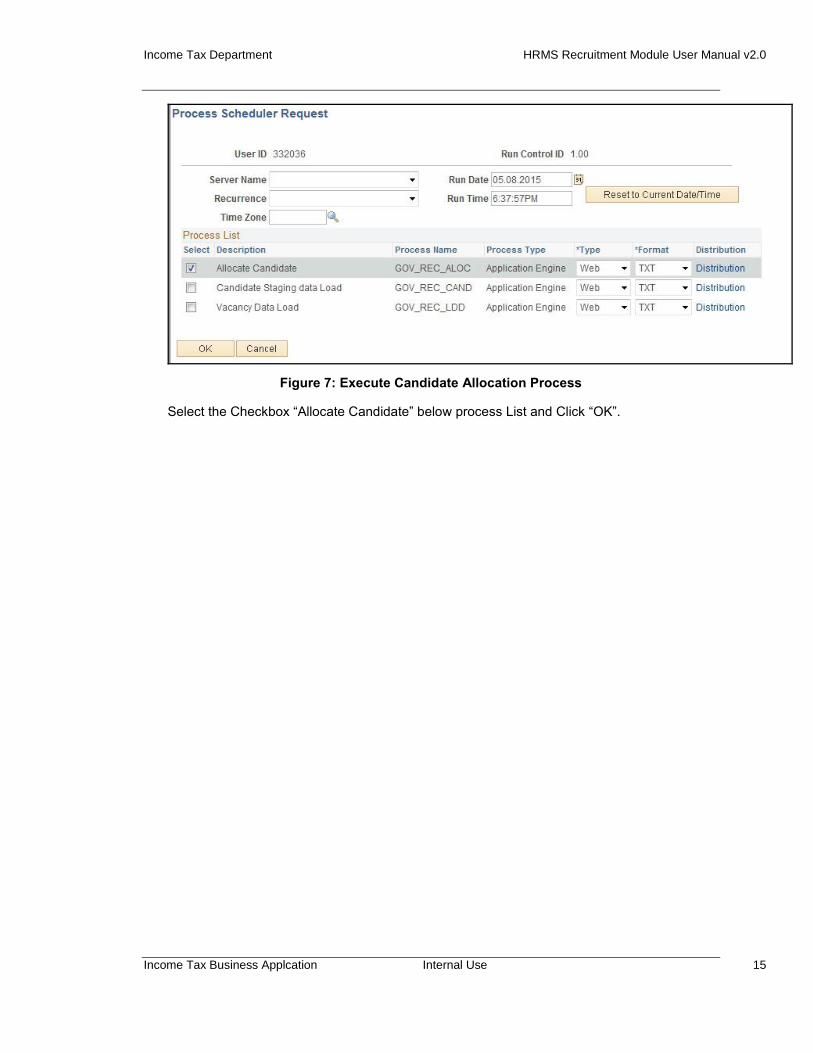
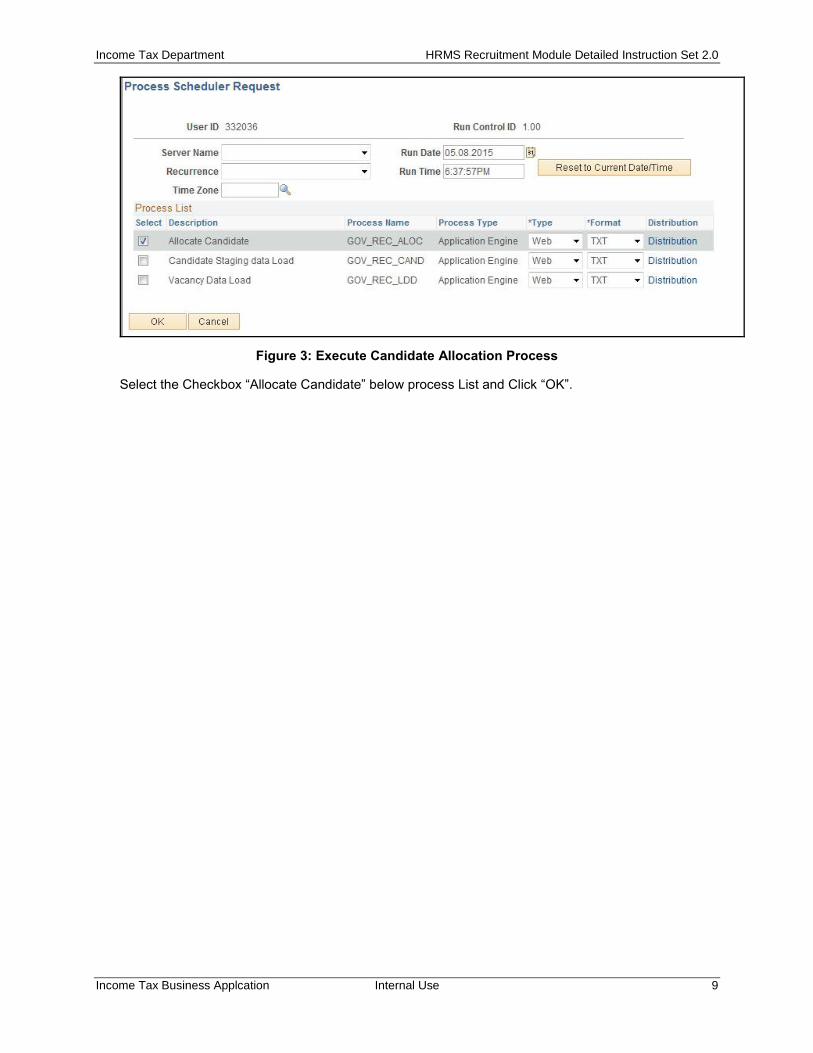
4.1.4 Executing candidate allocation process
In order to allocate candidates to their respective regions, the user should execute the “Allocate Candidate” process through the Recruitment AE Run Screen:
Navigation: Main Menu Workforce Administration Recruitment Recruitment AE Run
Figure 6: Recruitment AE Run Screen
Click “Run”. The following screen is displayed
Export to Excel
Income Tax Department HRMS Recruitment Module User Manual v2.0
Income Tax Business Applcation Internal Use 15
Figure 7: Execute Candidate Allocation Process
Select the Checkbox “Allocate Candidate” below process List and Click “OK”.

Income Tax Department HRMS Recruitment Module User Manual v2.0
Income Tax Business Applcation Internal Use 16
Once the Candidate Allocation process is executed, the Candidate allocation Details can be
checked and submitted for approval. Role based approver can approve or deny the
Allocation. Candidate Allocation Details Screen
Navigation: Main Menu Workforce Administration Recruitment Candidate Allocation Details
NOTE: The user can export the data on Candidate Allocation Details Screen into an Excel sheet by clicking on the relevant button as shown below
Figure 8: Candidate Allocation Details Screen
Fields on Candidate Allocation Details Screen:
Post: The post for which dossier allocation is done
Display Name: Candidate’s Name
Examination Rank: Rank secured by the candidate in the Examination
Roll Number: Candidate’s Roll Number
Year: Year for which allocation is done
Caste: Category in which candidate is selected
Count: Vacancies left in Candidate’s original category in that region to which the specific candidate is allocated
Merit/Own Merit: Whether candidate’s allocation is done based on merit or own merit
4.1.5 Approval for Candidate allocation process
1. Role Based Approver can access the Pending, Approved Allocation created through
Export to Excel

Income Tax Department HRMS Recruitment Module User Manual v2.0
Income Tax Business Applcation Internal Use 17
Workforce Administration -> Recruitment Management -> Approval for Allocation
2. He/ She can Approve or deny the Allocation done created by Admin.
3. Navigation: Main Menu > Workforce Administration -> Recruitment Management ->
Approval for Allocation
Figure 19: Approval for Allocation
1. Select Status from the Status Dropdown
2. Enter the Start date and Till date
3. Click on Search Button.
Figure 20: List of Submitted Allocation
Approver can act upon the submitted Request by Clicking on Approve Button Corresponding
to the Request.
After Click on Approve Button, Candidate Allocation page will open in New Tab.

Income Tax Department HRMS Recruitment Module User Manual v2.0
Income Tax Business Applcation Internal Use 18
Figure 21: Approval Page for Allocation Created
Approver can Approve or Deny the Allocation Created.
3. Admin having role “GOV_HRD_ADM_REC” can approve the Allocation Created.

Income Tax Department HRMS Recruitment Module User Manual v2.0
Income Tax Business Applcation Internal Use 19
Figure 22: Approval Page for Allocation Created
Figure 23: Approved Request of Allocation
Income Tax Department HRMS Recruitment Module User Manual v2.0
Income Tax Business Applcation Internal Use 20
Income Tax Business Application (ITBA)
HRMS Recruitment MODULE – Frequently Asked
Questions (FAQs)
April 2018, Version 2.0
Income Tax Department HRMS Recruitment Module FAQ v 2.0
Income Tax Business Application 1
I don't know my employee ID, to whom should I contact? Please contact your RCC admin of your region for the employee id.
I know my employee ID, how will I login in the HRMS? The employee ID pre fixed by U becomes your user id, like 123456 is your employee ID than your user ID will be ‘U123456’. Click on the below mentioned linked and you will be asked to enter your login details like user id and password details. Once you have successfully entered your credentials than you will be login inside the HRMS Application. URL LINK: https://itba.incometax.gov.in
I forget or don’t remember my password, how will I recover it? There is forget password option on the in the login screen, once you have reset the password the new password will sent to your income tax email id.
How to navigate to HRMS Recruitment Module?
Navigation: Main Menu > Workforce Administration > Recruitment
What are the functionalities present in Recruitment Module? In this section following functionalities are performed:
1. Recruitment Vacancy Management
2. Approval for Vacancy
3. Uploading Candidate Staging details
4. Executing Candidate Allocation Process
5. Approval for Candidate Allocation
How to navigate to Vacancy Management?
Navigation: Main Menu > Workforce Administration > Recruitment > Vacancy Management
How to Upload Candidate Staging details? Follow the below navigation to upload candidate staging csv file Navigation: Main Menu > Workforce Administration > Recruitment > Recruitment Attachment
Run the Staging data load Process
Income Tax Department HRMS Recruitment Module FAQ v 2.0
Income Tax Business Application 2
Navigation: Main Menu Workforce Administration Recruitment Recruitment AE Run
Once the Candidate Staging Data upload process is executed, the staging data can be checked
through the Candidate Staging Details Screen
Navigation: Main Menu Workforce Administration Recruitment Candidate Staging Details
How to Execute the candidate allocation process
Admin should execute the “Allocate Candidate” process through the Recruitment AE Run Screen:
Navigation: Main Menu Workforce Administration Recruitment Recruitment AE Run
Once the Candidate Allocation process is executed, the Candidate allocation Details can be
checked and submitted for approval. Role based approver can approve or deny the Allocation.
Candidate Allocation Details Screen
Navigation: Main Menu Workforce Administration Recruitment Candidate Allocation Details

Income Tax Department HRMS Recruitment Module Detailed Instruction Set 2.0
Income Tax Business Applcation Internal Use 1
HRMS Recruitment Management Instruction Set 2.0
Income Tax Department HRMS Recruitment Module Detailed Instruction Set 2.0
Income Tax Business Applcation Internal Use 2
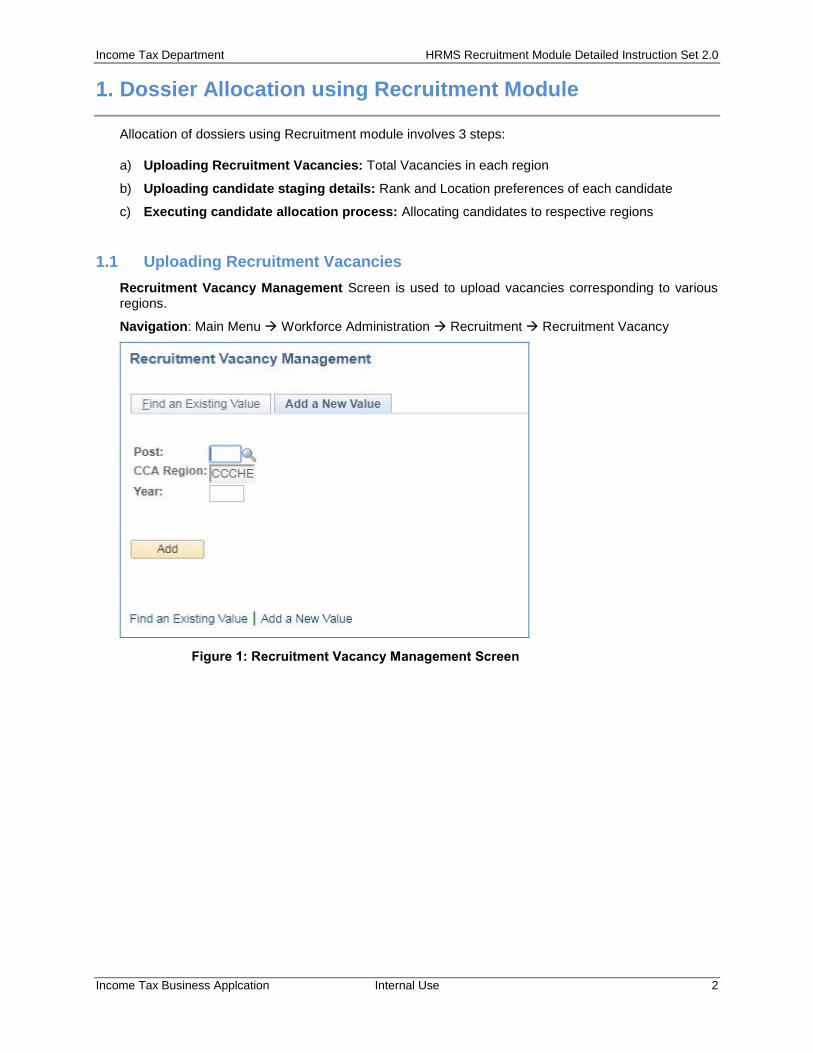
1. Dossier Allocation using Recruitment Module
Allocation of dossiers using Recruitment module involves 3 steps:
a) Uploading Recruitment Vacancies: Total Vacancies in each region
b) Uploading candidate staging details: Rank and Location preferences of each candidate
c) Executing candidate allocation process: Allocating candidates to respective regions
1.1 Uploading Recruitment Vacancies
Recruitment Vacancy Management Screen is used to upload vacancies corresponding to various regions.
Navigation: Main Menu Workforce Administration Recruitment Recruitment Vacancy
Figure 1: Recruitment Vacancy Management Screen
Income Tax Department HRMS Recruitment Module Detailed Instruction Set 2.0
Income Tax Business Applcation Internal Use 3
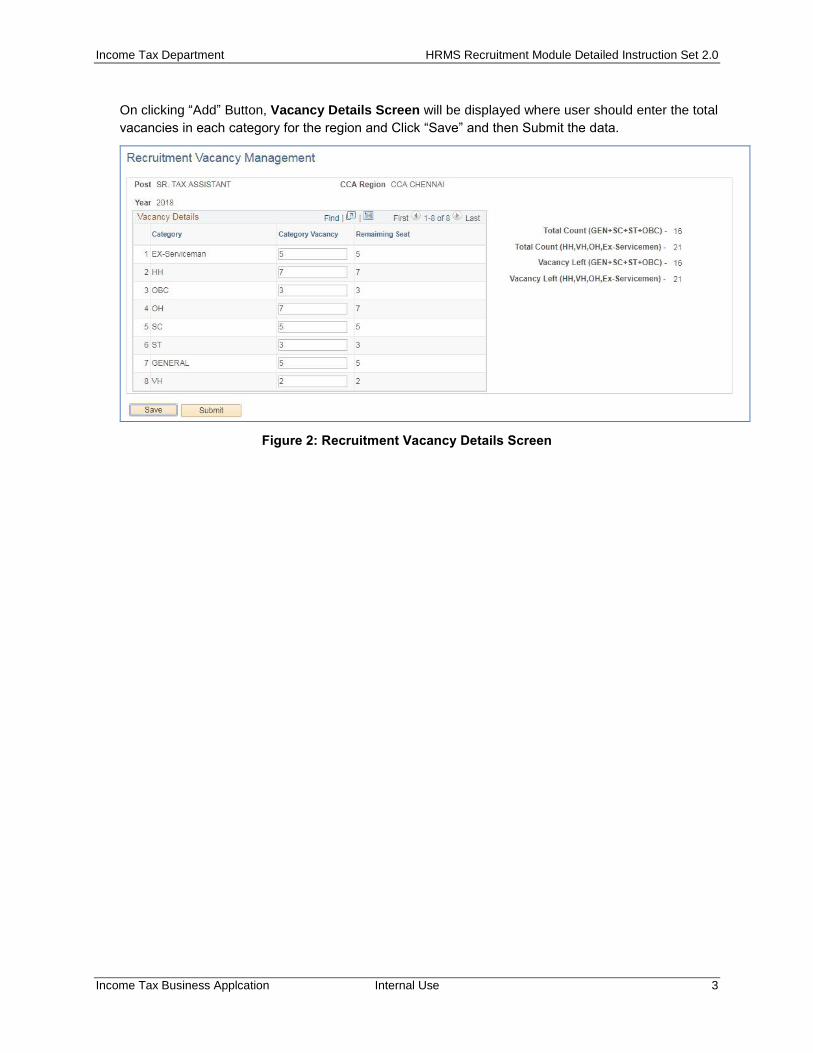
On clicking “Add” Button, Vacancy Details Screen will be displayed where user should enter the total
vacancies in each category for the region and Click “Save” and then Submit the data.
Figure 2: Recruitment Vacancy Details Screen
Income Tax Department HRMS Recruitment Module Detailed Instruction Set 2.0
Income Tax Business Applcation Internal Use 4
1. Admin having role “GOV_REG_REC_VAC” can create the Vacancy of their own Region.
2. Admin having role “GOV_HRD_REC_VAC” can create the Vacancy of all Region.
1.2 Recruitment Vacancy approval by Role Based Approver
Role Based Approver can access the Pending, Approved and Denied Vacancy created of their
region through Workforce Administration -> Recruitment Vacancy -> Approval for Vacancy
He/ She can Approve or deny the Vacancy created by Admin.
1. Navigation: Main Menu > Workforce Administration > Recruitment > Approval for Vacancy
Figure 3: Approval for Vacancy
1. Select Status from the Status Dropdown
2. Enter the Start date and Till date
3. Click on Search Button.
Figure 4: List of Submitted Vacancy
Approver can act upon the submitted Request by Clicking on Approve Button Corresponding to the
Request.
After Click on Approve Button, Recruitment Vacancy page will open in New Tab.

Income Tax Department HRMS Recruitment Module Detailed Instruction Set 2.0
Income Tax Business Applcation Internal Use 5
Figure 5: Approval Page for a Vacancy Created
Approver can Approve or Deny the Vacancy Created.
1. Admin having role “GOV_REGION_ADM_REC” can approve the Vacancy of their own
Region.
2. Admin having role “GOV_HRD_ADM_REC” can approve the Vacancy of all Region.
1.3 Uploading candidate staging details
Candidate staging details include the rank as well as the location preferences of each candidate along with their name, category, roll number, post and recruitment year.
In order to upload candidate staging details, following steps are involved:
Step1: Upload the attachment on the Attachment Screen
Navigation: Main Menu Workforce Administration Recruitment Attachment
Income Tax Department HRMS Recruitment Module Detailed Instruction Set 2.0
Income Tax Business Applcation Internal Use 6
Figure 6: Upload of Candidate Staging Data
Figure 7: Upload of Candidate Staging Data

Income Tax Department HRMS Recruitment Module Detailed Instruction Set 2.0
Income Tax Business Applcation Internal Use 7
Step2: Execute the Candidate Staging data upload process
Navigation: Main Menu Workforce Administration Recruitment Recruitment AE Run
Figure 8: Recruitment AE Run Screen
Click “Run”. The following screen is displayed
Figure9: Candidate Staging Data Load” Selection on Recruitment AE Run Screen
Select the Checkbox “Candidate Staging Data Load” below process List and Click “OK”
Once the Candidate Staging Data upload process is executed, the staging data can be checked
through the Candidate Staging Details Screen
Navigation: Main Menu Workforce Administration Recruitment Candidate Staging Details
Figure 10: Candidate Staging Details Screen
The user should select Direct Recruitment type as “Open Examination” and click on “Search” button. The Candidate Staging Details Page is displayed as shown below (Figure 11):

Income Tax Department HRMS Recruitment Module Detailed Instruction Set 2.0
Income Tax Business Applcation Internal Use 8
Figure 11: Candidate Staging Details Page
1.4 Executing candidate allocation process
In order to allocate candidates to their respective regions, the user should execute the “Allocate Candidate” process through the Recruitment AE Run Screen:
Navigation: Main Menu Workforce Administration Recruitment Recruitment AE Run
Figure 2: Recruitment AE Run Screen
Click “Run”. The following screen is displayed
Income Tax Department HRMS Recruitment Module Detailed Instruction Set 2.0
Income Tax Business Applcation Internal Use 9
Figure 3: Execute Candidate Allocation Process
Select the Checkbox “Allocate Candidate” below process List and Click “OK”.

Income Tax Department HRMS Recruitment Module Detailed Instruction Set 2.0
Income Tax Business Applcation Internal Use 10
Once the Candidate Allocation process is executed, the Candidate allocation Details can be checked
and submitted for approval. Role based approver can approve or deny the Allocation. Candidate
Allocation Details Screen
Navigation: Main Menu Workforce Administration Recruitment Candidate Allocation Details
1.5 Approval for Candidate allocation process
1. Role Based Approver can access the Pending, Approved Allocation created through
Workforce Administration -> Recruitment Management -> Approval for Allocation
2. He/ She can Approve or deny the Allocation done created by Admin.
3. Navigation: Main Menu > Workforce Administration -> Recruitment Management -> Approval for
Allocation
Figure 14: Approval for Allocation
1. Select Status from the Status Dropdown
2. Enter the Start date and Till date
3. Click on Search Button.
Figure 15: List of Submitted Allocation
Approver can act upon the submitted Request by Clicking on Approve Button Corresponding to the
Request.
After Click on Approve Button, Candidate Allocation page will open in New Tab.

Income Tax Department HRMS Recruitment Module Detailed Instruction Set 2.0
Income Tax Business Applcation Internal Use 11
Figure 16: Approval Page for Allocation Created
Approver can Approve or Deny the Allocation Created.
3. Admin having role “GOV_HRD_ADM_REC” can approve the Allocation Created.
Figure 17: Approval Page for Allocation Created

Income Tax Department HRMS Recruitment Module Detailed Instruction Set 2.0
Income Tax Business Applcation Internal Use 12
Figure 18: Approved Request of Allocation

Income Tax Business Application (ITBA)
HRMS Recruitment MODULE – Frequently Asked
Questions (FAQs)
April 2018, Version 2.0

Income Tax Department HRMS Recruitment Module FAQ v 2.0
Income Tax Business Application 1
I don't know my employee ID, to whom should I contact? Please contact your RCC admin of your region for the employee id.
I know my employee ID, how will I login in the HRMS? The employee ID pre fixed by U becomes your user id, like 123456 is your employee ID than your user ID will be ‘U123456’. Click on the below mentioned linked and you will be asked to enter your login details like user id and password details. Once you have successfully entered your credentials than you will be login inside the HRMS Application. URL LINK: https://itba.incometax.gov.in
I forget or don’t remember my password, how will I recover it? There is forget password option on the in the login screen, once you have reset the password the new password will sent to your income tax email id.
How to navigate to HRMS Recruitment Module?
Navigation: Main Menu > Workforce Administration > Recruitment
What are the functionalities present in Recruitment Module? In this section following functionalities are performed:
1. Recruitment Vacancy Management
2. Approval for Vacancy
3. Uploading Candidate Staging details
4. Executing Candidate Allocation Process
5. Approval for Candidate Allocation
How to navigate to Vacancy Management?
Navigation: Main Menu > Workforce Administration > Recruitment > Vacancy Management
How to Upload Candidate Staging details? Follow the below navigation to upload candidate staging csv file Navigation: Main Menu > Workforce Administration > Recruitment > Recruitment Attachment
Run the Staging data load Process

Income Tax Department HRMS Recruitment Module FAQ v 2.0
Income Tax Business Application 2
Navigation: Main Menu Workforce Administration Recruitment Recruitment AE Run
Once the Candidate Staging Data upload process is executed, the staging data can be checked
through the Candidate Staging Details Screen
Navigation: Main Menu Workforce Administration Recruitment Candidate Staging Details
How to Execute the candidate allocation process
Admin should execute the “Allocate Candidate” process through the Recruitment AE Run Screen:
Navigation: Main Menu Workforce Administration Recruitment Recruitment AE Run
Once the Candidate Allocation process is executed, the Candidate allocation Details can be
checked and submitted for approval. Role based approver can approve or deny the Allocation.
Candidate Allocation Details Screen
Navigation: Main Menu Workforce Administration Recruitment Candidate Allocation Details

Income Tax Department HRMS Recruitment Module Detailed Instruction Set 2.0
Income Tax Business Applcation Internal Use 1
HRMS Recruitment Management Instruction Set 2.0

Income Tax Department HRMS Recruitment Module Detailed Instruction Set 2.0
Income Tax Business Applcation Internal Use 2
1. Dossier Allocation using Recruitment Module
Allocation of dossiers using Recruitment module involves 3 steps:
a) Uploading Recruitment Vacancies: Total Vacancies in each region
b) Uploading candidate staging details: Rank and Location preferences of each candidate
c) Executing candidate allocation process: Allocating candidates to respective regions
1.1 Uploading Recruitment Vacancies
Recruitment Vacancy Management Screen is used to upload vacancies corresponding to various regions.
Navigation: Main Menu Workforce Administration Recruitment Recruitment Vacancy
Figure 1: Recruitment Vacancy Management Screen

Income Tax Department HRMS Recruitment Module Detailed Instruction Set 2.0
Income Tax Business Applcation Internal Use 3
On clicking “Add” Button, Vacancy Details Screen will be displayed where user should enter the total
vacancies in each category for the region and Click “Save” and then Submit the data.
Figure 2: Recruitment Vacancy Details Screen

Income Tax Department HRMS Recruitment Module Detailed Instruction Set 2.0
Income Tax Business Applcation Internal Use 4
1. Admin having role “GOV_REG_REC_VAC” can create the Vacancy of their own Region.
2. Admin having role “GOV_HRD_REC_VAC” can create the Vacancy of all Region.
1.2 Recruitment Vacancy approval by Role Based Approver
Role Based Approver can access the Pending, Approved and Denied Vacancy created of their
region through Workforce Administration -> Recruitment Vacancy -> Approval for Vacancy
He/ She can Approve or deny the Vacancy created by Admin.
1. Navigation: Main Menu > Workforce Administration > Recruitment > Approval for Vacancy
Figure 3: Approval for Vacancy
1. Select Status from the Status Dropdown
2. Enter the Start date and Till date
3. Click on Search Button.
Figure 4: List of Submitted Vacancy
Approver can act upon the submitted Request by Clicking on Approve Button Corresponding to the
Request.
After Click on Approve Button, Recruitment Vacancy page will open in New Tab.

Income Tax Department HRMS Recruitment Module Detailed Instruction Set 2.0
Income Tax Business Applcation Internal Use 5
Figure 5: Approval Page for a Vacancy Created
Approver can Approve or Deny the Vacancy Created.
1. Admin having role “GOV_REGION_ADM_REC” can approve the Vacancy of their own
Region.
2. Admin having role “GOV_HRD_ADM_REC” can approve the Vacancy of all Region.
1.3 Uploading candidate staging details
Candidate staging details include the rank as well as the location preferences of each candidate along with their name, category, roll number, post and recruitment year.
In order to upload candidate staging details, following steps are involved:
Step1: Upload the attachment on the Attachment Screen
Navigation: Main Menu Workforce Administration Recruitment Attachment

Income Tax Department HRMS Recruitment Module Detailed Instruction Set 2.0
Income Tax Business Applcation Internal Use 6
Figure 6: Upload of Candidate Staging Data
Figure 7: Upload of Candidate Staging Data

Income Tax Department HRMS Recruitment Module Detailed Instruction Set 2.0
Income Tax Business Applcation Internal Use 7
Step2: Execute the Candidate Staging data upload process
Navigation: Main Menu Workforce Administration Recruitment Recruitment AE Run
Figure 8: Recruitment AE Run Screen
Click “Run”. The following screen is displayed
Figure9: Candidate Staging Data Load” Selection on Recruitment AE Run Screen
Select the Checkbox “Candidate Staging Data Load” below process List and Click “OK”
Once the Candidate Staging Data upload process is executed, the staging data can be checked
through the Candidate Staging Details Screen
Navigation: Main Menu Workforce Administration Recruitment Candidate Staging Details
Figure 10: Candidate Staging Details Screen
The user should select Direct Recruitment type as “Open Examination” and click on “Search” button. The Candidate Staging Details Page is displayed as shown below (Figure 11):

Income Tax Department HRMS Recruitment Module Detailed Instruction Set 2.0
Income Tax Business Applcation Internal Use 8
Figure 11: Candidate Staging Details Page
1.4 Executing candidate allocation process
In order to allocate candidates to their respective regions, the user should execute the “Allocate Candidate” process through the Recruitment AE Run Screen:
Navigation: Main Menu Workforce Administration Recruitment Recruitment AE Run
Figure 2: Recruitment AE Run Screen
Click “Run”. The following screen is displayed

Income Tax Department HRMS Recruitment Module Detailed Instruction Set 2.0
Income Tax Business Applcation Internal Use 9
Figure 3: Execute Candidate Allocation Process
Select the Checkbox “Allocate Candidate” below process List and Click “OK”.

Income Tax Department HRMS Recruitment Module Detailed Instruction Set 2.0
Income Tax Business Applcation Internal Use 10
Once the Candidate Allocation process is executed, the Candidate allocation Details can be checked
and submitted for approval. Role based approver can approve or deny the Allocation. Candidate
Allocation Details Screen
Navigation: Main Menu Workforce Administration Recruitment Candidate Allocation Details
1.5 Approval for Candidate allocation process
1. Role Based Approver can access the Pending, Approved Allocation created through
Workforce Administration -> Recruitment Management -> Approval for Allocation
2. He/ She can Approve or deny the Allocation done created by Admin.
3. Navigation: Main Menu > Workforce Administration -> Recruitment Management -> Approval for
Allocation
Figure 14: Approval for Allocation
1. Select Status from the Status Dropdown
2. Enter the Start date and Till date
3. Click on Search Button.
Figure 15: List of Submitted Allocation
Approver can act upon the submitted Request by Clicking on Approve Button Corresponding to the
Request.
After Click on Approve Button, Candidate Allocation page will open in New Tab.

Income Tax Department HRMS Recruitment Module Detailed Instruction Set 2.0
Income Tax Business Applcation Internal Use 11
Figure 16: Approval Page for Allocation Created
Approver can Approve or Deny the Allocation Created.
3. Admin having role “GOV_HRD_ADM_REC” can approve the Allocation Created.
Figure 17: Approval Page for Allocation Created

Income Tax Department HRMS Recruitment Module Detailed Instruction Set 2.0
Income Tax Business Applcation Internal Use 12
Figure 18: Approved Request of Allocation