Embed Size (px)
Citation preview

Universal CMDBSoftware Version: 10.33
FIPS Deployment Guide
Document Release Date: May 2018 (Second Edition)Software Release Date: July 2017

Legal Notices
DisclaimerCertain versions of software and/or documents (“Material”) accessible heremay contain branding from Hewlett-Packard Company (now HP Inc.) and Hewlett PackardEnterprise Company. As of September 1, 2017, theMaterial is now offered by Micro Focus, a separately owned and operated company. Any reference to the HP and HewlettPackard Enterprise/HPEmarks is historical in nature, and the HP and Hewlett Packard Enterprise/HPEmarks are the property of their respective owners.
WarrantyThe only warranties for products and services of Micro Focus and its affiliates and licensors (“Micro Focus”) are set forth in the express warranty statements accompanyingsuch products and services. Nothing herein should be construed as constituting an additional warranty. Micro Focus shall not be liable for technical or editorial errors oromissions contained herein. The information contained herein is subject to change without notice.
Restricted Rights LegendConfidential computer software. Except as specifically indicated otherwise, a valid license from Micro Focus is required for possession, use or copying. Consistent with FAR12.211 and 12.212, Commercial Computer Software, Computer Software Documentation, and Technical Data for Commercial Items are licensed to the U.S. Governmentunder vendor's standard commercial license.
Copyright Notice© 2002 - 2017Micro Focus or one of its affiliates.
Trademark NoticesMICRO FOCUS and theMicro Focus logo, among others, are trademarks or registered trademarks of Micro Focus (IP) Limited or its subsidiaries in the United Kingdom,United States and other countries. All other marks are the property of their respective owners.
Adobe™ is a trademark of Adobe Systems Incorporated.
Microsoft® andWindows® are U.S. registered trademarks of Microsoft Corporation.
UNIX® is a registered trademark of TheOpenGroup.
Documentation UpdatesTo check for recent updates or to verify that you are using themost recent edition of a document, go to: https://softwaresupport.softwaregrp.com.
This site requires that you register for a Software Passport and to sign in. To register for a Software Passport ID, click Register for Software Passport on theMicro FocusSupport website at https://softwaresupport.softwaregrp.com.
You will also receive updated or new editions if you subscribe to the appropriate product support service. Contact your Micro Focus sales representative for details.
Publication Date Summary of Changes
10.33 (2nd Edition, May 2018) l Added clarification that when prompted for the server-fips.keystore password, users should enter theirpassword, instead of updating the password.
l Updated the Azul OpenJDK JCE dependencies download link to Zulu Cryptography Extension Kit.l Updated theOracle JRE path example from *jre1.8.0_45* (Oracle JRE version used in 10.22) to *jre1.8.0_92*
(Oracle JRE version used in 10.33)l Other minor improvements
Document Changes
SupportVisit theMicro Focus Support site at: https://softwaresupport.softwaregrp.com.
This website provides contact information and details about the products, services, and support that Micro Focus offers.
Micro Focus online support provides customer self-solve capabilities. It provides a fast and efficient way to access interactive technical support tools needed tomanage yourbusiness. As a valued support customer, you can benefit by using the support website to:l Search for knowledge documents of interestl Submit and track support cases and enhancement requestsl Download software patchesl Manage support contractsl Look upMicro Focus support contactsl Review information about available servicesl Enter into discussions with other software customersl Research and register for software training
Most of the support areas require that you register as a Software Passport user and to sign in. Many also require a support contract. To register for a Software Passport ID,click Register for Software Passport on theMicro Focus Support website at https://softwaresupport.softwaregrp.com.
To findmore information about access levels, go to: https://softwaresupport.softwaregrp.com/web/softwaresupport/access-levels.
Integration Catalog accesses theMicro Focus Integration Catalog website. This site enables you to exploreMicro Focus Product Solutions tomeet your business needs,includes a full list of Integrations betweenMicro Focus Products, as well as a listing of ITIL Processes. The URL for this website ishttps://softwaresupport.softwaregrp.com/km/KM01702731.
FIPS Deployment Guide
Micro Focus Universal CMDB (10.33) Page 2 of 62

ContentsChapter 1: Introduction to FIPSDeployment 4Chapter 2: Overview of the FIPSMigration Process 5
Important Notes 7Chapter 3: FIPSConcepts 9
Out of the Box (OOTB) UCMDB Certificates and Keystores Used in FIPSMode 9
Chapter 4: Step by Step FIPSMigration 10Task 1. Prerequisites 10Task 2. Configuration Manager Migration - Phase I 12Task 3. UCMDB Browser Migration - Phase I 14Task 4. UCMDB Server Migration 16Task 5. UCMDB UI Migration 24Task 6. Data Flow Probe Migration 29Task 7. UCMDB Integration Service Migration 31Task 8. Universal Discovery Content Migration 34Task 9. Configuration Manager Migration - Phase II 37Task 10. UCMDB Browser Migration - Phase II 40Task 11. UCMDB Browser Migration - Phase III 42Task 12. Configuration Manager Migration - Phase III 43
Chapter 5: Improving Security 44Generate a Standalone Self-Signed Certificate (hpcert) Using JsafeJCECryptography Provider 44Generate a Self-Signed Root Certificate (hproot) and a Self-SignedCertificate (hpcert) Which Will Be Signed by hproot Using JsafeJCECryptography Provider 46
Chapter 6: Known Problems and Limitations 49Chapter 7: Troubleshooting - FIPSDeployment 51
Troubleshooting the Data Flow Probes 51Troubleshooting the UCMDB Server 54Troubleshooting the UCMDB UI 57
Send documentation feedback 62
FIPS Deployment Guide
Micro Focus Universal CMDB (10.33) Page 3 of 62

Chapter 1: Introduction to FIPS DeploymentWelcome to the Universal CMDB FIPS Deployment Guide.
The Federal Information Processing Standard (FIPS) Publication 140-2, “Security Requirements forCryptographic Modules,” was issued by the National Institute of Standards and Technology (NIST) inMay 2001. The standard specifies the security requirements for cryptographic modules utilized within asecurity system that protects sensitive or valuable data.
Starting from version 10.21, CMS supports running in FIPS mode. The FIPS mode covers all parts ofthe CMS system, including UCMDB Server, Universal Discovery, UCMDB Browser, andConfigurationManager.
This guide provides guidelines for switching the CMS system to the FIPS mode. We stronglyrecommends you to follow the guidelines strictly to avoid any unforeseen risk that may be introducedby the complex FIPS solution. This guide also walks you through the entire FIPS migration processstep-by-step to ensure that the FIPS mode can be successfully turned on for CMS 10.21.
FIPS Deployment Guide
Micro Focus Universal CMDB (10.33) Page 4 of 62

Chapter 2: Overview of the FIPS MigrationProcessThe diagram below illustrates the overall FIPS migration process for the CMS system.
Note: This step by step FIPS migration process applies to the HTTPS configuration. This is alsothe strongly recommended configuration. Considering the limitation with the HTTP configuration,organizations adopting FIPS security standards would find HTTP configuration insufficient.
FIPS Deployment Guide
Micro Focus Universal CMDB (10.33) Page 5 of 62

FIPS Deployment Guide
Micro Focus Universal CMDB (10.33) Page 6 of 62

Important NotesBefore you decide to switch your CMS system to the FIPS mode, you should be aware of the followingimportant notes:
l The FIPS mode is not compatible with non-FIPS mode. For example, data flow probes in FIPSmode cannot connect to a non-FIPS compliant UCMDB Server.
l Once the FIPS mode is enabled, there is no way to disable it.
l Always switch ConfigurationManager and UCMDB Browser to FIPS mode before you start toswitch the UCMDB server to FIPS mode.
l Basic Authentication. Basic Authenticationmust be disabled before you start to enable the FIPSmode.
l Data Flow Probes. Before switching to FIPS mode, make sure that you have deactivated alldiscovery jobs.
l Integration Service. You have deactivated all integration jobs.
l DDMI agents. The FIPS mode does not support DDMI agents. You need to ensure that all DDMIagents have been successfully migrated to UD agents before you start the whole FIPS migrationprocess.
The table below describes different types of agents youmight have in your environment and if anyaction is required from you:
Agent typeCovered by the automaticFIPS migration process? Action required
DDMI agents No Migrate all DDMI agents to UDagents before the FIPSmigration process starts.
Pre-10.33 UD Agents Yes None
10.33 (or later) non-FIPS UDAgents
Yes None
For details about how tomigrate DDMI agents to UD agents, see theDDMI to Universal DiscoveryMigrationWalkthroughGuide.
l Download and copy the Zulu Cryptography Extension Kit. Before running the upgrade script toupgrade UCMDB from version 10.2x in FIPS mode to version 10.3x, stop the UCMDB Server first,
FIPS Deployment GuideImportant Notes
Micro Focus Universal CMDB (10.33) Page 7 of 62

and then copy the Zulu Cryptography Extension Kit to the%UCMDB_HOME%/bin/jre/lib/security/ directory.
l Set master key before upgrade. Before running the upgrade, make sure the master key is set. You can set it by invoking the changeMasterKey JMX method. For detailed instructions, see Universal CMDB JMX Reference Guide.
FIPS Deployment GuideImportant Notes
Micro Focus Universal CMDB (10.33) Page 8 of 62
Chapter 3: FIPS Concepts
Out of the Box (OOTB) UCMDB Certificates andKeystores Used in FIPS ModeAfter switching the UCMDB Server to FIPS mode, it will use the new out of the box (OOTB) keystoreand truststore files which contain new certificates. The keystores are of type PKCS12 and we haveused the JsafeJCE cryptography provider (from Crypto-J toolkit) for creating them. In FIPS modeUCMDB uses a new certificate chain which is composed of two self-signed certificates: HPEUniversal CMDB Root (hproot) > signs > HPE Universal CMDB (hpcert).
In order to be able to securely communicate with the UCMDB Server, for all the SSL clients (UCMDBUI, UCMDB Browser, UCMDB ConfigurationManager), you should import either the hproot or hpcertcertificate into their truststores. Since hpcert should be re-generated, and in order to avoid themanualimport on all the probes' truststores, the hproot certificate is imported into the probe truststore bydefault. Since hproot signs hpcert, hpcert will also be trusted.
You can use your own certificates. You should import themmanually into the corresponding keystores.TheOOTB keystore/certificates configuration can be a starting example. The "Improving Security"sections contain keytool commands examples for importing certificates into the keystores.
TheOOTB FIPS stores on UCMDB Server side are:
l UCMDBServer\conf\security\hproot.keystore - contains the private key entry and the hprootpublic certificate
l UCMDBServer\conf\security\server-fips.keystore - contains the hpcert certificate which is signedby hproot
l UCMDBServer\conf\security\server-fips.truststore - contains the hproot certificate and thehpprobe certificate
TheOOTB FIPS stores on Probe side are:
l DataFlowProbe\conf\security\FIPS_HPProbeKeyStore.jks - contains the hpprobe certificate
l DataFlowProbe\conf\security\FIPS_HPProbeTrustStore.jks - contains the hpprobe certificate andhproot certificate
FIPS Deployment GuideOut of the Box (OOTB) UCMDB Certificates and Keystores Used in FIPS Mode
Micro Focus Universal CMDB (10.33) Page 9 of 62
Chapter 4: Step by Step FIPS MigrationNote: This step by step FIPS migration process applies to the HTTPS configuration.
After performing the tasks below, youmigrate CMS 10.3x to FIPS mode and you will use theOOTB self-signed certificates, keystores, and truststore files.
If you wish to perform additional customization, see "Improving Security" on page 44.
The step-by-step instructions for switching the CMS 10.3x system to the FIPS mode consists of thefollowing tasks:
Task 1. Prerequisites 10
Task 2. ConfigurationManager Migration - Phase I 12
Task 3. UCMDB Browser Migration - Phase I 14
Task 4. UCMDB Server Migration 16
Task 5. UCMDB UI Migration 24
Task 6. Data Flow ProbeMigration 29
Task 7. UCMDB Integration ServiceMigration 31
Task 8. Universal Discovery Content Migration 34
Task 9. ConfigurationManager Migration - Phase II 37
Task 10. UCMDB Browser Migration - Phase II 40
Task 11. UCMDB Browser Migration - Phase III 42
Task 12. ConfigurationManager Migration - Phase III 43
Task 1. Prerequisitesl Version requirements:
o UCMDB Server version 10.33
o ConfigurationManager version 10.23
o Data Flow Probe version 10.33
o UCMDB Browser version 4.14 (or later)
o Content Pack version 24.00 (or later)
FIPS Deployment GuideTask 1. Prerequisites
Micro Focus Universal CMDB (10.33) Page 10 of 62

l Back up UCMDB database and UCMDB Server installation directory. Before switching theUCMDB Server to FIPS mode, perform a backup of the UCMDB database and the entire UCMDBServer installation directory.
l Download the correct version of the JCE Unlimited Strength Policy Files for the JRE versionyou use, because the JCE Unlimited Strength Policy Files are different for each JRE version.
For example, for version 10.3x, UCMDB Server uses OpenJDK, the JCE Unlimited Strength PolicyFiles should be downloaded from Zulu Cryptography Extension Kit provided by OpenJDK.
Note: ConfigurationManager (CM) version 10.23 still uses JRE 8, the JCE Unlimited StrengthPolicy Files should be downloaded from Java Cryptography Extension (JCE) UnlimitedStrength Jurisdiction Policy Files 8 Download.
l Understand that you should strictly follow the sequence in this step-by-step FIPS migrationprocess.
For example, always switch ConfigurationManager and UCMDB Browser to the FIPS mode beforeyou switch the UCMDB server to FIPS mode. Because switching the UCMDB Server to the FIPSmode also updates the LW-SSO configuration, whichmeans that you will not be able to log in toConfigurationManager if it is still in non-FIPS mode.
l For Data Flow Probes and Integration Service, you have deactivated all discovery jobs andintegration jobs.
FIPS Deployment GuideTask 1. Prerequisites
Micro Focus Universal CMDB (10.33) Page 11 of 62

Task 2. Configuration Manager Migration -Phase I
To switch Configuration Manager to FIPS mode,
1. Copy the necessary files.
o Copy the JCE Unlimited Strength Jurisdiction Policy Files to the <Configuration_Manager_installation_directory>\java\windows\x86_64\lib\security directory.
o From the <Configuration_Manager_installation_directory>\lib folder, copy the followingCryptoJ jars:
l cryptojce-*.jar
l cryptojcommon-*.jar
l jcmFIPS-*.jar
FIPS Deployment GuideTask 2. ConfigurationManager Migration - Phase I
Micro Focus Universal CMDB (10.33) Page 12 of 62

into:
<Configuration_Manager_installation_directory>\java\windows\x86_64\lib\ext
2. Restart ConfigurationManager.
3. Invoke the JMX method to switch ConfigurationManager to FIPS mode.
a. Check andmake sure that the FIPS mode is not yet enabled.
i. On the UCMDB server, go to JMX Console > UCMDB:service=Settings Services >showSettingsByCategory.
ii. Invoke the showSettingsByCategorymethod with the following parameters:
l customerID:Enter your Customer ID. The default value is 1.
l category: enable.fips.mode
iii. If the returnmessage is "No settings found", the FIPS mode is not yet enabled.
b. Go to the ConfigurationManager's JMX console, click Configuration set service, andinvoke switchAllConfigurationSetsToFips.
Note:You can also run the switch in a test mode, whichmakes no changes to thesystem.
4. Backup copies for the following files are generated in a folder specified by you:
o encryption.properties
o encrypt_repository
o cnclwssofmconf.xml
o database.properties
A dump of the database entries are also updated in encryptedProperties.db.
5. Stop ConfigurationManager.
FIPS Deployment GuideTask 2. ConfigurationManager Migration - Phase I
Micro Focus Universal CMDB (10.33) Page 13 of 62
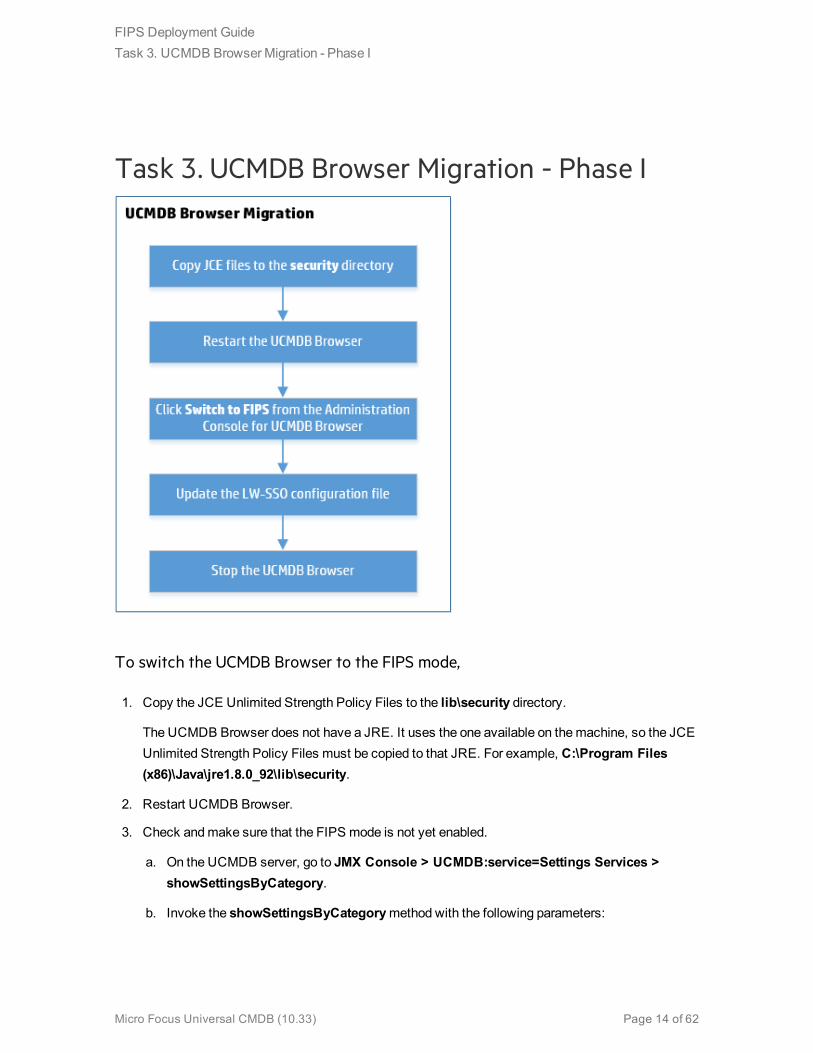
Task 3. UCMDB Browser Migration - Phase I
To switch the UCMDB Browser to the FIPS mode,
1. Copy the JCE Unlimited Strength Policy Files to the lib\security directory.
The UCMDB Browser does not have a JRE. It uses the one available on themachine, so the JCEUnlimited Strength Policy Files must be copied to that JRE. For example, C:\Program Files(x86)\Java\jre1.8.0_92\lib\security.
2. Restart UCMDB Browser.
3. Check andmake sure that the FIPS mode is not yet enabled.
a. On the UCMDB server, go to JMX Console > UCMDB:service=Settings Services >showSettingsByCategory.
b. Invoke the showSettingsByCategorymethod with the following parameters:
FIPS Deployment GuideTask 3. UCMDB Browser Migration - Phase I
Micro Focus Universal CMDB (10.33) Page 14 of 62

l customerID:Enter your Customer ID. The default value is 1.
l category: enable.fips.mode
c. If the returnmessage is "No settings found", the FIPS mode is not yet enabled.
4. Switch the UCMDB Browser to the FIPS mode from the UCMDB Browser AdministrationConsole.
a. Log in to Universal CMDB Browser, hover your mouse over the <username> in the top rightcorner and select Administration Console (only admin users have access to it).
b. In the Administration Console for UCMDB Browser page, Click theSWITCH TO FIPS tab inthe navigation pane.
The old files are backed up in the Browser's temp folder, where a new folder named as thecurrent timestamp is created.
You can click theShow encrypted properties button to display encrypted properties.
5. After the switch is done, update the LW-SSO configuration file.
The LW-SSO configuration file ucmdb_browser_lwsso_config.xmlmust be updated to use theFIPS compliant algorithms.
<crypto cryptoSource="jce" cipherType="symmetricBlockCipher"engineName="AES" paddingModeName="CBC" keySize="256"pbeDigestAlgorithm="SHA1" encodingMode="Base64Url"jceProviderName="JsafeJCE" jcePbeAlgorithmName="AES"jcePbeMacAlgorithmName="AES" macType="hmac" macAlgorithmName="SHA1"directKeyEncoded="true" directKeyEncoding="Base64Url"algorithmPaddingName="PKCS5Padding" pbeCount="20" macKeySize="256"macPbeCount="20" initString="what is the init string"></crypto>
6. Stop UCMDB Browser.
FIPS Deployment GuideTask 3. UCMDB Browser Migration - Phase I
Micro Focus Universal CMDB (10.33) Page 15 of 62

Task 4. UCMDB Server Migration
FIPS Deployment GuideTask 4. UCMDB Server Migration
Micro Focus Universal CMDB (10.33) Page 16 of 62
This task includes the following:
1. "Switch the UCMDB Server to the FIPS mode" below
2. "Regenerate a new self-signed hpcert and sign it with the default UCMDB root certificate" on thenext page
Switch the UCMDB Server to the FIPS mode
1. Copy the JCE Unlimited Strength Policy Files (local_policy.jar andUS_export_policy.jar) intothe corresponding server JRE directory (<UCMDB Server directory>\bin\jre\lib\security) of allthe UCMDB Servers in the HA cluster to overwrite the existing files.
2. If LW-SSO is enabled, go to the JMX Console > UCMDB-UI:name=LW-SSO Configuration,invoke the setInitStringmethod to set a 32-character length LW-SSO init string.
Note:
o Check andmake sure that the all Data Flow Probes are connected to the UCMDB server.
o Make sure that UCMDB Browser and UCMDB CM have the same init string, and theconfiguration works.
3. Restart the HA cluster andmake sure that all the UCMDB servers are up and running.
4. Switch the UCMDB Servers from the HA cluster (both writer and readers) to the FIPS mode.
a. From the writer machine, go to JMX Console > UCMDB:service=Security Services.
b. Invoke the enableFIPSMode JMX method with the current passwords for admin, sysadmin,UISysadmin and the CM integration user (if you use UCMDB ConfigurationManager).
Important: For all other users, their passwords will be changed to use the default passwordfrom the security.user.password.default global setting.
Make sure you inform the users that their password will be reset to the default one.
5. Verify andmake sure that all the Data Flow Probes are switched to FIPS mode.
To verify if a probe is switched to the FIPS mode, invoke the probe's JMX methodGet FIPSstatus (located in theMainProbe category).
This step is important especially when the Probe and the Server are communicating throughHTTPS. In case the automatic migration of the probe to FIPS mode fails and the server isrestarted, you need to perform several manual steps on the probe side. For detailed instructions,see "Troubleshooting the Data Flow Probes" on page 51.
FIPS Deployment GuideTask 4. UCMDB Server Migration
Micro Focus Universal CMDB (10.33) Page 17 of 62

6. Stop the HA cluster.
7. Regenerate a new self-signed hpcert and sign it with the default UCMDB root certificate.
In case you use the UCMDB UI, it is recommended to regenerate the hpcert certificate now toadd the corresponding Subject Alternative Name (SAN) extensions (DNS name for the Servermachine).
For detailed instructions, see "Regenerate a new self-signed hpcert and sign it with the defaultUCMDB root certificate" below.
8. Restart the HA cluster.
Regenerate a new self-signed hpcert and sign it with the default UCMDB root
certificate
Limitation with the default hpcert Certificate
The default hpcert certificate from server-fips.keystore uses a SAN extension with DNS field setto localhost. This limits the access to the UCMDB UI only from the UCMDB Server Machine(localhost). That is to say, UCMDB UI must be on the samemachine with UCMDB Server, andyou can only use URL https://localhost:8443/ to access the UCMDB Server, neitherhttps://<UCMDB_Server_Name>:8443/ nor https://<UCMDB_Server_IP_Address>:8443/.Therefore, we strongly recommend to generate a new hpcert certificate with appropriate SANextensions with a DNS field, which shouldmatch your server's full qualified domain name (FQDN).
In case of High Availability, you should add DNS extensions for all the servers in the cluster. Thenew hpcert should reside in the server-fips.keystore and it will be signed with hproot. Since theprobes already contain the hproot certificate in their truststore by default, no changes are neededon the probe side after hpcert is regenerated. In the truststores of the UCMDB UI JRE, UCMDBBrowser, and UCMDB ConfigurationManager, you should add the hproot certificate or the newlygenerated hpcert certificate. (The corresponding steps from the FIPS deployment guide are givingall the details regarding this in each corresponding submodule procedure: UCMDB UI, UCMDBBrowser, and so on).
For instructions about regenerating the hpcert, signed by hproot, with corresponding SANextensions, see the section below.
FIPS Deployment GuideTask 4. UCMDB Server Migration
Micro Focus Universal CMDB (10.33) Page 18 of 62

1. Set up the UCMDB Server JRE with Crypto-J Toolkit and the JCE Unlimited
Strength Jurisdiction Policy jars
In this step-by-step guide, we will use the UCMDB Server's JRE located by default in the<UCMDB_Server_Home>\bin\jre directory (for example,C:\hp\UCMDB\UCMDBServer\bin\jre).
Note: We need to revert all the changes done to the UCMDB Server's JRE after the newcertificates and keystore files are generated.
a. Make sure you have stopped the UCMDB Server.
b. Copy the Crypto-J toolkit files (cryptojce-6.2.jar, cryptojcommon-6.2.jar, and jcmFIPS-6.2.jar) from the <UCMDB_server_home>\lib directory and place them inside the<UCMDB_server_home>\bin\jre\lib\ext folder.
c. Copy the Java Cryptography Extension (JCE) Unlimited Strength Jurisdiction Policy Files(local_policy.jar andUS_export_policy.jar into the <UCMDB_server_home>\bin\jre\lib\security folder.
Note: The JCE Unlimited Strength Policy Files should be already present there if youhave enabled FIPS mode on the UCMDB Server.
UCMDB Server version 10.3x uses OpenJDK, the JCE Unlimited Strength Policy Filescan be downloaded from Zulu Cryptography Extension Kit.
d. Add the JsafeJCE security provider as follows into the java.security file located in the<UCMDB_server_home>\bin\jre\lib\security directory.
JsafeJCE in java.security:
Windows: security.provider.11=com.rsa.jsafe.provider.JsafeJCE
Linux: security.provider.10=com.rsa.jsafe.provider.JsafeJCE
2. Generate a new self-signed certificate (hpcert) and sign it with the default
UCMDB root certificate (hproot)
a. Prerequisites
You have followed the instructions in Set up the UCMDB Server JRE with Crypto-J Toolkitand the JCE Unlimited Strength Jurisdiction Policy jars above.
FIPS Deployment GuideTask 4. UCMDB Server Migration
Micro Focus Universal CMDB (10.33) Page 19 of 62

Note: The prerequisites steps for switching UCMDB UI to FIPS when the server is inFIPS mode are the same. Therefore, it is recommended that you proceed with theUCMDB UI Migration after you finished generating the new hpcert certificate in task bbelow. Then you proceed with reverting the changes made to the UCMDB Server's JRE(see Revert the changes made to the UCMDB Server's JRE after the certificate storesgeneration is completed). This way you do not need to set up twice a JRE with Crypto-Jtoolkit and JCE Unlimited Strength Policy files.
b. Generate a new self-signed certificate (hpcert) and sign it with the default UCMDBroot certificate (hproot)
On Windows:
On the UCMDB Server machine, inside theC:\hp\UCMDB\UCMDBServer\tools\securityfolder, we provided a new tool keystoregen.bat. This tool runs the needed keytool commandsfor generating the server-fips.keystore file, which contains the hpcert certificate signed byhproot.
First, the keystoregen.bat tool verifies the following prerequisites:
l UCMDB Server JRE contains the Crypto-J Toolkit
l The JCE Unlimited Strength Jurisdiction Policy jars are present in the UCMDB ServerJRE
l JsafeJCE provider is present in the security providers list
Then it takes the hproot certificate from theC:\hp\UCMDB\UCMDBServer\conf\security\hproot.keystore file, and generates a newhpcert. It also prompts the user for the DNS of the UCMDB Server machine and an IPaddress. You can supply multiple DNS names and IP addresses separated by comma (,),which will be added as SAN extensions to the hpcert certificate.
To generate the new server-fips.keystore file using the keystoregen.bat tool,
i. Navigate to theC:\hp\UCMDB\UCMDBServer\tools\security directory.
ii. Run the keystoregen.bat tool from a command prompt.
A. In case you use HA, it is recommended to add here both the Full Qualified DomainNames (FQDNs) of theWriter and the Reader machine separated by comma (,).
B. You will be prompted for the UCMDB Server Machine DNS name. Usecomma (,) to separatemultiple DNS names.
C. You will be prompted for the UCMDB Server IP. This is for the cases when
FIPS Deployment GuideTask 4. UCMDB Server Migration
Micro Focus Universal CMDB (10.33) Page 20 of 62
you will access the UCMDB Server by using the IP address.
D. You will be prompted for the hpcert validity period.
E. You will be prompted for the server-fips.keystore password. Enter yourpassword.
iii. After entering all the needed information a new server-fips.keystore file is generated intheC:\hp\UCMDB\UCMDBServer\tools\security folder.
This keystore contains the newly generated hpcert certificate signed by hproot. It alsocontains all the needed extensions.
iv. Copy the newly generated server-fips.keystore file fromC:\hp\UCMDB\UCMDBServer\tools\security toC:\hp\UCMDB\UCMDBServer\conf\security to overwrite the OOTB server-fips.keystore file.
In case you use HA, make sure you copy this new keystore file to all the HA servers.
v. Regenerate server-fips.truststore by running the following script:
C:\hp\UCMDB\UCMDBServer\tools\security\truststoregen.bat
When running truststoregen.bat, you will be prompted for two passwords:
l The original truststore password, which should be hppass if nomanual change wasmade
l The new truststore password, which should be the one you specified duringinstallation if nomanual change was made since the installation
vi. i. Copy the new server-fips.truststore file to theC:\hp\UCMDB\UCMDBServer\conf\security folder to overwrite the OOTB server-fips.truststore file.
In case of HA, make sure you copy the new truststore file to all the HA servers.
On Linux:
In case of Linux, manual commands should be executed to regenerate hpcert with the neededSAN extensions and sign it with hproot:
i. Go to the /opt/hp/UCMDB/UCMDBServer/bin/jre/bin directory.
ii. Export hproot from OOTB hproot.keystore to /opt/hp/newstores/hproot.crt.
./keytool -exportcert -alias hproot -keystore/opt/hp/UCMDB/UCMDBServer/conf/security/hproot.keystore -storetype
FIPS Deployment GuideTask 4. UCMDB Server Migration
Micro Focus Universal CMDB (10.33) Page 21 of 62

PKCS12 -storepass hppass -providername JsafeJCE -file/opt/hp/newstores/hproot.crt
iii. Generate a self-signed certificate hpcert and place it inside server-fips.keystore.
Make sure you set the correct SAN extension to the appropriate DNS of your servermachine. (In case of HA, set both the reader and the writer machines' FQDNs.
./keytool -genkey -alias hpcert -validity 365 -keyalg RSA -keysize2048 -storetype PKCS12 -providername JsafeJCE -keystore/opt/hp/newstores/server-fips.keystore -extsan=dns:myucmdbserver.hp.com,dns:localhost,ip:127.0.0.1
When prompted, enter your password.
iv. Export hpcert from the keystore.
./keytool -exportcert -alias hpcert -keystore/opt/hp/newstores/server-fips.keystore -storetype PKCS12 -storepass<password> -providername JsafeJCE -file /opt/hp/newstores/hpcert.crt
v. Generate a certificate signing request for hpcert and place it in /opt/hp/newstores.
./keytool -certreq -alias hpcert -keystore /opt/hp/newstores/server-fips.keystore -storetype PKCS12 -storepass <password> -providernameJsafeJCE -file /opt/hp/newstores/hpcert_sign_request.csr
vi. Generate the signed hpcert certificate which is signed by hproot and add the neededSAN extensions.
./keytool -gencert -infile /opt/hp/newstores/hpcert_sign_request.csr-outfile /opt/hp/newstores/hpcert_issued_by_hproot.rsp -alias hproot-storetype PKCS12 -providername JsafeJCE -keystore/opt/hp/UCMDB/UCMDBServer/conf/security/hproot.keystore -storepasshppass -ext san=dns:myucmdbserver.hp.com,dns:localhost,ip:127.0.0.1
vii. Concatenate the signed hpcert and hproot in the same file.
./keytool -printcert -rfc -file /opt/hp/newstores/hpcert_issued_by_hproot.rsp >> /opt/hp/newstores/hpcertandroot.p7c
./keytool -printcert -rfc -file /opt/hp/newstores/hproot.crt >>/opt/hp/newstores/hpcertandroot.p7c
viii. Import the hpcert signed with hproot into server-fips.keystore.
FIPS Deployment GuideTask 4. UCMDB Server Migration
Micro Focus Universal CMDB (10.33) Page 22 of 62
./keytool -importcert -keystore /opt/hp/newstores/server-fips.keystore -storetype PKCS12 -providername JsafeJCE -aliashpcert -file /opt/hp/newstores/hpcertandroot.p7c
ix. Copy the new server-fips.keystore from /opt/hp/newstores to/opt/hp/UCMDB/UCMDBServer/conf/security to overwrite the OOTB server-fips.keystore file.
In case you use HA, make sure to copy this new keystore file to all the HA servers.
x. Regenerate server-fips.truststore by running the following script:
/opt/hp/UCMDB/UCMDBServer/tools/security/truststoregen.sh
When running truststoregen.sh, you will be prompted for two passwords:
l The original truststore password, which should be hppass if nomanual change wasmade
l The new truststore password, which should be the one you specified duringinstallation if nomanual change was made since the installation
xi. Copy the new server-fips.truststore file to the/opt/hp/UCMDB/UCMDBServer/conf/security folder to overwrite the OOTB server-fips.truststore file.
In case of HA, make sure you copy the new truststore file to all the HA servers.
3. Revert the changes made to the UCMDB Server's JRE after the certificate stores
generation is completed
After generating the needed files for UCMDB Server and UCMDB UI by executing the neededkeytool commands and scripts, revert the changes done to the UCMDB Server's JRE. To do so,
a. Remove the Crypto-J toolkit files (cryptojce-6.2.jar, cryptojcommon-6.2.jar and jcmFIPS-6.2.jar) from the <UCMDB_Server_Home>\bin\jre\lib\ext directory.
b. Remove the JsafeJCE provider from the java.security file located at <UCMDB_Server_Home>\bin\jre\lib\security.
Remove JsafeJCE from the server's JRE
Remove the following line from java.security:
Windows: security.provider.11=com.rsa.jsafe.provider.JsafeJCE
Linux: security.provider.10=com.rsa.jsafe.provider.JsafeJCE
FIPS Deployment GuideTask 4. UCMDB Server Migration
Micro Focus Universal CMDB (10.33) Page 23 of 62

Task 5. UCMDB UI Migration
To Switch client machines to FIPS mode
1. Prerequisites
You have completed steps described in Set up the UCMDB Server JRE with Crypto-J Toolkit andthe JCE Unlimited Strength Jurisdiction Policy jars.
FIPS Deployment GuideTask 5. UCMDB UI Migration
Micro Focus Universal CMDB (10.33) Page 24 of 62

This is why you are recommended to run UCMDB UI migration steps after you "Generate a newself-signed certificate (hpcert) and sign it with the default UCMDB root certificate (hproot)". Thisway you do not need to set up twice a JRE with Crypto-J toolkit and JCE Unlimited StrengthPolicy Files.
2. Copy the needed JCE Unlimited Strength Policy Files and Crypto-J Toolkit jars into theclient JRE folder.
a. Copy the JCE Unlimited Strength Policy Files (local_policy.jar andUS_export_policy.jar)to the client JRE lib\security folder (for example, C:\Program Files (x86)\Java\jre1.8.0_92\lib\security).
b. Copy the Crypto-J Toolkit jars (cryptojce-6.2.jar, cryptojcommon-6.2.jar, and jcmFIPS-6.2.jar) from the <UCMDB_Server_Home>\lib folder to the lib\ext folder on the clientmachine (for example, C:\Program Files (x86)\Java\jre1.8.0_92\lib\ext).
Note: If the jars are not present in the client JRE ext folder, the UCMDB UI should alsodisplay a pop-up dialog box at login time with a URL link from where you can downloadthe Crypto J toolkit jars and the JCE Unlimited Strength Policy files.
Or, you can download the JCE Unlimited Strength Policy Files from the followinglocations:
l For Oracle JRE8: http://www.oracle.com/technetwork/java/javase/downloads/jce8-download-2133166.html
l For OpenJDK JRE 8: Zulu Cryptography Extension Kit
c. Edit the java.security file located at the client JRE lib\security folder (for example,C:\Program Files (x86)\Java\jre1.8.0_92\lib\security) and add the JsafeJCE provider.
The java.security file should contain the JsafeJCE provider as a standard cryptographyprovider in the providers list. In addition, for SSL communication we also configure theSunJSSE SSL provider in the FIPS mode. This is done by performing the change to thesecurity provider from the 5th position (security.provider.5, as shown below). SunJSSEis configured in FIPS mode by associating it with an appropriate FIPS 140-2 certifiedcryptographic provider (JsafeJCE) that supplies the implementations for all cryptographicalgorithms required by SunJSSE.
java.security:
com.rsa.cryptoj.fips140initialmode=FIPS140_SSL_MODEcom.rsa.cryptoj.kat.strategy=on.load
security.provider.1=sun.security.provider.Sunsecurity.provider.2=com.rsa.jsafe.provider.JsafeJCE
FIPS Deployment GuideTask 5. UCMDB UI Migration
Micro Focus Universal CMDB (10.33) Page 25 of 62

security.provider.3=sun.security.rsa.SunRsaSignsecurity.provider.4=sun.security.ec.SunECsecurity.provider.5=com.sun.net.ssl.internal.ssl.Provider JsafeJCEsecurity.provider.6=com.sun.crypto.provider.SunJCEsecurity.provider.7=sun.security.jgss.SunProvidersecurity.provider.8=com.sun.security.sasl.Providersecurity.provider.9=org.jcp.xml.dsig.internal.dom.XMLDSigRIsecurity.provider.10=sun.security.smartcardio.SunPCSCsecurity.provider.11=sun.security.mscapi.SunMSCAPI
3. Create the FIPS-compliant client truststore.
a. Create the jssecacerts trusted certificates store of type PKCS12 using the JsafeJCEprovider
In FIPS mode the client JRE will use a different trusted certificate store, which is of typePKCS12, created using the JsafeJCE provider. The new jssecacerts file is generated byconverting the client JRE cacerts file from JKS to PKCS12 and by copying all the trustedcertificates from cacerts inside jssecacerts. In the <UCMDB_Server_Home>/tools/securityfolder, a new java tool jks2pkcs12.jar is added for performing this conversion. The keystoreconverter tool is getting two parameters, the keystore to be converted of type JKS (cacerts)and the newly generated keystore of type PKCS12 (jssecacerts).
In this guide, we copied the cacerts file from the client JRE machine (for example,C:\Program Files (x86)\Java\jre1.8.0_92\lib\security\cacerts) to theC:\newstores folderon UCMDB server machine. Next, run the following command fromC:\hp\UCMDB\UCMDBServer\bin\jre\bin in order to perform the needed conversion.
Create jssecacerts by converting the client JRE cacerts file:
ForWindows:
java -jar C:\hp\UCMDB\UCMDBServer\tools\security\jks2pkcs12.jarC:\newstores\cacerts C:\newstores\jssecacerts
For Linux:
java -jar /opt/hp/UCMDB/UCMDBServer/tools/security/jks2pkcs12.jar/opt/hp/newstores/cacerts /opt/hp/newstores/jssecacerts
When prompted for the keystore password, you should use the password changeit since thisis the default password for the cacerts file. The new jssecacerts will be also placed atC:\newstores.
b. Export the hproot server root certificate and place it inside C:\newstores
FIPS Deployment GuideTask 5. UCMDB UI Migration
Micro Focus Universal CMDB (10.33) Page 26 of 62
ForWindows:
keytool -exportcert -alias hproot -keystoreC:\hp\UCMDB\UCMDBServer\conf\security\hproot.keystore -storetype PKCS12-providername JsafeJCE -file C:\newstores\hproot.crt
For Linux:
./keytool -exportcert -alias hproot -keystore/opt/hp/UCMDB/UCMDBServer/conf/security/hproot.keystore -storetypePKCS12 -storepass <password> -providername JsafeJCE -file/opt/hp/newstores/hproot.crt
When prompted for the keystore hproot.keystore password, enter your password. .
c. Import the hproot server root certificate into the client jssecacerts as a trustedcertificate
In this guide, we assume that the UCMDB Server root certificate hproot.crt resides in theC:\newstores folder.
Import hproot into client truststore (jssecacerts):
keytool -import -trustcacerts -keystore C:\newstores\jssecacerts -storetype PKCS12 -providername JsafeJCE -storepass changeit -aliashproot -file C:\newstores\hproot.crt
d. Copy the newly generated JSSE cacerts file jssecacerts from the Server machine(C:\newstores) to the client JRE inside the lib\security folder (for example, C:\ProgramFiles (x86)\Java\jre1.8.0_92\lib\security).
e. Add a new environment variable for the current user on the client machine which willenable the client JRE to use the new jssecacerts file.
Update the environment variable value to the correct path of the jssecacerts file as follows:
Point the client JRE to the correct truststore file
User defined environment variable name:
JAVA_TOOL_OPTIONS
Environment variable value:
-Djavax.net.ssl.trustStore="C:/Program Files (x86)/Java/jre1.8.0_92/lib/security/jssecacerts" -Djavax.net.ssl.trustStoreType=PKCS12 -Djavax.net.ssl.trustStoreProvider=JsafeJCE -Djavax.net.ssl.trustStorePassword=changeit -Djavax.net.ssl.keyStore="C:/Program Files (x86)/Java/jre1.8.0_
FIPS Deployment GuideTask 5. UCMDB UI Migration
Micro Focus Universal CMDB (10.33) Page 27 of 62
92/lib/security/jssecacerts" -Djavax.net.ssl.keyStorePassword=changeit -Djavax.net.ssl.keyStoreType=PKCS12 -Djavax.net.ssl.keyStoreProvider=JsafeJCE
Note:All the java applications executed on the client machinemay be affected by theJAVA_TOOL_OPTIONS environment variable set in this step.
4. Restart the Internet Browser for Java to be initialized with the new FIPS configuration.
Note: After you executed the keytool commands and bat files, do not forget to restore theUCMDB Server JRE to its original state as described in "Revert the changes made to the UCMDBServer's JRE after the certificate stores generation is completed" on page 23.
Note: After switching UCMDB client JRE to FIPS mode, you cannot connect it to a non-FIPSmodeUCMDB server!
FIPS Deployment GuideTask 5. UCMDB UI Migration
Micro Focus Universal CMDB (10.33) Page 28 of 62
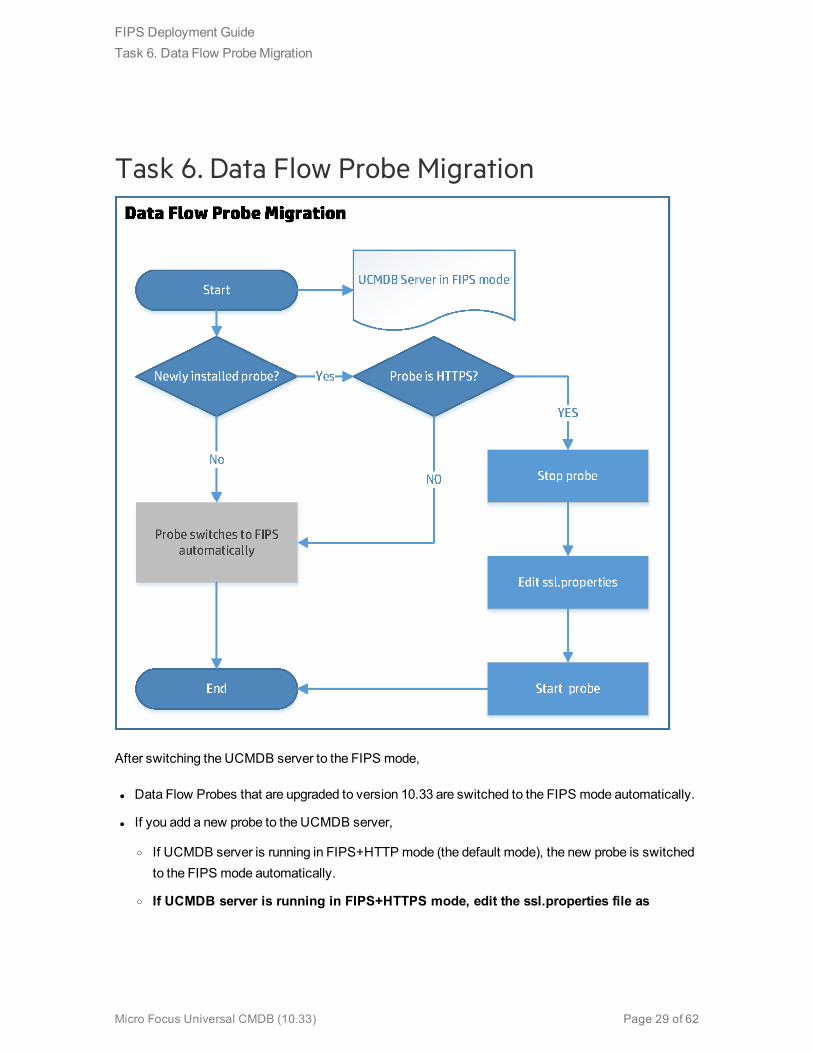
Task 6. Data Flow Probe Migration
After switching the UCMDB server to the FIPS mode,
l Data Flow Probes that are upgraded to version 10.33 are switched to the FIPS mode automatically.
l If you add a new probe to the UCMDB server,
o If UCMDB server is running in FIPS+HTTP mode (the default mode), the new probe is switchedto the FIPS mode automatically.
o If UCMDB server is running in FIPS+HTTPS mode, edit the ssl.properties file as
FIPS Deployment GuideTask 6. Data Flow ProbeMigration
Micro Focus Universal CMDB (10.33) Page 29 of 62

described below to complete the FIPS migration process for the new probe. This is thescenario that requires manual steps.
Edit the ssl.properties file to enable the new probe to connect to the UCMDB server
in FIPS+HTTPS mode
To do so,
1. Stop the probe.
2. Open the <DataFlowProbe_Home>/conf/security/ssl.properties file in a text editor.
3. Locate the following attributes, and update their values as follows:
javax.net.ssl.keyStore=FIPS_HPProbeKeyStore.jks
javax.net.ssl.trustStore=FIPS_HPProbeTrustStore.jks
4. Save the ssl.properties file.
5. Restart the probe.
Note:Backup copy of the following files are created when Data Flow Probes are switched to FIPSmode:
l <DataFlowProbe_Home>\conf\DataFlowProbe.properties
l <DataFlowProbe_Home>\conf\security\ssl.properties
l <DataFlowProbe_Home>\bin\WrapperGateway.conf
l <DataFlowProbe_Home>\bin\WrapperManager.conf
The backup copy of these files are saved to the <Probe_Home>\conf\bak directory.
Tip: How to check whether a probe or integration service is already switched to FIPS
To check whether a probe or integration service is already in FIPS mode,
1. Go to the probe or integration service's JMX Console. For example, <Probe_IP>:<Probe_Port>/jmx-console/.
2. Search for getFipsStatus.
3. On the result page, check whether the value of the FipsStatus attribute is "Current probe is inFIPS mode".
FIPS Deployment GuideTask 6. Data Flow ProbeMigration
Micro Focus Universal CMDB (10.33) Page 30 of 62

Task 7. UCMDB Integration Service Migration
To switch UCMDB Integration Service to FIPS mode, do the following,
1. Prerequisites
a. You have successfully switched the UCMDB Server to FIPS mode.
b. You have deactivated all integration jobs.
2. Append the probe.fips.status setting to the DataFlowProbe.properties file
manually
a. Go to the <UCMDB_Server_Home>\integrations\conf directory (for example,C:\hp\UCMDB\UCMDBServer\integrations\conf) and open theDataFlowProbe.properties file in a text editor.
b. Append the following line to the end of the file:
probe.fips.status=1
FIPS Deployment GuideTask 7. UCMDB Integration ServiceMigration
Micro Focus Universal CMDB (10.33) Page 31 of 62
This setting indicates that the integration service is ready for switching to FIPS mode.
c. (Upgrade only) Locate the basic_discovery_minimal_classpath parameter, and after the../lib/shared-utils.jar; value, append the following:
../lib/cryptojce.jar;../lib/cryptojcommon.jar;../lib/jcmFIPS.jar;
Note: For new installation of UCMDB 10.3x, this step is not needed, the above jar filesare already included in the value of the basic_discovery_minimal_classpathparameter.
d. Save the file.
3. Restart UCMDB Integration Service manually
If you have successfully switched the UCMDB Server to FIPS mode, restart UCMDBIntegration Service manually.
This enables the system to do the following:
a. Create a backup copy of the following files:
l <UCMDB_Server_Home>\integrations\conf\DataFlowProbe.properties
l <UCMDB_Server_Home>\integrations\conf\security\ssl.properties
l <UCMDB_Server_Home>\integrations\bin\WrapperGateway.conf
l <UCMDB_Server_Home>\\integrations\bin\WrapperManager.conf
The backup copy of these files are saved to the <UCMDB_Server_Home>\integrations\conf\bak directory.
b. Check if the enable.fips.mode setting in the infrastructureSettings.xml file is alreadyupdated to true.
c. If yes, it proceeds to update the following files:
l Update the encrypted passwords in theDataFlowProbe.properties file.
l Update the keystore/truststore information in the ssl.properties file.
l Enable the fipsmode setting in both theWrapperGateway.conf andWrapperManager.conf files by uncommenting the following line:
wrapper.java.additional.30=-Dmindterm.jce.fipsmode=yes
FIPS Deployment GuideTask 7. UCMDB Integration ServiceMigration
Micro Focus Universal CMDB (10.33) Page 32 of 62

d. Then, it updates the probe.fips.status setting in theDataFlowProbe.properties file to 2.
This means that FIPS migration for the UCMDB Integration Service is completed.
Tip: How to check whether a probe or integration service is already switched to FIPS
To check whether a probe or integration service is already in FIPS mode,
1. Go to the probe or integration service's JMX Console. For example, <Probe_IP>:<Probe_Port>/jmx-console/.
2. Search for getFipsStatus.
3. On the result page, check whether the value of the FipsStatus attribute is "Current probe is inFIPS mode".
Tip: If, after you restart the UCMDB Integration Servicemanually, the FIPS migration processfails and UCMDB Integration Service is not switched to FIPS mode, you can restore the originalsettings by using the three backup files described in step 3.a, and then repeat step 2 and step 3 tostart over themigration process again.
FIPS Deployment GuideTask 7. UCMDB Integration ServiceMigration
Micro Focus Universal CMDB (10.33) Page 33 of 62
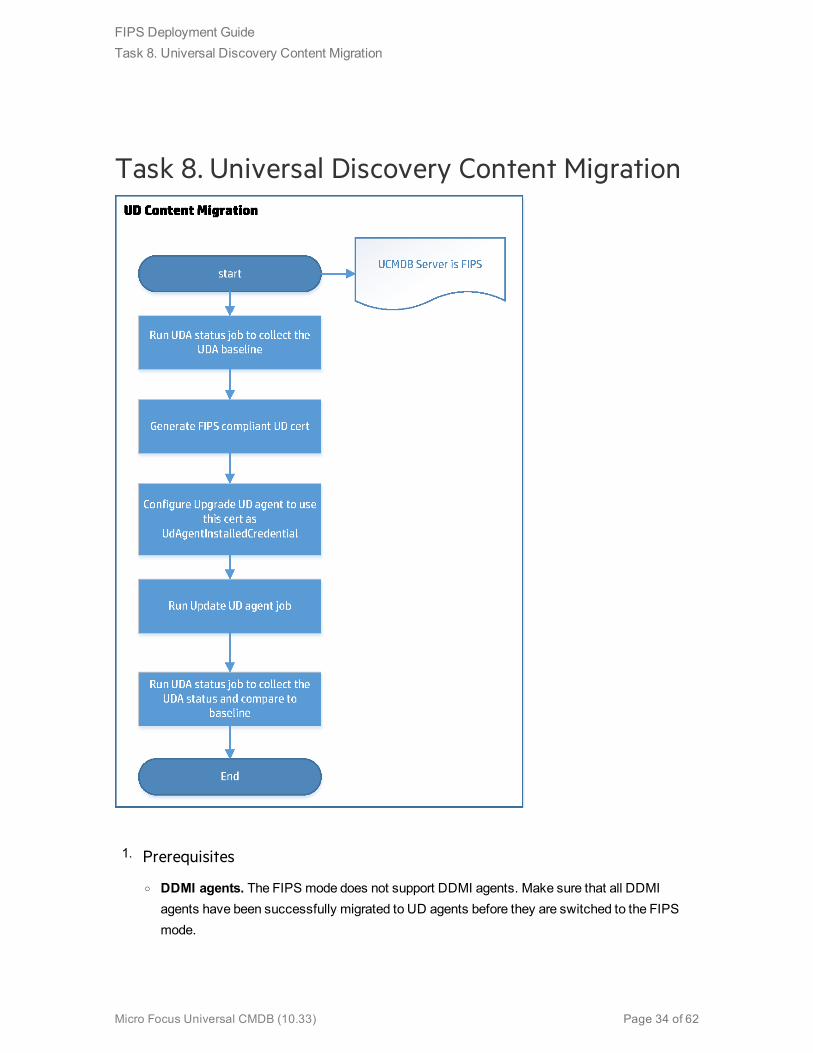
Task 8. Universal Discovery Content Migration
1. Prerequisites
o DDMI agents. The FIPS mode does not support DDMI agents. Make sure that all DDMIagents have been successfully migrated to UD agents before they are switched to the FIPSmode.
FIPS Deployment GuideTask 8. Universal Discovery Content Migration
Micro Focus Universal CMDB (10.33) Page 34 of 62

The table below describes different types of agents youmight have in your environment and ifany action is required from you:
Agent typeCovered by the automatic FIPSmigration process? Action required
DDMI agents No Migrate all DDMI agentsto UD agents before theFIPS migration processstarts.
Note: 10.32 wasthe last UCMDBversion to supportany kind of DDMImigration. Version10.33 dropped thesupport for DDMImigrationcompletely.
Pre-10.33 UD Agents Yes None
10.33 non-FIPS UD Agents Yes None
o Ensure that both UCMDB server and data flow probes are FIPS-compliant before youenable the UD Agents to work under the FIPS mode.
Once switched to the FIPS mode, the old credentials are not supported by the UD Agentsunder FIPS mode any more, a new UDA credential need to be regenerated through UCDMBUI.
To switch an existing UD Agent to the FIPS mode, you need to choose the newly generatedcredential in theUpdate UD Agent job.
To install a new UD Agent under the FIPS mode, you need to choose the newly generatedcredential in the Install UD Agent job.
2. Switch UD Content to the FIPS mode
a. (Optional) Go toData Flow Management > Universal Discovery > DiscoveryModules/Jobs > Tools and Samples > UD Agent Management, and run theUDA StatusCollector job to collect the UDA baseline.
b. Generate new FIPS compliant UD Agent certificates for theUniversal Discovery Protocolthrough UCMDB UI.
FIPS Deployment GuideTask 8. Universal Discovery Content Migration
Micro Focus Universal CMDB (10.33) Page 35 of 62
i. Go toData Flow Management > Data Flow Probe Setup.
ii. In the Domains and Probes pane, select your domain and expandCredentials >Universal Discovery Protocol.
iii. In theUniversal Discovery Protocol pane, click to create a new credential.
iv. In the Universal Discovery Protocol Parameters dialog, provide values for the fields asnecessary and click OK.
For theUser Label field, provide ameaningful name. You will need this credential toinstall or upgrade your UD agents later.
Your new credential is added to the credential list.
v. Click OK again to save your credential.
c. Run theUpdate UD Agent job.
For Advanced mode:
i. Go toData Flow Management > Discovery Modules/Jobs > Update UD Agent, andclick theProperties tab.
ii. Modify theUpdate UD Agent job parameters as follows:
A. Select theOverride checkbox for theUdAgentInstallCredentialId parameter,and then click to select the FIPS-compliant Universal Discovery Protocol.
B. Select theOverride checkbox for theUpgradeAgent parameter, specify its valueto true for pre-10.33 UD agents; it can be either true or false for 10.33 non-FIPSUD agents.
C. Click OK to save the job.
iii. Run/Rerun theUpdate UD Agent job.
For Management Zone-based mode:
i. Go toData Flow Management > Zone-Based Discovery, select the Infrastructureactivity which you created for updating UD agents, then click .
ii. On the Define Credentials page, select the FIPS compliant Universal DiscoveryProtocol, then click Next.
iii. On the Universal Discovery Agent Deployment page, click Select Credential forCredential for UD Agent Update and select the FIPS compliant Universal DiscoveryProtocol; then click Next until finish to save the changes.
iv. On the Universal Discovery Agent Deployment page, select theUpgrade Agent
FIPS Deployment GuideTask 8. Universal Discovery Content Migration
Micro Focus Universal CMDB (10.33) Page 36 of 62

checkbox for pre-10.33 UD agents; while for 10.33 non-FIPS UD agents, theUpgradeAgent checkbox can be either checked or unchecked.
v. Run/Rerun this Infrastructure activity.
d. (Optional) Run theUDA Status Collector job again to collect the UDA status and comparethe result against the baseline you collected in step a.
Check the UD Agent status report, delete the old Universal Discovery Protocol only after thisreport shows that all the agents have beenmigrated successfully.
Task 9. Configuration Manager Migration -Phase II
Enable SSL between the UCMDB Server and the Configuration Manager
To do so,
FIPS Deployment GuideTask 9. ConfigurationManager Migration - Phase II
Micro Focus Universal CMDB (10.33) Page 37 of 62

1. Copy the Crypto-J Toolkit jars (cryptojce-6.2.jar, cryptojcommon-6.2.jar, and jcmFIPS-6.2.jar)from the <Configuration Manager directory>\servers\server-0\webapps\cnc\WEB-INF\libfolder to the <Configuration Manager directory>\java\windows\x86_64\lib\ext directory.
2. Modify the <Configuration Manager directory>\java\windows\x86_64\lib\security\java.security file.
a. Update the keystore.type property value toPKCS12 as follows:
keystore.type=PKCS12
b. Add the following two lines:
com.rsa.cryptoj.fips140initialmode=FIPS140_SSL_MODEcom.rsa.cryptoj.kat.strategy=on.load
c. Replace all the security providers with the following lines:
security.provider.1=com.rsa.jsafe.provider.JsafeJCEsecurity.provider.2=sun.security.provider.Sunsecurity.provider.3=sun.security.rsa.SunRsaSignsecurity.provider.4=sun.security.ec.SunECsecurity.provider.5=com.sun.net.ssl.internal.ssl.Provider JsafeJCEsecurity.provider.6=com.sun.crypto.provider.SunJCEsecurity.provider.7=sun.security.jgss.SunProvidersecurity.provider.8=com.sun.security.sasl.Providersecurity.provider.9=org.jcp.xml.dsig.internal.dom.XMLDSigRIsecurity.provider.10=sun.security.smartcardio.SunPCSCsecurity.provider.11=sun.security.mscapi.SunMSCAPI
3. Run the following command to convert cacerts to pkcs12.
In FIPS mode, the UCMDB ConfigurationManager uses a different trusted certificates store filewhich is of type PKCS12, created using the JsafeJCE cryptography provider. The new truststorefile is generated by converting the default JRE cacerts file from JKS to PKCS12 and by copying allthe trusted certificates from cacerts into truststore.p12. The java command should be run from theUCMDB ConfigurationManager's JRE folder (<Configuration Managerdirectory>\java\windows\x86_64\bin).
You can find this jar in <UCMDB Server directory>\UCMDBServer\tools\security. Thepassword is changeit.
java -jar jks2pkcs12.jar <Configuration Manager directory>\java\windows\x86_64\lib\security\cacerts <Configuration Manager directory>\java\windows\x86_64\lib\security\truststore.p12
FIPS Deployment GuideTask 9. ConfigurationManager Migration - Phase II
Micro Focus Universal CMDB (10.33) Page 38 of 62
4. Add the following parameters to the ConfigurationManager's service if you run CM as aWindowsservice; Or, add the following parameters to the JAVA_OPTS parameter located in<Configuration Manager directory>\start_server.bat if you run it from the command line:
SET JAVA_OPTS=%JAVA_OPTS% -Djavax.net.ssl.trustStore=<Configuration Managerdirectory>\java\windows\x86_64\lib\security\truststore.p12 -Djavax.net.ssl.trustStorePassword=changeit -Djavax.net.ssl.trustStoreProvider=JsafeJCE
5. Import either the server root certificate or the server certificate into the p12 truststore.
You can import the server certificate from aweb browser by clicking the HTTPS lock icon. Thecert.txt file is the server certificate file.
keytool.exe -importcert -alias hpcert -file cert.txt -providername JsafeJCE-keystore truststore.p12
6. Change the protocol in CM's database from HTTP toHTTPS, and change the port from 8080 to8443.
UPDATE [database_name].[dbo].[CCM_CONFIG_PROPERTIES] set value='HTTPS' wherename='ucmdb.connection.strategy';
UPDATE [database_name].[dbo].[CCM_CONFIG_PROPERTIES] SET value='8443' wherename like 'ucmdb.server.port';
FIPS Deployment GuideTask 9. ConfigurationManager Migration - Phase II
Micro Focus Universal CMDB (10.33) Page 39 of 62

Task 10. UCMDB Browser Migration - Phase II
Enable SSL between the UCMDB Server and the UCMDB Browser
To do so,
1. Copy the Crypto-J Toolkit jars (cryptojce-6.2.jar, cryptojcommon-6.2.jar, and jcmFIPS-6.2.jar)from the <UCMDB Browser directory>\webapps\ucmdb-browser\WEB-INF\lib folder to the<JRE_directory>\lib\ext directory.
2. Modify the <JRE_directory>\lib\security\java.security file.
FIPS Deployment GuideTask 10. UCMDB Browser Migration - Phase II
Micro Focus Universal CMDB (10.33) Page 40 of 62

a. Update the keystore.type property value toPKCS12 as follows:
keystore.type=PKCS12
b. Add the following two lines:
com.rsa.cryptoj.fips140initialmode=FIPS140_SSL_MODEcom.rsa.cryptoj.kat.strategy=on.load
c. Replace all the security providers with the following lines:
security.provider.1=com.rsa.jsafe.provider.JsafeJCEsecurity.provider.2=sun.security.provider.Sunsecurity.provider.3=sun.security.rsa.SunRsaSignsecurity.provider.4=sun.security.ec.SunECsecurity.provider.5=com.sun.net.ssl.internal.ssl.Provider JsafeJCEsecurity.provider.6=com.sun.crypto.provider.SunJCEsecurity.provider.7=sun.security.jgss.SunProvidersecurity.provider.8=com.sun.security.sasl.Providersecurity.provider.9=org.jcp.xml.dsig.internal.dom.XMLDSigRIsecurity.provider.10=sun.security.smartcardio.SunPCSCsecurity.provider.11=sun.security.mscapi.SunMSCAPI
3. Run the following command to convert cacerts to pkcs12. You can find this jar in <UCMDBServer directory>\UCMDBServer\tools\security. The password is changeit.
java -jar jks2pkcs12.jar <JRE_directory>\lib\security\cacerts <JRE_directory>\lib\security\truststore.p12
4. Add the following parameters to the UCMDB Browser's service if you run the Browser as aWindows service; Or, add the following parameters to theCATALINA_OPTS parameter locatedin bin\setenv.bat if you run it from the command line:
-Djavax.net.ssl.trustStore=<JRE directory>\lib\security\truststore.p12 -Djavax.net.ssl.trustStorePassword=changeit -Djavax.net.ssl.trustStoreProvider=JsafeJCE -DenableServerCertValidation=true-DenableServerCertHostValidation=true
Note: If the setenv.bat file does not exist, create it, and add the following line:
set CATALINA_OPTS=-Djavax.net.ssl.trustStore=<JREdirectory>\lib\security\truststore.p12 -Djavax.net.ssl.trustStorePassword=changeit -Djavax.net.ssl.trustStoreProvider=JsafeJCE -
FIPS Deployment GuideTask 10. UCMDB Browser Migration - Phase II
Micro Focus Universal CMDB (10.33) Page 41 of 62

DenableServerCertValidation=true -DenableServerCertHostValidation=true
5. Import either the server root certificate or the server certificate into the p12 truststore.
You can import the server certificate from aweb browser by clicking the HTTPS lock icon. Thecert.txt file is the server certificate file.
keytool.exe -importcert -alias hpcert -file cert.txt -providername JsafeJCE-keystore truststore.p12
6. Change the connection parameters, the protocol, and the port in the ucmdb_browser_config.xmlfile.
<ucmdb_configuration name="your_ucmdb_server"><protocol>https</protocol><host_port>8443</host_port>
</ucmdb_configuration>
Task 11. UCMDB Browser Migration - Phase III
Enable SSL on the UCMDB Browser
To do so,
1. Use the FIPS compliant keystore that you generated earlier for the UCMDB Server.
2. Enable SSL on the UCMDB Browser.
For detailed instructions, see the Configure SSL section in the Universal CMDB Browser
Installation and Configuration Guide.
3. Add the following two attributes to theConnector tag in the server.xml file:
keystoreType="pkcs12" keystoreProvider="JsafeJCE"
4. Restart the UCMDB Browser.
FIPS Deployment GuideTask 11. UCMDB Browser Migration - Phase III
Micro Focus Universal CMDB (10.33) Page 42 of 62

Task 12. Configuration Manager Migration -Phase III
Enable SSL on the Configuration Manager
To do so,
1. Use the FIPS compliant keystore that you generated earlier for the UCMDB Server.
2. Enable SSL on the Configuration Manager.
For detailed instructions, see Universal CMDB Hardening Guide.
3. Add the following two attributes to theConnector tag in the server.xml file:
keystoreType="pkcs12" keystoreProvider="JsafeJCE"
4. Restart ConfigurationManager.
FIPS Deployment GuideTask 12. ConfigurationManager Migration - Phase III
Micro Focus Universal CMDB (10.33) Page 43 of 62
Chapter 5: Improving SecurityIn case you do not want to use the OOTB certificates from UCMDB, you can generate or use your ownFIPS keystores (probe, UI, UCMDB Browser, and so on).
Whenmanipulating FIPS certificates and keystores (when executing keytool commands) you shoulduse the provider from RSA BSAFE Crypto-J Toolkit (JsafeJCE). In addition, consider the fact that thecertificate stores in FIPS mode are of type PKCS12.
The keytool commands from "Generate a Standalone Self-Signed Certificate (hpcert) Using JsafeJCECryptography Provider" below and from "Generate a Self-Signed Root Certificate (hproot) and a Self-Signed Certificate (hpcert)WhichWill Be Signed by hproot Using JsafeJCE Cryptography Provider" onpage 46 can be taken as examples on how tomanipulate FIPS certificates and keystores. You can alsomodify them in case you use your own certificates signed by a specific Certificate Authority. For thesake of the example we have used here self signed certificates but the commands are similar whenusing custom certificates.
This chapter describes how to:Generate a Standalone Self-Signed Certificate (hpcert) Using JsafeJCE Cryptography Provider 44
Generate a Self-Signed Root Certificate (hproot) and a Self-Signed Certificate (hpcert)WhichWill Be Signed by hproot Using JsafeJCE Cryptography Provider 46
Generate a Standalone Self-Signed Certificate(hpcert) Using JsafeJCE Cryptography ProviderThis section describes how to generate a new hpcert certificate which will be placed in the server-fips.keystore and server-fips.truststore. If you do not want to use the default certificate hierarchycomes with UCMDB, you will need tomake sure the standalone certificate which is generated here isalso placed on all the SSL clients truststores (Probe truststore, UCMDB UI FIPS truststore(jssecacerts), UCMDB Browser, and UCMDB ConfigurationManager).
1. Prerequisites
You have completed instructions in Set up the UCMDB Server JRE with Crypto-J Toolkit and theJCE Unlimited Strength Jurisdiction Policy jars.
2. Generate a Server keystore of type PKCS12 using the JsafeJCE cryptography provider.
FIPS Deployment GuideGenerate a Standalone Self-Signed Certificate (hpcert) Using JsafeJCE Cryptography Provider
Micro Focus Universal CMDB (10.33) Page 44 of 62
Note: All the generated files will be placed insideC:\newstores.
The keystore will contain a certificate with a Subject Alternative Name (SAN) extension with aDNS matching the URLs used to connect to the UCMDB Server. Change the SAN extensionaccordingly to match your UCMDB Server URL, IP address, and so on. For this guide, we areusing the following DNS values:myucmdbserver.example.com, localhost and an IP addressset to 127.0.0.1.
We assume that the UCMDB Server is installed at the default pathC:\hp\UCMDB\UCMDBServer. From C:\hp\UCMDB\UCMDBServer\bin\jre\bin run thefollowing command and complete all the details when prompted for certificate details:
Generate server-fips.keystore. Add the correct parameters to the SAN extensionbefore running the command!!!
keytool -genkey -alias hpcert -validity 365 -keyalg RSA -keysize 2048 -storetype PKCS12 -providername JsafeJCE -keystore C:\newstores\server-fips.keystore -extsan=dns:myucmdbserver.example.com,dns:localhost,ip:127.0.0.1
3. Export the Certificate from server-fips.keystore.
From C:\hp\UCMDB\UCMDBServer\bin\jre\bin run the following command:
Export the Certificate from the keystore
keytool -exportcert -alias hpcert -keystore C:\newstores\server-fips.keystore -storetype PKCS12 -storepass <password> -providername JsafeJCE-file C:\newstores\hpcert.crt
4. Import Certificate into server-fips.truststore.
From C:\hp\UCMDB\UCMDBServer\bin\jre\bin run the following command:
Import hpcert in truststore
keytool -importcert -alias hpcert -file C:\newstores\hpcert.crt -providername JsafeJCE -storetype PKCS12 -keystore C:\newstores\server-fips.truststore
5. Copy the newly generated server-fips.keystore and server-fips.truststore from C:\newstoresinto the security folder of the UCMDB Server (C:\hp\UCMDB\UCMDBServer\conf\security) tooverwrite the existing files.
6. Copy the UCMDB certificate to each Probe machine.
FIPS Deployment GuideGenerate a Standalone Self-Signed Certificate (hpcert) Using JsafeJCE Cryptography Provider
Micro Focus Universal CMDB (10.33) Page 45 of 62
Copy the certificate fileC:\HP\UCMDB\UCMDBServer\conf\security\hpcert.crt from theUCMDB Server machine to the following folder on each Data Flow Probemachine:
C:\HP\UCMDB\DataFlowProbe\conf\security\
7. Data Flow Probe Configuration.
Note: Youmust configure each Data Flow Probemachine.
Import the server's certificate hpcert.crt to the Probe’s Truststore.
a. Open the command prompt and run the command:
keytool -import -alias hpcert -fileC:\HP\UCMDB\DataFlowProbe\conf\security\hpcert.crt -storetype PKCS12 -providername JsafeJCE -keystoreC:\HP\UCMDB\DataFlowProbe\conf\security\FIPS_HPProbeTrustStore.jks
b. Enter the keystore password logomania.
c. When prompted Trust this certificate?, press y and thenEnter.
The followingmessage is displayed: Certificate was added to keystore.
8. Restart the Machines
Restart both the UCMDB server and the Probemachines.
Generate a Self-Signed Root Certificate (hproot)and a Self-Signed Certificate (hpcert) WhichWill Be Signed by hproot Using JsafeJCECryptography ProviderThese commands are actually similar with the ones incorporated in the keystoregen.bat tool located intheC:\hp\UCMDB\UCMDBServer\tools\security directory.
This section describes how tomanually generate a new self-signed root certificate (hproot) and a self-signed certificate (hpcert) which will be signed by hproot. All the files will be placed insideC:\newstores.
By default, UCMDB Server in FIPS mode already uses a certificate hierarchy similar to this.
FIPS Deployment GuideGenerate a Self-Signed Root Certificate (hproot) and a Self-Signed Certificate (hpcert)WhichWill Be
Micro Focus Universal CMDB (10.33) Page 46 of 62
1. Prerequisites
You have completed instructions in Set up the UCMDB Server JRE with Crypto-J Toolkit and theJCE Unlimited Strength Jurisdiction Policy jars.
2. Generate the self-signed root certificate hproot in C:\newstores.
keytool -genkey -alias hproot -validity 365 -keyalg RSA -keysize 2048 -storetype PKCS12 -providername JsafeJCE -keystoreC:\newstores\hproot.keystore -ext bc:c="ca:true"
3. Export hproot in C:\newstores.
keytool -exportcert -alias hproot -keystore C:\newstores\hproot.keystore -storetype PKCS12 -storepass hppass -providername JsafeJCE -fileC:\newstores\hproot.crt
4. Generate a self-signed certificate hpcert and place it inside server-fips.keystore. Makesure you set the correct SAN extension to the appropriate DNS.
keytool -genkey -alias hpcert -validity 365 -keyalg RSA -keysize 2048 -storetype PKCS12 -providername JsafeJCE -keystore C:\newstores\server-fips.keystore -extsan=dns:myucmdbserver.example.com,dns:localhost,ip:127.0.0.1
5. Export hpcert from the keystore.
keytool -exportcert -alias hpcert -keystore C:\newstores\server-fips.keystore -storetype PKCS12 -storepass <password> -providername JsafeJCE-file C:\newstores\hpcert.crt
6. Generate a certificate sign request for hpcert and place it in C:\newstores.
keytool -certreq -alias hpcert -keystore C:\newstores\server-fips.keystore -storetype PKCS12 -storepass <password> -providername JsafeJCE -fileC:\newstores\hpcert_sign_request.csr
7. Generate the signed hpcert certificate signed by hproot and add the needed SANextensions.
keytool -gencert -infile C:\newstores\hpcert_sign_request.csr -outfileC:\newstores\hpcert_issued_by_hproot.rsp -alias hproot -storetype PKCS12 -providername JsafeJCE -keystore C:\newstores\hproot.keystore -storepasshppass -ext san=dns:myucmdbserver.example.com,dns:localhost,ip:127.0.0.1
8. Concatenate the signed hpcert and hproot in the same file.
FIPS Deployment GuideGenerate a Self-Signed Root Certificate (hproot) and a Self-Signed Certificate (hpcert)WhichWill Be
Micro Focus Universal CMDB (10.33) Page 47 of 62

keytool -printcert -rfc -file C:\newstores\hpcert_issued_by_hproot.rsp >>C:\newstores\hpcertandroot.p7ckeytool -printcert -rfc -file C:\newstores\hproot.crt >>C:\newstores\hpcertandroot.p7c
9. Import the hpcert (which is signed by hproot) into server-fips.keystore.
keytool -importcert -keystore C:\newstores\server-fips.keystore -storetypePKCS12 -providername JsafeJCE -alias hpcert -fileC:\newstores\hpcertandroot.p7c
10. Copy the newly generated server-fips.keystore into the security folder of the UCMDB Server(C:\hp\UCMDB\UCMDBServer\conf\security) to overwrite the existing files.
11. Copy the UCMDB root certificate to each Probe machine
Copy the certificate fileC:\HP\UCMDB\UCMDBServer\conf\security\hproot.crt from theUCMDB Server machine to the following folder on each Data Flow Probemachine:
C:\HP\UCMDB\DataFlowProbe\conf\security\
12. Data Flow Probe Configuration
Note:Youmust configure each Data Flow Probemachine.
Import the server's root certificate hproot.crt to the Probe’s Truststore.
a. Open the command prompt and run the command:
keytool -import -alias hproot -fileC:\HP\UCMDB\DataFlowProbe\conf\security\hproot.crt - storetype PKCS12 -providername JsafeJCE -keystoreC:\HP\UCMDB\DataFlowProbe\conf\security\FIPS_HPProbeTrustStore.jks
b. Enter the keystore password logomania.
c. When asked Trust this certificate?, press y and thenEnter.
The followingmessage is displayed: Certificate was added to keystore.
13. Restart the Machines
Restart both the UCMDB server and the Probemachines.
FIPS Deployment GuideGenerate a Self-Signed Root Certificate (hproot) and a Self-Signed Certificate (hpcert)WhichWill Be
Micro Focus Universal CMDB (10.33) Page 48 of 62

Chapter 6: Known Problems and Limitationsl PosgresSQLwill not be FIPS compatible but this should be acceptable because the communicationis local from UCMDB Server/Probe to PosgresSQLDatabase.
l Limitations with SSH in FIPS mode
o SSH does not support public key authentication.
o SSH client does not support connecting remote host with non-FIPS compliant SSH server. Theunsupported operating systems include, but not limited to, the following:
l Solaris (both SPARK and x86)
l RedHat AS3.
One technical reason for the issue is that there is no common key exchange algorithm betweenclient (probe side) and server: in FIPS mode, the probe will force to use diffie-hellman-group14-sha1 as key exchange algorithm, which is not supported by remote host.
l The HPUX HPPA platform is not FIPS compliant. When the FIPS mode is on, the UD Agent cannot start on the non-FIPS compliant HPUX HPPA platform. Therefore, the FIPS mode for the UDAgent is turned off in order to run the UD Agent on the HPUX HPPA platform. (QCCR1H100684)
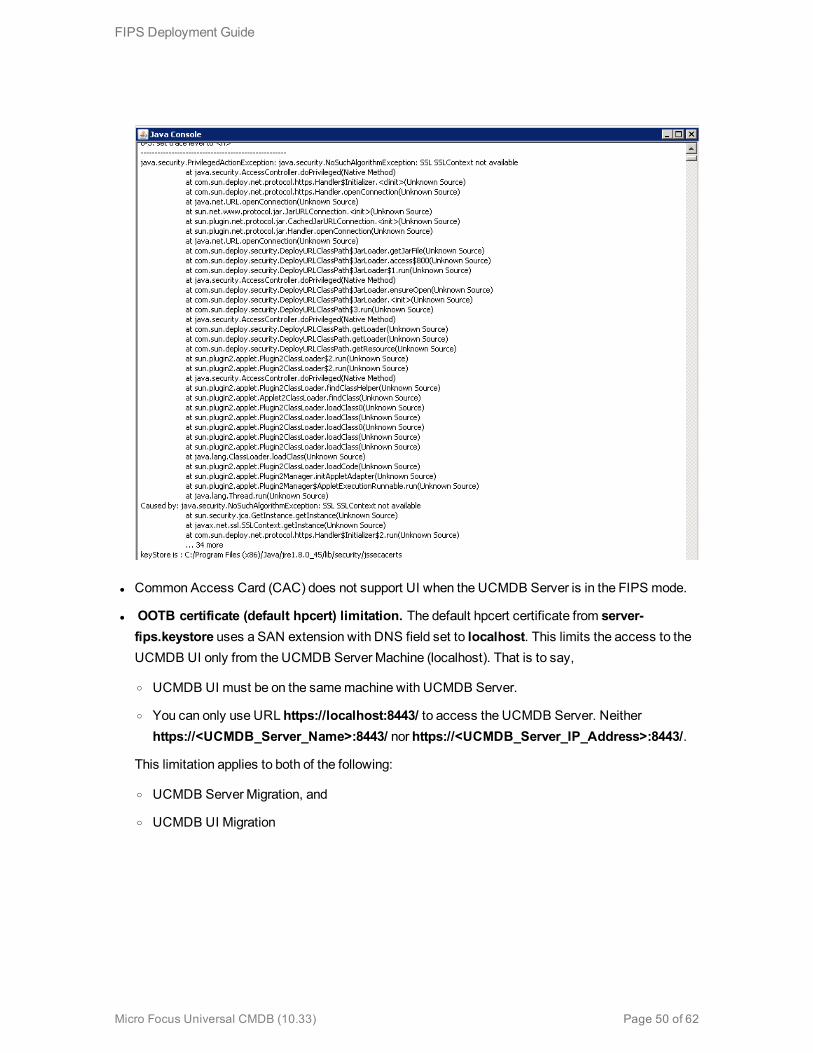
l UCMDB UI limitation: If –Djavax.net.debug=ssl is present and Java console is also enabled, thefollowing exception will always be printed in the console. It can be ignored, the UI will still be ableto communicate through SSLwith the Server.
FIPS Deployment Guide
Micro Focus Universal CMDB (10.33) Page 49 of 62
l Common Access Card (CAC) does not support UI when the UCMDB Server is in the FIPS mode.
l OOTB certificate (default hpcert) limitation. The default hpcert certificate from server-fips.keystore uses a SAN extension with DNS field set to localhost. This limits the access to theUCMDB UI only from the UCMDB Server Machine (localhost). That is to say,
o UCMDB UI must be on the samemachine with UCMDB Server.
o You can only use URL https://localhost:8443/ to access the UCMDB Server. Neitherhttps://<UCMDB_Server_Name>:8443/ nor https://<UCMDB_Server_IP_Address>:8443/.
This limitation applies to both of the following:
o UCMDB Server Migration, and
o UCMDB UI Migration
FIPS Deployment Guide
Micro Focus Universal CMDB (10.33) Page 50 of 62

Chapter 7: Troubleshooting - FIPSDeployment
Troubleshooting the Data Flow Probesl When probes finish upgrading, the new keystore/truststore is in place. If the UCMDB Server doesnot perform the last step of turning on FIPS, and HTTPs communication is enabled, in the UCDMBUI, you will see probe disconnected until the UCMDB Server replaces the new FIPSkeystore/truststore in JMX.
l If you want to find out whether an agent has been switched to the FIPS mode, follow the stepsbelow:
a. Run theUDA Status Collector job.
In UCMDB UI, go toData Flow Management > Universal Discovery > DiscoveryModules/Jobs tab > Discovery Modules tree > Tools and Samples > UD AgentManagement, right-click UDA Status Collector, and select Activate.
b. Access the Data Flow Probe JMX console: On the probemachine, launch aWeb browser andenter the following address: https://localhost:8453.
Youmay have to log in with a user name and password.
c. Locate the exportUdaStatusmethod, provide the path, for example, C:\, and then clickInvoke.
d. Go to the probe node and find the uda_status.csv file under the path you specified and open it.
e. Check the agentVersion column in the file. If the agentVersion value is in the <agentversion>-fips format, for example, v10.33.000 build:185-fips, then it means the agent hasbeenmigrated to FIPS mode successfully. Otherwise, it is still a non-FIPS agent.
f. Count the rows where agentVersion value is in the <agent version>-fips format.
l Problem: If HTTPS communication is enabled on the UCMDB Server side, after the UCMDBserver is switched to FIPS mode, data flow probes cannot connect to the UCMDB server.
Solution: Update keystore and truststore values in the ssl.properties file (located in the<DataFlowProbe_Home>\conf\security directory) manually.
To do so,
FIPS Deployment GuideTroubleshooting the Data Flow Probes
Micro Focus Universal CMDB (10.33) Page 51 of 62

a. Open the ssl.properties file in a text editor.
b. Locate the following two lines:
javax.net.ssl.keyStore=HPProbeKeyStore.jksjavax.net.ssl.trustStore=HPProbeTrustStore.jks
c. Update the values for the two settings manually to the following:
javax.net.ssl.keyStore=FIPS_HPProbeKeyStore.jksjavax.net.ssl.trustStore=FIPS_HPProbeTrustStore.jks
d. Save the file.
e. Restart the Probe.
l PROBLEM: After adding a new probe to the UCMDB server that was already switched to the FIPSmode, the automatic FIPS switch process for the new probemight fail. This is because once thenewly installed probe is started, it downloads all the resources from the UCMDB server, and whenthe probe gets the probe upgrade package, it would schedule a restart, which blocks the automaticFIPS Switch process. (QCCR1H106144)
Workaround: Once you find that the automatic FIPS Switch process for a new probe failed,
a. Copy the jar files of Zulu JCE Unlimited Strength Policy Files 8 into the%\DataFlowProbe_HOME%\bin\jre\lib\security directory on the Data Flow Probemachine.
b. Add the following line into theDataFlowProbe.properties file on the Data Flow Probemachine, and then save the file.
probe.fips.status=1
c. Restart the Data Flow Probe.
Note: If the Data Flow Probe is in separatemode, you need to perform the above steps forboth the ProbeManager and ProbeGateway.
l PROBLEM: After switching to the FIPS mode, you cannot log in to the Data Flow Probe JMXConsole using some of the latest versions of Internet Explorer 11, Microsoft Edge, or Firefox. Andwhen using these browsers youmay get “Unsupported Cipher” error message.
Workaround: To resolve the issue, do either of the following:
FIPS Deployment GuideTroubleshooting the Data Flow Probes
Micro Focus Universal CMDB (10.33) Page 52 of 62
o Configure your web browser
l For Internet Explorer 11 or Microsoft Edge
A. OnWindows, click Start, in the Search box, enterEdit Group Policy, then click Editgroup policy that shows under Control Panel. The Local Group Policy Editor windowopens.
B. In the navigation pane, go toComputer Configuration > Administrative Templates> Network > SSL Configuration Settings.
C. In the right pane, double-click SSL Cipher Suite Order.
D. In the SSLCipher Suite Order, select theEnabled radio button.
E. In the Options pane, edit the order of SSLCipher Suites by placing a cipher that doesn'tcontain ECDHE in the first place.
F. Click Apply andOK.
G. Restart your computer.
l For Firefox
A. In the Address bar of the web browser, type about:config and press Enter.
B. Click I accept the risk!when prompted.
C. In the Search bar that appears below the Address bar, type ssl3.
All preferences that contain ssl3 are listed.
D. Change the value of all Cipher preferences containing ecdhe to false.
You can enable or disable a preference by toggling its value with a double-click on thepreference name. true indicates that the cipher suite is enabled, false indicates notavailable.
E. Restart Firefox.
o Update the Crypto-J toolkit files to version 6.2.2
i. Close your web browser (Internet Explorer 11, Microsoft Edge, or Firefox).
ii. Stop the UCMDB server and the Data Flow Probe.
iii. Delete the browser cache under theC:\Users\<user>\AppData\Local\Temp\UcmdbAppletJars folder.
iv. Obtain the Crypto-J toolkit files (cryptojce-6.2.2.jar, cryptojcommon-6.2.2.jar, andjcmFIPS-6.2.2.jar).
Note: For information about Crypto-J 6.2.2 files, youmay go to
FIPS Deployment GuideTroubleshooting the Data Flow Probes
Micro Focus Universal CMDB (10.33) Page 53 of 62
https://community.rsa.com/community/products/bsafe/crypto-j-62.
v. On the UCMDB server side:
A. Delete the files under the <UCMDB_server_home>\runtime\jetty-cache folder.
B. Copy the Crypto-J toolkit files (cryptojce-6.2.2.jar, cryptojcommon-6.2.2.jar, andjcmFIPS-6.2.2.jar) to the following folders:
l <UCMDB_server_home>\bin\jre\lib\ext
l <UCMDB_server_home>\deploy\ucmdb-ui\static\appletJars
l <UCMDB_server_home>\deploy\ucmdb-ui\WEB-INF\lib
l <UCMDB_server_home>\integrations\lib
vi. On the Data Flow Probe side, copy the Crypto-J toolkit files (cryptojce-6.2.2.jar,cryptojcommon-6.2.2.jar, and jcmFIPS-6.2.2.jar) from the <UCMDB_server_home>\lib directory, and place them inside the <DataFlowProbe>\lib folder (for example,C:\hp\UCMDB\DataFlowProbe\lib).
vii. Restart the UCMDB server and the Data Flow Probe.
Troubleshooting the UCMDB Serverl Manual steps to make a reader server FIPS ready
In case the enableFipsMode JMX method reports a failure for a reader server, you can performseveral manual steps tomake the reader server FIPS-ready.
Note: These steps are applicable only when the switch to FIPS modewas successful on thewriter server.
The JMX output page displayed after the enableFipsMode JMX method is executed containsdetailed information about the status of the switch to FIPS mode on all the HA cluster servers.Only when the switch to FIPS modewas successful on the writer server, but failed on a readerserver, you can follow the steps below tomake the reader server FIPS ready.
a. Stop all the servers in the HA cluster, including the writer server.
b. Start only the writer server.
FIPS Deployment GuideTroubleshooting the UCMDB Server
Micro Focus Universal CMDB (10.33) Page 54 of 62
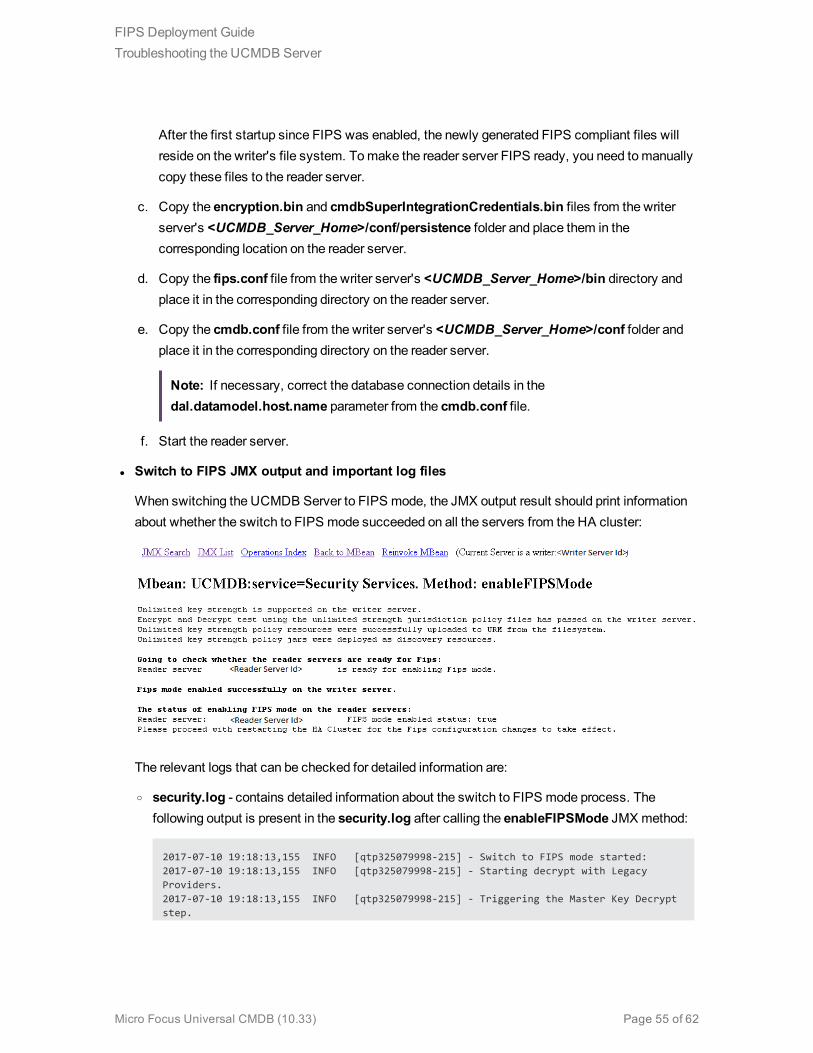
After the first startup since FIPS was enabled, the newly generated FIPS compliant files willreside on the writer's file system. Tomake the reader server FIPS ready, you need tomanuallycopy these files to the reader server.
c. Copy the encryption.bin and cmdbSuperIntegrationCredentials.bin files from the writerserver's <UCMDB_Server_Home>/conf/persistence folder and place them in thecorresponding location on the reader server.
d. Copy the fips.conf file from the writer server's <UCMDB_Server_Home>/bin directory andplace it in the corresponding directory on the reader server.
e. Copy the cmdb.conf file from the writer server's <UCMDB_Server_Home>/conf folder andplace it in the corresponding directory on the reader server.
Note: If necessary, correct the database connection details in thedal.datamodel.host.name parameter from the cmdb.conf file.
f. Start the reader server.
l Switch to FIPS JMX output and important log files
When switching the UCMDB Server to FIPS mode, the JMX output result should print informationabout whether the switch to FIPS mode succeeded on all the servers from the HA cluster:
The relevant logs that can be checked for detailed information are:
o security.log - contains detailed information about the switch to FIPS mode process. Thefollowing output is present in the security.log after calling the enableFIPSMode JMX method:
2017-07-10 19:18:13,155 INFO [qtp325079998-215] - Switch to FIPS mode started:2017-07-10 19:18:13,155 INFO [qtp325079998-215] - Starting decrypt with LegacyProviders.2017-07-10 19:18:13,155 INFO [qtp325079998-215] - Triggering the Master Key Decryptstep.
FIPS Deployment GuideTroubleshooting the UCMDB Server
Micro Focus Universal CMDB (10.33) Page 55 of 62
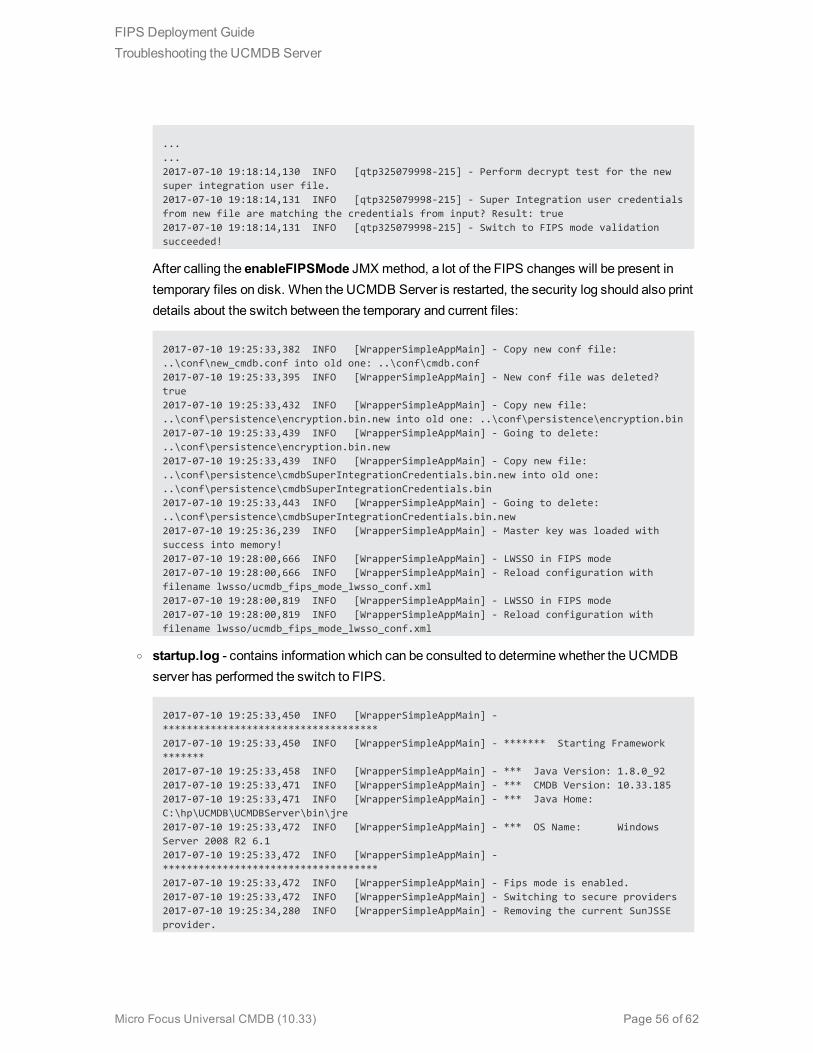
...
...2017-07-10 19:18:14,130 INFO [qtp325079998-215] - Perform decrypt test for the newsuper integration user file.2017-07-10 19:18:14,131 INFO [qtp325079998-215] - Super Integration user credentialsfrom new file are matching the credentials from input? Result: true2017-07-10 19:18:14,131 INFO [qtp325079998-215] - Switch to FIPS mode validationsucceeded!
After calling the enableFIPSMode JMX method, a lot of the FIPS changes will be present intemporary files on disk. When the UCMDB Server is restarted, the security log should also printdetails about the switch between the temporary and current files:
2017-07-10 19:25:33,382 INFO [WrapperSimpleAppMain] - Copy new conf file:..\conf\new_cmdb.conf into old one: ..\conf\cmdb.conf2017-07-10 19:25:33,395 INFO [WrapperSimpleAppMain] - New conf file was deleted?true2017-07-10 19:25:33,432 INFO [WrapperSimpleAppMain] - Copy new file:..\conf\persistence\encryption.bin.new into old one: ..\conf\persistence\encryption.bin2017-07-10 19:25:33,439 INFO [WrapperSimpleAppMain] - Going to delete:..\conf\persistence\encryption.bin.new2017-07-10 19:25:33,439 INFO [WrapperSimpleAppMain] - Copy new file:..\conf\persistence\cmdbSuperIntegrationCredentials.bin.new into old one:..\conf\persistence\cmdbSuperIntegrationCredentials.bin2017-07-10 19:25:33,443 INFO [WrapperSimpleAppMain] - Going to delete:..\conf\persistence\cmdbSuperIntegrationCredentials.bin.new2017-07-10 19:25:36,239 INFO [WrapperSimpleAppMain] - Master key was loaded withsuccess into memory!2017-07-10 19:28:00,666 INFO [WrapperSimpleAppMain] - LWSSO in FIPS mode2017-07-10 19:28:00,666 INFO [WrapperSimpleAppMain] - Reload configuration withfilename lwsso/ucmdb_fips_mode_lwsso_conf.xml2017-07-10 19:28:00,819 INFO [WrapperSimpleAppMain] - LWSSO in FIPS mode2017-07-10 19:28:00,819 INFO [WrapperSimpleAppMain] - Reload configuration withfilename lwsso/ucmdb_fips_mode_lwsso_conf.xml
o startup.log - contains information which can be consulted to determine whether the UCMDBserver has performed the switch to FIPS.
2017-07-10 19:25:33,450 INFO [WrapperSimpleAppMain] -************************************2017-07-10 19:25:33,450 INFO [WrapperSimpleAppMain] - ******* Starting Framework*******2017-07-10 19:25:33,458 INFO [WrapperSimpleAppMain] - *** Java Version: 1.8.0_922017-07-10 19:25:33,471 INFO [WrapperSimpleAppMain] - *** CMDB Version: 10.33.1852017-07-10 19:25:33,471 INFO [WrapperSimpleAppMain] - *** Java Home:C:\hp\UCMDB\UCMDBServer\bin\jre2017-07-10 19:25:33,472 INFO [WrapperSimpleAppMain] - *** OS Name: WindowsServer 2008 R2 6.12017-07-10 19:25:33,472 INFO [WrapperSimpleAppMain] -************************************2017-07-10 19:25:33,472 INFO [WrapperSimpleAppMain] - Fips mode is enabled.2017-07-10 19:25:33,472 INFO [WrapperSimpleAppMain] - Switching to secure providers2017-07-10 19:25:34,280 INFO [WrapperSimpleAppMain] - Removing the current SunJSSEprovider.
FIPS Deployment GuideTroubleshooting the UCMDB Server
Micro Focus Universal CMDB (10.33) Page 56 of 62

2017-07-10 19:25:34,280 INFO [WrapperSimpleAppMain] - Adding the new SunJSSEprovider which is configured in FIPS mode.2017-07-10 19:25:34,280 INFO [WrapperSimpleAppMain] - Changed SunJSSE to use JSafefor SSL.2017-07-10 19:25:34,280 INFO [WrapperSimpleAppMain] - Added the JSafe provider.2017-07-10 19:25:34,300 INFO [WrapperSimpleAppMain] - Start framework init
l Decryption error
In case a decryption error occurs, and the UCMDB server cannot start up, you can do the following:
a. Regenerate the server-fips.keystore/server-fips.truststore files.
For detailed instructions, see "Regenerate a new self-signed hpcert and sign it with the defaultUCMDB root certificate" on page 18.
b. Synchronize password in the database by running the following command:
<UCMDBServer>\bin\key-truststore.bat <FIPS or not? true for FIPS><keystore password> <truststore password>
Example:
C:\hp\UCMDB\UCMDBServer\bin\key-truststore.bat true mykeystorepassmytruststorepass
Troubleshooting the UCMDB UI1. Applet FIPS preliminary checks
After performing login in the UCMDB UI, there are basic checks done tomake sure the Crypto Jtoolkit and the JCE Unlimited Strength Policy Files are present in the correct location in the JRE.
Pop-up example from the UCMDB UI when the Crypto J toolkit jars and the Unlimited StrengthPolicy Files aremissing:
FIPS Deployment GuideTroubleshooting the UCMDB UI
Micro Focus Universal CMDB (10.33) Page 57 of 62

2. Troubleshooting the SSL Communication between the UCMDB UI and theUCMDB Server
To investigate applet loading issues and SSL communication issues between the UCMDB UI andthe UCMDB Server, Micro Focus recommends you to enable the Java console from the JavaControl Panel.
a. In theAdvanced tab of the Java Control Panel, under the Java Console category, select theShow console radio button.
b. Make sure that under theDebugging category, theEnable logging radio button is selected.
In addition to enabling the Java console, you should also add the -Djavax.net.debug=sslparameter to the JAVA_TOOL_OPTIONS environment variable. (The environment variableshould be present on the client machine if you performed steps in "Task 5. UCMDB UI Migration"for enabling the FIPS mode). After adding the SSL debug flag, you can inspect the output from theJava console when the UCMDB UI is loading.
FIPS Deployment GuideTroubleshooting the UCMDB UI
Micro Focus Universal CMDB (10.33) Page 58 of 62

As an example on how to troubleshoot applet issues, we will use the default hpcert limitation.The default hpcert certificate from server-fips.keystore uses a SAN extension with DNS field setto localhost. This limits the access to the UCMDB UI only from the UCMDB Server Machine(localhost). That is to say, UCMDB UI must be on the samemachine with UCMDB Server, andyou can only use URL https://localhost:8443/ to access the UCMDB Server, neitherhttps://<UCMDB_Server_Name>:8443/ nor https://<UCMDB_Server_IP_Address>:8443/. Incase we try to access the UI with FQDN from amachine different than localhost, since the SANextension DNS name (localhost) from the certificate does not match the URLwe have used toaccess the UI (FQDN of the UCMDB Server), an SSL exception will be thrown in the JavaConsole and the loading of the UCMDB UI will stop.
This issue should not appear if you have followed the instructions in the "Task 4. UCMDB ServerMigration" section, because a new hpcert certificate will be generated with appropriate SANextensions (containing correct DNS names).
3. Make sure the jssecacerts is loaded by the client JRE by checking the java
FIPS Deployment GuideTroubleshooting the UCMDB UI
Micro Focus Universal CMDB (10.33) Page 59 of 62

console.
4. Customize JRE 7 to use FIPS compliant protocols
If you use use JRE 7 for loading the UCMDB UI, make sure only TLS protocols are checked in theJava Control Panel. You need to un-check SSL 3.0.
FIPS Deployment GuideTroubleshooting the UCMDB UI
Micro Focus Universal CMDB (10.33) Page 60 of 62

FIPS Deployment GuideTroubleshooting the UCMDB UI
Micro Focus Universal CMDB (10.33) Page 61 of 62

Send documentation feedbackIf you have comments about this document, you can contact the documentation team by email. If anemail client is configured on this system, click the link above and an email window opens with thefollowing information in the subject line:
Feedback on FIPS Deployment Guide (Universal CMDB 10.33)
Just add your feedback to the email and click send.
If no email client is available, copy the information above to a new message in a web mail client, and send your feedback to [email protected].
Weappreciate your feedback!
Universal CMDB (10.33) Page 62 of 62