Embed Size (px)
Citation preview

HPE Reference Configuration for securing Docker on HPE hardware Docker security in a DevOps environment
Reference Architecture

Reference Architecture
Contents Executive summary ................................................................................................................................................................................................................................................................................................................................ 3 Introduction ................................................................................................................................................................................................................................................................................................................................................... 3
Security threats for containers .............................................................................................................................................................................................................................................................................................. 3 Docker security overview ........................................................................................................................................................................................................................................................................................................... 3 Docker security timeline .............................................................................................................................................................................................................................................................................................................. 4 Reference Configuration overview .................................................................................................................................................................................................................................................................................... 4
Solution overview ..................................................................................................................................................................................................................................................................................................................................... 5 Solution components ............................................................................................................................................................................................................................................................................................................................ 5
Hardware ................................................................................................................................................................................................................................................................................................................................................... 5 Software ..................................................................................................................................................................................................................................................................................................................................................... 6 Application software ....................................................................................................................................................................................................................................................................................................................... 7
Best practices and configuration guidance for the solution ............................................................................................................................................................................................................................. 7 Configuration guidance for the solution ....................................................................................................................................................................................................................................................................... 8 Best practices for CI/CD........................................................................................................................................................................................................................................................................................................... 11 Best practices for development ........................................................................................................................................................................................................................................................................................ 18 Best practices for operations .............................................................................................................................................................................................................................................................................................. 19
Summary ...................................................................................................................................................................................................................................................................................................................................................... 20 Appendix A: Jenkins implementation details .............................................................................................................................................................................................................................................................. 21
Building a sample project to test Jenkins service ............................................................................................................................................................................................................................................ 21 Proxy configuration for Jenkins........................................................................................................................................................................................................................................................................................ 22 Proxy configuration when building sample images ....................................................................................................................................................................................................................................... 22
Appendix B: Pipeline for building and deploying stack ..................................................................................................................................................................................................................................... 23 Pipeline script .................................................................................................................................................................................................................................................................................................................................... 23 Compose file for deploying stack .................................................................................................................................................................................................................................................................................... 24
Appendix C: Content Trust implementation details ............................................................................................................................................................................................................................................. 26 UCP Content Trust....................................................................................................................................................................................................................................................................................................................... 26 Install Notary client ...................................................................................................................................................................................................................................................................................................................... 26 Initialize trust metadata for official repositories ................................................................................................................................................................................................................................................ 26 Initialize trust metadata for dev repositories ........................................................................................................................................................................................................................................................ 27 Deploy the stack in UCP ......................................................................................................................................................................................................................................................................................................... 28
Resources and additional links ................................................................................................................................................................................................................................................................................................ 30

Reference Architecture Page 3
Executive summary Software development in the enterprise is undergoing rapid and widespread change. Application architectures are moving from monolithic and N-tier to cloud-native microservices while the development process has transitioned from waterfall through agile to a DevOps focus. Meanwhile, deployments have moved from the data center to hosted environments and now the cloud (public, private and hybrid) and release cycles have shrunk from quarterly to weekly, or even more frequently. To remain competitive, businesses require functionality to be delivered in a faster and more streamlined manner, while facing into ever-increasing security threats from both organized and ad-hoc adversaries.
Container technology promises to deliver the speed and agility required by enterprises, but a major obstacle to its adoption is the perceived security vulnerabilities involved. What is needed is usable security out-of-the-box, covering the entire software supply chain. At the same time, it should be customizable to facilitate easy integration into existing systems, so the current investments can be reused.
Over the past few years, Docker has migrated from a developer-friendly tool to an enterprise standard solution, providing the agility and security that businesses need across the full software workflow, from development through testing to deployment and day-to-day operations. It has enhanced its security features to such an extent that it is now safe to say that applications can run more securely in containers compared to running on bare-metal.
Target audience: This paper is for CIOs, technical architects, operations and security professionals who are exploring the possibility of using Docker for enterprise application development and deployment on Hewlett Packard Enterprise hardware.
Document purpose: The purpose of this document is to describe a best practice scenario for securing Docker, from application development through the continuous integration / continuous delivery (CI/CD) pipeline. Readers can use this document to achieve the following goals:
• Gain insight into how to leverage Docker security features throughout the CI/CD process.
• Learn by example how to build and use a CI/CD pipeline using Jenkins for Docker container development.
Introduction Security threats for containers Containers differ from virtual machines in that containers use a shared kernel that facilitates faster start-up and more efficient resource usage. However, it means the kernel is a single point-of-failure and any security breach can breakout to all containers in the system. Securing Docker requires reducing the attack surface and limiting the “blast-radius” should any attack succeed. Attacks come in a number of vectors including:
• External attacks: These attacks take a variety of forms including distributed denial-of-service (DDoS) targeting system resources, or exploitations targeting unpatched kernel or image vulnerabilities, weak passwords or incorrectly exposed internal services. (The potentially short lifetime of a container can make it hard to include it in regular patch management cycles and so it is important to address such updates in the generation of the source, “golden” image. For more information, see the section on Immutable Infrastructure).
• Container attacks on host: A container can, either maliciously or accidentally, cause a denial of service on the host through excessive use of memory, CPU or disk resources. Alternatively, a malicious container could launch attacks such as a “fork bomb” or a “billion laughs” XML bomb to exhaust a system's resources. Vulnerabilities in third party containers or in the kernel itself can allow access to private information on the host, or even modification of the kernel itself.
• Container attacks on other containers: Similar denial of service attacks can be inflicted on other containers that share the same host. These can vary from innocent “noisy neighbor” issues to infected containers accessing the information belonging to other containers.
Insecure applications will still be insecure whether they run in containers or not – however, we will see that running applications within containers can significantly reduce the impact of any attack due to the underlying protections available out of the box using Docker.
Docker security overview Docker’s core philosophy on security is to make it work out of the box and easy to use, while at the same time allowing users to customize it to suit their own compliance and audit requirements. The three pillars of Docker security are:
• Secure platform: This consists of securing the Docker daemon and of fundamental container security features like namespaces, cgroups, capabilities, Secure Computing (seccomp), and Linux Security Modules (for example, AppArmor, SELinux). It also covers the orchestration of nodes that participate in a swarm cluster with mutually authenticated TLS, providing authentication, authorization and encryption of data in motion.

Reference Architecture Page 4
• Secure content: Signing images and storing them in a trusted registry is a cornerstone of the Docker strategy for securing content. In addition, enabling Docker Content Trust will prevent any unsigned images from being used. Images in the registry can be scanned for vulnerabilities, not just at the time of creation but also on an on-going basis, so that any newly discovered threats will be flagged for remediation. Integrated secrets management allows you to safely store multiple versions of sensitive password and configuration information for use in different stages of the development and release workflow.
• Secure access: Docker Universal Control Plane (UCP) supports fine-grained Role-Based Access Control (RBAC) and LDAP/AD integration with external systems.
Docker security timeline Over the past four years, Docker has transformed from a handy tool favored by developers into an enterprise solution that processes billions of commercial transactions every day. Along the way, a number of security concerns have arisen that might lead a business executive to doubt if a tool championed by developers is suitable for deployment in front-line production systems. Headlines warning of “Container Breakout”, “Privilege Escalation” and “Dirty Cow Vulnerabilities” have generated fear, uncertainty and doubt and in this paper we address those concerns. We show how Docker has proactively addressed these issues over successive releases, using multiple layers of security in a defense-in-depth strategy so that security is now built-in and usable, while also being highly customizable so as to preserve any existing investment in security infrastructure. In particular, we look at how Docker can increase security across the entire software supply chain from development, integration and testing through to the delivery and deployment of complex, business-critical applications on multiple programming stacks and platforms.
Table 1. Timeline for Docker security features
Date Release Features
Aug 2014 1.2 Capabilities
Oct 2014 1.3 SELinux, AppArmor
Dec 2014 1.4 Security vulnerabilities addressed
Aug 2015 1.8 Docker Content Trust (Image signing based on Notary)
Nov 2015 1.9 Security Scanning
Feb 2016 1.10 User namespace, seccomp, authorization plug-in
Feb 2016 Datacenter 1.0 Role-Based Access Control (RBAC), LDAP/AD
May 2016 1.11 Comprehensive CIS Benchmark, Yubikey hardware image signing
June 2016 1.12 Secure-by-default out-of-the-box, yet customizable (mutually authenticated TLS, providing authentication, authorization and encryption to the communications of every node participating in a swarm)
Jan 2017 1.13 Secrets management, System prune for garbage collection
Jan 2017 Datacenter 2.0 Image security scanning and vulnerability monitoring
March 2017 17.03 Latest release at time of writing
Reference Configuration overview This Reference Configuration (RC) covers best practices for overall security across the entire software development lifecycle. It uses the sample Docker application, the example voting app found at https://github.com/dockersamples/example-voting-app, in a continuous integration / continuous delivery (CI/CD) pipeline using Jenkins to identify best practices for the development, build, and deployment stages of the lifecycle.
The configuration uses HPE ProLiant DL360 (Gen 9 and Gen 8) servers but the over-arching principles for securing the enterprise software lifecycle apply to all Docker EE deployments on Hewlett Packard Enterprise hardware, including Hyper Converged, Synergy and SimpliVity offerings. For more targeted information about other platforms, see the HPE Reference Configuration for Docker Datacenter on HPE Hyper Converged 380 and HPE Reference Configuration for Docker Enterprise Edition (EE) Standard on HPE Synergy with HPE Synergy Image Streamer, Reference Configuration documentation.
This version of the Reference Configuration focuses on best practices for overall security in the development lifecycle and, as such, we do not cover specific networking or storage configurations. For more information, see HPE Reference Configuration for Docker Datacenter on Bare Metal with Persistent Docker Volumes.

Reference Architecture Page 5
Docker Reference Architectures are available at https://success.docker.com/Architecture, including ones for Security, Development Pipeline and Deployment Architecture.
Solution overview The solution, as shown in Figure 1, consists of a two-node cluster for the continuous integration/continuous delivery (CI/CD) system with Docker Universal Control Plane (UCP) on one manager node and Docker Trusted Registry (DTR) on the second, worker node.
Figure 1. Solution overview
Solution components The following components were utilized in this Reference Configuration.
Hardware The following hardware components were utilized in this Reference Configuration as listed in Table 2.
Table 2. Hardware Components
Component Purpose
HPE ProLiant DL360 Gen9 Bare-metal Docker swarm host for CI/CD environment
HPE ProLiant DL360 Gen8 Bare-metal Docker swarm host for CI/CD environment
Reference Architecture Page 6
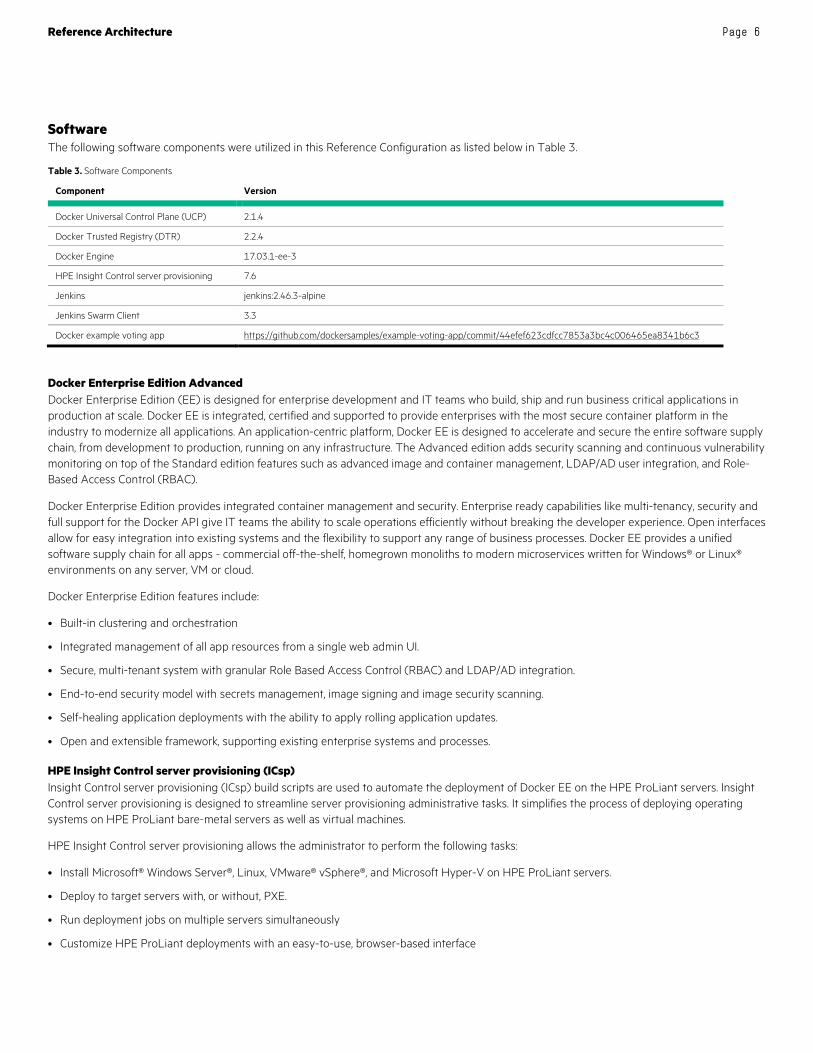
Software The following software components were utilized in this Reference Configuration as listed below in Table 3.
Table 3. Software Components
Component Version
Docker Universal Control Plane (UCP) 2.1.4
Docker Trusted Registry (DTR) 2.2.4
Docker Engine 17.03.1-ee-3
HPE Insight Control server provisioning 7.6
Jenkins jenkins:2.46.3-alpine
Jenkins Swarm Client 3.3
Docker example voting app https://github.com/dockersamples/example-voting-app/commit/44efef623cdfcc7853a3bc4c006465ea8341b6c3
Docker Enterprise Edition Advanced Docker Enterprise Edition (EE) is designed for enterprise development and IT teams who build, ship and run business critical applications in production at scale. Docker EE is integrated, certified and supported to provide enterprises with the most secure container platform in the industry to modernize all applications. An application-centric platform, Docker EE is designed to accelerate and secure the entire software supply chain, from development to production, running on any infrastructure. The Advanced edition adds security scanning and continuous vulnerability monitoring on top of the Standard edition features such as advanced image and container management, LDAP/AD user integration, and Role-Based Access Control (RBAC).
Docker Enterprise Edition provides integrated container management and security. Enterprise ready capabilities like multi-tenancy, security and full support for the Docker API give IT teams the ability to scale operations efficiently without breaking the developer experience. Open interfaces allow for easy integration into existing systems and the flexibility to support any range of business processes. Docker EE provides a unified software supply chain for all apps - commercial off-the-shelf, homegrown monoliths to modern microservices written for Windows® or Linux® environments on any server, VM or cloud.
Docker Enterprise Edition features include:
• Built-in clustering and orchestration
• Integrated management of all app resources from a single web admin UI.
• Secure, multi-tenant system with granular Role Based Access Control (RBAC) and LDAP/AD integration.
• End-to-end security model with secrets management, image signing and image security scanning.
• Self-healing application deployments with the ability to apply rolling application updates.
• Open and extensible framework, supporting existing enterprise systems and processes.
HPE Insight Control server provisioning (ICsp) Insight Control server provisioning (ICsp) build scripts are used to automate the deployment of Docker EE on the HPE ProLiant servers. Insight Control server provisioning is designed to streamline server provisioning administrative tasks. It simplifies the process of deploying operating systems on HPE ProLiant bare-metal servers as well as virtual machines.
HPE Insight Control server provisioning allows the administrator to perform the following tasks:
• Install Microsoft® Windows Server®, Linux, VMware® vSphere®, and Microsoft Hyper-V on HPE ProLiant servers.
• Deploy to target servers with, or without, PXE.
• Run deployment jobs on multiple servers simultaneously
• Customize HPE ProLiant deployments with an easy-to-use, browser-based interface

Reference Architecture Page 7
The ICsp build scripts to automate the deployment of Docker EE on HPE ProLiant servers are available at https://github.com/HewlettPackard/ICsp-Docker-OSBP. For this Reference Configuration, the servers are running Red Hat Enterprise Linux®, RHEL 7.2, and so the prerequisites for running the scripts in this particular environment include:
• Installing and configuring ICsp to deploy RHEL OS
• A Red Hat® network account to download files from the Internet or access to an internal RHEL repository
• Setting a proxy hostname and port, as the target systems in this particular environment are behind a proxy
Application software The application software for this Reference Configuration includes Jenkins and various Jenkins build agents. The Jenkins image, jenkins:2.46.3-alpine, is downloadable from https://store.docker.com/images/jenkins while the Jenkins Swarm Client is available at https://repo.jenkins-ci.org/releases/org/jenkins-ci/plugins/swarm-client/3.3/swarm-client-3.3.jar.
Best practices and configuration guidance for the solution In smaller organizations, developers usually perform multiple roles including building, testing and deploying the software they write. However, in large companies, there tends to be more clear-cut roles and responsibilities, even if this distinction is blurring somewhat with the advent of DevOps. This section covers best practices for development, integration, testing, delivery and deployment in an enterprise environment.
A typical CI/CD workflow using Docker Enterprise is shown in Figure 2.
Figure 2. CI/CD workflow using Docker Enterprise Edition
Code is pulled from the Source Code Management (SCM) system and build artifacts are produced (for example, Java is compiled into jar or war files) and these artifacts are stored in the appropriate repository (for example, Artifactory). Docker images are created using the build artifacts and pushed to a local registry, taking advantage of the signing, scanning and secret management features. These images are combined to deploy services to the cluster which can then be tested and approved by the QA team.

Reference Architecture Page 8
Configuration guidance for the solution In this section, we start with the installed software (Docker EE with a running swarm) and then:
• Configure a CI/CD environment using Jenkins
• Add build agents for Jenkins
• Build images for a sample application
• Push the images to a local repository, signing and scanning them for security
• Deploy the application to the swarm
We use the Docker example voting app, https://github.com/dockersamples/example-voting-app, as shown in Figure 3, consisting of:
• Python webapp which lets you vote between two options
• Redis queue which collects new votes
• .NET worker which consumes votes and stores them in a Postgres database
• Postgres database backed by a Docker volume
• Node.js webapp which shows the results of the voting in real time
Figure 3. Example voting application
Configuring Jenkins In this configuration, we run Jenkins as a service on a Docker swarm using a recent image from Docker Hub. For the sake of simplicity, we use the local filesystem for storing Jenkins setup and build data by creating and mounting the jenkins_home directory – in a real-world scenario, you would configure a persistent storage volume. As a consequence of this simplification, we want the master and build agents to run on the same swarm manager node.

Reference Architecture Page 9
Identify Jenkins node We explicitly identify this swarm manager node by adding a label using docker node update --label-add env=jenkins 10.10.174.27 and then targeting that node using a constraint when starting the service.
Note You can check if the label has been applied correctly to the node using the command docker node inspect self.
Start Jenkins service Once you have created the jenkins_home directory locally (and ensured that container’s jenkins user has write access to it), create the service for the Jenkins master as follows:
docker service create \ --name jenkins-noproxy \ -p 8082:8080 \ -p 50000:50000 \ --constraint 'node.labels.env == jenkins' \ -e JENKINS_OPTS="--prefix=/jenkins" \ --mount "type=bind,source=$PWD/jenkins_home,target=/var/jenkins_home" \ jenkins:2.46.3-alpine
Jenkins is now available at http://10.10.174.27:8082/jenkins and will prompt for a password that can be retrieved from jenkins_home/secrets/initialAdminPassword. If Jenkins cannot connect to the internet, it will prompt to configure the proxy settings by displaying the Manage Jenkins Manage Plugins Advanced screen. Once configured, proceed to install the suggested plug-ins and then set up the first admin user account and corresponding password. To test the installation, it is recommended you follow the example in Appendix A in the section Build sample project to test Jenkins service.
Install Self-Organizing Swarm plug-in Jenkins agents running as services on the Docker swarm facilitate the building of projects in various programming languages. These agents require the installation of the Self-Organizing Swarm Plug-in Modules. Navigate to Manage Jenkins Manage Plugins Available, search using the term “swarm” and then install the Self-Organizing Swarm plug-in.
Note The “swarm” here confusingly relates to a similarly-named but separate Jenkins Swarm Client rather than the underlying Docker swarm.
The Jenkins agents use JNLP to connect to the Jenkins master and each agent is used for a specific technology.
Installing Docker build agents There are a number of ways to create Jenkins agents so that they can build, push and deploy Docker images and the method that you use will have an impact on your overall security posture:
• Unsecured: Using a base Docker image and sharing the Docker socket (/var/run/docker.sock) to facilitate running Docker commands on the host node (“Docker out of Docker”).
• Secure: Using a base Linux image, installing Docker CLI and using UCP client bundle to allow the jenkins user to access the authorized TCP socket rather than the unauthenticated/unauthorized Docker socket.
In both instances, a layer is added to set up the Java-based communications with the Jenkins master. If the jenkins_home/workspace directory does not already exist locally (it will if you built the sample project) then you will need to create it and ensure that the container has write access to it.

Reference Architecture Page 10
Using the authorized TCP socket (secure) While it can be convenient to share the Docker socket, you should be aware that this can leave you open to privilege escalation and instead you should always use the authorized TCP socket. Here we start with a small alpine image and then install the Docker CLI, docker-compose and the Java Swarm Client jar.
docker service create --name docker-agent-cli \ --mode global \ --constraint 'node.labels.env == jenkins' \ --mount "type=bind,source=$PWD/jenkins_home/workspace,target=/workspace" \ gmcgoldrick/docker-agent-cli
Log in to UCP as the jenkins user and download the corresponding client bundle. Upload the bundle to the running container (using docker cp) , then docker exec into the container, extract the files and set up the environment variables using eval $(<env.sh). Now, run the Java client to connect to the Jenkins master
java -jar /home/jenkins/swarm-client-3.3.jar -master http://10.10.174.27:8082/jenkins -username admin -password admin -labels 'docker-cli' -executors 5
The command options passed into the Jenkins Swarm Client jar make the connection with the Jenkins master, setting a label of ‘docker-cli’ that we will use later as the target agent for builds. If successful, the agent will appear in the Build Executer Status panel and will be listed at http://10.10.174.27:8082/jenkins/computer/. If you drill into the agent details, you will see the ‘docker-cli’ label that was associated with the agent when starting the Jenkins Swarm Client.
Deploying the Docker example voting app, using the Docker agent Create a freestyle Jenkins project and use the setting Restrict where this project can be run to select the agent – set this to ‘docker-cli’ when using the secure agent above. Set the Source Code Management to point to the Docker sample application at https://github.com/dockersamples/example-voting-app. Add a build step to execute a shell and then use the command docker stack deploy --compose-file docker-stack.yml vote to deploy the sample application to the swarm. The resulting services are shown in Figure 4.
Figure 4. Services running on Docker swarm
The user-interface for voting is available on port 5000, while the results are available on 5001. To remove all the services, run the command docker stack rm vote on the manager node.
Reference Architecture Page 11
Best practices for CI/CD Deploying the sample application as a stack using the compose file simply pulls pre-built images from the Docker Hub. In a development environment, you will want to build images locally from your own codebase, push these images to your own registries and then deploy the complete application on a swarm. In this section, we will walk step-by-step though the process, adding layers of security and identifying best practices along the way, including:
• Building images with an explicit build number
• Infrastructure as code (IaC)
• Push images to Docker Trusted Registry on every successful build
• Scan images automatically
• Use secrets management to protect sensitive passwords and configuration data
• Create and maintain standardized baseline images
• Understand the provenance of third-party images
• Sign approved images in the registry
• Deploy services using docker stack
• Automatically sign build images using the CI system
• Use Content Trust in UCP
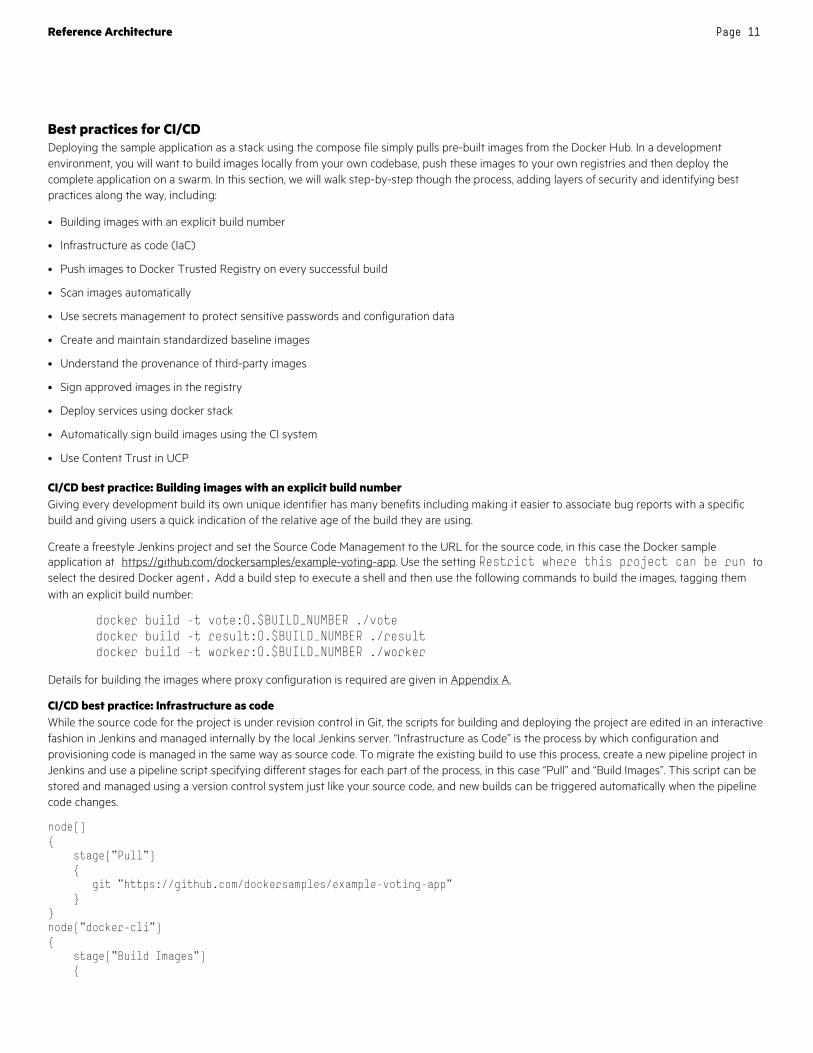
CI/CD best practice: Building images with an explicit build number Giving every development build its own unique identifier has many benefits including making it easier to associate bug reports with a specific build and giving users a quick indication of the relative age of the build they are using.
Create a freestyle Jenkins project and set the Source Code Management to the URL for the source code, in this case the Docker sample application at https://github.com/dockersamples/example-voting-app. Use the setting Restrict where this project can be run to select the desired Docker agent. Add a build step to execute a shell and then use the following commands to build the images, tagging them with an explicit build number:
docker build -t vote:0.$BUILD_NUMBER ./vote docker build -t result:0.$BUILD_NUMBER ./result docker build -t worker:0.$BUILD_NUMBER ./worker
Details for building the images where proxy configuration is required are given in Appendix A.
CI/CD best practice: Infrastructure as code While the source code for the project is under revision control in Git, the scripts for building and deploying the project are edited in an interactive fashion in Jenkins and managed internally by the local Jenkins server. “Infrastructure as Code” is the process by which configuration and provisioning code is managed in the same way as source code. To migrate the existing build to use this process, create a new pipeline project in Jenkins and use a pipeline script specifying different stages for each part of the process, in this case “Pull” and “Build Images”. This script can be stored and managed using a version control system just like your source code, and new builds can be triggered automatically when the pipeline code changes.
node() { stage("Pull") { git "https://github.com/dockersamples/example-voting-app" } } node("docker-cli") { stage("Build Images") {

Reference Architecture Page 12
dir('vote') { sh "docker build -t vote:0.$BUILD_NUMBER . " } dir('result') { sh "docker build -t result:0.$BUILD_NUMBER . " } } } Listing the images available on the node shows the images with the build number included in the tag:
docker images REPOSITORY TAG IMAGE ID CREATED SIZE result 0.1 496e2ee7c194 6 minutes ago 228 MB vote 0.1 5c5a27847c16 7 minutes ago 84.7 MB
In Figure 5, you can see that Jenkins UI shows the two distinct stages graphically:
Figure 5. Jenkins pipeline stages

Reference Architecture Page 13
CI/CD best practice: Push images to Docker Trusted Registry on every successful build The pipeline can be extended to include a stage for pushing the images to a local instance of Docker Trusted Registry. This example assumes that a jenkins user has been setup in Docker Trusted Registry (running on the swarm worker node at 10.10.174.28) and that it has write access to the dev/vote and dev/result repositories. Notice how the images are now tagged appropriately for the target repositories.
node() { stage("Pull") { git "https://github.com/dockersamples/example-voting-app" } } node("docker-cli") { stage("Build Images") { dir('vote') { sh "docker build -t 10.10.174.28/dev/vote:0.$BUILD_NUMBER . " } dir('result') { sh "docker build -t 10.10.174.28/dev/result:0.$BUILD_NUMBER . " } } } node("docker-cli") { stage("Push Images") { sh "docker login --username jenkins --password $JENKINS_PASSWORD 10.10.174.28" sh "docker push 10.10.174.28/dev/vote:0.$BUILD_NUMBER" sh "docker push 10.10.174.28/dev/result:0.$BUILD_NUMBER" sh "docker logout 10.10.174.28" }
}
Details for building the images where proxy configuration is required are given in Appendix A.
CI/CD best practice: Scan images automatically Image scanning is turned on in DTR under Settings Security. Each individual repository has its own settings for controlling the frequency of scanning – in a development environment, scanning should be performed on every build/push cycle, assuming the processing overhead is not too high. Most layers in your images will not change between builds and so the scanning can restrict itself to incrementally check only those layers that are different. Forcing images to be scanned as part of the software development lifecycle ensures that unscanned images can never make it into production.
To see how scanning can identify problems, pull an image with a known vulnerability from Docker Hub, re-tag it and push it to a local repository that is set to scan automatically.
docker pull elasticsearch:1.4.2 docker tag elasticsearch:1.4.2 docker push 10.10.174.28/dev/elasticsearch:vulnerable

Reference Architecture Page 14
DTR correctly identifies that this version of Elasticsearch contains a critical vulnerability in the scripting engine as shown in Figure 6. The vulnerability allows remote attackers to bypass the sandbox protection mechanism and execute arbitrary shell commands. DTR provides a link to the public database for more information on the vulnerability see https://cve.mitre.org/cgi-bin/cvename.cgi?name=CVE-2015-1427.
Figure 6. Critical vulnerability in Elasticsearch
To test the vulnerability locally (provided your testing environment is not publicly accessible), run a container using the vulnerable image and add some initial data, see the Elasticsearch in 5 minutes tutorial, for a quick introduction. Then, execute a shell command, in this instance ls, through the search interface that, in this particular version of Elasticsearch, erroneously allows certain Java classes to run unrestricted in the container.
docker run -d -p 9200:9200 --name elastic 10.10.174.28/dev/elasticsearch:vulnerable
curl -XPUT 'http://localhost:9200/blog/user/dilbert' -d '{ "name" : "Dilbert Brown" }'
curl http://localhost:9200/_search?pretty -XPOST -d '{"script_fields": {"myscript": {"script": "java.lang.Math.class.forName(\"java.lang.Runtime\").getRuntime().exec(\"ls\").getText()"}}}'
An extract from the search results is given below, showing the output of the ls command for the container:
"myscript" : [ "bin\nboot\ndev\netc\nhome\nlib\nlib64\nmedia\nmnt\nopt\nproc\nroot\nrun\nsbin\nsrv\nsys\ntmp\nusr\nvar\n" ]
This is an example of the added security you automatically get by running applications in containers – if this version of Elasticsearch was running on a bare-metal server, the exploit would provide remote access to the server itself rather than just to the container as happens in this instance.
There are a number of free resources available for learning about Docker and for running test services, including Katacoda and play-with-docker. Katacoda, in particular, presents many scenarios for securing Docker at the container level using cgroups, namespaces, seccomp, capabilities, etc., including a version of the preceding example using Elasticsearch. See https://katacoda.com/courses/docker-security for more information. These public sandboxes can provide a safe means for testing vulnerabilities and potential remediations without the need to compromise your internal systems.

Reference Architecture Page 15
CI/CD best practice: Use secrets management to protect sensitive passwords and configuration data While the password for accessing the registry can be configured using an environment variable, a more secure solution is provided through the use of the secrets management functionality in Docker swarm. Each secret is made available inside the container as a distinct file in a temporary filesystem at /run/secrets. You can create a secret in the UCP UI under Resources Secrets and then update the docker-agent service with the newly created secret using Services Service Environment Use a secret. Alternatively, you can use the command line:
echo –n "jenkinspassword" | docker secret create JENKINS_PASSWORD - docker service update --secret-add JENKINS_PASSWORD docker-agent
In the Jenkins pipeline script, we just need to read the contents of the secrets file to set the password securely:
node("docker") { stage("Push Images") { dir('/run/secrets') { sh "docker login --username jenkins --password ${readFile("./JENKINS_PASSWORD")} 10.10.174.28" sh "docker push 10.10.174.28/dev/vote:0.$BUILD_NUMBER" sh "docker push 10.10.174.28/dev/result:0.$BUILD_NUMBER" sh "docker logout 10.10.174.28" } }
}
Note When using the command line, we use the –n option on echo to omit a newline at the end of the file. Otherwise, the newline will terminate the shell command line early, resulting in the target registry being ignored, and the command will attempt to log in to the Docker Hub by default.
While secrets are intended for use with sensitive data like passwords, access tokens or certs, they can also be used for passing in configuration information that needs to change depending on the run-time environment.
CI/CD best practice: Create and maintain standardized baseline images An organization will typically standardize on a small number of operating systems, with specific hardening and common tools applied. On top of this base, distinct images will be created for each programming language stack required, for example, one for Java/Spring Boot framework and another for Python/Flask. Limiting the number of baseline images makes it easier to identify and update affected images whenever vulnerabilities are discovered. Security and operations personnel should be responsible for creating these baseline images, with input from developers on what functionality is required. The build files for the baseline images should be under strict revision control to prevent ad-hoc packages or scripts being added without approval while the images themselves should be signed and stored in the registry.
You should strive to create the smallest base image possible, using a minimal base image such as alpine, since the number of vulnerabilities is typically proportionate to size of image. Docker maintains a list of best practices for creating images here.
CI/CD best practice: Understand the provenance of third-party images The official repository at Docker Hub (and more recently Docker Store) is the best starting point for locating curated images for OS and popular programming language runtimes. The official images are signed by Docker and tend to be patched and updated frequently, with security scanning results available to identify any vulnerabilities in image layers and components. It is recommended that you pull specific versions (rather than defaulting to :latest) when accessing images on an official repository. Even so, you should be aware that Docker tags are not immutable and that an image with a seemingly explicit “version” tag may change without you realizing it. As such, you should pin to a specific instance using the digest rather than a tag. If you are using images from another repository, you should pull, re-tag, sign and push them to your local registry.

Reference Architecture Page 16
It can be hard to know exactly what is contained in an image if it has a chain of FROM clauses. Each Dockerfile can download and install packages, add users, expose ports, set environment variables and run arbitrary scripts. It is worthwhile following the inheritance chain and understanding what each layer adds to the finished image. If you need to take complete control of your images, you could re-build them from scratch using the existing Dockerfiles in the chain as a template. In this way you decide exactly what should be in the image but this approach can be a double-edged sword. Maintaining such custom images requires tracking all changes to the component images in the chain and applying updates/patches to your custom image when appropriate and, as such, this approach should not be undertaken lightly. Either way, it is highly advisable to investigate the provenance of third-party images and to keep a local copy of any Dockerfiles and shell scripts that are used to create the images you rely upon. Dependency management is a significant task, not just for your Docker images but also for your code dependencies in general (with Maven, npm, etc. ) and it is key in being able to reliably reproduce specific builds for your multiple deployment environments including QA (E2E, UAT, performance), staging and production.
CI/CD best practice: Sign approved images in the registry Setting the environment variable DOCKER_CONTENT_TRUST=1 means any image you push to a registry will be signed. This example assumes the devops1 user has write access to the official/redis repository. Once we are happy with the provenance of our third-party images, which have already been signed by Docker, we re-tag them and store them in our DTR instance so that we have local copies and can always recreate our environments on demand.
export DOCKER_CONTENT_TRUST=1 docker pull redis:3.2.9-alpine docker tag redis:3.2.9-alpine 10.10.174.28/official/redis:3.2.9-alpine docker pull postgres:9.4 docker tag postgres:9.4 10.10.174.28/official/postgres:9.4 docker login --username devops1 --password devops1password 10.10.174.28 docker push 10.10.174.28/official/redis:3.2.9-alpine docker push 10.10.174.28/official/postgres:9.4
Note If you encounter an error similar to “certificate signed by unknown authority” you will need to make your Docker Engine trust the certificate authority used by DTR. For more information, see https://docs.docker.com/datacenter/dtr/2.2/guides/user/access-dtr/. In our RHEL 7 environment, we performed the following steps:
curl -k https://10.10.174.28/ca -o /etc/pki/ca-trust/source/anchors/10.10.174.28.crt sudo update-ca-trust sudo /bin/systemctl restart docker.service

Reference Architecture Page 17
If this is the first push with content trust enabled, you will be prompted to create a new root signing key passphrase, along with a repository key passphrase. You can see in DTR, in Figure 7 below, that the image has been signed.
Figure 7. Signed image in repository
CI/CD best practice: Automatically sign build images using the CI system The CI system should sign images it builds when pushing them to the local registry, setting DOCKER_CONTENT_TRUST=1 in the pipeline script.
node("docker-cli") { stage("Push Images") { withEnv(["DOCKER_CONTENT_TRUST=1"]) { dir('/run/secrets') { sh "docker login --username jenkins --password ${readFile("./JENKINS_PASSWORD")} 10.10.174.28" sh "docker push 10.10.174.28/dev/vote:0.$BUILD_NUMBER" sh "docker push 10.10.174.28/dev/result:0.$BUILD_NUMBER" sh "docker push 10.10.174.28/dev/worker:0.$BUILD_NUMBER" sh "docker logout 10.10.174.28" } } } }
CI/CD best practice: Deploy services using Docker stack We can combine our approved third-party images with the images we have built locally for our application code and deploy them automatically in Jenkins using a compose file and the docker stack command. Stacks are a convenient way to automatically deploy multiple services that are linked to each other, without needing to define each one separately. Stack files are in YAML format and define environment variables, deployment tags, the number of containers, and related environment-specific configuration.
We modify the compose file. https://github.com/dockersamples/example-voting-app/blob/master/docker-stack.yml,so that it now pulls the approved third-party redis and postgres images from our official repository, and the application-specific images from the dev repository used by Jenkins and then combine these images in a new Deploy stack stage in the pipeline script. The complete compose file and pipeline script file are available in Appendix B.

Reference Architecture Page 18
CI/CD best practice: Use Content Trust in UCP UCP can restrict the services running on the Docker swarm to those signed by particular groups of users. However, UCP cannot automatically trust the images you have signed in DTR because it cannot associate the private key, which you are using for signing, with your UCP account. To sign images in the registry in such a way that UCP can trust them, you need to:
• Setup a Notary client. (Notary is a Docker project that allows anyone to have trust over arbitrary collections of data and is based on The Update Framework, a secure general design for the problem of software distribution and updates).
• Initialize trust metadata for your repositories, either by pushing content or using a notary init/key rotate/publish cycle.
• Delegate signing to the keys in the UCP client bundles for your users, in this case devops1 and jenkins.
• Add these users to teams in UCP, and use these teams when requiring signatures in UCP Admin Settings Content Trust.
The implementation details for setting up Content Trust with UCP are available in Appendix C. Once you have signed your images so that UCP can trust them, you can deploy the stack as usual using docker stack deploy --compose-file docker-stack.yml vote. Content Trust in UCP is a key element in securing your Docker swarm, allowing you to gate releases onto different environments based on approvals from the relevant teams.
Best practices for development In the same way that there are a multitude of configurations for your CI/CD pipeline, there are also numerous common developer workflows including using a single master branch in a central repository, using feature branches with pull requests for code review, or even more rigorous scenarios where code changes require review and approvals, including passing CI tests, before the changes are committed.
One typical developer workflow using Docker is shown in Figure 8:
Figure 8. Developer Workflow
Developers use a Source Code Management system for their code, and repositories appropriate to the programming languages they are using (for example, Artifactory for Java dependencies and build artifacts). Using Docker, they can build images locally and deploy services, either locally or in an integration environment.
Development best practice: Replicate CI environment on developer workstations One of the big attractions of Docker from the development point of view is the ability to run multiple versions of OS platforms, databases, or application stacks on a single developer workstation or laptop. Likewise, the ability to maintain consistent software configurations across all your developers’ environments helps to avoid the “it works on my machine” dilemma. While the CI/CD workflow is the single source of truth for images,

Reference Architecture Page 19
developers can build and test images locally, and even deploy multi-node stacks using docker-machine. The closer the development environment is to the CI one, the more confidence a developer will have that a commit will not break the build.
Development best practice: Multi-stage builds In your CI environment, you can deploy multiple flavors of build agents for each programming stack you use, for example one agent may be responsible for all Java builds, pulling in dependencies from external repositories (like Artifactory or Nexus), compiling code, building jar or war files and saving these build artifacts to a repository. A separate agent may use the build artifacts to create images and deploy services on the Docker swarm. It is now possible for developers to mimic this approach using Docker’s multi-stage builds, in the first stage creating a complete build environment while, in the second stage, setting up a minimal run-time environment.
Best practices for operations There are a number of different patterns used for deploying applications in a production environment, for example, Blue-Green, Canary or Rolling. Ideally, you should be able to perform push-button deployment of any build at any time, but for business reasons the actual process may be slower and involve some manual input from your operations team. In enterprise environments, it is common to separate develop and build systems from run-time resources and so there will be separate production and non-production UCP clusters. However, having a single master DTR cluster allows centralized enforcement of security best practices including signing, scanning and secrets. Note that policy enforcement on image signing requires you to have your DTR in the same cluster as UCP.
Operations best practice: Use UCP/DTR security features Docker’s commercial offerings provide a wide range of features to help secure your entire software supply chain, including deployment and on-going maintenance and monitoring. A single sign-on service provides a shared authentication service for UCP and DTR and works out of the box or via an externally-managed LDAP/AD service. You can replace the self-signed certs in UCP and DTR with fully-signed certificates using your organization's Certificate Authority (CA). Role-Based Access Control (RBAC) provides fine-grained control over access to individual volumes, networks, images, secrets, and running containers. (While users are shared across UCP and DTR, UCP uses “teams” to organize users into groups, whereas DTR has the concept of “organizations” for controlling access to repositories). When using DTR and Notary for image signing, key management is critical and, if possible, you should use a hardware token like a Yubikey. For more information, see the Docker Reference Architecture for Security Best Practices.
Operations best practice: Take advantage of container security features Container security features can be used to limit the occurrences of incidences such as kernel exploits, denial-of-service attacks or container breakouts. These features include:
• Kernel namespaces provide the isolation between containers and also the host itself.
• cgroups control the amount of system resources that a container can use.
• Kernel capabilities provide a fine-grained access control system over what operations a container can run.
• Secure computing mode (seccomp) is a Linux kernel feature that you can use to restrict the actions available within a container.
• The Linux Security Module (LSM) framework including SELinux and AppArmor.
The security features should be used to limit the resources and the access rights for containers:
• User namespaces is a relatively new feature in Docker (1.10). It allows the Docker daemon to create an isolated namespace that looks and feels like a root namespace. However, the root user inside of this namespace is mapped to a non-privileged uid on the Docker Host. This means that containers can effectively have root privilege inside of the user namespace, but have no privileges on the Docker Host. For more information on user namespaces, see the Docker Knowledgebase article here and the tutorial here.
• By default, Docker drops all capabilities except those needed using a whitelist approach, while allowing you to expand or contract the set. The seccomp profile is a whitelist that denies access to system calls by default, then whitelists specific system calls. The default seccomp profile provides a sane default for running containers with seccomp and disables around 44 system calls out of more than 300 calls, while you can expand (or contract) this number based on your applications needs.
• AppArmor (Application Armor) is a Linux security module that protects an operating system and its applications from security threats. Docker automatically generates and loads a default AppArmor profile for containers that is moderately protective while providing wide application compatibility. Once again, in line with the Docker philosophy of built-in but customizable security, you modify the profiles to suit your own custom needs.

Reference Architecture Page 20
The definitive treatment of (Linux) container security by Aaron Grattafiori is available at https://www.nccgroup.trust/us/our-research/understanding-and-hardening-linux-containers/. Docker also maintains a list of security vulnerabilities which Docker mitigated, such that processes running in Docker containers were never vulnerable to the bug – see https://docs.docker.com/engine/security/non-events/.
Operations best practice: Production Standard checks should be performed before running any images in your production cluster. Images must have the correct configuration, must include any required packages and exclude any blacklisted packages, and any third-party software should be updated and patched appropriately. There must not be any secrets (for example, passwords, access tokens or certs) embedded in the images and the network ports that are exposed must be known and approved. Images should be signed by the required teams, including CI/CD, QA, security, etc. and runtime options should be set to restrict resource utilization.
Access to production servers should be severely restricted – in particular, developers should not expect ssh or docker exec access to debug issues. Instead, a comprehensive logging and monitoring solution should be deployed on the swarm, to identify any suspicious patterns and to provide enough information to identify the source of any problems.
On-going security scanning and maintaining an up-to-date vulnerabilities database will help you to proactively manage any new threats. It is important to realize that node uptime is not necessarily indicative of node health and to understand the concept of “reverse uptime”. Rather than tracking how long a server has been up, instead you should limit the maximum time any server can be up for and then reimage it.
Operations best practice: Immutable infrastructure In general, containers should be run in read-only mode where possible, mounting explicit directories as writable as required by your applications. This severely restricts the damage an attack can do if it does get through your other layers of defense. This idea can be expanded to cover all intentional updates as well (for example, installing new packages, upgrading existing packages, minor code changes to CSS, etc.). Instead of making changes directly to running services, you make the changes in the build environment, maintaining your changes in the source code management system, and then building, testing and re-deploying the new images. Using immutable containers allows you to minimize “drift”, where servers that should be running the same code are out of sync due to direct manual changes or random failures in automated provisioning. It also allows you to quickly and reliably rollback to a known good state when a planned upgrade goes wrong.
Operations best practices: Run Docker Bench regularly The Docker Bench for Security is a script that checks for dozens of common best-practices around deploying Docker containers in production. The tests are all automated, and are inspired by the Center for Internet Security (CIS) Docker 1.13 Benchmark, an objective, consensus-driven security guideline for the Docker Server Software. It can be run as privileged container on any host and running it on a regular cadence will improve the security posture of your servers.
Operations best practices: Use encrypted overlay networks Overlay networking for Docker Engine swarm mode comes secure out of the box. You can also encrypt data exchanged between containers on different nodes on the overlay network. To enable encryption, when you create an overlay network pass the --opt encrypted flag. Because the overlay networks for swarm mode use encryption keys from the manager nodes to encrypt the gossip communications, only containers running as tasks in the swarm have access to the keys. Consequently, containers started outside of swarm mode using docker run (unmanaged containers) cannot attach to the overlay network. To work around this situation, you must migrate the unmanaged containers to managed services. For more information in encrypted overlay networks, see the Docker documentation here.
Summary This document shows how Docker Enterprise Edition can be used to secure the entire software supply chain, from development to integration, through testing to deployment and on-going maintenance. At a time when the processes involved in software delivery are undergoing rapid transformation , with the need for speed and agility having to be balanced against ever increasing security threats, the Docker philosophy of providing secure platform, content and access out-of-the-box facilitates a proactive approach to security from your development, QA and operations teams. Your build teams can leverage features such as signing, scanning, and secrets, along with concepts such as infrastructure as code and standardized baseline images to secure the CI/CD pipeline. Developer productivity can be enhanced through the use of multi-stage builds and the ability to easily replicate multiple and complex build environments on workstations and laptops. Finally, operations personnel can target immutable infrastructure and the use of DTR as a single source of truth as a goal for simplifying deployment and on-going maintenance. Following the suggested best practices outlined in this document for CI/CD, development and operations will ultimately allow you to deploy your applications more securely in containers that on bare-metal.
Reference Architecture Page 21
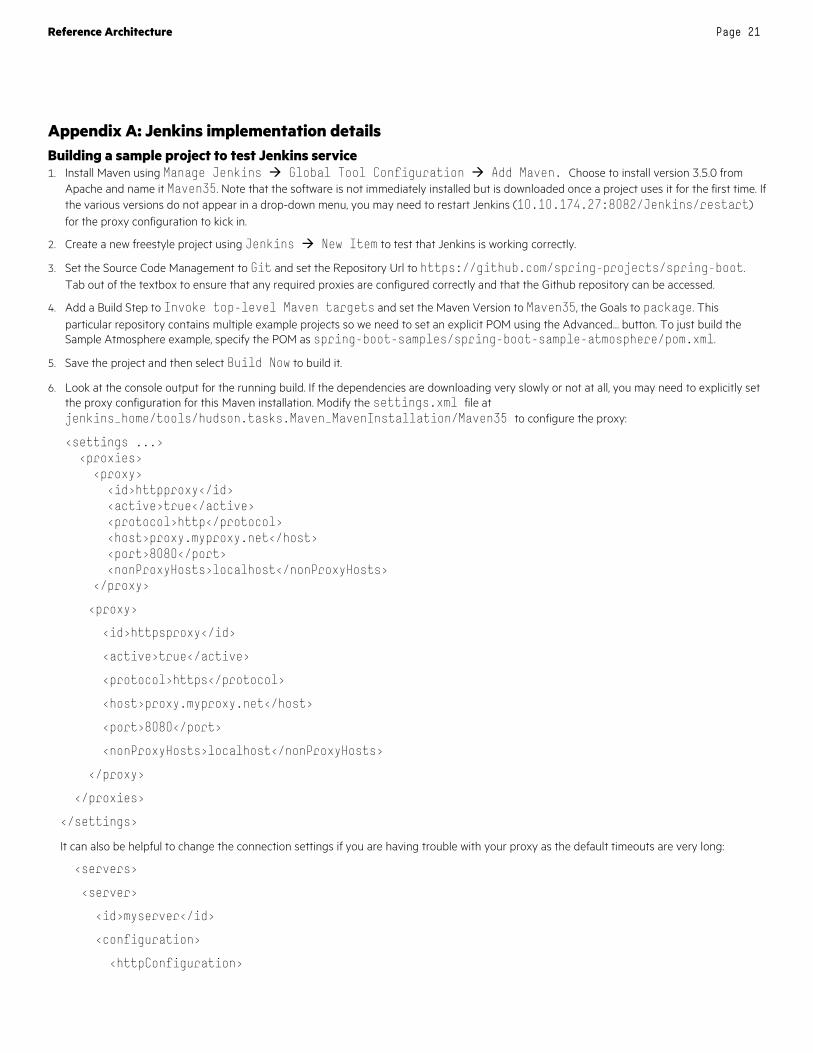
Appendix A: Jenkins implementation details Building a sample project to test Jenkins service 1. Install Maven using Manage Jenkins Global Tool Configuration Add Maven. Choose to install version 3.5.0 from
Apache and name it Maven35. Note that the software is not immediately installed but is downloaded once a project uses it for the first time. If the various versions do not appear in a drop-down menu, you may need to restart Jenkins (10.10.174.27:8082/Jenkins/restart) for the proxy configuration to kick in.
2. Create a new freestyle project using Jenkins New Item to test that Jenkins is working correctly.
3. Set the Source Code Management to Git and set the Repository Url to https://github.com/spring-projects/spring-boot. Tab out of the textbox to ensure that any required proxies are configured correctly and that the Github repository can be accessed.
4. Add a Build Step to Invoke top-level Maven targets and set the Maven Version to Maven35, the Goals to package. This particular repository contains multiple example projects so we need to set an explicit POM using the Advanced… button. To just build the Sample Atmosphere example, specify the POM as spring-boot-samples/spring-boot-sample-atmosphere/pom.xml.
5. Save the project and then select Build Now to build it.
6. Look at the console output for the running build. If the dependencies are downloading very slowly or not at all, you may need to explicitly set the proxy configuration for this Maven installation. Modify the settings.xml file at jenkins_home/tools/hudson.tasks.Maven_MavenInstallation/Maven35 to configure the proxy:
<settings ...> <proxies> <proxy> <id>httpproxy</id> <active>true</active> <protocol>http</protocol> <host>proxy.myproxy.net</host> <port>8080</port> <nonProxyHosts>localhost</nonProxyHosts> </proxy>
<proxy>
<id>httpsproxy</id>
<active>true</active>
<protocol>https</protocol>
<host>proxy.myproxy.net</host>
<port>8080</port>
<nonProxyHosts>localhost</nonProxyHosts>
</proxy>
</proxies>
</settings>
It can also be helpful to change the connection settings if you are having trouble with your proxy as the default timeouts are very long:
<servers>
<server>
<id>myserver</id>
<configuration>
<httpConfiguration>
Reference Architecture Page 22
<put>
<connectionTimeout>10000</connectionTimeout>
<readTimeout>30000</readTimeout>
</put>
</httpConfiguration>
</configuration>
</server>
</servers>
7. If Jenkins is configured correctly, the code should compile and the tests should run to completion successfully.
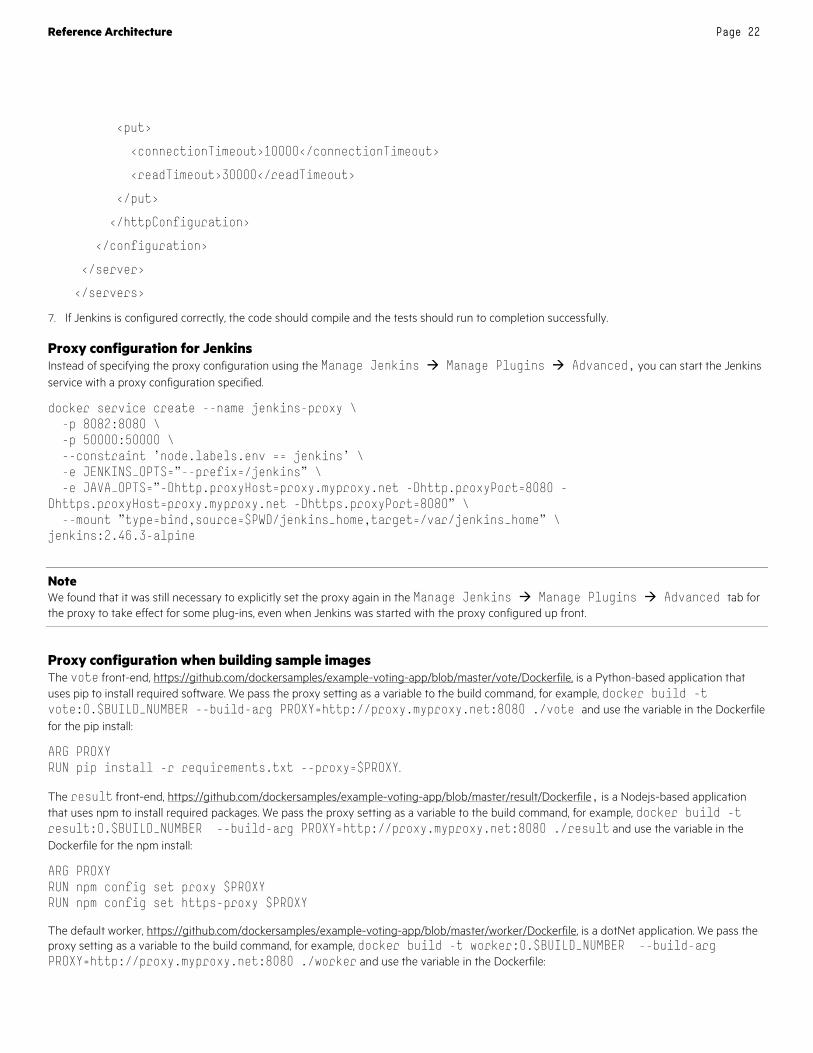
Proxy configuration for Jenkins Instead of specifying the proxy configuration using the Manage Jenkins Manage Plugins Advanced, you can start the Jenkins service with a proxy configuration specified.
docker service create --name jenkins-proxy \ -p 8082:8080 \ -p 50000:50000 \ --constraint 'node.labels.env == jenkins' \ -e JENKINS_OPTS="--prefix=/jenkins" \ -e JAVA_OPTS="-Dhttp.proxyHost=proxy.myproxy.net -Dhttp.proxyPort=8080 -Dhttps.proxyHost=proxy.myproxy.net -Dhttps.proxyPort=8080" \ --mount "type=bind,source=$PWD/jenkins_home,target=/var/jenkins_home" \ jenkins:2.46.3-alpine
Note We found that it was still necessary to explicitly set the proxy again in the Manage Jenkins Manage Plugins Advanced tab for the proxy to take effect for some plug-ins, even when Jenkins was started with the proxy configured up front.
Proxy configuration when building sample images The vote front-end, https://github.com/dockersamples/example-voting-app/blob/master/vote/Dockerfile, is a Python-based application that uses pip to install required software. We pass the proxy setting as a variable to the build command, for example, docker build -t vote:0.$BUILD_NUMBER --build-arg PROXY=http://proxy.myproxy.net:8080 ./vote and use the variable in the Dockerfile for the pip install:
ARG PROXY RUN pip install -r requirements.txt --proxy=$PROXY. The result front-end, https://github.com/dockersamples/example-voting-app/blob/master/result/Dockerfile, is a Nodejs-based application that uses npm to install required packages. We pass the proxy setting as a variable to the build command, for example, docker build -t result:0.$BUILD_NUMBER --build-arg PROXY=http://proxy.myproxy.net:8080 ./result and use the variable in the Dockerfile for the npm install:
ARG PROXY RUN npm config set proxy $PROXY RUN npm config set https-proxy $PROXY
The default worker, https://github.com/dockersamples/example-voting-app/blob/master/worker/Dockerfile, is a dotNet application. We pass the proxy setting as a variable to the build command, for example, docker build -t worker:0.$BUILD_NUMBER --build-arg PROXY=http://proxy.myproxy.net:8080 ./worker and use the variable in the Dockerfile:

Reference Architecture Page 23
ARG PROXY ENV http_proxy $PROXY
Appendix B: Pipeline for building and deploying stack The pipeline script builds and tags the 3 application images and pushes them to the local repository. It then deploys the application to the swarm using the compose file.
Pipeline script node("docker-cli") { stage("Build Images") { dir('vote') { sh "docker build -t 10.10.174.28/dev/vote:0.$BUILD_NUMBER --build-arg PROXY=http://proxy.myproxy.net:8080 . " } dir('result') { sh "docker build -t 10.10.174.28/dev/result:0.$BUILD_NUMBER --build-arg PROXY=http://proxy.myproxy.net:8080 . " } dir('worker') { sh "docker build -t 10.10.174.28/dev/worker:0.$BUILD_NUMBER --build-arg PROXY=http://proxy.myproxy.net:8080 . " } } } node("docker-cli") { stage("Push Images") { withEnv(["DOCKER_CONTENT_TRUST=0"]) { dir('/run/secrets') { sh "echo ${readFile("./JENKINS_PASSWORD")}" sh "echo password over" sh "docker login --username jenkins --password ${readFile('./JENKINS_PASSWORD')} 10.10.174.28" sh "docker push 10.10.174.28/dev/vote:0.$BUILD_NUMBER" sh "docker push 10.10.174.28/dev/result:0.$BUILD_NUMBER" sh "docker push 10.10.174.28/dev/worker:0.$BUILD_NUMBER" sh "docker logout 10.10.174.28" } } } } node("docker-cli") { stage("Deploy stack") { sh "docker stack rm vote"

Reference Architecture Page 24
sh "sleep 30" sh "docker stack deploy --compose-file docker-stack.yml vote" } }
Compose file for deploying stack The compose file is used to create the required networks and services, deploying images from the local official and dev repositories. It determines the ports used, the restart policies and the placement of services based on the constraints specified.
version: "3" services: redis: image: 10.10.174.28/official/redis:3.2.9-alpine ports: - "6379" networks: - frontend deploy: replicas: 2 update_config: parallelism: 2 delay: 10s restart_policy: condition: on-failure db: image: 10.10.174.28/official/postgres:9.4 volumes: - db-data:/var/lib/postgresql/data networks: - backend deploy: placement: constraints: [node.role == manager] vote: image: 10.10.174.28/dev/vote:0.${BUILD_NUMBER} ports: - 5000:80 networks: - frontend depends_on: - redis deploy: replicas: 2 update_config: parallelism: 2 restart_policy: condition: on-failure result: image: 10.10.174.28/dev/result:0.${BUILD_NUMBER} ports: - 5001:80 networks: - backend depends_on: - db deploy:

Reference Architecture Page 25
replicas: 1 update_config: parallelism: 2 delay: 10s restart_policy: condition: on-failure worker: image: 10.10.174.28/dev/worker:0.${BUILD_NUMBER} networks: - frontend - backend deploy: mode: replicated replicas: 1 labels: [APP=VOTING] restart_policy: condition: on-failure delay: 10s max_attempts: 3 window: 120s placement: constraints: [node.role == manager] # visualizer: # image: dockersamples/visualizer:stable # ports: # - "8080:8080" # stop_grace_period: 1m30s # volumes: # - "/var/run/docker.sock:/var/run/docker.sock" # deploy: # placement: # constraints: [node.role == manager] networks: frontend: backend: volumes: db-data:

Reference Architecture Page 26
Appendix C: Content Trust implementation details UCP Content Trust Add the devops1 and jenkins users to a new team, devops, in UCP. We use this team when specifying the signing criteria required in the user interface at UCP Admin Settings Content Trust.
Install Notary client The documentation for installing and using the Docker Notary client is available at https://docs.docker.com/notary/getting_started/.
Initialize trust metadata for official repositories There are two ways for initializing trust metadata – using a notary init/key rotate/publish cycle, or by pushing content for the first time to the repository. Here we use both methods for the purposes of illustration.
Initialize with Notary notary init 10.10.174.28/official/postgres
No root keys found. Generating a new root key... Enter passphrase for new root key with ID 6fefae6: Repeat passphrase for new root key with ID 6fefae6: Enter passphrase for new targets key with ID 0a38a13 (10.10.174.28/official/postgres): Repeat passphrase for new targets key with ID 0a38a13 (10.10.174.28/official/postgres): Enter passphrase for new snapshot key with ID ebc4783 (10.10.174.28/official/postgres): Repeat passphrase for new snapshot key with ID ebc4783 (10.10.174.28/official/postgres): Enter username: devops1 Enter password:
notary key rotate 10.10.174.28/official/postgres snapshot -r
Enter username: devops1 Enter password: Enter passphrase for root key with ID 6fefae6: Enter passphrase for targets key with ID 0a38a13: Successfully rotated snapshot key for repository 10.10.174.28/official/postgres
notary publish 10.10.174.28/official/postgres
Pushing changes to 10.10.174.28/official/postgres Enter username: devops1 Enter password: Enter passphrase for targets key with ID 0a38a13:
Add a delegation for the devops1 user for the official/postgres repository. Download the UCP client bundle for the devops1 user and copy and extract the zip file into a devops1 subdirectory. The public key for the devops1 user is ./devops1/cert.pem and the private key is at ./devops1/key.pem.
notary delegation add 10.10.174.28/official/postgres targets/releases --all-paths ./devops1/cert.pem notary delegation add 10.10.174.28/official/postgres targets/official --all-paths ./devops1/cert.pem notary publish 10.10.174.28/official/postgres notary key import ./devops1/key.pem
Enter passphrase for new delegation key with ID 6ef873e (tuf_keys): Repeat passphrase for new delegation key with ID 6ef873e (tuf_keys):

Reference Architecture Page 27
Now use the devops1 delegation key to sign the official postgres image:
docker tag postgres:9.4 10.10.174.28/official/postgres:9.4 export DOCKER_CONTENT_TRUST=1 docker login --username devops1 --password devops1password 10.10.174.28 docker push 10.10.174.28/official/redis:3.2.9-alpine
Enter passphrase for delegation key with ID 6ef873e: Successfully signed "10.10.174.28/official/postgres":9.4
Initialize with push As an alternative to using notary init, you can push content to the repository to initialize trust metadata.
docker tag redis:3.2.9-alpine 10.10.174.28/official/redis:3.2.9-alpine export DOCKER_CONTENT_TRUST=1 docker login --username devops1 --password devops1password 10.10.174.28
Enter passphrase for root key with ID 6fefae6: Enter passphrase for new repository key with ID b02c42b (10.10.174.28/official/redis): Repeat passphrase for new repository key with ID b02c42b (10.10.174.28/official/redis): Finished initializing "10.10.174.28/official/redis" Successfully signed "10.10.174.28/official/redis":3.2.9-alpine
Again, you set up delegation keys for the official/redis repository for the devops1 user and then push the redis image specifying the passphrase for the delegation key. At this point, it is useful to create a test service in UCP using the image you have just pushed, to check that the signing has been performed correctly and that the image passes the signing criteria specified in UCP Admin Settings Content Trust.
Initialize trust metadata for dev repositories We follow the same procedure for the dev repositories, this time copying and expanding the UCP client bundle for the jenkins user into a ./jenkins subfolder:
• Initialize the trust metadata for each of the three repositories, dev/vote, dev/result and dev/worker.
• Create delegation keys for each repository using the ./jenkins/cert.pem file.
• Import the private key for the jenkins user from the ./jenkins/key.pem file.
• Log in to the local DTR repository as the jenkins user, set DOCKER_CONTENT_TRUST=1 and push the images from the latest build (0.26 in our case).

Reference Architecture Page 28
Deploy the stack in UCP In UCP, use Resources Stacks & Applications Deploy to deploy the stack, as shown below in Figure 9.
Figure 9. Deploy stack
If successful, you should see the networks and services being deployed, as shown below in Figure 10.
Figure 10. Creating networks and services

Reference Architecture Page 29
By contrast, using the previous build images (0.25) that were not signed, you will see an error as shown below in Figure 11.
Figure 11. Failed deployment

Reference Architecture Page 30
Sign up for updates
© Copyright 2017 Hewlett Packard Enterprise Development LP. The information contained herein is subject to change without notice. The only warranties for Hewlett Packard Enterprise products and services are set forth in the express warranty statements accompanying such products and services. Nothing herein should be construed as constituting an additional warranty. Hewlett Packard Enterprise shall not be liable for technical or editorial errors or omissions contained herein.
Microsoft, Windows, and Windows Server are registered trademarks or trademarks of Microsoft Corporation in the United States and/or other countries. Linux is the registered trademark of Linus Torvalds in the U.S. and other countries. VMware and vSphere are registered trademarks of VMware, Inc. in the United States and/or other jurisdictions. Red Hat and Red Hat Enterprise Linux are registered trademarks of Red Hat, Inc. in the United States and other countries.
a00020437enw, July 2017
Resources and additional links
HPE Reference Architectures, hpe.com/info/ra
HPE Servers, hpe.com/servers
HPE Storage, hpe.com/storage
HPE Networking, hpe.com/networking
HPE Technology Consulting Services, hpe.com/us/en/services/consulting.html
Docker Success Center: Reference Architectures, https://success.docker.com/Architecture
Docker Reference Architecture: Securing Docker EE and Security Best Practices, https://success.docker.com/Architecture/Docker_Reference_Architecture%3A_Securing_Docker_EE_and_Security_Best_Practices
Docker Reference Architecture: Development Pipeline Best Practices Using Docker EE, https://success.docker.com/Architecture/Docker_Reference_Architecture%3A_Development_Pipeline_Best_Practices_Using_Docker_EE
Docker Reference Architecture: Docker EE Best Practices and Design Considerations, https://success.docker.com/Architecture/Docker_Reference_Architecture%3A_Docker_EE_Best_Practices_and_Design_Considerations
Docker Security Tutorials, https://github.com/docker/labs/tree/master/security
Because of the rapidly changing nature of the container landscape, it is important to monitor the latest developments and their impacts on CI/CD and security. The Docker Captains, https://www.docker.com/community/docker-captains, are a group of cross-industry Docker specialists who actively share up-to-date knowledge and it is recommended that you follow the blogs of those captains who focus on security concerns.
To help us improve our documents, please provide feedback at hpe.com/contact/feedback.