Embed Size (px)
Citation preview

HP-UX version 11.00.03Stratus Technologies
R1002H-09
HP-UX Operating System:Installation and Update

Notice
The information contained in this document is subject to change without notice.
UNLESS EXPRESSLY SET FORTH IN A WRITTEN AGREEMENT SIGNED BY AN AUTHORIZED REPRESENTATIVE OF STRATUS TECHNOLOGIES, STRATUS MAKES NO WARRANTY OR REPRESENTATION OF ANY KIND WITH RESPECT TO THE INFORMATION CONTAINED HEREIN, INCLUDING WARRANTY OF MERCHANTABILITY AND FITNESS FOR A PURPOSE. Stratus Technologies assumes no responsibility or obligation of any kind for any errors contained herein or in connection with the furnishing, performance, or use of this document.
Software described in Stratus documents (a) is the property of Stratus Technologies Bermuda, Ltd. or the third party, (b) is furnished only under license, and (c) may be copied or used only as expressly permitted under the terms of the license.
Stratus documentation describes all supported features of the user interfaces and the application programming interfaces (API) developed by Stratus. Any undocumented features of these interfaces are intended solely for use by Stratus personnel and are subject to change without warning.
This document is protected by copyright. All rights are reserved. No part of this document may be copied, reproduced, or translated, either mechanically or electronically, without the prior written consent of Stratus Technologies.
Stratus, the Stratus logo, ftServer, Continuum, Continuous Processing, StrataLINK, StrataNET, DNCP, SINAP, and FTX are registered trademarks of Stratus Technologies Bermuda, Ltd.
The Stratus Technologies logo, the ftServer logo, Stratus 24 x 7 with design, The World’s Most Reliable Servers, The World’s Most Reliable Server Technologies, ftGateway, ftMemory, ftMessaging, ftStorage, Selectable Availability, XA/R, SQL/2000, The Availability Company, RSN, and MultiStack are trademarks of Stratus Technologies Bermuda, Ltd.
Hewlett-Packard, HP, and HP-UX are registered trademarks of Hewlett-Packard Company.UNIX is a registered trademark of X/Open Company, Ltd., in the U.S.A. and other countries.All other trademarks are the property of their respective owners.
Manual Name: HP-UX Operating System: Installation and Update
Part Number: R1002HRevision Number: 09 Operating System: HP-UX version 11.00.03Publication Date: May 2003
Stratus Technologies, Inc.111 Powdermill RoadMaynard, Massachusetts 01754-3409
© 2003 Stratus Technologies Bermuda, Ltd. All rights reserved.
Contents
Preface xiRevision Information xiAudience xiNotation Conventions xiProduct Documentation xiv
Online Documentation xvNotes Files xvMan Pages xv
Related Documentation xvOrdering Documentation xviCommenting on This Guide xvii
Customer Assistance Center (CAC) xvii
1. Before You Install or Update 1-1Install Media 1-1
CD-ROMs 1-2Flash Cards 1-2
Operating System Requirements 1-3Hardware Requirements 1-3
Supported Peripherals 1-3Supported File System Types and Layouts 1-4File System Types 1-4Disk Layouts 1-4Root Disk Mirroring 1-4
Networking Requirements 1-5Checking the Media 1-5
Using Software Bundles 1-5Obtaining and Entering Codewords 1-6
Software Certificates 1-6Backing Up Your Current System 1-7For More Information 1-7
2. Installing HP-UX version 11.00.03 2-1Planning Your New Installation 2-1
Needed Information 2-2The Install Source 2-8Update the Flash Card 2-8
Booting the System 2-10Setting Up the Installation 2-14
HP-UX version 11.00.03 Contents iii

Contents
Completing the Installation 2-23Verifying the Installation 2-26
Listing Installed Applications 2-26Removing Unwanted Software/Filesets 2-27Running freedisk 2-27
Backing Up System Files 2-27Installing Additional Software 2-28
3. Installation Using Ignite-UX Server Software 3-1Ignite-UX Server System Requirements 3-1
HP-UX Operating System Version 3-1Disk Space 3-2NFS Server 3-2tftp 3-2
Load the Ignite-UX Software 3-2Edit Default Search Path 3-2Initial Ignite-UX Server Configuration 3-3
Run the Ignite-UX User Interface 3-3Perform Ignite-UX Server Configuration 3-4
Select Options->Server Configuration 3-4Select Add Booting IP Address 3-4Configure Ignite-UX Session Options 3-4
The Install Archive 3-5Creating an OS Archive 3-6Configuring Ignite-UX Server to Recognize OS Archive 3-7Setup For NFS Configuration 3-10Reboot and Gain Control of Target System 3-10Install the OS Archive on the Target 3-13Finishing the Install Archive 3-14
Customization 3-15Adding an SD Bundle to the Archive Environment 3-15Modifying Kernel Parameters with Ignite-UX 3-16
Using Multiple, Selectable Kernel Configurations 3-17Additional Install Parameters 3-18
Post-Installation Scripts 3-18Adding a Post-Installation Script 3-19Managing Network Printers 3-19
Creating a Golden System 3-20Installing the HP-UX Operating System from Media 3-21Installing Critical Patches onto the OS 3-21Loading Optional Software 3-21Customizing the System 3-21Finishing the Golden System 3-22
Setting Up Install Parameters Dynamically 3-22
iv Installation and Update (R1002H) HP-UX version 11.00.03

Contents
4. Troubleshooting Your Installation 6-1CD-ROM Eject 6-1Media Install 6-2Large System Problem Areas 6-2Troubleshooting Before and During Installation 6-4
Appendix A. Using the Debug Kernel A-1Installing the Debug Kernel A-2Reinstalling the Optimized Kernel A-3
Appendix B. Setting Up the Installation B-1Guided Installation B-1
Index Index-1
HP-UX version 11.00.03 Contents v

Figures
Figure 2-1. Welcome Screen 2-15Figure 2-2. User Interface Screen 2-16Figure 2-3. Basic Configuration Screen 2-17Figure 2-4. Root Disk Choice Screen 2-18Figure 2-5. Software Configuration Screen 2-19Figure 2-6. System Configuration Screen 2-20Figure 2-7. File System Configuration Screen 2-21Figure 2-8. itool Confirmation Screen 2-22Figure 3-1. Install Welcome Screen 3-11Figure 3-2. User Interface and Media Options Screen 3-11Figure 3-3. LAN Interface Selection Screen 3-12Figure 3-4. Network Configuration 3-12Figure B-1. System Configuration Screen B-1Figure B-2. System Environment Selection Screen B-2Figure B-3. Root Disk Selection Screen B-2Figure B-4. Root Disk Screen B-3Figure B-5. Root Swap Space Screen B-3Figure B-6. File System Screen B-4Figure B-7. Root Volume Group Disks Screen B-4Figure B-8. Language(s) Screen B-5Figure B-9. User License Screen B-5Figure B-10. Additional Software Screen B-6Figure B-11. Pre-Install Disk Information Screen B-6Figure B-12. Pre-Install Check Information Screen B-7Figure B-13. System Summary Screen B-7
HP-UX version 11.00.03 Figures vii

Tables
Table 1-1. LIF Files Available on the flash card 1-2Table 2-1. Installation Configuration Fields 2-2
HP-UX version 11.00.03 Tables ix

Preface <Preface>Preface
The HP-UX Operating System: Installation and Update (R1002H) manual describes how to install the HP-UX™ operating system and Fault Tolerant Services (FTS) on Continuum Series 400 and 400-CO systems.
Revision InformationThis manual has been revised to reflect support for Continuum systems using suitcases with the PA-8600 CPU modules, additional PCI card and storage device models, company and platform1 name changes, and miscellaneous corrections to existing text.
AudienceThis document is intended for system administrators who install and configure HP-UX operating systems.
Notation ConventionsThis document uses the following conventions and symbols:
■ The following font conventions apply both to general text and to text in displays:
– Monospace represents text that would appear on your screen (such as commands and system responses, functions, code fragments, file names, directories, prompt signs, messages). For example,
Broadcast Message from ...
1. Some Continuum systems were previously called Distributed Network Control Platform (DNCP) systems. References to DNCP still appear in some documentation and code.
HP-UX version 11.00.03 Preface xi

Notation Conventions
– Monospace bold represents user input in screen displays. For example,
ls -a
– Monospace italic represents variables in commands for which the user must supply an actual value. For example,
cp filename1 filename2
It also represents variables in prompts and error messages for which the system supplies actual values. For example,
cannot create temp filename filename
■ Helvetica represents all window titles, fields, menu names, and menu items in swinstall windows and System Administration Manager (SAM) windows. For example,
Select Mark Install from the Actions menu.
■ Italic emphasizes words in text. For example,
…does not support…
It is also used for book titles. For example,
HP-UX Operating System: Installation and Update (R1002H)
■ Bold introduces or defines new terms. For example,
An object manager is a process that …
■ The notation <Ctrl> – <char> indicates a control–character sequence. To type a control character, hold down the control key (usually labeled <Ctrl>) while you type the character specified by <char>. For example, <Ctrl> – <c> means hold down the <Ctrl> key while pressing the <c> key; the letter c does not appear on the screen.
■ Angle brackets (< >) enclose input that does not appear on the screen when you type it, such as passwords. For example,
<password>
■ Brackets ([ ]) enclose optional command arguments. For example,
cflow [–r] [–ix] [–i_] [–d num] files
■ The vertical bar (|) separates mutually exclusive arguments from which you choose one. For example,
command [arg1 | arg2]
xii Installation and Update (R1002H) HP-UX version 11.00.03

Notation Conventions
■ Ellipses (…) indicate that you can enter more than one of an argument on a single command line. For example,
cb [–s] [–j] [–l length] [–V] [file …]
■ A right-arrow (>) on a sample screen indicates the cursor position. For example,
>install - Installs Package
■ A name followed by a section number in parentheses refers to a man page for a command, file, or type of software. The section classifications are as follows:
– 1 – User Commands
– 1M – Administrative Commands
– 2 – System Calls
– 3 – Library Functions
– 4 – File Formats
– 5 – Miscellaneous
– 7 – Device Special Files
– 8 – System Maintenance Commands
For example, init(1M) refers to the man page for the init command used by system administrators.
■ Document citations include the document name followed by the document part number in parentheses. For example, HP-UX Operating System: Installation and Update (R1002H) is the standard reference for this document.
■ Note, Caution, Warning, and Danger notices call attention to essential information.
NOTE
Notes call attention to essential information, such as tips or advice on using a program, device, or system.
CAUTION
Caution notices alert the reader to conditions that could damage a program, device, system, or data.
HP-UX version 11.00.03 Preface xiii

Product Documentation
WARNING
Warning notices alert the reader to conditions that are potentially hazardous to people. These hazards can cause personal injury if the warnings are ignored.
DANGER
Danger notices alert the reader to conditions that are potentially lethal or extremely hazardous to people.
Product DocumentationThe HP-UX operating system is shipped with the following documentation:
■ HP-UX Operating System: Peripherals Configuration (R1001H) — provides information about configuring peripherals on a Continuum system
■ HP-UX Operating System: Installation and Update (R1002H) — provides information about installing or upgrading the HP-UX operating system on a Continuum system
■ HP-UX Operating System: Read Me Before Installing (R1003H) — provides updated preparation and reference information, and describes updated features and limitations
■ HP-UX Operating System: Fault Tolerant System Administration (R1004H) — provides information about administering a Continuum system running the HP-UX operating system
■ HP-UX Operating System: LAN Configuration Guide (R1011H) — provides information about configuring a LAN network on a Continuum system running the HP-UX operating system
■ HP-UX Operating System: Site Call System (R1021H) — provides information about using the Site Call System utility
■ Managing Systems and Workgroups (B2355-90157) — provides general information about administering a system running the HP-UX operating system (this is a companion manual to the HP-UX Operating System: Fault Tolerant System Administration (R1004H))
Additional platform-specific documentation is shipped with complete systems (see “Related Documentation”).
xiv Installation and Update (R1002H) HP-UX version 11.00.03

Product Documentation
Online DocumentationWhen you install the HP-UX operating system software, the following online documentation is installed:
■ notes files
■ manual (man) pages
Notes FilesThe /usr/share/doc/RelNotes.fts file contains the final information about this product.
The /usr/share/doc/known_problems.fts file documents the known problems and problem-avoidance strategies.
The /usr/share/doc/fixed_list.fts file lists the bugs that were fixed in this release.
Man PagesThe operating system comes with a complete set of online man pages. To display a man page on your screen, enter
man name
name is the name of the man page you want displayed. The man command includes various options, such as retrieving man pages from a specific section (for example, separate term man pages exist in Sections 4 and 5), displaying a version list for a particular command (for example, the mount command has a separate man page for each file type), and executing keyword searches of the one-line summaries. See the man(1) man page for more information.
Related DocumentationIn addition to the operating system manuals, the following documentation contains information related to administering a Continuum system running the HP-UX operating system:
■ The Continuum Series 400 and 400-CO: Site Planning Guide (R454) provides a system overview, site requirements (for example, electrical and environmental requirements), cabling and connection information, equipment specification sheets, and site layout models that can assist in your site preparation for a Continuum Series 400 or 400-CO system.
HP-UX version 11.00.03 Preface xv
Product Documentation
■ The HP-UX Operating System: Continuum Series 400 and 400-CO Operation and Maintenance Guide (R025H) provides detailed descriptions and diagrams, along with instructions about installing and maintaining the system components on a Continuum Series 400 or 400-CO system.
■ The D859 CD-ROM Drive: Installation and Operation Guide (R720) describes how to install, operate, and maintain CD-ROM drives on a Continuum Series 400 or 400-CO system.
■ The Continuum Series 400 and 400-CO: Tape Drive Operation Guide (R719) describes how to operate and maintain tape drives on a Continuum Series 400 or 400-CO system.
■ Each PCI card installation guide describes how to install that PCI card into a Continuum Series 400 or 400-CO system.
■ The sam(1M) man page provides information about using the System Administration Manager (SAM).
■ For information about manuals available from Hewlett-Packard™, see the Hewlett-Packard documentation web site at http://www.docs.hp.com.
Ordering DocumentationHP-UX operating system documentation is provided on CD-ROM (except for the Managing Systems and Workgroups (B2355-90157) which is available as a separate printed manual). You can order a documentation CD-ROM or other printed documentation in either of the following ways:
■ Call the CAC (see “Customer Assistance Center (CAC)”).
■ If your system is connected to the Remote Service Network (RSN), add a call using the Site Call System (SCS). See the scsac(1) man page for more information.
When ordering a documentation CD-ROM please specify the product and platform documentation you desire, as there are several documentation CD-ROMs available. When ordering a printed manual, please provide the title, the part number, and a purchase order number from your organization. If you have questions about the ordering process, contact the CAC.
xvi Installation and Update (R1002H) HP-UX version 11.00.03

Customer Assistance Center (CAC)
Commenting on This GuideStratus welcomes any corrections or suggestions for improving this guide. Contact the CAC to provide input about this guide.
Customer Assistance Center (CAC)The Stratus Customer Assistance Center (CAC), is available 24 hours a day, 7 days a week. To contact the CAC, do one of the following:
■ Within North America, call 800-828-8513.
■ For local contact information in other regions of the world, see the CAC web site at http://www.stratus.com/support/cac and select the link for the appropriate region.
HP-UX version 11.00.03 Preface xvii

1Before You Install or Update 1-
This manual describes how to perform “cold” installs of HP-UX version 11.00.03.
Cold install means that you install the operating system software on a new, uninstalled system or on an existing system in such a way as to erase old data completely. Chapter 2, “Installing HP-UX version 11.00.03,” describes the procedure for performing a cold install of HP-UX version 11.00.03 on Continuum systems.
Update means that you update the operating system software on an existing system while preserving much of the current configuration. Because of potential difficulties in updating from previous 32-bit versions of the HP-UX operating system to the 64-bit HP-UX version 11.00.03, no update procedure is provided. If you need to update from an earlier version of the operating system, contact the CAC for instructions (see “Customer Assistance Center (CAC)” in the Preface).
NOTE
Most administrative commands and utilities reside in standard locations. In this guide, only the command name, not the full path name, is provided if that command resides in a standard location. The standard locations are /sbin, /usr/sbin, /bin, /usr/bin, and /etc. Full path names are provided when the command is located in a nonstandard directory. You can determine file locations through the find and which commands. See the find(1) and which(1) man pages for more information.
Install MediaThe process of cold installation is essentially identical for all Continuum Series 400/400-CO systems, which boot from an external flash card (see “Flash Cards” later in this chapter).
HP-UX version 11.00.03 Before You Install or Update 1-1
Install Media
CD-ROMsThree CD-ROMs are required for installation on Continuum systems:
■ HP-UX 11.00 Extension Pack 9905 HP-UX Install and Core OS Software CD-ROM—This CD-ROM contains all the files and utilities necessary to install the standard HP-UX operating system. This CD-ROM contains the same software provided by Hewlett-Packard for HP 9000 Series 800 systems.
■ Stratus Fault-Tolerant Services Software CD-ROM—This CD-ROM contains the fault tolerant enhancements to the HP-UX operating system for use on Continuum systems.
■ Complete Patch CD for HP-UX version 11.00.03 CD-ROM (CD60 03/2003 or later)—This CD-ROM contains a complete set of HP-UX operating system patches for use on Continuum systems.
Flash CardsInstallation on a Continuum Series 400/400-CO system requires one 20-MB PCMCIA flash card. Items and files on the flash card are used instead of certain items and files provided on the Stratus Fault-Tolerant Services Software CD-ROM. Use one of the flash cards during the installation process. The other flash card is provided as a backup.
Each flash card contains a label, primary bootloader area, and the logical interface format (LIF) files shown in Table 1-1.
Each flash card also includes a copy of the Continuum bootloader (lynx). The lynx bootloader is used instead of the Hewlett-Packard initial and secondary system loaders (ISL and hpux) provided on the HP-UX 11.00 Extension Pack 9905 HP-UX Install and Core OS Software CD-ROM.
The HP-UX 11.00 Extension Pack 9905 HP-UX Install and Core OS Software CD-ROM contains all the bundles, products, and filesets, both required and optional, for a fully functional HP-UX version 11.00.03 system. See “Using Software Bundles” in this chapter for more information on this software.
Table 1-1. LIF Files Available on the flash card
LIF File Purpose
BOOT The mongoose bootloader reads the kernel from the disk.
CONF The system loader (bootloader) configuration file.
1-2 Installation and Update (R1002H) HP-UX version 11.00.03
Operating System Requirements
Additionally, the Stratus Fault-Tolerant Services Software CD-ROM contains all the fault tolerant drivers and utilities needed for supporting Continuum fault tolerant hardware.
The swlist command allows you to display a list of bundles and products (plus a method for viewing their contents) on the CD-ROM. For more information about the swlist commands, see the swlist(1M) man page.
Operating System RequirementsThe following sections describe system requirements for installation. These are minimum requirements; some system models require more. Also, you might have additional requirements for such things as swap space, tools, utilities, facilities, environments, applications, languages, data, and user files.
Hardware RequirementsTo install HP-UX version 11.00.03 on Continuum systems, you must have:
System Continuum system that includes a LAN card
Memory 512 MB of memory (minimum)
Source Device CD-ROM drive
Disk Drive At least two 2-GB (minimum) hard-disk drives and a pair of disks are strongly recommended; the install program performs an analysis of disk space needed prior to loading the software.
Supported PeripheralsYou can use any disks in your system that satisfy the space requirements for installation.
Continuum systems do not support disk arrays.
The HP-UX operating system installation tools support a V105 terminal running in VT320 emulation mode.
Tape drives and CD-ROM drives are supported on the external SCSI bus of a Continuum Series 400/400-CO system.
HP-UX version 11.00.03 Before You Install or Update 1-3
Operating System Requirements
NOTE
Continuum systems support Stratus-qualified devices only; Stratus assumes no responsibility for making unqualified devices function properly.
Supported File System Types and LayoutsThe HP-UX version 10.10 and later file systems are modeled after the UNIX SVR4 and OSF/1 systems. This layout provides such benefits as the separation of OS software from application software, and it also provides familiarity to system administrators who know the UNIX standard layout used by many other computer companies.
File System TypesHP-UX version 11.00.03 supports the following file system types:
■ HFS (the /stand file system must be HFS)
■ VxFS (the root (/) file system can be either VxFS or HFS)
■ NFS
Disk LayoutsThe file system for a cold-installed HP-UX version 11.00.03 system will support one of the following disk layouts:
■ “Whole disk” (single file system, single swap partition disk layouts)
■ The Logical Volume Manager (LVM)
The Logical Volume Manager is a standard feature installed with the operating system. Because the LVM is required for root disk mirroring (which is strongly recommended), you should use LVM for disk management. For more information about using the LVM, see the HP-UX Operating System: Fault Tolerant System Administration (R1004H), the Managing Systems and Workgroups (B2355-90157), and the lvm(7) man page.
Root Disk MirroringYou can set up root disk mirroring during the cold installation.
1-4 Installation and Update (R1002H) HP-UX version 11.00.03
Checking the Media
Networking RequirementsNetworking capabilities are not required for an HP-UX version 11.00.03 cold install unless you are loading applications from a remote system. If you are loading applications from a remote system, you will need the following:
■ A network card at /dev/lan0. In case your system has multiple LAN cards, during the install process, select the card that is configured onto the correct network. Only one card can be configured for installation. All other cards will not be configured and cannot be used during the installation.
■ A functional network connection. If you have more than one LAN connection, predetermine which LAN to use as the install server system.
Checking the MediaMake sure you have obtained the HP-UX 11.00 Extension Pack 9905 HP-UX Install and Core OS Software CD-ROM. Note that applications requiring codewords will be on a separate CD. If your HP-UX operating system product has multiple licenses, the installation process will install the most restrictive license unless you load a higher-level license from a separate license CD-ROM. This includes the User License CD-ROM, which has a default value of eight users.
Using Software BundlesThe software “bundle” is a collection of filesets that have been encapsulated for a specific purpose. These bundles make it easier to load several filesets onto your system as a single entity using the SD-UX Software Distribution Commands (swinstall, swcopy, swremove, and so on). Bundles can be kept in SD-UX depots and copied, installed, removed, listed, configured, and verified. All HP-UX version 11.00 OS software is packaged in bundles to make it easier to install. See Managing HP-UX Software with SD-UX (Hewlett-Packard Part Number B2355-90080) for more information on SD-UX commands, bundles, and depots.
A bundle can contain filesets from several different products. In general, performing a single operation on a bundle is the same as performing it individually on all the filesets listed in the bundle.
Bundles do not eliminate your ability to choose which initial products and filesets you wish to load on your system. You can still do this by interacting with the swinstall utility (see “Completing the Installation” in 2, “Installing HP-UX version 11.00.03”).
HP-UX version 11.00.03 Before You Install or Update 1-5

Obtaining and Entering Codewords
The major OS bundles in HP-UX 11.00 are as follows:
■ Non-Graphics Runtime (no graphics)
■ CDE Runtime
Your Core medium contains only the Core HP-UX version 11.00 product. Other application products and filesets are on the applications medium. These will require additional disk space.
Obtaining and Entering CodewordsThere are two types of software on the CD-ROM media: protected and unprotected. The core HP-UX operating system software is not protected and has no codeword. To access any protected software, you must enter an authorized codeword in the SD-UX interface. To access unprotected software, no codeword is required (for example, the HP-UX 11.00 Runtime bundles do not require a codeword).
You will have access only to those items on the CD-ROM medium that you have purchased, which are unprotected, or for which you have the proper codeword. See the HP-UX Operating System: Codewords and Passwords (R012H) document for information about codewords.
The swinstall utility allows you to enter codeword and customer ID information at the Enter SD-UX swinstall information screen. If you are updating interactively with SD-UX, you can enter a codeword on the command line. You can also store codewords in the network depot and fetch them automatically from there. They do not need to be entered for each system.
Software Certificates Examine all the packages that contain your products and the software certificate(s). Keep the certificate handy. If your certificate does not include a codeword (and you want to load optional, protected software), you must obtain a codeword from Stratus by following the codeword instructions that come with your software certificate. If you have problems with the codeword process, contact your Stratus representative.
1-6 Installation and Update (R1002H) HP-UX version 11.00.03

Backing Up Your Current System
Backing Up Your Current SystemIf you currently have no operating system or files on your system or if you have an OS and software that you can safely destroy, there is no need to perform a backup. You can now proceed with the installation and later set up a backup procedure.
If you already have an operating system and files on the system disk, you should make a full backup of the system before you start the install. See the “Backing Up and Restoring Data” chapter in the Managing Systems and Workgroups (B2355-90157) for instructions on backing up your data.
For additional backup security for cold install, you can optionally do the following:
■ Make printouts of customized files and refer to them after the installation (for example, files such as .profile, .mailrc, /etc/netlinkrc, and /etc/passwd).
■ Collect customized files in a directory (for example, /old). Use the tar command to make a tape archive of the files in /old. After the installation, restore the files, editing them as desired.
For More InformationFor general HP-UX version 11.00 information, see the installation program information in /usr/share/doc/11.0RelNotes. For FTS-specific 11.00.03 information, see /usr/share/doc/RelNotes.fts.
For more information about depots and the swinstall command, see the Managing HP-UX Software with SD-UX (B2355-90080) and the swinstall(1M) man page.
HP-UX version 11.00.03 Before You Install or Update 1-7


2Installing HP-UX version 11.00.03 2-
This chapter describes how to perform a cold installation of HP-UX version 11.00.03 on Continuum systems.
For more information about cold installations versus updates, or for information about the system requirements before you install, see Chapter 1, “Before You Install or Update.”
Planning Your New InstallationAfter you have installed and tested all your hardware devices, you are ready to install the software. The HP-UX version 11.00.03 cold installation process includes the following basic steps:
■ Boot a minimal operating system from the Stratus Fault-Tolerant Services Software CD-ROM.
■ Set up your system configuration.
■ Install core operating system software from CD-ROM.
■ Install fault tolerant system software from CD-ROM.
■ Install operating system patches from CD-ROM.
■ Install additional user licenses and other layered products or applications.
Most of these tasks require system administrator experience. It is also recommended that you contact the CAC if you have any questions about your installation.
HP-UX version 11.00.03 Installing HP-UX version 11.00.03 2-1

Planning Your New Installation
Needed Information Before starting the installation, be prepared to provide the following information:
■ the root and mirror disk path names
■ the CD-ROM drive path name
■ the host name
■ the Internet Protocol (IP) address
■ the time zone
■ the default routing Internet Protocol (IP) address
■ the root password
■ the subnet mask (for example, 255.255.248.0 or 0xfffff800)
■ the default gateway server name/gateway server IP address
■ sizes and uses of root volumes
The itool utility invoked as part of the installation presents five configuration screens: Basic, Software, System, File System, and Advanced. Table 2-1 describes the fields in these screens. Refer to Table 2-1 as you execute the setup procedure in the following section.”
NOTE
The Change? column provides guidelines whether to modify each field, but the recommendations are general guidelines only. You must determine what to modify in your environment. Contact the CAC for additional guidance.
Table 2-1. Installation Configuration Fields
Field Description Change?
Basic Screen
Configurations Specifies the operating system version that will be installed. The default is correct for installing HP-UX version 11.00.03. (The Description field provides additional information.)
no
Environments Specifies the system environment. The default value is to install the Common Desktop Environment (CDE). (The other option is to choose the 64-bit minimal HP-UX operating system, but this is not recommended.)
no
2-2 Installation and Update (R1002H) HP-UX version 11.00.03
Planning Your New Installation
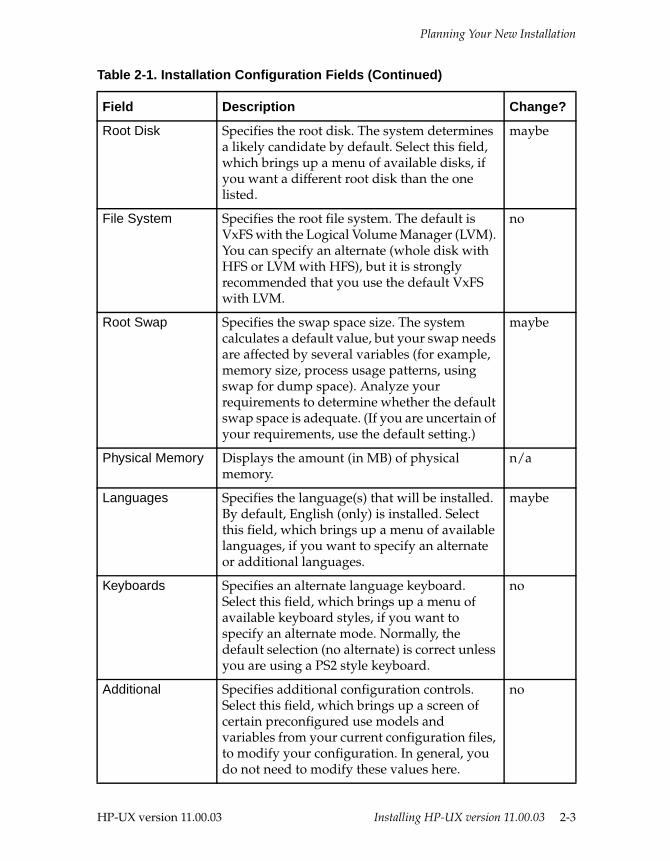
Root Disk Specifies the root disk. The system determines a likely candidate by default. Select this field, which brings up a menu of available disks, if you want a different root disk than the one listed.
maybe
File System Specifies the root file system. The default is VxFS with the Logical Volume Manager (LVM). You can specify an alternate (whole disk with HFS or LVM with HFS), but it is strongly recommended that you use the default VxFS with LVM.
no
Root Swap Specifies the swap space size. The system calculates a default value, but your swap needs are affected by several variables (for example, memory size, process usage patterns, using swap for dump space). Analyze your requirements to determine whether the default swap space is adequate. (If you are uncertain of your requirements, use the default setting.)
maybe
Physical Memory Displays the amount (in MB) of physical memory.
n/a
Languages Specifies the language(s) that will be installed. By default, English (only) is installed. Select this field, which brings up a menu of available languages, if you want to specify an alternate or additional languages.
maybe
Keyboards Specifies an alternate language keyboard. Select this field, which brings up a menu of available keyboard styles, if you want to specify an alternate mode. Normally, the default selection (no alternate) is correct unless you are using a PS2 style keyboard.
no
Additional Specifies additional configuration controls. Select this field, which brings up a screen of certain preconfigured use models and variables from your current configuration files, to modify your configuration. In general, you do not need to modify these values here.
no
Table 2-1. Installation Configuration Fields (Continued)
Field Description Change?
HP-UX version 11.00.03 Installing HP-UX version 11.00.03 2-3
Planning Your New Installation
Software Screen
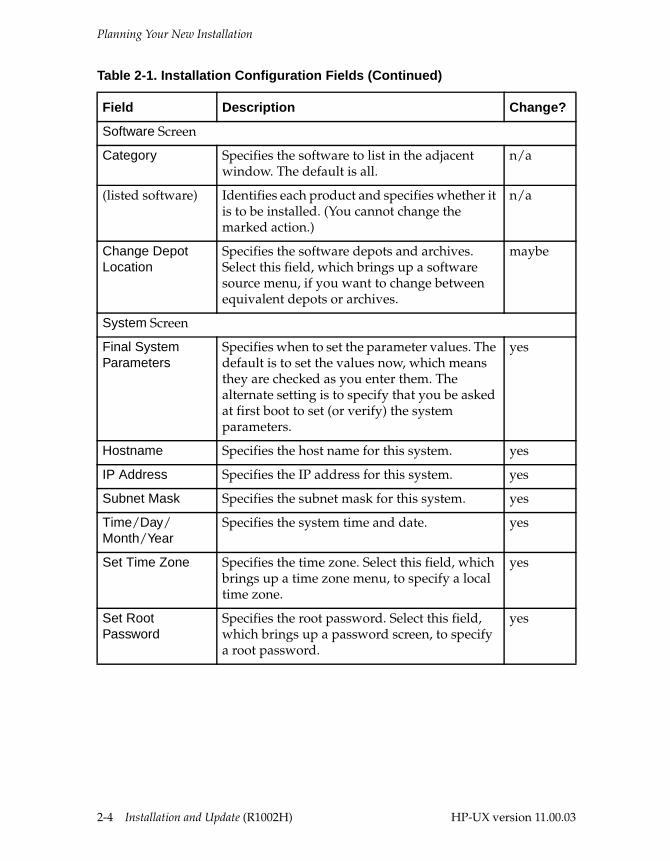
Category Specifies the software to list in the adjacent window. The default is all.
n/a
(listed software) Identifies each product and specifies whether it is to be installed. (You cannot change the marked action.)
n/a
Change Depot Location
Specifies the software depots and archives. Select this field, which brings up a software source menu, if you want to change between equivalent depots or archives.
maybe
System Screen
Final System Parameters
Specifies when to set the parameter values. The default is to set the values now, which means they are checked as you enter them. The alternate setting is to specify that you be asked at first boot to set (or verify) the system parameters.
yes
Hostname Specifies the host name for this system. yes
IP Address Specifies the IP address for this system. yes
Subnet Mask Specifies the subnet mask for this system. yes
Time/Day/Month/Year
Specifies the system time and date. yes
Set Time Zone Specifies the time zone. Select this field, which brings up a time zone menu, to specify a local time zone.
yes
Set Root Password
Specifies the root password. Select this field, which brings up a password screen, to specify a root password.
yes
Table 2-1. Installation Configuration Fields (Continued)
Field Description Change?
2-4 Installation and Update (R1002H) HP-UX version 11.00.03

Planning Your New Installation
Network Services Specifies network parameters. Select this field, which brings up a set of configuration screens, to specify various naming or configuration settings for the following services.
Select the Static Routes screen to specify a destination, gateway IP address, and destination hop count.
maybe
Select the DNS (Domain Name System) screen to specify the domain name and server IP address.
maybe
Select the NIS (Network Information Service) screen to specify the NIS domain name.
maybe
Select the XNTP (Network Time Protocol) screen to specify the XNTP server address.
maybe
Additional Interfaces(s)
Specifies the IP addresses for each of the LAN (e.g., Ethernet) ports in your system. (This field does not appear if you have only one LAN port.) The current system value is listed as the default.
no
File System Screen
Add/Modify/Remove
Specifies root file systems. The display on the left lists information about the file systems. Select the Add option to specify a new file system, and select the Modify or Remove option to modify or delete the highlighted file system. (Enter information in the Usage, VG Name, Mount Dir, and Size fields before invoking Add or Modify.) In general, do not remove any of the standard root file systems, and only modify (make larger if necessary) the file system size.
maybe
Usage Specifies the file system type for that file system. Options are HFS, VxFS, SWAP, Unused, DUMP, and SWAP+DUMP. Do not change a root file system type unless you are certain the change is correct. In general, use the VxFS type when adding a file system.
no(unless adding file system)
Table 2-1. Installation Configuration Fields (Continued)
Field Description Change?
HP-UX version 11.00.03 Installing HP-UX version 11.00.03 2-5

Planning Your New Installation
VG Name Specifies the volume group for that file system. The usual volume group name for the original root file systems is vg00.
no
Mount Dir Specifies the mount point directory for the file system.
no (unless adding file system)
Size Specifies the allocated size (in MB) for the file system. The Avail field displays the remaining available space that could be allocated to file systems.
maybe
Add/Remove Disks
Specifies the addresses and characteristics of the available disks. Selecting this field displays a menu of disks that include the address, usage (LVM, Whole Disk/HFS, Whole Disk/VxFS, Whole Disk/All Swap, None), volume group, size, and description of the disk. Through this menu you can add disks to the root volume group, and you can modify the usage or volume group of a disk.
maybe
Table 2-1. Installation Configuration Fields (Continued)
Field Description Change?
2-6 Installation and Update (R1002H) HP-UX version 11.00.03

Planning Your New Installation
CAUTION
A cold install will erase any existing data on the root disk and root disk mirror you select during the process. Proceed with caution. (To backup the data, see the “Backing Up System Files” section in this chapter.)
Additional Tasks Specifies additional disk, file system, and volume management settings that rarely need to be changed. Selecting the Additional Tasks field displays a submenu of four options, as indicated below.
Select the Disk Parameters option to change the tracks per cylinder, disk RPM, or media initiation settings.
no
Select the File System Parameters option to change rotational delay, fragmentation size, block size, minimum free percentage, blocks per inode, cylinders per group, or file length for an HFS file system. (You cannot change VxFS file system parameters.)
no
Select the Logical Volume Parameters option to change contiguous allocation, number of stripes, stripe size, B-block relocation, logical volume name, and disk mapping to logical volume.
no
Select the Volume Group Parameters option to change the maximum physical extents, maximum physical volumes, maximum logical volumes, physical extent size, and volume group name.
no
Advanced Screen
Add Add scripts to be executed. (None are available.)
n/a
Remove Remove scripts to be executed. (None are available.)
n/a
Table 2-1. Installation Configuration Fields (Continued)
Field Description Change?
HP-UX version 11.00.03 Installing HP-UX version 11.00.03 2-7

Planning Your New Installation
NOTE
The HP-UX operating system installation media includes the standard Stratus eight-user default user license configuration. If you need to add more users, you must install the User License product software after completing the cold installation procedure.
The Install SourceCompleting a cold installation requires three CD-ROMs:
■ The HP-UX 11.00 Extension Pack 9905 HP-UX Install and Core OS Software CD-ROM—This CD-ROM contains all the files and utilities necessary to install the standard HP-UX operating system. This CD-ROM contains the same software provided by Hewlett-Packard for HP 9000 Series 800 systems.
■ The Stratus Fault-Tolerant Services Software CD-ROM—This CD-ROM contains the fault tolerant enhancements to the HP-UX operating system for use on Continuum systems and bootloaders.
■ The Complete Patch CD for HP-UX version 11.00.03 (CD60 03/2003 or later)—This CD-ROM contains patches required to support various Continuum system features.
NOTE
The Complete Patch CD for HP-UX version 11.00.03 includes the README and INSTALL files that provide instructions for installing the patches. You can view these files during the installation procedure (see “Completing the Installation” later in this chapter), but printing them prior to starting the installation will allow you to have a hard copy to refer to during the installation. The files are located in the root (/) directory of the CD-ROM.
Update the Flash CardUpdate the flash card to ensure against boot problems.
CAUTION
The flash card must be updated to HP-UX version 11.00.03 before attempting to install the operating system. Older version of flash card contents will not boot the 64-bit kernel.
2-8 Installation and Update (R1002H) HP-UX version 11.00.03

Planning Your New Installation
Use the following steps to update the flash card:
1. Determine the CD-ROM device file name. To do this, enter
# ioscan -fn -C disk
The CD-ROM device file name is of the form /dev/dsk/c#t#d#.
2. Insert the Stratus Fault-Tolerant Services Software CD-ROM into the drive and mount the CD-ROM. To do this, enter
# mount device_name /SD_CDROM
device_name is the device file for the CD-ROM drive (as determined in step 1). For example, if the CD-ROM drive is in bay 2, SCSI ID 4, enter
# mount /dev/dsk/c2t4d0 /SD_CDROM
It may be necessary to create the /SD_CDROM directory if it does not already exist.
3. Remove any HP-UX 11.00 Flash-Contents fileset if installed. To do this, enter
# swremove Flash-Contents
4. Install the FTS 11.00.03 Flash-Contents product. After installing this fileset, the 11.00.03 flash card image will be ready to copy to the boot flash card. To do this, enter
# /usr/sbin/swinstall -s /SD_CDROM \ -x allow_incompatible=true Flash-Contents
5. Burn the appropriate image on the flash card, enter
# flashdd /dev/rflash/c#a0d0 /stand/flash/ramdisk0
where # is the bay number.
6. (Optional) If you are doing a suitcase upgrade, you need to shutdown and power off the system:
a. To shutdown the system, enter
# shutdown -h now
b. Power off the system and replace the suitcases before proceeding. See the Continuum Series 400 and 400-CO: Suitcase Replacement Guide (R733) for the suitcase replacement procedure.
HP-UX version 11.00.03 Installing HP-UX version 11.00.03 2-9
Booting the System
Booting the System
NOTE
The following procedure assumes that you are familiar with Continuum system hardware and hardware paths. See the HP-UX Operating System: Fault Tolerant System Administration (R1004H) for hardware path information.
A Continuum system normally boots automatically at power-up. To install, you must interrupt the automatic boot process and enter manual boot mode. Use the following procedure to boot your system prior to a complete installation.
1. Turn on the system console.
2. Turn on the CD-ROM drive.
NOTE
The CD-ROM must be connected to a U501 SCSI card in the same bay as the flash card.
3. Insert the Stratus Fault-Tolerant Services Software CD-ROM into the CD-ROM drive.
4. Insert the 11.00.03 flash card into the appropriate slot in one of the card cages. You must boot from the same card cage that the CD-ROM drive is connected. If you have not already updated the flash card to 11.00.03, do so now using the “Update the Flash Card” procedure in this chapter.
5. Power-on the Continuum system.
– If autoboot is enabled, the system begins the automatic boot process. Press any key when you see the following prompt:
Hit any key to enter manual boot mode, else wait for autoboot
Pressing a key interrupts the autoboot process, leaves the system at the firmware level, and displays the PROM: prompt.
– If autoboot is not enabled, the system waits at the firmware level and displays the PROM: prompt.
2-10 Installation and Update (R1002H) HP-UX version 11.00.03

Booting the System
NOTE
See Chapter 3, “Starting and Stopping the System,” in the HP-UX Operating System: Fault Tolerant System Administration (R1004H) for a complete list of the PROM (PROM:), primary (lynx$) bootloader, and secondary (ISL) bootloader commands.
6. Invoke the bootloader. At the PROM: prompt, enter
PROM: boot location
location is the boot device location or partition. Because Continuum Series 400/400-CO systems boot from a flash card only, you must enter a flash card location. For example, to boot from the flash card in card-cage 2, enter
PROM: boot 2
Once the system finds the boot device, it loads the bootloader and displays the bootloader prompt (lynx$).
7. Determine the proper CONF file to use, then load it at the lynx$ prompt as follows:
lynx$ clear lynx$ read conf_file
The CONF file values are:
CONFThis is the default CONF file.The boot parameters specified are automatically loaded when lynx starts up. This default CONF file is the same as CONF_EURDC.
CONF_EURDCContains the boot parameters required for systems with the DC powered Eurologics disk enclosure.
CONF_EURAC Contains the boot parameters required for systems with the AC powered Eurologics disk enclosure.
CONF_STGWKContains the boot parameters required for systems with the StorageWorks disk enclosure.
HP-UX version 11.00.03 Installing HP-UX version 11.00.03 2-11
Booting the System
NOTE
If the flash card does not contain all these images (but does contain a proper CONF file), and you cannot update the flash card because all root disks are corrupted, the cold installation will fail. In this case, enter unset disk_sys_type at the lynx$ prompt. As a result, you will be prompted later in the installation to push a shell because of a ftsGetBootEnv("disk_sys_type") failed error. Enter y at the prompt to enter the subshell, and then enter exit 2 at the shell prompt. The error is ignored, and installation continues using the existing CONF file.
8. Set rootdev to equal CDROMpath. To do this, enter
lynx$ rootdev=manager(v/w/x.y.z;n):INSTALL
manager(v/w/x.y.z;n) specifies the name of the installation device:
– manager is the generic name of an I/O system manager (such as disc).
– v/w/x.y.z is the hardware path of the CD-ROM drive.
– n is the minor number that controls manager-dependent functionality (always 0).
NOTE
HP-UX WINSTALL is not supported for HP-UX version 11.00.03.
NOTE
The CD-ROM drive must be located in the same controller as the flash card.
For example, if the system has a CD-ROM drive connected to the SCSI controller in bay 2 and set at SCSI target ID 4, and will be using the flash card in bay 2 as the flash card from which to boot, enter
lynx$ rootdev=disc(14/0/2.4.0;0):INSTALL
See Chapter 5, “Administering Fault Tolerant Hardware,” in the HP-UX Operating System: Fault Tolerant System Administration (R1004H) for more information about hardware paths and address syntax.
9. To continue the boot process, enter
lynx$ go
2-12 Installation and Update (R1002H) HP-UX version 11.00.03

Booting the System
10. Control transfers to the secondary bootloader, and the following prompt appears:
ISL> Hit any key to enter manual boot mode, else wait for autoboot
If you do not press a key, the boot process continues automatically. (If you press a key, the ISL> prompt remains until you enter a secondary bootloader command.)
11. After a series of messages, the following prompt appears. (Disregard the NETWORK INSTALLATION and TAPE RECOVERY parts of the prompt.) Remove the Stratus Fault-Tolerant Services Software CD-ROM, insert the HP-UX 11.00 Extension Pack 9905 HP-UX Install and Core OS Software CD-ROM, and then press <Return>.
CD-ROM INSTALLATION: Please remove the “Lucent Fault-Tolerant Services Software” CD-ROM and insert the “HP-UX 11.00 Extension Pack 9905 Install and Core OS” CD-ROM.
NOTE
Although the prompt refers to a “Lucent Fault-Tolerant Services Software” CD-ROM, the correct CD-ROM is the Stratus Fault-Tolerant Services Software CD-ROM.
12. The system displays a series of hardware configuration messages and then displays the prompt Press Return to Continue. Press <Return>.
13. The following prompt for a console terminal appears. Enter 2 (VT100) and press <Return>.
The HP-UX installation utility requires information about thetype of terminal that you are using as the system console.The terminals supported are:
1) HP type terminals.2) VT100 type terminals (and VT100 emulators).3) Wyse 60 type terminals (and Wyse 60 emulators).
Enter the number corresponding to the terminal typethat best matches your terminal (default: 1): 2
14. When you see the Welcome to the HP-UX installation process! screen, proceed to “Setting Up the Installation.”
HP-UX version 11.00.03 Installing HP-UX version 11.00.03 2-13
Setting Up the Installation
Setting Up the InstallationAfter you have booted the Install program from the flash card, as described in the preceding section, “Booting the System,” the Install Welcome screen appears, as shown in Figure 2-1.
NOTE
For the screens in the following steps, use the <Tab> key to navigate between fields, and the arrow keys within fields. Use the <Return> (or <Enter>) key to select an item. Use the <Return> key or space bar to pop up a choices list. If the menus are not clear, select Help for more information.
2-14 Installation and Update (R1002H) HP-UX version 11.00.03

Setting Up the Installation
1. After some processing and messages, the Welcome to the HP-UX Installation screen appears, as illustrated in Figure 2-1. Select Install HP-UX and press <Return>.
Figure 2-1. Welcome Screen
NOTE
The Welcome screen might also include a menu option to Run a Recovery Shell; it is not used in this install procedure.
HP-UX version 11.00.03 Installing HP-UX version 11.00.03 2-15

Setting Up the Installation
2. The User Interface and Media Options screen appears, as illustrated in Figure 2-2. Select Media only installation and Advanced Installation and then select OK.
NOTE
As an alternative to the Advanced Installation, you can use the Guided Installation, which provides more instruction during the installation process but limits your options for modifying system parameters. See Appendix B, “Setting Up the Installation,” for detailed instructions through a guided installation.
Figure 2-2. User Interface Screen
2-16 Installation and Update (R1002H) HP-UX version 11.00.03

Setting Up the Installation
3. The itool screen appears with the Basic folder screen displayed, as illustrated in Figure 2-3. In the Environment field, select 64-Bit: CDE HP-UX Environment.
4. Review the basic configuration information, and determine what, if any, data you need to enter (see Table 2-1). The most likely modification is to specify a different root disk.
NOTE
At any time while in the itool screens, you can review the system configuration by selecting the Summary View field. You can cancel all the modifications during this itool session by selecting the Reset Configuration field near the bottom of the screen. You can also select Cancel at any time. Selecting Cancel brings up a window that prompts you to restart itool in wizard mode (Guided Installation) or advanced mode, or to exit the installation by doing a system reboot or halt.
a. To change the root disk, select Root Disk and press <Return>.
Figure 2-3. Basic Configuration Screen
64-Bit: CDE HP-UX Environme ->>
HP-UX version 11.00.03 Installing HP-UX version 11.00.03 2-17
Setting Up the Installation
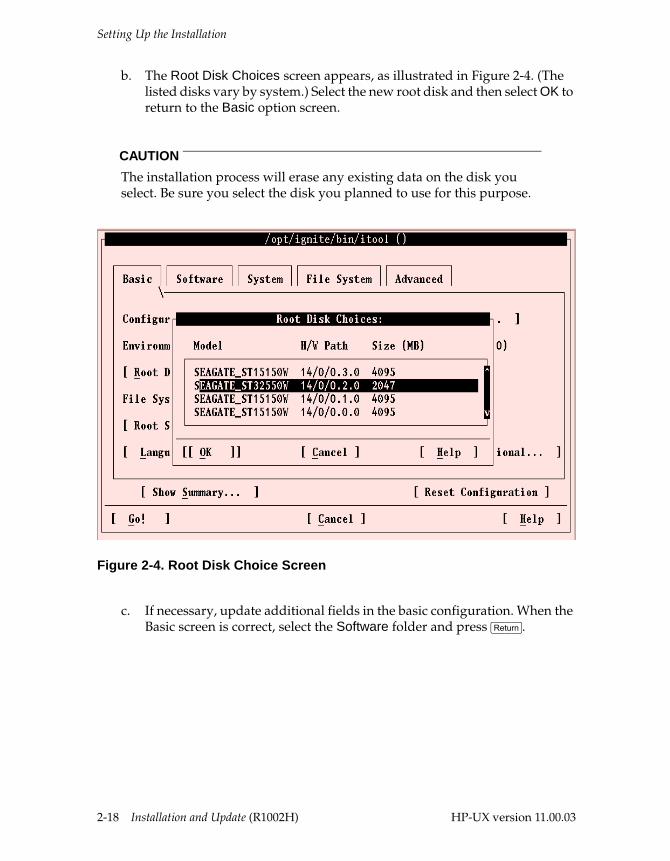
b. The Root Disk Choices screen appears, as illustrated in Figure 2-4. (The listed disks vary by system.) Select the new root disk and then select OK to return to the Basic option screen.
CAUTION
The installation process will erase any existing data on the disk you select. Be sure you select the disk you planned to use for this purpose.
Figure 2-4. Root Disk Choice Screen
c. If necessary, update additional fields in the basic configuration. When the Basic screen is correct, select the Software folder and press <Return>.
2-18 Installation and Update (R1002H) HP-UX version 11.00.03
Setting Up the Installation
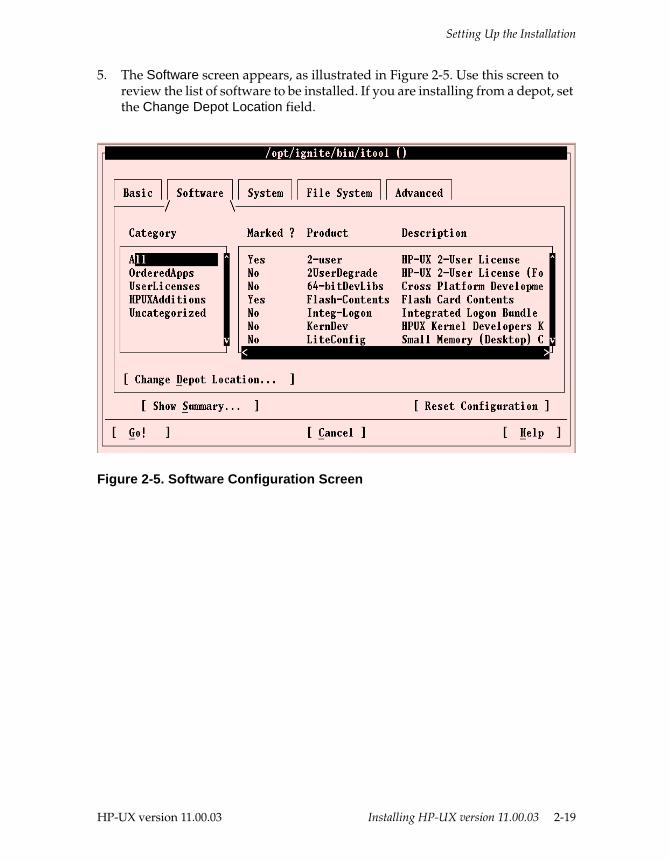
5. The Software screen appears, as illustrated in Figure 2-5. Use this screen to review the list of software to be installed. If you are installing from a depot, set the Change Depot Location field.
Figure 2-5. Software Configuration Screen
HP-UX version 11.00.03 Installing HP-UX version 11.00.03 2-19
Setting Up the Installation
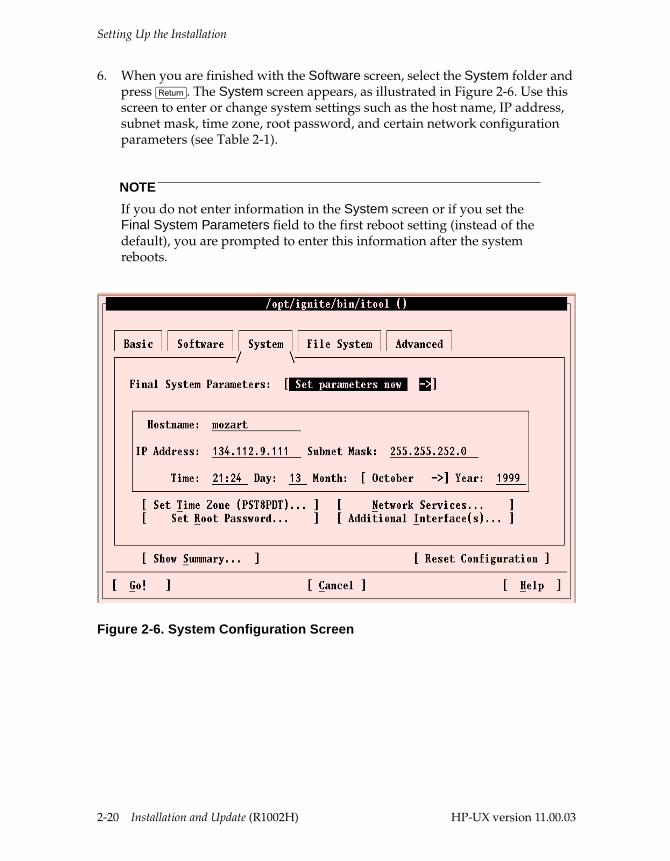
6. When you are finished with the Software screen, select the System folder and press <Return>. The System screen appears, as illustrated in Figure 2-6. Use this screen to enter or change system settings such as the host name, IP address, subnet mask, time zone, root password, and certain network configuration parameters (see Table 2-1).
NOTE
If you do not enter information in the System screen or if you set the Final System Parameters field to the first reboot setting (instead of the default), you are prompted to enter this information after the system reboots.
Figure 2-6. System Configuration Screen
2-20 Installation and Update (R1002H) HP-UX version 11.00.03
Setting Up the Installation
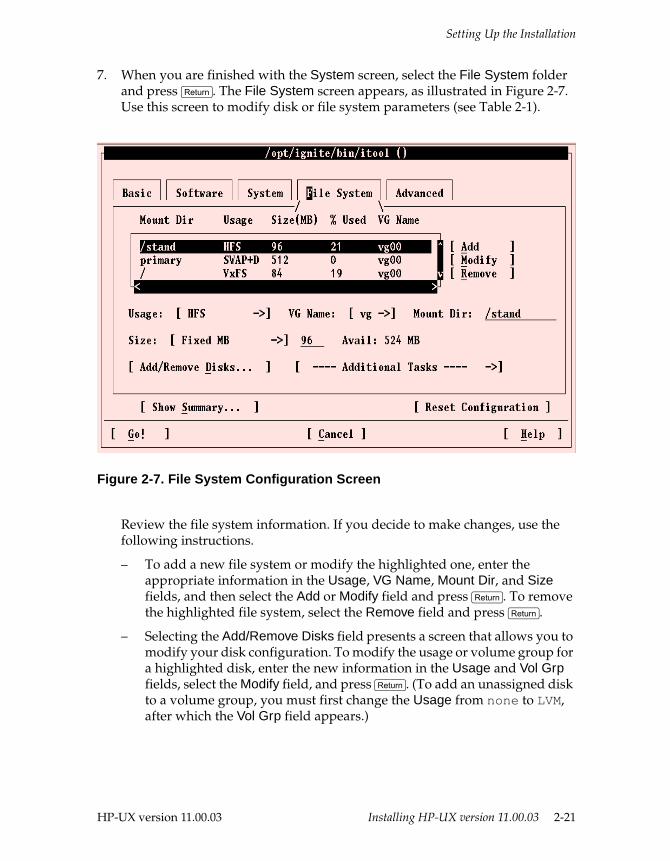
7. When you are finished with the System screen, select the File System folder and press <Return>. The File System screen appears, as illustrated in Figure 2-7. Use this screen to modify disk or file system parameters (see Table 2-1).
Figure 2-7. File System Configuration Screen
Review the file system information. If you decide to make changes, use the following instructions.
– To add a new file system or modify the highlighted one, enter the appropriate information in the Usage, VG Name, Mount Dir, and Size fields, and then select the Add or Modify field and press <Return>. To remove the highlighted file system, select the Remove field and press <Return>.
– Selecting the Add/Remove Disks field presents a screen that allows you to modify your disk configuration. To modify the usage or volume group for a highlighted disk, enter the new information in the Usage and Vol Grp fields, select the Modify field, and press <Return>. (To add an unassigned disk to a volume group, you must first change the Usage from none to LVM, after which the Vol Grp field appears.)
HP-UX version 11.00.03 Installing HP-UX version 11.00.03 2-21

Setting Up the Installation
– Selecting the Additional Tasks field displays a submenu of four options: Disk Parameters, File System Parameters, Logical Volume Parameters, and Volume Group Parameters. These parameters rarely need to be changed. To make changes, select the submenu option, enter the correct information in the appropriate fields, select the Modify field, and press <Return>.
NOTE
The Advanced screen allows you to add or exclude postinstall scripts to be run. However, this install procedure does not use any additional scripts, so that screen is not described here.
8. When you are satisfied with the entries for Basic, Software, System, File System, and Advanced folders, select Go and press <Return>. (To cancel without saving your changes, select Cancel.) The itool Confirmation screen appears, as illustrated in Figure 2-8.
Figure 2-8. itool Confirmation Screen
9. In the itool Confirmation screen, select Go. This completes the configuration setup. Proceed to the next section, “Completing the Installation.”
2-22 Installation and Update (R1002H) HP-UX version 11.00.03
Completing the Installation
Completing the InstallationUse the following procedure to complete the installation process.
1. After selecting Go from the itool Confirmation screen, the installation progresses by configuring your disks and file systems and displays initial messages similar to the following:
Starting swinstallStarting system configurationCreating LVM physical volume: /dev/rdsk/c1t0d0 (14/0/1.0.0)Creating volume group: vg00Creating logical volume: vg00/lvol1 (/stand)Extending logical volume: vg00/lvol1 (/stand)Mirroring logical volume: vg00/lvol1 (/stand) to (14/0/1.0.0)
After the disks and file systems are configured, the core operating system is loaded. The time to complete these actions varies by system, but it generally takes between 20 and 40 minutes. (No user input is required during this step.)
2. After the core operating system is loaded, the system displays the following prompt to switch install media. To continue the installation, remove the HP-UX 11.00 Extension Pack 9905 HP-UX Install and Core OS Software CD-ROM from the drive and insert the Stratus Fault-Tolerant Services Software CD-ROM. Press <Return> to indicate that you are ready.
USER INTERVENTION REQUIRED:
To complete the installation you must now insert the Stratus Fault-Tolerant Services Software CD. To complete the installation you must now insert the Stratus Fault-Tolerant Services Software CD.
Once this is done, press the <Return> key to continue:
NOTE
If the Stratus Fault-Tolerant Services Software CD-ROM is not in the target CD-ROM drive when you press <Return>, the system displays a warning message and will not proceed until you insert the correct CD.
3. The FTS kernel will be copied from the Stratus Fault-Tolerant Services Software CD-ROM media as /stand/vmunix and then it will reboot automatically. (No user input is required for this step.)
4. After rebooting, the system configures the installed software and then displays the following prompt. Enter y.
Do you want to install additional software? [y/n]: y
HP-UX version 11.00.03 Installing HP-UX version 11.00.03 2-23

Completing the Installation
5. The following menu appears. Enter 2 (to install the operating system patches).
Select from the following actions: 0) Done 1) List currently installed software 2) Install Software from CD-ROM 3) Run a shell
Enter the number for your choice: 2
NOTE
Option 3, Run a shell should not be used except for simple commands like ls, pwd, etc. Also, exiting the shell will return you to the menu.
6. The following prompt appears. Remove the Stratus Fault-Tolerant Services Software, insert the Complete Patch CD for HP-UX version 11.00.03 (CD60 03/2003 or later), and press <Return>.
Insert your software CD in the CD-ROM drive Press "Return" to continue...
7. The following prompt appears. Press <Return> if the displayed device name (for example, /dev/dsk/c2t3d0) is correct or enter the correct device name and then press <Return>.
Enter CD-ROM device [/dev/dsk/c2t3d0], or ’?’ for list:
8. The following prompt appears. Press <Return> if the displayed mount point (for example, /SD_CDROM) is correct or enter the correct mount point and then press <Return>.
Enter mount point [/SD_CDROM]:
9. The following menu appears. Select 1 and review the README file, which contains the latest information about the patch CD-ROM.
Informational files to view: 0) [DONE] 1) /SD_CDROM/README 2) /SD_CDROM/INSTALL
Enter selection of file to view from above list, or just press "Return" to continue:
10. When the menu reappears, select 2 and review the INSTALL file, which provides instructions to install the patches.
11. When the menu reappears, press <Return>. This invokes the swinstall utility. Follow the instructions from the INSTALL file. Install all the available patches (unless instructed to do otherwise in the INSTALL file). See the swinstall(1) man page for more information.
2-24 Installation and Update (R1002H) HP-UX version 11.00.03

Completing the Installation
12. When finished installing patches, exit the swinstall utility. The additional software install menu reappears (see step 5). Enter 0 (Done) and press <Return>.
13. The system displays a list of available disks and prompts you to specify the root disk mirror. Enter the disk device name and press <Return>. (The system prompts you to verify your entry.) The following example specifies disk c1t2d0 as the root mirror.
CAUTION
The installation process will erase any existing data on the disk you select. Be sure you select the disk you planned to use for this purpose. * Starting Mirroring the root disk.Your root disk is /dev/dsk/c0t2d0 and its size is 2097029 Kbytes. Please wait, displaying the available disks for mirroring ....
DISK SIZE in Kbytes
c0t0d0 4194157c0t1d0 4194157c0t3d0 4194157c1t0d0 4194157c1t1d0 4194157c1t2d0 4194157c1t3d0 4194157
Enter the hardware path of the disk.This disk will be used to mirror the root disk.The hardware path will be of the form c0t0d0,c0t1d0 etc.
Enter ’q’ to quit and not mirror your root disk.This is not advisable on a Fault-Tolerant system.
Enter disk hardware path: c1t2d0
The information you have entered is as follows:
The disk hardware path is: c1t2d0
Is the above information correct (y/n) ? y
14. After mirroring the root volumes and completing additional processing, the system burns the boot path in the PATH partition of the ReCC PROM. (No user input is required during this step.)
NOTE
In order to burn the boot path, the system has to be duplexed. There would be no error if the system is simplex. This process could take up to 15 minutes. Then, the system will reboot.
NOTE
If you set the Final System Parameters field to first reboot, you are prompted for system and networking information here.
HP-UX version 11.00.03 Installing HP-UX version 11.00.03 2-25
NOTE
During reboot, ignore the message Configure pseudo devices for MAC/LLA access ...FAIL
Verifying the Installation When you have completed the installation steps, check all log files for errors. You can install other software and data files, set up printing facilities, and connect additional peripherals, as needed. The system logs are /var/adm/sw/*.log and /var/adm/syslog/syslog.log.
Listing Installed Applications You can list the contents of your install media at various levels of detail by using the List button or the View menu during an installation. To list all applications on your system (after installing and rebooting), enter
swlist
This command lists all software that has been installed on your system. To view specific product information, enter
swlist -l product
The swlist utility creates various lists of software products that are installed on your local host or software that are placed in depots for later distribution. See the Managing HP-UX Software with SD-UX (B2355-90080) or the swlist(1M) man page for more information.
To verify whether the root disks have been mirrored successfully, execute the following command to see if both disks (root and mirror) are listed at the bottom.
# vgdisplay -v | grep “PV Name”
NOTE
The default user license level is eight users. Higher user license levels can be purchased from Stratus. When your system reboots after loading the software, no more than eight users will be able to log back in until the additional licenses are installed through the Stratus User License product. If additional licenses are needed, you must install them before bringing the system back online.

Backing Up System Files
Removing Unwanted Software/Filesets If it is necessary to remove software that has been installed on your system, use the swremove utility. The swremove utility also unconfigures the software as it removes it. See the swremove(1M) man page for more information.
NOTE
Before you remove a product, delete all of the filesets in the product directory to avoid an error.
If additional user licenses beyond the default of eight licenses have been installed, and you wish to remove these, you will need to use the Stratus Fault-Tolerant Services Software CD-ROM to deinstall these licenses. Insert the Stratus Fault-Tolerant Services Software CD-ROM into the drive and use the swinstall command to install the SRA-DEFAULT product.
Running freedisk Another method of removing filesets from your system is to use the HP-UX operating system freedisk command. The freedisk command invokes an interactive script that finds and optionally removes filesets that do not appear to have been used since they were originally installed. See the freedisk(1M) man page for more information.
CAUTION
Do not run the freedisk command until your new system has been in operation for some time, and be familiar with the swremove command before using freedisk.
Backing Up System Files You should immediately back up your system after a successful installation. This might help you recover your system in case of later problems. For information on restoring and backing up your system, see Chapter 9, “Backing Up and Restoring Data,” in the Managing Systems and Workgroups (B2355-90157).
Also, make a copy of your current system flash card. Maintaining flash cards is explained in the HP-UX Operating System: Fault Tolerant System Administration (R1004H). Keep a bootable flash card on site as a backup.
HP-UX version 11.00.03 Installing HP-UX version 11.00.03 2-27
Installing Additional Software
Installing Additional Software For information about installing layered products, see the installation documentation that comes with those products. For general information about installing products, see the Managing HP-UX Software with SD-UX (B2355-90080).
NOTE
You should not install the Hewlett-Packard SUPPORT-TOOLS product on a Continuum system. To stop receiving mail messages reminding you to install the SUPPORT-TOOLS product, run the following script after you have finished your installation:
/usr/sbin/diag/supportinfo/stop_mail
2-28 Installation and Update (R1002H) HP-UX version 11.00.03

3Installation Using Ignite-UX Server Software 3-
This chapter describes how to use an Ignite-UX server to install an archived system image onto a target system.
NOTE
Ignite-UX is a replacement for the Net-Install product. If your server contains the Net-Install bundle (HPUX-Install product), Ignite-UX will require that the Net-Install bundle be removed (using swremove), or that you touch the file /tmp/okay_to_remove_net_install before loading Ignite-UX, in which case loading Ignite-UX will automatically remove the Net-Install software.
Ignite-UX Server System RequirementsThe following sections explain the system requirements for installation using Ignite-UX.
NOTE
Use Ignite-UX version B.2.4.3.0.7. Other versions may be not be compatible or supported.
HP-UX Operating System VersionStratus recommends that you run the Ignite-UX server on an HP-UX version 10.20 or later system, although Ignite-UX is supported on any HP-UX version 10.x.x or 11.x operating system. Only HP-UX version 10.10 and later operating systems are supported as a Dynamic Host Configuration Protocol (DHCP) server, of which Ignite-UX takes advantage.
HP-UX version 11.00.03 Installation Using Ignite-UX Server Software 3-1

Load the Ignite-UX Software
Disk SpaceIgnite-UX is loaded under the directory /opt/ignite. The data files Ignite-UX creates are placed in /var/opt/ignite. Ignite-UX installation requires about 75 MB of disk space. You need at least 260 MB free space available in /var/opt/ignite for the archive and additional space for the software depot storage.
NFS ServerThe Ignite-UX server requires NFS to be configured and working. The Ignite-UX installation adds lines to the /etc/exports file, and runs exportfs.
tftpIgnite-UX will transfer some of its files using tftp. The minimum directories needed by tftp are set up in the /etc/inetd.conf file. Others might need to be added if you place configuration scripts in nonstandard locations.
Load the Ignite-UX SoftwareYou should load one or more Ignite-UX release versions. They are organized as bundles corresponding to the release that you want to load on your target systems. For example, if you want to load HP-UX version 11.00 onto your systems, you should load the Ignite-UX-11-00 bundle. To load this software, use the swinstall command.The bundle ignite_UX is included on the HP-UX Applications Release 11.00 CD-ROM, June 1999 version.
For example, to load Ignite-UX from the HP-UX Applications Release 11.00 CD-ROM, execute the following command:
swinstall -s /SD_CDROM Ignite-UX-11-00
This command assumes that you are loading Ignite-UX from a CD-ROM drive that is mounted on the /SD_CDROM directory.
Edit Default Search PathIn your login scripts, add /opt/ignite/bin to your default search path:
# export PATH=${PATH}:/opt/ignite/bin
3-2 Installation and Update (R1002H) HP-UX version 11.00.03

Initial Ignite-UX Server Configuration
Initial Ignite-UX Server ConfigurationThe majority of the Ignite-UX server configuration is performed by the product installation post-process procedures, but there are a few site-specific configuration steps that you need to perform. The following steps are centered around the specification of available IP addresses and host names, and should be performed in the order presented.
■ Run the Ignite-UX User Interface
■ Perform Ignite-UX Server Configuration
Note that the Ignite-UX installation has added two services to your /etc/inetd.conf file, tftp and instl_boots.
Run the Ignite-UX User InterfaceTo run the Ignite-UX user interface, enter
# /opt/ignite/bin/ignite
NOTE
A warning screen appears stating that no clients exists. This is appropriate because you do not have any clients waiting at this time.
If the following error message appears, the NFS server was not configured properly:
ERROR: This machine is not an NFS server (no nfsd running). The -n option will not be processed.
The Ignite-UX server must be an NFS server. Exit Ignite-UX, and make the Ignite-UX server an NFS server before continuing. You can do this by using the System Administration Manager (SAM), or by editing /etc/rc.config.d/nfsconf, setting NFS_SERVER=1, and rebooting.
If the above error message does not appear, Ignite-UX has modified your /etc/exports file to include the /var/opt/ignite/clients directory.
This directory is exported to allow remote root users to write to the client’s directory. This is required for proper Ignite-UX operations. You might need to export additional directories; for example, if you use NFS to transfer an archive, it must be NFS accessible.
HP-UX version 11.00.03 Installation Using Ignite-UX Server Software 3-3

Initial Ignite-UX Server Configuration
Perform Ignite-UX Server ConfigurationThe following steps are required to perform an Ignite-UX server configuration:
■ Select Options->Server Configuration
■ Select Add Booting IP Address
■ Configure Ignite-UX Session Options
Select Options->Server ConfigurationThis will show the Server Configuration Menu with two tabs: Server Options and Session Options. Under the Server Options tab, do the following:
Modify (if needed) the Server Options to match the following:
Default Configuration:[Set to the OS revision that you want to be the default.]
Default Printer: [Select a default printer to be used by Ignite-UX.]
Client Timeout: 40 [This is the number of minutes delay due to network or client failures before the Ignite-UX server will inform the administrator of a problem.]
Run client installation UI on: server [server = run the GUI for all installations on the server, target = run the TUI on the target system, or none= do not run a UI.]
This option is overridden by the client during an installation on Continuum systems. Therefore, the value you set here is ignored.
Select Add Booting IP AddressThis option is not used during installation on Continuum systems.
Configure Ignite-UX Session OptionsUnder Options->Server Configurations->Session Options, you can see various options for your server.
■ Confirm new clientsIf selected, this option puts a dialog pop-up window on your server whenever a new client is requesting to be installed by your server.
■ Ask for customer information during client installationIf selected, this option allows you to enter the customer name, serial number, and order number for each client. This information appears on the system manifest report.
3-4 Installation and Update (R1002H) HP-UX version 11.00.03

The Install Archive
■ Show the welcome screen for the install serverIf selected, a welcome screen with information on getting started and Ignite-UX concepts appears every time the Ignite-UX program is started.
■ Halt the client after installationIf selected, this option causes the client to halt after the installation completes.
■ Automatically move completed clients to historyIf selected, the server moves information related to the install of each client to the history area. Any further information about the client needs to be obtained from the install history.
You might want to deselect the Ask for customer information checkbox, as this installation information is more geared to Hewlett-Packard and Hewlett-Packard distributor-partner manufacturing.
The Install ArchiveThis section covers the following topics, which should be performed in the order presented:
■ Creating an OS Archive (golden image).
■ Configuring the Ignite-UX to recognize the OS archive.
■ Rebooting and Gaining Control of Target System.
■ Installing the OS Archive on the Target.
■ Finishing the Install Archive.
In this test scenario, we will create a golden image, or OS archive, which is a snapshot of a known good installation which we want to copy to other systems. The system we will copy is referred to as the golden system. The OS archive is a tar or cpio archive which will be distributed to other client machines.
This section covers how an OS archive is created and placed under Ignite-UX control, and then how to add applications and patch bundles specific to that OS archive. Note that Ignite-UX does not require you to create an OS archive to install a new client OS. It is faster to install an image than to go through the swinstall process. The OS archive method can decrease new OS installations to under 30 minutes.
The configuration file structure used by Ignite-UX is documented in the instl_adm(4) man page. In the following sections you will modify a number of configuration files, such as the /var/opt/ignite/INDEX file, which is read first to determine what software is available. This file points to additional files which further specify options and configurations.
HP-UX version 11.00.03 Installation Using Ignite-UX Server Software 3-5
The Install Archive
Creating an OS ArchiveOnce you have a golden system with the base OS, Ignite-UX has a facility to create an OS archive. It is up to the administrator to define exactly what constitutes a golden system. Some administrators include patches, applications, kernel configurations and so on, on the golden system. Others include only the core OS. The examples in this section include only the core OS. In general, it is faster to place all of your common applications, patches, and tools onto the golden system.
Ignite-UX is capable of installing systems from SD depots as well as archives. You might want to use this capability when setting up your golden system because you will need to install the system before you can get an image. See “Creating a Golden System” for details.
The make_sys_image command is provided to assist in creating the OS archive. See the make_sys_image(1m) man page for details. The command is located in the /opt/ignite/data/scripts directory.
NOTE
/make_sys_image stores the archive image in the default directory /var/tmp. You can also have it save the image to a remote server that allows remote access from this client. Whichever method you choose, you need to have sufficient disk space to hold the image. The amount of disk space needed is approximately one-half the amount of data contained on your golden system (assuming about 50% compression ratio provided by gzip).
Perform the following steps to create an OS archive:
1. Copy /opt/ignite/data/scripts/make_sys_image from your Ignite-UX server to /tmp on the golden system, and make sure it is executable.
If the golden system is a Continuum Series 400, edit the make_sys_image script and change this line as follows:
/stand!(system|kernel|system.d|dlkm|flash).
NOTE
While make_sys_image is running, the system should not be in use. Device files are removed, and the host and/or networking information on the system is reset. After the command is complete, these files are put back, with the exception of most log files.
3-6 Installation and Update (R1002H) HP-UX version 11.00.03
The Install Archive
2. On the Ignite-UX server, create an archives directory to store the golden image. It is best to keep the naming conventions Rel_B.11.00 (or whatever your release is). This directory will need to be NFS exported if you will be using NFS to transfer the archive to the target.
# mkdir /var/opt/ignite/archives
# mkdir /var/opt/ignite/archives/Rel_B.11.00
3. On the golden system, run /tmp/make_sys_image [options].
By default, this will create a gzip-formatted archive in /var/tmp with the default name hostname.gz. All specific host information, device files, log files, and network information will be removed.
Optionally, if you do not have enough disk space, or you would like for the archive to be created on a remote server, you can use the following options:
# /tmp/make_sys_image -d directory_to_place_archive \ -s ip_address_of_system_to_place_archive
For example,
# /tmp/make_sys_image \-d /var/opt/ignite/archives/Rel_B.11.00 \-s 15.2.72.150
4. Move the OS archive to /var/opt/ignite/archives/Rel_B.11.00/archive_file
archive_file is the file hostname.gz created by make_sys_image.
Configuring Ignite-UX Server to Recognize OS ArchiveIn Ignite-UX, there are no tools to assist in the creation of configuration files for an OS archive. An example configuration file is supplied with Ignite-UX, and you can modify it as follows:
1. Use /opt/ignite/data/examples/core11.cfg to create the OS archive configuration file.
a. Use the example configuration file to create a new one for the OS archive:
# cp /opt/ignite/data/examples/core11.cfg \ /var/opt/ignite/data/Rel_B.11.00/core_800_archive_cfg
The /var/opt/ignite/data/Rel_B.11.00/core_800_archive_cfg file name is arbitrary. You can store configuration files anywhere on the system you choose. Ignite-UX manages the names and locations via the
HP-UX version 11.00.03 Installation Using Ignite-UX Server Software 3-7
The Install Archive
INDEX file discussed in step 2. The only restriction on the location of configuration files and scripts is that they be accessible via tftp.
b. Modify the core_800_archive_cfg to set up the OS archive for NFS transfer. Make the following changes:
• In the sw_source clause, change the IP address in the following to the IP address of your Ignite-UX server and add Rel_B.11.00 to complete the path.
nfs_source = "15.2.72.150:/var/opt/ignite/archives/Rel_B.11.00"
(This points to the directory where the archive lives; it must be NFS exported.)
• In the init sw_sel clause, change the description to the following:
description = "Archive HP-UX 11.00 CDE"
(This will now appear in the Environments section of the Ignite-UX user interface as a menu choice.)
• archive_path = "archive_file"
(This points to the actual file in combination with the nfs_source line).
• Also in the init sw_sel clause, add the impacts lines by executing the archive_impacts command and include the results in the file, replacing the example impacts lines. By default, this assumes you created a tar archive on which you performed the gzip command.
# /opt/ignite/lbin/archive_impact -t -g archive_file
• Below is the complete sw_sel clause. Some of the extra clauses in the example were deleted for simplicity.
init sw_sel "golden image" {description = "Archive HP-UX 11.00 CDE"sw_source = "core archive"sw_category = "HPUXEnvironments" archive_type = gzip tar# For NFS, the path to the archive is relative to the mount# point specified in the sw_source: archive_path = "hostname.gz"# ftp/remsh sources can use a full path:# archive_path = "/pub/IUXarchives/B.11.00_800_CDE.gz"
3-8 Installation and Update (R1002H) HP-UX version 11.00.03
The Install Archive
impacts = "/" 23Kbimpacts = "/.dt" 35Kbimpacts = "/TT_DB" 18Kbimpacts = "/etc" 1375Kbimpacts = "/export" 1Kbimpacts = "/opt" 74079Kb impacts = "/sbin" 13449Kbimpacts = "/stand" 1Kbimpacts = "/tmp" 1Kbimpacts = "/usr" 225459Kbimpacts = "/var" 5736Kb}
2. Add the new configuration file to Ignite-UX.
Edit the /var/opt/ignite/INDEX file by installing a new configuration to Ignite-UX. In the following example, a new cfg clause has been added:
cfg "HP-UX B.11.00 archive" {
description "some description of this archive..."
"/opt/ignite/data/Rel_B.11.00/config"
"/var/opt/ignite/data/Rel_B.11.00/core_800_archive_cfg"
"/var/opt/ignite/config.local" }
The line of most interest is the one containing core_800_archive_cfg, which is the configuration file we added in step 1. config and config.local are standard configurations.
Note that /var/opt/ignite/config.local should be last. The last configuration file has the highest priority to override values in prior configuration files.
The file /opt/ignite/data/Rel_B.11.00/config supplies the disk and file-system layout defaults, plus other control information required by Ignite-UX. It must be first in every cfg clause.
Each cfg clause appears as an available configuration to Ignite-UX. Therefore, the string “HP-UX B.11.00 archive” will now appear as a valid configuration.
3. Ensure that the NFS file system is exported correctly.
In the above sw_source clause, you specified the location of the OS archive to be a file on an NFS server. You need to ensure target systems have access to this directory.
Make sure the NFS configuration is correct. Use the exportfs -v command to view the current status and ensure the directory containing the archive is correctly exported. Ignite-UX will automatically try to export /var/opt/ignite/clients for its use. In the example,
HP-UX version 11.00.03 Installation Using Ignite-UX Server Software 3-9
The Install Archive
/var/opt/ignite/archives/Rel_B.11.00 must also be exported because that is where we placed the OS archive.
The following is the /etc/exports file:
/var/opt/ignite/clients -anon=2/var/opt/ignite/archives/Rel_B.11.00 -ro
If these are not correct, use SAM to set them up correctly.
Setup For NFS ConfigurationThe Ignite-UX server requires NFS to be configured, to do perform the following steps:
1. Run the SAM utility
2. Choose Networking and Communications ->Network File System->Export Local File System.
3. From the Export Local File System screen, select Add exported file system task from the Action menu then enter the directory name.
4. Click on Apply to apply the changes.
5. Click on OK to exit SAM utility.
Reboot and Gain Control of Target SystemBecause the Ignite-UX server knows about your new OS archive, you can now use Ignite-UX to load the OS archive onto a target system. To do this, you need to get the target system to inform Ignite-UX that it is ready to install a new OS.
Manually boot the target system following the instruction for a cold installation. See Chapter 2, “Installing HP-UX version 11.00.03” and follow the steps in the “Booting the System” section. After completing the “Booting the System” section, the Install Welcome screen appears, as shown in Figure 3-1.
3-10 Installation and Update (R1002H) HP-UX version 11.00.03

The Install Archive
Figure 3-1. Install Welcome Screen
Now perform the following additional steps:
1. In the Install Welcome screen, select Install HP-UX and press <Return>. The User Interface and Media Options screen appears, as shown in Figure 3-2.
Figure 3-2. User Interface and Media Options Screen
HP-UX version 11.00.03 Installation Using Ignite-UX Server Software 3-11

The Install Archive
2. In the User Interface and Media Options screen, select Ignite-UX server based installation and Remote graphical interface on the network server, and select OK. The LAN Interface Selection screen appears, as shown in Figure 3-3.
Figure 3-3. LAN Interface Selection Screen
3. Fill in the network information screen with the correct host name and IP address. The Network Configuration screen appear, as shown in Figure 3-4.
Figure 3-4. Network Configuration
3-12 Installation and Update (R1002H) HP-UX version 11.00.03

The Install Archive
4. When you are finished, the target system will enable the network and contact the Ignite-UX server. No further interaction on the target system is needed after this step.
Install the OS Archive on the TargetYou can use the Ignite-UX user interface to customize an OS install.
Run the Ignite-UX user interface by executing the following as root:
# /opt/ignite/bin/ignite
When the target has rebooted (using the boot instructions in the previous step) and is ready for installation, it will appear as an icon, labeled by the host name supplied at the console.
Perform the following to install the OS archive on the target:
1. Highlight the icon of the system you want to install.
2. Select Actions->Install Client->New Install.
You should now see the Ignite-UX screen with five tabs across the top. (If you see the System Hardware Inventory screen, select OK to bypass this screen).
3. In the Basic tab (default), do the following:
Under Configurations:, select HP-UX B.11.00 archive.
Ensure that the Root Disk, Root Swap, and other fields are correct for your installation. Note that any disks you select here will be formatted. If you have a disk with existing user information that you do not want to modify, add it manually after Ignite-UX has installed the OS.
4. In the Software tab, do the following:
Because there is only an archive at this point, the screen is blank. We will add a patch and application depot later.
5. In the System tab, do the following:
Under Final System Parameters:, select Set Parameters Now. Fill in the blanks with the correct data.
Also select the Set Time Zone, Network Services, and, optionally, the Set Root Password and fill in these as well.
6. In the File System tab, do the following:
Verify the correct disk usage. You can also add disks at this point or modify the disk and file system parameters.
HP-UX version 11.00.03 Installation Using Ignite-UX Server Software 3-13

The Install Archive
NOTE
You will need to increase disk space for /usr to at least 500MB. Stratus also suggests that you also increase disk space in / and /stand to at least 100MB and 140MB because the size cannot be changed once it is set.
CAUTION
A newfs will be performed on all selected disks.
7. In the Advanced tab, do the following:
Nothing will be specified here at this time. Later you will add post-process scripts to execute.
8. When finished entering data, select Go.
A configuration dialog will appear. Make sure the data is correct, and select Go again.
9. If you double-click on the icon of the target system in the Ignite-UX server GUI during execution, a status screen will be displayed showing the install progress.
NOTE
Ignite-UX determines the state of a target by reading the files in the /var/opt/ignite/clients/<LLA> directory. Seeing an icon in the GUI does not mean that the target actually exists, but that its configuration and control files exist in the Ignite-UX directories. You can use this information to reinstall systems.
Finishing the Install ArchiveIn less than 30 minutes, the target system should have the new OS installed, a new kernel built, and the system rebooted and ready for use. Status of the target system will be shown on its icon and in the (double-click) status screen.
The last step is to log on to the target system as root and run the command /sbin/mirror_on.
3-14 Installation and Update (R1002H) HP-UX version 11.00.03
Customization
CustomizationThis section presents ways to customize the default configuration, either by adding additional information to the default configuration (dynamic parameters) or by adding additional software selections to be loaded after the archive.
You will add the following to the configuration:
■ SD bundles
■ kernel parameters
■ additional install parameters, such as swap and networking information
Adding an SD Bundle to the Archive EnvironmentIgnite-UX allows you to add patch bundles to your configuration. These bundles can be forced to load at install time, or can be selectable by the user. This allows the system administrator to install the base operating system very quickly with an Ignite-UX archive, and still have the flexibility to install additional software components selectively, based on machine type or use (for example, server versus client).
Use the following procedure to add a bundle which consists of patches, which would be a typical application. You must begin with a patch bundle, not just a patch depot. Verify the existence of bundles with the following command:
# swlist -l bundle -d @ /yourdepot
1. Assuming an S800 patch bundle in the /var/opt/ignite/PB depot, run the following Ignite-UX command to create a configuration file that Ignite-UX can use:
# make_config -s /var/opt/ignite/PB -a 800 -c \/var/opt/ignite/data/Rel_B.11.00/patch_bundle_cfg
This creates the patch_bundle_cfg file which Ignite-UX needs to manage the install from the depot.
2. Add the new configuration file name (the argument to -c above) to the /var/opt/ignite/INDEX file so that it appears in the HP-UX B.11.00 archive configuration. You created this configuration in “Creating an OS Archive”.
cfg "HP-UX B.11.00 archive" {description "The ARCHIVE B.11.00 release with patches.""/opt/ignite/data/Rel_B.11.00/config"
HP-UX version 11.00.03 Installation Using Ignite-UX Server Software 3-15
Customization
"/var/opt/ignite/data/Rel_B.11.00/core_800_archive_cfg""/var/opt/ignite/data/Rel_B.11.00/patch_bundle_cfg""/var/opt/ignite/config.local" }
The patch bundle will now show up in the Software tab of the user interface install screen, but will not be marked for install. (It will be optional.)
3. To force install of the patch bundle, in the sw_sel clause for the patch bundle in the file /var/opt/ignite/data/Rel_B.11.00/patch_bundle_cfg (you created this file with the make_config command), add the following line:
load_with_any = "golden image"
golden image is the name used in the sw_sel clause in the file /var/opt/ignite/data/Rel_B.11.00/core_800_archive_cfg for our archive HP-UX version 11.00.03 system. The load_with_any line causes this software selection to always be loaded with the golden image archive.
4. To check the syntax of your edits, enter:
# instl_adm -T
Modifying Kernel Parameters with Ignite-UXIgnite-UX uses the same mechanism for kernel parameters as it does for selectable software: create a configuration file that describes the changes; then make that file visible to Ignite-UX by adding it to an existing cfg clause in the INDEX file.
Use the following procedure to create a software selection called My_Kernel_Mods, which will set two kernel parameters, nproc and maxuprc, which will be force-loaded whenever the golden image archive is installed.
1. In the new file /var/opt/ignite/data/Rel_B.11.00/kernel_cfg, add the following: (Note that you can replace HPUXAdditions with your own category).
HARDWARE_MODEL ~ "9000/888"{
sw_sel "My_Kernel_Mods"
{ description = "Kernel parameters only" sw_source = "cmds" sw_category = "HPUXAdditions" mod_kernel += "nproc 2000" mod_kernel += "maxuprc 127"load_with_any = "golden image" }
}
3-16 Installation and Update (R1002H) HP-UX version 11.00.03
Customization
2. Add the name of this file into a cfg clause in the INDEX file (in this example, HP-UX B.11.00 archive):
cfg "HP-UX B.11.00 archive" {description "The ARCHIVE B.11.00 release with patches.""/opt/ignite/data/Rel_B.11.00/config""/var/opt/ignite/data/Rel_B.11.00/core_800_archive_cfg""/var/opt/ignite/data/Rel_B.11.00/patch_bundle_cfg""/var/opt/ignite/data/Rel_B.11.00/kernel_cfg""/var/opt/ignite/config.local"}
These changes will result in My_Kernel_Mods being loaded whenever the HP-UX B.11.00 archive is installed. Note that you have added the line:
load_with_any = "golden image"
Using Multiple, Selectable Kernel ConfigurationsYou can have multiple, predefined kernel configurations available at install time. This allows clients to be installed with optional parameters if necessary.
In the following example, there is a set of parameters all systems should have, Basic_Kernel_Mods. These are force-loaded. There is also an optional set, Advanced_Kernel_Mods, which can be selected in the user interface or in a configuration file at install time.
The contents of the /var/opt/ignite/data/Rel_B.11.00/kernel_cfg file is now:
HARDWARE_MODEL ~ "9000/888" {# basic required kernel parameterssw_sel "Basic_Kernel_Mods" { description = "Basic Kernel parameters only"sw_source = "cmds"sw_category = "HPUXAdditions"mod_kernel += "nproc (20+12*MAXUSERS)"mod_kernel += "maxuprc 127"load_with_any = "golden image" }#optional kernel parameterssw_sel "Advanced_Kernel_Mods" { description = "Advanced Kernel parameters"sw_source = "cmds"sw_category = "HPUXAdditions"mod_kernel += "maxdsiz 0x0A000000" mod_kernel += "maxtsiz 0x06000000" } } # end of hardware-specific section
HP-UX version 11.00.03 Installation Using Ignite-UX Server Software 3-17
Post-Installation Scripts
Additional Install ParametersYou can set a large number of additional parameters when you install a system. These are listed in the instl_adm(4) man page.
As a simple example, you might want to set the swap space of all machines you install using the golden image archive to 100 MB. The golden image is defined in the file /var/opt/ignite/data/Rel_B.11.00/core_800_archive_cfg.
To install additional parameters, do the following:
1. Add the following to the end of the core_800_archive_cfg file:
init _hp_pri_swap=100MB
If the primary swap size is not further specified in a configuration file, new systems will be installed with a default value of 100 MB of swap space. If there is a swap value set in the config file in the /var/opt/ignite/clients/<LLA> directory, it will take precedence.
As a further example, set the final DNS domain name and IP address of the DNS name server of systems installed using the golden image.
2. Add the following line to the end of the core_800_archive_cfg file:
final dns_domain = "mydomain.mycompany.com" finaldns_nameserver[0]="1.2.3.4"
Post-Installation ScriptsAfter installing the OS, you can perform many tasks on the target system by providing a script to be run on the target system. This section provides some common examples, but you can also write scripts to mount additional disk drives, add additional software, and modify configurations based on system use.
There are a number of points in the install process in which you can force scripts or commands to be run. Check the instl_adm(4) man page under the “Command and Script Execution Hooks” section for specifics. One point to note is that the post_config_script will run after all software has been loaded and the system has been booted with its final kernel, but before any of the normal /etc/rc startup scripts have been run. Basic networking is enabled in this environment.
3-18 Installation and Update (R1002H) HP-UX version 11.00.03

Post-Installation Scripts
Adding a Post-Installation ScriptTo add a post-installation script, follow these steps:
1. Create a script to perform the desired task. When Ignite-UX runs this script as a post-configuration, it will be run on the target system.
2. Add the script to your configuration file.
Ignite-UX post-configuration scripts are defined using the post_config_script variable. For example, you can place the following line into your core_800_archive_cfg config file:
post_config_script += \"/var/opt/ignite/scripts/install_default_printer"
The above will define the install_default_printer script to be run as a post-installation process on the target system. Note that the line should stand alone, placed outside of any clause (that is, a sw_sel clause). By default, the script will always be run on the targets. You can change the behavior using the Ignite-UX userinterface in the Advanced tab.
If you want to make a script available under all configurations, you can add it to the /var/opt/ignite/INDEX file. Add the following to the end of this file:
scripts { "/var/opt/ignite/scripts/install_default_printer" }
It will then show up in the Advanced tab for all configurations.
NOTE
Scripts are accessed by Ignite-UX via tftp. Make sure the directory the script resides in is available to tftp by examining and/or changing the /etc/inetd.conf file.
Managing Network PrintersAfter installing the new OS, you will need to set up the printers. You can automate this process by using SAM to write a script which performs the HP-UX operating system commands for adding a printer. Turn on SAM logging for “commands-only,” perform the tasks desired, and then extract those commands from the SAM log file. The following is a script for adding printbob to all system sand turning on the lp scheduler:
#!/sbin/sh# Post process IUX script to add a local default printer# Performing task "Add Remote Printer": Adding "printbob"#
HP-UX version 11.00.03 Installation Using Ignite-UX Server Software 3-19
Creating a Golden System
/usr/sbin/lpadmin -pprintbob -ormhpfcmgw.fc.hp.com \ -orptsslj -mrmodel -v/dev/null -orc -ocmrcmodel \ -osmrsmodel
/usr/sbin/lpadmin -dprintbob/usr/sbin/accept printbob/usr/bin/enable printbob# Turn on lp scheduler# lpsched -v
Creating a Golden SystemThis section covers how to create a golden system. In general, the golden system is simply a system which has been configured with all the software and customizations which will need to be distributed to a group of target systems.
Most large HP-UX operating system sites already have the equivalent of a golden system, which is maintained by the IS certification or QA department. This system is configured with customer modifications on top of a base HP-UX operating system. Critical patches which all users need are installed onto the OS. Local, common software that all users use are also layered on the OS, and the resulting system is tested to ensure proper operation in the customer’s environment.
These systems represent a prototype or starting point for all users. The steps needed for installation customizations are normally captured and are well known. They make good candidates for a golden image archive using the steps outlined in “Creating an OS Archive”. If a golden system already exists, the remainder of this section can be ignored.
Creating a golden system from scratch normally involves the following steps:
■ Installing the HP-UX operating system from media.
■ Installing critical patches onto the OS.
■ Loading optional software.
■ Customizing the system.
■ Finishing the golden system.
3-20 Installation and Update (R1002H) HP-UX version 11.00.03

Creating a Golden System
Installing the HP-UX Operating System from MediaThis can be performed without Ignite-UX by using the install-from-media steps. Follow the instructions for a cold installation to install the core OS on your golden system.
Installing Critical Patches onto the OSAt this point you should have a target system with the basic 11.00.03 release. If you have patches which you want to distribute to all users, install them now using the standard SD tools.
As an example, install patch PHSS_8375. If you have downloaded and unshared a patch, you will have a depot file. For example, after downloading PHSS_8375 and unsharing it, you would be left with files PHSS_8375.depot and PHSS_8375.text. To install the patch noninteractively, run the following:
# swinstall -x autoreboot=true -x match_target=true \-s ./PHSS_8375.depot
These instructions can also be found in the PHSS_8375.text file.
Loading Optional SoftwareLoad any optional Hewlett-Packard and third-party software you want to make available to all users. Remember that you are creating a golden system, and anything put on this system will be distributed to all systems installed using the golden image. Be aware of licensing restrictions as well.
Hewlett-Packard software (such as compilers) is normally loaded using SD from media or a network SD depot. Third-party software installation varies depending on the vendor.
Customizing the System Perform any customizations that you want to distribute to all users. These might include customized CDE login screens, base /etc/passwd files, additional phone tools and man pages, or corporate-wide default DNS and NIS setup. It would not include machine, work group, or site-specific changes, such as gateways, user accounts, or machine-specific networking. These will be taken care of by Ignite-UX later.
HP-UX version 11.00.03 Installation Using Ignite-UX Server Software 3-21
Setting Up Install Parameters Dynamically
Finishing the Golden SystemUse the steps outlined in “Creating an OS Archive” to create a golden image from this system, and configure Ignite-UX to use it.
Setting Up Install Parameters DynamicallyIgnite-UX can make intelligent decisions about install parameters when it runs, based on information it reads from the target system. Instead of forcing static values for swap size or kernel parameters, the best values for these can be determined based on the characteristics of the target machine.
This can make configurations set up by the system administrator more general purpose and limit the need for multiple, slightly differing configurations to handle minor system differences.
These decisions are specified in a C-like language and grammar unique to Ignite-UX. The variables and syntax are documented in the instl_adm(4) man page.
To set up install parameters dynamically, follow these steps:
1. As an example, set the primary swap size of the target system root disk dynamically at install time based on the size of the disk, and on the size of the target system RAM. The algorithm will set swap to 125 MB if the disk is large (> 500 MB) and if the amount of system RAM is greater than 64 MB. If you have a small disk, make the swap very small to maximize the amount of space available for the HP-UX operating system.
Add the following lines to the end of the file /var/opt/ignite/data/Rel_B.11.00/core_800_archive_cfg or to /var/opt/ignite/config.local if you would like this to be the default for all configurations:
# default to very minimal swap of 25MB# unless the disk is larger than 500 MB # and we have more than 64MB ram(disk[_hp_root_disk].size > 500MB & memory > 64MB){ init _hp_pri_swap=125MB}else { init _hp_pri_swap=25MB}
3-22 Installation and Update (R1002H) HP-UX version 11.00.03
Setting Up Install Parameters Dynamically
NOTE
If the _hp_pri_swap parameter is set later in the order of files searched in the cfg definition, this setting will be overwritten. The order in which the files are evaluated is documented in the instl_adm(4) man page.
2. In this example, force the load of a patch bundle if you determine the target machine matches the regular expression 88*, such as 888.
Add the following lines to the end of the file:
/var/opt/ignite/data/Rel_B.11.00/core_800_archive_cfg# check for H/W model 88x # and add the Misc_Patches bundle if true(hardware_model ~ "9000/88*") {init "Misc_Patches" = true}
3. This example will run a previously created post-installation script and increase a tunable kernel parameter if you determine the target machine is a Model 755. If not, it sets a default value for the kernel parameter:
post_config_script +="/var/opt/ignite/scripts/755special"HARDWARE_MODEL == "9000/755" {post_config_script +"/var/opt/ignite/scripts/755special"mod_kernel += "maxuprc 300"}else{ mod_kernel += "maxuprc 100"}
HP-UX version 11.00.03 Installation Using Ignite-UX Server Software 3-23


4Troubleshooting Your Installation 4-
The following are some items to check if you have problems during the install process.
CD-ROM EjectSometimes, if the system reboots while a CD-ROM is mounted, you might not be able to eject the media in the drive.
In order to reset your CD-ROM drive so that the media will eject, you can perform one of the following operations:
■ For external CD-ROM drives, cycle power on the CD device itself.
■ Where cycling power is not an option, mount and unmount the devices using the SAM application. You can also cause a simple access to the device using a command such as the following:
echo < /dev/dsk/device_name
device_name is the device file corresponding to your device (such as c0t1d0).
If you are not sure of the device file name, use the following command to list disk device file names and look for device files with the word CD-ROM in the description.
ioscan -fn -C disk | grep CD-ROM
HP-UX version 11.00.03 Troubleshooting Your Installation 4-1

Large System Problem Areas
Media InstallIf your installation from the CD-ROM media fails, check the following:
1. If you are using a CD-ROM as a depot for updating or installing software, make sure that the CD-ROM is mounted, using the mount command, before you attempt to use it as a source.
2. Make sure that connections to drive(s) and I/O cards are secure. Remove and replace cables or cards if a loose connection is suspected. Do this, for example, if the system is unable to contact the drive. If you check the ioscan output, you will probably see that the device status is NO_HW.
Large System Problem AreasIf the system has a large number of file systems (over a hundred), or a very large number of disk drives (such as 50 or more), or if the system has only eight disk drives, you might see one of the following messages during the system analysis phase of cold install:
Out of inode- can’t link or find disk
Write failed, file system is full.
File system full.
One of the following solutions might apply:
■ On a system with only eight internal disk drives, the file system will need to be extended by using the lvextend command.
■ On large system configurations, you can reduce the likelihood of this problem by turning off any disks not being used for the installation process, then start over.
After the system is cold-installed, you might want to add back all the file systems that existed under the previous installation, either manually or by using SAM. However, for a large number of file systems (for example, over 100), some tables in the kernel might be too small to allow correct booting. This is because the newly installed kernel contains default values for kernel tables sizes, and does not allow for special configurations made to the kernel installed previously.
4-2 Installation and Update (R1002H) HP-UX version 11.00.03
Large System Problem Areas
For example, the first boot after adding the file systems might result in error messages displayed to the console, such as the following:
inode: table is fullproc: table is fullfile: table is full
Additionally, the boot might fail in various ways. For example, you might have to repair the file system manually.
If this is not possible, the kernel might need to be reconfigured before booting. The following settings should allow the kernel to be booted, but might not be optimal for the system:
ninode = 2048 (default is 476)nproc = 1024 (default is 276)nfile = 2048 (default is 790)
Alternatively, you can reconfigure the kernel in one of the following ways:
■ Increase maxusers to a large value, such as 200.
■ Select an appropriate bundle of parameters from the SAM Kernel Configuration Actions menu.
HP-UX version 11.00.03 Troubleshooting Your Installation 4-3

Troubleshooting Before and During Installation
Troubleshooting Before and During InstallationEnsure the following both before and during an installation:
■ The boot flash card must be updated with the 11.00.03 version by copying the ramdisk0 file and also copying the conf file as outlined. This is done early in the procedure.
■ The HP-UX version 11.00.03 SD-UX tools must be put onto the system during the procedure as outlined.
■ The swinstall of the HP-UX 11.00 Extension Pack 9905 HP-UX Install and Core OS Software CD-ROM must be interactive as outlined. If a noninteractive install is used, the update will not be successful.
■ The system must be allowed to reboot after doing the swinstall of the HP-UX 11.00 Extension Pack 9905 HP-UX Install and Core OS Software CD-ROM and copying the generic kernel to /stand/vmunix. While the system is starting up after the reboot, there will be a long pause after the message “Configuring all unconfigured software filesets” appears where it is doing the swconfig of the newly installed files. For a successful update, verify this configuration did take place. The pause is one sign; you can also review the log file /var/adm/sw/swconfig.log.
■ If you have trouble with the swinstall program hanging, try adding these values to the /var/adm/sw/defaults file:
swinstall.polling_interval = 60swinstall.rpc_timeout = 5swinstall.retry_rpc = 9swinstall.agent_timeout_minutes = 10
4-4 Installation and Update (R1002H) HP-UX version 11.00.03

AUsing the Debug Kernel A-
The standard HP-UX version 11.00.03 operating system employs an optimized kernel that does not include special debugging code. Alternatively, you can install a debug kernel that allows you to do kernel debugging through the kdb utility. (You cannot run the standard and debug kernels concurrently.)
HP-UX version 11.00.03 Using the Debug Kernel A-1

Installing the Debug Kernel
Installing the Debug Kernel Use the following procedure to install the debug kernel. You can normally complete this procedure in 30 minutes or less.
1. Save all custom /conf files or other custom files before installing the system debugger.
2. Determine the CD-ROM device file name. To do this, enter
ioscan -fn -C disk
The CD-ROM device file name is of the form /dev/dsk/c#t#d#.
3. If necessary (because a CD-ROM is already mounted), unmount the CD-ROM drive. To do this, enter
umount /SD_CDROM
Remove the CD-ROM from the drive.
4. Insert the Stratus-DBG CD-ROM (HP-UX version 11.00.03) into the drive and mount the CD-ROM. To do this, enter
mount device_file /SD_CDROM
device_file is the device file for the CD-ROM drive (as determined in step 2). For example, if the CD-ROM drive is in bay 3, SCSI ID 4, enter
mount /dev/dsk/c3t4d0 /SD_CDROM
It may be necessary to create the /SD_CDROM directory if it does not already exist.
5. Install the Stratus-DBG product, which contains the debug kernel fileset. To do this, enter
swinstall -s /SD_CDROM Stratus-DBG
6. Edit (using vi or another editor) the /usr/conf/master.d/core-hpux file by changing the BOOTSPINLOCKS parameter value from 256 to 512.
Before editing, the line should read as follows:
bootspinlocks BOOTSPINLOCKS 256
After editing, the line should read as follows:
bootspinlocks BOOTSPINLOCKS 512
7. Use SAM to rebuild the kernel and reboot the system.
A-2 Installation and Update (R1002H) HP-UX version 11.00.03

Reinstalling the Optimized Kernel
Reinstalling the Optimized KernelUse the following procedure to deinstall the debug kernel and reinstall the optimized kernel. You can normally complete this procedure in 30 minutes or less.
1. If necessary (because a CD-ROM is already mounted), unmount the CD-ROM drive. To do this, enter
umount /SD_CDROM
2. Insert the Stratus Fault-Tolerant Services Software CD-ROM (HP-UX version 11.00.03) into the drive and mount the CD-ROM. To do this, enter
mount device_file /SD_CDROM
device_file is the device file for the CD-ROM drive. (To determine device_file, see “Installing the Debug Kernel.”)
3. Remove the Stratus-DBG product. To do this, enter
swremove Stratus-DBG
4. Identify the kernel files (Stratus-FT.kernel fileset) to be replaced and save that list. To do this, enter
swlist -l fileset -a revision -x verbose=0 Stratus-FT.kernel | \ sed -e '/^#/ D' -e '/^$/ D' -e 's/ tab tab */,r=/' > /reinstall
tab means to press the <Tab> key (in this case twice).
5. Reinstall the Stratus-FT.kernel fileset. To do this, enter
swinstall -s /SD_CDROM -x reinstall=true -f /reinstall
6. Make a new kernel. To do this, enter
mk_kernel -o /stand/vmunix
7. Run showboot to get the current flash card.
8. Install the bootloader on the booting flash card. To do this, enter
flashboot -d result_of_showboot -b /stand/flash/lynx.obj
9. Reboot the system. To do this, enter
reboot
10. Once the system reboots, log in as root and review the /var/adm/sw/swinstall.log and /var/adm/sw/swagent.log files for error or warning messages.
HP-UX version 11.00.03 Using the Debug Kernel A-3


BSetting Up the Installation B-
This chapter describes how to perform a Guided Installation.
Guided InstallationIf you select the Guided Installation from the User Interface and Media Options menu, you will be using the Task Wizard illustrated in Figure B-1. The Task Wizard is intended to provide help for a first-time user of Ignite-UX by providing on-screen explanation and a limited number of steps to accomplish a basic installation.
NOTE
The Task Wizard is available only on a client-managed (stand-alone) installation, and is presented in character-mode (TUI).
Figure B-1. System Configuration Screen
HP-UX version 11.00.03 Setting Up the Installation B-1

Guided Installation
1. In the Select an overall system configuration screen, keep the default option (HP-UX B.11.00 Default) and choose Next. The Select a system environment screen appears, as shown in Figure B-2.
Figure B-2. System Environment Selection Screen
2. In the Select a system environment screen, select 64-Bit CDE HP-UX Environment and choose Next. The Select a root disk screen appears, as shown in Figure B-3.
Figure B-3. Root Disk Selection Screen
64-Bit CDE HP-UX Environment
B-2 Installation and Update (R1002H) HP-UX version 11.00.03
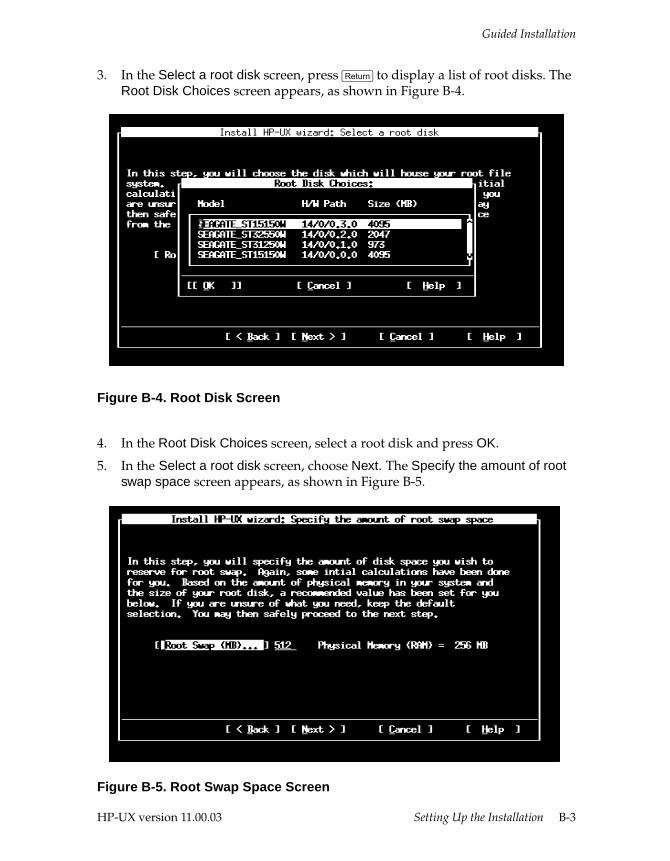
Guided Installation
3. In the Select a root disk screen, press <Return> to display a list of root disks. The Root Disk Choices screen appears, as shown in Figure B-4.
Figure B-4. Root Disk Screen
4. In the Root Disk Choices screen, select a root disk and press OK.
5. In the Select a root disk screen, choose Next. The Specify the amount of root swap space screen appears, as shown in Figure B-5.
Figure B-5. Root Swap Space Screen
HP-UX version 11.00.03 Setting Up the Installation B-3

Guided Installation
6. In the Specify the amount of root swap space screen, keep the default options (it depends on the system memory size) and choose Next. The Select a file system type screen appears, as shown in Figure B-6.
Figure B-6. File System Screen
7. In the Select a file system type screen, keep the default option (Logical Volume Manager (LVM) with VxFS) and choose Next. The Specify root volume group disk screen appears, as shown in Figure B-7.
Figure B-7. Root Volume Group Disks Screen
B-4 Installation and Update (R1002H) HP-UX version 11.00.03

Guided Installation
8. In the Specify root volume group disks screen, keep the default option (Number of Disks in Root Group: 1) and choose Next. The Select a language(s) screen appears, as shown in Figure B-8.
Figure B-8. Language(s) Screen
9. In the Select a language(s) screen, keep the default option ([Default Language:...] English) and choose Next. The Select a user license screen appears, as shown in Figure B-9.
Figure B-9. User License Screen
HP-UX version 11.00.03 Setting Up the Installation B-5

Guided Installation
10. In the Select a user license screen, keep the default option (HP-UX 2-User License) and choose Next. The Select Additional Software screen appears, as shown in Figure B-10.
Figure B-10. Additional Software Screen
11. In the Select Additional Software screen, choose Next. The Pre-install disk information screen appears, as shown in Figure B-11.
Figure B-11. Pre-Install Disk Information Screen
B-6 Installation and Update (R1002H) HP-UX version 11.00.03
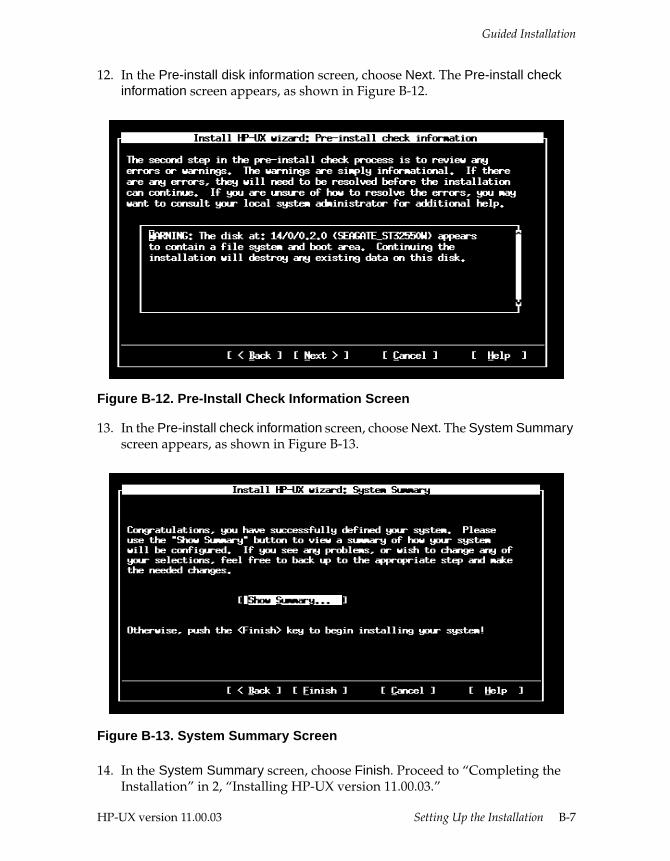
Guided Installation
12. In the Pre-install disk information screen, choose Next. The Pre-install check information screen appears, as shown in Figure B-12.
Figure B-12. Pre-Install Check Information Screen
13. In the Pre-install check information screen, choose Next. The System Summary screen appears, as shown in Figure B-13.
Figure B-13. System Summary Screen
14. In the System Summary screen, choose Finish. Proceed to “Completing the Installation” in 2, “Installing HP-UX version 11.00.03.”
HP-UX version 11.00.03 Setting Up the Installation B-7

IndexIndex-
11.00 HP-UX Install and Core OS Extension Pack 9905, 2-8
Aadministrative tasks
standard command paths, 1-1applications
listing, 2-26removing, 2-27
Bbackups
need for, 1-7of flash cards, 2-27of system files, 2-27
bootloader, lynx, 1-2BOOTSPINLOCKS, for debug kernel, A-2bundles
listing, 1-3software, 1-5
CCAC, contacting, xviiCDE Runtime, 1-6CD-ROM
debug kernel name, A-2mounting, 2-9, A-2troubleshooting problems, 6-1
codeword, obtaining, 1-6cold install
booting from flash card, 2-10choosing source for, 2-8definition of, 1-1loading installer, 2-12planning for, 2-1
conf file, saving settings, A-2configurations, customizing, 2-22Customer Assistance Center
see CAC
Ddebug kernel
CD-ROM name for, A-2changing BOOTSPINLOCKS, A-2installing, A-2reinstalling optimized, A-3
diskslayouts for, 1-4problems with, 6-2
documentationonline, xvrelated, xvviewing, xvi
Eerrors
large system, 6-2media install, 6-2
FFault Tolerant Services Software CD-ROM, 2-9file systems
problems with, 6-2supported, 1-4
file systems, specifying, 2-3, 2-5, 2-21filesets
removing unneeded, 2-27software, 1-6
flash card, 1-2booting from, 2-10
Ggateway server, 2-2
HHFS file system, 1-4HP-UX Install & Core OS Software
CD-ROM, 1-2
HP-UX version 11.00.03 Index-1
Index
Iinstall command, 2-12installation
additional software, 2-28advanced vs. guided, 2-16choosing source for, 2-8configuration fields, 2-2configuration tool, 2-17loading installer, 2-12needed information, 2-2overview, 1-1planning cold install, 2-1requirements for, 1-3
INSTALLFS, 1-2Internet Protocol, 2-2itool utility
configuration fields, 2-2using, 2-17
Kkernel
installing debug, A-2reinstalling optimized, A-3
Llisting
applications, 2-26bundles, 2-26
Logical Volume Managersee LVM
LVMdisk layout support, 1-4
lynx bootloader, 1-2
Mmedia
install, 1-1troubleshooting failures, 6-2
mirroring, root disk, 1-4mount command, 2-9, A-2
Nnetwork services, specifying, 2-5networking requirements, 1-5NFS file system, 1-4
Oonline documentation, xvoptimized kernel, reinstalling, A-3
Ppath names, administrative commands, 1-1products, software, 1-5protected, software, 1-6
Rrequirements, networking, 1-5root disk
specifying, 2-3, 2-17
Ssoftware
bundles, 1-5codewords, 1-6custom loading, 2-26listing installed, 2-26
Stratus-DBG CD-ROM, A-2subnet mask, 2-2swap space, specifying, 2-3swlist command, 1-3, 2-26swremove command, 2-27system files, backing up, 2-27system parameters, specifying, 2-4, 2-20system requirements
to install, 1-3
Ttarget disk, selecting, B-2terminal support, 1-3troubleshooting
CD-ROM issues, 6-1large system problems, 6-2media failure, 6-2
UUFS file system, 1-4umount command, A-2unprotected, software, 1-6update
definition of, 1-1mounting CD-ROM, 2-9
user license, 2-8
Index-2 Installation and Update (R1002H) HP-UX version 11.00.03


![[UX Series] 1 - UX Introduction](https://img.dokumen.tips/doc/110x75/563db7f0550346aa9a8f53b0/ux-series-1-ux-introduction.jpg)